#hierarchical inheritance in java
Explore tagged Tumblr posts
Visit Tumblr Blog
Explore Tumblr blogs with no restrictions, modern design and the best experience.
Last Seen Tumblr Blogs


Fun Fact
Users from the US are the majority of Tumblr visitors.
Text
Understanding Object-Oriented Programming with Java
Java is one of the most powerful and reliable programming languages in the world of technology. Its popularity comes not just from its cross-platform capabilities but also from its strong support for Object-Oriented Programming (OOP). For those who want to build a strong foundation in programming, learning OOP with Java is a great first step. Many students choose the Best Java Training Institute in Hyderabad, Kukatpally, KPHB to master Java through expert guidance and real-time project experience.
🧠 What is Object-Oriented Programming?
A programming model called object-oriented programming (OOP) organizes software design around data rather than logic and functions. Each object can contain data — in the form of fields — and code — in the form of methods. OOP allows developers to create modules that can be reused across different programs, which improves productivity and reduces errors.
🔑 Core Principles of OOP in Java
Java is a fully object-oriented language that uses the following four pillars to structure and build software:
✅ Encapsulation: Protecting Data
Additionally, it restricts access to some components, enhancing control and securityo
🧬 Inheritance: Reusing Code
Inheritance enables new classes to inherit features from existing ones. In this way, you can reuse code and develop hierarchical class structures to keep your code clean and easy to maintain.
🔁 Polymorphism: Flexibility in Code
Polymorphism allows objects to take on multiple forms. For instance, the same method name can behave differently based on the object that is invoking it. This adds flexibility and dynamism to your code.
🎭 Abstraction: Simplifying Complexity
Abstraction hides internal details and shows only the most essential features of an object in order to reduce complexity. This makes the code easier to work with and less error-prone.
💡 Why Learn OOP with Java?
It is easy to learn OOP with Java since it was designed with these principles in mind.The API is rich and the community support is strong, and its syntax is user-friendly and beginner-friendly. Whether you’re building web apps, Android apps, or enterprise software, Java's OOP approach gives you the tools to build scalable and robust solutions.
🎓 The Long-Term Benefits of Learning OOP
Mastering OOP early in your programming career helps you write cleaner, more maintainable code. It also sets the stage for learning other advanced technologies like Spring Boot, Hibernate, and Android development, all of which are based on Java and OOP principles.
Conclusion: Start Your Java Career with Confidence
Understanding object-oriented programming is essential for anyone aiming to become a professional software developer. If you're looking for expert-led, practical training in Java, Monopoly IT Solutions is here to guide you. With real-time projects, experienced trainers, and industry-relevant content, we’ll help you build a strong foundation in Java and prepare you for a successful tech career.
#java full stack training#java full stack training in hyderabad#java full stack training in kphb#java full stack developer training
0 notes
Text
What are the Types of Inheritance in Java? Examples and Tips to Master Inheritance
In Java, inheritance is a fundamental concept of object-oriented programming that allows one class to acquire the properties and behaviors of another. This promotes code reusability and establishes a hierarchical relationship between classes Read More...

0 notes
Text
Inheritance in Java – Explained with Examples
Understand Inheritance in Java with this clear and concise guide from Scientech Easy. Learn how Java inheritance promotes code reusability, supports hierarchical classification, and forms the backbone of object-oriented programming. This article covers types of inheritance, syntax, real-life examples, and common use cases to make learning easy for beginners and intermediates. Scientech Easy to boost your Java knowledge and get practical insights into core OOP principles. Start mastering inheritance in Java today with confidence!
0 notes
Text
Types of Data Models: A Detailed Explanation
Data models explain how data is structured, stored, and manipulated within a database. It serves as an organizing and understanding framework for the data relationship and, in this way, provides consistency and efficiency in managing the database. There are many types of data models. Some of these data models are best suited for particular applications. In this blog, we'll look at some of the most common types of data models and their applications.
1. Hierarchical Data Model
Description
The hierarchical data model is a tree-like structure, where every record (parent) has one or more child records. This model follows a one-to-many relationship.
Characteristics
-Data is structured in a hierarchy (tree format).
-Each child node has only one parent, but a parent can have multiple children.
-Navigation is done using predefined paths.
Use Cases
-Early database systems
-File systems (e.g., Windows Registry)
-Banking and telecommunication applications
2. Network Data Model
Overview
The network data model extends the hierarchical model by allowing multiple parent-child relationships (many-to-many relationships). Data is represented using a graph structure, where records are connected through links.
Characteristics
-More flexible than the hierarchical model.
-Supports complex relationships.
-Uses pointers to establish relationships.
Use Cases
-Large-scale applications like airline reservation systems
-Manufacturing and supply chain databases
-Telecommunications networks
3. Relational Data Model
Overview
The relational data model organizes data into tables (relations) consisting of rows (records) and columns (attributes). Relationships between tables are defined using primary keys and foreign keys.
Characteristics
-Uses structured query language (SQL) for data management.
-Provides high flexibility and scalability.
-Ensures data integrity through normalization.
Use Cases
-Web applications and enterprise software
-Customer relationship management (CRM) systems
-Banking and financial databases
4. Entity-Relationship (E-R) Model
Overview
The entity-relationship model represents data using entities (objects) and their relationships. It is used typically for database design even before the actual implementation of a relational database.
Characteristics
-Uses ER diagrams that are built up with entities, attributes, and relationships.
-Helps in conceptualizing and visualizing data.
-Provision of a high-level view of database structure.
Use Cases
-Database design and modeling
-Business process modeling
-Software engineering
5. Object-Oriented Data Model
Overview
The object-oriented data model integrates object-oriented programming (OOP) concepts into databases. Data is stored as objects, similar to classes in OOP languages like Java and C++.
Characteristics
-Supports complex data types.
-Enables inheritance, encapsulation, and polymorphism.
-Ideal for applications that require handling multimedia and complex data.
Use Cases
-Multimedia databases (e.g., images, videos)
-Computer-aided design (CAD) systems
-Artificial intelligence and machine learning applications
6. Document-Oriented Data Model
Overview
This model is commonly used in NoSQL databases, where data is stored as JSON or BSON documents instead of tables. Each document contains key-value pairs and can have a flexible schema.
Characteristics
-Schema-less and highly flexible.
-Supports nested and hierarchical data structures.
-Efficient for handling semi-structured and unstructured data.
Use Cases
-Content management systems (CMS)
-Big data applications
-E-commerce and real-time analytics
7. Key-Value Data Model
Overview
A simple data model where data is stored as key-value pairs. Each key is unique, and its associated value can be any type of data (string, number, object, etc.).
Characteristics
-High-speed data retrieval.
-Best suited for caching and session management.
-Minimal structure compared to relational databases.
Use Cases
-Distributed caching (e.g., Redis, Memcached)
-Shopping cart data storage
-Real-time recommendation systems
8. Graph Data Model
Overview
Graph data model. This model depicts data as nodes and edges, that is, as entities and relationships. This is very efficient in complex queries related to the relationship.
Characteristics
-Graphs are used when data is interlinked.
-Queries are based on graph traversal.
-Efficient in social networks and recommendation systems.
Choosing the right data model depends on the application's requirements, data complexity, and scalability needs. While relational models dominate traditional databases, NoSQL models like document-oriented and graph databases are gaining popularity for handling large-scale, complex data. Understanding different data models helps in designing efficient databases that best suit the business needs.
What type of data model do you use in your applications? Let us know in the comments!
TOPIC : TYPES OF DATA MODEL IN DBMS
1. Vidhanshu Kohale
2.Yash Waghamare
3.Yogesh Meherkar
4.Sumit Gone
5.Shreya Ingle
1 note
·
View note
Text
Explain OOP concepts like classes, objects, inheritance, and polymorphism.

Understanding OOP Concepts: Classes, Objects, Inheritance, and Polymorphism Object-Oriented Programming (OOP) is a programming paradigm that organizes code into reusable and modular components, making development more efficient and maintainable.
Here are the fundamental OOP concepts explained:
1. Classes: A class is a blueprint or template for creating objects. It defines the structure and behavior that the objects of the class will have.
A class typically contains attributes (data) and methods (functions). Example:
python
Edit class Car: def __init__(self, make, model):
self.make = make self.model = model def drive(self):
print(f”{self.make} {self.model} is driving!”)
2. Objects: An object is an instance of a class. It represents a real-world entity with specific data and behavior, defined by the class.
Example: python Copy Edit my_car = Car(“Toyota”, “Camry”) my_car.drive() # Output: Toyota Camry is driving!
3. Inheritance: Inheritance allows a class (child class) to inherit the attributes and methods of another class (parent class).
It promotes code reuse and hierarchical organization.
Example:
python
Edit class ElectricCar(Car):
def charge(self): print(f”{self.make} {self.model} is charging!”)
4. Polymorphism: Polymorphism enables objects of different classes to be treated as objects of a common parent class, allowing the same interface to perform different behaviors.
Example: python
Edit class GasCar(Car): def refuel(self):
print(f”{self.make} {self.model} is refueling!”)
my_cars = [ElectricCar(“Tesla”, “Model 3”), GasCar(“Ford”, “Mustang”)]
for car in my_cars: car.drive()
Benefits of OOP: Modularity:
Code is organized into smaller, reusable units.
Scalability: Easier to extend functionality using inheritance and polymorphism.
Maintainability: Changes in one part of the program have minimal impact on others. Understanding these OOP concepts helps developers create robust, flexible, and maintainable software.
They are foundational principles used in most modern programming languages like Python, Java, C++, and more.

0 notes
Text
The Single Most Important Thing You Need To Know About JAVA DEVELOPMENT
Java, a versatile and widely-used programming language, has stood the test of time as a cornerstone of software development. Since its introduction in 1995, it has been adopted for various purposes, from building web applications to creating robust enterprise systems. For developers diving into Java or seeking to refine their expertise, it’s easy to get lost in the vast ecosystem. Frameworks, libraries, and tools abound, and opinions on the “most important thing” vary. However, at its core, the single most crucial aspect of Java development is understanding and applying object-oriented programming (OOP) principles effectively.
Why Object-Oriented Programming is Essential in Java
Java is inherently an object-oriented programming language. The language’s design, libraries, and frameworks are deeply intertwined with OOP principles. Understanding these principles goes beyond academic knowledge; they’re the foundation of writing efficient, maintainable, and scalable Java applications. Let’s delve into what makes OOP principles the heart of Java development:
1. Encapsulation: Protecting Your Data
Encapsulation refers to bundling data (fields) and methods that operate on the data into a single unit or class. It also means restricting direct access to some of the object’s components, which helps maintain control over the internal state of the object.
Example:

Encapsulation ensures the balance field is not directly accessible, allowing controlled modifications only through the provided methods.
2. Inheritance: Building on Existing Code
Inheritance allows developers to create new classes based on existing ones, promoting code reuse and reducing redundancy.
Example:

Inheritance simplifies code and fosters a hierarchical structure, but overuse can lead to complex dependencies. Striking the right balance is key.
3. Polymorphism: Writing Flexible Code
Polymorphism enables a single interface to represent different data types. It promotes flexibility and scalability in applications.
Example:

Polymorphism ensures the application can accommodate new types with minimal changes, enhancing its adaptability.
4. Abstraction: Simplifying Complex Systems
Abstraction focuses on exposing only the necessary details while hiding the implementation complexities. In Java, abstraction is achieved through abstract classes and interfaces.
Example:

Abstraction helps in managing complexity by defining clear boundaries and responsibilities within the code.
How Mastering OOP Enhances Java Development
Improves Code Maintainability
When your code adheres to OOP principles, it’s easier to debug, extend, and maintain. Encapsulation ensures that changes in one part of the application don’t inadvertently affect other parts.
Enables Scalability
Well-structured object-oriented applications are inherently scalable. As your application grows, new features can be added with minimal disruption to existing code.
Fosters Reusability
Inheritance and abstraction promote code reuse, reducing development time and effort.
Enhances Collaboration
Object-oriented designs are intuitive and modular, making it easier for teams to collaborate. Developers can work on different classes or modules simultaneously without conflict.
Practical Steps to Master OOP in Java
Understand the Basics: Start with the fundamental concepts of OOP, including classes, objects, and methods.
Practice: Build small projects to reinforce your understanding of encapsulation, inheritance, polymorphism, and abstraction.
Read Code: Study well-written open-source Java projects to see how OOP principles are applied in real-world scenarios.
Learn Design Patterns: Patterns like Singleton, Factory, and Observer are built on OOP principles and provide solutions to common design problems.
Refactor Your Code: Regularly refactor to improve your application’s adherence to OOP principles.
Beyond OOP: Integrating Modern Java Practices
While mastering OOP is the single most important thing for Java developers, the language and its ecosystem have evolved. To remain competitive, developers should also embrace:
Functional Programming: Modern Java versions (starting with Java 8) support functional programming paradigms through features like lambdas and streams.
Microservices Architecture: Java frameworks like Spring Boot facilitate the development of microservices, a popular approach in modern application development.
Performance Optimization: Understanding the Java Virtual Machine (JVM) and optimizing garbage collection, threading, and memory usage are critical for high-performance applications.
Testing and Automation: Tools like JUnit and Mockito enable robust unit testing, ensuring code reliability.
Continuous Learning: The Java ecosystem is vast and ever-evolving. Staying updated with new versions, frameworks, and tools is essential.
Conclusion
Java’s success lies in its simplicity and power, underpinned by object-oriented principles. Whether you’re a novice or an experienced developer, understanding and applying OOP effectively is the most critical skill you can cultivate in Java development. By mastering these principles and embracing modern practices, you’ll be equipped to build robust, scalable, and maintainable applications that stand the test of time.
0 notes
Text
Inheritance Types In Java
In Java, inheritance allows a class to inherit properties and methods from another. There are four types: single inheritance (one class inherits from another), multilevel inheritance (a class inherits from another, which in turn inherits from another), hierarchical inheritance (multiple classes inherit from a single class), and hybrid inheritance (a combination of two or more types). Check here to learn more about inheritance types in Java.
0 notes
Text
COMP 250 Assignment 3
Assignment 3
COMP 250 Winter 2024
posted: Thursday, March 21, 2024
due: Tuesday, April 9, 2024 at 11:59m
Learning Objectives
By the end of this assignment, you will be able to model hierarchical data using trees. You will also be comfortable implementing recursive methods which take advantage of the fact that the data structure you are working with is recursively defined. You will learn how to convert a tree into a flat, two-dimensional structure, and, finally, you will strengthen your knowledge and your comfort with using inheritance in Java.
General Instructions
This assignment contains 3 parts. You need to download the files provided. Your task is to complete and submit the three following files:
Block. java
PerimeterGoal. java
BlobGoal. java
. Do not change any of the starter code that is given to you. Add code only where instructed, namely in the “ADD YOUR CODE HERE” block. You may add private helper methods to the three classes you have to submit, but you are not allowed to modify any other class.
. Please make sure that all the files you submit are part of a package called assignment3.
. You are NOT allowed to use any class other than those that have already been imported for you. Any failure to comply with these rules will give you an automatic 0.
. Do NOT start testing your code only after you are done writing the entire assignment. It will be extremely hard to debug your program otherwise. If you need help debugging, feel free to reach out to the teaching staff. When doing so, make sure to mention what is the bug you are trying to fix, what have you tried to do to fix it, and where have you isolated the error to be.
Submission instructions
. Submissions will be accepted up to 2 days late. Remember that you each have 2 free late days to use this semester. Any additional late day will be penalized by 10 points per day. Note that submitting one minute late is the same as submitting 23 hours late. We will deduct points for any student who has to resubmit after the due date (i.e. late) irrespective of the reason, be it the wrong file submitted, the wrong file format submitted or any other reason. We will not accept any submission after the 2 days grace period.
. Don’t worry if you realize that you made a mistake after you submitted: you can submit multiple times but only the latest submission will be evaluated. We encourage you to submit a first version a few days before the deadline (computer crashes do happen and Ed Lessons may be overloaded during rush hours).
. Do not submit any other files, especially .class files and the tester files. Any failure to comply with these rules will give you an automatic 0.
. Whenever you submit your files toEd, you will see the results of some exposed tests. If you do not see the results, your assignment is not submitted correctly. If your assignment is not submitted correctly, you will get an automatic 0. If your submission does not compile on ED, you will get an automatic 0.
. The assignment shall be graded automatically on ED. Requests to evaluate the assign- ment manually shall not be entertained, and it might result in your final marks being lower than the results from the auto-tests. Please make sure that you follow the instruction closely or your code may fail to pass the automatic tests.
. The exposed tests on ED are a mini version of the tests we will be using to grade your work. If your code fails those tests, it means that there is a mistake somewhere. Even if your code passes those tests, it may still contain some errors. Please note that these tests are only a subset of what we will be running on your submissions, we will test your code on a more challenging set of examples. Passing the exposed tests assures you that your submission will not receive a grade lower than 40/100. We highly encourage you to test your code thoroughly before submitting your final version.
. Next week,a mini-tester will also be posted. The mini-tester contains tests that are equivalent to those exposed on Ed. We encourage you to modify and expand it. You are welcome to share your tester code with other students on Ed. Try to identify tricky cases. Do not hand in your tester code.
. Failure to comply with any of these rules will be penalized. If anything is unclear, it is up to you to clarify it by asking either directly a TA during office hours, or on the discussion board on Ed.
Introduction
This assignment consists of implementing a visual game in which players apply operations such as rotations to a recursive structure in order to work towards a goal. The main data structure can be represented with a quad-tree (i.e. a tree in which each internal node has exactly four children). The rules are simple, but the game is still challenging to play. The game board resembles a Mondrian painting, and you can easily pick the color scheme that is most appealing to you. This assignment is adapted from an assignment created by Diane Horton and David Liu from University of Toronto.
The Game
The game is played on a randomly-generated game board made of squares of four different colors, such as the following:
Each player is randomly assigned their own goal to work towards: either to create the largest connected “blob” of a given color or to put as much of a given color on the outer perimeter as possible.
There are three kinds of moves a player can do:
. rotating a block (clockwise or counterclockwise),
. reflecting the block horizontally or vertically (i.e. along the x-axis or they-axis if you imagine
the origin of the axes being place in the center of the block), and
. “smashing” a block (giving it four brand-new, randomly generated, sub-blocks).
After each move, the player sees their score, determined by how well they have achieved their goal. The game continues for a certain number of turns, and the player with the highest score at the end is the winner.
The Game Board
We will call the game board a “block”. Blocks can be recursively defined; a block is either:
. a square of one color, or
. a square that is subdivided into 4 equal-sized blocks.
The largest block of all, containing the whole structure, is called the top-level block. We say that the top-level block is at level 0 (i.e. it would be at the root of the quad-tree used to represent it). If the top-level block is subdivided, we say that its four sub-blocks are at level 1 (i.e. these would correspond to the children of the root in the aforementioned quad-tree). More generally, if a block at level k is subdivided, its four sub-blocks are at level k + 1.
A board will have a maximum allowed depth, which is the number of levels down it can go. A board with maximum allowed depth 0 would not be fun to play on since it couldn’t be subdivided beyond the top level, meaning that it would be of one solid color. The following board was generated with maximum depth 5:
For scoring, the units of measure are squares the size of the blocks at the maximum allowed depth. We will call these blocks unit cells.
Moves
To achieve their goal, the players are allowed the three type of moves described above. Note that, smashing the top-level block is not allowed, since that would be creating a whole new game. And smashing a unit cell is also not allowed, since it’s already at the maximum allowed depth. What makes moves interesting is that they can be applied to any block at any level. For example, if the player selects the entire top-level block (highlighted) for this board
and chooses to rotate it counter-clockwise, the resulting board would be the following:
But if instead, on the original board, they choose to rotate (still counter-clockwise) the block at level 1 in the upper left-hand corner, then the resulting board would be the following:
Finally, if instead they choose to rotate the block a further level down, still sticking to the upper-left corner, they would get this:
Of course, the player could have chosen many other possible blocks on the board and they could have decided to perform a different type of move.
Goals and Scoring
At the beginning of the game, each player is assigned a randomly-generated goal. There are two types of goal:
. Blob goal. The player must aim for the largest “blob” of a given color c. A blob is a group of orthogonally connected blocks with the same color. That is, two blocks are considered connected if their sides touch; touching corners does not count. The player’s score is the number of unit cells in the largest blob of color c.
. Perimeter goal. The player must aim to put the most possible units of a given color c on the outer perimeter of the board. The player’s score is the total number of unit cells of color c that are on the perimeter. There is a premium on corner cells: they count twice towards the score.
Notice that both goals are relative to a particular color. We will call that the target color for the goal.
PART - 0: Familiarize yourself with the starter code
Let’s start by getting comfortable with the code provided and the idea behind the block data structure.
As mentioned in the introduction, we will be using a quad-tree to represent the structure of a block. Quad-trees are trees in which each internal node has exactly four children. It would not make sense for us to use a tree in which nodes could have a different number of children, say three. This is because a block is either solid-colored or subdivided; if it is solid-colored, it is represented by a node with no children (i.e. a leaf), and if it is subdivided, it is subdivided into exactly four sublocks.
Open the Block. java file and familiarize yourself with the provided code in this class. Note that the class has the following fields:
. Two ints, xCoord and yCoord, representing the coordinates of the upper left corner of this Block. Note that the origin, (0, 0), is the top left corner of the window, and the window has the following coordinates:
. An int size representing the height and width of this Block. Since all blocks are square, one variable is enough to represent both.
. An int level representing the level of this Block within the overall block structure. The top-level block, corresponding to the root of the tree, is at level 0. As already noted, if a block is at level i, its children will be at level i + 1.
. An int maxDepth representing the deepest level allowed in the overall block structure.
. A Color color. If this block is not subdivided (i.e. if it is a leaf), then this field stores its color. Otherwiwse, this field should be null.
. A Block[] children representing the blocks into which this block is subdivided. The children are stored in this order: upper-right child, upper-left child, lower-left child, lower-right child. If this Block has no children, then this field should store a reference to an array of length 0.
Before beginning to write your own code to complete the implementation of this class, let’s get more comfortable with the Block structure. Start by drawing on paper the quad-tree representing game board from Figure 1 (assuming the maximum depth is 2):
Figure 1: A Block with max depth 2
Each node should contain the values that would be assigned to their corresponding Block objects. You can assume that the size of the top-level block is 16. How many nodes have you drawn?
NOTE: If you come to office hours, we will ask to see your drawing before answering questions!
Now that you can draw the block structure on paper, can you translate it into code? Inside the main method of the Block class, create a Block object that corresponds to the same game board above. You can access constants representing the Colors needed from the class GameColors. Once you have created the board, you can display its text representation using the method printBlock() provided to you. If the structure has been created correctly the following should be displayed:
pos=(0,0), size=16, level=0
GREEN, pos=(8,0), size=8, level=1
RED, pos=(0,0), size=8, level=1
YELLOW, pos=(0,8), size=8, level=1
pos=(8,8), size=8, level=1
BLUE, pos=(12,8), size=4, level=2
RED, pos=(8,8), size=4, level=2
YELLOW, pos=(8,12), size=4, level=2
BLUE, pos=(12,12), size=4, level=2
Invariants. While thinking about the block structure, you might have noticed that each nodes must satisfy a lot of invariants for the tree to correctly represent a Block. Here is a list of some of them:
. Nodes have either 4 children or 0.
. If this Block has children then:
– their maxDepth is the same as the one of this Block
– their size is half that of this Block
– their level is one greater than that of this Block
– the position of their upper left corner can be determined from their size and the position of the upper left corner of this Block (I’ll leave it up to you to figure out how).
– the color of this Block is null
. level is always smaller than or equal to maxDepth
TEST and DEBUG. Please note that to test and debug your code you should not rely on the GUI. The GUI can definitely help fine tune your code, but you should test and debug it before using it. The method printBlock() provided to you displays a text representation of the block and can help you through this process. Remember that you are allowed and encouraged to add as many private helper methods as you wish. This will help you to: keep your code cleaner and better organized, as well as break each task into smaller steps. All of this will in turn help you when testing and debugging.
PART - I: Set up the board (30 points)
With a good understanding of the data structure, you are now ready to start working on the completion of the class Block.
[10 points] For the game, we want to be able to generate random boards. This is what the constructor Block(int lvl, int maxDepth) is for. The method generates a random Block with level lvl, and maximum depth maxDepth using the following the strategy: if a Block is not yet at its maximum depth, it can be subdivided. Decide whether or not to do so as follows:
. Use the Random object stored in the field gen to generate a random number in the interval [0, 1). Please note that you should generate this number if and only if it is possible for this Block to be subdivided.
. Subdivide the block if the random number is less than Math. exp(-0.25 * level), where level is the level of the Block within the tree.
. If a Block is not going to be subdivided, use a random integer to pick a color for it from the array of colors in GameColors. BLOCK COLORS . Make sure to generate the integer in the appropriate range, and use gen to do so.
Notice that the randomly-generated Block may not reach its maximum allowed depth. It all depends on the random numbers generated.
This constructor is responsible for assigning the appropriate values to the fields of all Blocks within the Block it generates except the fields size, xCoord, and yCoord which should be instead initialized by default. Next, you will write a method that can be used to correctly initialize all these fields.
If you use the seed 2 when initializing the Random variable gen on line 17 of Block. java, then when executing the following snippet of code
Block blockDepth2 = new Block(0,2);
blockDepth2.printBlock();
the text below will be displayed:
pos=(0,0), size=0, level=0
GREEN, pos=(0,0), size=0, level=1
RED, pos=(0,0), size=0, level=1
YELLOW, pos=(0,0), size=0, level=1
pos=(0,0), size=0, level=1
BLUE, pos=(0,0), size=0, level=2
RED, pos=(0,0), size=0, level=2
YELLOW, pos=(0,0), size=0, level=2
BLUE, pos=(0,0), size=0, level=2
[10 points] Implement the method updateSizeAndPosition(). This method takes three integers as input: one representing the size of this block, and the others representing the coordinates of the upper left corner of this block. The method updates the size and position for this block and all of its sub-blocks, while ensuring consistency between the values of the fields and the relationship of the blocks. Make sure the invariants are all respected! The method should throw an IllegalArgumentException is the input for the size is invalid, i.e. if it is negative or it cannot be evenly divided into 2 integers until the max depth is reached. There’s no need to perform any input validation for the coordinates.
If you use the seed 2 when initializing the Random variable gen on line 17 of Block. java, then when executing the following snippet of code
Block blockDepth2 = new Block(0,2);
blockDepth2. updateSizeAndPosition(16, 0, 0);
blockDepth2.printBlock();
the text below will be displayed:
pos=(0,0), size=16, level=0
GREEN, pos=(8,0), size=8, level=1
RED, pos=(0,0), size=8, level=1
YELLOW, pos=(0,8), size=8, level=1
pos=(8,8), size=8, level=1
BLUE, pos=(12,8), size=4, level=2
RED, pos=(8,8), size=4, level=2
YELLOW, pos=(8,12), size=4, level=2
BLUE, pos=(12,12), size=4, level=2
[10 points] In order for the game to be able to draw the blocks you can now generate, you need to provide an implementation for the method getBlocksToDraw(). The method returns an ArrayList of BlockToDraws. Open the file BlockToDraw. java to familiarize yourself with this data type. The list returned by getBlocksToDraw() should contain, for each undivided Block:
. one BlockToDraw in the color of the block
. another BlockToDraw in the FRAME COLOR (see GameColors. java) and a stroke thickness equal to 3.
Note that a stroke thickness equal to 0 indicates that the block should be filled with its color. The order in which the objects BlockToDraw appear in the list does not matter.
After having implemented this method, you can try to run BlockGame. If you use the seed 2 when initializing the Random variable gen on line 17 of Block. java and you select 2 as the maximum depth when running the game, you will see the following board displayed:
As you might have noticed, this is the same Block from Figure 1.
PART - II: Make the game playable (30 points)
Time to make the game real by allowing players to be able to select a block from the board and apply a move of their choice.
[12 points] The first thing to do is implement the method getSelectedBlock() which allows the game to retrieve the Block selected by the player. In order for the user to play the game, they must be able to select a block on which they would like to make a move. They will do so by clicking on the board at a desired location, and using the up and down arrows to choose the level of the block. The method getSelectedBlock() takes those inputs (the (x,y) coordinates of where the user clicked, and an int representing the level selected), and finds the corresponding Block within the tree. If the level specified is lower than the lowest block at the specified location, then the method returns the block at the location with the closest level value. Note that if a Block includes the location (x,y), and that Block is subdivided, then one of its sub-Blocks will contain the location (x,y) too. This is why the level is needed to identify which Block should be returned. Please note that you can view the quad-tree representing the block data structure as a search tree. As such, this method should run in O(h), where h is the height of the tree.
Input validation: if the level provided is smaller than this Block’s level or larger than its maximum depth, then the method should throw an IllegalArgumentException. If the position, (x,y), is not within this Block, then the method should return null.
For example, using the seed 4 when initializing the Random variable gen online 17 of Block. java, the following snippet of code generates a board with maximum depth 3, top left corner in position (0, 0), and size equal to 16.
Block blockDepth3 = new Block(0,3);
blockDepth3. updateSizeAndPosition(16, 0, 0);
We can then select and print the Block at level 1 containing the location (2 , 15) as follows:
Please note, that the same would have been displayed even if the level selected was 2 or 3. On the other hand, we can select and print the Block at level 2, containing the location (3 , 5) as follows:
[6 points] Implement the method reflect(). The method takes an int as input representing whether this Block should be reflected over the x-axis (if the input is 0) or the y-axis (if the input is 1). When thinking about performing a reflection of this Block, you can think of the origin of the axes being placed in the center of this Block. To successfully perform a reflection, the same operation should be propagated to all the sub-blocks of this Block. Make sure that the method correctly updates all the necessary fields. The method throws an IllegalArgumentException if the integer received as input is neither a 0 nor a 1.
For example, using the seed 4 when initializing the Random variable gen online 17 of Block. java, let’s generate aboard with maximum depth 3. In Figure 2, you can see the effect of a reflection over the x-axis of either the top-level block or the level 1 block on the top-left corner.
Figure 2: Left: Original board. Center: Board after reflection on top-level block. Right: Board after reflection on the level 1 top-left block.
[6 points] Implement the method rotate(). The method takes an int as input representing whether this Block should be rotated counter-clockwise (if the input is 0) or clockwise (if the input is 1). The operation should be propagated to all of its sub-blocks. If this Block has no children, then the method should not do anything. Make sure that the method correctly updates all the necessary fields. You can throw an IllegalArgumentException if the integer received as input is neither a 0 nor a 1.代做COMP 250
For example, using the seed 4 when initializing the Random variable gen online 17 of Block. java, let’s generate aboard with maximum depth 3. In Figure 3, you can see the effect of a clockwise rotation of either the top-level block or the level 1 block on the top-left corner.
Figure 3: Left: Original board. Center: Board after a clockwise rotation of the top-level block. Right: Board after a clockwise rotation of the level 1 top-left block.
[6 points] Implement the method smash(). This method takes no inputs and, if this Block can be smashed, it randomly generates four new sub-blocks for it. If the Block already had children, they will be discarded. Make sure that the method correctly updates all the necessary fields. Remember that a Block can be smashed if and only if it is not the top-level Block and it is not already at a level equal to the maximum depth. The method returns true if this Block was smashed and false otherwise.
For example, using the seed 4 when initializing the Random variable gen online 17 of Block. java, let’s generate a board with maximum depth 3. In Figure 4, you can see the effect of smashing the level 1 block on the top-left corner or the effect of smashing the level 2 block on the top-left corner.
Figure 4: Left: Original board. Center: Board after smashing the level 1 top-left block. Right: Board after smashing the level 2 top-left block.
weixin: codehelp
0 notes
Text
Exploring Java: The Quintessential Object-Oriented Programming Language
In the vast realm of programming languages, few stand as prominently as Java. Renowned for its versatility, robustness, and scalability, Java has become a cornerstone of modern software development.
At the heart of Java's success lies its adherence to the principles of object-oriented programming (OOP), a paradigm that has revolutionized the way developers approach software design and implementation.
Unlock the power of Java with our expert developers, hire java developers to elevate your projects.
Understanding Object-Oriented Programming
Before delving into Java's role in the world of OOP, let's first grasp the fundamental concepts of this programming paradigm. Object-oriented programming is centered around the concept of objects, which encapsulate data and behavior. These objects interact with each other through methods, forming the building blocks of a software application.
The four main principles of OOP are:
Encapsulation: Encapsulation involves bundling data and methods that operate on the data into a single unit, known as a class. This shields the internal state of an object from external interference, promoting modularity and reusability.
Inheritance: Inheritance allows a class (subclass) to inherit properties and behavior from another class (superclass). This facilitates code reuse and promotes the creation of hierarchical relationships between classes.
Polymorphism: Polymorphism enables objects to take on multiple forms or behaviors. This can manifest through method overloading, where a class has multiple methods with the same name but different parameters, and method overriding, where a subclass provides a specific implementation of a method defined in its superclass.
Abstraction: Abstraction involves simplifying complex systems by focusing on essential characteristics while suppressing irrelevant details. In Java, abstraction is achieved through abstract classes and interfaces, which define common behavior without specifying implementation details.
Java: An OOP Powerhouse
Java was designed from its inception to embrace the principles of OOP fully. Its syntax and features are tailored to support encapsulation, inheritance, polymorphism, and abstraction seamlessly. Let's explore some of the key features of Java that make it an exemplary OOP language:
Classes and Objects: In Java, everything is an object. Classes serve as blueprints for creating objects, defining their structure and behavior. Through classes, developers can encapsulate data and methods within a cohesive unit, fostering code organization and modularity.
Inheritance: Java supports single and multiple inheritance through class extension and interface implementation, respectively. Subclasses inherit attributes and methods from their superclasses, allowing for code reuse and the establishment of hierarchical relationships.
Polymorphism: Java leverages polymorphism to enable dynamic method dispatch, where the appropriate method implementation is determined at runtime based on the object's type. This flexibility enhances code flexibility and extensibility, enabling developers to write more modular and maintainable code.
Abstraction: Abstract classes and interfaces in Java enable developers to define common behavior without specifying implementation details. This abstraction promotes code flexibility and facilitates the creation of loosely coupled systems, where components can be easily replaced or extended.
Encapsulation: Java's access modifiers, such as public, private, and protected, facilitate encapsulation by controlling the visibility of class members. This ensures that the internal state of an object is protected from unauthorized access, enhancing code security and maintainability.
Experience seamless Java development services crafted to meet your unique business needs - hire our dedicated team today.
Conclusion
In conclusion, Java stands as a quintessential object-oriented programming language, embodying the core principles of OOP in its syntax, features, and design philosophy. By embracing encapsulation, inheritance, polymorphism, and abstraction, Java empowers developers to build robust, scalable, and maintainable software systems. Whether you're a seasoned developer or just starting your programming journey, mastering Java's OOP concepts is essential for unlocking the full potential of this versatile language. So, dive into the world of Java OOP, and unleash your creativity in software development like never before.
#software development#mobile app development#web development#java full stack developer#java application development#java development company
0 notes
Text
Understanding Inheritance in Java: Exploring Types and Examples

In the world of Java programming, inheritance is a powerful concept that allows developers to create a relationship between classes, fostering code reuse and organization. In this blog, we'll delve into what inheritance is in Java, explore its types, and provide practical examples to make it all crystal clear.
What is Inheritance in Java?
Inheritance is a key pillar of Object-Oriented Programming (OOP), enabling a class to inherit properties and behaviors from another class. The class granting the inheritance is known as the superclass or parent class, and the class receiving the inheritance is the subclass or child class. This mechanism promotes the reuse of code and establishes a hierarchy among classes.
Types of Inheritance in Java:
1. Single Inheritance:
In single inheritance, a subclass inherits from only one superclass. Let's illustrate this with a simple example:
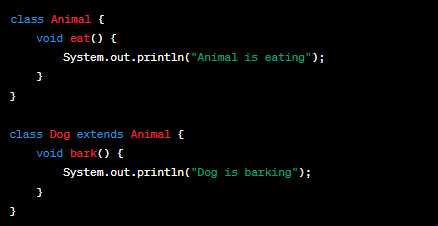
Here, Dog is the subclass inheriting from the Animal superclass. The Dog class can access the eat() method from the Animal class.
2. Multiple Inheritance (Through Interfaces):
Java doesn't support multiple inheritance for classes, but it does support it through interfaces. Consider the following:
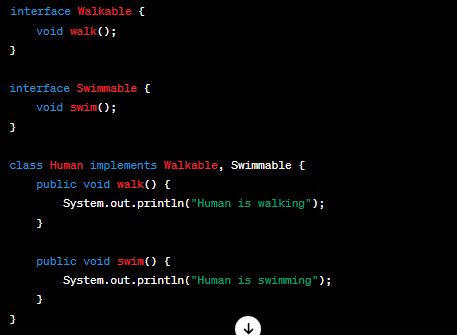
Here, the Human class implements both the Walkable and Swimmable interfaces, achieving a form of multiple inheritance.
3. Multilevel Inheritance:
In multilevel inheritance, a class inherits from another class, and then another class inherits from the second class, forming a chain. Let's see an example:
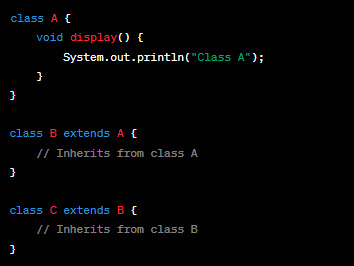
In this scenario, C inherits from B, and B inherits from A.
4. Hierarchical Inheritance:
In hierarchical inheritance, multiple classes inherit from a single superclass, creating a hierarchy. Consider the following:
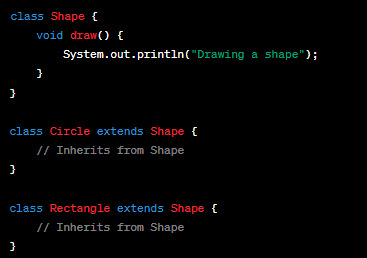
Here, both Circle and Rectangle inherit from the Shape superclass.
Benefits of Inheritance:
Code Reusability: Inheritance allows you to reuse code from existing classes, minimizing redundancy.
Method Overriding: Subclasses can provide specific implementations for methods inherited from the superclass.
Polymorphism: Objects of the subclass can be treated as objects of the superclass, enhancing flexibility.
Modularity: Inheritance aids in creating modular and easily understandable code by organizing classes into a hierarchical structure.
Conclusion
In conclusion, understanding inheritance in Java is fundamental to writing efficient and organized code. Whether you're a beginner or an experienced developer, incorporating inheritance into your Java programming skills can significantly enhance your ability to create robust and maintainable applications.
Get to Know more: https://analyticsjobs.in/question/can-you-please-tell-me-what-are-the-various-types-of-inheritance-in-java/
#java#inheritance in java#learn java#analyticsjobs#what is inheritance#types of inheritance#elearning#coding#programming
0 notes
Text
What are the Types of Inheritance in Java? Examples and Tips to Master Inheritance
In Java, inheritance is a fundamental concept of object-oriented programming that allows one class to acquire the properties and behaviors of another. This promotes code reusability and establishes a hierarchical relationship between classes Read More...

0 notes
Text
Learn Inheritance in Java – Scientech Easy
Master the concept of Inheritance in Java with step-by-step tutorials on Scientech Easy. Understand how Java classes inherit methods and fields, and explore types like single, multilevel, and hierarchical inheritance. Perfect for beginners and advanced learners alike!

#bca course subjects#Interface in Java#Python tuple#Exception handling in Java#collection framework in java#constructor in java#Polymorphism in Java
1 note
·
View note
Text
Inheritance is a fundamental concept in object-oriented programming that allows one class to inherit properties and behaviour from another class. The C++ programming language does not support inheritance in the same way as other object-oriented languages such as C++, Java, and Python.
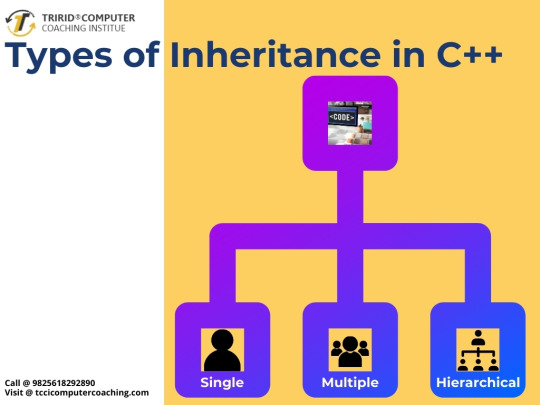
However, there are still ways to achieve similar functionality using different techniques. This essay describes the different types of inheritance in C++ and how to implement them.
Single Inheritance:
Single inheritance allows a class to inherit only properties and behaviour from another class. This is the simplest form of inheritance and can be achieved in C++ using struct pointers. You can simulate single inheritance in C++ by defining a struct that contains the properties and behaviour of the base class and creating a struct for the derived class that contains a pointer to the base class structure.
Multiple Inheritance:
Multiple inheritance allows a class to inherit properties and behaviour from multiple classes. Although C++ does not directly support multiple inheritance, it can be simulated using a technique called structural embedding. You can achieve the effect of multiple inheritance by embedding one structure in another.
Hierarchical Inheritance:
Hierarchical inheritance occurs when multiple classes inherit from the same base class. This is common type inheritance, and can be achieved in C++ by defining multiple structures, each containing a pointer to a base class structure.
Each type of inheritance has its own advantages and disadvantages, so it is important to carefully consider which technique is best for your particular situation. A solid understanding of these techniques allows developers to effectively simulate inheritance in C++ and create well-structured and maintainable code.
TCCI provides the best training in C++ through different learning methods/media is located in Bopal Ahmedabad and ISCON Ambli Road in Ahmedabad.
For More Information:
Call us @ +91 9825618292
Visit us @ http://tccicomputercoaching.com
#computer classes in bopal Ahmedabad#computer classes in ISCON Ambli Ahmedabad#computer coaching institute in bopal Ahmedabad#computer coaching institute in ISCON Ambli Ahmedabad#computer course in bopal Ahmedabad
0 notes
Text
Inheritance in Java
Inheritance in Java is a mechanism in which one object acquires all the properties and behaviors of a parent object. It is an important part of OOPs (Object Oriented programming system).
The idea behind inheritance in Java is that you can create new classes that are built upon existing classes. When you inherit from an existing class, you can reuse methods and fields of the parent class. Moreover, you can add new methods and fields in your current class also.
Inheritance represents the IS-A relationship which is also known as a parent-child relationship.

0 notes
Text
What are the 5 steps of Java programming?
Java is one of the most widely used programming languages in the world, renowned for its portability, robustness, and scalability. Whether you're building Android apps, desktop software, or enterprise-level solutions, Java provides a structured and efficient development process.
To effectively write Java programs, it’s essential to understand the five key steps involved in Java programming. These steps form the foundation for writing, compiling, and running Java code smoothly.
This article will walk you through each of these steps in detail and help you understand how a Java program goes from idea to execution.
Step 1: Writing the Java Code (Source Code Creation)
Every Java program begins with writing the source code using a text editor or an Integrated Development Environment (IDE) like IntelliJ IDEA, Eclipse, or NetBeans.
The source code is saved with a .java extension and typically includes:
Class definitions
Methods
Variables
Control structures
Object-oriented principles like inheritance and encapsulation
At this stage, understanding the syntax and structure of Java is essential, which is thoroughly taught in Best Java training, especially for beginners.
Step 2: Compiling the Java Program
Once the source code is written, the next step is compilation.
Java uses a compiler (javac) to convert the human-readable source code into bytecode, which is stored in a .class file. Bytecode is an intermediate language understood by the Java Virtual Machine (JVM).
Step 3: Loading the Class File (Class Loader)
Before executing, the compiled bytecode must be loaded into memory. This is where the Class Loader comes in. The JVM’s class loader loads the .class files and prepares them for execution.
There are three main types of class loaders in Java:
Bootstrap ClassLoader
Extension ClassLoader
Application ClassLoader
These work together to load the required classes and dependencies into memory in a hierarchical manner.
This phase also verifies the bytecode to ensure it’s safe and conforms to JVM rules.
Step 4: Bytecode Verification and Linking
Once the class is loaded, the bytecode is verified for security. The JVM ensures that the bytecode does not perform illegal operations like accessing private memory or performing unauthorized casts.
Key activities in this step:
Type checking
Stack map verification
Symbol resolution
Preparing memory for static variables
This is one of the reasons Java is considered a secure language—the JVM won’t run unverified code.
Step 5: Execution by JVM (Interpretation or JIT Compilation)
Finally, the verified bytecode is executed by the Java Virtual Machine. The JVM reads the bytecode and executes it either by interpreting each bytecode instruction or compiling it into native machine code using the Just-In-Time (JIT) compiler.
The JVM ensures that the Java application runs on any operating system where the JVM is installed, fulfilling Java’s promise: “Write once, run anywhere.”
Bonus: Understanding the Lifecycle of Java Execution
To recap the complete process:
Write Java code (.java)
Compile code into bytecode (.class)
Load class files into memory
Verify & link bytecode for safety and preparation
Execute via JVM
Each step is designed to ensure that your program is secure, efficient, and portable, which is why Java remains a top choice for developers worldwide.
Why Learning Java the Right Way Matters?
If you're just starting your Java journey, mastering these five steps is crucial. Enrolling in a structured course—like those offered at the Best Java training classes in Chandigarh—can help you gain real-world knowledge, hands-on practice, and guidance from industry experts.
With project-based learning, live mentoring, and certification support, such courses ensure you're not just learning Java—you’re learning how to use it effectively in real development environments.
Conclusion
Understanding the five fundamental steps of Java programming helps demystify the development process. From writing clean code to executing it on the JVM, each step plays a vital role in delivering robust and platform-independent applications.
By mastering these stages—and reinforcing them through practice—you’ll become a confident and capable Java developer, ready to tackle any programming challenge.
0 notes
Text
Hierarchical Inheritance in Java with program Example
Hierarchical Inheritance in Java with program Example
Hierarchical inheritance is a type of inheritance in which two or more classes inherit a single parent class. In this, multiple classes acquire properties of the same superclass. The classes that inherit all the attributes or behaviour are known as child classes or subclass or derived classes. The class that is inherited by others is known as a superclass or parent class or base class. For…

View On WordPress
0 notes