#how to disable safe mode in oppo
Explore tagged Tumblr posts
Visit Tumblr Blog
Explore Tumblr blogs with no restrictions, modern design and the best experience.
Last Seen Tumblr Blogs


Fun Fact
The total number of visits Tumblr.com received during January 2021 is 327 million.
Text
#how to disable safe mode in oppo#how to turn off safe mode in oppo#how to remove safe mode in oppo#how to off safe mode in oppo#oppo safe mode off#oppo android safe mode turn off
0 notes
Text
How to Disable Safe Mode in Oppo Devices

Have you ever found yourself stuck in Safe Mode on your Oppo device and just couldn't figure out how to get out of it? Don't worry, you're not alone! Putting your Oppo phone into Safe Mode might seem like a straightforward task, but getting it back to normal mode can sometimes be a bit tricky. But fear not, because we've got you covered. In this article, we'll walk you through various methods to disable Safe Mode in Oppo devices, ensuring that you can easily switch back to the normal mode you love. You see, Safe Mode can be a lifesaver when you're troubleshooting certain issues on your Android phone. It strips away all the fancy bells and whistles, allowing you to start your Oppo device with only the most essential features and services. However, if you find yourself unable to exit Safe Mode, it can quickly become frustrating. We'll help you navigate through the steps to remove Safe Mode from your Oppo device, ensuring that you can enjoy your phone in its full glory once again. So, let's dive in and bid farewell to Safe Mode woes together! Read More - ADDING IR SENSOR | AS REMOTE What is Safe Mode? Why is your Oppo Device in Safe Mode? Methods to disable Safe Mode in Oppo DevicesRestart your Oppo Device Try from the Notification Panel Use Power Up with Volume Down keys Take Out the Battery Remove some Apps Factory Reset your device Conclusion Frequently Asked Questions (FAQ)How do I know if my Oppo device is in Safe Mode? Can I still access my apps and data while in Safe Mode? Is it possible to accidentally activate Safe Mode on my Oppo device? Can I seek professional help if I'm unable to disable Safe Mode on my Oppo device? Is it safe to continue using my Oppo device while it's in Safe Mode?
What is Safe Mode?

Safe Mode on your phone isolates pre-installed software, suspending third-party apps. It's a troubleshooting tool to identify problematic applications and settings. By disabling most third-party apps and background processes, it provides a clean slate for diagnostics. Essentially, it's a method of booting with minimal software to resolve issues effectively.
Why is your Oppo Device in Safe Mode?
Your Oppo device may enter Safe Mode automatically due to issues it's encountered. This could result from a problematic mobile app or malware. Alternatively, you might inadvertently trigger Safe Mode yourself. Read More – Screen overlay Detected Problem solved on Oppo Safe Mode on Oppo devices prevents unauthorized apps and ensures smooth performance. Even without issues, it's vital for optimal device functionality. Don't overlook its importance, as it maintains device capabilities. Read More – What Can Do With Safe Mode
Methods to disable Safe Mode in Oppo Devices
- Restart your Oppo Device. - Using Notification Panel. - Use Power Up with Volume Down keys. - Take out the battery from your device. - By removing apps. - Factory Reset your Oppo Device. You can disable Safe Mode using the methods outlined above. Here, we briefly explain these methods. Restart your Oppo Device
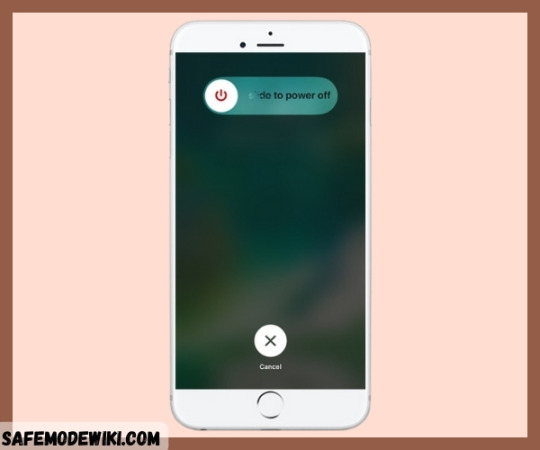
Most people resort to this method when something goes wrong with their device. To disable Safe Mode, follow these steps: Hold down the Power Button until the Power Off option appears. Wait a few minutes, then turn your device back on. If this method doesn't work, then try the next one. Try from the Notification Panel

This method may not work for all devices, but some have a Safe Mode notification in the Notification Panel. Simply go to the Notification Panel and tap on "Exit Safe Mode." Still unable to disable Safe Mode on your device? Then consider using hardware methods. Use Power Up with Volume Down keys
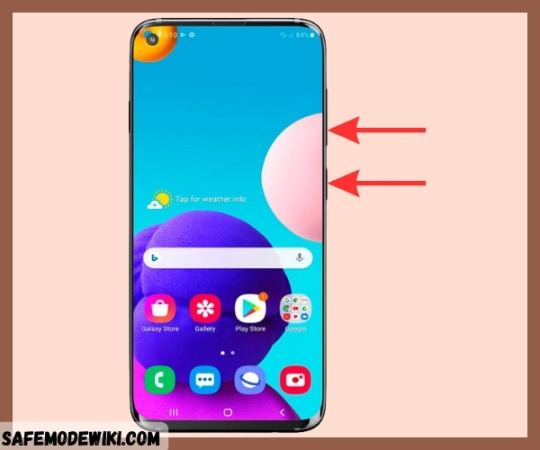
Many people have tried this method and found it effective. First, turn off your device, then simultaneously hold down the Power Button and Volume Down keys. If your Volume key is broken, your device may mistakenly detect that you're holding one of the volume buttons, triggering Safe Mode unintentionally. This can occur during reboots or even when you're not attempting to do so. If this happens consistently, you may need to repair your device. Remove the protective case as it may disrupt the functionality of the phone's physical keys and hinder proper startup. Take Out the Battery

First, you need to turn off your device and then remove the battery. Wait for a couple of minutes before putting the battery back in and turning the device back on. Remove some Apps

If you're still unable to turn off Safe Mode on your device, it could be due to a mobile app. Your device may have some apps that are causing errors, leading to Safe Mode activation to protect it from potential harm. Before uninstalling any app, consider clearing the app's cache by following these steps: - Open Settings on your phone. - Navigate to Apps. - Select "See all apps." - Choose the specific app you want to clear the cache for. - Go to Storage and Cache. - Select "Clear Cache." You can also attempt to delete the app's data with the following steps: - Access Settings on your phone. - Navigate to Apps. - Select "See all apps." - Choose the specific app. - Go to Storage and Cache. - Clear the storage.

Deleting an app's storage clears the cache on your user data for that app. You'll need to go through the setup process again, but this could resolve the issue and allow you to exit Safe Mode. Follow these steps to uninstall the faulty app : - First, identify the problematic app causing Safe Mode activation. - Since apps cannot run in Safe Mode, uninstallation is the only option. - Navigate to Settings >> Apps to view the list of downloaded apps. - The recently downloaded app is likely the cause of the Safe Mode issue. - Select the app you want to remove and proceed to uninstall it.

Factory Reset your device
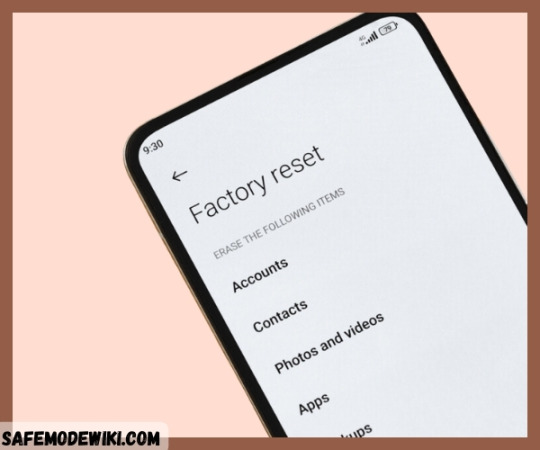
Before attempting this method, it's better to try all the methods mentioned above. If you're still unable to disable Safe Mode, proceed with this method, but keep in mind that it will erase all data on your device. Remember to backup your data before resetting the device. This method will likely work, based on my knowledge. We believe this guide will help you successfully disable Safe Mode on your Oppo Device.
Conclusion
In conclusion, navigating Safe Mode on your Oppo device can be a hassle, but with these comprehensive steps, you can troubleshoot and disable it effectively. Remember to try various methods and backup your data before resorting to a factory reset. Share this guide with others to help them overcome Safe Mode issues and keep your device running smoothly. Stay informed and connected by subscribing to our page for future updates and tech tips.
Frequently Asked Questions (FAQ)
How do I know if my Oppo device is in Safe Mode? You can tell if your Oppo device is in Safe Mode by observing the words "Safe Mode" displayed on the screen, usually in the bottom-left or top-left corner. Additionally, certain features and functionalities may be limited while in Safe Mode. Can I still access my apps and data while in Safe Mode? While in Safe Mode on your Oppo device, you can still access your apps and data, but only essential system apps will be available. Third-party apps won't be accessible until you exit Safe Mode. Is it possible to accidentally activate Safe Mode on my Oppo device? Yes, it's possible to accidentally activate Safe Mode on your Oppo device. This can happen if certain buttons are pressed during startup or if there are issues with specific apps or software, triggering Safe Mode activation unintentionally. Can I seek professional help if I'm unable to disable Safe Mode on my Oppo device? Yes, if you're unable to disable Safe Mode on your Oppo device using the provided methods, seeking professional help from an authorized service center or Oppo customer support is advisable. They can offer specialized assistance and solutions tailored to your device's specific issues. Is it safe to continue using my Oppo device while it's in Safe Mode? Yes, it's safe to continue using your Oppo device while it's in Safe Mode. Safe Mode is designed to restrict certain functions to diagnose and resolve issues, but it won't cause harm to your device. However, some features may be limited until you exit Safe Mode. Hey there! Thanks for checking out our page. If you found this guide useful, consider sharing it on social media platforms such as Facebook, Twitter, and Reddit so others can also take advantage of it. And if you run into any trouble or encounter error messages, don't hesitate to drop a comment. Our team is here to help you out pronto. Oh, and if you're wondering how to disable safe mode in Oppo, we've got you covered! Stay in the loop by subscribing to our page for all the latest updates. Read the full article
#howtodisablesafemodeinoppo#howtooffsafemodeinoppo#howtoremovesafemodeinoppo#howtoturnoffsafemodeinoppo#opposafemodeoff
0 notes
Text
Realme Mobile Repair
Realme Water Damage Repair
The best way to fix your cracked screen without needing additional damage to this Realme mobile is to deliver it to professional repair support. The trained technicians at Cell Realme Phone Repair may restore your screen quickly and safely. If you see the store immediately so which you can get back to enjoying your phone.
Realme is becoming hugely popular in many countries including India because of its specs and a comparatively low price tag it offers as it is a subsidiary of Oppo which adds to the lowering price tag. But there are just a few trade-offs and resistance against water is just one of them. Since a majority of Realme smartphones are targeting the funding price range, these telephones lack water-resistance and that is why Get Droid Tips is here to examine Realme water-damaged tablets if you accidentally drown your phone or spill water on it or even vice versa. Even though you can always report to an agency center, there's a procedure which you could perform on your own to bring the phone back to life, and here is everything you need to know about it.
Realme Mobile MIC Repair
In this post, we're going to offer Basic and advanced procedures to resolve this"MIC Not functioning Problem". Sometimes this problem is caused because of bad MIC (Hardware) but a whole lot of times it is brought on by the Android program or caches.
Sometimes the third-party apps control the way the microphone behaves. Therefore restart your Oppo Realme 2 Guru in protected mode and it will help you. (When you are on safe mode, It Is Going to disable all third-party programs temporally)
Realme Mobile Signal Repair
Among the problems which we can find on our mobile, those that have to do with a policy are the most annoying. Running out of sign means being cut off, so long as we are not under the protection of a Wi-Fi network. Furthermore, our data connection will likewise be impacted. That is why we wanted to determine how to address these problems in Realme mobiles.
Failures with the policy of our Realme phone can appear when we least expect it. Its causes can be very varied, being ourselves the culprits or any third-party app. It can also be due to certain difficulties with our operator or in spite of the SIM card. In this way, we can totally lose the signal or it's too weak to ensure the quality of calls and cellular data.
In this case, the policy signal does not appear anywhere, that is, we will notice an"x" that will show that there are issues with the signal. In this case, we will have several options in our hands to attempt and take care of the issue.
Realme Motherboard Repair
Without it, your phone wouldn't have the ability to work. It is, in actuality, that the heart of your entire apparatus like a CPU is obviously a pc.
The circuit board retains together multiple crucial sections of your cellphone. Let's say your heart fails. What happens afterward? Your system stops moving and you're considered as dead. In the same way, if your motherboard gets damaged somehow, your device will quit functioning. Therefore it is important to identify if your phone is malfunctioning because of a faulty motherboard. However, it's not an easy task to fix your phone's circuit board. Fortunately, our specialists at Hitec Mobile can quickly figure out what is causing your telephone to malfunction and fix it accordingly in virtually no time.
Realme Display Damage Repair
All smartphones come with a massive display nowadays and the larger the screen, the higher the odds of you damaging your smartphone screen when it accidentally slips from your grip. In fact, the very first question to cross our minds when we hold a recently launched phone is, "The best way to protect the screen? "We wouldn't say there are techniques to completely save your cellphone's display from breaking but yes, there are ways to protect your smartphone display from harm.
Realme Dead Phone Repair
How to Revive a Dead Android phone if there's a charger near you, catch it, plug it in, and hit the power button. The battery might just be dead since it is not due to faulty batteries losing charge abruptly. Once the cable has been plugged into the telephone, it should have the ability to begin. If your phone has lights for alarms, this is a fantastic way to understand if the charging indicator comes on. The least that means that the circuit from the USB to the main port is working fine. If it works, then you might just have a broken battery, which can be readily replaced, but if that still doesn't, then it’s time to take some drastic steps.
It is possible that your phone is only with a system hang, and in rare circumstances, Android programs have been proven to freeze quite badly, so badly that even by pressing the power button, there's absolutely no response. Once the battery is plugged in again, check if your phone can get to restart. If the phone still does not boot up, take a look at the battery compartment, there'll be a little square of what seems like white paper embedded within this region. This is actually the moisture index and if it has turned pink or pink even partially, this implies your phone has been subjected to water and it means that your warranty is taken and the phone is dead.
Realme Camera Repair
Smartphones are unique with their quality cameras at a very reasonable cost. Realme goals the common people with the best-in-class facilities at a very reduced price. However, are you frustrated with any flaws in the camera? Can not enjoy taking selfies just as before? Stay trendy, the expert mobile service technicians of Mi Mobile Service Center Hyderabad is here to help you. Mobile service center Hyderabad provides the ideal support apt for the Mi Smartphone camera at Hyderabad.
Camera Service Center Hyderaad substituted your faulty cellphone camera using the original Realme camera of the best quality from our shops with the best warranty. So, why wait patiently without capturing your memorable occasions, if the very best Mi phone camera support in Hyderabad is out here. Contact Sizcom Mi service center in Hyderabad for almost any questions, for we are should assist you.
Now boost up your selfies using cellular camera replacement solutions! Long-term usage and if it is rough and hard, it may make your mobile phone act wild. Most commonly the quantity buttons may not work or only fall off because of continuous use. This is not at all a serious problem as support center Hyderabad is here to repair your problem. Fix center Hyderabad resolve every issue about your Mi mobile phone and spare parts. Make us a call for rapid and pleasing service from our licensed workers.
Realme Battery Restoration
If there's something in a cell telephone that gets damaged in most cases, it needs to be the battery life. Many mobiles come with good excellent battery life, but just like any other digital product, the battery of a smartphone can have problems at any time. It is obviously frustrating when your telephone suddenly switches off because of faulty battery issues. Generally, a mobile telephone's battery goes completely dead or does not hold a charge however long you put it upon charging. If that's also the case with your Realme mobile phone, then it's far better to opt for Realme cell battery replacement.
To get the battery for the Realme phone repaired, you should pay a visit to the authorized mobile service center in town. They have highly skilled mobile repair technicians that provide battery problem-related aid and other help. You can take the device to their service center and ask to repair the battery or elect for a new battery replacement if the telephone is in warranty. They will most likely keep the telephone in the center for a couple of days because ordering spare components takes time.
1 note
·
View note
Text
Silicon Image SCSI & RAID Devices Driver Download For Windows 10

Can anyone tell me what a 'SI pseudo SCSI processor device' is???? Everytime I boot win xp finds it and wants to load drivers. Also in Device Manager it is shown under 'Other Devices'. Uninstalling or disabling it does nothing. It's back next boot. Also in 'Network Connections' I have an icon labelled 'Local area connection 3'. It has a red cross through it and it can not be removed. Clicking on properties tells me nothing. These don't seem to interfere with the running of the comp. They are just annoying. Jack
SCSI Drivers; Silicon Image SiI 3114 SATALink Controller. By Tyan Computer USA February 9, 2005. Download Now Download Now This package supports the following. The Silicone Image Sil 0680 ATA/133 RAID Controller is listed (in green) and the two devices that are connected are the IOMEGA ZIP 100 SCSI Disk Device and the TSSTcorp CDDVDW TS-H652H SCSI CdRom Device (in orange). The devices that are connected through the controller will has SCSI inserted into the name of the devices. AMS SP-PCIE3132 - Silicon Image Sil3132 SATALink 3Gbps PCI-E Host Controller (2-Port eSATA) - Compatible to PC and Mac (PowerPC and Intel based).
In this blog post we will discuss how you can fix the issue of RAID controller not reconsigning the drives and if you are not able to fix the RAID controller not recognizing drives error, how you can recover data with Stellar Data Recovery Technician software. Get the software now!
A RAID controller is a software program or hardware componentthat is used to manage storage drives such as hard disk drives (HDDs) andsolid-state drives (SSDs) in a RAID environment to achieve redundancy, performance,or both.
This logical arrangement of physical drives in a RAID arrayis susceptible to errors often caused by hardware/software failure and humanerrors.

Events such malware or virus infection, power surge or abrupt shutdown, device driver issues, metadata conflicts, etc. can lead to errors where RAID controller may stop detecting or recognizing RAID drives.
Further, SMART disk errors and overheating can also lead to such errors. And in some rare cases, a RAID may stop detecting RAID drives after a soft reboot.
Below are some quick fixes for a RAID controller when it failsto recognize RAID drives.
How to Fix RAID Controller not Recognizing Drives Error
To fix the RAID Controller not detecting RAID hard drives error, follow these troubleshooting steps,

Step 1: Inspect Drives
Semcreserved driver download for windows 10 32-bit. Remove all drives from the RAID stack and connect them to aWindows PC via SATA or SATA to USB converter cables.

Then use a SMART disk monitoring utility such as CrystalDiskInfo or a comprehensive datacare tool like Stellar Data Recovery Technician to get better insights aboutdisk health.
If the drive monitor utility displays poorhealth and SMART warnings, prefer cloning the disk as it may fail in the nearfuture. Immediately skip to Step 3. and reconstruct a virtual RAID to avoid data loss.
In case everything looks fine, continue to withthe below fixes
Step 2: Check/Reset BIOS configuration
Make sure BIOS settings are defined as per the RAID setup.If you observe any recent changes due to BIOS update or corruption, revertthose.
You may also try to update or downgrade your BIOS.
CAUTION: Updating BIOS is safe if it completes successfully. However, downgrading BIOS can be fatal for the system as it can brick your laptop or PC. System BIOS may get corrupt if the downgrade procedure fails in between. So proceed accordingly, at your own risk.
Further, check the SATA Mode selection or similar setting inyour system BIOS to ensure RAID is selected instead of SATA drive.
Step 3: Replace or Try another RAID Controller
If your RAID array is external or network-connected, tryreplacing the hardware controller. Alternatively, you can try anothercontroller to check if the drives are recognized.
This step may not be feasible to many as hardwarecontrollers are not cheap. But there’s a more affordable alternative discussedin the next step that can help you rebuild a virtual RAID array.
Step 4: Reconstruct a Virtual RAID 0, RAID 5, or RAID 6 Array
If you are not able to fix the RAID controller not recognizing drives error, it’s better to reconstruct a virtual RAID with the help of a RAID recovery software. Oppo usb drivers. Follow these steps to rebuild your RAID array and recover or backup your inaccessible data,
Download, install and run Stellar Data Recovery Technician
Choose what to recover and click ‘Next.’
Select ‘RAID Recovery’ under ‘Other Location’ screen and click ‘Scan.’
Click on respective RAID tab and move RAID disks to ‘Move hard drives up/down for disk order’ list box using left-right arrow buttons.
Arrange all disks in the correct order as they were in RAID stack by using the up-down arrow buttons.
Enter or select the required RAID parameters or choose ‘Don’t know …’ option if you don’t remember the required parameters for virtual RAID reconstruction.
Click the ‘Build RAID’ button. Based on entered parameters, the software recreates a virtual RAID construction. Otherwise it creates a few probable RAID constructions
Click the ‘Show Volume List’ button
Select the RAID volume and click ‘Scan’
If the desired files are not found, click on ‘Click Here’ link at the bottom-left to begin a ‘Deep Scan.’
If the RAID volume is not listed, select virtual RAID 0 drive and scan for missing partition(s).
Select the files or folders that you want to recover and then click the ‘Recover’ button
Click ‘Browse’ to choose a save location
WARNING: Do not select RAID drive(s) as a savelocation to avoid overwriting. Select an external HDD or internal hard drivevolume with enough storage space to save recovered data.
Click ‘Start Saving’ to begin saving recovered files at your desired location
Onceyou have recovered your data, go ahead and format the RAID disks. Then recreateyour RAID array with the formatted disks.
In case the raid controller not recognizing drives error arises again, try low-level format or get RAID level storage drive to recreate RAID.
Conclusion
A RAID controller detection works with defined parameters unless any of the predefined settings conflicts or changed due to BIOS misconfiguration, damage, or corruption. Due to this, a RAID controller may fail to recognize the drives.
Further, logical, mechanical, and physical errors including SMART errors can also cause such drive detection error with RAID arrays.
This guide helps you fix all the common problems related to theRAID controller, drives, and software that cause the RAID controller not torecognize RAID drives.
Silicon Image Scsi & Raid Devices Driver Download For Windows 10 64
In most cases, raid controller not detecting drives error can’t be fixed and you may not be able to access your RAID volume even after applying these fixes. In such cases, you must use a powerful and reliable RAID data recovery software such as Stellar Data Recovery Technician that can reconstruct a virtual RAID array and facilitates data recovery from the virtual RAID.
Nov 18, 2019 Pluto TV, a free live TV service, offers enough programming to be useful in a pinch, but you won't get many premium entertainment, news, and sports channels, let alone extra capabilities. Pluto TV Landing Page darren levy 2018-04-20T21:34:02+00:00. Works on Roku, Amazon Fire, Laptops, iOS & Android; Watch Sports, News, Comedy, & Movies. Pluto laptops & desktops driver.
Silicon Image Scsi & Raid Devices Driver Download For Windows 10 Windows 10
The software can rebuild a failed, broken, corrupt, and crashed RAID 0, RAID 5, and RAID 6 arrays even if the critical RAID parameters required for RAID reconstruction are unknown. You can further keep using this software as it also monitors RAID drive health and helps you prevent situations such as RAID controller not recognizing drives error as it proactively monitors disk health and SMART status.
0 notes
Text
Realme Mobile Repair in Delhi
Realme Water Damage Repair
The best way to fix your cracked screen without needing additional damage to this Realme mobile is to deliver it to professional repair support. The trained technicians at Cell Realme Phone Repair may restore your screen quickly and safely. If you see the store immediately so which you can get back to enjoying your phone.
Realme is becoming hugely popular in many countries including India because of its specs and a comparatively low price tag it offers as it is a subsidiary of Oppo which adds to the lowering price tag. But there are just a few trade-offs and resistance against water is just one of them. Since a majority of Realme smartphones are targeting the funding price range, these telephones lack water-resistance and that is why GetDroidTips is here to examine Realme water-damaged tablets if you accidentally drown your phone or spill water on it or even vice versa. Even though you can always report to an agency center, there's a procedure which you could perform on your own to bring the phone back to life, and here is everything you need to know about it.
Realme Mobile MIC Repair
In this post, we're going to offer Basic and advanced procedures to resolve this"MIC Not functioning Problem". Sometimes this problem is caused because of bad MIC (Hardware) but a whole lot of times it is brought on by the Android program or caches.
Sometimes the third-party apps control the way the microphone behaves. Therefore restart your Oppo Realme 2 Guru in protected mode and it will help you. (When you are on safe mode, It Is Going to disable all third-party programs temporally)
Realme Mobile Signal Repair
Among the problems which we can find on our mobile, those that have to do with a policy are the most annoying. Running out of sign means being cut off, so long as we are not under the protection of a Wi-Fi network. Furthermore, our data connection will likewise be impacted. That is why we wanted to determine how to address these problems in Realme mobiles.
Failures with the policy of our Realme phone can appear when we least expect it. Its causes can be very varied, being ourselves the culprits or any third-party app. It can also be due to certain difficulties with our operator or in spite of the SIM card. In this way, we can totally lose the signal or it's too weak to ensure the quality of calls and cellular data.
In this case, the policy signal does not appear anywhere, that is, we will notice an"x" that will show that there are issues with the signal. In this case, we will have several options in our hands to attempt and take care of the issue.
Realme Motherboard Repair
Without it, your phone wouldn't have the ability to work. It is, in actuality, that the heart of your entire apparatus like a CPU is obviously a pc.
The circuit board retains together multiple crucial sections of your cellphone. Let's say your heart fails. What happens afterward? Your system stops moving and you're considered as dead. In the same way, if your motherboard gets damaged somehow, your device will quit functioning. Therefore it is important to identify if your phone is malfunctioning because of a faulty motherboard. However, it's not an easy task to fix your phone's circuit board. Fortunately, our specialists at Hitec Mobile can quickly figure out what is causing your telephone to malfunction and fix it accordingly in virtually no time.
Realme Display Damage Repair
All smartphones come with a massive display nowadays and the larger the screen, the higher the odds of you damaging your smartphone screen when it accidentally slips from your grip. In fact, the very first question to cross our minds when we hold a recently launched phone is, "The best way to protect the screen?"We wouldn't say there are techniques to completely save your cellphone's display from breaking but yes, there are ways to protect your smartphone display from harm.
Realme Dead Phone Repair
How to Revive a Dead Android phone if there's a charger near you, catch it, plug it in, and hit the power button. The battery might just be dead since it is not due to faulty batteries losing charge abruptly. Once the cable has been plugged into the telephone, it should have the ability to begin. If your phone has lights for alarms, this is a fantastic way to understand if the charging indicator comes on. The least that means that the circuit from the USB to the main port is working fine. If it works, then you might just have a broken battery, which can be readily replaced, but if that still doesn't, then it’s time to take some drastic steps.
It is possible that your phone is only with a system hang, and in rare circumstances, Android programs have been proven to freeze quite badly, so badly that even by pressing the power button, there's absolutely no response. Once the battery is plugged in again, check if your phone can get to restart. If the phone still does not boot up, take a look at the battery compartment, there'll be a little square of what seems like white paper embedded within this region. This is actually the moisture index and if it has turned pink or pink even partially, this implies your phone has been subjected to water and it means that your warranty is taken and the phone is dead.
Realme Camera Repair
Smartphones are unique with their quality cameras at a very reasonable cost. Realme goals the common people with the best-in-class facilities at a very reduced price. However, are you frustrated with any flaws in the camera? Can not enjoy taking selfies just as before? Stay trendy, the expert mobile service technicians of Realme Mobile Service Center Delhi is here to help you. Mobile service center Delhi provides the ideal support apt for the Realme Smartphone camera at Delhi.
Camera Service Center Delhi substituted your faulty cellphone camera using the original Realme camera of the best quality from our shops with the best warranty. So, why wait patiently without capturing your memorable occasions, if the very best Realme phone camera support in Delhi is out here. Contact Realme service center in Delhi for almost any questions, for we are should assist you.
Now boost up your selfies using cellular camera replacement solutions! Long-term usage and if it is rough and hard, it may make your mobile phone act wild. Most commonly the quantity buttons may not work or only fall off because of continuous use. This is not at all a serious problem as support center Delhi is here to repair your problem. Fix center Delhi resolve every issue about your Realme mobile phone and spare parts. Make us a call for rapid and pleasing service from our licensed workers.
Realme Battery Restoration
If there's something in a cell telephone that gets damaged in most cases, it needs to be the battery life. Many mobiles come with good excellent battery life, but just like any other digital product, the battery of a smartphone can have problems at any time. It is obviously frustrating when your telephone suddenly switches off because of faulty battery issues. Generally, a mobile telephone's battery goes completely dead or does not hold a charge however long you put it upon charging. If that's also the case with your Realme mobile phone, then it's far better to opt for Realme cell battery replacement.
To get the battery for the Realme phone repaired, you should pay a visit to the authorized mobile service center in town. They have highly skilled mobile repair technicians that provide battery problem-related aid and other help. You can take the device to their service center and ask to repair the battery or elect for a new battery replacement if the telephone is in warranty. They will most likely keep the telephone in the center for a couple of days because ordering spare components takes time.
To get the battery for the Vivo phone repaired, you should pay a visit to the authorized mobile service center in town. They have highly skilled mobile repair technicians that provide battery problem-related aid and other help. You can take the device to their service center and ask to repair the battery or elect for a new battery replacement if the telephone is in warranty. They will most likely keep the telephone in the center for a couple of days because ordering spare components takes time.
0 notes
Photo
New Post has been published on https://magzoso.com/tech/vivo-u10-review/
Vivo U10 Review
Following the positive reception that the Vivo Z1 Pro (Review) was met with, Vivo is continuing its new push into the online-only space with a lower priced model, the new Vivo U10. The entry-level space is where every little additional feature that you can get for your money really matters, and there’s no shortage of companies trying to outdo each other. It isn’t uncommon now to expect multiple cameras, mid-range processors, and high-quality construction even if your budget is capped below Rs. 10,000. Of course the Vivo U10 will have to work very hard to compete with Xiaomi’s Redmi and Redmi Note devices, as well as several models from Realme, Samsung, Nokia, Honor, and more.
Vivo wants to stand out in this space with a few tricks that aren’t common at this price level – at least not all together. The Vivo U10 has three rear cameras, a 5000mAh battery, 18W fast charging support, and a Qualcomm Snapdragon 665 processor. Still, a phone isn’t just the sum of its specifications. We’re going to put this newly launched model through its paces to see how well Vivo has done, and whether you should consider buying the Vivo U10.
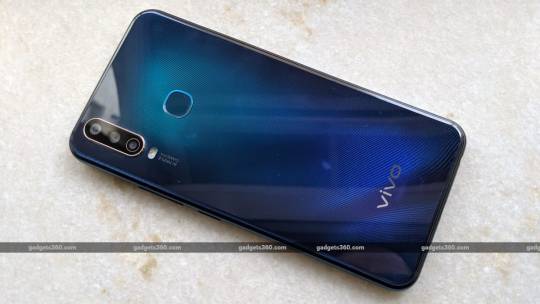
Vivo U10 design
Not a lot has changed for Vivo over the past few launches, and the company has maintained a consistent look across its recent models. The Vivo U10 is somewhat bulky and boxy, with a flat rear but rounded sides. This phone is definitely a handful at 8.92mm thick and 190.5g in weight, and some people might find it too unwieldy for everyday use. That’s despite having a 6.35-inch screen, which isn’t too huge by today’s standards.
Our review unit is the Electric Blue variant, which of course has a bold gradient on the back. There’s a light shade of blue radiating outwards from the fingerprint sensor and a darker one around the Vivo logo at the bottom, both of which fade into a deep navy blue around the border of the phone. The finish of the rear isn’t slippery at all, which does help with usability. This phone is also available in plain black for those who prefer to go low-key.
There’s a waterdrop notch at the top of the screen, and a pretty thick chin below it. Our test unit came with a pre-applied plastic screen protector. The rim around the sides of the phone has a shiny, colour-coordinated finish but is clearly plastic and not metal.
The camera module is surrounded by a gold metal rim, but thankfully doesn’t stick out very much. Thankfully, the fingerprint sensor doesn’t require too much of a stretch to reach. The power and volume buttons are on the right, while the SIM tray is on the left. There’s a Micro-USB port, a 3.5mm audio socket, and a speaker on the bottom.
Vivo seems to have used decent quality plastic, and we have no issues with the construction quality of this phone. It feels as though it should be able to withstand rough treatment, but there are no guarantees of toughness or reinforced materials to keep it safe in case it falls.
The company gives buyers a simple plastic case, a USB cable, an 18W charger, and a SIM eject pin in the box, in addition to the pre-applied screen protector. There’s no headset, but that shouldn’t be a problem for anyone.
The Electric Blue version of the Vivo U10 has a gradient pattern, but this phone is also available in black
Vivo U10 specifications and software
We start with the Qualcomm Snapdragon 665 SoC, which is a very recently launched chip. We’ve so far seen it on a few phones in the sub-Rs. 15,000 segment such as the Xiaomi Mi A3 (Review) and Oppo A5 (2020). It’s also the same chip that powers the Realme 5 (Review), a competitor to this phone in the sub-Rs. 10,000 market. This means that performance should be pretty impressive.
The 6.35-inch screen has an HD+ resolution of 720×1544 pixels, which is expected. Vivo has used an IPS panel. There’s dual-band Wi-Fi, Bluetooth 5, GPS, and all the usual sensors including a compass and gyroscope. The battery capacity is 5000mAh, and as mentioned earlier, 18W fast charging is a headlining feature. The tray on the left has slots for two Nano-SIMs as well as a microSD card.
You have three choices of configurations: 3GB of RAM with 32GB of storage for Rs. 8,990; 3GB of RAM with 64GB of storage for Rs. 9,990, and 4GB of RAM with 64GB of storage for Rs. 10,990. That’s a lot of options, but at the cost of confusion, we like that you can step up in small increments and buy the best configuration that your budget will allow. We’re reviewing the top-end variant of this phone.
It’s impressive that nothing major is missing from the Vivo U10, even though the base price is well below Rs. 10,000. Some models at this level don’t feature fingerprint sensors or gyroscopes, for example, but you get all the basics plus extras such as fast charging and three rear cameras.
As for software, we have Vivo’s Funtouch OS 9.1, a slightly updated version of the highly customised skin running on top of Android 9. As we’ve said many times before, Funtouch OS deviates extensively from the stock Android look and feel, and we find much of that unnecessary. This is sure to be a polarising factor for buyers and users. Nothing much is different on the new Vivo U10, other than a system-wide dark mode – teasers of a new desaturated aesthetic and cleaned-up UI elements do not seem to have made it to this version.
In short, there are a few major points to note. You have to swipe upwards from the bottom of the screen to pull up all the quick shortcuts and toggles, and even then the layout is confusing. Vivo promotes its own smart assistant, called Jovi Smart Scene, but it’s pretty much just a screen to the left of the first home screen with panels for the weather, calendar events, and news updates with some promoted content thrown in. Your lock screen will show random photos and advertising messages each time you wake the U10 from sleep unless you disable this.
That said, Funtouch OS does have lots of useful features including screen recording, app cloning, gestures, shortcuts, and a bike mode. You can read about version 9 in great detail in our coverage of the Vivo Y17 (Review), Vivo Z1 Pro (Review), and Vivo S1 (Review).
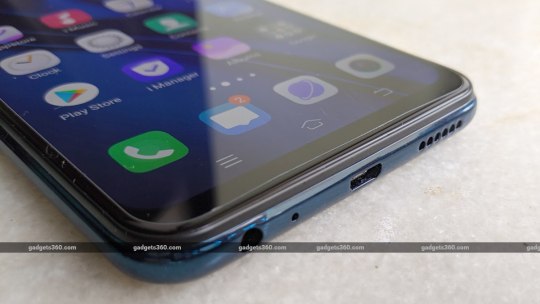
There’s a Micro-USB port, 3.5mm audio socket, and speaker on the bottom
Vivo U10 performance
While we aren’t really thrilled with Funtouch OS, it didn’t seem to slow down the Vivo U10 in day-to-day usage. Some of the animations are a bit slow, which can be annoying. For example, it takes a second or two after unlocking the phone for the Android navigation buttons to slide up into view. Apps might take a moment or two to load fully, but that’s the only kind of lag we experienced. We like to have realistic expectations of budget phones, but Vivo has exceeded them. If you’re using a sub-Rs. 10,000 model from a couple of years ago, the Vivo U10 will seem like a huge upgrade.
Gaming performance is a big factor for much of the young audience that Vivo is targeting. PUBG Mobile surprised us by defaulting to the Low graphics quality preset, and while gameplay was smooth, the visual quality was sorely lacking. The upper rear barely got warm, which was good. Things looked a bit better in Balanced quality mode and the game was still smooth, but the usual HD mode was seemingly unsupported on this device. Asphalt 9: Legends was playable but we did see some stuttering in races, especially with multiple cars on screen.
Our impressions are backed up by benchmark tests. AnTuTu gave us a score of 138,817 and Geekbench 5’s single-core and multi-core results were 317 and 1,422 respectively. 3DMark put up scores of 1,809 in the Slingshot Unlimited test and 23,760 in Ice Storm Unlimited. GFXBench managed 51fps in the T-rex scene and 27fps in Manhattan 3.1.
The large size and HD resolution of this display mean that it isn’t really sharp, and we noticed that text was not as crisp as we would have liked. However, it can get very bright and we had no complaints with the colours or viewing angles. Video looks great and even the single speaker is good enough for music and voices as long as you don’t try to push the volume up beyond the three-quarter mark or so. Interestingly, this phone is Widevine L1 DRM compliant for HD video streaming.
Battery life was truly impressive. We sailed through a full day with quite a bit of gaming and camera use along with an hour of video streaming and some general Web surfing. At night, we still had over 40 percent left. We could easily get a day and a half from a single charge, and careful usage could see that stretch to two full days. Our HD video loop test ran for 17 hours, 58 minutes. On the other hand, despite Vivo shipping an 18W charger in the box, we only saw the battery level rise to 8 percent in 10 minutes and 61 percent in an hour.
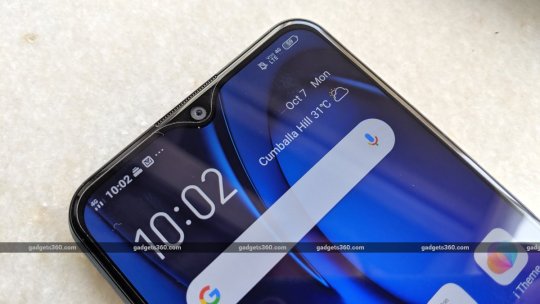
There’s a waterdrop notch at the top of the 6.35-inch HD+ IPS screen
As upbeat as we’ve been about some aspects of this phone, testing the cameras of the Vivo U10 quickly brought us back down to earth. On the back of the device, we have a 13-megapixel primary camera and 8-megapixel wide-angle one, both with f/2.2 apertures. There’s also a 2-megapixel depth sensor and a flash. The front camera is an 8-megapixel f/1.8 unit.
Photo quality is just about average for a phone in this price range. Starting of course with the primary camera, close-ups shot under sunlight did come out looking good with reasonably good detail and exposure. There was no jarringly artificial colour, and HDR seemed to work well. The wide-angle camera also produced good results without much distortion. In portrait mode, it takes a while for the phone to work out what needs to be blurred and what doesn’t, and the results could be good if we were willing to wait.
Things go downhill at night though. Details were blotchy and dull. Focusing took a while and even then, there was no guarantee it would be accurate, often requiring multiple attempts. Even close-ups could be hard to manage. Interestingly, the wide-angle camera worked better sometimes despite having poorer specifications, simply because it can let more light in to work with.


Tap to see full-sized Vivo U10 photo samples
Video is recorded at 720p by default, which surprised us a little. You can manually go up to 1080p. There doesn’t seem to be any form of stabilisation, and our clips were shaky, to say the least. You can’t switch between cameras while shooting. We noticed warping at the edges of wide-angle video, and a yellowish colour tone that wasn’t in our stills. Video taken at night was barely usable at all.
The front camera does a decent job in the daytime and in low light, though again things aren’t great. You might just about be able to share some of these shots on social media.
Verdict
It seems as though going online-only has allowed Vivo to deliver some seriously competitive hardware on a very tight budget. The Vivo U10 performs admirably and looks pretty slick. We often felt as though we were using a phone that was in a higher price bracket. On the other hand, it’s bulky and awkward to use, with a UI that we really think needs to be toned down.
The headlining features – three rear cameras and 18W fast charging – will definitely make the competition sit up and take notice. On paper, they’re impressive. In practice though, the cameras are just serviceable and charging still takes a relatively long time.
We like the Vivo U10 for its performance and battery life. The display and overall look are great for such a low-priced phone, but you can do better, especially if you’re budgeting for the higher priced variants.
There’s sure to be a battle between this phone and Xiaomi’s upcoming Redmi 8 series. Stay tuned to Gadgets 360 to see how that turns out.
0 notes
Text
How to Fix Oppo F1S Screen Flickering Issue

Stop Screen Flickering in Oppo F1S
Fix Oppo F1s Screen Flickering Issue, So do you want to the Best way to Stop the Screen Flickering Issue in Oppo F1S? if yes then you are at right Place, If you are at this post you might be facing problems while using your Oppo Device? You are trying to operate it but it is Flickering and you are Unable to Just Given commands on Screen. So make sure you follow this Guide till end. So it happens many times when we are using our Android phone and Suddenly it starts behaving Weirdly, You try to operate your smartphone from fingers but the touch becomes unresponsive, Now to solve this issue you Start turning off your smartphone and Perform hard reset but nothing Works? No worries in this article today we will show you the Best way to Stop Screen Flickering in Oppo F1s, But before that lets have a Quick Look at the specifications of the smartphone and After that We will head over to Possible reasons why Screen of your Oppo F1s is fluctuating and How you can Get Rid of that issue. Oppo F1s comes with a 5.5 inch display having 720X1280 pixels resolution and 267 Ppi density, under the hood of the device there is Mediatek octa core processor coupled with 4Gb of ram. The smartphone comes with 16Mp front selfie camera whereas 13Mp camera unit is placed at back, Coming to the software so the smartphone runs on Android 6.0 Marshmallow.
Fix Screen Flickering Issue in Oppo
Oppo F1s Touch Screen Flickering Fix
So if you are at this Part of guide it might be possible that you are facing Difficulty in using your android Phone and you are looking for a Fix. But Before we head over to the fix lets have a Quick look at the Possible reasons why your android Started flickering issue. Moisture in Oppo F1s So moisture in Oppo F1s can also Cause Touchscreen Flickering, Sometimes it happens that we accidentally Drop our Smartphone in Water and as an Result the Screen of our Oppo 3 Start's Malfunctioning. So if you also Dropped your smartphone in Water and you are facing Screen Flickering Issue you can Follow this Guide on Fix Moisture Detected Error on Android Devices . So after you follow this Guide you can Easily Solve Moisture problem in your Oppo F1s. Touch Screen Crack Oppo F1s Fix So Next and Major Reason why your oppo F1s is not working properly is simply that the touch Screen on your Oppo F1s has cracked and as a Result you are facing the Screen Flickering Issue. Now to fix this issue you have to Get your Oppo F1s fixed by Any Professionals. Oppo F1s Touchscreen Calibration So If you ever used any Samsung Device you Might Know about the term Touchscreen calibration. Now when you keep on using your phone for long time it need's screen calibration and also you have to Change some settings which can Increase and Decrease the Sensitivity . For this you can simply Follow this Guide to Make Android touchscreen Smooth Without root. After that you Will Feel Difference in the Input of Touchscreen. Oppo F1s Touchscreen Automatically Working So you Might Have Noticed that Whenever you try to Charge your Oppo F1s your Touchscreen Starts automatic Respond and as an Result it also Starts Flickering Issue. So to Get Rid of this All You need to Do is Just Pull Out your Smartphone from the Charging Jack and then Check if the Screen is working perfectly or not. Oppo F1s Screen Not Responding To Touch So Most of the users also complained that there Screen Stops Responding to Touch, Now if this is the same case with you All you need to Do is just Restart your Android Device. Incase if that also Doesn't Works then you can Try Hard Turn off.
Fix Oppo F1s Touch Screen Flickering Problem
So above we have given some of the possible Reason's on Why Your Smartphone might have Flickering problems, Now coming to the Fix and solution of this So below are some of the tested Fix which you can also try on your Phone and get it Fixed at home itself. Restart Your Android Device So this Method works most of the Time and all you need to Do is just turn off your Android phone. As soon as you restart your android device you will notice that your phone will start Working Normally. Boot Your Device into Safe Mode If you are Familiar with android You Might know that Android has many third party Applications installed which keep Running in the Background. Now if this the Same Case with you then there are possible chances that your Screen Starts flickering So in order to Solve that All you need to Do is Just boot your Device in Safe Mode, After you boot your device in safe mode all the third party applications will Stop and hence you can use your device without any problem. Disable Auto Brightness To Solve Oppo F1s Screen Flickering Issue You Can Disable Auto brightness and then check if your Device is Working properly or Not, Most of us have a habit to Keep the Auto Brightness Option turned on in our Display. Now What happens when we have Enabled The Auto brightness is that the display keep's Adjusting the brightness on Scree automatically. Now the thing which creates a problem here is sometimes because of Continuous increase and decrease in brightness the smartphone itself starts Inducing Screen Flickering issue. So the another thing you can Do to Fix Oppo F1s screen flickering issue is simply Disable Auto Brightness. Enable Developers Option on Oppo F1s Step 1: To Enable Developers option in Oppo F1s all you need to do is Go to settings> Build Number > Tap on Build Number for 7 times> after you Tap on Build Number for 7 times Developer option Will Be enabled Automatically. Now Next thing you have to Do is Enable Hardware overlays. Step 2: So First of all Head over to the settings and Open Developer Options and head over to Drawing. Step 3: Now You will see another option Show Surface updates, Tap on that and Just check if it is Enabled or not. Step 4: Now You have to Search for Hardware acceleration option, By Default it is Disable to get Good battery backup but sometimes it is also the reason behind the screen Flickering problem in Oppo F1s. So once you Find it just tap on Enable and thats it !!! . By Doing the Above things you will Solve the Screen Flickering Issue on Oppo F1s. Oppo F1s Service Center So if all the above steps Doesn't work for you then you should Seek a professional, Sometimes this error is not about Software it's all About Hardware and only Oppo F1s Service center professionals can fix this. So all you need to do is just check the nearest oppo Service center and take your Device. Features of Oppo F1s

Oppo F1s Was launched in 2016 August Oppo F1s Comes with 5.5" Inch Display having 267 PPI Oppo F1s comes with Corning Gorilla Glass 4 Oppo F1s Comes with ColorOS 3 Based on Android 6.0 Marshmallow, Now Following this Guide you can Update Oppo F1s to Android 9.0 Pie. Also Read: How To Update Oppo F1s to Android 9.0 Pie So this was all About How to Fix Screen Flickering Issue in oppo F1s, We hope this Guide helped you. Incase if you have any Doubt feel free to Write Down in the comments section below. Also Consider out checking Some other articles on Rootupdate. Read the full article
0 notes
Text
CS Tool Latest Version Full Setup File Download 2019

For many MTK device users cs tools can be of a great help. Flashing your phone, reading phones SW/HW info’s, unlocking the phone, installing firmware and many other MTK or SPD device task is possible with this tool. Finding and downloading the drivers is not that of a big deal. The hardest part is to setup the required files. So now, how to do that? This content is going to show you that.
About CS Tool Driver
CS tool driver or CS toolbox mainly act as a phone servicing solution. The tool can fix many problems of MTK and SPD devices. What are the main features? Let's have a check on them.You can flash, repair, phone codeRead the phone HW/SW InformationRead Full firmware and also the user contentWrite a full FirmwareFormat your phoneFactory Default settings optionRepair ImeiRead/write Flash up to 64GBRead the phones lock optionWhats Latest For CS ToolAdded SupportMTK 6763/6367T Added Support * Read Info * Read android Properties * Read Flash FW (CST Format) * Write Flash FW (CST Format) * Write Factory FW **** Download + Rebuild Partition table * Format Phone * Repair ImeiSPD SC9820 Added Supported * Read Info * Read android Properties * Read Flash FW (CST Format) * Write Flash FW (CST Format) * Write Factory FW (Pac Format) *** Pac Writing Options **** Download + Rebuild Partition table * Format Phone * FRP * Repair Imei * MTK Signed Mode Flashing Revised for All eMMC Phones * MTK Safe Format Revised * MTK Format Revised (Select Encrypted Partition If Required) * MTK FRP Revised to New Method * SPD FRP Revisied & Support * FRP Reset Revisied for Qualcomm * Oppo A83/F5 youth/F5 Added Support (Select Oppo TAB, Common MTK) * Vivo V75 & other MTK6763 (Select Vivo TAB , Common MTK) * Meizu M6 Added support * Meizu M6 qualcomm Added SupportCs-tool 1.60 is currently the latest version. You can download the file from online. Installing the file on any version of the Windows is possible.Popular Post:Miracle Box Latest Setup File DownloadSamsung FRP Tool For PC CS tool download Downloading the latest version of the tool is not that of a hassle. Search the tool driver and just one click on the website will start the downloading process. So, just clicking onto the provided download link will do the job for you. If you download Cs tool crack than you might need to extract the downloaded file later on.
CS Tool Dongle Setup
After downloading the tool, you need to set up the application on your computer. The driver always supports on MTK CPUs. Now how to set up the file? Check out the process down below.Click onto the downloaded file and extract the file using WinRAR or any other app.Many websites come with cs tool cracks. So they will provide you more than one file. In that case, you need to make 2-4 files and copy each of the files into the parts.Make sure you have disabled your PC's antivirus. Otherwise, you won't be able to install the file.Click onto the setup.exe application file to start the installation.When the user license agreement page comes, select the I agree with all the agreements and condition.The installation will begin shortly.When the installation is over, click on the finish button to close the installation Wizard.Now, connect the PC with your MTK device using a USB driver. CS-Tool Setup File Download Link

Conclusion Day by day the urge of connecting MTK devices to the computer is increasing. The reason is that people like to customize the phone or collect information from dead phones. Upgrading the phones operating system, flashing it and with many more options, CS tools need to be updated. Now, with all that in mind, there comes a possible question about downloading the files. After that, you need to set up the file. We mainly tried to talk about all these. Hope, now you will be able to download and install the file on your computer. Read the full article
0 notes
Text
How to Fix Oppo F3 Screen Flickering Issue
Stop Screen Flickering in Oppo F3
Fix Oppo F3 Screen Flickering Issue, So do you want to the Best way to Stop the Screen Flickering Issue in Oppo F3? if yes then you are at right Place, If you are at this post you might be facing problems while using your Oppo Device? You are trying to operate it but it is Flickering and you are Unable to Just Given commands on Screen. So make sure you follow this Guide till end. So it happens many times when we are using our Android phone and Suddenly it starts behaving Weirdly, You try to operate your smartphone from fingers but the touch becomes unresponsive, Now to solve this issue you Start turning off your smartphone and Perform hard reset but nothing Works? No worries in this article today we will show you the Best way to Stop Screen Flickering in Oppo F3, But before that lets have a Quick Look at the specifications of the smartphone and After that We will head over to Possible reasons why Screen of your Oppo F3 is fluctuating and How you can Get Rid of that issue. The Oppo F3 comes with a 5.5 inch Display, having resolution of 1080X1920 Pixels and a Pixel density of 401PPI, under the hood of the smartphone there is Mediatek MT6750 28NM processor coupled with 4GB of ram. Coming to the other features of the Phone Such As Camera and Battery So the Oppo F3 comes with 13Mp primary camera unit whereas a 16Mp + 8Mp Dual camera unit is placed at the front Side. Under the hood of the smartphone there is 3200 mah Non-Removable battery.
Fix Screen Flickering Issue in Oppo F3
Oppo F3 Touch Screen Flickering Fix
So if you are at this Part of guide it might be possible that you are facing Difficulty in using your android Phone and you are looking for a Fix. But Before we head over to the fix lets have a Quick look at the Possible reasons why your android Started flickering issue. Moisture in Oppo F3 So moisture in Oppo F3 can also Cause Touchscreen Flickering, Sometimes it happens that we accidentally Drop our Smartphone in Water and as an Result the Screen of our Oppo 3 Start's Malfunctioning. So if you also Dropped your smartphone in Water and you are facing Screen Flickering Issue you can Follow this Guide on Fix Moisture Detected Error on Android Devices . So after you follow this Guide you can Easily Solve Moisture problem in your Oppo F3. Touch Screen Crack Oppo F3 Fix So Next and Major Reason why your oppo F3 is not working properly is simply that the touch Screen on your Oppo F3 has cracked and as a Result you are facing the Screen Flickering Issue. Now to fix this issue you have to Get your Oppo F3 fixed by Any Professionals. Oppo F3 Touchscreen Calibration So If you ever used any Samsung Device you Might Know about the term Touchscreen calibration. Now when you keep on using your phone for long time it need's screen calibration and also you have to Change some settings which can Increase and Decrease the Sensitivity . For this you can simply Follow this Guide to Make Android touchscreen Smooth Without root. After that you Will Feel Difference in the Input of Touchscreen. Oppo F3 Touchscreen Automatically Working So you Might Have Noticed that Whenever you try to Charge your Oppo F3 your Touchscreen Starts automatic Respond and as an Result it also Starts Flickering Issue. So to Get Rid of this All You need to Do is Just Pull Out your Smartphone from the Charging Jack and then Check if the Screen is working perfectly or not. Oppo F3 Screen Not Responding To Touch So Most of the users also complained that there Screen Stops Responding to Touch, Now if this is the same case with you All you need to Do is just Restart your Android Device. Incase if that also Doesn't Works then you can Try Hard Turn off.
Fix Oppo F3 Touch Screen Flickering Problem
So above we have given some of the possible Reason's on Why Your Smartphone might have Flickering problems, Now coming to the Fix and solution of this So below are some of the tested Fix which you can also try on your Phone and get it Fixed at home itself. Restart Your Android Device So this Method works most of the Time and all you need to Do is just turn off your Android phone. As soon as you restart your android device you will notice that your phone will start Working Normally. Boot Your Device into Safe Mode If you are Familiar with android You Might know that Android has many third party Applications installed which keep Running in the Background. Now if this the Same Case with you then there are possible chances that your Screen Starts flickering So in order to Solve that All you need to Do is Just boot your Device in Safe Mode, After you boot your device in safe mode all the third party applications will Stop and hence you can use your device without any problem. Disable Auto Brightness To Solve Oppo F3 Screen Flickering Issue You Can Disable Auto brightness and then check if your Device is Working properly or Not, Most of us have a habit to Keep the Auto Brightness Option turned on in our Display. Now What happens when we have Enabled The Auto brightness is that the display keep's Adjusting the brightness on Scree automatically. Now the thing which creates a problem here is sometimes because of Continuous increase and decrease in brightness the smartphone itself starts Inducing Screen Flickering issue. So the another thing you can Do to Fix Oppo F3 screen flickering issue is simply Disable Auto Brightness. Enable Developers Option on Oppo F3 Step 1: To Enable Developers option in Oppo F3 all you need to do is Go to settings> Build Number > Tap on Build Number for 7 times> after you Tap on Build Number for 7 times Developer option Will Be enabled Automatically. Now Next thing you have to Do is Enable Hardware overlays. Step 2: So First of all Head over to the settings and Open Developer Options and head over to Drawing. Step 3: Now You will see another option Show Surface updates, Tap on that and Just check if it is Enabled or not. Step 4: Now You have to Search for Hardware acceleration option, By Default it is Disable to get Good battery backup but sometimes it is also the reason behind the screen Flickering problem in Oppo F3. So once you Find it just tap on Enable and thats it !!! . By Doing the Above things you will Solve the Screen Flickering Issue on Oppo F3. Oppo F3 Service Center So if all the above steps Doesn't work for you then you should Seek a professional, Sometimes this error is not about Software it's all About Hardware and only Oppo F3 Service center professionals can fix this. So all you need to do is just check the nearest oppo Service center and take your Device. Some Points About Oppo F3

Samsung Galaxy Oppo F3 Was Launched in November 2016 Oppo F3 Was one of The Very First Device from Oppo to Come Up With Moon Light Selfie Camera. Oppo F3 Comes with 5.5 inch Display Having 1080X1920 Display Oppo F3 Was launched in May 2017. Oppo F3 Comes with Corning Gorilla Glass 5 Which protects the smartphone from Deep Scratches. Also Read: How To Update Oppo F3 to Android 9.0 Pie So this was all About How to Fix Screen Flickering Issue in oppo F3, We hope this Guide helped you. Incase if you have any Doubt feel free to Write Down in the comments section below. Also Consider out checking Some other articles on Rootupdate. Read the full article
0 notes