#how to install gutter downspout
Explore tagged Tumblr posts
Visit Tumblr Blog
Explore Tumblr blogs with no restrictions, modern design and the best experience.
Last Seen Tumblr Blogs


Fun Fact
Hackers stole 65M passwords from Tumblr in 2013.
Text
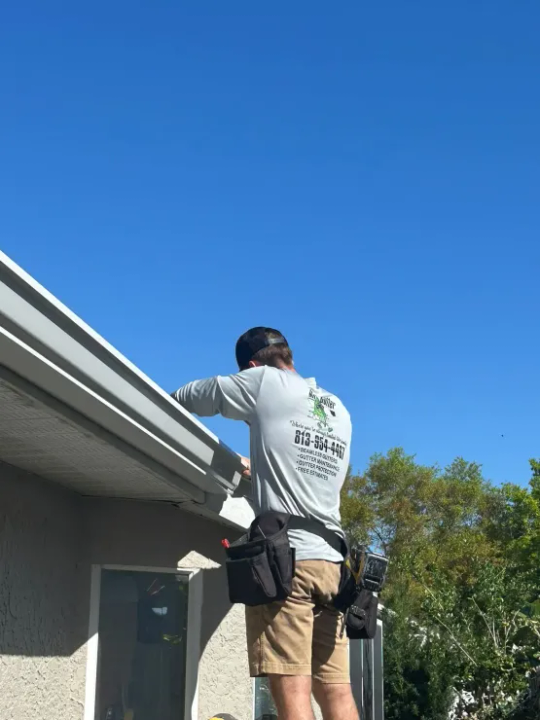
Installing Downspouts? 3 Tips and Common Mistakes to Avoid

Learn essential tips and avoid common mistakes when installing downspouts with our helpful guide. Discover how to properly install gutter downspouts and avoid costly errors that could compromise your drainage system. Whether you're tackling downspout installation yourself or hiring a professional, we provide valuable insights to ensure a successful project. From understanding the process to estimating the cost to install downspouts, we cover all aspects of downspout installation. Trust our expertise to guide you through the process and help you achieve effective water management for your home.
0 notes
Text
How to Stop Water from Pooling on a Patio?
So, you've got a patio—your little slice of the outdoors where you sip coffee in the morning, grill burgers on the weekends, or just stretch out and soak up the fresh air. But then it rains, and suddenly, you’re dealing with puddles, mud, and maybe even some slippery spots. Not exactly the relaxing vibe you were going for, right?
Water pooling on a patio isn’t just an eyesore—it can lead to structural damage, mold, and even safety hazards. The good news? You don’t have to live with it. Whether you're dealing with minor puddles or a full-on mini lake, there are plenty of ways to fix the issue.
Let’s break down why this happens and, more importantly, how you can stop it.
First, Why Does Water Pool on Your Patio?
Before you grab a shovel or call in the pros, it helps to understand what’s causing the problem. Here are the usual culprits:
Poor Drainage – If your patio isn’t built with a slight slope, water has nowhere to go.
Soil Settling – Over time, the ground beneath your patio can shift, creating low spots where water collects.
Clogged Drains or Gutters – If water isn’t flowing away properly, it’s bound to find a new home—on your patio.
Paving Material Issues – Some materials absorb water, while others cause it to pool on the surface.
Surrounding Landscape – If the area around your patio doesn’t allow for proper drainage, water can back up and collect.
Alright, now that you know the why, let’s tackle the how.
Quick Fixes for Small Water Puddles
If you only have minor pooling in certain areas, you might not need a major overhaul. Here are some quick solutions:
Sweep It Away (Temporarily)
If water is just hanging out in small puddles, a broom or squeegee can push it off. Obviously, this isn’t a permanent fix, but it works in a pinch—especially after a light rain.
Drill Drainage Holes (For Concrete Patios)
For concrete patios that hold water in specific spots, a few well-placed drainage holes can help. Use a masonry drill bit to create small holes in low areas so water can escape into the ground below.
Apply a Waterproof Sealer
Some patio surfaces absorb water, worsening the pooling problem. A waterproof sealer helps by repelling water, making it bead up and roll off rather than soak in.
Long-Term Solutions to Stop Water Pooling
If your patio regularly turns into a wading pool, it’s time for more serious solutions. Here’s what you can do:
1. Adjust the Slope
Water needs a path to flow away. Ideally, patios should have a slope of about 1/4 inch per foot leading away from your house. If yours is flat or slopes the wrong way, you might need to:
Resurface with a sloping layer of concrete
Use a self-leveling compound (for minor adjustments)
Rebuild sections of a paver patio to create proper runoff
2. Install a French Drain
A French drain is essentially a gravel-filled trench with a pipe that redirects water away from problem areas. It’s a great option if your yard naturally collects water, and it works well for patios that are set lower than the rest of the yard.
3. Add a Drainage Channel
If water tends to collect at the edge of your patio, a channel drain (also called a trench drain) could be the answer. These are narrow drains set into the patio surface, directing water to a more suitable drainage area.
4. Replace Solid Surfaces with Permeable Pavers
Solid concrete or stone patios don’t let water pass through, leading to runoff and pooling. Permeable pavers (like gravel-filled grids, porous bricks, or spaced-out pavers with drainage gaps) allow water to soak into the ground instead.
5. Improve Gutter and Downspout Placement
Sometimes, the problem isn’t the patio—it’s the water coming from your roof. Check if your gutters and downspouts are directing rainwater straight onto your patio. If they are, adding downspout extenders or rerouting them can help.
6. Landscape for Better Drainage
If your patio is surrounded by heavy, compacted soil, water won’t drain properly. Consider:
Adding gravel or river rock around the edges for better absorption
Planting water-loving plants (like ferns, hostas, or native grasses) to help absorb excess moisture
Creating a rain garden—a landscaped area designed to collect and slowly absorb runoff
What If You’re Building a New Patio?
If you’re in the planning stages of adding a patio, designing for proper drainage from the start will save you a ton of headaches later. Here’s what to keep in mind:
Pick the right material – Permeable pavers or concrete with drainage gaps are best.
Ensure a proper slope – Even a small incline (1-2%) makes a big difference.
Plan for drainage – French drains, gravel beds, and downspout placement all matter.
When to Call in the Pros
Some drainage issues can be tackled with a bit of DIY effort, but if your patio is sinking, constantly flooding, or affecting your home’s foundation, it’s time to bring in a professional. A contractor can help with:
Regrading your patio or yard
Installing a full drainage system
Lifting or replacing sunken pavers
Addressing major erosion issues
Final Thoughts
Water pooling on a patio isn’t just annoying—it can lead to bigger problems like mold, cracks, and foundation damage. Whether it’s a simple fix like sealing the surface or a bigger project like installing drains, there’s always a way to get rid of those puddles for good.
Need expert help? If you're in South Bend or the surrounding areas, Screenmobile of South Bend can help with custom patio solutions, including enclosures, screens, and upgrades that enhance your outdoor space—without the water mess.
Don't let rain ruin your patio—get the right fix today!
7 notes
·
View notes
Text
How Do You Prevent Corrosion in Residential Metal Roofing?
When it comes to home improvements, you want your upgrades to last, especially in a climate like the Pacific Northwest, where rain is common. If you’re considering residential metal roofing, you’re already on the right path to durability and longevity. However, one concern you may have is corrosion. So, how do you prevent corrosion in residential metal roofing? Let’s dive into practical tips and insights that will help you protect your investment for years.
Understanding Residential Metal Roofing
Before discussing corrosion prevention, it's important to understand residential metal roofing. Metal roofing is designed for strength and longevity and is typically made from various metals like steel, aluminum, or copper. While it's renowned for its durability against extreme weather conditions, it can still be affected by corrosion if not properly maintained. So, what can you do to safeguard your metal roof from this potential issue?
Choose the Right Material
The first step in preventing corrosion is to choose the right type of metal for your roofing. Different metals have varying resistance to corrosion:
Galvanized Steel is steel coated with zinc, which provides a protective barrier against rust.
Galvalume Steel is similar to galvanized steel but contains a mix of zinc and aluminum, enhancing its corrosion resistance.
Aluminum: Naturally resistant to rust, aluminum is an excellent choice for coastal areas where salt corrosion can be a concern.
Copper: While more expensive, copper is highly resistant to corrosion and can last for decades.
Choosing the right material tailored to your specific weather conditions is essential for long-term performance.
Proper Installation Matters
Even the best materials can succumb to corrosion if not installed correctly. Ensure that your residential metal roofing is installed by a qualified professional who understands the nuances of metal roofing systems. Proper installation involves:
Adequate Sealing: Ensure all seams and joints are sealed correctly to prevent moisture penetration.
Proper Ventilation: Adequate roof ventilation can help dissipate moisture build-up, which is a leading cause of corrosion.
By investing in quality installation, you're laying the groundwork for a corrosion-resistant roof.
Regular Inspections and Maintenance
Routine maintenance is key to preventing corrosion in residential metal roofing. Here are some tips:
Inspect Regularly: Check your roof at least twice a year for any signs of damage, such as rust spots or loose seams.
Clean Debris: Remove leaves, branches, and other debris that can trap moisture against the metal. This is particularly important in rainy climates.
Gutter Maintenance: Ensure gutters and downspouts are free from blockages. Poor drainage can lead to water pooling and increased corrosion risk.
You can catch potential issues by staying proactive with maintenance before they escalate.
Invest in Protective Coatings
Another effective way to combat corrosion is to apply protective coatings. These coatings create a barrier against moisture and other corrosive elements. Here are some options:
Paint: A high-quality paint designed for metal roofs can provide a protective layer. Look for paints that contain rust inhibitors.
Sealants: Applying sealants to seams and joints can prevent moisture from seeping into vulnerable areas.
When selecting coatings, ensure they are compatible with your metal roofing material to maximize effectiveness.
Address Water Accumulation
Water accumulation can lead to significant corrosion issues, particularly in areas with heavy rainfall. To mitigate this risk, consider the following:
Ensure Proper Slopes: Ensure your roof has the appropriate pitch to facilitate water runoff. Flat roofs can be particularly susceptible to water pooling unless designed with drainage systems.
Install a Good Drainage System: A well-designed gutter and downspout system can help direct water away from your roof and foundation.
Managing water effectively is vital for preventing corrosion in residential metal roofing.
Be Mindful of Surrounding Elements
The environment surrounding your home can also impact the longevity of your metal roof. Here are some factors to consider:
Trees: Overhanging branches can scratch the surface of your roofing and create areas for moisture to accumulate. Trim back any branches that may contact your roof.
Pollution: Living in an area with high pollution levels can accelerate corrosion. Regular cleaning can help mitigate these effects.
Maintaining the external environment can go a long way in preserving your roof's integrity.
Know the Signs of Corrosion
Awareness of the early signs of corrosion can help you address issues before they become serious. Keep an eye out for:
Discoloration: Noticeable color changes may indicate rust formation.
Flaking or Peeling Paint: This can expose the metal beneath, making it vulnerable to corrosion.
Pitting or Craters: Small indentations on the surface can indicate the beginning of rusting.
If you notice any of these signs, consult a professional to evaluate the situation promptly.
Safeguard Your Home with Corrosion-Resistant Roofing
Preventing corrosion in residential metal roofing ensures its longevity and performance. You can effectively protect your roof from corrosion by choosing the right materials, investing in quality installation, conducting regular maintenance, and being mindful of your environment.
Ready to enhance your home with a durable, corrosion-resistant metal roof? Visit Lastime Exteriors today to explore our services and learn more about our energy-efficient roofing solutions. Together, we can ensure your home remains protected for years to come!
7 notes
·
View notes
Text
Rain Barrel Compatibility with Downspouts: Harvesting Water Effectively
Introduction
Water conservation has become an essential practice in our increasingly resource-conscious world. As homeowners look for ways to minimize water usage and maximize efficiency, rain barrels have emerged as a popular solution. These devices collect and store rainwater from rooftops for later use, making them an excellent addition to any eco-friendly home. However, not all rain barrels are created equal, especially when it comes to compatibility with downspouts. Understanding how to effectively harvest water using rain barrels is crucial for ensuring that your system functions optimally.

In this comprehensive article, we will dive deep into the nuances of rain barrel compatibility with downspouts. We’ll explore various aspects such as gutter systems, https://www.google.com/search?kgmid=/g/11vwpj23lm#lpc=lpc&prid=2078183187166882869 installation processes, maintenance requirements, and more. By the end of this guide, you’ll be equipped with the knowledge needed to set up an efficient rainwater harvesting system that complements your home’s design and functionality.
Rain Barrel Compatibility with Downspouts: Harvesting Water Effectively
Rain barrels can significantly reduce your water bill while providing a sustainable source of irrigation for your garden or landscape. To ensure that your rain barrel works efficiently, it must be compatible with your home's downspout system. A well-placed downspout directs the flow of rainwater into the barrel without causing overflow or leaks.
Understanding Your Downspout System What Is a Downspout?
A downspout is a vertical pipe that carries rainwater from the gutter system directly to the ground or drainage area. Its primary function is to ensure proper water management around your home’s foundation.
Why Are Downspouts Important?
Downspouts play a vital role in preventing water pooling around your home’s foundation, which can lead to structural damage and costly repairs. Additionally, they facilitate the collection of rainwater for reuse when connected to a rain barrel.
youtube

Choosing the Right Rain Barrel Types of Rain Barrels Plastic Rain Barrels: Lightweight and easy to install. Available in various colors and shapes. Wooden Rain Barrels: Aesthetic appeal but may require more maintenance. Metal Rain Barrels: Durable but can be prone to rust. Customizable Options: Some manufacturers offer customizable colors and designs. Sizing Your Rain Barrel
Selecting the right size depends on various factors:
The roof size contributing to your gutters. Average rainfall in your area. Intended use (e.g., watering plants vs. filling a swimming pool). Gutter Installation Process Explained
Understanding how gutters are installed can help you determine how best to connect them to your rain barrel system.
youtube
The Gutter Installation Process Planning: Measure roof edges and decide where gutters will be installed. Choosing Materials: Select from alu
2 notes
·
View notes
Text
Understanding How Fascia Damage Occurs from Neglected Gutters
Introduction https://www.mrgutterinc.net/yearly-maintenance-program
When it comes to home maintenance, the importance of a well-functioning gutter system cannot be overstated. Neglected gutters can lead to a cascade of issues, one of which is fascia damage. This article delves deep into understanding how fascia damage occurs from neglected gutters while providing insights into the entire gutter installation process, maintenance tips, and more. If you’re looking to safeguard your home’s integrity, understanding these elements is crucial.
youtube

youtube
Understanding How Fascia Damage Occurs from Neglected Gutters
Fascia boards are the horizontal boards that run along the edge of your roof. They serve not only as an aesthetic element but also as a critical support structure for your gutters. When gutters are neglected—whether due to poor installation, lack of maintenance, or simply forgetting they exist—they can become clogged with debris such as leaves or dirt. This blockage leads to water overflow, which ultimately seeps into the fascia board.
What Causes Gutter Clogs?
Clogs in gutters can be caused by several factors:
Leaves and Debris: Seasonal changes bring leaves that settle in gutters. Animal Nests: Birds or squirrels may build nests that obstruct water flow. Dirt and Soil: Wind can carry dirt into your gutters, leading to clogs over time. Effects of Clogged Gutters on Fascia
When water overflows from clogged gutters, it doesn’t just pool around the foundation; it also trickles down the fascia boards. This constant exposure to moisture can lead to:
Rotting: Wood is particularly vulnerable when constantly wet. Mold Growth: Moisture encourages mold and mildew growth. Structural Weakness: Over time, weakened fascia boards can compromise roof integrity. Preventive Measures for Fascia Damage
To prevent fascia damage resulting from neglected gutters:
Regularly clean your gutters at least twice a year. Install gutter guards to minimize debris accumulation. Check for signs of wear and tear on both your gutters and fascia boards.
Incorporating these preventive measures will not only protect your fascia but also extend the lifespan of your entire roofing system.

Gutter Installation Process Explained Why Proper Gutter Installation Matters
The installation process is key in ensuring that your gutter system functions effectively. Poorly installed gutters can exacerbate problems like fascia damage because they may not direct water away from the house efficiently.

Steps Involved in Gutter Installation Planning & Measurement: Measure roof edges accurately. Determine downspout placement based on roof pitch. Gathering Materials: Choose materials—aluminum, vinyl, copper, etc.—based on climate and aesthetics. Checking Local Building Codes: Ensure compliance with local regulations regarding gutter installations. Installation: Secure brack
2 notes
·
View notes
Text
Common Mistakes in DIY Gutter Installation and How to Avoid Them
Introduction
When it comes to home maintenance, one of the most critical yet frequently overlooked aspects is gutter installation. Properly installed rain gutters protect https://www.google.com/search?kgmid=/g/11vwpj23lm#lpc=lpc&prid=-3928557679487118904 your home from water damage, safeguard your foundation, and help maintain its overall value. However, many homeowners take on DIY gutter installation, only to encounter problems that lead to costly repairs. In this comprehensive guide, we will dive into Common Mistakes in DIY Gutter Installation and How to Avoid Them, ensuring you can undertake your project with confidence and skill.
Common Mistakes in DIY Gutter Installation and How to Avoid Them
DIY gutter installation can seem straightforward, but there are numerous pitfalls that can sabotage your efforts. One of the most prevalent mistakes is improper measurement. Failing to measure correctly can lead to ill-fitting gutters that don’t drain efficiently, causing overflow and potential damage.
Misjudging Gutters' Slope
A crucial element of rain gutters installation is ensuring the right slope. Gutters should slope slightly towards the downspouts—typically about a quarter-inch for every ten feet. If this angle is ignored, water may pool in certain areas instead of flowing freely toward the downspouts.
How to Avoid This Mistake:
Use a level when installing your gutters. Mark the slope on your fascia board before attaching the gutters. Neglecting Downspout Placement
Another common error involves downspout placement. Homeowners often install downspouts without considering where the water will flow once it exits the gutter system. Incorrect positioning can lead to erosion around your foundation or even water pooling in unwanted areas.
To Prevent Issues:
Plan downspout locations carefully; they should direct water at least 3-4 feet away from the house. Consider using extensions or splash blocks for extra protection against erosion. Choosing the Wrong Gutter Material
When deciding between materials like aluminum or vinyl for your gutters, it's essential to weigh their pros and cons before making a choice. Aluminum gutters are popular due to their durability and resistance to rust, while vinyl offers a lightweight alternative that's often easier to install but may not withstand extreme weather conditions as well.
Materials Breakdown:
| Material | Pros | Cons | |------------|---------------------------------|--------------------------| | Aluminum | Durable, Rust-resistant | Can be dented easily | | Vinyl | Lightweight, Easy installation | Less durable | | Copper | Aesthetic appeal | High cost |
youtube
youtube
Ignoring Local Climate Conditions
Whether you're choosing seamless aluminum gutters or regular ones, climate plays a significant role in determining what type of gutter system is best for your home. Locations prone to heavy rainfall may require larger gutters or more robust materials, whereas drier climates may allow for simpler designs.
Adaptability Tips:
Research regional weather patterns before selecting materials. Consult local regulations concerning gutter installations if necessary. Overlooking Gutter Guards
Many homeown
youtube
2 notes
·
View notes
Text
What are the signs of improper asphalt roof installation?
Have you ever looked up at your roof and wondered if it was installed correctly? It’s a natural question, especially when your roof plays such a vital role in protecting your home from the elements. Improper installation can lead to leaks, structural damage, and a shortened lifespan for your roof—issues no homeowner wants to deal with.
Recognizing the signs of improper asphalt roof installation is essential for keeping your home safe, attractive, and functional. A poorly installed roof doesn’t just affect aesthetics; it can compromise your home’s overall value and durability. Knowing what to look for can save you money and stress down the road.
In this article, we’ll guide you through the common signs of poor asphalt roof installation and provide practical tips for hiring a reliable contractor. With the right knowledge, you’ll be able to make informed decisions and confidently choose a professional who can deliver a durable, high-quality roof. Let’s dive in!
Signs of Improper Asphalt Roof Installation
Spotting issues early can save you thousands in repairs and ensure your home remains well-protected. Here are the most common signs that your asphalt roof may not have been installed properly:
1. Misaligned or Uneven Shingles
Shingles should form straight, uniform rows across your roof. If you notice irregular spacing or shingles that appear crooked, this could indicate careless workmanship. Uneven shingles not only look bad but also hinder proper water drainage, increasing the risk of leaks and water damage.
2. Curling or Buckling Shingles
Shingles that curl at the edges or buckle in the middle are often signs of improper fastening or poor attic ventilation. This problem can leave your roof vulnerable to moisture and accelerate the wear and tear on the shingles.
3. Missing Shingles
If you’re finding shingles in your yard shortly after installation, it’s a red flag. Missing shingles often mean the adhesive wasn’t applied correctly or the nails weren’t secured properly. Both scenarios compromise the roof��s ability to protect your home from wind and rain.
4. Visible Nail Heads
Nails should sit flush with the shingle surface and be properly covered. Exposed nail heads can corrode over time, allowing water to seep into the roof deck. This is a clear indication of subpar installation techniques.
5. Sagging Rooflines
A sagging appearance may indicate inadequate support for the roof structure. This could result from poor craftsmanship or the use of substandard materials during installation. A sagging roof is more than an aesthetic issue—it’s a potential safety hazard.
6. Improper Flashing
Flashing is essential for directing water away from vulnerable areas like chimneys, vents, and valleys. If the flashing is missing, poorly installed, or improperly sealed, it can lead to leaks and water damage in your attic or home interior.
7. Absence of a Drip Edge
Drip edges prevent water from seeping under the shingles and damaging the roof deck. If your roof lacks a drip edge, you may notice water stains, mold, or rot near the edges of your home. Always ensure this critical component is included during installation.
8. Poor Attic Ventilation
Ventilation keeps your attic cool and dry, preventing moisture buildup that can deteriorate shingles and other roofing materials. If your attic feels excessively humid or you notice condensation, it could be due to poor ventilation design during the roofing process.
9. Excessive Granule Loss
Asphalt shingles are coated with granules to protect them from UV rays. If you notice large amounts of granules in your gutters or downspouts, it could indicate poor-quality shingles or improper handling during installation.
10. Water Leaks and Stains
Water stains on your ceiling or walls are often the first visible signs of a roofing problem. Leaks caused by improper installation can worsen over time, leading to significant damage inside your home.
How to Choose a Reliable Asphalt Roofing Contractor
Hiring the right contractor can make all the difference in ensuring a proper roof installation. Follow these steps to find a trustworthy professional:
1. Verify Licenses and Insurance
Licensing: Ensure the contractor has the necessary licenses for your area. Licensing ensures they meet local building codes and regulations.
Insurance: Ask for proof of liability insurance and workers’ compensation coverage to protect yourself from unforeseen liabilities.
2. Check References and Reviews
References: Request contact information for recent clients to verify the quality of the contractor’s work.
Online Reviews: Read reviews on platforms like Google or Yelp to gauge their reputation. Look for consistent positive feedback and how they handle complaints.
3. Evaluate Experience with Asphalt Roofing
Specialization: Choose a contractor who specializes in asphalt roofing rather than someone who dabbles in various roofing types.
Portfolio: Ask to see photos or examples of their past asphalt roofing projects to assess their expertise.
4. Request Written Estimates
Detailed Breakdown: Ensure the estimate includes labor, materials, permits, and cleanup costs.
Comparison: Collect estimates from at least three contractors to compare pricing and services. Avoid contractors with unusually low bids, as this may indicate poor-quality work.
5. Understand Warranties
Material Warranty: Covers defects in the roofing materials.
Workmanship Warranty: Protects against errors made during installation. Discuss warranty terms in detail and get them in writing for future reference.
6. Ask Key Questions During Consultations
Timeline: How long will the project take?
Safety Measures: What precautions do they take to protect your property during installation?
Crew Size: How many workers will be on-site, and what are their qualifications?
7. Look for Clear Communication
A reliable contractor will answer your questions openly and provide updates throughout the project. Poor communication can be a warning sign of disorganization or lack of professionalism.
Tips for a Successful Asphalt Roofing Project
Here are some practical tips to ensure your roofing project runs smoothly:
Do Your Homework: Research contractors, materials, and installation techniques before hiring.
Inspect the Job Site: Visit a current job site to observe the contractor’s work habits and attention to detail.
Get Everything in Writing: Contracts should outline the scope of work, payment schedule, and warranty terms.
Be Present: If possible, be available during the installation to address any questions or concerns.
The Importance of Proper Asphalt Roof Installation
A well-installed asphalt roof not only enhances your home’s appearance but also provides long-lasting protection. By recognizing the signs of improper installation and taking the time to hire a reputable contractor, you can avoid the stress and expense of premature repairs or replacements.
Don’t let roofing concerns overwhelm you. Start by researching local contractors, reading reviews, and asking the right questions. With a bit of effort, you’ll find a professional who can deliver a beautiful, durable roof that protects your home for years to come. Take action today and invest in the peace of mind that comes with a properly installed asphalt roof!
2 notes
·
View notes
Text
How To Prevent Future Water Stains After Fixing The Leak
So, you’ve fixed the leak—but now you’re left with the lingering worry that it might happen again. After all, a water stain on the ceiling isn’t just unsightly—it’s a red flag that moisture found way into your home. And for many homeowners, the appearance of new white circles on the ceiling can be a frustrating reminder of past damage. Fortunately, with the right prevention strategies, you can stop stains from returning.
Here’s how to keep your ceilings dry and looking fresh long after the leak is gone.
1. Confirm the Leak Has Been Fully Resolved
It’s tempting to patch the ceiling and move on, but unless the root cause of the water stain on ceiling has been completely addressed, the problem could reappear. Common culprits include roof damage, plumbing leaks, HVAC condensation, or window flashing failures. Ensure that:
Roof shingles and flashing are intact and sealed
Plumbing pipes are free from drips and corrosion
HVAC drip pans and condensate lines are clear and functioning
Attic or crawl space is free from signs of moisture
Bring in a professional for a second opinion if you’re unsure the leak is fully fixed.
2. Improve Home Ventilation
Poor airflow contributes to moisture buildup that may cause white circles on ceiling surfaces. This is especially true in areas like bathrooms, kitchens, and laundry rooms.
Use exhaust fans while cooking or showering
Keep attic ventilation clear and unobstructed
Consider a whole-home dehumidifier if indoor humidity stays high
Ventilation reduces humidity levels and prevents condensation from forming on ceilings.
3. Use a Stain-Blocking Primer Before Painting
Even after the ceiling has dried, a residual water stain on ceiling can seep through fresh paint. The solution? Use a high-quality, stain-blocking primer.
Apply primer specifically designed for water stains
Let it dry fully before applying a topcoat
Use a mildew-resistant ceiling paint for added protection
This helps prevent white circles on the ceiling from reappearing and keeps the ceiling finish clean.
4. Clean Gutters and Downspouts Regularly
Overflowing gutters are a hidden cause of leaks that lead to ceiling stains, especially near exterior walls. When water has nowhere to go, it can back up under shingles and into your attic.
Clear leaves and debris from gutters at least twice a year
Check that downspout direct water away from your home’s foundation
Install gutter guards for added protection
Clean drainage pathways reduce the risk of future water intrusion.
5. Schedule Routine Roof Inspections
Tiny roof issues can lead to major water damage over time. Many leaks that cause a water stain on the ceiling start as small problems that go unnoticed.
Inspect your roof at least once a year
Look for missing or curling shingles, cracked flashing, or sagging gutters
Address minor issues before they escalate
A professional roof inspection helps ensure your home’s first line of defense stays secure.
6. Monitor for Signs of Moisture
Don’t wait for white circles on the ceiling to alert you to a problem. Get ahead of issues with these simple monitoring tips:
Install a humidity sensor in rooms prone to moisture
Check your attic or upper walls regularly for mold, musty smells, or soft spots
After heavy rain, look for damp patches or discoloration on ceilings
Early detection means faster resolution and fewer repairs.
Final Thoughts
Once you’ve repaired the leak that caused a water stain on the ceiling, the next step is prevention. From improving ventilation to using stain-blocking paint and scheduling regular maintenance, these proactive measures will help ensure that white circles on ceiling don’t make another unwelcome appearance.
Need help sealing up your roof or inspecting moisture issues? Contact Absolute Construction for expert solutions that keep your home safe and your ceilings spotless.
1 note
·
View note
Text
A Guide to Protecting and Beautifying Your Property
Imagine coming home to a property that not only protects your investment but also exudes beauty from every corner. A place where functionality meets aesthetics, creating a harmonious environment that you can truly be proud of. But how do you achieve this perfect combination? How do you protect and beautify your property in a way that is both practical and visually appealing? Look no further than A Guide to Protecting and Beautifying Your Property, your one-stop resource for everything you need to know.
This comprehensive guide offers a wealth of knowledge on the art of property protection and beautification. Delve into the history and background of property management, tracing its origins to ancient civilizations who recognized the importance of preserving and enhancing their surroundings. Discover the secrets to maintaining a long-lasting and visually striking property, including tips on landscaping, exterior maintenance, and security measures. Did you know that investing in landscaping can increase the value of your property by up to 20%? This guide will provide you with the tools and techniques to transform your property into a haven of both practicality and beauty, ensuring that you reap the benefits for years to come.
To protect and beautify your property, follow these professional tips:
Inspect your property regularly for any signs of damage or wear.
Maintain a regular cleaning schedule for both the interior and exterior.
Invest in high-quality landscaping to enhance curb appeal.
Apply a fresh coat of paint to walls and fences to rejuvenate the appearance.
Install security features such as cameras and motion-sensor lights to protect your property.

Tips for Safeguarding and Enhancing Your Property
Ensuring that your property is protected and beautified is not only important for your personal enjoyment, but also for maintaining its value and appeal. In this guide, we will provide you with valuable tips on how to safeguard and enhance your property. From securing your home to enhancing its curb appeal, we've got you covered. Let's dive in!
1. Secure Your Home
The safety and security of your property should always be a top priority. Here are some essential steps to safeguard your home:
Install sturdy doors with deadbolt locks
Ensure all windows have functioning locks
Install a reliable security system
Consider motion sensor lighting for outdoor areas
Trim shrubs and trees near windows to eliminate hiding spots
By taking these measures, you can protect your home from potential intruders and promote a sense of security for yourself and your family.
2. Maintain Your Roof and Gutters
A well-maintained roof and properly functioning gutters are essential for protecting your property from water damage. Follow these tips:
Regularly inspect your roof for any signs of damage
Replace missing or damaged shingles promptly
Clean your gutters regularly to prevent clogging
Ensure downspouts are directing water away from your foundation
Consider installing gutter guards to prevent debris buildup
By keeping your roof and gutters in good condition, you can prevent leaks and water damage that can be costly to repair.
3. Enhance Your Landscaping
A beautiful and well-maintained landscape can greatly enhance the aesthetic appeal of your property. Consider the following tips:
Plant trees and shrubs that complement your property
Maintain a regular watering and fertilizing schedule
Trim and shape your hedges and bushes regularly
Add colorful flowers and plants to your garden beds
Consider installing outdoor lighting to highlight your landscaping features
By investing time and effort into your landscaping, you can create a welcoming and visually pleasing environment.
4. Upgrade Your Exterior
The exterior of your property is the first impression visitors and potential buyers will have. Consider the following upgrades:
Apply a fresh coat of paint to your home's exterior
Upgrade your front door with a stylish and secure option
Replace old or damaged siding or stucco
Consider adding shutters or window boxes for added charm
Upgrade your garage door for a more modern look
These exterior upgrades can significantly improve your property's curb appeal and value.
5. Protect Your Outdoor Structures
If you have outdoor structures such as a shed, gazebo, or pergola, it's important to protect them from the elements. Here are some tips:
Apply a weatherproof sealant to wooden structures
Regularly inspect for any signs of damage or wear
Remove snow and ice from the roof during winter months
Keep vegetation around structures trimmed to prevent damage
Consider adding a protective cover or awning to extend their lifespan
By taking these steps, you can prolong the life of your outdoor structures and ensure they remain in good condition.
6. Install Outdoor Security Cameras
Enhancing the security of your property can be done by installing outdoor security cameras. Here's what you need to know:
Choose high-quality cameras with night vision capabilities
Install cameras in strategic locations to cover all entry points
Ensure cameras are properly mounted and protected from the weather
Choose a reliable surveillance system with remote access capabilities
Consider signage to deter potential intruders
Outdoor security cameras can provide you with peace of mind and act as a deterrent against any potential threats.
7. Regularly Inspect and Maintain Your Property
Ongoing maintenance is key to preserving the integrity and value of your property. Here are some essential tasks:
Inspect your property for signs of damage or wear
Repair any issues promptly, such as leaks or cracks
Maintain your HVAC system for optimal performance
Service your appliances regularly to prevent breakdowns
Keep your property clean and free from debris
By staying proactive with property inspections and maintenance, you can catch and address any issues before they become major problems.
8. Invest in Quality Outdoor Furniture
To create a comfortable and inviting outdoor space, invest in high-quality outdoor furniture. Consider the following tips:
Choose furniture made from weather-resistant materials
Consider furniture with built-in storage for added convenience
Invest in cushions and pillows made from durable and fade-resistant fabric
Arrange your furniture in a way that promotes conversation and relaxation
Regularly clean and maintain your outdoor furniture to prolong its lifespan
Quality outdoor furniture can transform your outdoor area into a stylish and comfortable retreat.
9. Consider Energy-Efficient Upgrades
Reducing your property's energy consumption not only benefits the environment but also saves you money. Here's what you can do:
Upgrade to energy-efficient windows and doors
Install programmable thermostats for optimal temperature control
Switch to LED or energy-saving light bulbs
Insulate your home properly to prevent heat loss
Consider installing solar panels for renewable energy
These energy-efficient upgrades can help lower your utility bills and make your property more eco-friendly.
10. Regularly Clean and Maintain Outdoor Surfaces
To keep your property looking its best, regular cleaning and maintenance of outdoor surfaces is essential. Consider these tips:
Pressure wash your driveway and walkways to remove dirt and stains
Sweep and clean your patio or deck regularly
Remove any weeds or plants growing through cracks in your outdoor surfaces
Reapply sealant or stain to wooden surfaces as needed
Clean and maintain your pool or hot tub regularly
By keeping your outdoor surfaces clean and well-maintained, you can enhance the overall appearance of your property.
Conclusion
Protecting and Beautifying Your Property:
Tips for Safeguarding and Enhancing Your Property 1. Secure Your Home 2. Maintain Your Roof and Gutters 3. Enhance Your Landscaping 4. Upgrade Your Exterior 5. Protect Your Outdoor Structures 6. Install Outdoor Security Cameras 7. Regularly Inspect and Maintain Your Property 8. Invest in Quality Outdoor Furniture 9. Consider Energy-Efficient Upgrades 10. Regularly Clean and Maintain Outdoor Surfaces
A Guide to Protecting and Beautifying Your Property
Keep your property clean and clutter-free.
Regularly inspect and maintain your home's exterior, including the roof, siding, and windows.
Invest in landscaping to enhance the curb appeal of your property.
Install security measures, such as outdoor lighting and a security system, to protect your property.
Regularly clean and maintain your driveway and walkways to keep them safe and attractive.
Frequently Asked Questions
Here are some commonly asked questions about protecting and beautifying your property:
1. How can I protect my property from damage?
To protect your property from damage, there are several steps you can take. Firstly, ensure that your property is properly maintained. Regularly inspect the exterior of your home for any signs of wear or damage, and address them promptly. This can include repairing any cracks in the walls or foundation, replacing broken windows or doors, and maintaining a well-functioning roof and gutter system. Additionally, consider installing security measures such as alarm systems, security cameras, and motion sensor lights to deter intruders and protect your property from theft or vandalism.
Furthermore, it's important to have adequate insurance coverage for your property. Review your insurance policy to ensure that it provides coverage for common risks such as fire, flood, and natural disasters. Consider adding additional coverage, such as liability insurance, to protect yourself in the event of accidents or injuries that occur on your property. Finally, take precautions to prevent accidents and injuries by maintaining a safe environment, removing any potential hazards, and following local building codes and regulations.
2. How can I beautify my property's exterior?
To beautify your property's exterior, there are various strategies you can employ. Start by enhancing your landscaping. Consider planting flowers, shrubs, and trees that complement the architectural style of your property and create a visually appealing garden. Regularly maintain your lawn by mowing, edging, and watering it, and remove any weeds or dead plants to keep your outdoor spaces looking their best.
Another way to beautify your property is by adding exterior elements such as outdoor lighting, decorative fences or gates, and pathways. These features can not only enhance the aesthetic appeal of your property but also improve its functionality and create a welcoming atmosphere. Additionally, consider giving your property a fresh coat of paint or staining the exterior surfaces to revitalize its appearance. Choose colors that complement the architectural style and neighborhood, and consider consulting with a professional for expert advice.
3. How can I protect my property from natural disasters?
Protecting your property from natural disasters requires a combination of proactive measures and proper insurance coverage. Firstly, identify the potential risks in your area. Research the common natural disasters that occur, such as hurricanes, earthquakes, floods, or wildfires, and take appropriate precautions. This can include reinforcing the structure of your property, such as installing hurricane shutters or seismic retrofitting, and ensuring that your property is built to withstand local weather conditions.
Additionally, review your insurance policy to ensure that it covers the specific risks in your area. Consider adding additional coverage for flood or earthquake insurance, depending on the prevalent hazards. Keep important documents and valuable possessions in a safe and easily accessible location to protect them in the event of a disaster. Stay informed about weather warnings and evacuation procedures, and have an emergency preparedness plan in place for your family and property.
4. How can I maintain the value of my property over time?
Maintaining the value of your property requires ongoing care and attention. Regular maintenance is key to preventing deterioration and ensuring that your property remains in good condition. Schedule regular inspections of your property, including the roof, foundation, plumbing, and electrical systems, to identify any issues early on and address them promptly. Perform necessary repairs and upgrades to keep your property up to date and in line with market standards.
Furthermore, keep up with landscaping and exterior maintenance to enhance the curb appeal of your property. Regularly clean and maintain outdoor spaces, including patios, decks, and sidewalks. Consider making energy-efficient upgrades such as installing insulation, upgrading windows, or replacing appliances to not only increase the value of your property but also reduce utility costs. Finally, stay informed about the local real estate market and make strategic improvements or renovations that align with current trends and buyer preferences.
5. How can I protect my property from pests?
To protect your property from pests, it's important to take preventive measures and address any infestations promptly. Start by regularly inspecting both the interior and exterior of your property for signs of pests, such as droppings, chewed wires, or holes in walls. Seal any cracks or openings that can serve as entry points for pests, including gaps around doors and windows, vents, or pipes. Keep your property clean and free of food debris, as this can attract pests.
If you notice any signs of pests, consult with a professional pest control company to assess the situation and develop an appropriate treatment plan. This may involve using baits, traps, or pesticides to eliminate the pests. Consider implementing preventive measures such as installing screens on windows, using door sweeps, and storing food in airtight containers. Regularly maintain your property and address any issues that may attract pests, such as leaky pipes or standing water. More: External wall Insulations
Home Security - How to Harden Your Home With Navy SEAL "Coch"
youtube
To protect and beautify your property, follow these simple guidelines. First, maintain a regular cleaning schedule to keep your property free of debris and dirt. Regularly sweep and remove fallen leaves, and clean surfaces to prevent the buildup of dirt and grime.
Second, invest in proper landscaping and gardening. Trim overgrown shrubs and trees, and maintain a well-manicured lawn. Add colorful flowers and plants to enhance the visual appeal of your property.
Third, take steps to ensure the security of your property. Install strong locks on doors and windows, and consider investing in surveillance cameras and security systems. Regularly check for any potential vulnerabilities and make necessary repairs.
Finally, don't forget about the little details that make a big difference. Paint your property regularly to maintain a fresh and vibrant look, and add decorative elements such as outdoor lighting and potted plants.
By following these guidelines, you can protect and beautify your property, creating a welcoming and aesthetically pleasing environment.
2 notes
·
View notes
Text
RainPillow
How to install a rain pillow to harvest roof top rainwater. Why rainwater pillow tanks to collect rainwater – Pillow tanks are flexible storage tank options that can be installed in crawlspaces and under decks to hide them from view. Pillow tanks are often used with inlets that can be connected to downspouts. This allows them to collect water directly from a downspout or gutter system. In…

View On WordPress
2 notes
·
View notes
Text
Does a Patio Need Drainage? Here's What You Should Know
You finally got that patio you've been dreaming about—maybe it’s a cozy nook for morning coffee, a gathering spot for summer barbecues, or a sleek outdoor extension of your home. But then it rains, and suddenly, you've got puddles where your furniture should be. That’s when the question hits: Does a patio really need drainage?
Short answer? Yes. Long answer? Also yes, but with a few important considerations. Let’s break it down.
Why Patio Drainage Isn’t Just About Avoiding Puddles
Water has a way of sneaking into places it shouldn’t. Without proper drainage, you’re inviting more than just the occasional splash underfoot. Here’s what happens when water overstays its welcome:
Erosion and shifting – Water pooling under or around your patio slowly erodes the ground beneath it, making it uneven or even leading to cracks.
Mold and mildew – Standing water creates the perfect breeding ground for mold and algae, which isn’t just unsightly—it can make surfaces dangerously slippery.
Foundation damage – If your patio is too close to your house and water doesn’t drain properly, it can seep into your foundation, leading to bigger (and more expensive) problems.
Annoying insects – Mosquitoes love stagnant water. Without drainage, you’re giving them a personal invitation to your backyard.
Now, before you panic, know that there are plenty of ways to fix—or prevent—patio drainage issues.
Spotting Drainage Problems Before They Ruin Your Patio
Not sure if your patio is a drainage disaster waiting to happen? Look for these red flags:
Water pooling for hours (or days) after rain – If you have mini lakes forming, your patio isn’t draining properly.
Mud or soft spots near the patio – Indicates water is getting trapped underground.
Moss or mildew growth on the patio surface – Too much moisture sticking around.
Cracks or shifting pavers – Water could be washing out the base material beneath them.
Caught one or more of these signs? Time to consider some drainage solutions.
How to Keep Your Patio Dry and Functional
The good news is, you have options. Whether you’re designing a new patio or fixing an existing one, here are the best drainage solutions:
1. Slope It Right
A patio should have a slight slope (about 1/8 to 1/4 inch per foot) directing water away from your home. It’s subtle enough that you won’t notice it but effective enough to keep water moving.
2. Use Permeable Materials
Instead of solid concrete, consider materials like:
Permeable pavers – These allow water to seep through gaps rather than pooling.
Gravel or crushed stone – Great for patios with a natural or rustic look.
Porous concrete – Looks like regular concrete but absorbs water instead of repelling it.
3. Install a French Drain
A French drain is basically a trench filled with gravel and a pipe that redirects water away. Perfect if your patio sits in a naturally low area.
4. Add a Channel Drain
Think of it as a mini gutter for your patio. Installed at the lowest point, it catches runoff and sends it away before it becomes a problem.
5. Extend Downspouts Away from the Patio
If your patio is near a house downspout, make sure that water is being directed well beyond your patio area—otherwise, it’s just dumping extra water right where you don’t want it.
6. Raise the Patio (If Necessary)
In extreme cases where water constantly pools, raising the patio slightly or adding a gravel drainage layer underneath can solve the issue.
South Bend Homeowners: What Works Best for You?
Every home is different, and in South Bend, where we see everything from heavy spring rains to winter freezes, patio drainage needs special attention. Here are a few local factors to consider:
Clay-heavy soil? You’ll need extra drainage since clay doesn’t absorb water well.
Snowmelt in winter? Ensure water drains away before it freezes, preventing expansion cracks.
Heavy tree coverage? Leaves can clog drains, so maintenance is key.
If you’re unsure about the best drainage solution for your patio, it’s always a good idea to consult with professionals who understand South Bend’s unique climate and soil conditions.
Can You Fix Patio Drainage Yourself?
If your issue is minor (like a small puddle that takes a bit too long to dry), a quick DIY fix—such as adding gravel around the edges—might work. But if you have major drainage problems, it’s worth getting an expert’s opinion.
Sometimes, drainage issues are a sign of a bigger problem—like an improperly compacted base or water being directed toward your home instead of away from it. A professional can help you find the root of the problem before it turns into a costly repair.
Final Thoughts
At the end of the day (oops—ultimately), a well-designed patio isn’t just about aesthetics. Drainage plays a huge role in keeping it functional and long-lasting. Whether you’re planning a new patio or trying to fix an existing one, taking drainage seriously will save you a lot of headaches (and money) down the line.
Need expert advice on your South Bend patio project? Reach out to Screenmobile South Bend—we’ll make sure your outdoor space stays dry, durable, and ready for year-round enjoyment.
7 notes
·
View notes
Text
How Gutter Services Help Avoid Expensive Roof Replacements

When homeowners think about protecting their roof, they often overlook one of the most vital components—gutter services. Gutters might seem like a minor feature of your home’s exterior, but they play a major role in directing rainwater away from your roof and foundation. Without well-functioning gutters, your home is exposed to serious and costly damage that could eventually lead to a full roof replacement.
In Garrettsville, OH, where weather conditions vary across seasons, investing in professional gutter services can save homeowners from significant roof-related expenses. This blog explores how proper gutter systems and regular maintenance can extend the life of your roof and help avoid expensive replacements.
The Crucial Role of Gutters in Roof Protection
Gutters help manage rainwater runoff and prevent it from damaging your roofing structure. When clogged or damaged, they allow water to enter roof materials, leading to costly decay and compromised support.
When water pools on your roof or backs up under the shingles, it accelerates wear and tear. With consistent gutter installation and timely gutter repair, water is efficiently carried away, reducing the risk of leaks and preventing long-term roof damage.
Preventing Water Damage and Roof Rot
When gutters become clogged or neglected, a major issue homeowners face is unwanted water penetrating areas it shouldn’t.
Professional gutter contractors ensure that your gutter system is designed and installed to accommodate your home’s roofline and rainfall patterns. A properly sloped gutter system with clean downspouts will ensure water flows freely, minimizing the risk of roof rot and damage.
Reducing Gutter Installation Cost Through Regular Maintenance
Many homeowners delay gutter service or avoid maintenance due to the assumed cost. However, ignoring gutter issues can ultimately lead to a full roof replacement, which is far more expensive than any gutter installation cost.
By scheduling regular inspections and cleanings, you reduce the chances of severe damage. Professional gutter repair can fix minor issues like leaks, sagging, or small blockages before they evolve into roof-threatening problems. In the long run, this preventative care reduces overall maintenance expenses and protects your roof's longevity.
Benefits of Hiring a Professional Gutter Installation Company

Not all gutters are created equal. The quality of materials and installation plays a major role in your roof’s protection. A licensed gutter installation company will ensure that your gutter system is properly measured, secured, and graded to perform effectively during heavy rain or snow.
Additionally, professionals provide customized solutions based on your home’s structure, local climate, and water runoff needs. This expertise minimizes the chances of installation errors and guarantees long-term performance.
In Garrettsville, where snow and rain can cause serious water flow challenges, expert installation ensures that your gutters hold up throughout the seasons.
Gutter Upgrades That Enhance Roof Protection
Aside from standard gutters, homeowners can invest in upgrades like seamless gutters, gutter guards, and downspout extensions. These enhancements reduce blockages, increase durability, and improve the flow of water away from your roof and foundation.
Gutter guards, for instance, prevent debris buildup, minimizing the need for frequent cleaning. This results in fewer opportunities for water overflow and significantly lowers the risk of roof deterioration due to clogged gutters.
Let Pally Roofing Handle Your Gutter Needs in Garrettsville, OH
The cost of a roof replacement can be overwhelming, especially when it could have been avoided with proper gutter services. Whether you’re building a new home or maintaining your existing one, don’t underestimate the power of a quality gutter system.
At Pally Roofing, we offer comprehensive gutter solutions including gutter installation, gutter repair, and seasonal maintenance tailored to the weather patterns of Garrettsville, OH. As a trusted gutter installation company, we combine high-quality materials with skilled workmanship to protect your home from water damage year-round.
Protect your home proactively with professional gutter maintenance and save big on future roofing expenses. Contact Pally Roofing today for a free estimate on our gutter services and discover how we can help preserve the integrity of your roof.
#Gutterservices#gutterinstallation#guttercontractors#gutterservice#gutterinstallationcost#gutterinstallationcompany#gutterrepair
0 notes
Text
What does granular loss mean on a roof?
Granular loss on a roof is a term used to describe the shedding of small, sand-like particles embedded in asphalt shingles. These particles, known as granules, play a vital role in protecting your roof from environmental damage. They shield shingles from ultraviolet (UV) rays, enhance fire resistance, and contribute to the overall durability of the roof.
While some granule loss is normal as your roof ages, excessive or premature loss can compromise the roof’s performance. It’s essential to understand what causes granular loss, how to identify it, and how to prevent it to protect your home and maintain the roof’s longevity.
What Causes Granular Loss?
Granular loss can happen for a variety of reasons, ranging from natural aging to external factors. Here’s a breakdown of the most common causes:
1. Aging and Wear
Over time, asphalt shingles naturally lose some granules due to exposure to the elements.
The adhesive bond between the granules and the asphalt weakens with age, leading to gradual shedding.
2. Severe Weather Conditions
Hailstorms, heavy rain, and high winds can dislodge granules from shingles, leaving them less protected.
Nebraska’s harsh winters and summer storms can accelerate this process.
3. Physical Damage
Debris such as tree branches falling onto the roof can scrape off granules.
Foot traffic during roof maintenance or repairs can also lead to granule loss.
4. Poor Installation Practices
Shingles installed incorrectly or with subpar techniques may shed granules prematurely.
Professional installation is crucial for ensuring shingles remain secure and protected.
5. Manufacturing Defects
On rare occasions, manufacturing flaws can cause shingles to lose granules faster than expected.
It’s important to review warranties and consult with contractors if defects are suspected.
How to Identify Granular Loss
Detecting granular loss early is key to preventing more significant damage. Here are the most common signs:
1. Granules in Gutters or Downspouts
After heavy rain, you might notice a buildup of granules in your gutters or at the base of downspouts.
This is often the first sign that shingles are shedding excessively.
2. Bald Spots on Shingles
If shingles appear to have bare patches where granules are missing, it indicates significant loss.
These areas are more vulnerable to UV damage and water penetration.
3. Discoloration or Uneven Shading
Shingles with missing granules may appear darker due to exposed asphalt.
Uneven shading across the roof could be a visual indicator of granular loss.
4. Roof Debris Around the Property
Finding granules scattered around your yard or driveway after a storm is another sign to inspect your roof closely.
Why Granular Loss Matters
Granular loss may seem like a minor issue, but it can have serious implications for your roof and home:
1. Reduced UV Protection
Granules act as a barrier against UV rays, preventing shingles from becoming brittle and cracking.
Without adequate granules, your roof ages faster and becomes less effective.
2. Increased Risk of Leaks
Shingles with granular loss are less water-resistant, leading to potential leaks.
Moisture can seep into the underlayment, causing mold, rot, or structural damage.
3. Compromised Aesthetic Appeal
Missing granules result in an uneven, patchy roof appearance, which can lower your home’s curb appeal.
Discoloration may make your roof look older than it actually is.
4. Shortened Roof Lifespan
A roof with significant granular loss will deteriorate faster, requiring repairs or replacement sooner.
How to Prevent Granular Loss
Proactive maintenance can help you minimize granular loss and extend the life of your roof. Here are some practical steps you can take:
1. Schedule Regular Inspections
Have your roof inspected at least once a year or after severe weather events.
A professional inspection can identify minor issues before they become costly problems.
2. Clean Gutters and Downspouts
Keep gutters clear of debris to prevent water backup, which can weaken shingles and cause granules to dislodge.
Trim overhanging tree branches to reduce the risk of physical damage.
3. Use Professional Installation Services
Ensure your roof is installed or repaired by experienced contractors who follow best practices.
Proper installation is crucial for long-term durability.
4. Address Repairs Promptly
Don’t ignore small signs of damage, such as a few missing granules or a loose shingle.
Timely repairs can prevent further granule loss and protect your roof.
5. Invest in Protective Roof Coatings
Applying a roof sealant can help preserve granules and protect shingles from environmental stress.
When to Consider Roof Replacement
If your roof exhibits extensive granular loss, it might be time to consider replacing it. Factors to keep in mind include:
Age of the Roof: Asphalt shingle roofs typically last 20–30 years. If your roof is nearing this age range, replacement may be the best option.
Extent of Damage: Widespread granule loss across the roof indicates significant wear.
Leaks or Structural Issues: If granular loss has led to water damage, replacing the roof can prevent further problems.
Consulting a professional roofing contractor can help you determine whether repair or replacement is the most cost-effective solution.
Conclusion
Granular loss is a common issue for asphalt shingle roofs, especially in areas like Nebraska where weather conditions can be harsh. While some granule shedding is normal, excessive loss can compromise the roof’s integrity, leading to leaks, reduced lifespan, and costly repairs.
By understanding the causes and signs of granular loss, you can take proactive steps to protect your roof and maintain your home’s safety and value. Regular inspections, proper maintenance, and timely repairs are key to preventing extensive damage.
If you’re concerned about granular loss or need professional advice, don’t wait. Contact our roofing experts today to schedule an inspection and ensure your roof remains in top condition for years to come.
0 notes
Text
How Does LeafGuard Compare Gutters for Long Island Homeowners?
Choosing the right gutter system is one of the most important decisions homeowners can make when protecting their property. From controlling rainwater drainage to preventing long-term water damage, gutters play a crucial role in home maintenance. For Long Island homeowners, where storms and seasonal leaf fall are common, understanding how LeafGuard compares to traditional gutter systems is essential. This guide breaks down the key differences, helping you make a smart, informed choice for your home.
The Importance of a Reliable Gutter System
A quality roof drainage system does more than just move rainwater away. It protects your entire home from moisture buildup, soil erosion, and even foundation issues. Gutter systems help keep basements dry, prevent siding from staining, and guard fascia and soffit from rotting. When gutters clog or leak, the consequences can be expensive and frustrating.
Long Island’s weather, with its heavy rainfall and leaf-shedding trees, increases the need for dependable storm gutter solutions. That’s why many homeowners are turning to clog-free gutters and gutter guard systems that offer better long-term protection. The goal is to invest once and avoid the hassle of seasonal cleaning or emergency repairs after every storm.
How LeafGuard’s One-Piece Design Stands Out
One of the biggest differences between LeafGuard and traditional gutter options lies in its unique, one-piece construction. Unlike regular gutters that require added screens or guards, LeafGuard integrates a debris-blocking gutter design directly into the gutter itself. The curved hood allows rain to flow into the gutter while keeping out leaves, twigs, and other debris.
This design helps keep water flowing freely without the need for constant maintenance. Many traditional gutters require frequent cleaning or the addition of mesh guards that can eventually clog themselves. LeafGuard solves this by addressing both flow and filtration in one sleek system. For homeowners who value simplicity and efficiency, this can be a major upgrade in leaf protection for gutters.
Benefits for Long Island Weather and Homes
LeafGuard gutters are especially useful in areas like Long Island, where trees shed heavily and seasonal storms can bring a sudden downpour. These systems are built to manage large volumes of water while keeping debris out, which is perfect for protecting homes in high-leaf zones. The built-in hood also keeps birds, squirrels, and other pests from nesting in your gutters.
In addition, the seamless gutter installation process helps prevent leaks that occur at gutter joints. This enhances downspout performance and ensures consistent rainwater drainage. Traditional sectional gutters can separate over time, creating weak points for water to leak through and damage siding or landscaping. Seamless systems are less likely to sag or break, especially during heavy rain or ice buildup.
LeafGuard vs Traditional Gutter Guards
When comparing LeafGuard to standard gutter guard systems, one of the key differences is how the systems manage clog prevention. Most gutter guards are add-ons installed over existing gutters. While they can block leaves, many of these systems fail over time or require manual cleaning. Leaves may rest on top of the guard, preventing water from flowing in, or small debris may sneak through the mesh.
LeafGuard, on the other hand, was designed from the start to be an all-in-one clog-free gutter solution. The curved hood encourages debris to fall to the ground while water adheres to the surface and rolls into the gutter. It uses the principles of liquid adhesion, which are particularly effective in directing water away from the home while reducing buildup inside the system.
The built-in structure also eliminates the need for additional attachments that might wear out. This makes it a longer-lasting option for those who want set-it-and-forget-it peace of mind. Plus, it offers more effective water damage prevention because the water is efficiently diverted before it can pool near foundations or seep into walls.
Long-Term Value and Maintenance Considerations
Gutters may not seem like a big investment at first, but when you add up maintenance, repairs, and damage from poor performance, the costs can skyrocket. Traditional systems might seem cheaper upfront, but over time, the expenses from clogged gutters and water intrusion can be significant. Homeowners may find themselves cleaning gutters multiple times a year or hiring professionals to fix leaks and overflow issues.
With LeafGuard, homeowners experience fewer problems over the long run. Its design reduces the need for regular cleaning and drastically lowers the chances of clogs. The system is also crafted from durable aluminum, which resists rust and warping. Since the seamless design includes fascia and soffit protection, you avoid the costly repair of hidden damage that standard systems often leave exposed.
Many customers find that the upfront investment in LeafGuard pays for itself through reduced maintenance, better home exterior protection, and fewer service calls. Especially in regions like Long Island, where falling leaves and sudden storms are a seasonal norm, this kind of reliability can make a big difference.
Why Seamless Gutters Make a Difference
Seamless gutters, like those in the LeafGuard system, minimize the weak spots where leaks and separations typically occur. Traditional sectional gutters have joints every 10 to 20 feet, and those joints can become problem areas over time. Cracks, rust, or even pulling apart due to ice and snow are all common in standard gutters.
The benefit of seamless construction is durability. Water flows more freely, reducing strain on downspouts and helping direct it away from the foundation efficiently. This leads to better downspout performance and reduces the risk of erosion or basement leaks, two issues that are costly and difficult to repair.
Fascia and Soffit Protection Benefits
Gutters aren't just about rainwater they also protect your roof's structural elements. Fascia and soffit boards, which help support your roof and provide ventilation, are vulnerable to moisture if water isn’t managed properly. Overflow from clogged or misaligned gutters can rot these boards, leading to expensive woodwork and even pest infestations.
LeafGuard’s debris-blocking gutter design eliminates the risk of water spilling over and soaking these vulnerable areas. By keeping gutters clean and water flowing in the right direction, the system extends the life of your roof and ensures your attic stays dry and well-ventilated.
Conclusion: Choosing the Right Gutter Solution
In the world of gutter systems, not all solutions offer the same level of protection or value. For Long Island homeowners, where unpredictable weather and falling debris are major concerns, investing in a reliable system is more than just a home improvement; it's a necessity. LeafGuard stands out because of its seamless design, built-in clog protection, and ability to handle heavy rain without fail.
When you compare gutters and evaluate options side by side, the difference in performance and peace of mind becomes clear. While traditional systems may seem cost-effective upfront, the long-term benefits of a clog-free, low-maintenance system like LeafGuard often outweigh the initial price.
If you're looking to upgrade your gutter system and want a dependable, long-term solution, Long Island LeafGuard Gutter Company offers a system worth considering. As you compare gutters and their ability to protect your home from the elements, remember that the best investment is one that keeps your home safe year after year.
0 notes
Text
How can I prevent ice dams on my asphalt roof?
Have you ever noticed icicles hanging from your roof during winter and wondered if they might be signaling a problem? While they can add a picturesque touch to your home, these icicles often indicate the presence of ice dams—ridges of ice that form along the edges of your roof. Ice dams can lead to significant issues, including water leaks, damaged shingles, and compromised structural integrity.
Preventing ice dams is essential for maintaining the health of your asphalt roof. A well-maintained roof not only ensures long-term durability and safety but also enhances your home's curb appeal. Choosing the right asphalt roofing contractor plays a pivotal role in achieving these goals.
Selecting a reliable contractor doesn't have to be a daunting task. With the right guidance, you can make informed decisions that lead to a stress-free roofing project. In this article, we'll explore practical steps to prevent ice dams and provide tips on hiring a trustworthy asphalt roofing contractor to ensure your home remains protected and visually appealing.
Understanding Ice Dams and Their Impact on Asphalt Roofs
Ice dams form when heat from your home's interior escapes into the attic, warming the roof's surface and causing accumulated snow to melt. As this meltwater flows down the roof, it reaches the colder eaves and refreezes, creating a barrier that prevents proper drainage. The resulting ice dam can cause water to back up under shingles, leading to leaks, shingle damage, and potential structural issues.
Steps to Prevent Ice Dams on Your Asphalt Roof
Preventing ice dams involves maintaining a consistent roof temperature and ensuring proper drainage. Here are some practical steps to consider:
Enhance Attic Insulation: Proper insulation minimizes heat transfer from your living spaces to the attic, keeping the roof's surface cooler and reducing snow melt.
Improve Ventilation: Adequate ventilation in the attic helps regulate temperature and moisture levels, preventing the conditions that lead to ice dam formation.
Seal Air Leaks: Identify and seal gaps or cracks that allow warm air to escape into the attic, such as around chimneys, vents, and light fixtures.
Maintain Gutters and Downspouts: Regularly clean gutters and downspouts to ensure they are free of debris, allowing meltwater to flow away from the roof efficiently.
Install Ice and Water Shield: Consider adding an ice and water shield membrane under the shingles, especially along the eaves, to provide an extra layer of protection against water infiltration.
Use Roof Heating Cables: In areas prone to heavy snowfall, heated cables can be installed along the roof's edge to melt snow and ice, facilitating proper drainage.
Hiring a Reliable Asphalt Roofing Contractor
Choosing the right contractor is crucial for effective ice dam prevention and overall roof health. Here are key considerations to keep in mind:
Verify Licenses and Insurance: Ensure the contractor holds the necessary licenses and carries adequate insurance coverage to protect against potential liabilities.
Check References and Reviews: Request references from previous clients and read online reviews to gauge the contractor's reputation and quality of work.
Assess Experience with Asphalt Roofing: Confirm that the contractor has substantial experience specifically with asphalt roofing systems, as this expertise is vital for proper installation and maintenance.
Review Portfolios: Examine the contractor's portfolio of completed projects to assess the quality and style of their work, ensuring it aligns with your expectations.
Understand Warranties: Inquire about the warranties offered on both materials and workmanship to ensure long-term protection for your investment.
Obtain Written Estimates: Request detailed, written estimates from multiple contractors to compare pricing, scope of work, and timelines.
Ask Key Questions During Consultations: Prepare a list of questions to ask potential contractors, such as their approach to ice dam prevention, project timelines, and communication practices.
Conclusion
Preventing ice dams on your asphalt roof is essential for maintaining your home's durability, safety, and aesthetic appeal. By implementing proper insulation, ventilation, and maintenance practices, you can minimize the risk of ice dam formation. Equally important is selecting a reliable asphalt roofing contractor who can provide quality workmanship and guidance tailored to your home's needs.
Take the first step toward a successful roofing project by conducting thorough research, seeking recommendations, and making informed decisions. With the right approach, you can ensure your home remains protected and beautiful for years to come.
2 notes
·
View notes
Text
How to Maintain Your Gutters After Installation
Gutters are a critical part of any home’s drainage system. Once installed, they help prevent water damage, protect your foundation, reduce soil erosion, and maintain the integrity of your siding and roof. But installing a new gutter system is just the first step. To get the most out of your investment, consistent maintenance is key.
If you recently had gutter installation in Frederick, this guide will help you understand exactly what needs to be done to ensure your gutters remain in excellent condition—year after year.
Here’s everything you need to know about maintaining your gutter system after installation, straight from the local professionals who know the Frederick area best.
Why Gutter Maintenance Matters
Whether you're a homeowner who just completed Guttering Installation Frederick or you're planning to in the near future, understanding the role of maintenance is essential. Even professionally installed gutters will fail if they're neglected. The risks include:
Roof leaks
Foundation cracks
Mold growth
Damaged landscaping
Pest infestations
Many homeowners begin their search for gutter installation near me thinking installation alone is enough. But without proper upkeep, even the best gutters will clog, sag, or break over time.
1. Clean Your Gutters at Least Twice a Year
One of the most essential steps in post-installation gutter care is regular cleaning. If you live in a tree-heavy neighborhood or deal with seasonal storms, gutter cleaning in Frederick MD should be scheduled at least twice a year—once in the spring and again in the fall.
Here’s what to look for:
Leaves, twigs, and roof shingle granules
Standing water or slow drainage
Signs of animal nests or insects
Overflowing gutters during rain
If you’re uncomfortable getting on a ladder or handling the mess, hire a local expert. Many gutter installation companies offer cleaning services or maintenance packages.
2. Inspect for Signs of Sagging or Separation
Even brand-new gutters can develop problems if not monitored. One common issue is sagging, which usually happens when gutters are clogged, overloaded, or poorly secured.
Check for:
Gutters pulling away from the fascia
Uneven gutter lines
Water spilling over the sides during rainfall
Local gutter installation contractors can inspect for early signs of separation and tighten brackets or replace worn-out hangers. It’s always more affordable to fix these small issues early than to replace an entire section later.
3. Ensure Proper Water Flow and Drainage
After a Frederick MD gutter installation, homeowners should make sure that water flows freely through the downspouts and away from the foundation. Blocked or poorly positioned downspouts can lead to costly damage over time.
To maintain proper flow:
Clear any clogs from the downspouts
Make sure downspouts extend at least 4–6 feet from the house
Consider installing splash blocks or extenders
If you notice puddles forming near your foundation, that’s a red flag that something’s wrong with your drainage setup.
4. Trim Trees and Overhanging Branches
Overhanging trees can lead to clogged gutters, broken brackets, and damaged rooflines. Even if your gutter installation in Frederick is perfectly done, nearby trees can cause debris buildup and heavy branch impacts.
Prevent damage by:
Trimming back branches at least 6–10 feet from the roof
Cleaning up fallen leaves and pine needles promptly
Monitoring roof valleys and gutter intersections for build-up
Proper tree maintenance not only extends the life of your gutters but also helps protect your roof and siding.
5. Install Gutter Guards for Added Protection
Many gutter installation companies in Frederick now offer gutter guard systems to prevent clogs and reduce maintenance. These mesh or perforated covers sit over your gutters and block large debris while allowing water to flow through.
Benefits include:
Fewer cleanings per year
Reduced risk of clog-related overflow
Longer gutter lifespan
If your home is surrounded by foliage or you’re frequently hiring gutter cleaning in Frederick MD, guards may be a cost-effective upgrade to consider.
6. Watch for Water Damage and Staining
After a rainstorm, take a quick walk around your home to inspect the siding, fascia, and foundation. Water stains or peeling paint can indicate that your gutters aren’t directing water where they should.
Common signs of poor drainage include:
Dirty streaks on siding beneath the gutters
Peeling paint on fascia boards
Soil erosion or exposed roots around the base of your home
These signs often point to overflowing or misaligned gutters. If you notice these issues, contact trusted gutter installation contractors in your area to diagnose the problem before it escalates.
7. Check for Animal Activity
Birds, squirrels, and insects often view gutters as nesting grounds. If you spot twigs sticking out of your gutters or hear scratching in the downspouts, you may have some unwanted tenants.
To prevent infestations:
Install mesh screens on downspouts
Clean gutters thoroughly each season
Seal any nearby openings in your roofline
Animals can do more than just clog gutters—they can chew through parts of your home’s structure or cause water to back up onto the roof.
8. Re-Seal and Re-Caulk as Needed
Over time, caulking around gutter joints and corners can wear away. This leads to leaks, drips, and moisture damage. Especially in Frederick’s fluctuating temperatures, seasonal expansion and contraction can crack sealants.
Routine checks should include:
Corner joints
End caps
Seams where gutters connect
Use a waterproof gutter sealant to patch minor leaks, or call your original gutter installation contractors to professionally re-seal vulnerable areas.
9. Check Slope and Pitch Annually
The slope of your gutters ensures water flows smoothly to the downspouts. If the pitch is off—even by a little—water will pool and eventually cause damage.
An ideal slope is about 1/4 inch of decline for every 10 feet of gutter length.
You may not notice an issue until you see standing water. If so, call your gutter installation in Frederick experts to re-align the system. It’s a fast fix that protects the entire structure.
10. Keep Records of Your Maintenance
It’s smart to document every inspection, cleaning, and repair. Not only does this help you plan future maintenance, but it also:
Boosts resale value by showing proof of upkeep
Helps with warranty claims
Gives contractors a history if repairs are needed
If you used reputable gutter installation companies, they may already keep a file of your installation and service records—don’t hesitate to request it for your home files.
Final Thoughts: Protect Your Investment with Consistent Care
A high-quality gutter system can last 20 years or more—but only with the proper care. Whether you've recently completed a Frederick MD gutter installation or are planning to in the near future, establishing a gutter maintenance routine ensures your home stays protected and dry through every season.
Look beyond the initial installation and think long-term. Clean your gutters regularly, inspect for issues, trim nearby trees, and seek professional help when needed. When in doubt, turn to local experts who specialize in gutter installation near me and understand the unique challenges of maintaining homes in Frederick, Maryland.
Politz Enterprises Roofing Inc. provides trusted, professional gutter services in the Frederick area—helping homeowners maintain strong, effective drainage systems for lasting peace of mind.
0 notes