#how to install wordpress on localhost using xampp server
Explore tagged Tumblr posts
Visit Tumblr Blog
Explore Tumblr blogs with no restrictions, modern design and the best experience.
Last Seen Tumblr Blogs


Fun Fact
The average Tumblr user visits about 67 pages every month.
Text
Expert Advice: How to Install WordPress on Localhost Using XAMPP
As someone who’s built and scaled countless WordPress sites, I always recommend setting up a local environment before touching a live server. Whether you're testing themes, developing custom plugins, or just learning the ropes — installing WordPress on localhost using XAMPP is a must-have skill in your toolkit.
Let me walk you through it like I would with a junior dev on my team.
🔧 Step 1: Set Up Your Local Server with XAMPP
Start by downloading XAMPP from apachefriends.org. Choose the version that matches your OS.
Once installed:
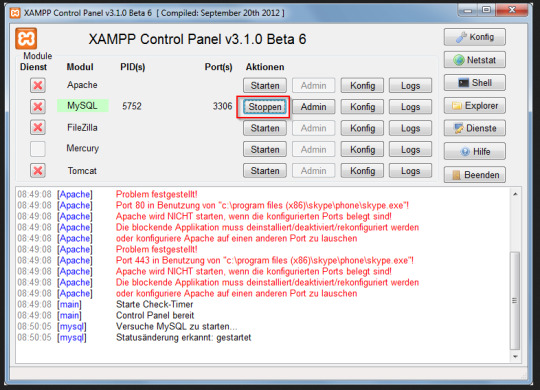
Launch the XAMPP Control Panel.
Start Apache and MySQL — these are your local web server and database engine.
🧠 Pro Tip: If Apache doesn’t start, check for port conflicts (Skype and other apps love port 80).
📁 Step 2: Prepare WordPress Files
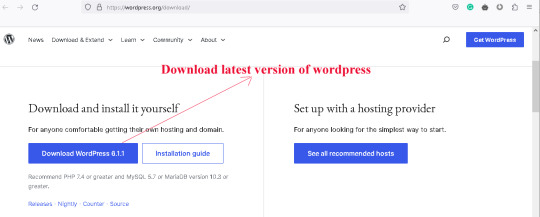
Download the latest version of WordPress from wordpress.org.
Then:
Extract the ZIP file.
Move the folder into your htdocs directory (usually C:\xampp\htdocs\ on Windows).
Rename it to something clean and relevant — I usually go with the project name (e.g., clientsite).
🗃 Step 3: Create a Database
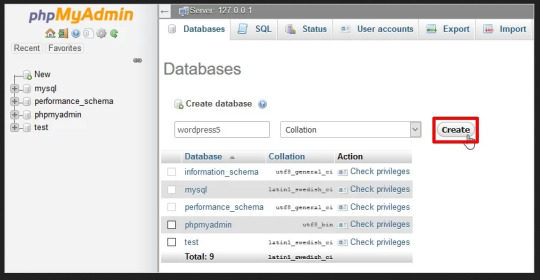
Head to http://localhost/phpmyadmin.
Click on the Databases tab.
Create a new database (e.g., clientsite_db).
No need to create tables — WordPress will handle that during installation.
⚙️ Step 4: Install WordPress
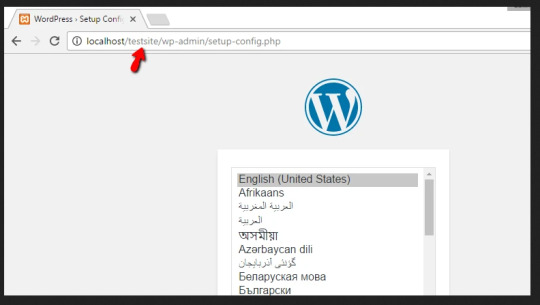
Now go to http://localhost/clientsite in your browser.
Choose your language.
Enter your database details:
Database Name: clientsite_db
Username: root
Password: (leave blank)
Submit and run the installation.
Set your site title, admin username, and password. Keep these credentials secure — even on localhost.
🚀 Step 5: Log In and Start Building
Access your dashboard at http://localhost/clientsite/wp-admin.
From here, you’re in full control. Install themes, test plugins, build layouts — all without risking a live site.
🧠 Final Thoughts from a Pro
Running WordPress locally is a game-changer. It gives you the freedom to experiment, break things, and build confidently. I use this setup for everything from client prototypes to plugin testing.
👉 Want the full breakdown with screenshots and extra tips? Read the complete guide on our blog: How to Install WordPress on Localhost Using XAMPP — it’s written for creators who want to work smarter, not harder.
#how to install wordpress on localhost using xampp#how to install wordpress on localhost using xampp server#how to install wordpress on localhost xampp#how to install wordpress on xampp localhost#how to install wordpress on localhost xampp 2021#how to install wordpress on xampp localhost pdf#how to install wordpress on localhost using localwp#how to install wordpress on localhost wamp#how to install wordpress on localhost#how to install wordpress using xampp
0 notes
Text
Complete PHP Tutorial: Learn PHP from Scratch in 7 Days
Are you looking to learn backend web development and build dynamic websites with real functionality? You’re in the right place. Welcome to the Complete PHP Tutorial: Learn PHP from Scratch in 7 Days — a practical, beginner-friendly guide designed to help you master the fundamentals of PHP in just one week.
PHP, or Hypertext Preprocessor, is one of the most widely used server-side scripting languages on the web. It powers everything from small blogs to large-scale websites like Facebook and WordPress. Learning PHP opens up the door to back-end development, content management systems, and full-stack programming. Whether you're a complete beginner or have some experience with HTML/CSS, this tutorial is structured to help you learn PHP step by step with real-world examples.
Why Learn PHP?
Before diving into the tutorial, let’s understand why PHP is still relevant and worth learning in 2025:
Beginner-friendly: Easy syntax and wide support.
Open-source: Free to use with strong community support.
Cross-platform: Runs on Windows, macOS, Linux, and integrates with most servers.
Database integration: Works seamlessly with MySQL and other databases.
In-demand: Still heavily used in CMS platforms like WordPress, Joomla, and Drupal.
If you want to build contact forms, login systems, e-commerce platforms, or data-driven applications, PHP is a great place to start.
Day-by-Day Breakdown: Learn PHP from Scratch in 7 Days
Day 1: Introduction to PHP & Setup
Start by setting up your environment:
Install XAMPP or MAMP to create a local server.
Create your first .php file.
Learn how to embed PHP inside HTML.
Example:
<?php echo "Hello, PHP!"; ?>
What you’ll learn:
How PHP works on the server
Running PHP in your browser
Basic syntax and echo statement
Day 2: Variables, Data Types & Constants
Dive into PHP variables and data types:
$name = "John"; $age = 25; $is_student = true;
Key concepts:
Variable declaration and naming
Data types: String, Integer, Float, Boolean, Array
Constants and predefined variables ($_SERVER, $_GET, $_POST)
Day 3: Operators, Conditions & Control Flow
Learn how to make decisions in PHP:
if ($age > 18) { echo "You are an adult."; } else { echo "You are underage."; }
Topics covered:
Arithmetic, comparison, and logical operators
If-else, switch-case
Nesting conditions and best practices
Day 4: Loops and Arrays
Understand loops to perform repetitive tasks:
$fruits = ["Apple", "Banana", "Cherry"]; foreach ($fruits as $fruit) { echo $fruit. "<br>"; }
Learn about:
for, while, do...while, and foreach loops
Arrays: indexed, associative, and multidimensional
Array functions (count(), array_push(), etc.)
Day 5: Functions & Form Handling
Start writing reusable code and learn how to process user input from forms:
function greet($name) { return "Hello, $name!"; }
Skills you gain:
Defining and calling functions
Passing parameters and returning values
Handling HTML form data with $_POST and $_GET
Form validation and basic security tips
Day 6: Working with Files & Sessions
Build applications that remember users and work with files:
session_start(); $_SESSION["username"] = "admin";
Topics included:
File handling (fopen, fwrite, fread, etc.)
Reading and writing text files
Sessions and cookies
Login system basics using session variables
Day 7: PHP & MySQL – Database Connectivity
On the final day, you’ll connect PHP to a database and build a mini CRUD app:
$conn = new mysqli("localhost", "root", "", "mydatabase");
Learn how to:
Connect PHP to a MySQL database
Create and execute SQL queries
Insert, read, update, and delete (CRUD operations)
Display database data in HTML tables
Bonus Tips for Mastering PHP
Practice by building mini-projects (login form, guest book, blog)
Read official documentation at php.net
Use tools like phpMyAdmin to manage databases visually
Try MVC frameworks like Laravel or CodeIgniter once you're confident with core PHP
What You’ll Be Able to Build After This PHP Tutorial
After following this 7-day PHP tutorial, you’ll be able to:
Create dynamic web pages
Handle form submissions
Work with databases
Manage sessions and users
Understand the logic behind content management systems (CMS)
This gives you the foundation to become a full-stack developer, or even specialize in backend development using PHP and MySQL.
Final Thoughts
Learning PHP doesn’t have to be difficult or time-consuming. With the Complete PHP Tutorial: Learn PHP from Scratch in 7 Days, you’re taking a focused, structured path toward web development success. You’ll learn all the core concepts through clear explanations and hands-on examples that prepare you for real-world projects.
Whether you’re a student, freelancer, or aspiring developer, PHP remains a powerful and valuable skill to add to your web development toolkit.
So open up your code editor, start typing your first <?php ... ?> block, and begin your journey to building dynamic, powerful web applications — one day at a time.

0 notes
Text
How to Set Up a Local Development Environment for Web Development
If you’re learning web development or working on projects, having a local development environment is essential. It allows you to build, test, and experiment with websites without affecting a live site. Setting this up may sound technical, but it’s easier than you think. In this guide, we’ll go step by step to help you get everything ready.
Why Do You Need a Local Development Environment?
A local development environment allows you to work on a website directly on your computer before making it live. This helps in:
✅ Testing without risk – You can make changes and fix issues without affecting the actual website. ✅ Faster development – No need to upload files every time you make an update. ✅ Better debugging – You can test features in a controlled space before launching.
Now, let’s get started with setting up your local development space.
Step 1: Choose a Code Editor
A code editor is where you write and edit your website files. Some of the best options include:
Visual Studio Code (VS Code) – Free, lightweight, and packed with useful extensions.
Sublime Text – Simple and fast, but some features require a paid license.
Atom – Another free editor, though it’s not as fast as VS Code.
For beginners, VS Code is the best choice because of its ease of use and built-in tools.
Step 2: Install a Local Server
Websites that use PHP, WordPress, or databases need a local server to run properly. Here are some tools that provide everything you need:
XAMPP – Supports Apache (server), MySQL (database), and PHP. Works on Windows, macOS, and Linux.
MAMP – Similar to XAMPP but designed for macOS and Windows users.
Local by Flywheel – Great for WordPress development, offering a simple setup.
How to Install XAMPP (Recommended for Beginners)
Download XAMPP from the official website and install it.
Open the XAMPP Control Panel.
Start the Apache and MySQL services.
Place your project files inside the htdocs folder (inside the XAMPP installation directory).
That’s it! Now, you can access your project by opening http://localhost/yourprojectname in your browser.
Step 3: Install a Version Control System (Git)
Git helps track changes in your project and makes collaboration easier. It’s widely used by professional developers and every website development company in India prefers it for managing code.
Installing Git
Download Git from the official website.
Follow the installation steps and complete the setup.
Open a terminal or command prompt and type:
bash
CopyEdit
git --version
If Git is installed correctly, you’ll see the version number displayed.
For projects that involve teamwork, platforms like GitHub, GitLab, and Bitbucket help store and manage code online.
Step 4: Set Up a Database (If Needed)
If your website uses databases, you’ll need software to manage them. MySQL is the most common choice and comes with XAMPP.
To manage your database visually, use phpMyAdmin, which is included in XAMPP.
How to Access phpMyAdmin
Open your browser and go to http://localhost/phpmyadmin/.
Click New, name your database, and start adding tables.
For larger projects, tools like MySQL Workbench or DBeaver provide advanced database management features.
Step 5: Use a Package Manager (Optional but Useful)
A package manager simplifies installing tools and libraries needed for development. Here are two important ones:
Node.js & npm (for JavaScript-based projects) – Download from the official Node.js website. npm (Node Package Manager) comes included.
Composer (for PHP projects) – Helps manage PHP dependencies efficiently.
Using a package manager ensures you get the latest versions of necessary tools without manually downloading files.
Step 6: Test Your Setup
Before you start coding, make sure everything is working properly.
Open your code editor and create a simple index.html file inside your project folder.
Write a basic HTML structure and save the file.
Open it in your browser or, if using a local server, navigate to http://localhost/yourprojectname.
If everything is displayed correctly, your local development environment is ready!
Step 7: Start Building Your Website
Now that your setup is complete, you can start creating your website. Whether you’re working on static sites, dynamic applications, or WordPress projects, this local setup will make development smoother.
For businesses, having a well-structured development environment is important. If you’re looking for professional help, Dzinepixel, a leading website development company in India, offers expert solutions to build and manage websites efficiently.
Conclusion
Setting up a local development environment might seem technical at first, but once you have the right tools, it becomes easy. Whether you’re building personal projects or working professionally, having a local setup speeds up development, reduces errors, and allows safe testing before going live.Now that your environment is ready, start coding, experimenting, and creating amazing websites! 🚀
#performance marketing agency odisha#performance marketing agency bhubaneswar#website development company in india#Integrated Digital Marketing agency#best web development company in Odisha
0 notes
Text
How to Set Up a Local Development Environment for Web Development

If you’re learning web development or working on projects, having a local development environment is essential. It allows you to build, test, and experiment with websites without affecting a live site. Setting this up may sound technical, but it’s easier than you think. In this guide, we’ll go step by step to help you get everything ready.
Why Do You Need a Local Development Environment?
A local development environment allows you to work on a website directly on your computer before making it live. This helps in:
✅ Testing without risk – You can make changes and fix issues without affecting the actual website. ✅ Faster development – No need to upload files every time you make an update. ✅ Better debugging – You can test features in a controlled space before launching.
Now, let’s get started with setting up your local development space.
Step 1: Choose a Code Editor
A code editor is where you write and edit your website files. Some of the best options include:
Visual Studio Code (VS Code) – Free, lightweight, and packed with useful extensions.
Sublime Text – Simple and fast, but some features require a paid license.
Atom – Another free editor, though it’s not as fast as VS Code.
For beginners, VS Code is the best choice because of its ease of use and built-in tools.
Step 2: Install a Local Server
Websites that use PHP, WordPress, or databases need a local server to run properly. Here are some tools that provide everything you need:
XAMPP – Supports Apache (server), MySQL (database), and PHP. Works on Windows, macOS, and Linux.
MAMP – Similar to XAMPP but designed for macOS and Windows users.
Local by Flywheel – Great for WordPress development, offering a simple setup.
How to Install XAMPP (Recommended for Beginners)
Download XAMPP from the official website and install it.
Open the XAMPP Control Panel.
Start the Apache and MySQL services.
Place your project files inside the htdocs folder (inside the XAMPP installation directory).
That’s it! Now, you can access your project by opening http://localhost/yourprojectname in your browser.
Step 3: Install a Version Control System (Git)
Git helps track changes in your project and makes collaboration easier. It’s widely used by professional developers and every website development company in India prefers it for managing code.
Installing Git
Download Git from the official website.
Follow the installation steps and complete the setup.
Open a terminal or command prompt and type:
bash
CopyEdit
git --version
If Git is installed correctly, you’ll see the version number displayed.
For projects that involve teamwork, platforms like GitHub, GitLab, and Bitbucket help store and manage code online.
Step 4: Set Up a Database (If Needed)
If your website uses databases, you’ll need software to manage them. MySQL is the most common choice and comes with XAMPP.
To manage your database visually, use phpMyAdmin, which is included in XAMPP.
How to Access phpMyAdmin
Open your browser and go to http://localhost/phpmyadmin/.
Click New, name your database, and start adding tables.
For larger projects, tools like MySQL Workbench or DBeaver provide advanced database management features.
Step 5: Use a Package Manager (Optional but Useful)
A package manager simplifies installing tools and libraries needed for development. Here are two important ones:
Node.js & npm (for JavaScript-based projects) – Download from the official Node.js website. npm (Node Package Manager) comes included.
Composer (for PHP projects) – Helps manage PHP dependencies efficiently.
Using a package manager ensures you get the latest versions of necessary tools without manually downloading files.
Step 6: Test Your Setup
Before you start coding, make sure everything is working properly.
Open your code editor and create a simple index.html file inside your project folder.
Write a basic HTML structure and save the file.
Open it in your browser or, if using a local server, navigate to http://localhost/yourprojectname.
If everything is displayed correctly, your local development environment is ready!
Step 7: Start Building Your Website
Now that your setup is complete, you can start creating your website. Whether you’re working on static sites, dynamic applications, or WordPress projects, this local setup will make development smoother.
For businesses, having a well-structured development environment is important. If you’re looking for professional help, Dzinepixel, a leading website development company in India, offers expert solutions to build and manage websites efficiently.
Conclusion
Setting up a local development environment might seem technical at first, but once you have the right tools, it becomes easy. Whether you’re building personal projects or working professionally, having a local setup speeds up development, reduces errors, and allows safe testing before going live.Now that your environment is ready, start coding, experimenting, and creating amazing websites! 🚀
#website development company in india#web design company india#online reputation management companies in bhubaneswar#digital marketing services in bhubaneswar#seo services in bhubaneswar
0 notes
Text
How to Install WordPress Locally on Your MacBook (Easy Guide)
🚀 Exciting news for all you WordPress developers and enthusiasts! 🎉 Just published a new blog post on how to easily install WordPress locally on your MacBook! 💻 Perfect for testing themes, plugins, and building websites offline. No more messing with live servers! 🙌 This step-by-step guide walks you through the entire process, making it super simple even for beginners. Whether you're using MAMP, XAMPP, or another local development environment, this tutorial has you covered. 🤓 Check it out now and start building your WordPress projects locally! 👇 #WordPress #LocalDevelopment #MacBook #Installation #Tutorial #WebDev #MAMP #XAMPP #Localhost #PHP #MySQL #WordPressTutorial #WebDevelopment #Coding #Tech #BlogPost #NewBlog #LearnToCode #RTFM #100DaysOfRTFM #Innovation #Technology #Creativity #LocalWP #SoftwareDevelopment #DigitalStrategy #DigitalMarketing
So, you’re ready to dive into the world of WordPress development, but you don’t want to mess with a live server just yet? Great idea! Setting up WordPress locally on your MacBook is the perfect way to experiment, test themes and plugins, and build your website in a safe environment. This guide will walk you through the process step-by-step. Why Install WordPress Locally? Before we jump in, let’s…
#Installation#Local Development#Localhost#MacBook#MAMP#MySQL#PHP#Tutorial#Web Development#WordPress#XAMPP
0 notes
Text
How to Install XAMPP for Windows 10 - XAMPP WordPress For Beginners
To install XAMPP on Windows 10 and set it up for WordPress, follow these steps:
Step 1: Download XAMPP
Go to the official XAMPP website.
Click on the "XAMPP for Windows" button.
Once the installer is downloaded, locate the .exe file (usually in the Downloads folder).
Step 2: Install XAMPP
Double-click the .exe file to start the installation process.
Choose the components you want to install. For WordPress, you need at least Apache, MySQL, and PHP. These are selected by default, so you can leave them as is.
Choose the installation folder (default is usually fine).
Click "Next" and follow the prompts.
During installation, the installer may ask if you want to start the XAMPP Control Panel. Leave it checked and click "Finish."
Step 3: Start Apache and MySQL
Open the XAMPP Control Panel (it should have opened automatically, or you can search for it in the Start menu).
Click the "Start" button next to Apache (this will run the web server).
Click the "Start" button next to MySQL (this will start the database server).
Make sure both Apache and MySQL show "Running" in green.
Step 4: Install WordPress
Download the latest version of WordPress from the official WordPress website.
Extract the WordPress ZIP file.
Move the extracted folder (the WordPress folder) into the htdocs folder of your XAMPP installation (usually located at C:\xampp\htdocs).
Step 5: Create a Database for WordPress
Open your browser and go to http://localhost/phpmyadmin/.
In the phpMyAdmin dashboard, click on "Databases."
Create a new database for WordPress. Give it a name (e.g., wordpress_db) and click "Create."
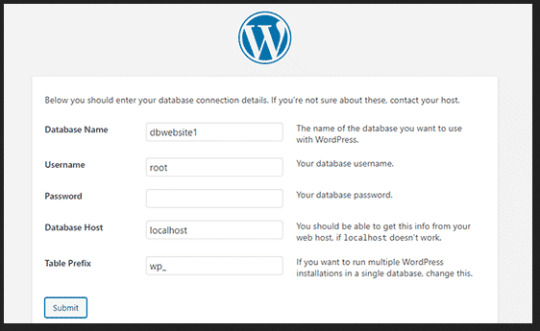
Step 6: Configure WordPress
Open your browser and go to http://localhost/wordpress (or the folder name you chose).
The WordPress installation screen should appear.
Select your language and click "Continue."
On the next screen, enter your database details:
Database Name: The name you created (e.g., wordpress_db).
Username: root (default for XAMPP).
Password: Leave this blank (default for XAMPP).
Database Host: localhost (default).
Table Prefix: Leave as wp_ unless you want to change it.
Click Submit and then Run the Install.
Step 7: Complete the WordPress Setup
Fill in the site details (site title, admin username, password, and email).
Click "Install WordPress."
Once the installation is complete, you’ll see a success message. You can now log in to your WordPress dashboard at http://localhost/wordpress/wp-admin.
Final Notes
To stop your server, go to the XAMPP Control Panel and click "Stop" for Apache and MySQL.
If you need to make your local WordPress site public, you'll have to configure port forwarding or use a tool like Local by Flywheel or XAMPP for public access.
#installxampp#xamppforbeginners#xamppwindows10#wordpressinstallation#localserversetup#runwordpresslocally#xamppwordpress#webdevelopment#phpdevelopment#wordpressforbeginners#tutorial2025#localwordpress#xamppsetup#installingwordpress#wordpresssetup#beginnerfriendly#xamppguide#developmenttutorial#learnwordpress#wordpresslocally
0 notes
Text
How to Move Your WordPress Site from Localhost to a Live Server
Developing a WordPress site on localhost is a great way to build and test your website in a controlled environment. However, the real challenge arises when it's time to move the site from your local server to a live hosting environment. If not done correctly, you could encounter broken links, missing images, or even database errors.
In this blog, we'll guide you through a step-by-step process to successfully move your WordPress site from localhost to a live server.

Step 1: Choose the Right Hosting Provider
Your first step is to select a reliable web hosting provider that meets your website’s needs. Look for:
Server Speed: Fast servers for better performance.
Uptime Guarantee: At least 99.9% uptime to ensure availability.
Ease of Use: User-friendly dashboards and tools.
WordPress Support: Hosting optimized for WordPress websites.
Popular options include Bluehost, SiteGround, and WP Engine.
Step 2: Export Your Local WordPress Database
The database is the backbone of your WordPress site. To export it:
Open phpMyAdmin on your local server (e.g., XAMPP or WAMP).
Select your WordPress database.
Click on the Export tab and choose the Quick Export method.
Save the .sql file to your computer.
Step 3: Upload Your WordPress Files to the Live Server
To move your files:
Compress Your WordPress Folder: Zip your local WordPress installation folder.
Access Your Hosting Account: Use a file manager or an FTP client like FileZilla.
Upload the Files: Transfer the zipped folder to your hosting server's root directory (usually public_html).
Unzip the Folder: Extract the files once uploaded.
Step 4: Create a Database on the Live Server
Now, set up a new database on your live hosting server:
Log in to your hosting control panel (e.g., cPanel).
Navigate to the MySQL Databases section.
Create a new database, database user, and password.
Assign the user to the database with full privileges.
Step 5: Import the Database to the Live Server
Open phpMyAdmin in your hosting control panel.
Select the new database you created.
Click the Import tab.
Choose the .sql file you exported from your localhost.
Click Go to import the database.
Step 6: Update the wp-config.php File
To connect your site to the live database:
Locate the wp-config.php file in your WordPress installation.
Open the file in a text editor.
Update the following lines: define('DB_NAME', 'your_live_database_name'); define('DB_USER', 'your_live_database_user'); define('DB_PASSWORD', 'your_live_database_password'); define('DB_HOST', 'localhost'); // Keep this unless your host specifies otherwise.
Save the file and upload it to your server via FTP.
Step 7: Update URLs in the Database
Your localhost URLs need to be replaced with your live site URLs.
Use a tool like Search Replace DB or run SQL queries in phpMyAdmin.
In phpMyAdmin, run the following query: UPDATE wp_options SET option_value = 'http://your-live-site.com' WHERE option_name = 'siteurl'; UPDATE wp_options SET option_value = 'http://your-live-site.com' WHERE option_name = 'home';
Step 8: Test Your Live Website
Once everything is uploaded and configured, check your website by entering its URL in a browser. Test for:
Broken Links: Fix them using plugins like Broken Link Checker.
Missing Images: Ensure media files were uploaded correctly.
Functionality: Verify forms, buttons, and features work as expected.
Step 9: Set Up Permalinks
To ensure proper URL structure:
Log in to your WordPress admin dashboard on the live site.
Go to Settings > Permalinks.
Choose your preferred permalink structure and click Save Changes.
Step 10: Secure Your Live Website
After migrating, secure your site to prevent vulnerabilities:
Install an SSL Certificate: Most hosting providers offer free SSL certificates.
Update Plugins and Themes: Ensure everything is up to date.
Set Up Backups: Use plugins like UpdraftPlus for regular backups.
Conclusion
Moving your WordPress site from localhost to a live server may seem daunting, but by following these steps, you can ensure a smooth and error-free migration. A successful move allows you to showcase your site to the world, engage your audience, and achieve your goals.
Start today and take your WordPress project live with confidence!
0 notes
Text
How do you edit WordPress on a localhost?
Editing a WordPress site on localhost involves setting up a local development environment on your computer. Here's a general guide on how to do this:
1. Install a Local Server Environment:
You can use software like XAMPP, MAMP, or Local by Flywheel. These tools provide a local server environment with Apache, MySQL, and PHP.
Download and install the software of your choice.
2. Download WordPress:
Visit the official WordPress website (https://wordpress.org/) and download the latest version of WordPress.
3. Set Up Database:
Open your local server software and start the server.
Create a new database for your WordPress installation. Note down the database name, username, and password.
4. Install WordPress:
Extract the WordPress zip file you downloaded.
Move the WordPress files to the root directory of your local server (e.g., htdocs in XAMPP).
Rename the wp-config-sample.php file to wp-config.php.
Open wp-config.php and enter your database details (database name, username, password).
5. Access Local WordPress Site:
Open your web browser and go to http://localhost/yourwordpressfolder (replace "yourwordpressfolder" with the actual folder name where you installed WordPress).
6. Edit Your WordPress Site:
Log in to your local WordPress site using the credentials you set during the installation.
You can now edit your WordPress site just like you would on a live server. Install themes, plugins, and make changes to content and settings.
7. Theme and Plugin Development:
If you are a developer and want to make theme or plugin changes, you can create a themes or plugins folder inside the wp-content directory and develop your code there.
8. Save Changes:
Any changes you make on your localhost won't affect your live site until you migrate the changes. For this, you might use a migration plugin or manually transfer files and the database.
Important Note: Always remember that changes made on your localhost won't reflect on the live site until you manually migrate the changes. Be cautious when making significant changes, and consider using a backup solution.
If you plan to move your site from localhost to a live server, you'll need to export your database and migrate your files. There are plugins and manual methods available for this purpose.
1 note
·
View note
Text
Creating a Local WordPress Site Using XAMPP: A Comprehensive Guide(2023)
Creating a Local WordPress Site Using XAMPP: A Comprehensive Guide

At , we understand the importance of having a local WordPress site that allows for easy development and testing before going live. In this article, we will provide you with a step-by-step guide on how to create a local WordPress site using XAMPP, a free and open-source software that allows you to run a web server and database server locally on your computer.
Step 1: Download and Install XAMPP
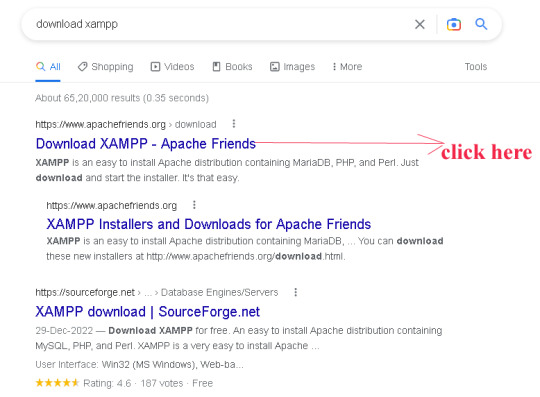
The first step to creating a local WordPress site using XAMPP is to download and install software on your computer. XAMPP is available for Windows, Mac, and Linux operating systems, so be sure to download the version that is compatible with your computer. this way you can xampp download

Once downloaded, double-click the installation file and follow the prompts to install XAMPP on your computer. During the installation process, you will be asked to select which components to install. Make sure to select Apache and MySQL as they are necessary for running a local WordPress site. xampp server can use ram of your pc more to fix problem do not open any other application in your system
Step 2: Start Apache and MySQL Servers
After installing XAMPP, you will need to start Apache and MySQL servers to run a local WordPress site. To do this, open the software's Control Panel and click on the Start buttons next to Apache and MySQL.
Step 3: Create a Database
Next, you will need to create a database for your local WordPress site. To do this, open your web browser and navigate to http://localhost/phpmyadmin/. This will bring up the phpMyAdmin page where you can manage your databases. Click on the Databases tab and enter a name for your database. Click on the Create button to create the database.
Step 4: Download and Install WordPress
Now it’s time to download and install WordPress. You can download the latest version of WordPress from the official WordPress website (https://wordpress.org/download/). Once downloaded, extract the WordPress files to the htdocs folder located in the XAMPP installation directory. Rename the extracted WordPress folder to your preferred name for your local WordPress site.
Step 5: Configure WordPress
After installing WordPress, you will need to configure it to work with your local server. To do this, open the wp-config.php file located in your local WordPress site’s root directory and edit the following lines:
- define('DB_NAME', 'database_name_here'); - define('DB_USER', 'username_here'); - define('DB_PASSWORD', 'password_here'); - define('DB_HOST', 'localhost'); Replace the database_name_here, username_here, password_here, and localhost with the database name you created earlier, “root” for the username, leave the password blank, and localhost for the database host.
Step 6: Install WordPress
Now that WordPress is configured, it’s time to install it. To do this, open your web browser and navigate to http://localhost/. This will bring up the WordPress installation page where you will need to enter the necessary details such as site title, username, and password. Once completed, click on the Install WordPress button to install WordPress on your local server.
Step 7: Access Your Local WordPress Site

Congratulations! You have successfully created a local WordPress site using XAMPP. To access your site, simply open your web browser and navigate to http://localhost/. If you want to know about basic plugins to install in your WordPress? the technical word gives you this information free of cost
Conclusion
Creating a local WordPress site using XAMPP is an essential step for any WordPress developer or website owner. With XAMPP, you can easily develop and test your website locally before going live, saving time and ensuring a smooth transition. Follow the step-by-step guide provided in this article to create your own local WordPress site using XAMPP.
FAQ
What is XAMPP for Windows?XAMPP for Windows is a free and open-source web server solution that allows developers to easily create and test dynamic web applications locally on their Windows machines. It is a combination of several software components, including Apache, MySQL, PHP, and Perl, that work together to provide a complete web server environment. 1. Three important pieces of information about XAMPP for Windows are: It includes Apache, MySQL, PHP, and Perl: These are the four essential components that make up XAMPP for Windows, and they allow developers to create, test, and deploy web applications on their local machines. 2. It is free and open-source: XAMPP for Windows is completely free to use, and its open-source nature means that developers can modify and customize it to suit their specific needs. 3. It is easy to install and use: XAMPP for Windows has a simple and intuitive installation process, and once installed, it can be easily configured and managed through a web-based control panel.How do I install XAMPP for Windows?To install XAMPP for Windows, follow these steps: 1. Download the latest version of XAMPP for Windows from the official Apache Friends website. 2. Run the downloaded installer and follow the on-screen instructions to complete the installation process. 3. Choose which components you want to install, such as Apache, MySQL, PHP, and Perl. 4. Once the installation is complete, start the XAMPP Control Panel and start the Apache and MySQL services. 5. Open a web browser and navigate to http://localhost to verify that XAMPP for Windows is installed and running correctly. Three important pieces of information about installing XAMPP for Windows are: 1. Choose which components to install: XAMPP for Windows includes several software components, so it's important to choose which ones you need for your particular project. 2. Start the Apache and MySQL services: XAMPP for Windows installs Apache and MySQL as Windows services, which means they will start automatically whenever you boot your machine. However, you may need to manually start them using the XAMPP Control Panel if they are not running. 3. Verify that XAMPP for Windows is installed correctly: Once you've installed XAMPP for Windows, it's a good idea to verify that it's working correctly by navigating to http://localhost in your web browser. Read the full article
1 note
·
View note
Text
How to download and Install WordPress | step by step | create a database in phpMyAdmin

In this video we’ll show you, step-by-step, how to set up or host a WordPress website on your PC, we will be using the XAMPP server and guide you hosting a WordPress website on your machine with a mysql database created using in phpMyAdmin database panel. You can watch the YouTube video down below, which will give you further assistance with XAMPP Server and assist you hosting your site. https://youtu.be/qcPs5p1Dc2c How to download and Install WordPress | step by step | create a database in phpMyAdmin To know how to download and install apache http XAMPP server, phpMyAdmin SQL Database? Click Here open your Chrome and search for WordPress download. click on the first link or Click Here scroll down and click on download WordPress 6.1.1, every time you can see a new version released over there, and let the download be complete Extract the Downloaded Zip file once the downloaded is complete show in folder, this will be a zipped file copy the file on the desktop, and paste it here extract the file to some folder Create a base folder for your website files go to C:Drive >> xampp >> hddocs, and create a new folder for your website, I'm calling it "wp-testsite1" and click enter, you can define the folder name as you want, this will be the prefix to your website url, so make sure it does not contain any spaces and copy all the files which has been extracted from the downloaded wordpress zip file create a database for our WordPress website open your XAMPP control panel, and start your Apache and MySQL server note the port number, now open Chrome and visit the phpMyAdmin database panel using the below link as follows http://localhost:/phpmyadmin click on databases, type the database name you want, I'm calling it "wp-testsite1-db", to support the database in multiple languages we will be choosing the option called collation and click create Start installing WordPress go to http://localhost:/ which you just created "wp-testsite1" in my case and hit enter a. Choose your language preferences Append Database to your website a. Enter the database name which you just created in phpMyAdmin (i.e; "wp-testsite1-db") b. Enter the username root c. password should be empty d. database Source should be localhost click submit and run the installation Configure your Wordpress Website and create a Admin a. Enter your site title b. Enter Admin user name (ex: "TestUser1") c. use a rememberable password click confirm password d. Enter the Admin user email finally click install WordPress Yada! Open your website's Wordpress dashboard once Wordpress is installed you will see success message save your credentials and log into your dashboard by using the below link, you can use your username or email to login along with password http://localhost:/ /wp-admin To know How to host a website on your PC and Access the website on the Lan Network from another computer? Click Here If you find this content helpful, feel free to post a comment, like, share and subscribe on YouTube Read the full article
0 notes
Text
Wordpress localhost ampps alternative

#Wordpress localhost ampps alternative how to#
#Wordpress localhost ampps alternative install#
#Wordpress localhost ampps alternative update#
I had mega problems getting the XAMPP Server working locally, so I decided to try the WAMP. In “Step 5”, you say “With your browser go to Should this be: Thanks so much for your assistance! In “Step 4”, you say “…… the username is root, enter nothing between the ‘.’, and host……” What is the “enter nothing between the ‘…’ referring to? The password?ģ. In “Step 3″, you say ” Go to wamp / www”… This directory does not exist. (get “IE cannot display this webpage” error on this one. No luck on either front, as constant “The requested URL was not found on this server” errors.
#Wordpress localhost ampps alternative install#
Having endless problems with the install and have tried both Nicks and your directions. If you’re having a problem getting your WAMP or XAMPP server online, that’s a whole ‘nother issue, but check to make sure you’re not using IIS infact disable IIS if possible. Step5.)With your browser go to Hope that helps! New file structure will be wamp / Step4.)Unless you’ve changed the db username, password or host name then the db_name is whatever you created in Step 2, the username is root, enter nothing between the ‘.’, and host is localhost. Step 3.) Go to wamp / to a folder ( mysite) with only the content of the wordpress folder dumped directly into ( mysite). With WAMP installed (or XAMPP) your Step 3, 4 and 5 will look different then, our gracious host has suggested, with a MAMP install.
#Wordpress localhost ampps alternative how to#
In the next chapter, I’m going to show you how to create a custom WordPress theme in designer way (no PHP skill is required).įor anyone using WAMP (and possibly XAMPP, have not tested) who has any issues related to Step 3-5, here is your solution: With your browser, go to and follow the instructions to install WordPress.
#Wordpress localhost ampps alternative update#
Open wp-config.php and update the database details (db_name, user, password, host) according to your local server. In the folder, rename the wp-config-sample.php to wp-config.php. Go to the htdocs folder (where you installed the MAMP), extract the wordpress.zip to a new folder (eg. Go to and download the latest build of WordPress. In the phpMyAdmin page, create a new database (eg. Create a New DatabaseĪfter you’ve installed MAMP, run it and it should take you to the start page. I’m using Mac here, so I’m going to install MAMP. In order to run any PHP/database application on a local computer, you need a local host (ie. Run wp-admin/install.php and follow the instructions to install WordPress.īefore you start, let’s look at the requirements to run WordPress: Rename the wp-config-sample.php file to wp-config.php and update the database details according to your local server. Install a local server ( Mac: MAMP, PC: XAMPP or WAMP).ĭownload WordPress from and extract the files to a new folder under the htdocs folder. Here are the simplified steps on how to install WordPress on a local computer: If you have some technical background, you can skip the detailed steps in this tutorial. This tutorial is intended for beginners who want to learn how to run WordPress locally. You can also use the local version to test new plugins, themes, and upgrades. By doing so, it will save you time from updating and previewing files (so, you don’t have to frequently upload files on every change). In this chapter, you will learn how to install WordPress on a local computer. This is the first chapter of the Complete WordPress Theme Guide series.
0 notes
Text
Mamp wordpress mac theme

MAMP WORDPRESS MAC THEME HOW TO
MAMP WORDPRESS MAC THEME FOR MAC OS
MAMP WORDPRESS MAC THEME INSTALL
MAMP WORDPRESS MAC THEME PRO
MAMP WORDPRESS MAC THEME SOFTWARE
Click “Let’s Go!”.Īs you can see above you only need to change the top 3 fields to connect to your database: You’ll then see a screen checking that you have the 5 bits of info you’ll need to configure WordPress. The safest way is to manually create the file.” Ignore it and click “Create a Configuration File”. You can create a wp-config.php file through a web interface, but this doesn’t work for all server setups. With any luck, you’ll be greeted with a screen saying, “There doesn’t seem to be a wp-config.php file.
MAMP WORDPRESS MAC THEME INSTALL
Having created the database you are nearly ready to install WordPress! Go to in your browser.
Type a name for your database (no spaces or special characters) and remember it.
Click Databases in the second line of tabs in blue.
Now that you have all this MAMP goodness installed on your machine, everything that you put in the folder Applications/MAMP/htdocs/ ends up on your localhost “website” which you can access through a browser at Next you should download the most recent version of WordPress (how many times have we all done that?) After unzipping, place the /wordpress/ folder inside your /htdocs/ folder.
P is for PHP (or Perl or Python) the programming languages used for web development.
M is for MySQL the database management system (or database server).
MAMP WORDPRESS MAC THEME FOR MAC OS
M is for Mac OS X, your operating system.
MAMP WORDPRESS MAC THEME SOFTWARE
MAMP is a acronym that stands for the stack of software it uses: This can be done in 5 minutes.įirst of all you should download and set up MAMP.
MAMP WORDPRESS MAC THEME HOW TO
The following video shows you how to install WordPress on your Mac using MAMP. If you are on a Windows PC you can use XAMPP. Getting WordPress installed on your own computer, as if your computer was a webhost’s server, is easy on a Mac with MAMP. Why would you want to do this? You’ll find the process much quicker and it’ll stop you going crazy waiting for files to upload to the server. It does not store any personal data.Any sort of WordPress development – testing themes and plugins, creating themes and plugins, etc. The cookie is set by the GDPR Cookie Consent plugin and is used to store whether or not user has consented to the use of cookies. The cookie is used to store the user consent for the cookies in the category "Performance". This cookie is set by GDPR Cookie Consent plugin. The cookie is used to store the user consent for the cookies in the category "Other. The cookies is used to store the user consent for the cookies in the category "Necessary". The cookie is set by GDPR cookie consent to record the user consent for the cookies in the category "Functional". The cookie is used to store the user consent for the cookies in the category "Analytics". These cookies ensure basic functionalities and security features of the website, anonymously. Necessary cookies are absolutely essential for the website to function properly. Well, it's either a blackberry iced-tea mojito, or a nice flat white coffee with a double shot of espresso, or, a caramel macchiato coffee. You know what I love sipping on whilst I'm working on website projects? Step One: Go get yourself a beverage of your choice
MAMP WORDPRESS MAC THEME PRO
I'm running a 2016 MacBook Pro with Touch bar with the latest version of Mac OS, however, it really doesn't really matter which version of the OS you're using or how old your Mac is, this tutorial is universal.Īre you ready? Let's get to it. OK, so now let's get on with the detailed tutorial on how to install WordPress locally on your Mac.
You save yourself money on additional web hosting resources, and you don't need to purchase a new domain for your local site either.
If you're a web developer like myself, a great way to start a new project is locally, before moving it over to a staging or live site.
You can access your site offline since it's installed locally on your Mac.
You can do all the messing around you want without running the risk of breaking your live site.
There are some advantages of hosting a WordPress website locally on your computer, here are some of them. I much prefer to mess around with a WordPress site that is actually installed locally on my Mac. Reason being is that if I make a mistake, I could bring down my entire site.Īnd the headache of trying to fix things I could do without. These days, however, I try not to do too much messing around with my actual live site. I think it's a great way to learn how to do new things with WordPress. Hey, I'm exactly the same, I love messing around with my site. If you have a WordPress website then I'm sure you love to spend time messing around with it, tweaking it endlessly. In this post, I'll show you how to install WordPress locally on a Mac computer using MAMP.
0 notes
Text
How to Host WordPress Website From Localhost to Server
How to Host WordPress Website From Localhost to Server Before you can move your WordPress website from localhost to server, you'll need to change the link structure of the content files. By default, WordPress URLs start with https://localhost/. This means that you'll need to change the link structure to match your live server installation. Duplicator plugin The Duplicator plugin for hosting a WordPress website from localhost to server will automate the process of setting up a WordPress site on a new server. After installing the plugin, the WordPress dashboard will show a Duplicator section. If there are no packages yet, click the Add Package button. A download archive and installer file will appear. Once you download it, you can follow the installation instructions. The Duplicator plugin backs up your entire site, including all files, plugins, themes, pages, posts, media, and media. The plugin can create an archive of your website as a zip file. If you choose the wrong archive, your site will not be restored. XAMPP The first step to host a WordPress website on a server is to install the WordPress application on the hosting server. To do this, you need to download the latest version of WordPress from WordPress.org and manually unzip it into the XAMPP folder. Once the program has finished installing, you can create a database and folder to store your website data. XAMPP is a free web application package that runs on all operating systems. It has different versions for Linux, Mac OS X, and Windows. Once you download and unzip the XAMPP file, follow the installation instructions. In some cases, XAMPP will prompt you to select which Windows version you want to run, although this is generally not necessary if you're using the program on a Windows computer. If you're using a Mac or Linux computer, you can also use XAMPP to host your WordPress website. phpMyAdmin First, you'll need to start the Apache Web Server and MySQL Database. Once you've done that, open up phpMyAdmin by going to localhost/phpmyadmin. You'll see a list of all the databases and URLs for your WordPress website. Now, you need to import your database from your localhost to your server using phpMyAdmin. To do so, you'll need to open phpMyAdmin and navigate to your hosting account's control panel. Once you've launched the program, you'll see a list of database names. Choose the one you want to import and click Export. Then, you'll need to create a new database in your new hosting account. Note that some hosts disable the ability to create databases using phpMyAdmin, so it's best to check with your hosting provider before you try this. cPanel To host a WordPress website on a server, you'll first need to create a MySQL database. If you already have one, you can skip this step. If not, you can create a new one by using the MySQL Database Wizard. You'll find this wizard in the Databases section of your cPanel dashboard. Click on the "Create a new database" icon, and enter a name for it. After that, the wizard will create a new database for your WordPress site. You'll also need to know how to install FTP on your computer. FTP is a file transfer protocol. You can use it to transfer files to and from your server. WordPress Installing WordPress on a localhost can help you get started with building your site without the need for a user server. It also allows you to test customizations and settings before transferring them to the live server. In addition, you can use it to test any third-party tools, plugins, or themes before committing them to a live server. The first step is to open phpMyAdmin and navigate to the root directory of your local WordPress website. This directory contains your wp-admin and wp-includes files. Once you have the files you need to move your site to the remote server, upload them there. These files will replace their counterparts on the remote server. permalink structure Moving your WordPress website from localhost to server is an excellent option for building many different sites without the need for an internet connection. It also allows you to test new settings and customizations, including the WordPress core installation, plugins, and themes, without affecting your live website. This way, you can identify any conflicts or issues before transferring your changes to your live site. The first step to move your WordPress website from localhost to a live server is to get an account with a web host. This will allow you to upload your website from localhost to the live server in a few steps. In order to do this, you will need a web hosting account, a domain name, and an FTP program. You should already know how to use an FTP program, such as FileZilla or WinSCP. DNS name If you are creating a WordPress website locally, you need to change the DNS name of the site to point to the server. You can do this on your computer. This will make your site available to everyone. After you've changed the DNS name, you can go live! Follow these instructions to move your WordPress website. You can also use cPanel to move your site. If you're using IPv4, you can use the localhost DNS name. If you're using IPv6, you'll want to use the server name. The localhost name resolves to 127.0.0.1, which is a reserved top-level DNS name. This allows developers to test their sites without causing any unauthorized changes. How to Host WordPress Website From Localhost to Server Read the full article
0 notes
Text
Wamp server 64 bit for windows 10

Set up Wamp server on windows 10 - ElderNode Blog.
Wamp server for windows 10 64 bit free download - movieslasem.
Frequently Asked Questions (FAQs) - Snap Creek Software.
How to download Windows Installer 5.0.
WampServer - Browse /WampServer 3/WampServer 3.0.0 at.
Wampserver - Files and addons.
Php - Call to undefined function oci_connect() - Stack Overflow.
WAMPServer - Download.
How to Update to PHP 8 in WAMP Server Localhost - Blog.
Php - Composer install error - requires ext_curl when it's.
UwAmp Wamp Server - Apache MySQL PHP.
How to Install WAMP server in windows 10: Step by Step.
Download WAMPServer 3.2.6 for Windows - F.
Set up Wamp server on windows 10 - ElderNode Blog.
I think the point is that XAMPP works in 32-bit, and can therefore only work with the Oracle 32-bit driver. The Oracle client 32-bit is intelligent enough to be able to talk with the 64-bit server version. But XAMPP-32 is not intelligent enough to work with the Oracle 64-bit client driver.. Jul 01, 2022 · Install WordPress on Windows Using WampServer. WampServer or WAMP is a compilation of Apache web server, PHP and MySQL bundled for Windows computers. All of them are separate open-source software. However, installing them separately is not quite easy even for experienced users. Download WebStorm: The Smartest JavaScript IDE by JetBrains.Windows Installer 3 1 64 bit download - X 64-bit Download.Downloads - MAMP & MAMP PRO.Welcome to CodeIgniter.FusionInventory.WampServer (64-Bit) - Free download and software reviews - CNET Download.Télécharger WinRAR gratuit pour PC - CCM - CommentCaMarche.Télécharger gratuitement WampServer sur Futura.Download Release.
Wamp server for windows 10 64 bit free download - movieslasem.
Jan 24, 2021 · Step 0: Download the PHP 8 zip version from the PHP Download site for Windows. Choose the x64 Thread Safe version if you have 64bit Windows. As of now PHP 8.0.1 is available so I have downloaded PHP 8.0(8.0.1).
Frequently Asked Questions (FAQs) - Snap Creek Software.
Step 9. Select the components that you want to install and click on the "Next" button. Step 10. Select the start menu folder. Step 11. "Ready to Install" window will appear on the screen and then, click on the "Next" button. Step 12. Now, select the default browser and default text editor for the wamp server. Step 12. Download WampServer 64 bits (x64) 3.2.6. WampServer est disponible gratuitement (sous licence GPL). Vous pouvez remplir ce formulaire qui nous permettra de vous faire parvenir les actualités formation d’Alter Way, société éditrice, ainsi que toutes les informations liées aux évolutions de WampServer. WampServer 64-Bit is an open-source web development platform for Windows that developers use to test web applications on a local machine. WampServer is an open-source web development stack that developers can use to test their own applications and run other programs locally. For the web developer, a tool like this can ease development considerably.
How to download Windows Installer 5.0.
Oct 09, 2011 · Windows Installer 5.0 is released with Windows Server 2008 R2 and Windows 7. Windows Installer 5 is not available as a standalone version and you can either download Windows 7 SDK Web installer or the Windows 7 SDK ISO file. The advantage of the web installer is you can choose to install any subset of the SDK. WampServer (anciennement WAMP5) est une plateforme de développement Web de type WAMP, permettant de faire fonctionner localement (sans avoir à se connecter à un serveur externe) des scripts PHP.
WampServer - Browse /WampServer 3/WampServer 3.0.0 at.
3.2.6. Apr 29th, 2022. Older versions. Advertisement. WampServer is a collection of web development tools that you can use to install an Apache server with PHP and MySQL database. An open source package that you need to test the function of your website locally. You need these tools if you do backend coding since this is the only way that you. Step 3: Installing the app from Windows Store. When you've found the WampServer (64-bit) on windows store, you'll see the name and logo, followed by a button below. The button will be marked Free, if it's a free app, or give the price if it's paid. Click the button and the installation will begin.
Wampserver - Files and addons.
How to Download and install Wamp Server 3.2 on Windows 10 error free. This is a tutorial on how to download and install Wamp Server on your Windows 10. The. WAMPServer is an excellent development tool, allowing developers to quickly set up a web server that they can deploy their web applications to and test things like website design and dynamic website features easily, and from the comfort of a local machine. It is not entirely beginner-friendly, however, as the documentation for WAMPServer can be. Download. 596.33 MB. free. WampServer is a collection of web development tools that you can use to install an Apache server with PHP and MySQL database. An open source package that you need to test the function of your website locally.
Php - Call to undefined function oci_connect() - Stack Overflow.
The default database manager is MySQL, see wamp(64)/ for details.... With Windows 64-bit, it is imperative to install both 32 and 64 bit of each package.
WAMPServer - Download.
WampServer aims to help developers who need to create advanced web applications. The software is available for free for both 32-bit and 64-bit Windows computers. It’s compatible with Windows Vista, 7, 8 and 10, but it won’t work with Windows XP, SP3 or Windows Server 2003. You can use WampServer with Apache, PHP, MySQL and MariaDB. Jan 01, 1970 Method 1: Unintall app Manually. Hover your mouse to taskbar at the bottom of your Windows desktop. Then click the “Start” button / Windows logo. Select the “Control Panel” option. Click the Add or Remove Programs icon. Select “WampServer (64-bit)” from apps that displayed, then click. UBugtack Your new lightweight and powerful bugtracker, compatible with Slack, Github... Try it Free.
How to Update to PHP 8 in WAMP Server Localhost - Blog.
Wampserver 3.2.9 64 bit - Apache 2.4.53 - PHP 8.1.5…5.6.40 - MySQL 5.7.38/8.0.29 - MariaDB 10.5.15/10.7.3 PhPMyadmin 5.1.3 - MysqlDumper 1.24.5 on W10 and W7 Pro 64 bit Documentation Apache - Documentation PHP - Documentation MySQL - Wampserver install files & addons.
Php - Composer install error - requires ext_curl when it's.
WampServer 64-bit 3.2.6. WampServer x64 is a Windows web development environment. It allows you to create web applications with Apache, PHP and the MySQL database. It also comes with PHPMyAdmin to easily manage your databases. WampServer installs automatically (installer), and its usage is very intuitive. Jun 21, 2022 · The Uniform Server is a free lightweight WAMP server solution for Windows. Less than 50MB, modular design. The server includes the latest versions of Apache 2, PHP (switch between PHP 7.0, PHP 7.1, PHP 7.2, PHP 7.3, PHP 7.4, PHP 8.0 or PHP 8.1), MySQL, MariaDB with phpMyAdmin built in. No installation required! No registry dust! Just unpack and. Oct 02, 2021 · The store will show Ubuntu 18.04 or 20.04, select and install any of them as per your choice. This tutorial is written as per Ubuntu 18.04, those who want to go for the 20.04 version can see this one- How to install NextCloud on Ubuntu 20.04 LTS WSL Windows 10 and then use the launch button.
UwAmp Wamp Server - Apache MySQL PHP.
WampServer is a Web development platform on Windows that allows you to create dynamic Web applications with Apache2, PHP, MySQL and MariaDB. WampServer... in both 32 and 64 bit versions. Wampserver is not compatible with Windows XP, SP3, or Windows Server 2003. Features. Manage your Apache, MySQL and MariaDB services; Install and. WampServer, also known as WAMP, is a free, open-source Content Management System used to easily deploy, manage and configure websites, blogs, social media applications and many more. WampServer has been around since 1993, with many developers contributing their time and efforts to make it even better. The WampServer is very flexible and you can.
How to Install WAMP server in windows 10: Step by Step.
This is of vital importance since if we use a 64-bit computer, we must install the versions for 64 and 32 bits too. Both can be downloaded from here. Tool to check if the VC++ packages needed to Wampserver 3 are installed correctly. All VC Redistribuable Packages (x86_x64) (32 & 64bits). With that in mind, now let’s look at how to install a WAMP server. Step 1: Installing and Setting Up WAMP Server on Windows Computer. The first step is to download the latest version of the installer file for the WAMP server on to your Windows PC. To do this: Visit the WAMPserver website. WampServer Files A Windows Web development environment for Apache, MySQL, PHP databases Brought to you by: alterway, herveleclerc... If you do it you will get an instable Wampserver. Version 2.2e 32 or 64 bits Apache 2.2.22 or 2.4.2 MySQL 5.5.24 PHP 5.3.4 or 5.4.3 PHPMyAdmin 3.5.1 SqlBuddy 1. 3.3 XDebug.
Download WAMPServer 3.2.6 for Windows - F.
WampServer 64-bit is a Windows web development environment. It allows you to create web applications with Apache, PHP, and the MySQL database. It also comes with phpMyAdmin to easily manage your databases. The app is the only packaged solution that will allow you to reproduce your production server. Once the software is installed, you have the.
Other content:
Ti Nspire Cx Cas Student Software Download Free
Visiting Card Software Free Download Full Version
Windows 10 Product Key For Hp Laptop
1 note
·
View note
Text
How to install WordPress on XAMPP by STEP IADM Student
WordPress is the most wanted and easiest open source CMS. It’s easy to use and SEO-Friendly. However, today we are talking about how to download and then upload on any local server. Step by step. First of all, Obviously, we need a local Server.
Step 1:
How to Download XAMPP:
XAMPP is the local server application. Which is easy to download and use. Here is the link for Xampp the application. And then install it properly then start the:
1:Apaches 2: MySQL (Database)
e.g.
Step 2:
Download WordPress on PC:
After the Server connection, Secondly, you need to have WordPress. Hence, Download Setup. Here is the link. And secondly, you just need to have WordPress in Zip File. Thereafter extract the WordPress in Address: My Computer>C file> Xampp> ht docs. thereafter you get the folder in htdocs with the name of WordPress. Rename the folder as you wish. And then save it. Presently I save it as the name of ZIPPER (Folder name).
e.g.
Step 3:
Localhost:
Now open any browser and type the URL: localhost/PHPMyAdmin.
Click on the New button left on your dashboard. Enter your file name in the box. Which you save in the docs folder. Thereafter click on Create Button:
e.g.
Step 4:
Go to URL: localhost/zipper (your domain name or folder name which you save in htdocs)
C:\xampp\htdocs\zipper
e.g.
Select your Language and then click on Continue Button
This is the screen you have now:
Step 5:
e.g.
Now enter your Database Detail here: look how to put the detail in this:
1: Enter your Database name first
Remember that database has a username and password by default
The default user and password are:
2: Root
3: Null (Database has no Password so leave it Empty)
Step 6:
e.g.
Step 7:
And then Click on Submit Button
e.g.
Click on the Button and Run the installation
Step 8:
Now you get the interface like below:
e.g.
Step 9:
Now put some more detail. Like the bellow Screenshot:
e.g.
Step 10:
Now you get the Screen like this:
e.g.
Now your WordPress is successfully installed on Xampp.
Step 11:
Click on Login Button or go on another tab URL: Localhost/zipperr/wp-admin
e.g.
Step 12:
URL: Localhost/zipperr/wp-admin
Now you get the screen like this:
e.g.
Click on Login Button
And now your WordPress is completely installed and ready to use:
e.g.
Here is the Dashboard of WordPress here:
hence you can approach your WordPress dashboard. Whenever you want.
open a tab and go to localhost/Fav folder Name) /wp-admin
e.g.
Enter your Login Detail here. And press the button login.
similarly, we complete all processes of WordPress installation on Xampp or Local Server
all rights reserved Boss
1 note
·
View note
Text
Xampp On External Drive

To really be able to develop for WordPress or another CMS it’s best to have a local web server. This will save you time in FTPing and editing remote files on your final server. I used to use WAMP server, although very good, it had some limitations. I found I was switching between my desktop and laptop, making things unnecessarily complicated. Than I discovered XAMPP Lite, which I installed on a USB stick, and it works great. Another simple option is Instant WordPress, I haven`t played around to much, but I think you are much more limited.
Getting Started With Xampp
Xampp On External Drive Mac
Xampp Tutorial
Xampp Where Is Localhost
Installing XAMPP Lite
Installing XAMPP lite is pretty straight forward, use the link below to use the self extracting EXE file.
https://bellaload91.tumblr.com/post/654440098576957440/video-converter-to-avi-full-version-downloadmarcus-reid. Download XAMPP USB Lite 1.7.7 – as an EXE file, Zip and 7zip can be downloaded here.
Example, open up the XAMPP Configuration of Control panel by clicking on Config. Then click the button marked Service and Port Settings. A new box will open and be on the Apache tab. Change the port to something random, such as 11111. Then click the Filezilla tab, and change it. Not using the setup script, or selecting relative paths in the setup script, is preferred if you are installing XAMPP on a usb drive. Because on each pc such a drive can have an other drive letter. You can switch from absolute to relative paths at any time with the setup script. I can't seem to start MySQL on my external USB 3.0 drive. In the past, I haven't had problems working off of external drives. This is the first time using a large drive. Any help will be appreciat. If you're trying to get XAMPP to use a network drive as your document root you have to use UNC paths in httpd.conf. XAMPP will not recognize your mapped network drives. For example the following won't work, DocumentRoot 'X:/webroot' But this will, DocumentRoot '//192.168.10.100/webroot' (note the forward slashes, not back slashes). Hi, I am using XAMPP for developing my Inventory management system. I have stored the XAMPP in Drive C in Windows. But there is a risk if windows corrupt I will lose all my data, So I want to save the XAMPP in Drive D and acces all the pages stored in httdocs from Drive D. Please Guide me.
Launch the Installer, and browse where you want to install XAMPP.
Select the flash drive and directory you wish to use. You should have at least 400 MB of free space, plus how ever much space you need for your website, and databases.
Click install, all of the files will be extracted to your flash drive. This may take a few moments depending on your flash drive’s speed.
Click Finish and you are now done!
Launching XAMPP
Launching XAMPP is very easy. Navigate to the directory on your USB drive and launch xampp-control.exe.

Getting Started With Xampp
Click Start beside Apache and MySql to get your webserver running.
Please note: Do not check the Svc box, as this will run the server as a Windows service. To keep XAMPP portable, you do not want it running as a service!
Windows Firewall or your firewall may prompt you that it blocked the server; click Allow access to let your server run.
Open your favorite web browser and type localhost in the address bar. If everything is working correctly you should see the following in your address bar. Choose your default language…
Xampp On External Drive Mac
You should now see the default XAMPP page.
Click status to see that everything is working. If it is not try restarting the services.
You are now ready to start building and adding webpages your mobile webserver. Save all of your web files in the xampphtdocs folder on your flash drive.
Xampp Tutorial
Well that is it for installing XAMPP Lite. Check back tomorrow for how to setup wordpress in XAMPP Lite.
Xampp Where Is Localhost
Complete XAMPP details are available at http://www.apachefriends.org/en/xampp-windows.html.
0 notes