#i had to delete tons of files or move them to the linux partitions and install the game from a USB stick
Explore tagged Tumblr posts
Visit Tumblr Blog
Explore Tumblr blogs with no restrictions, modern design and the best experience.
Last Seen Tumblr Blogs


Fun Fact
70% of Tumblr users say the Dashboard is their favorite place to spend time online.
Text
Fun fact: Divinity OS 2 Definitive Edition contains the entire original game too. As a separate game. That means when you install it you get 30GB of data that serves no purpose if you actually want to play the DE. You can basically delete the "Data" folder. Just keep the "DefEd/Data" folder.
(This is true for the GOG version, idk how it works on Steam.)
#divinity original sin 2#less fun: my 500GB SSD only has a 150GB windows partition#not easy to free up 60GB for the installation#i had to delete tons of files or move them to the linux partitions and install the game from a USB stick#only to immediately delete half the data again lolol#great work larian
3 notes
·
View notes
Text
Running Traditional HA Clusters on Kubernetes
In an era where everything runs on Kubernetes and a sense of security that all problems are now solved. I can’t help to frown at some of the availability problems that may arise for traditional HA applications. Which of course is stateful and require persistent storage. Modern stateful applications we couldn’t worry less about, that have one way or another, evolved and been rewired to fit cloud-native patterns.
Kubernetes provides automatic recovery in many scenarios and really shines for stateless applications. For stateful applications to behave well on Kubernetes during outages and failures they need to be distributed and built to deal with partitions. That said, any stateful application not providing these mechanics running in a single replica Deployment, could take more then 10 (ten) minutes to recover in the event of a compute node failure.
CSI Introduces volumeMode: Block
As HPE recently introduced the HPE CSI Driver for Kubernetes I got exposed to a ton of new functionality available in Kubernetes. One feature in particular piqued my interest to double-click on and understand better. As a veteran sysadmin I used to build HA clusters with my bare hands. HP ServiceGuard, Oracle RAC and Red Hat Cluster Suite (It’s called something else now) were among the ones I started out with and later on RSF-1 when ZFS came into my field of view. A common theme among them is that they somehow have capabilities to deal with shared storage. So, with the introduction of Raw Block Volume support in the CSI spec, what if we simply could run these cluster software stacks on Kubernetes to provide the traditional sense of high availability combined with automatic recovery?
Corosync and Pacemaker
The most prominent of the open source tools available to build highly available system is by far Corosync and Pacemaker (now governed at clusterlabs.org. I used to support a Deployment Consideration with these tools at Nimble and I couldn’t let go of the idea of running Corosync and Pacemaker on Kubernetes using a ReadWriteMany PVC with volumeMode: Block. Can it be done? Does it work? I knew out the gate that this would be an embryo that would give birth to one of Frankenstein’s creations. I’m happy to report that it can be done and it does work.
The goal of the experiment was to run NFS Ganesha on the HA cluster to provide NFS services to workloads on the Kubernetes cluster. I settled for a 3-node HA cluster to ensure I could sustain one failure and have remaining nodes to perform quorum votes.
Kubernetes Limitations
As I started this journey I knew I needed a tight window to start the Pods and was surprised that I couldn’t find any mechanics for the StatefulSet to perform a synchronized start and a simple stanza to ensure service names where available in DNS before starting. Second, in a 3-node HA cluster there will only be one Pod serving the workload. A traditional Kubernetes Service is not smart enough and will happily throw traffic at non-responding Pods. And to my defeat, ivenessProbes nor readinessProbes could be used here as Pods are not capable of communicating with each other within the StatefulSet unless they’re “Ready”. Which is needed by Corosync and Pacemaker to form the cluster and keep heartbeats. I therefore had to craft my own L4 HAProxy load balancer to deal with both the DNS changes and Pod failures. There are a bunch of issues filed in kubernetes/kubernetes to better understand active/passive applications and there’s definitely work to do here.
The Architecture
I’ll walk through the main container image on how it’s built and used. First things first, the architecture.
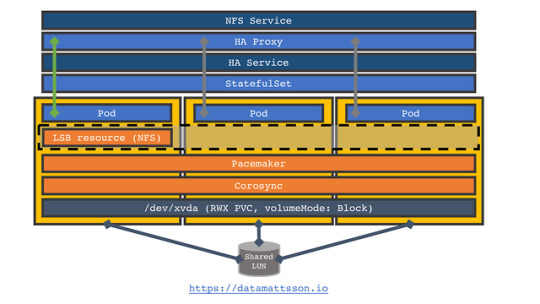
Starting at the bottom we have a PV that has been created through a PVC using the HPE CSI Driver for Kubernetes (Nimble) with ReadWriteMany accessModes in volumeMode: Block. Inside the three replica StatefulSet corosync and pacemaker has been preconfigured with a cib.xml file (this is the file that keeps the cluster in sync). Do note that there are hardcoding galore throughout here, but thanks to the mechanics of the StatefulSet, that’s fine (except for the haproxy.cfg, more on that later). The node names nfs-0.ha to nfs-2.ha are littered throughout. A single LSB (Linux Standard Base service) resource has been preconfigured which consists of a NFS Ganesha server and surrounding dependencies. There’s one “HA” Service that manages intra HA cluster communication and subsequently used by the handcrafted HAProxy three replica Deployment. A dedicated “NFS” Service is serving the HAProxy Deployment and is the endpoint NFS clients eventually connect to. If the Pod goes down or the node fails it runs on fails, corosync and pacemaker will immediately see the failure and reschedule the LSB resource. If the node hosting the LSB resource become isolated, it will automatically shutdown the LSB resource as it does not have enough votes to serve.
The Dockerfile
This Dockerfile produces a 300MB+ image. There’s some unnecessary bits in there like crmsh but I used that to create my initial cib.xml. I also have a crude shell script that I used to clock failover times which rely on bc for some math.
FROM ubuntu:latest ENV DEBIAN_FRONTEND noninteractive RUN apt-get update && \ apt-get install -y \ pacemaker \ corosync \ crmsh \ xfsprogs \ nfs-ganesha-xfs \ host \ bc && \ rm -rf /var/lib/apt/lists/* ADD entrypoint.sh /entrypoint.sh # This is fairly standard ganesha.conf with one export ADD ganesha.conf /etc/ganesha/ganesha.conf # This is the actual LSB resource ADD butler.sh /etc/init.d/butler # Utility to ping the NFS resource (for testing) ADD rpcping.sh /usr/local/bin/rpcping # This is a pre-cooked cib.xml file with my LSB resource and nodes # hardcoded ADD cib.xml /var/lib/pacemaker/cib/cib.xml RUN mkdir /export && \ mkdir /var/run/dbus && \ mkdir -p /run/sendsigs.omit.d/rpcbind ENTRYPOINT /entrypoint.sh
The Entrypoint
Any sane person would’ve used a real programming language. This is not by any means a bullet proof solution.
#!/bin/bash set -e NODES=0 TIMER=30 WAITING=${TIMER} # These are the procs that we monitor inside the container that # should all be running PROCS="dbus-daemon corosync pacemakerd cib stonithd lrmd attrd pengine crmd" # NFS Ganesha rely on a functional dbus system. dbus-uuidgen --ensure dbus-daemon --system --fork set +e # For corosync and pacemaker to have a chance to reach quorum on # first boot, all names must be reachable in DNS. echo -n "waiting for pod service names" until host nfs-0.ha >/dev/null 2>&1 && host nfs-1.ha >/dev/null 2>&1 && host nfs-2.ha >/dev/null 2>&1; do echo -n . sleep 1 done # Corosync might fail first start sometimes... while ! service corosync start 2>&1 | grep '...done.'; do if [[ ${WAITING} -eq 0 ]]; then exit 1 fi WAITING=$(expr ${WAITING} - 1) echo "waiting for corosync start (${WAITING}s)" sleep 1 done WAITING=${TIMER} # We’ll ensure are nodes have joined before starting pacemaker while [[ ${NODES} -ne 3 ]]; do if [[ ${WAITING} -eq 0 ]]; then exit 1 fi NODES=$(corosync-cmapctl | grep join_count | wc -l) WAITING=$(expr ${WAITING} - 1) echo "waiting for nodes to join (${WAITING}s, ${NODES} so far)" sleep 1 done set -e service pacemaker start # Monitor all the procs, if pidof fails, the pod dies while [[ 1 ]]; do for PROC in ${PROCS}; do pidof ${PROC} >/dev/null done sleep 5 done
The Butler
The LSB resource is a standard init script which need to conform to a certain standard. Let’s walk through it.
#!/bin/bash set -euxo pipefail # This is a crude POC. Do not use for anything you care about GANESHA_PID=/var/run/ganesha.pid GANESHA_RETRY=5 GANESHA_RETRY_INTERVAL=5 GANESHA_EXPORT=/export GANESHA_DEAD=0 MULTIWRITER_DEVICE=/dev/xvda case $1 in start) # Here’s where the magic sits. If this is first boot, a new # filesystem is created. mkfs.xfs detects if there’s a # filesystem on the volume prior and won’t reformat the # volume on a service move. mkfs.xfs ${MULTIWRITER_DEVICE} || true mount ${MULTIWRITER_DEVICE} ${GANESHA_EXPORT} # Very strange requirement for NFS Ganesha echo "/dev/xvda /export xfs rw,relatime,attr2,inode64,noquota 0 0" >/etc/mtab # Startup all the services service rpcbind start service nfs-common start ganesha.nfsd -L /var/log/ganesha/ganesha.log echo started ;; stop) set +e # The stop sequence will simply kill the NFS process and try # to be clever about if the pidfile gets deleted or not # (sometimes it doesn’t and need help) while [[ ${GANESHA_RETRY} -ne 0 ]] || [[ ${GANESHA_DEAD} -eq 0 ]]; do if [[ -e ${GANESHA_PID} ]]; then if ! kill $(cat ${GANESHA_PID}); then if ! pidof ganesha.nfsd; then echo ganesha is dead, ensure pid file is gone rm ${GANESHA_PID} fi fi GANESHA_RETRY=$(expr ${GANESHA_RETRY} - 1) sleep ${GANESHA_RETRY_INTERVAL} echo retrying ${GANESHA_RETRY} else GANESHA_DEAD=1 GANESHA_RETRY=0 if mountpoint ${GANESHA_EXPORT}; then umount ${GANESHA_EXPORT} fi service nfs-common stop service rpcbind stop echo -n "" >/etc/mtab fi done echo stopped ;; status) # pacemaker periodically checks the status if pidof ganesha.nfsd; then echo running else exit 3 fi ;; *) echo please invoke `basename $0` with start, stop or status as the only argument ;; esac
Assumptions, Secrets and ConfigMaps
As mentioned prior, many values are hardcoded. If you want to mod the service and workload names you’re in for a session. One assumption is being made that everything runs in the default namespace and that your cluster DNS services registers on svc.cluster.local. If you’re deploying to a different namespace and your cluster has a different service domain, edit haproxy.cfg to fit your environment before creating the ConfigMap:
kubectl create configmap haproxy --from-file=./haproxy.cfg
Creating the Secret for Corosync is a bit tricky as the key shared among the cluster members needs to be generated by a corosync tool, in essence:
kubectl run keygen --image=drajen/butler --restart=Never --command -- tail -f /dev/null kubectl exec keygen -- corosync-keygen -l kubectl cp keygen:etc/corosync/authkey authkey kubectl delete pod/keygen
Now, create the Secret:
kubectl create secret generic corosync --from-file=./authkey --from-file=./corosync.conf
These files will be projected in /etc/corosync in each Pod.
Deploy
The workload declarations are quite self-explanatory and I won’t go over those in detail. I have a StorageClass named “hpe-hybrid” that points to my HPE Nimble Storage hybrid array and the PVC to create the shared block device looks like this:
--- apiVersion: v1 kind: PersistentVolumeClaim metadata: name: block spec: accessModes: [ "ReadWriteMany" ] resources: requests: storage: 100Gi volumeMode: Block storageClassName: hpe-hybrid
Pay attention to the accessModes and volumeMode that will provision a 100GiB volume with mulit-initiator access. To expose the device inside the pod, this snippet from the StatefulSet is useful to understand as it differs from the traditional volumeMounts stanza:
volumeDevices: - name: block devicePath: /dev/xvda
The name block refers to a standard PVC stanza:
volumes: - name: block persistentVolumeClaim: claimName: block
Create the PVC and bring up the cluster:
kubectl create -f pvc-rwx-block.yaml -f butler.yaml persistentvolumeclaim/block created service/ha created deployment.apps/haproxy created service/nfs created statefulset.apps/nfs created
In a minute or so, this is what it should look like:
$ kubectl get svc,deploy,statefulset,pods NAME TYPE CLUSTER-IP EXTERNAL-IP PORT(S) AGE service/ha ClusterIP 10.106.82.128 <none> 2049/TCP,111/TCP,2224/TCP,3121/TCP,21064/TCP,5404/UDP,5405/UDP,5406/UDP 103s service/kubernetes ClusterIP 10.96.0.1 <none> 443/TCP 39d service/nfs ClusterIP 10.111.133.174 <none> 2049/TCP,111/TCP 103s NAME READY UP-TO-DATE AVAILABLE AGE deployment.extensions/haproxy 3/3 3 3 103s NAME READY AGE statefulset.apps/nfs 3/3 103s NAME READY STATUS RESTARTS AGE pod/haproxy-684bf78968-4gp5p 1/1 Running 0 103s pod/haproxy-684bf78968-mvw5d 1/1 Running 0 103s pod/haproxy-684bf78968-v74kj 1/1 Running 0 103s pod/nfs-0 1/1 Running 0 103s pod/nfs-1 1/1 Running 0 103s pod/nfs-2 1/1 Running 0 103s
An NFS client
I also composed a client that uses a native NFS PV that has been statically provisioned. It’s not a terribly good example as the client takes 2 minutes to recover when an actual resource move only takes around 20 seconds. This has to do with the linear backoff the NFS client does after a couple of retransmissions and goes into longer sleeps before attempting recovery. I also have issues changing the mountOptions for the NFS PV and have no means to tweak the mount options to attempt recovering faster. Hence I created the rpcping hack to actually monitor service availability.
Anyhow, the NFS client is an ioping that performs an IO on the /nfs mountpoint where the NFS export is mounted. Also pay attention here as you need to change the IP address in client.yaml of .spec.nfs.server of the PV to whatever the NFS service IP address is. Figure out the IP address with:
kubectl get svc/nfs NAME TYPE CLUSTER-IP EXTERNAL-IP PORT(S) AGE nfs ClusterIP 10.110.69.26 <none> 2049/TCP,111/TCP 79m
Go ahead and deploy the client:
kubectl create -f client.yaml persistentvolume/pv-nfs created persistentvolumeclaim/pvc-nfs created pod/ioping created
It’s now possible to observe IO is being performed:
kubectl logs pod/ioping -f 4 KiB <<< /nfs (nfs4 10.110.69.26:/export): request=1 time=646.3 us 4 KiB <<< /nfs (nfs4 10.110.69.26:/export): request=2 time=1.18 ms 4 KiB <<< /nfs (nfs4 10.110.69.26:/export): request=3 time=1.48 ms 4 KiB <<< /nfs (nfs4 10.110.69.26:/export): request=4 time=1.66 ms 4 KiB <<< /nfs (nfs4 10.110.69.26:/export): request=5 time=887.6 us ^C
Another requirement here is of course that the compute nodes need to be capable of mount NFS exports. On Ubuntu, the nfs-common package is required as an example.
Failures
At this stage, a clustered resource running and client accessing it, we should start moving things around and stopping pods. I don’t have enough compute nodes in this environment to simulate a network partition properly. It would also be a very lengthy explanation, copying and pasting etc, so I created a screencast where I move the LSB resource between Pods and shoot it in the head etc.

The key takeaways for the TL;DR, it takes between 10 to 20 seconds to transfer or fail the cluster resource (measured with rpcinfo). The NFS client takes just about 2 minutes to recover.
Summary
These container images have not been optimized for efficiency or fashion. This is a proof of concept. I don’t intend to maintain or support this project. I simply had to kill my own curiosity. Please ping me on Twitter (@datamattsson) if you find this useful or think I wasted a perfectly good weekend and want to express that in writing.
Oh, yes! The source is here. It’s open source under Apache 2.0 and you get to keep both pieces when it breaks.
0 notes