#i switched to an ethernet cable in case it was the wireless adapter but it's still happening
Explore tagged Tumblr posts
Visit Tumblr Blog
Explore Tumblr blogs with no restrictions, modern design and the best experience.
Last Seen Tumblr Blogs


Fun Fact
Tumblr has a 66 index score for customer satisfaction in the US.
Text
tumblr works perfectly fine on my work computer and i cannot for the life of me figure out why the desktop version won't load properly at home
#i feel like there's Something going on in my laptop but again i can't figure out what#i've switched browsers and it happens regardless wrt tumblr#sometimes instagram won't load or even google docs#i switched to an ethernet cable in case it was the wireless adapter but it's still happening#i've run multiple malware + virus scans and got nothing#i checked the wifi itself and supposedly that's working fine#like idk if i'm paying spectrum $90 a month just so they can fuck me over#but i genuinely can not figure out what's going on#jay text
0 notes
Text
Also going to add onto this - if you decide that you don't want to switch to Linux for whatever reason (in my case, it's that I use software for my job that doesn't work well with WINE and that I don't trust myself to not accidentally -rm -rf something important (ie: entire Windows VM)), you can do all of what OP said above on Windows 10.
Just be sure to have an ethernet cable on hand (and an RJ45-to-USB adaptor if needed) because for some fucking reason Windows 10 (when doing a clean install from a boot USB) does not install with drivers for a computer's wireless adapters, though after about 2 minutes of being plugged in after you get past the OOBE it'll install those drivers on it's own without issue.
Also if you decide to go the Win10 direction, Win11 and Win10 licenses are fully interchangeable so you won't need to fuck around with any numbers or anything it'll just work.
I got a laptop with Windows 11 for an IT course so I can get certified, and doing the first time device set-up for it made me want to commit unspeakable violence
Windows 11 should not exist, no one should use it for any reason, it puts ads in the file explorer and has made it so file searches are also web searches and this cannot be turned off except through registry editing. Whoever is responsible for those decisions should be killed, full stop.
Switch to linux, it's free and it's good.
145K notes
·
View notes
Text
How to Connect Switch to Laptop? [Easy Ways]

To connect a switch to a laptop, use an ethernet cable to connect the switch's port to the laptop's ethernet port. Additionally, make sure the laptop has the required drivers installed for the switch to function properly.

Understanding The Basics
Understanding the basics of connecting the switch to a laptop involves different wireless methods.
Wireless Connection: Connect Switch And Laptop Seamlessly
Wirelessly connect your switch to your laptop effortlessly with bluetooth technology. No tangled wires needed, just a simple pairing process. Alternatively, make use of wi-fi direct to establish a direct connection between the two devices. By eliminating the need for an internet connection, this method ensures a seamless gaming experience. Another option is to pair your switch and laptop using a wireless adapter. This adapter enables a stable and reliable connection without the hassle of cables. With these easy steps, you can enjoy gaming on your switch directly from your laptop screen. Say goodbye to limitations and hello to a new level of gaming convenience. Experience the freedom of wireless connectivity today. https://www.youtube.com/watch?v=uHIFip7ZV48
Wired Connection: Connecting Switch To Laptop With Ease
Connecting a switch to a laptop through a wired connection is a breeze. One method involves using an hdmi cable to establish a connection between the devices. Another way is to employ a usb-c cable, which requires a few simple steps to connect the switch and the laptop effortlessly. Additionally, utilizing a capture card is another viable option to link the two devices seamlessly. By following these methods, gamers can enjoy playing their favorite switch games on a larger laptop screen. With the hdmi cable, the video and audio signals are transmitted smoothly, providing an immersive gaming experience. The usb-c cable offers a straightforward setup process, ensuring a reliable connection. The capture card offers the flexibility to capture gameplay footage and stream it directly to the laptop. Connecting a switch to a laptop opens up a world of gaming possibilities.
Troubleshooting Common Issues
Troubleshooting bluetooth connection problems can be a frustrating task, but there are a few simple steps you can take. First, ensure that bluetooth is enabled on both your switch and laptop. Check if there are any physical obstructions or interference that may affect the connection. If the issue persists, try restarting both devices and see if that helps. Additionally, make sure that both devices are within range of each other. If you're still having trouble, updating the bluetooth drivers on your laptop might solve the problem. Diagnosing wifi connection issues between your switch and laptop can also be done by following similar steps. Check if both devices are connected to the same network and try restarting them. In case of hdmi connectivity issues, make sure the hdmi cable is properly connected and functional. Troubleshooting common issues is crucial to ensure a smooth and seamless connection between your switch and laptop.
Enhancing The Gaming Experience
Enhancing the gaming experience by connecting your switch to your laptop is a great way to enjoy games on a bigger screen. Streaming games from your switch to your laptop is made easy with software tools designed for optimization. These tools help ensure a smooth and lag-free gaming experience. By using them, you can maximize the performance of your laptop and enjoy your games without any interruptions. To further enhance your gaming experience, consider following some tips. Optimize your laptop's settings, close any unnecessary background applications, and use a stable internet connection. These simple steps can greatly improve your gameplay and make it more enjoyable. So, connect your switch to your laptop and take your gaming experience to the next level.
Frequently Asked Questions Of How To Connect Switch To Laptop
How Do I Connect My Nintendo Switch To My Laptop? To connect your nintendo switch to your laptop, you'll need an hdmi cable. Connect one end of the cable to the hdmi output port on the nintendo switch dock, and the other end to the hdmi input port on your laptop. Make sure that both devices are powered on and set to the correct input source. Can I Play Nintendo Switch Games On My Laptop Screen? Yes, you can play nintendo switch games on your laptop screen by connecting your switch to your laptop using an hdmi cable. This allows you to enjoy your favorite games on a larger display and have a more immersive gaming experience. What Are The Advantages Of Connecting The Switch To A Laptop? Connecting your nintendo switch to a laptop offers several advantages. It allows you to play games on a larger screen, provides a more immersive gaming experience, and enables you to use your laptop as a secondary display for multiplayer games. Additionally, connecting to a laptop can make it easier to record or stream gameplay. How To Mirror Nintendo Switch To Laptop Screen? To mirror your nintendo switch to your laptop screen, connect the switch to your laptop using an hdmi cable. Then, go to the display settings on your laptop, select the hdmi input source, and choose the option to mirror or extend the display. This will enable you to see the switch's screen on your laptop. Can I Charge My Nintendo Switch Using My Laptop? While it is not recommended to charge your nintendo switch using your laptop, it is possible in some cases. However, charging the switch via a laptop may be slower than using the official charger. It is advised to use the original charger or a recommended third-party charger for optimal charging speed and safety.
Conclusion
Connecting your switch to your laptop is a simple and efficient way to optimize your gaming experience. By following the step-by-step guide outlined in this blog post, you can seamlessly connect the two devices and enjoy a wide range of games on a larger screen. Whether you prefer playing on the go or at home, connecting your switch to your laptop allows for ultimate flexibility and convenience. Additionally, the process outlined here ensures that you can connect your switch to your laptop without any technical difficulties. So, why wait? Start enjoying your favorite nintendo switch games on the big screen today by connecting it to your laptop. Enhance your gaming experience and take your gaming sessions to the next level with this simple and effective solution. Read the full article
1 note
·
View note
Text
What to Do if the Ethernet Keeps Disconnecting on Windows 10 & 11

A major benefit of using an Ethernet connection over Wi-Fi is the improved and consistent network performance. However, this may not always be the case. Your Ethernet connection may occasionally let you down when it disconnects for no apparent reason on your Windows 10 or 11 PC. Before you give up on your Ethernet connection and switch to a wireless one, try the following tips to fix the problem.
1. Disconnect and Reconnect the Ethernet Cable
A loose or damaged Ethernet cable is one of the most common causes of this issue. Hence, you should first disconnect the Ethernet cable and reconnect it. While you are at it, make sure to inspect the cable for any cuts or damage. If the cable or the connector appears to be damaged, try using a different one.
Another thing you should do is clean the Ethernet port on both your computer and router to ensure a secure fit for the cable. If there are multiple ports, try connecting the cable to another port and see if it resolves the issue.
2. Restart Your Router or Modem
This is another basic fix you need to try to resolve any issues with your internet. Rebooting your router or modem should help clear any memory and other issues affecting its performance.

While you are at it, you can consider restarting your PC as well. After that, see if the Ethernet connection on your Windows 10 or 11 PC still disconnects randomly.
3. Enable Automatic DHCP
If you set incorrect IP information on Windows, your Ethernet connection may become unstable and frequently disconnect. To prevent this, you can enable the Automatic (DHCP) option in Windows. Here's how to do that: - Press Win + I to open the Settings app. - Head to Network & internet > Ethernet. - Click the Edit button next to the IP assignment. - Use the drop-down menu to select Automatic (DHCP) and click the Save button.

Once you complete the above steps, Windows will allow automatically obtain the IP address and other network settings from your router.
4. Run the Network Adapter Troubleshooter
Running the Network Adapter troubleshooter in Windows can help fix all kinds of network-related issues, including this one. It will scan your system for any common problems that may have been causing the Ethernet to disconnect and reconnect randomly. To run the Network Adapter troubleshooter: - Press Win + I to open the Settings app. - In the System tab, click on Troubleshoot. - Select Other troubleshooters. - Click the Run button next to the Network Adapter.

Follow the on-screen prompts to finish running the troubleshooter and check if the Ethernet still disconnects after that.
5. Disable and Re-Enable the Ethernet Adapter Driver
Temporary issues with your Ethernet adapter can also cause your connection to keep dropping. Most of the time, you can fix such issues by simply disabling and re-enabling the Ethernet adapter. Here are the steps for the same. - Right-click on the Start icon and select Device Manager from the list. - Double-click Network adapters to expand it. - Right-click the Ethernet driver and select Disable device from the resulting menu. - Select Yes to confirm. - Right-click the Ethernet driver again and select Enable device.

Can’t find your Ethernet driver in the Device Manager? Check our guide on how to restore the missing network adapter on Windows.
6. Prevent Windows From Turning Off the Ethernet Driver
In order to conserve power, your Windows computer turns off your USB devices and network adapter when they are not in use. This could be the reason why Windows may be disconnecting your Ethernet connection. To prevent this, you need to change the power management settings for your Ethernet driver. Here’s how you can go about it. - Press Win + S to access the search menu. - Type device manager in the text box and select the first result that appears. - Expand Network adapters. - Double-click on your Ethernet driver to open its properties. - Switch to the Power Management tab. - Clear the Allow the computer to turn off this device to save power checkbox. - Hit OK.

7. Update the Ethernet Driver
A malfunctioning Ethernet driver can also lead to such anomalies. This usually happens when the Ethernet driver is outdated or incompatible. You can try updating the problematic Ethernet driver to see if that resolves the issue. To do so, use these steps: - Press Win + R to open the Run dialog box. - Type devmgmt.msc in the box and press Enter. - In the Device Manager window, expand Network adapters. - Right-click on the problematic driver and select Update driver. - Select the Search automatically for drivers option. - Click on Search for updated drivers on Windows Update.

After updating the Ethernet driver, check if the issue still occurs.
8. Disable Proxy or VPN Services
Are you using a proxy server or VPN service to hide your online activities? If so, issues with your proxy or VPN server can cause problems with your Ethernet connection. To check for this possibility, you can temporarily turn off your proxy server or VPN connection and see if that restores normalcy.
9. Disable Your Antivirus Program
Many third-party antivirus programs have firewall and network protection features that can sometimes interfere with your network connection. This can cause your Ethernet connection to become unstable or stop working. You can temporarily disable your antivirus program to see if this resolves the issue. Right-click on the antivirus icon on the taskbar and select Disable > Disable until computer is restarted.

If this resolves your problem, you may need to reconfigure your antivirus program and fix any irregularities. Alternatively, you can switch to a more reliable antivirus program. If you need help picking one, check out our guide on the best antivirus programs for Windows.
10. Reset Network Settings
If the above tips do not work, you can reset your PC's network settings as a last resort. This will restore your PC's network settings to their default values, resolving any issues. Note that this process will delete all of your saved Wi-Fi networks and custom DNS settings. If you are okay with this, refer to our guide on resetting network settings in Windows and follow the steps outlined there.
Enjoy a Stable Ethernet Connection on Windows
Whether you rely on a wired connection for gaming, video conferencing, or simply browsing the web, dealing with frequent Ethernet disconnections on Windows can ruin your experience. In most cases, it’s either a faulty Ethernet cable or outdated drivers that cause such issues. In any case, one of the tips mentioned above should help solve the problem, and you should be able to enjoy a stable internet connection. source Read the full article
0 notes
Text
Industry 4.0 requires enclosures for smart sensor applications
The fourth industrial revolution, or "Industry 4.0" for short, has already begun, even if many people are not really aware of this. On the one hand, this is due to the fact that most people have already heard of it, but many are struggling with the definition and its real impact on day-to-day working life. In addition, the topical subjects of IoT (Internet of Things) and IIoT (Industrial Internet of Things) are mentioned in the same breath as Industry 4.0. This makes things a little more complex.


IoT in the household
Digitisation and networking can best be used and understood in your own private environment: with your smartphone, which has meanwhile become "man's best friend", you can today control a wide variety of things, no matter where you are. Individual devices such as the smart watch are linked up with other "smart things" and the data is stored in a centralized secure "cloud". All of this is intended to make our everyday life easier for us. In my opinion much of this is absolutely sensible, such as wearable emergency call systems/transmitters in hospitals or social areas. Or also personal tracking systems in occupations with an increased safety risk. An interesting example is the "Capturs" by the French manufacturer of the same name (www.capturs.com). At first glance this GPS tracking system may seem to cater for the fun factor, but a closer look reveals much more: the wearable device makes it possible for friends, family and fans to keep track of routes and thus to be involved live when persons are pursuing their sports activities, regardless of the terminal unit in question. You can export/save the data (route, distance, elevation, duration) and even publish them in social networks. But now the special feature: in the event of crashes or accidents, departure from the predefined route, longer stay at a given location and when the battery is weak, it automatically sends an email or a text message to certain persons. This makes it possible to call for help quickly in case of emergency. The Capturs was installed in the OKW MINITEC series of enclosures and can be used for all outdoor activities: hiking, skiing, climbing, paragliding etc. Other OKW series of enclosures that can be used for wearables are the BODY-CASE and the ERGO-CASE.
Industry 4.0 and IIoT
Let us come back now to the actual topic of "Industry 4.0" and IIoT "Industrial Internet of Things". There is a significant difference between the two concepts – in short, Industry 4.0 is a high-tech strategy for promoting the digitisation of industrial production; IIoT is the concrete use of smart technologies in the manufacturing industry. Many companies are currently discussing the question of how to make internal processes transparent and how to optimise them across different levels/organisations. In IIoT, it is also basically a question of making things smarter by making them communicate with each other. The focus here is on sensors which are embedded in the devices and which constantly gather and centrally deliver data concerning machinery and special application scenarios or data about the user and the entire value-added chain. The main objectives are always the same: providing better quality, optimising processes and streamlining operations, optimising the use of resources, completing orders faster and delivering them faster to the customers. In addition, an important objective is to significantly shorten the market introduction cycle for new products in order to gain a competitive advantage.
Enclosures and IIoT
Even today, many OKW enclosures series are used for the most varied applications in the smart factory. Subsequent use in day-to-day work is highly varied, and the requirements to be met by the enclosures may therefore vary considerably:
Mobile enclosures for the integration of temperature, humidity or presence sensors – ergonomic design for fatigue-free working.
Installed permanently on the wall as gateways – simple, concealed wall mounting, possibly with security functions
In machines/systems with integrated vibration/pressure and status sensors.
In miniature form for wearable applications – on the arm, wrist, around the neck or in the shirt/trouser pocket
Larger sizes in a robust design – if more space is required for installing components/displays.
Use of high-quality materials for the manufacture of the standard enclosures
High IP classes for the protection of the built-in electronic components and sensors.
Options for modifying the tandard products according to individual customer wishes and requirements.
In the following, I have picked out some interesting examples of customer applications from the field of IIoT for you:
Wireless data logger

With the Almemo 470 wireless data logger by Ahlborn Mess- und Regelungstechnik, you can wirelessly measure climate parameters such as temperature or atmospheric humidity. A flexible connection technology for digital sensors allows the adaptation of a large number of different sensors for measuring different variables.
Application wireless data logger
Wireless network access point
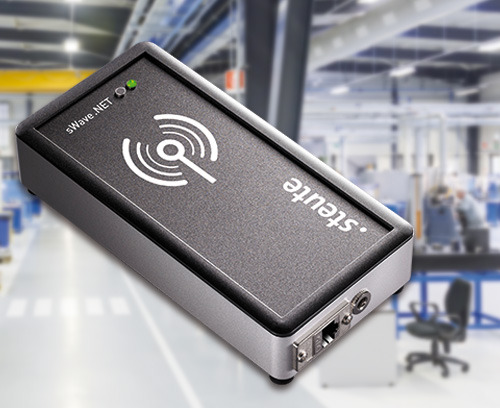
At field level, the sWave.NET wireless network by steute Schaltgeräte GmbH & Co. KG facilitates variable communication between wireless switching devices and access points, which function in a similar manner to a router. They receive signals from wireless switching devices, bundle them and then transmit them, e.g. by Ethernet or WiFi, to one or more application servers. The access points are installed across the transmission range and communicate with the wireless switchgear.
Application wireless network access point
Smart TAG

The conbee Smart TAG is based on the Bluetooth 4.x specification with a range of up to 150 m. The fully configurable TAG has an authentication function using out-of-band or SecureSimple pairing, is forgery-proof and has a motion sensor that is capable of detecting manipulation attempts. Status data are transmitted at dynamically adaptable transmission intervals in advertisement packets that provide information about the object to be tracked. The intelligent TAG cyclically reports its identification number, temperature and movement data as well as battery status and optionally also its position.
Application Smart TAG
Robust UHF reader
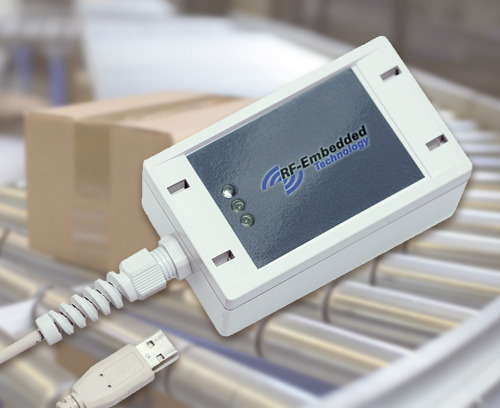
RF-Embedded GmbH has developed an RFID reader for the passive ultra high frequency (UHF) radio range, which generates an energy field from electromagnetic waves. As soon as a passive UHF transponder enters the energy field, it sends the content of its memory to the relevant RFID reader.
Application robust UHF reader
We have now drawn up a list of all enclosures that are suitable for the use of smart sensors under a separate heading. Now you can find a suitable sensor enclosure even more quickly.
Overview IIoT/Sensor Enclosures >>
To ensure that the standard enclosures also meet individual customer requirements in terms of company colour, visual adaptation to the usage environment, company logo, the electronic components and cables etc., we offer a wide range of services: painting, printing, EMC aluminium vapour plating as protection from stray radiation, cutouts/openings, for example for USB/SPI/I2C/LAN connectors or control buttons. In industrial enclosures with high IP classes, the use of special pressure compensation elements is a big advantage. A partial vacuum may be created inside sealed enclosures if there is a change of temperature. Moisture and dirt particles may be sucked in, damaging the sensitive electronics. These OKW pressure compensation elements can counteract this, since they allow an especially high air flow. At the same time the innovative design provides reliable protection against dirt and, if required, is absolutely waterproof up to a pressure of 6 bar.
#Enclosres#enclosure#plastic enclosure#plastic enclosures#okw#OKW Gehäusesysteme#OKW Gehäuse#OKW Enclosures#OKW Enclosure#IoT#IIot#iiot solution#smart factory#smart fabrics#smart industry#industry 4.0#sensor#sensoric#sensor enclosure#IoT enclosures#sensor enclosures#internet of things#industrial internet of things
2 notes
·
View notes
Text
The Raspberry Pi Comes of Age with the Pi 400 Desktop Computer
Raspberry Pi 400
9.00 / 10
Read Reviews
Read More Reviews
Read More Reviews
Read More Reviews
Read More Reviews
Read More Reviews
Read More Reviews
Read More Reviews


Shop Now
Key Features
Ready to use out of the box
Six keyboard variants
Full computer experience
Under $100
Specifications
Brand: Raspberry Pi
Storage: microSDHC
CPU: Cortex-A72
Memory: 4GB
Operating System: Linux (Raspberry Pi OS)
Ports: Gigabit Ethernet, 2 × USB 3.0, 1 × USB 2.0, 2 × micro HDMI, GPIO
Display: Max 4Kp60
Pros
Geared to productivity
Plug and play
Easy to set up
Cons
Not as flexible as the standard Raspberry Pi B boards
No number pad on keyboard
Extension required for most HATs
Buy This Product
Raspberry Pi 400 other
Shop
// Bottom var galleryThumbs1 = new Swiper('.gallery-thumbs-1', { spaceBetween: 10, slidesPerView: 10, freeMode: true, watchSlidesVisibility: true, watchSlidesProgress: true, centerInsufficientSlides: true, allowTouchMove: false, preventClicks: false, breakpoints: { 1024: { slidesPerView: 6, } }, }); // Top var galleryTop1 = new Swiper('.gallery-top-1', { spaceBetween: 10, allowTouchMove: false, loop: true, preventClicks: false, breakpoints: { 1024: { allowTouchMove: true, } }, navigation: { nextEl: '.swiper-button-next', prevEl: '.swiper-button-prev', }, thumbs: { swiper: galleryThumbs1 } });
You've probably heard of the Raspberry Pi. It's a compact, credit card-sized computer that runs Linux and lets you do everything from retro gaming and media streaming to desktop productivity, programming, and even developing your own computer-based projects.
For some, the Raspberry Pi is difficult to get started with. After all, it doesn't look like the popular perception of a computer, rather the inside of a very small PC.
That is about to change, however, with the Raspberry Pi 400: a Raspberry Pi buried inside a keyboard.
A Raspberry Pi in a Keyboard
Essentially a Raspberry Pi 4 inside a keyboard, the Pi 400 has a strong retro feel. While the PCB differs from the main Raspberry Pi 4, and the keyboard follows the design ethos of the official Pi 4 case, there is more going on here.
Back in the 1980s, home computers regularly shipped in units with the keyboard mounted on top. Think of the Commodore 64, ZX Spectrum, and the Pi's spiritual forerunner, the BBC Acorn.
By mounting the Pi inside a keyboard, the Raspberry Pi 400 gains instant productivity points. Don't worry about losing access to the GPIO, either, as it's still provided via an open slot.
Various versions of the Pi 400 are available, each with a choice of 78- or 79-key keyboards. UK, US, German, French, Italian, and Spanish keyboard variants are available at launch.
Two Raspberry Pi 400 Options
Further to the keyboard variants, there are two options for buying a Raspberry Pi 400.
First is the standard computer-only box, which simply features a Raspberry Pi 400 keyboard with the modified Raspberry Pi 4 board inside.
Second is the more attractive version: a full computer kit. This features the Raspberry Pi 400, an official Raspberry Pi mouse, official Raspberry Pi USB-C power supply, microSD to SD card adaptor, micro-HDMI to HDMI cable, and a copy of Gareth Halfacree's Raspberry Pi Beginner's Guide. There's also a preinstalled microSD card already inserted in the Pi 400, ready to boot the operating system.
Unboxing a computer has not been this thrilling in years. There's a real feeling of excitement as you reach for the Pi 400, then discover the extra items. When you've removed the cables and peripherals, you're then surprised by the book. It's a tactile experience that harks back to the days before every piece of vital media was digital; it's wonderful.
If you grew up in the days when detailed user guides shipped with computers, you'll understand the vibe. Too young to remember? Prepare yourself for a totally new experience.
Raspberry Pi 400 Tech Specs
The Pi 400 is equivalent to the 4GB model Raspberry Pi 4. As such, you'll find it can handle most tasks that you throw at it. At the heart of the computer is a Broadcom BCM2711 quad-core Cortex-A72 (ARM v8) 64-bit SoC @ 1.8GHz with 4GB LPDDR4-3200 RAM, and OpenGL ES 3.0 graphics.
Connectivity is via 2 x USB 3.0 and 1 x USB 2.0 ports, a Gigabyte Ethernet port, and Wi-Fi and Bluetooth 5.0 BLE. Wireless networking is dual-band (2.4GHz and 5.0GHz) IEEE 802.11b/g/n/ac. A USB-C port is positioned next to the standard USB slots, but this is for power only (5V DC).
For video out, the Pi 400 has dual micro HDMI out ports, supporting up to 4Kp60, and the device can playback H.265 and H.264 video. A microSD slot sits alongside the micro HDMI ports, with the Pi's 40-pin GPIO header slot next to this.
Measuring 286mm x 122mm x 23mm, the Pi 400 is around the size of an iMac keyboard. Weight is distributed to the rear of the case where the PCB and ports are mounted, aiding comfortable typing.
Plug and Play: Setting Up the Raspberry Pi 400
With a spare monitor available to use, you can have the Pi 400 up and running in under a minute.
After unpacking, simply connect the mouse, ensure the microSD card is inserted, and attach the HDMI cable at both ends. If you're using Ethernet, connect your network cable, then the power adapter to the Raspberry Pi, and switch it on.
A few seconds later, the Raspberry Pi OS will appear. This is the full version of the Linux-based operating system, which means that several key apps are preinstalled. So, you can look forward to the full LibreOffice suite, VLC, and Scratch, SonicPi, and MinecraftPi, among many others. Want more apps? You've got most of the Linux library at your fingertips, from emulators to development tools, games, image editors, and more.
It is worth spending a few words to extoll the virtues of Gareth Halfacree's book. I've written extensively about the Raspberry Pi since 2012, but even I learned something reading this volume. Its only shortcoming, perhaps, is that aside from the first section it is heavily geared towards standard Pi boards. However, this is a minor gripe.
Desktop Replacement, Development Machine, Retro Gaming Center
The Pi 4 4GB version is an adequate desktop replacement. While not as powerful as the 8GB variant, it is nevertheless capable of handling multiple browser tabs, word processing, email, and other productivity tools.

With the Pi 400, you get that same desktop replacement potential, but inside a keyboard. It's a comfortable keyboard, too, and while it misses the keypad, the additional numbers are nevertheless available in conjunction with the fn key. For typing, it is small, easy to use, and doesn't require too much adjustment from other keyboards.
If typing is important to your work but you don't use a word processor, you're probably more interested in coding. Several development tools are built in to Raspberry Pi OS, but others are available. Again, the lack of a number pad might be a minor deficiency for this productivity dynamic, but overall the speed of the keyboard will help overcome this.
Having a keyboard makes retro gaming easier too, especially if you're focusing on platforms with keyboard interfaces.
A common use for the Raspberry Pi is as a media center. Usually, the device is hooked up next to your TV, but the more portable (albeit wired) Raspberry Pi 400 presents the possibility of a Kodi device that sits beside you on the sofa, beaming video content to your TV.
How Suitable Is the Pi 400 as a Hobbyist Machine?
Perhaps the most striking thing about the keyboard-based Raspberry Pi 400 is how different it is to previous models. While the biggest diversion from the B board of the Raspberry Pi 2, 3, and 4 has been the half-sized Pi Zero, the Pi 400 takes things in a new direction.
So, is there a trade-off?
Inevitably. The Pi 400 is geared more towards productivity than it is to building---for example---a webcam, or a robot. Meanwhile, although HATs will retain compatibility, they won't be as compactly arranged as they are with the model B form factor.
But this is largely nitpicking. The other Pi models remain available and completely versatile, suitable for almost all purposes. The Pi 400 has a different aim, the provision of affordable out-of-the-box computing in every environment.
Retro Feels, Linux Stability, and Raspberry Pi Goodness All in One Device
The lack of the complete versatility of the main Raspberry Pi boards aside, the Pi 400 is a complete success.
Previous Raspberry Pi upgrades (all the way back to the Raspberry Pi B+) have concentrated on packing in as much processing power and connectivity as the form factor and price allow. With the Raspberry Pi 400, the computer has literally exploded beyond that, bringing enhanced usability into the equation.
With two bundles available, the Pi 400 Personal Computer Kit seems like the smartest buy, giving you a usable plug-and-play home computer for under $100. But the cheaper Pi 400 kit is ideal if you have all the peripherals already.
Sure, it's a mystery why a Raspberry Pi mounted inside a keyboard didn't happen before now, but if you need an affordable computer suitable for school, college, or programming, the Pi 400 is just perfect.
Now is the time to get on board with the Raspberry Pi. It has finally come of age, feeling less like a versatile gadget, and more like a home computer.
The Raspberry Pi Comes of Age with the Pi 400 Desktop Computer published first on http://droneseco.tumblr.com/
0 notes
Text
10 Useful Ways to Reuse an Old Router.

If your ISP sent you a replacement router, otherwise you will simply want to upgrade, they will be dragged.
What do you have to do with the old router?
If you change your ISP, you will often be prompted to return the old device. But if you have an old router that's circling the place, here are several ways to reuse it.
What you'll do with an old router
It can be during a box; it can overload a drawer or get lost in the back of a closet. In any case, old routers and combined modem/router units are often reused.
Combined modem-router device
We've identified nine ways to reuse an old WiFi router:
Guest WiFi connection
Wireless Repeater
Cheap internet radio
Use the old router as a network switch
Customize as a wireless bridge
Build a reasonable start center
Convert your router to a NAS
Use an old router as an Internet server
A DIY VPN router
Sell your router on eBay
Let's take a look at each of these uses for older routers in more detail.
1. Ceate a wireless repeater
What if your WiFi network doesn't cover the entire range of your home? Although you can choose Powerline Ethernet adapters, adding a second router to the combination can be a good alternative.
This means that you connect the old router to your new wireless network using the WLAN signal. You can then share access to the Wi-Fi network, which provides greater coverage. Although there may be some latency issues, this is usually quick and easy thanks to the expansion of your wireless network.
It has several uses, from better Wi-Fi access to a strange part of the house, so you can stream videos to your tablet while you're in the garden.
2. Wi-Fi connection for guests
If you have people who use your wireless internet regularly, why don't you give them your network?
This is exactly like the wireless repeater project, but with a twist. The router connects to your existing password-protected network but allows passwordless access to new devices. This can use the guest network feature of your old router. By default, this prevents guests from accessing other devices on your network.
If this security level is insufficient, verify the firewall settings on the router that you want to regulate.
3. Cheap Internet Radio Streamer
Would you like to enjoy your favorite radio stations on the Internet? Some routers are often configured to play Internet radio when you are ready to enter the custom OpenWrt or DD-WRT router firmware.
You need additional software, also as a USB sound card, to output audio.
Although it is not a simple compilation and there are many other Internet radio options available, it is often still an excellent project. It gives you an idea of how to install custom firmware, also as an appreciation of how music is streamed.
4. Use the router as an economical network switch
Most routers do not have six Ethernet ports. With the rise of wireless technology in the house, that number could even be as low as four. But with a transparent need for devices connected over Ethernet, you may no longer have a port.
For example, home appliance monitors, smart TVs, and set-top boxes, game consoles, and more may not require wireless networks. You have a physical connection to your network, i. H. Ethernet
If you run out of Ethernet ports, add more with a network switch. It is the network version of an AC outlet, with additional ports connected to a port on the router.
Your old router usually has four or more ports, so the connection immediately increases the number of ports available. You must disable wireless networks on the old router to avoid conflicts.

5. Get your old router to work as a wireless bridge
What if your new router is wireless only? Perhaps the ISP does not offer a router with Ethernet ports, or even uses a 4G Internet provider. Either way, if you want to connect Ethernet devices to your home network, the solution is a wireless bridge.
Although economical, an old router is often used as a wireless bridge.
This works like a cable repeater, but instead of sharing the Wi-Fi connection, the wireless bridge offers Ethernet. The old router connects
6. Build a reasonable start-up
Some routers come with some useful additional ports. In some cases, this may be a USB port, which will make it easier for the OpenWRT or DD-WRT router firmware to flash.
Other devices can accompany a serial interface. These routers are often used as home automation servers.
The router operates a server that you can use to simply connect to your browser. This can be on a PC, or for convenience, on your smartphone.
Although simpler options are available, you may want to use this to require a better understanding of home automation.
7. Convert your router to a NAS
Looking for how to store your data on a device and access it from anywhere in your home? You want Network Attached Storage (NAS), which is essentially a hard drive connected to your network.
While NAS devices are affordable enough to keep an older router, you'll save. Note that this is often limited to routers that run custom firmware (such as DD-WRT) and have a USB port. You should even be ready to scan the contents of all USB devices connected through the router.
(Without USB there are no thanks to the connection of the hard drive or the USB flash drive).
Once you've discovered it, your bespoke NAS should give you instant access to your files from anywhere in the house.
8. Use an old router as an internet server
If your old router runs OpenWRT or DD-WRT and can host a significant NAS or home hub, you can also host a basic website.
This could be a home-only website designed to share important information with your family. Alternatively, it would even be a blog because the custom router firmware supports the LAMP stack. This suggests that you could install WordPress.
Are you running a website and want a reasonable area to test new topics, add-ons, and code? Your old router might be the low-spec server you want.
9. Make your VPN router
Older routers that support custom firmware are often found with VPN software. This suggests that if you have a VPN account with, for example, ExpressVPN, you will often find yourself on your router.
As a result, each device on your network is VPN-protected. Individual client applications are no longer required when connecting through your home network.
Note that some older routers have VPN provisioning, but this only works if they are configured in modem-only mode.
0 notes
Text
Remembering the days we spent chasing congalala, understanding lifi and taking a look at Intel's AX200 wireless card

Summer is at its peak, Rain is around the corner. Soon the heavy clouds will leak, So says my trusty informer.
Between you and me as you might have perceived, but nevertheless I will come out and say it in clear terms, to remove any remaining doubt, that I’m no expert in wireless technology. The whole thing seems to me quite astonishing infact. There lies a box in the corner holding a wand. You (s)witch it on and it will send you data over the air. What sorcery is that?
However many people have pointed out to me that it is no magic. On the contrary it is a phenomenon that has been studied scientists,verified by engineers and regulated law makers. It is very much real. So I take their word for it and believe in it myself.
But technology changes so quickly. Just as we have broken the gigabit barrier in wifi a new invention has come up. LiFi or Light Fidelity a new form of communication that promises something even more incredible. To use visible light for wireless transmission. Our readers demand to know its status. We scramble for answers.
And before we could satisfactorily answer one query more questions are raised. It is in these trying times we come to accept our limitations. However we don’t let that stop us. After many hours of reading arcane specifications and trying to make sense of this rapidly progressing world of communication technology we present our thoughts to you on the matter, hoping that you’ll be so kind as to pardon the inconsistencies and factual errors that may have mistakenly crept in despite the most careful efforts of a tired staff.
What happened to LiFi technology?
Thank you for A2A. Light is an electromagnetic wave. It is already the most dominant form communication in both wireless and wired varieties. Fiber optic communication which powers today’s internet broadband service uses light. Wireless communication such as wifi [1] and Bluetooth use electromagnetic spectrum of light. TV remotes have used IR waves for switching channels.
So there is precedent in using light waves for communication in modern world.
LIFI intends to use visible light signals for wireless communication. Note the emphasis on visible light. We are not talking about radio waves here. We mean light we can see. Violet, Indigo, Blue, Green, Yellow,Orange and Red. Including UV and IR (IR as we have noted has already had a very successful implementation in remote controls for TV )
The idea is good. But the implementation is going to be tricky because of following reasons
Client support. Even if you build base stations for wireless visible light communication how are you going to get users to use them? Lot of work needs to be done in this area. There is however no reason that signals can’t be transformed from visible light to other already supported mediums like wifi to provide communication.
Visible light affects humans. So the intensity of light must be kept low. At lower intensities will the technology reduce to point to point communication? If so what happens to roaming devices? These are the questions I have not found answers to. Considering the negative press that 5G is getting for its millimeter wave , the use of UV in LIFI is going to be a PR nightmare. I can already hear cries from beauty experts on how LIFI is damaging their skin!
LIFI positions itself as a short range communication medium. That gives it protection against hackers. [2] At short range, lets say within room how can it be cheaper than a near free Ethernet cable that has universal support? Especially in the industrial application where LIFI aims to reduce electromagnetic interference. The easiest/cheapest way is to use wired communication. I might care about aesthetics in my hotel lobby. But in a workplace I want something reliable and well supported. If LIFI had increased distance transmission capacity say more than 70 M then it would have been a better substitute.
So to answer your question. LIFI is promising. But like every new invention LIFI needs to overcome technological, economical and marketing challenges. These things will take time. I’m sure that it will find a niche that will transform into a big industry. But its going to take time.
Talking about niches there’s one upcoming technology called optical computing [3](utilized in what is known as a photonic computer) that could replace electronic circuits. At the moment fiber optic cables are used to transmit light. In an optical computer therefore it would make sense that fiber optic cables would form the data transfer medium.
Here lifi technology could be utilized. In a controlled environment like inside of a CPU case you can benefit from all the positives of visible light communication while experiencing none of the negatives.
[1] Is LIFI a substitute for WIFI? https://www.quora.com/Is-LiFi-a-...
[2] “The light waves cannot penetrate walls which makes a much shorter range, though more secure from hacking, relative to Wi-Fi.” https://en.wikipedia.org/wiki/Li-Fi
[3] https://en.wikipedia.org/wiki/Optical_computing
What was your amazing experience with wireless technology?
It was raining outside. Power was out. We were supposed to be attending lecture. We skipped. I turned on my psp. My friend did the same. I had the black one. His was jet blue, slim.

We were going to hunt Congalala. He was a low level monster. An ape. Quick on his feet. Fond of fart bombing his enemies. Ice was his weakness. So we crafted out ice elemental weapons. Still he was too good for us.
We died often and when we didn’t we ran out of time. You must finish a quest within 50 minutes. Or else its game over. We were novice hunters in those days. Knew little about the habitat of the beast we were hunting. Even less about the mysterious jungle in which he dwelled.
We played and played until the battery ran out. But he got the best of us. We lost all our money. Our equipment was rendered useless. Our preparation futile. The beast won every time we attempted to take him down.
That was the start of an epic 700 hour long wireless multiplayer campaign. I haven’t felt the same way about any other game since. Even now a decade later sometimes I dream about Monster Hunter.
At that time psp was a very competent multiplayer device. A 32 bit arm 9 chip powered its 802.11b wifi. Upto 16 players could play simultaneously. But most games allowed only 4. Enabling a speed of upto 11 mbps back in 2005. It was unlike anything the world had seen before. A handheld [2]multiplayer gaming device that could stream!
Monster hunter was a sensational adhoc multiplayer success. Selling a combined total of 10M copies in japan alone.
That was 11 years ago. Multiplayer games these days need internet to work . If you don’t have a fast connection or if the server is taken down you’re out of luck. I do see a change around the corner. Game streaming is becoming more common now. We’ll need different kind of devices to [1] enable this kind of gaming. Those devices will most probably be wireless. That’s the amazing experience that I’ll be looking forward to.
[1] Return of wireless adhoc multiplayer. https://workrockin.quora.com/Ret...
[2] Nintendo Switch’s wireless capabilities look extremely promising for the future of gaming (https://workrockin.quora.com/The-wireless-features-of-Nintendo-switch)
How fast is Intel Wi-Fi 6 AX200 wireless network adapter card?
Thank you for A2A. The chip can do 2.4 gbps but only if you’re using 5ghz channel. Otherwise 573.6 mpbs on 2.4 ghz.

To calculate speeds look at the data rates table on wikipedia
https://en.wikipedia.org/wiki/IE...
The max speed is in the lowest column (#11) on the table. As an example assume we want to calculate the max speed of 2.4 ghz.
2.4 ghz band can have a max width of 40 mhz. And according to the spec [1] we have 2 transmitters. So the max speed in 2.4 ghz band is
2*286.8 = 573.6 mbps
Similarly 5ghz band can have a max of
2 * 1.2 =2.4 gbps
Some more details on the AX200 hardware
intel launched AX200 wifi 6 chip [1] last month. It is competitively priced between $10-$17 [2] . Before we take a look at the hardware it would be good to start with a brief on wifi 6
Wifi 6 is is technically defined by 802.11ax standard. Although it works in both 2.4ghz and 5ghz bands the highest speed in 160 mhz channel is only attainable in 5ghz band. And since 5ghz has lesser range than 2.4 ghz it means that you can only enjoy the highest speed at lesser distances. [3]
Max speed on a single radio, widest (160 mhz) channel is 1.2 gbps.
Since the standard works in both 2.4 and 5ghz bands it is backwards compatible with all other wifi standards. Which means that all your wifi client devices will work with a wifi 6 access point whether they themselves support wifi 6 or not. [3]
With that out of the way lets see what chip has for us in terms of hardware
2 transmission and 2 receive radios. Which means that we get a max throughput of 1.2*2= 2.4 gbps (note the point #2 above)
Dual band support with max channel width of 160 MHZ.
Integrated support for bluetooth 5.
Not bad for its price I’d say [4].
[1] https://ark.intel.com/content/ww...
[2] When purchased in volumes of thousands. This price is only for device manufacturers. But this is also good news for consumers because they’ll be getting the latest networking technology at cheap prices.
[3] FCC has a test report for the chip in which they specify the supported modulation schemes (page 6). BPSK, QPSK, 16QAM, 64QAM, 256QAM. Which confirms the backwards compatibility with all wifi standards.
Note that the FCC document only measures up to 256-QAM. But intel’s product page indicates a max speed of 2.4 gbps which means that it should support 1024-QAM. I’m not sure why it is not covered in the fcc document.
https://fccid.io/PD9AX200D2L/RF-Exposure-Info/RF-Exposure-SAR-Report-4213237.pdf
[4] The actual performance that you’ll achieve will also depend upon the hardware of your system. The wireless card is mostly a peripheral and its optimal performance is contingent on the capabilities of host device.
Looking for someone to help you with your wifi problems? We ar ehere to help. Email us on
write to us on our tumblr page
[https://workrockin.tumblr.com/ask]
tweet
[https://twitter.com/workrockin]
connect with us on linkedin
[https://www.linkedin.com/in/workrock-careers-21b3a2186/]
Happy networking!
Santiago,Chile
1 note
·
View note
Text
setup.ampedwirelesssetup.com : What to do if I forget the Amped wireless router password?
Amped wireless router and Amped wireless extender
Amped wireless is one of the leading brands in the production of some high reliable, efficient and high-speed networking devices like routers, modems, and extenders etc. What you need to do is just access this device’s admin login window through their local static IP which is 192.168.1.1 or 192.168.0.1.
Amped wireless has also provided its users with this easy to use the web address of setup.ampedwireless.com. This web address of setup.ampedwireless.com is quite easy to use for the router setup portal access and configuration thereof.
Amped wireless SR10000 setup
The Amped wireless SR10000 setup implies to the easy and quick installation, configuration and set up of the Amped range extender device. The Amped wireless range extender can be used to extend the existing poor wifi signals of the home or office routers.
Follow the step by step guide in order to get the Amped wireless SR10000 extender configured.
Firstly, unbox your Amped SR10000 extender and you will find several accessories with it like the external antennas, Ethernet cables, and power supply adapters etc.
Assemble the external antennas with your Amped wireless extender and connect it to the nearby power outlet.
Wait for few seconds till the LEDs on it get stable.
Now that your Amped SR extender is stable, open the wifi settings section on your computer system and search for the Amped_SR wireless network.
You will not require any password or key to get connected to the Amped_SR wireless network as it is the debut connection with the extender network.
Now, open the web browser and enter the web address www.setup.ampedwireless.com in the address bar and then enter the default login details like the username and password.
Note- The Amped wireless extender supports only some specific web browsers like Google Chrome, Safari and Internet Explorer.
Also if the Amped extender’s web setup interface is not accessible via setup.ampedwireless.com, then try to get through it the IP i.e.192.168.1.240.
Upon accessing the web setup interface of your Amped extender, select the Scan button and the system will search for the available wireless networks.
Select your home or office wireless network from the list that you want to extend.
You will be required to enter the network security key in the next window, however, if the password is not set, you can leave the password field blank and click the Next button.
The consecutive settings page allows the user to configure their extender’s wireless network. Users can set and customize their extended network’s name and password. You can also select “clone the settings” button to just keep the same wireless network name and password for the extender also.
You are now ready to use the extender wireless network.

Important points to consider
It is always advisable to keep the SSID or network name of your extender wifi network a bit different from the existing wireless network as it gets difficult to differentiate between the extended and non-extended network.
If the wifi connection between the Amped wireless router and the Amped wireless range extender, then the users should try to get the extender and router connected through the Ethernet cable.
Users can also establish a fast and reliable wireless connection between the devices through the WPS button provided on the router and the range extender.
Amped wireless setup
The Amped wireless router’s setup process is quite an easy one. Let us show how you can easily get your Amped wireless router’s setup done. Below mentioned steps are to be followed.
Connect your modem device to the Internet port of your router and then connect the computer system to one of the available LAN ports of the Amped wireless router.
Now, just switch on the power supply of all the devices and wait for a while till the devices get stable. Make sure that the LEDs are stable before you can proceed on with the configuration.
If you are using a cable connection, the Amped wireless router will detect the connection type as Dynamic.
Click the Save and apply tab and then select the reboot now tab to make all the changes effective on the router. Wait for the reboot to finish properly and make sure there is no interference in the device reboot as it can lead to serious harm to the device.
Note- please don’t change any of the values in the configuration section. The users are required to keep the settings as default as it is.
Follow the instructions on the screen and complete the Amped wireless setup.
If the connection is not dynamic, you might have to configure the settings and those details for configuration will be provided by your Internet service providers.
Amped wireless password reset
When do we need to perform the Amped wireless password reset?
The Amped wireless password reset needs to be done in several cases as listed below.
When the user forgets the login password
When the Amped wireless router is not working properly
Amped wireless lagging and buffering
What to do if I forget the Amped wireless router password?
Well, there is absolutely no need to panic if you have forgotten your Amped wireless router’s login password. What you need to do is just reset your Amped wireless router to its basic factory settings that will erase all the data written in its memory. Now that all the settings have been erased from the router, the new router login password can be easily set up. It is advised to keep a note of your Amped wireless router password so it can be retrieved easily whenever required.
Important note- The main thing to keep in mind while performing the Amped wireless router reset is to ensure that the reboot at the end should be done properly and without any interference as any interruption in between the reboot process can cause the router to malfunction and the device can be fully corrupted also rendering it useless.
Amped wireless firmware update
The Amped wireless router’s firmware can be updated also by accessing the web set up a portal of the router through www.setup.ampedwireless.com and then select the ADVANCED tab and click the Router firmare>Update tabs.
Click the “Yes download and install” button to initiate the firmware update process and the router’s firmware update file will be downloaded and installed automatically. In this process also, make sure to get the reboot done properly without any interruption as a reboot is a major part of any admin-level tasks in the networking devices.
0 notes
Text
RANGEXTD WIFI BOOSTER EXTEND YOUR WI-FI RANGE FARTHER THAN EVER BEFORE.
My house is not equipped with Ethernet cables everywhere. I am looking for a 100% wireless solution. I've got 4 repeaters best of the best yet they are giving me the worst times and nightmares. Not only i have to switch manually every time i go to a different room. Worse, there is a significant loss of 50% in the internet speed for each router giving the one next in a compounded manner. I wonder if there is a mesh system which works 100% wireless both ways? Only power is needed and no need for an Ethernet? I didnt find anything like that. In case not, i dont know whether the powerline adapters shall work as the repeaters in terms of loss of internet speed/power? Aside the fact that i dont know the quality of my electricity grid. So i hope you give us some Rangextd Wifibooster Review here please.
Two issues these mesh routers are controlled by apps from what I heard have lousy privacy terms of service , especially googles and I think I read TP links app is created by a company controlled by the chinese government . Some aspects of MESH sound very cool but the privacy trade off and from I understand they also do not work with vpn applications seem to be completely insecure and privacy nightmare. Could you answer those question hear or in a separate video regarding mesh privacy issues?
I bought a wifi extender (dlink ac1200 wifi extender) and it created a new wifi network. So on my wifi list I see my main network (which is weak) and a new one with _EXT at the end. Means that as you said, if I move in between, I have to manually switch to the other network unless I'm completely out of one's coverage so my device will connect to the next available network.The conclusion is that I probably have to get a
RangeXTD wifi booster.
0 notes
Text
Roku Premiere Streams Netflix, Disney+ and More in HD, 4K, & HDR for Under $50
Our verdict of the Roku Premiere: Slick, smooth, and speedy --- the Roku Premiere is an incredible device for such a low price. While it has minor niggles, with such a large choice of apps in such a compact package, this is an amazing media streamer with 4K capabilities at an unmissable price.910
The media streamer market is at saturation point, with multiple devices available from all the big names. There’s Apple TV, Amazon Fire sticks and boxes, Android TV units, and Google Chromecast.
And then there’s Roku. With a couple of devices to choose from, their budget Roku Premiere is particularly interesting. It costs under $50, streams 4K video, and seems to have an app for every service you can think of, and quite a few you can’t.
But does the Roku Premiere deliver on the performance promised on the box?
We’ve teamed up with Plex to offer a fantastic giveaway bundle to one lucky reader, consisting of a Roku Premiere, HD HomeRun Connect Duo TV-tuner, indoor antenna, and LIFETIME Plex Pass! You’ll find the entry widget at the end of this review, and the bonus code in the video. Good luck!
Unboxing the Roku Premiere
In the box, you’ll find the Roku Premiere (3920 model), USB cable, power adapter, and a surprisingly short HDMI cable. Also in the box is an IR remote control (Wi-Fi fans can use the mobile app), featuring pre-set channel shortcut buttons (including Netflix) and two AAA batteries. Along with a brief set-up guide, an adhesive strip is also included.
All of this is wrapped up in an orange box that promises much: “4K & HDR streaming made easy” and a bunch of free and subscription services. If you have 4K content, a suitable internet connection, and a TV with the requisite HDCP 2.2 compliant HDMI port, you’ll get 4K. Otherwise, the Roku Premiere is perfect for standard 1080p content, too.
Roku Premiere Specification
Roku Premiere | HD/4K/HDR Streaming Media Player, Simple Remote and Premium HDMI Cable Roku Premiere | HD/4K/HDR Streaming Media Player, Simple Remote and Premium HDMI Cable Buy Now On Amazon $31.99
On the face of it, the Roku Premiere is incredibly unimpressive. It’s a small plastic slab, measuring 3.30 x 1.40 x 0.70 inches and weighing just 1.28 ounces. On the back is a single micro-USB power port and a single HDMI port. You’ll also find a small reset button, accessed using a pin.
For connecting the Roku Premiere to your network, there’s an 802.11bgn single-band wireless chip.
At the heart of the Roku is a quad-core ARM Cortex A53 CPU with 1GB of RAM and 512MB channel storage. There is no microSD card slot with the Roku Premiere.
The device can handle 4K UHD up to 2160p at 60fps, and supports HDR10 and HLG (Hybrid Log-Gamma). Audiophiles can enjoy DTS Digital Surround and Dolby Audio, with Dolby ATMOS pass through over HDMI, and Digital stereo over HDMI.
Can you connect Roku to your TV? Well, if you have an HDTV or greater, you should be fine. The box can stream to standard HDTVs with 1080p, as well as upscaling 720p.
For 4K UHD TVs, the Roku streams up to 2160p at 60fps (3840×2160) with up-scaling from 720p and 1080p. For this, the 4K TV should have an HDMI input that supports HDCP 2.2. The Roku Premiere can also stream at HDR10 to 4K UHD HDR TVs, using the same HDCP 2.2 HDMI input.
Note: as most people own a 1080p HDTV, we’ve reviewed the Roku Premiere on such a device.
Setting Up the Roku Premiere
While easy to set up and install, the Roku Premiere comes with a couple of positional challenges.
How should you power it?
Where should you place it?
Both are straightforward. The device ships with its own USB power adapter, so if there is a mains electric connection nearby, use this. However, this isn’t always the case. Fortunately, most modern TVs offer a 5V USB power outlet which is ideal for the Roku Premiere.
With the power sorted out, positioning is the next challenge. The Roku Premiere is compact and light enough to be mounted on your TV. It comes with a double-sided adhesive strip to attach the device to the top or bottom of your television. If there is a consistent surface for the adhesive, the Roku Premiere can be reliably attached. Given the length of the HDMI cable, it makes sense to keep the device close to your TV.
Hooking up the Roku Premiere to Wi-Fi is straightforward, as is the entire set up process. You’ll need to set up your Roku account on a PC or tablet, however, in order to activate the device. This is a straightforward process that helps you initialize the Roku for your territory and download the relevant selection of apps. Once this is done you can switch back to the Roku Premiere itself to add channel apps, log in or create new accounts, and prepare for viewing.
It’s fair to say that everything about this unit, from the compact size and ergonomic remote control to the simplicity of the user interface, makes it suitable even for the most tech-averse person you know.
Another example: the fabric tab on the remote’s battery compartment. No more struggling with your remote’s battery cover—it literally pulls off to let you quickly change the batteries. The remote itself is light, easy to use, and sits nicely in your hand. The lack of volume control is a surprise, but a minor disappointment.
Everything about Roku is designed with usability in mind. It’s a wonderful philosophy that gets a big thumbs up.
Finding and Installing Apps on Roku Premiere
The Roku Premiere features a vast selection of channels that can be installed or removed like apps. Among these are big names such as Netflix, Google Play TV, and Apple TV. The selection depends on where you live, so some apps don’t appear or won’t work in particular territories.
Thousands of channels are available overall. You’ll even find things like Plex and HD Homerun for streaming video and TV from your own networked devices.
Other channel apps include Disney+, Prime, Apple TV, Now TV, and YouTube. Channels are divided by category, and the platform even supports basic games.
Managing apps on the Roku Premiere is easy, too.
You can and delete as necessary, and the settings screen opens a whole host of options. You can change the theme, the screensaver, enable network access for mobile apps, factory reset, system update, change the language, and even initiate a guest mode. This lets visitors to your home input their own credentials for a specific app. A useful option for borrowing Disney+ to catch the latest addition to the service with friends and family.
As noted, the Roku has 512MB of channel storage. I spent around 30 minutes finding and installing apps without running out of space, so unless you’re really indecisive you probably won’t hit that limit.
Missing Channels? Use Mirroring
Incredibly, despite having 100s of channels, the Roku Premiere might not feature a channel app you want to use. For example, in the UK there is no Britbox app (although the US version is listed). Similarly, there is no Kodi app for Roku.
So, what is the solution? Fortunately, Roku supports screen mirroring. All you need to do is open Settings > System > Screen Mirroring, then choose whether to allow all connections or issue a prompt.
On the device you’re mirroring from, use the mirroring option. So, on Android, use a mirroring app rather than Chromecast. We tried it out on Windows, Android, and iOS—the mobile devices worked whereas Windows 10 did not. Connection was made, but no streaming was established, despite several attempts and reboots.
Setting Up Roku Premiere with HD Homerun DUO and Plex
This review is all about the Roku Premiere, but thanks to Plex, our incredible prize bundle also includes an HD Homerun DUO, HDTV indoor UHF antenna, and a Lifetime Plex Pass.
But how well do these systems play together?
Well, we think you’ll be impressed. While the HD Homerun DUO requires a strong, consistent terrestrial HDTV signal, it’s easy to add to your network. Just plug it into your router using Ethernet, hook up the antenna (internal or external), and over the air TV can be viewed on any compatible device. The Roku Premiere features an HD Homerun app, so any TV you’re missing can be enjoyed that way.
Plex has expanded in recent years, now offering content only available with a Plex Pass along with your own media hosted on a network drive. The Plex app on Roku easily connects to your existing Plex server, giving access to every media file you need.
Roku: The Perfect Plex Partner
Over the years I’ve used several media streamers, from Apple TV and Chromecast to Amazon Fire TV and Chromecast Ultra. They all have their advantages and disadvantages, but none are as easy to use and slick as Roku.
Roku Premiere | HD/4K/HDR Streaming Media Player, Simple Remote and Premium HDMI Cable Roku Premiere | HD/4K/HDR Streaming Media Player, Simple Remote and Premium HDMI Cable Buy Now On Amazon $31.99
Of course, the Roku Premiere has some shortcomings. HDMI-CEC—the system that allows your TV remote to control a media streamer or vice versa—seems inconsistent. There is also a lack of volume control. Screen mirroring from Windows 10, meanwhile, appears fraught with pitfalls and is possibly best avoided. The lack of Kodi might be a deal-breaker, too.
However, these are minor. Overall, this is a great media streamer, at a surprisingly low price for 4K and HDR. It’s easy to set up, surprisingly simple to use, and you probably won’t use your standard TV decoder for days after installing the Roku Premiere.
Enter the Competition!
Roku Premiere, HD Homerun Duo, and Plex Bundle
Read the full article: Roku Premiere Streams Netflix, Disney+ and More in HD, 4K, & HDR for Under $50
Roku Premiere Streams Netflix, Disney+ and More in HD, 4K, & HDR for Under $50 posted first on grassroutespage.blogspot.com
0 notes
Text
10 ways to troubleshoot the wireless AP
As we all know, wireless AP devices are used to centrally connect all wireless nodes and perform centralized management. The general wireless AP will provide a wired Ethernet interface for connection with wired networks, workstations and routing devices.
The following editor will introduce 10 ways to quickly troubleshoot wireless AP, I hope to help everyone.
10 ways to quickly troubleshoot wireless AP
1. Wireless connection rate drops
Wireless network equipment can intelligently adjust the transmission rate to adapt to changes in wireless signal strength and ensure the smoothness of the wireless network. However, if the network connection speed is lower than 2Mb / s for a period of time, it means that the network may be faulty. You can perform the following operations to restore the original transmission rate:
01. Check whether the power saving mode of the wireless network card is turned on. When the power saving mode is adopted, the transmission power of the wireless network card will be greatly reduced, resulting in weakening of the wireless signal, thereby affecting the transmission rate of the wireless network;
02. Check if there is any obstruction between the wireless devices. If there is an obstruction between the wireless network card, or between the wireless network card and the wireless AP, especially a metal obstruction, it will seriously affect the wireless signal transmission. It is recommended to place the wireless AP at a higher position in the room to make it visible to the wireless network card;
03. Check if there are other interference devices. Devices such as microwave ovens, cordless phones, etc. that are close to the frequency of the wireless network will cause greater interference to the wireless transmission, resulting in a decrease in the communication rate. Most microwave ovens use 7 to 11 of the 14 channels on the 2.4GHz frequency band, so for wireless devices that use the 802.11b protocol, as long as the communication channel is fixed to 14 (the last channel).
2. The wireless network cannot receive data
If everything is normal when the wireless AP is connected to the wireless router, Internet connection sharing of the wireless network can be realized, indicating that there is no problem with the hardware and settings of the wireless AP. Since the data cannot be received, it indicates that the connection with the network cannot be established correctly, and the cause of the failure may appear in the connection between the wireless AP and the switch.
If the switch supports smart ports, it can determine the device connected to the peer and automatically complete the port mode switch. Otherwise, you should use the designated jumper to connect the wireless AP and the switch. Normally, crossover cables should be used for the connection between network devices. Therefore, it is recommended to use a crossover cable to connect the wireless AP and the switch to test whether the fault is resolved.
3. The wireless AP cannot connect too many devices
Although in theory, a wireless AP or wireless router can simultaneously support 256 Wi-Fi connections. However, from the practical experience, once there are more than 10 clients using the same access point, its performance will quickly decline. In a sense, wireless APs and wireless routers are very similar to hubs, and all access users share bandwidth.
Therefore, as the number of access users increases, the available bandwidth decreases rapidly, resulting in a significant drop in the network transmission rate. In addition, the performance of wireless APs and wireless routers is limited. When processing concurrent access by multiple users at the same time, the delay will become very large. The following methods can be adopted to solve:
01. Configure another wireless AP, set the two APs to different channels (such as one using channel 1 and one using channel 5), and use a crossover cable to connect them directly, or use a switch to interconnect each other ;
02. Lock each network card to the designated access point. After configuring a wireless AP, it will form a wireless roaming network. The wireless network card roams from one access point to another access point, and then locks on the access point with the strongest signal strength. If there are multiple access points in an environment and there are more than two comparable signal strengths, the wireless network card will continuously switch back and forth between different access points, greatly reducing the performance of the network. Lock the wireless network card to a fixed access point, which can eliminate the phenomenon of switching back and forth between access points; increase security, make unauthorized wireless network cards unable to use wireless APs; prevent a wireless AP from connecting too many wireless Client.
4. The computer cannot communicate with the wireless network
If the wireless network card shows normal operation, but the data receiving and sending values are 0, you can take the following methods:
01. Check all the cables of the wireless AP and make sure that the power indicator is green;
02. Verify that all wireless network property settings are correct;
03. Make sure that the signal received by the computer from the access point is good.
5. Unstable wireless network transmission rate
After the wireless network is installed, the network communication is basically normal, but the data transmission speed is fast and slow. This is because wireless devices are closely related to the environment such as distance and interference. They can automatically adjust the speed according to the environment, so speed changes are normal. The simplest is that the transmission speed will decrease when the distance is far. Generally, the wireless access device AP can be placed in the center of the wireless local area network device group, so that all wireless terminals are not too far away.
6. The wireless network card shows only sending and not receiving
If the wireless AP setting is correct, other staff in the office can receive wirelessly, and the computer can access the Internet through the wired network, but the data reception through the wireless network is always 0. Check the wireless network properties and find that the IP address and subnet mask are not the normal values. This indicates that the network card is not connected to the wireless network and does not obtain IP address information from the wireless AP.
The cause of this failure is related to the wireless network settings. Different wireless networks use different SSID and WEP encryption. Therefore, the problem may be due to modified network settings. The solution is to refresh and set the wireless AP, and modify the WEP encryption.
7. The laptop cannot access the wireless network
Use SVA wireless AP and wireless network card to build a wireless network. The SVA wireless client can access the wireless network normally, but the built-in wireless network card of the IBM notebook cannot establish a wireless connection. This is because wireless products of the same manufacturer have the same default SSID and WEP encryption, but the SSIDs of different manufacturers are not the same.
Therefore, in addition to Windows XP, other operating systems must install a wireless client and modify the SSID (note the case) and WEP password of the IBM wireless network. It should be noted that the SSID and wireless connection mode of the wireless network card should also be checked in the "Device Manager".
8. Low communication rate between wireless APs
The maximum distance of wireless AP bridging is about 150m. At this distance, two APs often fail to connect. Generally, it can be solved by setting up an external gain antenna, but the cost of doing so is relatively high. Another method is to install two wireless APs to the outdoor wall, and use the two walls as reflection objects to enhance the front radiated waves. The aluminum-plastic board is used as a pot-shaped container for protection between the wireless AP and the wall, which not only looks beautiful but also solves the problems of waterproofing and sun protection, and also plays a good role in reflection. After processing, the connection rate can be as high as 11Mb / s, and there will be no more disconnections.
9. Wrong location of wireless AP can't get online
If the company's office building is on the 6th floor and two wireless APs are used on the first and third floors, Internet access is not good. Measures can be taken to place two wireless APs on the second and fourth floors to achieve wireless coverage of the entire office building. The two APs are connected to the switch through a cable, and then access the Internet through a broadband router.
10. The wireless signal weakens after the wireless AP moves
After moving the wireless AP in the office to the file cabinet, the wireless signal weakened a lot, and the transmission rate dropped significantly. The cause of this failure is the problem of MulTIpath. In the past, when using a horn antenna to watch TV, there were some ghost images on the screen of some channels. These ghost images are called multiple channels.
Similarly, after the wireless signal is bounced by nearby objects, it reaches the receiver at different points in time, resulting in multiple paths. For example, place a wireless client in a room and have an access point in the room. When the access point sends a signal, the signal will spread out from all directions and reach the wireless client. However, the wireless signal will also bounce off other objects, and then reach the wireless client through the turning path. This means that the wireless client actually received two or more signals.
It is almost impossible for wireless networks to eliminate multi-path signals, so they can only reduce multi-path phenomena as much as possible. Try not to place metal objects near the access point or wireless client.
The wireless AP plays a vital role in the wireless network, it is equivalent to a relay, connecting all nodes. I hope that the above 10 quick troubleshooting methods for wireless APs can give you a reference.
The above is the news sharing from the PASSHOT. I hope it can be inspired you. If you think today' s content is not too bad, you are welcome to share it with other friends. There are more latest Linux dumps, CCNA 200-301 dumps, CCNP Written dumps and CCIE Written dumps waiting for you.
0 notes
Text
Minix Neo U22-XJ is Minix’s latest (and blazing fast!) Amlogic based Android TV Box! Based on Amlogic’s most powerful S922-XJ SoC, you can now expect great HDR support as well as Dolby Vision straight out of the box.
What’s in the Box?
U22-XJ comes in the standard classy box embossed with the logos of supported standards such as 4k, HDR, Dolby and so on. Inside we find the TV Box itself encased in soft nylon and laid in a caveat inside a cardboard cover. After we lift that cover we find all the peripherals – HDMI 2.1 cable, USB-OTG cable and, of course, the DC power adapter (with multiple power plug adapters), removable antenna, IR remote control and the Setup guide. U22-XJ itself uses the standard black minix matte plastic box with its plethora of ports (see details bellow)
U22-XJ Looks
Minix box design remains the same over the years. If I had to venture a guess, it is to reduce cost and use the same basic box design for all of Minix’s Android/Windows product lines. At most, extra ports need to be embedded into the box, but the classic black plastic shell is the same.
U22 Top
U22 Front
U22 Back
U22 Right
U22 Bottom
U22 Left
U22-XJ PCB Top without heatsink. Curtesy of Minix & Trebor from Freaktab Forum
U22-XJ PCB Bottom. Curtesy of Minix & Trebor from Freaktab Forum
U22-XJ Open Box showing PCB with heatsink. Curtesy of Minix & Trebor from Freaktab Forum
Here are the items that come in the box: WiFi antenna, HDMI 2.1 cable, User Guide, IR Remote, Power adapter, Power plug adapters, and a USB-OTG cable.
Minix Neo U22-XJ Items
Minix Neo U22-XJ Home Screen
U22-XJ Specifications
Chipset Amlogic S922XJ Quad Core Cortex-A73 + Dual Core Cortex A53 Processor (64-bit) GPU Mali-G52 MP4 Memory / Storage 4 GB (LPDDR4 3200 MHz) / 32GB eMMC 5.1 flash, microSD card slot LAN Yes, RJ-45, 1Gbit / s Wireless 802.11ac 2.4GHz / 5GHz WiFi (2 × 2 MIMO) Bluetooth Bluetooth 4.1 + EDR OS Android 9.0 Pie Video Output HDMI 2.1 output up to 4Kp60 with HDR10, HDR10+, Dolby Vision support Audio Output / Input HDMI 2.1, Optical S/PDIF, 3.5mm audio jack Power 5VDC/3A via power jack Peripheral Interface RJ-45 Gigabit Ethernet Micro SD card reader, Kensington Lock ready USB 3.0 port x 3, USB-C port x 1 (data only) 3.5mm audio jack, IR receiver (remote included) Packing Included power adapter, OTG-USB Cable, HDMI Cable, MINIX IR remote control, and a user manual Dimensions 128mm x 128mm x 28 mm
U22-XJ Benchmarks and Testing
All benchmarks have been repeated 3 times and results have been averaged to give a more accurate reading:
Antutu Benchmark
The Antutu benchmark tests single core performance over multi-core as it is a better indication of the performance of one device over others in most situations. Minix U22-XJ performs amazingly, and is placed number 1 in the list of TV boxes (and one tablet) reviewed. It is also worth noting that Minix U22-XJ is placed above any other Amlogic based box on the list.
Bellow is a screenshot of the latest Antutu benchmark (I have not tested other boxes with this new version, so there is no comparison graph as yet):
GPU Mark Benchmark
[easy-image-collage id=28444]
GPU Mark tests 3d gaming performance and also provides a normalized score according to the used screen resolution (for a more accurate result). The test is quite short and should be taken as a supporting result to that of the more serious 3D Mark benchmark. Minix U22-XJ performs very well here, placing it second only to the top contender (a powerful tablet) – it’s S922-XJ chipset placing it higher than all TV Boxes reviewed so far.
A1 SD Benchmark
[easy-image-collage id=28447]
A1 SD Benchmark tests RAM and flash memory speeds. As can be seen in the provided graphs, RAM is much faster (by a factor of about 40) than flash memory – that is why it’s in smaller amount and is also volatile (does not keep its contents after a reboot). Minix U22-XJ achieved 2th place in the RAM Copy Speed test, placing it only under the powerful tablet. In the storage Read/Write testing, Minix U22-XJ takes 2nd place again, this time only behind a Realtek based box.
PC Mark Benchmark
The PC Mark benchmark tests run several productivity tests, but sadly, results page comes up empty, and freezes the application.
3D Mark Benchmark
Slingshot
Slingshot Extreme
3D Mark benchmark is considered as one of the best ways to test 3d performance on Android (and other platforms). Minix U22-XJ is officially compatible with only these two tests: Slingshot, and Slingshot Extreme (which results are also showing above). But using an older APK of 3dmark, I was able to run the older “Ice Storm Unlimited” test and get quantifiable results (with the new version on the android play store, you can run the test, but the result comes out as “Max”). As can be seen, this new generation of Amlogic chipsets opens a wide gap ahead of everything I tested before it..
U22-XJ Extra Benchmarks
For some more information, see the following screenshots from other benchmarks such as Basemark, Vellamo, Passmark, and GFXBench:
CPUMark
DiskMark
PassMark
U22-XJ Bugs and Issues
Restarting the box causes loss of picture on screen. Must unplug and re-plug HDMI cable to restore.
PCMark Work 2.0 benchmark will not show results at end of testing
After shutting down box from remote, sometimes unable to turn it back on from remote, and must use the physical power button. Then must unplug and re-plug HDMI cable to restore picture as in issue above
Built-in Root function only works per session (while the device is running, and reverts to non-root after a restart). Also does not play well with SuperSU root permission management app, as when you try to update the SU binary, it will brick the U22-XJ box. Also, the root switch stay “ON” after a restart, even though root functionality is not active.
John from Minix assures me that at least some of these aforementioned issues (especially the loss of picture) will be corrected in upcoming firmware updates.
U22-XJ Root function
Minix seems to have done away with the unofficial (which requires some know-how and may cause box bricking) methods for rooting their new boxes. Instead, you get a nice menu option for turning Root “ON” or “OFF”.
But.. it is far from perfect. Instead of turning it on and expecting it to stay on after reboot, this root is only per session. Meaning, after reboot the U22-XJ is no longer rooted. On top of that, the switch option itself still remains as “ON”, even though the root is not active. To allow root status again, you’ll need to turn it “OFF”, and then back “ON”. That’s tedious, and really unnecessary.
On top of that, this is a permission-less root. So there is no “SuperSU” or other permission management app which gets installed along with the root. It will automatically grant your application root rights as needed. Personally, I prefer to have better control of which applications gets root access and which do not. You can always install SuperSU yourself, but be warned: if you agree to update the SU binary – which the application will automatically offer you to do, the U22 will be soft bricked upon reboot, and will require a firmware flash using a cable and a PC. Learned that the hard way.
U22-XJ Video Playback testing (Using KODI)
Resolution Video Format Local Playback Network (Wi-Fi) Playback 720p (1280*720) AVC ([email protected]) Plays OK Plays OK 1080P (1920*1080) AVC (High@L4) Plays OK Plays OK 2160P (3840*2160) HEVC (H.265) Plays OK Plays OK 4K (4096*2304) AVC ([email protected]) Plays OK Plays OK 4K HDR HEVC Main 10@L5@High HDR10 Plays OK Some buffering 4K TS HEVC HEVC (H.265) 10Bit Plays OK Plays OK
Kodi 18.6 arrives pre-installed on the U22-XJ. Video performance is very good, although local network streaming was less than perfect (especially with 4k HDR content) even though the WiFi performance measured very well outside of Kodi.
* 8k video is not really usable in kodi, but I have found that these samples DID play locally (with some stutter and a bit of buffering) on MX Player Pro
Kodi add-ons tested quite well. IPTV streamed without issues. Also, this box contains a SDR to HDR and HDR to SDR capabilities. It makes the picture pop. Some would like it and some would not, but you can always turn that feature off.
Antutu Video Testing got mixed results: U22-XJ played all the videos in the test, aside for FLV and RMVB formats which failed. Video playback was pretty flawless in general.
U22-XJ Network performance
I tested the network performance using the popular Speedtest.net application from the play store. I tested both WiFi (the fastest WiFi supported – in this case 5GHz 802.11ac), and wired connection (in my case AV1200 Ethernet over power line). My home connection is a symmetric 500 Mb Fiber connection so it would not limit the testing (but the Ethernet over power line connection does) – Minix U22-XJ shows the strength of its MIMO antennas in the excellent WiFi performance, but less so with the LAN over Power-line connection:
WiFi 5Ghz
Wired, over power lines
According to the Speed test, the network connection performed amazingly on WiFi 5 GHz (probably due to the MiMo and hardware), but not so great on the wired connection. Since the wired connection is over powerline adapters, inferior speeds are to be expected.
U22-XJ Gaming performance
U22-XJ is definitely suited for smooth gaming – as long as you have a proper controller with which to play:
Asphalt 8 Airborne – a 3d graphic intensive racing game. Loads and runs smoothly, Using the included standard IR remote I could steer, but could not use Nitro..
Angry Birds 2 – a popular 2d action game. U22-XJ loaded the game fast and run smooth as butter – using an air mouse (not included). There is an issue where you cannot move from one stop to the next due to inability to click on an icon (clicking does nothing – also tried with a mouse), but that seems to be due to a game bug with this and some of the other TV boxes I tested.
Walking War Robots – an online robot warfare game that requires a game-pad (I don’t have a game-pad). U22-XJ loaded the game fast, and it run smoothly without issues. But full control was only possible via an air mouse with built in keyboard. otherwise, could only look around, but could not shoot or move with the standard IR remote.
U22-XJ Conclusions
Did I like it? Yes, it is another quality power performer from Minix.
Would I recommend it? Yes, even though there area few issues, they do not affect the stability or the performance of the box in general. (8k is not currently common, a requirement or officially available on this chipset, so it cannot be counted)
You like it! Where can you buy it? It’s not a cheap box, but starting at about 170 USD for the basic package, you can find it here: AliExpress.com Product – MINIX NEO U22-XJ TV BOX S922X-J Android 9.0 4GB DDR4 32GB eMMC Smart TV BOX Dolby Video Audio 4K UHD Media Hub 2.4G/5.0G WiFi
or here: MINIX Android 9.0 Pie Media Hub 4K Ultra HD Dolby Vision Dolby Audio HDR10+4GB DDR4/32GB eMMC HDMI 4K @ 60Hz 3 x USB 3.0 USB-C [data only] GLAN AC Wi-Fi TF Card (NEO U22-XJ)
Amazon Minix Store
Aliexpress Minix Store
Review | Minix Neo U22-XJ AMLogic S922-XJ TV Box Minix Neo U22-XJ is Minix's latest (and blazing fast!) Amlogic based Android TV Box! Based on Amlogic's most powerful S922-XJ SoC, you can now expect great HDR support as well as Dolby Vision straight out of the box.
#3dmark#9.0#a1sd#amlogic#android#antutu#benchmark#Dolby#fullhd#gpumark#HDR#internet#kodi#minix#neo#pcmark#pie#review#s922-xj#streamer#tv box#U22-XJ#UltraHD#Vision
0 notes
Text
Roku Premiere Streams Netflix, Disney+ and More in HD, 4K, & HDR for Under $50
Our verdict of the Roku Premiere: Slick, smooth, and speedy --- the Roku Premiere is an incredible device for such a low price. While it has minor niggles, with such a large choice of apps in such a compact package, this is an amazing media streamer with 4K capabilities at an unmissable price.910
The media streamer market is at saturation point, with multiple devices available from all the big names. There’s Apple TV, Amazon Fire sticks and boxes, Android TV units, and Google Chromecast.
And then there’s Roku. With a couple of devices to choose from, their budget Roku Premiere is particularly interesting. It costs under $50, streams 4K video, and seems to have an app for every service you can think of, and quite a few you can’t.
But does the Roku Premiere deliver on the performance promised on the box?
We’ve teamed up with Plex to offer a fantastic giveaway bundle to one lucky reader, consisting of a Roku Premiere, HD HomeRun Connect Duo TV-tuner, indoor antenna, and LIFETIME Plex Pass! You’ll find the entry widget at the end of this review, and the bonus code in the video. Good luck!
Unboxing the Roku Premiere
In the box, you’ll find the Roku Premiere (3920 model), USB cable, power adapter, and a surprisingly short HDMI cable. Also in the box is an IR remote control (Wi-Fi fans can use the mobile app), featuring pre-set channel shortcut buttons (including Netflix) and two AAA batteries. Along with a brief set-up guide, an adhesive strip is also included.
All of this is wrapped up in an orange box that promises much: “4K & HDR streaming made easy” and a bunch of free and subscription services. If you have 4K content, a suitable internet connection, and a TV with the requisite HDCP 2.2 compliant HDMI port, you’ll get 4K. Otherwise, the Roku Premiere is perfect for standard 1080p content, too.
Roku Premiere Specification
Roku Premiere | HD/4K/HDR Streaming Media Player, Simple Remote and Premium HDMI Cable Roku Premiere | HD/4K/HDR Streaming Media Player, Simple Remote and Premium HDMI Cable Buy Now On Amazon $31.99
On the face of it, the Roku Premiere is incredibly unimpressive. It’s a small plastic slab, measuring 3.30 x 1.40 x 0.70 inches and weighing just 1.28 ounces. On the back is a single micro-USB power port and a single HDMI port. You’ll also find a small reset button, accessed using a pin.
For connecting the Roku Premiere to your network, there’s an 802.11bgn single-band wireless chip.
At the heart of the Roku is a quad-core ARM Cortex A53 CPU with 1GB of RAM and 512MB channel storage. There is no microSD card slot with the Roku Premiere.
The device can handle 4K UHD up to 2160p at 60fps, and supports HDR10 and HLG (Hybrid Log-Gamma). Audiophiles can enjoy DTS Digital Surround and Dolby Audio, with Dolby ATMOS pass through over HDMI, and Digital stereo over HDMI.
Can you connect Roku to your TV? Well, if you have an HDTV or greater, you should be fine. The box can stream to standard HDTVs with 1080p, as well as upscaling 720p.
For 4K UHD TVs, the Roku streams up to 2160p at 60fps (3840×2160) with up-scaling from 720p and 1080p. For this, the 4K TV should have an HDMI input that supports HDCP 2.2. The Roku Premiere can also stream at HDR10 to 4K UHD HDR TVs, using the same HDCP 2.2 HDMI input.
Note: as most people own a 1080p HDTV, we’ve reviewed the Roku Premiere on such a device.
Setting Up the Roku Premiere
While easy to set up and install, the Roku Premiere comes with a couple of positional challenges.
How should you power it?
Where should you place it?
Both are straightforward. The device ships with its own USB power adapter, so if there is a mains electric connection nearby, use this. However, this isn’t always the case. Fortunately, most modern TVs offer a 5V USB power outlet which is ideal for the Roku Premiere.
With the power sorted out, positioning is the next challenge. The Roku Premiere is compact and light enough to be mounted on your TV. It comes with a double-sided adhesive strip to attach the device to the top or bottom of your television. If there is a consistent surface for the adhesive, the Roku Premiere can be reliably attached. Given the length of the HDMI cable, it makes sense to keep the device close to your TV.
Hooking up the Roku Premiere to Wi-Fi is straightforward, as is the entire set up process. You’ll need to set up your Roku account on a PC or tablet, however, in order to activate the device. This is a straightforward process that helps you initialize the Roku for your territory and download the relevant selection of apps. Once this is done you can switch back to the Roku Premiere itself to add channel apps, log in or create new accounts, and prepare for viewing.
It’s fair to say that everything about this unit, from the compact size and ergonomic remote control to the simplicity of the user interface, makes it suitable even for the most tech-averse person you know.
Another example: the fabric tab on the remote’s battery compartment. No more struggling with your remote’s battery cover—it literally pulls off to let you quickly change the batteries. The remote itself is light, easy to use, and sits nicely in your hand. The lack of volume control is a surprise, but a minor disappointment.
Everything about Roku is designed with usability in mind. It’s a wonderful philosophy that gets a big thumbs up.
Finding and Installing Apps on Roku Premiere
The Roku Premiere features a vast selection of channels that can be installed or removed like apps. Among these are big names such as Netflix, Google Play TV, and Apple TV. The selection depends on where you live, so some apps don’t appear or won’t work in particular territories.
Thousands of channels are available overall. You’ll even find things like Plex and HD Homerun for streaming video and TV from your own networked devices.
Other channel apps include Disney+, Prime, Apple TV, Now TV, and YouTube. Channels are divided by category, and the platform even supports basic games.
Managing apps on the Roku Premiere is easy, too.
You can and delete as necessary, and the settings screen opens a whole host of options. You can change the theme, the screensaver, enable network access for mobile apps, factory reset, system update, change the language, and even initiate a guest mode. This lets visitors to your home input their own credentials for a specific app. A useful option for borrowing Disney+ to catch the latest addition to the service with friends and family.
As noted, the Roku has 512MB of channel storage. I spent around 30 minutes finding and installing apps without running out of space, so unless you’re really indecisive you probably won’t hit that limit.
Missing Channels? Use Mirroring
Incredibly, despite having 100s of channels, the Roku Premiere might not feature a channel app you want to use. For example, in the UK there is no Britbox app (although the US version is listed). Similarly, there is no Kodi app for Roku.
So, what is the solution? Fortunately, Roku supports screen mirroring. All you need to do is open Settings > System > Screen Mirroring, then choose whether to allow all connections or issue a prompt.
On the device you’re mirroring from, use the mirroring option. So, on Android, use a mirroring app rather than Chromecast. We tried it out on Windows, Android, and iOS—the mobile devices worked whereas Windows 10 did not. Connection was made, but no streaming was established, despite several attempts and reboots.
Setting Up Roku Premiere with HD Homerun DUO and Plex
This review is all about the Roku Premiere, but thanks to Plex, our incredible prize bundle also includes an HD Homerun DUO, HDTV indoor UHF antenna, and a Lifetime Plex Pass.
But how well do these systems play together?
Well, we think you’ll be impressed. While the HD Homerun DUO requires a strong, consistent terrestrial HDTV signal, it’s easy to add to your network. Just plug it into your router using Ethernet, hook up the antenna (internal or external), and over the air TV can be viewed on any compatible device. The Roku Premiere features an HD Homerun app, so any TV you’re missing can be enjoyed that way.
Plex has expanded in recent years, now offering content only available with a Plex Pass along with your own media hosted on a network drive. The Plex app on Roku easily connects to your existing Plex server, giving access to every media file you need.
Roku: The Perfect Plex Partner
Over the years I’ve used several media streamers, from Apple TV and Chromecast to Amazon Fire TV and Chromecast Ultra. They all have their advantages and disadvantages, but none are as easy to use and slick as Roku.
Roku Premiere | HD/4K/HDR Streaming Media Player, Simple Remote and Premium HDMI Cable Roku Premiere | HD/4K/HDR Streaming Media Player, Simple Remote and Premium HDMI Cable Buy Now On Amazon $31.99
Of course, the Roku Premiere has some shortcomings. HDMI-CEC—the system that allows your TV remote to control a media streamer or vice versa—seems inconsistent. There is also a lack of volume control. Screen mirroring from Windows 10, meanwhile, appears fraught with pitfalls and is possibly best avoided. The lack of Kodi might be a deal-breaker, too.
However, these are minor. Overall, this is a great media streamer, at a surprisingly low price for 4K and HDR. It’s easy to set up, surprisingly simple to use, and you probably won’t use your standard TV decoder for days after installing the Roku Premiere.
Enter the Competition!
Roku Premiere, HD Homerun Duo, and Plex Bundle
Read the full article: Roku Premiere Streams Netflix, Disney+ and More in HD, 4K, & HDR for Under $50
Roku Premiere Streams Netflix, Disney+ and More in HD, 4K, & HDR for Under $50 published first on http://droneseco.tumblr.com/
0 notes
Text
How to Play PS4 on a Laptop Screen
How many times does it happen that you come home eager to play the new FIFA you just ordered a couple of days back only find out that the TV is currently occupied by your sister or dad enjoying their favorite TV soap or sports?
The wait is killing, isn’t it? So what if there you didn’t need your TV to play your PS4? Yup, believe it or not, you can also connect and play your PlayStation on your laptop screen.
Though keep in mind that the process can be a little tricky and won’t simply work by you connecting the HDMI cable to your laptop rather than the TV.
But why? What is the problem?
That is because the HDMI ports on your laptop and PS4 are output ports and cannot be converted into input ports so easily. So what can you do? Here are a couple of tricks to play PS4 on a Laptop screen.
Method 1: With a Video Capture Card
This is one of the easiest ways to turn your laptop into your new LCD for gaming but remember but your pocket might take a little hit as there are a few things that need purchasing.
Here’s what all you will need.
Laptop
Video Capture Card
Internet (WIFI or Ethernet)
File sharing enabled
HDMI cable
Step 1: The first and foremost thing to connect your PS4 to the internet. If you have a wireless network then go to the Settings option on the menu. There you will find the Internet Connection Settings. Once you locate your WI-Fi, hit the button and connect to it.
But I do not have a wireless connection so what do I do?
Well, in that case, you will need to connect both your laptop and PS4 using Ethernet Cables
Step 2: Next up, you will need a Video Capture Card. We recommend you go with the Elgato Game Capture Card HD60 S. It is an absolute value for money pick as it gives you Full-HD quality and ability directly stream on Twitch, YouTube, etc. at a low cost of less than $120 (no wonder it is an Amazon best-seller).
Step 3: Once you get the video capture card, you need to connect it to your laptop. The USB and all the software needed to establish the connection correctly will be provided to you with the purchase.
Step 4: After you connect the video capture card to your laptop it needs to be hooked up to the PS4. This again is an S-Video connection cable. All you have to do it put in the HDMI cable into the HDMI-IN port on the Capture Card and HDMI-Out port on the PS4.
Step 5: Run the Capture Card software you just installed onto your laptop and turn on the PS4. The software will do a quick search and show the PS4 on the screen within 60-seconds.
Note: To enjoy the game graphics to the fullest make sure to run the software in full-screen.
And just like that, you no longer have to wait for the TV. You can turn your laptop into a screen for your PS4 anytime anywhere but note, that this method does not work with Macbooks.
So what if you have a Macbook or cannot purchase the Video capture card as of now? Well, no problem, we have another trick up our sleeves. Here’s all about it.
Method 2: With Remote Play (Also works with Mac)
Things you will need for this method include:
Your Laptop
A PS4
USB cable or DUALSHOCK 4 USB wireless adaptor
An Account on PlayStation Network
Internet Connection
The Catch: One of the reasons we do not recommend this method first is that it does require a TV at first. For a few minutes only but yes, you will need your LCD as your PS4 settings require a little adjustment for streaming to your laptop.
So if you can get that access, here are the steps.
Step 1: Firstly, you need to download the Sony Remote Play app on your Windows or Mac laptop. It is easy as the files for both OS are available on the official website itself. Once the download is complete, get done with the installation which takes about a minute.
Got more than one PS4 at home? Then step 2 is important for you. But if you not, you can jump right to step 3.
Step 2: Its time to set up the PS4 for connection.
For that, you will need to turn one of the PS4’s into the primary console. So how do you do that? Well, switch on your PS4 and head to the Playstation Network settings available in the settings menu. There you will find the Account Management option with an option to Activate the current system as the Primary Console.
Another thing you will have to do is make sure your PS4 has the software 3.50 or higher running on it. In case you haven’t updated it in a while just hit the System Software Update in the settings menu to download the latest updates.
Step 3: Now you have to enable the Remote Play option in PS4 settings. For that you’ll have to go into Settings, then into Remote Play Connection Settings, check if the Remote Play is enabled. To allow you access to the games through your network, the PS4 should power on or the Rest mode activated.
Step 4: Activate Rest Mode. It is usually by default enabled, however, it is good to check. Go to the Settings, then to Power Save Settings, now Set Features Available in Rest Mode.
Confirm that the Enable Turning on PS4 from Network is ticked, if it isn’t you have to enable this feature to be able to stream your PS4 on your laptop.
Step 5: Now you have to switch to the Remote Play app on the laptop, after tweaking things up in the PS4 settings. On the left corner of the app, there’s a Settings option.
You need to set the settings like resolution, frames per second, etc. You can set the resolution to 1080p, but it’s usually set at 720p because for the higher resolution you’d need a high power laptop and also a PS4 Pro. While on the frame rate you can choose from standard to high frame rates. With high, you will get 60fps which is pretty dope but will eat up your network.
Step 6: Connecting DUALSHOCK 4 Controller. You can use a USB cable or DUALSHOCK 4 wireless USB adaptor to plug in the controller to your laptop.
To connect the wireless controller follow these steps:
First, hold down Share and circular PlayStation buttons on your controller till the light bar starts flashing on the controller.
Plug in the USB adapter into your laptop and hold it in a pushing position for at least 3-4 seconds. Your controller now paired.
Step 7: You’ll be able to see a Start option in your Remote Play app on the laptop. You’ll be prompted to log-in to your PlayStation Network when you click on that start button. The app will search for the first PS4 in the network and will take you to the PS4’s home screen.
This is the console being streamed on to your laptop. Interestingly you can also use your laptop’s mic and keyboard for chat and text typing.
Step 8: In case you want to power off the PS4. You have to press down the PlayStation button on DUALSHOCK 4 controller, then go to power settings and enter Rest Mode. This will sleep your PS4 and terminate the connection stream.
The post How to Play PS4 on a Laptop Screen appeared first on Laptop Verge.
0 notes
Text
Your Wi-Fi and your smart home don't get along. Now what?
New Post has been published on https://nexcraft.co/your-wi-fi-and-your-smart-home-dont-get-along-now-what/
Your Wi-Fi and your smart home don't get along. Now what?
It’s not you, it’s your Wi-Fi router (maybe). (Web Hosting via Unsplash/)
Having a smart home hasn’t been quite what The Jetsons promised me it would be. In between all the futuristic voice commands and smart automation, there’s a lot of fussing with devices that just won’t cooperate, which can be a real buzzkill.
The internet is littered with forum threads diagnosing issues like this, from Sonos speakers having problems with mesh networks to Nest devices hopping offline at random. Our editor-in-chief even bought some LIFX light bulbs that turned on and off in the middle of the night, thanks to communication issues between his Nest’s Home/Away feature and (maybe) his Eero Wi-Fi network. Most annoyingly, it seems everyone has a different solution to their problem, meaning there’s no simple one-size-fits-all fix. Also, there is no definitive list of products that generally don’t play nicely together, since many folks might run the same combination of stuff without any issues.
Still, there are some common threads at play, so if you run into problems with your supposedly-futuristic smart home crapping out, here are some things we recommend trying before you give up and return everything in a fit of rage.
Move the device (or your router)
Let’s start with the most common (and obvious) tech trouble: Wi-Fi signal. If your home’s Wi-Fi is already spotty, you’re not exactly setting yourself up for success by adding a bunch of smart devices. Try moving the device in question—whether it’s a Sonos speaker, smart plug, or other accessory—closer to your Wi-Fi router. If you find it’s more reliable the closer it gets, you know signal strength may be to blame, and you’ll need to extend your Wi-Fi with better equipment. If you use a Wi-Fi extender or mesh system, you’ll get better results if you wire them together with Ethernet, rather than repeating the Wi-Fi signal
If you’re lucky, you may even be able to get better signal throughout your home just by moving the router. If it’s all the way off to one side of the house, for example, moving it to a more central location will provide a more consistent signal. I’ve even heard that if a device is too close to your Wi-Fi router, moving it away from the router can help. I haven’t seen this myself, but if nothing else works, there’s no harm in trying.
Of course, not all smart devices use Wi-Fi. Some use open protocols like Zigbee or Z-Wave, while others (like Insteon) use their own communication technologies. Philips Hue, for example, contains a hub that wires directly into your router and communicates wirelessly with its bulbs using a Zigbee mesh. If a bulb is too far away from the hub—or from another Hue bulb—it may be finicky, or unable to turn on at all. In this case, you’ll either want to move the hub, or add more bulbs near the problem area.
Similarly, when my Insteon ceiling fans were acting unreliably, it was because they were too far away from the next link in the chain, making it difficult to communicate with the controller hub on the other side of the house. I added an Insteon smart plug between them as an “extender” of sorts, so the signal could make shorter, more reliable “hops” back to its home base.
Wire devices to your router when possible
Just start plugging away. (Lorenzo Cafaro via Pixabay/)
Wired connections will always be stronger and more reliable than wireless ones. Even if you have a seemingly good Wi-Fi signal somewhere, you might get better results if a device is wired up with Ethernet.
Sonos, for example, uses Wi-Fi to connect each speaker to your home network. If you plug just one speaker into your router with an Ethernet cable, though, that speaker will create its own separate wireless network and run your speakers off that instead, so they aren’t competing for bandwidth. If you can’t plug one of your speakers into the router, the standalone Sonos Boost performs the same function.
In addition, I’ve found that some smart home hubs—like the Philips Hue Bridge—perform better when plugged directly into the router, rather than being plugged into an Ethernet switch. If you have a complicated setup of network gear—say, a router from your internet service provider, a switch, and a few mesh extenders or powerline adapters—you may get better results from certain network devices than others.
Isolate the 2.4GHz Wi-Fi band
Many modern routers are “dual band,” using both the 2.4GHz and 5GHz frequencies to improve speed and cut down on interference. To this day, some routers require you to have two separate networks as a result (e.g. Smith_House_2GHz and Smith_House_5GHz), which is clunky and inefficient. But now there are also alternatives that allow you to use the same network name for both frequencies, and your laptop, phone, and other devices will intelligently choose the best frequency they can.
But believe it or not, many smart home devices are not that smart. Some may have trouble choosing the correct band, or—shockingly—some may only be compatible with the old 2.4Ghz frequency. This can cause all kinds of connection problems during the initial setup—the device is looking for a 2.4GHz network, but the app wants to hand off the 5GHz version your phone is connected to, causing the whole thing to fail. Yes, this is a hilariously stupid problem, but I’ve seen it happen.
There are a few potential solutions here. If you can log into your router’s settings and temporarily disable the 5GHz band, you might be able to get the app to connect your new device to the correct network. If that isn’t an option—as is the case on many modern routers and mesh systems—you might try using an old 2.4GHz-only phone or tablet to perform the initial setup. (The iPhone 4S was the last single-band iPhone, while a lot of old Android tablets were single-band as well.) If all else fails, you could add a second 2.4GHz-only router for those devices. But if you ask me, at that point, I’d just return my smart home product and buy something that works properly.
Other options
I’ve successfully used the above solutions quite a few times, though they aren’t the only ways to solve your wireless woes. In my research, I’ve stumbled upon many other “quick fixes,” which may or may not work for you, but are worth a shot. These include:
“Reboot” your router, hub, or device.** Yep, the ol’ “turn it off and on again” trick works just as well for smart home gadgets as it does for Wi-Fi routers. Unplug it, wait 10 seconds, and plug it back in to see if your problems go away.
Put your router into “bridge mode.” If you’re using an ISP-supplied modem/router combination in conjunction with a mesh system, you might be running two wireless networks that are interfering with one another. Enter the administrative settings for your ISP-supplied router and enable the bridge mode setting—if you can find one—then let the mesh system create the network to avoid doubling up. If your ISP-supplied router doesn’t offer this feature, you may have to put the mesh system in bridge mode from its app instead.
Repair the mesh. If the devices in question use the Z-Wave protocol (search for your device’s name and model to find out if this is the case), you might be able to solve your problems by repairing the Z-Wave mesh in your hub’s app. (Or, in the case of the current Samsung SmartThings app, by contacting customer support.)
Use modern Wi-Fi encryption schemes. If you’re still using a Wi-Fi network with an outdated WEP or WPA password, you’ll want to upgrade it to WPA2 encryption to ensure the best security and compatibility with recent devices.
Do a factory reset. It isn’t fun, but if your device used to work reliably, you may just need to go back to a blank slate. Open the smart home app in question, reset the device to its factory settings, and try setting it up from scratch.
With any luck, one of these tweaks will solve your problem, and you’ll get that 21st century home you’ve always wanted. If not, it may be time to swap out your router, mesh system, or smart home device for something else entirely—or go back to flipping light switches the old fashioned way until someone else figures all of this stuff out.
Written By Whitson Gordon
0 notes