#iTop Screen Recorder
Explore tagged Tumblr posts
Visit Tumblr Blog
Explore Tumblr blogs with no restrictions, modern design and the best experience.
Last Seen Tumblr Blogs


Fun Fact
The total number of visits Tumblr.com received during January 2021 is 327 million.
Text
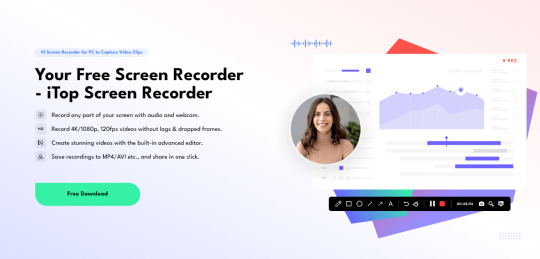
Запись Экрана Онлайн: Захватите Свои Моменты В Интернете
В мире современных технологий, мы все стремимся делиться своими историями и опытом в интернете. Иногда одними словами или фотографиями недостаточно, чтобы запечатлеть все моменты, которые хотим передать. И вот тут на помощь приходит "Запись Экрана Онлайн" — удивительный инструмент, который позволяет нам захватить все происходящее на наших экранах и поделиться этим с другими.
Что такое "Запись Экрана Онлайн"?
"Запись Экрана Онлайн" — это онлайн-сервис, который позволяет вам записывать все, что происходит на вашем экране. Будь то игры, обучающие уроки, видеоконференции, создание контента для YouTube или просто интересные моменты из вашей повседневной жизни — с этим инструментом вы можете захватить все важное и поделиться этим с миром.
Почему "Запись Экрана Онлайн" так удобна?
Простота использования: Этот онлайн-инструмент предоставляет простой и понятный интерфейс. Вам не нужно быть опытным пользователем, чтобы начать запись. Все, что вам нужно сделать, это запустить программу и нажать "Запись".
Не требует загрузки дополнительного ПО: Одной из главных преимуществ записи экрана онлайн является то, что вам не нужно устанавливать какое-либо специальное программное обеспечение. Все происходит прямо в вашем веб-браузере, что экономит время и пространство на вашем устройстве.
Доступность: Будь вы пользователем Windows, Mac или Linux, вам доступен этот инструмент, так как он совместим со множеством операционных систем.
Совместимость с разными форматами: Когда вы завершите запись, вы сможете сохранить видео в разных форматах, таких как MP4, AVI, GIF и другие. Это обеспечивает максимальную гибкость при публикации вашего контента.
Легкая публикация: Завершив запись, вы можете легко поделиться видео на своих любимых платформах социальных сетей, стриминговых сервисах или просто отправить его друзьям и семье через мессенджеры.
Как использовать "Запись Экрана Онлайн"?
Откройте веб-сайт "Запись Экрана Онлайн": Найдите надежный онлайн-сервис для записи экрана и перейдите на его веб-сайт.
Запустите запись: Вам может потребоваться разрешить доступ к вашему экрану. После этого выберите нужные настройки (звук, качество видео и т.д.).
Начните захват: Нажмите кнопку "Запись" и начните записывать все, что вам нужно.
Завершите запись: Когда вы закончите, остановите запись и сохраните видео в выбранном формате.
Поделитесь своим контентом: Теперь ваша запись готова к публикации! Поделитесь ею с миром и наслаждайтесь реакциями вашей аудитории.
Теперь, когда вы знаете о преимуществах и простоте использования "Записи Экрана Онлайн", вы можете свободно делиться своим опытом, идеями или забавными моментами с другими. Этот инструмент дает вам свободу выразить себя и сделать свой след в онлайн-мире. Не упустите возможность запечатлеть важные моменты и стать частью глобального сообщества онлайн-контента!
В дополнение к преимуществам, которые мы рассмотрели ранее,
давайте более детально рассмотрим, как "Запись Экрана Онлайн" стала незаменимым инструментом для различных аспектов нашей деятельности.
Использование Screen Recorder на бизнес-платформах:
Образование и Обучение
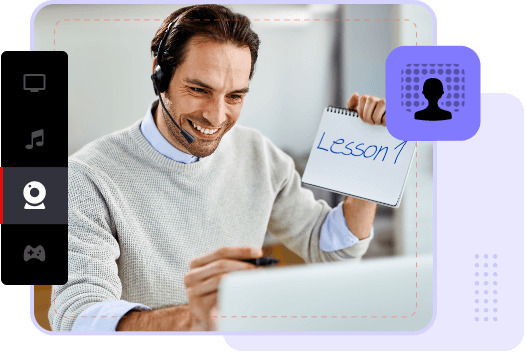
В области образования "Запись Экрана Онлайн" сыграла революционную роль. Преподаватели и учащиеся могут использовать этот инструмент для создания интерактивных уроков и обучающих материалов. Процесс обучения становится более привлекательным и эффективным, когда можно визуализировать сложные понятия или демонстрировать работу с программным обеспечением на экране. "Запись Экрана Онлайн" позволяет превратить обучение в увлекательный опыт, который стимулирует интерес и развивает навыки учащихся.
Контент для Социальных Медиа
В эпоху социальных медиа контент играет ключевую роль в привлечении внимания аудитории. Благодаря "Записи Экрана Онлайн" пользователи могут создавать захватывающие видео с экрана, демонстрируя свои умения, создавая обучающие контенты или просто делясь интересными моментами из жизни. Этот инструмент позволяет создать впечатляющий контент, который быстро станет популярным и поднимет вашу активность в социальных медиа на новый уровень.
Профессиональная Деятельность
Для профессионалов, занятых в различных областях, "Запись Экрана Онлайн" стала незаменимым средством для создания презентаций, обучающих материалов и демонстрации рабочих процессов. От программистов и дизайнеров до маркетологов и руководителей проектов, все могут использовать этот инструмент для создания качественного контента и передачи информации своим коллегам и клиентам.
Техническая Поддержка и Виртуальные Уроки
В сфере технической поддержки "Запись Экрана Онлайн" помогает решать проблемы пользователей быстро и эффективно. Технические специалисты могут записать экран и демонстрировать шаги для решения проблем, что упрощает понимание и устранение ошибок. Также "Запись Экрана Онлайн" является отличным инструментом для создания виртуальных уроков, что особенно актуально в ситуациях дистанционного обучения.
Творчество и Развлечения
Для творческих личностей "Запись Экрана Онлайн" открывает множество возможностей для самовыражения и развлечения. Вы можете создавать свои собственные анимации, ролики или влоги с легкостью. Этот инструмент помогает воплотить в жизнь ваши идеи и делиться своими талантами с миром.
"Запись Экрана Онлайн" продолжает эволюционировать, предоставляя нам все более мощные и интуитивно понятные инструменты. С его помощью мы можем захватывать моменты, обучать, развлекать и делиться опытом с другими в интернете. Неважно, какие цели вы преследуете — обучение, развлечение или профессиональная деятельность — "Запись Экрана Онлайн" всегда будет рядом, помогая вам достигать ваших целей и украшая вашу онлайн-жизнь.
1 note
·
View note
Text
0 notes
Text
0 notes
Text
0 notes
Text
0 notes
Text
0 notes
Text
În lumea digitală de azi, capturarea a ceea ce se întâmplă pe ecran poate fi extrem de util pentru diverse activități - de la crearea de tutoriale video și înregistrarea de webinarii la surprinderea momentelor importante din jocuri și prezentările de afaceri. iTop Screen Recorder se remarcă drept o soluție robustă pentru înregistrarea de înaltă calitate a ecranului, oferind instrumente puternice de editare care facilitează capturarea, adăugarea de adnotări și partajarea conținutului. Denumire produs: iTop Screen Recorder 5 Pro Website: https://www.itopvpn.com/ Valabilitate licență: 6 luni Sistem de operare: Windows Pagină promotionala: N / A Descarcă: https://recorder.itopvpn.com/ (pagina oficială) Cod de licență: 4424E-45713-7C5AE-4AD45 Vizitați pagina oficială, descărcați și instalați programul pe computer. Utilizați codul de licență de mai sus pentru activarea iTop Screen Recorder 5 Pro. 1. Interfață intuitivă Interfața prietenoasă permite începerea înregistrării cu doar câteva clicuri, fiind accesibilă pentru utilizatori de orice nivel. 2. Moduri de înregistrare personalizabile Selectează zone specifice pentru înregistrare, cum ar fi întregul ecran, o fereastră de aplicație sau o regiune personalizată. 3. Suite puternică de editare Adaugă efecte, adnotări și tranziții direct după capturare. Editorul încorporat este suficient de robust pentru a face din iTop o soluție completă pentru înregistrare și editare. 4. Integrare audio și cameră web Înregistrează sunetul de sistem, microfonul și camera web simultan, ideal pentru crearea de tutoriale sau webinarii captivante. 5. Compatibilitate ridicată iTop Screen Recorder suportă diverse formate, incluzând MP4, AVI și FLV, și funcționează fără probleme pe sistemele de operare Windows. De ce să alegi iTop Screen Recorder? iTop Screen Recorder este conceput atât pentru începători, cât și pentru utilizatori avansați, oferind opțiuni flexibile care răspund nevoilor de înregistrare personale și profesionale. Iată de ce a devenit o alegere preferată pentru înregistrarea ecranului: Captură video de înaltă calitate: Înregistrează în HD 1080p pentru a te asigura că fiecare detaliu este redat perfect. Opțiuni flexibile de înregistrare: Înregistrează pe tot ecranul, ferestre specifice sau regiuni personalizate, fără restricții. Instrumente de editare încorporate: Editează videoclipurile imediat după înregistrare, incluzând tăierea, decuparea și adăugarea de adnotări. Partajare ușoară: Exportă videoclipuri în diverse formate și partajează-le rapid pe multiple platforme. Beneficiile SEO ale iTop Screen Recorder pentru creatori de conținut iTop Screen Recorder permite creatorilor de conținut să producă rapid videoclipuri de înaltă calitate, îmbunătățind prezența online și gradul de interacțiune. Iată cum ajută: Calitate video îmbunătățită: Înregistrare clară, detaliată, ideală pentru tutoriale și demonstrații video profesioniste. Flexibilitate de branding: Adaugă watermark-uri și adnotări personalizate pentru a personaliza conținutul, ideal pentru creatorii care doresc să se diferențieze. Productivitate crescută: Cu opțiuni de editare și partajare încorporate, crearea de conținut devine mai rapidă, eliberând mai mult timp pentru producție.
0 notes
Text
Nhân dịp Ngày của Mẹ, iTop tổ chức chương trình iTop Say Love to Mom Giveaway, tặng miễn phí bản quyền 5 phần mềm hữu ích cùng thẻ quà tặng Amazon trị giá 50 đô la. Cách thức tham gia như thế nào, cùng AnonyViet tìm hiểu qua bài viết dưới đây nhé! Tôn vinh Ngày của Mẹ với quà tặng từ iTop Ngày của Mẹ là dịp để chúng ta bày tỏ lòng biết ơn và yêu thương đối với người phụ nữ vĩ đại nhất trong cuộc đời mỗi người. iTop, nhà cung cấp phần mềm hàng đầu, đã quyết định tổ chức một chương trình giveaway lớn nhất từ trước đến nay nhân dịp này có tên là “iTop Say Love To Mom”. [caption id="attachment_60040" align="aligncenter" width="750"] Chương trinh iTop Say Love To Mom[/caption] Quà tặng iTop Say Love To Mom bao gồm những gì? Giải thưởng bao gồm giấy phép sử dụng phần mềm iTop Flagship trị giá hơn 100,000 USD. Các sản phẩm nổi bật như iTop Screen Recorder, iTop PDF, iTop VPN, IObit Uninstaller sẽ là công cụ đắc lực hỗ trợ bạn trong công việc và học tập. Không chỉ vậy, thẻ quà tặng Amazon cũng là một phần của gói quà tặng này. Có tham gia là chắc chắn 100% có quà. Cụ thể tổng quà tặng bao gồm: 6 Thẻ quà tặng Amazon eCard trị giá $50/ thẻ 500 mã code bản quyền iTop PDF VIP 6 tháng 500 mã code bản quyền iTop Data Recovery PRO 6 tháng 500 mã code bản quyền IObit Uninstaller 13 PRO 6 tháng 500 mã code bản quyền iTop VPN Premium 6 tháng 500 mã code bản quyền iTop Screen Recorder PRO 6 tháng Thời gian và cách thức tham gia iTop Say Love To Mom 2024 Chương trình diễn ra từ 09/05 đến 15/05/2024. Bước 1: Truy cập đường link chương trình TẠI ĐÂY > Nhấn ‘How to Enter’ [caption id="attachment_60041" align="aligncenter" width="750"] Nhấn ‘How to Enter’ để tham gia iTop Say Love to Mom[/caption] Bước 2: Chia sẻ những lời yêu thương với mẹ trên mạng xã hội kèm theo hashtag #iTop#mothersday2024 Hoặc bạn có thể nhấn “Copy” những gợi ý câu chúc ở dưới cho nhanh. [caption id="attachment_60042" align="aligncenter" width="750"] Nhấn “Copy” những gợi ý câu chúc[/caption] Bước 3: Nhấn Share trên Facebook hoặc X Bước 4: Sau khi chia sẻ xong, bạn nhấn ‘Yes’ [caption id="attachment_60043" align="aligncenter" width="693"] Sau khi chia sẻ xong, bạn nhấn ‘Yes’[/caption] Bước 5: Chọn phần mềm bạn thích > Nhấn ‘Get code’. [caption id="attachment_60044" align="aligncenter" width="750"] Nhấn ‘Get code’[/caption] Bước 6: Điền email để nhận mã bản quyền > Bấm ‘Send prize’ [caption id="attachment_60045" align="aligncenter" width="700"] Điền email để nhận mã bản quyền[/caption] License code sẽ được gửi qua email cho bạn. Bước 7: Bạn có thể tham gia chia sẻ sự kiện này trên Facebook hay X để có cơ hội nhận Amazon Gift trị giá 50 USD (Kết quả sẽ được công bố vào ngày 20/5). [caption id="attachment_60046" align="aligncenter" width="750"] Chia sẻ sự kiện này để nhận ecard từ iTop[/caption] Lời Kết Thời gian diễn ra trong thời gian ngắn chỉ có vài ngày thôi nên mọi người nhanh tay tham gia chương trình khuyến mãi iTop Say Love To Mom để nhận bản quyền những phần mềm mình cần và có cơ hội chiến thắng thẻ quà tặng Amazon trị giá 50 đô la nữa nha. Chúc bạn thành công!
0 notes
Text
How to record Zoom meetings with iTop Screen Recorder
Given how much it facilitates remote work, Zoom has been a godsend for several businesses and the education sector. However, a privacy-related issue arises (based on experience). Zoom captures both the meeting and your screen. Zoom won’t start recording the screen until someone shares theirs during the meeting. Leaving the window causes the screen to freeze regardless of whether the video camera…
View On WordPress
0 notes
Text
Wise Care 365 v6.6.5
Wise Care 365 continue de s’améliorer, et les nouvelles notes publiées sont les suivantes : Quoi de neuf : 1. Amélioration des règles de nettoyage pour CocCoc Browser et Battle.net. 2. Ajout de règles pour le nettoyage de SoulseekQt, Deezer Desktop, iTop Screen Recorder, iTop PDF, Amazon Kindle, WebEx, Citrix Receiver et Digsby. 3. La corbeille n’est pas sélectionnée par défaut dans PC…

View On WordPress
0 notes
Text
[WP-Coder id="25"] The Screen Recording Revolution: Getting to Know RecordRTC In the sprawling digital landscape, capturing screen actions has never felt more essential. Be it for education, entertainment, or business, knowing how to record your screen is a skill worth its weight in gold. This guide isn’t just about any screen recording tool; it’s about mastering RecordRTC. Why Even Bother with Screen Recording? So, you're pondering, "Why should I care about screen recording?" Let's spell it out: How-To Videos: Want to show someone how to set up a software or master a video game level? That's where screen recording shines. Showcasing Gaming Skills: Think you're the next big gamer? Prove it with some slick recordings. Constructive Critiques: Provide clear feedback or even review digital products. Education: Teachers can immortalize lessons, making them available anytime, anywhere. Enter RecordRTC: A Fresh Perspective on Screen Recording What's the Buzz Around RecordRTC? Among the jungle of tools available, why should RecordRTC be your pick? Unparalleled Simplicity Both greenhorns and veterans will find this tool accessible and functional. Skip the API Hassle Tired of API keys? RecordRTC feels the same. It's all about straightforward functionality. Audio-Video Harmony It’s not just about visuals; RecordRTC understands the power of voice too. Your First Date with RecordRTC Let's break down your first recording session: Kick-off: Head to your browser and find the tool. Push the Button: Spot 'Start Recording'? Click it. A prompt will guide you further. Speak Up: If your video needs commentary, plug in that mic. The Grand Finale: Done with your session? 'Stop Recording' is your friend. The Playback: Bask in your creation, then save it for the world. Secrets for Stellar Screen Recordings To get that perfect recording, consider these insider tricks: Brighten Up: If there's a face reveal, ensure your face isn't lurking in the shadows. Clarity in Audio: A muffled voice is no fun. Invest in a decent microphone and avoid ambient noise. Map it Out: Spontaneity is great, but sometimes a little prep work can save the day. In Conclusion With tools like RecordRTC, screen recording is no longer a daunting challenge but a delightful opportunity. Whether you’re sharing your passion, knowledge, or feedback, there’s a world waiting to see your screen’s story. best Microphone test tool Common Queries Q: Does RecordRTC come with a price tag? A: No, it's free. No hidden costs, no surprises. Q: Is it compatible with all browsers? A: It mostly is, but double-checking with your preferred browser never hurts. Q: Stuck with a recording glitch. What next? A: Their official documentation is a good starting point. If that doesn’t help, the community might have answers. Q: How do I boost video quality? A: A steady internet connection is key. And perhaps, shut down a few background apps. Armed with RecordRTC, you're all set to create, share, and shine. Here's to your screen recording adventures! screen record on mac screen recorder screencast o matic screen recorder for pc du recorder screen recorder windows 10 screencast xrecorder screen capture free screen recorder windows screen recorder screenrec apowersoft screen recorder camstudio itop screen recorder obs screen recorder movavi screen recorder www bandicam com az screen recorder screen o matic screenflow free screen recorder windows 10 icecream screen recorder best screen recorder for pc wondershare democreator screen record android easeus recexperts screen recorder windows 11 free screen recorder for pc democreator best screen recorder debut video capture du screen recorder screen recorder chrome extension screen recorder extension x recorder simplescreenrecorder screen recorder chrome screen video recorder screen cast o matic loom screen recorder loom for chrome record screen windows 11 video recorder for pc free cam 8 screen recorder with audio ifun screen recorder webcam recorder
0 notes
Link
ITop Screen Recorder Pro Crack is a free and easy-to-use screen recorder with a built-in lightweight video editor. It allows easy screen
0 notes
Note
Can we have a gif tutorial? and a tutorial on how you capture the vids? please
I think there are better specific tutorials out there than I can write myself (this is a really good one for beginners), but I can give a general rundown of my process! And some tips/tricks I’ve found useful.
First off, I use a lot of paid software which may limit how much use you can get out of this. The only thing really specific to my process though is Photoshop. There are tutorials and resources out there for other programs, but there are a lot more resources that are catered to PS so it's definitely easier on you if you can get PS (I won’t go into how to get PS without a sub, but other tutorials out there might!). I have a subscription so I’m using the latest version, but any version that supports video timelines should be alright.
Get the Vid
People will tell you "always use 1080p" and yes you should look for the highest quality first, but as someone who often gifs more obscure stuff, let me say do not let it stop you if you can’t find 1080p. Gif what your heart wants to gif.
The first place I will look for vids is through t*rr*nts. I won’t detail that here, but if you want to do this, you need to get a vpn. I use NordVPN and they will occasionally have some really good deals. But whatever you get, make sure it has some kind of "kill switch" option that should always be enabled when you're downloading.
My next option when I can’t find a download is PlayOn. This is a paid service, but reasonably priced (for a one-time payment of $7.50 you can get 50 recordings, or 15 cents a recording). It lets you download episodes from streaming services that you are subscribed to or any free ones like tubi. It supports most major streaming services. I’ve found the app version (PlayOn Cloud) easier to use, and it’s pretty self-explanatory, just make sure you set your settings to HD downloads. Also the recording quality will depend on the streaming service, I find it’s a bit hit and miss.
As a last resort, I screen record. Again the quality will vary here. I don't have a good specific free rec for a screen recorder without watermarks, but there’s a lot of different programs out there. You’ll need to find something that works with sites like netflix and doesn’t block the screen record (for a paid option, there is iTop Screen Recorder).
Finally, for Youtube vids, there are tons of free options for downloading directly, the tutorial I linked has one!
Clip the Vid
This is a divisive step, but what I've personally found the easiest is to clip the scenes I want to gif in a separate program first. (Some other tutorials, like the one I linked, will have directions for using screencaps instead.) I use Movavi, but there are tons of different video editors out there. You can clip directly in photoshop, but I find it easier to clip down the scenes beforehand so I can load in multiple gifs at a time.
The downside of this method is when it comes to loading the vids into photoshop, it’s going to use more cpu and a lot of scratch disk space. There’s also an annoying issue with photoshop where if it crashes, these temp files won’t get deleted and will eat up all your disk space. Occasionally you have to go into your AppData folder (something like C:\Users\<your user>\AppData\Local\Temp) and delete any files that look like “Photoshop Temp...”.
But all those disclaimers out of the way, I find that clipping vs screen-capping saves me more time in the long run. :)
I typically find that I can fit at most ~3 seconds into a gif and keep it under the 10 MB limit. So I’ll clip a video down to a bunch of 2.5-3 second bites. I will then export as one big video file and I have a process for making a bunch of gifs at once. But to keep things simple for the purpose of this rundown, let’s assume you have cut a single 3 second clip to make one gif from the video. Make sure you export the video with the highest possible quality so you don't lose any quality in this step! In Movavi, this would be Export > Advanced > And then drag the “Quality” slider all the way up.
Load into a gif
In photoshop:
1. Select File > Open, and open your vid
(If you hadn’t already clipped a scene, you could do it here now, but will assume you already have the couple seconds you want to gif.)
2. Use the crop tool to crop if desired.

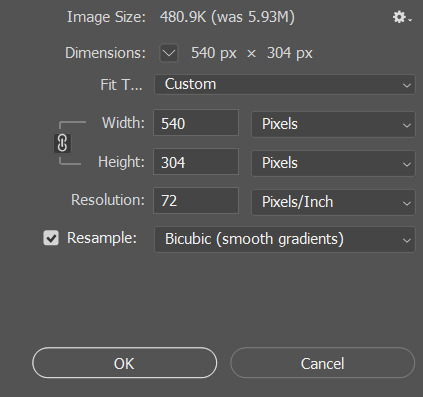
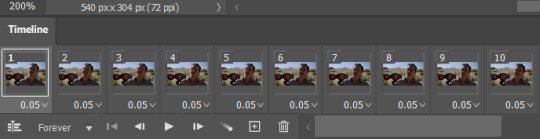
3. Resize by going to Image > Resize Image. For most gif sets, I will set the width to 540px and let the height be determined accordingly. Alternatively, if working with something extra wide, I will resize by height, and then crop down to 540px wide. The most important thing here is that the chain link symbol stays selected to maintain aspect ratio when changing the width or height. You can also play with the Resample options. I have mine set to Bicubic (smooth gradients).
4. Occasionally, especially with lower quality vids, you may get a couple pixel line on one of the edges. Check for this and crop it out and redo the resize steps if needed. Make sure when you are done your file is still 540px. (This is not referring to the transparent line around the entire edge that most gifs will get in the resize step. This transparent line will be handled in a later step.)
5. I use the action from this post for making my gifs. Save this action and open in photoshop.
6. With your gif video file selected, in the Actions panel, select “* timeline to frames w/o sharpen” under the new action you just loaded, and then click the Play button to run the action.
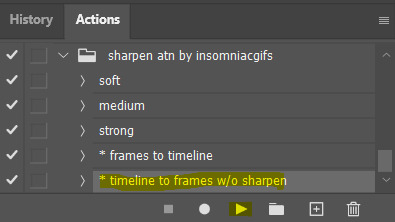
7. Wait for the Action to complete. At this point, you could save and you already have a working gif!

Note: This action will set the frames to 0.06 seconds per frame. I usually prefer 0.05 but the next action I use handles that. You can also adjust directly in timeline if needed. This is also where you may need to end up deleting some frames from the beginning/end if your gif size ends up being too large.
Sharpen
You can go in and play around with smart sharpen, and other tutorials will give you some help with that, but this is another thing I’ve found most useful to just use an action for. My fave I’ve found is this one here. It has two different sharpening actions, basic and hd. I tend to choose hd if I have a higher quality vid but I find it doesn’t always work as well on lower quality vids. This is also a good time to mention to save often!!! It’s hard to undo an action, so you’re better off reopening the file if you decide you don’t like the action you chose.
Here’s my gif with the hd sharpening action applied:

Color
I am really going to breeze over this step. I think there are a lot better tutorials out there for coloring. I will say that Levels, Curves, and Exposure will get you a long way! And I think they’re relatively easy to get the hang of. Selective Color is another adjustment I’m fond of, whenever I need to tone down or highlight certain colors. These can all be found under Layer > New Adjustment Layer.
Here is my gif after tinkering with these adjustment layers a bit:

Besides finding some good coloring tutorials, I find it really useful to search for coloring PSDs. I don’t recommend just slapping a psd on top of your gif without other adjustments, but I like to sometimes use them as a jumping off point, or just as a learning tool to see what different adjustment layers will do.
Export
Once you’re happy with how your gif looks, go to File > Export > Save For Web. Here you will need to make sure your gif is under 10 MB, or go back and delete some frames if it isn’t. You can also play around with the export settings to try and get the best quality. These are the settings I usually go with:
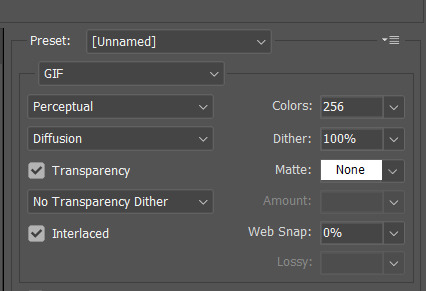
An important setting here is “Matte: None”. This will get rid of that transparent line around the border of the gif that I mentioned earlier, for a cleaner looking gif.
After you hit Save, that’s it! You’ve got a gif. Hopefully you found some of this useful. And if you have any questions, feel free to ask. <3
#intended to just give a quick rundown and some tips but this got long#and kinda did become a tutorial#i don't think i'm the best teacher#but hopefully there's something of use in there for someone#resources
21 notes
·
View notes
Text
0 notes

Text
The Ultimate iTop Screen Recorder Review 2023
http://dlvr.it/SrdsF8
0 notes