#implementation of android edittext
Explore tagged Tumblr posts
Visit Tumblr Blog
Explore Tumblr blogs with no restrictions, modern design and the best experience.
Last Seen Tumblr Blogs


Fun Fact
25% of US internet users with an annual income of $80-100K use Tumblr.
Link
0 notes
Text
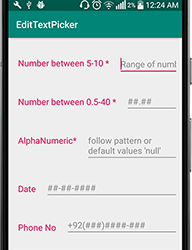
EditTextPicker
Edittext library which can easily achieve a lot of functionalities though directly implemented some lines of code in XML and on Java side.
Following are the functions that EditTextPicker provides:
Empty checking
Masking Edittext
Pattern checking
Range checking
from The Android Arsenal http://bit.ly/2YHntcd
1 note
·
View note
Text
Text encoding android

TEXT ENCODING ANDROID HOW TO
TEXT ENCODING ANDROID INSTALL
TEXT ENCODING ANDROID UPDATE
TEXT ENCODING ANDROID ANDROID
TEXT ENCODING ANDROID CODE
Public class MainActivity extends Activity implements OnClickListener else if (a1 = 10 & val. NET object types to a JSON string, and vice versa, supporting UTF-8 text encoding. JSON example can be created by object and array. The wire size is much larger than it needs to be, and may not be compatible with other JSON code.
TEXT ENCODING ANDROID CODE
To implement the UI of the activity invoke the following code inside the activity_main.xml file.У меня есть один textview, один edittext и одна кнопка в моем приложении.
TEXT ENCODING ANDROID ANDROID
The main layout and one, which includes only a TextView and as varied as we go on discuss the various contexts. How can I validate EditText input in Android - This example demonstrate about How can I validate EditText input in Android.Step 1 Create a new project in A.Step 2: Working with the activity_main.xml file
TEXT ENCODING ANDROID HOW TO
Refer to Android | How to Create/Start a New Project in Android Studio? to know how To Create an empty activity Android Studio project.
Create an empty activity Android Studio Project.
Have a look at the following list and image to get an idea of the overall discussion. For example, if the important part of the information is to be highlighted then the substring that contains, it is to be italicized or it has to be made bold, one more scenario is where if the information in TextView contains a hyperlink that directs to a particular web URL then it has to be spanned with hyperlink and has to be underlined. This TextView widget in android can be dynamized in various contexts. This plays a very important role in the UI experience and depends on how the information is displayed to the user. TextView in Android is one of the basic and important UI elements. Open the converted file in the app of your choice. Supports virtually all charsets through ICU4J, such as GB18030, BIG5, etc.
How to Convert Kotlin Code to Java Code in Android Studio? The Text Encoding Language Converter can convert the text file back to the language you want Auto-detect the language and encoding that your text file is in.
Firebase Authentication with Phone Number OTP in Android.
External Storage in Android with Example.
Image Slider in Android using ViewPager.
TEXT ENCODING ANDROID INSTALL
How to Fix “Failed to install the following Android SDK packages as some licenses have not been accepted” Error in Android Studio?.
How to Create and Add Data to SQLite Database in Android?.
How to Push Notification in Android using Firebase Cloud Messaging?.
Fix "Unable to locate adb within SDK" in Android Studio.
Broadcast Receiver in Android With Example.
How to change the color of Action Bar in an Android App?.
When you enter a string in the given input box, the tool will start automatically encoding it.
How to Install and Set up Android Studio on Windows? All you have to do is enter the simple text in the input box, and the text will be automatically encoded.
How to Change the Color of Status Bar in an Android App?.
Content Providers in Android with Example The Text Encoding Language Converter can convert the text file back to the language you want Auto-detect the language and encoding that your text file is in Supports virtually all charsets.
This would explain why you got a rectangular box as the handset is not able to decipher the encoding.
TEXT ENCODING ANDROID UPDATE
How to Update Gradle in Android Studio? 5 SMS, generally, uses the 7-bit GSM encoding standard, however a quick cursory glance with google-fu yielded this answer posted on StackOverflow which seems to say that Apple uses UTF-16 (Unicode encoding).How to Add and Customize Back Button of Action Bar in Android?.Android Projects - From Basic to Advanced Level.MVVM (Model View ViewModel) Architecture Pattern in Android.How to Change the Background Color of Button in Android using ColorStateList?.ISRO CS Syllabus for Scientist/Engineer Exam.ISRO CS Original Papers and Official Keys.GATE CS Original Papers and Official Keys.
0 notes
Text
What you'll learn Implementing Material Design Feature at the end of this course will be a piece of cake for studentsThe concept of this awesome feature provided for Android App Development will be crystal clear.Material design is a comprehensive guide for visual, motion, and interaction design across platforms and devices. This course talks about all the important material design specifications, colors, design guidelines, and also using material widgets along with material themes and concepts. Curious about Android Material Design? This is the your final stop where you will get information regarding material design specifications and the related widgets being used with material design themes. The best part of this course is that you will learn to make several complete android demo apps from scratch - two major apps and several small apps - based on material design guidelines. Enhance your application user interface designing skills by implementing all new materialistic features introduced in Android Lollipop 5.0. Styling of Android Application is very important and one of the most critical feature in designing the app. To make this difficult task easy, I have come up with this course of Android Material Design, which begins with the basics of the material design and proceeds with covering some really complicated and most interesting stuffs like Android Material Design Animation. We will also dive into the material design support library and implement it in our demo applications. The topics we will be covering includes: 1. Material Design Themes and Colors Color PaletteMaterial Design ThemesMaintaining Backward CompatibilityExploring Tinting of Widgets 2. Material Design Toolbar Popup Menu or Overflow MenuContextual MenuToolbar Theme Customisation 3. Basic components of Android Material Design Floating Action ButtonSnackbarCoordinator Layout 4. Android Material Design Animation Ripple Effect: Touch FeedbackSlide Activity TransitionShared Element TransitionExplode Activity TransitionFade TransitionActivity Transition Overlaps 5. EditText with Floating Label Implementing Floating HintsValidation of TextFieldsValidation Error Resolution 6. AppbarLayout and CollapsingToolbarLayout Using AppBarLayout with Scroll FlagsHow to collapse Image along with CollapsingToolbarLayoutExploring various pin modes 7. RecyclerView and CardView Implementing RecyclerView in various orientationsUsing CardView to create list itemsAdding and Deleting an Item from RecyclerViewRecyclerView AnimationGrid, Staggered Grid Implementations 8. Navigation Drawer using NavigationView Inflate menu items in the Navigation Drawer using NavigationViewAdding dividers between the menu itemsGrouping the menu items under one category By the end of this series, you will be mastering the implementation of this features in your android app.Who this course is for:Students should have basic knowledge of Android Application Development. What are the basic components of an Android Application and the basic Hello World Program.
0 notes
Text
kotlin android 개발 날씨앱 만들기 과정 요약
original source : https://www.youtube.com/playlist?list=PLEPZdzLLJH94Jk_Jz-cTUXYFoObPBH7KB
시애틀에 있는 수염난 안경낀 백인 청년 설명
.

.

.
.
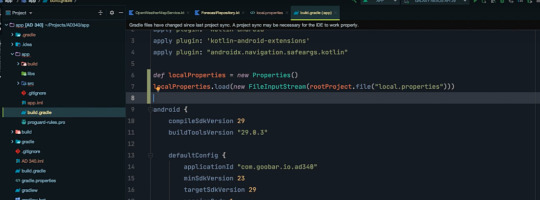
data binding을 위해서 gradle에서 해야할 작업

.
data binding의 장점
.

.
.
3rd party image loading library들 이 강의에서는 coil을 사용

.
toolbar를 app bar로 사용하면서 navigation component를 사용하는 경우

.
tool bar를 app bar로 사용하는 경우 약간의 material 느낌을 주기위해 AppBarLayout를 이용한 경우

.
coil를 사용해 image loading한경우
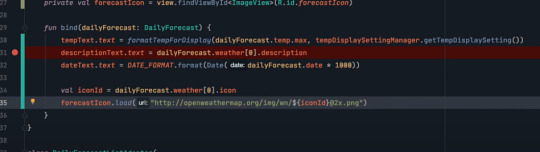
.
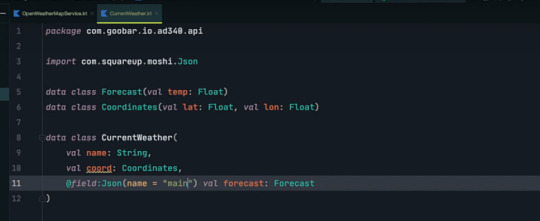
json converting을 위해 moshi를 사용한 경우
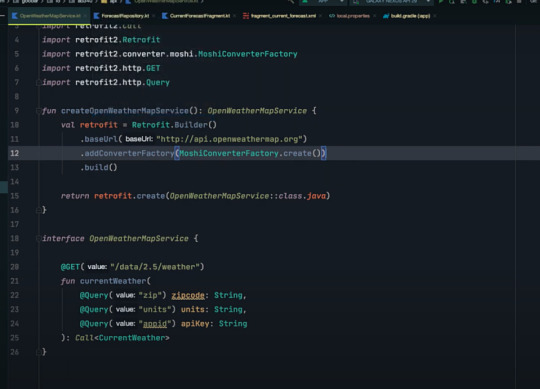
.
retrofit

.
.
.
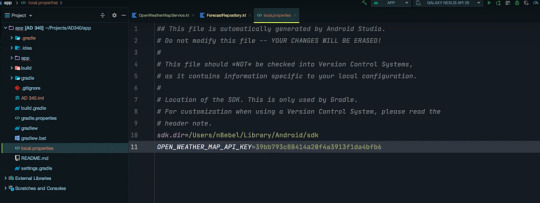
민감한 data를 외부에 놓고 사용하는 방법

.
.
.
외부에서 전달되는 json data의 키와는 다른 field명을 쓰고 싶을때
.
외부와 data 통신시에 보안을 위해 usesCleartextTraffic을 사용한다.

.
.
.
.
1강
0:01 - Week 0 Review
1:22 - Syllabus Review
2:40 - Class Announcements
6:14 - Why Learn App Development?
9:26 - Challenges of App Development
15:34 - Types of Mobile Development
22:36 - Why Android Development?
27:42 - Setting Up Our Android Development Environment
28:34 - Installing Android Studio
36:12 - Creating Your First Android Studio Project
39:17 - Creating An Android Emulator
41:52 - Installing Your First Android App
45:14 - Sharing An Android Studio Project to GitHub
50:06 - Building An Android APK
- What are the unique benefits and challenges of Android app development?
- What are some different ways of building mobile apps?
- What makes Android the most popular mobile operating system?
- What is Android Studio?
- What is the Android Emulator?
- What is Kotlin?
- How do you create a new Android project?
- How do you share code from Android Studio to GitHub?
- How do you add a README to your GitHub repo?
.
.
.
.
2강
0:36 - Outline
1:57 - Android Framework Components
14:07 - What is generated when you create a new Android Studio project?
40:26 - Working with Android Activities
41:20 - Android Activity lifecycle
50:12 - Using the Android Studio debugger // How to set a breakpoint in Android Studio?
59:38 - Creating Interactive User Interfaces
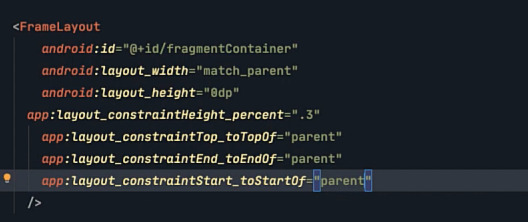
1:01:46 - What is FrameLayout?
1:05:09 - What is LinearLayout?
1:08:34 - What is RelativeLayout?
1:14:22 - What is ConstraintLayout?
1:28:09 - Responding To User Interaction
1:29:00 - ConstraintLayout simple tutorial
1:29:37 - How to create a new Vector Asset in Android Studio?
1:38:46 - How to respond to a Button click in Android
1:40:04 - Android Button setOnClickHandler
1:45:40 - Receiving user input using an EditText
1:54:00 - Customize Material Design theme in Android Studio
- What are the Android app components?
- What is an Android Activity?
- What is generated when we create a new Android Studio project?
- What is the Android Activity lifecycle?
- What is the difference between an Android ViewGroup and a View?
- What is a FrameLayout? LinearLayout? Relative Layout? ConstraintLayout?
- How to build a simple UI using ConstraintLayout?
- How do define an Android click listener?
- How to show a Toast message in an Android Activity?
- How to enable Android developer options?
- How to use an EditText to receive user input?
.
.
.
.
3강
- How to display dynamic content in an app?
- How to display large collections of data?
- How to architect your app to provide data to your Activity?
- What is MVVM?
- What is LiveData?
- How to model data with Kotlin data classes?
- How to create a RecyclerView Adapter?
- How to bind data using a RecyclerView ViewHolder?
- How to define an onClickHandler for your RecyclerView?
- How to format String resources?
.
0:25 - Outline
2:17 - Project Demo
3:56 - Displaying Dynamic Data
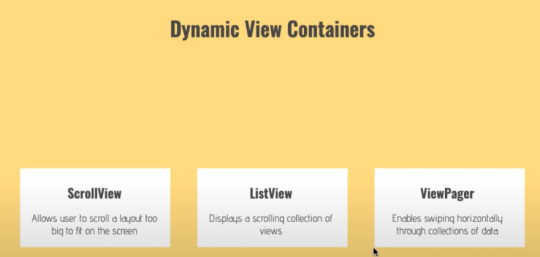
5:05 - Dynamic view containers // ScrollView, ListView, ViewPager
6:57 - RecyclerView
7:50 - Why RecyclerView?
16:47 - Defining A Data Model
20:00 - Modeling data with Kotlin data classes
24:25 - What is LiveData?
28:08 - Implementing A RecyclerView
29:23 - Creating a data class to model daily weather forecasts
31:50 - Creating a data repository
32:04 - Using LiveData to expose data from a repository
49:54 - Adding a RecyclerView to your layout xml file
52:37 - How to use Logcat to understand why your app crashed
54:58 - Add RecyclerView dependency to your build.gradle file
57:52 - How to add margin to your RecyclerView using ConstraintLayout design view?
1:01:57 - How to implement a RecyclerView Adapter using Kotlin?
1:30:38 - Add touch feedback to RecyclerView list items
1:40:00 - How to format String resources?
.
.
.
.
4강
- How to create a new Android Activity?
- How to use an Intent to open a new Activity when a button is clicked?
- How to display an options Menu
- How to respond to a Menu item click?
- How to display an AlertDialog?
- How to save a value using SharedPreferences?
.
.
.
.
5강
- How to create a new Fragment
- How to migrate UI/logic from an Activity to a Fragment
- How to communicate between a Fragment and an Activity
- How to add a FloatingActionButton to your UI
.
.
.
.
6강
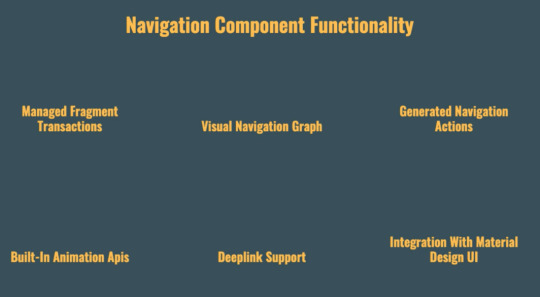
- What is the Android Navigation Architecture Component?
- What problems is it trying to solve?
- How to create a navigation graph?
- How to add new destinations and actions to your navigation graph?
- How to navigate to a new Fragment using the NavController?
- How to update your AppBar based on navigation changes?
- How to implement a BottomNavigationView?
.
.
.
.
7강
- How to load data from a remote api using Retrofit; an HTTP client library for Android/JVM?
- How to listen to changes in SharedPreferences values?
- How to load and display remote images using the Coil image loading library
.
.
.
.
0 notes
Video
In this video we are going to implement a custom ListView for our Electronic Shop android app. Our custom ListView contains an ImageView for displaying product image, two TextView for product name and product price, Two ImageButton for increment and decrements the quantity of the product to purchase and finally an EditText to display product quantity selected by end user.
For Complete Source Code and Code to copy please visit below blog Post.
Blog Post: https://vlemonn.com/Blog/Android/Android-Custom-ListView-with-ImageView-EditText-and-Button
If you want to download complete project download button is the bottom of the article.
Key Points 1. ListView 2. Adapter 3. getView function 4. What is convertView 4. Click listener
Note: If source code is not updated please let us know.
Support Us: PayPal: https://www.paypal.me/vlemonn Patreon: https://www.patreon.com/vlemonn
Useful URL: Our Website: https://vlemonn.com Blog Post: https://vlemonn.com/Blog/Android/Android-Custom-ListView-with-ImageView-EditText-and-Button Facebook: https://www.facebook.com/vLemonn Twitter: https://www.facebook.com/vLemonn Google Plus: https://plus.google.com/112993831877465971811
#Android#Android Tutorial#ListView#Click Listener#Custom ListView#Android Free Tutorial#Free Tutorial#Tutorial#free#vlemonn#Mayank Sanghvi
1 note
·
View note
Photo

Simplify Android App Development With Anko
Designed by JetBrains, the organization behind Kotlin, Anko is an open-source library that can radically change the way you create Android apps. It leverages Kotlin's syntax to offer a large collection of helper functions that help you reduce the verbosity of your code while also improving its performance.
Anko doubles as a DSL, short for domain-specific language, for creating Android layouts. In other words, it can act as a type-safe, dynamic, and more reusable alternative to layout XML files, which, as you might already know, tend to get unwieldy for large apps.
In this tutorial, I'll help you get started with Anko by showing you how to use some of its most popular features.
1. Project Setup
To be able to use the core features of Anko in your Android Studio project, all you need to do is add the following implementation dependency in the app module's build.gradle file:
implementation 'org.jetbrains.anko:anko:0.10.1'
If you want Anko to work with widgets from Android's support libraries, however, you'll need the following additional dependencies:
implementation 'org.jetbrains.anko:anko-appcompat-v7:0.10.1' implementation 'org.jetbrains.anko:anko-design:0.10.1' implementation 'org.jetbrains.anko:anko-recyclerview-v7:0.10.1' implementation 'org.jetbrains.anko:anko-cardview-v7:0.10.1'
2. Creating Layouts
The Anko DSL has helper functions for almost every widget that's offered by the Android SDK and the Android support libraries. Using them, you can create your layouts programmatically. The names of the functions match the names of the widgets, but they start with a lowercase letter. For example, to create a TextView widget, you use Anko's textView() function. Similarly, to create a FloatingActionButton widget, you can use the floatingActionButton() function.
Inside the functions, you'll have access to all the properties and event listeners of the associated widgets. For instance, you can change the text size of a TextView widget by updating the value of the textSize property inside the textView() function. Similarly, you can add an on-click event listener to it using the onClick method.
To help you better understand how to use the DSL, here's a sample layout for a browser app, containing an EditText widget and a WebView widget placed inside a LinearLayout widget whose orientation is VERTICAL:
linearLayout { orientation = LinearLayout.VERTICAL var myWebView:WebView? = null editText { inputType = InputType.TYPE_TEXT_VARIATION_URI imeOptions = EditorInfo.IME_ACTION_GO onEditorAction { _, _, _ -> myWebView?.loadUrl(text.toString()) } } myWebView = webView { webViewClient = WebViewClient() } }
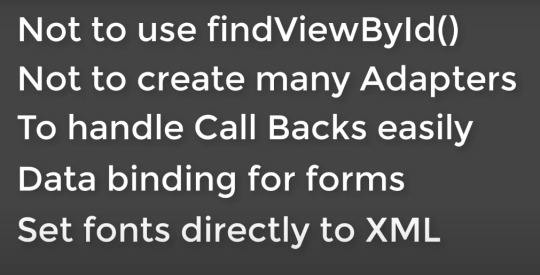
Code written in the Anko DSL is very readable and intuitive, but it does take some getting used to, especially if you are already an experienced Android developer. You no longer have to assign identifiers to your widgets—or use the findViewById() method to reference them—because unlike XML-based layouts, Anko's DSL-based layouts can encapsulate your app's business logic. For instance, you can see that the EditText widget defined above has an OnEditorAction event listener that directly calls the loadUrl() method of the WebView widget to load the URL the user typed in.
Furthermore, you don't have to call the setContentView() method anymore because Anko calls it automatically inside your Activity class's onCreate() method.
The DSL includes several shortcuts you can use to make your layouts more concise. For example, you can directly pass strings to its functions to assign labels to widgets. Often, you can also avoid explicitly setting layout parameters such as widths and heights because it handles them automatically. The following sample code shows you how to create a layout containing two TextView widgets in a highly concise manner:
verticalLayout { textView("One") textView("Two") }
For comparison, here's what the above layout would look like if it were created conventionally:
<?xml version="1.0" encoding="utf-8"?> <LinearLayout xmlns:android="http://ift.tt/nIICcg" android:layout_width="match_parent" android:layout_height="match_parent" android:orientation="vertical"> <TextView android:layout_width="wrap_content" android:layout_height="wrap_content" android:text="One"/> <TextView android:layout_width="wrap_content" android:layout_height="wrap_content" android:text="Two"/> </LinearLayout>
Lastly, it's worth mentioning that layouts created using the Anko DSL tend to load faster than regular layouts because there's no XML parsing required.
3. Creating Dialogs
If you think using the AlertDialog.Builder class to create dialogs is a lot of work, you're definitely not alone. For example, here's how you would normally create a simple dialog that displays a title, a message, and an "OK" button:
AlertDialog.Builder(this@MyActivity) .setTitle("My Dialog") .setMessage("This is a test message") .setPositiveButton("OK", null) .create() .show()
With Anko, however, creating the above dialog simply involves a call to the alert() function, which accepts the dialog's title and message as its arguments.
alert("This is a test message", "My Dialog") { yesButton { } }.show()
Note that you don't have to pass a context to the alert() function. It infers the context automatically.
Anko has similar intuitively named functions to help you quickly create toasts and snackbars too. The following code shows you how to create both short and long duration toasts:
toast("This is a short toast") longToast("And this is a long toast")
4. Creating Intents
Whenever you need to start a new activity in your app, you must create an intent. Additionally, if you want to send data to the activity, you must include it in the intent as one or more extras.
With Anko's startActivity() function, you can usually perform both tasks in just one line of code. For example, the following code shows you how to launch an activity named MyActivity and pass two extras, a string extra named "PERSON" and an integer extra named "AGE", to it:
startActivity<MyActivity>("PERSON" to "Bob", "AGE" to 25)
Anko also has helper functions for several common intent-based tasks. For instance, you can use its browse() function to open a URL in the device's default browser app. Similarly, you can use the email() function to open the default email app and compose an email.
// Open browser browse("https://tutsplus.com") // Open default E-mail app email("[email protected]", "Hello", "This is a test email")
5. Using SQLite Databases
Even though every Android app can create and use SQLite databases with no additional dependencies, many developers choose third-party databases like Realm. Why? Well, maybe it's because Android's SQLite API is extremely verbose, low-level, and requires a good understanding of SQL. Fortunately, Anko has SQLite helper functions to address all those problems.
Let's say we have a simple SQLite database created using the following code:
val myDB = openOrCreateDatabase("test.db", Context.MODE_PRIVATE, null)
With Anko, you can now add a table to the above database simply by using the createTable() function, which expects the name of the table along with one more or tuples specifying the names and data types of its columns. The following sample code creates a table named PERSON having four columns, one of which serves as a primary key:
myDB.createTable("PERSON", true, "NAME" to TEXT, "AGE" to INTEGER, "NET_WORTH" to REAL, "ID" to INTEGER + PRIMARY_KEY)
What's more, to insert rows into the table, you no longer have to depend on the ContentValues() class. You can directly call the insert() function on the database, specify the name of the table you want to add the row to, and then pass the column values to it in the form of tuples.
// Add a row myDB.insert("PERSON", "NAME" to "Bob Martin", "AGE" to 25, "NET_WORTH" to 2500.50, "ID" to 100) // Add another row myDB.insert("PERSON", "NAME" to "Jane Flores", "AGE" to 32, "NET_WORTH" to 21500.80, "ID" to 101)
Lastly, to query the database, you can use the select() function, optionally followed by a chain of intuitively named functions such as whereSimple(), orderBy(), and groupBy(). For example, to list the names and ages of all persons in the above table whose net worth is greater than 10000, you can use the following code:
myDB.select("PERSON", "NAME", "AGE") .whereSimple("NET_WORTH > ?", "10000.0").exec { // More code here }
The result of the above query will be, as you might expect, a Cursor object. Converting it into a List containing actual column values of all the rows is slightly more complicated because it involves creating an object that implements the RowParser interface and passing it to the parseList() function.
The RowParser interface has just one method, the parseRow() method, inside which you'll have access to the column values of a row. How you use the values is of course up to you. For now, let's just concatenate them and print them. The following code shows you how to do so:
parseList(object: RowParser<String>{ override fun parseRow(columns: Array<Any?>): String { // Concatenate the values of the first and second columns, // which happen to be NAME and AGE return "${columns[0]} (${columns[1]} years old)" } }).forEach { println(it) // print the concatenated values } // Result is: // Jane Flores (32 years old)
Note that you don't always have to create a RowParser object manually. If the results of your query contain just one column, you are free to use one of Anko's many built-in parsers.
The names of the built-in parsers are based on the data types of the columns. For example, if the data type is TEXT, you can use a StringParser. Or if the data type is INTEGER, you can use an IntParser. The following code shows you how to use a StringParser to simply list the names of all persons in our database:
myDB.select("PERSON", "NAME").exec { parseList(StringParser).forEach { println(it) } } // Result is: // Bob Martin // Jane Flores
Conclusion
In this tutorial, you learned how to use Anko's DSL and helper functions to simplify Android application development. You also saw how Anko simplifies SQLite-related operations. I hope you now realize how well-thought-out and useful the library is.
In my opinion, if you are competent in Kotlin already, there's really no reason why you shouldn't use Anko to further improve your efficiency and development experience. To learn more about it, do refer to its official wiki.
And while you're here, check out some of our other posts about Kotlin and Android app development!
Android SDK
Java vs. Kotlin: Should You Be Using Kotlin for Android Development?
Jessica Thornsby
Android SDK
Introduction to Android Architecture Components
Tin Megali
Android SDK
Get Started With RxJava 2 for Android
Jessica Thornsby
Kotlin
Kotlin From Scratch: More Fun With Functions
Chike Mgbemena
by Ashraff Hathibelagal via Envato Tuts+ Code http://ift.tt/2jL70UU
1 note
·
View note
Text
Implementing a Custom Request Using Volley Library

Why we use Volley Library?
Volley is an HTTP library that makes networking for Android apps easier and most importantly, faster. Volley is available on GitHub.
Volley offers the following benefits:
Automatic scheduling of network requests.
Multiple concurrent network connections.
Transparent disk and memory response caching with standard HTTP cache coherence.
Support for request prioritization.
Cancellation request API. You can cancel a single request, or you can set blocks or scopes of requests to cancel.
Ease of customization, for example, for retry and back off.
Strong ordering that makes it easy to correctly populate your UI with data fetched asynchronously from the network.
Debugging and tracing tools
Things You Need to Do:
Extend the Request<T>class, where <T> represents the type of parsed response the request expects. So if your parsed response is a string, for example, create your custom request by extending Request<String>.
Add Gson library compile dependency to your app-level build.gradle
Create a model class as per response.
Add custom request to request queue of volley
Create the Model Response class :
public class ServiceResponse { String data;
public String getData() { return data; }
public void setData(String data) { this.data = data; } public int getType() { return type; } public void setType(int type) { this.type = type; } int type; }
Create CustomRequest class :
public class VolleyCustomRequest extends Request<Object>{ Map<String, String> params; protected int reequesttype; String postdata; int postdatv=1; protected Response.Listener mListener; public VolleyCustomRequest(String url, Response.ErrorListener listener) { super(url, listener); } public VolleyCustomRequest(int method, String url, Response.Listener listener1, @Nullable Response.ErrorListener listener, String postdata, int reequesttype) { super(Method.POST, url, listener); this.reequesttype=reequesttype; this.mListener=listener1; this.postdata=postdata; this.postdatv=2;
} public VolleyCustomRequest(int method, String url, Response.Listener listener1, @Nullable Response.ErrorListener listener, int reequesttype) { super(Method.GET, url, listener); this.reequesttype=reequesttype; this.mListener=listener1; } public VolleyCustomRequest(int m, String url, Response.Listener listener1, Response.ErrorListener listener, Map<String, String> params, int requestType) { super(Method.POST, url,listener); this.reequesttype=requestType; this.mListener=listener1; this.params=params; }
@Override protected Response<Object> parseNetworkResponse(NetworkResponse response) { String jsonData=new String(response.data); ServiceResponce s=new ServiceResponce(); s.setData(jsonData); s.setType(reequesttype); Response<Object> resp = Response.success((Object) (s), HttpHeaderParser.parseCacheHeaders(response)); return resp; }
@Override protected VolleyError parseNetworkError(VolleyError volleyError) {
ServiceResponse s=new ServiceResponse(); s.setData(volleyError.getLocalizedMessage()); s.setType(reequesttype); return super.parseNetworkError(volleyError); }
@Override protected void deliverResponse(Object response) { mListener.onResponse(response);
}
@Override public Map<String, String> getHeaders() throws AuthFailureError { Map<String,String> params = new HashMap<>(); params.put(“Content-Type”,”application/x-www-form-urlencoded”); return params; } @Override protected Map<String, String> getParams() throws AuthFailureError { return params; } @Override
public byte[] getBody() throws AuthFailureError { return postdata.getBytes(); }
}
Let’s use volley custom request in your app :
public class YourActivity extends AppCompatActivity implements Response.Listener,Response.ErrorListener { EditText et_email; TextView back,submit; LoadingDialog loadingDialog;
@Override protected void onCreate(Bundle savedInstanceState) { super.onCreate(savedInstanceState); setContentView(R.layout.forgotpassword_layout); init(); } public void init() { HashMap<String, String> amp = new HashMap<>(); amp.put(“user_id”,et_email.getText().toString()); loadingDialog = new LoadingDialog(ForgotPasswordActivity.this); loadingDialog.showDialog(); VolleyCustomRequest request = new VolleyCustomRequest(Request.Method.POST, “your url”, this, this, amp, 3); RequestQueue queue = Volley.newRequestQueue(ForgotPasswordActivity.this); queue.add(request); }
@Override public void onErrorResponse(VolleyError error) { loadingDialog.stop(); Snackbar.with(this,null) .type(Type.ERROR) .message(“Some Problem Occure”) .duration(Duration.SHORT) .fillParent(true) .textAlign(Align.LEFT) .show(); }
@Override public void onResponse(Object response) { loadingDialog.stop(); ServiceResponce serviceResponce=(ServiceResponce)response;
if(serviceResponce.getType()==3)
{
try {
// here you get service response JSONObject jsonObject = new JSONObject(serviceResponce.getData()); String message=jsonObject.getString(“message”); Toast.makeText(getApplicationContext(),message,Toast.LENGTH_LONG).show(); Snackbar.with(this,null) .type(Type.SUCCESS) .message(message) .duration(Duration.SHORT) .fillParent(true) .textAlign(Align.LEFT) .show(); } catch (Exception e) {
}
}
}
}
#android app#top app development companies#mobile app development#android app development service#android app development service gurgaon
0 notes
Text
Twitter Live Streaming - Sample Code

Social media is the key ingredient of applications and integrating the social media platform with mobile applications the key of success for your mobile applications. The large social networks could not fit to one single mobile application increasing the opportunity for all mobile developers to create more interesting and creative small apps for mobile devices with this social platforms. Twitter is one of the popular social networking platform. The update on twitter is very fast as tweets are small in size. Twitter introduced the live streaming APIs to get the updates in real time from twitter live streaming service. You can integrate the twitter live streaming in your android application as described in this post. Create a default activity project in eclipse for android and create the following layout for your application in activity_main.xml. Now replace the default activity class code by the following code import java.io.BufferedReader; import java.io.InputStream; import java.io.InputStreamReader; import java.net.URI; import java.util.ArrayList; import java.util.HashMap; import java.util.List; import org.apache.http.HttpResponse; import org.apache.http.auth.AuthScope; import org.apache.http.auth.UsernamePasswordCredentials; import org.apache.http.client.methods.HttpGet; import org.apache.http.impl.client.DefaultHttpClient; import org.json.JSONObject; import android.os.AsyncTask; import android.os.Bundle; import android.app.Activity; import android.content.Context; import android.util.Log; import android.view.Menu; import android.view.View; import android.widget.EditText; import android.widget.ListView; import android.widget.SimpleAdapter; import android.widget.Toast; public class MainActivity extends Activity implements View.OnClickListener { private List mTweets = new ArrayList(); private SimpleAdapter mAdapter; private boolean m_Running = false; private String m_SearchKeyWord = ""; final int MAXLIST = 10; @Override public void onCreate(Bundle savedInstanceState) { super.onCreate(savedInstanceState); setContentView(R.layout.activity_main); //create a list view and bind with simple adapter mAdapter = new SimpleAdapter(this, mTweets, android.R.layout.simple_list_item_2, new String {"Tweet", "From"}, new int {android.R.id.text1, android.R.id.text2}); ListView lv = (ListView)findViewById(R.id.TweetsList); lv.setAdapter(mAdapter); //create a list view and bind with simple adapter } public class StreamTask extends AsyncTask { protected Boolean doInBackground(Context... arg0) { try { DefaultHttpClient client = new DefaultHttpClient(); String userName = "XXXXXXX"; String password = "XXXXXXX"; UsernamePasswordCredentials creds = new UsernamePasswordCredentials(userName, password); client.getCredentialsProvider().setCredentials( new AuthScope(AuthScope.ANY_HOST, AuthScope.ANY_PORT), creds); HttpGet request = new HttpGet(); String m_SearchKeyWord = null; request.setURI(new URI("https://stream.twitter.com/1/statuses/filter.json?track=" + m_SearchKeyWord)); HttpResponse response = client.execute(request); InputStream in = response.getEntity().getContent(); BufferedReader reader = new BufferedReader( new InputStreamReader(in) ); handleTweets(reader); in.close(); } catch (Exception e) { Log.e("SampleTwitter", "doInBackground_" + e.toString()); } return true; } private void handleTweets( BufferedReader reader ) { try { String line = ""; do { line = reader.readLine(); JSONObject tweet = new JSONObject(line); HashMap tweetMap = new HashMap(); if (tweet.has("text")) { Log.i("SampleTwitter","Tweet : " + tweet.getString("text")); tweetMap.put("Tweet", tweet.getString("text")); tweetMap.put("From", tweet.getJSONObject("user") .getString("screen_name")); Log.i("SampleTwitter","From : " + tweet.getJSONObject("user") .getString("screen_name")); mTweets.add(0, tweetMap); if (mTweets.size() > MAXLIST) { mTweets.remove(mTweets.size() - 1); } publishProgress(true); } } while (m_Running && line.length() > 0); } catch (Exception e) { Log.e("SampleTwitter", "handleTweets_" + e.toString()); } } protected void onProgressUpdate(Boolean... values) { super.onProgressUpdate(values); mAdapter.notifyDataSetChanged(); Log.d("SampleTwitter", "Im in onProgressUpdate()"); } } public void stopTweets(View view ) { m_Running = false; for(int idx=mTweets.size()-1;idx>=0;idx--) mTweets.remove(idx); if(mTweets.size() ==1) mTweets.remove(0); mAdapter.notifyDataSetChanged(); } public void startTweets(View view) { if( m_Running == false ) { EditText edt = (EditText)findViewById(R.id.SearchText); m_SearchKeyWord = edt.getText().toString(); if( m_SearchKeyWord.length() > 0 ) { StreamTask st = new StreamTask(); st.execute(); m_Running = true; } else { Toast.makeText(this, "Please enter the search keyword", Toast.LENGTH_SHORT).show(); } } else { Toast.makeText(this, "Already Running", Toast.LENGTH_SHORT).show(); } } @Override public boolean onCreateOptionsMenu(Menu menu) { getMenuInflater().inflate(R.menu.activity_main, menu); return true; } @Override public void onClick(View arg0) { // TODO Auto-generated method stub } } This sample is getting the twitter updates from real time stream API and showing that in a list view. you need to change the username and password values in doInBackGround() method to connect to the twitter. The following is URL on which we can send a https request to get the tweets update in real time based on the tag value or search keyword.
0 notes
Text
New Post has been published on Simplified Coding
New Post has been published on https://www.simplifiedcoding.net/search-functionality-recyclerview/
Search Functionality in RecyclerView using EditText

In this post we will learn adding Search Functionality in RecyclerView. If a list contain many items then giving a search option is really necessary for making it user friendly. So lets see how to add Search Functionality in RecyclerView.
Contents
1 Creating a RecyclerView
1.1 Creating new Project
1.2 Adding RecyclerView and CardView
1.3 Creating Layouts
1.4 Creating RecyclerView Adapter
2 Implementing Search Functionality in RecyclerView
Creating a RecyclerView
Creating new Project
The very first thing we need is the RecyclerView itself. Only then we can add the search. So lets create a new Android Studio Project.
Adding RecyclerView and CardView
Once you have created a new Android Studio Project add RecyclerView and CardView to it. If you don’t know adding RecyclerView and CardView you can refer to the previous RecyclerView Tutorial.
Creating Layouts
Now once you have added the project come inside activity_main.xml and create a RecyclerView. The code for my activity_main.xml is below.
<?xml version="1.0" encoding="utf-8"?> <android.support.constraint.ConstraintLayout xmlns:android="http://schemas.android.com/apk/res/android" xmlns:app="http://schemas.android.com/apk/res-auto" xmlns:tools="http://schemas.android.com/tools" android:layout_width="match_parent" android:layout_height="match_parent" tools:context="net.simplifiedlearning.recyclerviewsearch.MainActivity"> <EditText android:id="@+id/editTextSearch" android:layout_width="0dp" android:layout_height="wrap_content" android:hint="Enter search term" tools:layout_constraintTop_creator="1" tools:layout_constraintRight_creator="1" android:layout_marginStart="8dp" android:layout_marginEnd="8dp" app:layout_constraintRight_toRightOf="parent" android:layout_marginTop="16dp" tools:layout_constraintLeft_creator="1" app:layout_constraintLeft_toLeftOf="parent" app:layout_constraintTop_toTopOf="parent" android:layout_marginLeft="8dp" android:layout_marginRight="8dp" /> <android.support.v7.widget.RecyclerView android:id="@+id/recyclerView" android:layout_width="0dp" android:layout_height="0dp" tools:layout_constraintTop_creator="1" tools:layout_constraintRight_creator="1" tools:layout_constraintBottom_creator="1" android:layout_marginStart="8dp" app:layout_constraintBottom_toBottomOf="parent" android:layout_marginEnd="8dp" app:layout_constraintRight_toRightOf="parent" android:layout_marginTop="8dp" app:layout_constraintTop_toBottomOf="@+id/editTextSearch" tools:layout_constraintLeft_creator="1" android:layout_marginBottom="8dp" app:layout_constraintLeft_toLeftOf="parent" android:layout_marginLeft="8dp" android:layout_marginRight="8dp" app:layout_constraintHorizontal_bias="0.0" app:layout_constraintVertical_bias="1.0"> </android.support.v7.widget.RecyclerView> </android.support.constraint.ConstraintLayout>
The above code will produce the following layout.

(adsbygoogle = window.adsbygoogle || []).push();
As you can see have a RecyclerView and an EditText. When we type something on EditText the RecyclerView will get filtered.
Now we will create a layout for our List Item. So create a new Layout Resource file named list_layout.xml and write the following xml code.
<?xml version="1.0" encoding="utf-8"?> <LinearLayout xmlns:android="http://schemas.android.com/apk/res/android" android:layout_width="match_parent" android:layout_height="wrap_content" android:orientation="vertical"> <android.support.v7.widget.CardView android:layout_marginTop="5dp" android:layout_marginBottom="5dp" android:layout_width="match_parent" android:layout_height="wrap_content"> <TextView android:id="@+id/textViewName" android:padding="15dp" android:textAppearance="@style/Base.TextAppearance.AppCompat.Large" android:layout_width="match_parent" android:layout_height="wrap_content" /> </android.support.v7.widget.CardView> </LinearLayout>
Creating RecyclerView Adapter
Now we will create Adapter for our RecyclerView. So create a class named CustomAdapter and write the following code.
package net.simplifiedlearning.recyclerviewsearch; import android.support.v7.widget.RecyclerView; import android.view.LayoutInflater; import android.view.View; import android.view.ViewGroup; import android.widget.TextView; import java.util.ArrayList; /** * Created by Belal on 6/6/2017. */ public class CustomAdapter extends RecyclerView.Adapter<CustomAdapter.ViewHolder> private ArrayList<String> names; public CustomAdapter(ArrayList<String> names) this.names = names; @Override public ViewHolder onCreateViewHolder(ViewGroup parent, int viewType) View v = LayoutInflater.from(parent.getContext()) .inflate(R.layout.list_layout, parent, false); return new ViewHolder(v); @Override public void onBindViewHolder(ViewHolder holder, int position) holder.textViewName.setText(names.get(position)); @Override public int getItemCount() return names.size(); class ViewHolder extends RecyclerView.ViewHolder TextView textViewName; ViewHolder(View itemView) super(itemView); textViewName = (TextView) itemView.findViewById(R.id.textViewName);
Now come to MainActivity.java and write the following code.
package net.simplifiedlearning.recyclerviewsearch; import android.support.v7.app.AppCompatActivity; import android.os.Bundle; import android.support.v7.widget.LinearLayoutManager; import android.support.v7.widget.RecyclerView; import android.text.Editable; import android.text.TextWatcher; import android.widget.EditText; import java.util.ArrayList; public class MainActivity extends AppCompatActivity RecyclerView recyclerView; EditText editTextSearch; ArrayList<String> names; CustomAdapter adapter; @Override protected void onCreate(Bundle savedInstanceState) super.onCreate(savedInstanceState); setContentView(R.layout.activity_main); names = new ArrayList<>(); names.add("Ramiz"); names.add("Belal"); names.add("Azad"); names.add("Manish"); names.add("Sunny"); names.add("Shahid"); names.add("Deepak"); names.add("Deepika"); names.add("Sumit"); names.add("Mehtab"); names.add("Vivek"); recyclerView = (RecyclerView) findViewById(R.id.recyclerView); editTextSearch = (EditText) findViewById(R.id.editTextSearch); recyclerView.setHasFixedSize(true); recyclerView.setLayoutManager(new LinearLayoutManager(this)); adapter = new CustomAdapter(names); recyclerView.setAdapter(adapter);
Now run the application and you will see your RecyclerView.

As you can see we have the RecyclerView. Now we will implement Search Functionality in RecyclerView.
Implementing Search Functionality in RecyclerView
Come to MainActivity.java and add a TextChangedListener as shown below. You have to do this inside onCreate().
//adding a TextChangedListener //to call a method whenever there is some change on the EditText editTextSearch.addTextChangedListener(new TextWatcher() @Override public void beforeTextChanged(CharSequence charSequence, int i, int i1, int i2) @Override public void onTextChanged(CharSequence charSequence, int i, int i1, int i2) @Override public void afterTextChanged(Editable editable) //after the change calling the method and passing the search input filter(editable.toString()); );
Now we need to create the method filter().
private void filter(String text) //new array list that will hold the filtered data ArrayList<String> filterdNames = new ArrayList<>(); //looping through existing elements for (String s : names) //if the existing elements contains the search input if (s.toLowerCase().contains(text.toLowerCase())) //adding the element to filtered list filterdNames.add(s); //calling a method of the adapter class and passing the filtered list adapter.filterList(filterdNames);
Lastly we need to create the method filter inside CustomAdapter class. So come inside CustomerAdapter.java and define the following method.
//This method will filter the list //here we are passing the filtered data //and assigning it to the list with notifydatasetchanged method public void filterList(ArrayList<String> filterdNames) this.names = filterdNames; notifyDataSetChanged();
Now run the application and try searching.

Bingo! It is working absolutely fine.
So we have the Search Functionality in RecyclerView. Thats all for this tutorial. If you are having any confusions or queries then lets have a discussion on comment section. Also don’t forget to SHARE the post if you found it useful. Thank You 🙂
0 notes
Link
Kotlin Android App Development with Android Q by building real apps. Beginner to advanced + Kotlin for Android
What you’ll learn
You will learn how to install tools
You will learn Kotlin for Android
You will learn how to develop Android apps
You will learn how to Implement 4 real apps
You will learn how to use database in your apps
You will learn how to publish your apps on Google Play
1- Installing and Setting Up Tools
Introcucing tools (IDE + Android SDK + Emulator + JDK)
How to download and install required tools
Creating a new Android Studio project
How to change the font of code editor
What is an activity
What is androidmanifest file
Developing your first Android app
Attributes panel
Code completion list
Displaying a toast
Running your app on an emulator
Examining different parts of an emulator
Send sms and phone calls between two emulators
Enabling directional pad
Cloud-based testing
Installing Google USB driver
Enabling developr options
Connecting a real device to the Android Studio
2- Kotlin _ Say Hello to Basics
Int data type
Declaring and initializing variables
Single line comment
var vs val
print() function
Floating point data type
Boolean data type
String data type
Type inference system
Naming conventions (Camel Case)
Data member and function member
dec() function
compareTo() function
Intellisence
Argument
replace(string) function
replace(char) function
char data type
toInt() function
toIntOrNull() function
NumberFormatException
toFloatOrNull() function
What is Null?
Kotlin Nullable types
Arithmetic operators
Operator precedence
Assignment operators
readLine() function
3- App ( Tip Calculator ) + Android Basic Views
TextView
Seekbar
EditText
Button
Set constraints for views
Resolving the “Hardcoded strings” warning
Converting text to number
Working with seekbar’s listeners (setOnSeekBarChangeListener)
Concatenating strings, variables and expressions with the + operator
Concatenating strings, variables and expressions with String Templates
4- Kotlin _ Control Flow
If expression
If Else expression
Relational operators
Gutter area
Debugging the apps by using breakpoints
Transfer of control
How to check if a numbers is even or odd
Logcat tab
Toast messages
Statement vs Expression
lift out assignment
Any data type
When expression with arg
When vs If
When expression without arg
Combining concitions in a when expression
An app that determines if a number is prime number
How to hold a range of values (double dotted and in operators)
Using the when expression with ranges
Logical AND operator
Useful Android Studio shortcut keys
Defining range variables
5- Kotlin _ Functions
Simple functions
Functions with Parameters
Functions with return type
Function signature
Parameter vs Argument
Userful Android Studio shortcut keys
Multi line comment
6- Kotlin _ Immutable and Mutable Collections + Loops
Defining and initializing the Arrays
Using the arrays
Manipulating the array elements
Any data type
ArrayIndexOutOfBound exception
Data types and performance
How to define an array type explicitly
The second way of declaring and initializing an array
Iterating over arrays by using the for loop
Destructuring declaration
Iterate through a Range
How to get the numbers of an array elements
withIndex() function
Until keyword
listOf() function
mutableListOf() funciton
Array vs Collection
mutable vs immutable
7- Kotlin _ Classes + Enums + Exception Handling
Declaring classes
How to create objects
Constructors
Iterating through an array of objects
Vertical selection
Property and method
Class header
Primary constructor
Declaring properties from the primary constructor
Class diagram
How Enums make things easier
Happy path
Try Catch block
Multiple catch blocks
Finally block
8- App ( English Stories ) + Activities + List View + Singleton Pattern
Displaing data into a Listview
ListView click listener
How to creating a new Activity
Passing data between activities
Scrolling toolbar
How to set the start up Activity
FAB (Floating Action Button)
Snakbar
Singleton pattern
Private visibility modifier
Public visibility modifier
Overriding the functions
String controls characters
9- App ( My Notes ) + SQLite Database + Activity Life Cycle + Action Bar + Alert Dialog
Set the Margin attribute for views
Designing SQLite databases for Android apps (Fields, Records, Tables, …)
Extending classes
SQLiteOpenHelperClass
TODO() functions
NullPointerException
Check null values
Safe call operator
Not null assertion operator
Using readble connetions to read data from database
Using writable connections to write data to database
OnDestroy() funciton
Performance tune-up while working ith databases
Variables’ scope
Up button
<Meta Data> tag
How to add menu to Action Bar
Working with Asset studio
Refactoring resource names
XML namespaces
match-constraint attribute
Hint attribute
Setting EditText text attribute
Changing the EditText focus programatically
How to check if an EditText is empty
Inserting new records into the database
Up button vs Back button
Activity life cycle
Navigating clipboard items
Refactoring functions
How to close an Activity programatically
Alert Dialog
Updating and Deleting records from database
10- App ( Best Quotes ) + Recycler View +Card View + Intents + Guidelines + Unicode Characters
How to insert default values into the database
Designing layouts by using a Card View
Linear Layout
Image View
Layout Margin attribute
Writing a customized Adapter for Recycler View
Recycler View vs List View
Inner classes
findViewByID() function
Arranging and managing Recycler View items by using LayoutManager
Using the customized Adapter View
Passing functions in Kotlin as parameters
Guidelines in constraint layout
On item click listener for RecyclerView
Creating DB in memory
Explicit intent and Implicit intent
Ripple effect
Share data with other apps
11- App ( Animating a Spaceship + Best Quotes ) + Animation in Android + Splash Screen
Alpha animation
Translate animation
Rotate animation
Scale animation
Companion objects
Creating Splash Screens by using Lottie library
Using third-party libraries
Assets folder
Application context vs the this keyword
noHistory attribute
12- Publishing Your App
Parallex effect
Safe zone
Legacy icons
Adaptive icons
Debug key vs Release key
Signing the APK
Requirements
No, tools are free
The concepts start from scratch
All you need is a computer
You even don’t need an Android device. Because in this course, you’ll learn how to create emulators.
Description
* In this course, you will learn how to write Android apps from scratch.
* No prerequisite is required.
* The obvious point about this course is that it is exercise-based to make sure you will understand and use the course materials correctly.
* Also, we will use the latest version of Android Studio, because it has many changes in recent mouths.
Who this course is for:
Everyone who thinks about an Android application idea and eagers to turn it into a business
College students
Those who wants to learn the newest programming language (Kotlin)
Android developers that want to update their knowledge about Android SDK
Created by Dev Hive Last updated 7/2019 English English
Size: 6.08 GB
Download Now
https://ift.tt/2jSX0cN.
The post Android Q App Development with Kotlin: Beginner to Advanced appeared first on Free Course Lab.
0 notes
Text
Currency-Edittext
Currency-Edittext
A Custom EditText implementation that allows formatting of currency-based numeric inputs.
from The Android Arsenal http://bit.ly/2QHY1yx
0 notes
Link
EditText Cursor and Scroll Bar Color Change like IOS in android studio
EditText Cursor and Scroll Bar Color Change like IOS
_____________________________________________
scrollview_thumb.xml [blank area]
_____________________________________________
<?xml version="1.0" encoding="utf-8"?>
<shape xmlns:android="http://bit.ly/nIICcg">
<solid android:color="@android:color/black" />
<corners android:radius="15dp" />
</shape>
_____________________________________________
scroll_color.xml [fill area]
_____________________________________________
<?xml version="1.0" encoding="utf-8"?>
<shape android:shape="rectangle"
xmlns:android="http://bit.ly/nIICcg">
<gradient
android:angle="45"
android:centerColor="@android:color/white"
android:endColor="@android:color/white"
android:startColor="@android:color/white" />
<corners android:radius="20dp" />
</shape>
_____________________________________________
implementation
_____________________________________________
<androidx.appcompat.widget.AppCompatEditText
style="@style/EdtCreatePost"
android:hint="@string/write_a_caption"
android:maxHeight="289dp"
android:minHeight="289dp"
android:scrollbarThumbVertical="@drawable/scroll_color"
android:scrollbarTrackVertical="@drawable/scrollview_thumb"
android:paddingEnd="@dimen/dp_16"
android:layout_marginEnd="@dimen/dp_4"
android:fadeScrollbars="false"
android:paddingStart="@dimen/dp_16"
android:textCursorDrawable="@color/ttu_sunfloweryellow"
android:background="@android:color/transparent" />
_____________________________________________
style.xml
_____________________________________________
<style name="EdtCreatePost">
<item name="android:layout_width">match_parent</item>
<item name="android:layout_height">wrap_content</item>
<item name="android:fontFamily" tools:ignore="NewApi">@font/lato</item>
<item name="android:textColor">@android:color/white</item>
<item name="android:textColorHint">@android:color/white</item>
<item name="android:textSize">@dimen/sp_14</item>
<item name="android:gravity">top|start</item>
<item name="android:inputType">textMultiLine</item>
<item name="android:scrollbars">vertical</item>
<item name="android:scrollbarSize">@dimen/dp_4</item>
<item name="android:scrollbarStyle">outsideOverlay</item>
</style>
0 notes
Text
Use Dialog Fragments in Honeycomb
Using Dialog Fragments in Honeycomb
Honeycomb (Android 3.x) introduced the Fragments to better utilize the UI areas and logic across the multiple activities of the in an application. The showDialog/dismissDialog methods in Activity are being deprecated to promote the DialogFragments This post shows a simple DialogFragment example. The example layout file for the dialog is as follows Create the Dialog Class The dialog class extends the DialogFragment (to support the DialogFragment on other devices I included the DialogFragment from version 4)import android.support.v4.app.DialogFragment; // ... public class SampleDialog extends DialogFragment { private EditText mEditText; public SampleDialog() { // Empty constructor required for DialogFragment } @Override public View onCreateView(LayoutInflater inflater, ViewGroup container, Bundle savedInstanceState) { View view = inflater.inflate(R.layout.fragment_edit_name, container); mEditText = (EditText) view.findViewById(R.id.txt_your_name); getDialog().setTitle("Hello!CreativeAndroidApps"); return view; } }Showing the Dialog Box in a Fragment Activityimport android.support.v4.app.FragmentActivity; import android.support.v4.app.FragmentManager; // ... public class FragmentDialogDemo extends FragmentActivity implements SampleDialogListener { @Override public void onCreate(Bundle savedInstanceState) { super.onCreate(savedInstanceState); setContentView(R.layout.main); showSampleDialog(); } private void showSampleDialog() { FragmentManager fm = getSupportFragmentManager(); SampleDialog sampleDialog = new SampleDialog(); sampleDialog.show(fm, "fragment_edit_name"); } @Override public void onFinishEditDialog(String inputText) { Toast.makeText(this, "Hi, " + inputText, Toast.LENGTH_SHORT).show(); } } Please provide your most valuable comments to improve this post.
0 notes
Text
Simplest Way to Implement Custom Adaptor with List View|Android Studio
Simplest Way to Implement Custom Adaptor with List View|Android Studio
List View is used view in android studio. To implement a Custom Adapter on list view is really simple task just follow these steps. But First Understand why a custom adapter is required.
To Impose/Inflate a custom view on the list view
To set data in list view in each row which contains multiple elements like ImageView/ TextView/ EditText Etc.
Let’s start:
View On WordPress
#Android Studio#android studio tutorial#image view in list view android#List View#List View with Adapter#list view with custom adapter
0 notes
Text
Clearable Material EditText In Android
In this article, we will learn how to create and use Clearable EditText without using any Third party library. It is very easy to implement and useful control for our application development. source https://www.c-sharpcorner.com/article/clearable-material-edittext-in-android/ from C Sharp Corner https://ift.tt/2Ml0QmY
0 notes