#installationtips
Explore tagged Tumblr posts
Visit Tumblr Blog
Explore Tumblr blogs with no restrictions, modern design and the best experience.
Last Seen Tumblr Blogs


Fun Fact
Tumblr was created by web developers David Karp and Marco Arment.
Text
Are you searching for dependable and functional cable terminations? MTK International provides an extensive selection of top-quality terminations for convenient electrical connections in industrial, commercial, and residential applications. Our cable terminations carry durability, superior insulation, and resistance to environmental stress to be used in high-voltage and low-voltage applications. MTK International supplies heat-shrink and cold-shrink terminations that are precision-manufactured to ensure performance and reliability for the long term while offering convenient installation options. We offer tested and certified services to comply with international standards for quality and assurance when you expect to operate. Count on MTK International to supply the best technology in cable terminations to power your systems safely and reliably.
#CableTerminations#ElectricalWiring#CableInstallation#ElectricalEngineering#WiringBasics#TechTutorial#DIYProjects#HomeImprovement#ElectricalSafety#NetworkingSolutions#CableManagement#SolderingTechniques#FiberOpticTerminations#Telecommunication#WireConnections#PowerSys#InstallationTips#ElectronicsDIY#WireTermination
0 notes
Text
Common Installation Mistakes to Avoid: A Guide by bellevuenebraska

When it comes to installations—whether it's electrical systems, plumbing, HVAC units, or even home appliances—doing it right the first time can save a lot of money, time, and stress. At bellevuenebraska, we’ve seen firsthand how seemingly small mistakes during installation can lead to bigger problems down the line. That’s why we're sharing this detailed guide to help you avoid common installation pitfalls and ensure your home or business stays safe, functional, and up to code.
Why Correct Installation Matters
Proper installation isn't just about getting things to work. It’s about safety, efficiency, and longevity. A poorly installed water heater, for example, could leak or become a fire hazard. A misaligned air conditioning unit might waste energy and increase utility bills. And a faulty electrical installation? That could lead to serious safety risks like electric shocks or fires.
Understanding common mistakes can help homeowners and contractors alike recognize what to watch out for during any type of installation.
1. Skipping the Manufacturer’s Instructions
One of the most common mistakes people make is assuming they already know how to install something and tossing the manual aside. While many appliances and systems look similar, each one may have specific installation steps that differ slightly from others. Failing to follow instructions often leads to missed steps or improper connections.
Tip: Always read the manufacturer’s instructions completely before beginning any installation. This ensures you're using the correct tools and procedures.
2. Using the Wrong Tools or Materials
Not every screw fits every wall, and not every adhesive is suited for every surface. Using incompatible materials or tools can damage the item being installed or reduce its life expectancy.
Example: Installing a wall-mounted TV with drywall anchors when you actually need studs can result in the entire unit falling and damaging your property.
Tip: Research what tools and materials are required for your specific project. When in doubt, consult a professional.
3. Ignoring Local Building Codes
Many installations—especially plumbing and electrical—require compliance with local regulations and building codes. Ignoring these not only increases the risk of accidents but can also lead to fines or problems if you sell your home.
Tip: Before starting a major installation project, check with your local municipality or hire a licensed professional familiar with Bellevue, Nebraska’s codes.
4. Poor Planning and Measurement
"Measure twice, cut once" is a golden rule for a reason. Improper measurements or not planning for available space often leads to installations that are misaligned or require costly corrections.
Example: Installing kitchen cabinets or countertops without accurate measuring can result in poor fit, gaps, or misalignment with plumbing and electrical points.
Tip: Always double-check your measurements and account for future expansion or maintenance access.
5. Failing to Secure Permits
Certain installations—especially HVAC systems, water heaters, or structural changes—require a permit. Skipping this step might seem like a shortcut, but it could backfire during inspections or property sales.
Tip: Call your local building office in Bellevue, Nebraska to confirm whether your installation project needs a permit.
6. Improper Ventilation or Drainage
Whether it’s a bathroom fan, dryer vent, or sump pump, improper ventilation or drainage can lead to long-term damage like mold growth or foundation issues.
Example: Connecting a dryer vent into an attic instead of venting it outside can cause moisture buildup and rot.
Tip: Ensure any system that involves moisture, heat, or fumes is properly routed to the exterior of the building.
7. Overloading Circuits
With modern homes requiring more power than ever, plugging too many appliances into a single circuit during installation is a common mistake. This can cause blown fuses or even electrical fires.
Tip: Consult with an electrician before adding new appliances or wiring. An upgraded panel might be necessary to safely distribute the load.
8. Inadequate Support or Fastening
Heavy objects like shelves, water heaters, or wall-mounted furniture require strong support. Using flimsy brackets or failing to anchor into studs can lead to collapse.
Tip: Always use hardware rated for the weight of the object and appropriate for the wall type.
9. Neglecting Safety Precautions
From wearing safety goggles to turning off the power before installing electrical fixtures, ignoring safety basics is one of the quickest ways to get hurt or cause damage.
Tip: Never rush a job. Take the time to review safety protocols and use the right personal protective equipment.
10. DIY Beyond Your Skill Level
YouTube can be helpful, but it can’t replace years of professional experience. Tackling a job you’re not qualified for can be more expensive in the long run if it needs to be redone.
Tip: Know your limits. If the job seems complex, hiring a licensed professional in Bellevue, Nebraska can save you time and prevent costly errors.
Frequently Asked Questions (FAQs)
1. What’s the most dangerous installation mistake to avoid?
The most dangerous mistake is improper electrical installation. Mistakes in wiring can result in electrical shocks, fires, or system failures. Always turn off the main power and consult a licensed electrician.
2. Can I install a water heater myself in Bellevue, Nebraska?
While it’s technically possible, we strongly recommend hiring a professional. Local codes, proper venting, and correct pressure relief valve installation are all critical—and easy to get wrong without experience.
3. What’s a common mistake during HVAC installation?
Poor airflow planning and incorrect duct sizing are two of the most common mistakes. These issues reduce system efficiency and can shorten the life of your unit.
4. Is it okay to install appliances without a permit?
Small appliances like microwaves or dishwashers usually don’t require permits, but major systems like HVAC, plumbing, and electrical panels often do. Always check with your local Bellevue building department.
5. How do I know if my installation was done incorrectly?
Watch for warning signs like leaks, frequent breaker trips, unusual noises, or visible misalignment. If anything seems off, have a professional inspection done.
Final Thoughts from bellevuenebraska
Installation projects can be exciting—whether you're upgrading your home or launching a new business space. But mistakes can cost you time, money, and safety. Avoiding the common errors listed above will help ensure your installations are secure, efficient, and long-lasting.
And remember, if you're unsure or need a second opinion, the experts at bellevuenebraska are here to help. We know the local regulations, we have the tools, and we believe in doing it right the first time.
#InstallationTips#BellevueNebraska#HomeSafety#HVACInstallation#ElectricalSafety#DIYMistakes#PlumbingDoneRight#BuildingCodeCompliance#SmartHomeUpgrades#ContractorAdvice
0 notes
Text
Power Up Your EV Charging Station Knowledge! ⚡️🔌
Did you know there are 4 key types of electrical conduit crucial for safe and efficient EV charging stations?
In this post, we're breaking down:
The unique demands of EV charging systems
The ideal conduit type for each application
Best practices for a flawless installation
Whether you're an electrician, contractor, or just EV-curious, this post is a must-read!
#EVCharging#ElectricVehicles#ElectricalConduit#Construction#InstallationTips#CarChargingStations#EVChargingStations#LEDES
0 notes
Text
🚿 Mastering Stainless Steel Pipe Installation 🛠️
Looking for a durable and reliable plumbing or construction solution? Stainless steel pipes offer longevity and resistance to corrosion, but proper installation is key to unlocking their full potential. From preparation and cutting techniques to joining and sealing methods, understanding the right steps ensures a seamless and secure setup.
Dive into our comprehensive guide to make your installation process efficient and effective: Stainless Steel Pipe Installation
0 notes
Text
Insulated PEX: The Ultimate Solution for Plumbing in Cold Climates
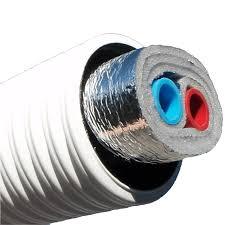
It is essential to maintain the resilience and efficiency of your plumbing if you live in a cold climate, particularly for underground water lines and outdoor boilers. Cross-linked polyethylene, or insulated PEX, is innovative in that regard. Insulated PEX is made to retain temperature, avoid freezing, and minimize energy loss, all while being strong and flexible. It offers several advantages that more conventional materials, such as copper or CPVC, cannot match.
What Makes Insulated PEX Different?
Insulated PEX, in contrast to ordinary PEX, has an extra layer of insulation to fend off extreme weather and lessen heat loss. These long-lasting pipes are made of high-density polyethylene (HDPE), which makes them resistant to weather and breaking. Because insulated PEX may be used in outdoor boiler systems and underground applications, it is a very adaptable material that can be used in a variety of cold environment applications.
Benefits of Using Insulated PEX in Cold Weather
Freeze Protection: Freezing pipes can result in burst pipes and expensive repairs, making it one of the main problems in cold areas. Insulated PEX significantly reduces the chance of frozen pipes and ensures continuous water flow by helping to maintain stable temperatures.
Energy Efficiency & Heat Retention: PEX pipes' insulating layer lowers heat loss from hot water lines, cutting expenses and energy use. It enhances the heating process, increasing the effectiveness and economy of your outdoor boiler.
Durability & Reliability: Insulated PEX is made to last and can withstand frigid temperatures as well as physical harm. It is more dependable than conventional piping materials due to its strength and flexibility, which lowers the possibility of leaks and long-term damage.
Applications for Insulated PEX
Outdoor Boiler Systems: Insulated PEX works better when used with outdoor boilers because it lowers heat loss during water transit, increases boiler efficiency, and keeps exposed areas from freezing.
Underground Piping: Insulated PEX is the best material for subterranean water lines because it can tolerate moisture, temperature fluctuations, and soil movement. It is made to withstand the harsh circumstances found in underground settings, guaranteeing the protection and continued effectiveness of your system.
Residential & Commercial Use: Insulated PEX is versatile and appropriate for any scenario requiring steady, insulated water flow, whether it be for industrial applications, commercial settings, or household heating systems.
Installation Tips for Insulated PEX
To maximize the performance of your insulated PEX, consider these installation best practices:
Trench Depth: n most cases, dig a trench that is at least two feet deep. Dig a hole that is at least 4 feet deep and, for extra safety, place a 6-inch PVC sleeve underneath driveways.
Rock-Free Backfill: To prevent damage, make sure that no rocks come into touch with the PEX pipe's outer casing. First, backfill trenches with sand.
Use End Caps: Make sure the insulated PEX casing reaches inside the building before making any cuts to maintain a waterproof connection between the outdoor boiler and the building.
Monitor Connections & Seals: Inspect the system regularly to make sure the connections are completely sealed and the insulation is still in place.
Cost vs. Long-Term Savings
Even though insulated PEX may initially cost more than non-insulated alternatives, in the long run, energy savings, less maintenance, and the avoidance of frost damage make it an economical solution. Over the course of the piping's lifespan, you can anticipate cheaper heating expenses and less repair expenditures due to heat retention and energy waste reduction.
Sustainability and Low Maintenance
The environmental friendliness of insulated PEX is one of its often ignored benefits. It lowers energy usage and thereby the carbon footprint by minimizing heat loss. Furthermore, insulated PEX requires very little maintenance; routine checks to make sure the insulating layer is still intact are typically sufficient to maintain the system's functionality for many years..
Choosing the Best Insulated PEX
Think about things like the type of fluid being transported, installation requirements, and climatic conditions when choosing the best insulated PEX for your needs. Make sure you're utilizing high-quality insulated PEX items, like those offered by Outdoor Boiler, for optimal lifetime and efficiency. These products are made to withstand harsh conditions and deliver reliable performance.
Conclusion
Purchasing insulated PEX is a cost-effective and practical approach to protect your plumbing system from freeze damage, heat loss, and expensive repairs for anyone who works or lives in a cold area. It is the greatest choice for buried lines, outdoor boilers, and both residential and commercial heating systems because of its adaptability, toughness, and efficiency. Explore Outdoor Boiler's selection of the best-insulated PEX products and solutions to have a dependable, energy-efficient plumbing system that can withstand the worst winter weather.
1 note
·
View note
Text
A Mica Band Heater is an efficient heating solution designed for cylindrical surfaces like barrels and pipes. It consists of a nickel-chrome resistance wire wound around a mica core, which is encased in a stainless-steel sheath. These heaters provide uniform heat distribution, making them ideal for applications requiring precise temperature control, such as plastic injection molding, extrusion, and other industrial processes.
#MicaBandHeaters#HeaterInstallation#IndustrialHeating#SafetyGuidelines#ElectricalSafety#HeatingSolutions#ProperInstallation#SafetyFirst#ManufacturingSafety#HeaterMaintenance#IndustrialEquipment#HeatingEfficiency#HeaterSafety#InstallationTips
0 notes
Text
How to Choose the Right Mezzanine Floor Installers for Your Project
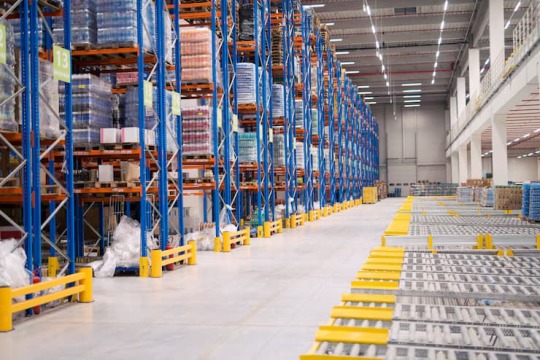
Adding a mezzanine floor to your building can significantly increase your usable space, whether for additional storage, office areas, or other purposes. However, the success of your mezzanine floor installation project hinges on selecting the right mezzanine floor installers. This article provides a comprehensive guide on how to choose the best installers for your project, ensuring that you achieve a smooth and efficient installation process.
Understanding the Importance of Choosing the Right Installers
The installation of a mezzanine floor is a complex task that involves not just the assembly of physical structures but also adherence to safety regulations, building codes, and precise engineering requirements. Choosing experienced and reputable mezzanine floor installers is crucial for several reasons:
Quality of Work: Professional installers bring expertise and attention to detail, ensuring that the mezzanine floor is constructed correctly and safely.
Compliance with Regulations: Installers must adhere to local building codes and regulations, which can vary by location.
Project Efficiency: Experienced installers complete projects on time and within budget, minimizing disruptions to your business operations.
Steps to Choose the Right Mezzanine Floor Installers
Define Your Project Requirements
Before you start searching for mezzanine floor installers, clearly define the scope of your project. Consider the following aspects:
Purpose: Determine what the mezzanine floor will be used for (e.g., storage, office space, manufacturing).
Size and Layout: Establish the dimensions and layout of the mezzanine floor.
Budget: Outline your budget, including installation costs and any additional expenses for materials or modifications.
Having a clear understanding of your project requirements will help you communicate effectively with potential installers and evaluate their suitability for your needs.
Research and Shortlist Potential Installers
Begin by researching potential mezzanine floor installers. Use various sources to gather information:
Online Searches: Look for installers with positive reviews and high ratings on industry-specific websites and forums.
Referrals: Ask colleagues, industry peers, or business associates for recommendations based on their experiences.
Industry Associations: Check with relevant industry associations for a list of qualified installers.
Create a shortlist of installers who appear to have the necessary experience and qualifications.
Evaluate Experience and Expertise
Experience is a key factor in the quality of mezzanine floor installation. When evaluating potential installers, consider:
Years in Business: Find out how long the installer has been in the industry. More experienced installers are likely to have encountered and resolved a wide range of installation challenges.
Specialization: Ensure the installers specialize in mezzanine floors and have relevant experience in similar projects.
Project Portfolio: Review the installer’s portfolio of completed projects to assess their work quality and versatility.
Check Credentials and Qualifications
Verify that the mezzanine floor installers have the necessary credentials and qualifications:
Licenses and Certifications: Ensure the installers hold the required licenses and certifications for working in your area. This may include general contractor licenses and specific certifications for mezzanine floor installation.
Insurance: Confirm that the installers have adequate insurance coverage, including liability insurance and workers’ compensation. This protects you from potential liabilities related to accidents or damages during installation.
Assess Reputation and References
A reputable installer will have a history of satisfied clients. To assess an installer’s reputation:
Read Reviews: Look for reviews and testimonials from previous clients to gauge their satisfaction with the installer’s work.
Request References: Ask the installer for references from past projects. Contact these references to inquire about their experiences, including the quality of work, adherence to timelines, and overall professionalism.
Evaluate Communication and Customer Service
Effective communication and customer service are essential for a successful installation project. Evaluate potential installers based on:
Responsiveness: Assess how promptly and effectively the installers respond to your inquiries and provide information.
Clarity: Ensure that the installers clearly explain the installation process, project timeline, and any potential challenges or risks.
Support: Evaluate the level of support provided throughout the project, including addressing any concerns or issues that arise.
Review Contracts and Terms
Before finalizing your choice, carefully review the contract and terms offered by the installers:
Scope of Work: Ensure the contract clearly outlines the scope of work, including details of the mezzanine floor design, materials, and installation procedures.
Cost Breakdown: Review the cost breakdown to understand what is included in the price and identify any potential additional expenses.
Timeline: Confirm the project timeline and any milestones or deadlines. Ensure there are provisions for delays or changes.
Warranty and Support: Check the warranty and support terms provided by the installer. A good warranty offers protection against defects and issues that may arise after installation.
Compare Proposals and Make a Decision
After evaluating potential installers, compare their proposals based on the following criteria:
Experience and Expertise: Consider the installers’ experience and qualifications.
Cost: Compare the cost estimates and ensure they align with your budget.
References and Reputation: Weigh the feedback from references and the installer’s overall reputation.
Choose the installer who best meets your criteria and offers a combination of quality, value, and reliability.
Conclusion
Selecting the right mezzanine floor installers is a critical step in ensuring the success of your installation project. By carefully defining your project requirements, researching potential installers, evaluating their experience and qualifications, and reviewing contracts, you can make an informed decision that aligns with your needs and expectations. A well-chosen installer will not only deliver a high-quality mezzanine floor but also contribute to a smooth and efficient installation process, ultimately enhancing the functionality and value of your space.
0 notes
Video
youtube
How to Install Slide Rubber Lagging - Complete Tutorial@DCCD_Group
#youtube#conveyorsystem#rubberlagging#installationtips#industrialmaintenance#conveyormaintenance#installationguide#dccd
0 notes
Text
DIY Installation Tips for Anti-Bird Spikes
Installing anti-bird spikes yourself can be a cost-effective way to keep birds away from your property. With the right approach, you can achieve effective results and protect your surfaces from bird damage. Here’s a detailed guide on DIY installation of anti-bird spikes with tips from Sai Ram Safety Nets Chennai.

1. Gather Your Materials
What You’ll Need:
Anti-Bird Spikes: Choose the right type and size based on your bird problem and installation surface.
Measuring Tape: For accurate measurements of the installation area.
Drill and Screws: For securing the spikes to the surface (if drilling).
Adhesive (Optional): For surfaces where drilling isn’t possible.
Screwdriver: To tighten screws.
Clean Cloth: For cleaning the surface before installation.
Safety Gear: Gloves and safety glasses for protection.
2. Prepare the Installation Area
Clean the Surface:
Remove Debris: Thoroughly clean the area where the spikes will be installed. Remove any dirt, bird droppings, or old deterrents.
Ensure Dryness: Make sure the surface is completely dry before starting the installation.
Inspect the Surface:
Check Surface Type: Determine if the surface is flat, sloped, or uneven as this will affect your installation method.
3. Plan the Layout
Measure the Area:
Determine Placement: Use the measuring tape to find the length and width of the area where you’ll install the spikes.
Mark Positions: Mark the spots where you will place the spikes. Ensure the marks are evenly spaced and align with the design of the spikes.
Layout Design:
Spacing: For effective deterrence, the spikes should be spaced close enough to prevent birds from landing between them. Typical spacing ranges from 4 to 6 inches apart, depending on the bird species.
4. Install the Spikes
Drilling and Screwing:
Mark Drill Points: For metal or wooden surfaces, mark where you will drill holes for the screws.
Drill Holes: Use a drill to create holes at the marked points. Make sure the holes are appropriately sized for the screws and anchors.
Attach Spikes: Align the spikes with the drilled holes and secure them with screws. Use a screwdriver to tighten the screws.
Adhesive Installation:
Apply Adhesive: For surfaces where drilling is not an option (like certain types of glass or painted surfaces), apply a strong adhesive to the base of the spikes.
Press and Hold: Place the spikes onto the surface and press down firmly. Hold in place until the adhesive sets according to the manufacturer’s instructions.
Secure the Spikes:
Check Stability: Ensure all spikes are securely attached. There should be no loose or wobbling spikes.
5. Final Checks and Adjustments
Inspect Coverage:
Check for Gaps: Make sure the spikes cover all targeted areas with no gaps where birds might land.
Adjust if Needed: Add more spikes or reposition them if necessary to ensure complete coverage.
Clean Up:
Remove Excess Material: Clean up any adhesive residue or debris left from the installation process.
6. Maintenance Tips
Regular Inspections:
Check for Damage: Periodically inspect the spikes for any signs of wear, damage, or dislodgement. Replace or adjust as necessary.
Clean the Spikes:
Remove Debris: Keep the spikes free from dirt and debris to ensure they remain effective.
Benefits of Choosing Sai Ram Safety Nets Chennai
Expert Guidance: Provides professional advice on selecting the right type and size of spikes.
Quality Products: Offers high-quality spikes that are durable and effective.
Support: Available for any questions or additional help you might need during installation.
Get Started
For expert advice and high-quality anti-bird spikes, or if you need assistance with your DIY project, contact Sai Ram Safety Nets Chennai. They offer valuable insights and products to ensure your bird deterrent system is effective and long-lasting.
#DIYBirdSpikes#AntiBirdSpikes#SaiRamSafetyNetsChennai#BirdControl#PigeonPrevention#EffectiveSolutions#BirdDeterrents#InstallationTips#ChennaiSafetyNets
0 notes
Text
MC Cables Reliable Metal-Clad Solutions for Diverse Applications

MC cables generally consist of a number of parts. Typically these will have conductors such as copper or aluminum, a ground wire, insulation color, and then a metal sheath that is either aluminum or steel. The structure of MC cables makes them able to withstand great physical stress/strain, and with the protection from water, abrasives, and other conditions that they provide, they will be able to operate at higher loads while extending the lifespan of the cable.
MC cables provide power transmission over long distances and with minimal energy loss, ensuring that industrial processes are efficient and reliable. When proceeding to MC cables to distribute electrical power, it is often the best solution, for multiple reasons, across a host of industries. MC cables are used in everything from massive manufacturing and data centers to high-rise and mixed-use residential/commercial buildings, offering safe, versatile, and convenient power delivery. Essentially, MC cables allow businesses to grow, operate, and prosper.
Read more: MC Cables Reliable Metal-Clad Solutions for Diverse Applications
#MCCables#ElectricalInstallation#Cables#HomeWiring#MCWire#ElectricalEngineering#CableManagement#WirePath#ConstructionLife#DIYProjects#InstallationTips#SafetyFirst#PowerYourHome#EnergizeYourSpace#WiringSolutions#TechTrivia#CablingSystems#ModernElectrics#UtilityWiring
0 notes
Text
Experience the unbeatable benefits of M24 Grade Belts! With high tensile strength and superior abrasion, heat, oil, and chemical resistance, these belts are built to last. Enjoy enhanced durability, reduced maintenance costs, and resilience against impact and weather, ensuring uninterrupted operations in the toughest conditions. 🛠️🔝
Read more: https://lakhotiaindia.in/
Contact us: +919025194360
#RubberLagging#DrumMaintenance#OptimalPerformance#InstallationTips#IndustrialMaintenance#ConveyorBelts#RubberBonding#DrumSurface#EquipmentMaintenance#WearAndTear#IndustrialInspection#RubberWelding#PerformanceOptimization#MaintenanceTips#IndustrialSolutions
0 notes
Photo


Todays Sharing (April 07,2025): 🔥 Causes of Cracking in Polycarbonate Sheets🔥 ✨Polycarbonate sheets may develop cracks or even fracture during use, primarily due to stress concentration, temperature fluctuations, and improper installation. To avoid these issues, proper installation and regular inspections are recommended.✨ In order to give you a better answer, I will give you some photos. ✨ We are a professional manufacturer of PC hollow sheet for ten years, and we have many molds to make various types of PC hollow sheet. ✨ Feel free to contact us with any questions! 🍭View more details👉https://www.mclpanel.com Email👉[email protected] Phone👉0086 18701960126 #PolycarbonateSheets #CrackingIssues #PreventiveMeasures #InstallationTips #MaterialScience http://www.mclpanel.com/industrial-grade-clear-polycarbonate-thick-panel-15mm-20mm-for-bulletproof-glass.html
0 notes
Text
A Mica Band Heater is a type of heating element commonly used in various industrial applications. It consists of a metal sheath, typically made of stainless steel or other heat-resistant materials, which encloses a heating coil. This heating coil is insulated by layers of mica, a mineral known for its excellent electrical insulation properties and ability to withstand high temperatures.The mica insulation not only provides electrical insulation but also enhances heat transfer efficiency by ensuring uniform distribution of heat across the surface of the heater.
#ManufacturingEfficiency#MicaBandHeaters#IndustrialHeating#EnergyEfficiency#ExtrusionProcesses#HeatingSolutions#CeramicVsMica#CartridgeVsMica#InfraredVsMica#InstallationTips#Troubleshooting#CostSavings
0 notes
Photo

So... that’s why there’s a #magnet on my #level! #whirlypig #displaymaker #installationtip #cleanuptime #whatlltheythinkofnext (at Century City, Los Angeles) https://www.instagram.com/p/BxvHuMxp25c/?igshid=1vm1smgikepw4
0 notes
Link
When it comes to fulfilling huge storage requirements for industries, on-site industrial storage tanks are indispensable. Be it inflammable and combustible liquids or hazardous industrial chemicals or oils, tanks are the ideal containers to store them safely.
Apart from the underground storage tanks, above ground storage tanks have seen a spike in popularity because of their ease of installation and hassle-free maintenance.
0 notes