#it has a gif export option and it has settings for contrast and saturation and exposure and so on
Explore tagged Tumblr posts
Visit Tumblr Blog
Explore Tumblr blogs with no restrictions, modern design and the best experience.
Last Seen Tumblr Blogs


Fun Fact
12.7% of mobile users access Tumblr.
Text
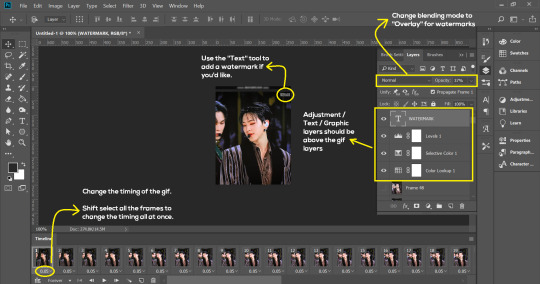
updated stage settings: (that literally no one asked for!)
assumes knowledge of photoshop and a working vapoursynth. if you don't use vs, you can replicate with mpv - though sharpening will most likely need to be stronger, since i use finesharp in vs.
when using mpv/screencaps, i recommend importing as a dicom file! it loads faster and is a little clearer in my opinion. when using screencaps, only crop once. if you need to change the dimensions, zoom, etc., i would undo to the full size you imported at or it will lower your quality.
examples: an ending fairy of cravity's seongmin, and a typical stage set gif (using a close-up) of tripleS's kaede. shows the steps, effects, and goals of sharpening and coloring, but does not share psds or actions since i recommend using your own unique sharpening and coloring style. psds cannot be provided (i didn't save them) but i will share my actions if asked to! the actions i used are the two i almost always use (with a few exceptions) on stage gifs.
no keep reading because it ruins formatting (2 images side by side), so apologies for the incredibly long post!
ending fairy:
run through vapoursynth, resized (540 x 420) and sharpened with finesharp set to 0.7 (the last # in the fs code). not preprocessed, as i wanted the normal speed and exported it with a .04 frame delay!
sharpened using my stage sharpening action (4 diff smart sharpens)

colored using levels (using the eyedropper on what i want to be pure black), and curves (done to add contrast, using only the rgb channel)
colored (prev step still visible) using exposure, with the exposure upped and gamma around .90. also used brightness and contrast to get the look i wanted, while also keeping highlights in a range that i can edit (going too bright or too high contrast makes my later adjustments less effective)
colored (prev steps visible) using hue/saturation (adjusting the hue, saturation, and lightness (to the negatives) of reds and yellows), and selective color (fine-tuning tone of reds and adjusting whites)
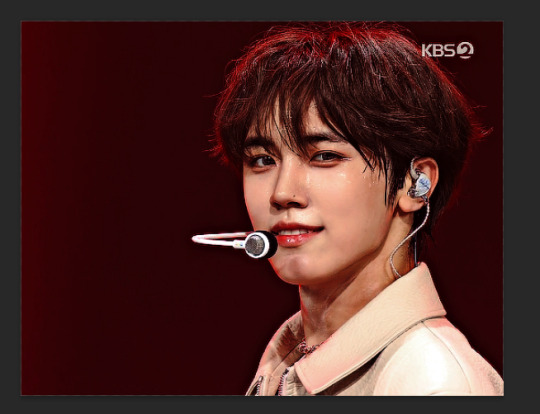
colored (prev steps visible) using selective color (adding back some white and adding cyan to it), and hue/saturation to further fine-tune (red + yellow), and brightness and contrast to get the final brightness and contrast/clarity i wanted.
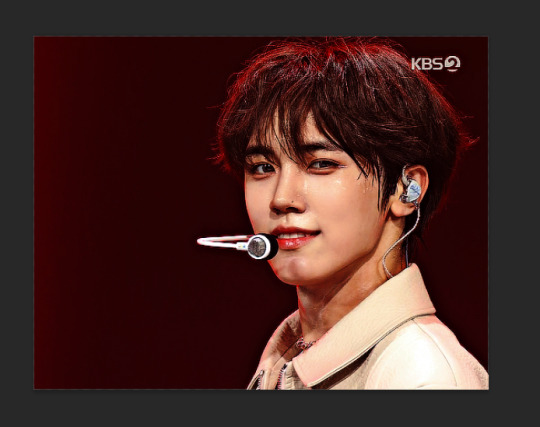
the original (resized and with vs finesharp) masked over the finished
close-up:
run through vs, resized (268 x 490), preprocessed 60fps slow, and sharpened with a finesharp of 0.7
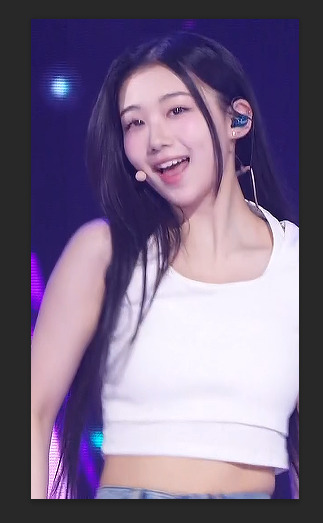

sharpened using my master mv sharpening (i changed the gaussian blur 500 from .04 to .03, + the unsharp mask is set to 50% opacity)
colored using levels (on what i want to be pure black, her hair by her ear in this case), and curves (unlike seongmin's which just adjusted rgb, i also changed the blue and green channels! i do this when it is not an ending fairy but several close-ups to try to make the coloring more consistent across lighting changes (i also do it on more challenging lighting from other sources))
colored with exposure (prev steps visible), with exposure upped (+) and gamma adjusted (~.90), and brightness and contrast to get the look i want (same highlight forethought as before)
colored (prev steps visible) with hue/saturation (adjusting hue, saturation, and lightness of reds and yellows), selective color (fine-tuning tone of reds and adjusting whites)

colored with selective color (adding back whites and adding cyan to them), hue/saturation to further fine-tune, and brightness and contrast to get the final look and clarity
optional, but nice for multi-shot sets: another hue/sat above your last brightness contrast, only adjusting background colors for cohesion when paired with the other gifs of the set

also optional: change speed to be faster, depending on the look you want. i tend to use ezgif.com/speed and do 105% speed
the original (resized, vs finesharp, preprocessed to 60fps slow) masked over the finished gif. the one on the right has been adjusted with ezgif at 105% speed

14 notes
·
View notes
Text
continuation to this tutorial under the cut
we continue colouring. next, onto the Curves layer! just like with Levels, choose white dropper and pick a light spot. this will be mine:
again, that's far too white, i only want to brighten up the scene a bit, so i will be changing Curves layer's opacity to 15% and this is what i got:


the gif now has a bit of brightness and blueish tone from the Curves, but not too much!
use Selective Colour layer to correct any colours you would like in your gif! i usually use it to bring back the colour of the characters' skin by changing Reds: Black to a higher number. in this case i added +20. i will also move the Selective Colour layer down under the Levels layer because i'd like for it to be more intense.

next, please use the Gradient Map layer from my psd. i cannot remember where i learned it from, but i always use this one in my gifs, while only changing the opacity of it sometimes. it ranges from 20% to 60% on my edits. it adds contrast to the gif.

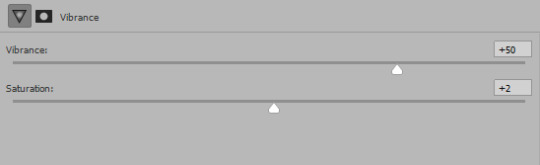
now, the last layer is Vibrance. as you pointed out, i really like to make gifs that are vibrant and colourful. my usual Vibrancy setting is +50 in Vibrance and +2 in Saturation, but you can play around to see what works best for you.
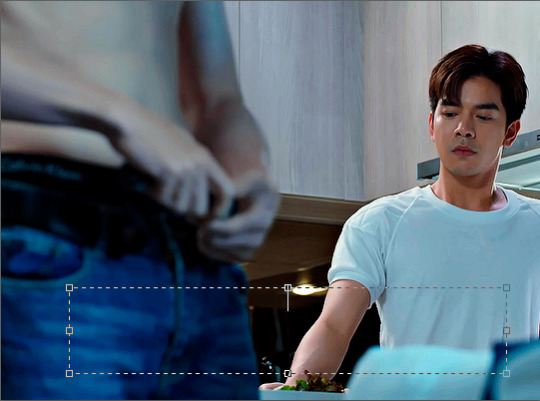
great, if you completed this step, you are done with colouring the way i do it! personally i will be erasing a bit of Levels layers on the left side of the gif cause the character's belly skin looks too light, but you don't need to worry about that for now.
Optional step: Captions
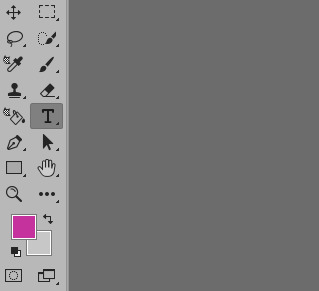
if you want to make a subtitle text layer, click the Type tool. then click on the picture and drag the tool on it.
type your text, choose a colour and a font. then change the font's setting to bold and italic

add a Layer Style by clicking on fx button > Stroke

enter these settings:
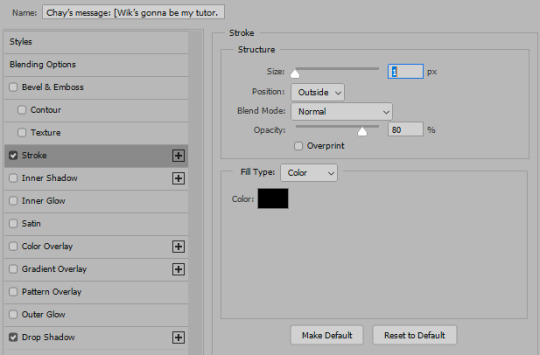
Click on Drop Shadow in this window and enter these settings > Click OK to save


here, we have a caption!
7. Saving the gif
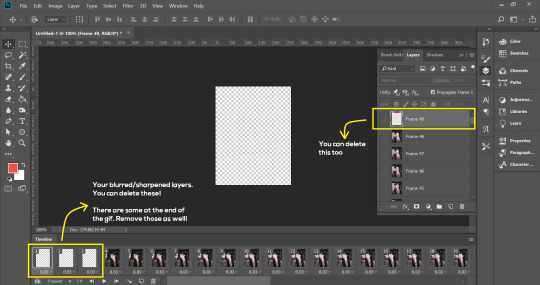
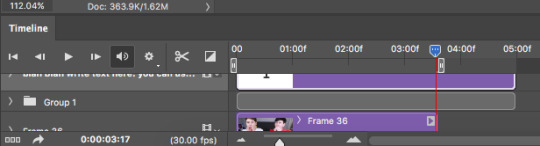
click the Save action. check the end of the timeline to see if you have any blank layers, and delete them if you do.

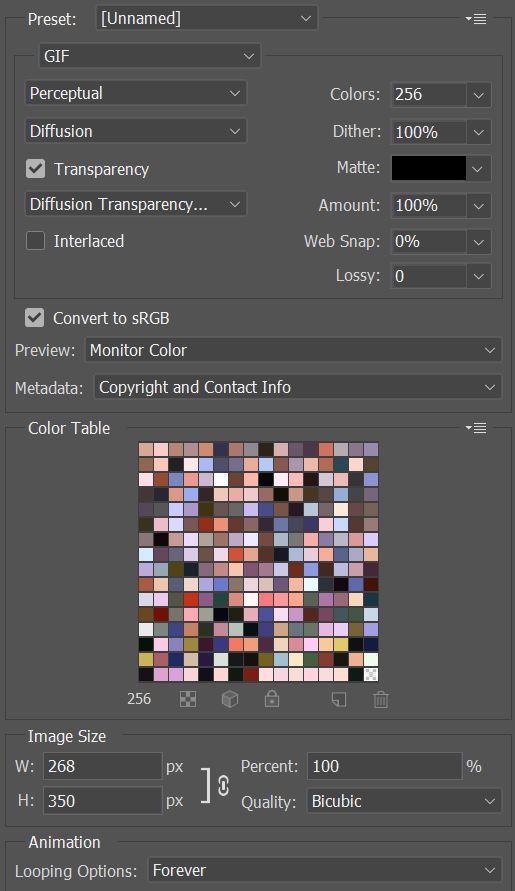
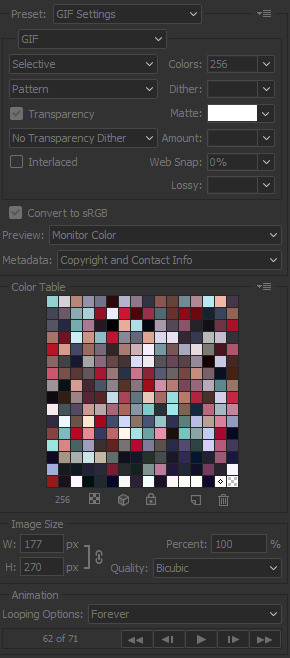
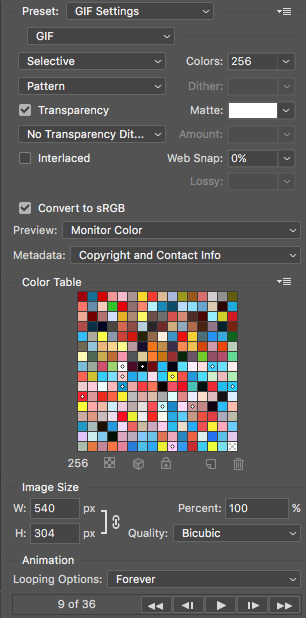
go to File > Export > Save for Web (Legacy)

these are my saving settings. most gifmakers use Diffusion, but i prefer Pattern cause i like the way it looks on the mobile better (especially in cases when my gifs are grainy).

click Save and name your gif. and you are done! hopefully i explained what you asked well, but english in not my first language and etc, i also am a whole damn idiot and not highly competent in the giffing field. sorry if anything in confusing! please send another ask or a message if you have questions darling <3 here is my result
also i collected many cool tumblr photoshop tutorials so i recommend going through my giffing tag too!
22 notes
·
View notes
Photo
💜 HOW TO MAKE A GIF WITH PHOTOPEA 💜
Hey everyone! I recently got asked to do a tutorial on how I make my gifs. I know that many people (such as myself) don’t have access to Photoshop for various reasons but they’d like to get into gif making. When I started making gifs, I only had a free trial of Photoshop, but when that ran out, I had to find another way to make gifs. Enter Photopea! A free, web-based software that you can use anywhere and that works just like Photoshop!
In this tutorial, I’ll teach you how to make a basic gif like the one I did above. I use a macbook air, but it should be doable on a regular pc too!
If you found this helpful, feel free to share it with your friends! The tutorial can be found under the cut below 💜
THINGS YOU’LL NEED
A browser (I switch between Safari and Chrome, more about this later)
A screencapping software (like MPlayer OSX Extended) or, alternatively, a presentation program like Keynote or Powerpoint.
A program to screenrecord or a program that let’s you download from YouTube
Lots of patience bc gifs are annoying little shits <3
1. GETTING A VIDEO BY SCREENRECORDING
First things first, you need to have the clip you want make a gif out of. There are plenty of ways that you can get them. I’ve seen some gifmakers say that they torrent entire movies and gif from that. The way I do is I screenrecord the part I want to gif directly from where I’m watching the movie or show (like Disney+ or Netflix [or something like 123movies if you’re a pirate 🏴☠️)]). That way, I don’t have to download the entire movie and I have just the part that I want.
To screenrecord, I use my macbook’s built-in program called Screenshot.
Open the program by pressing ctrl + command + 5 on your keyboard and you get these funny little buttons.
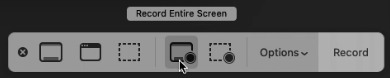
Click on the button that says record entire screen. The program is now recording your screen. Play the scene and make sure you expand the video into full screen so you get a full resolution. When you’re done, click the stop button that is at the top right of your screen (next to the wifi and battery symbols.)

If you don’t have Mac, I suggest you look into how to screenrecord on your computer, as I don’t know how other operating systems work. Sorry!
1B. GETTING A VIDEO FROM YOUTUBE WITH CLIPGRAB
Another way you can get videos is from Youtube. I use a program called ClipGrab for this. Download and open the program. You’ll get this window

Simply paste the link and chose the highest quality, then click ‘grab this clip!’. Done!
2. SCREENCAPPING
After we’ve obtained the clip we wanted, we can do this two ways. The first way is to use the program MPlayer OSX Extended. Here’s a tutorial on how to set it up, make sure you do this if it’s your first time using the program. Make sure that you have a special screenshot folder!
Open MPlayer, then go to file > open and find the video of the scene you screenrecorded or downloaded. MPlayer will now play the video. Use the left and right keys (< and >) to go go backwards or forwards 1 minute, but try not to move around too much because the software crashes if you do. If that happens, just click the reopen button when the popup comes on, and reload the video again.
When you’ve gotten to the point you want in the video, press the command + shift + s buttons at the same time and the program will now take a screencap of every single frame until you stop.
If everything goes smoothly, you should find all your frames in your screenshot folder that you’ve made before when setting up the program!
2B. USING A PRESENTATION SOFTWARE TO MAKE A GIF
If you want to skip the screencapping part and you want to have a fully completed gif, you can do the second option. That’s what I used to do before I got MPlayer. In my experience, it’s a really fast way to make a gif, but the quality isn’t really good.
Here’s a tutorial on how to turn a slide into a gif in Keynote.
Here’s a similar tutorial on how to make a gif on PowerPoint.
Basically, you make sure that the size of your presentation is the same as your video, and that you make sure to export one slide into a gif. Also make sure that you export in the highest quality!
3. LOADING THE FRAMES IN PHOTOPEA
Finally, we can start giffing! As I said at the start, Photopea can be used anywhere, but I switch between Safari and Chrome. The reason why is that if I upload the frames in Chrome, the frames will be out of order. In Safari, that doesn’t happen, but the downside is that once I start editing, Safari will reload the page because it takes up too much memory.
So, first I go to photopea.com on Safari. I click New Project and put in the same dimensions as the screencaps (in my case, they are 1440x900 px). You’ll get an empty project.
Then click file > open & place and select your screenshots. Wait until Photopea has loaded all the frames, then, at the speed of light, quickly click file > save as psd before Safari reloads! You’ll find it in your folder where all your downloads are.
Next, I open Chrome (I use the incognito window because I have adblock on my usual Chrome, the program won’t work as usual if you have it enabled) and I click Open From Computer, locate your saved .psd file that you saved from Safari.
Now, you’ll see all the frames as individual layers. Select everything by clicking on the first layer, then golding the shift button and clicking on the last layer. Press command + G to group the frames into a folder. Here’s how everything should look after you’ve grouped the layers.
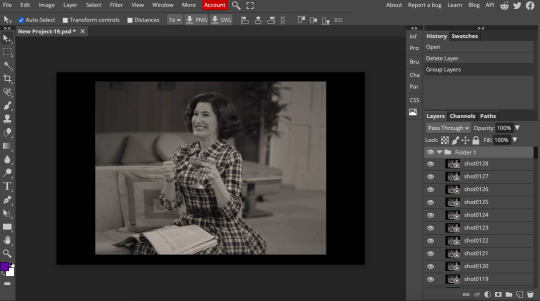
^^ See how Agnes approves! Agnes things you’re going a great job!
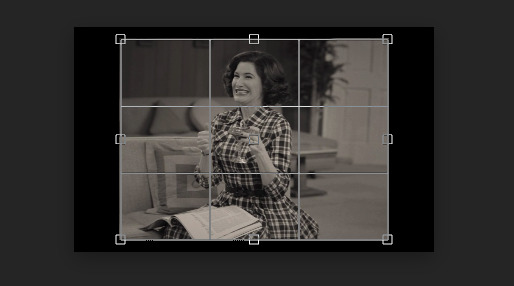
Now, it’s time to crop the gif and get rid of the black borders. Making sure that the folder is selected, click on the crop tool (or press C) and click on Fixed Size

W is Width and H is Height, write in your sizing here. Tumblr’s max width is 540, so I put the width as such. For the height, I use 405. Then you just drag the corners until you’ve selected the part that you want, like this
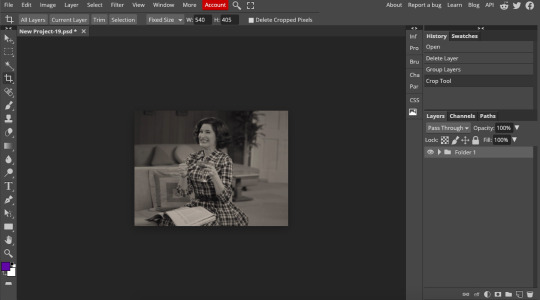
Press enter and the image will be sized down 540x405 px.
Now, our gif looks like this after cropping!
Open the folder so you can see all the layers. Select all your layers and right click on them, then click rasterize.
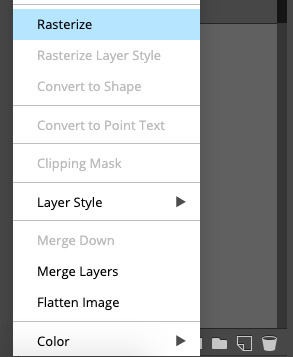
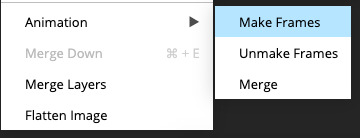
Then, go to layer > animation > make frames. You’ll now see that each layer begins with _a_ - this is crucial because this is how Photopea knows that the layers are part of a gif. If your layers don’t begin with _a_, then it will not play as a gif
If you instead already have a gif done, all you have to do instead is simply click open from computer when you first open Photopea and load your already finished gif and it’ll have the _a_ at the start of every layer. You won’t have to go through the steps of loading your frames into a new project to make your gif as it’s already done and in a folder :) Just start cropping once you load it
You can preview your work by going to file > export as > gif. Make sure to change the speed in the preview window until your gif plays the way you want it! I put my speed at 500%
4. SHARPENING
Hooray, we now have our gif! But to make it look a little nicer, it’s good to sharpen it. I always use Smart Sharpen when I sharpen my gifs, and many other gifmakers use that too. It’s really good :D
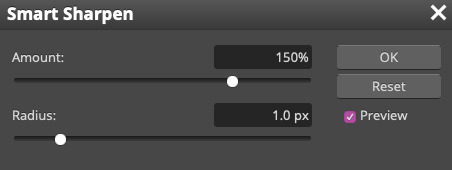
To sharpen your gif, again, make sure that all your layers are selected. Go to filter > sharpen > smart sharpen. I use two different settings for my gifs, it really depends on the gif.
Setting 1 (which is the default setting)
Setting 2
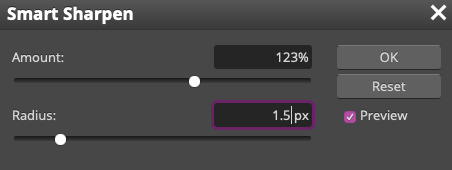
Again, it depends on the gif, play around until it looks good to you!
Here’s our gif after sharpening it
I ended up deleting the last few layers as the gif got bigger than 10mb (that’s Tumblr’s file limit, it your file is bigger than 10mb, it won’t upload). I also added a gradient map and it made the file size smaller, more about that in the next segment!
5. COLORING
Here’s the fun part! Now we get to play around with the gif, making it brighter and look Extra Nice™! Since this is a black and white scene, I make sure that the blacks and the whites really pop.
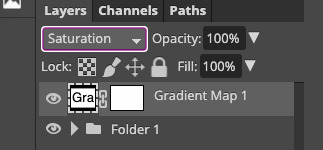
Notice how in the original scene it’s not actually b&w, it has a slight sepia tint to it. I want to remove this, so I add a gradient map by clicking on the white square with a black circle (I want to point out that we’ll be clicking on this button a lot in this step)

and I change the blending mode to Saturation
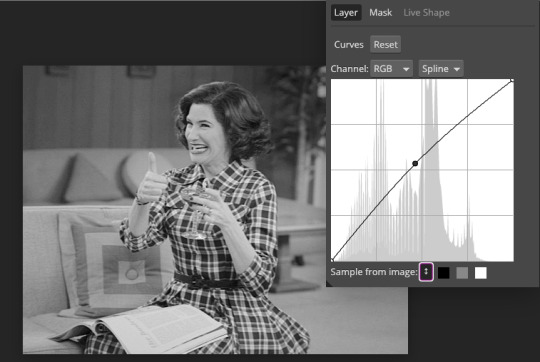
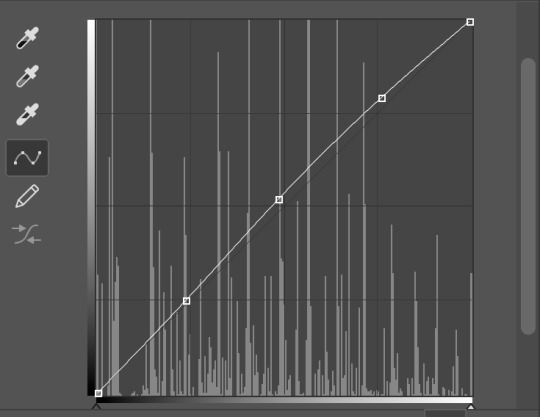
Then I add a curves layer using these settings
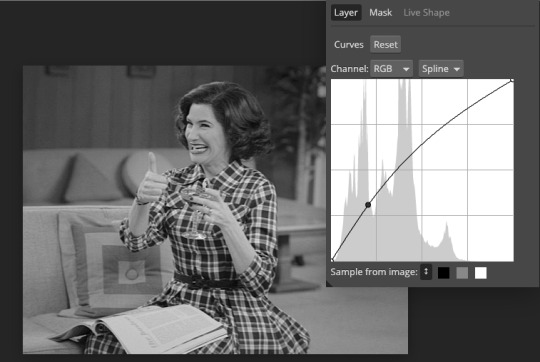
Then a second curves layer
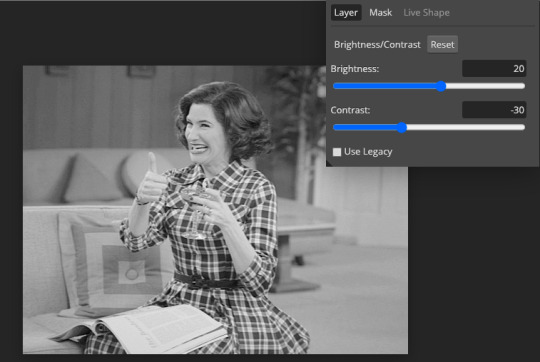
Brightness/contrast
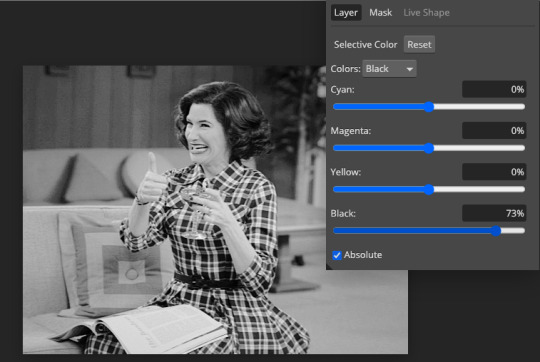
Then my favourite! Selective color! First layer, I deepen up the blacks
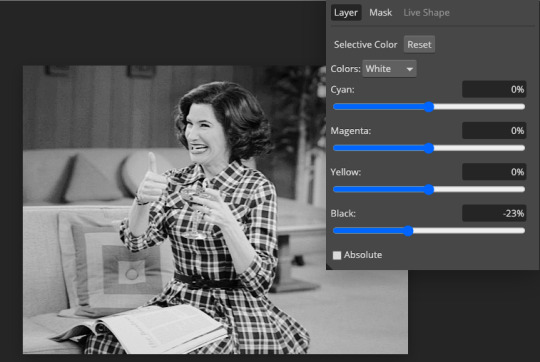
Then another selective color layer, this time the whites
Lastly the neutrals

Here we have the final results!
Wasn’t this a gas! I hope this helped you out, let me know if you want to know anything else about gifmaking, I’m happy to help! Also, sorry if I wasn’t very clear, I’m bad at explaining 🙈
MORE RESOURCES:
Here are some other tutorials that are really helpful in making gifs. These users use Photoshop, but you can still use their tips most of the time in Photopea too, you just need to play around and see what works for you!
Gifmaking for beginners by @chloezhao (this one saved my life)
Pale coloring tutorial by @itsphotoshop
Two-Toned Gif Background by @clubgif
Text with white outline tutorial by @anya-chalotra
#resources#tutorial#gif tutorial#photopea#photoshop tutorial#photopea tutorial#tuserfran#userlaur#userlaura#usermirna#(tagging mutuals if you wanna share :P)#my tutorials
1K notes
·
View notes
Photo
Welcome to soonhoonsol’s gif tutorial!
As a nice anon asked me how I make my gifs, I thought it’d be cool to create an in-depth tutorial :) Perhaps this can help some others enter the gif-ing world too!
What we’ll be using for this tutorial:
Software: Bandicam, Avisynth, Photoshop CC 2018, Topaz Labs
File Format: .mp4
Operating System: Windows
Disclaimer: This is just my method. Every gif maker works differently and has different preferences. What works for me may not work for you, and that’s completely okay!
Let’s get into it!
1. Find the best quality video you can find
This really depends on the content you want to gif. For variety shows, music videos or photoshoots, any video of [1080p] should be sufficient. Try not to use anything below 720p.
For stage performances, fancams tend to have higher resolutions [1440p, 4k]. Use these if your computer can handle it. If not, usually 1080p works fine. The best option would be to download .ts files, which provide clearer and less grainy videos.
For Seventeen, you can get .ts files from The Rosebay on Twitter :)
2. Screen recording
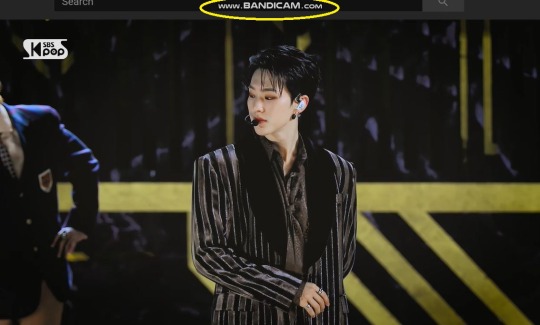
As a Windows user, I don’t have a built-in screen recorder on my laptop. So, I use Bandicam, which is a free screen recording software. The only con to it is that it has a watermark.
To combat the watermark, I always have the boundary box a little bigger than the video itself so that I can crop it out of the gif.
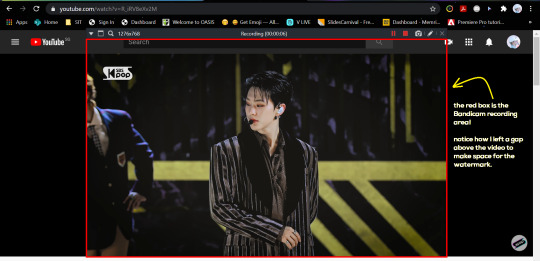
This is what the recording would look like:
Just record the scene(s) that you want to gif so your video file doesn’t end up too large! Your recording should be in .mp4 format.
(You may use pure .ts files in Avisynth but it never worked well for me so I usually screen record the .ts video and move on)
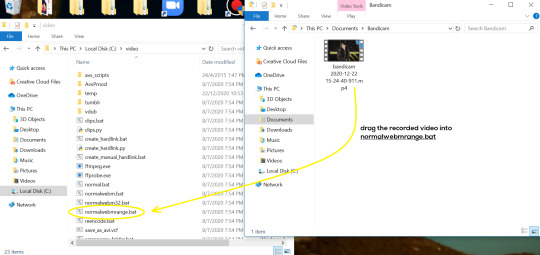
You can find your recorded videos in Documents > Bandicam.
3. Avisynth
I followed THIS tutorial to download Avisynth. This software is really helpful if you want sharp and clear gifs! I recommend to follow the steps in the tutorial as the below method stems from it.
- Once you have downloaded it, open up your recorded video from Step 2 and watch it. Take note of the duration you want to gif. (e.g. from 00:01 to 00:05)
- Drag your video file into normalwebrange.bat. On Windows, you can find this in File Explorer > Local Disk (C:) > video. For other .bat files, you may check out THIS tutorial.
- In the pop-up box, key in the start time for your gif (e.g. 00:00:01). It has to be in hh:mm:ss format. Press “enter”.
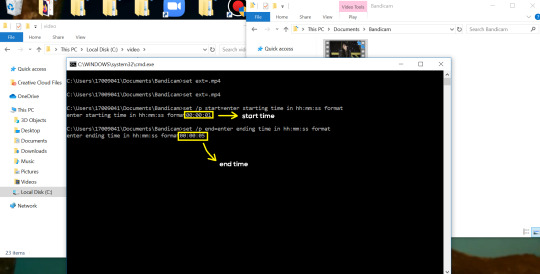
- Key in the end timing and press “enter” again. A resizer should pop up in an Internet Browser. I found that Firefox works best for me.
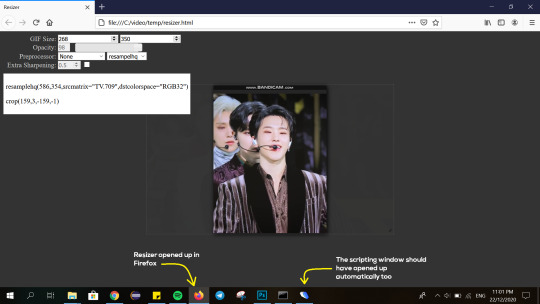
- In the resizer, you may indicate the size of the gif you’d like to make. You can also click and drag the video to resize and frame it to your liking. You may refer to THIS post for Tumblr dashboard sizing.
(These are some common gif sizes for stage performances):
1 gif - 540px by 540px (square)
2 gifs - 268px by 350px
3 gifs - 177/178px by 250px
- Under “Preprocessor”, select “debilinear” for the second box. For the first box, you may pick between qtgmc 30 (same frame rate as video) or qtgmc 60 (doubles the frame rate; smoother).
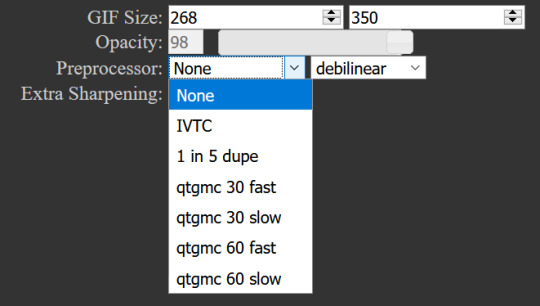
- You will also see “fast” or “slow” options. These are just how long the video will take to render. “Fast” will give you slightly lower quality as compared to “slow”, but usually is good enough.
(You can see that his features are sharper and more defined in the “slow” gif as compared to the “fast” one.)
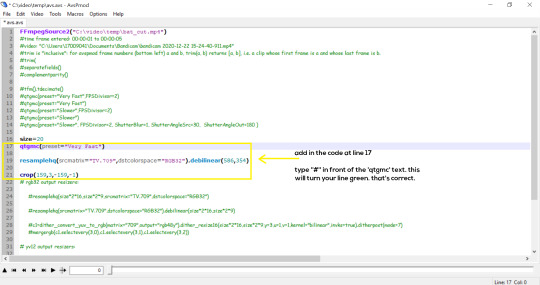
- Copy the code in the white box. Navigate to the scripting window (it should have popped up with the resizer) and paste the code at line 17. Type a “#” before qtgmc on the same line. This will prevent the software from lagging.
- Click on the inverted triangle at the bottom of the screen. Your video will now appear in the scripting window. Drag the slider to the intended starting point of your gif and press the “home” key on your keyboard.
- Drag the slider again to the intended ending point of your gif and press the “end” key on your keyboard. This blue area you see is the duration of your gif.
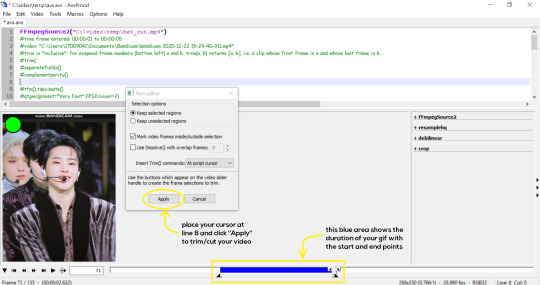
- On an empty line (I usually go to line 8), place your cursor there and click “Apply” in the mini pop-up window. Afterwards, remove the “#” from line 17.
- Go to File > Save or press Ctrl + S to save the code. Close the scripting window. The video renderer will pop up. When it’s done, it will automatically close by itself.
4. Using Photoshop and Topaz
I’m using my school license for Photoshop 2018, but if you don’t have that, there are plenty of cracked versions for free. I don’t have any to recommend though so I’m sorry about that :(
I followed THIS video tutorial to download Topaz plug-ins for free. I use Topaz DeNoise (the most helpful) and Clean, but you may use others if you’d like :)
Alright, let’s dive in to the steps!
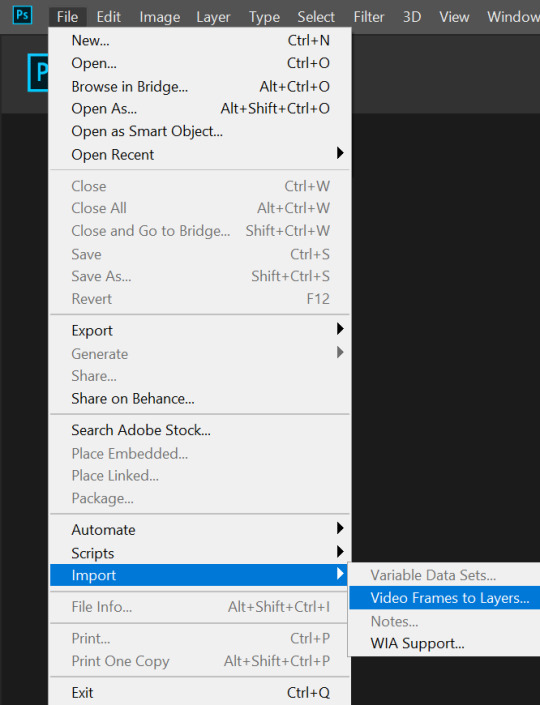
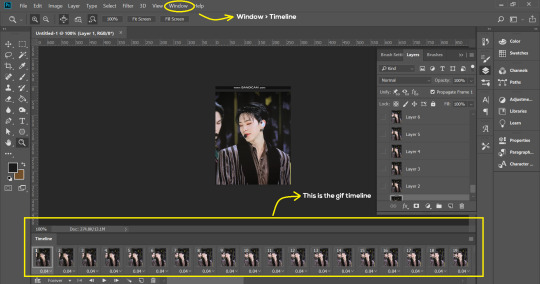
- Open up Photoshop and go to File > Import > Video Frames to Layers.
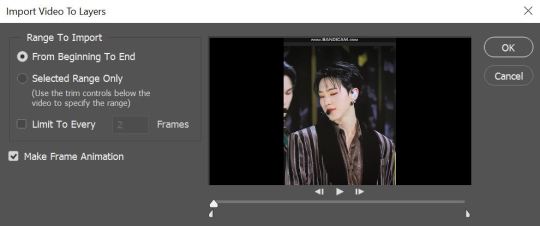
- A pop-up will appear. You can find your deinterlaced Avisynth video in File Explorer > Local Disk (C:) > video > temp > video.avi. Follow the settings in the picture and click “OK”.
- Go to Window > Timeline to open up the timeline. You should be able to see your gif spread out in frames. If you press the play button, it should play like a video.
- (Quick optional step I learned from THIS tutorial) Go to Image > Canvas and set the Resample option to “Bicubic (smooth gradients)”.)
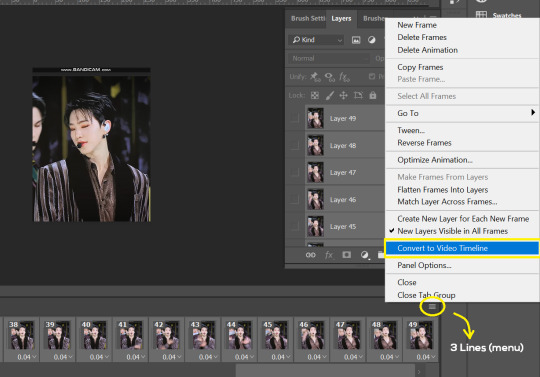
- Select the first frame of your gif in the timeline. Shift select the last frame. Go to Window > Layers. Shift select these layers as well.
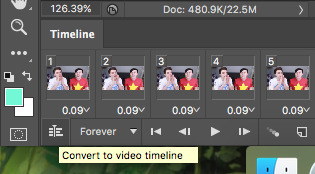
- With everything selected, click the 3 lines at the top right corner of the timeline. Select “Convert to Video Timeline”.
- At the top of the screen, select Filter > Convert for Smart Filters. Your layers will condense into one layer. Don’t worry, your gif is fine.
- Now it’s time to sharpen the gifs. Go to Filter > Sharpen > Smart Sharpen. Play around with the settings to your liking!
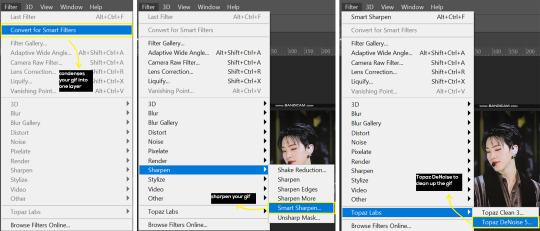
- If you’ve downloaded Topaz correctly, it should appear under Filter > Topaz Labs. If a pop-up asks you for an activation key, you may use THESE to activate it for free.
- Go to Filter > Topaz Labs > DeNoise and/or Clean and play with the settings until you’re satisfied.
5. Blurring
If your gifs have captions/logos that are distracting, you’d want to blur them out. Don’t be like 2018 me that blurred out the logo frame by frame; it’s very tiring. Instead, using this method from @scoupsy‘s tutorial, you’ll save lots of time.
- In the Layers tab (Windows > Layers), select the “New Layer” icon. It should be blank.
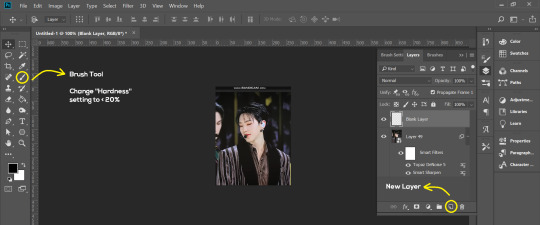
- Select the Brush tool. Make sure the “Hardness” setting is below 20%. This will blend the blurring nicely into the gif.
(For the sake of this tutorial, I will be blurring out the Bandicam logo to show you.)
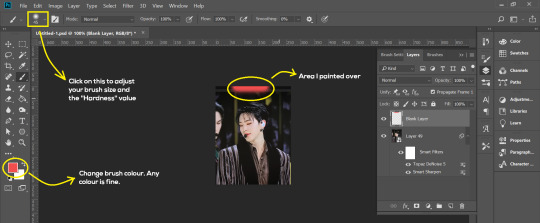
- Paint over the captions/logos. Make sure this is on the blank layer!
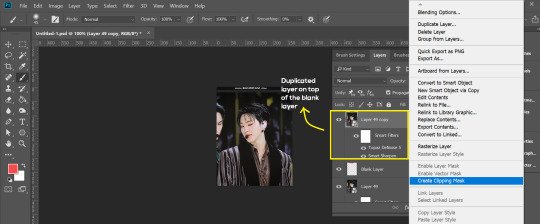
- Duplicate (Right Click > Duplicate) the gif layer and drag it so that it’s on top of the blank layer.
- Right click on the duplicate layer and select “Create Clipping Mask”.
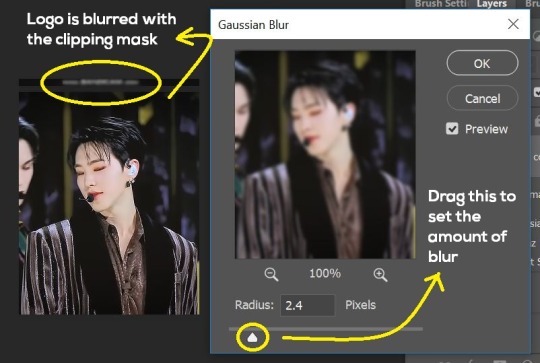
- Go to Filter > Blur > Gaussian Blur and play around with the settings until you’re satisfied with the level of blurring. Click “OK”.
6. Flattening & Colouring
- Once you’re done with sharpening and/or blurring, click on the 3 lines on at the right corner of the video timeline and go to Convert Frames > Flatten Frames Into Clips.
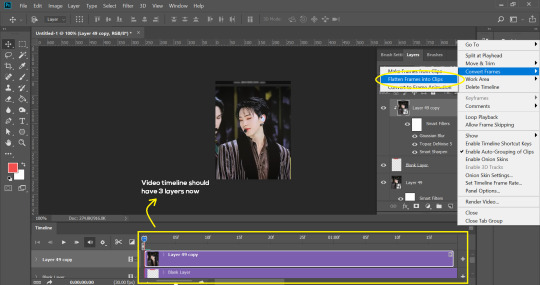
- Topaz layers and blurring will take some time to render so you can just chill for now~
- When it’s done rendering, click again on the 3 lines and go to Convert Frames > Make Frames From Clips.
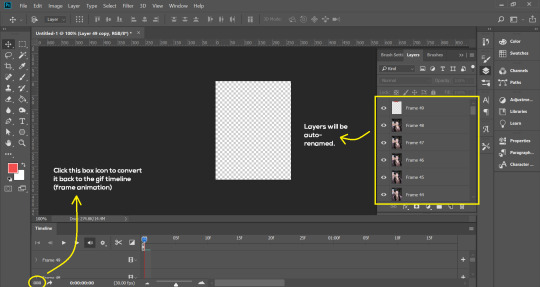
- Convert it back to the gif timeline by clicking on the 3-box icon at the bottom left of the timeline.
- Select the first frame of your gif. It must be the FIRST.
- Scroll to the top of the layers and select the layer at the top. Any other layers you add should be on top of this layer. VERY IMPORTANT!!
- In the Adjustments Tab (Window > Adjustments), there are many different things to play with. There’s a high chance you won’t use everything, but here’s a few of my favourites.
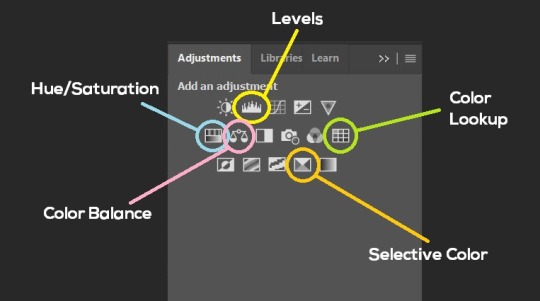
Levels - Adjust the brightness and contrast of your gif in depth.
Hue/Saturation - Useful for changing colours, or switching it to black and white.
Color Balance - Tweak the colours to your liking.
Colour Lookup - Comes with built-in LUTs that you can use as a preset. Great starting point for colouring. Saves time too. You can even download plug-ins for this. 11/10 tool.
Selective Colour - Adjust the vibrancy of specific colours.
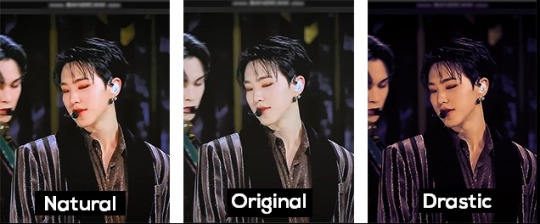
- Colouring is completely up to the gifmaker. Go crazy go stupid :D
7. Exporting
We’re almost to the end!
- Set the timing for your gif.
If you used qtgmc30, the best timing would be 0.04s / 0.05s / 0.06s.
If you used qtgmc60, the best timing would be 0.02s / 0.03s / 0.04s.
- Once you’re satisfied with everything, go to File > Export > Save for Web (Legacy).
- Follow the settings in the picture below:
- Tumblr’s gif limit is 10mb per gif. Check the gif size at the bottom left of the pop-up window. Make sure it’s below 10mb; the smaller the better.
- Click “Save”. Choose where you’d like to save the gif.
- Done!
~~~~~~~~~~~~~~~~
And that’s it! You’ve successfully made a gif! Good job you :D
I hope this tutorial was helpful! Please leave some feedback if it helped, or if you have other methods you’d like to share :)
Lastly, if you have any questions, feel free to send in an ask or DM me!! :)
Good luck and happy gif-ing :’D
#gif tutorial#kpop gifs#avisynth tutorial#topaz tutorial#gifs#chey.resource#kpop#idk what else to tag so...#i finally posted the tutorial yay!!#please spare a reblog if you find this even remotely helpful thank you <3#also to spread it hehe i spent a lot of time on this#if anyone has any questions please feel free to DM me!!#i apologize if there are any spelling errors
231 notes
·
View notes
Photo
i finally decided to take the time & do a heavily requested gif tutorial! this will be very detailed & is how i make every single one of my gifs from start to finish! i’ll also include resources for ps downloads, actions, etc. if you have any questions, don’t be afraid to ask! & if this helps you, pls rb!!
TUTORIAL UNDER THE CUT!
i’m going to break it down into sections to hopefully make it easier to understand!
1. software i use
2. hq movie/tv show/video downloads
3. screencaps
4. importing screencaps into photoshop
5. cropping
6. actions/sharpening/gaussian blur
7. image sizing
8. time delay
9. coloring
10. saving
1. software i use
photoshop - i use photoshop cc 2020 on my macbook air but any version of photoshop with video timeline/frame timeline will work for creating gifs! i pay for my photoshop but i know there are ways to get it for free. if you don’t want to/can’t pay for photoshop, here (x, x, x, x) are some links to download it without paying!
mplayer osx extended - this is the software i use for my screencaps. there are a lot of software’s out there & i think it truly comes down to preference. i’m just more familiar with mplayer & the screencaps come out really smooth in my opinion. it’s free as well & here is a link to download it!
2. hq movie/tv show/video downloads
ok so i’ll be real, i never used t*rrents until recently & i’ve personally noticed a huge difference when it comes to quality. before using them, i was using files from MEGA & if you’re not comfortable with t*rrents, i would definitely recommend MEGA links! when it comes to downloading any videos, try to make sure they are 1080p or 2160p if available! 720p is also ok but always try to get 1080p. also i’ve found that with movies, 1080p Blu-ray versions look better but again, it’s all about preference!
t*rrents - i only use one t*rrent site which is r*rbg. they have a huge variety of tv shows & movies from what i can tell.
MEGA - MEGA is really nice for people that aren’t comfortable with t*rrents. the way i used to use MEGA was, i followed accounts on twitter that would upload MEGA links to tv shows. here (x, x, x, x, x, x) are some of the accounts that post a wide variety of links to MEGA downloads! i will say, the only downside to MEGA links is that they seem to take longer to download & you can cap out at a certain amount of GB each day.
folx - i use this to download stuff from r*rbg! download this before you try to download anything from r*rbg. its free to use & there are multiple sites you can download this software from but i’ll link a few right here (x, x, x this one is a link directly from the apple store but it costs $15.00). if you don’t want to download from any of those links, you can just simply look up ‘folx mac/windows download’ in google!
4k video downloader - i use this to download videos from youtube! it’s free as well & you can download it here!
3. screencaps
once you’ve downloaded a movie or tv show or whatever you want to gif, open whichever screencap software you’re using & start playing the video. for mplayer osx extended, to screencap you just go to the scene you want to gif, pause the video, & hold down shift + command + S on mac (i think it’s the same for windows i’m not sure).
4. importing screenshots into photoshop
now that you’ve got the screencaps of the scene you want to gif, it’s time to open photoshop! to upload the screencaps, in photoshop go up in the lefthand corner to file > scripts > load files into stack. once you click on that, you’ll click ‘browse’ over to the right & the files on your computer will pop up. go to wherever you saved your screenshots & select all of them! once you’re done selecting them, hit ‘open’ in the bottom right corner.
5. cropping
now all of your screencaps are imported!!! now it’s time to crop the screencaps. go to the crop icon over to the left.

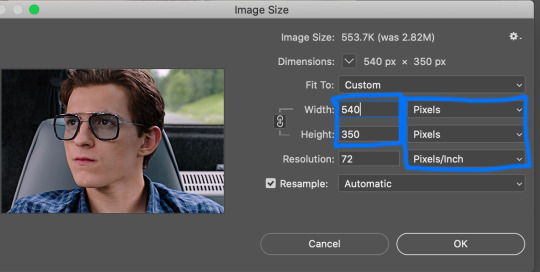
for this gif, i want dimensions to be 540 x 350, so i go up top & type it in
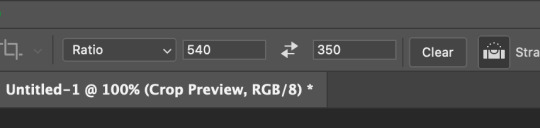
great! now the gif will look like this:
6. actions/sharpening/gaussian blur
now that the gif is cropped, we’re going to sharpen it. i use actions because they are so much faster & easier. i use the action that kylos uses in her giffing tutorial & the direct link to download the action is right here! to access actions, you can either go to window > actions or go over to the play button to the right that looks like this:
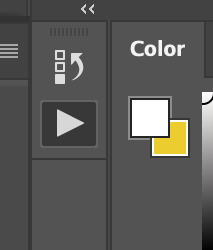
when you hit that play button, you will see the actions that you have downloaded pop up! select where it says ‘select here!’ & then go down to the play button at the bottom to play the action. i circled both steps down below

the default radius in this action is 0.3 & i normally change it to 0.4 (it’ll normally pop up & ask you like shown below & just change it to 0.4!)

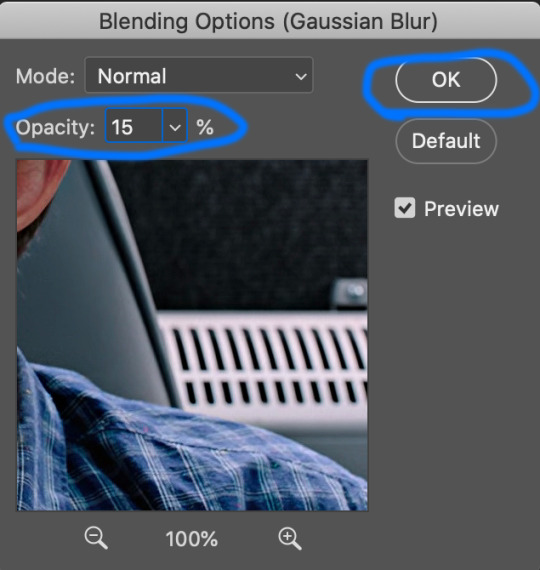
now the action has been played!! i add an extra step but it’s optional! what i do next is i add a layer of gaussian blur on top of the action. to do that, go to filter > blur > gaussian blur. once you select that, it’ll have a pop up that looks like the one below & you’ll just select ok or hit the enter button

once you do that, you’ll notice your gif looks soft or not sharpened so the next step is to change the percentage of the gaussian blur layer you just applied. to do this, you go to the bottom right corner & hold down option by clicking on the gaussian blur layer. there will be options that pop up & you’ll select ‘edit smart filter blending options’ like shown below (my handwriting looks like a five-year-olds ik)

another pop up will show up in the middle of the screen & you’ll be able to select which percentage you want to place on your gif. the opacity really depends on the gif but i normally do 10%-30%. for a lot of my gifs recently i’ve applied 15% which is what i did on this gif! once you change the opacity to whatever you want, hit ok!
after that you want to change the image size to the same size you cropped the gif to. to do this, you’ll go to image > image size > & change it to 540 x 350 (or whatever the size of your gif is! also make sure it’s switched to pixels instead of inches! once you’ve done that hit ‘ok’ or press enter.
once that’s done, go ahead & save the gif! to do this, go to file > export > save for web (legacy). it’ll show you the size of the gif down in the bottom left & as long as it’s under 10mb you’ll be fine!!! down below i circled my save settings as well! also its SUPER IMPORTANT THAT YOU SET LOOPING OPTIONS TO FOREVER! once you’ve done all that, save your gif by hitting the ‘save...’ button down below that’s circled. you can name your gif however you like just make sure you keep the .gif after it!

now my gif looks sharper than before:

now for time delay & coloring!!!
7. time delay
open the gif you just saved in photoshop by going to file > open. once it’s opened, you’ll see a timeline of all the frames towards the bottom. it’ll likely say 0.07 sec with a small little downward arrow next to it. select the downward arrow & select other. change the speed from ‘0.07′ to ‘0.05′! gifs look much better & more natural at this speed. (also yes i did delete a few frames because i felt it was too long so to delete frames you just select the ones you want to delete & click the trash button down by the scroller!)

8. coloring
coloring can be so much fun but so tricky! i personally use a base psd that i made for all of my gifs & then adjust it according to the gif i’m coloring but for this gif i colored it from scratch! so for most of my gifs i only color/edit them using levels, selective color, brightness/contrast, curves, color balance, & vibrance (in that order) to access these, go to layer > new adjustment layer > & then select whichever one you want to start with.
1. levels

2. selective color
blacks: black +2
reds: cyan -9, magenta +1, yellow -3
cyan: cyan +100

3. brightness/contrast
brightness: 5
contrast: 6

4. curves

5. vibrance
vibrance: +16
saturation: 0

then you save it just like earlier by going to file > export > save for web (legacy) & you’re all set!!!! i hope this helps anyone who is trying to get into gif making & if you have any questions, don’t be afraid to reach out!!!!
#this is so long i apologize#gif tutorial#allresources#resources#completeresources#quirkyresources#my tutorial#photoshop
649 notes
·
View notes
Photo

so i thought it’d be a good idea to make a full indepth tutorial on how i make my gifs and what i do to achieve them! please be aware that everyone’s giffing style is different and this is just how i make them and what my settings are! you can do absolutely whatever you wish when you’re making your gifs!
i will be going over where you can get videos, how you can download them, how to use photoshop, vapoursynth, and colouring (regular gifs, performance gifs and selective colouring to change colours in gifs)!
step one: downloading the video
so i always try to get 1080p videos and if not 720p for the highest quality possible (there is the option of 4k as well but that’s not used so often)
TS files: kpopexciting, kpop24hours (you need a login for this), HDhallyu (for more older performances circa 2015 and before), dongyoungsang (for kdramas/tv shows)
Youtube videos: 4K Video Downloader
Vlive videos: Soshistagram
Twitter videos: Twitter Video Downloader
Instagram videos: Dredown
step two: using vapoursynth
so vapoursynth is similar to avisynth but it works much faster and has more options when it comes to sharpening and denoising gifs especially performance gifs! i’ll go over the steps i do to use vapoursynth but i have also provided a video i’ve recorded (it’s very basic) in case text is a little too confusing! there’s also this tutorial that goes into details on how the options work and how you can use them!
have two windows open, one containing the videos you’re using and the other with vapoursynth.
drag whatever video you want to use onto ‘vapourscript.bat’ and a terminal window will popup. this is where you put in the the timestamp of where you want to start and end your clip in the HH:MM:SS format.
enter your starting point first and then it will prompt you again asking for the duration of how long you want the clip to be.
hit enter again and wait until the resizer.html pops up and from here you’ll put the settings you want to use for your gifs.
gif size
gif widths (the first number) recommended for Tumblr:
1 gif per row: 540px
2 gifs per row: 268px
3 gifs per row: 177/178px
opacity
changes how you view the video in the window.
preprocessor
refers to how the video will render! it refers to the number of frames per second (30 frames or 60 frames). i don’t normally use this cause it slows down the application for me personally but you can use it to your liking1
denoise
helps remove noise from gifs. I use KNLM and you can toggle the settings how you see fit
extra sharpening
it’s pretty self-explanatory but you just basically go off of your preference!!
then you just copy and paste your what you see on that white box in the browser onto the application and trim it to the length or number of frames you need! once your done you go to script > encode video and make sure to change the ‘no header’ to ‘y4m’!
step three: using photoshop
to create gifs in Photoshop, go to File > Import > Video Frames to Layers and then select your video file/output file from Vapoursynth. depending on how long your clip is you can press ok or select the option “limit to every 2 frames”.
with photoshop you can adjust the timing of your gif even further! my usual preferences are:
<20 frames: 0.15
20-59 frames: 0.1
60+ frames: 0.07
you gif should be under 3mb - to decrease a gif’s size, i usually delete frames and/or use selective color to increase the black percentage for whites, neutrals, and blacks.
with tumblr saying you can go over 3mb for gifs you definitely can but it will lower the quality of the gif. if i need to i’ll go up to 4mb at most.
step four: sharpening
it’s completely optional to do this since vapoursynth does some sharpening for you and you can find a ton from @completeresources and @yeahps to just name a couple ps resource blogs!!
you have to change the timeline from frame animation to video timeline and you can do that by clicking the button on the bottom left corner on the timeline that looks like stacked rectangles.
from here you will have to make all your frames into one layer so you have to go to filter > convert for smart filters. and you can use your action on that by going to the actions panel, selecting what action you want to use and press the play button.
now you can put the colouring that you would like on your gif!
step five: saving
now when you save you can do the shortcut ctrl+alt+shift+s or go to file > export > save for web and these are my setting for when i save:
miscellaneous notes
here i have three different gifs of the same scene to just show the difference between using .mp4, .ts only, and .ts + VS. as you can see there’s a significant difference between each of them especially the .mp4 versus .ts + VS.

how i colour
the adjustments i currently use the most are:
curves
brightness/contrast
color lookup
levels
selective color
some things that i personally like when i’m colouring is:
having the black of the gif to the darkest it can be
vibrant
to get the black areas to the darkest it can be, there are two options. option one is i would use a mix of curves and levels. i would start off with the curves and use the eye dropper tool that is filled with black and click on that then i would click on the darkest spot of the gif then it’ll automatically recolour the gif so the area that you selected would be black.
to keep the skin tone of idols intact i usually do the following:
keep the vibrance high
use selective colour to colour correct the skin
give a warmer tone to the gif using color balance
here’s just an example of how colouring can make a difference in the gifs and how they look afterwards as well:

most of the time i have around 3-5 adjustments for gifs if i need to but you definitely can add more to your desire!
how to change colours on gifs
changing colours completely is honestly a lot and sometimes it can take up to 10+ adjustment layers if you need to. it takes a lot of practice but the more you do the better you’ll be at it! i’ll basically be explaining how i went from this:

to this:

so tips for this type of colouring:
its easier on gifs that have mostly white backgrounds
it’s easier to change from cool tones to warm tones rather than the other way; especially if there are people in the gif. trying to change warm tones will affect the person’s skin colour
the main adjustments that i use to achieve this colouring is:
hue/saturation
colour balance
colour selective
so i’m going to be changing the blues of this gif into red/pink!
so you use the hue/saturation tool and click the drop-down with master and go to really any option cause you need the eye dropper to be activated.

i’ll use the eye dropper tool to select the cyans/blues in the gif and from there it’ll only change that colour to pretty much any colour you want. it doesn’t always allow you to have smooth changing of colours like this gif so sometimes you may need to use multiple hue/saturation layers to fix it! sometimes using colour balance also helps as well but it’s more broad in that it will change everything that is within the shade range of the colour you’ve selected.
for mostly white backgrounds what’s easiest is that you create a new layer and fill that layer with the colour you wish and change the layer from normal to multiply.
before:

after:
350 notes
·
View notes
Photo

(unofficially titled: how to change the grey wall)
As a thank you for reaching 2.5k followers, I thought it was about time to stop being lazy and do a gif tutorial as it has been frequently requested. Hopefully, this will help anyone who wants to start making gifs as well as anyone who wants to understand how to create colourings!
What You Will Need: - Photoshop (I use CC) - A source video
What Will Be Covered: - How to get the video - Timing, Resizing & Cropping - Sharpening - Colouring (and how to achieve extra af colours) - Subtitles - Saving your gif
This is going to be very thorough and informative (to the best of my ability) so all the information on how to make gifs is below the cut! As a disclaimer, you can use any version of photoshop for this.
1. Getting the Video.
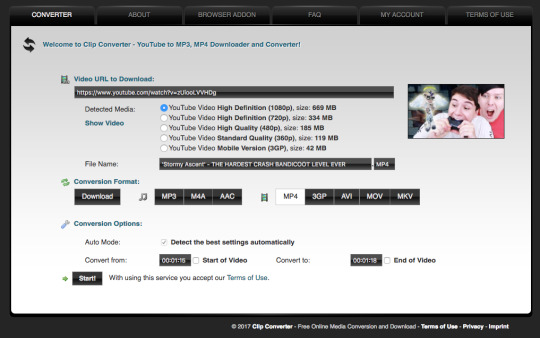
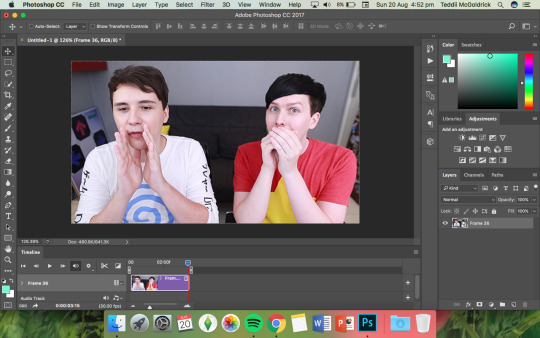
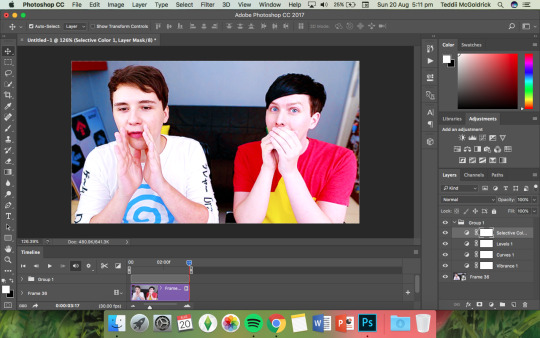
For this tutorial, I’ll be using a random clip from Dan & Phil’s crash bandicoot video. There are a lot of different methods to download a youtube video but I prefer using clipconverter. When downloading a video, you want to get the highest quality available (always try to get at least 720p). I used the download settings shown below:
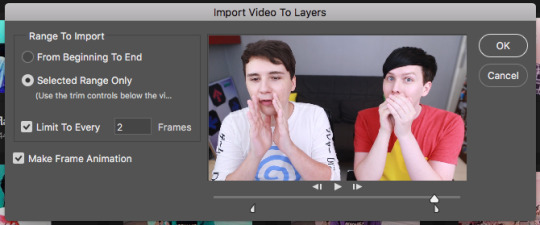
Once it’s downloaded, open up photoshop and import the video. To do this, go to File > Import > Video frames to layers. I use the settings shown below. (I had to trim the video slightly to only include the part I wanted)
Now that your video is imported, make sure your workspace looks similar to mine (the timeline section is the most important thing for gif making. you can add it from the window menu).

2. Timing, Resizing & Cropping.
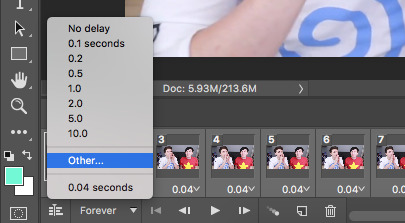
Timing is super important in making sure your gifs aren’t too fast or too slow. To alter the frame rate, select all your frames (shown at the bottom of your workspace) and then click on where it says 0.04 change the speed to 0.09.
After that, we have to change the image size since it’s currently way too big for tumblr. To do this, go to Image > Image size and change it to the settings shown below. 540px is the current optimised sizing for tumblr although 268px is used when making gifs that will be displayed in two columns like this.

Cropping is an optional step that I sometimes do as a way to make the file size smaller/for the aesthetic. Youtube videos have a default ratio of 16:9 and to alter the ratio you just use the crop tool and change it to what you desire. side note: I often use the cinematic ratio of 2.35:1 (i used it in this tutorial’s header).
3. Sharpening.
Sharpening your gifs is essential to making them look clean and crisp. Below is the difference between what our current gif looks like with and without it:
Without:
With:

As you can see, the second gif is way more crisp and defined. I use this action to sharpen my gifs (Full details on how to use it can be found in the link.) Once the action is finished, I then convert the frames into a video timeline by pressing the button in the bottom left:
I then select all the layers, right click, and convert to smart object. Now your workspace should look like this:
4. Colouring.
Colouring is by far my favourite part about gifmaking and the reason why I made this tute (questions about colour have always filled up my inbox so I hope this answers some of them). I’m going to show you how to make the same bright blue colouring that I used for the header!
I’d like to start by saying that I never took art or design classes so my knowledge on why adjustment layers do what they do is very minimal. I pretty much learnt how to colour by playing around in Photoshop so this is just a disclaimer about how there is probably an easier/proper/more informative way to do this.
I didn’t particularly know how to explain half the settings so some will be accompanied by screenshots while others will just have descriptions (I really hope it makes sense because heck, my colouring method is chaotic).
Firstly, we want to make a new group to put the adjustments in so to do this you go to Layers > New Group... and make sure the mode is set to pass through.
To create colourings, I use the following adjustments: - Vibrance - Curve - Levels - Brightness/Contrast - Selective Colour - Hue/Saturation - Colour Balance (occasionally)
Vibrance: I almost always make the vibrance +100 (I don’t alter saturation)
Curves: how you make a curve will differ with every video but for this gif I set my curves to this

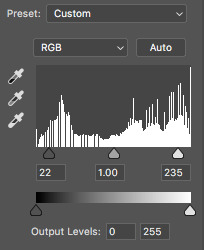
Levels: it does a similar job to curves tbh
Brightness/Contrast: I chose not to alter it for this tute.
Selective Colour: now this is where A LOT of adjustment is going to happen. I found this section the hardest to explain so I apologise in advance. I tend to heavily alter cyan and blue.
Since we have the ability to alter red, yellow, green, cyan, blue, magenta, white, neutral, and black, I’ll write the specific adjustments I used instead of adding a lot of pictures to this already massive post. But this is what selective colour looks like:
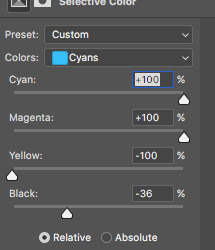
Reds: Cyan -34, Magenta +5, Yellow +8, Black - 7 Yellows: Cyan - 37, Magenta -31, Yellow +35, Black +14 Cyans: Cyan +100, Magenta +100, Yellow -100, Black -36 Blues: Cyan +100, Magenta -65, Yellow -100, Black -26
Now this is what it should look like after adding all those adjustments:
Yes, it is slightly blue but not THAT blue. We then have to add a second selective colour layer with these settings:
Cyans: Cyan +100, Magenta +15, Yellow -100, Black - 8 Blues: Cyan +100, Magenta -21, Yellow -100, Black +15 Blacks: Cyan 0, Magenta 0, Yellow 0, Black +20
(more selective colours will be added later because I’m extra)
Hue/Saturation: This a neat adjustment where you can turn one colour into a completely different colour. For this gif, I chose only to adjust the colour blue with these settings:
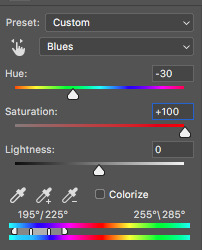
Now you’re probably confused at why it looks so noisy but don’t worry! We’re going to fix that (this is where it gets kinda tedious. Feel free not to use the hue/sat adjustment if you want to make your gifs quickly. I wanted to make this tutorial super in depth hence why it’s about to get problematic)
Selective Colour (Again): You now have to create a 3rd selective colour layer and place it under the hue/sat layer before using these settings:
Magentas: Cyan +100, Magenta -100, Yellow +100, Black +79 Cyans: Cyan +100, Magenta +100, Yellow +5, Black 0 Blues: Cyan +100, Magenta -16, Yellow +100, Black -47
Your gif should now look like this:

Some noise will still remain and we’re going to fix that by erasing some of the adjustment layers! You may notice that the far right behind Phil looks messy so, with the erasure tool, erase that area on the hue/sat layer.
There is also some noise/unwanted colour on the lounge and Phil’s hair so I did the following:
I erased the area of the lounge on selective colour 1, 3 and hue/sat and I erased Phil’s hair on selective colour 1,2,3 and hue/saturation.
Now your layers should look something like this:

And that’s it for the colouring! Erasing the messy bits isn’t always necessary although in this particular case I had to. Protip: If you don’t want to make a colouring from scratch you could always use a pre-made psd!
5. Subtitles.
This gif doesn’t require subtitles but for the purpose of this tutorial, I’ll teach you how to do them since they’re an essential aspect of gifmaking! Every gifmaker has an individual preference on how to make their subtitles so this will be just an insight on how I do mine.
To make subs, select the text tool and create a textbox in the bottom part of the gif. I use the font Calibri (download it here if you’re a mac user) in bold italic size 18pt. If text takes up two lines use the settings shown below:
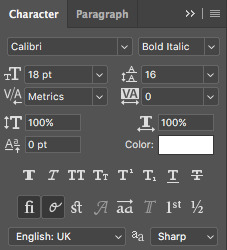
The main colour used for subtitles is pure white and the alternative/2nd speaker colour is yellow (I use the hex code #ffff00).
Now that we have the text you may notice how it doesn’t stand out. To fix this, right click on the text layer, select Blending options... and use these settings for stroke and drop shadow:


Now your gif should look like this:

You may notice that your text layer lasts longer in the video timeline than the actual frames. To fix this, make sure you drag the text layer to the start of the timeline and adjust the grey things above the text layer (I’m stumped at the proper word for them) so that the video ends at the last frame (shown below):
6. Saving your Gif.
Now that we are done with making a gif, it’s time to save!
To do so I use the shortcut command + option + shift + s (for mac) or you can go File > Export > Save for Web (Legacy) (for CC) or File > Save for Web (other versions)
My #1 tip for saving a gif is to make sure it’s under 3mb! Tumblr only supports gifs under 3mb so as long as it’s 2.999mb or less you’re fine. Fortunately, our gif ends up at 2.721mb but if you ever do go over, I suggest deleting a few frames or cropping it to a smaller ratio.
Copy my settings when saving:
And we’re done! You should now have a gif that looks like this:
Final Notes:
I hope this tutorial has made some kind of sense and helped you understand the basics of gifmaking and colouring. If you did find this useful and made some hella bright dnp gifs, feel free to tag me in them. I track #scifiphan and will be delighted to reblog them! If you have any questions feel free to send me an ask or a private message (I’ll always respond).
Please like/reblog this tutorial if you found this helpful!
#i actually really like this colouring heck#i created it as i was making it and now i wanna make gifs using this psd#i hope this makes sense#i suck sm at explaining things#this is super long#and the colouring part probs confuses u all#but enjoy#teddii's discourse#gif tutorial#phandom#gifmaking#photoshop#photoshop tutorials#chaoticresources#itsphotoshop#this took me ages to write rip#idk what else to tag it as#validate me lmao
381 notes
·
View notes
Text
Best Photo Collage Software For Mac

Photo Collage Maker Mac
Best Free Collage Photo Software For Mac
Best Photo Collage Websites
Photo Software For Mac
Photo Collage App Mac
Best Photo Collage For Mac
Best Free Picture Collage Software

Photo collages are a great way to show off and share a selection of images, so it's no surprise to find that collage makers are hugely popular creative tools right now. It's perfectly possible to use general design software, such as Adobe's Creative Cloud suite as a collage maker tool. Easy Way to Make a Photo Collage on Mac with Photo Collage Maker Mac. Launch photo collage maker Mac and choose a layout. Drag and Drop Photos from Computer or iPhoto directly. To add more photos, click “Add” or “Remove” button. Beautify photo collage as you like. Save photo collage as a image or print it directly or share with others.
Photo Collage for Mac is a Mac Photo Collage Maker software which helps you make customized greeting cards, scrapbooks, desktop wallpapers, CD Covers, calendars and comics from premade templates. • Simply drag and drop to make photo collage on Mac from templates; • Select from 200 + free occasional collage templates for wedding, baby, family, etc. For Mac users, you can use SnowFox Photo Collage Maker with features such as sharing photo collages on social media and tools for basic editing. Feel free to check more Photo Collage Software to have more downloadable tools to help you out.
If you wish to give the best gift to your family or best friend then photo collage would be a good choice for that. And creating collages is a fun; whether you make it digital or on paper frames or wooden frame. However, in this digital world, when everyone uses gadgets, digital photo collage will be a good option. There are various photo collage maker software available on the internet for creating collages. So, in this post we are going to share with you the 10 best photo collage maker software programs, you can choose any program as per your requirement to make the best collage.
Best Photo Collage Maker Software For Windows
1. Fotor for Windows
If you are looking for a free photo collage maker software then Fotor for Windows can be a good choice for you. It is a powerful freeware for making great collages. It allows you to add 30 images at once. It provides various editing tools like Exposure, Brightness, Contrast, Vibrance and Saturation. It also allows you to setup collage with up to eighty predefined frames to place images vertically, horizontally and free style, but you can set up to nine images in that frame. Fotor also provides various other features like zooming, cropping, undo/redo, rotate etc. It allows you to share your collage images on social media such as Facebook, WhatsApp, Twitter etc. It also provides various filters to apply on images. You can download its latest version from its official website.
Read Also:Best Duplicate Photo Finder And Cleaner Software
2. AmoyShare Photo Collage Maker
Photo Collage Maker Mac
AmoyShare Photo Collage maker is a good option for you as provides you with numerous options for making the photo collage. It’s easy to use interface makes it accessible for kids too. Choose from the collection of templates, and add frames, cliparts to make the collage more appealing. It includes pre-made templates for the scrapbook, invitations, greeting cards, and calendars to place pictures in a simple way. It is a multilingual software with English, German, French, Japanese, Chinese. Although you can show your creativity with tools such as masking or cropping the images. Another feature which is social sharing makes it handy. You can also print the final product to frame it.
3. Photo collage Maker Pro (AMS software)
Photo Collage Maker Pro by AMS software is available to design some amazing photo collages and scrapbooks. With 350+ design templates available with special themes like weddings, travel, holidays and seasons. You can create more than one photo collage at a time, as it supports multi page projects. To make it more email transfer friendly, get the image in an optimized JPEG format. Undo and Redo option available to make you reconsider your decisions. Select from 200 frames and original masks to use in your photo collage. You can also get the high-quality prints for your photo collage.
4. PhotoScape
PhotoScape is a famous image editor with a very efficient collage making feature. It’s combine feature allows you to merge photos into a bigger image. It allows you to put the images in vertical, horizontal formats. It is a free picture collage maker software which comes with various options. It runs smoothly on Windows and allows you to make various adjustments in images such as add balloons, bubbles, frames, brightness, contrast etc. Its Gif tool allows you to create an animated gif slideshow of your pictures. It allows you to convert RAW images to jpg format. It comes with various inbuilt features. You can download it from its official website.
5. CollageIt
CollageIt is a free photo collage maker software which comes with a simple user interface. It offers fifteen different templates to choose from. The number is less as compared to other picture collage maker software but it has various customization options. It allows you to resize images, crop images, increase/decrease width margins, shadow effects etc. It comes with free and pro versions. However, free version comes with limited functionality and leaves a watermark on collage. It allows you to share your collage on social media. It is very easy to install and you can download it from its official website.
6. Collagerator

Collagerator is a free photo collage maker software which has been made specifically for creating collages. Making collages using Collagerator is a simple task, you just need to choose images and put them into a predefined template. You can customize the collage as per your need. You can save your created collage in various formats. It also gives you various printing options like postcard size, greeting card etc. The user interface of the program is very simple. You can download it from its official website.
Best Free Collage Photo Software For Mac
Read Also:Best Photo Recovery Software For Windows 10, 8, 7
Best Photo Collage Websites
7. Picture Collage Maker
Picture Collage Maker software is a simple photo collage maker program for creating photo collages. It allows you to create digital scrapbooks, posters, calendars, greeting cards etc. You can share the collages that you create, with your family and friends. It offers 150 different templates to choose from. It provides various effects like clipart, mask, frames etc. You can save the collages in various formats. The free version of the program comes with 15 days trial version. It allows you to share your collage via e-mail. You can download latest version of the program from its official website.
8. My Memories Suite
MyMemories Suite is a very famous photo collage maker program which is also well known for scrapbook. It comes with an intuitive user interface which is very easy to use. It offers various predefined templates with various customization tools. Customization tool allows you to set any dimension you wish. It allows you to export your created collage in various formats such as a JPEG, PNG or PDF file. It allows you to share your collage on social media. You can download it from its official website.
9. Foto Fusion
Photo Software For Mac
FotoFusion is a photo collage creating program developed by LumaPix. It offers various predefined templates with embellishments tools. It allows you to save your created collage in various formats. It might be one of the best picture collage maker program, if it has very large number of predefined templates options. It allows you to share your collage on social media. You can download latest version of the program from its official website.
Photo Collage App Mac
Read Also:Best Free Photo Organizing Software For Windows 10, 8, 7
10. MemoryMixer 4
MemoryMixer is a simple photo collage maker program which allows you to make more than 50 images collage in a very less time. It has an auto collage feature which makes it extraordinary. You can save your created collages in jpg format. You can download latest version of the program from its official website.
Best Photo Collage For Mac
11. SnowFox Photo Collage Maker
SnowFox is an easy to use photo collage maker program which allows you to create collages and digital scrapbook. It provides various types of styles to make collages such as posters, wallpaper, greeting card, wedding invitation and much more. It provides editing features like add caption, background change, rotate etc. It allows you to share your collage on social media. You can download latest version of the program from its official website.
12. PhotoMix
Best Free Picture Collage Software
PhotoMix is a photo collage maker program which comes with blank canvas. It comes with very simple user interface which is very easy to use. It offers various predefined templates, you just need to drag down the images in template to make collage. It allows you to export your created collage in various formats such as a JPEG, PNG or PDF file. It allows you to share your collage on social media. You can download it from its official website.
That’s all! These were our top 10 pics for the best picture collage maker software. We hope you will like this post. If you have any comment or suggestion you can write them in comment section provided below.
0 notes