#kanditutorial
Explore tagged Tumblr posts
Visit Tumblr Blog
Explore Tumblr blogs with no restrictions, modern design and the best experience.
Last Seen Tumblr Blogs


Fun Fact
Tumblr was the first site to host the blog for President Barack Obama in 2011.
Text
ੈ✩‧₊˚ੈ✩‧₊˚ੈ✩‧₊˚ੈ✩‧₊˚ੈ✩‧₊˚ੈ✩‧₊˚ੈ✩‧₊˚ੈ✩‧₊˚
TUTORIAL ☆ peyote stitch cuff!
this is easily the simplest cuff i know how to do, and it's my favourite! while it's easy, this tends to use more than 80 beads, so make sure you have enough.
MATERIALS
☆ elastic string, one arms length ☆ 45 beads of one colour (I used pink) ☆ 45 beads of one colour (I used purple) ☆ scissors
DIFFICULTY ☆ it's very easy
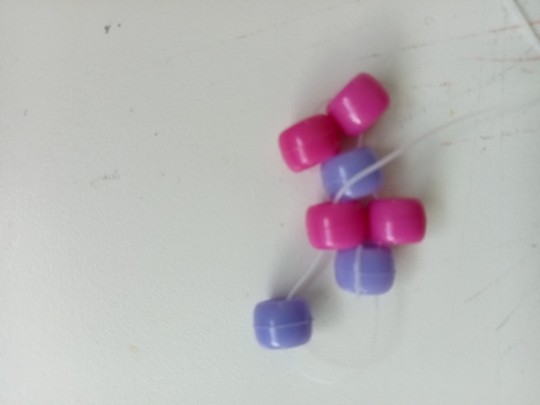
STEP ONE

string an even amount of beads onto some elastic string. i'm using pink and purple!
STEP TWO

string one bead of the colour you just put on. then, loop the string through the purple bead.
STEP THREE

repeat with another pink bead and pull tight. If it's not perfect, don't worry! there will be plenty of time to make it tight again.
STEP FOUR
take a purple bead and loop the string through the pink bead. repeat with another purple bead. repeat this process until the cuff fits comfortably on your wrist, you shouldn't have to pull it for it to fit.

here it is with ten rows, don't forget to pull it tight after every row!

and again with 30 rows! remember that the two ends should fit like a puzzle piece when you are ready to finish off.
STEP FIVE
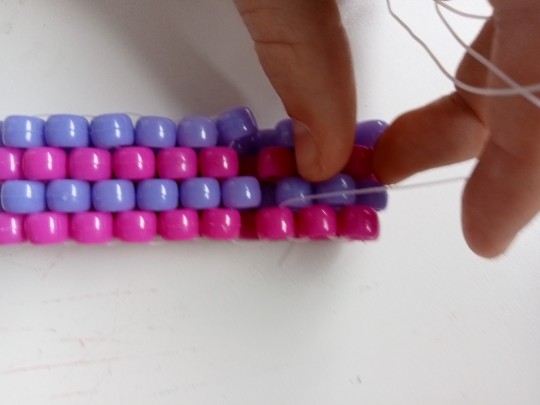
take the string and loop it through the pink bead on the other end of the cuff. Repeat with the purple bead.

do this until it's one, long string of beads. i've tried to draw what it should look like, the string should zig-zag through the beads. pull tight and tie off!
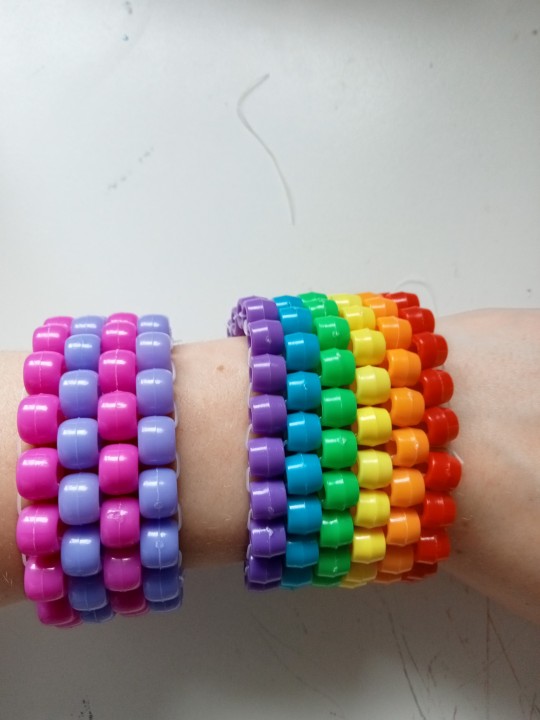
and done! here's a rainbow one made with the same method, but with 6 rows instead of 4. you can add as many rows as you want, so long as it's an even number.
NOTE: the 45 bead estimate might be too many or not enough for you. i actually need 38, but i have a slim wrist. just make it to however long you need it to be :)
hope this was helpful! if you need any help or clarification, i'd be more than happy to help!
don't forget to stay hydrated and have a good day!
ੈ✩‧₊˚ੈ✩‧₊˚ੈ✩‧₊˚ੈ✩‧₊˚ੈ✩‧₊˚ੈ✩‧₊˚ੈ✩‧₊˚ੈ✩‧₊˚
#kandi#kandikid#kanditutorial#peyotestitch#first post#hey i really hope this helps#stay hydrated u dumb fuck
33 notes
·
View notes
Photo

Need a little pop of color in your life? Try out my 3D star #kanditutorial uploaded yesterday. - 💝Kandi Guru - Raver - Vlogger💝 www.youtube.com/gingercande - 10% off your order at #iheartraves, #emazinglights & #GloFX use code GingerCandE https://www.instagram.com/p/CE4r8NEA_Qy/?igshid=10gomy0xjhpv0
3 notes
·
View notes
Text

So I think I figured out a new way to make a kandi choker without anything but string and beads. Also doesn't need extra thick string to handle the stretch. You need: - 2 pieces of cord, just make them long you can always trim them later. I'm using a rainbow that I use for most of my kandi. - Measure your neck size. it is adjustable to a certain extent but more coverage is better. For my beads every three beads on the straight part was about .75 of an inch. I used twenty sets of three plus one extra on the end. - Beads! Get cool ones! I'm using clear, pastels, and glow in the dark for the very center piece Step by step: 1. count out your beads, lay them in the pattern you want color wise so they're easy to grab 2. Put all the beads straight on the first string. 3. Put 3 extra on the very end (labeled y above). 4. Take the cord and loop it back through that last bead you put on besides the 3. Make it only go through this bead and pop out 5. String 3 beads. These are going to be side of the x, middle of the x, side of the x 6. Skip 2 beads and put it through the 3rd one. Only put it through the third one and have it pop back out. In the attached picture note I've put a pastel instead of a clear each time you have to do that. 7. Repeat the above 2 steps until you get back to where you started. 8. Tighten! Make sure you tighten it enough that the beads start to form the Xs. I had to wiggle both strings independently and push the beads into position to get this to work 9. Once it's tight enough, wrap both loose ends of the beads through that last one to prevent it sliding. 10. Get your second piece of string. Repeat step 2 through 4 above on this string 11. Now instead of stringing 3 beads, put one, run it through the middle bead of your already built half, and then put on a second. 12. Run it back through, every third bead just like before. Just attach the sides together. 13. Get to the end, tighten. Try to make sure everything is flat and straight and properly x light. Do the same thing where you loop the cord through the final bead and tie to make it tight. 14. Hold the almost finished choker up to your neck. Find out how big the gap is between the ends. I used fingers to measure. 15. Tie a square knot so a loop forms that's a little less then the gap. Repeat for both strings You're done! To wear put around your neck, and put that loop your tied over the 3 end beads. X meeting Y. I normally do this in the front and then spin it around to hide it. Hope this was clear enough. There are for sure other ways to do this but I figured this one out and it's not that hard. Have fun and good luck!
3 notes
·
View notes
Photo

Tomorrow at 8am the revised shape cuff tutorial will be live. 💖 - 💝Kandi Guru - Raver - Vlogger💝 www.youtube.com/gingercande - 10% off your order at #iheartraves, #emazinglights & #GloFX use code GingerCandE - #kandi #shapecuff #kandicuff #peyotecuff #peyote #trianglecuff #starcuff #kandikid #starcuff #ponybeads #craft #kandifam #plur #edm #plurlife #kanditutorial https://www.instagram.com/p/B_vHY89gO8S/?igshid=blk4so6kki55
#iheartraves#emazinglights#glofx#kandi#shapecuff#kandicuff#peyotecuff#peyote#trianglecuff#starcuff#kandikid#ponybeads#craft#kandifam#plur#edm#plurlife#kanditutorial
8 notes
·
View notes
Photo

New #3dkandi tutorial coming this month. Stay tuned. 💚 I am posting every Monday. 😊 - 💝Kandi Guru - Raver - Vlogger💝 www.youtube.com/gingercande - 10% off your order at #iheartraves, #emazinglights & #GloFX use code GingerCandE - #kandi #kandikids #kandifam #3dcuff #xbase #xbasecuff #kandicuff #kanditutorial https://www.instagram.com/p/B_DsHx8A36N/?igshid=n5luidk56rp0
#3dkandi#iheartraves#emazinglights#glofx#kandi#kandikids#kandifam#3dcuff#xbase#xbasecuff#kandicuff#kanditutorial
5 notes
·
View notes
Photo
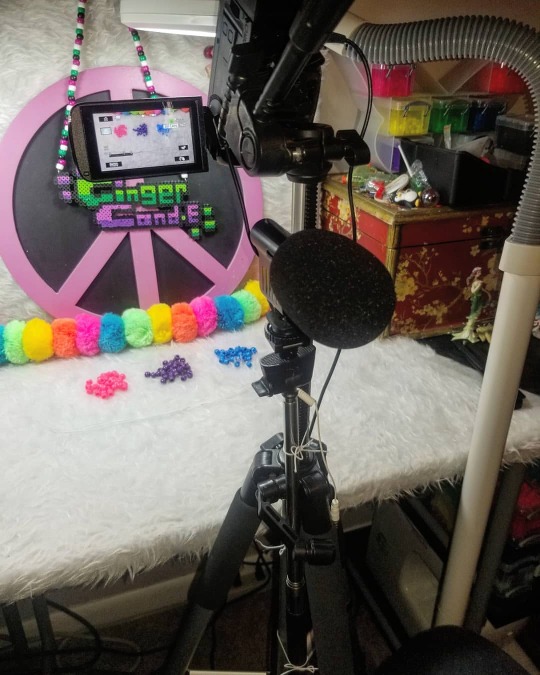
In case you had any doubts about how much of a professional I am. Yes, that is my microphone attached to a selfie stick and tied to my tripod with elastic cord. No, I am not going to fix it. 😂😂😂 - #makeitwork #dontjudgeme #crafty #camerasetup #diystudio #kandi #kanditutorial #kandikid https://www.instagram.com/p/B-CjZbHg6zZ/?igshid=1yvjvdadthq0
3 notes
·
View notes
Photo

New video is up! How to make a bar cuff. ❤ - 💝Kandi Guru - Raver - Vlogger💝 www.youtube.com/gingercande - 10% off your order at #iheartraves, #emazinglights & #GloFX use code GingerCandE - #kandi #kanditutorial #kandikid #kandicuff #barcuff #kandifam #kandibracelet #ponybeads https://www.instagram.com/p/B-nXWdcAPiO/?igshid=10nzwmpwmr8kx
#iheartraves#emazinglights#glofx#kandi#kanditutorial#kandikid#kandicuff#barcuff#kandifam#kandibracelet#ponybeads
2 notes
·
View notes
Photo

New video uploaded! ❤ How to make a 3D kandi cube & cube cuff. - 💝Kandi Guru - Raver - Vlogger💝 www.youtube.com/gingercande - 10% off your order at #iheartraves, #emazinglights & #GloFX use code GingerCandE - #kandi #kanditutorial #3DCube #3dkandi #CubeCuff #KandiCuff #kandikid #raver #edm #ravefam https://www.instagram.com/p/B-PgMcyAb5x/?igshid=2xnro6tydl75
#iheartraves#emazinglights#glofx#kandi#kanditutorial#3dcube#3dkandi#cubecuff#kandicuff#kandikid#raver#edm#ravefam
2 notes
·
View notes
Photo

Another video ready for export. I am working on May's videos. I have one video planned for the first Monday of each month for the rest of the year! Provided I have more time I will be releasing bonus videos. April and May will have a new video every Monday! 🥰 - 💝Kandi Guru - Raver - Vlogger💝 - www.youtube.com/gingercande - 10% off your order at #iheartraves, #emazinglights & #GloFX use code GingerCandE - #kandi #kandikid #kanditutorial #kandifam #shapecuff #peyotecuff #KandiCuff https://www.instagram.com/p/B-xmqlpgGNT/?igshid=16lro06yi4dfd
#iheartraves#emazinglights#glofx#kandi#kandikid#kanditutorial#kandifam#shapecuff#peyotecuff#kandicuff
1 note
·
View note
Text
No need to thank me, darling! Your tutorials are amazing and totally deserve more recognition! Stay safe, sweetheart!🌸🍓🌈✨🍄
ੈ✩‧₊˚ੈ✩‧₊˚ੈ✩‧₊˚ੈ✩‧₊˚ੈ✩‧₊˚ੈ✩‧₊˚ੈ✩‧₊˚ੈ✩‧₊˚
TUTORIAL ☆ kandi stars!
hi! today i'm going to show you how to make kandi stars! they are very easy and fun, and they look great when done! they make really good charms, or work on their own.
MATERIALS
☆ 10 beads for the center ☆ 15 beads for the points
DIFFICULTY ☆ very easy
STEP ONE
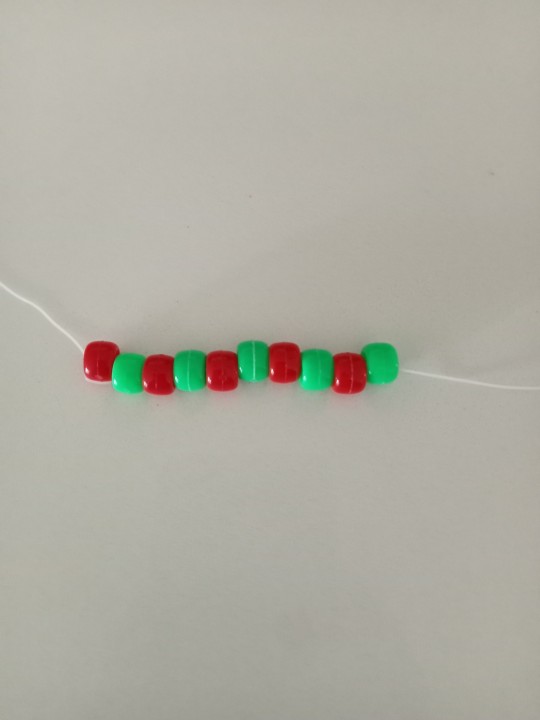
string on 10 beads. it always needs to be 10 for this method, but you can use any colours you like.
STEP TWO

loop into a circle, then tie off but don't cut the string, you need it for the next bit. also, it helps map out where to put the next few beads if you pop up every second bead. make sure that the string is coming out of a popped up bead.
STEP THREE
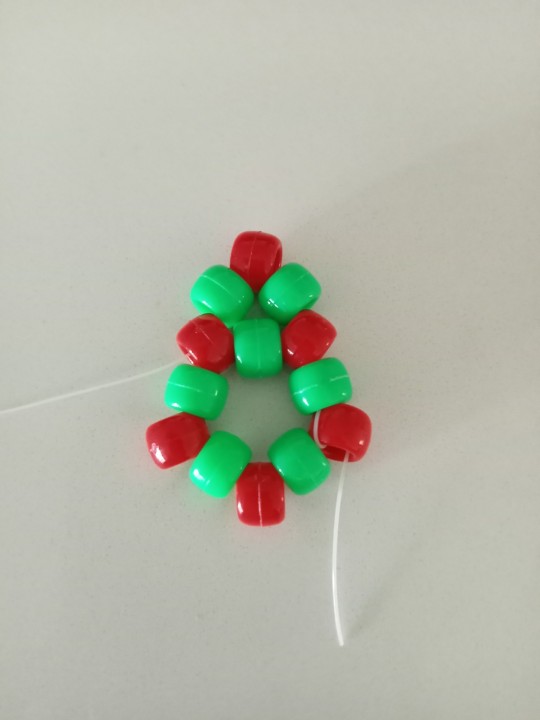
string on three beads of any colour and pull the string through the next popped up bead, or one bead over. pull tight and repeat with the rest of the loop.
STEP FOUR

once you've put on the rest of the beads, pull tight and tie off. congratulations! your kandi star is done!
i hope this was helpful, if you have any questions or need clarification on anything, please let me know!
also, i wanted to say thank you to anyone who liked or reposted my posts, and to @shineyfish and @kuyrkrzak following me! it really means a lot, you guys are amazing!
don't forget to stay hydrated and have a great day!
ੈ✩‧₊˚ੈ✩‧₊˚ੈ✩‧₊˚ੈ✩‧₊˚ੈ✩‧₊˚ੈ✩‧₊˚ੈ✩‧₊˚ੈ✩‧₊˚
108 notes
·
View notes