#maybe some freemode activities?
Explore tagged Tumblr posts
Visit Tumblr Blog
Explore Tumblr blogs with no restrictions, modern design and the best experience.
Last Seen Tumblr Blogs


Fun Fact
In 2020, 44% of users from Denmark used Tumblr daily.
Text
the cluckin' bell farm raid was actually such a fun little heist and vincent was SO fun 🥺
#gta#gtao#gta online#if there's dripfeed content i really hope we get some more clothes or something#maybe some freemode activities?#anyway I liked this update!
3 notes
·
View notes
Text
The Tribit Stormbox Pro Speaker Brings the Thunder to Your Portable Party
Tribit StormBox Pro
9.00 / 10
Read Reviews
Read More Reviews
Read More Reviews
Read More Reviews
Read More Reviews
Read More Reviews
Read More Reviews
Read More Reviews
Read More Reviews
Read More Reviews
Read More Reviews


See on amazon
The Tribit Stormbox Pro speaker offers everything you need from a portable soundbox, from water resistance, through to long battery life and, of course, big sound (which can be made even bigger with the bass boost function). At such a comparatively low price point, the Stormbox Pro should be in everyone's party bag.
Key Features
Stereo Mode
Battery Life
Water Resistant
Portable
Bass Boost
Specifications
Brand: Tribit
Connectivity: Bluetooth 5.0
Battery: ~24 hours
Water Resistance: IP67
Pros
Stereo mode is great
24-hour battery life
Bass boost feature is excellent
Easily portable even packing two speakers
Can reverse charge other devices via USB Type-A output
Cons
On occasion stereo mode can drop out briefly
Buy This Product
Tribit StormBox Pro amazon
Shop
// Bottom var galleryThumbs1 = new Swiper('.gallery-thumbs-1', { spaceBetween: 10, slidesPerView: 10, freeMode: true, watchSlidesVisibility: true, watchSlidesProgress: true, centerInsufficientSlides: true, allowTouchMove: false, preventClicks: false, breakpoints: { 1024: { slidesPerView: 6, } }, }); // Top var galleryTop1 = new Swiper('.gallery-top-1', { spaceBetween: 10, allowTouchMove: false, loop: true, preventClicks: false, breakpoints: { 1024: { allowTouchMove: true, } }, navigation: { nextEl: '.swiper-button-next', prevEl: '.swiper-button-prev', }, thumbs: { swiper: galleryThumbs1 } });
Let's be honest, Bluetooth speakers are ten-a-penny. But excellent quality Bluetooth speakers, with a low price tag and a big battery life, are harder to come by.
Fortunately, Tribit is on hand with the latest portable Bluetooth speaker to add to its Stormbox family; the Stormbox Pro. As I already own a Tribit Stormbox, I was excited to give the Pro version a try, and it hasn't disappointed me.
So, what makes the Tribit Stormbox Pro such an impressive device? Let's take a look.
A Familiar Form
In terms of form factor, the Tribit Stormbox Pro doesn't look drastically different from a lot of other portable Bluetooth speakers available on the market today.
First off, it is predominantly black, so not a great deal to report color-wise. Tribit crafts the chassis from rubber at the top and bottom, with the top of the speaker housing the controls in contrasting white and the bottom a non-slip grip.
A convenient carry handle made from a sturdy, thick, rubber strap also sits up top, fastened to the sides of the speaker. This allows the handle to pivot so you know you won't damage it just by carrying it.
The main body of the device features a familiar black mesh fabric wraparound, which hides the 360 degree speaker array beneath.
The front features the Tribit logo, and around the back we have the Type-C charging input and a handy Type-A charging output, meaning you can actually charge devices from the speaker, in a pinch. These are both covered by a rubber cap, which seals them off from moisture.
In terms of footprint, the base is only 3.7 inches square. The height of the speaker peaks at a lofty seven inches. It only tips the scales at 980 grams (34 oz), so it won't break your back carrying one or two of these to the beach with you.
And that is it! A nice, straightforward device, aesthetically.
Super-Simple Operation
To operate the speaker, Tribit has followed a similarly simple path to that of the Stormbox Pro's appearance. There is really nothing difficult here, nor is there anything that doesn't work properly.
As mentioned, the controls are up top. In the center of the upper face, you have a multi-function button (MFB). You can use this to control functions in the Stormbox's Music Mode and also in Conversation Mode.
In Music Mode, a quick press of the button will control play and pause. Double pressing skips the track forward, while a triple press skips back a track. Pressing and holding the MFB for one second will launch the voice assistant on your phone or connected playback device (if it has one).
Related: Gravastar Mars Is a Portable Speaker From Our Apocalyptic Future
In Conversation Mode (i.e. when you are taking a call from your phone via the speaker), you can control the call. So a short press will answer or hang up a call. Press and hold for one second and you can reject the call. Then, while a call is underway, a short press will answer a second call, with another short press allowing you to switch conversations.
To either side of the MFB is a plus and minus symbol. These allow you to increase or reduce the volume of the Stormbox Pro (which is independent of your phone's volume unless you mute the sound from your handset).
Below, you have three buttons. To the left is the Bluetooth pairing button with a blue backlight. This is also used to put two Stormbox Pro speakers into stereo mode or, as Tribit calls it, "Party Mode", by pressing and holding for five seconds. This means you can listen to music in stereo. We'll come to that when we discuss the device's performance.
The center of the three buttons is the power button, which is obviously to switch the Stormbox on and off. To the right, you have the button to toggle the X-Bass mode, which is also present on Tribit's other portable speakers and is designed to boost bass frequencies.
Again, very simple in terms of operation. This makes the Tribit Stormbox Pro an excellent first portable Bluetooth speaker; it is simple to operate with no dedicated app getting in the way and complicating matters.
So, How Well Do the Stormbox Speakers Work?
Looking familiar and operating simply are two things, but does the Stormbox Pro deliver in terms of sound and functionality? I'm pleased to report it does. In fact, it exceeds expectations for what most people would refer to as a budget option.
It may not break the bank, but turn the Stormbox Pro up loud enough and you may well break a few windows. Just one of these little monsters can pump out up to 40 W of sound, which is plenty loud.
I could hear the music I was playing perfectly during a recent day spent at my local park, which is always busy with people and families, so is generally quite noisy. Even at 40-50% volume, the Stormbox Pro coped well with loud conversation close to me and shouting children not much further away.
Said park trip lasted for around six hours and the battery hardly wavered. During testing, I have only had to charge the Stormbox Pro once, after multiple extended uses and with X-Bass active. Therefore, the 24-hour battery claim rings true.
Stereo mode works pretty well, although the Stormbox can occasionally drop in and out of stereo mode. Unfortunately, there is no way of knowing why this has happened, as multiple factors may cause it.
Maybe other devices are interfering with the stereo connection. It is a Bluetooth stereo connection after all, so is subject to interference in a way that a wired stereo connection wouldn't be.
To be honest, the dropping in and out was infrequent, and I only noticed it happen a handful of times (three-four) during testing over several weeks and under different conditions. Any dropout is brief, so isn't a major issue. Pairing two of the devices for stereo mode is incredibly easy and presents no issues.
In terms of range, the Bluetooth extends for miles. Well, perhaps not miles, but you get 100 feet out of the range providing that is a clear run. This reduces slightly if the Bluetooth signal needs to pass through walls or people.
As for the water resistance, IP67 works perfectly. I left both Stormbox Pro speakers outside for several days and through several weather conditions, and neither showed any signs of deterioration. This included two days of fairly consistent drizzle (the UK's default weather) and there was no sign of water damage.
With that in mind, the Stormbox Pro is perfect for both indoor and outdoor use. You can even take them in the shower with you, if you really must!
Bringing the Thunder With the Stormbox Pro's Sound
In terms of sound quality, the Stormbox Pro performs well. Bass is obviously the focus, given that the unit houses a 25 Watt, 3.5 inch neodymium bass driver and two 7.5 Watt passive radiators. Two transducers take care of the mids and trebles.
In this case, the bass is clear and heavy. Even more so when you activate the X-Bass feature. There is no muddiness to speak of, so a very pleasant dub soundtrack accompanied my trip to the park, as deep bass reverberated around my ankles in stereo.
The mids and trebles are also very present and, despite the bass focus, bottom-end sounds don't overpower the mids and top end, so there is no sound congestion. Both are crisp and bright, with the treble free of those harsh, sibilant tones that can make listening to other lower-quality speakers an unpleasant listen.
In all, the Stormbox Pro provides a well-rounded sonic experience, particularly for a portable Bluetooth device in this price range. With a bass-oriented signature, this is a perfect portable party speaker, particularly in stereo mode.
Take the Party Everywhere, With Tribit's Stormbox Pro
So, there we have it. The Tribit Stormbox Pro is a refreshingly simple device. Despite this, it knocks spots off some of its similarly priced competition, with stereo mode and that tremendous 24-hour battery life being real boons for portable party-goers.
In the Stormbox's price range, you'd be hard-pushed to find a device that has this kind of stamina, can pair up for stereo mode, has an IP67 rating, and can function as a power bank. All while sounding great. If you're in the market for an inexpensive, portable, Bluetooth speaker, then the Tribit Stormbox Pro should be at the top of your list.
The Tribit Stormbox Pro Speaker Brings the Thunder to Your Portable Party published first on http://droneseco.tumblr.com/
0 notes
Text
Asustor LockerStor 2 NAS Review: Blazingly Fast Networking, Let Down By Poor Software
Asustor AS6602T LockerStor 2
8.00 / 10
Read Reviews
Read More Reviews
Read More Reviews
Read More Reviews
Read More Reviews
Read More Reviews
Read More Reviews
Read More Reviews
Read More Reviews
Read More Reviews
Read More Reviews
Read More Reviews


See on amazon
For sheer networking performance, the LockerStor 2 AS6602T is a top choice that won't break the budget. You will need to pair it with a 2.5GbE capable switch (like this QNAP 5-port switch), but those are more affordable than ever, and your existing cabling should work. If you find yourself struggling with large file transfers for video editing tasks and such, look no further.
Specifications
Brand: Asustor
CPU: Intel Celeron J4125 2GHz
Memory: 4GB, user upgradeable to 8GB
Drive Bays: Two
Expansion: No
Ports: 3 x USB3.0, HDMI out, 2 x 2.5Gb Ethernet
Caching: Dual NVMe slots
OS: Asustor Disk Manager
Pros
Dual 2.5Gb Ethernet connectivity
Option to use NVMe drives as a storage volume or cache
HDMI output useful for device management in-situ
Cons
The HDMI output is not suitable for media playback
Inconsistent interface and frequent bugs
Buy This Product
Asustor AS6602T LockerStor 2 amazon
Shop
// Bottom var galleryThumbs1 = new Swiper('.gallery-thumbs-1', { spaceBetween: 10, slidesPerView: 10, freeMode: true, watchSlidesVisibility: true, watchSlidesProgress: true, centerInsufficientSlides: true, allowTouchMove: false, preventClicks: false, breakpoints: { 1024: { slidesPerView: 6, } }, }); // Top var galleryTop1 = new Swiper('.gallery-top-1', { spaceBetween: 10, allowTouchMove: false, loop: true, preventClicks: false, breakpoints: { 1024: { allowTouchMove: true, } }, navigation: { nextEl: '.swiper-button-next', prevEl: '.swiper-button-prev', }, thumbs: { swiper: galleryThumbs1 } });
Looking for some blazingly fast network-attached storage? The LockerStor 2 from Asustor offers incredible performance and unique features at a great price. Retailing at $400 without drives, is this the high-performance NAS you've been waiting for? Maybe, but only if you know what you're doing.
youtube
Hardware and Specs
The LockerStor 2 comes in two and four-bay models; we've reviewed the two-bay device. Internally the specs are the same, though there are a few external differences.
The LockerStor 2 looks unremarkable externally, featuring an office-like matt black plastic front and dark grey metal enclosure. Included in the box are two Cat5E network cables, mounting screws, and the power brick.
On the front, you'll find status lights for each drive bay, power, and network activity. The curious little black nub in the top right is an infra-red receiver for the optional remote control. Why does it have a remote control? We'll get to that later.
There's also a USB3.0 port in the bottom left, the frame of which is actually a one-touch backup button. Once configured, you can simply insert a USB drive, tap the button, and have the contents slurped up to your choice of archive folder. It's an incredibly useful feature that means you'll likely want to keep the LockerStor 2 on your desktop rather than hidden away.
Around the rear, you'll find the headline feature of dual 2.5 Gigabit Ethernet ports, two more USB 3.0 ports, and most curiously... a full-size HDMI port. That's right, you can hook up a monitor or TV to the LockerStor 2. That's also where the optional remote control comes in. We'll discuss the HDMI later in the section titled "Asustor Portal".
A single 70mm fan provides cooling, and in my experience, it ran silently—you're more likely to notice the noise of the hard drives clicking away.
Internally, the AS6602T is powered by an Intel Celeron J4125 Quad Core CPU running 2Ghz with a burst mode 2.7Ghz, backed up by 4GB DDR4-2400 RAM which is user-upgradeable to 8GB total.
There are also dual M.2 2280 NVMe SSD slots, though installation of these drives requires removing the whole case and unscrewing the NVMe tray.
The two drive trays are easy to remove, though not toolless. Everything you need to install drives is supplied in the box, and it's not something you'll need to do often. So what drives should you buy?
Choosing The Right Hard Drives
Network Attached Storage devices are not the same as small desktop computers: they're designed to run all the time. While they're much more efficient with their power requirements, the constant disk operations do take a toll on the hard drives, which spin every hour of every day.
Believe it or not, hard drives are not all the same, and I'm not talking about 5400 vs 7200 RPM speeds. You'll find different "classes" of hard drives depending on their intended purpose, according to how much workload they can handle, and the expected lifetime of the drive.
For my first NAS, I admit that I filled all four bays with an assorted collection of mismatched disks I had recovered from junk. Predictably, they all died within a few years, but I was able to replace them in a timely fashion without losing data in the process. You might not be so lucky, so if you can afford to, it's important to choose drives that are NAS-rated.
Seagate IronWolf drives are my go-to choice. IronWolf drives are rated to 180TB/year; the Pro line increases that to 300TB/year. Since I started using IronWolf drives, I haven't had one fail on me yet. That's probably because the average time between failures is 1,000,000 hours—or about 16 years!
Whichever type of drive you choose, a good tip is to either stagger your purchase or buy from a different retailer, to avoid getting all your drives from the same manufacturing batch. While extremely rare, if there happens to be a bad batch, you want to avoid all your drives failing at once.
The AS6602T is a two-bay device, though a four-bay model is also available. For data security, you'll need to use a RAID1 configuration, whereby one drive is essentially a duplicate of the other. In a four-bay device, you can opt to use RAID5, in which only a single drive out of four is dedicated as a spare, therefore, you use the drives more efficiently. You should also purchase drives of the same size for the LockerStor 2, regardless of which model you buy. You'll be unable to make use of the additional space from a larger disk until drives have been upgraded.
You also have the option of using RAID0 (striping the data across multiple drives for speed, with the total capacity being the combined capacity of two identical drives); or JBOD ("just a bunch of disks", combined into one volume). Your file system can be either EXT4 or BTRFS. BTRFS is newer, and supports snapshots, as well as allowing for intra-volume instantaneous file operations. In a RAID1 system, BTRFS can also protect against "bitrot", where data can become corrupted over time.
Installation and Setup
Managing your LockerStor 2 is all done using Asustor's custom operating system, called Asustor Disk Manager (ADM).
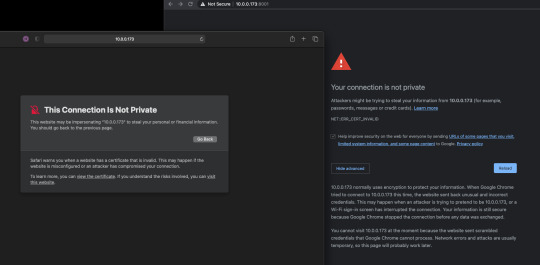
Installation was not as smooth as I would have liked. The helper utility (a generically named app "Control Center") successfully found the LockerStor2 on the network, but defaulted to loading the admin interface over a secure connection, which results in a security error for invalid certificates.
I had to bypass the error in Chrome by typing "thisisunsafe", and later enabled insecure connections.
Once I was into the setup interface, things began to run much more smoothly. It was easy enough to walk through the wizards to create a user account, configure the storage volume, etc.

Then you're thrown into the full Lockerstor ADM full interface and things are a lot less intuitive.
The main desktop view looks simple enough, but it wasn't immediately clear to me that new shared folders should be set up under the icon labeled "Access Control", rather than say a file manager app or control panel. After all "Access Control" implies some sort of user management.

The system-wide search feature isn't great either: searching for "Sync" doesn't find the "DataSync Center" app, while "DLNA" doesn't find the "miniDLNA" server app.

Part of the problem is that I'm so used to other systems, so it's a bit like throwing a Mac user into Windows for the first time. But even so, these simple tasks should be intuitive enough that it doesn't matter what system you're used to.
I'm accustomed to using link-local addressing (otherwise known as zeroconf) for other NAS devices. This means you can give a friendly name to your device, to access it without typing in the IP address (such as mynas.local). In the current ADM OS this can only be enabled alongside Apple File Protocol, which even Apple no longer recommends using. And even with AFP enabled, the zeroconf naming only works for network shares, and doesn't create a DNS entry on your router for admin access. This means you need to type the full IP address of your system each time to access the control panel. On the four-bay AS6604T model this is less of an issue, since the IP address can be displayed on a front LCD screen. But on the two-bay model, this is awkward for typical home users, and really shouldn't be needed.
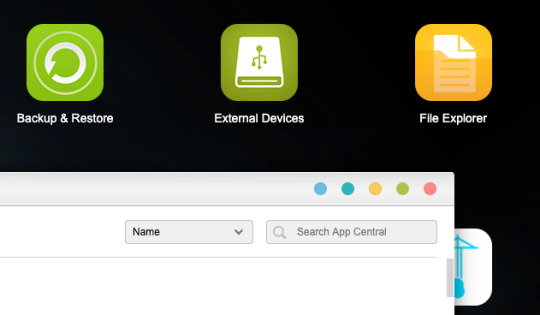
App Central is where you'll find hundreds of server components, including things like Plex. There's plenty for everyone here, and if you don't find what you want, you can always use Docker. Much of the software available in the Asustor App Central is, in fact, a Docker install script, which you'll find listed among your other images if you open up Portainer. The benefit of doing things this way is that server components tend to get updated more quickly.
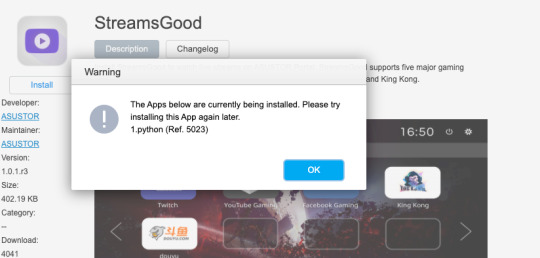
One problem I ran into frequently while installing apps was the apparent inability to queue an install. If one app has the same pre-requisite packages as another, you need to wait for the first install to finish before doing the second.
Another example: installing the DLNA media servers defaulted to using the LAN2 interface, because that's what was plugged in at the time of install. When I moved the NAS and ended up using the other Ethernet port, the DLNA server just stopped working. I had to delve into the server options and switch that over to "auto", which really ought to be the default. Restricting your media server to a single interface only is just not the standard use case.
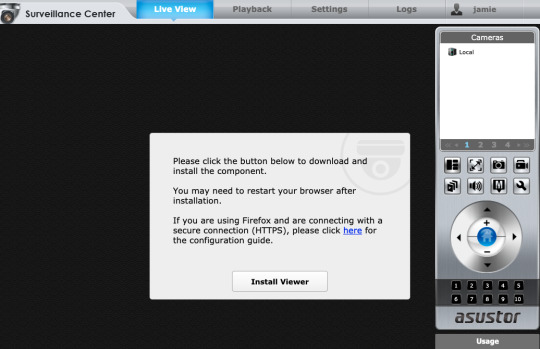
Lastly, those of you hoping to use the LockerStor 2 as a DIY CCTV system will be pleased to know that the Surveillance Center app includes a generous four camera licenses, which should be enough for most home users. Unfortunately, if you're running Mac OS Big Sur, as I am, you're out of luck. The management interface requires the installation of a driver, which doesn't work on Chrome, and isn't currently compatible with Big Sur at all.
In the grand scheme of things, these are all individually very minor issues. But combined, they indicate of real-world user testing and consequently a frustrating experience for those new to the system.
That said, the LockerStor 2 is an absolute beast when it comes to performance.
Performance Testing
Asustor claims up to 588MB/s Read and 583MB/s write speeds are possible on the AS6602T, but those figures should be taken with a bucket of salt. While those sorts of speeds may be possible in ideal lab conditions, utilizing both 2.5GbE ports in a link aggregated manner to a suitably equipped network switch and client, you're unlikely to ever achieve near those sorts of speeds at home.
For a more realistic performance test, I transferred a single large file in a variety of configurations, against a baseline of a similarly specced NAS that's equipped with only a Gigabit Ethernet connection. All volumes were created as BTRFS, and I measured the time it took to copy a 5.84GB file.
For testing purposes, we're using an Asustor 2.5GbE to USB-C adaptor on a MacBook Pro running Big Sur, and going via a QNAP 5-port 2.5GbE switch with the Cat5E cabling supplied with the NAS. This switch doesn't support link aggregation (and even if it did, we'd still only have the single 2.5GbE adaptor on the Mac side).
Shorter write times are better, with effective copy speed indicated in brackets.
Competitor's NAS w/ Gigabit Ethernet: 51.94s (112MB/s)
LockerStor2 HDD RAID0: 20.88s (279MB/s)
LockerStor2 HDD RAID1: 22.81s (255MB/s)
LockerStor2 HDD RAID1 Encrypted folder: 32.85s (177MB/s)
LockerStor2 NVMe SSD RAID0: 20.5s (285MB/s)

These numbers were also reflected broadly by BlackMagic Disk Speed Test, the only difference being that the read speed from an encrypted folder was much faster than the write speed.
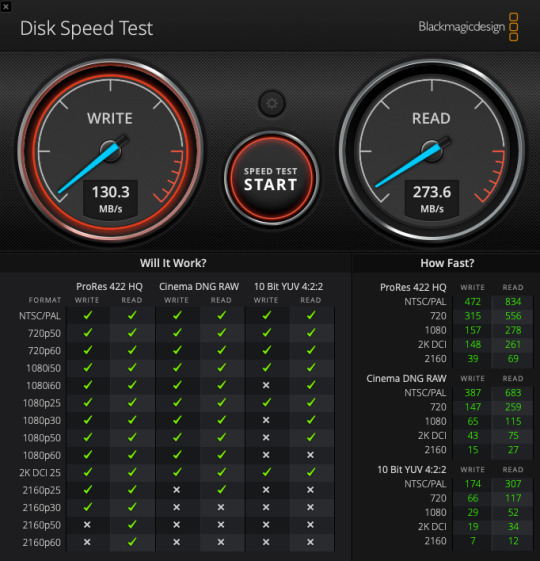
So what does this tell us?
Firstly, we can see that the 2.5GbE connection makes a huge difference–as expected–more than doubling the read/write speed in both RAID 0 and 1 configurations compared to a similar specced NAS equipped only with Gigabit Ethernet. However, the additional performance gained from running a striped RAID0 configuration compared to the one-disk redundancy of RAID1, appears to be insignificant.
Secondly, encrypting the folder massively reduces the write performance by about 25 percent (but not read). But, it's still significantly faster writing to an encrypted folder over 2.5GbE, compared to a non-encrypted folder on a Gigabit-only connection.
Lastly, using a volume on the NVMe drives was faster, but not fast enough to justify using the cost difference to regular HDDs. At that point, you're almost fully saturating the 2.5Gb Ethernet connection and would need to aggregate both ports to truly see any benefits of a faster disk volume. I'm unable to test this though. The only use case for an NVMe volume, as far as I can see, is if you wanted the fastest possible volume (such as for editing raw video files over the network), then to easily transfer those files to an encrypted and data secure folder on the HDD array for long term storage.
Regardless, if it's sheer transfer speed performance that you're after, this LockerStor 2 AS6602T is a fantastic choice.
Instead of an additional storage volume, the NVMe SSDs can be used to create a caching drive, where your system will place frequently used files. Unfortunately, this is very difficult to do quantitative benchmarking for. Not all applications that you run on your NAS are going to benefit from a caching drive. If all you're doing is copying files back and forth to the drive array, you won't see any significant speed improvements from a caching system. If you're running a Plex server and streaming or transcoding large movie files, you also won't see an improvement from a cache.
On the other hand, if you're running your own web server, you're more likely to benefit from those frequently accessed server files being stored on the SSD. Web software like Wordpress needs to read tens of thousands of small PHP files to generate even a simple webpage. Other things like virtual machines will also benefit to varying degrees from an SSD cache—similar to how your PC runs far better from an SSD compared to a regular spinning disk. But that's not something we can quantify for you by saying"an NVMe cache will make your system 20% faster".
Asustor Portal (HDMI Out)
You probably weren't expecting to find an HDMI output port on the back of a Network Attached Storage system, and that's completely understandable. However, if you need something that can do double duty as both a massive network storage system and a media center, the LockerStor 2 can do that. Sort of.
In order to use the HDMI output you'll need to install Asustor Portal from the App Center. It's included if you choose the default set of Home/Personal Applications, but can be installed individually too.
The Asustor Portal is essentially a web browser, with the home screen containing links to a variety of web services, including YouTube and Netflix. You can customize these links, or just have it default to a single one if you prefer.
The Asustor Disk Manager OS can also be used directly from the HDMI output, which makes it much easier to manage the device in-situ, without needing to jump onto another computer.
If you have VirtualBox installed, you can also operate the currently running VM from Asustor Portal—in theory anyway, because I couldn't get this working.
However, the experience with media apps with far from satisfactory. In fact, they're not apps at all; they're web links. Upon opening YouTube, it presents a message that you're being redirected to YouTube web, and that you should consider installing the YouTube app for this device instead. There is no YouTube app though. After a recent update, I can no longer sign in either—YouTube won't allow sign-ins from an "insecure browser".
While Asustor Portal can technically output at 4K60, I found the general interface was quite sluggish, and even then, YouTube wouldn't actually permit anything higher than 1080p to be played. I don't have a Netflix account to test if that would output at 4K, but I wouldn't hold your breath.
Basically, any $50 media streaming stick is going to offer a far superior experience to Asustor Portal, so the only viable use-case here is for in-situ device management. For that, it works well.
VirtualBox and Portainer
Instead of first-party virtual machine manager tools, Asustor has VirtualBox for full virtual machines and Portainer for Docker images. These are both very competent tools that you might already be familiar with, though relying on third-party software means the experience is less integrated.
VirtualBox is easy enough to get up and running with your choice of virtual machine, and you even have the option of displaying the currently running machine (you're limited to one at a time) on the HDMI output via Asustor Portal. Unfortunately this didn't work in testing for me: both the admin interface and a Windows 10 VM refused to display at all. I'm still working through the issue with support at the time of publishing, though their solution so far was to delete and re-install Asustor Portal and the X.org package—which also resulted in a handful of other applications being deleted in the process (rather than simply pausing them until the requisite software was re-installed).

The VirtualBox admin interface can also be accessed from any web browser, and once in, you can view the currently running machine through your browser by clicking on the "Console" view. Be warned though, this requires Adobe Flash, so it didn't work for me in Chrome. This left Remote Desktop Management from another PC as the only option to access the virtual machine.
Both Portainer and VirtualBox are powerful tools if you know how to use them—but they are symptoms of Asustor's over-reliance on third-party software, resulting in an inconsistent experience.
Should You Buy The LockerStor2 AS6602T?
For sheer networking performance, the LockerStor 2 AS6602T is a top choice that won't break the budget. You will need to pair it with a 2.5GbE capable switch (like this QNAP 5-port switch), but those are more affordable than ever, and your existing cabling should work. If you find yourself struggling with large file transfers for video editing tasks and such, look no further.
For pros who what they're doing and are comfortable with Portainer for managing Docker images, or VirtualBox for virtual machines, the LockerStor 2 is a beast that'll run anything you throw at it. You've also got the choice of either NVMe caching or as an extra fast storage volume for use with virtual machines. There's a lot of flexibility to configure the LockerStor 2 for your exact purposes. You'll find all the pro features you expect in a network storage system—but you may have to look a bit harder for them.
However, if you're looking for your first network storage device, it's difficult to recommend the LockerStor 2 to beginners. The interface design is inconsistent, and I encountered lots of small issues during testing that combined lead to a frustrating first-time user experience. The lack of Zeroconf naming meaning you have to type the IP address in every time, for instance, or the fact that the Surveillance Center doesn't work on Mac OS Big Sur. The Asustor Portal HDMI output is unsatisfactory as a media player, so this isn't going to do double-duty underneath your living room TV. It could prove useful for in-situ device management, but that's a rare use case.
Overall, the Assutor LockerStor 2 is a superb device—just not for beginners. It's fantastic hardware, let down by poor software.
Asustor LockerStor 2 NAS Review: Blazingly Fast Networking, Let Down By Poor Software published first on http://droneseco.tumblr.com/
0 notes
Text
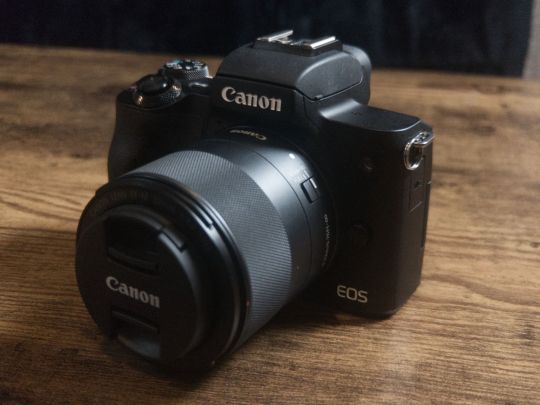
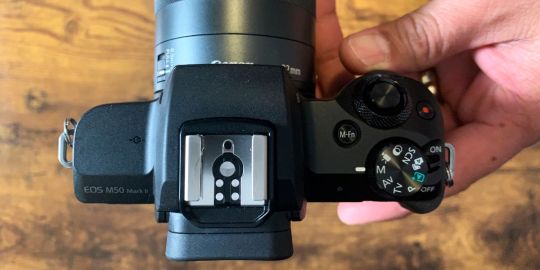
Canon M50 Mk II: Is It Really That Bad?
Canon M50 Mk II
9.20 / 10
Read Reviews
Read More Reviews
Read More Reviews
Read More Reviews
Read More Reviews
Read More Reviews
Read More Reviews
Read More Reviews
Read More Reviews
Read More Reviews
Read More Reviews
Read More Reviews
Read More Reviews
Read More Reviews
Read More Reviews


See on amazon
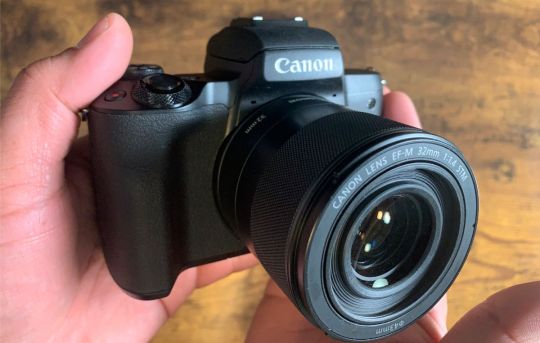
If you're looking for a starter camera that makes your photos and videos pop, you can’t go wrong with the EOS M50 Mk II.
Key Features
Lightweight
YouTube Streaming
Vertical Shooting Mode
4K video (Cropped)
Flip-Out Display
Mirrorless
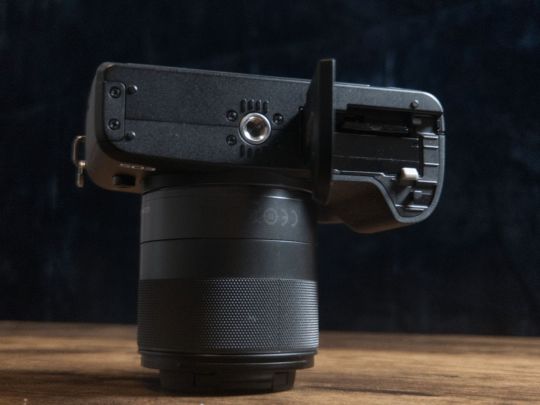
Hot Shoe Mount
Specifications
Brand: Canon
Sensor Size: CMOS APS-C 22.3mm x 14.9mm
Video Resolution: 3840 x 2160
Photo Resolution: 6000 x 4000
Battery: Yes
Connection: USB, HDMI, Audio In
Size: 4.6 x 3.5 x 2.3 inches (Body only)
Weight: 387 g
Water Resistance: No
Lens: 15 - 45 mm kit lens ; EF-M mount
Pros
Easy to Use
Onboard Mic Input
Clean HDMI Out
Vlogging Beast
Wide Range of Accessories
Photos and Videos are Stunning
Durablity
Cons
Battery Life
Only Slight Upgrade from Original
Kit Lens is Just Okay
Canon App is Terrible
Buy This Product
Canon M50 Mk II amazon
Shop
// Bottom var galleryThumbs1 = new Swiper('.gallery-thumbs-1', { spaceBetween: 10, slidesPerView: 10, freeMode: true, watchSlidesVisibility: true, watchSlidesProgress: true, centerInsufficientSlides: true, allowTouchMove: false, preventClicks: false, breakpoints: { 1024: { slidesPerView: 6, } }, }); // Top var galleryTop1 = new Swiper('.gallery-top-1', { spaceBetween: 10, allowTouchMove: false, loop: true, preventClicks: false, breakpoints: { 1024: { allowTouchMove: true, } }, navigation: { nextEl: '.swiper-button-next', prevEl: '.swiper-button-prev', }, thumbs: { swiper: galleryThumbs1 } });
F-Stops. ISO. Shutter Speed. Autofocus. The Exposure Triangle. Focal Length. 35mm vs. 50mm. Full-Frame vs. Micro Four Thirds. Mirrorless vs. DSLR. As a beginner, this is a short list of terms that you’ll be expected to know to get the best out of a consumer-grade camera.
While there is no substitute for good-old-fashioned-experimentation when it comes to shooting photos, sometimes you want to grab your camera and take a decent picture. But maybe you want to live out your Casey Neistat dreams of being the next Youtube Vlog sensation. Heck, maybe you'd like to use a camera that doesn’t come with a monthly service plan or double as a handheld Bejeweled Blitz machine.
youtube
If only there were an entry-level camera that could help you solve those problems without costing a small fortune. If only a camera could take great photos without generating snotty looks from mustachioed hipsters effortlessly wielding their $8,000 Leicas. Well, folks, allow me to introduce you to the Canon EOS M50 Mk II.
The EOS M50 Mk II is the new 24.1-megapixel, mirrorless camera that improves upon the M50 Mk I from 2018. It uses the DIGIC 8 processor, designed to improve image quality even at higher ISO speeds. The EOS M50 Mk II can shoot 4K—more on that in a moment—at 24 frames per second (FPS); and shoot 1080P up to 60 FPS. The maximum video image size is 3840 x 2160.
Canon considers this its "entry-level" offering, and I am inclined to agree. But, with the entry-level price point and consumer in mind, that means the camera offers several features that make it easy for the average person to use. I think that's one of the EOS M50 Mk II's biggest strengths.
What’s in the Box?
The Canon EOS M50 Mk II Body
15-45mm Zoom lens
Owner’s Manual
Battery
Charger
Lens caps
The Canon M50 Mk II is the second iteration of the previous Canon M50 mirrorless camera staple in the YouTube vlogging world. A search on YouTube yields an almost endless supply of M50 videos. Seriously, everyone has this camera.
The wide use means there's also an abundance of accessories available for the M50 Mark II, including lenses, cages, speed-boosters, USB power adapters, 110v A/C plug-in power supplies, and much more.
So, what makes the EOS M50 Mk II better than the original? And why should you fork over an additional $50 bucks on top of the price of the original M50 for the standard Mk II body-and-kit-lens package? And what about all that negative press?! Isn’t the M50 Mk II just a software update to the original M50?
Yes. Essentially the hardware for the M50 Mk II is the same as the original M50. And Yes, the Mk II is essentially just a software update from the original. Don’t listen to the haters, though. You should still buy the Mk II unless you're only planning on taking photos.
Related: Common Camera Lenses and When to Use Them
But why? Well, mostly because I think it adds $50 worth of additional features that you’re not going to get if you decide to buy the original.
Features like autofocus improvements, and a clean HDMI out, which means that you can plug the M50 MK II into a desktop monitor to gaze into your own pretty face while filming for your adoring YouTube fanbase, or record to an external device.
There’s also better battery life. That means about 1/3 more photos than the original M50, not to mention more video footage. And the Mk II offers improvements to autofocus, as well as a new feature—eye-tracking focus. Plus, you can use autofocus while the AI Servo AF is active—a feature that makes motion capture simple and is absent from the original M50.
Is the EOS M50 Mk II an Upgrade?
If you’re going to make a decently large purchase for a camera that is around $700, then you want the absolute maximum of features packed into whatever you buy. While the original M50 is still a great camera, it’s not the best for vlogging, and the camera’s anemic battery life has been flagged more than once. Of course, you could always spend a little extra and buy another battery if you like. That’s a great way to go as well. Or you could buy the Mk II.
Then there's the autofocus. Canon is famous for its dual pixel autofocus. I won’t get into the jargon-y specifics because I don’t like to bore my readers, but what you need to know is this: Canon's dual pixel autofocus is awesome.
youtube
It’s great for videos and normal photography alike. It’s also fast. Eye-controlled focus (eye-tracking) adds to the dual pixel autofocus by accentuating the subject’s eyes while shooting.
It’s generally accepted that if you want to take good portraits, then you should focus—no pun—on the eyes of your subject. The eye-tracking focus feature makes it easy to do just that.
In addition to the improvements in autofocus, Canon added a vertical video shooting mode designed for your favorite photo and video-based social media platforms. The company has added wireless YouTube streaming (though YouTube restrictions mean you'll need over 1,000 subscribers), and you get that clean HDMI out so that if you’re streaming via the HDMI port, you don’t have to stare at the on-camera settings.
Related: A Complete Guide to the Exposure Triangle in Photography
This on-camera info display was a huge gripe for a lot of folks with the original EOS M50. With that model, whenever you connected an external display, there was no way to turn off the busy informational display settings. The Mk II changes that.
While we’re on the subject of minor gripes with the M50 Mark I, let’s talk about a feature that the Mark II has that the Mark I didn't. The flip-out screen record button.
That means you can now reach over and tap the on-screen button to start your video while you can still see yourself in the frame. The new on-screen record button is a little thing, but it’s something that the vlogging crowd and I certainly appreciate.
The M50 Mark II also makes it quick to get up and running. Charge the battery, pop on the lens, insert a memory card and get shooting. Additionally, for all of you colorists, the Mk II can shoot in a mostly flat color profile with a little software tweaking. But, I should note that it won't shoot LOG.
Did I mention that the M50 Mk II can be used with Zoom and OBS or the Canon EOS Webcam Utility as a webcam? It can, and it is also fabulous for this purpose as long as you have enough battery life to support it.
Personally, I bought an adapter that allows me to plug the camera into an AC cable and plug that cable into the wall. I love it. Every time I use the M50 Mk II as a webcam, I get bombarded with questions about my setup.
For the best use of this feature, I'd recommend you look into the 22mm f2.0 lens that Canon offers for the EF-M mount cameras. This lens gives you a wider shot and a larger aperture than the 15-45mm kit lens that the M50 ships with.
Related: Simple Ways to Improve the Quality of Your Photos
Ease of Use
Arguably the biggest benefit of the Mark II is how easy it is to pick up and use. Unfortunately, the kit lens isn’t the sharpest, and the f/3.5 aperture doesn’t lend itself to the type of creamy bokeh that you’re used to seeing in professional portrait photography. Still, for amateur photographers looking to get their feet wet, this is a great package.
For point-and-shoot photography, the 15-45mm kit lens is more than enough to make your photos pop. Though, you should know that low-light settings are going to require increased ISO. Past 400 things start to get a little grainy, but most photos don’t really suffer until you’re around the 800+ mark.
The one thing the 15-45mm kit lens is excellent at is vlog content creation. Paired with a small on-camera shotgun mic and a gimbal or GorillaPod, this setup is a vlogging beast. It’s no wonder so many YouTubers—some with several hundred thousand followers—use their EOS M50 as their primary run-and-gun rig.
While the Canon’s mic preamp is slightly lacking, using this setup with both the Rode VideoMicro and the Takstar Sgc-598 provided plenty of decent quality audio capture. A little normalization and compression in post were all it took to get decent quality sound.
Related: How to Take Care of Your Camera Lenses
Is the M50 Mk II Durable?
It is, and I want to take a moment to focus on its durability. Now I admit, I am not the most careful person when it comes to my equipment. That’s why, when I managed to knock over my tripod not once but twice, with the M50 Mk II on top of it, I almost wound up on blood pressure meds.
Both times I thought I was going to scoop up a camera with some extreme damage. Maybe a broken viewfinder or a smashed touch screen.
Well, I am happy to report that my Canon M50 Mk II doesn’t have a scratch on it. The lenses aren’t cracked or damaged, and the display is clear and sharp. The body of the camera looks like it was just taken out of the box.
There are really only two possibilities for why this is: either I’m lucky (and I certainly need to be more careful with my equipment) or, maybe the M50 Mk II is a pretty durable unit for even the most buttery of fingers.
What's Not to Love About the M50 Mk II?
After a few weeks using the M50 MK II, I can honestly say I have only a couple of complaints. First is the cropped image in 4K. While this camera is touted as a 4K camera and perfectly capable of recording in 4K, the sensor will dump a large portion of its field of view. This is an additional 1.6x crop over the APS-C crop of 1.6x (2.56x total). Also, while in the 4K mode, you lose Canon’s delicious dual pixel autofocus.
This isn’t really a problem for me, as I don’t like shooting in 4K anyway. Even when I am creating content, I prefer to shoot at 24 FPS in 1080p full HD. Footage shot at 24 FPS has that cinematic look that I adore, and I can use the autofocus to make sure all of my shots are effortlessly tack sharp.
Second, on this list is the Canon iOS app. I hate it. It’s buggy, it’s clunky, it crashes often, and it constantly makes me reset the Wi-Fi settings of the camera to use my phone as a wireless display. The app drives me absolutely insane, and if any Canon app developers are reading—shame on you.
Last on the list is the digital viewfinder. While it works well as a viewfinder, the sensor next to the viewfinder might give me an aneurysm. Whenever I am using the camera for Zoom meetings, I find the sensor will shut off the external display if it is near a reflective surface—namely, the watercolor painting hanging above my desk. Fortunately, this sensor can be disabled in the menu for the M50 Mk II.
Should You Buy the Canon EOS M50 Mk II?
I think you know the answer to this question by now. If you don’t, then get your credit card out; it’s time to do some camera buying. The original M50 was a great all-around camera. The Mark II adds several improvements aimed at content creators and vloggers. If you fit that description, and you can’t afford to spend $3,000 to improve your smartphone shots, then the M50 MK II is a great choice.
If you are looking to start a YouTube channel, then the M50 Mk II has enough features to keep you busy for a while. You might eventually outgrow it, though some YouTubers continue with the M50 well into the six-figure subscriber counts.
If you need a camera that will allow you to level up your photographs, this is the camera to buy. And while you’re at it, think about upgrading from the kit lens to the Canon 32mm F1.4. It’s how I get most of my product photography shots. Finally, if you need a small and lightweight camera for taking on the road or for street photography, the M50 Mark II isn’t cumbersome and doesn’t draw a lot of attention.
On the other hand, if you’re a die-hard camera enthusiast who breathes shutter speeds, or if you can spot the difference between a nifty 50 and a 35mm at 300 yards, then you’re better off buying something a little more high-end. Additionally, if the thought of auto-anything makes you shudder (pun intended), then save up for a while and buy a Sony A7s III. You’ll be much happier.
Final Focus on the EOS M50 Mark II
Overall, the M50 Mk II is a delightful starter camera. Canon makes it easy for a total beginner to pick up the unit and get some great photos off the rip. That’s really what makes it excellent. It has a diverse range of functions for both budding photogs and experienced users alike. Unfortunately, it won’t compete with some of the more expensive models, but for regular people who want a camera that makes their photos look great without much effort, you can’t go wrong with the EOS M50 Mk II.
Ignore the crowd that says this camera is “disappointing.” It’s not. It just has a specific purpose, and what it is designed to do—namely, be an entry-level vlogging camera with excellent photo capability—it does well.
Though the M50 Mark II might not make you a YouTube star, it will help you get started.
Canon M50 Mk II: Is It Really That Bad? published first on http://droneseco.tumblr.com/
0 notes
Text
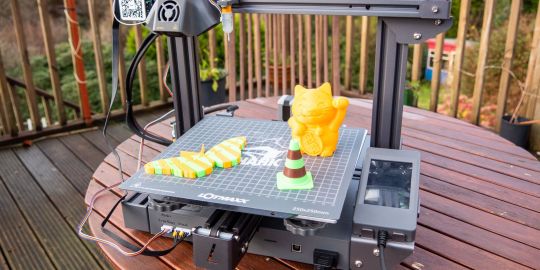
Lotmaxx SC-10 Shark Review: Reliable 3D Printer for Beginners, But Maybe Skip the Upgrades
Lotmaxx SC-10 Shark
9.00 / 10
Read Reviews
Read More Reviews
Read More Reviews
Read More Reviews
Read More Reviews
Read More Reviews
Read More Reviews
Read More Reviews
Read More Reviews
Read More Reviews
Read More Reviews
Read More Reviews
Read More Reviews
Read More Reviews
Read More Reviews
Read More Reviews
Read More Reviews
Read More Reviews


Shop Now
The Lotmaxx SC-10 Shark is an incredibly well-built and reliable printer out of the box, which makes it perfect for beginners. With easy to use features like a flexible heated build plate and handheld touchscreen, in my experience, there were zero tweaks required to get amazing prints. That's an incredible achievement for any printer, let alone one at this price point. I've tried a lot of 3D printers over the years, and almost none of them have "just worked". Full marks for the core package.
Specifications
Brand: Lotmaxx
Build Volume: 9.25x9.25x10.4 inches (235x235x265mm)
Printing Accuracy: 0.1-0.4mm
Connectivity: MicroSD, USB
Heated Build Plate: Yes, flexible and removable too
Feed Type: Bowden tube
Dimensions: 17x18.3x19.21 inches (443x466x488mm)
Weight: 18.5lbs (8.4kg)
Dual-Color Printing: Optional upgrade
Pros
Fantastic quality prints out of the box, no tweaking required
T-slot metal chassis is solid and well built
Detachable screen for convenience
Heated, removable, flexible print bed
Cons
Bi-color printing adds too much complexity, wastage, and failure rates for beginners
Auto-leveling upgrade is temperamental
Laser engraving prints line by line
Messy wiring once you add in any of the upgrade modules
Buy This Product
Lotmaxx SC-10 Shark other
Shop
// Bottom var galleryThumbs1 = new Swiper('.gallery-thumbs-1', { spaceBetween: 10, slidesPerView: 10, freeMode: true, watchSlidesVisibility: true, watchSlidesProgress: true, centerInsufficientSlides: true, allowTouchMove: false, preventClicks: false, breakpoints: { 1024: { slidesPerView: 6, } }, }); // Top var galleryTop1 = new Swiper('.gallery-top-1', { spaceBetween: 10, allowTouchMove: false, loop: true, preventClicks: false, breakpoints: { 1024: { allowTouchMove: true, } }, navigation: { nextEl: '.swiper-button-next', prevEl: '.swiper-button-prev', }, thumbs: { swiper: galleryThumbs1 } });
Easy to use, good quality prints, reasonably priced: pick any two when it comes to 3D printers.
At least, that used to be the case. The Lotmaxx SC-10 Shark doesn't compromise on build quality, yet it's also easy to use, works out of the box for reliable prints, and is very reasonably priced. It even has a selection of upgrades available, able to turn it into a dual-color extruder, or even a laser engraver.
youtube
Initial Impressions and Design
Arriving somewhat flat-packed, you'll need to spend a good half hour or so putting together the SC-10 Shark before first use. This isn't as bad as it sounds; it's certainly not what I'd call a DIY kit. Construction amounts to bolting on the upright gantry, as well as the spool holders, and screen. An extensive set of tools are provided, as well as a replacement Bowden tube, clippers, and scraper. Everything you could possibly need to get started printing is included, including some sample filament.

The component quality of the SC-10 is a class above most printers, with an all-metal T-slot chassis and injection molded plastic parts. It looks and feels premium, and solidly built. Whether that translates to good quality prints is another matter.
The core design is that of an Ender 3 clone, with a Bowden tube feeding the filament into the print head. A filament feed sensor ensures that running out of filament mid-print will pause and alert you to change it.
While the filament sensor is a useful touch, I admit I'm not a fan of the Bowden tube. The interface of the printer means that changing the filament requires pressing the same button about thirty times in order to move the filament 10mm at a time until it leaves the tube. A direct-drive extruder located directly on the print head is much easier, but this is a minor complaint.
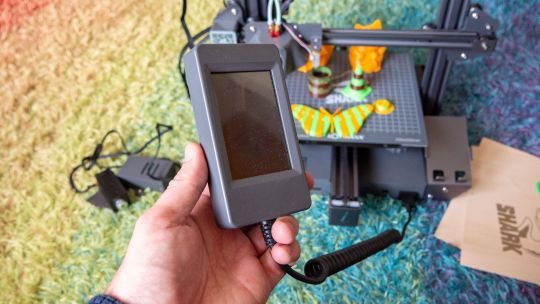
A large, removable full-color touchscreen can be found on the right-hand side, with a coiled cable which means you can manipulate the screen from anywhere within about a foot radius. Although this sounds like a small point of note in the hardware specs, I found it to be surprisingly useful, especially when you've got the printer perhaps pushed off to the back of your desk, or in a cabinet. The interface is a little slow, however, and could probably have simplified into a monochrome scheme to speed up processing.
You can transfer Gcode to the printer using a micro-SD card. Although USB printing is supported, it's not recommended from a PC, and I have yet to see any official support for Octoprint.
Particularly useful for beginners is the heated and removable flexible build plate. A heated build plate helps with first layer adhesion, which means fewer failed prints. Removing prints is effortless: just pull off the magnetically attached steel build plate, and bend it slightly to release the print. Scrape off any residue using the supplied scraper.
Lotmaxx SC-10 Shark: First Print
Before getting started with your first print, you'll need to manually level the print bed using four large dials located underneath. Select the leveling process from the settings menu, and place a sheet of paper on the print bed. Tap each leveling point in turn, and adjust the dial until you can start to feel some friction on the paper between the nozzle and the build plate. Repeat until it feels the same at all five points.
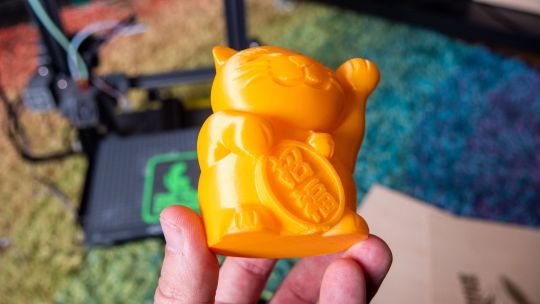
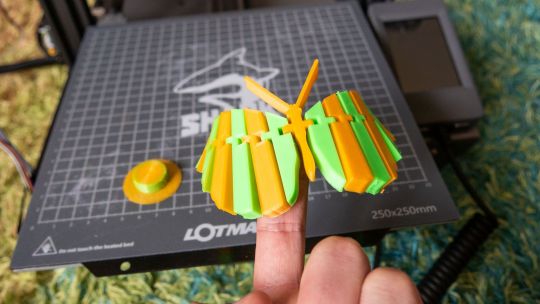
My first print was using the supplied test Gcode: a lucky cat. I'm pleased to report it worked the first time, with good adhesion and fast printing speed. While there is a slight issue with a drooping overhang under the right paw, it's still incredible quality for a first print, and these could easily be fixed by slowing it down.
What really surprised me was how incredibly quiet it was when printing. When idle, the fan noise is audible but easily ignored; but when printing starts, you could be in the same room and not actually know it's on. This is in sharp contrast to my aging Prusa Original mkII, which the entire house is aware of. The combination of solid metal frame, powerful stepper motors, and good quality stepper driver chips are what makes this possible. I would happily put the Lotmaxx SC-10 Shark in my office or bedroom while it prints.
Slicing Models
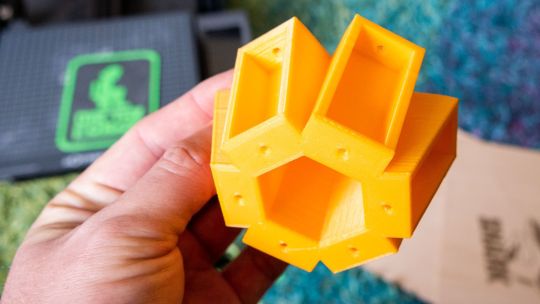
Lotmaxx provides custom software for slicing; it appears to be a modified version of Cura. Though I'm more familiar with Slicr, it feels easy enough for beginners and pros alike, displaying all the features I'd expect in an accessible way. There's a variety of quality presets, or you can delve into the individual parameters and create your own custom profiles. Slicing a downloaded STL file (for a 2V geodesic dome) was effortless, and again, produced a fantastic quality print with no failures. Printed at a slower speed than the lucky cat, there were no bridging issues at all.
There's no reason you can't use your own favorite slicing software, of course—the printer uses standard Gcode, and the settings can be taken from the device profile. But for beginners, I'd recommend just using the Lotmaxx software until you're more comfortable.
There's another reason to use the supplied software: if you purchased the laser engraving upgrade, the design software to produce laser Gcodes is integrated. Unlike 3D object slicers, I'm not aware of any third-party software that can handle this. Which brings us neatly onto the first upgrade available for the Lotmaxx SC-10 Shark.
Laser Engraving Module
The laser engraver is the easiest module to install, requiring only a few bolts to secure it to the right-hand side of the standard 3D print head. Once plugged in (to the front of the machine), the printer will automatically recognize it should switch over to Laser mode, without any firmware modifications or settings being changed. The interface adjusts accordingly, and you'll be able to select your laser Gcode for printing.
Use the clips provided to attach your print surface securely to the build plate. Since the engraver module is attached to the right of the print head, the actual area available to print on is less than the full build plate; roughly two-thirds the size, but this is still plenty big enough for most purposes. MAke sure you're wearing the provided safety goggles, then activate the laser and use a combination of the Z-axis and manually adjusting the focus dial on the laser module until the laser beam is focussed. Then you can start printing your design.
While it's generally safe to leave a 3D printer to its get on with its business thanks to thermal safety features, burning wood and other materials with a high-powered laser is another matter. Do not leave the machine unattended when printing in this mode.
Unfortunately, my results with the laser engraver were disappointing. Rather than treating outlines as a continuous movement then filling in the middle (as it would when 3D printing), the laser engraver prints line by line, like an inkjet. It looks quite terrible and ruins the utility of the module for me. The hardware is obviously capable of much better, so either I'm doing something completely wrong that isn't well explained in the manual, or it can be fixed with a software update.
Auto-Leveling
The second upgrade you can purchase with the SC-10 is the auto-leveler, a 3D Touch module. This is a small, physical probe that drops down, touches the print bed, then retracts. It's an inexpensive module, but in my experience, wasn't worth the hassle.
The auto-leveler attaches in much the same way as the laser engraver and also plugs in around the front of the machine. Unlike the laser module, you'll need to modify the firmware configuration file in order to make use of it, as well as change the Gcode start settings found in the slicing software.
Though I did manage to get one successful print having installed the auto-leveler, subsequent attempts sent the print head crashing into the bed. After much experimentation, I found the BLTouch seemingly requires the print bed to be manually leveled first, which somewhat defeats the purpose of an auto-leveling mechanism.
At this point, I was also frustrated with the lack of live Z-adjustment. Live Z-adjustment means that you can move the print head up and down even when the print process has started, so it's easy to back off or add a little more squish for the first layer, as needed. If you've manually leveled the bed anyway, this generally isn't needed, since it's already tuned to a paper thickness. But every time using the auto-leveler, I found I needed to tweak it slightly. Which again, involves the manual dials underneath the bed.
This is the first time I've used a 3D Touch probe, and I hope it's the last. The PINDA inductive probe method used by Prusa is more reliable and is able to adjust for all manner of warped beds without any manual intervention.
So despite being an inexpensive upgrade, I just wouldn't bother with the auto-leveler. Out of the box, manual leveling works just fine.
Bi-Color Printing with a Dual Extruder
The final upgrade you can purchase for the SC-10 Shark is the most complex to install, and most impressive—if you can get it working right.
Printing in multiple filaments takes the creative possibilities of a 3D printer to a whole other level. As well as multiple colors, you can print more complex objects thanks to water-soluble support structures.
The dual-extruder upgrade on the Lotmaxx SC-10 involves completely disassembling the print head and replacing the hotend. You'll then have two Bowden tubes to deal with. You'll also need to fit a second extruder motor, sensor, and filament holder onto the gantry, and remove the base of the printer to install a driver chip. And there'll be more cables to route, which again, plug in at the front of the machine. It took me at least an hour, and I'm fairly certain I broke the single-color hotend in the process, thanks to an uncooperative Bowden tube clip.
When you're finished, it's a little messy, if I'm honest. While I can deal with a dangling cable for the temporary use of a laser engraver, once you add in an auto-leveler and second extruder, the neatly wrapped cabling and overall aesthetics of the printer are ruined.
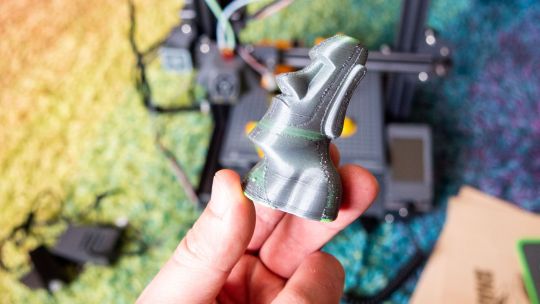
After again altering the firmware configuration file and printer profile settings, the test print turned out great. It's a beautiful two-color cone, it really is. But one thing you should know about bi-color printing from a single print head is that getting defined colors like that requires cleaning the hotend at each color change. The print head moves off to the side, squirts a bit out into a column of waste, then carries on. To produce that one lovely test cone required an equally large column of waste.
Perhaps this is a non-issue if you're printing an entire plate full of beautifully bi-color cones. Wider, flatter models produce comparatively less waste, for sure. But I have to ask if it's worth it. You can turn off the column of cleaning waste if you want, but the results are terrible; you can see below how the bi-color effect is ruined, and you'll get "bobbling" where it tries to change colors anyway.
Unlike some printers, the Sc-10 Shark can't mix colors. Attempting to push the other filament in at the same time doesn't work, and you'll hear the extruders clicking as the filament jams. This means that before each print you'll need to ensure both filaments are retracted about 1cm into the Bowden tube. This isn't an automatic process, so you have raise the hotend temperature first, then retract each extruders. It's even trickier with lighter colors filaments as the tube is opaque white, so you may need to use a smartphone flashlight to shine through the tube.
You should also know that designing a two-color print requires two models. You'll need to load both models in, hope they align, assign each to the respective print head, then merge them. There are comparatively few ready-made bi-color models available in this format for you to download.
Although the results are impressive, the additional wasted plastic, slicer complications, and inability to color mix filaments inside the hotend mean that you need significantly higher levels of patience to get good results. Once I swapped over to the dual-color system, my failure rate skyrocketed.
I should also note that it's still possible to print in two colors even without a second extruder if the color change occurs at a specific layer. This enables you to print things like signage by just sending a pause signal at a certain layer, and swapping the filament over.
Aside: the print above was terrible quality (though it didn't fail, as such), with pillowing on the first layer and what seems like over-extrusion throughout. I'm still trying to isolate why.
Lotmaxx SC-10 Shark: Great for Beginners
Let me be clear: the Lotmaxx SC-10 Shark is an incredibly well-built and reliable printer out of the box, which makes it perfect for beginners. With easy to use features like a flexible heated build plate and handheld touchscreen, in my experience, there were zero tweaks required to get amazing prints. That's an incredible achievement for any printer, let alone one at this price point. I've tried a lot of 3D printers over the years, and almost none of them have "just worked". Full marks for the core package.
But once I got to the optional upgrades, I ran into increased failures and disappointing results.
The auto-leveler is unreliable and still needs manual adjustment. Manual leveling really isn't that hard anyway, so I ended up just disabling the 3D Touch module.
The dual-extruder adds too much complexity for the beginner and decreases the overall reliability of the prints; I wouldn't recommend installing it and ruining what is otherwise a great printer. If you're a pro user who must have the ability to print with dual-extruders, I'd recommend a printer that's designed for it from the outset, rather than an optional upgrade.
The laser engraver is the most promising upgrade that requires the least effort to install. While I haven't had great best results with it yet, I'm confident it can be improved. If you can buy one upgrade only, it should be the laser module.
Then again: at around $400 for the complete package, it might be worth a punt anyway. Software updates might improve the performance of the upgrades, or you might be confident enough later down the line to install them without fearing the inevitable tweaks.
Lotmaxx SC-10 Shark Review: Reliable 3D Printer for Beginners, But Maybe Skip the Upgrades published first on http://droneseco.tumblr.com/
0 notes
Text
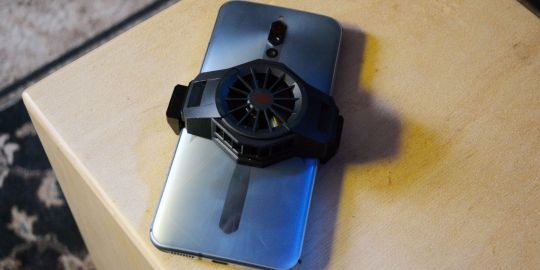
The Red Magic 5S Is a Gaming Phone You’ll Actually Want to Use
Red Magic 5S
8.00 / 10
Read Reviews
Read More Reviews
Read More Reviews
Read More Reviews
Read More Reviews
Read More Reviews
Read More Reviews
Read More Reviews
Read More Reviews
Read More Reviews


See on amazon
The Red Magic 5S is a powerful Android phone with gaming features like a 144 Hz display and shoulder triggers. It's not for everybody, but that's by design. If you're looking for a phone that can handle any game you throw at it with ease, this will be one of the first options you consider.
Specifications
Brand: Nubia
Storage: 128 GB
CPU: Snapdragon 865
Memory: 8GB
Operating System: Android 10
Battery: 4500 mAh
Ports: USB-C
Camera (Rear, Front): 64MP, 8MP
Display (Size, Resolution): 6.65-inch, 1080x2340
Pros
Buttery smooth display
Shoulder triggers are great in some games
Games run extremely well
Cons
Camera isn't fantastic
Buy This Product
Red Magic 5S amazon
Shop
// Bottom var galleryThumbs1 = new Swiper('.gallery-thumbs-1', { spaceBetween: 10, slidesPerView: 10, freeMode: true, watchSlidesVisibility: true, watchSlidesProgress: true, centerInsufficientSlides: true, allowTouchMove: false, preventClicks: false, breakpoints: { 1024: { slidesPerView: 6, } }, }); // Top var galleryTop1 = new Swiper('.gallery-top-1', { spaceBetween: 10, allowTouchMove: false, loop: true, preventClicks: false, breakpoints: { 1024: { allowTouchMove: true, } }, navigation: { nextEl: '.swiper-button-next', prevEl: '.swiper-button-prev', }, thumbs: { swiper: galleryThumbs1 } });
Phones have gone from something you use for calls, texts, and managing appointments to do-it-all computing devices. Because for many people, phones are quickly replacing PCs, it only makes sense that we'd see the same sort of variety: casual phones, business phones, and yes, gaming phones.
While you can play games on any phone, the Nubia Red Magic 5S is built for it, with a powerful chipset, a butter-smooth 144Hz display, and even a built-in cooling fan. The phone looks great on paper, but does it focus too much on gaming-specific features or is it well-rounded enough to be your daily driver?
youtube
Specifications
OS Version: Red Magic OS 3.5 (Android 10)
CPU: Qualcomm Snapdragon 865
RAM: 8GB
Storage: 128 GB
Battery: 4,500mAh
Display: 6.65-inch AMOLED 144 Hz, 240 Hz poll rate
Dimensions: 6.63 x 3.07 x 0.38 inches
Front Camera: 8MP, f/2.0
Rear Camera: 64MP Sony IMX686, f/1.8, PDAF
Connectivity: 5G, Bluetooth 5, Wi-Fi 6
Features: ICE 4.0 Active Liquid-Cooling with Turbo Fan, 320Hz Shoulder Triggers, In-Display Fingerprint Reader
Design & Build Quality
There are two versions of the Red Magic 5S, each with different specs and a different finish. We're looking at the lower-specced version, which features 8GB RAM and 128GB internal storage and comes in the Sonic Silver finish. The higher-spec version comes with 12GB RAM and 256GB internal storage, and a flashier if somewhat gaudy two-tone finish called Pulse.
While I'm curious how the even higher-spec phone would perform, I'm glad I received the review unit I did, because I prefer the look of it by a wide margin. Though it's called Sonic Silver, there is a slight blue tint to the finish that helps it stand out in a sea of drab-looking Android phones.
Partly due to the metal used in the build and partly due to the non-standard components like cooling fans, this is heavier than your average phone. I didn't mind this and while it's certainly a good deal heavier than the iPhone 12 Mini I use on a daily basis, I didn't find the weight annoying even after marathon gaming sessions on the 5S.
Speaking of cooling fans, these necessitate vents on the side of the Red Magic 5S. These are unusual to see on a phone, as you'd imagine, but I like the effect on the aesthetics. They give it the appearance of a powerful phone which, as it turns out, is very much the case.
Display
Somewhat bucking recent trends, there is no slight notch in the display, nor is there a camera placed smack dab in the middle of the upper part of the screen. Instead, you get good old-fashioned bezels. I know these are often frowned on now, but I find the half-centimeter bezels at the top and bottom of the phone lend a nice sense of symmetry.
These bezels also have a practical nature since this is a phone you'll often use in landscape orientation. They give you a spot to actually hold on to the phone without your fingers obscuring part of the screen, which comes in handy in games with significant HUD elements on the sides of the screen.
The display is a 6.65-inch AMOLED panel, which brings some impressive color and brightness to the table. Even more impressive are the supported refresh rates. While you can use the standard 60Hz refresh rate to improve battery life, you also have options for 90Hz and 144Hz.
At 144Hz, the phone uses more battery but feels significantly smoother. This refresh rate is mainly meant for games, but I liked its overall effect on the feel of the phone so much that I left it on this setting at nearly all times.
Gaming Features
One of the first things you'll notice looking over the Red Magic 5S is the bright red slighter on the upper-left side of the phone. Slide this up and the phone enters Compete Mode.
This is a dedicated gaming space that serves as an alternate launcher with several gaming-specific features. Here you can launch games, but also toggle on various options like the 144 Hz refresh rate and block calls and messages to keep you in the zone.
One of these options is the internal fan, which helps keep the phone from heating up during intense gaming. It's strange to hear the slight whir of a fan coming out of a phone, but with this on I never noticed the phone heating up significantly, even in the most demanding games.
My review unit of the Red Magic 5S also came with the company's Ice Dock. This is an optional add-on that brings an external fan to help keep the Red Magic 5S even cooler. Just slide it on, plug the built-in USB-C cable into the port on the bottom of the phone, and you've got even more cooling power.
This isn't where the gaming features end. The Red Magic 5S features dual Shoulder Triggers, touch-sensitive areas on the right side of the phone that becomes the top when you turn it on its side for landscape-oriented games.
You configure the left and right shoulder triggers to virtually tap any area of the screen when you tap them. This means that they're compatible with any game without games needing to specifically support them. These lended such an advantage in games like Call of Duty that it almost felt like cheating.
The 4D Shock feature is nice, but isn't as impressive. This is only available in certain games like Asphalt 9, and adds a "rumble" effect that feels similar to the HD Rumble in the Nintendo Switch. If it was available in more games, the feature would be more impressive. Maybe someday.
Software
The Red Magic 5S arrived running Android 10 and, as of the writing of this review, hasn't seen an update to Android 11. I've seen one major update during that time, but no sign that the phone will see an update to Android 11 anytime soon.
On top of Android, you get the Red Magic OS, which is essentially a pair of launchers and some various software. We've already gone over most of the significant elements here in talking about Compete Mode, but the look and feel of the phone isn't something you'd see on a Google Pixel device.
I only encountered one bug while using the phone, but it was a major one. After launching the Calendar app, the phone hard crashed to the point that the first thing I saw after the screen went black was the boot-up animation. This only happened once.
Performance
The Red Magic 5S features a powerful Qualcomm Snapdragon 865 with support for 5G, assuming you can get it wherever you're located. While it isn't quite as powerful as the Plus version of the same chipset, it's still among the fastest chipsets available in an Android phone right now.
This, combined with the 144Hz refresh rate, results in a phone that feels smooth no matter what you're doing. The 8GB RAM is plenty, though the bump up to 12GB is the top-spec version likely has app switching feeling even more responsive.
For benchmarks, we turned to Geekbench 5. Scores averaged 900 for single-core performance and 3,200 for multi-core. For the Compute benchmark, the Red Magic 5S averaged around 3,200 for the OpenCL score.
For gaming, I tested using a handful of the most popular games right now, including Call of Duty Mobile, Asphalt 9, Madden NFL 21, and PUBG. Even with plenty of complaints about Madden NFL 21 in the Play Store reviews, I didn't find the game to struggle even a bit on the Red Magic 5S, even at max settings.
The games I spent the most time with were Call of Duty Mobile and Asphalt 9, the former thanks to the shoulder buttons and the latter because of the support for the 4D shock feature. Even after long sessions, neither game ever lagged, and with the internal fan turned on (I never found the Ice Dock to be necessary) the phone stayed plenty cool.
Cameras
The Red Magic features a 64MP rear-facing lens with a Sony IMX686 sensor, but the camera isn't very impressive. It's not bad in most cases, taking serviceable shots, but it's not going to take pictures that make you gasp when you view the results.
The front-facing camera is more of the same, but limited to 8MP. If you need to take a quick selfie, it will do the job, but again, this isn't a phone you'd buy just for the camera. It's possible future software updates may improve the photos that come out of the Red Magic 5S, but I wouldn't count on it.
Battery
The battery has a capacity of 4,500 mAh, which is nice since gaming on a phone is relatively battery intensive. When it comes time to charge, the phone doesn't feature support for wireless charging, but it does feature Quick Charge up to 55W to help get the battery back up to max quickly.
Even with the capacity, I was surprised at how long the battery lasted. Maybe it's the optimizations you get from Compete Mode / Game Space, but even with the display in 144Hz mode, a near-full day of gaming, benchmarks, and other tests didn't drain the battery.
If you were to use this as you would use a "normal" phone, you could easily go a few days without charging. I can't imagine a situation where you'd need to plug this in during the day after an overnight charge.
Should You Buy The Red Magic 5S?
If you spend the vast majority of the time you're on your phone gaming, you're the exact person the Red Magic 5S is built for. While you can also harness that power for editing videos or similar power-user activities on the 5S, it's clear that this isn't what it was built for. Still, the latest update to the Red Magic 5S has ironed out enough of the bugs that it's a phone you can use for anything.
One of my personal problems with gaming phones has always been that they looked like the phone equivalents of Alienware PCs, over-designed and largely goofy. While the more powerful version of the phone in the Pulse finish suffers from this, the Sonic Silver version I had for this review doesn't have the same problem. You could carry this into a business meeting and nobody would bat an eyelash.
The Red Magic 5S isn't for everybody, but that is by design. If you're looking for a phone that can handle any game you throw at it with ease, this will be one of the first options you consider.
The Red Magic 5S Is a Gaming Phone You’ll Actually Want to Use published first on http://droneseco.tumblr.com/
1 note
·
View note