#monotubes
Explore tagged Tumblr posts
Visit Tumblr Blog
Explore Tumblr blogs with no restrictions, modern design and the best experience.
Last Seen Tumblr Blogs


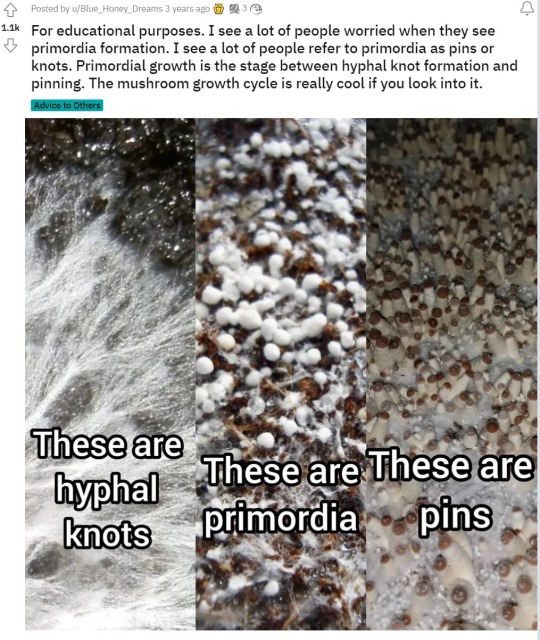
Fun Fact
Post activity is at the highest at 4:00 pm EDT; notes peak at 10:00 pm EDT.
Text


holding for jongin: day 512 of 641 ↳ EXO KAI for Gucci on the set of Monotube | March 2021
118 notes
·
View notes

Video
youtube
Time To upgrade your #suspension with the new #ironman4x4 monotube. Get better rides when #offroad. Now at #hawkesoutdoors 210-251-2882.
#youtube#suspension#lift kit#offroad#ironman 4x4#repairs#auto#trails#monotube#replace#truck#rover#jeeps#overland#camping#travel#hawkes outdoors#san antonio#texas
1 note
·
View note
Text
La méthode 3 en 1 du MONOTUB pour cultiver les champignons [Tutoriel]
🍄 Découvrez la méthode monotub, une méthode 3 en 1 pour faire pousser facilement vos champignons sans installation !
La méthode Monotub est une technique simple à mettre en place pour cultiver les champignons et commencer à gérer un environnement de culture partiellement contrôlé. Cette méthode convient parfaitement aux débutants qui n’y connaissent rien et peut leur permettre de cultiver une grande diversité de champignons. C’est une méthode 3 en 1, car elle permet de réaliser le substrat, l’incubation et la…
0 notes
Text


waiting for Kai 114/641 ↳ Kai for Monotube x Gucci
#waiting for nini#kpopco#kvanity#ultkpop#kpopccc#ksoloists#userjoanna#usermolly#usermau#usermusic#useroro#userresa#useranusia#lisanamjoon#ceeblr#melontrack#my*#kai#exo
117 notes
·
View notes
Note
do you know much about mushroom cultivation? if so, would it be feasible to have an isopod colony living inside a mushroom grow tank like a monotub? both are generally kept humid and warm, and the isopods could eat the mushrooms and when the isopods die the mushrooms could eat the isopods. and there'd be cool mushrooms and cool bugs like next to each other. it would be beautiful.
I have very limited knowledge of fungus cultivation, but I do know that the “mushrooms eat isopods” bit would not work here. isopods like eating each other much more than mushrooms do, and will do that much faster. unless something is horribly wrong, isopods do not leave any evidence of their dead.
I also do not think mushrooms are a complete diet for isopods, who need a plant-based diet of leaves (and less so wood). you would need to provide them with leaf litter + veg/protein treats even if the isopods did want to eat the mushrooms or the mushroom growth media (which might well be more edible to them than the fungus).
I still think the idea would be feasible if you used mushrooms as more of a decoration, and picked something very hardy like Pleurotus that can eat whatever junk you grow it on. build a normal isopod tub, but bury a plug of inoculated mushroom spawn in the substrate somewhere, and if you keep the soil moist you’ll probably get some mushroom/isopod cohabitation going on.
also, don’t keep isopods warm unless they’re tropical species. most of the common varieties are native to cold areas of Europe and weather freezing temperatures most of the year. I find all of my species breed best at about 70F° or slightly under that.
59 notes
·
View notes
Text


SVT x T&H Collaboration Monotube Photoshoot
#homerunj#nbwmh#dinonetwork#userzyx#ftsummer#userzaynab#sonafied#dino#lee chan#seventeen#*#svt#behind#*max
128 notes
·
View notes
Text
Here is the time-lapse of the inflatable monotub. I think it turned out pretty good. 🍄😍
#cottagecore#fairycore#naturecore#forestcore#mushroomcore#cottage aesthetic#fairy tale aesthetic#fairy aesthetic#nature aesthetic#forest aesthetic#mushroom aesthetic#hedgehog#animals#snail#woodland#woodland creatures
46 notes
·
View notes
Text

Birds of Prey? Again, past me was not logging where these came from, because past me had not remotely considered doing this blog that I’m doing right now.
All in all, a pretty good wheelchair. It doesn’t look like a hospital chair. It has push rims. No handles on the back. Back doesn’t go up sky high. The front angle isn’t too angled too much. I’m noticing a trend where the front casters are often attached to the seat on some long spindly forks, instead of being attached lower on the frame or to the foot plate. I can’t tell if that’s what’s happening here or not.
8/10 due to caster ambiguity.
Wheelchair terminology for reference under the cut
For rreference:

Swing away frames like this one, and box frames like the Quickie GP, will usually have the front caster attached to the bottom part of the box. The legs will then extend out in front of the caster. I think that's what they're trying to illustrate in the above?

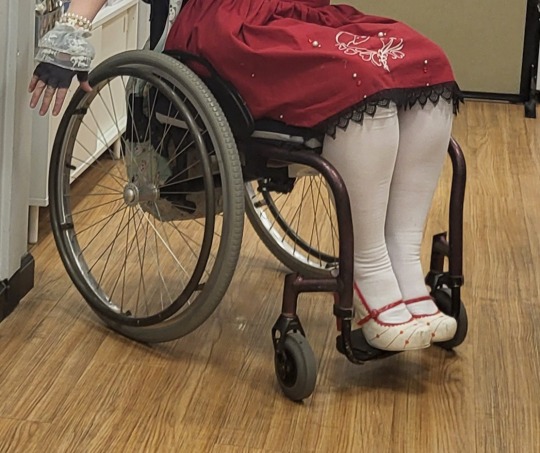
Meanwhile monotube chairs and a lot of dual tube chairs will have the casters attach on either side of the foot plate. The advantage of this is that your feet are inside your turning radius, while on a swing-away they are outside of your turning radius. It's a lot easier to slam your feet/feet plates on walls and damage yourself/the wall when your feet extend beyond your turning radius. Ask my walls how they know.
I know that 2001 wheelchairs were different from 2024 wheelchairs, but I don't know of a time when the casters were on their own long spindly stem that attaches to the seat.
#wheelchair batgirl#dc#barbara gordon#wheelchair#dc comics#birds of prey#oracle dc#wheelchair batgirl rates 8/10
4 notes
·
View notes
Text
Experiment time. My first monotub (nicknamed minecraft) is fully spent. Three beautiful flushes as expected. Her mycelium is too old to make mushrooms anymore. She was damp but no activity, and she had trouble holding together. Mushroom scent is weaker now, but still noticeable.
But I put a little coco coir where she split in half last time and she grew into it as young mycelium during the 3rd flush. No contam, so I broke her into a super tub with more substrate and food. No idea if this can even work, and the thickness is kinda insane, but it can't hurt at this point since she's reached the end of her life. This is normally how she dies, but nothing has moved in to eat her yet. She seems happy with the new substrate so I'm weirdly hopeful this could work. But I'm not counting on anything. You can't ever count on a damned thing with this. There is always an element of luck no matter what you do. Especially doing something without an established tek.
Mushrooms are fucking aliens, but they fascinate me to no end. There seems to be so little information on them, and conflicting information can both be true based of variables we just don't know about yet. So now I'm branching out and trying new things to see what works.
2025 please be kind and let me live. I have so much more I want to do with all these silly little guys. I want to try new kinds. I want to go out in spring and summer and fall to see what's in the wilds of Pennsylvania. I finally found my autistic thing after all these years, and I want the chance to become the mushroom queen in her magical forest. Some kinds only really can be cultivated in the wilds over the course of years. Those that live with the trees are very different, and they sustain each other. I want to work with them too.
I love mushrooms so much. Here's a fly agaric -> 🍄
4 notes
·
View notes
Text
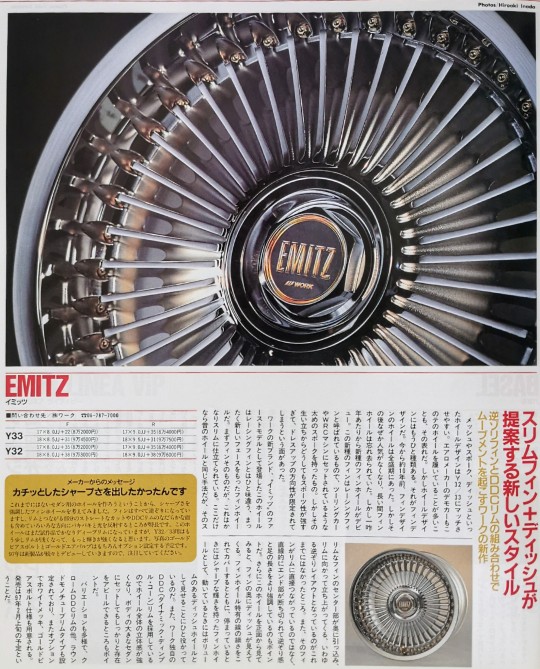
EMITZ
■Inquiries/Work Co., Ltd.
06-787-7000
A new style proposed by slim fin + dish
With the combination of reverse Zorifin and DDC rim
New works that create a movement
Wheel designs such as mesh, spokes, and dishes are easy to match with Y32/33. This is evidenced by the fact that demo cars from aero manufacturers often wear wheels made from this type. However, there is another type of wheel design. That's fin design. About 10 years ago, Fin Design wheels were at their peak. However, for some reason it fell out of favor after that, and the fin wheel was forgotten for a long time. However, a new type of fin wheel made its debut around the year before last. This new type of fin is called a racing fin, and it has thick spokes like those used on touring cars and WRC machines. However, due to her upbringing, she was too sporty, and her options for dressing up were limited.
This wheel, which was introduced as the first model of the new work brand "Emitz," is a fin wheel with a completely new face that is a little different from racing fins. First of all, the fin itself is made to be quite slim. This is the same method used for old wheels, but the center part of the rimmed fin retracts inward and rises toward the rim, creating a so-called reverse layout that has never been seen before. Another key point is that the fins are not directly connected to the rim, but are cut off at the end in a straight line, emphasizing the backwards feel and length of the legs. Furthermore, if you look at this wheel from the front, you can see the dish behind the fins. This covers the thinness of the lines peculiar to fin wheels, and also makes it look like a fin wheel with a sharp shine when it is stationary, and as a dish wheel with volume when it is in motion. It plays a role in this. In addition, the use of Work's unique DDC (Dynamic Dimple Cone) rim gives the entire wheel a strong three-dimensional feel, making it possible to make your presence known even when set on a large-bodied sedan.
There are many variations, including a chrome DDC rim and a round monotube rim type, as well as white plating and gold pierced bolt specifications as options. Release is scheduled for early February 1997.
Message from the manufacturer
I wanted to create a crisp sharpness.
Since we wanted to create a wheel for a sedan that has never been seen before, we came up with a fin wheel that emphasizes sharpness. The fins are all curved backwards, and the feature is that they reflect light in a variety of directions, including the straight cut where they connect to the rim and the gentle surface of the DDC rim. This wheel is still a prototype and has a fairly deep rim, but I think the Y32/33 version will have a slightly shallower rim and a stronger shine. The gold pierced bolt and gold air valve shown in the photo will of course be available as options. New products will debut one after another in 1997, so please keep an eye out for them.
13 notes
·
View notes
Text


holding for jongin: day 622 of 641 ↳ EXO KAI for Gucci on the set of Monotube | March 2021
57 notes
·
View notes
Note
hi mycopal :) I'm enjoying your blog and admiring your set up, seems very hightech. I'm also reading about cultivating a local (Australian) psilocybin variety we often find in pine forests. Could you point me in the right direction for more info to get started with a simple at home set up for beginners? thanks again for your good work :)
Hello there mycopal! Thanks for reaching out! I appreciate your kind words :) I’m super proud of my lab area! It has taken two years to put together by saving 25-50 a paycheck lol!! Humorously my roommate doesn’t like that i commandeered a whole room … haha, but here we are ;) What mushy are you looking to cultivate? Pscilocybe Tampensis or P. subtropicalis maybe? :)
note: my opinions and advice are based on my own experience and studious research :) there are MANY ways to skin things with… skin… lol; as such, my way should work for most but may not and there are many other mycoeducators with varied approaches that offer great insight in their own right :) I have a few vids on youtube (still new to content creating there and working on adding more) if you wanna see more of what I do as I outline it below! At the end of this long winded MCX response I will provide supportive resources for your consideration in order they are addressed in this response.
🍄Tip: get some nasalpharyngeal swabs so you can actively swab and store mushroom genetics you find in the wild for later reararch ;)
Pretext: I live in a (technically) tropical area so what i do with my research areas may be different than you! I am not sure how much of what im about to detail has been considered by you… but if youve considered it then disregard :) i like to break things down like you’re new new new incase theres any detail to miss.
Introductory Answering your Q: Basically you have to consider a handful of generalized steps for cultivating any fungus; and find TEKs (ie: guides by other mycopal’s that have yielded them success) and make your own tek— I always say that the mycojourney is coming up with your own tek, cobbled together from current teks that speak to you and also are appropriate for your resource availability :) after you get through my response you’ll have homework of studying resources but also: finding TEKs for your specific strain you want to work with :)
My preferred supplies-
Genetics: Dont know about the laws and availability where you live, but formal vendors (like innoculatetheworld ; sporeworks) and informal mycoeducators (who sometimes vendor spores) like PGT and Boomershroomer; are the only spore sources I trust (outside of my own stock;).
Boomershroomer makes quality inflatable monotubs and if you order one of her tubs she sends genetics with it! A little ‘secret’ ;) to be aware of!
PGT has a shop online thats only open sometimes but has a cool collectible trading card system for his genetics (buy the card get the microscopy supply with the card).
ITW and SW are generally up 24/7 and are more formal vendors that also sell microscopy stuff.
I currently use and recommend using 6qt shoebox totes for grow container (the kind that you buy in 5-10 packs from Walmart that have gusseted lids that allow some air flow for ‘sneakers’ to be stored hehe). Note that you can use 12/24/48/72qt etc, but I have no experience with those and they require larger set ups with fans, humidifiers, etc. i prefer less is more :)
I always promote a company called Microppose :) they do amazing filters and just started their own monotub production I think :) my fave substrate is CocoBliss coconut coir pith, and I use lab grade nutritional additives like: gypsum, lime, malt extract, and yeast off amazon in various stages of my process. For grain bags, before I made my own, I only trust: spawnmagic.com ; for my grains I use Producers Pride: Whole Oats (like what is given to horses) from the feedstore :) a 50lb bag has lasted me two years, no lie. I dont use bags, but jars for grain: i use brand: Ball, glass mason jars for spawn containers prior to moving spawn into a tub with substrate. I use Aozita wide mouth masonjar plastic lids (off Amazon) for my jars as they can be modified with filters and then pressure cooked safely and come with rubber seals :)
Now to go into detail to answer your question:
Here we go-deep breath-: lets talk cultivation and research starting:
1. Genetics: (a) multi spore syringe (mss) (can be injected into a grow bag but isnt ideal and may not produce viable strains) (recomended to use mss on agar to isolate your own colonies), (b) spore print/swab (requires agar) or (c) liquid culture (LC) isolate syringe (best option for immediate injection-inoculation of grain containers/bags with best chance for healthy growth and fruiting without time and hassle of the steps I outline further :)
1a. If you are able to work with agar (either make your own or buy premade sterilized, one time use agar plates): then you will start your journey by MSS->Agar->Isolate separate germinating colonies off mss agar plate to new plates (those become your mother isolate plates for each specific strain isolate for whatever strain youre working with). The mother plate should become your cold storage, reference plate as you study growth and fruiting characteristics of the colonies you isolate :) at that pont: You can then use some excised pieces of the mother plate (if in a rush, or if able to wait, till gen1 plates (transfers from mother plate to new plates that become duplicate isolates of the mother plate)) to inoculate a jar or two and also inoculate other plates to continue to ‘run the mycelium out’ / ‘chase the mycelium’.
1b. If you are not able to do agar work then I strongly suggest you seek genetics that are LC syringe. Basically, LC syringes are when mycopal takes a 2nd gen+ plate and moves some of that mycelium to sterile sugar water and lets the mycelium grow out in that water till its all filled with reproduced mycelium and can be sucked up into syringes for better more assured propagation of genetics ;)
Side thought: Spore swabs and spore syringed are dice rolls :) [Spore germination discussion incl quote from TMC- https://at.tumblr.com/mycochaos/uscrybal-commented-on-a-comment-i-made-quoting/pjzr0c86nlyt]
2. Grain spawn: once you have genetics hammered out, next is grain spawn. Grain spawn can be … well, any grain. Really. Mushrooms can colonize and fruit off of wet cardbord… 💯🍄😂, so what “type” of spawn is more about whats available in your area imo. Youll need to sterilize any grain spawn, unless using a premade bag thats already sterilized or taking chances with uncle bens (or similar) rice baggies that arent sterilized but are arguably cleaner than grains scooped out of a bags of grains from a mill or feedstore.
2a. Grain bags: milo, millet, rye berries, corn kernals, rice, whole oats, really any grain or berry that has a husk can be used :) some species prefer specific grains most work on all kinds of grains with varying levels of efficiency. Some grains are more or less robust and some do better when moistened and or pressure cooked than others :) i make my own grain but exclusively use glass mason quart jars :)
2b. Grain jars: my preference. I have recent grai. Jar prep and creation reels/shorts on my instagram and some on this tumblr if you wanna see specifics :) generally I do 15psi, 10 minute venting, for 1.5 hours for my grain and I do not soak grains, only low boil them for 30 min to soften husks and extract some grain nutrients to then use that liquid ‘grain soak’ run off for agar nutrients :)
2c. Uncle Bens rice bags: i dont do this and dont have any good advice on it. I have a UB tek link or two at end for consideration and there is a whole reddit mushroom sub i think r/unclebens (?) for this
2d. All in one bags: i also do not use these and do not recommend them generally. If you have never had a flush and are literally first timing it, then all in one may work fine :) but as much of the process you can source or create yourself the cheaper and often better, imo!
3. Substrate & Spawn-to-bulk (S2B): many mycopals have their own substrate preferences, but for me I prefer shaved coconut coir pith. I generally do a coir block 650g, 500g vermiculite (from garden store), and 50g gypsum + 50g lime for my substrate. I do not sterilize it, but I do heat pasteurize my substrate for at least 12 hours. In an air tight, insulated cooler (like for sodas at a party). You can also cold pasteurize. I like how Boomershroomer and PGT do their sub and learned from them then tweaked it for my own preferences :)
When my jars are fully colonized and observably free from contam, I will S2B using a clean butter knife :) I kinda cut down into the grain in pizza slices then swirl the knife around as I let grains that spill out mix with my substrate and basically do 1qt spawn to 2qt of substrate, saving maybe 10-15% of the spawn and substrate till end to make a special psuedo casing layer once bulk of spawn and substrate are mixed and compacted. Then I do a last sprinkling of the remaining grain like a baby lasgana and cover that with substrate.
Casing layer explainer: A casing layer is a layer of material applied on top of the colonized substrate in mushroom cultivation. It can help improve yield, reduce certain types of surface contaminants, and maintain humidity around the fruiting bodies. In my experience, using an organic sphagnum peat moss mixed with lime powder and filtered water has produced successful tubs without the need for pasteurization or sterilization. Before I used that i just used left over substrate as a casing layer :) — While some species require a specific type of casing layer after substrate colonization, most do not require one. However, adding a casing layer can be beneficial for improving yield and humidity control.
There are different ways to apply a casing layer. Some people apply it as part of the spawn to bulk (S2B) process, while others apply it only after the substrate surface is fully colonized or slightly before pinning. Personally, I have used a casing layer when colonizing pasteurized wheat/rye straw to provide an even fruiting surface for mycelium. I have also experimented with an organic peat and lime dust casing layer (no pasteurization or sterilization), which has helped retain humidity and has not resulted in any contamination. Personally, I've worked some APEs in that past that had a casing layer applied in the same instance as the S2B occuring, essentially the compacted bits colonized faster than the looser casing layer. Where I always use casing layer, is if I use spawn to colonize pasteurized wheat/rye straw, if only to provide an even fruiting surface for the mycelium! But, even then... most cubensis can fruit solely on pasteurized straw, with no casing layer!
4. Colonization and Fruiting:
4a. Youll need to find a TEK based on whatever substrate container you settle on using :) what ive outlined so far is my own tek, using 6qt shoe boxes and the materials ive outlined above. The substrate chamber/container can be a flat container/tote or could be fruited out the top of a grain bag/all-in-one bag OR could fruit off the side of a bag (if its a species like Oyster mushies that prefer side fruiting). I personally use unmodified tubs and will leave lid on my tubs while colonizing and then take lid off and replace with cleaned, upside down, misted 6qt tub that rests on the edges of the right-side-up tub to create a mini climate that allows more passive air flow, allows light to filter in from high angles promoting fruits growing upwards towards the light. Light isnt needed until pinning, and is a secondary trigger to pinning but a primary factor in pigmentation of fruits and growth direction of fruits.
Colonization of most mushroom fruiting fungi is generally between 68-80F, every species and even some varieties within those species, may have specific temp needs. The way mycopals control for this is many things that I dont have to use fortunately :) ‘Martha Tents’ are something to consider. Some use heating pads and humidifiers depending on where they live and where they are compared to the sea💯. I dont have any experience with martha tents or doing more than using my home A/C, a closet, and a heppa room filter to control my temps in the closet and with lots of trial and error…. I now leave my home at 72F, my closet warms to about 74 with the door shut and a/c at that temp, so i let plates, jars and tubs colonize at 74F and then I will move the tubs to open closet with more air flow and is closer to 72F when I am moving to fruiting :) Ive tried to be clever in how I use my space… so i use wire racks and know higher up on the rack is hotter and less air flow whereas lower is cooler and often more air flow.
Something I havent really gone into yet in this response is about sterility, aseptic environments, personal and environmental hygiene. All important to condsider…
4a. Heres my explainer on that:
Strict aespetic and hygiene techniques are not 100% and even using fancy laminar flow is not 100% contamination free potentials! Common contaminant sources include airborne spores, dust, and environmental factors. Pets that roam around your cultivation area could carry spores on their fur or paws, which may be released when they move through your space. Additionally, some fungal contaminants, like Kahms yeast, can present in distinctive ways and there are dimorphic fungal molds that have one or more alternate morphologies, main dimorphism being mold with a secondary yeast form (whence the mold spores get into human lungs, for example with blastomycosis perhaps) as an alternative reproductive presentation within its life cycle (based on temperature and environmental variables). It's essential to understand that spores and other contaminant-genetic cells are incredibly tiny and (in the case of most spores) can suspend in the air, waiting for air currents, light, or vibrations to move them around. Wet spores and bacterial cells oftentimes require animal assistance or liquid splashing/spritzing/spraying to move around, but can often hitch rides of natural environmental variabes (currents of wind, water, dirt, etc). Humans also carry a range of bacteria and fungal organisms on their skin, which can contribute to localized environmental dust and potential contamination when working in hyper sterile or attempted hygienic environments while researching fungi :)
4b: Primordia, Pins and Fruiting: Pinning is a colony activity (that impacts all sides of your cake once colonized) that shifts metabolic processes of the mycelia to pinning and fruiting, this is why when you start getting heavy side pins you rarely get any flat-surface pins and fruits (all the energy goes into what pins form and fruit, first). Additionally, I believe my suggestions will be effective in controlling for environmental triggers to pinning, it is important to note that side pinning can also occur due to other factors such as genetics or substrate composition.
You can reduce the microclimate from being created that promotes side pins, during the process, by ensuring that the substrate is firmly compressed, once S2B occurs, and then sprinkled with a .25" casing layer of the same substrate material (or peat+lime casing). I press my base spawn+cvg mix firmly, and ensuring that the surface is even with least amount of inconsistently level substrate surface. This early compression, keeps the cake against the wall for as longer than doing little to no compression of your spawn+sub. You should ensure your colonizing mycelium isnt exposed to the same lighting you would for fruiting, but light is only a secondary trigger to pinning, FAE+Temp Drop+Humidity pooling/then drying are the primary triggers for pinning once colonization has completed.
5. Harvesting and Dehydrating: i twist and pull my fruits, some will cut at base, some will float their cake with water and then cut or twist and pull at that poimt :) harvesting is preferential imo. I dehydrate fruits 125F for 24 hours in Air Fryer o. Dehydrate mode :)
Resources and foundational TEKs:
Genetics: innoculatetheworld.com, sporeworks,com, boomershroomer.com, pgtmycology,com
Casing layer post w/screencaps: https://www.tumblr.com/mycochaotix/723941213220339712/mycochaos-oldacnt-plzfollownew-one-of-my
Growing gourmet (book): https://drive.google.com/file/d/1-CsyZenWzF8kHLviXM8pencZ4FAHDedh/view?usp=drivesdk
PF tek - Check this site out, gives a great layout of "PF TEK" and also BRF cakes as part of that TEK - https://www.fungifun.org/pmwiki.php/English/Pftek
HOw to make easy (cvg) bulk substrate (boomer shroomer): https://www.youtube.com/watch?v=7M6YHfaMyQ8&t=3s
how to make plates, slants, and LC - north spore - https://www.youtube.com/watch?v=a4bzQQkh71Q&t=487s
pgt LC basics - https://www.youtube.com/watch?v=gqwjUq31KgU&t=284s
Southwest mushrooms - mycelium grain spawn and LC - https://www.youtube.com/watch?v=rxlJJpu3O_g
How to sterilize equipment such as petri dishes - MIcrobehunter microscopy - https://www.youtube.com/watch?v=MVtEBtxkhGk
mycelium inoculation in the lab - southwest mushrooms - https://www.youtube.com/watch?v=Ng_Wq9PnEVI&t=560s
Mushroom Cultivation, how it should and shouldnt look: https://www.shroomery.org/forums/showflat.php/Number/17231150
Recognizing and dealing with contamination: https://www.shroomery.org/forums/showflat.php/Number/23130868
Sterilization vs Pasturization - http://www.differencebetween.net/science/difference-between-sterilization-and-pasteurization/
Mushrooms, Molds and Mycorrhizae: A Fungal Immersion Course Part 1 - https://www.youtube.com/watch?v=dD1IL2dBLQ8
Mushrooms, Molds and Mycorrhizae: A Fungal Immersion Course Part 2 - https://www.youtube.com/watch?v=_bam3tF_a7M
Mushrooms, Molds and Mycorrhizae: A Fungal Immersion Course Part 3 - https://www.youtube.com/watch?v=AiIUGGKjuwU
Mushrooms, Molds and Mycorrhizae: A Fungal Immersion Course Part 4 - https://www.youtube.com/watch?v=KLfwruf2xVA
Guide to Oysters, Gourmet, Freshcap - https://www.youtube.com/watch?v=EZAjz6bZjpg
Cooking Oyster mushrooms, TGS - https://www.youtube.com/watch?v=7qb2KF6kvhA
5 gallon bucket tek - oyster mushrooms - gourmet - https://www.youtube.com/watch?v=45b2t7fqhjA&t=60s
Mycophilia YT 'All About Aborts' discussion: https://www.youtube.com/watch?v=9C8x_32Saxg
Bacterial colony morphology - https://www.youtube.com/watch?v=4JZAFUPckUg
Mycelium morphology : how to select healthy mycelium when breeding mushrooms -- https://www.youtube.com/watch?v=leUpfsonVxc&t=1s
mycotrophic - agar xfers/sectoring off healthiest growth - https://www.youtube.com/watch?v=XMxGwkj9Wn4
DayTrippers Microscopy library of contam and healthy mycelium examples: https://www.reddit.com/r/ContamFam/comments/nnquol/microscopy_of_healthy_mycelium_and_contamination/
PH trich conversation pt 2 DT: https://www.reddit.ccom/r/ContamFam/comments/jldtuw/my_garden_of_contam_free_grow_it_is_all_about_the/
DayTrippers Trip Tips - apply PH casing layer to prevent trich: https://www.reddit.com/r/ContamFam/comments/m3unbr/daytrippers_trip_tips_video_tutorial_on_how_to/
Trich contamfam library: https://www.reddit.com/r/ContamFam/comments/115gyj2/trichoderma_the_green_monster/?utm_source=share&utm_medium=web2x&context=3
If FAE is a problem: not pinning, getting Cobweb, Stroma Overlay! “READ THIS”: https://www.reddit.com/r/ContamFam/comments/jur5ar/daytrippers_trip_tip_why_cant_i_get_this_if_fae/
DayTripper’s Trip Tips: Two cultivation tricks to solve common problems of insufficient Fresh Air Exchange and Overlay growth in monotubs: https://www.reddit.com/r/ContamFam/comments/10w1yxm/daytrippers_trip_tips_two_cultivation_tricks_to/?utm_source=share&utm_medium=web2x&context=3
#mycology#lgbtqia2s#magic mushies#microbiology#mold#60s psychedelia#lgbtqia#lgbtqia2s+#myc#enby#myco#fungi#fungusamongus#fungus#funthey#funthem#nb#non binary#psychedlia
13 notes
·
View notes
Text
The 2024 KTM 990 Duke Hits The Bullseye With Sniper-like Accuracy
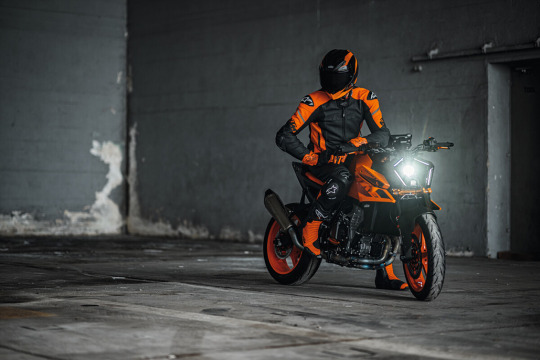
Heralding a massive leap forward for the KTM Naked range, the all-new KTM 990 DUKE takes aim directly at the coveted 1000 Naked bike segment, pulling no punches! With 2024 marking 30 YEARS OF DUKE, the all-new KTM 990 DUKE slots into the line-up like a well-polished round in the chamber. In its quest to be the most performance-focused NAKED machine possible, the KTM 990 DUKE ticks all the right boxes mechanically, while deploying extreme new styling. The KTM 990 DUKE makes its intentions perfectly clear. Apart from a blisteringly potent engine, an all-new chassis and swingarm design – not to mention updated ergonomics and technology – it now sizes up to larger capacity motorcycles in both displacement and proportions.
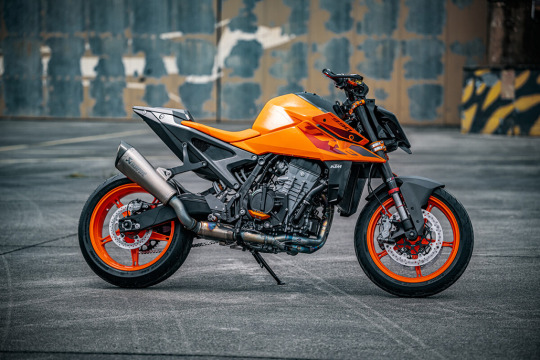
Side-on, the new design has been modelled around the concept of an explosion in a freeze-frame, harnessing extreme energy ready to be released. This new design is further enhanced by two colourway options; Black and Electric Orange – the latter being reminiscent of the Naked models of a bygone era, developed specifically to celebrate 30 YEARS OF DUKE. At the face of it, predatory design meets reduced styling with its evolved LED headlight being a stand-out feature of the all-new KTM 990 DUKE. Constructed from a carefully chosen mix of materials, the new design ensures lighting stability in all road conditions. Position and daytime running lights are located on the profile of the headlight, which also auto-adjusts in intensity according to ambient light conditions thanks to a light sensor integrated into the dashboard. Additionally, the KTM 990 DUKE is fitted with a Coming Home light function as standard. Here, the headlight will remain on after the ignition has been switched off, awarding the rider with a few seconds of light to open doors or for better visibility in the garage.
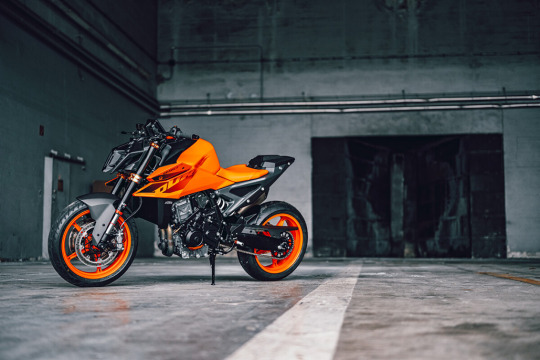
Power is taken care of by a dramatically updated version of the LC8c engine found in the KTM 890 DUKE R. Boasting 947 cc, the roaring heart of the KTM 990 DUKE receives new pistons, crankshaft and conrod, producing a fire-breathing 123 HP and 103 Nm, with a total motorcycle weight of only 179 kg, ready to ride. The KTM 990 DUKE takes its DNA from the long lineage of hard-hitting DUKE models that have come before it, adding more verve and aggression for 2024. It is a performance-oriented machine at its core, designed around a lightweight, flickable chassis that inspires utmost rider confidence. In typical DUKE fashion, a stiff trellis frame and a new closed-lattice swingarm come together to welcome high-quality adjustable WP APEX Suspension components. These, together with track-proven Bridgestone S22 tyres, provide SNIPER-like accuracy when it comes to cornering stability. The WP APEX Suspension fitted to the KTM 990 DUKE features easy-to-adjust settings, encouraging the rider to push the limits comfortably. Upfront, the 43 mm WP APEX Suspension can be easily and accurately dialed in with 5 clicks on both rebound and compression. On the rear, the WP APEX Monotube shock absorber can be adjusted in 5-clicks, with manual preload adjustment also possible.
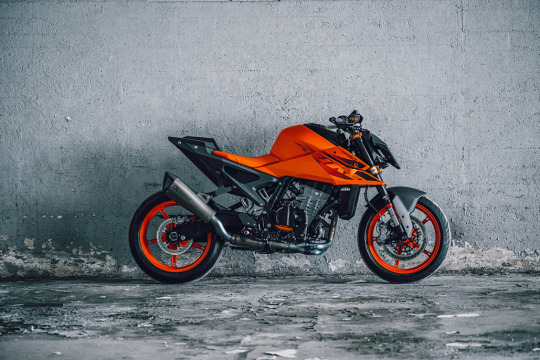
Once seated, riders are greeted by a 5-inch, anti-scratch bonded glass dashboard providing all the information a KTM 990 DUKE pilot could need. Revised graphics and menu structures are designed for faster, more intuitive access to the various features of the KTM 990 DUKE. This includes a new function that displays Lean Angle data, with an optional TRACK Mode complete with lap timer and telemetry stats. A USB-C connection is also added for device charging duties. In short, the brief was simple; develop the ultimate mid-class NAKED machine. In achieving this, the 2024 KTM 990 DUKE hits the mark dead centre. A full range of specially developed KTM PowerParts and KTM PowerWear are available for riders to personalise their motorcycles and get themselves kitted up in READY TO RACE performance. The 2024 KTM 990 DUKE will be available from Authorised KTM Dealers from February 2024 onwards, for £12,999 OTR. Discover more about 30 YEARS OF DUKE and the all-new 2024 KTM 990 DUKE at HERE. Read the full article
2 notes
·
View notes
Text
Finally starting to see some growth on my Mushroom spawn! I inoculated the spores a few weeks ago but the cold here has slowed the growth down a lot. I reckon it'll be at least another 4 or 5 weeks until the spawn is ready for the monotub.
It's nice to have a project that takes almost no effort or attention. And at the end I'll have Mushrooms!
1 note
·
View note
Text


Bilstein 5100 Assembled Tundra Struts – Titan Swap Length: The Ultimate Suspension Upgrade
Product Information
The Bilstein 5100 Assembled Tundra Struts – Titan Swap Length is a premium suspension upgrade designed for off-road enthusiasts and performance-driven drivers. Engineered for enhanced ride quality, stability, and durability, this product is the perfect solution for those looking to elevate their vehicle’s suspension system. With the Bilstein 5100, drivers can experience improved handling, better shock absorption, and increased control over rough terrain.
Why ChooseAssembled Bilstein 5100 Tundra struts - Titan swap length?
When it comes to upgrading your vehicle’s suspension, quality and reliability are key factors. The Bilstein 5100 Tundra struts are a proven choice among off-road and performance enthusiasts due to their superior construction, adjustable ride height options, and long-lasting durability. Whether you’re tackling challenging terrains or simply looking for a smoother ride on highways, these struts deliver unmatched performance and comfort.
Complete & Convenient: Pre-Assembled Bilstein 5100 Tundra Struts for Easy Installation
The Bilstein 5100 Assembled Tundra Struts – Titan Swap Length package comes with everything needed for a seamless installation. The pre-assembled kit saves time and effort, ensuring that you can get back on the road or trail as quickly as possible.
Is This Suspension Upgrade Right for You? Perfect for Off-Roaders, Truck Owners & Titan Swap Conversions
This suspension upgrade is perfect for:
Off-road enthusiasts who need enhanced shock absorption and stability
Truck owners looking for a smoother and more controlled ride
Drivers upgrading their vehicle for improved ground clearance and performance
Those performing a Titan Swap conversion for their Tundra or other compatible vehicles
Key Features and Benefits
1. Superior Shock Absorption
The Bilstein 5100 struts feature a monotube gas pressure design that provides consistent and fade-free performance in extreme conditions. Whether you're navigating rocky trails or handling uneven roads, these shocks will keep your ride smooth and stable.
2. Adjustable Ride Height
With adjustable ride height options, the Bilstein 5100 allows users to customize their suspension setup to accommodate larger tires and enhance ground clearance without compromising ride quality.
3. Enhanced Durability
Made from high-quality materials, these struts are built to withstand the toughest environments. The zinc-plated steel body provides excellent corrosion resistance, ensuring long-term reliability.
4. Improved Handling and Stability
These struts significantly enhance vehicle handling by reducing body roll and improving traction. Whether you're cornering at high speeds or traversing rugged terrain, the Bilstein 5100 offers unparalleled stability.
5. Perfect for Titan Swap Conversions
If you're performing a Titan Swap on your Tundra, these struts are a must-have. Designed specifically for this application, they provide the necessary length and support required for an effective and efficient swap.

http://cjdracing.com/cdn/shop/files/TTR.webp?v=1715882388
Who Should Consider the Bilstein 5100 Assembled Tundra Struts?
The Bilstein 5100 Assembled Tundra Struts cater to a wide range of vehicle owners and driving styles, including:
Off-Road Adventurers – Those who love to explore rugged trails will benefit from improved suspension performance and durability.
Daily Drivers – Truck owners who use their vehicles for daily commuting will enjoy a smoother, more comfortable ride.
Performance Enthusiasts – Those who seek better vehicle handling and suspension tuning will find this product a game-changer.
Mechanics and DIY Installers – The pre-assembled design makes installation a breeze, saving time and effort.
Unboxing the Bilstein 5100: Everything You Get for a Hassle-Free Upgrade
When you purchase the Bilstein 5100 Assembled Tundra Struts – Titan Swap Length, you will receive:
A pair of Bilstein 5100 struts (pre-assembled for easy installation)
Heavy-duty coil springs
High-quality mounting hardware
Detailed installation instructions
Why Choose CJD Racing?
CJD Racing is a trusted name in the off-road and performance suspension industry. When you purchase from CJD Racing, you benefit from:
High-Quality Products – Every product is tested and designed for durability and superior performance.
Expert Customer Support – The knowledgeable team at CJD Racing is always available to assist with questions, installation guidance, and product recommendations.
Competitive Pricing – Get the best value for your money with top-tier suspension upgrades at affordable prices.
Fast and Reliable Shipping – Orders are processed quickly so you can get your parts when you need them.
Enhance Your Tundra’s Performance with Bilstein 5100 – Upgrade Today
Upgrade your truck’s suspension today with the Bilstein 5100 Assembled Tundra Struts – Titan Swap Length. Experience the difference in ride quality, handling, and durability.
Upgrade Your Ride: Why the Bilstein 5100 Assembled Tundra Struts Are the Ultimate Suspension Solution
When it comes to enhancing your truck’s suspension, settling for anything less than the best isn’t an option. The Bilstein 5100 Assembled Tundra Struts – Titan Swap Length offers the perfect balance of performance, durability, and ease of installation. Whether you're hitting the trails or cruising on the highway, these struts will elevate your driving experience. Invest in quality, choose Bilstein 5100, and trust CJD Racing for all your suspension needs!
0 notes