#netgear firmware upgrade
Explore tagged Tumblr posts
Visit Tumblr Blog
Explore Tumblr blogs with no restrictions, modern design and the best experience.
Last Seen Tumblr Blogs


Fun Fact
In February 2021, Tumblr had 518.6 million blog accounts.
Text
How to login netgear wifi extender?
It is easy to modify and customize the settings of your Netgear WiFi extender by logging in.
Make that the extender is within range of your current WiFi network and that it is correctly connected to a power supply before starting.
After the extender has been turned on, link your PC or mobile device to the default network—usually called "NETGEAR_EXT."
Once connected, use a web browser and input 192.168.1.250 or http://mywifiext.net into the address bar.
This will launch the Netgear WiFi extender login page. When logging in for the first time, you'll be asked to either set up an account or configure the extender by providing the login credentials for your router.
If you’ve previously set it up, log in with the credentials you created during the first setup.
It's typically possible to reset the extender if you've forgotten your login information.
To accomplish this, press and hold the reset button for around ten seconds, which will reset the extender to its initial configuration. Resetting it will require you to set it up again.
Once signed in, you may adjust settings like the WiFi network name (SSID), password, or security options, and check the connection status between your router and the extender. You can keep an eye on performance, fix problems, and upgrade firmware for improved security and performance by logging in frequently.
For more details visit our website.
0 notes
Text
youtube
📣 Upgrading your Netgear C9800-CL wireless controller just got easier! 📣
🎬 Watch & learn as we walk you through the process, step by step. No more struggling with confusing manuals or mysterious tech jargon. We've got you covered! 😎
��� Why upgrade? 🌟
Boost your Wi-Fi speed & range
Enjoy smoother streaming & gaming
Secure your network with the latest firmware
🛠️ What you'll need: 🛠️
A computer (Windows or Mac)
A USB drive (2GB or less)
The latest firmware file (download it from Netgear's official site)
🎬 Now, let's dive into the video! 🎬
We'll show you how to download & prepare the firmware file
Then, we'll guide you through the upgrade process on your C9800-CL
Finally, we'll test the new firmware & make sure everything's running smoothly
💡 Pro tip: 💡 Always backup your router's settings before upgrading. You never know when you might need them!
🤝 Got questions or need help? 🤝 Drop a comment below, and we'll do our best to assist you. After all, we're all in this together! 🤗
🎉 Happy upgrading, tech enthusiasts! 🎉
0 notes
Text
To Update The Netgear Router Firmware, open the web browser and type the routerlogin.net web address in the browser bar. Now, type the username & password on the login window. Hereon, select Advanced > Administration>Firmware Upgrade and follow the on-screen instructions to complete the Firmware update or connect with us!
0 notes
Text
How to Update Netgear router firmware? Quick Guide Here!
You can update the Netgear router firmware using the setup wizard or through the app as well. You can sign in to the setup wizard and head to the admin settings section. Once there, you can access the firmware update section and click on the firmware upgrade button to proceed. For more help with the firmware process, you can read through our website now.
1 note
·
View note
Text
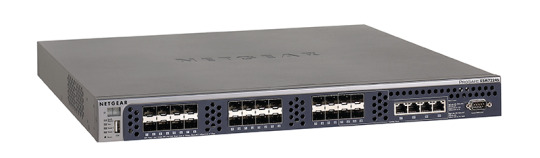
Netgear M7300-24XF (XSM7224S) Software Administration Manual: A Comprehensive Overview
The digital era has revolutionized the way businesses and individuals connect, communicate, and collaborate. Amidst this shift, networking equipment has become paramount to ensuring seamless connectivity. A shining example of cutting-edge networking technology is the Netgear M7300-24XF (XSM7224S). This article delves deep into the intricacies of the Netgear M7300-24XF (XSM7224S) Software Administration Manual, providing a concise understanding of its features, benefits, and administration procedures.
1. Overview of the Netgear M7300-24XF (XSM7224S)
The M7300-24XF, more popularly recognized as the XSM7224S, stands as one of Netgear’s flagship products in the realm of managed switches. Designed for small to medium-sized enterprises, this switch offers robustness and scalability. With 24 SFP+ ports and high-speed 10G connections, the XSM7224S is not only built for speed but also for flexibility.
2. Features of the Netgear M7300-24XF (XSM7224S)
High-Performance Connectivity: Offering 10G connections, the switch ensures lightning-fast data transfers, making it ideal for data-intensive applications and businesses with expanding network requirements.
Advanced VLAN Features: Equipped with VLAN routing, private VLANs, and protocol-based VLANs, the device facilitates better resource management and enhanced security.
Comprehensive Security Suite: With features like ACL filtering, MAC lockdown, and guest VLAN, administrators can ensure robust security and protect sensitive data from potential breaches.
User-friendly Interface: The Netgear software administration interface is designed for ease of use, allowing administrators to manage and configure the switch effortlessly.
3. Administering the Netgear M7300-24XF (XSM7224S)
Initial Setup: Like most Netgear products, the XSM7224S features a step-by-step setup wizard. Following the on-screen instructions ensures a hassle-free setup, allowing the switch to be operational within minutes. Visit https://mans.io/files/viewer/26305
Configuration: Through the software administration manual, users are guided through various configuration settings, including IP settings, VLAN configurations, and port settings.
Firmware Updates: To ensure optimal performance and security, Netgear regularly releases firmware updates for its products. The administration manual provides a detailed procedure on how to safely update the switch's firmware.
Troubleshooting: The manual is also an essential resource for troubleshooting common issues. Whether it's a connectivity problem, performance lag, or configuration challenge, the software administration manual provides solutions and best practices.
4. Benefits of Using the Netgear M7300-24XF (XSM7224S)
Scalability: With 24 ports, businesses can easily expand their networks as they grow, without the need for frequent hardware upgrades.
Robust Performance: The high-speed 10G connections ensure that data transfers are swift and seamless, meeting the demands of modern businesses.
Advanced Security: The in-built security features offer peace of mind, ensuring that sensitive data remains protected from potential threats.
Cost-Efficient: Given its features and performance, the XSM7224S offers tremendous value for money, making it an ideal choice for businesses looking for a budget-friendly yet powerful networking solution.
5. Conclusion
In a rapidly digitalizing world, having a reliable and efficient networking system is non-negotiable. The Netgear M7300-24XF (XSM7224S) emerges as a top contender in this arena, offering unparalleled performance, security, and scalability. With the help of the software administration manual, even those new to network administration can confidently manage and optimize the switch's capabilities. Whether you're a growing business or an established enterprise, the XSM7224S promises to be a game-changer in your networking journey.
0 notes
Text
In the 21st century, whosoever has brought and installed the Netgear router in their homes has complained that they are unable to do Netgear firmware upgrades because of the IP not working issue. In case you are also in the same mess, then the troubleshooting tips mentioned below will be of great help to you. Taking that into consideration, continue reading.
0 notes
Text
How To Update Netgear Router Firmware?
How To Update Netgear Router Firmware?
Netgear firmware is the software that runs all the router functions. The company keeps releasing firmware updates to fix bugs and protect routers from network threats. When you update Netgear router firmware it comes with some latest features. So, you need to keep up to date on your Netgear firmware. Does NETGEAR automatically update the firmware? How do I know if my router needs a firmware…

View On WordPress
0 notes
Link
To ensure proper functionality, it is recommended to update the Orbi router firmware. The Orbi router firmware update will enhance the security and improve the performance. Netgear Orbi router and satellite are intended to update their firmware automatically. Though sometimes, your Orbi router and satellite may fail to auto-update their firmware. The Orbi firmware update failed may cause a hard time for you. Usually, this issue occurs due to slow or weak internet connection. Fortunately, there are some steps and tips that a user can use to get rid of Netgear Orbi firmware issues. Updating the Orbi firmware on your own could be a monotonous task. You need to grasp the steps in order to successfully update or upgrade your Orbi router.Regular checking and updating firmware is very essential to secure your router from malware and cyber-attacks. We highly recommend orbi users to check and update firmware on time to get the best performance and latest security features on your orbi router.
#orbi firmware update not working#orbi firmware update failed#orbi firmware problems#how long does orbi firmware update take
1 note
·
View note
Link
Netgear Nighthawk app is the most reliable application which offers you an easy way to control your Nighthawk router login settings from a computer and smartphone. Download the Netgear router app from the Play store or the App Store. With the Netgear Nighthawk app for PC and smartphone, it becomes really easy to perform the Netgear router setup. One can easily install their Netgear WiFi router on their own. To set up your Netgear router, you need to download the Nighthawk app, log in to your router, and follow the on-screen Netgear Nighthawk setup instructions. Nighthawk app installation is a simple and easy process. The Netgear router app makes the firmware updates easy to install. Get a timely notification using the Netgear Nighthawk app for PC when it's time to upgrade the firmware of the Netgear device.
1 note
·
View note
Link
If you can’t update Orbi firmware, you might see Netgear Orbi router firmware upgrade error on your device. Regular checking and updating firmware is very essential to secure your router from malware and cyber-attacks. To ensure the smooth functioning of Netgear Orbi, it is recommended to update its firmware whenever a new version available. Both the orbi router and satellite are set to update their firmware automatically. However, sometimes, your router and satellite may fail to auto-update their firmware. And the netgear orbi firmware update failure may result in a lot of issues. Generally, this issue happens because of a weak or slow internet connection. Fortunately, orbi firmware update failed error can be resolved with a few simple troubleshooting tips.
#orbi firmware update not working#orbi firmware update failed#orbi firmware problems#how long does orbi firmware update take
1 note
·
View note
Link
Netgear Orbi is among the finest devices out there that is famous for its high-speed internet services. In order to enjoy the netgear orbi services peacfully, You need to make sure that you are Updating the Orbi's Firmware when it is necessary. But when it is not updated on time, it is possible then it is very possible that you may face various issues. There is sometimes an issue where you are going to face the Netgear Orbi Firmware Check Error. You are going to face this error if you are not updating the firmware correctly. There are some steps that you need to follow in order to make sure that you are upgrading your firmware.
#orbi firmware update not working#orbi firmware update failed#orbi firmware problems.#how long does orbi firmware update take
1 note
·
View note
Text
Tips and best practices for optimizing your smart home
You’ve figured out the basics of setting up your smart home, now it’s time to raise your game. I’ve spent years installing, configuring, and tweaking dozens of smart home products in virtually every product category. Along the way I’ve figured out a lot of the secrets they don’t tell you in the manual or the FAQs, ranging from modest suggestions that can make your smart home configuration less complex, to essential decisions that can save you from having to start over from scratch a few years later.
Here’s my best advice on how to optimize your smart home tools, top tips and best practices.
1. Choose a master platform at the start These days, an Amazon or Google/Nest smart speaker or smart display can fill the role of a smart home hub (and some Amazon Echo devices are equipped with Zigbee radios).
There are three major smart home platforms on the market, and your smart home will probably have at least one of them installed: Amazon Alexa, Google Assistant, or Apple Home Kit. The industry now revolves around these three systems, and virtually every significant smart home device that hits the market will support at least one of them, if not all three.
These platforms are different, of course. Alexa and Google Assistant are voice assistants/smart speakers first, but the addition of features that can control your smart devices has become a key selling point for each. Home Kit is a different animal, designed as more of a hub that streamlines setup and management. But since Home Kit interacts , it too offers voice assistant features provided you have your iPhone in hand or have an Apple Home Pod.
All three of these platforms will peacefully coexist, but you definitely don’t need both Alexa and Google Assistant in the same home, and managing both will become an ordeal as your smart home grows larger. It’s also completely fine to use Home Kit for setting up products and then using Alexa or Google Assistant for control. If you have a Home Kit hub device (either an AppleTV or a Home Pod), you’ll want to use it, as it really does simplify setup.
2. You don’t necessarily need a smart home hub In the early days of the smart home, two wireless standards, Zigbee and Z-Wave, were going to be the future. These low-power radios offer mesh networking features that are designed to make it easy to cover your whole home with smart devices without needing to worry about coverage gaps or congestion issues.
The main problem with Zigbee and Z-Wave devices is that they require a special hub that acts as a bridge to your Wi-Fi network, so you can interact with them using a smartphone, tablet, or your computer (while you’re home and when you’re away, via the internet). Samsung SmartThings is the only worthwhile DIY product in this category at present; its only credible competitor used to be Wink, a company that is now on its third owner and which has a questionable future at best. The Ring Alarm system has both Z-Wave radios onboard, but it’s much more focused on home security than home control.
As simple as Smart Things and Ring Alarm are, you’ll still face a learning curve to master them, and if your home-control aspirations are basic, you might find it easier to use devices (and the apps that control them) that connect directly to your Wi-Fi network and rely on one of the three platforms mentioned above for integration. It’s worth noting here than the 800-pound gorilla in the smart lighting world—Signify, with its Philips Hue product line now offers families of smart bulbs that rely on Bluetooth instead, so they don’t require the $50 Hue Bridge.
That said, however, you’re limited to controlling 10 Hue bulbs over Bluetooth. The Hue Bridge is required beyond that, and it’s also required if you set up Hue lighting fixtures, including its outdoor lighting line.
The bottom line on this point: Unless you want to build out a highly sophisticated smart home system, I recommend sticking with products that connect directly to your network via Wi-Fi, rendering a central hub unnecessary.
3. Range issues can create big problems
The downside of installing Wi-Fi only gear is that everything in the house will need to connect directly to your router. If your router isn’t centrally located and your house is spread out, this can create range issues, particularly in areas where interference is heavy: the kitchen, bathrooms, and anything outside.
Your best bet is to check your Wi-Fi coverage both inside and outside the house before you start installing gear. Make a map of dead zones and decide whether you can live with them. If not, you’ll want to consider relocating your router or moving up to a mesh Wi-Fi network with two or more nodes. You can read more about mesh Wi-Fi networks here.
Interference can also be a troubling problem that changes over time. If your next-door neighbor upgrades or moves his router, you may find that an area of the house with a once-solid signal has suddenly become erratic. You can tinker with the Wi-Fi channel settings in your router’s administration tool, but deploying a mesh network is a more sure-fire solution. Netgear even has an Orbi mesh node that can be installed outdoors to cover your backyard.
4. You don’t need smart gear everywhere
Many a smart home enthusiast has dreamed of wiring his entire home from top to bottom with smart products. A smart switch in every room and a smart outlet on every wall sounds like a high-tech dream; in reality, it can spiral into a nightmare.
The biggest problem is that while smart gear can be amazingly convenient, it also adds complexity to your environment because all of it must be carefully managed. Does installing 50 firmware updates sound like a great way to spend the weekend? Or troubleshooting that one switch that just won’t suddenly connect properly? Deploying smart speakers all over house, so you don’t need to yell for one to hear you, sounds like a great idea, too—that is, until the speakers have difficulty deciding exactly which one you’re talking to.
Devices such as Leviton’s Decora Smart Voice Dimmer with Amazon Alexa make it easy to put Amazon’s digital assistant in every room, which sounds like a great idea until they start fighting each other to answer your commands. In choosing where to install smart gear, think first about necessity. The hard-to-reach socket where you always plug in your Christmas tree is a perfect place for a smart outlet that can be set on a recurring schedule. The kitchen is a great option for voice control, so you don’t need to touch anything with dirty hands. My living room feature is lighted by three lamps which would normally have to be turned off and on individually; with smart bulbs and Alexa, it’s easy to power them on with a couple of spoken words. But does the overhead light in the master closet really need to have any of these features?
And finally, there’s the obvious issue: Smart gear isn’t cheap, and outfitting a large home with smart gear can quickly become exorbitantly expensive. Think about what happens when your gear becomes outdated (and out of warranty)?
The bottom line: While it’s a great idea to install everything you think you’re going to use at the start of your project, don’t overdo it. You can always add on to your system down the road. Install smart gear only where you legitimately know you will use it.
5. Consolidate vendors It might sound like common knowledge to suggest you try to stick with a single vendor when it comes to all your switches or light bulbs, but it’s easy to be wooed by a product that promises new features or better performance. Avoid taking the bait: Over time, bouncing from one vendor to the next will leave you managing multiple apps, and you’ll likely get confused about which one goes with which device.
Many smart outlets and switches don’t carry a visible brand logo, so it isn’t always as easy as just checking the hardware itself to see where you should go. (Making matters worse, many smart products use a management app with a name that that has no relation to the hardware’s name.) And while most HomeKit-capable apps can control other vendors’ Home Kit devices, you’ll still usually need the official app to get things set up initially and to perform regular maintenance.
The good news is that Tech Hive has plenty of buying guides in almost every smart home category to help take the guesswork out of figuring out which brands to build your home around, so you needn’t experiment to find the best products on the market.
6. Give your gear short, logical names By default, many smart products will give themselves a name during setup that consists of generic terms and random digits, none of which will be helpful to you in identifying them later. It’s best to give your gear a short but logical and easy-to-remember name when you first set it up.
Start by giving all the rooms in your house a name in the management app, even if they don’t have any gear in them. (You might install equipment there later.) “Bedroom” is not a good name unless you only have only one. You’ll want to use the most logical but unique names possible here: “Master bedroom,” “Zoe’s bedroom,” “Guest bedroom,” and so on.
Now, when you install a product, standardize names using both the room name and a description of the item—or what the item controls. For example: “Master bedroom overhead lights” for a wall switch or “Office desk lamp” for a smart plug connected to said lamp. In rooms where you have multiple products, you can use a longer descriptor, numerical ID (1, 2, 3…), or something similar. In my living room, the three lamp smart bulbs are named Living room lamp left, center, and right, so if one isn’t working in the app, it’s easy for me to figure out which is which.
Doing this work up front will save you time if and when you connect your gear to a voice assistant. Not only does having a standardized, logical naming system make it easy for you to remember what to say, changing the name of a product in its app generally means having to re-discover the product within your voice assistant app, which is a hassle.
7. Wiring never looks like it does in the pictures
Manuals and online guides always make in-wall wiring look like a standard, well-organized affair, but I can assure you that many an electrician has taken some significant liberties with the way that switches and outlets are wired in the average home. Don’t be surprised to find multiple black line/load wires when you expected to find just two, strange in-wall hardware that doesn’t look like the picture, and wiring that simply doesn’t make sense.
The neutral wire required by the vast majority of smart switches and outlets is typically white. So which of these two white wires is the neutral? Of course, you can always experiment as long as you’re patient. There’s little risk of damaging the product if you miswire it the first time. Just make sure you’re turning the power off at the circuit breaker before you touch anything.
As a last tip on wiring, note that neutral (typically white) wiring is essential for most of the smart switches on the market. If there is no neutral wire in the electrical box where you want to install a smart switch, you’ll need to seek out the handful smart switches and dimmers that don’t require a neutral wire, like these C by GE models or certain switches.
8. Expect problems to emerge without warning
You know how your computer suddenly starts crashing every day, or your printer abruptly vanishes from the network? The same kind of things happen to smart home gear, which, after all, are miniature computers of their own, all prone to the same types of issues. Expect the occasional product to abruptly disconnect from your network, vanish from the management app, or stop working altogether—even after months or years of otherwise trouble-free operation, without any discernable reason. In many cases, you’ll need to manually reset the product to get it to reconnect to the app. Sometimes the app will guide you through this process, otherwise a quick Google search can get you squared away.
9. Pay attention to battery life
Devices not attached directly to the grid rely on battery power to operate. Door/window and motion sensors, smart locks, smart doorbells, many cameras, smoke alarms, and more are all likely to require regular battery replacements or recharging, and while many devices claim to last for multiple months or even years, the reality is often shorter than that.
Take stock of the batteries each of these devices use—some are truly oddball cells that you won’t have in the junk drawer—and keep spares on hand for when they die. Devices that use a rechargeable battery like the Ring Doorbell are supposed to alert you via the app when the battery is running low, so you can recharge it before it goes totally dead, but my experience is that these alerts are rarely actually delivered (or end up being ignored).
If your Ring Video Doorbell’s battery is dead, you’ll never know if someone’s ringing the bell (which, in my case, usually means a “missed delivery” slip from FedEx). I check my Ring’s battery life in the app once a week (it’s under Device Health), and when it hits about 35 percent, I remove the cell and charge it back up (you can also buy spare Ring batteries and just swap a dying battery for a freshly charged one).
10. Dimmers can be particularly problematic
Electrical dimmers like the old-school wall-mounted dial type work by lowering the amount of electrical current being sent to the load device, which will, say, lower the brightness of an incandescent bulb or slow down a fan. Unfortunately, dimmers pose particular problems for many devices. Smart home devices are especially problematic when dimmers are attached, because they contain electronics and radios that simply won’t work if the power isn’t coming through at full strength. As such, it’s a bad idea to connect devices like smart light bulbs to circuits that are connected to a dimmer.
On a similar front, you’ll need to be especially observant if you replace an old toggle switch with a smart dimmer. As a shortcut, sometimes switches are wired with pass-through circuitry that is meant to pass along current to other devices (such as a nearby power outlet). If you swap out this switch with a dimmer, you might inadvertently connect the dimmer to those outlets, causing them to lose all or partial power, making for a complex troubleshooting session.
1 note
·
View note
Text
New Extender Setup | My Wifi Range Extender Setup

The manual establishment technique for the WiFi extender arrangement is known as mywifiext arrangement. At the point when go to mywifiext.net for your Wifi extender, it gives you on-screen Setup steps to do. That is the reason your WiFi range extender is regularly alluded to as a shrewd arrangement wizard. In this part, you can discover direction on the most proficient method to get to your Netgear Extender Setup page:
Snap the Setup button for the new extender.
Enter your username and secret key to login to www.mywifiext.net.
After that the Netgear Genie Setup wizard will open up.
Follow the means gave on mywifiext's setup screen and introduce your extender.
Anyway these rules are exceptionally thorough and are hard to fathom for easygoing clients.
So on the off chance that you are stuck anytime on mywifiext arrangement page, don't spare a moment to get quick help from our specialized master. They will have your new Extender System running very quickly.
Manual for Manual Setup by means of Mywifiext Setup Login page:
For those that don't care for the WPS design, the Mywifiext Setup is for those. This is on the grounds that WPS isn't the occupation of those switches.. In contrast with the WPS arrangement, the manual arrangement is somewhat redundant. You should go to the arrangement page to set up a shiny new Netgear Extender framework. For the manual arrangement, the bit by bit directions are beneath:
Connection the force supply to your remote extender.
The force light on the extender will illuminate you that the arrangement cycle is all set through.
Next, join the extender with your switch.
Just Netgear-Ext. It will end up being the tag of your organization now.
Open an internet browser on your Desktop and associate through mywifiext.local.
The Netgear extender login page will show up after that.
Round out the username and secret key for mywifiext.net in the fields gave. Snap the Proceed-just catch.
Besides, select your WiFi network at home and enter your secret phrase.
By adhering to the extra on-screen guidelines, finish the arrangement.
Understand More: NEW WIFI EXTENDER CONFIGURATION
Note: If you can't open www.mywifiext.net, open the 192.168.1.250.
Mywifiext Installation Wizard from mywifiext.local:
It is as simple as attachment and play to get the Mywifiext Setup to work. You should simply unpack your Mywifiext.net arrangement, associate with mywifiext.net's Setup Wizard, and that is it. Whenever set up, the extender can be mounted and any remote framework can be associated with it where you need to help the Wifi signals. The best part about mywifiext.net is that when you are in your home, you don't need to arrangement it over and over.
Due to such arrange slipups, there are cases when the extender doesn't sign into the Mywifiext.local Setup tab. It could be the settings or the overall convention for network access which forestalls the reach extender from making an association. nearby additionally has a wide assortment of capacities, for example, tweaking the arrangement of the extender, redesigning the firmware update, changing the organization name and secret word, and so on
At the point when you are in a difficult situation, our master group won't need to stress over getting you out of any basic conditions. At our complementary number with a very much qualified expert, you simply send us a solitary call and talk. Our specialists will assist you with appending your expansion and get your augmentation going all out with mywifiext.net.
Administrator LOGIN GUIDE: MYWIFIEXT FOR SMART WIZARD SETUP
A wifi range extender is a kind of remote repeater used to grow the scope of a remote LAN, frequently alluded to as a Netgear Extender Setup. The reach extender distantly ingests and afterward retransmits the sign associated with the turn or hitting the objective. Anyway you can depend on us whenever to get committed help for mywifiext brilliant wizard administrator arrangement.
Extension extenders are very proficient for shoppers to get to an awful sign as opposed to for individuals who need to go to the signs in any capacity. Mywifiext Admin Login for Smart Wizard Setup depends on these inclinations with regards to the sort and extent of the extender being utilized.
Focuses to note while designing the administrator arrangement of mywifiext.net's keen wizard:
The New Extender Configuration should be set up for both the client gadget and the sign source.
In the event that the sign is set, there is a requirement for comparable encryption keys.
It ought to have a set IP address to ensure it tends to be acknowledged as a customer.
The sign that the device communicates should be like the sign that the source sends.
The system strategy is best when the extension extender utilizes a similar programming and chipsets as the passageway or the base switch.
Hugeness of the administrator login design for www.mywifiext.net and the Smart Wizard.
With PDAs, PCs, media players with a protected association are associated with wifi, and the all-inclusive reach on one or the other side of the room gives you a great deal of help from Netgear's wifi range extender.
The Mywifiext Range Extender empowers your present wifi organization to develop:
By utilizing both reach augmentation and development, you can promptly expand the quantity of passageways from your anteroom to the yards and even in your office.
It stretches out the wifi reach to each side of your home with great effectiveness and generally works with any standard switch.
net Configuration Network Login gives rapid just as an organization for your versatile PCs, workstations, cell phones, and numerous different gadgets.
When To Get An Extender?
Netgear Wifi Extender Setup is required distinctly if there should arise an occurrence of availability issues with your current WiFi Network. As such, you ought to get a Netgear Extender just if your WiFi Device is put in a "No man's land". To put it plainly, your current Network's Connection is poor or non-existent at this area. In such a circumstance, you should go for Netgear Extenders.
Working Of An Extender
Netgear Extender spans up network holes between your WiFi Router/WiFi Access Point and a Computing Device situated past the Router's reach. Principally, it works in two different ways as referenced underneath.
➥ As a Network Extender
It basically interfaces with your current WiFi Network and intensifies its reach to give you upgraded inclusion. As such, it associates with the Network like some other WiFi Device as a Network Client.
➥ As A WiFi Access Point
Aside from that, it can likewise be utilized as a WiFi Access Point like your WiFi Router. To place it in straightforward terms, it imparts its own WiFi Network. Other WiFi Devices associate with its Network as opposed to interfacing with your Router's Network. Along these lines, it acts like your WiFi Router..
How To Perform Netgear Extender Setup?
Netgear Extender Setup
You can perform Netgear Extender Setup in two different ways relying on the foundation of your Router/Network Access Point. For example, go for the WPS Connection Method just if your Router has an actual press button for WPS. Something else, choose the Installation Assistant or Web Browser Setup. Notwithstanding, prior to continuing further, ensure that you have just enlisted your Netgear Extender at "netgear.com/mynetgear".
1 note
·
View note
Text
192.168.1.1
192.168.1.1 is a personal IP address used to login to the admin panel of a router. 192.168. 1.1 is pre-specified from the router firms as the default gateway address and may be used to create unique adjustments to the router preferences. How to Login into 192.168.1.1? To login into 192.168.1.1 follow those measures -- Open an internet browser and then go to http://192.168.1.1 or kind 192.168.1.1 to the browser URL bar. A login page will appear asking you to enter the login password and username. Enter the username and password in the specified areas. You will now be logged into the Admin Panel of this router. Note: If you cannot access the router admin panel in 192.168.1.1, consider using another IP address -- 192.168.0.1 or even 10.0.0.1. If you've forgotten that the IP Address Username and Password or even if they Aren't working then you can -- Look in the manual/box or rear of the router. (or assess default username and password password listing ). If you changed the password and also have dropped it or forgotten it then you want to do a factory reset. To do so, start looking for a tiny concealed RESET button on the rear of your router. Press and hold that button for approximately 10-15 seconds with a paper clip or a needle. The router will reboot and will return to default settings. The default gateway IP address comes pre-assigned from the online service provider, though, a user may configure it level to demands. It's frequently shifted to stop bad men get into your admin panel, stop DDoS attacks, or simply to add an extra layer of security. Here is the way to get it done -- Login into a default admin panel in 192.168.0.1 or 192.168.1.1 (admin/admin is password and username ) Under"IP Address" area you will change it to a preferred address for example 192.168.1.2. Save and the router will reboot to use the changes. Login into your router setup page (username: admin & admin: admin/blank) Now you may find Router IP Address field. Change it preferred and Save Settings. Login to NetGear router configurations page through 192.168.1.1 or 192.168.0.1. Once logged in, navigate into Advanced > in left side menu go to"Setup" > LAN Setup. Under LAN TCP/IP Setup, you'll see IP Address. Change 10.10.10.1 as favored. Apply Changes and the machine will reboot to upgrade configurations. In any instance throughout the procedure something goes wrong, you might reset your router to factory default settings all customization is going to probably be reverted back. Protecting your WiFi system is very important to avoid unauthorized access. Follow basic principles like allowing WPA2 encryption, establishing powerful password, disabling WPS adds additional safety as it's an old technique of synchronization between networks, empower MAC-address filtering and upgrade your router firmware sometimes. Here's a comprehensive guide about the best way best to guard your WiFi network.
1 note
·
View note
Link
0 notes
Link

0 notes