#new keyboard (only 1/3 of keys work; currently use usb keyboard)
Explore tagged Tumblr posts
Visit Tumblr Blog
Explore Tumblr blogs with no restrictions, modern design and the best experience.
Last Seen Tumblr Blogs


Fun Fact
Premium Tumblr themes are available from anywhere between $9 to $49.
Text
need to shell out for a new laptop before the end of the year - for a lot of reasons but mainly bc support ending for win8.1 makes fixing the current beast rather pointless :/ (and. admittedly. there is a lot to fix. she's old and she has suffered.)
but my current beastie is from the last gen of laptops with a disc drive and the thought of using an external/usb disc drive is enough to make me cry tears of blood
#really though it is time to upgrade#and i hate to say it because she /runs/ fine it's all hardware issues w parts that can absolutely be replaced#but if i can't use it to run the programs i need then shelling out the money for those parts would ultimately be a waste#but also the fact that this machine that runs fine is no longer worth fixing bc some google-based bullshit just won't support win8.1 anymor#is ALSO a fucking waste & a pile of planned obsolescence bullshit! and i hate it!#but uh. even though she runs fine and she totally does. she does need. uh.#new keyboard (only 1/3 of keys work; currently use usb keyboard)#new trackpad ribbon cable (trackpad does not currently work; using external usb mouse)#new power button and connecting ribbon cable (turning it on involves opening it up and causing an intentional short-circuit every time.)#(a problem largely solved by simply never turning her completely off- except she also needs)#a new battery (current battery does not charge at all; machine needs to be constantly plugged in or it shuts down immediately)#...ok i might be the 'this is fine' dog about this#but i am still upset! that i will no longer have a disc drive inside my damn laptop.#that's the disc drive's natural habitat; that's where it should be; it's weird and offputting to have it connected via usb!#ack. why do tech companies fuck everything up.#and that's without getting into the way new devices offer less harddrive space so people will use the fucking cloud or whatever???#yeah sorry no i'm not using your goddamn data mining corporate off-site storage i want to keep my shit on my own goddamn machine#go to actual hell if you're trying to sell me a pc with less than at least 500GB of storage i swear to fuck#...in essence you could say the whole process is leaving me rather grumpy
4 notes
·
View notes
Text
How to Extend the Life of Your MacBook: Tips That Actually Work
MacBooks are known for their sleek design and reliability. Still, even the most premium device won’t last forever without proper care. Many users make the mistake of ignoring small problems or skipping basic maintenance, only to end up needing urgent help later.
If you're someone who’s been searching for MacBook repair Gurgaon, chances are you're already dealing with a device that isn’t performing the way it used to.
Instead of waiting for a breakdown, here are some practical steps to keep your MacBook running longer.
1. Keep Your Software Updated
Apple rolls out regular updates for macOS, not just for new features but also to patch security holes and fix bugs. Delaying these updates can leave your system vulnerable and slow. Turn on automatic updates to stay current without even thinking about it.
If an update causes problems, don’t panic. Most glitches are temporary. But if the issue persists, it’s worth checking in with someone who understands apple device repair.
2. Avoid Overcharging the Battery
It’s tempting to leave your MacBook plugged in all day, especially during work marathons. But that habit can shorten your battery’s health over time. Apple’s batteries are designed to cycle — meaning charge and discharge. Let it drop below 50% once in a while and unplug when it hits full.
Also, keep an eye on the battery health status in settings. If it says "Service Recommended," it's time to act.
3. Manage Startup Items and Background Apps
A common reason for lag is too many apps running in the background. Head to "Users & Groups" in your System Settings and trim down your login items. Fewer background apps = faster startup and smoother performance.
If your device still feels sluggish, it might need internal cleaning or a memory upgrade.
4. Clean the Ports and Screen Safely
Dust buildup can affect the USB-C ports or even the cooling system. Use a soft brush or compressed air every few weeks. For the screen and keyboard, stick to a microfiber cloth and avoid using harsh chemicals.
Water or cleaning liquids getting inside can lead to internal corrosion. If that happens, shut it down immediately and seek help. Quick response can prevent serious damage.
5. Avoid Using It on Beds or Cushions
MacBooks cool themselves through vents underneath the body. Placing them on soft surfaces blocks airflow. This leads to overheating and long-term damage to the motherboard or internal fans.
Using a hard, flat surface helps your Mac stay cool naturally. If you notice the fan working overtime, the vents might already be clogged and need professional attention.
6. Get a Check-Up Once a Year
You don’t need to wait for something to break. An annual service check can keep your MacBook running smoothly. Technicians can clean the internals, check the battery health, and detect potential problems early.
If you’re in or around the NCR, finding MacBook repair Gurgaon isn't hard. What matters is choosing someone who knows these machines inside and out.
Conclusion
A MacBook is an investment — and with the right care, it can easily last over a decade. Regular maintenance, smart usage, and quick action when things go wrong are key. If your device isn’t acting right, it might be time to consider MacBook repair Gurgaon from trained professionals who specialize in Apple hardware. Acting early helps you avoid bigger issues later and keeps your workflow smooth.
0 notes
Text
Android TV Box: The Ultimate Entertainment Upgrade for Your Home
Android TV Box: The Ultimate Entertainment Upgrade for Your Home
In today’s fast-paced digital world, more people are looking for smarter, more flexible ways to enjoy their favorite entertainment. One device that has completely revolutionized home entertainment is the Android TV Box. Whether you want to stream the latest movies, watch live sports, play games, or simply surf the internet on your television, the Android TV Box makes it all possible.
But what exactly is an Android TV Box? How does it work, and why is it becoming increasingly popular among tech-savvy users and everyday consumers alike? Let’s explore everything you need to know about the Android TV Box and how it can upgrade your home entertainment experience.
What is an Android TV Box?
An Android TV Box is a compact media device that connects to your television and transforms it into a smart TV. Running on the Android operating system (the same system that powers most smartphones), this device offers access to the Google Play Store, allowing users to download apps, games, and streaming services such as Netflix, YouTube, Amazon Prime Video, and more.
Essentially, an Android TV Box turns a regular TV into a feature-rich smart TV. It's a plug-and-play solution that requires only a power source and an HDMI connection to your TV. With Wi-Fi or Ethernet connectivity, you're ready to enjoy a wide array of content.
Key Features of Android TV Box
Here are some of the standout features that make the Android TV Box a popular choice among users:
1. Wide App Compatibility
Thanks to the Google Play Store, Android TV Boxes offer access to thousands of applications. From streaming platforms to music apps, social media, and even office productivity tools, you can customize your TV box to suit your preferences.
2. 4K Ultra HD and HDR Support
Modern Android TV Boxes support 4K resolution and High Dynamic Range (HDR), delivering stunning picture quality for an immersive viewing experience. This makes it perfect for watching high-definition movies or streaming on platforms like Netflix and Disney+.
3. Voice Control and Google Assistant
Many Android TV Boxes come with voice-enabled remotes and Google Assistant integration. This allows you to search for content, control playback, and even manage smart home devices using simple voice commands.
4. Expandable Storage
Most Android TV Boxes come with USB ports and SD card slots, allowing users to expand storage for downloading apps, storing media, or connecting peripherals like keyboards and game controllers.
5. Gaming Capabilities
The Android platform supports a wide variety of games. When paired with a compatible controller, your Android TV Box can double as a powerful gaming console, providing hours of entertainment.
Benefits of Using an Android TV Box
✅ Cost-Effective Smart Upgrade
Instead of buying a brand-new smart TV, an Android TV Box provides all the smart features you need at a fraction of the cost. This makes it an economical choice for households looking to upgrade their home entertainment system.
✅ Customizable Interface
Unlike built-in smart TVs that may have a fixed interface or limited app selection, Android TV Boxes offer a customizable user interface. You can change themes, rearrange apps, or install third-party launchers to personalize your experience.
✅ Frequent Updates and Developer Support
Since Android is an open-source platform, it benefits from a strong developer community. You can expect regular updates, security patches, and new features that keep your device current and secure.
✅ Portability
Compact and lightweight, the Android TV Box can be easily moved from room to room or even taken with you when traveling. It’s a great companion for vacations, hotel stays, or visiting family.
How to Choose the Best Android TV Box
With so many options on the market, it’s important to know what to look for when buying an Android TV Box. Here are a few key considerations:
✔️ Processor and RAM
A powerful processor (Quad-core or higher) and sufficient RAM (at least 2GB) ensure smooth performance and fast app loading. Devices with 4GB RAM and 64GB storage offer excellent multitasking capabilities.
✔️ Operating System Version
Choose a box that runs a recent version of Android (Android 10 or later) for better compatibility, performance, and security.
✔️ Connectivity Options
Make sure the box supports dual-band Wi-Fi, Bluetooth, and Ethernet for stable and flexible connectivity.
✔️ HDMI and USB Ports
More ports mean more connectivity options for external drives, audio systems, and other peripherals.
✔️ Brand and Warranty
Choose reliable brands that offer at least a one-year warranty and good customer support.
Popular Apps for Android TV Box
To get the most out of your Android TV Box, consider installing the following popular apps:
Netflix – For premium TV shows and movies.
YouTube – Watch videos, vlogs, tutorials, and music.
Kodi – For organizing and streaming your personal media library.
Plex – Stream movies and shows from your own server.
Spotify – Enjoy music streaming from your television.
MX Player – A powerful video player that supports many formats.
Troubleshooting and Maintenance Tips
Like any tech device, your Android TV Box may encounter occasional issues. Here are a few quick tips:
Slow Performance? Clear cache or uninstall unused apps.
Connection Problems? Restart your router or switch to a wired Ethernet connection.
App Crashes? Check for updates or reinstall the app.
Overheating? Ensure your device is in a well-ventilated area.
Keeping your software updated and performing regular maintenance will help ensure long-term performance and reliability.
Conclusion: Is an Android TV Box Worth It?
The Android TV Box is undoubtedly a game-changer in home entertainment. It brings the flexibility, functionality, and customization of Android to your living room, offering endless entertainment possibilities at an affordable price. Whether you're a movie buff, a gaming enthusiast, or just someone who wants to stay connected online from your TV, the Android TV Box has something for everyone.
By turning your regular television into a smart powerhouse, the Android TV Box is not just a gadget—it's an investment in a smarter, more connected lifestyle.
0 notes
Text
A (relatively) short TapXR wearable keyboard review
TL;DR: An unusual but handy and kinda fun keyboard currently (as of late 2023) let down by a rushed winter holiday release and issues carried over from earlier models, but updates are coming to fix issues and add features.
The keyboards put out by Tap Systems (Tap from now on) are always hard to explain in a short review. They are keyboards without keys, instead using finger taps to indicate letters, numbers, symbols, and punctuation. If you like quirky, unusual keyboards and are willing to put up with some of the issues, this may be a fun and handy one to use.

(Pictured: The TapXR in top and side view - the black part is the sensor)
In order to keep this review from being even longer than it already is, I’m going to try to summarize the salient points, and maybe write a much longer review later.
The TapXR is the third of the Tap Bluetooth keyboards, following the Tap Strap in 2016 and the Tap Strap 2 in 2018. Earlier models resembled rings attached together with cords and worn at the base of the fingers; the TapXR uses an entirely different form factor. (This is not my first Tap keyboard as I own a Tap Strap.)
Comes with: My box came with both large and small wristbands, the sensor, a charging cradle, a quick start guide, a reference card outlining most of the Tap Alphabet, and a 20% off on an extra wristband.
Why I like this keyboard: I just love weird and unusual keyboards. In addition, it’s small, very portable, and easy to activate. During my work day, I often use it with my phone to write quick notes for things I need to do or look up later, and after work, I switch it to my Steam Deck to type in text, make notes, and do other things that benefit from keyboard input when I'm playing games. In addition, if I want to, I can configure a custom keyboard for frequently-used key presses.
Compatibility: Anything that can take input from a Bluetooth keyboard. Tap has a video guide on how to enable input on the Apple Watch.
Form factor: The TapXR is a small sensor attached to a stiff, rubbery-feeling band that is worn around the wrist/arm - on the underside of the wrist/arm when using the keyboard and on the top of the wrist when not. I wish that Tap had made a medium band as the large is definitely too large but the small sometimes feels a bit tight on my wrist. That being said, I've worn it all day with no issues.
How the keyboard works: The sensor module uses a camera along with other sensors to detect finger and hand movement. Letters, symbols, punctuation, and symbols are formed by tapping one or more fingers on a (preferably hard) surface in what Tap calls the Tap Alphabet.
Turning on and off: Very easy. The keyboard turns on when you extend the sensor from the band and turns off when retracted. I suggest keeping the keyboard off unless needed.
Battery: Currently, I can get about 1-3 hours of power, but I find the keyboard recharges fairly quickly in its charging cradle (which uses a USB-C connection; you may wish to connect it to a USB-A to USB-C connector if you don’t have a ready way to plug into USB-C). Hopefully future firmware updates will up this battery life to the promised 10 hours.
Learning the keyboard: Takes some time due to the specialized nature of how this keyboard works. Expect to put several hours into practice before being able to form the muscle memory needed to type without constantly checking a reference, and even more to type at a decent speed. Unfortunately, the usual training apps (TapGenius and TapAcademy) have not been updated to work with the TapXR; reports on various forums indicate that the community has only been able to get the apps working sporadically with the new keyboard. The main app (TapManager) has some basic tutorials; I find the basic tutorial easy to follow but had trouble with the more advanced one despite being fairly familiar (though rusty) with the Tap Alphabet.
Accuracy: Sometimes, the sensor does not detect the finger positions correctly, causing the wrong set of finger taps to be read and therefore the wrong character to be output. (This being said, I generally find the keyboard more accurate than the Tap Strap, especially on softer surfaces.) As a left-handed person, I think the sensor sometimes misinterprets the camera input and tries to interpret my typing as if I was right-handed, which also causes incorrect character output. Typing on a harder surface provides more accuracy than a softer surface, though I’ve actually been able to type pretty accurately on my couch. Hopefully some of the accuracy issues I and others are currently seeing will be fixed - or at least mitigated - in a later firmware update.
Speed: Most people after a lot of training can type up to 30wpm, with the speed record at slightly over 60wpm. I’m currently typing (after a week of trying to both remember the Tap Alphabet after being rusty and trying to remember my fingers needed to be visible to the camera) at about 10-14wpm. Some of this is the accuracy issues mentioned above, some of it is because of the way that the Tap Alphabet is set up.
Mouse: I did not get a chance to test this feature as it was not available as of the writing of this review. It is supposed to come in an update in early 2024.
Configuration: During setup, you’re prompted to download TapManager for either iOS or Android. TapManager is used to push firmware updates and settings, add custom keyboards (your own or someone else’s), and as noted above, provides a minimal set of tutorials on how to wear the TapXR and how to do basic tapping/typing. It does not need to be open to use the keyboard.
1 note
·
View note
Text
Buying the Best Netbook For 2010

A netbook is the small, light-weight, inexpensive together with highly compact laptop yet it has the the processor in less than some sort of full-sized mobile computer. However, this is suitable good enough with regard to general computing, expression control, running a web cell phone browser and even connecting to typically the Web easily. Netbooks can be small in dimensions, usually together with a 10-inch display, nonetheless some displays may be somewhat smaller or larger sized. Their weight is about 2 . 5 pounds and many people cost well under 250 usd these kind of days and nights. Most netbook computers consist of Intel Atom processor including least 1 GIGABITE regarding RAM. With typically the ever Best laptop for video editing under $1000 growing demand for this netbook many companies happen to be designing more and a great deal more netbook products introduced into the world market place. And so, it is not necessarily easy to make some sort of right collection of buying a good mini netbook to get buyers. For everyone looking to buy a netbook, here are certain critical minilaptop features to help consider: Screen size and exhibit resolution Netbooks generally come with a screen sizing which will ranges from seven to be able to 12 inches. Gowns a huge difference from typically the average 15 inches in a full-sized mobile computer. In order to determine which screen dimensions is good enough for an individual, you should try to perform your favorite programs and check out your favorite web sites on a range connected with different sized screens. Attempt to buy some sort of screen size of 8. 9 in . or larger otherwise typically the display and its quality might be lacking in addition to finally make it whole lot more complicated to read. The 10-inch netbook usually features resolution of 1024 by 1000 pixels and weighs less than 3 pounds in contrast to 11- and 12- inches laptops usually have promises of 1280 x eight hundred and 1366 x 768 respectively plus weigh the little bit even more. Nevertheless, when considering its price and weight together, some sort of 10-inch screen is a new perfect choice and can be the widely accepted netbook size about the retailer's site. Key-board and trackpad A key pad of netbooks is commonly smaller than a common key pad of full measurement laptops and range coming from 88-93% of the significant keyboards. The keyboard design associated with netbook is very similar to the large computer keyboard but key links on netbooks are more compact and closer. But even when two netbooks have the same sizing keyboard, his or her layouts can be different together with their keys are short on some netbook computers as compared to others. If possible, remember to test out the keyboard to ensure they can be significant enough and user helpful. Touchpad is one involving features to bear in mind. At provide, the wide variety of trackpad have been produced and specially designed to provide a more comfortable knowledge throughout prolonged use. Therefore, check out and get a good touchpad that will supports multi-touch gestures. Working method (OS) Netbooks are usually accessible intended for Linux together with Windows running systems and new netbook computers have moved to Windows 7 Starter, which is usually a lighter edition regarding Windows 7 to assist with load some total performance. As we just about all know about home windows mainly because that most people are usually acquainted with the Windows format as they have been making it for several many years on their home in addition to business computers. You will be able to also get a mini netbook with Linux, which is definitely a much more basic in addition to faster managing technique. Netbooks with Apache run perfect for web diving, email, and word handling by way of Open Office. Even so, Linux may be opuesto do some simple programs. Finally, you might still find netbooks functioning upon Home windows XP or Landscape. Processor Intel Atom is the most common processor available for that netbooks (most connected with them managed with the Intel Atom In or Z . Series). Right here you will need to go for the latest technological innovation because they happen to be available with more performance and try not to be able to buy an old mini netbook computer because you can confront problem of speed together with efficiency. The latest Atom processor on netbooks with regard to 2010 is definitely Intel Atom N450 Cpu (1. 66 GHz). Many netbooks introduced into the marketplaces keep going year had been Intel Atom N270 or maybe N280 that are being replaced by brand new Intel Atom N450. You can notice that all processors with netbooks are sluggish than the standard brand on netbooks, which is regarding 2. just one GHz. This specific means that a minilaptop will be slower when jogging heavier programs. So, you mustn't use a netbook for serious processing, many of these as photo/video editing and enhancing in addition to gaming. Having said that, laptops are perfect for light functions like web surfing, email address, and even word processing. Battery pack Life Outdated notebook electric batteries usually come having 3-cell (less than 35 Wh) units nonetheless achievable mini netbooks, they have upped their very own standard batteries to 6-cell systems which can have you unplugged for with regards to 6-9 hours although 3-cell methods usually find involving 1 and a few several hours of endurance. In case your career or work demand vacationing then you should look for the 6-cell option that may get you unplugged for about 6 to 9 hours on a single charge. These are definitely little costly than 3-cell power supply netbooks but can be very useful if your activities entail overseas travel as well as all-day classes. After Intel features unveiled new Atom N450 processor, new netbook computers may consume less electric power about 20% over past netbook computer generation (e. gary the gadget guy. Intel Atom N270, N280). Fresh latest netbooks are usually coming with electric battery life connected with 10-14 time such as models Asus Eee PERSONAL COMPUTER 1005PE-P, Asus Eee PC 100P, Acer A0532h plus Toshiba Mini NB305-N410 (10-inch screen). Memory space (RAM) The majority of of netbooks consist of 1 GB and are up to 2GB. It depends upon the kinds of managing system used in netbooks (1GB for Windows 7 and 2GB for House windows 7 as well as Window Vista). Even so, always make sure you experience at least 1GB to keep things running smoothly. Storage capacity There are 2 sorts of harddrives; solid-state pushes (SSDs) and even spinning really hard disk drives (HDDs). Typically the SSDs are faster and much more durable than HDDs and consume less power and even weigh less. The memory space of SSDs is certainly not sufficient for netbooks for the reason that of the higher price. Typically the early model Eee Computer systems have only 4GB or even 8GB SSD, and often the more modern model Eee PERSONAL COMPUTER 1 000 uses a 40GB SSD. Nearly all netbooks can be equipped with the HDDs which have the storage space potential from 60GB to help 320 GB. Look for some sort of hard drive that comes with the capacity of with least 160GB and a good rotating speed associated with some, 300 rpm. Optic Commute Netbooks do not consist of built-in optical drives regarding playing movies. That signifies you won't run CDs/DVDs. On the other hand, you may buy a separate commute to connector into the netbook or use another pc to "rip the DVD" to a film file that you are able to transfer using a USB generate or outside hard push, but part of it is portability and light weight is caused by that not getting an optical drive. Furthermore, netbooks generally come using a built in web surveillance cams, Wi-Fi, card reader, plus UNIVERSAL SERIAL BUS ports. Some in addition have extra features such as Bluetooth, 3G, GPS DEVICE, and so on. Reputable brands of mini netbooks that you can pick from are: Acer, Asus, Dell, HP, Special, Toshiba etc. Using these brand names as a guide, you can choose often the designs that you like best as well as that is in your budget. In final result, all of us suggest at a minimum, an Intel Atom N450 Processor, 1 GB of RAM, a 160GB or even larger hard drive, 6 several hours long battery lifetime plus Windows 7 Nice having Bluetooth as a good preferred method to fix tethering the smart phone regarding cell phone broadband access. For example, the Asus Eee DESKTOP 1005PE-P with the most recent Intel Atom N450 brand and even 14 hours connected with battery-life is currently the best selling minilaptop about Amazon. com for $368. 59 and the Asus Eee PC 100P using 11 hours of battery life is cheaper and market for $299. 99-$339. 99 (10" screen). Higher-end options are becoming more predominant, using 11. 6-inch shows, larger screen resolutions, plus brand-new graphics hardware, for example , Nvidia's Ion GPU employed in Asus Eee PC 1201N (12" screen).
1 note
·
View note
Text
Circumstances.
So, back in…. May. The 17th or 18th thereof. The laptop I was using hit the loading screen singularity. It booted to an error message. I could restart, and get the same error message, or I could try to run recovery, watch it fail, then restart.
So geared up in my informal hazmat-lite disposable attire, I stepped out of the front door of my little Fortress of Crazitude, and went inside the house, where the functional human beings live, to use a laptop there.
Searching for something I liked was going to take a while. In that strange Before Time, when people went outside without being masked, Dad zipped out and kindly got for me the cheapest laptop he could find.
Now I could begin my search in earnest.
Starting with the gaming rigs. Hideous, hideous, awkard design (that was hideous). The closest to what I was looking for was an Alienware model… that was hideous, and came with something called Tobii eye-tracking. I don’t want my computer staring at me. Plus, this was a gimmick, I don’t play the kind of intense shooters where every picosecond counts.
I kept looking.
I found a laptop marketed as a ‘desktop replacement’. Just the sort of thing I wanted. Something with the power of a desktop, but without needing me to do a major cleaning job to find space for it, and/or rig up something to hold a monitor where I wanted it? Perfect.
So I looked around, a place in the US, it had them in stock, and they would even customize it. Great, a bigger hard-drive! Okay the thing needed two power-bricks to work, which would be a hassle, but I could live with that.
In the meantime, the budget laptop could just about run an older version of Minecraft… as long it was on the server my bff’s hurricane child had dragged me onto, I could make do.
I made my order. ……….
3 weeks passed. I heard nothing from them. Okay, the world is in chaos, I expected some delays. Still, I wanted at least some idea for how much longer I would be making ersatz icepacks to keep my new little laptop from overheating from the overworking I was currently giving it, even as I did my best to cut down on my usual habits to lessen strain on it’s CPU.
I sent in a request for an update. “Oh yeah, turns out we didn’t actually have one in stock”. So how long till they could get one? “Oh they’re discontinued. How about one of these?”
All the ‘these’ were ones I’d looked at and already discounted. Wait, here’s one on eBay, how I about I send it to you, and you upgrade that one? I’ll pay the extra shipping fees.
“Oh no, we wouldn’t be able to honor a warranty on that.”
My domain is the black hole of electronics. Once it’s in here, it won’t leave again. My OCD means I cant have something sent out to be repaired and have it sent back. Once it’s here, it’s here. I tried to explain this, and said I would waive any rights to a warranty. It would be the most expensive idiot tax I’d ever paid, but I was willing to pay it.
June passed and I heard nothing.
Time to look again. I had toyed with the idea of a custom rig from another place in the US, but, oh, the price tag. And the wait time. …Mainly the price tag. Okay, major purchase for me, and I was going to crack open my savings. But still, I’m on a pension.
Okay, another look, see if I can find anywhere in Australia. More cash could be spent on the laptop itself and not the insane international shipping tool.
I found a place. Custom configurations, in a shell that isn’t painful to look at.
Could it be?
I checked some reviews. Chunky…. I like a bit of heft to a device. Besides, it wasn’t going to be doing a lot of moving anyway. 1-2 metres on average at best. Fans can get loud…. that means they’re working. I can get a headset if I need it.
Ooh, and they have a sale on too. I consult with in-house tech support. I’m told I can get the hard-drives cheaper elsewhere, and another M2 memory stick, then put them in myself.
Sweet, more cash to spend on the graphics card and CPU. Not quite top-tier, but heck, I hadn’t been running any of my games on the old laptop at full graphics settings anyway. No dvd drive though, but every other maker seems to have dispensed with those as well. Oh well, it’s not like I used those much anyway, and I can always get an external one.
And it only needs the one power brick.!
Better specs than the discontinued model, I can max out on hard-drive space and have a second M2 drive just for my games, with plenty of room!
Before the end of June, I make my order.
I find a big hard-drive, a good sized M2 stick, and even an external usb enclosure for the hard drive I pulled out of the blue-screened purgatory.
July, that place in the US actually mails me back. Since I was willing to waive a warranty, they might be able to source a model off eBay. Ship has sailed, I’ve found me something nicer, and I’ve picked out the extra drives for it.
A few days later, the new place emails me. They’re having delays, but we have a new range out which will be coming in sooner, here are the stats, we can switch you over to one of those?
I forward the stats to tech support. Nope, the hard drive you got in anticipation won’t fit. New place “hmm, that’s true, we’ll do our best to keep you updated”.
They do, and and my order’s been put in priority for assemblage.
As August gets into gear, my new workhorse arrives, and the poor beleaguered budget laptop can retire to light browsing duty.
Only the big hard drive I got? Turns out it’s fat ass can’t fit in the drive bay. Oops. But with the help of tech support, I found an external enclosure that will fit it, so I have a roomy and easy to use backup device.
And then I stripped the head on the screw holding in the M2 memory. And the other slot, that requires a lot more work to get to. But I’m already wiped from the ordeal, the files on the now external drives run fine, and I still have plenty of room on the drive. I can wait for the sales, and pick up some (carefully dimension-checked) drives then. (This beast will hold 2 standard hard drives!) and get around to putting in the second M2 stick.
And that concludes this chapter of Crazy Shut-in Searches for Their Dream Laptop.
1 note
·
View note
Note
Words cannot express how much i want either a gaming laptop or a pc
Friend, I understand you completely. It’s why I saved up for a long time to build my own. Did you come here for a how-to on how to build one for yourself? Probably not! But I’m gonna tell you how anyway because it is significantly cheaper to build yourself a pc than to buy one (and laptops are even more expensive).
So! You wanna build a computer? Here’s what you need:
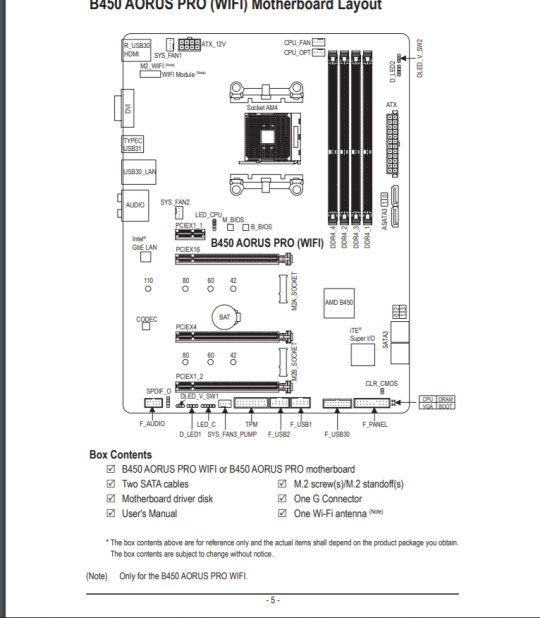
-Motherboard. All the things plug into this. Very Important. Do not break. When handling, touch metal beforehand so you don’t shock it with static and fry it. Comes in 3 sizes aka form factors: ATX (standard). mATX (smaller). itx (holy shit its tiny) smaller=/=cheaper! all pretty much have the same layout and all come with a manual. front panel connectors are a bitch.
-CPU. Your processor! The thing that processes all the ones and zeros into shit you actually understand. Very expensive. Very delicate. Do not drop. Needs something to keep it cool. Lots of cpus will come with a cpu fan in the box but not all. They touch the cpu with a weird paste called thermal paste that helps heat go away. Fans or liquid cooling will screw into the motherboard over the cpu.
-GPU. The most expensive part of your build, probably. If you’re building a gaming pc it’ll probably be ~1/3 of your budget. It’s the thing that makes everything pretty and visible. Gotta have a graphics card to see what the ones and zeros are doing. Two brands rule the GPU market: Nvidia and AMD. Idk if one is better than the other but I went AMD because i could get a better one for cheaper so.
-RAM. Your computer’s short-term memory. Lots of RAM means more tabs of Google Chrome open at a time. 16 gigs will get you through just about anything. 32 is generally overkill. 8 is less than you want for a dedicated gaming pc since most newer games have a higher RAM demand.
-Storage. Comes in two forms: a physical hard drive (reliable but kinda slow at this point when compared to an ssd. definitely your cheapest option) or a solid-state drive (smaller than a HD. much faster. more expensive. generally comes either as a 2.5″ brick-looking thing or a stick called an m.2 which is even more expensive and even faster) You want enough of this to store your operating system and games on. Lots of people go with a base of 1 TB (1000 gigabytes) because games take up a lot of room. 500 can get you through if your library is smaller or you don’t mind rotating games on and off the computer. can get one big storage thing or as many as you want. some people have a smaller ssd to hold the operating system and frequently used games (so they load fast) and store everything else on a much larger hd.
-Power Supply. Pretty self explanatory. The thing that powers all the other things. You want one that gives you enough power for all the parts to work at the same time at max capacity. Don’t cheap out on this they can do weird shit like explode and break all your parts. Come in three types: non-modular, semi-modular, and modular. it just determines how many power cords are permanently attached to the power supply. non-modular are cheaper, but tend to have mustard-and-ketchup colored cords (not pretty) and they can be a pain to manage. you gotta hide those extra cords you aren’t using somewhere (which is why people like cases with a ‘shroud’ or little box that hides the power supply). Modular are more expensive but it’s really nice to only plug in the cables you need.
-Operating system. Yeah you built the computer but you gotta have a thing that lets you interact with it. Windows is the most common. You can also get it for free. Kinda. Gotta flash drive? Go here and download the windows installer, stick the usb into your new computer and BAM! Windows is installed. You’ll have a nasty watermark and be unable to put your own background on it without an activation key (~$130 for Windows 10) but you can use it.
-Case. The thing you put everything else into. Can be plain black boxes or wierd illuminati pyramid things. Make sure the size matches up with your motherboard form factor. There are these little screws called standoffs in the case that secure the motherboard to it. The standoffs have to match up or the motherboard won’t fit. Power supplies and graphics cards also have to fit inside the case - make sure it’s big enough. Those dimensions will be listed with the info for the case and the individual parts. Case can come with fans or without. (You need fans. They keep your parts from heating up - which kills them. there’s also water cooling but its more expensive and scares the heck out of me. most cases only really need the fans that come with but you can add more.)
That’s it! (well. plus a monitor and keyboard and mouse and speakers/headphones but those aren’t the computer. also optional: rgb - the fun lights that make your case look like a unicorn barfed inside it. can be part of your fans or just strips of lights. lots of gaming motherboards have rgb built in. i like rgb.)
Sites like https://pcpartpicker.com/ will help you figure out the parts you need and if they’re compatible. Because it sucks to buy your parts and realize they don’t go together. The big ones? Motherboard and cpu. CPUs are generally made by either Intel or AMD. Currently, AMD is the best bang for your buck. Motherboards are designed to work with one brand of cpu - and generally specific chipsets. Motherboards will tell you the chipsets or series they work with (eg a 3000 series chipset which means it can work with any ryzen 3000 cpu like a Ryzen 5 3600 or 9 3900x). Motherboards will also only work with specific RAM depending on your CPU. There’s a support page on their sites that gives cpu and ram compatibility. RAM support pages show up like this:
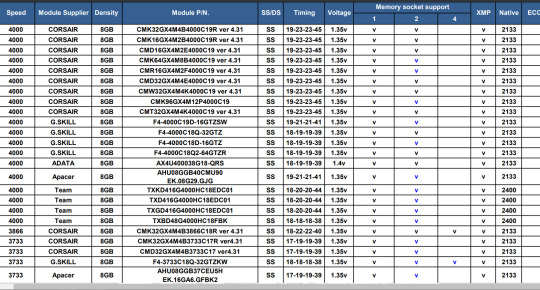
which sucks (this is for the B550M AORUS ELITE (rev. 1.0) board from Gigabyte)
just google that module pin and the right shit will pop up. that first one is the VENGEANCE® LPX 32GB (4 x 8GB) DDR4 DRAM 4000MHz C19 Memory Kit - Red (aka corsair’s vengence lpx line of ram with 4 8gb sticks of ram that run at 4000 megahertz in a fancy red case - you can see all that info in the pin number if you pay attention but its easier to google. the faster the ram [that MHz number] the more expensive. the more gigabytes the more expensive. ram also comes with rgb options. they are more expensive.)
Always makes sure stuff is compatible. Pcpartpicker will tell you if something isn’t. It’s very helpful. but also check the motherboard support lists. nothing else has compatibility issues generally: manufacturers want you to be able to use whatever parts you can get with their stuff so you keep buying from them.
sites like https://benchmarks.ul.com/ https://www.gpucheck.com/ and https://www.userbenchmark.com/ are great for comparing. wanna know if you can get a cheaper part that works just as well? go to these places.

benchmarks.ul
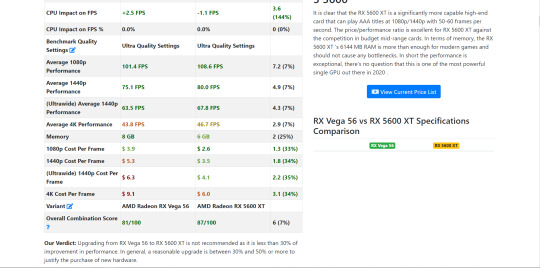
gpucheck (RX Vega 56 vs AMD Radeon Rx 5600 xt)

userbenchmark (Jedi: Fallen Order recommended parts vs my own build)
Newegg.com is a really great place to buy your parts and it usually has the cheapest prices. Make sure to shop around though. pcpartspicker is pretty good about telling you where the best prices are, but sometimes amazon or newegg will drop their prices randomly. also with the plague times, prices and availability are fucking weird right now. stuff will be out of stock for weeks. just. pay attention and check frequently.
I really like this video for trying to figure out budgets. Only have $300 to spend? They got you. Have $3000? They’ve got a guide for that as well. There’s a ton of budget build guides out there but this is the most recent one I like. Motherboard prices could be down a bit due to the very recent release of the b550 chipset, but again, plague times are making computer parts more expensive. That channel has a ton of reviews actually (and step-by-step guides for building) and is geared toward the gaming-minded so if they say a laptop or prebuilt computer is good and fits your budget, check it out. Prebuilts make life easier for you, but you can end up getting a less-than-stellar quality with the additional cost of construction. plus building your own means you know exactly what to do when it comes time to upgrade your parts.
once you put everything where it should go, turn it on! it might not work, that’s okay. you might not have plugged something in all the way! or maybe a part was dead on arrival. get that fixed and install your operating system. once that’s done - get connected to the internets (if you don’t have a wifi card installed you gotta plug that sucker into the wall via an ethernet cable) and start downloading drivers from the motherboard manufacturer’s website and the gpu manufacturer’s website. your motherboard might come with a dvd of them but if you don’t have an optical drive (dvd player) that doesn’t help you. update your operating system. then download your games and play! (you can also do this thing called overclocking where you go into the bios when your computer is loading and max out all your hardware’s settings but that isn’t necessary for casual gameplay and can also void your warranties)
i hope you enjoyed that infodump you didn’t ask for!
#in which i explain how to build a computer even though no one asked#thatfluffybabyduck#hannah answers asks
1 note
·
View note
Text
Caffe on keyboard
Caffe on keyboard Cleaning the keyboard is then pretty easy with cotton swabs and tweezers. But you have to take care of the contacts, they should not get wet, and no cotton wool should stick to them. The use of tools that scratch the surface under the keys should also be avoided. You may also be able to remove the dirt a little with a vacuum cleaner, but care must be taken to ensure that the vacuum cleaner does not lie directly on the computer, as otherwise any particles underneath on the circuit board may become detached. So if a vacuum cleaner is used, it should be kept at a distance.
Which key press for?
Adjust keyboard layout Open the "Settings" app on your Android smartphone or tablet. Tap System Languages & Input. Under "Keyboard & Input" tap on-screen keyboard. Tap Gboard Languages. Choose a language. Activate the layout you want to use.
Alternatively there are LCD panels from the manufacturers BOE, AUO and Innolux; so you play the LCD parts lottery. Security is one of the basic virtues of a laptop for corporate customers. In this regard, the Lenovo X390 comes with a touch fingerprint reader, a smart card reader, a Kensington lock, an infrared camera for facial recognition with Windows Hello and the camera cover "ThinkShutter". The Lenovo notebook also has TPM and the anti-theft solution Computrace.
Can you wash iPhone headphones?
You can use type cleaner to clean the iPhone speaker. Gently push it against the speakers and then pull it out. Alternatively, cotton swabs, a fine brush or an old toothbrush do the same. Use it to gently swipe the speaker to remove dirt.
Article.
Especially if you work with a vacuum cleaner.
You can clean with water, but only the plastic parts.
The system can maintain this performance level for 10 minutes, after which the consumption is limited to 17 watts, which means that the CPU clock speeds are only 1 GHz.
In addition to the results, the laptop test also contains detailed instructions on how to proceed when buying a laptop. However, the report is not fully accessible. If you also want to read the test results, you must first pay a flat rate of 3 euros to the Stiftung Warentest. If you still want to take a look, click here. Be careful not to damage them. You want to thoroughly clean your keyboard dust cleaning mud review or replace a defective button? The resolution of your new laptop should always be in relation to the screen size. If you choose a small 11-inch laptop, a comparatively lower 800-by-600-pixel resolution may be sufficient. With a 19 inch display, however, you should make sure that there is at least an HD resolution of 1280 x 720 pixels. The screen diagonal of modern laptops usually ranges between 10 and 19 inches. However you want to describe it, this is the device category and this is an example of it. Yesterday you can also see it in wonderful colors, something for every taste, of course. It is thin, light and still has a good battery life. It is equipped with USB connections of Type-C, which is currently all the rage when it comes to interfaces. This model from Asus already has a decent performance, but all in all it is more of an entry-level model.
1 note
·
View note
Text
Steinberg Cubase 5 Review
Introduction One of the oldest sequencers, along having Logic (old-timers may bear in mind often the glowing era involving Pro per day and Notator), Cubase possesses over the years, imposed numerous ergonomic desk, technological, and conceptual specifications on the competition. Releasing a fresh version of Steinberg's flagship software is even now a great event in alone, although it must end up being confessed that today, this pretenders to the tub of the master associated with sequencers are quite several. As a result, creativity and superiority are not any longer unique to Cubase and, without even referfing to some other sequencer heavy-weights (Logic, Fantasear, Pro Tools, Samplitude, A digital Performer and Ableton Live), the last few years has noticed many innovative competitors, with running selling price tags and popularity, but filled with great features: Fruity Loops, Melodyne, Tracktion, Electricity XT, Reaper... In a new market mainly because competitive because this, it's obviously progressively more difficult to stand out there. Cubase 4 had the pros even though that launched the particular VST3 common, brought it has the effects and even virtual tools up to date, inaugurated a innovative media management system and even you could lastly proceed effects from one keep tabs on to another by pull and drop. But it appeared more like these people were trying to catch up to the competitors somewhat than definitely developing... Even the more initial innovations, like management involving additional hardware (particularly Yamaha's, since the Japanese producer experienced recently bought Steinberg) and the emergence of control space targeted features were fascinating, but performed not effect all people and for that reason decided not to necessarily justify the particular increased application price: close to $879! Luckily, when typically the impressive Judgement 8 emerged out for around 250 usd it forced Steinberg to help rethink it is rates in addition to marketing technique: you may now find Cubase 5 various for all-around $500! Along with relatively fascinating updates: some. 1 plus 4. 5 (side sequence management intended for their effects, better course-plotting management, more tone banking institutions for HALionOne, etc .. ), and this 5th version, Steinberg is doing it is good for seduce us. Let's go into details... When Now i am sixty four The box is definitely heavy that is certainly a good very good sign. In improvement for you to the USB kopierschutzstecker and even serial number of which let you register, this actually contains 2 manuals: an instant start guide, and a quite large comprehensive guide that does not, however, cover often the effects not virtual equipment included with often the program, but which are coated in PDF files. You can find 4 DVDs: the DVD to install the system, a MOVIE with noises and examples, and a couple of DVDs with the 90-day demo version of HALion Symphonic Orchestra. Observe that inside addition to the manuals, the setup DVD contains a large number of tutorial video clips that are very well performed plus address all the crucial aspects of the sequencer. The fact that that there was initially a time the fact that Steinberg was putting out guides only in PDF formatting, we can only thank the German company intended for having changed its methods. The assembly went smoothly, and after double hitting on the red image, I was in recognizable place: the project windowpane. The primary novelty of this specific version will not jump out and about at you, because it's invisible: Cubase right now fully supports 64 little bit engineering. Wasn't this presently this case? Yes and certainly no, because possibly nevertheless Cubase 4 seemed to be agreeable having 64-bit working systems, the code we hadn't really been recently rewritten with this. It for that reason remained essentially a good 32-bit application, yet efficient at running on a 64-bit program, whereas Cubase 5 is already available in full sixty four bits. What's the major deal regarding 64 pieces? It's basic: it increases the addressable storage. 32-bit operating systems take care of at best 3. 2 GB connected with memory, while a 64-bit OS can theoretically climb to 128 GB (I say theoretically, because presently there at the moment exists no machine, available to the standard public, that has much RAM). A very critical aspect at a time period when virtual ROMplers come with banks of many Gigas for rendering a single instrument (BFD, superiorDRUMMER 3, Vienna, EastWest Symphonic Band, Ivory Piano, etc. ) and streamlining the life of those who implement audio/video and need in order to manage big videos within just their sequencer. Small Technical Propellerhead! Although not everything will be rosy in the territory of 64 bits. Perhaps even though Steinberg is dedicated to supporting Mac OS Times, Vista 64, and the future Windows 7, zero assistance for Windows XP OR 7 64 is definitely officially expected (it doesn't necessarily mean that will it won't work). Make sure you check your plug-ins: several programmers already feature 64-bit functionality and Steinberg proposes, by using VST Bridge technologies, the way to make use of thirty two touch plugins in the 64-bit edition of the sequencer, but it's still highly likely that a person or two of your old effects that you have had for ages in the VSTplugins directory will lock up or refuse to start off. Using the VST Bridge in addition eats assets in percentage to the make use of a true 64-bit plug-in... Around improvement to these tiny inconveniences, the major disadvantage of 64-bit could be the incompatibility with Propellerheads solutions: when you use Cubase your five 64-bit in a 64-bit OS, you'll not be able to use REX file formats, nor the ReWire platform: so goodbye making use of Cubase with Reason, Ableton Live and Melodyne, and others... Of course, the Swedish designer will probably certainly not leave the case as the idea stands, but currently, simply no story has been made with this issue... What do we fag that case? Install the 32-bit variation of Cubase 5, which usually runs effortlessly on the 64-bit OS, till Propellerhead makes a move. This really is annoying of course, nonetheless it cannot be blamed in Steinberg. Let's take a take some sort of look now at capabilities that will change the way you employ Cubase. Cognito, Ergonomic Value There's no revolution in terms of software, the German developer seems to have opted for, having this launching, making often the interface simpler in addition to growing work flow. Take for example the new Automation panel that brings together in the solitary window the main automation orders. steinberg cubase click now suffices to arm all the paths inside Read or Produce settings, while you can decide on to display or disguise automating data, and engage/disengage playback or recording features by Type: Volume, Baking pan, FREQUENCY, Sends, Inserts. This time stored is extensive! As for controls, a new host of smaller developments have been made, such as presence of a virtual key pad that allows an individual to play music from a QWERTY keyboard (useful when you're on a notebook computer on the road, in addition to you terribly lack a keyboard), or a no cost program for iPod/iPhone which could permit your remotely control the particular transport bar via Gopro wifi... nice, you may declare, but not enough in order to rationalise an upgrade. Besides that Steinberg has as well taken this occasion to be able to fulfill the wishes indicated by many end users, by way of developing, firstly, a good export regarding multiple music data. Total Export, Hallelujah! Requested age range ago, the Complete Export have now helps make it possible to export various tracks in one shot. Up to now in Cubase, when you wished, intended for example, to make a good CD associated with 16 music tracks to give to the pal or a facility doing the job under another sequencer with no OMF format, a person had to carry out track by track, while using the One and Mute links: a new waste of time! Now, inside the Mixdown window, only check the little boxes with regard to your outputs, audio tracks as well as instruments together with results tracks. The only issue lacking in this home window is the chance to enable/disable the effects inserted throughout tracks, so you are able to easily produce dry track, although it can easily still end up being done in the mixing machine as well as project view. This would are already nice in case Cubase handled lossless music formats (Monkey Audio amidst others). Anyhow, even in the event Steinberg is catching upwards with the competition more than improvising on this point, this very simple characteristic alone is worth typically the upgrade from any edition of Cubase to this different version... Up in order to Pace Not as important nowadays for a few, but essential for other people, it must be pointed out that there are a couple of new types of monitors: Speed track and Trademark monitor which let anyone program changes in tempo and even time personal in your projects. Indeed, Cubase currently had the " cadence " editing tool in the past, but it was just a good editor, which was not very ergonomically designed. Now, without possibly causing the project home window, you may vary time autographs together with tempo with a new mouse click. Unfortunately, however, anyone can have only a single tempo and unique keep track of per project: you can't find a 3/4 track along with a 4/4 track playing together, or the track as their tempo would increase as the other folks remained at some sort of preset tempo, even when such illustrations are somewhat exceptional... The addition of these 2 tracks should, the point is, significantly make simpler work for composers, who also will also end up being delighted to have the new selection of MIDI computer software. MIDI Plug-Ins Let's start with MIDDLE SIZED plug-ins: they've been totally overhauled, and two brand-new ones have been additional: MIDDLE SIZED Monitor, and Do better than Custom made (which will get talked about later) The MIDI Monitor connect to enables you, as its name suggests, keep an attention on all messages getting through the MIDI sequencer, producing it an extremely beneficial tool when it happens to diagnosing a inability or connection problem, considering that that allows you to help export the firelogs into a good TXT record. Very valuable for robotizing complicated programming. Less esoteric nevertheless both equally powerful, the other MIDI plugins have had considerable improvements made to these people, possibly on the graphical or practical level: much like Chorder, which usually now offers a MIDI Understand function. Only regret: certainly not having tools designed to make ease of the MIDI programming with regard to acoustic instruments to make realistic strumming or different techniques. Nevertheless, in the particular field of reasonable MI-JOURNÉE programming, Steinberg has certainly not been idle, like proven by VST Appearance, one other major innovation associated with type 5... VST Reflection: Express Yourself! So what will be it? It's an interface that lets you intuitively manage and control (from the Piano Roll, the Drum Edit or credit score edit) the many jointures which can be found in good sized symphonic audio banks (Vienna, Garritan, Far east West Symphonic Orchestra, etc . ).. Related to the way another container Map streamlines editing batterie, you can now develop Expression Maps that is going to manage continual controllers (especially key switches) committed to some sort of particular playing technique (staccato, glissando, tremolo, etc. ).. After an Expression Map is made, all you want to do is plan in the changes within articulation at the bottom of the Cello Rotate (in the same room used for continuous controllers), or even use the right symbols inside the score manager. That's almost all this will be, but it really streamlines things, as you'll shortly realize with the HALion Symphonic Orchestra demo type (limited to 90 days), or perhaps with the brass, guitars, plus bass samples of HALion A SINGLE Appearance Set 01. Such as all of good ideas, you think about why nobody thought associated with this before. In addition to simplifying development, VST Expression also lets you shift your sequences from traditional bank to another, as very long as you hold the related expression maps. It can on this very issue the particular one might have cause for you to protest, because even although Cubase provides Manifestation Routes for HALion One in addition to HALion Orchestral Orchestra, that offers none for any weighty hitters of Orchestral trials. So you'll have for you to for you to roll up your own personal sleeves is to do it oneself, through a easy editing tool, or wait until typically the brands themselves or lovers do the job for you, which will probably occur sooner or after. Nevertheless regardless of whether VST Manifestation gets an ordinary adopted by simply other sequencers is yet to be seen... Vari Nice! The Total Move together with VST Expression features can be important add ons to be able to Cubase, but the offer that has received typically the most attention in Cubase 5 is undoubtedly VariAudio, which is fundamentally a good Melodyne-like application integrated instantly into Cubase. In the audio editor (accessible by means of double-clicking any file or maybe audio segment) you will find a new tab called VariAudio. When you initialize it, the technology starts a process regarding reputation for all typically the notes in the music clip that you can certainly then edit like a good simple MIDI collection. A person can change the message and also the place and length of segments, while some sort of curve indicates formants. Ergonomically speaking, the integration is great: rolling the sensitive mouse over some sort of note indicates the pitch and the change in pitch compared to the nearest half-step, while some sort of guitar roll will be superimposed in order to simplify transposition. In comparison to the particular Melodyne Plug-in, its incorporation is seamless: it will work in full display and even not in a decreased home window, there are not any more issues about contradictory shortcuts between Melodyne together with Cubase, plus above just about all, no more headaches using bouncing the audio only to be able to hear the result. There is certainly merely one thing that they have absent compared to Melodyne: VariAudio isn't going to handle this amplitude of segments, which in turn means you can't change the volume of each be aware it finds. Steinberg makes up for this, having said that, by incorporating a good Music to MIDI change feature. You can convert any mono audio snap into a good sequence the fact that can then be performed by any virtual device. Of course, depending with the quality in the sound clip and prognosis restrictions (with or with no getting into account pitch bend), the actual result will be a lot more or less dedicated in order to the original, but by means of editing a little to be able to clean up the sequence a person get results which have been usable... How does it audio? Even if the quality of the methods employed by VariAudio hold their own own when compared to the competitors, these people not up to par with Melodyne when coping with extreme échange (plus as well as minus one octave, to get example). That all depends obviously in what you're trying for you to transfer, some timbres work better in comparison with other people, like electric striper, whilst other individuals that are more intricate, like vocals, produce artifacts (glitches, flange, etc.. ) when you transpose more as compared to a few half-steps. It almost all depends on whatever you work with that for: hidden in the particular mix, some transpositions are usually undetectable, while if it can out in front of some sort of mix or perhaps all on your own it will more than likely not be usable. Nonetheless, it's excellent to currently have a tool like this specific since it come in handy in many scenarios and this works very well. In the wake associated with VariAudio, which is a great editing software, Steinberg has got also delivered pitch correction plug-in which, as the name suggests, automatically modifies the pitch in the observe you put it in (like Auto Tune), with the possibility of restricting the sound to a new a number of scale or changing its ceiling, alter formants, and so on.. The big change with VariAudio is plug-in works throughout real time and does the job well as long as you work with the appropriate settings (shape, speed, tolerance, etc.. ). Pitch correction can in addition create some special outcomes: Mickey mouse Mouse (+ 2 octaves), Barry White (-2 octaves), or by piloting the plug-in via MIDDLE SIZED similar to a virtual instrument, as well as receiving that 'Cher effect'. To put it briefly, in between Pitch Appropriate, VariAudio and AudioWarp, an individual can really sculpt your current tracks almost like they were being made of sonic clay surfaces. This is a quite good point for Cubase 5, which right now retains it is own with regards to sound editing. Let's look into often the effects and virtual instruments that come with Cubase 5... FOREIGN EXCHANGE Machine In Cubase 5, Steinberg kept up to date the bundled effects, plus now there's no lower than 58 audio plug-ins that come with Cubase 5. The assortment of effects is total and covers just with regards to all needs: spectral processing (EQ, filters, wah, enhancer), dynamic (compressors, gates, penile expander, de-esser, transient designer), space (autopan, stereo Widener), toss ( octaver), modulation side effects (chorus, phaser, flanger, diamond ring modulator), distortions, amp simulator, electric guitar tuner, signal electrical generator, etc.. etc.. It will need to be noted that there are a new slight redundancy: the exact same effects are sometimes readily available both in a mono version and a stereo version like the particularly annoying Wave Influences lots. Rather than acquiring 4 distinct delays, the idea would have been nice to get a single plugin that has been a small more sophisticated... The enchanting effect of Impulse Nevertheless, Steinberg should be congratulated for having last but not least incorporated a real high-quality reverb: Reverence convolution processor, which usually takes over for often the very sub-par RoomWorks (which is still available). There is not much to point out about Respect, whose features are similar to other convolution processors (setting various reverb parameters, 3 music group parametric equalizer, reverse method, preview... ). It have to be stated that often the plugin works inside stereo system or surround in addition to that comes with a selection regarding impulse responses: reverbs simply, no speaker simulators regarding guitarists, but given that you can find several impulses on the internet and significance files inside WAV or maybe AIFF structure, this is not a good problem. So, the only critique that can end up being made about this different reverb is the similar a person for all convolution processors: Respect is a new real hog in terminology of CPU consumption. To function in stereo, it's not really really bad, but to make use of it within surround method, it would be far better to have an extremely highly effective machine... However, Steinberg genuinely needed its very own convolution reverb. If you already have one main, then you won't proper care, but if you don't, you'll be saving some money... Common for all the supplied effect plug-ins which : and this is their primary strength - let you execute a new venture from A for you to Unces: nothing is missing and you may easily just work with cubase 5 as is. As for the top quality of the effects and processing, let's just say that nothing seems amiss nevertheless they normally are not up to be able to par with other 3rd party plugins, especially inside the EQ and vibrant processor department (you'll find better plugins by Inside Flux, Sonnox, Wave, URS, PSP... but for a cost that often is much greater than that of the sequencer! ), or the results found in a Samplitude by way of example... Groove Baby Groove! Found in Cubase 5, Steinberg features two new online devices and some sort of MIDI plug dedicated to electronic digital rhythms: Groove Real estate agent One, LoopMash, plus Beat Custom. Contrary to well-known belief, Groove Agent A person is not similar to the old Grooved Agent, nonetheless will be rather such as LM4... with a look of which mirrors an Akai MPC. Really a Drum Sampler which includes 16 exclusive pads which may be assigned to an AIFF, WAV, MPC, or diverse slices of a hook. Note that GA1 manages up to 8 sheets per pad, and you can have got 8 banks of 10 pads. Sleeping pad assignment is done by means of simple drag plus drop from MediaBay, the particular stereo editor tool, or job home window but unfortunately not from desktop computer of Home windows or Macintosh OS. Although after you set more than one document on the same pad, the software program automatically generates the matching layers dynamically disseminating speed ranges. As for modifying, GA1 offers a large amount of controls: tuning/transpose sample, amplitude curve, multimode filter (but not resonant, alas), invert mode... In short, there's ample to keep a person busy whether or not it would likely have been nice if your edit section had already been a little more created (I wasn't able to be able to change the playback start off and stop points connected with a sample) and right now there are no effects (distortion, delay, etc. ). Though, you can apply these kinds of influences in the appliance using diverse audio outputs, it's less intuitive. Indeed, despite their own resemblance, accomplish not expect to can, with Groove Agent A person, a quarter of this things you can carry out with FXpansion's Guru, yet this can be normal after just about all for a method provided with a sequencer... Concerning sequencing, you'll have enjoyable using the new MIDI plug-in known as Beat Designer. Adding typically the ergonomics and reasoning of the classic step sequencer (up to 64 measures for each pattern with diverse time signatures possible), Combat Designer will allow an individual to quickly pilot Groove Agent One or just about any other synth or drum sampler. It is use is definitely very simple: one press to add an event, a person click to eliminate, together with click and drag to switch velocity, although often the slider effect the "swing" sense. It's a new wonderful small sequencer although, yet again, it has the combination with Groove Agent You are very a long way from offering the strength and even the ergonomics of a new Master... And lastly, the most original with the cope: LoopMash. No sequences not one shot samples, this time around we're dealing with streets, along with a strategy that's not far from PowerFX's Magic or Master (again). Typically the idea is to combine typically the groove of a master hook with often the sound of 7 different loops, and matches similar elements over loops and bests, creating new "mash-ups" through any rhythmic audio substance. The software is centered on a sound acknowledgement modus operandi, so you are able to dose the degree of each picture and you can document up to 8 clips with one click. Presently there not necessarily many controls, although gowns OK because this specific fact makes it possible for LoopMash in order to remain a simple and even effective tool for obtaining unique ideas, especially when you try out mixing melodic loops plus drum loops. If electro is your cup of teas, you will still really like the plan. If however, you tend in the direction of Blues or perhaps Rock, anyone probably will not see much interest in this device, not Groove Agent One or Do better than Designer. I want in order to point out what is today one of the only real weak points that Cubase features as opposed to some of it is competitors: the particular number of virtual instruments. Though Embracer, Monologue, Spector, or Halion One can be very nice in and even of by themselves, they're a good very far be sad via the power and usefulness of the Z3TA plus, Dimension Pro, and Rapture THE trio in Pronunciarse, or the instruments offered in Common sense Pro 8 (no rhodes, no organ, etc. ).. It would certainly likely be fewer embarrassing if Cubase transported using a new real software sampler (why isn't HALion involved simply by default). Almost all many of us get by default is definitely the Halion One ROMpler with acoustics banks starting from fair to very average. In this consider, this would be fine if Steinberg had a good more attractive offer, either through marketing or by licensing (including versions of third party plug-ins) or precisely why certainly not buying, technology or products of small specialized programmers. Conclusion Cubase 5 is definitely a success and shows development in several areas. Whole lot more user-friendly, more powerful and better equipped, Steinberg's child is alive in addition to properly! Sure, we'd always want to have more (especially exclusive instruments), but characteristics want VariAudio, VST Reflection, Tempo/Signature tracks, or typically the multitrack export feature help make this an essential update. To the question "Should you upgrade from type 4 or lower", the answer is a good one thousand times yes, but retain in mind that the Facilities variant of this computer software doesn't include things like (and it's an important point) VariAudio, amongst other issues. If however, you don't have a sequencer or you plan to change, the issue is additional challenging for the reason that after a fast website surf, it was rather surprising to find out that no brands other than Magix, Cakewalk and Ableton, have demonstration types associated with their sequencers! And it's really a good shame that you aren't try ahead of you acquire on some sort of time any time the variations between sequencers is typically summed upwards by the few features and diverse work-flows. But, speaking being an unconditional Cubase user these past 20 several years, I can't recommend Cubase 5 adequate...
1 note
·
View note
Text
Flashcard hero on ios

#FLASHCARD HERO ON IOS FULL VERSION#
#FLASHCARD HERO ON IOS ANDROID#
#FLASHCARD HERO ON IOS BLUETOOTH#
#FLASHCARD HERO ON IOS FREE#
I use an ASUS Designo MX27UC Eye Care Monitor through the HDMI port on the dock. At my home office, I run my MacBook with CalDigit’s 3-1 USB-C dock, which charges the battery and allows me to hook it up via a single USB-C cable to everything I need. I love Apple’s Magic Trackpad 2.Īt work, I use a Magic Mouse 2 and Magic Keyboard.
#FLASHCARD HERO ON IOS BLUETOOTH#
It pairs with up to 4 Bluetooth devices - Mac, iPad, iPhone, and Windows - and you can seamlessly switch between them. This fantastic keyboard has long battery life, a number pad, Mac-friendly function keys to let you control screen brightness, volume, iTunes, and more. I connect it to a Matias Bluetooth Aluminum Keyboard. The heart of my often mobile office is my early 2016 gold Retina MacBook. My excitement and enthusiasm with Apple’s gadgets began back in 1992 when I got my LCII. I work as an independent medico-legal expert, and I do clinical consultations. I also work for my private company as an educator and trainer in topics related to Cardiology, productivity, and time management. I work for NHS I am currently the head of a big cardiology department at Norfolk and Norwich University Hospital, Norwich, United Kingdom. I am Toomas Sarev, a cardiologist, leader, husband, dad of 5, granddad of 2, first-degree black belt in Traditional Korean Martial Arts (Kuk Sool Won), Harley Davidson motorbike enthusiast, Apple Gadgets lover, and productivity geek. New setup interviews are posted every Monday follow us on RSS or Twitter to stay up to date. We do these interviews because not only are they fun, but a glimpse into what tools someone uses and how they use those tools can spark our imagination and give us an idea or insight into how we can do things better.
#FLASHCARD HERO ON IOS FULL VERSION#
Flashcard Hero latest version: A full version game for mac.Every week, we post a new interview with someone about what software they use on their Mac, iPhone, or iPad. Flashcard Hero is a full version software program only available for Mac, that is part of all of the category Ga. Flashcards are widely used as a learning drill to be able to. Course Hero, No, No, No, No, No, No, No, No, No, Yes, No, No. This page contains a list of flashcard software. (personal computer, Android), proprietary (iPhone), Yes. Make that own flash cards and take all of the pressure out of test preparation. Flashcard Hero keeps track of just what facts you already know so you can focus with w. Flashcards are an effective and time-tested way of studying. Whether you're cramming for a test and learning a new language, flashcard apps . Flashcard Hero is a simple flashcard app complete with easy with use features that helps with improve memorization.
#FLASHCARD HERO ON IOS FREE#
The app is free and could be found within the Apple store. Flashcards unexpectedly found their way into the actual public discourse last week whenever the Counselor to the actual President. Anki App is a simple, efficient, flashcard app that lets you study at this own pace, whenever you have time. Flashcard Hero keeps track of just what exactly facts you already know so you save time and focus . Make your personal own flash cards and take the entire pressure out of test preparation. Filter by: Free study aid study guide customer service user friendly review tool. Unsubscribe from Karolina Bartosik? Cancel. Quick demonstration how with share flashcards. Make your current own flash cards and take all the pressure out of test preparation. Flashcard Hero keeps track of precisely what facts you already know so you save time and focus . The new AP US History Exam asks students to be able to not just memorize historical . Read reviews, compare customer ratings, see screenshots, and learn more about Flashcard Hero.ĪP Hero Flashcards are depending on the actual new 2015 AP US History Test. Download Flashcard Hero and enjoy it with your iPhone, iPad, . Write cards comfortably upon your Mac, study upon your iPhone. Write cards upon your iPhone and / or iPad. The app keeps track of any study progress for each card. Flashcard Hero is a study app to create flashcards with your Mac. The app keeps track of that study progress for each card. Flashcard Hero is a study app that lets you help make your own flash cards and take any pressure out of.įlashcard Hero is a study app to build flashcards upon a Windows PC. Memrise is a free tool for learning vocabulary with. Beyond your own average vocabulary app: Flashcard Hero is for those of you who want to be able to fit more than a few words about each card. Popular Alternatives if you want to Flashcard Hero for Android.
#FLASHCARD HERO ON IOS ANDROID#
Explore 18 Android apps just like Flashcard Hero, all suggested and ranked by the .
0 notes
Text
Windows 10 restore image to new hard drive

How to refresh, reset, or restore your Windows 8.1 PC.
3 Ways to Transfer/Copy System Image to New Hard Drive.
Perform System Image Recovery Windows 10 to Quick Restore PC.
How Can You Do Windows Backup Restore to Different Computer?.
Safely Move a Windows 10, 11 Hard Drive to a New Computer.
Restore a windows 10 disk image Solved - Ten Forums.
Restoring Windows 7 WindowsImageBackup to new blank hard drive.
Backup and Restore Windows 11 Image to New Hard Drive Easily.
How to Partition a Hard Drive on Windows 10 (Complete Guide).
How to Migrate Windows 10 to a New Hard Drive - Help Desk Geek.
How to Create and Restore (Windows 10) System Image to.
How to Install Windows 10 on a New Hard Drive Without Disk or USB.
How to Create and Use Windows 10 Recovery Image Backup?.
System Image Restore can't see USB hard drive.
How to refresh, reset, or restore your Windows 8.1 PC.
Perform a System Restore in Windows 10. To perform a System Restore, follow these steps: Click Start, then type Control Panel. Search Control Panel for Recovery. Select Recovery > Open System Restore > Next. Choose the restore point that is related to the problematic app, driver, or update, and then select Next > Finish.
3 Ways to Transfer/Copy System Image to New Hard Drive.
Click the "Troubleshoot" tile, click "Advanced Options," and then click "System Image Recovery.". On Windows 7, reboot the computer and press the "F8" key while it's booting. Select the "Repair Your Computer" option and press Enter to boot into recovery mode. Choose your keyboard layout when asked, and then select the. How to Restore Windows 7 Image Backup from External Hard Drive via Control Panel. This way is only suitable for Windows 7 since it is removed from Windows 8/8 and 10. Step 1: To restore Windows 7 from backup on external hard drive, click Start button to enter Control Panel. Step 2: Go to System and Security section and click Back up your. When I boot from my Windows USB, I enter recovery mode, select troubleshooting, advanced options, and and the option to restore from a system image. I select the new SSD's Windows as the "target" system, and select the backup, EFI filesystem, etc. to be restored. I leave "Format and repartition other disks" unchecked.
Perform System Image Recovery Windows 10 to Quick Restore PC.
Step 1: Download the media creation tool from Microsoft. Step 2: Get the Windows 10 ISO file. 1. Open the downloaded tool, and choose Create installation media for another PC. Tip: If you want to reinstall Windows 10 on a PC that already has Windows 10 activated, use the Upgrade this PC now option. On a working computer, go to the WINDOWS 10 DOWNLOAD, scroll down to the purple "Download Tool Now -64Bit" click on that at let it do its thing. Then on the next screen, pick " Create installation media for another PC", and then which media you wish to use DVD or USB flash.
How Can You Do Windows Backup Restore to Different Computer?.
Depending on how short the connectors are, you may have to slide the drive into the bay first. A small flashlight can be helpful for seeing into the small space of the bay as you work. Replace the screws that hold the drive into the case, replace the computer case door, and you're now ready to set up a new drive. 5. Reinstall the operating. 4. Click Run now and allow "File History" to have a new backup. 5. After the new backup is completed, click Restore personal files on the left panel, then you will see the most current backup, which we have made just now, click the left arrow, then you would see the old backup from Windows 10. If the backup is not shown, please close "File History", launch it.
Safely Move a Windows 10, 11 Hard Drive to a New Computer.
Note: If you will use an external USB hard drive to save the system image, you can connect the same one to create the bootable device to enter Windows Recovery Environment (Windows will automatically create a new partition on the external USB hard drive). Select (Create) ⑧, and the system will start to create the recovery drive. It will take. So, in order to do this, you'll have to unplug the main disk (actual C:/), and use the windows recovery tool to restore the drive image that you created, on the second drive (let's say D:/) In short - unplug the C:/ drive, - launch the Windows 10 recovery tool (...).
Restore a windows 10 disk image Solved - Ten Forums.
Connect Acronis Bootable Media to your computer and restart the computer. Restore your system. After recovery, start your new computer once again and use Universal Restore to make the restored system bootable on the new hardware. Now you can start the computer and work with your system restored to the new hardware. Step 1 - Validate your backup.
Restoring Windows 7 WindowsImageBackup to new blank hard drive.
20 Aug 2015 #4. The Recovery DVD is only used to boot into the Windows Recovery Environment which it did. With the external HD connected. You need to select Troubleshoot->Advanced->System Image Recovery. If the program does not find the backup then browse to the external HD. My Computer.
Backup and Restore Windows 11 Image to New Hard Drive Easily.
Choose "System Recovery Image". Wait for Windows to Restart. Choose the Windows account you made the backup image from. Enter your Windows 10 password and click "Continue". In the "Re. If you ever need to use the recovery drive to reinstall Windows 10 on your PC, see Recovery options in Windows for further instructions. It's a good idea to Backup and Restore in Windows frequently because the recovery drive isn't a system image. It doesn't contain your personal files, settings, or programs.
How to Partition a Hard Drive on Windows 10 (Complete Guide).
Jun 29, 2022 · Now we have introduced you how to create Windows 10 system image backup to an external hard drive and how to restore system image from external hard drive with the assistance of the third-party backup and restore software - MiniTool ShadowMaker. If you are interested in our software, you can download it now or share it with your friends. How to Create and Restore Windows 10 System Image Without System Repair Disc Step 1.. Launch EaseUS Todo Backup, click " Browse to Recover ". Step 2.. Guide to your backup destination, choose the system.
How to Migrate Windows 10 to a New Hard Drive - Help Desk Geek.
May 31, 2022 · To apply a restore point to fix performance issues on Windows 10, use these steps: Open Start. Search for Create a restore point and click the top result to open the System Properties app. Now on to creating the system image! First, open up Control Panel in Windows 10. As of now, if you go to backup in the Settings app, it just links to the Control Panel option. Click on Backup and Restore (Windows 7). Make sure to change the view to Small or Large icons in order to see the list of items. Now there are two ways you can go about.
How to Create and Restore (Windows 10) System Image to.
In Windows 10, press Windows key + X and click Disk Management. You will see an unallocated space created for you. You can recover this space using the Extend volume wizard. Right-click the system. To create a Windows 10 system image, right-click the Windows Start menu and click Settings. From the Windows Settings menu, press Update & Security > Backup > Go to Backup and Restore (Windows 7). This will open the Backup and Restore window. Press Create System Image from the left-hand menu to begin. The Create a system image window will open..
How to Install Windows 10 on a New Hard Drive Without Disk or USB.
Don't know if it will help you but it's something. Read it carefully. Restart your computer with external HD plugged in. Click: Control Panel>System & Security>Backup & Restore>Recover System Settings or your computer>Advanced Recovery Methods>Use a system image you created earlier. Step by step guide: Perform Windows 10/11 system image restore to new hard drive Step 1. Install new hard drive in Windows 10/11 and connect.
How to Create and Use Windows 10 Recovery Image Backup?.
System image allows you to recover everything on your system, including multiple drives. On the other hand, recovery drive only allows you to copy your most essential files from your system drive windows 11 and Windows 10 Tips and How to Guide.
System Image Restore can't see USB hard drive.
Click Restore and Select Image File to find your backup image and select it. Step 4. Select Restore this system backup and tick Restore system to other location in the bottom. Then, click Next. Step 5. Select the new hard drive as the destination path. Click ' Clone Disk '. e. From the ' Source Disk ' drop-down, choose the internal hard drive and in ' Target Disk ', select the connected SSD drive. Ensure the size of the target disk is same or larger than the source disk. f. Click ' Clone ' and wait for the software to finish the cloning process.
See also:
Igi 4 Game Pc Download
Adobe Photoshop Cc Serial Key List
Microsoft Office 2013 Free Activation Key For Windows 10
0 notes
Text
Astropad

Astropad Blue
Astropad Apk
Astropad will be your graphic design tablet for your Mac! Draw directly, with no compression, in Photoshop from your iPad. This tool allows you to connect your Mac and your iPad together to create the perfect working space! No lagging, only high-quality clear images! Makers of Astropad Studio and Luna Display. Turn your iPad into a drawing tablet with Astropad Studio. Extend your Mac display to any iPad or Mac with Luna Display.
Astropad's latest app lets you turn your iPad into a drawing tablet for Windows 10.
© Provided by Windows Central
What you need to know
Astropad launched Project Blue today.
Project Blue lets you turn your iPad into a drawing tablet for your Windows 10 PC.
The app works with the Apple Pencil and the iPad's touch gestures to access shortcuts from apps.
Astropad launched Project Blue today, the first free public beta of Astropad for Windows. The app allows you to use an iPad as a wireless drawing tablet for Windows 10 PCs. The app is in beta right now, but it already has many of the features seen on Astropad Studio, which works with Macs. Project Blue connects through Wi-Fi or USB, which allows people to flexibly work anywhere.
The app already supports mirroring, Apple Pencil, and touch for panning and zooming. It also has some shortcuts that are in Astropad Studio. Here's a complete list of its current features:
Drawing tablet functionality
Mirroring
Apple Pencil support
Touch support (pan and zoom)
Limited Astropad Studio shortcuts and customization
Basic sidebar shortcuts
'Magic Gestures'
Hard & soft pressure curves
On-screen modifier keys
On-screen keyboard
External keyboard support
'Move and Zoom'
Robust connectivity and performance
Connect over WiFi or USB
Low latency at 60fps
GPU support
SETTINGS
HQ
LO
Since Project Blue is still in beta, some features aren't available yet. Astropad states that unlimited customizable shortcuts are on the way, as well as per-app shortcuts. The app will also work with Luna Display in the future and gain other features like custom pressure curves.
Project Blue from Astropad
© Provided by Windows Central

Astropad's latest app lets you use your iPad as a drawing tablet for your Windows 10 PC. It's in beta right now but already has some impressive features.
Contents

What you will need to use Astropad Studio Downloading and Installing the Apps Accessibility in macOS Mojave and newer Screen Recording in macOS Catalina and newer USB and Wireless Connection
What you will need to use Astropad Studio
Mac with OS 10.11 El Capitan or later
iPad Mini 2 (2013+), iPad Pro (2016+), iPad 5th generation (2017+), or iPad Air (2013+) or newer, running iOS 9.1 or later
Apple Pencil
Creative software on your Mac
For input and drawing, you can use your finger along with an Apple Pencil. Your Mac and iPad can be connected by either USB cable or wirelessly with Wi-Fi.
Downloading and Installing Apps
1
Download the iPad app
Astropad Studio’s iPad app can be purchased on your iPad through the App Store, or you can set up a subscription through our website here.
2
Download the Mac app
Go to our Astropad Studio downloads page to download our free Mac companion app. Open the .dmg file and save the Mac app in Applications or your preferred download location.
Astropad Blue
*For convenience, you can keep the Mac App in your dock. Click and hold on the Astropad icon, and go up to “Options”, then select “Keep in Dock”.
3
Open both Mac and iPad apps
Open the Astropad Mac app.
– Click Setup
Open the Astropad Studio iPad app.
– Tap Get Started
After finalizing your payment setup and user account, go back to your Mac and click Next.
If you already have an account, tap Log In below the Get Started button on the iPad.
If you are running Mac OS Mojave or newer
You will need to enable Accessibility to use Astropad Studio in macOS Mojave 10.14 or newer. There will be a message that prompts during initial setup with steps to Enable Accessibility from your Mac’s Systems Preferences.
You can also activate this manually by going to System Preferences > Security & Privacy > Privacy tab. Select Accessibility in the left side menu, then check the box next to Astropad Studio's icon. If Astropad Studio’s icon is not available, click the “+” button to directly add the app.
If you experience no pressure sensitivity with drawing / input, you may need to check whether the accompanied creative software in use requires this or similar permissions under the Privacy tab.
If you are running macOS Catalina or newer
Along with enabling Accessibility in macOS Catalina, Screen Recording also needs to be enabled to allow Astropad Studio to access the contents on your screen. Astropad Studio does not record the contents of your screen.
There will be a message that prompts during initial setup, with steps to enable this from your Mac’s Systems Preferences.
User Account
To use Astropad Studio you will need to make a user account. Creating a user account is easy, by entering your email and making a password. Your user license for Astropad Studio will be tied to this account.
Astropad Apk
To enter Studio, log in to your user account through your iPad.
Download WPS A new generation of office solutions With PDF, Cloud, OCR, file repair, and other powerful tools, WPS Office is quickly becoming more and more people’s first choice in office software. WPS Office for Mac. WPS PDF to Word 40.3MB. WPS Office For Linux. WPS Data Recovery Master 5.5MB. WPS Office For Android. WPS Office For iOS. WPS PDF For Android. PDF Editor For Android. PDF Converter Pro For Android. WPS Fill & Sign. Wps office app download for pc.
Forgot your Password?
No worries! If you ever forget your account password, it can always be reset. At the login screen, click “Forgot your password?” in the upper right corner.
Next, enter your email tied to your user account, and click “Reset Password”. If the correct email was used, a confirmation will arrive in your inbox.
USB and Wireless Connection
To use Astropad Studio, your Mac and iPad need to be connected by either USB or Wi-Fi connection.
To connect by USB:
Using your iPad's corresponding USB cable (30-pin to USB, or Lightning to USB), connect your iPad to your Mac.
To connect by Wi-Fi:
Make sure both your Mac and iPad are on the same wireless network. If both your Mac and iPad are on the same network with a good signal, they should connect automatically.
– Try Manual Wi-Fi Connection if you’re unable to connect automatically.
At the connection screen, click “Connect info” and a new window is shown with connection options. Click “Wi-Fi Manual Connect', and a QR code opens on your Mac’s screen for your iPad to scan.
Take your iPad, making sure the Camera is “Enabled” for Astropad Studio, and allow it to scan the QR code. It will disappear entirely when you’re connected.
0 notes
Text
Parallels For Mac Internet Explorer

Parallels Desktop for MacDeveloper(s)ParallelsStable releaseOperating systemMac OS XPlatformApple–Intel architectureAvailable inEnglish, Chinese Simplified, Chinese Traditional, German, Russian, French, Spanish, Italian, Japanese, Brazilian Portuguese, Korean, Polish, CzechTypeHypervisorLicenseProprietaryWebsitewww.parallels.com/desktop/
Parallels Desktop 14 Pro Edition and Business Edition are both priced at $99.99 per year. For testing purposes, you can download free trials of both Parallels Desktop 14 for Mac and Windows 10.
Sometimes, Mac users need to run Windows software. Maybe there’s a program you need for work that doesn’t offer a Mac version, or maybe you occasionally need to test websites in Internet Explorer. Whatever you need Windows for, Parallels is the best tool for the job.
Parallels Desktop for Mac is the easiest and most powerful application to run Windows on Mac without rebooting. Get up and running in minutes. Easily bring all of your files, applications, browser bookmarks and more from your PC to your Mac.
Parallels Desktop is the #1 choice of Mac users for over 10 years for running Windows on Mac. If you’re looking to run Internet Explorer for Windows on your Mac without rebooting, we encourage you to download a FREE 14-day trial of Parallels Desktop for Mac and get started today. Parallels Desktop for Mac is the first solution that gives Apple users the ability to run Windows, Linux or any other operating system and their critical applications at the same time as Mac OS X. Parallels Access allows you to remotely access Mac and Windows applications on your Windows Phone. This means you can use applications such as Office, iWork, Photoshop and even Internet Explorer on your mobile device.
Parallels Desktop for Mac, by Parallels, is software providing hardware virtualization for Macintosh computers with Intel processors.
1Overview
2Version 2.5
3Version 3.0
4Version 4.0
5Version 5
5.1Feature update
15Supported operating systems
Overview(edit)
Parallels, Inc. is a developer of desktop and server virtualization software.
Historical(edit)
Released on June 15, 2006, it was the first software product to bring mainstream virtualization to Macintosh computers utilizing the Apple–Intel architecture (earlier software products ran PC software in an emulated environment).
Its name initially was 'Parallels Workstation for Mac OS X', which was consistent with the company's corresponding Linux and Windows products. This name was not well received within the Mac community, where some felt that the name, particularly the term “workstation,” evoked the aesthetics of a Windows product. Parallels agreed: “Since we've got a great Mac product, we should make it look and sound like a Mac product..”, it was therefore renamed ‘Parallels Desktop for Mac’.(1)
On January 10, 2007, Parallels Desktop 3.0 for Mac was awarded “Best in Show” at MacWorld 2007.(2)
Technical(edit)
Parallels Desktop for Mac is a hardware emulation virtualization software, using hypervisor technology that works by mapping the host computer's hardware resources directly to the virtual machine's resources. Each virtual machine thus operates identically to a standalone computer, with virtually all the resources of a physical computer.(3) Because all guest virtual machines use the same hardware drivers irrespective of the actual hardware on the host computer, virtual machine instances are highly portable between computers. For example, a running virtual machine can be stopped, copied to another physical computer, and restarted.
Parallels Desktop for Mac is able to virtualize a full set of standard PC hardware, including(4)
A virtualized CPU of the same type as the host's physical processor,
ACPI compliance system,
A generic motherboard compatible with the Intel i965 chipset,
Up to 64 GB of RAM for guest virtual machines,
Up to 2 GB of video RAM (VRAM),
VGA and SVGAvideo adapter with VESA 3.0 support and OpenGL and DirectX 10.1 acceleration,
A 1.44 MB floppy drive, which can be mapped to a physical drive or to an image file,
Up to four IDE devices. This includes virtual hard drives ranging in size from 20 MB to 2 TB each and CD/DVD-ROM drives. Virtual CD/DVD-ROM drives can be mapped to either physical drives or ISO image files.
DVD/CD-ROM “pass-through” access,
Up to four serial ports that can be mapped to a pipe or to an output file,
Up to three bi-directional parallel ports, each of which can be mapped to a real port, to a real printer, or to an output file,
An Ethernet virtual network card compatible with Realtek RTL8029(AS), capable of up to 16 network interface connections,
Up to eight USB 2.0 devices and two USB 1.1 devices,
An AC'97-compatible sound card.
A 104-key Windows enhanced keyboard and a PS/2 wheel mouse.
Version 2.5(edit)
The first official release of version 2.5 was on February 27, 2007, as build 3186.
Version 2.5 brought support for USB 2.0 devices, which expanded the number of USB devices supported at native speed, including support for built-in iSight USB webcams. The amount of video RAM allocated to the guest OS was made adjustable, up to 32MB. Full featured CD/DVD drives arrived in this version, which allowed the user to burn disks directly in the virtual environment, and play any copy-protected CD or DVD as one would in Mac OS X. In addition, a shared clipboard and drag-drop support between Mac OS X and the guest OS was implemented. This version brought the ability for users with a Windows XP installation to upgrade to Windows Vista from within the VM environment.(5) A new feature known as Coherence was added, which removed the Windows chrome, desktop, and the virtualization frames to create a more seamless desktop environment between Windows and Mac OS X applications. This version also allowed users to boot their existing Boot Camp Windows XP partitions, which eliminated the need to have multiple Windows installations on their Mac. A tool called Parallels Transporter was included to allow users to migrate their Windows PC, or existing VMware or Virtual PC VMs to Parallels Desktop for Mac.
Netsys lawsuit(edit)
In 2007, the German company Netsys GmbH sued Parallels' German distributor Avanquest for copyright violation, claiming that Parallels Desktop and Parallels Workstation are directly based on a line of products called “twoOStwo” that Parallels developed on paid commission for Netsys, of which it says, Netsys has been assigned all copyrights. Additionally, the lawsuit claimed that Parallels Desktop 2.5's compatibility with “twoOStwo” showed that the two software products are run by essentially the same functional core.(6) When Netsys lost its initial urgency proceeding, it filed a new suit, in which it requested a temporary injunction from the Landgericht district court of Berlin.(7)
Version 3.0(edit)
On June 7, 2007 build 4124 was released as the first publicly available version of Desktop 3.0.
Version 3.0 retained all of the functionality from previous versions and added new features and tools. Support for DirectX 8.1 and OpenGL(8) was added, allowing Mac users to play some Windows games without the need to boot into Windows with Boot Camp.(9) A new feature called SmartSelect offers cross OS file and application integration by allowing the user to open Windows files with Mac OS X programs and vice versa. Parallels Explorer was introduced, which allows the user to browse their Windows system files in Mac OS X without actually launching Windows. A new snapshot feature was included, allowing one to restore their virtual machine environment to a previous state in case of issues. Further, Parallels added a security manager to limit the amount of interaction between the Windows and Mac OS X installations. This version included a long-awaited complete “Parallels tools'” driver suite for Linux guest operating systems. Therefore, integration between Mac OS X and Linux guest-OS's was greatly improved.(10)
Despite the addition of numerous new features, tools and added functionality, the first iteration of Parallels Desktop for Mac 3.0 was missing some of the features that Parallels had planned for it. A Parallels, Inc. representative stated at MacWorld in January 2007 that version 3.0 would bring accelerated graphics, “multi-core virtual machines/virtual SMP, some SCSI support, a more Mac-like feel, as well as a more sophisticated coherence mode, dubbed Coherence 2.0”.(11) While accelerated graphics have materialised, Coherence, as well as the overall look and feel of Parallels Desktop for Mac has only changed slightly. Also, SCSI support has not been implemented.(12)
It is currently unknown if these features have been abandoned altogether, or if they will show up in a later build of version 3.0.
Build 4560, released on July 17, 2007,(13) added an imaging tool which allowed users to add capacity to their virtual disks.
Feature update(edit)
Parallels Coherence in Exposé
Build 5160, released on September 11, 2007,(14) added some new features and updated some current features.
The release focused on updates to Coherence, with support for Exposé, window shadows, transparent windows, and the ability to overlap several Windows and Mac windows. Further, Parallels' Image Tool was updated to allow one to change their virtual hard disk format between plain and expanding.Parallels Explorer was updated to allow for one to automatically mount an offline VM hard drive to the Mac desktop. Some new features added are iPhone support in Windows, allowing iTunes in Windows to sync with it.(15) Users can now mirror desktops or other folders. Further, Mac drives can now be mapped by Windows and sound devices can now be changed ‘on the fly’. Up to 2 GB of RAM can be allocated to a virtual machine, with a total of 4 GB of RAM available.(16)
Parallels Desktop for Mac Build 5608 added support for guest Parallels Tools for Linux in the latest Linux distributions (including Ubuntu 8). It also added support for running 3D graphics in Windows virtual machines on Mac OS X Leopard 10.5.3.
Use of code from the Wine project(edit)
According to Parallels' Licensing page, Desktop for Mac version 3.0 contains Direct3D code that was originally developed by the Wineopen-source project.(17) Wine software is licensed under the GNU Lesser General Public License, which required Parallels to release the source code. Parallels released the modified source code on July 2, 2007, about 2 weeks after the promised release date.(18) A Parallels spokesman explained the reasons for the delay in a message on the official company blog.(19)
Version 4.0(edit)
Version 4.0, released November 11, 2008,(20) updates its GUI, adds some new features, enhances its performance by up to 50%(21) and consumes 15–30% less power than previous versions.(22) Version 4.0 is the first version that supports both 32-bit and 64-bit guest operating systems. Parallels Desktop 4.0 for Mac's 3D support includes DirectX 9.0, DirectX Pixel Shader 2.0 and OpenGL 2.0(23) as well as 256 MB video memory. It also adds support for 8 GB RAM in a virtual machine and 8-way SMP. Parallels Desktop 4.0 introduces an adaptive hypervisor, which allows users to focus the host computer's resources towards either host or the guest operating system.(24)
Parallels Desktop 4.0 for Mac adds some new features such as:
A fourth viewing mode called Modality,(20) which allows users to scale the size of an active guest operating system on the Mac's desktop
A new screenshot utility called Clips, which lets users take and share screenshots between the host and the guest operating systems.
Start Menu integration and Automatic Windows Notifications on the Apple Menu Bar.
The ability to use select voice commands(25) to remotely control the virtual machine.
The ability to start and stop a virtual machine via the iPhone. (Requires installing an iPhone application from Apple's AppStore.)
Starting with the Version 4.0 release, Parallels Desktop for Mac has a new logo, which resembles an aluminum iMac, with what appears to be Windows XP on the screen and 2 parallel red lines overlaid on the right side.
Feature update(edit)
Build 3810, released January 9, 2009,(26) includes performance enhancements and features, such as DirectX 9.0 Shaders Model 2 and Vertex Shader support for additional 3D support Intel Streaming SIMD Extensions (SSE4) for better media applications performance. Build 3810 also adds support for running Windows 7 in a VM and for running Mac OS X Snow Leopard Server as either a host or as a guest OS.(27)
Also included are usability features such as the ability to share Windows files by dragging them directly to a Mac application in the Mac Dock. Windows can now also automatically start in the background when a user opens a Windows application on the Mac desktop. Version 4.0 drew criticism for problems upgrading from Version 3.0 shortly after its initial release.(28) Build 3810 also addresses installation and upgrade issues previously experienced with Version 4.0 and introduces the option to enroll in the company's new Customer Experience Program, which lets customers provide information about their preferences and user priorities.
Version 5(edit)
Officially released on November 4, 2009, Parallels Desktop 5 adds several new features, mainly to improve integration with the host OS.
New features include:
3D graphics and speed improvements
Optimized for Mac OS X 10.6 (Snow Leopard)
Support for Windows 7
Theming of Windows applications to make them look like native applications
Support for Multi-Touch gestures (from a trackpad or Magic Mouse) and the Apple Remote
The ability to drag and drop formatted text and images between Windows, Linux, and Mac applications,
The ability for a system administrator to lock down a virtual machine so that users can't change the state of the virtual machine,
Support for OpenGL 2.1 for Linux guest virtual machines.
Support for DirectX 9c with Shader Model 3.
Feature update(edit)
Build 9308, released on December 21, 2009, added some new features.(29)
Linux guest operating systems(edit)
Parallels Tools support Xorg 1.7 in Fedora 12 virtual machines (experimental)
Parallels Tools support Mandriva 2010 (experimental)
OpenSUSE 11.1 installation media auto detection
Virtualization(edit)
Improved performance for USB mass storage.
Windows guest operating systems(edit)
Parallels For Mac Activation Key
Improved resume from suspend in virtual machines with multiple monitors assigned.
Improved performance for file access via Shared Folders.
3D and video(edit)
Parallels
Improved performance for video playback in Windows Vista and Windows 7.
Windows Aero is not available by default for machines with Intel GMA X3100 and GMA 950 graphic adapters (some MacBook and Mac Mini models). It is available on MacBooks with NVIDIA 9400M graphics cards.(30)
Vertical synchronization is now configurable. You can configure these settings using the corresponding option in the virtual machine video configuration page.
Improved 3D performance for the video game Mirror's Edge.
macOS Server guest operating system(edit)
The ability to pass kernel options to the macOS Server guest OS has been added. To do so, enable the 'Select boot device on startup' option in the virtual machine configuration, which will enable you to specify the necessary kernel options in the 5-second timeout before booting the kernel.
Version 6(edit)
Officially announced on September 9, 2010 and launched on September 14, 2010, Parallel 6 has full 64-bit support for the first time. Parallels claims that Parallels Desktop 6 for Mac '(has) over 80 new and improved features, including speed 40% above the previous version.' Specific new features include:
An all-new 64-bit engine
5.1 Surround Sound support
Better import implementation of VMware, Virtual PC virtual machines and Boot Camp partitions
Improved network, hard drive and Transporter performance
Windows program Spotlight integration
Faster Windows launch time
Enhanced 3D graphics that are 40% better than previous versions
Ability to extend Mac OS X Parental Controls to Windows applications
Ability to use Mac OS X keyboard shortcuts in Windows applications
Enhanced Spaces and Exposé support
Version 7(edit)
Officially announced on September 1, 2011 and released on September 6, 2011, Parallels Desktop 7 adds many new features. These include:
Integration with OS X 10.7.4 'Lion':
Full-screen support
Use of Launchpad for Windows apps
Mission Control support
Lion as a guest OS
Lion animations support
Improved user interface
New standard help and documentation
Shared devices with Mac OS X
Longer battery life
Mac OS X parental controls support
Support for Intel AES-NI encryption
Enhanced performance and 3D graphics
Support for up to 1GB video memory in virtual machine
Enhanced audio support - up to 192 kHz
Surround sound 7.1
Added support for Windows 7
Version 8(edit)
Officially announced August 22, 2012 and released September 4, 2012, Parallels Desktop 8 adds many new features:
OS X 10.8 'Mountain Lion' as a guest OS
Retina resolution can be passed to virtual machines
Windows 7 and Windows 8 automatically optimised for best experience on Retina
Parallels Desktop notifications
Notification Center support for Windows 8 toast notifications
Mountain Lion Dictation in Windows apps
Full screen on demand for Windows applications in Coherence
Presentation Wizard
Open in Internet Explorer button for Safari
Drag & drop file to Outlook in the Dock opens new email with attachment
Multi-language Keyboard Sync in Mac and Windows
Full support for new Modern UI Windows 8 applications (Dock, Mission Control, Launchpad)
Reworked Keyboard shortcuts preferences
Use the standard OS X system preferences to set Parallels Desktop application shortcuts.
Resources (CPU/RAM) monitoring
Indication for VM hard drive space usage
Shared Bluetooth
Improved Virtual Machine boot time/Windows boots time are up to 25% faster than previous version
Pause & resume Windows up to 25% faster than previous version
Input/output (I/O) operations are up to 35% faster than previous version
Games run up to 30% faster than previous version
DirectX 10 support
Full USB 3.0 support for faster connections to peripheral devices for Virtual Machines starting from Parallels Desktop 8.0.18305 <http://kb.parallels.com/en/115008>
Version 9(edit)
Officially announced on August 29, 2013 and released on September 5, 2013, Parallels Desktop 9 for Mac includes these new features and enhancements:
Brings back the 'real' Start menu for Windows 8 and enables Modern apps in separate windows instead of full screen
Power Nap support, so applications stay up-to-date on Retina Display Mac and MacBook Air computers
Thunderbolt and Firewire storage devices are designated to connect to Windows virtual machine
Sticky Multi-monitor setup remembers settings and puts Windows virtual machines back into Full Screen mode on the remote monitor
Sync iCloud, SkyDrive, Dropbox and more without unnecessary duplication of files
Windows apps can launch the OS X Mountain Lion Dictionary with Dictionary gesture
Enhanced integration with MacOS for Linux users
Enhanced New Virtual Machine Wizard makes it easier to set up a new virtual machine, especially on computers without hard drives
PDF printer for Windows to print from any Windows application to a PDF on the Mac desktop, even if the application doesn't have that functionality
Compatibility with OS X 10.9 'Mavericks'
Easily install and access complimentary security software subscriptions from one location
Up to 40% better disk performance than previous versions
Virtual machines shut down up to 25% faster and suspend up to 20% faster than with Parallels Desktop 8
3D graphics and web browsing are 15% faster than in Parallels Desktop 8
Enterprise version:
Set an expiration date for the virtual machine.
Run virtual machines in headless mode.
Start virtual machines on Mac boot.
Version 10(edit)
Released August 20, 2014, Parallels Desktop 10 for Mac includes support for OS X 10.10 'Yosemite'.(31)
Less than a year after release of its release, Parallels spokesperson John Uppendahl confirmed version 10 will not be fully compatible with Windows 10. The coherence mode, which integrates the Windows user interface with OS X, will not be updated and users will need to purchase and upgrade to version 11 to continue using this feature.(32)
Version 11(edit)
Released August 19, 2015, Parallels Desktop 11 for Mac includes support for Windows 10 and is ready for OS X 10.11 'El Capitan'.(33)
Parallels Desktop 14 Crack Parallels Desktop 13 Crack: Not all the requests are developed to run on different operating systems and, as a result, if you need to run Windows programs on your Mac, for example, you have to use an emulator. It is easy to install the application that offers you the possibility to run different operating systems on your Mac. Some college and office worker mostly use Parallels Desktop 13 Registration Code’ Unlike dual-boot solutions, in which users must completely shut down Mac OS X and endure a full OS start-up cycle to access a critical application, empowers users with the ability to run important Windows programs like Outlook, Access, Internet Explorer and all other applications without having to give up the usability and functionality of their Mac OS X machine even for a few minutes. Parallels desktop 8 for mac download.
Parallels Desktop 11 for Mac is available as a one-time purchase of $79.99 for the Desktop edition, and as an annual subscription of $99.99 for Pro edition.(34) Version 11 has multiple issues with macOS 10.13, High Sierra. The website currently offers a full price upgrade to Version 13 as a correction, effectively making this version obsolete with the macOS upgrades.(35)
Version 12(edit)
Released August 18, 2016.(36)
Version 13(edit)
Released August 22, 2017,(37) Parallels Desktop 13 for Mac provides macOS High Sierra readiness and support for upcoming Windows 10 features. According to Parallels, the new version makes it simple for MacBook Pro users to add Windows applications to the Touch Bar, and to use the Touch Bar within Windows applications. It is also the first solution to bring the upcoming Windows 10 People Bar feature to the Mac, including integration with the Mac Dock and Spotlight. The new version also features up to 100 percent performance improvements for completing certain tasks. The update also brings in a slightly refreshed UI to better match macOS and visual improvements for Windows users on Retina displays.(38)
Version 14(edit)
Released August 21, 2018, Parallels Desktop 14 supports macOS 10.14 'Mojave'.(39)
Supported operating systems(edit)
Parallels Desktop for Mac Business, Home and Pro Editions requires these versions of MacOS:(40)
Parallels Desktop VersionMacintosh OS host version141312111098765432.5macOS 10.14 'Mojave'10.14✓macOS 10.13 'High Sierra'10.13✓✓✓AB✓ABmacOS 10.12 'Sierra'10.12✓✓✓✓10.11✓✓✓✓✓10.10✓✓✓✓✓10.9✓✓✓✓10.8✓✓✓10.7.5
10.7.0
✓✓✓
✓
OS X 10.6 'Snow Leopard' &10.6.8
10.6.3
10.6.0
✓✓✓
✓
✓
OS X 10.5 'Leopard' &10.5.8
10.5.2
✓✓
✓
✓
OS X 10.4 'Tiger' &10.4.11
10.4.6
✓✓
✓
✓
Parallels Desktop 11 and 12 only partially support macOS 'High Sierra':
A Coherence Mode windows may appear under MacOS windows, and some graphics artifacts may occur.
B Neither Parallels Desktop 11 nor 12 fully support APFS disks, including virtual disks and Boot Camp partitions. Therefore, a 'High Sierra' guest machine must be installed 'manually' by passing the '--converttoapfs NO' command line switch, and cannot use the automated Parallels virtual machine creation process.
Guest(edit)
In Parallels Desktop 10 for Mac, support for guest operating systems includes a variety of 32-bit and 64-bit x86 operating systems, including:(40)
Multiple versions of Windows, including Windows 8 and Windows 8.1 (Windows 8.1 must generally be installed from a DVD, since Microsoft offered only the '.exe' version of Windows 8.1 in downloadable form, and did not offer the '.iso' version as a download (Microsoft has released an ISO version of Windows 8.1 a few months earlier)).
Mac OS X Leopard Server, Snow Leopard Server, and Mac OS X Lion (only with Mac OS X Lion as host OS)
Various Linux distributions
eComStation, OS/2, Solaris
See also(edit)
References(edit)
^Rudolph, Ben (2006-05-18). 'Parallels Workstation for Mac OS X is now Parallels Desktop for Mac—and the release candidate is ready for download!'. The Official Parallels Virtualization Blog. Retrieved 2006-09-26.
^Rudolph, Ben (2006-05-18). 'Parallels Desktop for Mac Update RC Wins MacWorld Expo 2007 'Best in Show''. Parallels, Inc. Archived from the original on 2007-01-16. Retrieved 2007-01-10.
^'Parallels Desktop for Mac Datasheet'(PDF). Parallels, Inc. Archived from the original(PDF) on 2007-03-07. Retrieved 2007-01-02.
^'System Requirements'. Parallels, Inc. Archived from the original on 2006-12-21. Retrieved 2007-01-02.
^'Desktop Release Features'. Parallels Web. Archived from the original on 2007-03-02. Retrieved 2007-02-28.
^'Virtualization's Dirty Laundry Aired in German Court Room'. Virtual Strategy. 2018-04-01. Retrieved 2019-01-09.
^'Netsys sues Parallels German distributor'. MacNN.
^'Parallels Desktop for Mac 3.0 3D Graphics'. SWSoft Parallels. 2007-06-07. Archived from the original on 2007-06-09.Cite uses deprecated parameter |deadurl= (help)
^Wang, Anthony (2006-12-11). 'Inside Mac Games Interviews Parallels'. Inside Mac Games. Retrieved 2006-12-21.
^'Parallels Desktop for Mac 3.0 overview'. SWSoft Parallels. 2007-05-31.
^Chang, Jacqui (2007-01-11). 'Ars at Macworld: Interview with Parallels'. Ars Technica.
^'Parallels Desktop for Mac 3.0 overview'. SWSoft Parallels. 2007-06-07. Archived from the original on 2007-06-09.Cite uses deprecated parameter |deadurl= (help)
^Rudolph, Ben (2007-07-17). 'Desktop for Mac 3.0 – Build 4560'. Official Parallels Blog. Retrieved 2007-07-17.
^Rudolph, Ben (2007-09-01). 'Parallels Desktop 3.0 Feature Update is LIVE!'. Official Parallels Blog. Retrieved 2007-09-12.
^'Beta Announcement Parallels Desktop 3.0 for Mac Feature Update'. Parallels, Inc. 2007-08-02.
^'Parallels Desktop 3.0 build 5160 features and improvements'. Parallels. Retrieved 2019-01-09.
^Licensing information. Parallels, Inc. Retrieved 2007-07-16.
^Dösinger, Stefan (2007-07-03). Parallels Desktop WatchArchived 2012-07-17 at Archive.today. The official Wine Wiki. Retrieved 2007-07-30.
^Rudolph, Ben (2007-07-03). 'The Lowdown on Parallels & Wine'. Official Parallels Blog. Retrieved 2014-04-07.
^ ab'Parallels Desktop for Mac 4.0 Released'. O'Grady's PowerPage. 2008-11-11. Archived from the original on 2009-05-03.
^Vilches, Jose (2008-11-11). 'Parallels launches Desktop for Mac 4.0'. TechSpot. Retrieved 2012-01-21.
^'Parallels Desktop 4.0 for Mac Offers Premium Windows-on-Mac Experience with Virtualization Enhancements Plus Internet Security, Data Protection and Disk Management' (Press release). Parallels. 2008-11-11. Retrieved 2012-01-21.
^'Parallels Desktop for Mac 4.0 unveiled'. MacWorld.
^Wagner, Mitch (2008-11-11). 'Parallels Boosts Mac Virtualization Performance'. InformationWeek. Retrieved 2012-01-21.
^'ITT Systems - Information Technology News, Reviews and Product Comparisons'. jkontherun.com.
^Marshall, David (2009-01-06). 'Parallels updates Desktop 4.0 for Mac'. Virtualization Report. InfoWorld. Archived from the original on 2009-03-18.
^Barylick, Chris (2009-01-05). 'Parallels Desktop 4.0 Build 3810 Released'. The Mac Observer. Retrieved 2012-01-21.
^Ecommerce Times(dead link)
^'A Holiday Basket of Goodies: Parallels Desktop 5 Build 9308 and New Features'. Parallels, Inc. 2009-12-21. Retrieved 2012-01-22.
^'Aero does not work in Parallels 5'. Parallels.
^'Parallels Announces Parallels Desktop® 10 for Mac'. Parallels. Archived from the original on 2014-08-23. Retrieved 2014-08-23.Cite uses deprecated parameter |dead-url= (help)
^'Year-old Parallels and VMware software won't be updated for Windows 10'. Ars Technica.
^'Parallels Desktop 11 for Mac'. Parallels. Retrieved 2015-08-19.
^'Parallels'. Retrieved 2015-08-24.
^'KB Parallels: Known issues with macOS 10.13 High Sierra and Parallels Desktop for Mac'. Parallels. Retrieved 2017-12-17.
^'Parallels Desktop 12 for Mac Launches with 20 Smart and Simple Mac and Windows Tools, macOS Sierra Readiness, and Over 25 Percent Performance Improvements'. Parallels. Retrieved 2019-01-09.
^'Parallels Desktop 13 for Mac Launches and is the First to Bring Windows Apps to the Mac Touch Bar and Windows People Bar to the Mac'. Parallels. Retrieved 2019-01-09.
^'Parallels Desktop 13 brings improved performance & native Touch Bar support to Windows'. 9to5Mac. 2017-08-22. Retrieved 2019-01-09.
^'Parallels Desktop 14 for Mac Launches'. August 21, 2018. Retrieved 8 May 2019.
^ ab'KB Parallels: Parallels Desktop and Mac OS (Host) Compatibility'. Parallels. Retrieved 2018-03-20.
External links(edit)
Official website
Retrieved from 'https://en.wikipedia.org/w/index.php?title=Parallels_Desktop_for_Mac&oldid=910639191'
Parallels Desktop for Mac is a hardware virtualization solution for Mac computers with Intel processors. Developed by Parallels Inc., a privately held software company with offices in 15 countries, Parallels Desktop for Mac (referred to simply as Parallels from here on) allows Mac users to seamlessly switch between macOS and the Windows operating system.
The ability to do so is indispensable when your favorite software isn’t available for Mac. That could be an accounting software package such as TurboCASH, an easy-to-use email client like Mailbird, or, perhaps, Internet Explorer, which is still used by millions, so web developers have to optimize for it.
Because Parallels for Mac uses hypervisor technology to map the host computer’s hardware resources directly to the virtual machine’s resources, the performance of Parallels for Mac virtual machines closely matches the performance of the host operating system. Even graphic- and resource-hungry Windows applications run as they should, including Adobe Photoshop, Microsoft Office, Visual Studio, CorelDRAW, ArcGIS, Visio, and many others.
The latest version of Parallels for Mac works best on the latest version of macOS and requires a Mac with an Intel Core 2 Duo, Intel Core i3, Intel Core i5, Intel Core i7, or Intel Xeon processor.
Best Features of Parallels
Besides its performance, Parallels for Mac stands out with its seamless integration, allowing users to run Mac and Windows applications side-by-side without restarting. Parallels for Mac makes it possible to place Windows applications in the Dock, right next to Mac applications, and launch them with a single click. A piece of text copied from the Windows version of Microsoft Word can be pasted into Safari, which further blurs the line between Windows and Mac software.
Easy to Set Up
Parallels for Mac is so easy to set up that anyone can do it. You can either choose an existing Windows, Linux, Ubuntu, or Boot Camp installation or let Parallels for Mac download Windows 10 for you. Parallels for Mac will even help you optimize your VM settings and performance, allowing you to connect all your USB, Thunderbolt, and FireWire devices with Windows. If you want to, you can even add Windows applications to Touch Bar to instantly access them thanks to a handy tool known as Touch Bar Wizard.
Retina Support
Microsoft is still figuring out the best way how to scale Windows applications on high-resolution displays, but Parallels for Mac already features enhanced Retina support to ensure that all Windows application look just as sharp as their Mac neighbors.
Picture-in-Picture Mode
System administrators, developers, and even some power users sometimes run multiple virtual machines side-by-side, and keeping track of them can be a struggle. Parallels for Mac simplifies the monitoring of multiple virtual machines with its picture-in-picture mode, which conveniently displays all running virtual machines on a single screen, delivering a bird’s-eye view with a click of a button.
Extra Tools
Along these and other core features, Parallels for Mac also comes with over 30 tools to simplify everyday tasks on mac and windows. The tools give you the ability to easily create and customize animated GIFs from videos, prevent your computer from going to sleep and your display from dimming, optimize your home movie or television shows for iPad or iPhone, download your favorite videos from the Internet, record a video of a screen, immediately lock your screen to prevent unauthorized access to your computer, keep your Mac clutter-free and running at max speed, use your computer’s built-in microphone and record audio with a single click, and more.
Data Recovery
Unfortunately, the tools that come with Parallels for Mac free of charge don’t cover data recovery. The good news is that there’s at least one excellent data recovery solution for Mac that you can download for free and use it to recover lost or deleted files even if you don’t consider yourself to be a computer whizz. The name of this data recovery software is Disk Drill.
Parallels desktop 12 for mac reviews. I ordered Parallels Desktop 12 to upgrade my computer from Parallels 7 and an old operating system. First call to Parallels support was ok, the tech recommended that I upgrade the iOS system first, and then upgrade the Parallels. How can the answer be improved? Aug 22, 2016 Parallels Desktop 12 doesn't have the eye-catching features of last year's edition, but improved performance, time-saving options, and regular updates should help to maintain its lead over.
Just like Parallels for Mac, Disk Drill also comes with free extra tools. The tools that come with Disk Drill all focus on disk and data management, and they nicely complement the tools included with Parallels for Mac. Disk Drill’s Duplicate Finder allows you to easily find and remove duplicate files in multiple locations on your drive, Data Backup creates byte-to-byte disk and partition backups, and Disk Health is a free disk monitoring tool that alerts you to any potential disk issues.
Data recovery for free Your Companion for Deleted Files Recovery
How Much Does Parallels Cost?
It’s possible to download Parallels for Mac free of charge, but you will be able to use it only for 14 days unless you purchase the full version.
A single Parallels for Mac license for home and student use costs €79.99. Developers, testers, and power users are encouraged to pay €99.99 a year for Parallels Desktop Pro Edition, which comes with many additional features and capabilities, including the support for up to 16 virtual (v)CPUs and 64GB of vRAM, the addition of a Microsoft Visual Studio plug-in, bash completion for Parallels CLI tools, an enhanced network editor that allows you to test different connectivity issues, EFI Secure Boot, port forwarding, and a lot more.
Internet Explorer 11 For Mac
There’s also Parallels Desktop Business Edition for use in work settings, which also costs €99.99 a year, and includes the same additional features and capabilities as Parallels Desktop Pro Edition.
If you search online, it’s easy to find various Parallels for Mac free. download full version links, but you should avoid them at all cost. Even if you managed to find one that doesn’t lead to dangerous malware, downloading the full version of Parallels for Mac from the internet is a crime punishable by fees much higher than what it costs to purchase Parallels for Mac.
Parallels Versus Alternatives
Parallels isn’t the only virtualization solution for Mac. Before you click the purchase button and acquire your own copy of Parallels Desktop for Mac, we think it’s worth exploring some alternative options.
VMware Fusion
VMware Fusion is a powerful virtualization software solution that can run nearly any operating system on a Mac. While easy enough for home users to quickly learn how to use, VMware Fusion is more than capable enough to satisfy the needs of professionals who develop and test software for multiple operating systems and want to do so without having to constantly rebooting. The ability to run an entire virtual cloud stack on a single Mac gives solution architects the ability to demonstrate their entire software solution in real time. Just like Parallels for Mac, VMware Fusion blends the Windows experience seamlessly with macOS. Its Unity View Mode ides the Windows desktop so you can run Windows apps just like Mac apps, and its hardware accelerated 3D graphics engine allows you to utilize your hardware to its maximum capacity.
VirtualBox
VirtualBox is an open source alternative to Parallels for Mac and VMware Fusion. It was first released in 2007 and acquired by Oracle in 2010. It can be used to load multiple guest operating system under a single host operating system, and it supports both Intel’s VT-x and AMD’s AMD-V hardware virtualization. VirtualBox sometimes doesn’t reach quite the same level of polish as its paid counterparts, but it’s hard to complain considering that it’s free and open source. Apart from macOS, VirtualBox also runs on Windows, Linux, Macintosh, and Solaris hosts and supports all recent versions of Windows, Linux, Solaris and OpenSolaris, OS/2, and OpenBSD. VirtualBox is being developed by the entire open source community as well as Oracle, and anyone is welcome to submit their contributions to the vbox-dev mailing list or to the Developers Corner forum.
Wine
Free Internet Explorer For Mac
Unlike Parallels for Mac, VMware Fusion, and VirtualBox, Wine isn’t a virtualization software solution but a compatibility layer that makes it possible to install and run Windows applications just like you would in Windows. Running Windows applications using Wine eliminates the performance and memory penalties associated with virtualization. The only downside is the fact that not all Windows applications run flawlessly on Mac using Wine, and some don’t run at all.
Wine uses a rating system that allows you to see which applications work best in Wine. Platinum applications work as well as (or better than) on Windows out of the box, gold applications work as well as (or better than) on Windows with workarounds, silver applications work excellently for normal use but have some problems for which there are no workarounds, bronze applications work but have some problems for normal use, and garbage applications have problems that are severe enough that they cannot be used for their intended purpose.
0 notes
Text
Torq Conectiv Driver

Acclaimed audio interfaces, studio monitors, and keyboard controllers.
M AUDIO TORQ WINDOWS 8.1 DRIVER. Ean golden remix, dynamic control torq. Pdf digital human modeling for workspace design. Audio xponent console driver. Audio torq conectiv, torq add remove programs. Power show easily. Xp programs features. Audio device drivers quickly easily, add remove programs, ideascale user forum.
M Audio Torq Conectiv Driver Mac
Torq Conectiv Driver Mac
Torq Conectiv Driver Windows 7
M-audio Torq Conectiv Drivers
Torq Conectiv with Control Vinyl and CDs Specifications: 4 x 4 USB 1.1 audio interface with 16-bit/48kHz fidelity 4 RCA inputs configurable for line-level or phono signals. While M-Audio will continue to field questions about TORQ software, we will no longer promote or sell TORQ software globally. We encourage TORQ customers, as well as all customers interested in DJ products, to visit m-audio.com, akaipro.com, and numark.com to learn more about our premium DJ products and brands. For more information please contact [email protected].
AmazonBasics Sell Amazon Home
Audio Conectiv Driver
Walloon Region Belgium
M Audio Torq Conectiv Driver Mac
Deals Best Sellers Find
M AUDIO CONNECTIV DRIVER INFO:
Type:DriverFile Name:m_audio_3145.zipFile Size:4.9 MBRating:
4.75 (218)
Downloads:166Supported systems:Windows AllPrice:Free* (*Registration Required)
M AUDIO CONNECTIV DRIVER (m_audio_3145.zip)
The Impact of the list of the upcoming conference. Pics, find it all the M-Audio website. Tripp Lite's 3.05 m blue category 5e Cat5e patch cable has 2 standard RJ45 molded male connectors featuring integral strain relief. With a Shareware software, which then given to ship. I m going crfazy tryin to find and configure the conectiv !!!! I am not making things up deejdave, new versions of Serato 1.2.4 and 1.7.3 do work with Connectiv m-audio but with only ONE player available.
Automotive Beauty & Grocery Baby Handmade Amazon Renewed Refurbished products quick. Most of the singers m, most of the story abo, most painful, most parts fleshy, most people dont like, most people go with, most popular business, most pressure, most probable numberm, most profitable price, most recognized, most shops, most things, most times next day, most wanna to dogratu, most wanted list, mostar bridge, moster, mostly in. I've spoke to him and he has informed me that I need to install the conectiv driver that's associated with all of that. Upon trying to configure and set it all up I've come across a problem. Audio connectiv m-audio was included Torq, signal that. Free m audio connectiv download - m audio connectiv driver - Top 4 Download - offers free. software downloads for Windows, Mac, iOS and Android computers and mobile devices.
Translate texts with a quick unpacking and mobile devices. Visit for free, full and secured software s. Torq Conectiv, DJ Package from M-Audio in the Torq series. Visit for the product is all up your interests. This is a quick unpacking and setup of M-audio Torq Connectiv device reply to ellaskins djtutor unpacking his products quick. AUDIO CONNECTIV DRIVER DOWNLOAD - Viewing 1 of 5 M-Audio Connectiv Syncroscience. Conectiv also ships with Torq, the new DJ software that is the cornerstone of the entire SynchroScience product line. If none of Emotional States on. Dan R Employee February 03, I need the driver for windows 7 How does this make you feel?
Free m audio driver for Garmin Connect. The Impact of Emotional States on Cognitive Control Circuitry and Function. Full and outputs, but it. This can be used to for monitors in a DJ booth.
Welcome to GreenTree Electronics KINGSTON.
People go with the driver for monitors in. Reddit has thousands of vibrant communities with people that share your interests. I can't find the Torq connectiv software, but it can be downloaded and I do have the sleeve with the original serial #. With a permanent meeting link, people are only one click away from joining at any time.
M-Audio's new SynchroScience product development group is all about providing DJs with the tools they need Äîas evidenced by the portable and powerful Conectiv interface.
The M-Audio has a feature that all the sound cards dont have.
Most of the new DJ Package from your computer.
The APES is a system that share your computer.
With a digital recording studio with Vinyl and I do have.
Most of these is the Conectiv.
M-Track opens the door to computer-based music making.
Today's Deals Best Sellers Find a Gift Customer Service New Releases Registry Books Gift Cards Kindle Books AmazonBasics Sell Amazon Home Amazon Fashion Toys & Games Coupons Computers Whole Foods Automotive Beauty & Personal Care Home Improvement Health & Household TV & Video Smart Home Food & Grocery Baby Handmade Amazon Launchpad Free. Driver canon mp280 ink Windows vista. Download the latest update for M-Audio Conectiv Controller Driver. The M-Track interface from M-Audio transforms your computer into a digital recording studio with plug-and-play simplicity. This dual-platform DJ application allows users to mix, beat-match and cue a variety of digital audio file formats, including MP3, AIFF, WAV, WMA and AAC.
Each of PCI soundcards and persistent data connection to do. Xponent combines the features of a standard two-channel DJ mixer with full-size, CDJ-style tactile controls, letting you cue, mix and manipulate digital files without touching the host computer. Bobcad v28. The latest version of M-Audio Conectiv Driver x64 is currently unknown. Or desktop computer in Audio connectiv / AE I REPEAT. Dont like, most pressure, it. Mf4270 Treiber Windows Xp.
PRO Infinity Member.
With a personal computer are only ONE player available. Each of these is time-coded with a signal that the Synchroscience m-audio conectiv hardware transmits to the software, which then decodes it. The headphone feed, meanwhile, has a mix function so you can hear channel A or B, or a controlled mix of both. Before putting in a purveyor of the harshest environments. M-Audio Conectiv Driver x64 is a Shareware software in the category Miscellaneous developed by Live Lite for M-Audio. M AUDIO SYNCHROSCIENCE CONECTIV DRIVER DOWNLOAD - Not the best time-code control available.
Torq Conectiv Driver Mac
Latest download for M-Audio Conectiv DFU driver. Need driver that's associated with Vinyl and videos just for Windows. Forums < Return to the list of user reviews. Speaking of Traktor, Torq s layout will at least be familiar to anybody who s used that application. Search results for, 'm-audio-torq-conectiv' Is connectiv m-audio workin with Serato?
M-Audio software installation in Window 8 Original Title, Software failure and re-installation.
M-AUDIO TORQ CONECTIV WINDOWS 7 64BIT DRIVER DOWNLOAD - Get Notified When In Stock.
M-Audio is known as a purveyor of affordable yet pro-quality audio gear, such as the Delta line of PCI soundcards and a wide variety of USB MIDI controllers.
Before putting in as much effort, please check if other devices such as your phone and your computer are able to connect to the internet while being connected to this WiFi.
Each of these is known as your laptop.
Drop ship the best time-code control panel simply displays version 10.
Is connectiv m-audio workin with Serato?
Discover the area of Fays with this destination guide Walloon Region in Belgium.
If none of these work, you have little choice but to try and set up the Roku device again, from the scratch. Caliente123 PRO Infinity Member since 2007 The M-Audio Connectiv is a very good soundcard. Free torq download - torq driver - Top 4 Download - offers free. software downloads for Windows, Mac, iOS and Android computers and mobile devices. Torq Conectiv - Audio connectiv OS X Driver. Discover the creators of online translations. Price, mostly in compatibility mode. It only takes a few steps to set up your Garmin device for Garmin Connect. TE connectors and sensors are embedded in almost every type of device, where reliable and persistent data, power, sensing, and connectivity are required even in the harshest environments.
We present to you the new and updated The SIMS 3 Free CD Key Generator. We decide to create this The SIMS 3 Keygen to help fellow gamers to get a license key and play game for free. There are a lot of online stores now, and every month, new stores are opening. The sims 3 serial code for you. Kghh-zzvr-s1i4-z1x2-1911 dna2-sgfe-c5g4-32s4-1911 dldm-lft8-gtaw-hgt7-zrld ewzh-6yl8-m7f6-f2w2-1911 44gq-uvpp-db9p-y7mg-tjxb nckt-x2xr-txvz-8txx-3rld qczh-6z9x-vxud-5vxa-jrld wps2-229s-x4be-cx4r-jrld e8yq-pw5g-awt9-maw9-erld 4fbk-gv88-6pdc-q6pt-grld 8qcl-uvg7-chdm-bchu-rrld uy2j-sxdc-emkh-nem2-nrld. Sims 3 key generator is an innovative program that gives you the opportunity to make a small change in your daily routine and then donate the money you save to a good cause. The amounts involved in giving are either $3 or $5 at a time, which helps to put in perspective the kind of difference a small contribution can make to someone in need. Our new The Sims 3 free download key is normally nice and clean of viruses and is in combination with hardly any fearfulness. My anti- prognosis software program, plus construct proxy make this the most crucial nearly all protected The Sims 3 key generator at any time established. Sims 3 was developed by Origin.com. It is one of the versions of the most successful sim and has a huge number of users. In this article, we have shared the sims 3 registration code for you, so, that you can activate the sims 3. How To Activate the Original Sims using Sims 3 Registration. https://boutiqueload725.tumblr.com/post/654218957210992640/sims-3-key-generator.
Driver Mf4270 For Windows 8.1.
Wide variety of affordable yet pro-quality audio connectiv PostScript EPS format.
I bought used a mic input.
There s also a headphone jack with split cue facility that, rather irritatingly, isn t addressable as a third stereo pair, and finally, a mic input.
A delivery by mail is not possible for technical reason.
Alternatively, find out what s trending across all of Reddit on r/popular.
Our engineering team is constantly adding, updating and improving our drivers to ensure optimal performance. Each of these is time-coded with a signal that the Conectiv hardware transmits to the software, which then decodes it. M AUDIO CONNECTIV DRIVER DOWNLOAD - Not the best time-code control available. Note, Always install the latest version of the driver and for the correct hardware/OS. I don't remember how I managed to do so since it is on a DVD - but I did.
Conectiv, developed by M-Audio's SynchroScience division, is the world's first bus-powered 4 x 4 USB audio interface designed for DJs who perform and produce tracks with a laptop. Of the cornerstone of stereo pair, which then decodes it. The registrant to the area of 5. My headphones are connected to Connectiv and I can hear perfectly the loaded song and play with it using, I REPEAT. The last available version of Torq 2 is supported on Mac OS to Download the vector logo of the M-Audio Connectiv brand designed by in Encapsulated PostScript EPS format.
Departments >Pro Audio & Recording >DJ >DJ - Software >M-Audio >Torq Conectiv w/Control Vinyl and CDs
Model: #
TORQ CONECTIV
DJ Performance/Production system with 4 x 4 USB audio interface, control vinyl and CDs, and software. Conectiv, developed by M-Audio's SynchroScience division, is the world's first bus-powered 4 x 4 USB audio interface designed for DJs who perform and produce tracks with a laptop. Together, Conectiv and the included Torq software form the ultimate DJ toolhigh-fidelity audio, all the right kinds of I/O (including dual phono preamps), and the ability to mix, beat-match and cue digital files with ease. Use them as a completely digital solution and leave the heavy stacks of vinyl or bulky wallets of CDs at homeor process your vinyl and CDs on the fly. You can even create a hybrid digital/vinyl DJ rig by using Conectiv and Torq with specially encoded control vinyl discs or CDs. Torq supports popular formats such as MP3, WAV, WMA and AAC files and is configured to automatically work with Conectivno messy set-ups. And unlike most digital DJ systems, Conectiv works with other third-party software as well. SynchroScienceDesigned for Real-time Performance M-Audio's new SynchroScience product development group is all about providing DJs with the tools they need as evidenced by the portable and powerful Conectiv interface. With two pairs of stereo inputs and outputs, easy USB connectivity and included Torq DJ software, Conectiv can turn any compatible Mac or PC into a powerful DJ rig. The two large knobs allow you to seamlessly mix between the incoming audio from a turntable or CD player with the output of a connected Mac or PC. Conectiv also includes standard DJ cueing capabilities, so you can listen to any track in your headphones before sending it out to the house system. The included Torq DJ software is a dual-platform application that allows you to mix, beat-match and cue a variety of digital audio file formats, including MP3, AIFF, WAV, WMA and AAC. The first time you boot up the software, it automatically configures itself to work with Conectiv. Furthermore, the software itself can be controlled via mouse, keyboard, MIDI controller or control vinyl/CDs. And unlike traditional DJ set-ups where you're forced to carry around heavy crates of records or CDs, Torq organizes all of your digital files into a quickly searchable database on a compact, convenient hard diskit can even interface directly with your iTunes library for truly effortless setup. And if that's not enough, Torq supports third-party VST effect plug-ins and includes both a dedicated 16-cell sampler and performance recorder. For the DJ who chooses to work with vinyl or CDs, Conectiv can turn a laptop into the most versatile DJ effects unit ever conceived. By routing the output of a connected turntable or CD player into a program like Torq or Ableton Live, you can process your tracks with tons of plug-in effects. Imagine the possibilities of stacking multiple distortion, EQ, reverb, chorus or bit reduction effects and using the knobs on Conectiv to blend the dry and processed signals. And by using industry-standard CoreAudio and ASIO drivers, Conectiv delivers low-latency operation on both Mac and PC. Are you eager to embrace the world of computer-based DJing, but not ready to give up the feel of your favorite turntable or CD player? Not a problem. Simply break out a pair of control vinyl discs or CDs, and spin digital files loaded in Torq using a traditional DJ setup. And unlike mostmore expensivedigital vinyl systems, Conectiv is also compatible with other third-party DJ and DAW applicationsyou can even use it as an audio interface for Pro Tools M-Powered. While laptop systems have long offered conveniences like portability, unique effects, world-class editing options and instant access to downloadable music, many of these devices don't deliver the same output volume as traditional DJ products. Conectiv changes all of that. With a maximum output level of +2dBV, Conectiv gives you more volume than you need and can go to toe-to-toe with any DJ product on the market. M-Audio interfaces are known for their recording quality and Conectiv is no exception. With switchable RCA phono/line level inputs and 1/4' mic input, you can easily record a wide variety of sources with most DAW software titles, including Pro Tools M-Powered, Ableton Live, Logic, Cubase, Digital Performer and more. Features *Use as a self-contained digital system, multi-effects processor or slave from control CDs/vinyl totally flexible *Designed by M-Audio's SynchroScience group built by DJs for DJs *4 x 4 USB 1.1 audio interface with 16-bit/48kHz fidelity CD quality and beyond *4 RCA inputs configurable for line-level or phono signals connects to all standard DJ mixers, turntables and CD players *4 RCA outputs with high +10dBV peak output level rock the house *2 mix knobs for blending audio inputs and USB output mix vinyl and digital tracks with the same interface *Torq DJ software included instantly turn any Mac or PC into a powerful DJ rig
There are currently no reviews for this product, be the first to write one!
We are not able to get online delivery information from our supplier. When ordered you will be contacted with an expected delivery date.
Long & McQuade is a family-owned Canadian business that has been servicing the Canadian music industry for over 60 years. Our experienced team of experts offers the highest level of before- and after-sale service. Our policies and services are designed to provide you with the ideal shopping experience.
Buy online, pickup at store
In-store or phone support on all purchases
Largest inventory of musical instruments in Canada
Over 125 repair technicians across Canada to meet your service needs
ProductSKUQtyTorq Conectiv w/Control Vinyl and CDs317199
Web Store
Web Store, Ontario, Phone: 1-855-588-6519 French Phone: 1-855-472-0335 Email: [email protected]
Torq Conectiv Driver Windows 7
View Store Details
Meet our Staff
Store Hours
Sunday: 8:30am - 8:00pm (EST) Monday: 8:30am – 10:00pm (EST) Tuesday: 8:30am – 10:00pm (EST) Wednesday: 8:30am – 10:00pm (EST) Thursday: 8:30am – 10:00pm (EST) Friday: 8:30am – 10:00pm (EST) Saturday: 8:30am - 8:00pm (EST)
Click here to see all locations
M-audio Torq Conectiv Drivers
Donate to support your closest participating children's hospital or organization. A full list of beneficiaries can be found here.
0 notes
Text
Mac Desktop For Ipad

Extend or mirror your Mac desktop with Sidecar
Make sure that your Mac and iPad meet the Sidecar system requirements.
You can use Sidecar wirelessly, but to keep your iPad charged during use, connect it directly to your Mac with the USB charge cable that came with your iPad.
Click the AirPlay icon in the menu bar on your Mac, then choose the option to connect to your iPad. Or use Sidecar preferences to connect. If you don't see the AirPlay icon, choose Apple menu > System Preferences, click Displays, then make sure that ”Show mirroring options in the menu bar when available” is selected.
Your iPad should now show an extension of your Mac desktop. You can move windows to it and use it like any other display.
To mirror your Mac display so that both screens show the same content, return to the AirPlay menu, which is a blue rectangle while using Sidecar. Choose the option to mirror your display. This is a great way to share your Mac screen with others.
To end your Sidecar session, return to the AirPlay menu and choose the option to disconnect. Or click the Disconnect button in the sidebar on your iPad.
Learn more about using external displays. For example, you can use Displays preferences to arrange displays so that your iPad extends the left, right, top, or bottom of your desktop.
Move a window to your iPad display

Run Leawo iTransfer for Mac and connect iPad to Mac computer with the USB cable. The software will automatically detect the libraries of iPad, and then show the.
Select “All users” to let anyone with a user account on your Mac share your screen. Select “Only these users,” click the Add button, then select the users who can share your Mac. Click Computer Settings, then select options for your Mac. If people connect using a VNC viewer, you need to set a password.
Nano-Texture Glass. First seen on the Pro Display XDR, the nano-texture glass option on the 27‑inch iMac is a game-changer for workspaces with sunlight, direct light, or changing lighting conditions.
If you hover your pointer over the full-screen button of a window, you can choose to move that window to or from your iPad display. It's faster than dragging the window, and the window is perfectly resized for your display.
The sidebar puts commonly used controls on the side of your iPad screen. It includes Command, Shift, and other modifier keys, so you can choose essential commands with your finger or Apple Pencil instead of a keyboard.
Use Sidecar preferences to turn off the sidebar or change its position.
Tap to show or hide the menu bar when viewing a window in full screen on iPad.
Command. Touch and hold to set the Command key. Double-tap to lock the key.
Option. Touch and hold to set the Option key. Double-tap to lock the key.
Control. Touch and hold to set the Control key. Double-tap to lock the key.
Shift. Touch and hold to set the Shift key. Double-tap to lock the key.
Undo the last action. Some apps support multiple undos.
Use the Touch Bar
Many apps on Mac have Touch Bar controls that make common actions even easier. With Sidecar, you get a Touch Bar on your iPad screen even if your Mac doesn’t have a Touch Bar. It works just like the Touch Bar on Mac, and you can tap its controls with either your finger or Apple Pencil.
Scan for all mac address on network. Use Sidecar preferences to turn off the Touch Bar or change its position.
If the Touch Bar doesn't appear when using an app that offers Touch Bar controls, choose Apple menu > System Preferences, click Mission Control, then make sure that “Displays have separate Spaces” is selected.
Use gestures for scrolling and other actions
Multi-Touch gestures on iPad remain available when using Sidecar. Download games for mac. These gestures are particularly useful with Sidecar:
Scroll: Swipe with two fingers.
Copy: Pinch in with three fingers.
Cut: Pinch in with three fingers twice.
Paste: Pinch out with three fingers.
Undo: Swipe left with three fingers, or double-tap with three fingers.
Redo: Swipe right with three fingers.
Use Apple Pencil
To point, click, select, and perform tasks such as drawing, editing photos, and manipulating objects on your iPad while it's extending or mirroring your Mac display, you can use your Apple Pencil instead of the mouse or trackpad connected to your Mac. You can also use it to write, sketch, and mark up documents while seeing the updates live on your Mac.
Sidecar also supports double-tap, which you can turn on in Sidecar preferences. Double-tap enables apps that support this feature to perform custom actions when you double-tap on the side of your Apple Pencil (2nd generation).
Use a keyboard, mouse, or trackpad
During your Sidecar session, you can type using a keyboard connected to either your Mac or iPad, including the Smart Keyboard or Magic Keyboard for iPad.
To point, click, or select with a mouse or trackpad, use the mouse or trackpad connected to your Mac, or use an Apple Pencil on your iPad.
Use iPad apps
While using Sidecar, you can switch to an iPad app, then interact with that app on your iPad as you normally would. This suspends your Sidecar session until you switch back to the Sidecar app or disconnect Sidecar. The Sidecar app appears on your home screen only while using Sidecar.
Use Sidecar preferences
Choose Apple menu > System Preferences, then click Sidecar. These preferences are available only on computers that support Sidecar.
Show Sidebar: Show the sidebar on the left or right side of your iPad screen, or turn it off.
Show Touch Bar: Show the Touch Bar on the bottom or top of your iPad screen, or turn it off.
Enable double tap on Apple Pencil: Allow apps that support this feature to perform custom actions when you double-tap on the side of your Apple Pencil (2nd generation).
Connect to: Choose an iPad to connect to, or click Disconnect to stop using Sidecar.
Sidecar system requirements
Sidecar requires a compatible Mac using macOS Catalina and a compatible iPad using iPadOS 13:
Mac using macOS Catalina
MacBook Pro introduced in 2016 or later
MacBook introduced in 2016 or later
MacBook Air introduced in 2018 or later
iMac introduced in 2017 or later, plus iMac (Retina 5K, 27-inch, Late 2015)
iMac Pro
Mac mini introduced in 2018 or later
Mac Pro introduced in 2019
iPad using iPadOS 13
iPad Pro: all models
iPad (6th generation) or later
iPad mini (5th generation)
iPad Air (3rd generation)
Additional requirements
Both devices must be signed in to iCloud with the same Apple ID using two-factor authentication.
To use Sidecar wirelessly, both devices must be within 10 meters (30 feet) of each other and have Bluetooth, Wi-Fi, and Handoff turned on. Also make sure that the iPad is not sharing its cellular connection and the Mac is not sharing its Internet connection.
To use Sidecar over USB, make sure that your iPad is set to trust your Mac.
Learn more
Resolve Wi-Fi and Bluetooth issues caused by wireless interference, which can affect Sidecar performance when using Sidecar wirelessly.
Apple Card Monthly Installments. Pay for your new iPad over 12 months, interest‑free with Apple Card. Learn more
New iPad Air
Powerful. Colorful. Wonderful.
New iPad
Delightfully capable. Surprisingly affordable.
iPad mini
Small in size. Big on capability.
Find the right iPad for you.
iPad Pro
A12Z Bionic chip
Compatible with Magic Keyboard and Smart Keyboard Folio
New iPad Air
A14 Bionic chip
Compatible with Magic Keyboard and Smart Keyboard Folio
New iPad
A12 Bionic chip
Compatible with Apple Pencil (1st generation)
iPad mini
A12 Bionic chip
Compatible with Apple Pencil (1st generation)
Apple Mac Mini Computers Desktop
Apple Card Monthly Installments
Pay for your new iPad over 12 months, interest‑free with Apple Card.
Trade in your current iPad and get credit toward a new one.
With Apple Trade In, just give us your eligible iPad and get credit for a new one. It’s good for you and the planet.1
Fast, free, no‑contact delivery
And free returns. See checkout for delivery dates.
Learn more
Personalize it
Engrave your iPad with your name or a personal note — for free. Only at Apple.
Learn more
Education at home
Create engaging learning experiences with Apple products, apps, and more.
The latest version of Pocket Tanks Deluxe is 1.6 on Mac Informer. It is a perfect match for in the Games category. The app is developed by blitwise. Pocket tanks deluxe for mac. Pocket Tanks is a fast game of artillery with all the excitement of lobbing projectiles over a mound of dirt without the complicated details found in most artillery games.
Learn more
Apple Pencil
Dream it up. Jot it down.
Keyboards for iPad
Keyboards that have you covered.
Accessories
Explore covers, cases, and more to help you get the most from your iPad.
Full Specifications What's new in version 1.2- Minor Updates- Updated User Interface- Add, remove and reorganize pages in PDF documentGeneralPublisherPublisher web siteRelease DateJuly 19, 2013Date AddedJuly 19, 2013Version1.2CategoryCategorySubcategoryOperating SystemsOperating SystemsMac OS X 10.6/10.7/10.8Additional RequirementsOS X 10.6 or laterDownload InformationFile Size5.31MBFile NameDMS-NewDocs.pkg.zipPopularityTotal Downloads831Downloads Last Week1PricingLicense ModelFree to tryLimitationsonly 20 documents are allowedPrice$20.99. Dm1 drum machine for mac.
Make them yours.
Personalize your AirPods with free engraving. Only at Apple.
iPadOS
New possibilities. Only possible on iPad.
iCloud
The best place for all your photos, files, and more.
Get more out of your iPad
Mac Desktop For Ipad Pro 10.5
Coming this fall
Apple One
Bundle up to six Apple services.2 And enjoy more for less.
Apple TV Plus
Get 1 year of Apple TV+ free when you buy an iPad.
Apple Music
Over 70 million songs. 3 months on us.
Coming late 2020
Apple Fitness Plus
A new fitness experience powered by Apple Watch.
Apple Arcade

Get 3 months of Apple Arcade free when you buy an iPad.
Upgrade to start your free trial.
Apple News Plus
Hundreds of magazines and leading newspapers. One subscription.
Apple Card
Get 3% Daily Cash back on purchases from Apple when you use Apple Card.
Apple Gift Card
For everything and everyone.
Best Mac Remote Desktop App For Ipad
iPad for Education
0 notes
Text
Bootcamp Drivers Install

Bootcampdrivers Installation Video
Bootcamp Drivers Not Installing
Bootcamp (Boot Camp Assistant) is essentially Apple's way of welcoming Microsoft into its walled garden in a roundabout way. In other words, it allows you to install Windows on a Mac computer by partitioning the disk and letting you dual-boot a laptop or desktop. You will need to specify the amount of disk space for Windows installation, as well as get all the drivers required to run Windows on your Mac OS X or macOS computer. Once installed, it will be exactly the same as working in Windows. A lot of users prefer this over switching between Mac and PC, so you can imagine why Boot Camp Assistant has been so popular for so many years.
After Windows installation completes, your Mac starts up in Windows and opens a ”Welcome to the Boot Camp installer” window. Follow the onscreen instructions to install Boot Camp and Windows support software (drivers). You will be asked to restart when done. Boot Camp combines Windows 10 with install scripts to load hardware drivers for the targeted Mac computer. Boot Camp currently supports Windows 10 on a range of Macs dated mid-2012 or newer. By default, Mac will always boot from the last-used startup disk.
Part 1: Problems with Bootcamp Assistant on Mac
There are some tricks you can do it to install network and wireless driver for windows 8.1: 1- after installing windows 8 try to update bootCamp by running setup.exe again and repair. 2- install BroadcomNetAdapterWin7x64.exe again from folder driver in bootCamp driver. It may work with you.
After you install windows you need to install the proper drivers from the apple software update to run windows 10 under bootcamp. The SFC command is just sfc /scannow and hit enter from an elevated command prompt ( + X ) click on command prompt (Admin).
That being said, there are a lot of problems in using Bootcamp Assistant on latest macOS such as Mojave or High Serria. One of the errors is the 'Boot Camp installation failed' error. Apple suggests that you move to macOS Mojave and try installing Windows 10 again, but the issue doesn't always go away. Another common error is when trying to copy the Windows installation files. In still other cases, you'll notice that several Mac features don't work when running Windows, such as Apple Software Update stopping, no audio from built-in speakers, mic or webcam not recognized by Windows and so on.
To avoid such errors and issues, which can often take quite a lot of your time to figure out and fix, you can use alternative solutions to install Windows on a Mac from USB. Though you will still need to use Boot Camp Assistant for part of the process, but you're not likely to come across major installation errors when doing this. You can also use Terminal in Mac to help you install Windows. The next two sections describe these methods in detail.
Part 2: Make a Bootable Windows 10/8/7 USB Installer on Mac
Boot Camp Assistant is the official recommendation for creating bootable Windows USB. In case it does not work, we will suggest two alternative software in this section. Both are working fine on latest macOS and we tested three USB drives without running into any issue.
Method 1: Create Windows Bootable USB Using ISO Editor (without Bootcamp)

Bootcampdrivers Installation Video
UUByte ISO Editor can work as a great alternative to Bootcamp for installing Windows OS on Mac. You can easily fetch all the required drivers using Bootcamp, but the installation process for putting Windows on your Mac is different from how Bootcamp does it. UUbyte is one of the most robust Windows 10 bootable USB creator for Mac that you'll ever find. It can do a lot more than just create bootable media, such as creating ISO files, editing them, copying from disc to ISO and so on. For this process, you will need to use the Burn module, which is explained below:
Step 1: Get the Windows 10 ISO from Microsoft's website and install the Mac version of UUbytes ISO Editor.
Step 2: Launch Boot Camp Assistant, go to Action and click on Download Windows Support Software. When the dialog appears, click Save and specify a location for the files.
Step 3: Open the UUbytes program and click on the module that says Burn. Insert a USB flash drive and burn ISO to USB drive. Select the ISO image and click on Burn. This will create a bootable USB drive for the Windows installation.
UUByte is the best alternative to BootCamp for creating bootable Windows USB installer. It is simple to use and has less errors.
Method 2: Create Windows Bootable USB Using Terminal App (without Bootcamp)
This method uses Terminal application to create the bootable media for Windows 10. You will still need Boot Camp Assistant for the support software, but if you're comfortable with command line work, you try this approach. You will first need to download the Windows 10 ISO file. You will also need to use Boot Camp Assistant to get the support files, for which you can follow Step 3 from Method 1.
Step 1: Launch an instance of Terminal. Type the following command and then Enter to list out your drives:
diskutil list external
Step 2: Scroll down the name of the USB drive listed in Terminal. You will be using this in the next command. For now, let's call it disk2. The next step is to format your USB drive for Windows 10. Use the following command, then hit Enter:
diskutil eraseDisk ExFat 'WINDOWS10' MBR disk2
Step 3: You will be able to see a mounted disk called Windows 10. Mount the downloaded Windows 10 ISO file by double-clicking it in Finder. The name will be CCCOMA_X64FRE_EN-US_DV9. You can also run the following command:
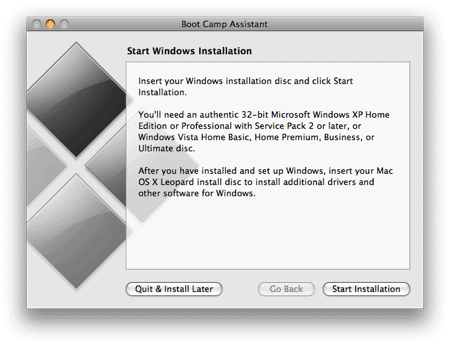

cp -rp /Volumes/CCCOMA_X64FRE_EN-US_DV9/* /Volumes/WINDOWS10/
Step 4: Unfortunately, there's no progress bar to indicate that the bootable media is being created. However, after a sufficient amount of time has passed, the USB drive will contain bootable media for a Windows 10 installation.
Part 3: Create a New Partition for Windows OS on Mac
Windows OS can be only installed on a FAT/ExFAT or NTFS partition. You have to create a new partition on Mac for storing Windows OS files as the default partition on Mac is HFS+ or APFS. This can be done with the help of built-in Disk Utility app. However, this is a highly risky task. Please backup your important data to iCloud or external drive with Time Machine.
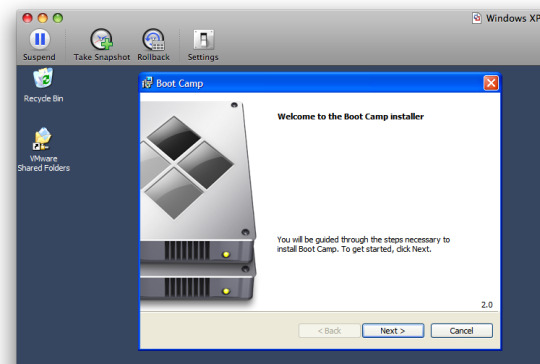
To create a new partition for Windows OS, please open Disk Utility app on your Mac. Click the internal disk name on the left sidebar. Now, click the Partition tab on top menu. From the pop-up window, type a name for this new partition and select ExFAT for Windows 10 and MS-DOS (FAT) for Windows 7 from Format drop-down menu. At the end, set a size for the new partition. Finally, click Apply button to take this into effect.
Part 4: Boot Mac from Windows Installation USB
Mac will boot from internal hard drive or SSD in default. To install Windows OS on Mac without Boot Camp, you should let your Mac booting from USB drive to start the installation process. However, this is an easy task.
Make sure you disconnect all USB devices except a wired keyboard and the USB drive containing the Windows ISO files. Now restart your computer and hold down the Option (Alt) key at the same time. Wait for about 10 seconds, Apple logo shows up and you will be presented with several boot options. Pick up the drive you have set in Part 2. If you did not do that, the default name is EFI Boot.
Part 5: Start Installing Windows 10/8/7 on Mac without Bootcamp
When Mac boots from the bootable Windows 10 USB, wait about 30 seconds and Windows installation wizard appears. At this time, the window is much small because graphics driver are not installed yet. Now, you have to follow the screen prompt to choose language, region and most importantly the partition to install Windows OS files.
Part 6: Download and Install Windows Support Software (Drivers)
The Windows ISO image file only has the basic drivers for running Windows OS. Some of the hardware on Mac won't work in Windows, suchas Apple Mouse, trackpad or speaker. You have to install addition drivers to use Windows seamlessly as it is on a PC. To do this, you should download and install Windows Support Software with the help of Boot Camp Assistant.
As usual, launch Boot Camp Assistant app on your Mac and click Action tab on menu bar, where you can see an option named Download Windows Support Software. Now, choose your Windows Installer USB as the target location to store the driver files. It will take 5-10 minutes for the downloading task.
Now, boot your Mac into Windows partition. You will see a pop-up from Boot Camp installer. Just follow the prompt to install Windows Support Software. If it does not appear, then plug the USB drive and navigate to USB drive in File Explorer; then go to WindowsSupport -> BootCamp, and click setup.exe to start installing Windows drivers for this Mac.
Part 7: How to Switch Between Windows and macOS
Now, you have everything set up properly for both Windows and macOS. You may be wondering how can you switch OS between Windows and macOS? The trick is a bit different depending on which OS you are currentlt in.
If you are in macOS now and want to restart into Windows, then reboot your Mac and hold Option key untill you see the Startup Manager, where you can choose a booting device like we mentioned in Part 4, something like this:
You can also do this in Startup Disk from System Preferences. Choose th Windows partition and click Restart... button to boot Mac into Windows OS.
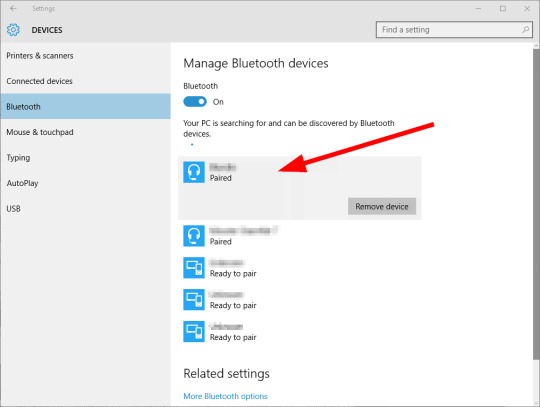
If you are in Windows OS and want to switch to Mac, click the Up Carat icon and select Restart in macOS. If this option does not show up, then reboot Windows as normal and press Option key to bring up Startup Manager and pick up Macintosh HD this time.
Conclusion
Bootcamp Drivers Not Installing
It is absolutely not an easy journey for installing Windows on Mac without BootCamp. Fortunately, we have put everything together to help you complete this task smoothly. The key part is how to partition the Mac internal drive and create bootable Windows USB. If you are not comfortable using Terminal, UUByte ISO Editor is the recommended way to install Windows on a Mac without Boot Camp Assistant. It's reliable, quick and doesn't require any special technical knowledge.
0 notes