#one of the help posts recommends creating a layer mask to double-check your work
Explore tagged Tumblr posts
Visit Tumblr Blog
Explore Tumblr blogs with no restrictions, modern design and the best experience.
Last Seen Tumblr Blogs


Fun Fact
Tumblr has a low social media market share in South America.
Note
Ok thanks for this post, it made me realize I was trending this way with (particularly) some of my rnm gifsets.
sorry but, what's orangewashing?
It’s when a character is left looking incredibly orange, skin tone-wise. I can probably show you better than telling you, so below are three gifs! The first is without coloring, the second is an example of orangewashing, and the third is the result of me going back to correct the second.
WITHOUT COLORING
ORANGEWASHED

COLOR CORRECTED

#one of the help posts recommends creating a layer mask to double-check your work#so guess who is finally going to figure out how to do layer masks#also hold the front door one of them said you can now do 10mb on tumblr is that true????#///#branching out#wow talk abt a tag I haven't used in forever
87 notes
·
View notes
Text
gif cut-out tutorial

ok ok so @subtledean requested a tutorial on how to do stuff like this post with the gif cutouts and the text effects. hopefully this helps aria ;w; i’m not the best at explaining things but i included some screencaps for clarity. i’ve tried to compress all the sample gifs and screenshots down to under 3mb to avoid tunglr compression on mobile so if they look a little different from the actual gifset, that’s probably why!
what you’ll need:
photoshop, i’m using PS 2021 but any version of photoshop will work out
a basic knowledge of gif-making (i’m assuming you already know how to make a gif and color it).
step 0: storyboard
this isn’t strictly necessary but i HIGHLY HIGHLY recommend it. you don’t have to do any photoshopping this first step, but it’s really important to check out your footage and the shots you have gathered to see what works, especially if you’re trying to combine three or more gifs onto the same canvas. like literally take a piece of paper and draw out where you want the character’s faces to be, where you want the cutouts to be in relation to their faces, and think about whether or not there’s enough empty space to the right or left of characters heads for a cutout to be placed. is there too much movement that would be distracting or messy in an already busy gif?
things like that really help, and it also makes you double check on your footage quality and feasibility. if you end up making a gif where you want one character’s face to be on the left side of the gif but it turns out there’s not enough empty space on the right side of their face to place a cutout and you then have to hunt for new footage or start all over, it’s kind of a trainwreck and you just waste another hour of your time as you deepen your procrastination hellhole. that’s not a real story—
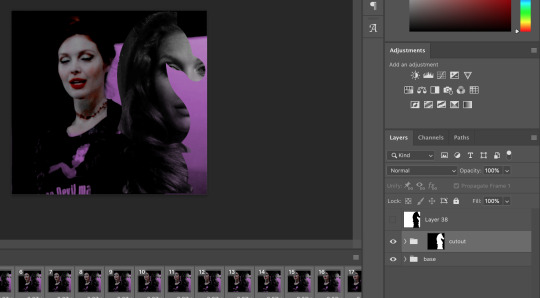
step 1: make the base gif
i’m assuming you know how to color it already. and aria i KNOW you know how to color already so :) size it accordingly to your desired dimensions.

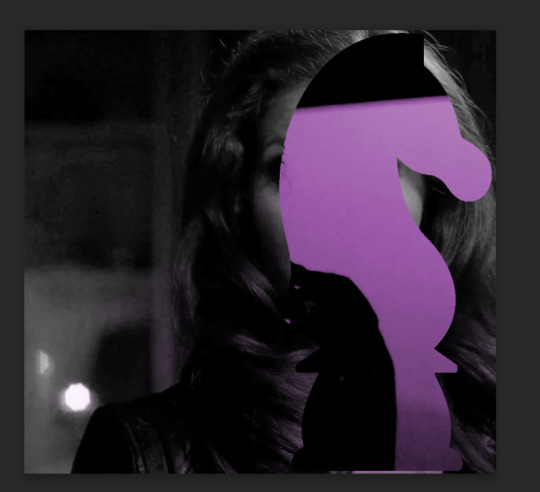
as you can see, i left enough space on the right side of abaddon for the knight cutout to be placed.
save this as a .psd file. you don’t actually have to sharpen and do everything that comes at the end of making a gif right away, but make sure your layers are clearly labeled. do NOT convert to video timeline/smart object just yet.
step 2: make the cutout gif
this is critical: make absolutely certain your cutout gif has the same number of frames as your base gif. otherwise it could get really messy! abaddon has 20 frames, so the cutout will also have 20 frames. again, do not convert the cutout gif to a video timeline/smart object. just keep it as a frame animation. here’s my cutout gif. it’s just a simple b&w gif but i added a touch of purple for color consistency sake whatnot.

now for this particular gif i’ve actually cropped abaddon to be roughly exactly where i would want her face to be in relation to the first gif, but that is unnecessary. helpful, but unnecessary. you do NOT need the cutout gif to be cropped exactly perfect in order to make this work.
step 3: combining the two gifs
there are many different ways to combine two gifs onto the same canvas. some people like to do it via video timeline. i prefer to do it by frames and convert everything to a video timeline only at the end (it’s just a personal preference). here’s a tutorial if you prefer working with timelines, but i’m gonna go over how to do it by frames.
first group everything in your base gif into one folder. then group everything in your cutout gif into one folder as well. you can name them however you want to keep track of things.
then, select all of the frames in your cutout gif. in this case, all 20 of b&w abaddon get selected. make sure its not just frames 4-20 or whatever, but all the frames you made. you can click frame one and then shift-click your last frame to double check.
click the timeline tab group options bar and then go to options > copy frames
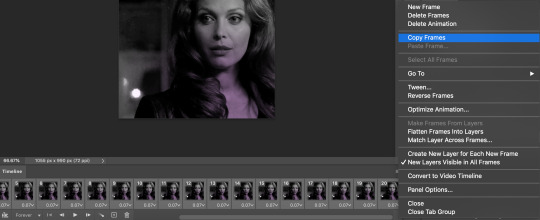
now go to your base gif canvas. select ALL the frames of your base gif as well (it’s critical that all of them are selected).
now do options > paste frames.
a popup should appear and you’re going to select the “paste over selection” option. do not link layers.
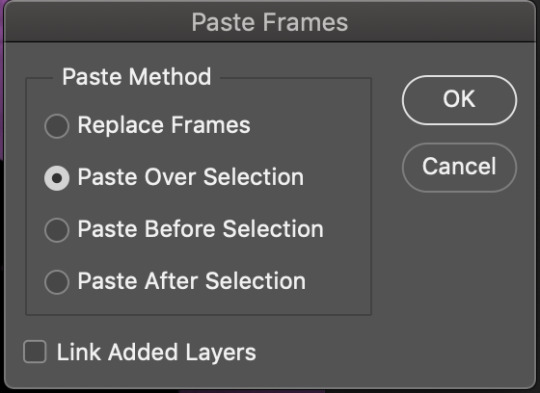
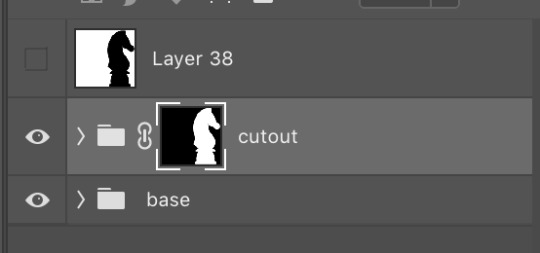
your cutout gif should now be completely or partially obscuring your base gif. however, now you should see two groups on your sidebar of layers. one for the base, one group for the cutout. if you labelled them with names you can tell which one is which.
step 4: creating the cutout
in order to create the cutout, we use my favorite thing in the whole world of photoshop. layer masks.
to make a layer mask, you simply select a layer or group you want to mask and then click this little icon on the row of icons at the bottom of your layers panel.
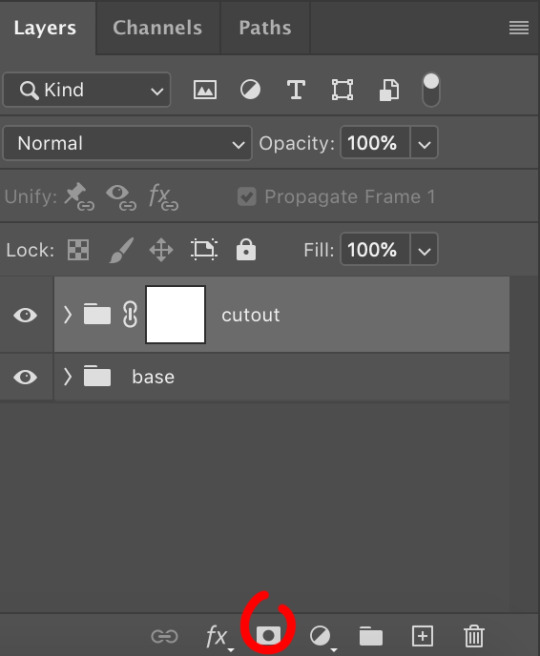
white on a layer mask means whatever group or layer is getting masked is completely visible. black on a layer mask means that the group or layer is invisible. if there is 50% gray on a layer mask, then its 50% visible. so on and so forth.
i love these so much i abuse them on the daily. i’ve made a few gifs where i’ve masked every frame one by one because i wanted to get some cool effects. admitting that kind of embarrasses me but oh well.
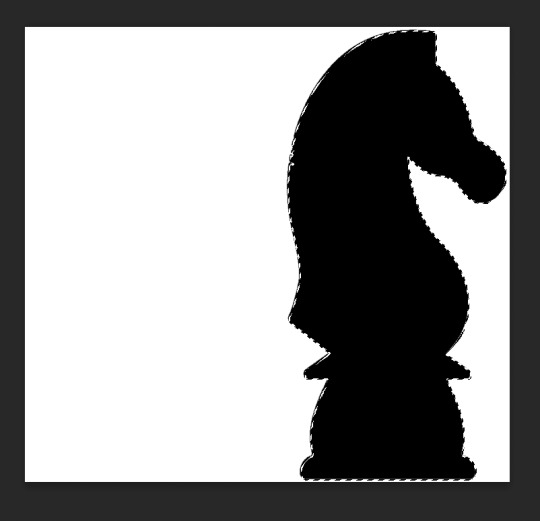
anyway this is simple though. just find a picture or an outline of a knight. i used these boyes:

obviously i cropped out the knight of the bunch, got rid of the watermark, and then i placed it on the canvas where i wanted it to go.
select the interior of the knight with the magic wand tool. should be pretty simple since it’s all black.
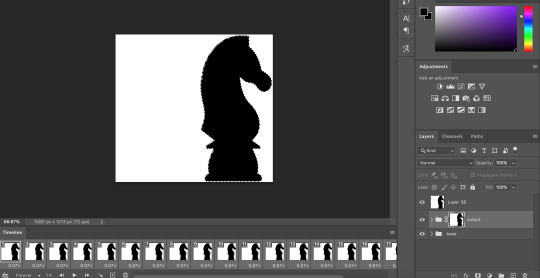
now click over to your layer mask. make sure you have selected the mask and not the group. you can tell you have selected the mask when a little white rectangle pops up on it.
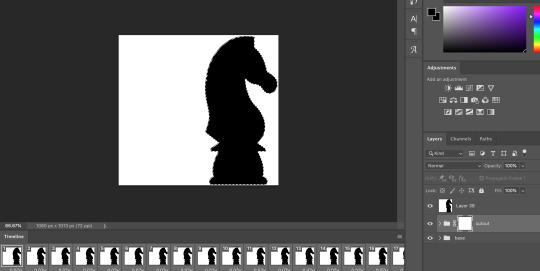
when you know you have the mask selected, click command+i or control+i to invert. if for some reason you do not have this keyboard shortcut, just take a brush tool and color over the area in complete black. as long as the magic wand tool is still selecting just the interior of the knight, it should be fine.
now once again, black means a layer will NOT be showing, white means a layer will be showing. so right now after i disable the visibility of the top layer we used as a reference for the silhouette, it looks like:
do not fear the clownery. layer masks are great because they are always non-destructive. meaning that even if you somehow mess up and your canvas is showing something completely gross, you can always go back and edit your layer mask and your original gif would be unharmed as long as you did not touch any layers in the group, only the mask. simply invert the mask (again, make sure your mask is selected and then command+i or image > adjustments > invert) to get:

for a layer mask that looks like:
you could have also just made a black layer mask to begin with and then inverted the knight outline to be white. many different ways to do the same thing.
another tip: if you select your outline and then click layer mask upon a group or layer with no mask at the current moment, it will automatically make a layer mask with your selection as white and the unselected pixels as black. this is normally how i do my cutouts, because it’s a time-saver even if it like. saves a few seconds max. but i typed out the above for explanation and clarity, so hopefully i didn’t just make anyone more confused.
anyway.
now say you don’t like where the cutout abaddon is positioned. layer masks can also be linked or unlinked, depending on the little link icon you see between the group and the layer mask in the image above. if the icon is visible, the layer mask and the group are linked. if you cannot see the link icon, they are unlinked.
linked layer masks will move in conjunction with the group if any type of transform is done upon them. if the group moves, the layer mask also moves. but if a layer mask is unlinked, you can move the mask and the group independently of one another. for instance, i can change where the cutout is located on the overall canvas of the gif by simply moving ONLY the layer mask (and thereby changing where the blacks and whites of the layer mask occlude the cutout gif contents). but i can also transform the cutout gif layers without changing where the overall outline is located relative to the canvas itself. basically, i can transform the interior contents of the cutout independently. so here (make sure all of your frames are selected):
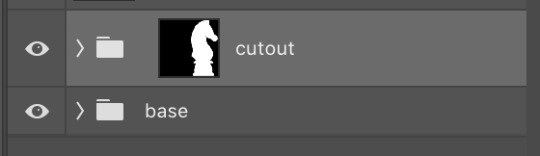
group unlinked. i’m also making sure that now i am selecting the GROUP (ie. the frames of the layers you are actually going to move) and not the layer mask. you can tell because the little white rectangle around the layer mask can no longer be seen.
now i can transform/adjust the contents of the cutout solely “within” the cutout, and i don’t have to worry about changing where the cutout is located in relation to the overall gif. when transforming, make sure all the frames of your gif are selected. like select the whole group and not just an individual layer, basically.
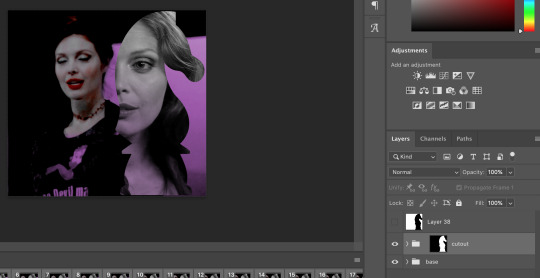
i’ve seen a lot of how to combine and cut out gifs tutorials on this website, and here is a really good one that i know sully also used <3 big shoutout to all the photoshop queens being inspired by each other!! however i haven’t seen anything that mentioned the linked vs. unlinked layer masks, which i really feel like deserves a shoutout. you don’t have to crop your gifs out perfectly every time, you can always adjust them later. for demonstration, i’ve positioned abaddon in a few different positions with an unlinked layer mask.
step 5: creating the outline
so in order to emphasize the shape of the cutout (the knight), i simply delete the white space surrounding the picture of the knight in the original silhouette that i used. magic wand tool + delete. you can also make a new layer, then paint bucket tool it. many ways to do the same thing.
now with only the knight on a transparent background, i double click the layer to pull up the effects. select outer glow. i used these settings:
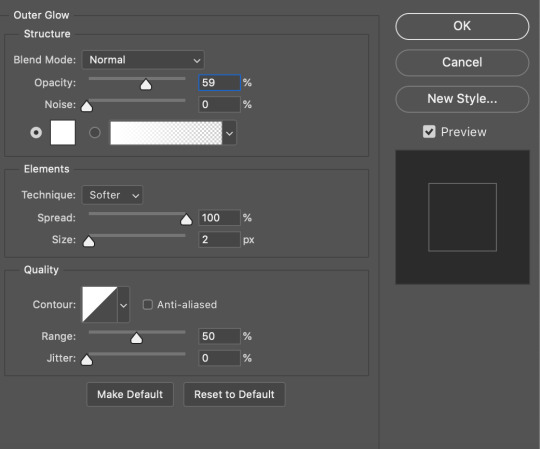
when you are doing this, make sure you are on frame one of the frame animation and the “propagate frame one setting” is selected, otherwise you might end up only applying the effect to one out of your many frames, which blows.
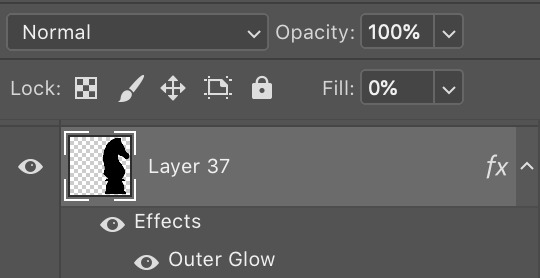
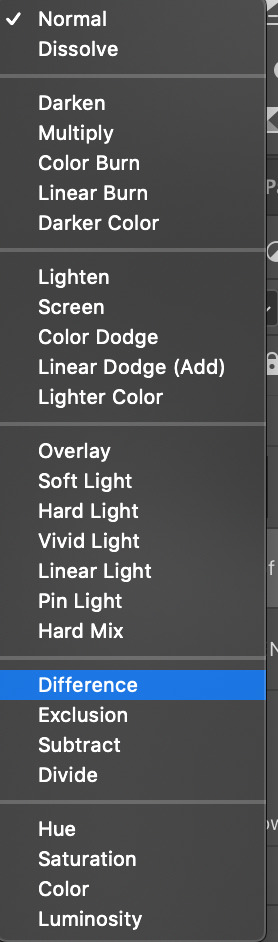
then i go change the fill setting to 0%, BUT i leave opacity at 100%. fill is basically like opacity, but it doesn’t affect layer effects (whereas opacity does). so you basically get only the outline but not the black. you can also set the blending mode of the layer to screen and get the same effect, etc, etc. feel free to adjust however you see fit, in addition to the outer glow settings.
i move this layer over a couple pixels to give it the little offset effect, but you don’t have to.

step 6: adding the text
okay the two fonts i used are avenir and perla. i think a LOT of gifmakers use them because they’re really pretty.
i make TWO different text layers, one with avenir in a smaller size and one with perla in a bigger size. this is because for the perla one, i’m going to be changing the blending mode whereas i don’t want to be changing the blending mode for the smaller text. i position the text where i want it to be and make sure the perla font is in the color i like:

then i change the blending mode of the fancy text (perla) to difference. ONLY that layer, and again make sure to check “propagate frame 1″ and make changes on the first frame to apply the change to all of your frames.

but i still don’t think it produces enough of a difference. so i right click on the text layer for knights of hell, and then go to: select pixels.
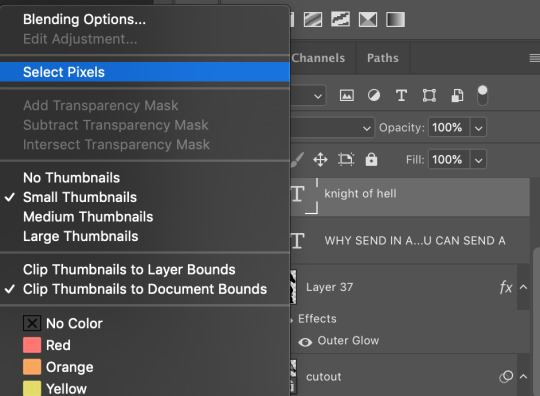

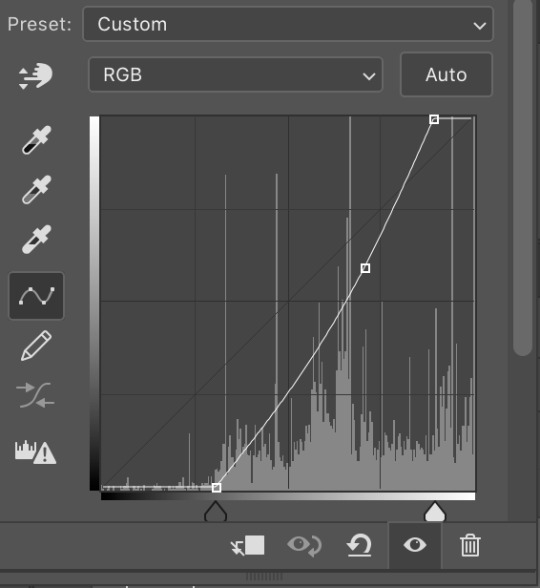
then i click the curves adjustment layer. this will automatically make a curves layer with a layer mask that occludes everything BUT the area you selected. beautiful. i drag the curves around until i get enough of a difference that i like. normally i make the lights lighter and the darks darker. yeehaw.

again there are sooooo many different ways to achieve the same effect on photoshop. this is just want comes easiest to me, and it’s totally okay if you find a different way that works better for you at producing the contrast you want or the colors you want.
step 7: export and cry
NOW you can convert everything to a video timeline, put your video frame layers to smart objects, and then apply your finishing sharpening filters. export, cry, and hope tumblr compression doesn’t screw you over.
hopefully this was helpful! pls like... idk support my edits if you found this helpful or reblog this post. feel free to dm me about how u do some of the text effects as well bc i’m always trying to learn new things and i am by no means an expert on like. any of this.
aria please go write your fucking thesis before i delete this entire tutorial challenge. :D
#subtledean#THIS IS FOR YOU#I FEEL LIKE THIS TUTORIAL HAS MORE WORDS THAN UR THESIS ATM SO!!!#tutorials#mine#idk what to tag this but PLS pls pls feel free to talk to me abt ph*toshop#or ask for help or point me towards other tutorials <3#shoutout to sully too its in there somewhere#resources#100n#ps
190 notes
·
View notes
Photo

Welcome to soonhoonsol’s gif tutorial!
As a nice anon asked me how I make my gifs, I thought it’d be cool to create an in-depth tutorial :) Perhaps this can help some others enter the gif-ing world too!
What we’ll be using for this tutorial:
Software: Bandicam, Avisynth, Photoshop CC 2018, Topaz Labs
File Format: .mp4
Operating System: Windows
Disclaimer: This is just my method. Every gif maker works differently and has different preferences. What works for me may not work for you, and that’s completely okay!
Let’s get into it!
1. Find the best quality video you can find
This really depends on the content you want to gif. For variety shows, music videos or photoshoots, any video of [1080p] should be sufficient. Try not to use anything below 720p.
For stage performances, fancams tend to have higher resolutions [1440p, 4k]. Use these if your computer can handle it. If not, usually 1080p works fine. The best option would be to download .ts files, which provide clearer and less grainy videos.
For Seventeen, you can get .ts files from The Rosebay on Twitter :)
2. Screen recording
As a Windows user, I don’t have a built-in screen recorder on my laptop. So, I use Bandicam, which is a free screen recording software. The only con to it is that it has a watermark.
To combat the watermark, I always have the boundary box a little bigger than the video itself so that I can crop it out of the gif.
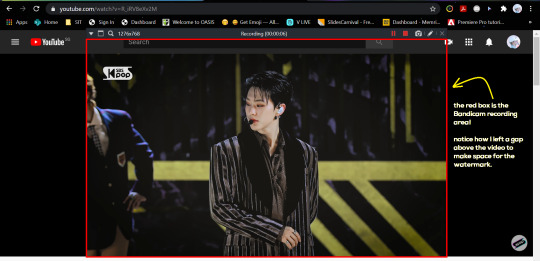
This is what the recording would look like:

Just record the scene(s) that you want to gif so your video file doesn’t end up too large! Your recording should be in .mp4 format.
(You may use pure .ts files in Avisynth but it never worked well for me so I usually screen record the .ts video and move on)
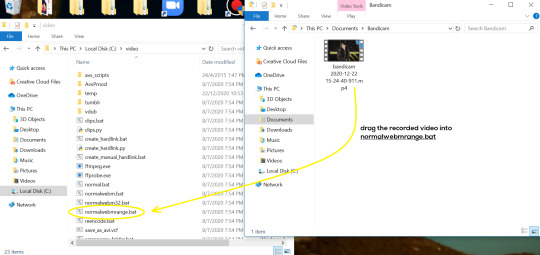
You can find your recorded videos in Documents > Bandicam.
3. Avisynth
I followed THIS tutorial to download Avisynth. This software is really helpful if you want sharp and clear gifs! I recommend to follow the steps in the tutorial as the below method stems from it.
- Once you have downloaded it, open up your recorded video from Step 2 and watch it. Take note of the duration you want to gif. (e.g. from 00:01 to 00:05)
- Drag your video file into normalwebrange.bat. On Windows, you can find this in File Explorer > Local Disk (C:) > video. For other .bat files, you may check out THIS tutorial.
- In the pop-up box, key in the start time for your gif (e.g. 00:00:01). It has to be in hh:mm:ss format. Press “enter”.
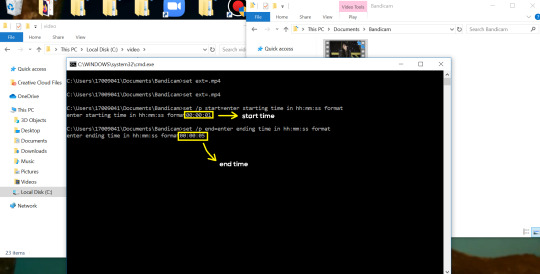
- Key in the end timing and press “enter” again. A resizer should pop up in an Internet Browser. I found that Firefox works best for me.
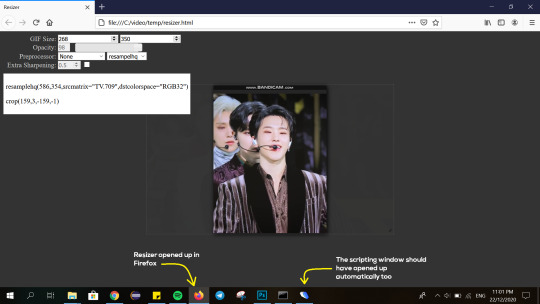
- In the resizer, you may indicate the size of the gif you’d like to make. You can also click and drag the video to resize and frame it to your liking. You may refer to THIS post for Tumblr dashboard sizing.
(These are some common gif sizes for stage performances):
1 gif - 540px by 540px (square)
2 gifs - 268px by 350px
3 gifs - 177/178px by 250px
- Under “Preprocessor”, select “debilinear” for the second box. For the first box, you may pick between qtgmc 30 (same frame rate as video) or qtgmc 60 (doubles the frame rate; smoother).
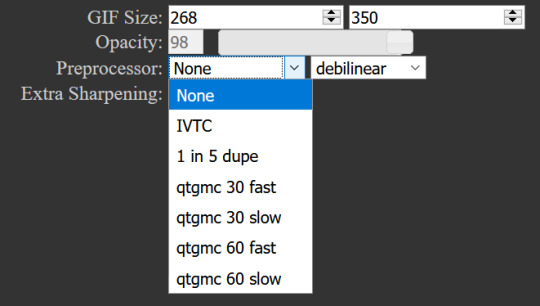
- You will also see “fast” or “slow” options. These are just how long the video will take to render. “Fast” will give you slightly lower quality as compared to “slow”, but usually is good enough.

(You can see that his features are sharper and more defined in the “slow” gif as compared to the “fast” one.)
- Copy the code in the white box. Navigate to the scripting window (it should have popped up with the resizer) and paste the code at line 17. Type a “#” before qtgmc on the same line. This will prevent the software from lagging.

- Click on the inverted triangle at the bottom of the screen. Your video will now appear in the scripting window. Drag the slider to the intended starting point of your gif and press the “home” key on your keyboard.
- Drag the slider again to the intended ending point of your gif and press the “end” key on your keyboard. This blue area you see is the duration of your gif.
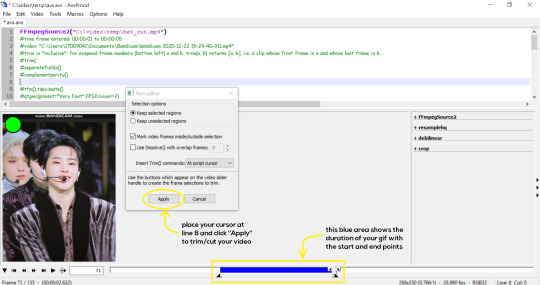
- On an empty line (I usually go to line 8), place your cursor there and click “Apply” in the mini pop-up window. Afterwards, remove the “#” from line 17.
- Go to File > Save or press Ctrl + S to save the code. Close the scripting window. The video renderer will pop up. When it’s done, it will automatically close by itself.
4. Using Photoshop and Topaz
I’m using my school license for Photoshop 2018, but if you don’t have that, there are plenty of cracked versions for free. I don’t have any to recommend though so I’m sorry about that :(
I followed THIS video tutorial to download Topaz plug-ins for free. I use Topaz DeNoise (the most helpful) and Clean, but you may use others if you’d like :)
Alright, let’s dive in to the steps!
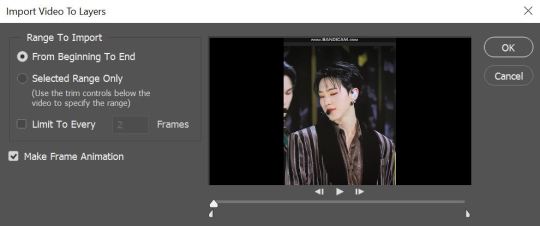
- Open up Photoshop and go to File > Import > Video Frames to Layers.
- A pop-up will appear. You can find your deinterlaced Avisynth video in File Explorer > Local Disk (C:) > video > temp > video.avi. Follow the settings in the picture and click “OK”.
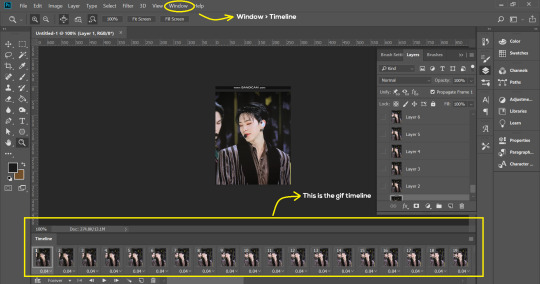
- Go to Window > Timeline to open up the timeline. You should be able to see your gif spread out in frames. If you press the play button, it should play like a video.
- (Quick optional step I learned from THIS tutorial) Go to Image > Canvas and set the Resample option to “Bicubic (smooth gradients)”.)
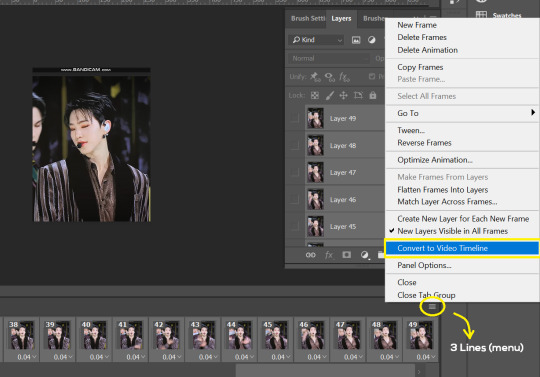
- Select the first frame of your gif in the timeline. Shift select the last frame. Go to Window > Layers. Shift select these layers as well.
- With everything selected, click the 3 lines at the top right corner of the timeline. Select “Convert to Video Timeline”.
- At the top of the screen, select Filter > Convert for Smart Filters. Your layers will condense into one layer. Don’t worry, your gif is fine.
- Now it’s time to sharpen the gifs. Go to Filter > Sharpen > Smart Sharpen. Play around with the settings to your liking!
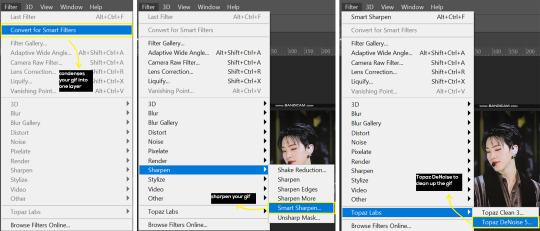
- If you’ve downloaded Topaz correctly, it should appear under Filter > Topaz Labs. If a pop-up asks you for an activation key, you may use THESE to activate it for free.
- Go to Filter > Topaz Labs > DeNoise and/or Clean and play with the settings until you’re satisfied.
5. Blurring
If your gifs have captions/logos that are distracting, you’d want to blur them out. Don’t be like 2018 me that blurred out the logo frame by frame; it’s very tiring. Instead, using this method from @scoupsy‘s tutorial, you’ll save lots of time.
- In the Layers tab (Windows > Layers), select the “New Layer” icon. It should be blank.
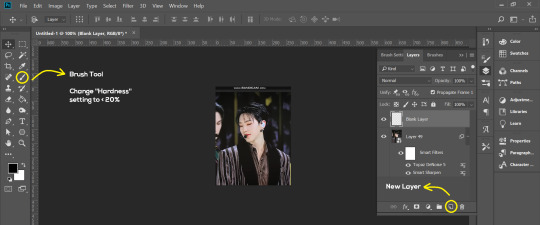
- Select the Brush tool. Make sure the “Hardness” setting is below 20%. This will blend the blurring nicely into the gif.
(For the sake of this tutorial, I will be blurring out the Bandicam logo to show you.)
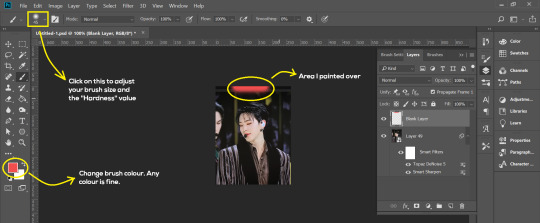
- Paint over the captions/logos. Make sure this is on the blank layer!
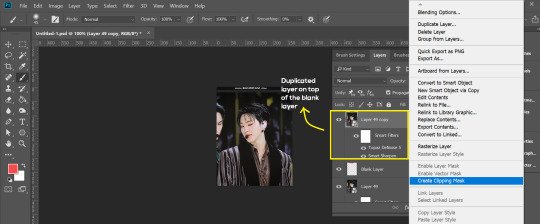
- Duplicate (Right Click > Duplicate) the gif layer and drag it so that it’s on top of the blank layer.
- Right click on the duplicate layer and select “Create Clipping Mask”.
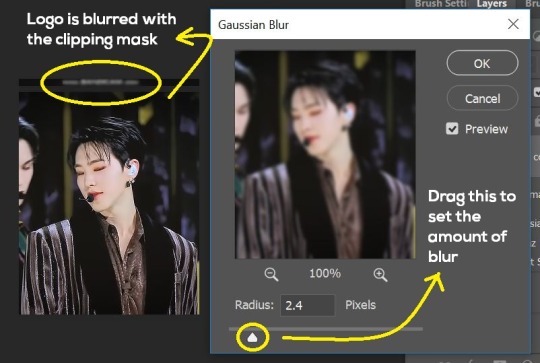
- Go to Filter > Blur > Gaussian Blur and play around with the settings until you’re satisfied with the level of blurring. Click “OK”.
6. Flattening & Colouring
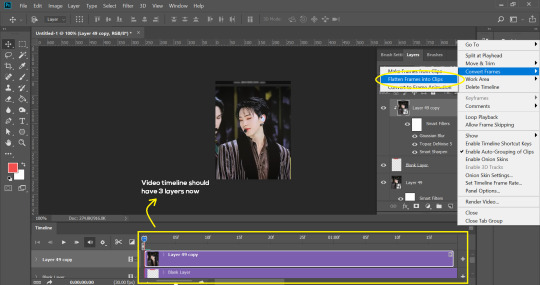
- Once you’re done with sharpening and/or blurring, click on the 3 lines on at the right corner of the video timeline and go to Convert Frames > Flatten Frames Into Clips.
- Topaz layers and blurring will take some time to render so you can just chill for now~
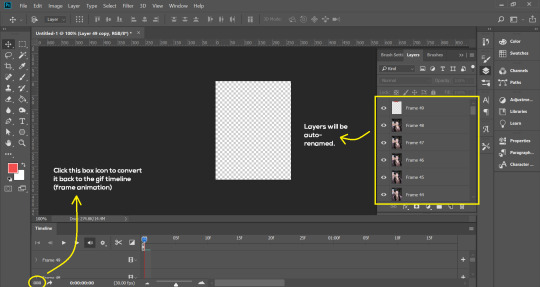
- When it’s done rendering, click again on the 3 lines and go to Convert Frames > Make Frames From Clips.
- Convert it back to the gif timeline by clicking on the 3-box icon at the bottom left of the timeline.
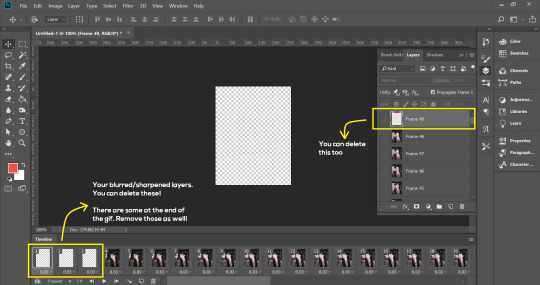
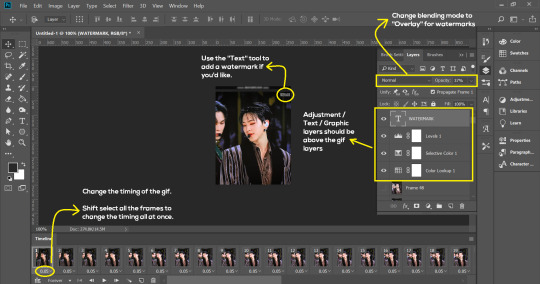
- Select the first frame of your gif. It must be the FIRST.
- Scroll to the top of the layers and select the layer at the top. Any other layers you add should be on top of this layer. VERY IMPORTANT!!
- In the Adjustments Tab (Window > Adjustments), there are many different things to play with. There’s a high chance you won’t use everything, but here’s a few of my favourites.
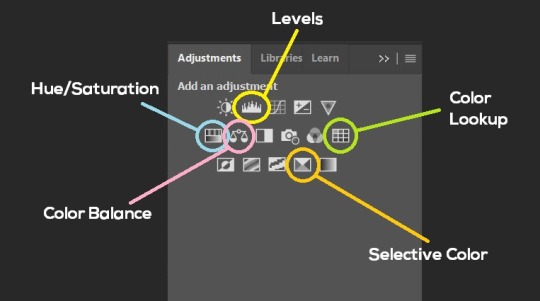
Levels - Adjust the brightness and contrast of your gif in depth.
Hue/Saturation - Useful for changing colours, or switching it to black and white.
Color Balance - Tweak the colours to your liking.
Colour Lookup - Comes with built-in LUTs that you can use as a preset. Great starting point for colouring. Saves time too. You can even download plug-ins for this. 11/10 tool.
Selective Colour - Adjust the vibrancy of specific colours.
- Colouring is completely up to the gifmaker. Go crazy go stupid :D

7. Exporting
We’re almost to the end!
- Set the timing for your gif.
If you used qtgmc30, the best timing would be 0.04s / 0.05s / 0.06s.
If you used qtgmc60, the best timing would be 0.02s / 0.03s / 0.04s.
- Once you’re satisfied with everything, go to File > Export > Save for Web (Legacy).
- Follow the settings in the picture below:
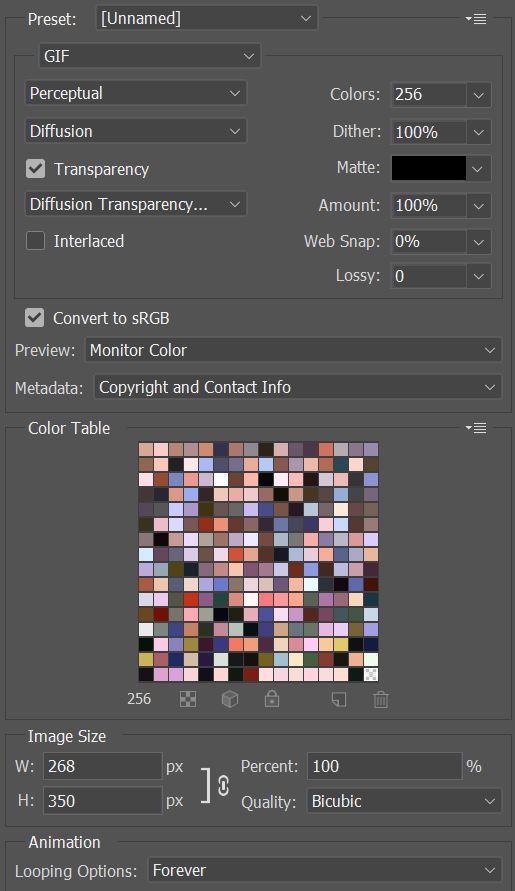
- Tumblr’s gif limit is 10mb per gif. Check the gif size at the bottom left of the pop-up window. Make sure it’s below 10mb; the smaller the better.
- Click “Save”. Choose where you’d like to save the gif.
- Done!
~~~~~~~~~~~~~~~~

And that’s it! You’ve successfully made a gif! Good job you :D
I hope this tutorial was helpful! Please leave some feedback if it helped, or if you have other methods you’d like to share :)
Lastly, if you have any questions, feel free to send in an ask or DM me!! :)
Good luck and happy gif-ing :’D
#gif tutorial#kpop gifs#avisynth tutorial#topaz tutorial#gifs#chey.resource#kpop#idk what else to tag so...#i finally posted the tutorial yay!!#please spare a reblog if you find this even remotely helpful thank you <3#also to spread it hehe i spent a lot of time on this#if anyone has any questions please feel free to DM me!!#i apologize if there are any spelling errors
231 notes
·
View notes
Text
The Basic Steps of Skincare (What to Use & When) ✨👏🏻
Hello skincare friends!! It’s been some time since I last made an actually informative (useful?) post. I’ve been really busy with, well, life, as most of you are too! And so many new people have joined our chill & fun skincare community—welcome newcomers! This post is going to be a longer one because there’s a lot to talk about. If you want a condensed version—there’s no condensed version, lol. So grab your coffee or your tea and some snacks and get comfy! FYI, instead of going by product type like cleanser, toner, cream, etc., like most step-by-step guides do, I’m going to go more by skin needs. Okay, you ready? Let’s go!
So, in my opinion, the two most basic steps of a skincare routine that everyone should start with are cleansing & moisturizing (+ SPF). That being the case, the sections below are going to be broken down into the basic “musts” when it comes to skincare and then the “extra” skincare steps that are optional, and for those wanting advice, I’ll put my personal tips below each step:
⭐ STEP 1: CLEANSE. The cleansing step is pretty straightforward. You can use a cleanser (or two) and, if you want, a toner, which is often the second and last step in the typical (Korean/Asian) cleansing routine. Toners are put onto a cotton pad and used to wipe your face.
🗸 Tip! “Double cleansing” is typically recommend if you need an extra, deeper cleanse. This is often the case if you (1) wear makeup, (2) wear heavier SPF, or (3) your skin gets very dirty/congested by the end of the day. Double cleansing can be using an oil cleanser + a water based cleanser, makeup wipes + a water based cleanser, a cleansing water + a water based cleanser, and so on—basically it’s cleansing twice people. The method you use is totally up to you, like everything in your routine is!
🗸 Tip! Opt for lighter cleansing in the morning and deeper cleansing at night. In the morning, your skin shouldn’t need a deep cleanse & you don’t want to strip your skin of its nutrients by over-cleansing. I only rinse my face with water and use a cleansing water/toner in the morning and it’s helped my skin so much!
🗸 Tip! Remember, cleansing doesn’t literally have to be limited to a “cleanser;” try using cleansing waters or an oil or a powdered cleanser etc. There are so many cleansing options out there so find one that works for you. Don’t feel pressured to get one of those tube shaped bottles with “cleanser” written in the title, lol.
🗸 Tip! Keep your face semi-wet after cleansing because it helps your skin retain moisture. Pat dry instead of rubbing. Have a designated face towel or use something less bacteria-harboring like tissues, a facial sponge, or just your hands! Likewise, don’t wait a long time after cleansing to follow up with your moisturizer/other products.
⭐ STEP 2: MOISTURIZE. Aka the “giving back” part of your routine. There are seriously so many ways to moisturize and whatever skin type you have it’s a must in some form or another. If we’re talking about the most basic routine for beginners or those wanting a simple routine, this step entails simply using one or more moisturizers for, you guessed it, moisture.
🗸 Tip! You can use just about any product meant to go on after cleansing as a moisturizer—essences (some “toners” are really essences; they just had to make skincare more confusing), serums, ampoules (why is this even a separate category from serums/essences?), oils, mists, creams, gels, you name it. Just like cleansing, as long as you’re moisturizing enough, whatever way you do it is up to you.
🗸 Tip! For oily skin types, I recommend trying a mist, essence, or gel-textured moisturizer. For drier skin types, I’d choose something heavier or layer lighter options—but it’s best to skip out on the “7 skin method”—that’s old news and it’s really, really, way too many layers. We ain’t got money to be using 7 layers a day! And likewise, go for lighter options in the warmer months and heavier options in the colder months. And, FYI, by “heavier” I mean more hydrating/moisturizing, which isn’t always literally a heavier product!
🗸 Tip! If you find your skin feeling “dehydrated,” a heavier cream isn’t always the best option. Often thicker moisturizers won’t go “deep” within the skin but they’ll just create a layer on the surface. So, if you’re feeling your skin is really thirsty, the best option is layering something thin like an essence or serum—something that will absorb into your skin—then topping it off with a moisturizer to lock in that hydration.
🗸 Tip! Your “giving back,” after-cleansing products can also double to treat your problem areas. For instance, you can use a brightening serum or a soothing cream or an acne-fighting essence, the list goes on—basically, I’m clumping everything into this broad category of “moisturizing” for simplicity’s sake, so go wild and be as basic or as complex in this step as you want. If you want to stay basic, just go for something that moisturizes, don’t worry too much about getting all the other 100 possible benefits products can give you—besides, odds are, any moisturizer you use has skin benefits beyond moisturization. Really, moisturization itself leads to other skin benefits. You don’t want to see me in my Skin Theory 101 mode—I can go on for days.
🗸 Tip! Your day-time moisturizer should have SPF or you should apply SPF at the end of your routine after moisturizing. If you want to keep your routine simple, get a moisturizer that’s going to give you sun protection too. SPF can be annoying sometimes, but it’s an absolute must, unless, you know, you want things like premature aging, wrinkles, dark spots, loss of elasticity, and so on, but no, yah, totally up to you.
🗸 Tip! Oftentimes, your oils, serums, or your essences can double as lip-care—say what?? Yep, it’s true. Just be aware of the ingredients, like strong exfoliants, that aren’t really meant for lips. But generally, what you put on your face is also safe (and beneficial) for your lips.
Read on for extra steps beyond the basic cleanser + moisturizer (+SPF) routine.
EXTRAS (Depending on your skin needs.)
Spot treatments. For those with acne or other spot-related issues.
🕒 When: Typically last, though this isn’t exclusive. For one, pimple patches should go after the cleansing step: less between the pimple patch and your skin the better it’ll work.
🗸 Tip! Drying spot treatments (like drying lotions) are great, particularly for oily skin types. If you don’t want to break the bank for that Mario Badescu drying lotion, try using a clay mask you have instead, leaving it overnight on small target areas just as you would a typical drying lotion! For dry skin types, tea tree oil is a personal favorite all-natural spot treatment of mine.
🗸 Tip! If you have a bad habit, like me, of itching, popping, and messing with your blemishes, use pimple patches to not only treat those blemishes, but to keep your hands off of them!
Targeted Treatment Products/Masks. This is again a super diverse section that overlaps others. You can use any sort of mask, leave-on treatment, or even a treatment tool, it’s up to you. You can even, you know, be like me and buy a $500 LED mask (or, better, DON’T be like me).
🕒 When: Wash-offs are usually after or before cleansing (read the package) and leave-ons (serums, ampoules, sleeping packs, sheet masks, etc.) usually depend on how thick they are (thin > thick), and, of course, their instructions. Always check the fine print people.
🗸 Tip! Clay masks are great for people with acne, pore problems, and excess sebum—shout out to my oily skin types, I see you! Sheet masks are cute and fun, but really sheets masks are like glorified single uses of an essence or serum, so I prefer using an actual essence or serum over spending $3-$5 on a single use version. Sorry sheet mask fanatics, the secret’s out. That $3 to $5 can, like, buy me a coffee at Starbucks, okay.
Exfoliation. Basically, exfoliating helps your skin shed it’s dead skin cells so that your skin cells can renew themselves. It helps all sorts of skin issues from acne to scarring to signs of aging.
🕒When: Almost always on a cleansed face before moisturizing. Use one to three times a week, depending on how sensitive your skin is and how “harsh” the product is. I tend to exfoliate once to twice a week because my skin is pretty sensitive right now and I’m using a lot of other strong ingredients/products. There are exfoliators that are said to be for everyday use, which some people swear by, but I personally don’t think I need to exfoliate daily.
🗸 Tip! Opt for chemical exfoliation (product key words: “peeling” “aha” “bha” “pha” etc.) over physical—no matter how good that apricot seed scrub feels when you use it, scrubs are almost always irritating to your skin, whether you can see it or not. Plus, they can create micro tears in your skin, especially the ones containing bigger granules—yikes! Exfoliants are sometimes in a wash-off mask form or can be left on the skin. They range from gentle to mild to so strong it feels like your skin is falling off—I don’t recommend the latter.
🗸 Tip! There are a whole bunch of ingredients and things you should avoid when exfoliating, which are typically said to be vitamin c, exposure to the sun without high SPF, retinol/retinoids, other exfoliants, etc. If you aren’t sure, feel free to ask me or, better, Google it.
P.S. You’ve probably realized this already but I should point out that these “different” steps or product types can, and often do, overlap each other. Like an exfoliant can be a treatment mask and a mask can also be a moisturizer and a cleanser can have ingredients that are exfoliating. It’s all too much, I know. Just start with the basics and gradually try more, if you want.
Overwhelmed? Are you currently like that dog just sitting in the kitchen saying “this is fine” while everything’s on fire? If you’re overwhelmed, that’s absolutely okay and normal! Start by getting products that meet the absolute basic needs of you skin—cleansing and moisturization (+ SPF). What I like to do when trying to find new products is (1) read a lot of reviews, (2) watch YouTube videos featuring the product to see it in real time, and (3) always search the ingredients on a website like CosDNA that tells you what each ingredient is. After you’ve got the basics down, I’d start with a gentle exfoliating product—no scrubs people, just don’t do it. Then, once you’re comfortable with skincare, consider if you want to incorporate other products or steps or tools depending on your skin needs. Never start using all kinds of different products at once; start simply and slowly. In any case, my ask is open, so let me know if you want any advice, but remember that I’m not an expert, I just love skincare and I’ve been doing it for a long time (just ask my very disappointed bank account if you want proof). Good luck guys and gals, catch ya later!
— sundayskin ❤️
#sorry this turned out so long lol#I'll probably update this whenever I feel like I need to#skincare#korean skincare
110 notes
·
View notes
Text
Lazy Man’s Tips for Better Pics Part 2: Editing with FireAlpaca
Photoshop has some amazing tools but can be expensive or lag your computer. There are a number of free alternative photo editing softwares and multiple tutorials on how to use them.
Below I will go into some useful tools from FireAlpaca to use on Sims Screenshots.
Check out the other tutorial:
Part 1: In-Game Tips
So my first suggestion is to check out and download FireAlpaca. It’s free and has a very helpful FAQ section of the site if you ever have more questions. I’m going to cover a few helpful tools inside FireAlpaca to create edits inside Sims 4 screenshots.

So first thing to do is open the screenshot you want to edit. “Open” can be found under the “File” tab.
The things to note here are your layers in the upper right corner:
Adding layers and using filters under the “Blending” drop down is a great way to add effects.
Some quick keyboard shortcuts:
CTRL + L

Opens your levels and lets you make things lighter or darker.
CTRL + U

Opens your hue saturation and brightness bars. You can add more color with Saturation and brighten or darken your screen. I wouldn’t mess with Hue too much unless you are trying to get an odd color effect.
I use these two shortcuts the most. They can do the most work for you.
The other helpful tools I use are under the “Filter” bar on the top:

Unsharp Mask will sharpen up your picture. You only need a very little to add a little edge to your sims.
Gaussian Blur will blur anything. A little goes a long way on that as well. It’s a great way to smear lights or soften anything.
So, if you wanted to add something to your sims screenshots, like say...some glow in the dark stars to your ceiling. First you need a screenshot of the ceiling and a picture of glow in the dark stars.
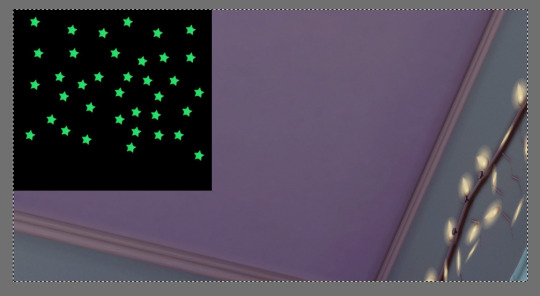
I got the screenshot from in game and opened it. I found the glow in the dark stars online and copy and pasted it over. So it looks like above.
Over at the layer bar you should see this:

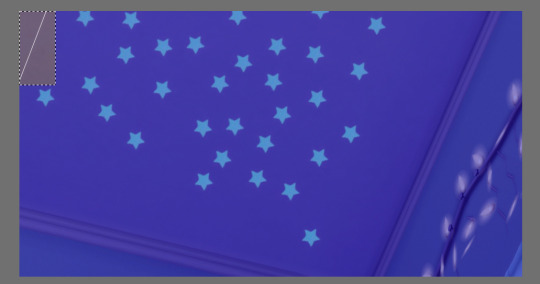
Make sure your layer with the stars is highlighted in blue and change the blending mode to “Screen”
Tip: Under the screen blending option, all black in the photo will disappear. This is useful to turn any photo with an all black background transparent.
Your shot will look like this:

Make sure you are still highlighted on that layer and press:
CTRL + T
This lets you move just that layer. Move the stars where you want them like so:

Now you may notice the white line. It is from the star photo. To get rid of that you can cut it out of the layer using the select tool on the side seen here:

It’s the square with the dotted lines. Select the part you want to get rid of:
Make sure you are still on the stars layer. Then hit delete on your keyboard. And it will go away.
If the space you want to delete is not a perfect rectangle you can use the drop down at the top:
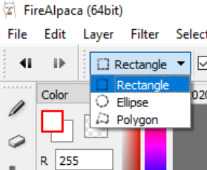
To change the shape of your select tool. The Polygon lets you make your own shape and once you get pretty good with that, you can do a lot of fancy tricks.
Another useful trick is circling a part of the layer you want to move and using:
CTRL + T
This will allow you to move just the selected part of your layer around. It’s how you can move one or two of the stars if you don’t like where they are.
YOU COULD STOP HERE WITH THIS EDIT
And it would be a cute little edit of stars on the ceiling. However, if you want to give your stars a little shine, then I recommend doubling the stars layer.
CTRL + A (selects the whole layer) CTRL + C (copies it) CTRL + V (pastes it)
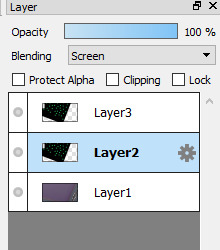
So on your layer bar you should see this:

Now it’s going to be all black again. Make sure you make this third layer match and “Screen” it under the Blending options.
Click on the layer under your copied layer:
Then head over to Gaussian Blur under the Filter tab on the top bar.

Adjust to wherever you like to add a little glow.
And ta-da:

I would post that as my screenshot.
Now that’s a lot of steps but it gets easier the more you do it and natural once you get used to the keys. Honestly the best way to get better at editing is to just keep doing it and trying new things. See what this filter does. Play with color. Play with blurs and blending and just keep trying new things!
I am not at all an expert and I do the least amount of work possible in most cases because I am much more of a “play then post” kind of person. I am sure there are others out there like me so I hope this can help someone out there.
Editing is an ongoing and forever changing thing. Trends will always be changing so my best advice is find your style. Find what you like. And google methods or ask others advice if there’s something you like.
This is by no means an all extensive tutorial but hopefully it helps out someone and gives them the courage to try out some new editing techniques!
If you liked these and they were any sort of help I might do more in the future. Thank you for reading these if you got this far and best of luck! I’d love to see what you do!
17 notes
·
View notes
Text
The Advanced Guide to Photoshopping Icons Using Batch Processing
Tired of making icons one-by-one? So was I before discovering the magic of Photoshop. This comprehensive tutorial will teach you every step you need to make fantabulous icons as easily as possible! The only manual steps are resizing images and making your template for icons. I am using Photoshop CS6 for this tutorial, but CC is capable of doing the same steps, and previous versions may also be able to handle it.
If you don’t have Photoshop, go ahead and check out my GIMP tutorial! http://dancingbetweenraindrops.tumblr.com/post/167426124590/how-to-batch-process-icons-in-gimp
Tutorial under cut.
Step 1: Set up Photoshop
Open Photoshop and create a new canvas sized 100x100 or whatever size you would like your icons to be. That’s it for this step!
Step 2: Resizing Icons
Paste art or screenshots of your character into the canvas and resize them to how you’d like them to appear within the frame.
Step 3: Export Layers to Files

Select File > Scripts > Export Layers to Files. You will then be given this screen.

Make sure you have your Destination set to the file directory you’d like your icons in. I’d suggest making a dedicated folder for just these icons, as it will help in the Batch Process.
!WARNING! Only export about 50 icons at once for maximum speed. Even on my gaming computer it takes a while for more than 50 at a time. I like to have all of my icons ready to go and then delete a group of them so I’m left with only increments of 50 at a time. It’s easy to undo deleting in the history window, so just undelete the previous batch and delete the batch you just finished. For example, if I have 100 icons, I delete icons 51-100 and save the first 50. Then I step back in the history window and delete the first 50 icons and save the last 51-100. Now I’d recommend also SAVING while you have all of them cropped, just in case you mess up while deleting and can’t get them back.
Step 4: Create a template
For this step, open one of the icons you saved from the script saving.

You will notice that the icon layer says “Index” and is locked. Go to Image > Mode and select RGB color to fix this. This is the only time we’ll need to worry about this.

Now for the creative part - you can go absolutely crazy with what you want to do with the icon. Add layers, adjustment layers, whatever you want. I usually start by creating a layer beneath my icon layer (You have to double click on the icon layer and change it to layer 0 instead of background first) and making it into a 95x95 or so box centered in the middle and clipping my icon to that layer.

That gives me a nice border space for my icon. Then I add new layers above that layer to make borders, or new adjustment layers to give them cool effects. Always remember to clip the layers to each other!
One of the most common effects I see in a lot of icons is this “Film” photo filter that washes out colours and softens blacks and whites. How to achieve this look is shown below. It is done using a Curves adjustment layer.

Set it to look similar to this

Adjust as needed.
To get a straight border, use the Layer Style for the clipping layer (the layer that all the others is clipped to.) Go ahead and add a stroke, drop shadow, and whatever else you’d like to your border.

Finally, save your template as a .PSD in the same directory as your icons (for ease) and give it an easy name, such as Template.PSD.
Step 5: Create a Script
This is where it gets tricky. You need to create a script in the EXACT order I give for it to work right. Close your template and open any icon. Then, click the arrow-like tool on the toolbar. It will open the Actions tab. Go ahead and press the little file button to create a new script. Name it whatever you want and then start record.

Once the action is recording, select the icon and hit control+c or copy. Then, go to File > Open and open your template. Paste your icon on top of the default icon. It should automatically clip as long as the adjustment layers above are clipped to the mask. Otherwise, right click on the layer and clip it.

Here, I pasted Layer 2 over Layer 0, the default icon.
Then, go to File > Save As and save your file in a subdirectory within your icon folder. Save it as 001.PNG. Make sure to select PNG and not save it as a JPEG or PSD file. Then, delete the layer you just pasted in and close the template.psd by clicking the little “x” at the top.

Finally, hit Stop Recording on the action panel.

Step 6: Batch Process
Go to File > Automate > Batch

After this, a window that looks like this will pop up

Make sure that your action is selected under Action:. Your source needs to be the folder in which you have all your icons saved. Your destination needs to be the folder you want all of your icons to save to. MAKE SURE TO CHECK “Override Action “Save As” Commands”. Finally, Go ahead and press “OK” and let Photoshop work magic!


#icons#tumblr#roleplay#roleplay icons#tutorial#roleplay tutorial#photoshop icons#photoshop tutorial#icons tutorial#tumblr roleplay#batch processing#batch process icons#photoshop batch process
7 notes
·
View notes
Text
Somewhere in our collection of home videos there is one of me sewing my newborn daughter’s first ever Halloween costume. I vaguely remember looking up as my husband provided voice over commentary while moving the camera closer. I was engrossed in lining up the black and yellow fleece stripes and while they were not complicated to stitch together, my frustration level was rising. I’m fairly certain the distinguishing feature of that long lost video is me swearing and attempting to muster a faint smile so my daughter would not think her mother unhappy with the task. But, sadly, I was.
Although, I persevered and must say it did turn out to be one adorable little bee costume which I still have. Maybe my future grandchildren will wear it again someday and I won’t actually have to sew something new for them.
As our return to normal is delayed and the CDC recommends cloth face coverings when in public spaces where social distancing is not possible, I had a dilemma. To sew or not to sew.
Clearly, it wasn’t a tough choice. While I could probably sew some face masks for my family with hopefully a minimum of profanity, I’d rather work on my other crafts and hobbies instead. But somehow, I don’t think scrapbooking a paper face mask would meet the recommended guidelines.
Fortunately, there are some wonderful Maine crafters and artisans who’ve stepped up and are providing a lot of great options when it comes to face coverings. Below is a completely random and absolutely incomplete list of ten local Maine face mask makers and their beautiful products picked solely because I thought they were pretty.
(#1) Tree and Vine
Tree and Vine produces colorful costume pieces for children including butterfly wings and eye masks. They are beautiful, whimsical and guaranteed to help a child’s imagination soar. I’ve blogged about this local business before in my post T is for Tree + Vine | Costumes that match a child’s imagination. They’ve now switched the majority of production over to cloth mask making and are offering face masks in lots of fun prints.
The reversible cloth masks have around-the-ear elastic for keeping them comfortably in place. Masks can be purchased on her Etsy shop. $11.50.
Gray. (Instagram: @treeandvine)
View this post on Instagram
Fox mask/fox mask 🦊🦊 #morethanonewaytosewamask #shopsmall #foxmask #natureinspired #etsy #helpkeepmylightson #mainemade #madeinusa
A post shared by Ellen Okolita, Tree + Vine (@treeandvine) on Apr 27, 2020 at 7:13pm PDT
@treeandvine. (2020, April 27). Fox mask/fox mask … [Instagram post]. Retrieved from https://www.instagram.com/p/B_geL3TAvue/
(#2) Erin Flett
This textile artist creates gorgeous graphic prints in engaging colors. They sell a variety of products on their website from tea towels to tote bags. I’m partial to her makeup bags. They just launched a collaboration with LL Bean. They have also been intermittently offering a limited number of face masks in some of their signature prints.
The masks are made of linen or bark cloth lined with muslin and made with cotton ties. You can purchase the face masks on their website. $25.00.
Gorham. (Instagram: @erinflett)
View this post on Instagram
More masks available for pre order! Link in bio. Getting in a groove! Choose neutral or colorful. Happy Friday everybody!! 😷 AND we have a few things left in our SAMPLE SALE SECTION so check it out! 🙏🏻🙏🏻🙏🏻✨❤️
A post shared by Erin Flett (@erinflett) on Apr 24, 2020 at 2:18pm PDT
@erinflett. (2020, April 24). More masks available for pre order!… [Instagram post]. Retrieved from https://www.instagram.com/p/B_YOFSiAHMO/
(#3) Catalyst for Change
This local clothing and accessories manufacturer donates a portion of all sales to local charities. I’m a big fan of their t-shirts and have purchased a few from their shirt a day collection including one with “support local” messaging. Supporting local has never been more important than it is right now.
They are now offering a one-piece face mask made from lightweight jersey fabric. You can purchase them on their website. $4.50.
Biddeford. (Instagram: @cfcwear)
View this post on Instagram
Tomorrow 4/29. 8am Est. 300 Maine Strong Face covers Available. Made from the same fabric as our hoodies. Thicker fleece fabric, single ply, two ear holes for different sizes. Wear daily and wash or discard. These will be a $1.99. If you need one and cant spare $ right now please message us. ❤
A post shared by Catalyst For Change Wear (@cfcwear) on Apr 28, 2020 at 7:10am PDT
@cfcwear. (2020, April 28). Tomorrow 4/29. 8am Est. 300 Maine Strong… [Instagram post]. Retrieved from https://www.instagram.com/p/B_hwNDwAmx5/
(#4) ANNE RIGGS DESIGNS
This sustainable goods manufacturer makes reusable products like cloth “paper” towels and snack bags using organic fabrics. I have some of her bowl covers which work as a great alternative to plastic wrap for keeping leftovers covered. They’re well made and beautiful.
Her face masks are made of all organic cotton and lined with organic muslin. They have elastic loops that go around your ears. They can be purchased from her Etsy shop. $15.00.
Portland. (Instgram: @anneriggsdesign)
View this post on Instagram
Reusable organic cloth mask, ready to ship within 24 hours $15.00 includes shipping. Link to Etsy shop in bio. #facemask #organicfacemask #portlandmaine #staysafe #etsyseller
A post shared by Anne Riggs Designs (@anneriggsdesigns) on Apr 28, 2020 at 8:36am PDT
@AnneRiggsDesigns. (2020, April 28). Reusable organic cloth mask, ready to ship…. [Instagram post]. Retrieved from https://www.instagram.com/p/B_h6GVNAwRh/
(#5) ROUGH AND TUMBLE
This local handbag and accessory business was established in 2008. They do all their manufacturing in Maine. They also offer a customizable bag feature and service where customers can design a one of a kind bag. They are now offering masks made by their local makers. They also are offering donation masks to those in need.
The masks are made of a tightly woven cotton nylon blend with the back lined in cotton. Ear loops are elastic. You can purchase them on their website. $15.50.
Brunswick. (Instagram: @roughandtumblebags)
View this post on Instagram
As a community initiative we have engaged our Makers to produce face masks for the Rough & Tumble and local communities. We want to help fill the need for non-COVID-19 patients and providers. 100% of sales from these masks go to payment to our Makers, materials, and helping to provide a donation mask to someone in need. See all details on our website of the non-medical grade masks. // #roughandtumbledesign #facemask #covid19 #shopsmallbusiness #madeinmaine
A post shared by Rough & Tumble (@roughandtumblebags) on Apr 6, 2020 at 2:31pm PDT
@roughandtumblebags. (2020, April 6). Tcommunity initiative we have engaged our Makers…. [Instagram post]. Retrieved from https://www.instagram.com/p/B-p5MOvgkB-/
(#6) JENNIE BLUE
I love the black and white sketch designs from this local artist. While her Etsy shop is focused on her tea towels and ceramics, she recently started offering face masks. Her first round sold out quickly so you’ll need to act fast when her next round goes up for sale. I’m partial to the lobster print one. It feels like home to me.
Each face mask is made from a tea towel of one of her original illustrations. They have three separate layers: two of tea towel lined with one layer of flannel. There are four ties to attach the mask. While I don’t mind ear loops on masks, my husband has struggled a bit with that style. I think this design with ties might work better. The masks can be purchased on her Etsy site. $22.00.
Belfast. (Instagram: @jenniebluevermont)
View this post on Instagram
Oh my ! Thank you! The response to the face masks was overwhelming , with 9 of the designs selling out within hours. Whoops……. I made a little booboo in pricing, not including all of my costs. The next batch will be a bit more. Sorry about that. 😳 For those already ordered, I will of course , honor the original price. Will add more to my Etsy shop in the next week. Stay tuned and please …. stay safe.
A post shared by Jennie blue vermont (@jenniebluevermont) on May 5, 2020 at 1:18pm PDT
@jenniebluevermont. (2020, May 5). “Oh my ! Thank you! The response to…” [Instagram post]. Retrieved from https://www.instagram.com/p/B_0b7Wsgk7L/
(#7) FOX & ROSE
This shop traditionally sells baby/children’s goods, home decor and accessories but they are now currently focused on face masks. They offer a variety of masks in fun, whimsical prints. She also offers child size masks and even has some doll sized ones for sale.
The masks are made with three layers of fabric. Two layers of cotton and a flannel filter sewn inside. Masks can be purchased on her Etsy site. $10.99.
Belfast. Instagram: @foxandrosedesign
View this post on Instagram
If you've been eyeing these prints, now is the time to order! I may not have the Woodland Tree print again, and this is the last Tiger Cat print I may have for a few days (they have been going as fast as I make them)! These are the last ones In ADULT SIZE! ❤ #facemasksforsale #facemask #facemaskfriday #etsygifts #etsyfinds #shopsmall #handmade #reusablefacemask #washablefacemask #staysafe #maine #madeinmaine #belfast #bucksport #portland #staysafe
A post shared by Fox & Rose || Kayla Nadeau (@foxandrosedesign) on Apr 24, 2020 at 10:50am PDT
@foxandrosedesign. (2020, April 24). If you’ve been eyeing these prints, now…. [Instagram post]. Retrieved from https://www.instagram.com/p/B_X2LXxA-om/
(#8) SPRUCE AND PINE
This Etsy shop makes reusable products for zero waste living. They have some super cute and environmentally friendly zero waste cutlery kits that are on my wish list. They also started making face masks. The prints are simple and elegant.
The masks are reversible, double layered with your choice of print on the outside and contrasting cotton fabric on the inside. They have elastic ear loops. You can purchase them from her Etsy shop. $14.00.
Portland. Instagram: @spruceandpineco
View this post on Instagram
I am in love with these light spring colors. Not in stock? Send me a PM on Etsy and I can hook you up with a custom listing if I still have the fabric in stock. ❤️ #clothmask #staywell #covid19 #togetherwestay
A post shared by Christy Carmody (@spruceandpineeco) on Apr 20, 2020 at 5:51pm PDT
@spruceandpineco. (2020, April 20). I am in love with these light…. [Instagram post]. Retrieved from https://www.instagram.com/p/B_OTMwIgUEk/
(#9) BLYND TOWN
This Maine based Etsy site has a large selection of face masks in fun prints and patterns. I recently purchased the one below. It was shipped super quick and the quality is excellent. I’m looking forward to wearing it out soon.
Their face masks have a double layer with coordinating fabric for added support, strength and coverage. They have elastic ear bands. Masks can be purchased on the Etsy site. $12.00.
(#10) BOWTIE.COM
This fun local business makes unique, colorful bow-ties, neckties and other men’s accessories and they’ve now added some equally fun face masks to their product line.
The masks are three layers of 100% pre-washed cotton. They are pleated and tie with elastics which can be worn encircling your head, or you can cut them to the lengths you prefer to loop around your ears. Face masks can be purchased from their website. $22.00
Kennebunk. (Facebook: @BowtieDotCom)
@BowtieDotCom. (2020, May 2).[No text]….. [Facebook post]. Retrieved from https://www.facebook.com/BowtieDotCom/posts/2833542810027953
I’ve included pricing with the information above as a reference point but please be sure to check the sellers shops to confirm as pricing may vary.
Maine MEP also has a list going of local face mask manufacturers: Retail Sales of Cloth Face Covers. While there is some small overlap with the makers I’ve highlighted here, their list focuses more on larger manufacturers and is worth checking out too.
** IMPORTANT ** These masks are NOT medical-grade and as stated on the Etsy website where many of them are sold, these masks are not intended to “mitigate, prevent, treat, diagnose or cure any disease or health condition.”1
For specific guidance on recommendations around face coverings, please see the CDC website.
While the thought of wearing a face mask can be overwhelming as it reinforces the seriousness of the pandemic that we are experiencing, for me personally, anything I can do to reduce the chance of potentially making someone else sick is worth any inconvenience.
It also makes it a little more palatable when there are so many amazing choices available for masks that have been crafted with love from Maine. They bring a smile to my covered face.
Do you know of other local manufacturers who are making cloth face masks?
“COVID-19 Safety on Etsy.” Etsy Help, help.etsy.com/hc/en-us/articles/360044460414-COVID-19-Safety-on-Etsy?ref=covidbanner&segment=shopping#h_262a1b98-6400-4c81-8ce1-b4265246c351.

Follow Blog via Email
Enter your email address to follow this blog and receive notifications of new posts by email.
Follow
Check out my latest blog post... Ten creative face masks that are made in Maine. #facemasks Somewhere in our collection of home videos there is one of me sewing my newborn daughter's first ever Halloween costume.
0 notes
Text
Dr. Brandt Microdermabrasion Skin Exfoliant Reviews
#cosmeticnews #janebrody #haircare #makeup #skincare #skinconcern #beautydevices
We all expect that moment at some point in our lives, but at times, it comes sooner than anticipated. Our lifestyles and diet have aggravated this situation. The instant reaction is to apply any product that will hide or do away with the fine lines or wrinkles. Some of these skincare products may prove to be harmful or may not work at all. One of the best solutions to this is microdermabrasion.
Microdermabrasion is a minimally invasive procedure that exfoliates and removes the top dead skin layer. It buffs and polishes the skin by use of steam of fine crystals or a diamond tip. Some microdermabrasion machines use suction to vacuum the loose skin cells from the body. Dr. Brandt Microdermabrasion is an age-defying exfoliator that polishes the skin gently, refining its texture and smoothing away fine lines. We will take an in-depth review of this product to see how it will help rejuvenate your skin.
See also:
Best Collagen Supplements | Best Collagen Protein Powder
Dr. Brandt Microdermabrasion Review

dr. brandt Microdermabrasion Skin Exfoliant, 2 fl....
Shop Now
(Last update on 2019-12-06 at 09:31 ,UTC)
Dr. Brandt has employed innovative office procedures, and extensive skincare research and years of professional dermatology practice to create a technologically advanced skincare line. Dr. Brandt Microdermabrasion is used to repair and prevent damage to the skin while at the same time delivering a healthy and beautiful skin. This is an at-home formula meant to offer skin transformation the same as in-office microdermabrasion treatment.
Dr. brandt microdermabrasion offers a brightening, smoothing and polishing effect. It is an excellent alternative to clinical treatments as it enables better absorption of skincare products to help diminish fine lines and blemishes. This product also comes with a collagen booster that has a blend of key amino acids to boost and maintain collagen levels. This chemical exfoliant penetrates the skin deep to help eliminate dryness, fine lines and discoloration.
Ingredients
The main ingredient in Dr. Brandt microdermabrasion is aluminum Oxide, which polishes and removes dead skin cells. Due to its abrasive texture, it is used to exfoliate and resurface the skin in microdermabrasion. It is safe, and its crystals are used to smooth refine and re-texture skin flaws and uneven discoloration.
Lactic acid is another primary ingredient that is derived from milk and is used to sweep away dead skin cells gently. It also plays the role of softening skin texture.
Other ingredients include Chamomile, which calms and soothes the skin, aloe vera, which also soothes and protects the skin and jojoba vegetable oil used to offer more smoothening and softening. These ingredients enrich the formula to ensure its efficiency in doing away with the dead skin cells while leaving the skin smooth, soft and with a youthful look.
Usage
To achieve the best results from using dr. brandt microdermabrasion,dampen the skin with warm water. Massage the cream slowly and gently on to the surface in a circular motion for about 1-2 minutes while avoiding the eye area. Using clean water, rinse thoroughly and pat dry. For this cream to work, optimally use 1-2 times per week and allow three days between applications.
If you like, follow the treatment with Dr. Brandt collagen booster to help you boost and maintain collagen levels of your skin. This procedure will lead to a smooth, bright and perfectly polished skin with a youthful radiant.
Pros
CHECK LAST PRICE
Deep exfoliation
Dr. brandt microdermabrasion mimics the transformative effects of professional microdermabrasion, to offer deep exfoliation of the skin. This leads to the diminishing of fine lines and wrinkles, revealing more radiant skin, which makes you look younger and more beautiful.
Very gentle on the skin
The formula used on this exfoliation cream is very gentle and does not cause harm to the skin. It can be used by people of all skin types to achieve a youthful look. It does not cause any breakout or irritation to the skin.
Fragrance-free
Its formulation is fragrance-free, meaning you do not battle with an unpleasant smell, especially when working on your face. It makes it more comfortable to use even for those people who don’t like fragrances at all.
Lightweight
This age-defying exfoliator has a lightweight consistency, which makes it easy to apply on the skin. It does not leave the skin sticky, and it produces a smooth skin texture.
Reduces the appearance of fine line and wrinkles
This cream is specifically meant for the reduction of ageing signs like fine lines and wrinkles. It exfoliates the skin, polishes and refines its texture to smooth away the fine lines and wrinkles. The results, which are clinically proven, are seen immediately.
Cons
Tends to harden on the skin
If it is not washed off sooner than 2 minutes, it hardens on the skin. This is beyond the recommended time of 1-2 minutes, so it is good to follow the directions.
Pricey
Some people find it costly, but because you only need to use a little amount at a time, the bottle lasts for long, giving you value for your money.
Customer Reviews
The majority of customers who have used dr brandt microdermabrasion were impressed and gave it an average rating of 4.4/5. Most of the customers liked its effectiveness and immediate result. Below is what some of the users had to say:
Elizabeth wrote this:
My go-to exfoliator! Can’t live without it! I was paying double the price at a famous make up store and at a high-end department store. So glad to see that I can get it here for half the price. If you want skin that feels like glass, and has antiaging benefits, use this! You cannot go wrong with Dr. Brandt products! – Elizabeth
Sara was also very satisfied. This what she wrote:
I bought this originally at sephora for around $70 and when I found out it was cheaper here I was ecstatic. This product makes my skin so soft, gets rid of any acne scarring I have and evens up my skintone. I like to use it in the shower, the steam and exfoliating microbeads do wonders for my skin. I use it around 2 or 3 times a week. This is my third bottle! My only c salon complaint is the bottle is kind of small and the smell isn’t the best, but honestly when you’re getting results, who cares?
CHECK LAST PRICE
Read Next: Pmd Personal Microdermabrasion Classic Review
Wrapping It Up
After reviewing this product and comparing its benefits and downsides, we have concluded that it is one of the best microdermabrasion creams in the market today. It is entirely non-invasive, and it works as perfectly as the more sophisticated machine procedures while producing some of the best results. Those who have used it have reported immediate results, which are very satisfying.
The fact that it is gentle enough to be used on all skin types makes it a top choice for many people. With the main ingredient being aluminum Oxide, which is a texture abrasive, it exfoliates the skin deeply, doing away with fine lines and other ageing symptoms to leave you looking much younger. We would highly recommend this exfoliation cream for those who wish to do away with wrinkles and maintain a smooth face.
Some Best Selling Microdermabrasion Cream Products
# Preview Product Rating 1

DRMTLGY Microdermabrasion Facial Scrub and Face Mask. Non-Abrasive Face Exfoliator Improves Acne... 447 Reviews Shop Now 2
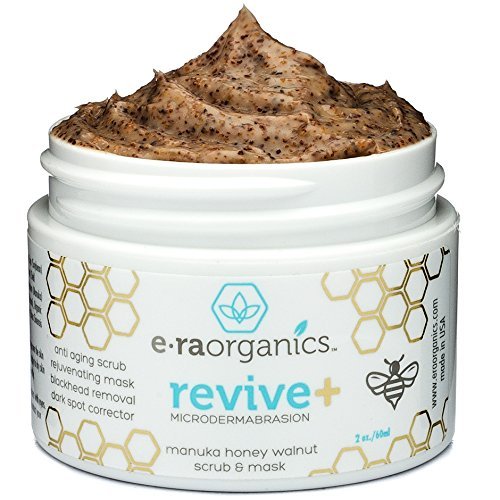
Microdermabrasion Facial Scrub & Face Exfoliator - Natural Exfoliating Face Mask with Manuka Honey &... 1,792 Reviews Shop Now 3

Clinicians Complex Microdermabrasion Facial Scrub, Pore Minimizer and Skin Exfoliant Cream... No ratings yet Shop Now 4
Best Microdrodermabrasion Cream Facial Scrub - Face Exfoliator - Professional Skin Care -... No ratings yet Shop Now 5
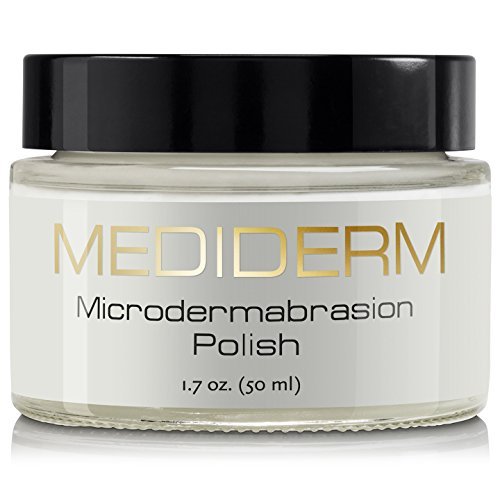
MediDerm Microdermabrasion Polish and Exfoliating Cream - Scrubs and Exfoliates Dead Skin, Reduces... No ratings yet Shop Now
5 / 5 ( 1 vote )
The post Dr. Brandt Microdermabrasion Skin Exfoliant Reviews appeared first on Cosmetic News.
0 notes
Text
At 35, I Started Caring About My Skin — Here’s My Routine

The hardest thing about traveling so often is keeping a regular, healthy diet and a skincare routine compatible with TSA requirements and my aging self. I recently turned 36, and I’m embarrassed to admit I didn’t truly get serious about caring for my skin until about 18 months ago. That said, better late than never (right? RIGHT?), so I put together this play-by-play of how to maintain a skincare routine in your 30s—and, in particular, how I keep it up while on the road.
But first, it must be said, I am not a doctor, a dermatologist or an aesthetician (clearly). You should absolutely see one (or all) of the above before doing anything drastic with your own skin. I do have a great derm, Dr. Lorien Sites at Nashville Skin, who I see once a year for skin checks and preventative cancer screenings and an aesthetician in Nashville, Mallory Hamilton at Woo Cosmetics, as well as one in Manchester, Megan Hershman of Be Well Skin, who I go to for professional facials and waxing. That said, I can only afford so many such treatments, so I’ve learned what I can do on my own and what I need to leave to the pros.

And it happens to be my favorite time of year: the Sephora VIB sale! I tend to stock up on all the products I need during this sale for 11 days every April and November. It’s the perfect excuse to try out a bevy of new products as there are 10 to 20 percent discounts throughout the course of 11 days, in addition to all sorts of freebies and perks.
Note: This post is in no way sponsored by Sephora, though I did include affiliate links when applicable below. I purchased every beauty product I featured below through Sephora (or Ulta if I can’t find it at my first-choice shop) and have stopped buying actual skincare products via Amazon. Why? Read this.
My Daytime Routine
After going overboard with products to start and creating blackheads for the first time in my life as a result, this is now what I do in the morning now. I don’t double-cleanse every single day, as I don’t wear makeup and my skin is already sensitive, so the second step is just an occasional add depending on how my skin is feeling that day. It’s always a trial-and-error with what works for you, though I’ve found a lot of helpful tips via beauty guru Caroline Hirons over the years. I also often defer to this New York Times piece on building a skincare routine when I’m feeling overwhelmed and sifting through the black hole of skincare recommendations that is the Internet.
Step 1: Rinse my face with warm water and a cleanser like this Algenist one
Step 2: Double cleanse with an exfoliating product like Tatcha’s Deep Cleanse (optional)
Step 3: Apply Tarte Knockout Tingling Treatment as a toner (I don’t do this every day)
Step 4: Splash my face with Fresh’s Black Tea Kombucha Antioxidant Essence to ward off pollutants
Step 5: Apply a layer of Drunk Elephant Day Serum
Step 6: Apply Supergoop SPF and an additional thin coat of moisturizer if needed (i.e. if my skin is dry)
Go about my day!
I’ve tried to be better about wearing SPF every single day, even if I don’t think I’m going out in the sun. My bestie Lemon turned me onto Supergoop! products a couple years ago, and those are my go-to for days I know I’ll be outside at some point. Plus, I love that it comes in a 1.7-ounce bottle, so I can keep it in my carry-on and reapply as needed. Back home, I have a massive tube of Le Roche-Posay’s Anthelios SPF, a line my makeup artist friend Brenna introduced me to a few years ago (and one you can now find at your local pharmacy like Walgreens), that I apply when running or working in the yard.
I have combination skin that errs on the oily side, so won’t use a moisturizer during the day unless it’s winter (or allergy season like now) and my skin is feeling tight and itchy. In that case, I’m a big fan of Little Seed Farm’s Goat’s Milk Moisturizer, which is a nearby Tennessee brand I purchase locally from Kroger’s but has a website from which you can order if you aren’t local. I also love Tatcha’s Water Cream, and it’s a bonus that it’s a clean product, too (slowly making the switch to mostly products that are certified clean).
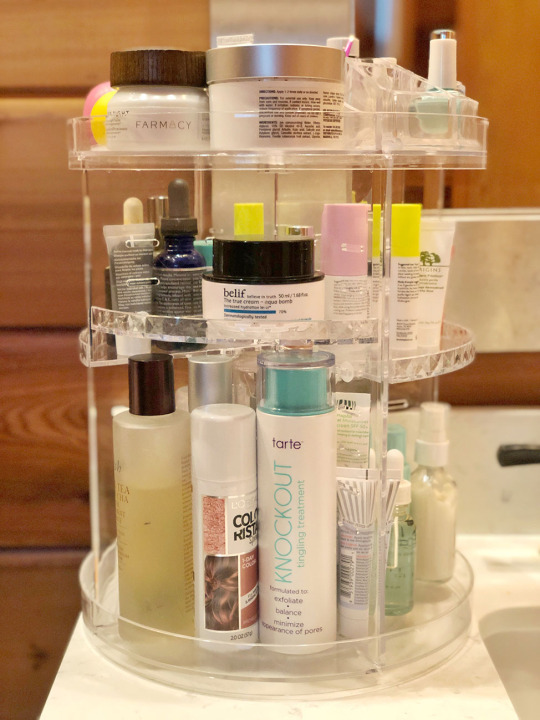
Keeping my products organized and ready to use step-by-step has been a lot easier in the new house as we actually have bathroom space and closets here. I like to keep everything where I can see it so I can survey what I have in stock, so I loved adding this rotating beauty organizer I got on Amazon for just $26 to my new bathroom. I also have a variety of Container Store and STORi plastic bins like this one that I use to organize my overflow and hair products in my bathroom closet.
Using Face Masks
Since I work from home, I often do a mask once or twice a week midday and have all my skincare products readily available and have liked splashing this Fresh essence on my face throughout the day when I need a boost. I’m constantly trying new ones, but here are a few of my favorites:
REN’s Glycol Lactic Radiance Renewal Mask (I use this peel once a week and it’s glorious)
Sephora Collection Face Masks (I prefer the coconut, pearl and lychee)
TONYMOLY Sheet Masks (for $3.75 a pop, you can’t beat the price)
My Nighttime Routine
One thing to note is that figuring out what works for you takes time. Don’t introduce everything at once, otherwise you won’t know what’s working and what’s not. For example, the Pixie Glow Tonic from Target beauty bloggers rave about? Only made my skin break out and become more red in complexion. I immediately took it out of my rotation and started testing out different Vitamin C and brightening serums instead.
Wash with a deep cleanser (I like various Peter Thomas Roth products)
Apply a serum (Sunday Riley Vitamin C or Drunk Elephant T.L.C. Framboos)
Apply a retinol (currently using Drunk Elephant’s A-Passioni)
Apply an eye cream (I haven’t found one I love but currently am using Drunk Elephant’s that came in a set)
Apply a night cream (see below for my thoughts on this)
Between each step, I make sure the product has properly soaked in before I add the next layer. Rule of thumb if you can’t remember which order to apply is: lightest to heaviest. My night cream or moisturizer depends on how thirsty my skin is (I used to not use one, but now I’m trying to reverse deep forehead wrinkles without Botox so use one religiously). My go-to is Belif’s Aqua Bomb, particularly in the drier months like winter, but I really love Farmacy’s Sleep Tight quenches my skin but doesn’t make me wake up feeling oily.
I also finally started using a silk pillowcase, the Slip pillowcase beloved by bloggers everywhere, and I’m kind of mad my mom has used one her entire life and never enforced it upon me because it does help protect both your skin and your hair. And as someone with crazy wavy hair, I can actually straighten it one day, sleep on the silk pillowcase and wake up to it not a mess for a change.
In terms of toning and skin-brightening, friends of mine swear by Karen Hayes Esthetics’ Koji pads, and I finally dropped $160 on a pack and … was extremely underwhelmed. I used them religiously for the recommended 60 days and saw no change in my skin tone. That said, I didn’t actually go in to see the esthetician first—rather, I filled out the survey online—so maybe I needed a stronger prescription? I don’t know. In a world of abundant skincare options, I don’t think I’d drop the money to re-try this one. I’m getting more religious about using a toner and Vitamin C serum instead.
After a decade of using retinol from my derm, I’ve been using OTC retinol products for the past year after my skin went ballistic with an allergic reaction the last time I tried medical-grade products. I’m due for my annual skin checkup with my derm soon, so I’m going to ask her to prescribe me a new retinol—not because my skin breaks out regularly, but because I have deep forehead lines that need reversing (I laugh a lot, what can I say?) and I’m just not into the idea of Botox (no judgment if you are). For those who don’t need as strong a retinol, I do like Drunk Elephant’s A-Passioni Retinol Cream and also Algenist’s Retinol Serum.
Drunk Elephant products are pricey, so I’d recommend you go with a sampler kit like this one before investing in the full-sized products to see what you like. But I’m fully on that bandwagon now, as I’ve been using them for nearly a year, and my skin feels so clean and fresh daily (plus, their products are non-irritating and non-toxic).
When I Travel, Here’s My Beauty Kit
My friend Christie, to whom I also go for skincare tips, made me envious of how organized her beauty kit always is, so I threw out my old caddy and bought this hanging organizer instead. I keep it hanging in my bathroom and each section is organized by theme: first aid (Band-Aids, medicine, prescriptions, etc.), dental hygiene, shampoo and conditioner, hair products and skincare. It’s always ready to go when I need to pack my suitcase, and this way, I never forget anything, which I was inevitably doing before. I also now use this little $8 seven-day pill organizer for my prescriptions, which has reduced the chance of me forgetting one bottle since I’m on so many daily allergy meds.

For this, I typically use Sephora samples I get when I’m stocking up or I buy mini-kits of products I use that are under three ounces. Nothing will get me to check a bag when I travel, so I find it’s always easier to be prepared. Some kits of minis I’ve used and love:
Algenist Discovery Kit (which includes the retinol, a serum, an eye cream and more)
Drunk Elephant’s The Littles (which includes a small version of every one of the products I use of theirs)
Tatcha Pore-Perfecting Duo (I use this for my cleanser and moisturizer when traveling)
What You Eat DOES Matter
Doing food elimination diets for my autoimmune disease means that I’ve seen firsthand how my skin reacts to certain foods, dairy in particular. And while we are mostly dairy-free day-to-day—we long ago, started making our own almond, cashew and coconut milk—neither one of us is one to turn down sour cream or cheese, and if I’m at a fancy coffee shop, I’ll occasionally opt for real creamer as opposed to oat milk or cashew substitute.
But if I’m consuming dairy or sugar on the regular, you better believe my skin reflects it. I get large breakouts around my mouth and jawline, and it’s just not pretty. Again, I’m a big fan of these cheap, but totally efficient Nexcare acne patches to get ride of isolated breakouts quickly (note: this is the only beauty product I buy via Amazon as my local Walgreens doesn’t carry it—but yours might). You can’t beat $6 a box! Target also carries the CosRx brand ($5 for 18) that beauty bloggers swear by.
Dermaplaning
I’ve had professional dermaplaning three times, and little has given my skin quite the glow as removing all the peach fuzz and dead skin cells. I absolutely love the effect of dermaplaning, but the problem is that it only lasts about two weeks (at least for me), and it is not cheap. Instead, these days I do weekly at-home dermaplaning with a variety of tools:
Stacked Skincare dermaplaning tool
Level Setter Razors
Tinkle Hair Removal Razors
Stacked is by far the most efficient, but it’s also very sharp, so proceed with caution. The $10 drugstore brands work fine to just get your face smoother for applying serums and creams; not having that layer of fuzz and dead skin definitely helps your products soak in more (and your makeup to go on more smoothly if you’re a daily makeup-wearer).
Microblading & Your Brows
So far I’ve yet to find a brow-grow product that fills in the patchy parts of the brows I overplucked in my teen years. Ladies, why did we not listen to our mothers? *face palm*
I’ve tried Shisheido, Rapid Brow and Sephora—none of which have done anything for me. I finally ordered the two-part GrandeBrow Brow and Lash Enhancing Serums from Sephora, and still nothing. One eyebrow got thicker, I’ll give it that, but the problem brow stayed, well, problematic. So, if you have an effective eyebrow serum, help a girl out, will you? I’m thinking of asking my derm for a Latisse prescription next time I’m in as nothing OTC seems to work.
I would love to try microblading, and honestly was going to do it years ago until I found out you have to get touch-ups once to twice a year. While I’m OK paying $500 for something that has a semi-permanent effect, paying $500 and then hundreds of dollars for touch-ups every quarter or bi-annually is just an investment I’m not ready to make yet (plus, the thought of getting my brows tattooed freaks SVV out to no end). But if you have thoughts on microblading or success stories, please let me know in the comments!

What’s worked for you when it comes to your skin? I’m constantly learning how to take care of myself after years of neglecting my skin, so share your favorite tips or products, pretty please!
At 35, I Started Caring About My Skin — Here’s My Routine published first on https://medium.com/@OCEANDREAMCHARTERS
0 notes
Text
How to lay a patio – tips, ideas and knowledge to help you succeed
Perfect for relaxing, dining and entertaining outdoors, a patio will extend your living space into the garden and add value to your home
As well as being an attractive feature, a patio is a practical addition that will help you maximise your living space and get more out of your garden.
Laying a patio yourself is tricky, but it can be done! Be aware that the job will require some heavy lifting and is likely to take at least a full weekend to complete, depending on the size and scope of your project. Often, it can make more sense to hire a local paving specialist to get the job done quicker and to a high standard.
Planning your patio
To ensure that your completed patio looks and functions just how you want it to, it’s important to not skip the planning stage.
Research designs With a little bit of thought and creativity you can create a design that’s not only an attractive focal point, but a practical addition to your garden too.
Measure Begin by deciding where you want your patio and how big it should be. Take appropriate measurements and plan your design by drawing it out on paper.
Calculate If you’re going to lay the patio yourself, you’ll need to calculate how much ground will need to be dug out. Your patio will be made up of three layers; hardcore, mortar and slabs.
You should allow:
75mm for hardcore or MOT type 1
50mm for mortar
Plus the thickness of your slabs
When making these calculations, take the following points into account:
A patio being laid next to your home’s wall should be 150mm below the damp proof course.
A patio by your house should be laid with a slight gradient away from the house to prevent rain from pooling. A gradient of 1:60 (16mm per metre) is recommended.
A patio being laid against a lawn should be 10mm below ground level to make mowing easy.
Dry lay slabs If possible, always dry lay your slabs out on the ground before you start. This can help you to check your design and spot any potential problems before you start on the build.
Tools and materials required to lay a patio
Tools
Shovel or spade
Rake
Tape measure
Rubber mallet
String and pegs
Spirit level
Pointing trowel
Safety equipment
Set square
Plastic sheets
Mixing tray
Broom
Materials
Hardcore or MOT Type 1 Sub-base
Mortar mix made using four parts sharp sand to one-part cement
Machinery (optional) Whether or not you choose to use machinery to complete the job is entirely up to you, your budget, and the size of the patio you’re laying. While you don’t have to use machinery, it can improve the quality of the finish and make it easier to complete the job.As you won’t be laying a new patio every week, it can be worth your while to rent machines from a tool hire specialist or DIY store instead. Three machines that you might need are a CAT tool, tamper of wacker plate, and a cement mixer.
Safety advice
As with all DIY, it’s important to take precautions to protect yourself and the people around you whilst you work.
If using heavy machinery, suitable steel toe capped footwear should always be worn. Gloves, a dust mask and safety goggles should also be worn when handling either wet or dry cement as it can cause burning and irritation to the skin. It’s also a good idea to use a CAT tool before beginning the project to check the area for hidden cables or pipes. Doing this can prevent dangerous and potentially expensive accidents.
Step by step guide to laying the patio
Preparing the area
Check that there are no hidden cables or pipes using a CAT tool (recommended)
Use pegs and string to mark out the area
Use a set square to make sure corners are straight
Mark the edges using a spade before removing the pegs and string
Dig out the area according to your calculations.
Laying the slabs
1. Pour on the MOT Type 1 or hardcore and rake it so it’s level. 2. Compact this layer using a tamper or wacker plate (optional). 3. Mix up your mortar using five parts sharp sand to one-part cement. Mix in a tray by hand or use a cement mixer if a large amount is required. 4. Make sure your mixture isn’t too dry or runny by pressing a shovel into the mix – the mortar should hold its shape. 5. Add enough mortar mix to the sub-base to lay the first slab (you should begin laying your slabs in the corner at the highest point of the patio.) Dampen the underside of the slab and lay it. 6. Use a rubber mallet to firm down the slab. 7. Double-check that the slab is laid level and straight. This is very important as this first slab will guide the rest. 8. Lay the rest of your slabs, leaving a consistent gap in between them, and regularly checking that they’re level and straight. 9. Cover with plastic sheeting and leave to dry for at least 24 hours. Don’t walk on the patio during this time. 10. Fill the gaps between the slabs with mortar mix using a trowel (this is called pointing). 11. Brush away any excess mortar from the slabs using a broom before it sets.
How to lay patio on grass
To build a patio on grass, the grass should be removed first, either manually with a spade or a grass cutter. After removing the grass, put some aside for filling in any gaps after the patio has been laid.
How to lay a patio on sand
If you want to lay a patio without cement, you couldlay slabs on a base of sand instead. This isn’t recommended though as the slabs are likely to loosen, sink and move around over time. You’ll also find that slabs bedded on sand will quickly become overgrown with weeds.
How to lay a patio on concrete
It’s easy to turn a drab concreted area into something more attractive and paved. If you already have a concrete base to work with you’ll simply need to apply your mortar and slabs directly onto the concrete after addingg a cement-based primer to the back of the slabs. Be sure to sweep and clean your concrete base before starting, to ensure a smooth and even finish.
Patio design ideas
Your patio design should be in harmony with both your garden and your home to tie the two living spaces together. Whether you’re looking for a simple design or something more artistic, there are plenty of different styles of slab and arrangements to choose from to help you create something personal that reflects your own taste.
Square
If you’re looking for a straightforward design then simple square slabs could be all you need to create an attractive, practical and affordable patio. If you’re planning on laying the patio yourself then using identical square slabs will make your job easier.
Brick
Brick patios can be made as simple or as complicated as you like. Brick is a durable material to build your patio from and can really complement your home’s exterior. Keep your design simple or branch out from the norm bycreating a pattern using different coloured bricks or a patterned arrangement.
Mosaic
If you’re feeling artistic you can use a variety of slabs or stones to create a mosaic pattern in your patio. Some careful planning is required to get the design just right, but the overall effect can be striking and unique, making it well worth spending the extra time on the design.
Natural stone
Arrange natural stone slabs of different shapes and sizes randomly to create an eye-catching crazy paving style patio. From limestone and slate to bluestone and quartzite, natural stone paving comes in an array of beautiful colours and textures, making each slab distinctive. Natural stone patios blend in beautifully with the garden’s natural surroundings.
Round
In the right space, a rounded patio can create a striking centrepiece in your garden. Combine with a mosaic pattern to create something eye-catching.
Mixed
Can’t decide between two different styles? Combine different types of slabs into your design. Try creating a pattern around square slabs using smaller bricks or border your main patio with slabs of a different colour or style.
Top tips for caring for your patio
One of the biggest benefits of a patio is how little maintenance they need and how hardwearing they are. If you want to keep yours looking brand new for longer though, these top tips will help you to maintain its condition.
Apply a sealant to prevent your patio’s colour from fading and to stop water seeping in. Sealants can help to enhance the appearance of your paving too.
Regular brushing and washing can prevent staining from leaves, dirt and debris.
Regularly check the condition of the pointing surrounding your patio slabs and refresh it when necessary to keep your slabs secure and to ward off the weeds.
Use low pressure when cleaning. If you’re going to be using a pressure washer to spring clean your slabs, it’s best to use it on a low pressure setting to prevent damage.
How much does it cost to lay a patio (per m2)?
The price of laying a patio can vary greatly depending on the size of the project and the quality of the materials used. Using natural stone will bump up the price of your project as will any intricate patterns or mosaics.
Here’s a rough guide to costs per m²:
Size of patioCost (low)Cost (high)Up to 10m²£500£1,00010m² to 20m²£800£1,50020m² plus£1,100£2,400
Get quotes from local tradespeople
Looking for professional help to create your new outdoor living space?
Find a landscape gardener now
The post How to lay a patio – tips, ideas and knowledge to help you succeed appeared first on Rated People Blog.
How to lay a patio – tips, ideas and knowledge to help you succeed published first on https://fanseeaus.tumblr.com/
0 notes
Text
5 Simple Techniques For sugar face mask
The orange powder is an essential and key component component of the complete procedure. It may be well prepared effortlessly at your house by making using pursuing methods. Blend all the above ingredients in a little mixing bowl. Employing clean up finger recommendations, implement a thick coat in the mixture on to your face. Subscribe to The usa's largest dictionary and have thousands extra definitions and Sophisticated research—ad free! two. Insert coffee powder, sugar and cinnamon powder in the coconut oil and blend all of the substances together. Orange peel powder is used in numerous skincare recipes to manage acne by drying it out and for a scrubbing agent to Carefully take away worn-out skin cells and thus open up up clogged pores and address blackheads. In addition it assists rid the skin from surplus oil, even more mitigating the risk of acne and imparting a healthful glow to the face in its place. A pop up will open with all mentioned web pages, find the choice “Let“, with the respective web page underneath the position head to enable the notification. in. Our selection also attributes bath extras like body sponges, all-natural loofah pads, bath towelettes, shower caps, bath brushes, tub mitts and also bath kits for small kinds to take pleasure in. Acquire skin care goods on line by logging on to Amazon.in and luxuriate in a vast choice of solutions at the top prices on line. Be it The common-or-garden challenging-boiled eggs which might be elevated into mouthwatering deviled eggs or boiled egg sandwiches, or maybe creamy poached eggs with a gorgeous runny yolk, eggs are an extremely low-priced and flexible domestic staple. Help https://www.youtube.com/watch?v=8_zWPn_5aag save the egg yolk and discard the egg white (or save it for another recipe). Egg yolks not simply aid nourish and moisturize your skin, Nevertheless they may aid minimize the looks of blemishes. You should utilize the egg white for making a simple face mask. To find out how to create 1, check with the part in this post on generating a simple mask. For starters, mix fuller’s earth as well as orange peel inside a bowl within their present native point out. Now, increase the freshly squeezed juice to produce a paste on the three. Once you've a thick paste, insert several drops in the crucial orange oil to it. Relevant Lookups for face mask: kids face mask fishing face mask cartoon face mask medical mask monkey face mask beard face mask kevlar face mask nurse face mask breathable face mask water resistant face mask antibacterial face mask plague health care provider mask mouth mask quite face masks 3m n95 mask Far more... Honey face masks can assist you fade acne scars and also out skin discolouration, providing your bright and toned skin. OEM ODM rorec moisturizing nourishing Olive honey aloe vera pomegranate blueberry cucumber sheet face mask You are able to nonetheless it's advised you utilize a darkly coloured glass bottle, not plastic, for purity. Definitely use within a couple of days because the oil Attributes will lessen with time and warmth.
The Greatest Guide To yeast face mask
Honey may assist with acne, but there isn't any confirmed scientific studies to confirm whether it really helps.[17] In the event you are thinking about the usage of an egg white mask, the very best avenue of therapy is usually to go to a skin care professional or a health care spa, where by those that provide the remedies have the type of expertise and schooling to advise you on no matter whether this kind of mask are going to be beneficial in your skin. Though an egg white mask is straightforward plenty of to generate in the home, building a person from a recipe observed on line might be risky, particularly if You're not aware of what more components that are sometimes advisable, for instance cornstarch and lemon, can perform to the skin. [16] Try out several of the subsequent relaxation strategies: Take a stroll across the block. This will let you get the job done off some steam. The contemporary air could also assist tranquil your head. Turmeric is a typical component in Southeast Asian beauty items. It really is beloved for its skin lightening talents. Just be careful, the orange can stain really light skin. My skin is super sensitive And that i crack out like outrageous if I take advantage of coconut oil on my face. It seems to work terrific if I utilize it basically any place else on my system…go figure. Yet again, source:- steptoremedies for all of your practical posts! You’ve completed much more for me this yr with my skin and snooze than any physician has!! During this economy, why devote $30 or more over a leg wax when you can do it you? I have several mates who wax their own legs And that i learned a recipe for any sugar "wax" around the Double X Web site for Ladies. Editor Hanna Rosin shares her loved ones's recipe. That is a single fascinating mask! When I initial saw the photo I believed it was a mask based on Turmeric, since It is additionally an orange powder, but a mask manufactured out of ground orange peel would have not happened to me. Many thanks for sharing! Orange peel consists of effective Homes that help keep aggravating pimples away. Implement a thick coat of this zit-busting orange peel face mask to deep-cleanse your pores and generate out the dirt, grime, excess oil, and microbes, all of which result in pimples and blackheads to kind around the skin surface. I typically utilize it in the evening. I do think my skin usually appears improved each morning when I utilize it at nighttime. On the whole the potential risk of salmonella may be very very low; particularly if you are aware of in which your eggs come from. So, I don’t Individually stress about it whatsoever. This article has some wonderful info on it: Coffee is often a prosperous source of antioxidants that protects our skin towards absolutely free radicals that hurt and age us. The caffeine in coffee stimulates the skin and enhances blood flow into the face, which is great for nutritious mobile turnover that makes us look radiant and vibrant. Want far more beauty strategies? Check out the video beneath, and you'll want to subscribe to Bustle’s YouTube page For additional hacks and methods! Drinking a great degree of h2o on a daily basis allows quite a bit. Also, clean your face and get off all makeup each night time.
5 Essential Elements For banana face mask
I also present variations of this mask so that it is suited to typical, dry, oily and sensitive skin. That is my ‘drop by’ face mask if I feel my skin becoming a little bit also oily, or if I am suffering from an outbreak. I swear by it. The pigment in a very mole is deep during the skin very similar to a tattoo. No topical Remedy will eliminate the pigment. I like to recommend removal by a plastic surgeon and sending it to pathologist. That is accustomed to detect individual browsers or units when the access the company, and it is used for stability motives. That’s a wonderful notion! I also use coffee grounds & coconut oil for cellulite. I didn’t know i could freeze. I had been trying to keep lots of utilized grounds in the mason jar w a dab of coconut oil in my shower. I really like the frozen Model alternatively. Could possibly operate best since it’s saved refreshing. Will check out. I'm on an organic and natural kick at this time and I favor not to put anything on my skin that I could not, well, take in. https://www.wikihow.com/Have-a-Good-Face-Care-Routine suggests I'm moisturizing more with oils (Feel sweet almond and coconut), I am scrubbing my skin and lips with brown sugar and coconut oil, I'm steaming my face in excess of my teapot and I'm using baths in milk and salts. how often really should I take advantage of this mask to determine outcomes but i also dont want to wreck my skin by making use of to A great deal if tht is smart Her close friends had been surprised at how fantastic her skin seemed and pestered her for the recipes so she made a decision to place them on line so she could support All people. Rinse your face with cold h2o to wash away mask’s components and to tighten your skin pores. Utilize an excellent moisturizer of one's option to hydrate your skin. Volla! Are you presently shock with your glowing and supple new look. Get an index of essential oils that function for all skin kinds. Not all necessary oils operate for all skin types. Some might burn up or hurt delicate skin, as an example. With regards to the milk, powder milk will operate best since the combination will only have to have somewhat degree of h2o. If you employ liquid milk, you won't get the good thing about milk by this tiny total. If you don't want to use milk,just liquefy the coffee with some drops of h2o then increase yogurt. These banana face mask recipes are usually not designed just for acne clients. if you rely on them on the traditional skin you have moisturized, tender and exquisite on the lookout skin. Brown sugar is a superb skin-exfoliator. It helps slough off dead skin cells on the outer layer from the skin. This permits home For brand spanking new balanced skin cells to regenerate and performance correctly. It may also deep cleanse your skin, getting rid of grime and germs from inside skin pores and stopping even more breakouts. The applying of an egg white mask can clog the pores and enhance the potential of breakouts for whoever has acne susceptible skin. Other Unwanted effects include the spread of bacteria within the skin, as Uncooked egg whites have salmonella, a bacterium that can cause meals poisoning.
The best Side of face mask
As this mask may get messy, it would be a good idea to tie or pin your hair again. You might also want to take into account draping a towel about your upper body and shoulders to shield your garments. You can nonetheless it's advisable that you choose to make use of a darkly colored glass bottle, not plastic, for purity. Surely use in just a few days because the oil Houses will lessen with time and heat. 2. Banana Face Mask to lighten skin: This natural face mask is nice for fading absent darkish spots, removing blemishes and brightening uninteresting skin. That is built up of subsequent three potent substances to hydrate, lighten and brighten your skin. Exactly how much you exfoliate is up for discussion. Some Girls have skin that gets scaly speedily. Many others seem dewy and fresh new with minimal fuss. Dermatologist Dr. Electric power-full of every one of the goodness of those superb ingredients, this face mask can make the skin glow and take away tan from oily skin. In excess of a time frame, you will certainly discover an All round enhancement in your skin texture, spots in your skin will probably be lightened and you may experience a new glow and shine with your skin. For instance, add yogurt or product and honey Should you have dry skin. Add lemon juice Should you have oily skin. When you have Tremendous dehydrated skin, oils operate as a substitute for dairy. If you're able to regulate it, you can implement banana-yogurt mask right away. If you are feeling it's going to mess-up Then you can certainly let it sit on your face for approximately thirty minutes or as very long as possible,after which you can rinse it off. Keep the mask on for ten to 15 minutes, then clean off with warm drinking water. Following patting your face dry which has a thoroughly clean towel, ensure you moisturize your face to forestall your sebaceous glands (which hydrate skin by producing pure oils) from going into overdrive to help make up for The shortage of oils. I used a banana mask with banana, apple cider vinegar, oatmeal in addition to a sprint of cinnamon ,,,, it absolutely was great!! Handiest facial I at any time did ….. and I hav used alot of different natural facials …. these days im gonna try your tumeric banana mask. Thank u for sharing these recipes. Egg whites support tighten skin, generating them an efficient house treatment for lessening look of crow’s-feet beneath and around eyes. Raw honey by by itself is Pretty, but You can even blend and match other food stuff-primarily based components to tailor your mask to your special skin kind. I tried it yesternight …… The outcome had been astounding …… My face was truely glowy glowy ……. I utilized the rice powder wnich i have grinded myself…. It's some gritty construction which gave a wonderfull scrubbing xperience ….. Totaly in adore with the effects….. *Thankyou* *thankyou* And how to care daily regime fir my below eye skin to keep it youthful for extended a long time. Please aid me…. Save the egg yolk and discard the egg white (or reserve it for one more recipe). Egg yolks not just help nourish and moisturize your skin, but they can also assist decrease the appearance of blemishes. You can utilize the egg white for making a simple face mask. To learn the way to create a person, seek advice from the section in the following paragraphs on building a simple mask.
sugar face mask - An Overview
The egg white not only help nourish and organization your skin, but it really will even aid tighten the pores[one] Discard the egg yolk or put it aside for one more recipe. You can use the egg yolk for making a nourishing face mask. Consult with the segment in this post on making a nourishing face mask to learn how. Go in excess of your overall face, but avoid your lips and eyes. Don’t use a washcloth to rub the sugar into your skin, as this may be too harsh of the exfoliant and will irritate your skin. Wash your face. Use a delicate cleanser to wash your face with lukewarm water, then pat your face dry that has a thoroughly clean, dry washcloth. Use the mixture on your face with the fingers. Function the sugar-honey combination on in your face with all your finger ideas in Mild round motions. Prevent your eyes and mouth although implementing. I think I’ll truly Incorporate 3 and 4 mainly because I've dry and inflamed skin. On the list of benefits of working with this sort of elements is they gained’t respond terribly collectively like atore purchased types could possibly! Get ready your face for the mask by washing it with warm h2o. This may open up your pores, that can improve the success of the mask. Because this mask has a tendency to obtain pretty messy, It's also possible to pull your hair back again into a ponytail, braid it, or pin it again. Whisk within the honey. Make this happen right until the lemon juice, olive oil, and honey Blend into a medium-thick Resolution. You can regulate the level of honey and olive oil you employ based on how thick or thin you'd like the scrub to generally be. Lemon juice can make your skin sensitive to daylight. Steer clear of heading outside the house soon after employing this mask, or apply a 30 SPF sunscreen instead. The egg white, lemon, and honey mask should help minimize blackhead and acne when the egg yolk, olive oil, and banana mask might help moisturize and nourish your skin. Examine this post to find out how to make both of those! Just finished this face mask, my skin feels fab! Rather like the idea of turmeric extra to it so I’ll do this upcoming time x Repeat at the time every week. Only do this mask the moment weekly. Performing it in excess of which will cause your skin to become dry and irritated. The mask ought to strengthen the caliber of your skin and lessen the looks of acne. Shower right after. When you shower prior to, the eggs will have nothing to "seize on to". Soon after, you need the mask to generally be properly and definitely off your face, and a shower can assist with that. Nourish your skin with honey and cooked oatmeal. Prepare dinner two tablespoons of oatmeal, then stir in one tablespoon of honey. Permit the mask interesting to home temperature, then implement it on your face. Help you save the egg yolk and discard the egg white (or put it aside for one more recipe). Egg yolks not merely assist nourish and moisturize your skin, Nevertheless they could also assistance lower the looks of blemishes. You should use the egg white to make a simple face mask. To learn how to make a single, check with the part in this post on creating a simple mask.
A Review Of honey face mask
This is utilized to identify unique browsers or equipment once the obtain the service, and it is employed for security motives. one. Use added virgin olive oil for most effective final results. Processed solutions could irritate your skin or result in acne breakouts. Studies have demonstrated that egg proteins drastically add in maintaining the elasticity of skin. An egg incorporates about 69 distinct proteins, which have the magical electrical power of lessening fine strains and give non permanent aid for your deep types. You might like to give this a try out Specifically mainly because I observed in the image you use your full neck with the combination. It lessens the prospect for a mess. Combining egg whites with honey and lemon juice helps make a highly effective Do-it-yourself egg white face mask for acne. Honey has powerful antibacterial and anti-inflammatory properties which make it very helpful versus acne. Maintain a jar around and dab the honey on acne, burns or slight cuts. And if you’re feeling Ill, take a spoonful or two. No HTML is permitted in opinions, but URLs will probably be hyperlinked. Responses will not be for promoting your article content or other web sites. Supply There are many means accessible to get ready a face mask at home. Nevertheless, be careful While using the accuracy of your ingredients. In the event the proportions go up or down – the face mask might not present the precise success. This can be utilized to detect individual browsers or gadgets if the accessibility the services, and it is employed for stability motives. Would you like the ideal of science-backed well being & nourishment info inside your inbox? If Certainly, remember to share your e-mail to subscribe. For more honey Strategies, try honey and cinnamon for brighter skin or honey with cocoa and product to exfoliate. Avoid the eye and mouth place when implementing the combination, as these are definitely additional delicate when compared with other elements of your face; and the tightening and stretching in the mask might induce wrinkles. • Insert https://www.facebook.com/steptoremedies/posts/2088297497930186 of basic yogurt, two tablespoons of honey, and two teaspoons of orange juice in 50 percent a cup of instantaneous oatmeal. This moisturizing face mask helps sustain gentle, clean and radiant skin.
coffee face mask Can Be Fun For Anyone
three. To avoid wasting time, put around the face mask just before accomplishing something like receiving breakfast All set or soaking in the tub, so that you destroy two birds with 1 stone. Your skin will sense easy and smooth instantly, but it might have a handful of applications to note an actual big difference in scars and spots. About a number of weeks and months, You might even see a putting variance in the appearance of your respective skin. Skin exfoliation mask, the yogurt aids clear away dead skin, lighten and brighten skin, will get rid of dark spots and Nearly prevents ageing. The Attributes of yogurt are many and when used in this mix, it’s confident to give you Advantages a lot better than a readymade mask. Permit the mask sit on your face for ten-quarter-hour and then clean your face with lukewarm h2o without having working with any soap this time. Pat your face dry and implement a moisturizer of the decision to circumvent your sebaceous glands to go overdrive and create surplus of oils to help make up for insufficient the oils. . Any over that so you’ll be dripping honey in every single place! I'd a dilemma with dripping initially, but the moment I Slice back again on the quantity of honey I employed, the issue resolved by itself. As well as that it’s a bit more inexpensive that way, far too! (i) Implement pine apple juice beneath your eyes, depart it on for 20-25 minutes and after that rinse it off. Generating this a pattern will help you take care of wrinkles usually in addition to in avoiding the early onset of wrinkles. Reply: Any authentic honey will do, but my individual most loved is Uncooked, unfiltered honey because it retains extra of its powerful therapeutic Attributes. I can in fact notify the distinction between the types of honey I’ve used for my honey mask. Is loaded with citric acid, which Carefully lightens darkish skin and evens out discolouration. Also lightens dark places and acne blemishes. Opt for which sort of sugar to employ. When https://www.pinterest.com/pin/722616702689546949 got sensitive skin, always pick brown sugar in excess of white granulated sugar or other coarse-grained sugars. Brown sugar could be the softest sugar and would be the most Mild with your skin.[eleven] i have tiny pours on my cheeks and nose and also acne issue…. remember to support me to remove this.. You can even increase ½ tsp of olive oil to this mask as a moisturizer so you would not have to reapply moisturizer soon after using the mask. Dr. face mask for oily skin reminds us that bananas have medicinal Homes that may be accustomed to soothe many inflammatory skin situations, together with acne. Dr. Boling says, “In line with a 2012 post in the Journal of Pharmacology and Phytochemistry For those who have an American type coffee device, use the coffee grinds within the filter; In case you have an Italian design equipment, just unscrew and take away the debris still left concerning the aspects of the cafetiere. In the bowl, choose some orange peel powder, sugar and almond oil. Ensure that the level of sugar is equal to your peel powder and below you have got a fairly easy recipe to a lovely smelling lip balm that’s productive and straightforward to make.
The best Side of yeast face mask
Baking soda With this solution will help in getting rid of the excess oil within the pores which can clog up the pores resulting in acne breakouts. Honey includes a significant serving of antioxidants for moisturized and vibrant skin. https://www.youtube.com/watch?v=LLyzh-nGTmg in honey ruin no cost radicals that cause oxidative stress in skin cells, thereby slowing down the getting old process of skin. Hey all, I am Suzanne, I like amassing new information on normal cure for wellbeing ailments. I often think that character has cures for all our health conditions, we just should utilize it in the proper way. Avoid the Sunlight concerning 10am and 2pm, as This can be when its rays are most dangerous.[18] If you don't like carrying sunscreen, consider using a moisturizer or foundation that have already got sunscreen in it. Historical past: Lots of of these masks have previously been in use for a huge selection of years as a standard home treatment for skin circumstances like acne. It's pretty frequent knowledge that oranges absolutely are a godsend in your skin. What isn’t emphasized sufficient, even so, is With regards to rejuvenating your lackluster skin, the most potent Portion of the fruit is, actually, it’s peel. Try this very uncomplicated and really successful cure to deep clean up your skin and expose a glowing complexion! three. Honey is usually a organic moisturiser which will help in preserving skin comfortable and supple. I normally use 2-3 drops of organic moisturiser in face packs to help keep the contents well well balanced so that the mask does not strip the natural dampness and hydration from my skin. It is the weakest finger and is not going to stretch the sensitive skin beneath your eyes just as much. Stretching skin excessive may result in wrinkles. one. As currently talked about, orange juice is rich in ascorbic acid written content and deep cleanses the skin thoroughly. It lightens existing acne spot and blemishes. Orange juice also brightens complexion and keeps in Test extreme oil secretion. two. Insert coffee powder, sugar and cinnamon powder to the coconut oil and blend all of the components together. Yoghurt, as we all know, is usually a abundant normal supply of protein and also consists of lactic acid. This makes it the very best component to hydrate and moisturize the dry skin. Inuit teams change broadly and don't share a common mythology or language. Not surprisingly their mask traditions may also be usually unique, While their masks tend to be manufactured away from driftwood, animal skins, bones, and feathers. See also: Masks amid Eskimo peoples Prior to I demonstrate this mask, Watch out for the level of lemon juice you insert for your face mask, just don’t go overboard with much more than 8 drops or 1/two tsp. Anyhow, this delectable smelling mask is certain to tease your taste buds, tempting you to have a lick, but you should resist!
The Ultimate Guide To pineapple face mask
"I know that anything below will get the job done. I am hoping for the ideal! Thank you a great deal of!" AA Abhishek Arora It is something that the many cosmetic industries happen to be applying in their products on account of it a number of skin benefits. Writer Information Boling, saying, “Bananas are significant in potassium, which can be superb for your personal lymphatic technique. The lymphatic procedure is what allows your skin clean up alone, and it provides nutrients to every mobile in Your system.” To find the most bang for your personal buck and the top success, try to find cold pressed, unrefined coconut oil. I take advantage of THIS coconut oil. You could find cold pressed, unrefined coconut oil in many grocery and overall health food items merchants. Here are a few really very simple Do it yourself face mask recipes that have become extremely popular between honey enthusiasts. The actions and elements involved with Just about every mask are so easy that you could prepare it in a few minutes. You would probably constantly recognize that yogurt will give you that cooling calming sensation when applied, that’s since it has that anti-inflammatory agent. [2] Also, orange peel also contains potassium that can help the skin keep its moisture along with magnesium that helps beat skin growing old induced by mobile oxidative harm. Suffice to mention then, which the rightful place for orange peels is not really inside your trash can but with your attractiveness routine. 4. Rice flour is really a speculate ingredient With regards to tan elimination. Making use of rice flour on the skin will allow you to in acquiring rid of stubborn age places and tan and Furthermore, it lightens complexion with typical use. Utilize a face scrub a few times each week to maintain your skin in suggestion-best shape. It is important to exfoliate the two your face and Your system 12 months-spherical, however, you may perhaps locate you'll want to exfoliate even more in Wintertime. It is the weakest finger and is not going to extend the delicate skin less than your eyes just as much. Stretching skin an excessive amount may lead to wrinkles. Take a look at my skin During this photograph…You'll be able to see the main difference it makes following the 1st use. Here's how my face appears to be like soon after making use of this mask… I am not putting on any type of makeup listed here, just moisturizer. Here i will discuss most effective six DIY egg white face masks which have been quick to arrange and will help clear up an array of skin challenges to give you toned and lovely skin. If essential, you are able to master different hacks to different the egg’s yolk and whites. This egg white face mask with lemon juice and further-virgin coconut oil is most effective fitted to All those with dry skin. The coconut oil performs to hydrate and nourish your skin, making it comfortable, balanced and youthful-looking.
Not known Details About coffee face mask
I did not notice egg white can be good for your personal skin. Many thanks a lot for sharing. I have bookmarked this hub for long run reference! :) I've been intending to pamper myself for a while, And that i think that a facial mask is just how to go. I'm absolutely energized to test these, Specifically because they all use low-cost things from the fridge or cupboard. Hello. Once you clean from the white egg wiith heat h2o, do you need to wash your face with soap or one thing? I mean how fonyou eliminate the scent? o Numerous African masks signify animals. Some African tribes believe that the animal masks may also help them talk to the spirits who live in forests or open savannas. Folks of Burkina Faso called the Bwa and Nuna get in touch with into the spirit to stop destruction. The Dogon of Mali have advanced religions that also have animal masks. Having said that, toners of right now aren't your mother's toners of a couple decades back. They are much much more Light, stuffed with antioxidants and skin brighteners and could make even the driest skin appear vibrant. The #1 reason for wrinkles is Solar injury, so it is vital to implement a sunscreen of no less than 30 SPF from the early years on even in winter and on cloudy days. An incredible trick is to buy two moisturizers: A single for that night time and one particular to the working day that features UV safety. https://www.youtube.com/watch?v=zelnf6j5DVk that has a quite loaded agricultural custom would be the Bamana people today of Mali. The antelope (termed Chiwara) is thought to have taught guy the insider secrets of agriculture. Sounds good! I might in all probability rinse it off after thirty minutes to an hour (just due to the egg white). You truly need to use The complete egg. The white as well as the yolk jointly. I conquer them properly, and set them in somewhat jar and keep it from the fridge. Each and every morning I implement it all over my face (incredibly generously) utilizing a cotton ball. Then as I am showering I wash it off. Particularly uncomfortable varieties, for example an iron mask, for instance the Scold's bridle, are healthy as equipment for torture or corporal punishment . "As we become older, it breaks down, creating traces and huge pores." Skincare experts disagree on all sorts of issues, but Many of them look at retinoids to become a wonder skin saver. This is actually the best egg white face mask for aging skin. It can help clean out wrinkles and hydrate aging skin, which makes it search youthful. Impression edited by healthmunsta Fantastic and useful report. I like just about anything home made - It is really generally the purest and Greatest! I'd personally use only natural and organic oranges due to each of the pesticides that happen to be Typically sprayed on them. Any use of this information is in the user’s discretion. For health and fitness issues or emergencies and medication adjustments, make sure you consult with a healthcare Expert.
Not known Factual Statements About orange face mask
Put together for your mask by washing your face and tying your hair back again. Use warm drinking water to assist open up up your pores. Should you be putting on make-up, you will need to get it off employing makeup remover. This may minimize redness and soothe any soreness. If https://en.search.wordpress.com/?src=organic&q=skin+care have aloe vera gel or glycerin, you can apply that also, as these each have comforting Houses also. There are many banana face mask benefits just one just really should be familiar with which mask is greatest for what skin sort. For this, we've been in this article to assist you as We now have categorized the face masks based on the different skin care requirements. Retain a jar all-around and dab the honey on acne, burns or slight cuts. And if you’re feeling Unwell, take a spoonful or two. https://www.youtube.com/watch?v=hfwyB59sdjY of coffee face masks include their power to lessen face inflammation. This selfmade mask will be your best ally for those days any time you haven't acquired A great deal sleep or have slept poorly and you wake up with a bit puffy face. This is the perfect egg white face mask for ageing skin. It helps easy out wrinkles and hydrate ageing skin, rendering it look youthful. Image edited by healthmunsta By combining bananas with other components stuffed with effective nutrients, we will make face masks that serve many functions. We're going to examine banana face masks that combat wrinkles, banishing acne, Regulate oil, lighten skin, and a lot more. Treat your self to a luxurious wax cure like they do in posh spas around the globe. Dip palms into heat wax and then peel away leaving arms gentle and supple. Blend the egg white and lemon juice. Using a fork, rapidly whisk The 2 elements until finally the egg white results in being foamy and frothy. Clean from the mask with lukewarm water in the event the time is up, and pat your face dry having a towel. Take pleasure in the seem of one's moisturized skin! This is often accustomed to discover distinct browsers or units once the access the support, which is used for protection reasons. Skin care entails more than just cleansing it and applying lotion. It also will involve possessing a nutritious diet plan, finding more than enough rest and exercise, and controlling pressure concentrations. Your special skin style might also identify any further treatments at the same time, which include making use of exfoliating scrubs or moisturizing masks. This services allows you to sign up for or associate a Google AdSense account with HubPages, to be able to receive funds from ads on the content articles. No knowledge is shared unless you interact using this function. (Privacy Coverage) Once i was all around fourteen, my hair bought just a little oily from my functions. To maintain my hair refreshing for a longer time soon after I washed it, I would use whipped egg white on it. I place it in my damp hair, and let it dry, then brushed it out. My hair had more volume way too.
5 Easy Facts About egg white face mask Described
Awesome piece. Great to acquire again to Basic principles and out with the chemical laden cosmetics. I'll be seeking honey tonight. Disclaimer: The written content on this site is generic, informational and adjunctive at ideal, but can't function a alternative for Specialist healthcare advice. Avoid paying out a lot of time from the Sunlight, and always put on sunscreen when you do. Pick out sunscreen with no less than fifteen SPF. It is best to put on it daily, even throughout the darker, colder Winter season months. Carefully exfoliates and scrubs skin thoroughly clean. Absorbs and removes impurities and Grime within the skin’s surface. This company will allow you to join or affiliate a Google AdSense account with HubPages, to be able to get paid revenue from advertisements with your content articles. No information is shared Except if you interact with this particular aspect. (Privateness Plan) Sit for fifteen to half-hour to Permit the face mask settle and have absorbed deep into your skin. Once the time is up, rinse off with warm h2o, and pat dry having a cleanse towel. The elements demanded for producing orange peel face mask with the oily skin and acne are given underneath. https://www.wikihow.com/Category:Skin-Care isn't just for chugging—it works great to be a normal exfoliant, far too. From face masks to hair therapies, these Do it yourself coffee scrub recipes will depart you with ...More » Blend the above substances comprehensively in a small mixing bowl. Coat your face With all the mixture working with clean up fingers. Enable it settle for 15 minutes. Meanwhile, you are able to lie down, near your eyes and take it easy given that the mask does its magic. In the event the time is up, rinse your face, and pat dry with a clear towel. Orange peel has purely natural bleaching Houses which aids lighten places. Honey has impressive antiseptic, antibacterial and moisturising Attributes which hydrate and nourish the skin. You may as well try out these home treatments to get rid of blemishes. > Who doesn’t desire to smell good all day lengthy? A very good scent can not merely cause you to scent awesome, it may possibly improve your self-assurance manifold. Honey is of course antibacterial, which can help your skin struggle off acne. In addition it's got an a fantastic antioxidant capability, and you'd like antioxidants all over to fight the no cost radicals that problems the skin. The alpha hydroxyl acids in apple cider vinegar assistance unclog skin pores and dissolve useless skin cells. Moreover, apple cider vinegar treats blemishes, restores the normal pH of the skin, and minimizes the looks of pores. Permit it sit for quarter-hour. Rinse your face with chilly water and pat dry that has a clear towel. Your skin will truly feel amazingly comfortable and glimpse clean and moisturised. In case your face is a little dry following the mask, particularly in acne spots, merely utilize a drop of olive oil to be a all-natural moisturizer.
Facts About banana face mask Revealed
I have definitely bad skin, and I really like doing a basic Uncooked honey mask! It cleans my pores, decreases inflamed acne, and leaves my skin emotion softer than before! So it seriously moisturizes your skin, Management extra oil, cure acne. It also brightens your skin so Furthermore, it definitely great for getting older skin. Can I mix mashed banana with sugar, orange juice and avocado oil ? And when yes am i able to store in the sealed container? Many thanks Somewhat cinnamon oil may be used While using the coconut oil, but I'd only use a fall or two in a small jar of coconut oil–much more than that could burn the skin. Are you able to make sure you explain to me any remedy for my less than eye skin. I am thirty many years old n i got great lines and crow’s feet under and about my eyes. Plz enable me… And allow me to know any powerful herbal cream or cure which will help me to get to obtain my less than eye skin youthful back again again. I attempted it anything and its great.... its really helpful... just ought to established minutes all of it ... I do it each day ahead of i take a tub or when have a bathtub... that's why typically I am 30mins within the rest room hahahaha... for 30days i can see the impact of glow The matters in these pages together with textual content, graphics, films along with other substance contained on this Web page are for informational applications only rather than for being substituted for professional clinical tips. Lemon juice is really a more powerful ingredient, so dependant upon your skin time, you might want to Restrict the quantity of times you utilize this mask to one-two occasions a week. Source Egg Yolk Face Masks—Egg yolks, Alternatively, are known for their capability to moisturize and hydrate skin, leaving it that has a wholesome glow. These masks are great for individuals with dry skin. Wash your face very first and also your arms as well as you don’t to apply a face mask on dirty face. So immediately after this implement a thick layer of the mask on the face. Rinse your face with drinking water, Carefully pat dry employing a soft towel and utilize a light-weight product to seal within the absorbed nutrients. पत्रलेखा ने कैंसर मरीजों के लिए धन जुटाने में मदद की These face mask recipes are simple to make in the home, working with common components out there in your kitchen. Orange peel is nutrient-loaded and has quite a few Advantages for skin, not only skin lightening.
coffee face mask No Further a Mystery
To be able to get the cucumber juice You need to grate it and after that squeeze the juice from it (grate adequate cucumber to acquire the amount of juice you need). Mix the above substances extensively in a small mixing bowl. Coat your face with the combination applying clean up fingers. Let it accept 15 minutes. In the meantime, you are able to lie down, near your eyes and chill out since the mask does its magic. Once the time is up, rinse your face, and pat dry by using a cleanse towel. This can lower redness and soothe any soreness. If you have aloe vera gel or glycerin, you could implement that too, as these both have soothing properties also. This assistance lets you to join or associate a Google AdSense account with HubPages, to be able to get paid money from adverts on your articles. No info is shared unless you interact with this attribute. (Privateness Coverage) No need to have to spend a fortune on top brands When you've got at your fingertips the refrigerator and pantry to build your very own products. Once a week use a mask In a natural way soon after cleansing your skin effectively to permit penetration. i want to know the households remedies for tumaric from india for itchy skin over the face likewise because I'm sure the best Answer I want to know urs smilrs Separate the egg. Crack an egg in excess of a bowl, and transfer the yolk from shell to shell. Each time you transfer the yolk, a small amount of the egg white really should circulation in the bowl. Hold doing this till the entire egg white is during the bowl. Clean off the mask with lukewarm water if the time is up, and pat your face dry using a towel. Benefit from the appear within your moisturized skin! As you'll be able to see, employing an orange peel face mask has multiple pros that work for various skin sorts. Regardless of the you need it for, orange peel powder is without a doubt a blessing. As I become old I have already been hunting for something which could assistance sluggish the ageing approach down a little bit. However, our skin is below assault 24/seven by quite a few things – ranging from involuntary publicity to dangerous radiation (such as the Sunshine) to diet. Add the olive oil or coconut oil. You may need two teaspoons of olive oil. The olive oil will moisturize your face, leaving the skin emotion delicate and clean. If you don't have olive oil, You can utilize coconut oil in its place, which is also extremely moisturizing. If you want to use this mask yet again Ensure that you develop a new 1 as this remain in the fridge for three days however it’s very good when you come up with a new 1. Thanks to your article. I much like the way. You explained the honey mask instructions. Your mask is a snap for making. I'm going to check out it in my next spa remedy. I love it. Mister healmunsta. I commenced making use of black tea bags as my heat compresses, and then I might dab honey over the soar. Inside of 1-2 times, each of the infection experienced drawn to your surface and my chills/fever went absent. Sorry for the small print, but I am a real believer in all-natural medicines and those two personalized experiences are what manufactured me the believer that i'm today!
Not known Facts About banana face mask
While you are concluded applying towards the afflicted acne spots, wait for about ten minutes and afterwards rinse off your full face Along with the lukewarm h2o. You may just keep it within an air-limited container and put it while in the freezer. Then subsequent week, just remove it about an hour or so before you decide to implement it in order for it to thaw. The egg white not simply enable nourish and agency your skin, but it really will likely assistance tighten the pores[1] Discard the egg yolk or save it for an additional recipe. You can use the egg yolk to produce a nourishing face mask. Confer with the area in this post on making a nourishing face mask to learn how. So, If you're amassing the kelp oneself, avoid really polluted destinations. If you are acquiring it, make sure that it is collected and manufactured in a spot with as reduced a level of pollution as possible. Insert the olive oil or coconut oil. You'll need 2 teaspoons of olive oil. The olive oil will moisturize your face, leaving the skin experience comfortable and smooth. If you don't have olive oil, You may use coconut oil instead, that's also extremely moisturizing. I have a little, smaller pimple on my forehead(tzone) from so many years, I have consulted the dermatologist as well they gave some creams for application, Right until i use those creams,my forehead is obvious once I ended using again little acne will begin on my forehead. -When you rinse your face with lukewarm h2o, clean it all over again with chilly h2o a few minutes later on. This will tone your face and enhance the firmness of your face muscles. Depart the mask on for quarter-hour. To forestall the mask from dripping all over the place, consider laying down or sitting down in a comfortable chair with the head tilted again. It's also possible to use this mask from the bathtub if you are soaking or having a stress-free bath. Frequent acne might also arise because of certain hormonal action in the teenage a long time that are sometimes connected with the doorway into puberty. This hormonal activity often helps make the regulation with the sebaceous gland to malfunction, abruptly making massive amounts of sebum. This is often why popular acne is mostly located in teenagers. When the openings of these sebum glands are blocked, the sebum are not able to escape and it commences depositing by itself down below the skin pores, building them glimpse red and swollen. Use a ripe avocado so that it is simpler to mash it into a lump-totally free paste. You can even freeze, then thaw it right before mashing to produce items less difficult. When you've got a blender, use it in place of a fork to rapidly and proficiently blend the avocado right into a lump-totally free puree. Honey, Conversely, is actually a all-natural humectant that assists the skin keep its dampness. It works equally as correctly as a normal cleanser and exfoliant to advertise obvious and glowing skin. This mask may possibly appear somewhat Odd on This website intended for natural solutions, but working with Aspirin – Honey Mask for treating acne is additionally a powerful and simple solution. Stay clear of Placing on damaged skin. In case you have any cuts or open acne with your face, prevent implementing the scrub to These parts given that the lemon juice will sting them. On top of that, the friction from applying the scrub could make your acne worse. Just give these masks a try out. These are virtually free therefore you don’t will need to look the whole world to have the necessary ingredients. In short, you have nothing to shed except your acne. Why not give it a try out?
Fascination About honey face mask
Aloe Vera Gel with at the very least ninety% pure aloe barbadensis leaf juice in it really is great for sunburned or irritated skin. Aloe vera is known for its therapeutic Houses and may do wonders for the skin. Points: Honey has antimicrobial Qualities and antioxidants that happen to be beneficially sticky. This stickiness pulls absent the dust, dead skin, and microbes through the pores although the antimicrobial Attributes maintain the skin from turning into infected once more. Please just take a bit moment to accomplish your profile so we are able to personalize your experience and ensure that you get written content and provides which have been appropriate to you personally. I attempted it every little thing and its great.... its definitely powerful... just have to set minutes all of it ... I get it done day to day just before i take a bath or although have a bathtub... This is exactly why generally I am 30mins inside the bathroom hahahaha... for 30days I am able to begin to see the result of glow Make certain that you use pure important oil, not fragrance oil meant for diffusers or cleaning soap-earning. If you cannot discover any, attempt one teaspoon of lemon juice alternatively. Utilize a face scrub a couple of times a week to keep your skin in suggestion-best form. It is vital to exfoliate both of those your face and your body calendar year-spherical, however , you may well discover you should exfoliate even more in Winter season. Many thanks for generally furnishing good facts. I would like to test the turmeric mask – just wanting to know if it received’t shade the skin tone to yellow. Orange, full of Vitamin C, is the greatest all rounder In terms of your skin. From your peel on the juice all function in the absolute best techniques to keep you glowing and healthy. one. Reduce or split a banana into tiny items, and location right into a mixing bowl. Mash up the banana with a steel spoon. Keep a jar all over and dab the honey on acne, burns or insignificant cuts. And if https://www.wikihow.com/Apply-Face-Masks-Correctly ’re feeling sick, have a spoonful or two. This articles is precise and real to the best from the creator’s awareness and isn't meant to substitute for official and individualized suggestions from a qualified Skilled. OEM ODM rorec aloe vera olive pomegranate blueberry honey normal skin mask for face masks skin care Choose to pick the finest cleanser for The body? Deal with oneself to refreshing showers on a daily basis with a range of bathtub and shower things like overall body washes, stress-free shower gels, cleansers, deodorants, overall body creams and moisturisers from Amazon. Meditate. This can be an historic follow that has been all-around for centuries—and forever cause! Many individuals discover that it can help them crystal clear their minds and rest.
5 Easy Facts About banana face mask Described
Am i able to retail store almond oil along with the vitamin E capsule drop by putting each jointly in a very plastic bottle and applying for few times on my facial skin? Is it required to adhere to by using a moisturizer soon after rinsing off the honey mask? I exploit Neutrogena Healthful Skin moisturizer. In the morning, a splash of lukewarm h2o is all you need. In case you have super oily skin, you may cleanse your skin once more each morning. Never ever wash your face with sizzling or chilly drinking water (both equally may cause damaged capillaries). A high quality area Uncooked honey produced my skin glow in a means the Many others didn’t! So for the actual great things about a honey mask, use the best quality honey you find. Go https://www.pinterest.com/pin/722616702689548155 within the lemon juice. Lemon juice can dry out and irritate your skin. In the event the scrub contained olive oil, you might use a lot more lemon juice, but since this one particular doesn’t, keep on with just some drops of lemon juice. Hi! I've truly dried my orange peels but.. :-/ I forgot to not include the white part (which you said it shouldn't be). Am i able to nonetheless utilize it? May perhaps I understand what variation will it make, working with 'just the leading most component' and 'including the white element'? This face mask features a 50 % face masking facility that can preserve all air pollution at bay and can even maintain you heat. What much better than obtaining the benefits of exfoliation and soothing in a single face mask? Effectively, the Oatmeal and banana face mask will be the a person that offers you scrubbing and smoothening impact simultaneously. Straightforward is vital right here. You must find a superior cleanser that the skin responds very well to and persist with it. Lots of people throw out orange peels at the time they’re performed having or juicing an orange. But did you know that orange peels really are a powerhouse of nutrients and antioxidants? The orange peels actually have a greater vitamin C material compared to the fleshy inside of! You should purchase microdermabrasion kits. See a list of the best facial scrubs and microdermabrasion kits. Most of it's essential to be questioning how to really make it in your house, since it's not an item available in outlets. Actually, making orange peel powder is really easy! Homemade is always much better, fresher and more effective! With out further ado, let's roll up our sleeves and get into the zest The 3 panel structure will ensure a perfect fit, though the neoprene material used to really make it will preserve you heat also. What's more, it has the advantage of currently being immune to h2o. Right here are my four recipes for honey face masks created with distinct skin forms in your mind. They can be absolutely foods-based mostly and you probably have the majority of the ingredients in your kitchen right this moment. Hurray for straightforward!
5 Tips about skin care You Can Use Today
[six] Some ceremonial or ornamental masks weren't built to be worn. Even though the spiritual use of masks has waned, masks are utilized occasionally in drama therapy or psychotherapy.[seven] Historic masks Orange, full of Vitamin C, is the greatest all rounder With regards to your skin. With the peel for the juice all perform in the absolute best means to maintain you glowing and wholesome. Japanese masks are Portion of an exceedingly outdated and extremely sophisticated and stylized theatrical custom. Even though the roots are in prehistoric myths and cults, they have got made into refined art forms. If you aren’t making use of the mixture for your full face, you may likely get absent with applying it to your face greater than twice weekly. Just be sure to cease making use of it when you recognize any discomfort. https://twitter.com/steptoremedies/status/1084945117566267392 , i`d experimented with it when for my spouse and she or he love it, I'm producing some much more for her again. that goes effectively with ice product and just about every other style of dessert sauces or toppings.I had to go searching for quite a while to uncover the correct kind of sugar to implement on the highest in order that it wouldn't dissolve This is considered the most complete mask within our manual, as it's the two a scrub as well as a nourishing remedy. You'll need floor coffee beans, just as much cocoa powder, 2 times just as much dairy or almond milk, a tablespoon olive oil - you can also use almond oil or, In case you have oily skin, lemon juice - along with a tablespoon honey, which may be skipped When you are vulnerable to acne. Cleaning the skin is The main move of skin care routine. But most often people today affiliate cleansing the skin only using honey. Goaltender mask, a mask worn by an ice or field hockey goaltender to protect The pinnacle and face from harm Technique: Blend all of them inside a bowl and use a thick coat with your face. Enable it do the job its magic for 15 minutes till it dries out. Then rinse with water and dry your face using a towel. Use a moisturiser promptly to prevent dry skin. While there are many skin care solutions available available but nothing can give you with the sort of greatest final results that a humble fruit as banana can. The banana face mask will do miracles for the skin. I am Do it yourself pursuer and therefore hold attempting purely natural factors to eliminate terrible disorders. You can be surprised to learn about the treasure mother earth has And just how it may also help us increase our overall health. Join me in a journey which choose you nearer to nature and maintain you healthier. Sugar: It can be Mild as being a scrub and would not clog pores. Honey: It's a superior moisturizer and assists endorse wound therapeutic. Skin exfoliation mask, the yogurt will help take away dead skin, lighten and brighten skin, receives rid of dim places and almost prevents ageing. The properties of yogurt are many and when Employed in this combination, it’s sure to provide you with Added benefits much better than a readymade mask.
0 notes
Text
The 17 Best Photoshop Tutorials & Ideas for Anything You're Trying to Accomplish
There's no doubt that Photoshop is an incredibly powerful tool for marketers. Photoshop has thousands of features, tools, settings, and shortcuts that have drastically changed and shaped graphic design and photo editing over the last few decades.
With the sophistication of today's design capabilities, however, comes the hassle of learning and staying up-to-date on Photoshop's features.
Whether you're a Photoshop wiz, a self-taught intermediate designer, or someone just starting out, there will always be more tricks and hacks to learn.
Luckily, we've compiled a list of 11 video tutorials for Photoshoppers at various levels to speed up your workflow. Some videos are better suited for beginners, while other videos are tailored towards people with more experience. So take a look, find the tutorials that are best suited for you, and use them to learn some helpful new tips and tricks.
17 Useful Photoshop Tutorials That'll Speed Up Your Workflow
1. Photoshop Basics Tutorial -- Adobe
Time: 46 min
Many of you likely recognize the value of Photoshop and other design software skills, but when it comes to self-teaching a new skill like Photoshop, it's hard to know where to begin. Luckily, this 46-minute tutorial is a great way to get started.
Created by the Adobe Photoshop team, this tutorial feels more like a free webinar class: You have a friendly teacher who shows you the basics of how Photoshop works with Adobe Bridge, and then shows you ten basic techniques to get you going.
Tips in this video include removing blemishes in photos, working with Photoshop's layers, cropping, editing image colors, removing parts of an image, and more.
youtube
2. Photoshop Painting Tutorial -- PiXimperfect
Time: 31 min
There's more than one way to "paint" in Photoshop. Often the prettiest illustrations that brands show off today were created using Photoshop's many digital paintbrushes. PiXimperfect's Photoshop tutorial shows you, in detail, how to make a photo actually look like a painting.
For painting in Photoshop, your host in this tutorial recommends using a physical pen or stylus, rather than your computer mouse. A stylus best simulates the physical motions of painting, and helps you maintain hand control as you gradually transform your photo.
Throughout the tutorial, you're taught how to use the many digital brushes in Photoshop to match the details of the photo you're starting with. The host also shows you various brush strokes for adding, correcting, and enhancing the image. Watch it in full, below.
youtube
3. Design Tools and Workflow Tips -- Adobe
Time: 7 min
There's no better teacher than the maker, right? This second tutorial, hosted on Adobe's Helpx site, gives quick basic tips for a better workflow. If you're a self-taught designer, I highly recommend this video for a simple brush up.
The teacher starts out by taking you through quick grids and explaining how to maximize efficiency in your workspace. Then, he gives you helpful tips on placing elements (smart objects, linked files, etc.) and using clipping masks.
The best part of the tutorial is the way it quickly and visually touches on how Photoshop interacts with other Adobe products such as Typekit and Illustrator. The teacher quickly produces a magazine page on the screen by showing you different elements of Illustrator and Photoshop, making it easy to follow and easy to generate design ideas from.
[Watch the video here.]
4. Photoshop Text Tutorial -- Pixel & Bracket
Time: 3 min
There are lots of ways to incorporate text into a photo or design using Photoshop. And there are just as many fonts and stylings to choose from. The video tutorial below is a high-level overview of how to add text to your Photoshop canvas.
Your host, Spencer, shows you the two basic types of text you can add to a Photoshop canvas: boundless text and a text box. Both types of text give you different levels of freedom to move, rotate, and wrap your text around the other contents of your design.
Watch the brief tutorial, below.
youtube
5. Top 10 Photoshop Keyboard Shortcuts -- Graphics Geeks
Time: 3 min
Part of speeding up your process is simply knowing and using the multitude of keyboard shortcuts available for the Photoshop software.
Luckily, Graphic Geeks put together this handy tutorial featuring their top 10 photo editing shortcuts in action. It covers toggling through layer blending modes, creating inverted masks, using clipping layers, transforming layers, resizing brushes, zooming in and out, previewing soft selections, duplicating layers, fading brush strokes, and sampling colors directly on the canvas.
Want even more tips and tricks? Check out this blog post for a list of 66 Photoshop keyboard shortcuts.
youtube
6. Photoshop Coloring Tutorial -- PHLEARN
Time: 19 min
Recoloring a drawing or illustration is easy. Adding new color to a live-action photo, on the other hand, is another story. This tutorial shows you how to do it in Photoshop.
Photos have extremely intricate color compositions -- they have way more colors than they appear to have at first glance. For this reason, it can be quite difficult to color a photo differently and ensure it looks natural in the end. Aaron Rice of the Photoshop resource, Phlearn, shows you how to use the "Colorizer" tool in Photoshop to isolate and change the color of certain parts of any photo.
The course teaches you how to apply a "layer mask" to your photo so you can reveal all the right details of the photo before "colorizing" it. As a result, you'll be able to change your subject's color without sacrificing quality. Watch the tutorial, below.
youtube
7. How to Use the Crop Tool -- Lynda.com
Time: 5 min
There are plenty of ways to crop images on Photoshop, and if you compare your cropping method to someone else's, you might realize they do it differently than you do. Part of this is because Photoshop's crop tools have changed throughout its different versions.
If you want to learn how to use the latest crop tool (as of Adobe CC) -- which allows you to hide cropped pixels instead of permanently deleting them -- this tutorial walks you through it.
This tutorial serves as part of a series by Lynda.com -- an excellent resource for extended Photoshop lessons.
youtube
8. Photoshop Background Tutorial -- Adobe
Time: 3 min
If you work with visual content long enough, you'll eventually be in a situation where you want to separate a photo's foreground subject from its background. The problem is, removing a photo's background can distort the subject you're trying to isolate in the process.
The following Photoshop tutorial comes from Adobe itself, and shows you how to add a transparent "skin" to your photo and "paint" the subjects you want to separate from the background. The result? A foreground subject that you can layer onto any new background you wish. Learn how to do it by clicking on the link below.
[Watch the video here.]
9. How to Use the Undo/Redo Tool, Steps, and History -- Sterling Teaches
Time: 5 min
If you've worked with Photoshop much at all, you've probably already realized that the undo/redo features don't quite work the same way as they do in programs like Word, Illustrator, or InDesign. Instead, Photoshop's undo/redo feature automatically sets to only undo one step. To go back through multiple steps, you have to use the history panel, and even the history panel is limited in the number of steps it remembers.
Photoshop is capable, however, of going back through older steps -- it just doesn't always seem like it at first. This tutorial walks you through how to use Photoshop's undo/redo tools, and how to set up your history panel to remember more steps than it does automatically.
youtube
10. Double Exposure Photoshop Tutorial -- Adobe Creative Cloud
Time: 45 sec
In my opinion, double exposure is one of the coolest visual effects available to you in Photoshop. This effect blends two different photos together so the texture of one image can fit into the shape of another image. And according to the tutorial below, pulling it off is easier than you think.
In the Photoshop tutorial below, Adobe Creative Cloud teaches you how to apply a double exposure using two images by lowering the images' opacity. Then, you can layer one image on top of the other in a creative way. The result is incredible.
Watch the tutorial, below.
youtube
11. How to Use the Rotate View Tool -- Creative Bloq
Time: 2 min
Ever been working on an image that you just wish you could flip upside down like you could a sheet of paper? If you didn't know already, with Photoshop, you can!
This two-minute tool tutorial by Creative Bloq walks you through this simple tool and shows you how to use it practice.
Don't forget to browse through other videos on Creative Bloq's "Two-Minute Tool" series to quickly increase your capabilities with tools you may not have used previously! Creative Bloq keeps their tutorial videos clear, quick, and straight to the point so you don't have to waste time searching for the information you want to know.
youtube
12. 3D Photoshop Tutorial -- Tutvid
Time: 31 min
You don't have to work for Disney Pixar to add a third dimension to an otherwise flat photo or design.
The 3D workspace in Photoshop sets you up in a gridded environment where you can add a three-dimensional object -- many of which come standard in Photoshop -- and create a 3D work of art using that basic object.
Photoshop's 3D workspace, according to your host Nathaniel from Tutvid, enables you to change your view of your Photoshop canvas so you can examine the sides, top, and bottom of your object and edit it from any angle.
Shapes, letters, and numbers are all available in 3D form using Photoshop. In the video below, however, pay close attention to the system requirements in the introduction. 3D in Photoshop is a beautiful thing, but you can only play in this space if your computer is equipped with the right graphics card.
youtube
13. How to Sharpen Images -- Kelvin Designs
Time: 16 min
As a photo editing and graphic design tool, it makes sense that Photoshop has hundreds of ways to sharpen, edit, change, and manipulate the look and feel of images. But it also means you may not know the best way to edit an image while maintaining the best quality.
This mid-length tutorial by Kelvin Designs takes you through the basics of sharpening images and why some ways are better than others. Your teacher will also give you tips on maintaining the quality of the images while explaining which tools work better for certain types of images.
As an added bonus, Kelvin Designs linked the source files used in the video for you to download and follow along on your own computer. If you're more of a hands-on learner, this might be a great tutorial for you.
youtube
14. How to Use Step & Repeat Patterns -- Phlearn
Time: 15 min
For many graphic designers, creating and using patterns is a fairly frequent task. While there are multiple ways to create patterns -- one of which is by hand -- Photoshop actually has a simplified trick for making pattern building much easier than measuring, copying, pasting, and repeating over and over again.
In this video, the teacher -- Aaron Nace -- takes you through the basics of building patterns. Nace has tons of tutorials for Photoshop and Lightroom, so make sure to check them out.
(Pro tip: This video has a pretty long introduction, so skip to 1:37 if you want to cut to the chase.)
youtube
15. Photoshop Actions Tutorial -- Phlearn
Time: 8 min
Ever wish you could just record a series of steps in Photoshop and apply those steps to a bunch of different files? Like cropping images to a certain size or a building a customer filter to use on lots of images? As it turns out, with Photoshop's Action tool, you can.
In the second Phlearn tutorial featured in this post, Nace how to batch edit photos using the Action tool. What I love about this tutorial is that he gives you ideas for other ways to use the Action tool even as he uses it primarily to set a custom filter for a group of wedding photos.
youtube
16. How to Create a Custom Brush -- Larry Lourcey
Time: 5 min
There are numerous times when designers have to place a watermark, logo, or some other standardized feature on images repeatedly throughout their work. While placing the image into the document as a layer works just fine, it's helpful to have those features already loaded into your workspace.
That's where creating custom brushes for things like logos and watermarks is a super handy way to speed up your workflow. In this tutorial, Larry Loucey from PhotoEducationOnline.com teaches you how to create custom brushes so you can load logos, watermarks, etc. into your workspace.
Doing this allows you to easily transform and place your logos/watermarks from your brushes panel onto your designs without having to search through your computer files each time.
youtube
17. Photoshop Masking Tutorial -- Tutvid
Time: 3 min
Layer masks tend to play a big role in many graphic design processes. Essentially, a layer mask allows you to apply something -- a color, shape, etc. -- to a specific part of an image, rather than the entire thing.
In this speedy tutorial, Tutvid.com dives into not only what masking is, but how to do it quickly. He uses the example of a car to show how a mask can be used to manipulate the car's color from red to green.
If you haven't already given masking a try, definitely check out this tutorial.
youtube
0 notes
Text
How Artificial Intelligence Can Boost Your Productivity
[Call for Entries: The HOW International Design Awards]
Taking advantage of plugins, artificial intelligence and bots can help you work smarter, not harder.
You’re on a deadline. The clock is ticking. A Photoshop action automatically resizes and reformats thousands of images. While it’s busy, you check in with your team on Slack, reflecting on meeting notes and sending updates. But why work double time when you can work double double time?
[Related: 32 Free(ish) Interactive Design Tools & Resources]
Use a Slack bot to automate tasks there too, shifting from fifth gear to tenth gear. Thanks to a whole new world of automation tools, including some that use artificial intelligence (AI) and machine learning (ML), you can complete tasks and meet deadlines in a fraction of the time you’re used to. It’s multi-purpose multitasking and it takes you out of the workflow, empowering you to do more.
1. Adobe Libraries
Adobe’s Paul Trani has some advice, especially when it comes to working efficiently. “Anytime you find yourself doing something multiple times, ask yourself, How can I do it just once and apply it to everything?”
Trani, Adobe’s senior worldwide Creative Cloud (CC) evangelist, recommends taking advantage of CC’s features, such as Libraries. Link a logo to a Library and when it’s changed, it updates all fi les across the board. “You can store assets like graphics (vector/bitmap), colors, character and layer styles, and brushes. When you need them, just access CC Libraries in whatever desktop app you’re in (Illustrator, InDesign, Photoshop, After Effects, Premiere Pro). In the mobile apps (Adobe Illustrator Draw, Adobe Photoshop Sketch) you can access the same Libraries and also add content to those libraries.”
Even cooler? Share Libraries across teams. A flag near an asset notifies everyone that it’s been changed. Right-click to update it, or select Update All Content to update automatically. And if you find yourself frequently exporting assets, use Photoshop’s Generate to lighten the workload. Create an asset on a layer with .jpeg in the name and it will be output as a JPEG. Include 50% before the name to save it at 50% of the original size, or put 50% after the name to compress it 50%.
2. Astute Graphics Plugins
Not only does Trani believe in pushing Creative Cloud to its limits, but he’s also a fan of using third-party tools to do so. He finds it “fun to work with” cool scripts in Illustrator, especially the kind that Astute Graphics makes. Their plugins “extend the capability and functionality of Adobe’s software” according to Dave Clayton, training manager at Astute Graphics.
“We invest time talking to designers to produce plugins which give Illustrator more capability and assist with a more efficient workflow, in most cases saving 30%-plus in production time.” Clayton calls VectorScribe, Ink-Scribe and DynamicSketch their best sellers “because they add enhancements and additional functionality to the Pen Tool, Pencil Tool and Brushes enabling better path creation, cleaner curves, point placements and overall improved control of each tool.”
Do a lot of PDF conversions? VectorFirstAid is a must-have. “The first time I used it, I was reminded of how many hours I had wasted in Illustrator fixing broken text, broken segments, removing unnecessary clipping masks and excessive points on shape paths. A job that once took me hours now takes me less than 5 minutes.”
Once you start browsing the Astute Graphics plugins it may be hard to get just one because of how much more efficiently and eff ectively you’ll be able to work. “All of our products signifi cantly save time one way or another, it all depends on which aspect of Illustrator you’re working in.”
3. Recommendations by Dovetale
When it comes to marketing, Dovetale’s Recommendations is changing how to reach influencers with the help of AI. Influencers can steer our purchasing decisions and sway our loyalties, impacting how we relate to brands.
Finding the right influencer is tricky, especially using older methods. In the past, according to Dovetale’s Mike Schmidt, it was mostly manual, but Recommendations makes it easier. “It’s very surprising how many teams still use spreadsheets and manual entry. People are scrolling through Instagram or YouTube for hours trying to find one ambassador for their brand, when they could be using ML to find 50 extremely qualified ambassadors.”
According to Schmidt, the only way to effectively do the work is with AI, image and video search. L’Oréal, BuzzFeed, SeatGeek and Victoria’s Secret, among others, use Dovetale to identify influencers, saving time, improving strategy, accountability and trust, according to Schmidt.
Upload an image or web address and it uses the Recommendations AI platform to return a list of qualified influencers that you can discover on YouTube, Instagram, Twitch and Twitter. If, for example, you find influencers in Charleston, SC, it finds pages to go to and people to contact.
“Machine learning will identify impact across gender, location, views, likes, comments, and go a layer deeper,” Schmidt says. “How can you drill in further to find out who they work for and what is their propensity to buy? How do you know what that person in Charleston has posted, and if it’s been successful?” He is a big believer in automation, and Recommendations can work for large or small organizations. “Marketers are really behind this and it only empowers boutique agencies to do more.”
4. x.ai
When it comes to scheduling appointments, Apple and Google have enabled their calendars to find events in emails and add them to your calendar automatically.
But what if you have to negotiate a day and time first? You can send emails back and forth to find an agreeable time, or you can use x.ai to schedule meetings. The entire process with x.ai takes place in email using invisible software, and it frees you up to do more.
How much time can it save you? Quite a bit, when you consider x.ai’s data: Scheduling a single meeting takes on average 17 minutes. Stefanie Syman, VP of customer experience & communications and the third-busiest scheduler at x.ai, found that the software has saved her over 21 hours per month over the last three months—a total of 64 hours.
Compared to Calendly or Doodle, two other scheduling tools, x.ai is a different experience. It lives in your email, has a personal touch, and is practically invisible. While first corresponding with Syman and emailing to schedule a phone interview with her, I experienced x.ai myself. Syman added “Andrew Ingram” to the email chain to schedule the meeting.
Once on the email chain, Andrew wrote that he was “happy to find a time” for Stefanie and I to conduct a call. He proposed a day with two different times and asked the best number for her to call. I responded within minutes, and he replied back letting me know a calendar invite was coming soon. The process of emailing with Andrew and receiving the subsequent calendar invite lasted approximately nine minutes, and because Syman had put x.ai to use instead of managing the scheduling herself, that was nine minutes she could spend doing other work.
x.ai’s scheduling bots, Andrew Ingram and Amy Ingram, both have AI as their initials, a nod to the software itself. The software was named to humanize it, providing a seamless experience during email exchanges, as if you were communicating with a human personal assistant. The AI assistants have a gender-neutral voice that Syman calls polite, helpful, friendly and diligent. There’s not much expressiveness, but it’s neither cold nor robotic. For setting up internal meetings, such as at your own company, Syman calls x.ai “truly seamless.”
So what’s the future of x.ai? Syman says, “Right now you can only communicate with Amy and Andrew via email in English. Eventually, you’ll be able to use other communications channels (e.g., Slack or SMS) and other languages.”
5. Howdy for Slack
Speaking of Slack, if you’re using Slack manually, you need to get acquainted with its automation capabilities. Say, “Howdy!” to Howdy. Eric Soelzer, product manager at Howdy and Botkit Studio, explains how it works: “Howdy collects information from members of your Slack team and delivers a report, either directly to a manager or right in the channel where the team can collectively view it. This can be run on a schedule, like a daily standup, so that the information is collected and reported automatically each day.”
Even better, Howdy functions automatically. “Once you set the bot on its task, whether that’s collecting lunch orders or project status updates, it goes to work without being prompted. It’s a simple use-case, but a great example of how automation of this type can serve in the workplace.”
6. Botkit
From Soelzer’s perspective, the future of AI and ML will have us working smarter, not harder, freeing us up to do more. “We often talk about the best bots being those that work automatically, without necessarily being prompted to do so. A good bot is like a good employee that sees something that needs to be done, and does it without being asked.”
Botkit, “essentially the underpinnings of Howdy,” according to Soelzer, has become an open-source botmaking toolkit with hundreds of GitHub contributors and a growing Slack community. “With Botkit, you can build bots for Slack, Facebook Messenger, Cisco Spark and other platforms.” Botkit Studio premium developer tools can allow you to do even more.
• • •
Automation tools, bots, AI and ML will soon become part of our routines, be it at home or the office—or the home office where there’s twice as much to juggle. Howdy’s Soelzer is optimistic about what’s next, “We want to realize a future where bots are doing all sorts of menial tasks that would otherwise require a person’s time, freeing that person to do more of the high-value work.”
If you’re worried about losing jobs to technology, Soelzer points out the reality: “Working smarter means lessening the plodding tasks to make way for more thinking and creating. It’s not about replacing jobs, it’s about empowering people to do more of what they’re good at doing.” If bots, routines, plugins or software free you up to do more, then you’ll soon see that there’s more than meets the eye.
Editor’s Note: This article originally appeared in the Fall 2017 issue of HOW Magazine. Pick up a copy here and discover its enthralling interactive features.
[Earn a Certificate in Marketing]
The post How Artificial Intelligence Can Boost Your Productivity appeared first on HOW Design.
How Artificial Intelligence Can Boost Your Productivity syndicated post
0 notes
Text
At 35, I Started Caring About My Skin — Here’s My Routine

The hardest thing about traveling so often is keeping a regular, healthy diet and a skincare routine compatible with TSA requirements and my aging self. I recently turned 36, and I’m embarrassed to admit I didn’t truly get serious about caring for my skin until about 18 months ago. That said, better late than never (right? RIGHT?), so I put together this play-by-play of how to maintain a skincare routine in your 30s—and, in particular, how I keep it up while on the road.
But first, it must be said, I am not a doctor, a dermatologist or an aesthetician (clearly). You should absolutely see one (or all) of the above before doing anything drastic with your own skin. I do have a great derm, Dr. Lorien Sites at Nashville Skin, who I see once a year for skin checks and preventative cancer screenings and an aesthetician in Nashville, Mallory Hamilton at Woo Cosmetics, as well as one in Manchester, Megan Hershman of Be Well Skin, who I go to for professional facials and waxing. That said, I can only afford so many such treatments, so I’ve learned what I can do on my own and what I need to leave to the pros.

And it happens to be my favorite time of year: the Sephora VIB sale! I tend to stock up on all the products I need during this sale for 11 days every April and November. It’s the perfect excuse to try out a bevy of new products as there are 10 to 20 percent discounts throughout the course of 11 days, in addition to all sorts of freebies and perks.
Note: This post is in no way sponsored by Sephora, though I did include affiliate links when applicable below. I purchased every beauty product I featured below through Sephora (or Ulta if I can’t find it at my first-choice shop) and have stopped buying actual skincare products via Amazon. Why? Read this.
My Daytime Routine
After going overboard with products to start and creating blackheads for the first time in my life as a result, this is now what I do in the morning now. I don’t double-cleanse every single day, as I don’t wear makeup and my skin is already sensitive, so the second step is just an occasional add depending on how my skin is feeling that day. It’s always a trial-and-error with what works for you, though I’ve found a lot of helpful tips via beauty guru Caroline Hirons over the years. I also often defer to this New York Times piece on building a skincare routine when I’m feeling overwhelmed and sifting through the black hole of skincare recommendations that is the Internet.
Step 1: Rinse my face with warm water and a cleanser like this Algenist one
Step 2: Double cleanse with an exfoliating product like Tatcha’s Deep Cleanse (optional)
Step 3: Apply Tarte Knockout Tingling Treatment as a toner (I don’t do this every day)
Step 4: Splash my face with Fresh’s Black Tea Kombucha Antioxidant Essence to ward off pollutants
Step 5: Apply a layer of Drunk Elephant Day Serum
Step 6: Apply Supergoop SPF and an additional thin coat of moisturizer if needed (i.e. if my skin is dry)
Go about my day!
I’ve tried to be better about wearing SPF every single day, even if I don’t think I’m going out in the sun. My bestie Lemon turned me onto Supergoop! products a couple years ago, and those are my go-to for days I know I’ll be outside at some point. Plus, I love that it comes in a 1.7-ounce bottle, so I can keep it in my carry-on and reapply as needed. Back home, I have a massive tube of Le Roche-Posay’s Anthelios SPF, a line my makeup artist friend Brenna introduced me to a few years ago (and one you can now find at your local pharmacy like Walgreens), that I apply when running or working in the yard.
I have combination skin that errs on the oily side, so won’t use a moisturizer during the day unless it’s winter (or allergy season like now) and my skin is feeling tight and itchy. In that case, I’m a big fan of Little Seed Farm’s Goat’s Milk Moisturizer, which is a nearby Tennessee brand I purchase locally from Kroger’s but has a website from which you can order if you aren’t local. I also love Tatcha’s Water Cream, and it’s a bonus that it’s a clean product, too (slowly making the switch to mostly products that are certified clean).
Keeping my products organized and ready to use step-by-step has been a lot easier in the new house as we actually have bathroom space and closets here. I like to keep everything where I can see it so I can survey what I have in stock, so I loved adding this rotating beauty organizer I got on Amazon for just $26 to my new bathroom. I also have a variety of Container Store and STORi plastic bins like this one that I use to organize my overflow and hair products in my bathroom closet.

Using Face Masks
Since I work from home, I often do a mask once or twice a week midday and have all my skincare products readily available and have liked splashing this Fresh essence on my face throughout the day when I need a boost. I’m constantly trying new ones, but here are a few of my favorites:
REN’s Glycol Lactic Radiance Renewal Mask (I use this peel once a week and it’s glorious)
Sephora Collection Face Masks (I prefer the coconut, pearl and lychee)
TONYMOLY Sheet Masks (for $3.75 a pop, you can’t beat the price)
My Nighttime Routine
One thing to note is that figuring out what works for you takes time. Don’t introduce everything at once, otherwise you won’t know what’s working and what’s not. For example, the Pixie Glow Tonic from Target beauty bloggers rave about? Only made my skin break out and become more red in complexion. I immediately took it out of my rotation and started testing out different Vitamin C and brightening serums instead.
Wash with a deep cleanser (I like various Peter Thomas Roth products)
Apply a serum (Sunday Riley Vitamin C or Drunk Elephant T.L.C. Framboos)
Apply a retinol (currently using Drunk Elephant’s A-Passioni)
Apply an eye cream (I haven’t found one I love but currently am using Drunk Elephant’s that came in a set)
Apply a night cream (see below for my thoughts on this)
Between each step, I make sure the product has properly soaked in before I add the next layer. Rule of thumb if you can’t remember which order to apply is: lightest to heaviest. My night cream or moisturizer depends on how thirsty my skin is (I used to not use one, but now I’m trying to reverse deep forehead wrinkles without Botox so use one religiously). My go-to is Belif’s Aqua Bomb, particularly in the drier months like winter, but I really love Farmacy’s Sleep Tight quenches my skin but doesn’t make me wake up feeling oily.
I also finally started using a silk pillowcase, the Slip pillowcase beloved by bloggers everywhere, and I’m kind of mad my mom has used one her entire life and never enforced it upon me because it does help protect both your skin and your hair. And as someone with crazy wavy hair, I can actually straighten it one day, sleep on the silk pillowcase and wake up to it not a mess for a change.
In terms of toning and skin-brightening, friends of mine swear by Karen Hayes Esthetics’ Koji pads, and I finally dropped $160 on a pack and … was extremely underwhelmed. I used them religiously for the recommended 60 days and saw no change in my skin tone. That said, I didn’t actually go in to see the esthetician first—rather, I filled out the survey online—so maybe I needed a stronger prescription? I don’t know. In a world of abundant skincare options, I don’t think I’d drop the money to re-try this one. I’m getting more religious about using a toner and Vitamin C serum instead.
After a decade of using retinol from my derm, I’ve been using OTC retinol products for the past year after my skin went ballistic with an allergic reaction the last time I tried medical-grade products. I’m due for my annual skin checkup with my derm soon, so I’m going to ask her to prescribe me a new retinol—not because my skin breaks out regularly, but because I have deep forehead lines that need reversing (I laugh a lot, what can I say?) and I’m just not into the idea of Botox (no judgment if you are). For those who don’t need as strong a retinol, I do like Drunk Elephant’s A-Passioni Retinol Cream and also Algenist’s Retinol Serum.
Drunk Elephant products are pricey, so I’d recommend you go with a sampler kit like this one before investing in the full-sized products to see what you like. But I’m fully on that bandwagon now, as I’ve been using them for nearly a year, and my skin feels so clean and fresh daily (plus, their products are non-irritating and non-toxic).
When I Travel, Here’s My Beauty Kit
My friend Christie, to whom I also go for skincare tips, made me envious of how organized her beauty kit always is, so I threw out my old caddy and bought this hanging organizer instead. I keep it hanging in my bathroom and each section is organized by theme: first aid (Band-Aids, medicine, prescriptions, etc.), dental hygiene, shampoo and conditioner, hair products and skincare. It’s always ready to go when I need to pack my suitcase, and this way, I never forget anything, which I was inevitably doing before. I also now use this little $8 seven-day pill organizer for my prescriptions, which has reduced the chance of me forgetting one bottle since I’m on so many daily allergy meds.

For this, I typically use Sephora samples I get when I’m stocking up or I buy mini-kits of products I use that are under three ounces. Nothing will get me to check a bag when I travel, so I find it’s always easier to be prepared. Some kits of minis I’ve used and love:
Algenist Discovery Kit (which includes the retinol, a serum, an eye cream and more)
Drunk Elephant’s The Littles (which includes a small version of every one of the products I use of theirs)
Tatcha Pore-Perfecting Duo (I use this for my cleanser and moisturizer when traveling)
What You Eat DOES Matter
Doing food elimination diets for my autoimmune disease means that I’ve seen firsthand how my skin reacts to certain foods, dairy in particular. And while we are mostly dairy-free day-to-day—we long ago, started making our own almond, cashew and coconut milk—neither one of us is one to turn down sour cream or cheese, and if I’m at a fancy coffee shop, I’ll occasionally opt for real creamer as opposed to oat milk or cashew substitute.
But if I’m consuming dairy or sugar on the regular, you better believe my skin reflects it. I get large breakouts around my mouth and jawline, and it’s just not pretty. Again, I’m a big fan of these cheap, but totally efficient Nexcare acne patches to get ride of isolated breakouts quickly (note: this is the only beauty product I buy via Amazon as my local Walgreens doesn’t carry it—but yours might). You can’t beat $6 a box! Target also carries the CosRx brand ($5 for 18) that beauty bloggers swear by.
Dermaplaning
I’ve had professional dermaplaning three times, and little has given my skin quite the glow as removing all the peach fuzz and dead skin cells. I absolutely love the effect of dermaplaning, but the problem is that it only lasts about two weeks (at least for me), and it is not cheap. Instead, these days I do weekly at-home dermaplaning with a variety of tools:
Stacked Skincare dermaplaning tool
Level Setter Razors
Tinkle Hair Removal Razors
Stacked is by far the most efficient, but it’s also very sharp, so proceed with caution. The $10 drugstore brands work fine to just get your face smoother for applying serums and creams; not having that layer of fuzz and dead skin definitely helps your products soak in more (and your makeup to go on more smoothly if you’re a daily makeup-wearer).
Microblading & Your Brows
So far I’ve yet to find a brow-grow product that fills in the patchy parts of the brows I overplucked in my teen years. Ladies, why did we not listen to our mothers? *face palm*
I’ve tried Shisheido, Rapid Brow and Sephora—none of which have done anything for me. I finally ordered the two-part GrandeBrow Brow and Lash Enhancing Serums from Sephora, and still nothing. One eyebrow got thicker, I’ll give it that, but the problem brow stayed, well, problematic. So, if you have an effective eyebrow serum, help a girl out, will you? I’m thinking of asking my derm for a Latisse prescription next time I’m in as nothing OTC seems to work.
I would love to try microblading, and honestly was going to do it years ago until I found out you have to get touch-ups once to twice a year. While I’m OK paying $500 for something that has a semi-permanent effect, paying $500 and then hundreds of dollars for touch-ups every quarter or bi-annually is just an investment I’m not ready to make yet (plus, the thought of getting my brows tattooed freaks SVV out to no end). But if you have thoughts on microblading or success stories, please let me know in the comments!

What’s worked for you when it comes to your skin? I’m constantly learning how to take care of myself after years of neglecting my skin, so share your favorite tips or products, pretty please!
At 35, I Started Caring About My Skin — Here’s My Routine published first on https://medium.com/@OCEANDREAMCHARTERS
0 notes