#only the ones with exactly 60 frames loop perfectly
Explore tagged Tumblr posts
Visit Tumblr Blog
Explore Tumblr blogs with no restrictions, modern design and the best experience.
Last Seen Tumblr Blogs


Fun Fact
Kazakhstan’s Minister of Communications and Informatics has blocked the Tumblr site because it contained 60 sites of terrorism, extremism, and pornography in 2015.
Text


all the twitch assets I drew for mike 😊
#artists on tumblr#art#mikethelink#tazercraft#digital art#my art#fanart#mike#vile arts#brart#brazilian artists#brartist#mcyt#took me so long to post this lol it's been months since I finished these#the animated emotes r a little glitchy cuz they all have different amounts of frames#only the ones with exactly 60 frames loop perfectly#also the bottom 3 animated emotes ????? they're cheermotes that he commissioned and never put in his channel#I think he just forgot ngl
415 notes
·
View notes
Text
me trying to make a gif part 2 (thrilling finale, buildup ver.)
ok good news and bad news: good news being withheld for Spoilers (not that it’s that hard to guess anyway lol), bad news explained first bc, chronologically, it is first
so yesterday i mentioned in the tags of that post that i had seen that krita has an animation feature so i was gonna try importing the frames into that and then exporting it as a gif. easier said than done, as it turns out
i started by opening the file i made yesterday with 62 layers as the frames and importing that into krita, which worked fine (i didn’t know you could actually open .psd files in clip stuido ((this typo is so fucking stupid it made me laugh so im leaving it)) and krita, so that’s pretty neat, i wonder if it works the other way around too) but i ran into problems when i tried to convert those layers into frames in an animation. because, like, the layout of the program has the layers displayed in one tab, and the animation timeline in another, like so:
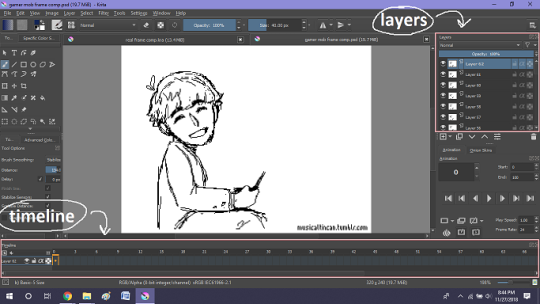
(do u like how im using pictures now, i thought of that yesterday after i published the other post and realized hey, visual reference would probably make my plight a lot easier to understand!! so enjoy these educational diagrams from now on)
so my goal was to get the frames from the layers into the timeline, and i still don’t know if i did it right bc lbr krita is not very intuitive at all,,.,, i mean i watched a video tutorial abt how to animate in krita which was v helpful (it’s the one by jesse j james on yt fuckin SHout out) but it was about animating from scratch, not importing an animation you’ve already done elsewhere
so like, the way krita’s animation thing works, from what i could piece together as i bumbled my way around w/ it, is that each layer in the layers tab is a separate timeline in the,,, timeline tab
i want them all to be in the same timeline, not separate ones, and there’s no way to combine them in the timeline tab bc doing that just overwrites whatever layer you’re pasting it down onto, and also if you define the number of frames for that timeline (62 for this project) it just puts the single image of that layer for all of the frames instead of just one of them, so you’d have to go through and delete all the other frames you don’t want it to be, which would be such a fuckin pain
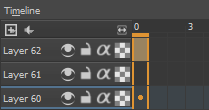
so i found a workaround, which is so tedious that it can’t be the right way to do it, but basically i started w/ layer 1 and defined 62 frames & then emptied frames 2-62, like this

(that blue box is the frame, btw, even tho it says 0, which actually kind of annoys me like why doesn’t it start the first frame on 1????)
from there i went up to layer two and selected that in the timeline, but for some reason the frame doesn’t show up automatically?

& i couldnt fuckin figure out how to make it into like, an Official Timeline Layer or whatever tf bc like, u see on layer 1 how theres that little lightbulb-looking icon on the right? that’s for turning on onion skin which only applies when you actually have frames with things drawn on them, so basically layer 2 in the layers tab has a drawing but in the timeline it doesn’t?
i didn’t find out what the actual reason for this is or how you’re /supposed/ to make the frame appear in the timeline, but what i did was right click on layer 2′s timeline & select “create blank frame” which magically made the frame i want appear

but it’s on top of the layer 1 frame, and i want it to be the frame after. also it’s still in a different timeline. this is the only easy fix in this whole damn process, u can literally just click & drag the frame from layer 2 to layer 1 and put it wherever u want on the timeline

and then u just delete layer 2 and that’s it, frame transferred!! then i just had to do that for 60 more layers and after [unspecified amount of time but it was a fuckin while ok] my timeline looked like this!

(the gaps near the end are held frames, to save me time so i didn’t have to copy a bunch of frames that were exactly the same)
krita is great because as far as i know ur animation can have an unlimited number of frames, at the risk of your own pc’s processing power, which is a definite upside to SOME expensive art programs i know (clip studio, i’m talking abt csp) and u can pick the frame rate too (cough photoshop elements 5.0 even tho u dont technically have an animation feature & it’s a miracle u can even make gifs at all) so once i finally got all the frames situated all nice and in order like on the same timeline, playing it was great! played at the right speed, looped perfectly, it was a dream come true right
well, time to export it as a gif
ha
haha
hoooo oo o
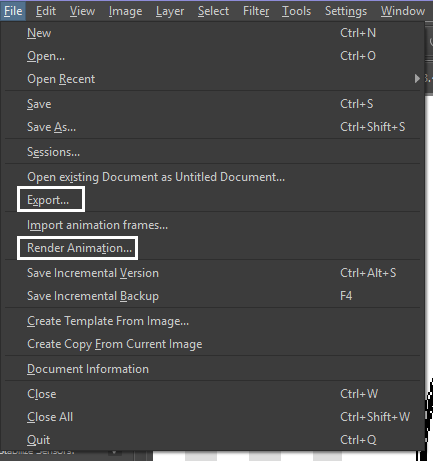
so u got 2 options for exporting ur animation, u can either hit “export,” which lets u save it as different file types, one of which being gif, or you can hit “render,” which gives you gif and video options
well
i tried export first, bc that seemed like a good idea, but the “””gif””” it made was distinctly not a gif, despite its claim to be one?? this is what i got:

notice: 1. it is not moving, and 2. the black bars to the sides?? those are supposed to be transparent. they’re transparent in the file i made so why didn’t they register as transparent in the export, when gifs have transparency capabilities??

so That was some real live bullshit but i still had the “render” option, right? export was wrong, so rrender must be the correct option to go to that will produce the results i am wanting to see produced in front of me like a silver dinner platter with a correctly functioning gif under the lid, that’s what i want to see and “Render Animation...” is gonna Give me that silver platter righWRONG ok look at this shit rn ok Look
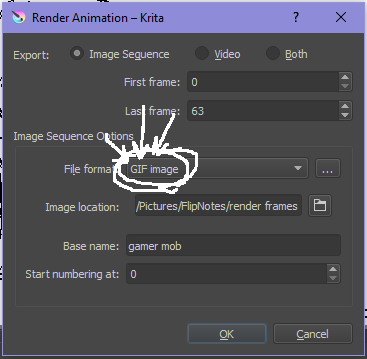
it says GIF it says it RIGHT THERE right??? right?????? then WHY


?????????????
and it also gave me all This bullshit

like did i ask?? did i fucking ask???? i already have all the individual frames why do i need even M o re i mfjgjgk
((rationally ok yea thats v useful for if ur making the animation in krita and want to export the frames to use elsewhere, but like uhhh 1. again, they’re not transparent & 2. i should have the option of saying i don’t want these??? bc *meme voice* i don’t want these)
so in the end i could find NO correct method of exporting animations as a gif in krita bc every ooption that says gif is fuckign LYING to ur face there are NO gifs in krita, aliens made the progam who looked at gifs and went “hmm i thikng this is how a gif works “ and just made jpegs instead but somehow got on the computers good side and got it to lie for them about it being a gif so thats why it says gif on the file still even tho its not a gif illimati confinr
so what is the conclusion to this? well i said there was good news too, and this is the portion where i divulge that sweet nectar (i type dthis 2 seconds ago and @ me what the fuck)
so after wasting a good 2 hours trying to figure out krita i gave up and watched some good old [youtuber name redacted bc what if it shows up in search & ppl see this dumbass post in there but it rhymes with fjackfsepticfeye] to relax into accepting my fate that i’ll never be able to upload my animations to tungle except in poor quality loopless video form, making me into a laughing stock on my own art blog, but THEN i had a stroke of genius, in my Brain
so if u read yesterday’s post u might remember that flipnote studio, the animation program i use on my ds, to animate, has the option to export files as gifs, both animated and sequential (meaning either as one fully animated gif or each individual frame separately), which is super convenient, but as i mentioned yesterday, any time i tried to open the folder with those files on my laptop, it crashed immediately
WELL today i thought “hey, how about instead of opening the folder in the sd card when it’s plugged in, how about i copy that folder from the sd card to my flash drive, and try to open it there, in case it’s the card’s hardware that’s causing the problem, not corrupted files”
so i tried that and it FUCKING WORKED THANK GOD GLORY HALLELUJAH
so now instead of spedning A THOUSAND YEARS trying and failing to force art programs to bend to my will i can just export the animations straight from my ds and drag them onto my computer Just As God Intended oh GOD im so fucking happy
here’s the gif in the end, i’m gonna post it to my art blog too but this is the Green Version bc i animate in green bc of some default settings in flipnote that i got used to, plus it makes me feel like i’m just sketching so nothing really has to be finalized so i’m comfortable while i work, and also it’s just nice ok it’s a Nice Green

(there’s a few frames at the end that are like the extra scraps from while i was working dw i got rid of those in the final version that i’m posting to my art blog later. also i added my blog url to that one too it’s aaaaaall good)
the only downside to this method is that i can’t change the canvas size to be 540px wide to fit with tumbrl s image dimensions but whatever i can just post them in a text post and fix the html to display it at its original size instead of the resizing bullshit tmurbl pulls constantly ugh. anyway it works great on desktop but it’s inevitably gonna look like shit on mobile no matter what i do *Big Ass Shrug*
anyway thats the end of my success story uhh i can’t make the like comment & subscribe joke again bc i already did that in the last post so like bye i guess thanks 4 watchign & have a great day i’ll see u in my next fvideo
https://www.youtube.com/watch?v=YYob4uDjEKI&t=0s
(^that’s my outro music)
#this started out so boring like a tutorial (but made by someone who doesn't know what the fuck theyre talking abt)#& then things derail Real Quick#that's why this is the ''buildup ver.''#retag later#talkin bout stuff#today posts#rieley's wips#(me: i can't mention this youtuber by name in case my post shows up in search#me: *adds a link to the post rendering that effort for naught*#me: *leaves it anyway bc it's funny*)#pls listen to the outro musi c it's rly good & tunmgmldnr wouldnt let me embed the video & idk how to do it thru html & too lazy to look it#up :(
2 notes
·
View notes
Text
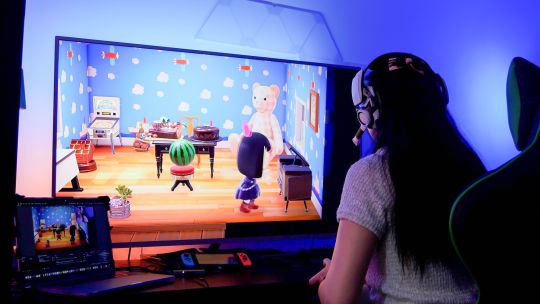
Looking to Stream Your Nintendo Switch Gameplay? Llano Microdock 3-in-1 Offers Charge, HDMI Out, and Capture
Llano MicroDock for Nintendo Switch
9.00 / 10
Read Reviews
Read More Reviews
Read More Reviews
Read More Reviews
Read More Reviews
Read More Reviews
Read More Reviews
Read More Reviews
Read More Reviews


Shop Now
The Llano MicroDock is a minuscule adaptor to replace the oversized plastic brick Dock, and let you record and stream your gameplay.
Specifications
Brand: Llano
Connection: USB-C
Ports: HDMI Out, USB-A capture interface, Audio Input/Output, USB-C Power
Pros
Plug'n'play, no drivers needed
Captures at full 1080p60
Direct audio input results in no lag when streaming
Cons
Only works with Switch, it's not a replacement for generic HDMI capture card
Buy This Product
Llano MicroDock for Nintendo Switch other
Shop
// Bottom var galleryThumbs1 = new Swiper('.gallery-thumbs-1', { spaceBetween: 10, slidesPerView: 10, freeMode: true, watchSlidesVisibility: true, watchSlidesProgress: true, centerInsufficientSlides: true, allowTouchMove: false, preventClicks: false, breakpoints: { 1024: { slidesPerView: 6, } }, }); // Top var galleryTop1 = new Swiper('.gallery-top-1', { spaceBetween: 10, allowTouchMove: false, loop: true, preventClicks: false, breakpoints: { 1024: { allowTouchMove: true, } }, navigation: { nextEl: '.swiper-button-next', prevEl: '.swiper-button-prev', }, thumbs: { swiper: galleryThumbs1 } });
The Llano MicroDock for Nintendo Switch is a pocket-sized replacement for your original Switch Dock—but with one fantastic additional feature: the ability to capture your gameplay, for recording and streaming. No drivers are needed, no additional cabling mess, and no costly separate capture cards. It's simple to use and does exactly what it says on the box with no fuss.
You can pre-order the Lanno MicrDock now for $99, but be quick, as the RRP rises to $150 when the campaign ends.
Is the Llano MicroDock the Switch streaming solution you've been looking for? Quite possibly, but read on to find out more about this minuscule Switch dock replacement.
youtube
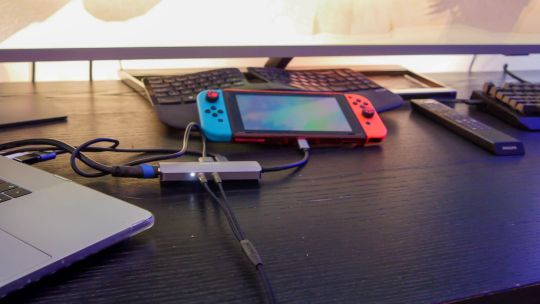
Llano MicroDock Design and Ports
Aesthetically, the MicroDock is nothing special. In fact, it looks like every other USB-C hub out there. Not entirely surprising given that's Llano's specialty. But open closer inspection, the selection of ports tells a different story–and the real magic is hidden away inside anyway.
On one end is a short USB-C cable. This plugs directly into your Nintendo Switch USB-C port on the bottom edge. At this point, it's worth noting that this is only compatible with the Switch, not the Switch Lite. The Switch Lite cannot be output to a TV, regardless of what adaptor you use—it simply doesn't have the hardware capable of doing that.
On the opposite end is a full-size HDMI port. No cable is supplied, but any cable should be sufficient since the Switch is only capable of outputting a maximum 1080pHD.
Before you can output anything though, you'll also need to plug your original Switch charger into the USB-C port on the side of the MicroDock. It's the only USB-C port on there, but also labeled on the underside with a lightning bolt. The MicroDock passes this through to the Switch, and presents itself as an original charger, so there should be no issues with under/overvoltage. Using third party adaptors with a Switch has always been a bit of a concern, with stories of devices being bricked thanks to unofficial chargers. Use the official Switch charger alongside the MicroDock and you'll be safe.
Lanno MicroDock TV Output
With the HDMI and USB-C charger plugged in, the MicroDock will act just as the original Dock does, allowing you to play on the big screen at the full HD 60FPS resolution.
In my experience, there was no discernible lag when using the Llano MicroDock for big screen play. I found plugging in the HDMI and charger to the MicroDock first, then plugging the USB-C cable into the Switch, worked most reliably, requiring only a few seconds for the TV input to activate.
It's worth noting that any limitations the Switch introduces with docked play are also present when using the MicroDock. Despite the fact that you could feasibly use the Switch handheld as is with the MicroDock attached, the Switch disables any attached joy-cons. So they will need to disconnected and slotted onto an external controller shell (or each used handheld).
Switch Game Streaming
The real magic comes from the additional USB-A port you'll find next to the USB-C charging port. A USB-A to USB-A cable was supplied in our package, along with a USB-C adaptor, though it's not clear if this will be in the final retail release. Regardless, it's a generic cable that's easy to source or replace.
Just plug this cable into your PC or Mac, and open up your favorite game capture and streaming software. Since the MicroDock presents as a standard USB video capture device, and doesn't require any additional drivers, it should work with any software. We tested with OBS, and there was nothing to configure–everything just worked after adding a new video and audio interface. Video is captured at the full HD resolution, at 60 frames-per-second. There's no loss in quality from what the Switch is capable of.
Of course, there is a lag of a second or so for the recorded footage. This is not unusual with any video capture device. The on-screen action on the TV remained perfectly in sync. You can then record or stream your gameplay to your favorite services. You can view samples of recorded gameplay in our review video.
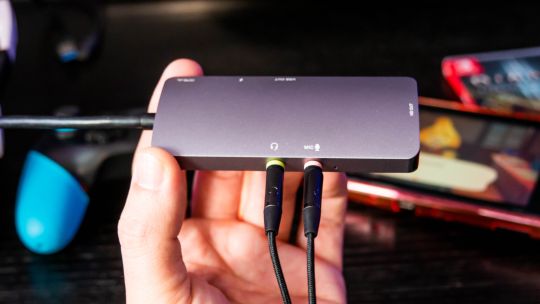
Direct Audio Capture and Output
One issue streamers face with any capture solution is the inherent lag between the game actions and your voice input on the PC software side. A second or two might not sound like much but can really sound awkward at critical moments.
The MicroDock avoids the audio input lag problem by shifting the microphone input onto the hardware side of things. On the side opposite to the USB ports, you'll find two 3.5mm stereo ports: one for your microphone, and one for headphones, so any analog gaming headset can be plugged directly into it. You don't need to configure additional audio inputs within your streaming system—it's automatically mixed into the game audio.
This approach might also be seen as a negative, though: you can't configure the audio level even if you wanted to. There are no additional drivers and no settings to adjust, so unless you have a very fancy gaming headset with inline mic level controls, you can't change it. But if you do find it's too loud, or too quiet in comparison to the game audio, you should plug the microphone into your PC instead to adjust there.
Thankfully, the microphone seemed acceptable in our testing–check out the recorded sample in the full review video.
In terms of audio quality, this will of course depend on the microphone you have plugged in. We used the EPOS | Sennheiser GSP601 gaming headset.
Be The Next Famous Switch Streamer with The Llano MicroDock
The Llano MicroDock is not a revolutionary device that contains never before seen electronics. It's a simple combination of existing technology in a neat package that does what it claims to do, and does it well.
For anyone looking to replace their original dock with a more portable solution, as well as record or stream gameplay, in one compact and convenient package: I can highly recommend the MicroDock. In my experience the connection was reliable, the recorded footage was at full quality, and it all just worked as intended without the need for complex drivers and configuration. The ability to plug your gaming headset directly into the adaptor is an added bonus that eliminates any awkward lag in your recordings.
The only downside to the Llano MicroDock is that it's very niche. It literally only works with the Switch (and curiously a few Samsung smartphones that can do DeX). Not the Switch Lite, not the Xbox, nor any other HDMI device. If you're an avid streamer, you might want a more future-proofed device or something that will work with the rest of your consoles. The MicroDock isn't for you. You'll need to invest in a more generic HDMI capture device, which alone will set you back upwards of $150, and can then be used in conjunction with your original Switch dock.
The MicroDock isn't worth it if you don't care about streaming or recording their gameplay at all, and just want a smaller dock adaptor to replace the plastic brick that Nintendo provides. You'll find cheaper devices in much the same form-factor as the MicroDock, for around half the cost, that don't have the ability to capture your gameplay.
Disclaimer: It's a Kickstarter
Kickstarters can fail, or suffer delays. There is no legal obligation on a company to actually deliver a product. I know this because I've personally lost thousands of dollars on undelivered products, as have our loyal readers who have lost money on projects we've featured in the past. For that reason, we've tightened the rules around which crowdfunding products we'll accept for review.
In this case, Llano is not a new company and has been making similar USB hub devices for many years. The product is as functional as it can be and appears to be ready for mass production. Delivery is slated for March 2021, and this seems reasonable. In this case, we don't think there's an undue risk in backing the MicroDock and are confident of the company's credentials. For transparency, our review sample was arranged through EarlyTechFinder, a PR agency that we've worked with before.
However, as with any crowdfunding campaign, never spend money you couldn't afford to lose if something were to go wrong; and never assume a product will be delivered on time.
Looking to Stream Your Nintendo Switch Gameplay? Llano Microdock 3-in-1 Offers Charge, HDMI Out, and Capture published first on http://droneseco.tumblr.com/
0 notes
Text
Brazilian + Mediterranean Design Influences Combine In This Ultra Glam Sydney Home!
Brazilian + Mediterranean Design Influences Combine In This Ultra Glam Sydney Home!
Architecture
Amelia Barnes

This recently renovated home was originally designed in the ’60s by architect George Reves. Photo – Prue Ruscoe.

Every details indoors and outdoor has been considered and enhanced in the renovation. Photo – Prue Ruscoe.

.The design references the work of Italian architect Giovanni Ponti and modern Brazilian architect Oscar Niemeyer. Photo – Prue Ruscoe.

The light internal palette allows the surrounding landscaping to become the focal point of the kitchen. Photo – Prue Ruscoe.

A cohesive array of green shades feature throughout the home’s interiors. Photo – Prue Ruscoe.

The home’s curved ceiling bulkheads were carefully restored in the renovation. Photo – Prue Ruscoe.

Photo – Prue Ruscoe.

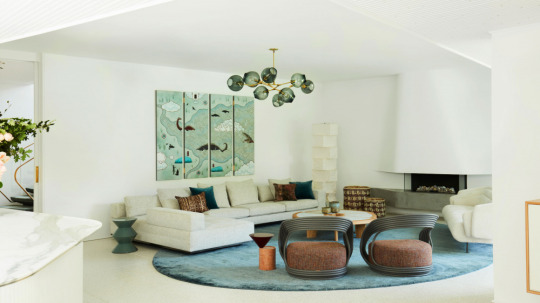
A Mediterranean feeling is instilled in the interiors through the use of ocean motifs, glamorous lighting pendants, and shades of teal and ice blue. Photo – Prue Ruscoe.

‘People say you shouldn’t combine blue and green, but I tend to disagree!’ says Romaine Alwill, director of Alwill Interiors. Photo – Prue Ruscoe.
The beautifully appointed formal living room. Photo – Prue Ruscoe.

The home’s signature curved lines are continued in the choice of furnishings. Photo – Prue Ruscoe.
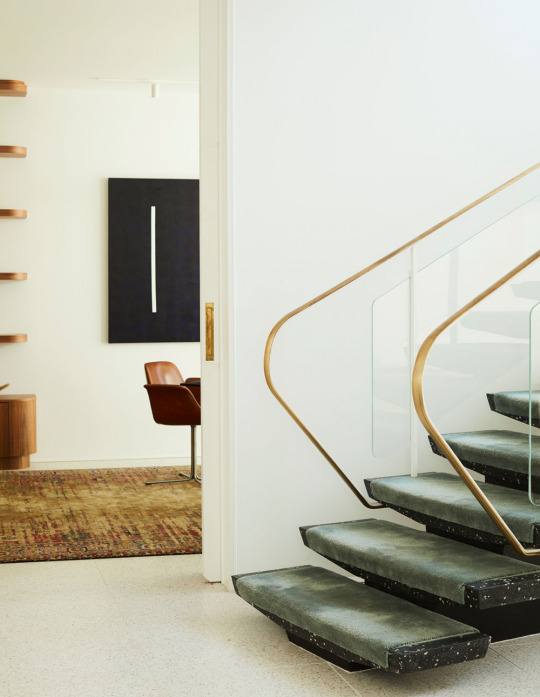
A brass handrail and glass balustrade detail gently curves around structural elements of the stairs. Photo – Prue Ruscoe.

The powder room is interior designer Romaine’s favourite area in the whole house! Photo – Prue Ruscoe.

An ocean breeze flows through the interiors. Photo – Prue Ruscoe.


The original stairs by architect George Reves were carefully restored in the project. Photo – Prue Ruscoe.

Large steel-framed doors slide open to reveal the garden. Photo – Prue Ruscoe.

Climbing vines adorn the facade. Photo – Prue Ruscoe.

Luigi Rosselli’s design set out to enrich the home’s existing exterior curves. Photo – Prue Ruscoe.

Columns in the exterior design blend into the background by emulating the trunks of the surrounding palm trees.Photo – Prue Ruscoe.

A 1950s ‘Loop’ Chair in concrete by Willy Guhl perfectly complements the design aesthetic. Photo – Prue Ruscoe.

Each element of the garden was carefully considered in relation to one another. Photo – Prue Ruscoe.

Sandstone adorns various garden elements including this entertaining area. Photo – Prue Ruscoe.
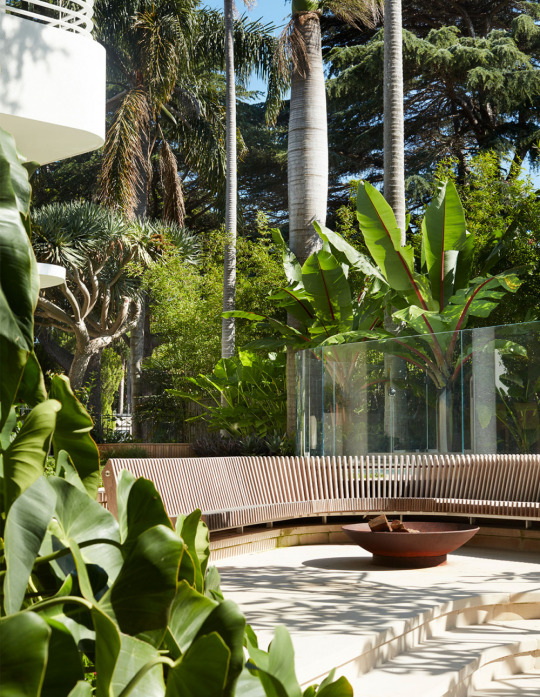
This timber bench seat was custom-built and designed by Sydcon Building Services. Photo – Prue Ruscoe.

The pool is just one small feature of this stunning and expansive property! Photo – Prue Ruscoe.

The completed renovation brings together the work of Luigi Rosselli Architects, Studio Schelp, Alwill Interiors and Dangar Barin Smith.
When looking at images of this home, it’s hard to determine where exactly it might be located. The cool white exterior suggests Palm Springs, the tropical landscaping and prominent façade is reminiscent of Brazilian architecture, and the interiors would look perfectly at home in a Greek or Italian resort.
This house is actually located in Sydney’s Bellevue Hill, and was deliberately crafted to combine a diverse but complementary array of architectural influences.
Renovations over time had seen this home become far removed from its mid-century origins by architect George Reves. Luigi Rosselli Architects and Studio Schelp were engaged to restore the home’s character, alongside Alwill Interiors, whose unique flair was sought for the indoors. This experienced design dream team worked with landscape firm Dangar Barin Smith to deliver a remarkable home where every detail has been considered and enhanced.
Referencing the work of Italian architect Giovanni Ponti, and modern Brazilian architect Oscar Niemeyer, Luigi Rosselli’s design set out to enrich the home’s existing exterior curves, and highlight these in the interiors. ‘The client wanted to keep it feeling light, open and airy, striking a balance between timeless elegance and paying homage to the unmistakable mid-century details and style,’ says Romaine Alwill, director of Alwill Interiors. ‘The house was to be luxurious in its execution, yet practical, and have an element of playfulness throughout.’
The floorplan was updated to feature predominately open-plan spaces, more conducive to the client’s relaxed harbourside lifestyle. This new layout presented a challenge to Alwill, requiring an integration of clever design cues to define the formal rooms from those more casual. ‘It’s actually a very difficult house to furnish! ‘Not only are there curves and few right angles, but the home’s openness makes it hard to define a language for each space,’ Romaine says. ‘Also, the client had three teenage kids, so it couldn’t be too precious. When it’s distinctly separate rooms it’s much easier!’
A Mediterranean feeling is instilled in the interiors through the use of ocean motifs, glamorous lighting pendants, and shades of teal and ice blue. ‘People say you shouldn’t combine blue and green, but I tend to disagree! Luigi is Italian so those Mediterranean curves are innate to him, but they were also a part of the original house, so I wanted to embrace that. It all came together quite naturally,’ Romaine says.
The result of these radical yet sympathetic updates has truly elevated this architecturally significant home to the next level. Romaine’s favourite element of the property is the connection between the indoors and out, and surprisingly, the powder room!
‘It’s heaven, I love how the materials came together in there: silk wallpaper, Hermes marble and brass. It’s like being in a cloud, but with fish swimming on the walls!’
0 notes
Text
Project 2 (Elephant and Mouse) Physical Computing
THE PITCH
The story of a cheerful mouse giving a puppet show
Elephant -
-Will be the head
-Moving trunk and ears
-Hat on its head covering up the mouse

Mouse -
-On the head of the elephant
-Moving arms so it can bow when it is reviled
-Looks as if it is controlling the elephant

Interactivity-
Motion sensor in front to see when a kid is in front of it. This activates the trunk to take off the hat, using an electromagnet, showing the mouse controlling the elephant Then the elephant puts the hat back on

THE PLAN -
We decided to split this project up into multiple
The elephant ears would be Jesse
the trunk would be Tim
the hat was Alex
and Jesse also had the mouses arms

TESTING
To get our servos running we found https://github.com/ArminJo/ServoEasing
this helped us a lot in the whole process. we started with the trunk and ears as they were very similar.
youtube
We also started to look at the mouse and how the arms could move. we found that rubber bands in arms was the best way to go. With the servos attached to the handles.


With a little over a week to go we finalized our plan of action
Wednesday night - basic wiring, testing motor movement outside of elephant shell. Complete build of Elephant shell.
Thursday from 6-9 add pieces of motors to elephant. attach trunk to elephant
friday 2pm-6pm. attaching the hat, ears, mouse.
Saturday - wiring. Testing movements inside elephant shell. Action button integration
Sunday - cosmetic refining. Final button placement. Troubleshoot/safety day (should the unexpected occur)
Monday - paint
Tuesday - Troubleshoot and finalize
Wednesday - Troubleshoot and finalize
Thursday - Troubleshoot and finalize
Friday - Load In
This worked really well for us as we were able to stay on scheduled.
CODE and WIRES -

For the programming, there where three major revisions of the code. The first was more of an experiment to see if the plan we had for the structure of the program would work the way we wanted it to. There was no major goal to get things fully working at this point, this was more of a proof of concept to show that we was moving in the right direction.
After finding that the initial plan was way over complicating things, we moved on to the second revision, this one much more closely resembled the final, but we found that there was an issue with using the servos how we wanted to. The issue being that we didn't quite understand how arduino sends out data to servos, so all of the servos were receiving what was essentially noise.
For the third and final revision, we had moved control of the servos to a library Tim found that was built to do exactly what we were trying to do, and then some. In this revision, the only thing that wasn't working perfectly was the hat movement, although we feel like the different attempts at getting it to function didn't constitute a major revision change, being as the core of the program stayed the same, or rather, because we didn't change the system for controlling the hat, only the logic.
The hat should have been one of the simplest parts of this project, and while in all reality it was, we were, as with much of this project, over complicating it for a very small amount of gain that would likely have gone unnoticed in the final product regardless. In the end, we decided to slightly reduce the requirements for what we wanted the hat to do, which ended up making the code much simpler to conceptualize, and allowed me to get to a working, show ready, state. All in all, we felt like we accomplished a vast majority of what we set out to do with this project, and feel like we delivered a solid product overall
Final code -
#include "ServoEasing.h"
//output pins int pinEarL = 2; int pinEarR = 3; int pinLeverL = 4; int pinLeverR = 5; int pinHat1 = 6; int pinHat2 = 7; int pinTrunk1 = 8; int pinTrunk2 = 9;
//input pins int pinButton = 12; bool button = false;
//data vars int hatPos = 0; int hatTimer = 0; long oldTime = 0; bool moveUp = false; bool moveDown = false; int hatMax = 300; //in frames, at 60, how long to let hat rise int hatDur = 900; //in frames, at 60, how long to keep hat up
ServoEasing servoEarL; ServoEasing servoEarR; ServoEasing servoLeverL; ServoEasing servoLeverR; ServoEasing servoTrunk1; ServoEasing servoTrunk2;
bool servoDir[] = {false, false, false, false, false, false};
void setup() { // put your setup code here, to run once:
Serial.begin(9600);
Serial.println("Attaching Servos via ServoEasing"); servoEarL.attach(pinEarL); servoEarR.attach(pinEarR); servoLeverL.attach(pinLeverL); servoLeverR.attach(pinLeverR); servoTrunk1.attach(pinTrunk1); servoTrunk2.attach(pinTrunk2);
servoEarL.write(120); servoEarR.write(60); servoLeverL.write(90); servoLeverR.write(90); servoTrunk1.write(90); servoTrunk2.write(90);
pinMode(pinHat1, OUTPUT); pinMode(pinHat2, OUTPUT); pinMode(pinButton, INPUT);
//let everything move to start pos //moveHatUp(); //delay(3000); hatPos = 0; moveHatDown(); delay(4000); moveHatNone();
}
void loop() { // put your main code here, to run repeatedly:
//update hat //check button was hit button = digitalRead(pinButton);
if (millis() - oldTime > 1000 / 60) { oldTime = millis(); //Serial.println(button);
if(button){ Serial.println(hatPos); if(hatPos<80&&!moveDown){ moveHatUp(); moveUp = true; moveDown = false; } else{ moveUp = false; moveDown = true; moveHatDown(); } }
if(moveUp){ hatPos++; Serial.println("MOVING UP"); } if(moveDown){ hatPos--; Serial.println("MOVING down"); }
if(hatPos>80 || hatPos<= 0){ moveHatNone(); moveUp = moveDown = false; }
button = false; } /* //check button was pressed if (button){ hatTimer = 0; moveUp = (hatPos <= hatMax); } //check if it needs to down if(hatPos >= hatMax && hatTimer <= hatDur ){ moveUp = false; hatTimer++; } //move it up if (moveUp) { hatPos++; moveHatUp(); } else if(hatTimer >= hatDur && hatPos>=0){ //else move check that it needs to mvoe down hatPos--; moveHatDown(); } else //else don't move the hat moveHatNone();
//reset button check button = false; }
//this bit should actually work as intended //so that it doesn't go up as soon as the arudino activates starts if (hatMax - hatTimer < 0) { //check that hat doesn't move too far up moveHatUp(); } else if (hatDur + hatMax - hatTimer < 0 && hatDur + hatMax * 2 - hatTimer > -10) { //check that hat hasn't moved to far down moveHatDown(); } else moveHatNone();//so that actuator doesn't explode, 10 extra mills to make sure it goes all the way down is fine */ //moveHatUp(); //end hat movement
//All the servo movement
if (!servoEarL.isMoving()) { servoEarL.startEaseTo(servoDir[0] ? 115 : 135, random(10, 20)); servoDir[0] = !servoDir[0]; }
if (!servoLeverL.isMoving()) { servoLeverL.startEaseTo(servoDir[2] ? 80 : 95, random(10, 15)); servoDir[2] = !servoDir[2]; }
if (!servoEarR.isMoving()) { servoEarR.startEaseTo(servoDir[1] ? 80 : 60, random(10, 20)); servoDir[1] = !servoDir[1]; }
if (!servoLeverR.isMoving()) { servoLeverR.startEaseTo(servoDir[3] ? 100 : 85, random(10, 15)); servoDir[3] = !servoDir[3]; } //end ear and lever movement
if (!servoTrunk1.isMoving()) { servoTrunk1.startEaseTo(servoDir[3] ? 110 : 80, random(2, 10)); servoDir[4] = !servoDir[4]; }
if (!servoTrunk2.isMoving()) { servoTrunk1.startEaseTo(servoDir[3] ? 110 : 80, random(2, 10)); servoDir[5] = !servoDir[5]; }
}
void moveHatUp() { digitalWrite(pinHat1, HIGH); digitalWrite(pinHat2, LOW); }
void moveHatDown() { digitalWrite(pinHat1, LOW); digitalWrite(pinHat2, HIGH); }
//set both to low for safty :) void moveHatNone() { digitalWrite(pinHat1, LOW); digitalWrite(pinHat2, LOW); }
Final product-
With a lot of hard work we are very happy with the outcome.
There are things that we would have done differently but overall we think this was a success. The story behind the object is what really drove this home for many people and they loved the hidden mouse.


0 notes
Text
Venice Travel Guide – Tips for Visiting Venice
Venice Travel Guide
Best Things to do in Venice
St. Mark’s Basilica
Readily the most renowned and famous building in Venice, St. Mark’s Basilica is really just a brand new slice of architecture which has endured the test of time since its invention in 1092 also is still perhaps one of the main religious properties in Northern Italy. Every component of the church is brilliant — By the intricate detail, sculptures, along with the art of front facade, into the attractively painted frescos and Byzantine pieces of art inside of this domed ceiling. Located from the Piazza San Marco, this basilica is readily reachable from the grand canal and also has been among those funniest surviving cases of Italian architecture.
St. Mark’s Square
Whilst St. Mark’s Basilica is by far probably the most well-known building in Venice, St Mark’s Square is by far probably the most well-known piazza.
On the canal, opposite the island of San Giorgio Maggiore this square holds tremendous significance in Venice and is now really a spectacular place to go to. Surrounding the Piazza can be a run of intricate buildings with arched paths that framework it perfectly.
Additional several significant buildings can be found in the square including St Mark’s Campanile, St Mark’s Basilica, Doge’s Palace and Torre dell’Orologio. This square, in fact, is the best spot to begin your trip of Venice and tick off a number of its impressive sights.
Doges Palace
One among the most Celebrated Structures in Venice Irrespective of the Basilica and Campanile, Doges Palace Additionally sits at St. Mark’s Square but Overlooks on the Expansive canal. This elaborate palace is only magnificent and its own front facade comes with a gorgeous arched design made from white rock with a streak of diamond patterns in the walls.
Indoors, the palace is at least as impressive and there’s a collection of exceptionally adorned rooms which most have initial elements, artwork, and art. Tours of this palace are all available and it’s suggested to invest some time seeing both the interior and exterior inside more detail to truly catch a part of the real heritage of Venice.
Ponte di Rialto
Among those bridges which period the striking Grand Canal, the Ponte di Rialto is definitely the most well-known and most iconic.
Found the San Marco and San Polo areas of Venice bridge is also an equally essential pedestrian thoroughfare, however, also a popular tourist attraction. Originally a wooden bridge, the culmination stood for centuries before it collapsed into 1524.
After this episode, an elaborate rock bridge has been built that still stands today. The design and detail of this bridge are only amazing and its own particular symmetry certainly frames the grand canal. Additional there are also set shops in the bridge which sell a range of products from memorabilia to jewelry.
Canale Grande
Venice has hundreds of canals which join the several islands which compose the city — the biggest which could be the Canale Grande. This enormous canal is a lot more similar to a river and it moves in 1 side of Venice into one snake and other throughout the middle at a sizable S flex form.
Over 170 buildings dating from as early as the 13th century line the banks of this canal and it’s functioned as a very important waterway from town for centuries. Just four bridges length that the expansive canal as broadly speaking tourists and people traveling over the canal, never on it. Look at walking across segments of this tube, admiring the buildings which line this, and watching the busy water traffic of Venice.
Bridge of Sighs
Even though merely a tiny bridge at the relative plot of Venice, the Bridge of Sighs is still perhaps probably one of the very viewed structures on the planet and is a significant historical landmark. Passing on the Rio di Palazzo, the bridge joins the Prigioni Nuove into Doge’s Palace.
Legend has itas offenders were shot from the Palace across the bridge, so they’d throw after last glance at Venice and sigh; believing their own impending punishment and imprisonment. Whilst seeing St. Mark’s Square, it’s an absolute necessity to glance that this legendary bridge too.
San Marco Campanile
Whilst the tallest building in Venice, the Campanile is really actually just a towering construction that stands in a gigantic 98.6damn high.
The construction that stands today, is, in fact, a renovation as the first dropped in 1902. Originally created from the 9th century, the campanile was utilized like a watchtower. All through time, the tower was damaged by fire, earthquakes and maybe lightning.
Made from a straightforward redbrick style and layout and style, the key shaft is very straightforward, however, also the bell home and pinnacle have a plethora of designs and stonework, and also the very best include a gold statue of the Angel Gabriel.
Admire the tower by the Piazza di San Marco, but additionally, consider the elevator to the most effective for the very greatest panoramic views of Venice.
Torcello Island
If you’re interested in finding a calm escape, then Torcello island offers only that and is not as busy than the principal locations of Venice.
Located on the far east of the most important portion of Venice, Torcello is nestled from Burano and can be approximately 45 minutes away from Venice using a standard ferry.
Walkthrough the primary street of Torcello and respect the gorgeous canal before you arrive at the Church of Santa Maria Assunta that includes a wonderful design. Additional there’s a passionate museum which exhibits the foundation of this series of islands, and also an assortment of restaurants and shops.
Chiesa di Santa Maria Assunta
Located from the Cannaregio region of Venice, the Church of Santa Maria Assunta is Really a Nice structure That’s also known since I Gesuiti.
Front facade of this Church includes several rock columns, intricately sculptured figurines of religious characters, and a slew of complicated detail — A massive bronze doorway functions as the major entry.
Constructed in 1729, that really can be amongst many newer churches in Venice however it’s still very important and the inner comprises quite a few notable artworks like the Martyrdom of St. Lawrence from Titian. What’s more, art, frescos and stone detail cover the ceiling of this church along with some gorgeous motif art lines the walls and columns.
Basilica di Santa Maria Della Salute
Most likely the very renowned church at Venice, the Basilica di Santa Maria Della Salute stays on the alternative aspect of the grand canal into St. Marks and sticks out from the surrounding structure.
Having a Baroque layout, this church has been performed in 1687 and can be called a little basilica of this Roman Catholic Church. Taking center stage over the Grand Canal, the surface is decorated with four statues of the apostles along with also the principal terrace towers above the skyline.
The inner provides an impression of fantastic distance and also the interior layout allows light to float into. Even though maybe perhaps not decorated to exactly the same level as the several some other churches in Italy, this basilica includes an excellent deal of charm and can be really satisfying on the eye-catching.
Murano
Murano is just another of those islands inside the Venice area — This space of property is actually composed of several tiny islands attached together by way of a series of bridges and canals (just like Venice). Murano has an excellent charm and it is frequently much less busy as the principal regions of Venice.
This superb island town has lots of sights including the Basilica dei Santa Maria, the Campo Santo Stefano, and also the Palazzo Da Mula. What’s more, Murano is well known for the glassblowing off and also you also may see live presentations at the respective factories which can be shown here.
Lido
If you’re trying to find an area of comfort and also to escape from most of the tourists, then the Lido is where to proceed. This distinct island produces a barrier between Venice and the Adriatic Sea and comes with a very long stretch of beautiful beach to enjoy.
Home to approximately 20,000 population, the Lido also features a plethora of residential places, restaurants, stores, and hotels. With a far calmer, laid back and relaxed setting to fundamental Venice, Lido can be actually really just a legitimate escape and gives a stark contrast to the crowded roads and waterways surrounding the expansive canal.
Best Time To Go Venice
Peak summer is humid and hot and could be beautifully decadent, therefore exciting avoided from late June through August. Spring (April to early June) and autumn (September to October) are ideal times to see, together with mild temperatures and fewer tourists. While cold temperatures can be icy, wet, also in danger of acqua alta (flood ), December and January will be the ideal months to observe that the city during its quietest–including xmas and New Year, people are in the absolute minimum, also while most shops and restaurants are shut, you should have the canals to float. The city can also be very busy throughout Carnival (a few weeks in February or March), which drops during rainy season. August is possibly the hardest time for you to go to Venice since it’s muggy and busy with tourists, in addition to enough full time when lots of locals take their very own vacations.
Transportation in Venice
Venice has an adequate network of Exotic public transportation: by vaporetti (water buses), that ply the Grand Canal, loop around the most important city shuttle from the Hawaiian islands, to traghetti, people gondolas that cross the Grand Canal at routine things. Single Vaporetto tickets cost 8.60, therefore think about travel card from $ 23 for twenty-four hours. One traghetto crossing costs $2.30 and can be paid in cash to the gondolier. Water taxis are extremely expensive, starting at approximately $60 for a ride even a few minutes. A waterbus from the airport costs $15.50.
Weather at Venice
January is the coldest month, with average temperatures of 3°C. July and August are the latest, having a mean temperature of 23 °C, but on account of the humidity, so it typically feels much sexier.
Money Saving Tips in Venice
Don’t eat at Piazza San Marco – This really can be the location having tourist, thus which makes it far higher priced. Avoid ingestion only at any cost, regardless of how enticing that the cafe slopes may possibly be.
Pack a picnic – Small niches are plentiful around the metropolis, therefore filled with a few fresh vegetables, fresh fruit, cheese, and wine, and revel in a delicious meal in a fraction of the price that it is to really go out.
Walk and get lost – Venice is really amazing you could spend some time wandering throughout the city visiting the older construction, churches, musicians, and, on top of that, obtain somewhat of people watching it. The island is so small, and thus do not worry, so you can not get that particular lost.
Discount bus tickets – If you’re staying for an extended time period, look at investing in a discount card to your own bus, or even vaperatto, services. It is possible to potentially save 25 percent on a seven-day overlook going right through VeniceConnected.com.
Get the Venezia Unica Pass – If you’re planning to do plenty of holiday season, this pass can provide you discounts on the most effective museums, tours, and attractions. It’s expensive to save money in comparison to buying tickets. Now you get on the internet and select what you wish to see beforehand. The cost varies based upon what you wish to determine.
Venice Travel Guide – Tips for Visiting Venice
0 notes