#plus of course the loaded meaning of the ceiling height and windows in and of themselves given the context of the epilogue
Explore tagged Tumblr posts
Visit Tumblr Blog
Explore Tumblr blogs with no restrictions, modern design and the best experience.
Last Seen Tumblr Blogs


Fun Fact
Tumblr was named as a finalist in Lead411’s New York City Hot 125 in Aug 2010.
Text


- Which part of it are we paying for? - The height of the ceiling. The glass above.
#lines that never registered before but hit me like a ton of bricks on the latest rewatch#not to be like everything's a metaphor all the time but. everything IS a metaphor all the time#plus of course the loaded meaning of the ceiling height and windows in and of themselves given the context of the epilogue#the brutalist#is it a movie about the failures of the american dream? wherein characters have to literally pay for the idea and symbols of freedom?#does it harken back to the prologue that explained to us what the film was going to be about? upside-down statue of liberty? goethe quote?#jesus christ.
18 notes
·
View notes
Text
Necessity

A/N: Welcome to chapter 1 of Necessity! This Supernatural fic is super plot twisty, I like keeping it chill in the beginning and then switching it up when you least expect it! If you love lots of drama, mystery and intense conflicts, here you go. There will def be some romance blossoming, slow build to smutty goodness, it's a good fic, I swear.
Chapter 1: The Last Day
April 5th, 2019
"Eva!" Her mother, Eleanor hollers.
Her eyes shoot open at the sound. It usually takes her a few minutes to actually get up. Whether it's scrolling through Instagram on her phone or stretching her body out, she takes her time. The sunlight was pouring in through the curtains; there was a gentle breeze from her ceiling fan. Then she begins to smell the sizzling bacon and her legs kick into gear.
During the fall semester she despised getting up early for classes, so this semester she got only afternoon and evening classes. Still reveling in the feeling of waking up later, Eva gracefully clothes herself in a pair of sweatpants, keeping her oversized sleep shirt on. She grabs her phone, leaves her room and heads on downstairs, passing all the glowing windows. She's not typically a morning person, but waking up at 11:30 is much nicer than 7:00 AM, not to mention that spring has always been her favorite season.
Spring is jam-packed with blooming flowers, singing birds and soaring butterflies. As soon as you walk outside you're met with beautiful colors and scents of greenery. It's amazing walking weather; you usually don't have to wear coats because it's never too hot or too cold. Everything is absolutely perfect, except-
"Rain," Her father sighs, "It's going to be pouring by the time your classes end."
She enters the kitchen, the smell of breakfast overwhelming her. She takes a seat next to her Dad, Augustus, also known as Gus.
"Well I can't pick her up, I have to go visit my Mother today," Eleanor says. She hands Eva a plate, as well one to her brother Charley.
"It's fine, Mom, I can just walk."
"You're going to have to bring an umbrella with you," Charley comments.
"I know Charley, that was pretty obvious," Eva rolls her eyes, 'such a simple-minded man,' she thinks to herself. She serves herself some bacon and eggs before filling up a glass of water.
She's the youngest of three, only 18. Her oldest brother is Charley, who is 24 years old, her second oldest is brother is Oliver, she calls him Oli for short, and he's 21.
Her mother finishes serving herself as well; Gus, Charley and Eva already diving into their meals. Just as she sits down she recognizes the empty seat.
"Where's your brother?"
To this Charley snorts, "Where do you think?"
"Stayed up all night again?" Gus asks.
This was a common occurrence. And I know what you're thinking, must be a hard partier, huh? No, that's not the case. In fact, it's quite the opposite. Her brother, Oliver, has a really hard time getting sleep. They're not sure exactly what it is. Perhaps he's a light sleeper, or maybe its nightmares, maybe anxiety—could be anything. If there's one thing Eva knows for sure, it's that his sleeping habits are a popular subject of gossip in her house. They always talk about him when he's not around, complaining about how concerned they are. Sometimes he'll even be in the same room and they'll still talk about him to each other as if he's not there. She'd be lying if she said it didn't make her feel guilty.
"At least he's asleep now," Eva comments.
Gus nods. He has bright blue eyes and jet-black hair. Well, used to be jet-black, now it's more like salt and pepper. Eva didn't get his eyes, or his hair, or his height, but she got his personality. There's something about her, that all of her older cousins and Aunts and Uncles comment on. It could be their face shapes, their smiles, nobody knows what it is about the two of them that is so strikingly similar, but it's there.
Her mother, on the other hand, she has big, chocolaty doe eyes, which is exactly what Eva inherited. She is also the same height as her Mom and almost same hair color. Eleanor has a light; hazel colored hair whereas Eva's is a much darker brown. She's sweet, she's caring but she's also incredibly timid. Charley and Oliver take a lot after their mother. They can be shy, can be sweet and could do with a little more assertiveness, exactly like Eleanor. But despite all of their passiveness, they are the most welcoming, warm people on the Earth.
It's funny because the whole family looks unrelated-- like a mismatched bunch. Charley has his mother's light feathery hair, her eye color, but Gus's eye shape and height. Oliver has the jet-black hair, just like his father, but his mother's height and his mother's eyes. And while Eleanor is more on the shy, dependent side, Gus is assertive and sovereign. He has the reputation of sometimes overstepping boundaries—maybe being a little too controlling. And unfortunately, in this family, most of them just go along with it due to their passive nature. That is until Eva came along.
Eva is a little firecracker and a straight copy of her dad. She's always been over-cautious like him, very honest, very assertive. They tend to have the same opinions, but on occasion when he's overstepping, she's the one to hash it out with him. They have a strong relationship.
"How's your modern poetry class going?" Gus asks Charley.
"It's..." He pauses, "Interesting."
"That bad?" Eva asks. Charley majors in Philosophy and Poetry. These are actually his last few classes before he graduates.
He rolls his eyes, "I didn't say it was bad."
"So you like it?" His mom asks. Instead of nodding, he shakes his head. Finding his words, his hand naturally finds his chin as he plays with the light stubble.
"It's just not my style of writing," He re-words, "Kind of weird to be honest."
They all fall silent, concluding the conversation. Eva finishes her food just as fast as Charley. Being both fast eaters, they scarf their meals down and usually leave the table before everyone else.
"So, how did you sleep?" Her mother asks her. Eva looks up from her empty dish to find her Mother's warm eyes.
"It was okay, how about you?"
Her mom sighs, "I stayed up watching tv until...what, like 3 in the morning?"
"Was Oli up too?" Eva asks.
"I think so, I saw the hall light on."
Eva only hums in acknowledgment, not really finding words. It's only a moment of silence before her Mother goes on to tell her about the movie she was watching. Reflecting on what she thought was such an inspiring story. It was a film about the world, it's culture and all the things we could do better.
"Did you know that in Finland, there's no college tuition?" Eleanor exclaims, "But of course in America, every single student is in debt,"
"Including me," Eva adds.
Both of them give a little laugh at the absurdity. 'It really is ridiculous,' Eva thinks to herself. Eventually, Eleanor goes back to finishing her breakfast and Eva silently listens to her brother ramble.
Once Charley finished he had quickly brought his notebook to the table. He pulled out a little packet full of poems and began making his last touches to his assignment. Once he finishes, he slides it back into his bag and grabs his dish.
"Analyzing the poetry is pretty awful, it's nothing like Emily Dickenson," Charley says as he starts cleaning up, "But I do like it when we have discussions about them in class."
"Why's that?" Their dad asks.
Charley continues to wash his dish over the sink before stacking it in the dishwasher, "I don't think anyone else can take the poems seriously either, so it's funny. Plus, all you have to do is raise your hand, say 'I interpreted this to be very self-deprecating', and then the Professor gives you a point, so easy."
"-Sorry for interrupting," Eleanor interjects, "I have to head out, bingo starts at 1:00. Can you wash the pans too?"
"No need to rush, you know your Mother's never ready on time anyway," Gus comments. Eleanor gives him a sarcastic dry laugh, 'always making jokes about Grandma,' Eva thinks to herself. Her Mom gives her Dad a quick peck on his cheek. She hugs Eva and hurries out the door.
Charley steadily grabs both pans, bringing them to the sink and loading them up with soap. He continues to talk with his dad. Charley muses about his Philosophy courses as usual, and Eva begins to drown them out. She picks up her phone, unlocking it. The first thing she notices is a bunch of texts from her friends she seemed to miss.
Sliding on the notifications, she reads, 'I hope she's ok'. This prompts her to scroll up; whom could they be talking about? She finally gets to the beginning,
'Did you guys hear about Amber?'
'No what happened?'
'it hasn't been 48 hours yet, but her parents think she's missing,'
'holy shit,'
'they said she didn't come home last night and nobody could get ahold of her this morning. Nobody's seen her either,'
"Oh my God," Eva whispers. Her brother and dad both pause their conversation, fixing their attention on her.
"What's wrong?" Her Dad asks.
"Amber Shirley is missing."
Her dad immediately jumps from his seat. As mentioned before, he's a very cautious person. He constantly watches the news, hearing about all the bad things that occur. It only feeds his anxieties but now-- now he has something to actually worry about.
"It's only been like, 20 hours," Eva continues, "But she's not home, nobody knows where she is,"
"Oh God," Her dad sighs, "I should call the Shirley's." He picks up the home phone to dial their number. As he talks to them, she goes back to her phone to anxiously read more texts.
'do you think it was a party?'
'nobody party's that hard on Wednesdays,'
'plus she was commuting'
'you guys I think she was doing drugs,'
'really?'
'why do you say that'
'yea did you hear that from somebody?'
'idk these past few weeks she'd been acting so weird'
'what do you mean?'
'she thought her house was haunted,'
'we all knew that, her house is a bit creepy tbh,'
'no, she legitimately was becoming paranoid. she thought something was trying to kill her,'
'like she even started skipping bio because she wasn't sleeping'
'did her parents know?'
'I think she tried to talk to them, im not sure'
'but she was like really scared you guys, she must've been on something really hard'
'shit'
'that's terrifying'
'I really hope it's not heroin,'
'I hope she's ok'
'me too' Eva sends the quick text.
Now Eva finally catches up, she's even more scared. It's very surreal to have something like a friend go missing. She's never dealt with crime in her life, so it all seemed so far away from her until now. The idea that Amber could be gone is frightening. For once in her life she was nervous to go to classes, and not because of exams.
From the moment she read that Amber was missing, an eerie shiver blew up her spine. Even after trying to hope that Amber was safe, that she was okay, praying she wasn't hurt-- that creepy feeling just won't shake off. Her mind won't stop frenzying over what could have possibly happened, what she could have done or even worse, what someone else could have done to her. The idea that someone dangerous could be walking around the streets of Willow only magnified her anxiety.
She checks the time, 12:25 pm. Her classes start soon, so she begrudgingly pushes herself up the steps to get ready.
"Eva, where are you going?" Her dad calls from the kitchen.
"To get ready for class."
"Ok, but you're not walking home tonight, not with Amber missing,"
She nods her head in agreement, "But who will pick me up?"
"Ask your friends, or take an Uber I guess," He says.
"Sounds good."
She makes her way up the stairs to her room; ridding herself of the saggy sweatpants and worn out black tee. She moves rather slowly. Her brain still in frenzy and her body seemingly rusted. It just didn't feel right today. Studying herself in the mirror, she slowly grazes a hand over her necklace. It's probably the most pretty and most precious thing she owns. It's a family 'hand me down', if you will. She got it as a baptismal gift from her Godmother and hasn't taken it off since. The dainty silver chain and tiny blue jewel can compliment almost all of her wardrobe.
She makes note of the extra windy and rainy weather today. Taking a nice pair of true denim overalls, she slides them over her legs. She finds a thick, cropped pullover that was a baby pink and dresses herself in the fleecy garment. She picks a nice pair of wooly socks, grabs her black rain boots. She twists her hair into a messy bun, before throwing on her matching black raincoat.
She sends a quick text to her friends, 'My dad is talking to the Shirley's rn. I still can't believe she's missing.'
'Same'
'My mom wants to bring them some muffins.'
'I think we should start a search party or something'
(Eva) 'That's a good idea. Also, can any of you give me a ride back home later?'
'Don't think so.'
'I can't!'
'Still don't have my license.'
'Maybe take an Uber?'
(Eva) 'Yeah, sounds like that's what I'm gonna do.'
She makes her way downstairs, seeing her Dad still on her phone and Charley at the dining room table studying. She looks to the kitchen to gratefully see Oliver groggily getting a bowl of Cheerios.
"Morning Oli," She greets while looking for an umbrella. He looks in her direction mumbling a gentle 'hello' back. She finally finds a large umbrella buried in her closet. It has a big wooden staff and a simple brown fabric. She sets it by the front door.
Oliver sits at the table watching YouTube on his IPad, while slowly but surely eating his Cheerios. It's the usual routine for him, he's either asleep when she's awake, or he's on his IPad. She grabs her glass from earlier this morning and refills it. She has a couple of minutes before she has to leave, so she decides to get extra hydrated. Walking to campus and all the way around it can be a little of a workout.
She plops down next to Oli, "So how'd you sleep?" He pauses the video, shifting his attention to her. His black hair is clearly disheveled from just being asleep, his eyes still heavy as well.
"It was fine," He shrugs. He's always been one to downplay his problems. Oliver hates being overwhelmed with everyone else's anxieties, so he tends to be vague, and always calm.
"Could've slept more?" She adds.
"Yeah," It's silent for a moment, "You know, I heard about, uh, Amber,"
Eva forces out a breath, her mind circling back to the fearful subject. It's as if all of a sudden her mouth is dry as a desert. She reaches for her water.
She doesn't really want to talk about Amber unless it's about her being found. She can't stand the nerve-wracking sensation of thinking about her—of where she is, of how bad it is, or if she's even still alive. Her mind just seems to go straight to that place, the extreme yet not so crazy idea that Amber could be in a life or death situation. Not to mention, all that they can do is rely on the police at this point. Talking about her—trying to unearth where she is just from guessing does nothing, like literally—nothing. It's helpless, she... Amber, could even be helpless. They're just frozen in a waiting period, can't do anything about it.
"It's just so scary," Is all she manages to say. She glances at her phone, at 12:43 pm.
"Oh, I need to head out," She gulps down the last of her water. Standing up from her seat, she gives Oli an awkward half-smile. Not really being able to conjure up enough energy to fully smile, or keep a conversation going. Throwing her backpack over her shoulder, she picks up the umbrella and as she's walking towards the door she sees a big, cardboard box just a few feet behind it.
"What's this box for?" Eva asks. She hears some shuffling from the dining room before Charley pops his head in the hallway to see.
"Oh, Dad's going to get the old family videos restored," He responds.
"Nice," Eva smiles at the thought. They definitely have some keepers in there, let me tell you. She recalls once when Oli had brought over a cute girl-- which was entirely rare due to his shyness. But of course, the night he brings her over, Eva, 12 at the time, decided to put on some of the old tapes. It plays, everyone excited to see what it is-- low and behold, a video from when Oli was 4 and was running around butt-naked with Pokemon cards. 'God', she cringes at the memory, she felt so bad about embarrassing him.
She unlocks the front door, stepping out before calling out, "Bye, love you guys,"
Eva hears a faint murmur of 'bye' and 'love you too' from the men of the house before the loud shut of the door. No longer in the warmth of her home; no longer with the sounds of Charley's pencil writing, Oli's slow Cheerio chewing, or Gus's sympathetic worries being spoken to the phone. She can hear the clear sound of birds chirping, a light patter of rain, and the barely audible sound of the wind in the trees.
She plugs her earbuds into her phone, unfolds her umbrella and begins to walk. The old peaceful streets of Willow generating natural, calm energy. She tries to focus on the music, the scenery, not daring to let her mind drift to the blood-curtling subject of Amber.
She commutes to Bartley University. The small neighborhood she and her family reside in is called Willow, and she's lived there her entire life. She only has to walk a few blocks before she enters the campus grounds. The street she lives on is interesting because while it's very close to a college, for some reason only half of the occupants are students. The other half of the houses are elderly people, mostly Italian in fact. But because of that, she has such friendly neighbors. Her parents got to be close enough with some that they'd the old Italian couples would bring them homemade wine and Pizelles.
One unfortunate thing she's learned with living in Willow is that most of the sidewalks have uneven foundations. You want to be careful not to drag your feet cause you can very easily trip...which she does all the time. 'Always been clumsy though,' She thinks to herself.
Once she reaches Ryter Street, she turns right into the other many traveling students. And before she knows it, she's passing by the big Lion shaped fountain and enters the History building. As she makes her way down the busy halls, she notices her friend Nora holding a thick stack of papers. And when she looks behind her, she sees a trail of 'Missing: Amber Shirley' posters pinned up on the walls. Right beneath the bold red letters, she sees the picture; Amber's face, plastered all around campus, but the real Amber not anywhere in sight.
Boy, today is going to be tough.
~~
"Don't forget to send me your articles, they need to be peer-reviewed, full text, and strictly correlational!" The Professor calls out. Everyone had begun packing up their items, desperate to get out of here as fast as possible. From all the noise, his voice began to get drowned out. All the kids began to file out of the lecture, and before Eva knew it, she was one of the last few kids left. Normally she's right with the crowd, antsy to get home. Especially since her mother makes the warmest, yummiest food. Her friends tend to get jealous of it actually, since they live in dorms and basically only eat ramen and pizza.
She slowly stands up from her seat. Her mouth feels exceptionally dry again, which is ironic considering how heavily it's pouring outside. She can even hear the bash of thunder from inside the building. Checking her IPhone, 6:30 pm. A few months into this semester, and she's regretting putting all four classes back to back. Ancient Greek History is one hour, Bio 101 is a two-hour long lecture, then she has a Bio Lab, then finally her Psych 101 is only an hour and a half—but still, she's beat.
She opens the Uber app and orders a car. As she waits to see the approximate arrival time, she sits back down into her chair. A constant nervous habit of hers, she starts toying with the little gem on her neck, twisting it between her fingers, sometimes even spinning the chain around her finger.
Approximate Arrival: 6:45 pm.
Right as she's about to head out to the common area, she gets a text from her dad.
'The Police are finally conducting an investigation. They want to talk to you and your friends. What time will you be home?'
(Eva) 'Probably 7:00 pm.
'Okay. Love you. Be safe.'
She sends a quick 'love you too' text back before standing up. She zips up her coat, nice and snug. As she makes it into the halls, she can't help but stare at the floor. Not having the guts to look at Amber's face. It's weird, not being able to control what she's feeling. This new experience is entirely daunting. It's such an unfamiliar emotion to have someone gone from your life that isn't dead yet, nor found yet, just inconclusive of her existence.
She enters the main conversational area, to which she finds is vacant. Usually, it's filled with students due to its comfortable seating arrangements and its beautiful architecture. But here she sees only two students and one janitor. The emptiness she finds rather unsettling, so she plops down on a couch and immediately opens Instagram. As she scrolls through her feed she jumps at the occasional blast of thunder, followed by heavy pounding rain.
As the clock rounds 6:45, she gets a message from her Uber driver:
'Pulled in behind the apartments on 5th'
'I guess the rainfall was causing a lot of flooding down here', she thinks to herself, what other reason would he park over there? The apartments aren't that far, just a block or so. She just prays she doesn't have to walk through any puddles that are deeper than her boots. Extending her umbrella, she pushes open the heavy brass doors and is met with the chaotic weather. Because it's coming around 7:00 pm, the sky is getting pretty dark. She makes her way towards 5th, but once she gets to the building, she can't find a car in sight. There's a couple of parked cars, the occasional slow approaching vehicle, but she can't seem to find this 'grey sedan car'. She messages her driver about 5 times, but her phone says that her messages couldn't be delivered. She tries to call him, but it won't even ring.
That's when the panic kicks in. And oh boy, is it hitting her hard. With her only source of light being the street lamps and her phone screen, everything around her becomes eerie, vague. She's clicking the call button to her Dad, her Mom, her brothers, her friends, but the bars in the corner of her phone are completely empty. Through all the dense rain crashing from the night's sky, she could barely hear a thing. Her breath was becoming heavier as the thunder became deafening, the lack of light and lack of any safety sending her into pure, unadulterated terror. Her hands were shaking, her lips were freezing and the tips of her toes were going numb—she couldn't breathe a full breath and every time her heart beat faster- her lungs gave out more, her mouth was painfully dry and her eyes felt like they were being pried open to stare into the darkness, and the sky unforgivingly beat down upon her and the earth around her. Suddenly she hears a sharp clink. Her necklace drops to the wet, flooded ground, the moment she frantically bends down to grab it, her fingers barely graze the silver chain before she hears thundering footsteps spiriting toward her.
Next, her body feels as if it's being ripped to pieces, there were scratches; deep-cut, gushing wounds being gouged into her flesh, her skin was white-hot and her nerves were screaming, a loud, piercing pain pulsing into her head, before she could even feel the claws rip through her body, she saw gallons of blood paint the rainwater red, she fell to the concrete, doing the only thing she could instinctively do—scream, a blood-curdling scream, as loud as she can. The last image she sees is a loose paper, destroyed by the rushing water, her peripheral begins to go black, her ears ringing with high-pitched bells, she grasps the paper, her hand crunching directly over Amber's smearing face.
And she softly closes her shuddering eyes, the pain clogging up her body was too much to bear, and she begins to cry--hot tears disappearing into the red-stained rushing water, and she bids goodbye to what she thinks is her last day.
~~
Hey, this is my first post ya’ll, tell me what you think? xoxox I NEED to know if this is intriguing?? Should I post the next few parts? Lemme know
#dean winchester#sam winchester#supernatural#supernatural fanfiction#supernatural smut#eventualsmut#ofc#dean winchester fanfiction#sam winchester fanfiction#dean winchester smut#sam winchester smut#mystery#writing#fanfiction#jensen ackles#jared padalecki#dean winchester imagine#sam winchester imagine#supernatural imagine#story#dean winchester dirty imagine#sam winchester dirty imagine
33 notes
·
View notes
Text
Cedar Grove exterior painting
Simple Techniques You Can Use To Create That Professional Looking Finish When Painting Your Home. Acrylic Paints are by far the easiest painting products to work with. Acrylic is easy to clean up, it dries quickly and doesn't run or sag, unless you apply crazy amounts or unless moisture and cold weather gets to it. It's really easy to apply, spread out and work with. So really, how hard can it be? Cedar Grove exterior painting
To be honest, for most who have never been taught the basics it can be really difficult. I often cringe when I see non qualified people painting. Maybe it's a pride issue, I don't know and I don't mean to be harsh, after all they are trying their best, but some of the techniques they use leave a lot to be desired. Painting the correct way isn't hard, it just takes a bit of practice, but first we have to see what bad habits you have picked up and what your application techniques actually are. Then I can show you the correct way.
Once you get a few of these basics down and had a little practice, then painting with acrylic will quickly become easy and you will be applying paint with a professional, quality finish every time.
1) - First things first - To paint acrylic well, you have to paint like you aren't paying for the paint! If you want a nice paint finish then you need to apply the right amount of paint. You should never spread paint out thinly because you want to save some money or for any other reason. It simply doesn't work, it will leave you with a coat of paint that you can see through, looks scratchy, has an uneven finish, or is simply very ordinary looking. To paint well, forget about the cost of the paint and apply a nice, even, thick coat. Of course not too think or else it will all end up sagging off your wall, but we will get to how much is the right amount as we go.
2) - How to apply acrylic paints correctly using a brush When I was taught how to paint I was made to do everything with a 3 inch (7mm) brush. This includes cutting in, painting windows, Glossing off wood work, everything.
Now, while I don't expect you to have the same control over a brush that this exercise taught me, it will help you to understand some of the differences between the over all finish that a DIY person using cheap, little, fiddly brushes will get versus a painter taught the correct way using the correct equipment. The number one reason for being taught this way is that you can achieve a much nicer finish with a bigger 3 inch brush than what you can with a little brush. The second reason and it is also a big factor is that it's much quicker once you develop the skill required to cut in with a bigger brush. Good quality little brushes have their place for fiddly work but the majority of your acrylic painting should be done with a 3 inch brush.
So what is a good quality brush then? Painting with a bargain shop $2 or $3 brush is going to produce a really crap finish. Use these types of brushes for washing engine parts!
As I have stated before in other articles, I favour the Purdy range of brushes. They are fantastically constructed, they narrow down to a thin point for cutting in at the tip of the bristles, they hold their shape extremely well and usually come with a nifty storage cover designed to hold the shape of the bristles during storage. This is so that you don't set about to start painting, pull out your collection of brushes from the shed to find the bristles are now bent in all directions except a usable one. But here is the best part about the Purdy's! With the proper care and correct use these brushes last for years! I have been using one of these 3 inch types just like the one you can see on this page for 8 Years!!! That's the same brush not different brushes! 8 years, now that's a good quality brush!!! Get yourself a decent brush it's essential for creating a good painting finish.
Method for painting acrylic with a brush: Now when it comes to applying paint with a brush, I find that most people dip the paint into their pot and then straight away wipe it all off again on the side of the pot??? The next problem is they like to use very short stokes with the brush and go back and forth. Hmm. This is how to do it properly. Lets presume that you are painting a wall and you have your painting pot, paint and a 3 inch brush ready to go.
Fill the pot up with only about 100mm or 4 inches of paint leaving enough room up the side of the pot to "tap" your brush against the side.
Next you dip the bristles of your brush no more than 1/2 way into the paint tap both of the flat sides of you brush 2 or 3 times against one side of your pot (this keeps your pot relatively clean.)
With either of the thin edges of your bristles as the leading edge( or pointing in the direction you are going to move the brush. Apply straight to the wall about 50mm or 2 inches from the surface you intend to cut into and wipe the bristles about 1 arms length across the surface.
Next you are going to spread the paint up towards the line you are going to cut into. Once you have cut in a nice straight line, which just takes practice. Then finish off the entire arms length stroke with a light even pressured stroke. That's it just one stroke over the whole surface you have just painted two max. This leaves a nice even finish making sure that you haven't left any "fat" edges or stop start marks which look horrible when the paint dries. if you have any fat edges left after this, then just wipe over them again with your brush in long strokes.
The whole length of your cutting in should be about 100 - 150mm or 4 - 6 inches wide and about one arms length long with no fat edges and a nice even finish free of stop start marks. Its important To make sure that you remove all stop/start marks ensure that the finishing stroke goes back in the direction of your previously painted surface, not towards the direction that you are about to paint next. always go back into your work with a long stroke to finish off.
3) - How To Apply Acrylic Paint Using A Roller Again there are many bad habits when it comes to using a roller to apply acrylic paints and also the tools that you use will make a huge difference too.
These are the tool that I suggest you use for your painting project. Thickness of the roller - For interior acrylic paints on a normal wall/ceiling - 11mm nap/pile (that's the length of the wool - I only use the wool roller sleeves I can't stand foam or the man made fibres) Length of the roller sleeve. - I always use the 270mm roller sleeves which is the largest sleeve and frame combo that you can buy. Why waste time with a smaller one?
The type of roller tray that you use is a big factor on how easy your job is going to run. many of them are just rubbish and cause you more spillage and headache than anything else. there are a few different one that painters use. My personal favourite, and unfortunately I can't supply with a photo so you will have to put up with my lame description is a curved well type. From the side on view where you pour the paint into looks a bit like a "C" with a tray coming of the bottom of the "C". I will take a photo of a nice clean new one and post it here for you to see. This type reduces the spills and accidents immensely plus it has a handle underneath so that when you pick it up all the paint sits in the Well and doesn't spill everywhere. They are great!!
Extension Poles - they are a must! Using an extension pole is essential for creating a professional finish to your wall. If you don't use them it will take you all day to do a 5 - 10 minute job and the finish will be uneven and very amateurish. The bottom line if you want nice even & professional finish to your newly rolled surface get yourself a good twist lock or extendable roller pole.
The Roller Frame that you use isn't overly important but there are a few things to keep in mind. With the cheap roller frames often after a bit of use they start to bleed a grease that mixes with the paint and causes grey splatters of tainted grey paint on your nice new wall. While this is really annoying it can be avoided most of the time by getting a better quality roller frame. Apart from that I don't have a favourite type that I would recommend.
Method for painting acrylic with a roller: Make sure you are wearing old clothing & have remove any nice jewelry that you don't want spattered with paint, you have a good quality drop cloth down on the floor and covering your furniture. Rollers tend to spray lots of little paint flecks so cover everything up. Now after stirring your paint, pour some into you tray but don't fill it right up to maximum capacity. You need to have a little bit of room to work with, so just full up the Well of your tray not the flat tray it self. Next rinse the roller sleeve under some cold water and spin out excess water this is just to dampen the wool which stops the paint from drying hard at the base of the wool fibers.
attach the extension pole and adjust to fit your size. When rolling you want to stand about 1 metre away from the wall and be easily able to reach all the way up to the ceiling without stretching and all the way down to the top of the skirting boards without bending over. Now load up your roller with paint. Start by placing your clean sleeve on the flat tray and role into the paint coating smaller amounts of the sleeve at a time until full (should take about 5 or 6 dips to do this) Never just plunge the entire roller sleeve into the paint nor do you roll back towards you on the tray, always roll towards the paint well this will keep the paint from dripping over the edge of the tray and making a big mess.
once the roller sleeve is nice and evenly coated all over then apply to the wall. Start about 200mm or 8 inches away from the corner of the wall and about knee height and roll up wards until you get about 3/4 of the way up the wall. leave it for the moment and re fill your roller and apply in the same fashion starting about knee height and about 150mm further across the wall from your last roller full. Next you want to spread it out evenly. After the 2nd applying roll, take your roller off the wall go back to the starting point of your first roll. Applying a firm even pressure roll up towards the cornice but this time roll it a bit closer to the cornice but not up to the final height yet, stay down about 150mm for now. Then roll down and across to the starting point of your second applying roll, again rolling it up to the cornice again staying down about 150mm from it. then roll back down and across to the starting point and down to the skirting board.
Now that the majority of your paint is spread out you need to push it out the the edges of your wall. so roll the paint gently out to about 30mm above the skirting board edge of your wall and the same up below the cornice. The trick is to avoid fat edges so lighten the pressure you are applying to the roller as you approach the edges and finish with a very light pressure as you rebound and roll back in the opposite direction. So - As you roll down to the skirting board start lightening your pressure about 300mm or 1ft above the skirting board and as you get to the bottom it should be just the weight of the roller on the wall as you stop your downwards roll and start rolling back up the wall.
When spreading the paint to the outside edges or as you are pushing the paint into the corners of your wall you want to make sure you aren't pushing copious amount o paint into the corners to make fat edges. For the edges of your wall make sure the side of your roller frame that the sleeve slides up against or the side that disappears into the sleeve is facing away from the wall. (you should always lead with the edge. that means have it facing the over all direction that you are painting) Now push gently and tilting the pole away from the edge that you are rolling into (this will lift the pressure on the edge of the roller closest to the internal corner of the wall and reduce the risk of creating a fat edge in that corner). Roll gently taking your time not to get too close to the other wall.
Now that the paint is evenly spread across the wall and all the surfaces are covered you need to apply the finishing roll. This is other wise known as "laying it off" with your now emptied roller start about half a roller width from the corner of the wall at about waist height. Again make sure the part of your frame which going inside the roller sleeve is facing towards the direction that you will applying your next roller full to. Now again slightly tilt the roller pole making your trailing edge of the roller sleeve light to avoid leaving a line of paint. Now roll up and into the top corner of your wall then roll down along the wall taking care again not to get it on the other wall. Once at the bottom roll up to the cornice this time slowly moving your roller as you go about half a roller sleeve width away from the internal corner once at the top. Do this movement over the whole rolling stroke don't lift off and reposition or slide over then start again for this lay of technique your roller should never lift off the surface. Once at the top go back down again moving 1/2 a roller sleeve over on your way down then at the bottom do it again and keep doing this until you have gone over the entire surface you just applied paint to.
Have a quick look to see if you left any lines of paint down your wall form uneven pressure or incorrect technique if it all looks good the start with the applying technique again. if not re do the laying off method until you are happy with it. For the rest of the wall it is exactly the same method as before. only you treat the previous laid off surface as the internal corner of the wall, except for when you get to the spreading it out part and when you lay it off. This time you will go back into your previously laid off surface about 1/2 a roller width when spreading it out and 1 full roller width when laying it off. Again with your laying off technique, start away from where your laying off stroke that goes back into your existing work will finish and at waist height roll up to the full 1 roller distance into the previously laid off surface roll straight down and then start the up down 1/2 roller at a time movement across the wall until you cover all the newly applied paint.
For all surfaces that you roll its the exact same technique. on ceilings though it is worth me mentioning that you start against one edge and work across the ceiling walking backwards. but you apply and lay off the paint exactly the same way. put it on spread it out and roll to the edges then lay it off and you're done! Painters tip: Remember to lighten the pressure that you are applying on your roller pole when you are about to change directions to avoid leaving a build up of paint where you changed the direction or other wise known as a "fat edge".
0 notes
Text
2020 Ford Transit review: A likable high-roof hauler
New Post has been published on https://appradab.com/2020-ford-transit-review-a-likable-high-roof-hauler-3/
2020 Ford Transit review: A likable high-roof hauler

This Ford Transit comes with the medium-height roof. Believe it or not, there’s an even taller model available.
Craig Cole/Roadshow
You don’t need to pastor a megachurch or run a plumbing-supply company to own a 2020 Ford Transit van. Those are admittedly the sort of customers this vehicle is aimed at, but it’s comfortable and pleasant enough to drive that you might consider one for your small business or your family, especially if you’ve got a large brood or just want a versatile camping rig.
Like
Surprisingly agile handling
Excellent forward visibility
Potent V6 engine
Don’t Like
Awkward pedal placement
Cramped footwells
Booming interior
Ford offers a dizzying array of variants in this Kansas City, Missouri-built vehicle, from cargo- and passenger-specific models, to chassis cab and cutaway variants. Giving customers even more choice, it’s also available with three different roof heights and in a trio of lengths. The Transit pretty much covers the market, meeting the needs of everyone from HVAC service technicians to adventure seekers who want to upfit their Transit to be the ultimate overlanding machine.
My tester is Ford’s new-for-2020 crew-van model, which has both a large cargo area and seating for five people. This van also features a regular-length body and medium-height roof, but trust me, even though it’s the “midsize” offering of the family, it’s plenty big. I can stand up in it without clocking my head on the ceiling, and an air mattress should fit without issue if you dream of owning a 1970s-style custom van. Sure, it’s a bit of a step up to get into this vehicle, but it’s not that bad.
Another welcome addition to the Transit for 2020 is available all-wheel drive, which affects neither the floor nor seat height. The system can send up to 100% of available torque to the front wheels as needed, giving this commercial-grade vehicle plenty of capability. Ford even offers a couple driver-selectable modes, one for mud and ruts as well as another for slippery conditions. Predictably, there’s no sport mode, which is a bummer because I wanted to autocross this Transit. Not only would it turn a few heads snaking around those cones, it might turn in some pretty impressive lap times. Seriously, this van drives that well.
For 2020, the Transit’s base engine is a 3.5-liter gas V6 that delivers 275 horsepower and 262 pound-feet of torque, pretty feeble figures on paper but that engine moves the Transit with shocking ease, at least when unladen. The new 10-speed automatic transmission and 3.73 limited-slip rear end make the most of every available pony. Quick to rev and unexpectedly smooth, it gives this van plenty of scoot off the line and at highway speeds. The gearbox is plenty responsive, quickly upshifting as you accelerate and easily dropping gears when it’s time to boogie, but I wish it were a touch smoother. Ford’s 10-speed auto-box isn’t always the most refined transmission. For customers who need even more performance, a twin-turbocharged 3.5-liter EcoBoost V6 is also offered. It delivers 310 hp and an even 400 lb-ft of torque. Models equipped with that turbocharged engine feature a different grille design for enhanced cooling. The five-cylinder diesel option in previous model years is no longer offered.

Due to the Transit’s van-like proportions, it’s hard to see, let alone access, the engine.
Craig Cole/Roadshow
As for dynamics, this house-size van is rather enjoyable to pilot, with unexpectedly crisp steering. In fact, for my money, it drives better and feels smaller than the Ford Ranger. Yeah, I couldn’t believe it either, but this vehicle feels more buttoned down, responsive and enjoyable than the Blue Oval’s own midsize truck, which can be pretty sloppy and disconnected. Empty, the Transit’s ride quality is also amazingly good, firm and a tiny bit bouncy at times, but nowhere near as harsh as you might expect for something with a Gross Vehicle Weight Rating of 9,070 pounds and a maximum payload capacity of 3,670 pounds. Swing for the fences, and you can get a Transit with a GVWR of 10,360 pounds and with a max payload rating of 4,550 pounds. Interior noise levels are, as expected, somewhat elevated since it’s basically just a giant uninsulated box on wheels. Load this baby up with freight and it should quiet down appreciably.
Like other vehicles with a GVWR exceeding 8,500 pounds, this van is exempt from government fuel-economy ratings. In testing around town and on the highway, I averaged about 16 mpg empty, which is better than I expected. Of course, if you’re hauling anywhere near this van’s limits, expect a lot less.
Perched atop the Transit’s elevated driver’s seat, which is passenger-car comfortable and trimmed in a rugged-feeling fabric, this Ford gives you picture-window forward visibility. The expansive windshield and relatively thin roof pillars make it easy to see where you’re going. Of course, a towering ride height doesn’t hurt, either, allowing you to look down the road over the rooftops of practically every other motorist except long-haul truckers. When it’s time to back this beast up, the sharp reversing camera and large outside mirrors with convex reflectors are surprisingly helpful. A 360-degree camera is not offered.

The Transit’s interior is comfortable and highly functional.
Craig Cole/Roadshow
Unfortunately, there is a tradeoff for those superb sight lines. The Transit’s driving position is as awkward as a middle-school dance though not as cumbersome as the Ram ProMaster’s seat, which is much more bus-like. Sitting so far forward means your left foot essentially rests above the wheel. This van’s front footwells are quite narrow as a consequence, and the brake pedal is on a plane far above the accelerator’s, which makes it ankle-twisting to operate. At least the brakes are beautifully weighted, with a nice, firm feel and no grabbiness at all.
As far as storage, let’s just say the Transit has cubbies and cupholders and bins galore. Its interior has no shortage of places to stash things, with large pockets on top of the dashboard and additional nooks down low. There are huge bins above the front seats and more junk-carrying receptacles on the door panels. If you run out of spots to put things in this van, you’re probably an undiagnosed hoarder. The rest of this van’s interior is decidedly workaday, constructed of coarsely grained hard plastic. Easy to clean and surely hard-wearing, but luxurious it is not. Making this blue-collar vehicle a little more refined, the Transit can be had with a power-sliding side door and even swivel seats, more new equipment for 2020. Ford also offers some fresh exterior colors and a 31-gallon fuel tank.
My test Transit arrived fitted with Ford’s Sync 3 infotainment system with navigation and an 8-inch touchscreen, an $810 option. This is one of my preferred multimedia arrays, as it’s easy to navigate, plenty snappy and supports Apple CarPlay, Android Auto, Amazon Alexa and even Waze. A multifunction display with a 4-inch screen is standard if you don’t feel like shelling out extra cash.

Really, this high-riding van ain’t too shabby.
Craig Cole/Roadshow
For 2020, a range of new advanced safety features are standard. Every Transit now comes with automatic emergency braking, forward collision warning, automatic high beams and even lane-keeping assist. This van doesn’t really wander (at least when there aren’t stiff crosswinds), but that last item is still helpful, gently nudging the Transit toward the center of its lane should you drift too close to one of the lines. Other models come with blind-spot monitoring including trailer coverage and cross-traffic alert. Additional available features include enhanced active park assist, high-intensity discharge headlamps and even adaptive cruise control, which is smooth and attentive even if it doesn’t work in stop-and-go traffic. As for protection, the Transit comes with your standard, three-year/36,000-mile bumper-to-bumper warranty. The powertrain and safety systems are covered for five years or 60,000 miles, plus you get roadside assistance for the same amount of miles and time. This coverage is exactly the same as you get with a Ram ProMaster, and very similar to the Mercedes-Benz Sprinter, though it comes with a five-year/100,000-mile powertrain warranty.
The 2020 Transit seen here stickers for $51,420. That price includes a smattering of useful options and a whopping $1,695 in destination fees. Is this high-riding van for everyone? Of course not. But drivers in need of a rig that can haul vast amounts of cargo or a Sunday school’s worth of kiddies would be wise to consider one. This big boy is comfortable, drives well and is super versatile, especially now that all-wheel drive is available. When it comes to hauling, the 2020 Ford Transit is tough to top.
0 notes
Text
Falling on Deaf Ears
Inspired by this post by @reioka (because jesus it resonated hard), but it’s a bit different. Hope you like it!
Summary: It wasn’t like Tony wasn’t used to it. He had years and years of experience in being ignored. Hell, he’d grown up with Howard and Maria Stark as his parents. He couldn’t even begin to count the number of times his six-year-old self had been dismissed from Howard’s presence, even when he’d been bouncing up and down with obvious excitement. And Maria-- well, Maria was always so busy. She’d give an absent ‘mm-hm’ every once in a while, but even those were rare compared to the complete apathy he usually got.
So this. He was used to this. And hey, at least he wasn’t getting hit this time around.
(Or five times Tony's ignored by his teammates, and one time someone finally listens.)
Link for AO3
I.
It wasn’t like Tony wasn’t used to it. He had years and years of experience in being ignored. Hell, he’d grown up with Howard and Maria Stark as his parents. He couldn’t even begin to count the number of times his six-year-old self had been dismissed from Howard’s presence, even when he’d been bouncing up and down with obvious excitement. And Maria-- well, Maria was always so busy. She’d give an absent ‘mm-hm’ every once in a while, but even those were rare compared to the complete apathy he usually got.
So this. He was used to this. And hey, at least he wasn’t getting hit this time around.
“--but it can’t be Kevlar because while it’s strong, it’s not light enough, and isn’t nearly as flexible as human skin, so then I was curious and I started researching, and then I thought it could be nano cellulose, because it’s completely organic and way more flexible, but actually, it’s so organic it would react with the water in his body and it would get all bloated, and considering John Smith did not, in fact, blow up into a balloon, it couldn’t have been that. So then, I kept researching, and--”
Tony faltered as Clint glanced away, distractedly looking at the TV. Tony tried to smile, before halfheartedly continuing, “--And-- and it actually could be graphene, because it’s only made up of locked carbon crystals and is almost totally nonreactive, and it’s so light you could--”
And now Clint isn’t even looking at him at all, not even trying to make it seem like he’s paying attention.
“You-- you could actually have a layer as big as a football field, and it would still way less than...”
He isn’t listening.
“... a gram,” Tony mumbled, his hands shaking around his mug of coffee. He shut his eyes and set it down, shaking his head.
It didn’t matter. Really, it didn’t.
Tony refused to let out a breath as he silently stood up and disappeared from the room.
II.
God knew Tony liked to ramble, and despite him trying to stop himself, he constantly caught himself going on for a half hour without even stopping.
“And then this guy-- I don’t even know who the fuck he was-- just came up to me and told me-- he didn’t ask, he told me-- to sign his middle finger. I don’t know why, like was he gonna get it tattooed or something? That’s still not as weird, though, as the time when a guy…”
He didn’t even know when he’d started, but when he looked up, no one was even in the room. He looked towards the couch Steve had basically taken over the last few months. (He liked to draw in here. And watch Tony work. Not listen, though, apparently.) There was an abandoned, half-finished sketch on the coffee table.. Tony had no idea when he’d left.
Tony closed his mouth, setting down the Allen wrench he’d been fiddling with. He remembered, back in college, hanging out with Ty.
“Jesus Christ, Tony, do you ever shut up?”
Tony clenched his jaw before picking up the wrench and going back to work.
III.
The power had gone out all across the city, including the coffee shop he and Nat liked to disappear to sometimes in the middle of the night for coffees that were more sugar than coffee. When Tony pulled out his phone to find the cause of the power outage, his findings made it easy for him to pass the time with some chatting. Or rather, ranting.
“God, this is ridiculous. God fucking dammit, Justin Hammer can suck my-- you know what, no, he can’t, because I deserve better than that. Justin Hammer can suck a duck’s dick-- except no, even a rabid corkscrew-dicked duck deserves better than that. Wait, can ducks even get rabies? Justin Hammer can get rabies. Fuck, Hammer probably does have rabies, that’d explain his complete idiocy, not to mention how much he spits when he talks, Jesus Christ, and just how the hell does he manage to make a virus that causes power to go out all across Manhattan? How did that man ever finish the seventh gra--”
“Shit.”
Tony looked up from the floor, only to see Natasha’s face illuminated by her phone. She was-- she was playing a game, something that revolved around colors. Something that was completely absorbing her attention.
Attention that was not, as he thought, on him..
“Uh, Nat?” he said, his coffee suddenly feeling cold.
“Hm?” she hummed, tapping her thumb against the screen furiously. She didn’t bother to look up.
“Uh. Were you listening?” he asked, his voice sounding stupidly hopeful.
“Justin Hammer, idiot, something about duck dicks, I got it,” she said, before huffing as she lost again. “Dammit.”
Tony nodded, his voice sounding small and subdued. “Right.”
IV.
“And-- oh! Oh, you probably haven’t gone to Coney Island yet, have you? It’s fun, as long as, y’know, you don’t do the hot dog eating contest right before you ride the Cyclone. But the Wonder Wheel’s always fun. I mean, I was terrified of it when I was little, but that’s because I was scared of heights. It wasn’t like it was unfounded, though, I mean, I did fall off the roof of the mansion once. Not like. All the way to the ground. Just to one of the lower dormers. I don’t remember what I was doing. I think I was looking at the stars. Or maybe I was trying to launch a rocket. Actually, I think I might have been trying to set off a weather balloon.
“Whatever, point is, my fear wasn’t unjustified. I’m not afraid anymore, though. Of heights, that is. I’m afraid of loads of other stuff, like clowns? Dolls? All that nonsense? Yeah, no. Never. I will never allow those in my presence. At least I’m not scared of chickens. Rhodey is. They freak him out. I don’t know. Personally, I think it stems from a project involving an egg he had to do in his high school home ec class, but I’m no professional.
“What was I saying? Oh, yeah, you’d love Coney Island. You could totally invite Jane up for a weekend, it’s a prime date loca… tion.”
Thor wasn’t even standing next to him anymore. He was at a churro stand twenty feet back, smiling cheerfully at the vendor as he bought a few.
Tony closed his mouth before silently walking back to join the thunder god.
When Thor completed his purchase, he took a bite of his fried pastry. He turned to Tony, smiling widely. “Anthony! These cinnamon treats are delightful!”
Tony forced a grin. “Uh-huh.”
V.
Sometimes he wasn’t even chattering nonsense. Sometimes, it was important.
“Plus, something about just getting it off my chest, and putting it out there in the atmosphere, instead of holding this in… I mean, this is what gets people sick, you know. Wow, I had no idea you were such a good listener. To be able to share all my intimate thoughts and my experiences with someone, it just cut the weight of it in half. You know, it’s like a snake swallowing its own tail. Everything comes full circle...”
There was a thud, and Tony faltered. “And-- and the fact that you’ve been able to help me process…” He looked over, and Bruce was rubbing his eyes. He-- he just-- oh. He’d been sleeping.
“You with me?” Tony said, after a moment of hesitation, hoping he’d been wrong.
“Sorry, I was, yeah. We were at, um…”
Tony resisted a sigh. “Are you actively napping?” he said, not bothering to hide his offense.
Bruce stammered. “I was… I… I drifted.”
Tony bit his lip so he wouldn’t do something stupid like scream. “Where did I lose you?”
Bruce hesitated for a second, at least having the decency to look guilty, before he said, “Elevator in Switzerland.”
Oh. Oh. Okay. “So you heard none of it.”
Bruce shook his head. “I’m sorry.” He reached towards Tony, but the genius shifted away ever so slightly. “I’m not that kind of doctor. I’m not a therapist; it’s not my training--”
Tony’s frustration bubbled over. “So?” That’s not why he called Bruce, he was just-- his doctor told him he needed to talk to people, and he thought maybe his friend would listen, but no-- no, of course not.
“I don’t have the…”
“What, the time?” Tony finished, staring at his friend, trying not to show the way his brain was shutting down.
“Temperament.”
Tony nodded, before beginning to ramble about something meaningless so he wouldn’t say something he’d regret.
Because this had been important. It had been.
It had, hadn’t it?
1.
“--and God, he’s hopeless. He tries his best and all, but Jesus, he’s a disaster. Half the coffee I’ve ingested over the last twenty years has contained some kind of grease or oil. He has his own cone of shame that has his name on it. Honestly, he’s ridiculous. One time, though, I found him with a flower crown on his head, and I honestly have no idea how he got it. Where could Dum-E have gotten a flower crown? I think he and JARVIS were messing with me. God, those two could team up and do some ridiculous--”
Jesus Christ, Tony, do you ever shut up?
Tony cut himself off, barely glancing towards his companions before dropping his gaze to his hands, his hands fiddling with a thread on his jeans.
They didn’t care, stop fucking rambling for once in your damn life, just--
“Stark?”
Tony startled, looking up at Gamora, who was leaning against the wall with her arms crossed, looking at him with raised eyebrows. Expectantly.
Wait. Everyone was looking at him expectantly. Drax had turned away from looking out the window to look at him, Groot was swinging from the ceiling patiently, Rocket was looking up from the gutted gun in front of him, and Peter was sitting across from him with a grin on his face. His beloved Walkman (which used to make Tony cringe, but had since gained his own adoration as soon as he learned of the sentiment attached to it) was even paused.
“Huh?” he said, his eyebrows furrowing in confusion.
“You were saying?” she said, tilting her head forward.
Tony blinked. “What?”
“You were telling us of your children,” Drax said. “JARVIS and the dumb one liked to team up and prank you.”
“Well--” Tony stumbled, his eyes flickering between each of them before looking at his hands again. ‘--yeah, but you guys don’t want to hear about all that.”
“What the hell makes you think that?” Rocket snapped, making Tony startle and look up. “We were all listening!”
“I am Groot!” Groot added, kicking his little legs and nodding enthusiastically.
Tony blinked, before he glanced around at them. “I-- no, it’s fine. Seriously. I get carried away sometimes. I didn’t realize I’d been talking so much, it’s fine. You guys can just-- you can just get back to what you were doing.”
Across from him, Peter frowned. Tony caught the look he gave around the room, but he didn’t get what it meant until everyone was quietly making their way out, going to different parts of the ship. Rocket grumbled and Groot sighed in defeat, but besides that, there were no protests.
Once they were alone, Peter walked around the table separating them and sat next to Tony, taking the genius’s hands in his.
“What was that, Tony?” he asked, and Tony winced when he heard the quiet hint of sadness in his voice.
“I’m sorry, I didn’t mean to prattle on and on. Just tell me to shut up whenever, okay?” he muttered, rubbing his forehead.
Peter huffed out an exasperated yet soft, “Aw, stardust,” before he gently pulled Tony from his own seat and into his lap. “You know I will never tell you to shut up, because I love hearing you talk. Your brain is awesome and your mouth is awesome, and I love everything that comes out of both.”
Tony huffed, ducking his head and hiding his face in Peter’s neck. “Peter…” he said, a hint of exasperation in his voice.
“I’m serious,” Peter argued, pressing a kiss to Tony’s head. “You could literally talk about nothing at all for days on end, and I would never get tired.”
“That’s stupid,” Tony mumbled, his lips tickling Peter’s skin.
“Maybe, but it’s nowhere near as stupid as you thinking I don’t like it when you talk.” He ducked his chin so he could gently push Tony’s head up, and he gave him a raised eyebrow. “Would you like to tell me where exactly this worry came from?”
Tony sighed, rolling his eyes. “Pete…” he whined.
“Because if it was the Avengers--” He chuckled bitterly. “I’ve got another thing to add onto my list of stuff to shoot them about.”
“You mean talk to them about,” Tony corrected, raising his eyebrows.
Peter rolled his eyes. “Yeah, okay,” he said sarcastically. “If talk is a euphemism for shoot.”
“Peter.”
“Nuh-uh. If those assholes seriously made you think that people don’t care about what you’re saying, then they deserve to be shot. Everyone else agrees.”
“That’s because everyone else is gun-happy.”
“When it comes to the Avengers? Hell, yeah, we are.”
Tony rolled his eyes before dropping his head down again, allowing Peter to pepper his hair with kisses.
“Seriously, though,” Peter said. “I love it when you talk. I swear I do. Especially when you’re excited. You’re freakin’ gorgeous like that.”
“Peter,” Tony whined, even as Peter lifted his chin so he could kiss his neck.
“You are,” Peter sang, kissing up his neck and along his jaw. “You’re gorgeous, and smart, and funny, and gorgeous--”
“You said that already.”
“Stardust, you’re so gorgeous, it counts three times,” Peter mumbled into his cheek, before finally pulling away and smiling at him. “Maybe four. Maybe five.”
Tony rolled his eyes, smacking Peter’s shoulder. “You’re ridiculous.”
“Not as ridiculous as your eyes. Seriously, I could drown in those.” Ignoring Tony’s groan, he continued, “Really! There’s so pretty. I could literally stare at them all day. Like, your eyes, your lips, and your voice. That’s all I need for the rest of my life. I don’t ever need anything else. Not even food.”
Tony rolled his eyes, resting his head on Peter’s shoulder. “You’re so dumb,” he muttered fondly.
“I dunno, I must’ve done something right if I got you,” Peter said.
Tony lifted his head, giving Peter an unimpressed look.
Peter grinned, tightening his hold around Tony’s waist. “So, do you wanna keep telling me about your AIs’ and bots’ shenanigans?”
“I could,” Tony said, smiling dopily as he tipped his head forward to rest his forehead against Peter’s. “But I’d kind of rather be kissing you.”
Peter grinned. “See, I told you your mouth is awesome.”
#starkquill#tony stark#guardians of the galaxy#seriously though i have never related to tony more in my LIFE#:(((#but he has the guardians so its okay!#this was my first time writing starkquill and i loved it!!#ah#tony#peter quill#gamora#drax#rocket#groot#steve#clint#natasha#bruce#thor#i think thats everyone#lindsey writes
65 notes
·
View notes
Text
A Quick & Easy Way To Hang Curtain Rods
Last fall we shared our trick for hanging affordable Ikea curtains so they look a lot more expensive than their $14 price tag per panel would suggest (across an entire house you can save thousands with that trick & these curtains alone!!). But since we were just replacing our old bedroom curtains when we wrote that post, we skipped the crucial step of actually hanging the curtain rods themselves. And since we just installed approximately one million curtains at the duplex (okay, 16 of them, but that’s a pretty notable amount to hang all at once) we wanted to share a new trick that we used to speed things up, keep everything looking level and equally spaced, and make it much easier and less overwhelming in general.

But first, let’s establish some quick curtain basics:
How HIGH Should You Hang Curtain Rods?
Like anything in decorating, there’s not a hard and fast rule for this, but most people agree that curtains look best when they’re hung (say it with me!) HIGH AND WIDE. As in, higher and wider than the window itself. This not only creates the illusion of a bigger, grander window, but it also makes your room feel taller and draws the eye up. This is a 9′ room below, and you can see how nice it is for the window trim to get to breathe a little, and the eye goes from floor to almost-ceiling thanks to those long white curtains and that highly hung rod.

sofa | side table | coffee table | rug | bookcase | lamps | wall: SW White Heron | trim: SW Stone Isle
Speaking of the floor, most experts say that your curtains should usually touch or nearly touch the floor itself. This is all personal preference (some like them to hover slightly above the ground, others love a dramatic pool of fabric at the bottom) but we typically like them to graze the floor ever so slightly – like below in our showhouse’s dining room. We find this helps keep them in place better (when they don’t quite touch they tend to just hang randomly, but when they graze the ground they ground themselves and stay put if that makes sense).

Having them just touch and not be extra long and pooled makes them easier to move for vacuuming and ours don’t get all dragged around and gross on the bottom since they’re not excessively long (bonus: remember these curtains are 100% washable! In fact one of the first steps of getting them is to wash them to preshrink them so whenever you wash them again later, they don’t shrink on ya and the rod is still in the right place – more on that here).

But back to the rod. The precise placement of yours depends on a few factors (ceiling height, curtain length, trim & molding style, etc) so I can’t give you a hard and fast measurement for where your rod should always go… but generally, we like to hang ours about 3-4″ below the ceiling or, if there’s crown molding, 3-4″ below the bottom edge of the crown.

capiz chandeliers | benches | chair | marble vase | stools | pendants | sconces
This allows the curtain rod to “reside” fully (including finials) within the painted area between the window and the ceiling, which always looks SO NICE. But the important thing to note is that we’re hanging them in relation to the ceiling, not the window. It’s the assumption that your curtains need to relate to the window that causes a lot of people to hang their curtains too low. Heck we have seen rods drilled right into the window trim itself, which is just another way to make things feel really squat and cramped.
Remember, trim looks so nice when it’s allowed to breathe without any rods looming over it or being drilled right into it. That being said – sometimes the window trim is really close to the crown, and in that case we like going into the wall above the trim if possible – since the crown or the trim might look tortured with a rod sticking out. This is another picture from the showhouse we designed a few years back to demonstrate what we mean:

Your best bet is to have someone hold half of the rod up with one curtain panel attached (after you’ve washed, ironed, and done whatever else might change the height of your panel – except for hemming, that should happen once they’re hung so you can get the perfect length). If you step back and view it while someone holds it up for you, you’ll be able to decide what looks best to your eye – and using that 3-4″ below the ceiling or crown molding guideline can help.
Of course there are super tall cathedral ceilings, or rooms where the ceiling height slopes, etc – so this guideline probably works best when the ceilings are 10′ or lower without much of a slope. All super tall rooms or spaces with sloped ceilings are special cases – but again, looking with your eyeballs as someone holds half a rod with a panel on it can really help you visualize what looks best.

How WIDE Should You Hang Them?
This is another thing that’s influenced by a variety of factors, like the size of the window itself, what else is on the wall (especially if there are OTHER windows nearby), and how tight or loose you want your panels to look. Generally we like to place the rod hooks about 8-11″ from the outer edge of the window trim.

sofa | side table | coffee table | rug | lamps | media cabinet
This gives us the loose, breezy curtains we like, while still allowing us to barely cover the window molding, which is what creates the illusion that the windows are wider than they really are. In other words: THE CURTAIN PANELS ARE HANGING IN FRONT OF THE WALL NEXT TO THE WINDOW – NOT IN FRONT OF THE WINDOW (which makes it look smaller and blocks light). Sorry for shouting, but it makes such an insane difference when people stop hanging their curtain panels right in front of their windows.
We might hang the rods less wide if there are windows that are closer together than usual (like in our bedroom below – where they’re just a few feet apart, plus that one window on the right is very close to the right wall). We don’t want them looking cramped so in the instance below we didn’t go as wide with the rods – but we definitely made it so that as much of the curtain panels as possible could hang in front of the walls around the windows as opposed to blocking the windows themselves.

bed | nightstand | armchair | dresser | floor lamp |chandelier
Conversely, we might hang them even wider than 8-11″ beyond the outer edge of the window trim if we’re trying to fill a large wall space. We might even hang the rod wider on one side than the other if we’re trying to make a window look less off-center (more on that here – it can make all the difference!). So it really is flexible.
Ok, But Now For Our Curtain Rod Trick That’ll Save You Time (On Video)
The reason for all that mumbo jumbo is because knowing the width (your desired distance from the window trim) and height (your desired distance from the ceiling) is what makes this easy trick possible. John demonstrates it all in this video below (also watch for my super cool footwear cameo). There are more photos after the video for those who can’t watch right now, but I’d strongly recommend coming back to view it when you can – things are so much easier to “get” when you see them in action on video – and this skill is handy to have forevermore.
NOTE: If you’re viewing this in a feed reader, you may need to click through to see the video. You can also watch it here on YouTube.
Step 1: Determine Your Measurements
John and I determined that for the duplex we wanted to place our curtain rods 10.5″ from the outside of the window trim (weirdly specific, I know) and 3″ down from the ceiling. I should note that these are our measurements to the screws (the top screw, to be exact) since we find it easiest to work with the measurements of where you’ll actually need to drill. Watch as John models exactly what I mean below:

Step 2: Make Your Template
We used a scrap piece of cardboard to make our template – marking 10.5″ from each side and 3″ down from the top. This was actually the cardboard that came in the curtain package, so you might have something like it on hand already! Once we marked our lines (you’ll see them labeled below), we lined up the curtain rod hook and marked the two screw holes on BOTH 10.5″ marks.

3. Drill Pilot Holes
You can pre-poke holes along these two marks, or you can just do it when you mark your first window. Load up your power drill with a small pilot hole bit (we used a 3/32″ one) and hold your template above your window with the edge lined up with the outside edge of the window trim and the top held flush to the ceiling. Then you can just drill small pilot holes through your two template marks.

Now, a note about keeping things level: CEILINGS AREN’T ALWAYS LEVEL (I’m looking at you, duplex) so using the ceiling as your guide might seem ill-advised. What if your ceiling is sloped and your curtains end up being sloped too?!
Well…. we have actually found that when you’re hanging the rod close to your ceiling, you actually want the rod to follow any slope in the ceiling exactly! It will be your eyes’ closest reference point for a straight line, so it will appear level even if it isn’t!! Meanwhile if you hang the curtain rod level but the ceiling slopes, the rod will actually look wrong! Or emphasize that the ceiling is wrong! So yeah, using the ceiling as your guide actually works well for wonky ceilings (again, the duplex has plenty of those – as does the pink house!).
4. Drill Larger Holes & Add Anchors
Next you’ll want to make your pilot holes on the other side the window using the other half of your template (this is why you marked 10.5″ from BOTH sides of the cardboard) – so you can use it as a template on both sides of each window. Assuming you don’t hit any studs, you’ll need to add anchors after making those pilot holes, so swap out your drill bit for the correct size that works with your anchors (the provided anchors for our rods needed a 3/16″ drill bit) and drill into each premade pilot hole to make larger holes that fit your anchors. Bonus – the template acts as a great way to catch drywall dust. John was very excited when he discovered this. Just look at the joy on his face.

With all of your anchor-ready holes drilled, gently tap in your anchors in with a hammer or mallet. As I passionately interject in the video, your anchor holes shouldn’t be too loose or the entire curtain rod will be rickety and won’t hold up. And you shouldn’t be able to push your anchors into the wall by hand or the holes are way too loose (which can cause your rod to sag or fall out of the wall). So using the correct drill bit size for your anchors is important. It should be indicated in your curtain rod’s instructions or on the box that your anchors came in.
5. Screw Your Hooks To The Wall
The rest is pretty straightforward – hammer in your anchors and secure your curtain rod hooks to the wall using the provided screws. I insisted on filming John as he demonstrated this part too, so if you want to see it in action you can catch it in the video above. Truly I think watching these things get done in real-time is worth a thousand blog pics & words – so check out the video whenever you have a second.

Bonus Tip: Correct Any Rod Sagging
I’m gonna throw in another little hack here. Depending on your rod and how wide it is, you may notice that it appears to sag a little bit in the middle – especially where the smaller rod piece connects into the larger ones. Even if it’s super secure to the wall, it’s just that the skinnier middle rod looks like it’s sloping down to your eye – and I’m Type A to notice this and hate it. Your package may come with a third hook to hang in the center of your window if you reach a certain span with the rod, but often ours aren’t super wide so another support bracket would be overkill – so we rely on this weird little hack instead. Emphasis on WEIRD.

First, I take some of the protective plastic end caps that come on the curtain rods (they’re just packaging) and use a utility knife or scissors to cut off some small slices.

Then we tuck a piece inside the curtain rod at whatever connection point is sagging. It’s important that you put it on the TOP side of the rod and if you can’t slide it all the way in, just rotate your rod slightly so it’s hidden from view because no one is viewing your rod from the top. I know it’s REALLY weird, but it has been an easy way for us to correct a little bit of rod sag which makes my heart very happy. Just trust me – there is a noticeable difference and it no longer looks like it’s sad and droopy. Plus it’s free and I’m scrappy. So yeah. Five stars, would recommend.

That should pretty much do it for hanging the actual rod itself. And again, you can check out the post from last fall with our tips for actually preparing & hanging these inexpensive white curtains themselves. Between this post and that one you should be able to add curtains that are extra affordable (and washable!) along with tackling a whole bunch of windows at once, which might have felt overwhelming or nerve-wracking before. And you’ll definitely be faster with our little template trick too ;)

sofa | coffee table | rug | lamp |bookcase
Oh, and the curtain rods we typically use are either these oil-rubbed bronze ones with these ring clips (ordering them online means you don’t have to run from store to store to find enough that all match) and sometimes we grab these Allen + Roth rods from Lowe’s in person if they have enough (their stock is often spotty).
When NOT To Use Curtains
“Wait, what if I have baseboard heaters or a built-in bench or something under my window?
I get this question a lot so I couldn’t end this post without touching on it. Some spots just aren’t great for a curtain panel. If it can’t hang all the way to the ground, sometimes it can make a room feel awkward to hang a not-quite-full-length curtain panel. There are definitely exceptions where cafe curtains can look really sweet, but we generally just go whole-hog (full curtains from floor to almost-ceiling) or skip curtains entirely in that spot. Take our dining room, for example, which has two heat registers right where curtains would hang, as well as a window that’s super close to the corner – so the panel would cover a lot of the window instead of having a wall to hang in front of:

capiz light | stair runner | entry table | glass jug
We just skipped curtains in there and went with woven shades. The room still flows nicely with other rooms nearby, since we kept the woven shades consistent throughout the first floor of our house.
For example, these are the same shades in the kitchen (you can read more on our curtain reno here):

Clearly we couldn’t have long curtains hanging down from those kitchen windows since they’d hit the counter – so we just went with the nice warm texture that shades added.
And here’s the living room, which DID have room for nice long curtains (and we love the softness they add), so we did BOTH in here. The woven shades tie into the other spaces that also have them with or without curtains…

sofa | chairs | side tables | marble table | floor lamp
… like our home office, which also has both.

desk chairs | parson desk | rug | bookcases
Our home office is actually a nice room to use as an example that you don’t have to treat all windows in the same room the exact same way. See how the windows along that right wall wouldn’t have room for curtain panels and the cork board (they’d basically cover the area where the cork board is, if we hung them wide so they didn’t entirely block the window?). So we just skipped them on that wall. Still looks fine having them around the bay window and not around those front windows, which also have heat registers that the curtains would have blocked on both sides. So it worked out just fine. It’s kinda like the bay window is the star, and the front windows are just supporting actors.

My closing lesson would be: general curtain rod guidelines and a trick to hang them more easily & quickly can be handy, but when it comes to the whole “what would look good in here” question, every single person might have a different challenge, layout, etc – so it’s really smart to have someone hold things up and step back and trust your eye. Try different heights. Stare at a picture of a certain window shade on your phone while standing in that room and looking at the window. Really try to picture things before you commit. Heck, you can even try photoshopping different solutions or printing out a photo of your room and drawing right over it (color blinds or curtains right onto the pic – this is the original photoshop – ha!).
And don’t forget to consider woven blinds or even a pretty patterned roman shade (like this) for certain spots where curtains wouldn’t quite work – and remind yourself that it’s ok to just take your time and figure things out as you go. So many of our rooms have had curtains or blind changes while we figure it out – so don’t beat yourself up about it if it takes a second try.
P.S. Wanna know where we got something in our house (or what color’s on the walls)? Click here. And we made the same masterlist of sources & paint colors for the beach house too for ya. And we’re pulling together a source lis for the duplex – it’s not very thorough yet, but a lot of the stuff we have there is on this page for ya – and there’s more to come.
*This post contains affiliate links*
The post A Quick & Easy Way To Hang Curtain Rods appeared first on Young House Love.


A Quick & Easy Way To Hang Curtain Rods published first on https://landscapingmates.blogspot.com
0 notes
Photo

A Quick & Easy Way To Hang Curtain Rods https://ift.tt/2TLWdLz
Last fall we shared our trick for hanging affordable Ikea curtains so they look a lot more expensive than their $14 price tag per panel would suggest (across an entire house you can save thousands with that trick & these curtains alone!!). But since we were just replacing our old bedroom curtains when we wrote that post, we skipped the crucial step of actually hanging the curtain rods themselves. And since we just installed approximately one million curtains at the duplex (okay, 16 of them, but that’s a pretty notable amount to hang all at once) we wanted to share a new trick that we used to speed things up, keep everything looking level and equally spaced, and make it much easier and less overwhelming in general.

But first, let’s establish some quick curtain basics:
How HIGH Should You Hang Curtain Rods?
Like anything in decorating, there’s not a hard and fast rule for this, but most people agree that curtains look best when they’re hung (say it with me!) HIGH AND WIDE. As in, higher and wider than the window itself. This not only creates the illusion of a bigger, grander window, but it also makes your room feel taller and draws the eye up. This is a 9′ room below, and you can see how nice it is for the window trim to get to breathe a little, and the eye goes from floor to almost-ceiling thanks to those long white curtains and that highly hung rod.

sofa | side table | coffee table | rug | bookcase | lamps | wall: SW White Heron | trim: SW Stone Isle
Speaking of the floor, most experts say that your curtains should usually touch or nearly touch the floor itself. This is all personal preference (some like them to hover slightly above the ground, others love a dramatic pool of fabric at the bottom) but we typically like them to graze the floor ever so slightly – like below in our showhouse’s dining room. We find this helps keep them in place better (when they don’t quite touch they tend to just hang randomly, but when they graze the ground they ground themselves and stay put if that makes sense).

Having them just touch and not be extra long and pooled makes them easier to move for vacuuming and ours don’t get all dragged around and gross on the bottom since they’re not excessively long (bonus: remember these curtains are 100% washable! In fact one of the first steps of getting them is to wash them to preshrink them so whenever you wash them again later, they don’t shrink on ya and the rod is still in the right place – more on that here).

But back to the rod. The precise placement of yours depends on a few factors (ceiling height, curtain length, trim & molding style, etc) so I can’t give you a hard and fast measurement for where your rod should always go… but generally, we like to hang ours about 3-4″ below the ceiling or, if there’s crown molding, 3-4″ below the bottom edge of the crown.

capiz chandeliers | benches | chair | marble vase | stools | pendants | sconces
This allows the curtain rod to “reside” fully (including finials) within the painted area between the window and the ceiling, which always looks SO NICE. But the important thing to note is that we’re hanging them in relation to the ceiling, not the window. It’s the assumption that your curtains need to relate to the window that causes a lot of people to hang their curtains too low. Heck we have seen rods drilled right into the window trim itself, which is just another way to make things feel really squat and cramped.
Remember, trim looks so nice when it’s allowed to breathe without any rods looming over it or being drilled right into it. That being said – sometimes the window trim is really close to the crown, and in that case we like going into the wall above the trim if possible – since the crown or the trim might look tortured with a rod sticking out. This is another picture from the showhouse we designed a few years back to demonstrate what we mean:

Your best bet is to have someone hold half of the rod up with one curtain panel attached (after you’ve washed, ironed, and done whatever else might change the height of your panel – except for hemming, that should happen once they’re hung so you can get the perfect length). If you step back and view it while someone holds it up for you, you’ll be able to decide what looks best to your eye – and using that 3-4″ below the ceiling or crown molding guideline can help.
Of course there are super tall cathedral ceilings, or rooms where the ceiling height slopes, etc – so this guideline probably works best when the ceilings are 10′ or lower without much of a slope. All super tall rooms or spaces with sloped ceilings are special cases – but again, looking with your eyeballs as someone holds half a rod with a panel on it can really help you visualize what looks best.

How WIDE Should You Hang Them?
This is another thing that’s influenced by a variety of factors, like the size of the window itself, what else is on the wall (especially if there are OTHER windows nearby), and how tight or loose you want your panels to look. Generally we like to place the rod hooks about 8-11″ from the outer edge of the window trim.

sofa | side table | coffee table | rug | lamps | media cabinet
This gives us the loose, breezy curtains we like, while still allowing us to barely cover the window molding, which is what creates the illusion that the windows are wider than they really are. In other words: THE CURTAIN PANELS ARE HANGING IN FRONT OF THE WALL NEXT TO THE WINDOW – NOT IN FRONT OF THE WINDOW (which makes it look smaller and blocks light). Sorry for shouting, but it makes such an insane difference when people stop hanging their curtain panels right in front of their windows.
We might hang the rods less wide if there are windows that are closer together than usual (like in our bedroom below – where they’re just a few feet apart, plus that one window on the right is very close to the right wall). We don’t want them looking cramped so in the instance below we didn’t go as wide with the rods – but we definitely made it so that as much of the curtain panels as possible could hang in front of the walls around the windows as opposed to blocking the windows themselves.

bed | nightstand | armchair | dresser | floor lamp |chandelier
Conversely, we might hang them even wider than 8-11″ beyond the outer edge of the window trim if we’re trying to fill a large wall space. We might even hang the rod wider on one side than the other if we’re trying to make a window look less off-center (more on that here – it can make all the difference!). So it really is flexible.
Ok, But Now For Our Curtain Rod Trick That’ll Save You Time (On Video)
The reason for all that mumbo jumbo is because knowing the width (your desired distance from the window trim) and height (your desired distance from the ceiling) is what makes this easy trick possible. John demonstrates it all in this video below (also watch for my super cool footwear cameo). There are more photos after the video for those who can’t watch right now, but I’d strongly recommend coming back to view it when you can – things are so much easier to “get” when you see them in action on video – and this skill is handy to have forevermore.
NOTE: If you’re viewing this in a feed reader, you may need to click through to see the video. You can also watch it here on YouTube.
Step 1: Determine Your Measurements
John and I determined that for the duplex we wanted to place our curtain rods 10.5″ from the outside of the window trim (weirdly specific, I know) and 3″ down from the ceiling. I should note that these are our measurements to the screws (the top screw, to be exact) since we find it easiest to work with the measurements of where you’ll actually need to drill. Watch as John models exactly what I mean below:

Step 2: Make Your Template
We used a scrap piece of cardboard to make our template – marking 10.5″ from each side and 3″ down from the top. This was actually the cardboard that came in the curtain package, so you might have something like it on hand already! Once we marked our lines (you’ll see them labeled below), we lined up the curtain rod hook and marked the two screw holes on BOTH 10.5″ marks.

3. Drill Pilot Holes
You can pre-poke holes along these two marks, or you can just do it when you mark your first window. Load up your power drill with a small pilot hole bit (we used a 3/32″ one) and hold your template above your window with the edge lined up with the outside edge of the window trim and the top held flush to the ceiling. Then you can just drill small pilot holes through your two template marks.

Now, a note about keeping things level: CEILINGS AREN’T ALWAYS LEVEL (I’m looking at you, duplex) so using the ceiling as your guide might seem ill-advised. What if your ceiling is sloped and your curtains end up being sloped too?!
Well…. we have actually found that when you’re hanging the rod close to your ceiling, you actually want the rod to follow any slope in the ceiling exactly! It will be your eyes’ closest reference point for a straight line, so it will appear level even if it isn’t!! Meanwhile if you hang the curtain rod level but the ceiling slopes, the rod will actually look wrong! Or emphasize that the ceiling is wrong! So yeah, using the ceiling as your guide actually works well for wonky ceilings (again, the duplex has plenty of those – as does the pink house!).
4. Drill Larger Holes & Add Anchors
Next you’ll want to make your pilot holes on the other side the window using the other half of your template (this is why you marked 10.5″ from BOTH sides of the cardboard) – so you can use it as a template on both sides of each window. Assuming you don’t hit any studs, you’ll need to add anchors after making those pilot holes, so swap out your drill bit for the correct size that works with your anchors (the provided anchors for our rods needed a 3/16″ drill bit) and drill into each premade pilot hole to make larger holes that fit your anchors. Bonus – the template acts as a great way to catch drywall dust. John was very excited when he discovered this. Just look at the joy on his face.

With all of your anchor-ready holes drilled, gently tap in your anchors in with a hammer or mallet. As I passionately interject in the video, your anchor holes shouldn’t be too loose or the entire curtain rod will be rickety and won’t hold up. And you shouldn’t be able to push your anchors into the wall by hand or the holes are way too loose (which can cause your rod to sag or fall out of the wall). So using the correct drill bit size for your anchors is important. It should be indicated in your curtain rod’s instructions or on the box that your anchors came in.
5. Screw Your Hooks To The Wall
The rest is pretty straightforward – hammer in your anchors and secure your curtain rod hooks to the wall using the provided screws. I insisted on filming John as he demonstrated this part too, so if you want to see it in action you can catch it in the video above. Truly I think watching these things get done in real-time is worth a thousand blog pics & words – so check out the video whenever you have a second.

Bonus Tip: Correct Any Rod Sagging
I’m gonna throw in another little hack here. Depending on your rod and how wide it is, you may notice that it appears to sag a little bit in the middle – especially where the smaller rod piece connects into the larger ones. Even if it’s super secure to the wall, it’s just that the skinnier middle rod looks like it’s sloping down to your eye – and I’m Type A to notice this and hate it. Your package may come with a third hook to hang in the center of your window if you reach a certain span with the rod, but often ours aren’t super wide so another support bracket would be overkill – so we rely on this weird little hack instead. Emphasis on WEIRD.

First, I take some of the protective plastic end caps that come on the curtain rods (they’re just packaging) and use a utility knife or scissors to cut off some small slices.

Then we tuck a piece inside the curtain rod at whatever connection point is sagging. It’s important that you put it on the TOP side of the rod and if you can’t slide it all the way in, just rotate your rod slightly so it’s hidden from view because no one is viewing your rod from the top. I know it’s REALLY weird, but it has been an easy way for us to correct a little bit of rod sag which makes my heart very happy. Just trust me – there is a noticeable difference and it no longer looks like it’s sad and droopy. Plus it’s free and I’m scrappy. So yeah. Five stars, would recommend.

That should pretty much do it for hanging the actual rod itself. And again, you can check out the post from last fall with our tips for actually preparing & hanging these inexpensive white curtains themselves. Between this post and that one you should be able to add curtains that are extra affordable (and washable!) along with tackling a whole bunch of windows at once, which might have felt overwhelming or nerve-wracking before. And you’ll definitely be faster with our little template trick too ;)

sofa | coffee table | rug | lamp |bookcase
Oh, and the curtain rods we typically use are either these oil-rubbed bronze ones with these ring clips (ordering them online means you don’t have to run from store to store to find enough that all match) and sometimes we grab these Allen + Roth rods from Lowe’s in person if they have enough (their stock is often spotty).
When NOT To Use Curtains
“Wait, what if I have baseboard heaters or a built-in bench or something under my window?
I get this question a lot so I couldn’t end this post without touching on it. Some spots just aren’t great for a curtain panel. If it can’t hang all the way to the ground, sometimes it can make a room feel awkward to hang a not-quite-full-length curtain panel. There are definitely exceptions where cafe curtains can look really sweet, but we generally just go whole-hog (full curtains from floor to almost-ceiling) or skip curtains entirely in that spot. Take our dining room, for example, which has two heat registers right where curtains would hang, as well as a window that’s super close to the corner – so the panel would cover a lot of the window instead of having a wall to hang in front of:

capiz light | stair runner | entry table | glass jug
We just skipped curtains in there and went with woven shades. The room still flows nicely with other rooms nearby, since we kept the woven shades consistent throughout the first floor of our house.
For example, these are the same shades in the kitchen (you can read more on our curtain reno here):

Clearly we couldn’t have long curtains hanging down from those kitchen windows since they’d hit the counter – so we just went with the nice warm texture that shades added.
And here’s the living room, which DID have room for nice long curtains (and we love the softness they add), so we did BOTH in here. The woven shades tie into the other spaces that also have them with or without curtains…

sofa | chairs | side tables | marble table | floor lamp
… like our home office, which also has both.

desk chairs | parson desk | rug | bookcases
Our home office is actually a nice room to use as an example that you don’t have to treat all windows in the same room the exact same way. See how the windows along that right wall wouldn’t have room for curtain panels and the cork board (they’d basically cover the area where the cork board is, if we hung them wide so they didn’t entirely block the window?). So we just skipped them on that wall. Still looks fine having them around the bay window and not around those front windows, which also have heat registers that the curtains would have blocked on both sides. So it worked out just fine. It’s kinda like the bay window is the star, and the front windows are just supporting actors.

My closing lesson would be: general curtain rod guidelines and a trick to hang them more easily & quickly can be handy, but when it comes to the whole “what would look good in here” question, every single person might have a different challenge, layout, etc – so it’s really smart to have someone hold things up and step back and trust your eye. Try different heights. Stare at a picture of a certain window shade on your phone while standing in that room and looking at the window. Really try to picture things before you commit. Heck, you can even try photoshopping different solutions or printing out a photo of your room and drawing right over it (color blinds or curtains right onto the pic – this is the original photoshop – ha!).
And don’t forget to consider woven blinds or even a pretty patterned roman shade (like this) for certain spots where curtains wouldn’t quite work – and remind yourself that it’s ok to just take your time and figure things out as you go. So many of our rooms have had curtains or blind changes while we figure it out – so don’t beat yourself up about it if it takes a second try.
P.S. Wanna know where we got something in our house (or what color’s on the walls)? Click here. And we made the same masterlist of sources & paint colors for the beach house too for ya. And we’re pulling together a source lis for the duplex – it’s not very thorough yet, but a lot of the stuff we have there is on this page for ya – and there’s more to come.
*This post contains affiliate links*
The post A Quick & Easy Way To Hang Curtain Rods appeared first on Young House Love.


0 notes
Text
A Quick & Easy Way To Hang Curtain Rods
Last fall we shared our trick for hanging affordable Ikea curtains so they look a lot more expensive than their $14 price tag per panel would suggest (across an entire house you can save thousands with that trick & these curtains alone!!). But since we were just replacing our old bedroom curtains when we wrote that post, we skipped the crucial step of actually hanging the curtain rods themselves. And since we just installed approximately one million curtains at the duplex (okay, 16 of them, but that’s a pretty notable amount to hang all at once) we wanted to share a new trick that we used to speed things up, keep everything looking level and equally spaced, and make it much easier and less overwhelming in general.

But first, let’s establish some quick curtain basics:
How HIGH Should You Hang Curtain Rods?
Like anything in decorating, there’s not a hard and fast rule for this, but most people agree that curtains look best when they’re hung (say it with me!) HIGH AND WIDE. As in, higher and wider than the window itself. This not only creates the illusion of a bigger, grander window, but it also makes your room feel taller and draws the eye up. This is a 9′ room below, and you can see how nice it is for the window trim to get to breathe a little, and the eye goes from floor to almost-ceiling thanks to those long white curtains and that highly hung rod.

sofa | side table | coffee table | rug | bookcase | lamps | wall: SW White Heron | trim: SW Stone Isle
Speaking of the floor, most experts say that your curtains should usually touch or nearly touch the floor itself. This is all personal preference (some like them to hover slightly above the ground, others love a dramatic pool of fabric at the bottom) but we typically like them to graze the floor ever so slightly – like below in our showhouse’s dining room. We find this helps keep them in place better (when they don’t quite touch they tend to just hang randomly, but when they graze the ground they ground themselves and stay put if that makes sense).

Having them just touch and not be extra long and pooled makes them easier to move for vacuuming and ours don’t get all dragged around and gross on the bottom since they’re not excessively long (bonus: remember these curtains are 100% washable! In fact one of the first steps of getting them is to wash them to preshrink them so whenever you wash them again later, they don’t shrink on ya and the rod is still in the right place – more on that here).

But back to the rod. The precise placement of yours depends on a few factors (ceiling height, curtain length, trim & molding style, etc) so I can’t give you a hard and fast measurement for where your rod should always go… but generally, we like to hang ours about 3-4″ below the ceiling or, if there’s crown molding, 3-4″ below the bottom edge of the crown.
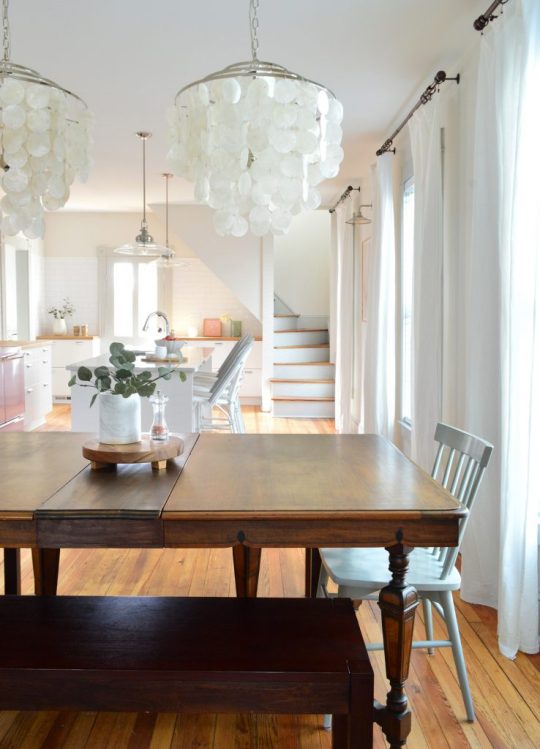
capiz chandeliers | benches | chair | marble vase | stools | pendants | sconces
This allows the curtain rod to “reside” fully (including finials) within the painted area between the window and the ceiling, which always looks SO NICE. But the important thing to note is that we’re hanging them in relation to the ceiling, not the window. It’s the assumption that your curtains need to relate to the window that causes a lot of people to hang their curtains too low. Heck we have seen rods drilled right into the window trim itself, which is just another way to make things feel really squat and cramped.
Remember, trim looks so nice when it’s allowed to breathe without any rods looming over it or being drilled right into it. That being said – sometimes the window trim is really close to the crown, and in that case we like going into the wall above the trim if possible – since the crown or the trim might look tortured with a rod sticking out. This is another picture from the showhouse we designed a few years back to demonstrate what we mean:

Your best bet is to have someone hold half of the rod up with one curtain panel attached (after you’ve washed, ironed, and done whatever else might change the height of your panel – except for hemming, that should happen once they’re hung so you can get the perfect length). If you step back and view it while someone holds it up for you, you’ll be able to decide what looks best to your eye – and using that 3-4″ below the ceiling or crown molding guideline can help.
Of course there are super tall cathedral ceilings, or rooms where the ceiling height slopes, etc – so this guideline probably works best when the ceilings are 10′ or lower without much of a slope. All super tall rooms or spaces with sloped ceilings are special cases – but again, looking with your eyeballs as someone holds half a rod with a panel on it can really help you visualize what looks best.

How WIDE Should You Hang Them?
This is another thing that’s influenced by a variety of factors, like the size of the window itself, what else is on the wall (especially if there are OTHER windows nearby), and how tight or loose you want your panels to look. Generally we like to place the rod hooks about 8-11″ from the outer edge of the window trim.

sofa | side table | coffee table | rug | lamps | media cabinet
This gives us the loose, breezy curtains we like, while still allowing us to barely cover the window molding, which is what creates the illusion that the windows are wider than they really are. In other words: THE CURTAIN PANELS ARE HANGING IN FRONT OF THE WALL NEXT TO THE WINDOW – NOT IN FRONT OF THE WINDOW (which makes it look smaller and blocks light). Sorry for shouting, but it makes such an insane difference when people stop hanging their curtain panels right in front of their windows.
We might hang the rods less wide if there are windows that are closer together than usual (like in our bedroom below – where they’re just a few feet apart, plus that one window on the right is very close to the right wall). We don’t want them looking cramped so in the instance below we didn’t go as wide with the rods – but we definitely made it so that as much of the curtain panels as possible could hang in front of the walls around the windows as opposed to blocking the windows themselves.

bed | nightstand | armchair | dresser | floor lamp |chandelier
Conversely, we might hang them even wider than 8-11″ beyond the outer edge of the window trim if we’re trying to fill a large wall space. We might even hang the rod wider on one side than the other if we’re trying to make a window look less off-center (more on that here – it can make all the difference!). So it really is flexible.
Ok, But Now For Our Curtain Rod Trick That’ll Save You Time (On Video)
The reason for all that mumbo jumbo is because knowing the width (your desired distance from the window trim) and height (your desired distance from the ceiling) is what makes this easy trick possible. John demonstrates it all in this video below (also watch for my super cool footwear cameo). There are more photos after the video for those who can’t watch right now, but I’d strongly recommend coming back to view it when you can – things are so much easier to “get” when you see them in action on video – and this skill is handy to have forevermore.
NOTE: If you’re viewing this in a feed reader, you may need to click through to see the video. You can also watch it here on YouTube.
Step 1: Determine Your Measurements
John and I determined that for the duplex we wanted to place our curtain rods 10.5″ from the outside of the window trim (weirdly specific, I know) and 3″ down from the ceiling. I should note that these are our measurements to the screws (the top screw, to be exact) since we find it easiest to work with the measurements of where you’ll actually need to drill. Watch as John models exactly what I mean below:

Step 2: Make Your Template
We used a scrap piece of cardboard to make our template – marking 10.5″ from each side and 3″ down from the top. This was actually the cardboard that came in the curtain package, so you might have something like it on hand already! Once we marked our lines (you’ll see them labeled below), we lined up the curtain rod hook and marked the two screw holes on BOTH 10.5″ marks.

3. Drill Pilot Holes
You can pre-poke holes along these two marks, or you can just do it when you mark your first window. Load up your power drill with a small pilot hole bit (we used a 3/32″ one) and hold your template above your window with the edge lined up with the outside edge of the window trim and the top held flush to the ceiling. Then you can just drill small pilot holes through your two template marks.

Now, a note about keeping things level: CEILINGS AREN’T ALWAYS LEVEL (I’m looking at you, duplex) so using the ceiling as your guide might seem ill-advised. What if your ceiling is sloped and your curtains end up being sloped too?!
Well…. we have actually found that when you’re hanging the rod close to your ceiling, you actually want the rod to follow any slope in the ceiling exactly! It will be your eyes’ closest reference point for a straight line, so it will appear level even if it isn’t!! Meanwhile if you hang the curtain rod level but the ceiling slopes, the rod will actually look wrong! Or emphasize that the ceiling is wrong! So yeah, using the ceiling as your guide actually works well for wonky ceilings (again, the duplex has plenty of those – as does the pink house!).
4. Drill Larger Holes & Add Anchors
Next you’ll want to make your pilot holes on the other side the window using the other half of your template (this is why you marked 10.5″ from BOTH sides of the cardboard) – so you can use it as a template on both sides of each window. Assuming you don’t hit any studs, you’ll need to add anchors after making those pilot holes, so swap out your drill bit for the correct size that works with your anchors (the provided anchors for our rods needed a 3/16″ drill bit) and drill into each premade pilot hole to make larger holes that fit your anchors. Bonus – the template acts as a great way to catch drywall dust. John was very excited when he discovered this. Just look at the joy on his face.
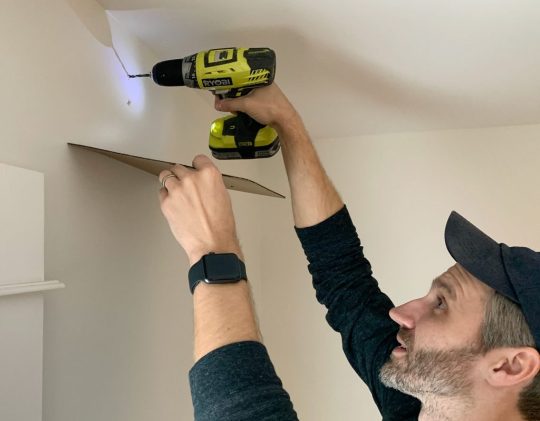
With all of your anchor-ready holes drilled, gently tap in your anchors in with a hammer or mallet. As I passionately interject in the video, your anchor holes shouldn’t be too loose or the entire curtain rod will be rickety and won’t hold up. And you shouldn’t be able to push your anchors into the wall by hand or the holes are way too loose (which can cause your rod to sag or fall out of the wall). So using the correct drill bit size for your anchors is important. It should be indicated in your curtain rod’s instructions or on the box that your anchors came in.
5. Screw Your Hooks To The Wall
The rest is pretty straightforward – hammer in your anchors and secure your curtain rod hooks to the wall using the provided screws. I insisted on filming John as he demonstrated this part too, so if you want to see it in action you can catch it in the video above. Truly I think watching these things get done in real-time is worth a thousand blog pics & words – so check out the video whenever you have a second.

Bonus Tip: Correct Any Rod Sagging
I’m gonna throw in another little hack here. Depending on your rod and how wide it is, you may notice that it appears to sag a little bit in the middle – especially where the smaller rod piece connects into the larger ones. Even if it’s super secure to the wall, it’s just that the skinnier middle rod looks like it’s sloping down to your eye – and I’m Type A to notice this and hate it. Your package may come with a third hook to hang in the center of your window if you reach a certain span with the rod, but often ours aren’t super wide so another support bracket would be overkill – so we rely on this weird little hack instead. Emphasis on WEIRD.
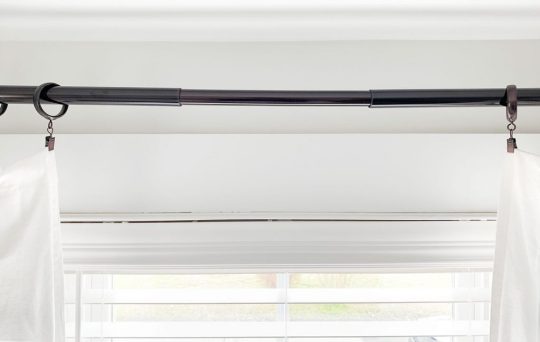
First, I take some of the protective plastic end caps that come on the curtain rods (they’re just packaging) and use a utility knife or scissors to cut off some small slices.

Then we tuck a piece inside the curtain rod at whatever connection point is sagging. It’s important that you put it on the TOP side of the rod and if you can’t slide it all the way in, just rotate your rod slightly so it’s hidden from view because no one is viewing your rod from the top. I know it’s REALLY weird, but it has been an easy way for us to correct a little bit of rod sag which makes my heart very happy. Just trust me – there is a noticeable difference and it no longer looks like it’s sad and droopy. Plus it’s free and I’m scrappy. So yeah. Five stars, would recommend.

That should pretty much do it for hanging the actual rod itself. And again, you can check out the post from last fall with our tips for actually preparing & hanging these inexpensive white curtains themselves. Between this post and that one you should be able to add curtains that are extra affordable (and washable!) along with tackling a whole bunch of windows at once, which might have felt overwhelming or nerve-wracking before. And you’ll definitely be faster with our little template trick too ;)

sofa | coffee table | rug | lamp |bookcase
Oh, and the curtain rods we typically use are either these oil-rubbed bronze ones with these ring clips (ordering them online means you don’t have to run from store to store to find enough that all match) and sometimes we grab these Allen + Roth rods from Lowe’s in person if they have enough (their stock is often spotty).
When NOT To Use Curtains
“Wait, what if I have baseboard heaters or a built-in bench or something under my window?
I get this question a lot so I couldn’t end this post without touching on it. Some spots just aren’t great for a curtain panel. If it can’t hang all the way to the ground, sometimes it can make a room feel awkward to hang a not-quite-full-length curtain panel. There are definitely exceptions where cafe curtains can look really sweet, but we generally just go whole-hog (full curtains from floor to almost-ceiling) or skip curtains entirely in that spot. Take our dining room, for example, which has two heat registers right where curtains would hang, as well as a window that’s super close to the corner – so the panel would cover a lot of the window instead of having a wall to hang in front of:

capiz light | stair runner | entry table | glass jug
We just skipped curtains in there and went with woven shades. The room still flows nicely with other rooms nearby, since we kept the woven shades consistent throughout the first floor of our house.
For example, these are the same shades in the kitchen (you can read more on our curtain reno here):

Clearly we couldn’t have long curtains hanging down from those kitchen windows since they’d hit the counter – so we just went with the nice warm texture that shades added.
And here’s the living room, which DID have room for nice long curtains (and we love the softness they add), so we did BOTH in here. The woven shades tie into the other spaces that also have them with or without curtains…

sofa | chairs | side tables | marble table | floor lamp
… like our home office, which also has both.

desk chairs | parson desk | rug | bookcases
Our home office is actually a nice room to use as an example that you don��t have to treat all windows in the same room the exact same way. See how the windows along that right wall wouldn’t have room for curtain panels and the cork board (they’d basically cover the area where the cork board is, if we hung them wide so they didn’t entirely block the window?). So we just skipped them on that wall. Still looks fine having them around the bay window and not around those front windows, which also have heat registers that the curtains would have blocked on both sides. So it worked out just fine. It’s kinda like the bay window is the star, and the front windows are just supporting actors.

My closing lesson would be: general curtain rod guidelines and a trick to hang them more easily & quickly can be handy, but when it comes to the whole “what would look good in here” question, every single person might have a different challenge, layout, etc – so it’s really smart to have someone hold things up and step back and trust your eye. Try different heights. Stare at a picture of a certain window shade on your phone while standing in that room and looking at the window. Really try to picture things before you commit. Heck, you can even try photoshopping different solutions or printing out a photo of your room and drawing right over it (color blinds or curtains right onto the pic – this is the original photoshop – ha!).
And don’t forget to consider woven blinds or even a pretty patterned roman shade (like this) for certain spots where curtains wouldn’t quite work – and remind yourself that it’s ok to just take your time and figure things out as you go. So many of our rooms have had curtains or blind changes while we figure it out – so don’t beat yourself up about it if it takes a second try.
P.S. Wanna know where we got something in our house (or what color’s on the walls)? Click here. And we made the same masterlist of sources & paint colors for the beach house too for ya. And we’re pulling together a source lis for the duplex – it’s not very thorough yet, but a lot of the stuff we have there is on this page for ya – and there’s more to come.
*This post contains affiliate links*
The post A Quick & Easy Way To Hang Curtain Rods appeared first on Young House Love.
A Quick & Easy Way To Hang Curtain Rods published first on https://novaformmattressreview.tumblr.com/
0 notes
Text
How Much Does Air Conditioning An Apartment in Houston Cost?
How Much Does Air Conditioning An Apartment in Houston Cost?
Hunting for a new apartment in Houston but worried about how much electricity it might use for air conditioning? Let us show you how to figure it all out and save some money, too.
What’s The Average Electric Bill To Cool My Apartment?
Hunting for a new apartment in Houston, TX? One thing you want to know is how much it costs to run an air conditioner. It seems a straight forward question, right? There’s plenty of exhaustive DOE reports on the average Houston home’s electricity usage. But why is there dang-near-nada reliable information on how much air conditioning an apartment in Houston costs?
The key problem is that the Department of Energy and the Energy Information Agency only collect information on “residential” over-all usage by combining data from both houses and apartments. So, it takes time and persistence just to tease out useful apartment over-all usage information. And depending on who’s doing the teasing, you might wind up with the wrong information that’s out of date by a decade ago or more.
None of that is much help if you’ve got a paper thin budget and you’re looking to move before electric rates in Texas start climbing later this summer. You want to see how much it will cost you in today’s money, not what it cost in 2010 or 2015. You need realistic and reliable numbers to help you estimate costs while you search websites for a new place. So, let’s dig deep to find you the right kind of information to help you make some reasonable estimates about how much air conditioning will cost you in your next Texas apartment. Plus, we’ll check out things you can do to reduce your AC costs once you move in.
Apartment Summer Electricity Costs
First, let’s start with figuring out the average size of a Houston apartment. While you might not find a perfectly-average “average sized” apartment, it’s useful to start with a common size to compare with. Apartment size varies regionally due partly by climate and by market. Nationally, the average apartment size is 889 square feet. That’s close to what we’re looking for since in the average Houston apartment is about 879 sq. ft.
Building age should also figure prominently into the equation when you compare and shop. Home sizes (both house and apartments) have been on the increase for decades. Square footage for apartments (nationally) increased by 2.1% between 2009 and 2015. That might not sound like much but on average between 2009 and 2015, newer units had an average of 40 square feet more. However, the significant point is that since newer apartments tend to be larger, they require more energy for air conditioning to be cooled. So while you might be able to afford renting a newer and bigger place, you should double check how much it will cost you to heat and cool it. Of course, older, smaller apartments may be equipped with old central AC systems. And while they might work fine, their old and inefficient design might end up costing you as much as you would have spent for a newer apartment.
How Much AC Per Square Foot?
If you ask any HVAC technician worth their salt, they’ll likely say that you can’t accurately calculate AC demand per square foot. Now, that’s very true. However, many will cite a “rule of thumb” that, while terribly inaccurate for planning and installing a system, will provide a ball park figure to estimate your cooling costs.
The rule of thumb for air conditioning is 500 square feet per ton (12,000 BTUs) equals the size of air conditioner needed. This rule can include other important sizing considerations like the number of residents, how shaded the building is, number of windows, whether there is a kitchen, and ceiling height. However, for our apartment-hunting purposes, we don’t need to get that specific just yet. For now, we only need the ratio of 500 square feet per ton as a quick, crude estimation for energy cost.
AC Sizing Matters
First we need to determine how many BTUs per hour it will take to cool our average Houston apartment. That’s done using the 500 square feet per ton (12,000 BTUs) ratio:
879/500 x 12,000 = 21,096 BTUs of cooling capacity per hour.
In practice, our Rule of Thumb equation runs into a technical problem. Most residential air conditioning systems are sized in increments of half a ton (6,000 BTU/hour) sizes:
12,000 BTUs = 1 ton
18,000 BTUs = 1.5 tons
24,000 BTUs = 2 tons
That means the average apartment’s AC system will sized to the nearest half ton. That choice or going up or down depends on who designed the system and when. If a system was designed 30 years ago, it might be both inefficient and undersized for the current climate. If it’s oversized, it might waste energy and needlessly increase your Houston electricity bill.
For our average-sized apartment, the nearest half ton is 18,000 BTUs.
So, if 1 BTU = 0.000293071 kWh, then our BTUs of capacity per hour converts into kWh:
18,000 x 0.000293071 kWh = 5.2752793 kWh
How Many kWh to Cool An Apartment?
Now, “kWh of capacity” means you need to have an AC unit that can use up to 5.27 kWh. It doesn’t mean you’ll actually use that much. The important point in figuring AC usage is that the l o n g e r your AC must run to match your thermostat’s temperature setting, the more Texas electricity you will use. The more you use, the more it costs you.
In mid-autumn and early spring, you probably won’t run the AC very much at all. In winter, even if you’re using electric heat, that amount won’t likely won’t be anywhere nearly as high your summer AC energy consumption. That said, even though there’s times it sure seems like it, air conditioners don’t always run nonstop, 24 hours a day, 7 days a week. So, let’s assume that your apartment’s AC unit uses 5 kWh and that for the whole month of July, your AC ran 8 hours/day.
That’s 8 hours x 5 kWh = 40 kWh per day.
At 30 days x 40 kWh = 1200 kWh.
If we assume 10 cents per kWh, then it costs $120 just for the Houston electricity supply to run your AC for 8 hours each day for 30 days. For 10 hours per day, the total goes up to $150.
Other Apartment AC Factors
An apartment’s description might look perfect on a website but you should visit the unit before you sign a lease. That’s because with these figures in mind, it’s important to see how many of all those other factors mentioned earlier that might affect your air conditioning usage:
How high are the ceilings? Apartment square footage doesn’t include ceiling heights. And the higher the ceiling the larger the space that needs cooling.
Is the apartment in the middle or on the end of the building. Units in the middle of a building are insulated by their neighbors. Units on the ends will have at least two exterior walls.
How many south-facing windows are there?
What is the age and condition of the building?
Are there window and door drafts
What is the type of AC system? Central air, split system, or less efficient room units.
Reduce Your Apartment’s AC Costs
The most efficient ways to reduce your apartment’s air conditioning costs is to reduce the amount of time it runs The best way to control run time is to adjust your thermostat to 7°-10°F higher for 8 hours a day when you’re not at home or asleep. Programmable thermostats do this very well because you can set up the temperature to change in advance automatically. That way, your apartment will be at a comfortable temperature when you arrive or are active. This can save 10% per year.
Another important thing is to keep the AC air filters clean. Dirty air filters reduce air flow and make your AC run longer.
Lower the Apartment Heat Load
All buildings absorb heat from the sun during the day. Luckily there are simple ways to reduce how much heat your apartment absorbs. Keeping out the heat will cut your costs to keep your place cool:
Use drapes to close off windows where the sun shines in. Blocking off sunlight with medium-colored draperies with white-plastic backings can reduce heat gain by 33%.
Be on the look out for drafty doors and windows. Hot, humid air leaking into your apartment from outside adds to heat to your apartment. Weather stripping is cheap and easy to apply. Why wait for your landlord to take care of it when drafts are adding to your Houston electricity bill . Not sure which kind to use? Energy.gov’s Weatherstripping page has THE BEST guide for selecting the right one for your apartment.
Like to cook? Try using other ways to cook by using the microwave or grilling outside. Thinking about baking in the oven? Avoid it but if you really must, try to do it well after the sun has gone down. Turn off the AC and use a fan to blow the heat from your kitchen outside. This also applies to running the dishwasher or any other appliance that creates a lot of heat.
One final way to cut your apartment air conditioning costs in Houston is to shop the best electricity rates at http://www.texaselectricityratings.com. Not only can you find competitive rates for different term lengths but also customer written reviews on 135 retail electricity providers. We make it quick and easy to help you find the best plan for your needs.
0 notes
Text
Vizio SB36514-G6 Soundbar Review: Shockingly Affordable Dolby Atmos
New Post has been published on https://bestedevices.com/vizio-sb36514-g6-soundbar-review-shockingly-affordable-dolby-atmos.html
Vizio SB36514-G6 Soundbar Review: Shockingly Affordable Dolby Atmos
Vizio SB36514-G6 5.1.4-channel Dolby Atmos soundbar
"The Vizio SB36514-G6 is your one-way trip to delight Dolby Atmos on a budget."
Sleek design
Impressive performance from Dolby Atmos
Solid detail for the price
Chromecast Wi-Fi streaming
Several ways to customize the sound
Bass can be limp
Setup and calibration require patience
It will be hard to hide from Dolby Atmos. From 4K Blu-rays to Netflix, Amazon and Disney's new streamer, Disney +, Atmos sneaks into every format. The only real barrier is the expensive hardware that makes Atmos sing.
This is where Vizio's growing fleet of Dolby Atmos soundbars like the SB36514-G6 come in.
After Vizio thrilled the crowd with the $ 1,000 SB46514-F6, which offers 5.1.4-channel Dolby Atmos performance for hundreds less than most of its competitors, Vizio has released several follow-ups in different sizes at lower prices . The SB36514-G6 shrinks the length of the flagship bar by a full 10 inches, but retains all 5.1.4 channels, Chromecast streaming, and more for just $ 700.
Is there atmos in it?
The SB36514-G6 comes in a relatively compact L-shaped box that is reminiscent of most two- or three-channel budget bars and is much smaller than the sarcophagus boxes that I get from other all-in-one Dolby Atmos I'm used to setups.
Inside, you'll find a sleek, five-part system that features Vizio's signature silver and black (a greeting to your Raiders fans). The 36-inch soundbar (which adds to the intricate name) contains three oval drivers on the front, two passive radiators, and oval drivers towards the center.
The two satellite speakers are each equipped with two drivers, including their own high-powered drivers, to complete the ".4" height channels, which bounce the sound off the ceiling for a hemispherical immersion. The last piece of the puzzle, the aluminum-coated subwoofer, has a small but powerful 6-inch driver inside that highlights the bass.
While the satellite speakers need to be connected to the subwoofer with old-fashioned cables and mounted behind you, the system is easily one of the most inconspicuous Atmos setups I've encountered, causing guests to be amazed at how much sound can be extracted from them a compact setup. The aesthetics are more useful than sexy, but the silver-plated subwoofer is really stylistic.
The most inconspicuous Atmos setups that I've come across.
There are numerous connections on the back of the bar, including a digital optical connection, an analog 3.5 mm connection, Ethernet for the Wi-Fi connection, HDMI ARC for connecting to your TV and an HDMI input for the Connect a streaming box or other device directly. Of course there is also Bluetooth streaming, although the "casting" from Spotify or other apps using Chromecast technology from Google offers the best sound quality.
Loaded package
The SB36514-G6 offers numerous play options as well as numerous functions – especially for the price – many of which can be traced back to Vizio's Google partnership. The brand's SmartCast system uses Google Casting for Wi-Fi streaming, which also uses multi-room streaming with other Google Home speakers, as well as basic Google Assistant commands for the bar over those speakers. In other words, it pays to dive deeper into the Google ecosystem to get more for your money.
When it comes to decoding surround sound, the SB36514-G6 essentially has the entire Dolby Suite, including Dolby Atmos (of course) as well as Dolby Digital Plus and Dolby TrueHD. DTS Digital Surround and high-resolution DTS-HD Master Audio are also supported, but DTS: X, the brand's Atmos rival, is not. As with the SB46514-F6, this means that all DTS: X 3D surround tracks must be rendered virtually. On the other hand, we've seen so few DTS: X mixes outside of some 4K Blu-rays that this shouldn't be the case. For most listeners, this is not that important.
On the video side, the SB36514-G6's HDMI 2.0a input provides 4K HDR pass-through, including HDR10 and Dolby Vision.
Old School Interface (with a twist)
Those who are used to one of Vizio's sound bars – including mid-level and even entry-level bars – are very familiar with the remote-based interface used here. Essentially, the remote control's Casio-like digital screen is the interface you need to scroll through the small window from EQ and sound modes to inputs and speaker settings. There is only one column of white LEDs on the front of the bar with an on-board display.
It is a system that I have never loved, that I have got used to over the years. In addition, compared to bars like Samsung's expensive Q90R, it's easier to forgive the elementary setup when you consider Vizio's desire to deliver the best Atmos punch for your money.
You can use the remote control to change almost anything, including adjustments for height speakers – something that Vizio's previous SB46514-F6 didn't include – and center, surround, and subwoofer levels so you can effectively adapt the system to your room. Still, it's a bit more expensive than automatic calibration systems like Sennheiser's highly Falutian Ambeo bar, and due to some bass balance issues (more on that below), I had to play around a lot to include things.
An interesting aspect of Vizio's setup is how the Music, Film and Direct EQ modes work. The latter is the only way to get an unrestricted audio signal, including stereo playback for music. In addition, all subwoofer, speaker, or bass / treble settings are exclusive to the mode you are in. In the end I just used the film mode (with my own adjustments) for film and TV playback and the direct mode for music playback.
It is important that the Vizio SmartCast app offers an additional option for customizing sound and functions, with a multitude of settings in the virtual remote area. It's a great addition to the real remote and offers a modern upgrade to the outdated user interface. With the app you can also set up the SB36514-G6 in your Wi-Fi network.
configuration
Getting the SB36514-G6 up and running is easy enough, if a bit tedious, when it comes to laying these long cables for the satellite speakers. They are connected to the wireless sub, which theoretically limits the placement options in larger rooms. However, there are a lot of cables to work with and I simply placed the sub in my room in the usual layout. Just make sure you've matched the color-coded left and right inputs with the appropriate speakers. Otherwise you have to start over.
Otherwise, connecting to the TV is very easy. The supplied HDMI cable leads from the HDMI ARC connection of the bar to the corresponding ARC input on your TV. This is important if you want to get Dolby Atmos directly from your TV. You can also use the TV remote control to control the volume and power of the SB36514-G6 (although you may need to turn on CEC in your TV settings). Otherwise, the optical input is the best backup option.
The system is an absolute ace with Atmos content.
The last piece of the puzzle connected via Wi-Fi via the SmartCast app caused me (predictably) some problems. It's always difficult to connect third-party Google Home products to Wi-Fi (or is it just me?), And I had to restart the app a couple of times to make everything work. Finally, however, things clicked and I was able to use the app and stream via Spotify Connect without any problems.
performance
There's nothing like a sweet Dolby Atmos demo to knock someone off your feet, and a weekend full of house guests gave me the opportunity to do just that. When I turned on the library with specially tailored demos from two of Dolby's latest demo discs, my guests were absolutely amazed when they first learned what Atmos can do. Like drug addicts who were looking for their solution, they repeatedly asked me to load the next scene so that I could get lost again in the lush Atmos sound.
When it comes to Atmos content, the SB36514-G6 is an ace.
In the Leaf demo, the bar pulls you blindly through the trees and later turns the brochure, which breaks off the branch around you with impressive precision, while the subwoofer pulsates the heartbeat of the scene with booming pressure through the room. The Amaze demo is similarly spectacular, as the insects initially shimmer in a whisper around you, while the Rainstorm clip offers cascading showers from above and lifelike thunder that shakes your chest with crackling power. And so on.
It is this powerful subwoofer that occasionally stands in the way of an otherwise brilliant experience outside of the Atmos clips. While the submarine has the muscle, it doesn't always have the rhythm to control it. Sometimes it sounds limp and bloated when it should be tight and stiff. While this unbridled blow generally does the trick in potent action scenes like the introductory monster fight in Guardians of the Galaxy Vol. 2. 2, it gets a little hot sometimes, like an uninvited party guest who started partying too early.
This is most evident in the content of television programs, especially during musical interludes. In the thematic intros for shows like Parks and Recreation and The Office, the submarine blows up the room without warning and forces you to scurry for the remote control. In the Jessica Jones intro, the sub simply got out of sync and transforms the wonderful stand-up bass from tight and lively into a blurry, over-coated porridge. Overall, it takes a certain balance between genre and genre to keep the action hot and the more subtle scenes cool.
These problems do not occur with Samsung's high-end Atmos bars, such as the HW-K950 or the updated Q90R, which offer more details, performance and, above all, more control over the low frequencies. But these bars are also more than twice as expensive as the SB36514-G6.
Otherwise, the SB36514-G6 is very impressive and offers a solid level of detail of the front unit. The bar only occasionally sounds as bright as it looks in the upper midrange – usually when lighter blends are used. It's also relatively solid for music playback, as you can choose the right settings for most genres in direct mode, and you can just let the stereo sound spout respectable details and big volume for larger rooms.
Honestly, it's amazing that you can get this kind of swirling movie sound from a bar of this price and stature. Vizio's piecemeal system, which swaps the 36-inch bar into multiple Atmos iterations, seems to be paying off – both for Vizio and for anyone who wants to bring the sweet pulse of Atmos into their room while making it clear stay below $ 1,000.
Warranty information
Vizio grants a warranty on its soundbars one year after the date of purchase.
Our opinion
The latest 5.1.4-channel Dolby Atmos soundbar from Vizio offers an impressive wealth of Atmos riches for your dollars in a slim design and extends this exciting surround technology to almost every setup and budget.
Is there a better alternative?
Not at this price. Bass reproduction is poor, and you can get more details and balance from sound bars with similar prices that use virtual surround effects, but nothing I've encountered offers more atmospheric thrills for less money.
If you want a bit more quality, performance, and stiffness across the spectrum and have some money to play with, Vizio's $ 1,000 SB46514-F6 offers a higher quality experience, including bigger, tighter basses. Outside of Vizio, the Samsung HW-N950, still my favorite Atmos bar, is available at a bargain price compared to the original price.
Do you need further help with the purchase of a soundbar? Check out our favorite sound bars from 2019.
How long it will take?
The SB36514-G6 appears to be solidly built and is as future-proof as you would expect from a soundbar of this price and caliber. The only thing we want that isn't here is eARC, something we see in the latest top-class A / V equipment.
Should you buy it
Yes. If you're looking for exciting Dolby Atmos sound on a budget, the Vizio SB36514-G6 offers the best $ 700 you can spend.
Editor's recommendations
0 notes
Text
10 DIY Don’ts of Home Improvement
Egged on by social media and publishing platforms like Pinterest, there’s been a cultural shift from valuing expertise to preaching do-it-yourself (DIY) projects.
From pins proclaiming to repurpose old socks and unused mason jars to boards that boast “25 DIY Home Improvement Projects,” there seems to exist a false confidence that encourages homeowners to attempt projects that were once left to the professionals.
While DIY home improvement projects may seem like the most cost-efficient way to repair or add value to your home, we’ll break down the top 10 projects that should be left to the professionals.
Installing Crown Molding
You may have read various posts about how crown molding can beautify a room. When installed correctly, it can transform your space from ordinary to regal with elegant details lining the walls of your home.
Molding may seem like a quick weekend home improvement project, but it’s not a feat for the faint of heart. This is mostly attributed to the fact that walls are never perfectly straight – even in newly constructed houses. Caulk all you want, but walls will always have imperfections.
To rectify this reality, contractors and even some painters use professional tools and a tricky technique known as scribing to make sure molding is aligned correctly to crooked walls. For a DIY-er, this process can be meticulous and impossible to achieve.
Installing or Replacing Drywall
Given that drywall is generally lightweight and inexpensive, many DIY daredevils falsely assume that there’s no need to seek instruction when attempting to install or replace it.
Yet without proper guidance, improperly installing drywall can compromise the structural setup of your wall, which may lead the wall to unexpectedly collapse.
For example, drywall is soft and therefore easily ruined, so should you set it up wrong, you’re at risk for heavy picture frames or mirrors falling and shattering.
Contractors are experienced and can repair your drywall in no time. They can also save you money, because if you attempt to DIY and find that you’re having to try several times to get it right, the cost can add up in the end.
Electrical Repair
DIY electrical work can feel as nerve-wracking as a suspenseful bomb-diffusing scene in an action movie. Is it the red wire or the blue wire? While you may not be at risk of a dramatic movie explosion, you could electrocute yourself or cause a house fire.
Besides the risk of electrocution and fire, there are a few other aspects of electrical work that you shouldn’t tamper with. For example, all electrical components in a home are required to pass a home inspection before use. Failure to do so could result in hefty fines.
Even more so, when it’s time to sell your home and hire an inspector, your DIY work may not pass the inspector’s criteria, meaning you could decrease the value of your home, or worse, find that you’re unable to sell it.
Avoid the risk of danger for your home and family by hiring an electrician.
Gas Repair
Like electrical work, if you don’t know what you’re doing, the process and result could be dangerous and possibly fatal. Carbon monoxide poisoning, typically caused by an incorrectly installed gas appliance or leading gas line, can lead to death or an explosion in your home.
If you notice leaks in a gas line or a gas odor in your home, the first thing you should do is contact your local gas company directly. Unless you have experience with gas line repair, do not attempt to DIY; an incorrectly sealed leak can still release enough gas to eventually poison anyone in or around your home.
Since a natural gas line is potentially one of the most dangerous elements in your home, make sure you don’t leave it up to chance and contact your local gas company.
Roofing Repair
When I think of fixing a roof DIY-style, I imagine the scene in “The Santa Clause” when Tim Allen shouts “Hey, you!” at the Santa perched on his roof, causing Santa to slip and fall unceremoniously onto Allen’s front lawn. Whether you’re delivering Christmas presents or replacing shingles, being up on a roof is dangerous.
That’s why it’s best to leave roof replacement to a professional roofing contractor. Not only are they experienced, they possess the proper tools for the task – when you’re replacing your roof, you not only need the materials for the new roof, you need the tools to be able to complete the task itself.
If you don’t have the proper knowledge or tools for the task, you can almost guarantee your DIY project will not look as good or be as sturdy as a professional job. Not to mention, most home warranties require that a certified roofer perform repairs, so it can end up saving money should you need any additional roof work in the future.
Plumbing Repair
As comically as the plumbing profession is depicted on television and movies, there’s a lot of expertise that goes into this line of work. From broken pipes to leaks, you’ll want a professional plumber to come identify and rectify the problem.
You can easily start a plumbing DIY project believing all you have to do is go in and tighten a nut or a screw to stop a leak and end up causing water damage, and worst of all, mold growth. Much like electric work, your plumbing is also upheld by a code to ensure everything works properly.
Not only will a professional plumber know and uphold the current code, they’ll know the correct size of pipes, connections and valves for all the different places and purposes of water use in your home. Avoid harming your home and call a professional plumber.
Structural Demolition or Addition
Whether demolition or home addition, changing the existing structure of your home is no easy feat. Before you start swinging a sledgehammer, you should know that demolishing a load-bearing wall could compromise the structural integrity of your home, possibly leading to a dangerous collapse.
A professional contractor will be aware of any electrical wiring, gas or plumbing in the walls of your home before knocking anything down.
Additionally, a contractor will be aware of specific building permits you may need to obtain before you make any structural changes to your home. Plus, they’ll know the ins and outs of electrical wiring, gas lines, plumbing and window installation that go into a new addition.
It may be tempting to engage in this type of project to add to your home’s resale value. However, a project at this magnitude may compromise the structural integrity of your house and could have fatal consequences. To avoid any future problems with the frame or foundation of your home, contact an engineer or a certified contractor before you remove a wall or add a room to your house.
Erecting a Fence
Hiring a professional to erect a fence in your backyard, rather than attempting it yourself, could be the difference between enhanced curb appeal to your home and a botched DIY project.
Installing a fence is a lot more time consuming and expensive than typically perceived. You need to be able to dig holes for your posts (sometimes renting a hole auger in the process) and install a fence that rises and dips with the contours of your lawn. Not to mention, a lot of cities require specific permits to get the job done, a task that might be more complicated to achieve for the average layperson, compared to a reputable company.
Oftentimes, this is a job for a professional crew, rather than a solo weekend project. Instead of wasting your time on installing a poor fence, consider reaching out to a crew to complete this task.
Painting Your Walls or Ceilings
Painting your home may be one of the most underestimated home projects that you could undertake. You might assume that a few cans of paint, brushes, tarps and tape are the only tools you need for the task, but there’s actually a certain amount of art that goes into painting the walls of your home.
From the patience that goes into the prepping process to the detailed eye needed for fixing flaws in your walls and ceiling, there’s a lot of room for error in the painting process.
Going back to the idea of selling your home, you’ll want to present your space in the best way possible and a botched paint job can make all the difference in the way your home is perceived and sold on the market.
Consider hiring a painting professional to get the job done fast and properly.
Tree Removal
Cutting down a tree might seem simple (anyone can swing an axe, right?) but before you go all Paul Bunyan on your trees, consider hiring a professional.
There are serious calculations that go into the landing trajectory of a falling tree. And if you get it wrong, you risk harming your car, house and power lines. A professional will calculate the height, weight and foliage of a tree to know where to cut and at what angle.
Even branch removal can be hazardous if you don’t know what you’re doing. Put away your ladder and lumberjack flannel and consider calling a professional.
(Don’t) Do-It-Yourself
Of course, every situation is unique. Perhaps you’re naturally handy or possess a foundational knowledge of home improvement projects. The important thing to remember is quality. You wouldn’t expect a paid professional to perform a mediocre repair or upgrade on your home, so the same should apply to yourself.
If you don’t have the know-how, however, there are other DIY projects you can do around the house that require less risk to the safety and integrity of your home.
Have you recently had a home DIY project go south? Tell us about it in the comments below.
The post 10 DIY Don’ts of Home Improvement appeared first on ZING Blog by Quicken Loans.
from Updates About Loans https://www.quickenloans.com/blog/5-donts-diy-home-improvements-2
0 notes