#polyframe
Explore tagged Tumblr posts
Visit Tumblr Blog
Explore Tumblr blogs with no restrictions, modern design and the best experience.
Last Seen Tumblr Blogs


Fun Fact
Tumblr Inc. is funded by 13 investors.
Text
#video#warframe 1999 spoilers#warframe#quincy isaacs#smacking the floor with extreme fervor i am in love???????#he has more lines than this btw this is NOT all of them#god if only polyframe was a thing i want everybody here
108 notes
·
View notes
Note
Polyfram culture is "who's fronting and why does it feel like 6 of them?"
Polyfrag culture is...
We relate to this so much 😭 /lh
#antiendopolyfragculture#endo supporters dni#endos fuck off#endos dni#anti endo community#anti endo#plural#polyfragmented#polyfrag#polyfrag did#polyfrag system#actually polyfrag#pro endo dni#pro endos dni#anti endo blog
13 notes
·
View notes
Text
INTRODUCTION TO ZBRUSH
ZBrush is an industry standard sculpting tool for today's entertainment artist that combines 3D/2.5D modeling, texturing, and painting.
We were given a brief introduction to ZBrush by our lecturer and then we were given a tutorial on how to model an ear.
Since I wanted to familiarize myself with the software even further, I came across a few tutorials that would come in handy to me.
Beginner’s ZBrush Cheat Sheet: Essential Tools & Shortcuts
Navigation & View Controls
- Alt + Left Click → Rotate view
- Alt + Right Click → Zoom
- Right Click + Drag → Pan
- F → Frame the model
Sculpting & Brushes
- B → Open Brush Menu
- BMV → Move Brush (reshape large forms)
- BCB → Clay Buildup (add volume)
- BSH → Smooth Brush (soften edges)
- BDS → Dam Standard (sharp creases & wrinkles)
- BIN → Inflate Brush (expand areas)
Dynamesh & Topology
- Ctrl + Drag on Empty Space → Remesh Dynamesh
- ZRemesher (Tool > Geometry > ZRemesher) → Auto retopology
- Shift + D / D → Lower/Higher subdivision levels
Masking & Selection
- Ctrl + Click & Drag → Mask an area
- Ctrl + Alt + Click & Drag → Invert Mask
- Ctrl + Tap on Masked Area → Blur Mask
- Shift + Ctrl + Click & Drag → Hide geometry (Isolate)
Subtools & Polygroups
- Tool > Subtool → Manage different parts
- Shift + F → Toggle Wireframe (Polyframe)
- Ctrl + W → Create a new Polygroup
- BPR (Shift + R) → Quick render
Exporting & File Management
- Ctrl + S → Save Project (.ZPR)
- Tool > Export → Export as OBJ/FBX
- ZPlugin > UV Master → Quick UV unwrapping
Links:
youtube
youtube
0 notes
Text
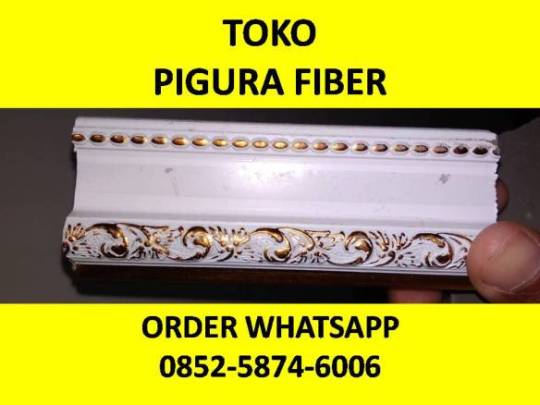
WA 0852-5874-6006 Agen Pigura Fiber Sragen
WA 0852-5874-6006 Agen Pigura Fiber Sragen
WA 0852-5874-6006 Agen Pigura Fiber Sragen, Pesan Bingkai Foto Ulang Tahun, Harga Pigura Untuk Mahar, Supplier Frame Fiber Cilacap, Harga Bingkai Foto 20r, Agen Pigura Fiber Ciamis, Pigura Cermin Berdiri, Harga Pigura Foto Presiden, Tempat Jual Bingkai Foto Di Makassar, Agen Pigura Fiber Padangsidempuan, Toko Pigura Di Semarang

Agen Pigura Fiber Sragen, Pesan Bingkai Foto Ulang Tahun, Harga…
View On WordPress
#Agen Pigura Fiber Ciamis#Agen Pigura Fiber Karawang#Agen Pigura Fiber Sragen#Distributor Bingkai Fiber Lampung Selatan#Distributor Pigura Polyframe#Grosir Pigura Fiber Semarang#Harga Bingkai Foto#Harga Bingkai Foto 20r#Harga Pigura Untuk Mahar#Jual Bingkai Foto Medan#Jual Frame Foto Grosir Di Jakarta#Pesan Bingkai Foto Ulang Tahun#Pigura 30x40#Pigura Cermin Berdiri#Pigura Untuk Wisuda#Supplier Frame Fiber Cilacap#Toko Bingkai Foto Di Medan
0 notes
Photo

😍 Got this absolute beauty from my mom. Love it! #birthdaypresent #selfmade #diy #hexemimmade #nofilter #macaron #loveit #bag #baglover #colorful #instadiy #birthday #happybirthdaytome #homemade #sewing #sew #instasew #instapresent #brinigram #instabrini #photo #instaphoto #collage #instacollage #clef #igers #igersstuttgart #beautifulbag #dreambag #polyframe
#igersstuttgart#polyframe#bag#instaphoto#instasew#nofilter#beautifulbag#collage#birthday#instadiy#igers#loveit#instapresent#selfmade#colorful#macaron#birthdaypresent#photo#diy#hexemimmade#baglover#instacollage#brinigram#homemade#happybirthdaytome#dreambag#clef#sewing#instabrini#sew
0 notes
Photo
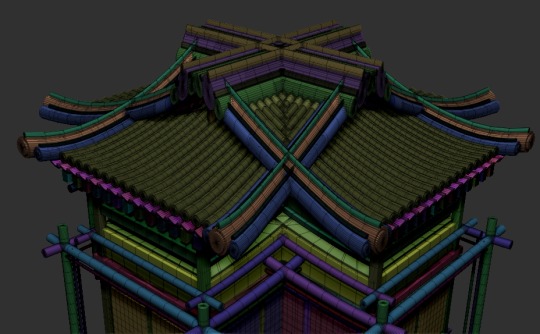
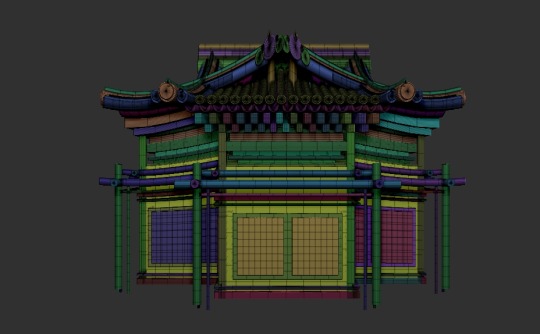
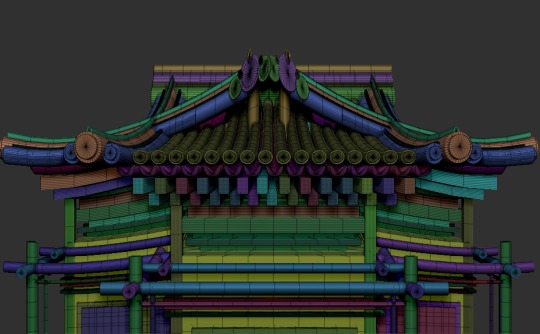
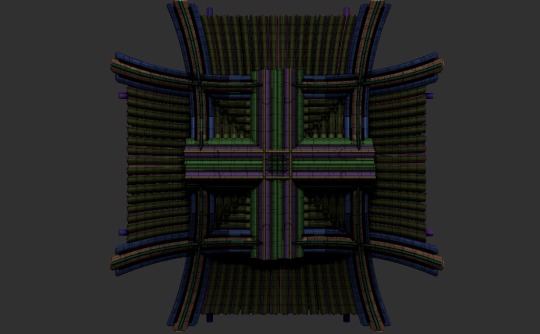
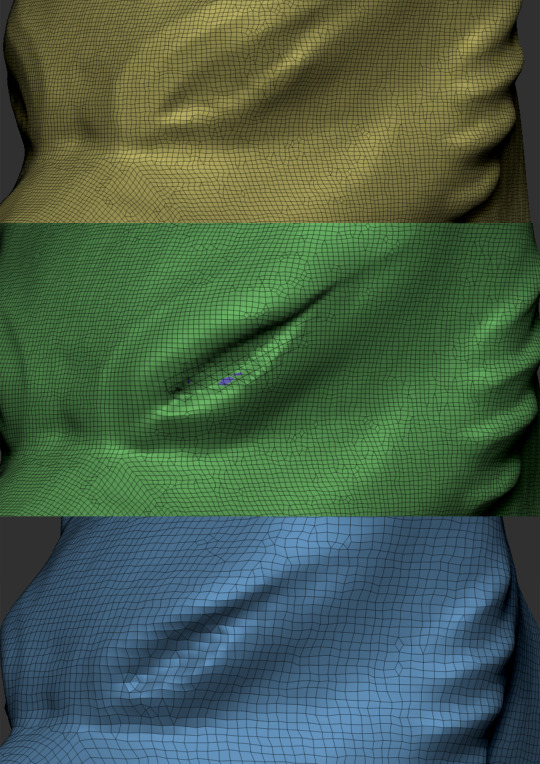
Architecture model. There’s a really interesting function in ZBrush called ‘Draw Polyframe’ (Shift + F), which allows the model surface mesh to be visible for the detection of any errors or inconsistencies. I have no idea what the colour code means, I’m sure they’re a record of the amount of polygons on the surface but even with research I can’t find it anywhere.
I like turning this function on when I’m finished sculpting, the colours are fascinating, and I like how it’s a visual representation of the dynamesh data in the model.
0 notes
Text
ZBrush Notes Part 3
Show polyframe - Shift F Dynamesh - fixes the topology - Tool, Geometry, Dynamesh, Dynamesh button Shortcut - CMND drag outside of model Increase the resolution of the tool - edit a tiny part of the tool - increase the resolution slider and CMND drag outside Work incrementally - start with low res when doing basic mesh, then gradually increase the slider as you do more and more detail If Dynameshing creates holes in thin parts, use the inflate brush to fix those areas and re-dynamesh It is scale dependant - when starting to dynamesh something, always start at the lowest possible resolution You generally don’t have to go above a million polys (top right, total points) when dealing with dynamesh - keep it low To insert other shapes into the tool and combine them, go to the Insert Primitives brush, drag out a shape and position where you want, then dynamesh Don’t go above a few million polys
Use Trim brushes to cleanly cut away parts of the model - CMND Shift and go on brushes - the trim rectangle one is best Hold down CMND Shift to use it Then use Dynamesh to fix the topology
Sculptris pro - to the left of rgb intensity Creates topology automatically, unlike dynamesh Stroke - sculptris pro - adaptive size - adjusts according to brush size - best to keep on, although it does increase your points count (top right) Stroke - sculptris pro - subdivide size = increase or decrease the resolution - lower number = smaller size of polygon and vice versa Stroke - sculptris pro - undivide ratio - hold down shift to smooth out areas with small polygons - low number = higher poly count and vice versa So can sculpt with smaller polygon sizes and then smooth out and remove information with the undivide ratio on a low number With sculptris pro enabled, you can hold Shift to smooth an area until it turns objects into an island An advantage of using sculptris pro over dynamesh is that you can change the topology of specific areas rather than the whole thing, using sculpting However, it can create some small artefacts, so once you’re done with sculptris pro, you can use dynamesh Use sculptris pro when sculpting and then use dynamesh to even out the topology after Don’t go above a few million polys
Subdivisions - best to use when the topology is good and at a more complete stage - only when the design is resolved - use dynamesh/sculptris pro when you’re actually sculpting and designing You can have much more resolution with subdivisions - like 10 to 20 million polys Tool - geometry - subdivision Press the divide button or press CMND D Divides the polygons by 4 Can increase and increase the subdivision level Can’t use sculptris pro or dynamesh with this feature as they change the topology, but subdivisions just add resolution instead Shift D to go down a subdivision and D to go back up If you want to change bigger areas, like using the move brush, you can decrease the subdivision level and do the edit, then increase the subdivision levels again and all the hi res texture will be preserved Press Del Lower to show the actual topology without the ghost lines - you can also do the opposite by going to the lower subdivision level and pressing Del Higher Press Reconstruct Subdivision to go back to previously deleted subdivision levels
Dynamic subdivisions - Geometry, Dynamic Sub - press D to enable and Shift D to disable Always have the QGrid set to 0 (in the dynamic sub area in geometry) Dynamic sub is better than normal subdivision as it doesn’t soften the model and make soft edges - if you take it out of ZBrush into another program, it will look identical Especially important to use dynamic sub on hard surface models to keep the crisp edges
ZRemesher - retopologises the whole tool - not just for finishing off topology, also good for WIP topology Tool, Geometry, Zremesher - best if you just use the one ZRemesh button Press Half or Double to half or double the resolution Not as good as it seems, especially on faces, as it doesn’t make a loop around the mouth Fix areas like the mouth manually; areas that will move when animated Bear in mind that it works symmetrically if you have symmetry enabled A good work flow is to sculpt basic forms, then Dynamesh to get more resolution, and then ZRemesh it to get a nice smooth base
0 notes
Photo


WALKING SIMULATOR
WEEK 2
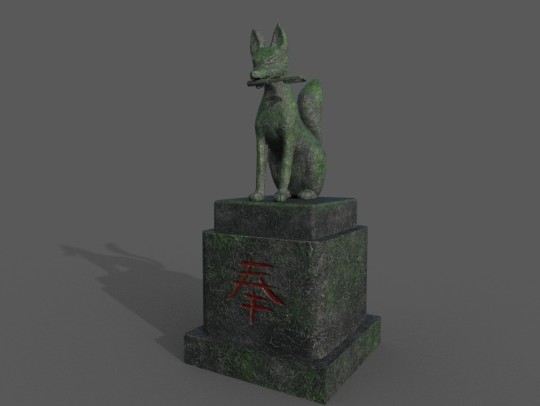
My second asset was a fox statue. I enjoyed making the previous model in Maya, but I really want to improve my skills in Zbrush, that is why I decided that my next model would be the fox statue. The screenshots at the top show the general process of the model in Zbrush.
First of all, I had to get familiar with the object. Fox statues are commonly found in Japan next to shrines, so it was really easy to find references. When researching, I found out that they do not look exactly like a real fox. That gave me a bit of freedom with the design since the model did not need to look exactly a super realistic fox.
Also, when we established the aesthetics of walking simulator, we agreed on making semi-realistic assets. Consequently, I was allowed to not spend time on small details, as they did not have to look realistic.

Once I got solid references, I started modelling. As you can see in the first image, I started modelling the head, followed by the body, legs and tail. I sculpted all of them in different meshes and in low poly. I started trying different proportions; as you can see in the references, they can have different body, tail and ear size. When I got a good shape, I combined the meshes and I used dynamesh, and I started now to work in a higher resolution mesh.
I used the basic brushes, Standard, Claybuildup and Move. Even if I knew I was going to add an object in the mouth, I sculpted the statue with the mouth closed. Therefore, that is why you can find a screenshot where the mouth has been masked. I decided to mask the bottom part of the mouth, I separated it from the mesh, rotated, and placed it the right way. Then, dynamesh again and finishing touches. When I finished, I used the brushes TrimAdaptive and TrimDynamic to polish the edges and get a closer look to statue’s features.
When the model was ready, I duplicated and I made use of Decimation master to keep the original characteristics with less polygons. Now, the model was ready to be imported to Maya, where I would add the plinth under the statue. But before that, I used Dynamesh and Zremesher to get a low poly model and I did the UV unwrapping in Zbrush. I knew I would not get the same result as making it manually in Maya, but I wanted to save as much time as possible and I wanted to see how it would look in UE4, not before giving a quick texturing in substance.

I found out that I did something wrong in Zbrush. When making the eyeballs, I just added two spheres and use Dynamesh, that resulted in holes in the mesh when I exported it. After every significant change of the model, I saved the file (resulting in 10 different files) so it was easy to come back to the right moment. I went back to the moment of making the eyes, but this time with Draw Polyframe selected to see the polygons. As you can see, it was clear that something was wrong. I deleted the spheres and I change the eyes look. Also, I exaggerated a bit more the part of the eyebrows and cheekbones. The comparison images are: 1.Before placing the eyeballs 2. After placing them 3. After I fixed it.
The model now looked fine in UE4, so it was time to finish the asset by making the plinth and the tool of its mouth in Maya. I assigned different materials, having a total of 3 materials when including the fox.
This is how the model and UVs looked at the beginning:


Then, I took the model to Substance Painter. Here, I first bake the mesh map, including the high poly version of the statue, and I add a simple texturing to the objects. Also, I typed the Japanese kanji in a different layer, playing with height and roughness to make it look like a stone engraving.


Even if I did not make the retopology, it looked fine to me, because since it was a statue, it did not need to look perfect. After making every object, I would try it first in Unreal to make sure that I would send the file ready to be placed in the prototype. The screenshot below is how it looked, and it was ready to be uploaded for the project.

After I sent it, I was told that the model was still to high poly. In addition, the day after, Darius had it exported into the project and for some reason, the texturing was not working properly. I did not know why that would happen because it worked just fine for me when I tried it in unreal. Anyway, I decided to make things right, so I did a proper retopology of the fox in Maya.
By then, I was working in another asset (a shed) where I encountered some problems with the textures. I will explain this later, but the fact is that I learn that I was not doing the UVs in a right way. So I did not make only the fox’s retopology, but also I change the UVs of whole model.
Here bellow you can find the difference between the polyframe of the model with Zremesher in Zbrush and the model after making the retopology in Maya. The last images show how I changed the UVs of the plinth, which was looking better and allowed me to get better textures results; and then, the last rendering. They were finished at the beginning of the third week and they looked much better than the first results I got the week before.


0 notes
Text
WA 0852-5874-6006 Grosir Pigura Fiber Semarang
WA 0852-5874-6006 Grosir Pigura Fiber Semarang
WA 0852-5874-6006 Grosir Pigura Fiber Semarang, Harga Bingkai Foto, Jual Bingkai Foto Medan, Distributor Bingkai Fiber Lampung Selatan, Toko Bingkai Foto Di Medan, Jual Frame Foto Grosir Di Jakarta, Distributor Pigura Polyframe, Agen Pigura Fiber Karawang, Pigura Untuk Wisuda, Pigura 30×40, Pigura Untuk Foto
Grosir Pigura Fiber Semarang, Harga Bingkai Foto, Jual Bingkai Foto Medan, Distributor…
View On WordPress
#Agen Pigura Fiber Karawang#Distributor Bingkai Fiber Brebes#Distributor Bingkai Fiber Lampung Selatan#Distributor Bingkai Fiber Padang Lawas#Distributor Pigura Polyframe#Grosir Bingkai Foto Medan#Grosir Pigura Fiber Semarang#Harga Bingkai Foto#Jual Bingkai Foto Medan#Jual Bingkai Foto Solo#Jual Frame Foto Grosir Di Jakarta#Jual Frame Foto Jakarta Selatan#Pigura 30x40#Pigura 40x60#Pigura Untuk Mahar Uang#Pigura Untuk Wisuda#Pusat Pigura Custom Kota Sby Jawa Timur#Pusat Pigura Semarang#Supplier Frame Fiber Rembang#Toko Bingkai Foto Di Medan
0 notes

Text
Cheat Sheet
Edit Mode Navigation with a 3D mesh
Free Rotate Click & drag Background Move Alt+Click & drag Background Constrain 90 Click+drag, then press Shift Zoom Alt+Click, Release Alt, drag Background Dolly Shift, Click, release Shift, drag
(For best results turn off Right Click Navigation in the Preferences>Interface menu.)
3D Models
Save Tool Shift+Ctrl+T Fit Mesh to view F Perspective P Floor Grid Shift+P Activate Symmetry X Show/hide Polyframe & polygroups Shift+F
Geometry
Divide Ctrl+D Lower Res Shift+D Higher Res D Edge Loop Ctrl+E (partially hidden mesh)
SubD
Divide Ctrl+D Res Toggle Down Shift+D Res Toggle Up D
0 notes
Text
ZBrush Notes Part 2
When you've selected a tool, you can use Initialize to edit it in cool ways To sculpt on tool, go to Make Polymesh 3D Stay in Edit mode all the time W - move, hold ALT to position where it pivots from
Hold CMND when sculpting to Mask Hold CMND and Alt to remove mask CMND Click to blur the mask CMND Alt Click to sharpen it CMND Click outside of the tool to invert the mask CMND and drag outside the tool to clear the mask CMND and drag over a part of the tool to mask over that area like a box You can change the mask brush, e.g. lasso mask brush
B - bring up brush menu Can press letters in the menu to find specific brushes starting with that letter S - change brush size U - change brush intensity Play around with the Focal Shift slider (above draw size) To make sure your brush doesn’t go through the model when sculpting, go to Brush, Auto masking, BackFaceMask - only applies to the selected brush, will have to do it everytime For clay buildup brush, go to Alpha, and then Alpha Off to make it smooth, or Alpha 06 for an inbetween Main brushes; standard, inflate, clay buildup, dam standard, trim dynamic, move, snakehook Inflate - good for making areas bigger Clay buildup - great for adding form quickly Dam standard - great for wrinkles and creases - hold Alt to get nice sharp edged lines Trim dynamic - great early on for getting the planes down, or to simplify a model if it’s getting too busy early on Snakehook - good for dragging out weird forms etc. (don’t get carried away) Blob - great for lumps and veins XtractorDragRect - pick area to duplicate, press G and circle that area, wait for it to work then you can draw that anywhere - increase or decrease the Focal Shift to sharpen or blur it Another way to add texture is to change the stroke to ‘spray’ then pick a textured alpha Use ‘Dynamic’ (by Draw Size) when using brushes so the strokes stay the same size when you zoom in and out - when working on a larger object, go to Preferences, Draw and then make sure Dynamic Brush Scale is on the highest
Alphas - like a brush texture - don’t use too much or too early - they add lots of very fine frequency details onto your model very quickly - looks amazing if done right, but it can destroy the model if it’s done too early - need to make sure the model supports it with good forms etc. Best to use the Spray or DragRect strokes You can load your own alphas by going to Alpha, Import Go to Alpha, Modify and the MidValue slider - below 50, the texture will go into the model, above 50 it will come out of the model - best to keep at 50
Polygroup (make sure Draw Polyframe is selected in the right toolbar thing - shift F) - mask an area and then press CMND W Autogroups for different objects UV Groups for udems (?) Auto Groups with UV Hide polygroup - CMND Shift click on polygroup Invert visibility - CMND Shift drag outside the model Everything visible - CMND Shift click outside the model
Select a sub tool - Hold Alt and click on the object To only view a certain subtool without clicking the eye icon, especially when you have loads of subtools, turn on the Solo button (bottom of R toolbar) Can scroll through the subtools with the up and down arrows - hold down CMND to move the selected subtool up and down in the hierarchy You can organise the subtools into folders, like PS groups You can’t hide the selected subtool with the eye icon Hold down Shift and click on the eye icon to make them all invisible or visible Hold Shift and click on the brush icon next to the eye to enable and disable polypaint on all at once You can’t select more than one subtool at once You can copy a subtool and paste it into another one with the Copy and Paste buttons You can duplicate subtools with the Duplicate button Delete is not undoable Undo history is stored separately for each subtool Use Split to split up subtools in different ways You can merge subtools by selecting a subtool and going to Merge, merge down or merge up to merge it with the tool above or below it in the subtool list
0 notes
Photo

PM- Polyframe Supervisor https://ift.tt/2AuIvQK
0 notes
Video
vimeo
Directions From Growth from Entagma on Vimeo.
When dealing with growth solvers, often you not only need the growth itself, but a direction vector. For exapmple to copy feathers on to a surface. In this tutorial Manuel explains how to calculate direction vectors on the surface by using the gradient.
01:00 Importing the geometry 01:37 Remeshing 02:15 Preparing the seed 04:50 Precalculating neighbours 08:45 Writing the solver 13:00 Visualizing the result 15:00 Using polyframe to compute the gradient 18:30 Creating the orient attribute 22:00 Removing points that are not infected
Thanks to our supporters on Patreon and a special shout out to Mohammed Al Abri, Chris Hebert, Nick Nick, Bahaman jahanbakhshi, John Kunz and Joseph Howerton - thanks for truly believing in us! patreon.com/entagma
Initial geo: entagma.com/wp-content/downloads/DFG_testgeo.zip
Project File: entagma.com/wp-content/downloads/DFG_end.zip
0 notes
Text
5 Easy Facts About Dulux Upvc Paint Described
How Can You Paint Upvc Windows Can Save You Time, Stress, And Money.
When selecting a brand-new door for your house, there are a variety of important elements to consider. Your door will be the very first thing visitors and neighbours see about your house, so it's crucial to pick one that has the look you want. Security is another element; a tough door assists prevent burglaries. In addition the level of insulation used by your door is necessary; a well-insulated door reduces heat loss and helps to keep your energy expenses down.
Aparna Venster uPVC windows & doors don't need re-painting thus reducing expensive maintenance costs significantly. #Upvc #doors #Windows pic.twitter.com/C0YnEAsOfH
— Aparna Venster (@aparnavenster) November 7, 2017
Lastly, toughness is a crucial question: how long will the door last and how typically will it have to be changed? Composite doors perform much better than uPVC doors in all of these areas. For several years, uPVC doors have been a common sight on British houses. However, the advances integrated in modern composites are causing numerous homeowners to upgrade to composite. The majority of doors are available just in white or off-white colours, whereas the external layer in a composite can be any of a wide range of colours, with or without simulated wood result. This layer likewise uses superior resistance to fading and weathering; doors often fade or yellow after being exposed to rain and sunlight for extended periods. When selecting a brand-new door, keep in mind the composition of the external layer.
Some older composites have a uPVC outer layer, but GRP skins are increasingly common, using superior insulation and resilience. The gasket that seals a door adds an unsightly black line around the frame, whereas composites integrate quickly with a house's general design. For security-conscious property owners, composite doors offer increased weight and thickness. The density of a uPVC door is normally around half of an equivalent composite, with the main layer of the composite being a thick, rigid foam that offers greater resilience than the core of a uPVC door. The sturdy outer layer of the composite is also more resistant to damage than uPVC.Fixed 2 Operable
uPVC Windows Window Advertising LED Display PVC local supply structure of the world Shipping port: FOSHAN, China; High security and point locking Option of 3 colours as standard Window Patching Machine Model This included density likewise gives composites remarkable insulation compared with uPVC. By retaining
heat better, composites minimized energy expense, lowering the environmental effect of your home and minimizing your energy expenses at the exact same time. click for more info Toughness is another area where composites can save cash. Since they are more resistant to weathering and damage, this type of door will last longer than uPVC, requiring to be changed less frequently. As an outcome, although uPVC doors (click through the following website) might be cheaper at first, the cost savings in energy and replacement expenses make the long-lasting composite the more economical option over the long term. There are still a lot of benefits that you can obtain from double glazed windows and doors but these are a few of the best. You ought to begin considering about providing them with.
Another element that you need to consider is the quality.
They are able to likewise assist your house be look more attractive. Your financial allowance is the very first thing that you should consider first. Make sure that you have the proper spending plan which you can set your limitations. It's significant that you can compare the numerous prices from different brand names. Another factor that you have to think about is the quality. The basic ought to be focused on all the time. You have to make certain that the windows and doors are extremely thick because
this is how double glazed systems ought to be. They should likewise be percentage to one another. You ought to likewise make certain that there is no condensation present in the systems as this will indicate that there is a leakage someplace and these units need to be changed. The next thing that you need to inspect is the function of these units. Not every items are efficient enough to supply insulation and thermal function so you need to be sure that you've them analyzed first prior to establishing. If you actually want to improve your home, find out more about polyframe double glazed windows in our site. Purchasing your house is most likely going to be the greatest financial investment you ever make, and how you refurbish and embellish it all boils down to your very own personal taste. The windows and exterior doors ought to be concern as they secure your house and personal belongings versus trespassers
and protect your household. Cash invested in these items must be considered as a financial investment as quality doors and windows are going to last a long time. As they are usually the very first functions visitors see of your home, and can detract or add from the overall appearance in addition to adding worth to the home, then you desire to make the right option. There are a lot of alternatives in the various styles and products utilized for external doors and windows these days that it can be tough to know precisely where to start.
If you liked this short article and you would certainly such as to obtain more facts relating to Upvc Transformation - his response www.pvctransformation.ie - kindly check out our web site.
0 notes
Text
Fire Ladders
Would you like to improve the safety of your home for your family and your loved ones?
We’re delighted to announce that we can now install the unique Polyframe Fire Ladder.
In 2014/15 domestic fires killed over 250 people in Great Britain and caused more than 7,500 injuries. (source) The Fire Ladder is designed to reduce those statistics.
Designed to look like a down pipe the fire ladder does not disrupt the look of your property
Fully secure, the fire ladder cannot be opened from ground level.
Strong enough to hold the weight of 12 adults.
This is how they work…
Simply pop off the top cap.
Gravity will take over and open up the fire ladder.
Descend safely down the ladder.
The ladder the can’t be opened from the ground keeping your home secure.
Fire Escape Ladders are a permanent, but collapsible, safety ladder for emergency use in the event of fire in your home. It will help you and your family to escape quickly, easily and safely from an upper storey window in the event of all downstairs exits being blocked.
Once installed on an outside wall of your home, the fire escape folds away neatly and discreetly to resemble an unobtrusive rainwater downpipe. It is easily installed, fully weather resistant and maintenance free. The ladder comes fully assembled complete with all fixing bolts and comprehensive fixing instructions.
How does it work………..?
Simple…… In the event of fire – open the escape window and remove the cap from the top of the fire escape.
Gravity takes over and the ladder opens at 90 degrees to the house. Safe exit can now be made from the building.
Fire Escape Ladders are simple to operate by all – why take the risk?
Our team of installers will measure and fit the fire ladder with little to no disruption to you or your family.
We work right across the North East of England.
You can be safe and secure in no time at all.
If you have any questions about the fire ladder please do not hesitate to get in touch.
from Fire Ladders
0 notes