#poster printing software
Explore tagged Tumblr posts
Visit Tumblr Blog
Explore Tumblr blogs with no restrictions, modern design and the best experience.
Last Seen Tumblr Blogs


Fun Fact
Celebrities use Tumblr as well.

Text

0 notes
Text

Be the first five businesses earning between 10M to 50M per year that SET UP a FREE BUSINESS DIGITAL & PROFIT MAXIMIZATION CONSULTATION & receive a FREE CUSTOMIZED LOGO & BRANDING CONSULTATION WORTH $1000.00!(Offer good until January 31, 2024)
BE THE FIRST FIVE READERS TO RECEIVE YOUR FREE CUSTOMIZED BUSINESS LOGO & FREE BRANDING CONSULTATION WORTH $1000 NOW! Visit:
www.AmericanElite.Biz
Offer Good Until January 31. 2024
The Transformative Role of Technology in Cosmetic Surgery
Putting Ideas into Pictures:
The consultation stage has been completely transformed by 3D imaging technologies, which offer a three-dimensional representation of possible results. Together, patients and surgeons can investigate options, promoting a better comprehension and well-informed choices.
Surgical Scheduling and Modeling:
Surgeons use three-dimensional imaging to plan surgeries with precision. Anatomical assessments, procedural simulations, and exact incision placement are made possible by this technology, which adds to a more precise and customized approach.
Improved Surgical Accuracy:
Precision has reached new levels thanks to robotically aided surgery. Surgeons possess unparalleled accuracy in performing intricate treatments, which results in less scarring, quicker recovery periods, and ultimately, happier patients.
Techniques with the Fewest Invasions:
Robotic systems are used for delicate treatments, allowing for minimally invasive techniques made possible by technology. This method not only makes sure that patients recuperate more comfortably, but it also presents cosmetic surgery as a less intrusive and more accessible choice.
Electronic Health Records:
EHR systems ensure accurate and conveniently accessible patient records by streamlining administrative duties. These digital data, which include treatment plans and medical histories, improve communication between healthcare providers and help ensure smooth patient care.
Improved Safety Procedures:
EHR systems that offer real-time access to patient data help to improve safety procedures. Comprehensive records enable surgeons to make well-informed decisions that minimize problems and guarantee patient safety.
Online Reach:
Geographical boundaries are removed through the use of telemedicine to permit remote consultations. Surgeons can now visit with patients in the convenience of their own homes, increasing access to cosmetic expertise and promoting a worldwide philosophy of beauty enhancement.
Simple Follow-Ups:
Telemedicine facilitates easier access to post-operative care. Virtual follow-ups allow surgeons to keep an eye on patients' recuperation and quickly address any issues, making the patient experience more convenient and tailored.
Keeping Digital Exchanges Safe:
As technology becomes more and more integrated into cosmetic surgery, strong cyber security protocols are essential. In the digital era, maintaining ethical standards, safeguarding privacy, and fostering trust are all facilitated by ensuring the safe handling of patient information.
Your call to action must have a deadline for an offer!—-Visit www.AmericanElite.biz
Be the first five businesses earning between 10M to 50M per year that SET UP a FREE BUSINESS DIGITAL & PROFIT MAXIMIZATION CONSULTATION & receive a FREE CUSTOMIZED LOGO & BRANDING CONSULTATION WORTH $1000.00!(Offer good until January 31, 2024)
BE THE FIRST FIVE READERS TO RECEIVE YOUR FREE CUSTOMIZED BUSINESS LOGO & FREE BRANDING CONSULTATION WORTH $1000 NOW! Visit:
www.AmericanElite.Biz
Offer Good Until January 31. 2024
#packaging#poster#programming#3d printing#rpg maker#typography#machine learning#python#software engineering
0 notes
Text
Unlocking the Essence of a Software Development Company: 3 Intriguing Facets
Dive into the dynamic world of software development as we unravel the fascinating layers of a Software Development Company. From cutting-edge technology to the art of innovation, explore three intriguing facets that define the essence of modern software development companies. Discover how they shape the digital landscape and revolutionize industries.
#machine learning#3d printing#lettering#linux#logo design#low poly#marketing#packaging#programming#poster#developer#software#software company#it services#web development#software development
0 notes
Note
Hello! I was wondering what company you use for your sticker sheets? I bough one from your Ko-Fi shop and really like the quality, and the pricing you were able to sell at is waaaaaay more reasonable compared to any of the companies I've seen and used myself. Is it a POD company, or a mass purchase of them to sell on your own?
Thank you for your time if you're able to respond!
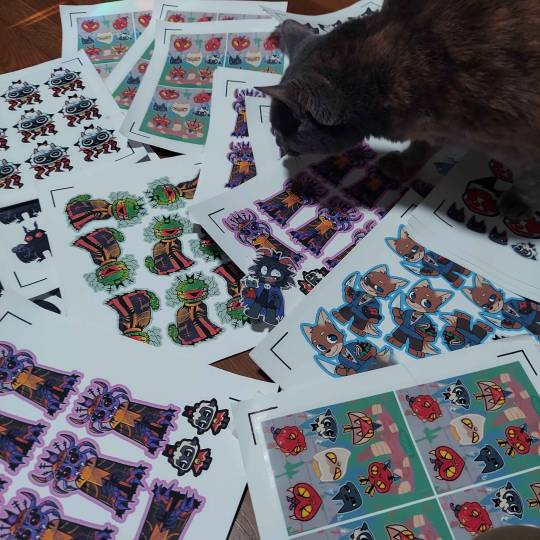
I'm really glad you like the quality, because I actually make them by hand at home! (Please forgive the lighting, my bedroom is my office lmao.)
I don't use a company (and Idk what a POD company is sorry!) but making them at home gives a lot more freedom of stock, just be wary it can be very time consuming depending on how many you need to make.
I've had other people ask before, so here's a rundown of how I make my stickers at home: At most you'll need:
Printer
Sticker paper (this is the type that I use)
Laminator and lamination paper (the lamination paper that I use.) You can also use adhesive non-heat lamination paper if you don't have a laminator, gives you the same result, just be careful of bubbles. You will get double your worth out of a pack because we are splitting the pouches to cover two sticker sheets.
Your choice of a sticker cutting machine or just using scissors.
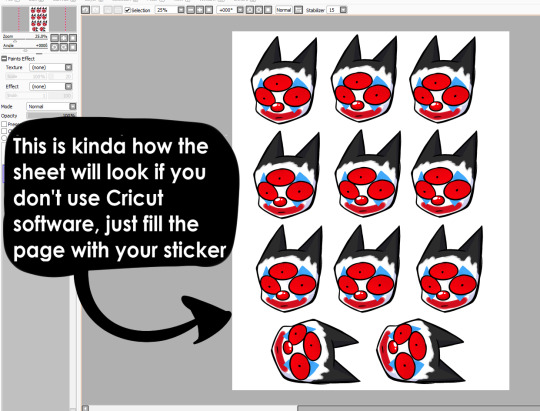
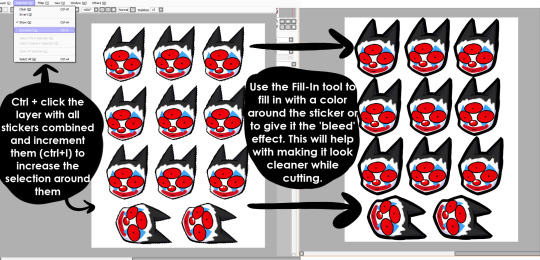
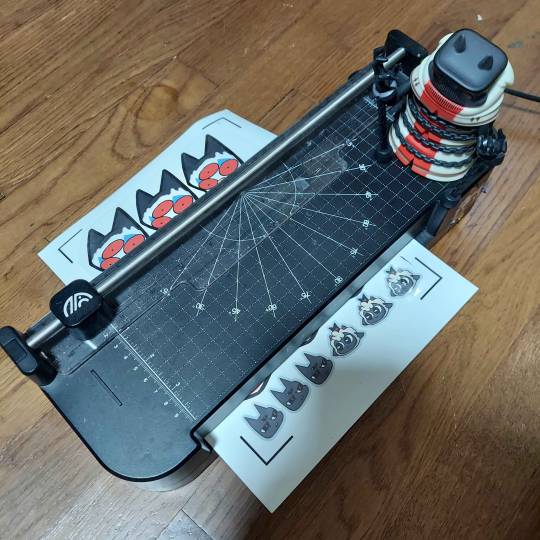
First, I use Cricut's software to print out the sticker sheet with the guidelines around the corners so the machine can read it. If you do NOT have a Cricut machine, open up your art program, make a canvas of 2550x3300 and fill it up with your sticker design with some cutting space between them. This the 8.5x11 size for the sticker page.
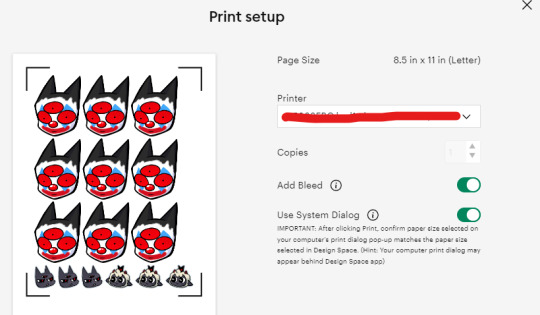
I usually have bleed selected so the cut comes out cleaner. Tip for non-Cricut users below: Increase the border around your sticker design to fake the 'bleed' effect for a cleaner cut.
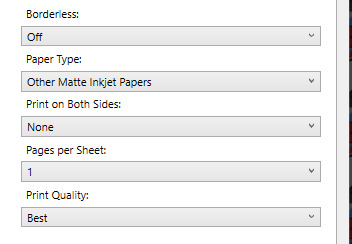
These are the print settings I use for my printer. I use the 'use system dialogue' to make sure I can adjust the settings otherwise it prints out low quality by default. Make sure if you're using the above paper that you have 'matte' selected, and 'best quality' selected, these aren't usually selected by default.
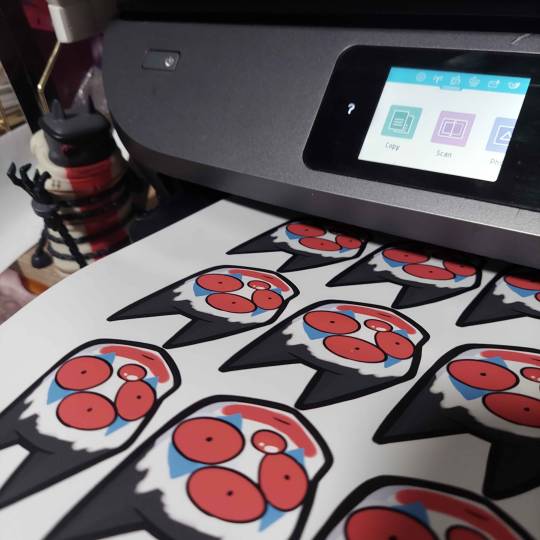
So you have your sticker sheet printed! Next is the lamination part. I use a hot laminator that was gifted to me, but there is no-heat types of lamination you can peel and stick on yourself if that's not an option.
(This is for protection and makes the colors pop, but if you prefer your stickers matte, you can skip to the cutting process.)
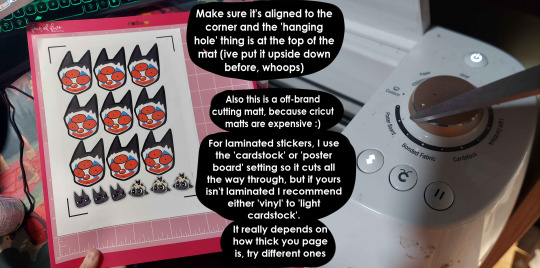
Important for Cricut users or those planning to get a Cricut: You're going to cut the lamination page to cover the stickers while also not covering the guidelines in the corners. First, take your lamination page and lay it over the sheet, take marker/pen and mark were the edges of your stickers are, and cut off the excess:
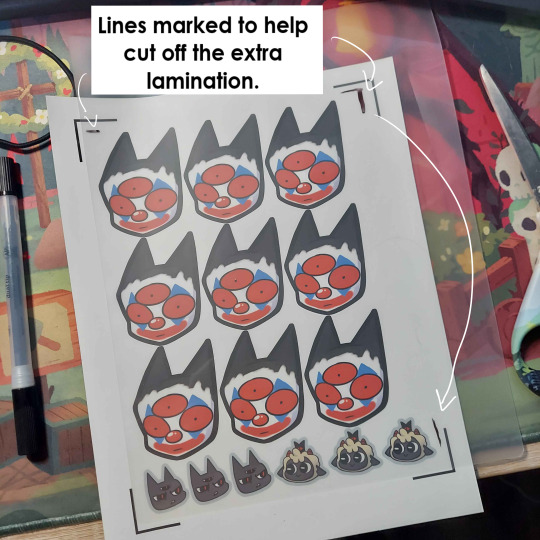
(I save the scrap to use for smaller stickers or bonuses later on)
After you've cut out your lamination rectangle, separate the two layers and lay one down on your sticker sheet over your stickers with matte side down, shiny side up. (Save the other sheet for another sticker page)
The gloss of the lamination will prevent the machine from reading the guidelines, so be careful not to lay it over them. It also helps to cut the corners afterwards to prevent accidentally interfering with the guidelines.

Now put that bad boy in the laminator! (Or self seal if you are using non-heat adhesive lamination)
Congrats! You now have a laminated page full of stickers.
For non-cricut/folks cutting them out by hand: this is the part where you start going ham on the page with scisscors. Have fun~
Cutting machine: I put the page on a cutting mat and keep it aligned in the corner, and feed it into the machine. For laminated pages I go between 'cardstock' and 'poster board' so that it cuts all the way through without any issues, but for non-laminated pages or thinner pages, I stick for 'vinyl' and 'light card stock'. Kinda test around.
Now I smash that go button:

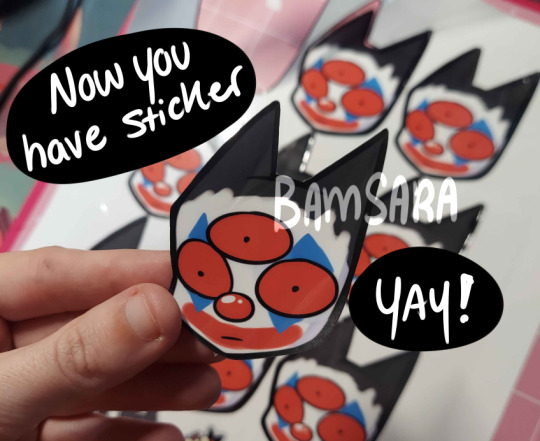
You have a sticker now!
The pros of making stickers at home is that you save some cost, and you have more control of your stock and how soon you can make new designs. (I can't really afford to factory produce my stickers anyway)
However, this can be a very time consuming, tedious process especially if you have to make a lot of them. There is also a LOT chance for some errors (misprints, miscuts, lamination bubbles, ect) that will leave you with B-grade or otherwise not-so-perfect or damaged stickers. (Little note, if you have page mess up in printing and can't be fed into the cricut machine, you can still laminate it and cut it out by hand too.)
I have to do a lot of sticker cutting by hand, so if you don't have a cricut don't stress too much about it. I have an entire drawer filled to the top of miscuts/misprints. I keep them because I don't want to be wasteful, so maybe one day they'll find another home. Sucks for my hand though.
But yeah! This is how I make my stickers at home! Hope this is helpful to anyone curious
1K notes
·
View notes
Text

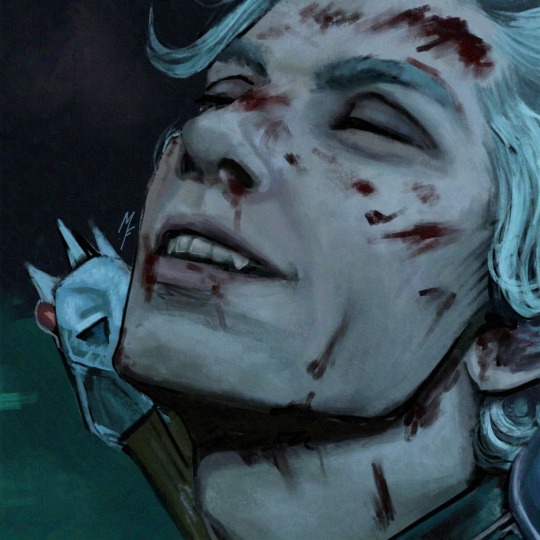
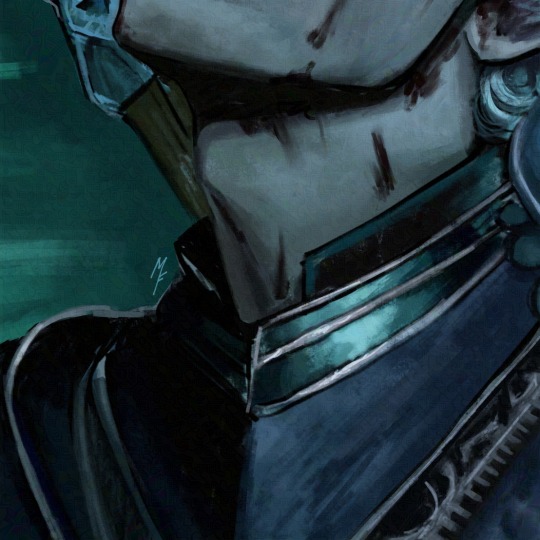
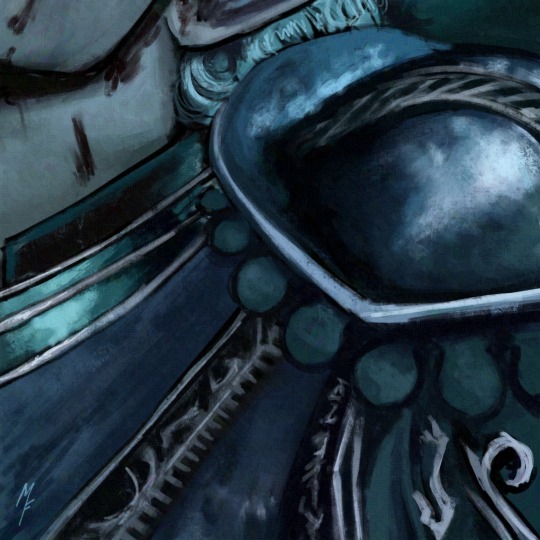
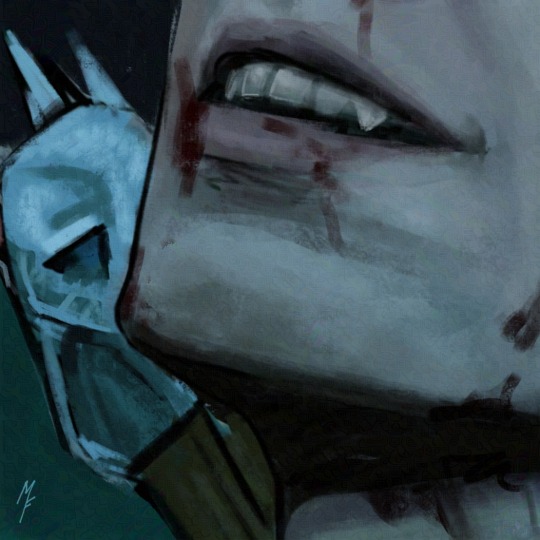
Hi Tik Tok! I'll try to be more diligent with my account, it's been a lot since moving back home 💀 Here’s fanart of Astarion from Baldur’s Gate 3 that I’d been working on for months (granted, a few minutes a day, but still!) 🦇
I decided to leave it as is, I like that there are some unfinished parts
This is also available for purchase on my Redbubble shop as prints and other merch✨
Software: Procreate
Fanart of Astarion from Baldur’s Gate 3
Brushes by Aaron Griffin
92 notes
·
View notes
Note
what’s your painting process?
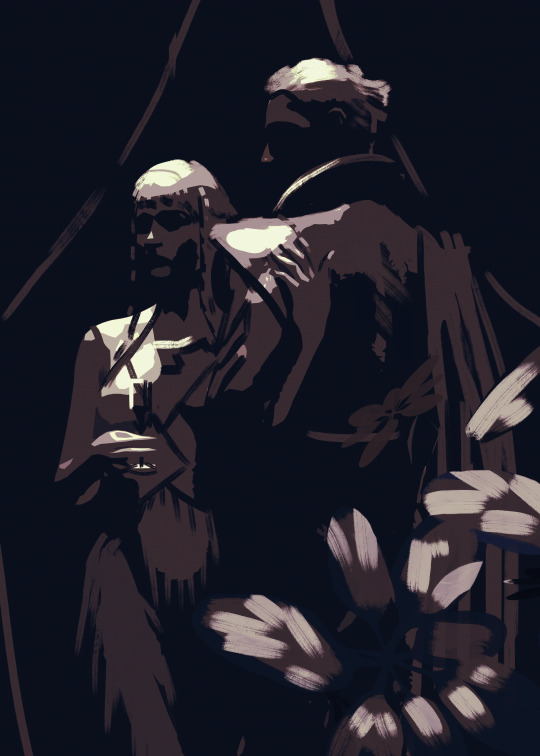
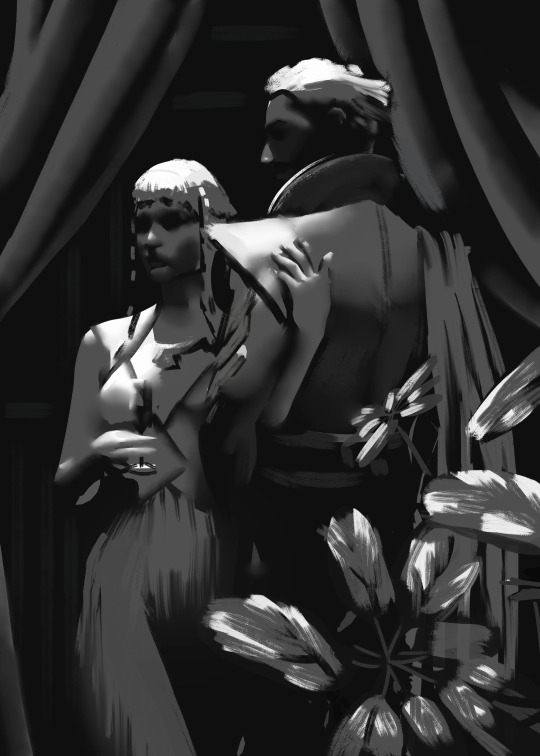
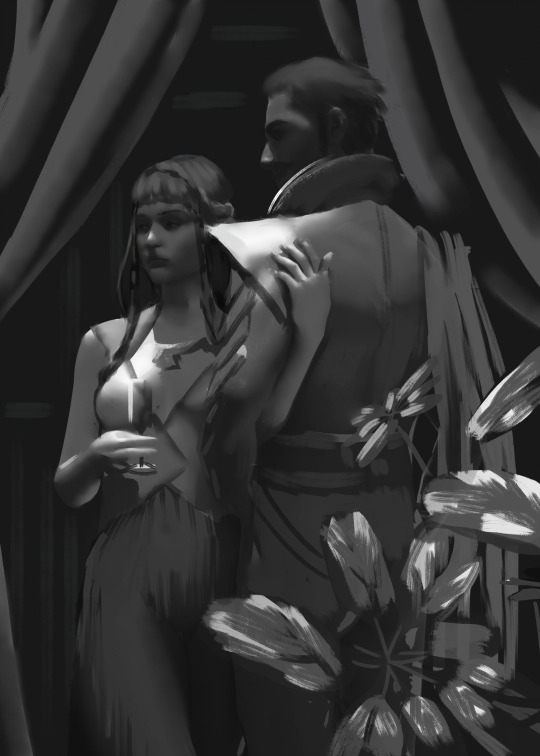
THIS IS A HARD QUESTION! Because I am a lil chaotic in my personal work. My best personal pieces can vary wildly from me painting randomy shapes in black and white and slowly turning it into something by getting more and more detailed in every pass at it, like I did here:

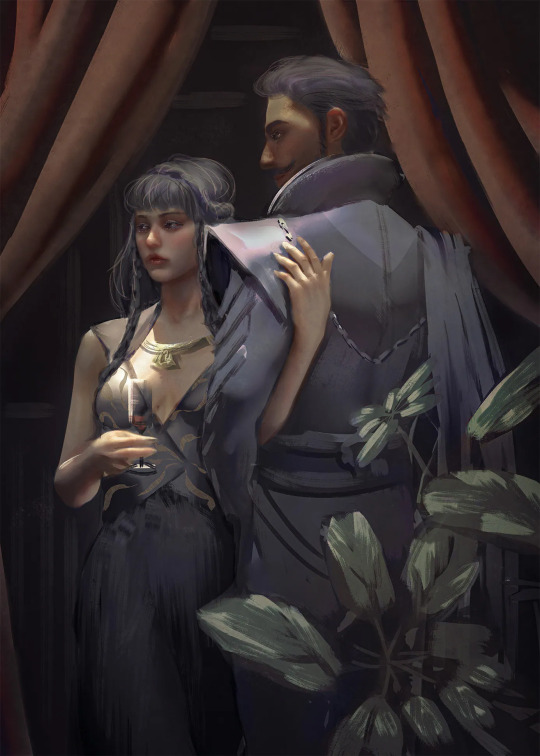
To an almost completely 3D render with a paint over, like I did here:
Or anything in between those to processes that you can imagine, tbh, I've probably tried that as well. BUT, I'll tell you what I've been doing lately in my professional stuff to keep the quality and style a lil less all over the place.
Step 1: Plan a pose and lighting in Daz 3D.
The models I usually use for this are modified Victoria 9 and Michael 9 because those are the most anatomically correct. But you can totally just use the free Genesis 9 or Genesis 8 models that come packaged with the free software and it souldn't really give you any issues.
Step 2: Posterize your refrence until it's 3 Values, then use that a reference to create a 3 value thumbnail, planning the arrangement of element in your painting and the lighting, midtone, and shadow colours.
Step 3: Create a duplicate of the thumbnail and apply a black and white filter. Put the original thumbnail in a seperate window or on a reference board or something to look at, so you don't stray too far from the points of contrast and lighting in that. Define your hard and sharp edges in the black and white painting, using your favourite hard edged painting brush and your favourite soft smudging tool. then fil in the values that exist in between your 3 key values. You can usually find these correct in-between values by eye drop selecting from the gradient in your newly softened edges.
Step 4: Detail and paint until your black and white painting looks like it would be a passable greyscale painting by your own standard. This one is hard to give specific instructions on how I detail because I just look at things I dont like and fix them until the things I don’t like are minimal.
Step 4: Add base colours using gradient maps, colour balance, selective colour, or curves. If you don't know which out of these is your favourite method for colouring greyscale, I encourage experimenting. Sometimes I myself use different methods even withing the same painting, because they all have their lil quirks of how they work and the colour results.

Step 5: Render. This one is, again, hard to discribe as it's mostly just looking at things you don't like and fixing them until you're happy.
Step 6: Add lighting effects. Here you can see I added bloom, jittered the hue in the shadow and light affected areas to be warmer or cooler, added glare to the glass, and then, dust particles being hit by the light, a VERY transparent colour dodge layer where the light is coming down from an off screen chandelier, then since all these lighting effects washed the character in the dress out too much, I went in with a softlight layer and a low opacity brush to do colour correction.
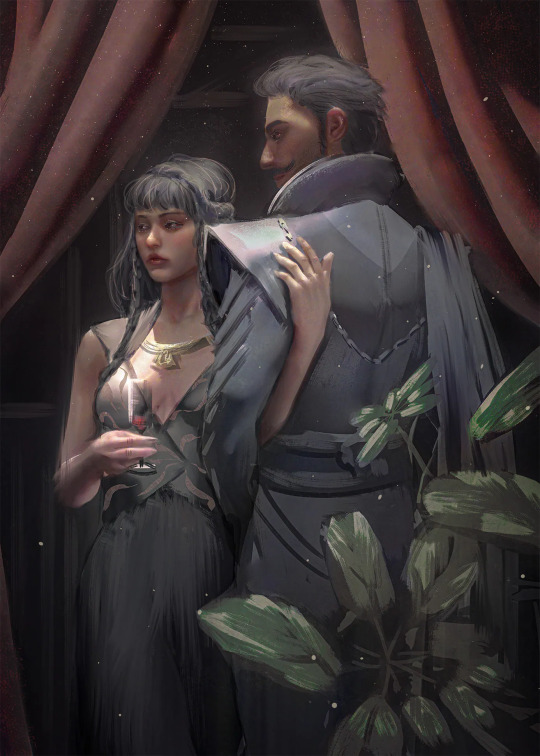
Step 7: Post processing. Add a noise layer, smart sharpened the image, added a high pass filter on overlay and set it to 20% yada yada now if one were to print the full res it would look nice.

And that's basically the process right now. But if you ask me again in a month I'm probably going to have changed the way I do things again because I'm always developing the process more and more as I go. I hope this answered some questions for people, was informative, or in any way helped.
#digital art process#digital art#illustation#digital painting#3d art#ask answered#answered#ask#my inbox is always open!
12 notes
·
View notes
Text

🎨 Meet BAKU — A Color Font That Shouts Boldness Baku is a fearless OTF color typeface, designed for bold display use. Its modern geometric shapes and striking multicolor fills make it ideal for attention-grabbing headers, packaging, posters, and branding visuals. Whether you're designing for digital or print, Baku stands out with power and precision.
It comes in 7 stunning multicolor styles — easily editable in compatible software like Illustrator or Photoshop. Each glyph is perfectly balanced and ready to make your message unforgettable.
🛒 Get it here: → Pixnugget → Creative Market → Ko-Fi → Font Bundles → EpicPXLS → Creative Fabrica
13 notes
·
View notes
Text

Fresno Nightcrawler Houndstooth // Fabric Design for @shapeshiftersvt and The Cryptid Collection
Remember way back a few weeks ago when I posted the Squonk poster and I said that once I'd designed the fabric to go along with it I'd start posting the fabric designs here? Well guess what! It's time!
For those who don't remember or who didn't know, I am the co-owner, site manager, and graphic designer for @shapeshiftersvt. 2024 marks our 10th anniversary and we wanted to do something big and special and new to mark the occasion and my partner, co-owner, head tailor, fashion designer, and founder, Eli, pitched a fashion line themed around cryptids. We call it The Cryptid Collection and it features six of our and the internet's favorite cryptids: The Fresno Nightcrawler, Mothman, the Jackalope, the Jersey Devil, Champ, and the Squonk.
My parts of the collection were designing the posters, and creating fabric designs for our very own, truly Shapeshifters designed chest binders and sports bras. But since we utilized Spoonflower to have those fabrics printed, they're also available through the Spoonflower marketplace for anyone to buy for their own sewing projects.
And now that all of the fabric designs are done and uploaded and proofed and listed, I, as promised, am posting them here to talk a bit more in-depth about them, the thoughts and inspirations behind them, and the design process.
Starting with the Fresno Nightcrawler.
Part of the reason I'm starting with the Fresno Nightcrawler is because this was the very first design that I finished. When we were planning out the fabrics, it was the most solid design concept I had that wasn't just adapting the poster design to fabric (mostly because ... I hadn't done the poster yet). It was the first one I really came up with, the one I was most excited about, and the one that pretty much stayed the same from concept to execution.
I love houndstooth. Which is weird to say when I don't think I've ever owned a single garment or accessory in with a houndstooth pattern? But I do, I love it. I love the teeny tiny classic version of the pattern; I love a blown-up graphic version of the pattern; I love plays and variations on it. So when I was trying to brainstorm what kind of fabric pattern I could make inspired by a creature with such a simple shape whose only colors were white and black, the idea came pretty quickly: A houndstooth. Or a Nightcrawlertooth, if you will. It was a trick, though, and a real learning experience, especially with this being my first design.
Getting a pattern to repeat smoothly is a skill unto itself. Basically you have what's called a tile, and the tile contains the part of the pattern that you want to repeat. Then, when your pattern is created, the original tile just gets essentially copy-pasted over and over so 1) you don't have to draw the whole yard of fabric, and 2)all of the repeated parts of the design are identical. But by doing it this way, you have seams you need to take into consideration. If you think of putting the pattern together, it's sort of like making a basic quilt: You start with one square (or rectangle), then attach four more squares to each side, and then just keep doing that. Each one of those seams (top, bottom, left, right) is a place where the pattern might not match up, which means when it's applied to a yard of fabric, it's not going to look like a smooth, seamless pattern.
Of course there's ways to avoid this altogether. If you're doing a simple stripe, using the line tool in your drawing software will keep your stripe a consistent thickness, and holding SHIFT while you draw it will keep the line straight. Or, even easier, you can create a pattern where the part that repeats doesn't straddle a seam; like a polkadot pattern, where the dot(s) can be centered on the tile and seams only cut through a solid background.
The trouble with a houndstooth, though, is that not only does the tile need to repeat, it's made up of repeating figures that interlock. I can't just center the white Nightcrawler on the tile and call it a day, because then the black Nightcrawler straddles the seam. On top of that, they needed to be shaped in such a way that the negative space between the white Nightcrawlers left a shape that was also recognizable as a Nightcrawler and similar enough to the white one that the pattern is mostly seamless.
I fully admit that I was not able to do this on my own. Enter: Eli. Eli is, among other things, a math nerd who enjoys an excuse to break out the graph paper. They found a tutorial online and got to graphing and shaping and, in just a couple of hours, had gotten the shapes down. I took that tile, illustrated it, cleaned up the seams (shoutout to Eli for also finding an easier way to do this than just manually copy-pasting), and voila! A Fresno Nightcrawler houndstooth.
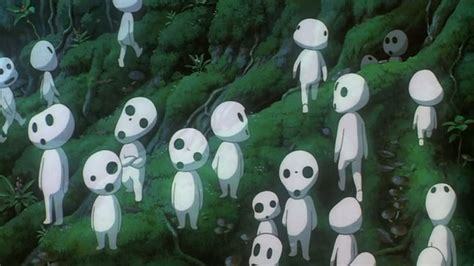
Now, you might look at that image up there and say, "Well that's all well and good, Pents, but they're kind of blobby and the lines are wobbly and it's all a little uneven." To which I say ... yeah, that's true. It's also kind of intentional. Like, I'm not gonna sit here and claim I got the basic pattern done and wasn't exhausted. But also I could've left it and come back to it the next day to clean up the lines and shapes a bit more, make everything really smooth and even. But, like. Look at this guy.

He's just a weird kinda blobby little dude. So I left the pattern kinda weird and blobby.
Even if I'd cleaned it, it's such a blobby little shape that's so at odds with the classic houndstooth that's all straight lines and sharp angles. So I made a deliberate choice to not polish it up. To kind of lean into the kodama vibes:
I am really so so proud of and pleased with this design. It came out almost exactly how I pictured it; it was really the most true design collaboration between Eli and I; and I'm just so pleased, after a lifetime of being a houndstooth lover, to now also have designed a houndstooth.
If you'd like a custom-sized, handmade, made-to-order binder or sports bra in this houndstooth like the one in the photos, you can find those listings (as well as the poster listing) here, on the Shapeshifters website. There are three pattern size options, the classic teeny tiny version; a somewhat bigger medium size; and a super graphic large size. Our binders are the most comfortable and effective on the market thanks to our finely graded internal sizing system. Because we're a small operation that makes every garment to order, both our binders and sports bras are highly customizable, and can be made to ALL measurements with flat pricing across sizes.
If you'd like to purchase the fabric yourself for your own sewing projects, you can order it through our Spoonflower shop, where we have it listed in the same three pattern sizes.
#cryptids#fresno nightcrawler#california#fabric design#fabric pattern#the cryptid collection#shapeshifters#spoonflower
36 notes
·
View notes
Note
I'm indifferent to Chatgbt and all that tbh. Like, I don't care if someone uses it. Except for the AI for art I'm against that, but rest? meh.
I run into issues when people use the chatbots to write their papers for them, in education or the professional world, if you're in school you're supposed to be learning and if you're in the professional world you got hired for the work you do not the prompts you can give to the chatbot.
There's already enough of a creativity drought right now and if I were hiring a ad agency to come up with some new slogans or eye catching posters and what not,
I would be pissed if I found out they used some AI program to to the work.
Should be treated the same as plagiarism in academia imho too.
Enough horror stories about therapy bots out there to make me wary of that on top of everything else.
AI art at least you can throw a watermark on, which I think should be a requirement, same with the videos they make. If every printer can put a invisible watermark on the pages they print should be easy enough to do it with the others.
If you're just having fun with the software, getting a recipe, need something to bounce ideas off of, whole bunch of good uses for it out there really that I have zero problems with.
Telling a recovering meth addict to have a little meth however is bad.
There's great uses and not so great uses, just like any other technology out there.
8 notes
·
View notes
Text
Inter Milan 2024–2025 Font Vector Pack – A Must-Have for Soccer Design

If you're a football design enthusiast, jersey collector, or creative working on fan-inspired content, you're going to love this one — introducing the Inter Milan 2024–2025 Font Vector Pack, now available on my Etsy shop, PixelHavenVault!
Inspired by the bold and modern identity of Inter Milan's 24/25 home and away kits, this custom-made font pack is a high-quality, digital tribute to one of Europe’s most iconic clubs.
Serie A is one of Europe’s most prestigious football leagues, home to legendary clubs like Inter Milan, AC Milan, Juventus, AS Roma, Napoli, Lazio, and Atalanta. Known for its tactical brilliance and passionate fan base, Serie A continues to set trends in both football performance and kit design. From the bold blue and black of Inter to the iconic stripes of Juventus, the league delivers some of the most recognizable jersey fonts and styles every season.
🔤 What’s Included in the Font Pack:
📁 AI, EPS, SVG, PDF, and PNG formats – perfect for any design software
🧩 Full set of numbers (0–9) and uppercase letters
🎯 Clean vector format – scalable, editable, and ready to use
🖥️ Compatible with Adobe Illustrator, Photoshop, Cricut, Silhouette, and more
🕹️ Great for kit mockups, merch designs, posters, and football graphics
youtube
💡 Why This Font?
The Inter Milan 2024–2025 font is sleek, sharp, and perfectly modern. It reflects the team’s renewed identity on and off the pitch — with a look that stands out in both print and digital form.
Every detail has been carefully designed to match the club’s real jersey typography, allowing you to create professional-grade visuals with ease. Whether you're creating a fantasy kit, a match-day social post, or a printable football gift, this pack brings your vision to life.
⚙️ Instant Digital Download
Like all products in my PixelHavenVault Etsy shop, this font pack is delivered as an instant download. No waiting, no shipping — just purchase, download, and start designing within minutes!
👇 Grab It Here:
🛒 Inter Milan 2025 Font Vector Pack on Etsy 👉 https://www.etsy.com/uk/listing/1899810223
✨ Stay Connected
Follow this blog for more football font releases, behind-the-scenes design tips, and creative inspiration. Up next: more club and national team fonts dropping soon — including fan favorites from La Liga, the Premier League, and Euro 2024 kits!
#Champions League#Font Football#Inter milan#Inter milan 24-25 font#inter milan numbers#Serie A#vector numbers inter#uefa champions league#font#font design#fonts#fonts & typography#football#football jerseys#football numbers#Youtube
3 notes
·
View notes
Text
#seo #seoagency #seoagencycapetown #bestseoagency #topseo #searchengineoptimization


1 note
·
View note
Text

Your call to action must have a deadline for an offer!—-____Visit www.AmericanElite.biz
Be the first five businesses earning between 10M to 50M per year that SET UP a FREE BUSINESS DIGITAL & PROFIT MAXIMIZATION CONSULTATION & receive a FREE CUSTOMIZED LOGO & BRANDING CONSULTATION WORTH $1000.00!
(Offer good until January 31, 2024)
BE THE FIRST FIVE READERS TO RECEIVE YOUR FREE CUSTOMIZED BUSINESS LOGO & FREE BRANDING CONSULTATION WORTH $1000 NOW!
Visit: www.AmericanElite.Biz Offer Good Until January 31. 2024
Strategies for Making Surgical Centers More Profitable with Technology
Overview:
Surgical centers are utilizing technology advancements to improve patient care and increase operational efficiency and, ultimately, profitability in the quickly changing healthcare industry. In order to successfully strike a compromise between state-of-the-art medical care and long-term financial viability, this article examines strategic techniques that use technology to increase surgical center profits.
Using 3D Imaging for Accurate Diagnostics:
By integrating 3D imaging technology, surgeons may now see anatomical features with never-before-seen detail, improving diagnostic precision. This enhances surgical planning efficiency while simultaneously improving patient outcomes.
Intraoperative Imaging Devices:
During surgery, real-time imaging gives doctors instantaneous insights. This technical breakthrough optimizes resource usage by reducing the need for follow-up surgeries and guaranteeing accuracy throughout procedures.
Little-Invasive Techniques:
Minimally invasive surgery can be performed with the use of robotics, which shortens hospital stays and recovery times. In addition to being favored by patients, these procedures also result in higher patient turnover and more financial success.
Robotics under Surgeon Control:
Using robotic technologies under the supervision of surgeons improves operating precision. Surgeons are regarded for their superior surgical skills and are able to perform complex treatments with higher accuracy, which improves patient satisfaction.
Digital Documentation for Optimal Performance:
EHR systems ensure accurate documentation, minimize paperwork, and digitize patient records to expedite administrative processes. Staff members can concentrate on patient care thanks to the time savings that result from this efficiency, which also boosts overall productivity.
Automated Workflow Management and Scheduling:
Allocating surgery suites, personnel, and equipment is optimized when automated scheduling is used through EHR systems. This not only shortens patient wait times but also increases the surgical center's ability to do treatments, which eventually boosts profitability.
Portals for Patients to Access Information:
Putting patient portals into place improves engagement and communication. Patients will be more informed and happier as a result of having access to information, pre-operative instructions, and post-operative care data.
Handy Mobile Applications:
Creating smartphone apps for patients facilitates communication and adds convenience. Through the ability to schedule appointments and get medical records, mobile apps improve patient satisfaction and foster enduring loyalty.
In summary:
By utilizing technology, surgical centers can position themselves for more revenue while also guaranteeing better patient care. Surgical centers may establish a smooth and effective operation that generates revenue by carefully combining robotic-assisted surgery, EHR systems, telemedicine, data analytics, and patient-centric technologies. Surgical centers may become lucrative and sustainable in the digital era by combining technology and surgical quality; this is more than just a business decision.
Your call to action must have a deadline for an offer!—-____Visit www.AmericanElite.bizBe the first five businesses earning between 10M to 50M per year that SET UP a FREE BUSINESS DIGITAL & PROFIT MAXIMIZATION CONSULTATION & receive a FREE CUSTOMIZED LOGO & BRANDING CONSULTATION WORTH $1000.00!(Offer good until January 31, 2024)
BE THE FIRST FIVE READERS TO RECEIVE YOUR FREE CUSTOMIZED BUSINESS LOGO & FREE BRANDING CONSULTATION WORTH $1000 NOW!
Visit: www.AmericanElite.Biz Offer Good Until January 31. 2024
#packaging#poster#programming#3d printing#software engineering#machine learning#rpg maker#typography#python#technology#software#medicine#consulting services#cosmetics
0 notes
Text


11.04.25
We went to Reade Signs in Aldershot today!
We went to have a meeting about posters at the Abbey School with Andy.
Reade Signs use iMacs for graphics and productivity work and Windows PCs for admin.
We met Scotty and Alex, who showed us the amazing printers in the workshop!
The printer, which is a 'VUTEk' LED hybrid printer, runs the Debian Linux operating system on an integrated Fiery controller.
The desktop environment for this Linux OS is a modified version of MATE, which is a modern version of the GNOME 2 DE.
The printer software running on this is VutekUI, used for managing client printing jobs. Vutek printers and software is managed by Electronics for Imaging (EFI).
Official Debian desktop wiki site:
https://wiki.debian.org/DesktopEnvironment
I had a go at operating the printer by pressing, Ready to Print!
See our previous visits in 2016 and 2017 here:
https://www.tumblr.com/bjsmall/140038522222/on-the-26th-of-february-chris-and-i-went-to-reade?source=share
https://www.tumblr.com/bjsmall/162556084377/030717-we-had-a-meeting-with-reade-signs-in?source=share
It was great to return to Reade Signs!
5 notes
·
View notes
Text
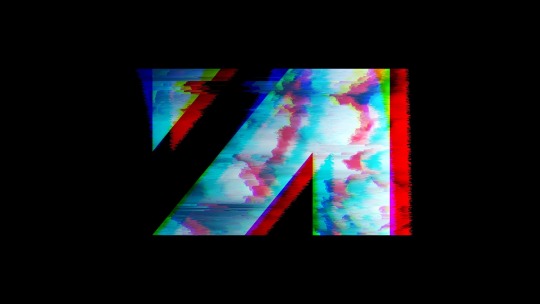
Well hello again,
tl;dr aphelion video here

I’ve always been fascinated by errors, mistakes, misprints, and glitches. I remember being too young to read, and looking at the pictures in a comic book (the Fantastic Four were foiling Dr. Doom’s nefarious plans yet again). The ink layers hadn’t registered quite properly, and the cyan, magenta, yellow, and black inks were misaligned. Although I was bothered by the imperfection of the illustration, I was drawn in and felt like I got a forbidden glimpse into the process. Thereafter, I started noticing color swatches on the tabs of paper packaging and the margins of pages. I was delighted when I found a piece of printed media that was missing a color, or a poster or book cover that was partially sun-bleached. All these accidents became an art form in and of themselves, simultaneously revealing the process by which the original pieces were created, and reimagining them along the way.
Damaged VHS tapes and corrupted data files gave rise to new types of visual experiences that once again broke the illusion of the original art, but created their own visual identity. A few months ago I started experimenting with data corruption and glitch art, but quickly became disillusioned with much of what is readily commercially available, at least outside Adobe’s predatory system. So I set to create my own software.
I built an app from scratch, that allows me to batch process images or video, and beat the ever loving snot out of it. The app accepts a data file, such as a piece of audio, and drives the intensity of the glitch effect in response to the amplitude of the audio.
As a step towards my dream of creating a synesthetic combination of music and visuals, I created this visualizer video for Aphelion! Please check it out, and I hope you will enjoy it.
As always, thanks for your time and support!
a.
#glitch#glitch art#music video#electronicmusic#electronic music#music#synthesizer#cinematic#epic#art
2 notes
·
View notes
Text
TwenT3

At TwenT3, we specialize in creating personalized 3D lenticular prints that bring flat, traditional images to life. Whether you're looking for custom business cards, photo gifts, or large-format 3D prints, our mission is simple: to turn your memories into eye-catching, interactive experiences through the magic of lenticular technology. What’s in a Name? We’re often asked, “How do you pronounce TwenT3?” The answer is easy — it’s pronounced “Twen - T - 3.” The name reflects our purpose: blending the classic world of 2D with the third dimension. TwenT3 exists to transform ordinary images into vibrant 3D creations that stand out in any setting.
Our Story: TwenT3 was born from a simple idea between friends — to design images that were unique, space-saving, and visually engaging. Inspired by the growing use of 3D in TVs and cinemas, we set out to make this technology more accessible for everyday use. Today, TwenT3 proudly offers premium lenticular products to individuals, creators, and businesses looking for something different — something that moves, flips, and impresses.
What We Do: We create a wide range of custom lenticular products, including:
3D Lenticular Business Cards
Personalized Photo Gifts
Flip and Animated Keyrings
Zoom and Morphing Magnets
Layered 3D Posters
Custom-Sized Lenticular Prints
Why Choose TwenT3?
Individually crafted, not mass-produced
High-quality lenticular lenses and 3D software
Indoor and outdoor display options
Passionate about creativity, innovation, and quality
#3 dimensional posters#3d effect#3d effect images#3d effect photo#3d effect picture#3d greeting cards online#3d hologram business cards#3d holographic business cards#3d moving pictures#3d print lenticular#3d printing kent#3d printing services near me#animation image#animation photo#backlit photo#branded keyrings for business#business card gift card#business card printing services near me#buy branded keyrings#buy printed keyrings#corporate branded keyrings#custom 3d card#custom lenticular pictures#flip images#flip photo#flip pictures#holographic business card printing#lanticular#lenticular advertising#lenticular animation
2 notes
·
View notes