#precomposition
Explore tagged Tumblr posts
Visit Tumblr Blog
Explore Tumblr blogs with no restrictions, modern design and the best experience.
Last Seen Tumblr Blogs


Fun Fact
Tumblr Inc. is using 66 technologies for its website.
Text
Hydrogen bomb vs. coughing baby: graphs and the Yoneda embedding
So we all love applying heavy duty theorems to prove easy results, right? One that caught my attention recently is a cute abstract way of defining graphs (specifically, directed multigraphs a.k.a. quivers). A graph G consists of the following data: a set G(V) of vertices, a set G(A) of arrows, and two functions G(s),G(t): G(A) -> G(V) which pick out the source and target vertex of an arrow. The notation I've used here is purposefully suggestive: the data of a graph is exactly the same as the data of a functor to the category of sets (call it Set) from the category that has two objects, and two parallel morphisms from one object to the other. We can represent this category diagrammatically as ∗⇉∗, but I am just going to call it Q.
The first object of Q we will call V, and the other we will call A. There will be two non-identity morphisms in Q, which we call s,t: V -> A. Note that s and t go from V to A, whereas G(s) and G(t) go from G(A) to G(V). We will define a graph to be a contravariant functor from Q to Set. We can encode this as a standard, covariant functor of type Q^op -> Set, where Q^op is the opposite category of Q. The reason to do this is that a graph is now exactly a presheaf on Q. Note that Q is isomorphic to its opposite category, so this change of perspective leaves the idea of a graph the same.
On a given small category C, the collection of all presheaves (which is in fact a proper class) has a natural structure as a category; the morphisms between two presheaves are the natural transformations between them. We call this category C^hat. In the case of C = Q, we can write down the data of such a natural transformations pretty easily. For two graphs G₁, G₂ in Q^hat, a morphism φ between them consists of a function φ_V: G₁(V) -> G₂(V) and a function φ_A: G₁(A) -> G₂(A). These transformations need to be natural, so because Q has two non-identity morphisms we require that two specific naturality squares commute. This gives us the equations G₂(s) ∘ φ_A = φ_V ∘ G₁(s) and G₂(t) ∘ φ_A = φ_V ∘ G₁(t). In other words, if you have an arrow in G₁ and φ_A maps it onto an arrow in G₂ and then you take the source/target of that arrow, it's the same as first taking the source/target in G₁ and then having φ_V map that onto a vertex of G₂. More explicitly, if v and v' are vertices in G₁(V) and a is an arrow from v to v', then φ_A(a) is an arrow from φ_V(v) to φ_V(v'). This is exactly what we want a graph homomorphism to be.
So Q^hat is the category of graphs and graph homomorphisms. This is where the Yoneda lemma enters the stage. If C is any (locally small) category, then an object C of C defines a presheaf on C in the following way. This functor (call it h_C for now) maps an object X of C onto the set of morphisms Hom(X,C) and a morphism f: X -> Y onto the function Hom(Y,C) -> Hom(X,C) given by precomposition with f. That is, for g ∈ Hom(Y,C) we have that the function h_C(f) maps g onto g ∘ f. This is indeed a contravariant functor from C to Set. Any presheaf that's naturally isomorphic to such a presheaf is called representable, and C is one of its representing objects.
So, if C is small, we have a function that maps objects of C onto objects of C^hat. Can we turn this into a functor C -> C^hat? This is pretty easy actually. For a given morphism f: C -> C' we need to find a natural transformation h_C -> h_C'. I.e., for every object X we need a set function ψ_X: Hom(X,C) -> Hom(X,C') (this is the X-component of the natural transformation) such that, again, various naturality squares commute. I won't beat around the bush too much and just say that this map is given by postcomposition with f. You can do the rest of the verification yourself.
For any small category C we have constructed a (covariant) functor C -> C^hat. A consequence of the Yoneda lemma is that this functor is full and faithful (so we can interpret C as a full subcategory of C^hat). Call it the Yoneda embedding, and denote it よ (the hiragana for 'yo'). Another fact, which Wikipedia calls the density theorem, is that any presheaf on C is, in a canonical way, a colimit (which you can think of as an abstract version of 'quotient of a disjoint union') of representable presheaves. Now we have enough theory to have it tell us something about graphs that we already knew.
Our small category Q has two objects: V and A. They give us two presheaves on Q, a.k.a. graphs, namely よ(V) and よ(A). What are these graphs? Let's calculate. The functor よ(V) maps the object V onto the one point set Hom(V,V) (which contains only id_V) and it maps A onto the empty set Hom(A,V). This already tells us (without calculating the action of よ(V) on s and t) that the graph よ(V) is the graph that consists of a single vertex and no arrows. The functor よ(A) maps V onto the two point set Hom(V,A) and A onto the one point set Hom(A,A). Two vertices (s and t), one arrow (id_A). What does よ(A) do with the Q-morphisms s and t? It should map them onto the functions Hom(A,A) -> Hom(V,A) that map a morphism f onto f ∘ s and f ∘ t, respectively. Because Hom(A,A) contains only id_A, these are the functions that map it onto s and t in Hom(V,A), respectively. So the one arrow in よ(A)(A) has s in よ(A)(V) as its source and t as its target. We conclude that よ(A) is the graph with two vertices and one arrow from one to the other.
We have found the representable presheaves on Q. By the density theorem, any graph is a colimit of よ(V) and よ(A) in a canonical way. Put another way: any graph consists of vertices and arrows between them. I'm sure you'll agree that this was worth the effort.
#math#adventures in cat theory#oh btw bc よ is full and faithful there are exactly two graph homomorphisms よ(V) -> よ(A)#namely よ(s) and よ(t)#which pick out exactly the source and target vertex in よ(A)
100 notes
·
View notes
Text
EXPLORING AFTER EFFECTS
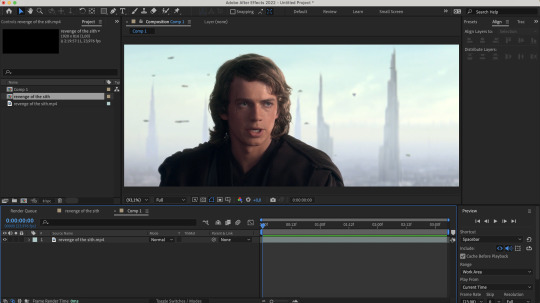
We were asked to spend the week between the first class and the second familiarizing ourselves with the basics of After Effects. As a complete newcomer to the software, I followed this tutorial by Ben Marriott on YouTube to get acquainted with some of AE's beginner features.
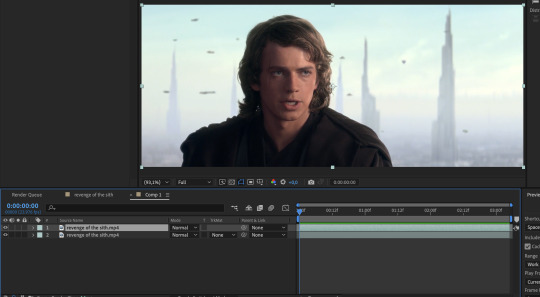
SHOT 01

The output looks rather rough, but the first segment of the tutorial covered AE's default interface, importing media, layers, transforms and alignment, masking and keyframing! (The background is this video from Pexels.)
SHOT 02

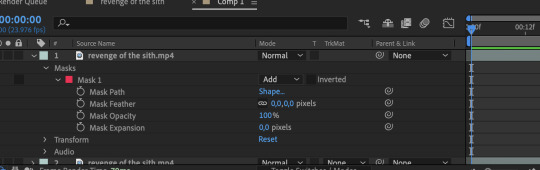
Segment 2 of the video covers animating mask paths and parenting layers, as well as interpolation between keyframes and precomposition.
2 notes
·
View notes
Note
Out of curiosity, how many layers can you end up with when exporting a fullbody animaton to After Effects for animation? I have been trying to do some but having all the little parts separated ready for animation is dizzying!
yeah I end up with a ton of layers!! I tend to overshoot it because it's more annoying to have to go back in and add new ones than it is to precompose unnecessary ones together, and I always end up with a ton of precompositions anyway so oh well!! ^^;;;
9 notes
·
View notes
Text
Developing the Experience
Angelique Shelley (MA Concept Art)
Blog Post #7
Sound
As production in After Effects continued, it became clear that it would make more sense for me to add and composite together the audio. The main reason for this is that the After Effects project file, complete with image sequences from Unreal added up to over 60GB so syncing that between team members could be problematic, especially since I am remote. There was also quite a lot of sickness in the group which I was fortunate enough to avoid.
Ana selected and shared some excellent sounds throughout the project for us to use.
We also received feedback from staff on how we should avoid just sticking sounds straight on but should pay attention to blend them together carefully.
I found that Premiere Pro was far more capable in the sound department than After Effects so exported the final composition from After Effects as an mp4 with a manageable file size that could render in real time in Premiere Pro. To avoid double-compression by encoding to mp4 twice though I decided to edit the sounds over the pre-rendered mp4 and then bring in the processor-intensive after effects file directly into Premiere Pro with the dynamic link at the very end and render that instead. This ensures maximum video quality and ease of editing along the way.
While it could be argued that our visuals may seem disconnected throughout the video I hoped that the sound could help tie it together with more cohesion.
After adding the first sounds of rocks banging down and slate grinding and stone chips falling, I noticed that the sound effects seemed laughably ‘small��� compared to the size of the giant heads rotating into position. I found that adding a Bass effect made the sounds sound larger and a Studio Reverb with the equalizer set to custom>great hall with some extra tweaks made it more echoey in between the pillars of the first scene (see fig. 1).
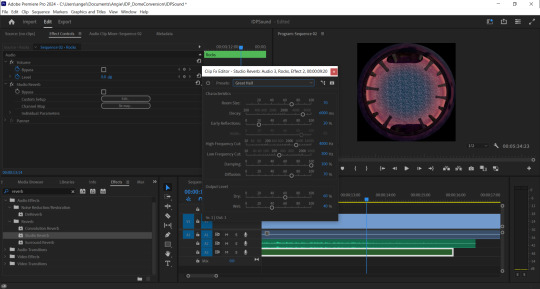
Fig. 1 A screenshot showing the application of Studio Reverb.
The echoes unfortunately did not extend beyond the audio clip length so although echoing through the clip, ended abruptly. If this was After Effects I would assume that a precomposition of the audio layer would allow the software to echo even where there is no actual audio clip. I found that the premiere version of precompose is called ‘nest’. Indeed this worked as I intended. Duplicating a small audio file, adding it beyond the end of the composition and nesting that too allowed the final audio clip to echo as well.
The sounds now matched the scene far better. The sound links below show the originals and how small they sound in comparison.
I added the sound of wind and calm water to connect the viewer to the scene more as well.
The sound of the clock increasing in speed was a challenge as the speed ramp effect only worked on video instead of audio but I found that I could increase the speed of the whole layer linearly so just duplicated the audio layers, speeding each one up with a fade between them all.
I applied similar effects to all of the above for the wormhole and final scenes, but layering the sounds for the wormhole effect was both fun and challenging (see fig.2).
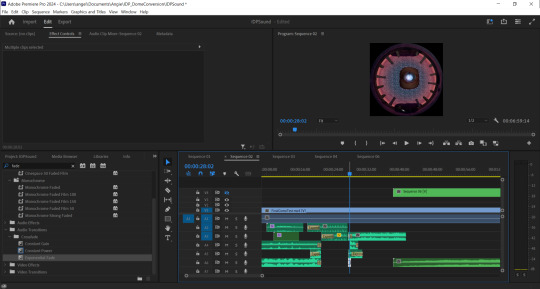
Fig. 2 A screenshot showing some of the final layers of sound for the wormhole effect.
The music we chose had an ethereal, mysterious and slightly unsettling feel and worked well as a more ambient track that did not draw too much attention to itself and did not overpower the direct environmental sounds such as the rocks or wormhole. I feel that the overarching music helps tie everything together and make it a more harmonious experience.
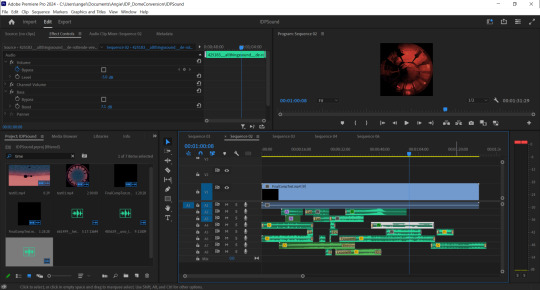
Fig. 3 Screenshot of final sound composition.
The Final Composite
youtube
References:
allthingssound (2018). de rottende veerboot. [Sound]. Freesound.org. [Online]. Available at: https://freesound.org/people/allthingssound/sounds/425183/ [Accessed 12 February 2024]
carmsie (2012). PB It is time.wav. [Sound]. Freesound.org. [Online]. Available at: https://freesound.org/people/carmsie/sounds/168303/ [Accessed 12 February 2024]
carmsie (2012). PB Remember Remember v2.wav. [Sound]. Freesound.org. [Online]. Available at: https://freesound.org/people/carmsie/sounds/168305/ [Accessed 12 February 2024]
DylanTheFish (2018). Warp Speed.wav. [Sound]. Freesound.org. [Online]. Available at: https://freesound.org/people/DylanTheFish/sounds/454683/ [Accessed 12 February 2024]
felix.blume (2023). River bank, waterfall distant loud, lapping water, close recording, bird, subtle cicada in indigenous village Salto Hacha in Amazon rainforest. [Sound]. Freesound.org. [Online]. Available at: https://freesound.org/people/felix.blume/sounds/674104/ [Accessed 12 February 2024]
f-r-a-g-i-l-e (2019). Buttery Breakbeat Synth, octave playthrough. [Sound]. Freesound.org. [Online]. Available at: https://freesound.org/people/f-r-a-g-i-l-e/sounds/500662/ [Accessed 12 February 2024]
het_HCKM_DS_... (2022). Mortality Boring Death Dying clock tick tock klok tik tak incl 20 Hertz sometimes. [Sound]. Freesound.org. [Online]. Available at: https://freesound.org/people/het_HCKM_DS_huis/sounds/661499/ [Accessed 12 February 2024]
Jovica (2008). Pad 006 - Whispering Ears - D4.flac. [Sound]. Freesound.org. [Online]. Available at: https://freesound.org/people/Jovica/sounds/52489/ [Accessed 12 February 2024]
kernschall (2018). SFX_Stone_Calcit_DeadSea_Avalacne_foot #3-178.wav. [Sound]. Freesound.org. [Online]. Available at: https://freesound.org/people/kernschall/sounds/425017/ [Accessed 12 February 2024]
klankbleed (2017). wind gap indoors 001 170305_1100.wav. [Sound]. Freesound.org. [Online]. Available at: https://freesound.org/people/klankbeeld/sounds/383139/ [Accessed 12 February 2024]
Robinhood76 (2021). 10105 big stone crush impact.wav. [Sound]. Freesound.org. [Online]. Available at: https://freesound.org/people/Robinhood76/sounds/567840/ [Accessed 12 February 2024]
X3nus (2020). Ardanbanapolis Interstellar Hub.flac. [Sound]. Freesound.org. [Online]. Available at: https://freesound.org/people/X3nus/sounds/513487/ [Accessed 12 February 2024]
Zimbot (2011). Portal_Continuous_Rumble.wav. [Sound]. Freesound.org. [Online]. Available at: https://freesound.org/people/zimbot/sounds/122972/ [Accessed 12 February 2024]
0 notes
Text
my precompositions are a mess
0 notes
Text
I shan't try to defend categories now, you've heard my spiels. But I'll say, kan extensions are just adjoints in a functor category. This comes up a lot especially when you're working with precomposing by a functor, precomposition often has adjoints.
I get that all concepts are Kan extensions, but I struggle to see the payoff of doing that.
14 notes
·
View notes
Photo

After Effects Tutorial - How to Pre-Compose | भाग 13 - मराठी मध्ये शिका
#precomposeaftereffects#precomposition#precomposicionaftereffects#howdoyoueditindividuallayers#compositionsinadobeaftereffects#aftereffectsbeginners#aftereffectstutorialsinmarathi#explainingthecomposition#quicklyjoin2ormorecompositionsinaftereffects#howtocreate2ormorecompositionsinaftereffects#howtoduplicatecompositionsinaftereffects#precompositionaftereffects#learnaftereffect#learnaftereffectinmarathi#aftereffectinmarathi#pk100#pk100.in#pk100inmarathi#pk100inhindi#graphicdesigninginmarathi#graphicsoftware
0 notes
Photo

lots happens between fat times of making large sounds; coffee and pastries meetings fundraising governmental red-tape and branding meet-and-greets preparations for the daily general meeting with the share-holders the consortium feels that annual reporting is quite démodé today there have been great strides in the production of electric sound #precomposition #postcomposition #haiku #instapoetry #poemlet #consortium #meetings #paperwork #antibiggovernment #librarymusic #pastries #coffee #electronica (at Wedding, Berlin) https://www.instagram.com/p/BzvUDhHIlpE/?igshid=t3ar1dt02ncd
#precomposition#postcomposition#haiku#instapoetry#poemlet#consortium#meetings#paperwork#antibiggovernment#librarymusic#pastries#coffee#electronica
0 notes
Text

hi! i’m user ames tattooine, and i’m gonna go over how to cut footage out of a scene. i’ll talk about rotoscoping—what it is, its history, and how to mask with the rotobrush successfully. i will also briefly go over how to use the pen tool to mask in after effects.
though this is pretty comprehensive and info-heavy already, there are still things i don't go over! but it should be a guide fit for beginner-intermediate after effects users.
YOU WILL NEED:
adobe after effects (minimum version cs5 / anything released after 2010)
basic knowledge of the interface and workflow, including but not limited to: compositions/precompositions, keyframes, and how to use brush tools
time. a lot of it
patience. more of it
also, before you click "read more," please note that this is about 3000 words long. definitely recommend viewing it in your browser. with housekeeping out of the way, let's go!
WHAT IS ROTOSCOPING?
very simply put, rotoscoping is a tracing technique. physically, it’s a little like using a selection tool on video. conceptually, things are slightly different, and that’s due to how it was meant to be used—but like many artistic tools, rotoscoping was transformed by contemporary artists / editors / animators / etc to become the versatile thing it is today. for mainstream giffing and video editing purposes, it is most often used as a way to mask footage out. see:

UNDERSTANDING ROTOSCOPING
the main thing you need to understand is that rotoscoping was meant for animation. not masking, not giffing—hand-drawn animation. in its early days, animation was clunky and generally unnatural-looking; not due to stylistic decisions about motion, but because artists were mostly guessing at how a movement would be divided into frames between point A and point B of any given movement. then, in 1915, two brothers named max and dave fleischer stuck a projector to a table, attached it to a car light, and beamed that light onto a block with tracing paper attached. they’d then take the image produced onto the tracing paper, trace out the figure (in the first case, dave dancing on top of a roof in front of a white sheet), and repeat this frame by frame to eventually trace an entire scene. the animated character would be drawn over / match the traced figures, and bam, animators suddenly had a HUGE shortcut to imitating real life movement in drawn scenes. (or, more accurately, only max and dave did, at least until the patent expired lol)
WHAT DOES THIS MEAN FOR ME??
well, maybe not much if you don’t care to nerd out like i do, but it should absolutely inform the choices you make re: scene selection. dave and max used a white sheet for contrast and added a car light to their apparatus to enhance that contrast when they were tracing. if you try to rotoscope a scene that doesn’t have much contrast to it, you may not come out the other end with much success.
but remember: the tool wasn’t created so that you could cut your blorbo out of a scene, it was so that artists could trace movement for funky and weird animated characters in the 1920s. over time, and as tech advanced, people realized that if they completed half the rotoscoping process, they would have an isolated scene from the original footage. aka, they could mask out background footage. sprinkle in a little web 2.0, accessibility and increasingly easy use of tools from the mid-90s onwards (and the implementation of the rotobrush tool specifically after 2010), and we have a fascinating study of how tools can be transformed from their original use to do things that are different but equally valid. and yeah—2010. it’s mind-boggling to think about the leaps and bounds we’ve made with editing tech in the last 10-15 years alone. i digress.
ROTOSCOPE =/= ROTOBRUSH
so here’s where you might be like, jesse what the fuck are you talking about dot jpg. i’ll try to be concise: rotoscoping is the method. rotobrush is ONE of the tools you can use to rotoscope. i have a little issue about terminology that i won’t get into, but what people want to do in gifsets and video edits with the rotobrush is MASK. they are using the rotobrush to mask away footage, the same as if they used tape to cover up sections of a canvas. it’s easier, however, to think of it in the inverse—taking specific footage out, rather than snipping background away. imagine i have gingerbread dough, and i want to cut it into stars or various shapes. one thing i could do is take a knife and a stencil and physically cut out my shapes; another thing i could do is use a cookie cutter. the rotobrush tool is like a cookie cutter if it was driven by machine learning, involved way too much math and programming for personal comfort, and also was incredibly inelegant. the former method can be done using the pen tool, which is more time consuming, perhaps, but it lends itself to accuracy because it’s all done by you, the artist. i will be going over both methods.
THE ROTOBRUSH METHOD
fucking finally! we’re in after effects! first thing of note: my interface looks like this. yours, unless you also went through a sony vegas envy phase in 2015 and then modified your existing cs6 interface to be as inconvenient as possible, does not. don’t worry about it—the tools you need are located in the same place, and if ever i use a panel you can’t find, just click “window” at the top (both in mac and windows) and click what you need there.
step 1: select your footage, and be selective. and boy, do i mean be selective, or else you are in for a world of irritation. you want a scene that has naturally high contrast between your subject and your background. you want a scene that doesn’t have erratic movement, or if it does, you need to have the frame rate to support that movement. similarly, your background shouldn’t have too much movement either.
(what is erratic movement? well, let’s say your footage is 24 fps, and a character moves their arm between frame 0 and frame 12, or half a second. if the arm is moving incrementally throughout all 12 frames, or every 2 frames, that’s workable! but if you have a still image for frames 0-3 where the character’s arm is in one position, then another still image for frames 4-6 where the character’s arm is in a vastly different position—that’s erratic movement. after effects will not process that easily.)
if you’re masking out footage of a human (or humans), then for your own sanity, choose a scene that doesn’t have a lot of flyaway hair. finally, you probably don’t want a scene that’s too long! for this tutorial, i’ve got this shot of my baby boy.

notice how he’s dressed in dark clothing against a very light background? how his hair is mostly flat to his head, and how there’s nothing really that could have erratic movement? the background is a little busy, but it doesn’t seem like anything that’ll mess up the rotobrush’s calculations. as a bonus, the subject is relatively large and details around the edges aren’t too detailed! this is the kind of footage that’ll give you an easier time.
note: when i say “calculations” btw, i really do mean calculations. the algorithm takes the brush tool set to “constant” and predicts “edges” based on things like contrast between pixels, relative position of where the brush was used, etc. this is why it can be really convenient, but also why it can be prone to error. as i said: inelegant.
step 2: isolate the scene in a separate comp, whether that be through creating a separate composition manually or just precomping your existing one. the key thing is to have workable start and end points that automatically pop up when you enter the layer so that you don’t have to wait hours for each unused frame to load. this is what i’ve got now:
step 3: enter the layer by double clicking it in your timeline. you should see a separate panel pop up at the top here…

and what looks like the entirety of your footage here.

fret not! this is simply how layers work in after effects: they’re non-destructive, so you can add modify it to your heart’s content, and the original footage will not change. kind of like smart objects in photoshop, if you want a comparison. that is to say, yeah, in this layer, you DO have the entirety of your footage; in your composition, however, you’ve cut away all but 3 seconds of it. the point of step 2 will be apparent in one second when you do step 5.
step 4: equip the rotobrush tool. that’s the blue icon here on your tool bar (turns blue when you equip it).

step 5: go to the beginning of your composition and vaguely trace the outline of your subject INSIDE the footage you want by clicking and dragging (like any other brush tool), like so:
the line doesn't have to connect, mine just does. you’ll notice that the "rotobrush and refine edge" effect is automatically applied, and if you zoom in on the timeline from step 3, you’ll also see that the start and end points of your workspace have been automatically set to fit your composition.
after you release your click-and-drag, you should see a pink outline appear around the selection.

you can change how you view your selection by hitting the buttons down here to toggle different alpha view settings. and if you didn’t know this already, alpha means transparency. i personally like switching between the pink outline and the alpha overlay setting—the former makes it easier to see the smoothness of my selection, and the latter makes it easier to see if i’m missing footage / provides a starker contrast.

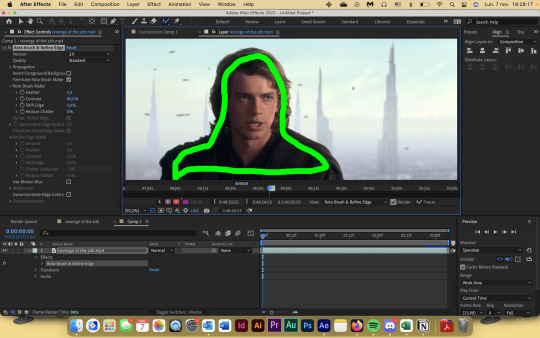
step 6: refine the initial selection. if you have experience with tracking, you can think of this as a “master frame” where you’re defining the parameters that will go on to be approximated for the rest of the footage. reminder that you are manipulating an algorithm when you use this tool, so you want to feed it data! this means clicking and dragging to collect any missing footage, or holding option / alt while you click and drag to remove footage. if you see jagged lines (like around his hair here), you can make it smoother by tracing inside the subject around the area and removing footage from the outside around the area—basically, telling the algorithm that This Is Where The Edge Is And I’m Moving Around It.

step 7: click play and let footage propagate. once it’s done, it should preview and look something like this:
if you’ve done everything right so far, then your outline shouldn’t be jumping wildly around or anything—for the most part, it should stick to a good 80-90% of the footage you want! the more solid foundation you have that doesn’t need (much) fixing, the smoother the mask is going to be.
step 8: refine the “problem” frames. you can click through frame by frame and see where things go off the rails. for me, it’s anakin’s right (so my left) shoulder. basically repeat what you did in step 6 and add / take away footage as necessary to refine the edge. VERY IMPORTANT TO NOTE WHEN REFINING: the algorithm calculates edges FORWARDS. that is to say, if you make a change 2 seconds in, that change is only going to make modifications from that 2 second point onwards. it will not make a change backwards, meaning that if a problem starts to show up, you need to fix it from the root onwards and teach the algorithm that This Is Where The Edge Is. if you don’t do this, then you will end up going backwards frame by frame fixing the same mistake over and over again, and it will look wonky because you will redraw in different places. i have had students do this and spend hours in misery. be patient: work from the start and fix as you move forward frame by frame! don’t jump forwards and backwards if you can help it.
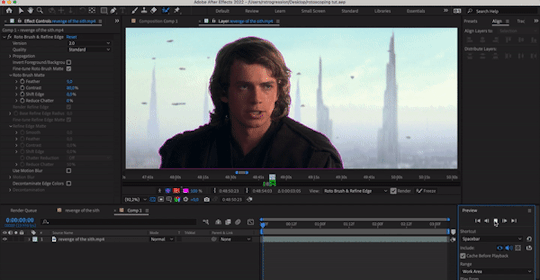
step 9: fiddle with the effect settings. now that you’ve basically gotten your mask as neat as possible, you can play with the actual effect itself. just quickly, i’ll explain what i think to be the most important things (and the other settings, you can experiment with on your own):
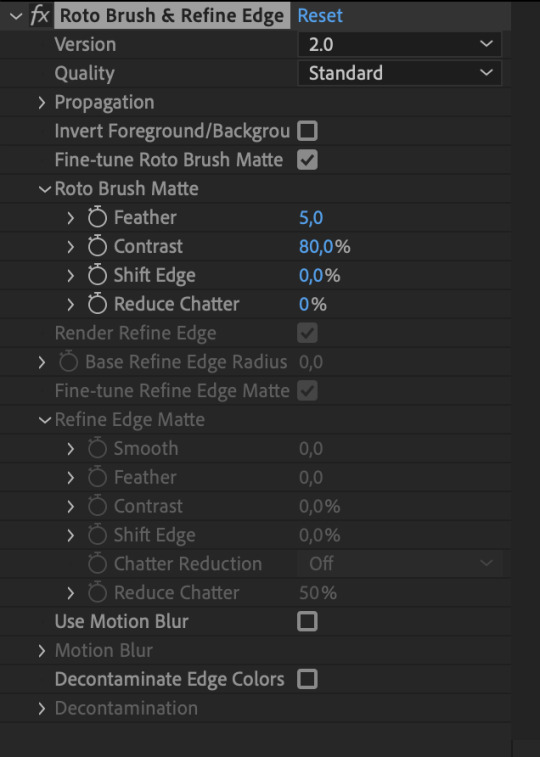
version: 2.0 is their latest and ostensibly “most improved” version from the 2020 update, though if you don’t have the hardware that can take it, you’ll end up propagating frames for Hours. version 1.0 is perfectly adequate, and at times even more efficient than 2.0. up to you!
invert foreground / background: select the footage around your subject rather than the subject itself. can be very useful!
reduce chatter: chatter is the shakiness of your outline from frame to frame. when things get ugly—say, when you use the refine edge tool—is when your outline is jerking around every frame, seemingly unable to find an edge, like so (to the extreme—yours will likely be smaller twitches):

(also, this is me warning you right now. if you use the refine edge tool, you will triple your workload trying to actually refine it, and it will still look weird. if you insist on using it, be sure to work with a tiny brush size and stick as close as you can to the edge of your selection. this thing sucks and does not behave like it does in photoshop. LMAO.)
for the luke gifs, i had my feather at 10, my contrast at 90, my shift edge anywhere between 10 and 40%, and reduce chatter set to 100. these will vary greatly depending on the look you’re going for and also how neat your existing selection is. (at vague claims like this, i often hold a blinking neon sign at my students that says "REMEMBER MARSHALL MCLUHAN? THE MEDIUM IS THE MESSAGE? FORM AND CONTENT ARE INEXTRICABLY LINKED? CONSIDER THAT AND BE PURPOSEFUL IN YOUR DESIGN CHOICES PLEASE")
overall, the effects controls you see are very much like the select and mask feature in photoshop! you can play around with it and see what the other settings do, but those under roto brush matte are the main ones imo. and that’s all there is to it! you can render out your composition, or you can nest it in another composition if you’re working all in after effects, or whatever. for those who are slightly more advanced in ae: i wouldn't recommend using twixtor after masking to slow down the footage (if anything, risk the compression and add twixtor before, then render and import back and mask), but you can definitely adjust the time keyframes without impacting the quality of your selection. or you can sit and admire your genius and the power of c++.
THE PEN TOOL METHOD
this method is less a pain in the ass and more just.. very tedious. also jsyk, it works better with animated content (cartoons, anime, etc) and less so with live action just because of like, hair. i totally recommend being in a discord call with friends while you do this method because it is an absolute vibe and distracts you from how mind-numbing and boring editing actually can be lol
step 1: select your footage, and be selective. maybe not as particular as you had to be for the rotobrush method, but it should still have mostly the same elements. erratic movement isn’t so much an issue. i’m using the same scene as above for convenience.
step 2: isolate the scene in a separate comp, whether that be through creating a separate composition manually or just precomping your existing one. this is mostly for workflow reasons, but some people hate working with a lot of compositions, so it’s up to you if you want to work in the original composition with your whole footage.
step 3: duplicate the layer. you should have something like this now:
step 4: equip the pen tool, highlighted in blue here (turns blue when you equip it)!

step 5: on the top layer, create a mask around the very edges of your subject, starting from the beginning of your selected footage. you should end up with something that looks like this. i wouldn’t bother with curving your lines, just because it can be harder to move around (especially when you’re making video edits and masking out action sequences and whatnot). if you toggle the visibility off and on your bottom layer, you’ll see that you’ve masked out the rest of the footage, and everything else is transparent. woo!

NOTE: if you haven’t already, go to your preferences and make sure that this is toggled off. you want to be able to add and delete vertices at will without changing the mask path in previous frames!

step 6: hit “M” on your keyboard, or use the dropdowns on the uppermost layer to reveal the mask 1 dope sheet.
step 7: create a mask path keyframe at the first frame by clicking on the stop watch. your station should look something like this:

step 8: go forward frame by frame until the image changes. this may be by one frame, two, or sometimes three.
step 9: deselect your layer, then select it again. the mask outline should change from square vertices to circular ones.


step 10: click and drag to move the vertices so that they align with the edge of your subject again. feel free to zoom in and out as necessary! you’ll notice that keyframes are created automatically when you make changes, so don’t worry about manually inputting them.
repeat steps 8 to 10 until you’ve finished :) this is why it’s time consuming and annoying :))
bonus options: you can shift the edge of your mask by fiddling with mask expansion. mask feather will feather around your mask, and mask opacity will change the transparency of the footage outlined inside the mask. less sophisticated than the roto brush matte settings, but they work great!
annnd 3000+ words later… that’s it! that’s how you cut footage from a scene using after effects. i hope this was informative! if you have any questions, feel free to send an ask to usergif.
xo ames, signing off 🖤
161 notes
·
View notes
Text
Graphs as presheaves 4: coverages
So as we all know, directed multigraphs are presheaves on the small category Q = V ⇉ A, with two non-identity morphisms s,t: V -> A. In order to determine which graphs are in fact sheaves, we need to equip Q with a notion of 'covers' of its objects. I will call this structure a coverage, though note that often this specific kind of coverage is called a Grothendieck topology.
A coverage J tells each object X of our category Q which of the sieves on X are covering. The collection of covering sieves is then denoted J(X). A sieve on X is a set of arrows into X closed under precomposition. A sieve on X can be identified with a subfunctor of the hom-presheaf よ(X), so in our case this is a subgraph. A coverage J needs to satisfy three axioms for all objects X:
(S1) よ(X) itself is a covering sieve of X,
(S2) if U is a covering sieve on X and y: Y -> X is an arrow, then the pullback sieve y*U covers Y,
(S3) if U is a covering sieve on X, and W is any sieve on X such that for all u ∈ U we have that u*W is a covering sieve, then W is a covering sieve.
If a category is equipped with a coverage, we call it a site.
So for Q, a coverage assigns to our objects V and A a set of subgraphs of よ(V) and よ(A), respectively. Recall that よ(V) is the graph consisting of just one vertex and no arrows, and that よ(A) is the graph consisting of two vertices and one arrow from one to the other. By the Yoneda embedding, we can identify V and A with these graphs, and Q with the full subcategory of graphs containing the hom-presheaves. It's easy to see that V has two subgraphs and A has five, so it's not too hard to find every coverage on Q. Let's name the subgraphs in question. The subgraphs of V are V itself and the empty subgraph, which we denote by ∅. For A, let A be the whole arrow graph, let B be the subgraph containing just both vertices, let S and T be the subgraphs containing just the source or target vertex respectively, and let E be the empty subgraph (we distinguish the empty graphs as subgraphs of V and A, as they are 'embedded' in different objects).
By S1, J(V) must contain the whole graph V. This gives us two options for J(V): either it contains ∅ or it doesn't.
Note that if E ∈ J(A), then J(A) must be the set {E,S,T,B,A} of all subgraphs. To see this, check out the third coverage axiom S3; by definition, the vertex set and arrow set of E are empty, so as a set of morphisms into A it contains no elements. It follows that if W is any sieve on A, then vacuously for all u ∈ E we have that u*W is a covering sieve, so any sieve W on A is covering.
We have four arrows in Q. Pullbacks of sieves along identities give you the same sieve back, so there's two interesting cases. Because the arrows s,t: V -> A correspond via the Yoneda embedding to the inclusions of V into the subgraphs S and T of A respectively, the pullback of a subgraph W of A is the intersection of W with either S or T, depending. So if W does not contain the vertex T, then t*W = ∅. It follows that if S ∈ J(A), then by axiom S2 we have that t*S ∈ J(V), so ∅ covers V. Then by axiom S3 we can show that E covers A, so we're in the case we've already done. The same argument holds if T ∈ J(A).
If B ∈ J(A), we have two options. If V is covered by ∅, then by S3 we can show that E ∈ J(A). If J(V) = {V} on the other hand, then J(A) = {A,B} does in fact define a coverage on Q. Finally, if J(A) = {A}, then we are free to choose J(V) as we like. We conclude that there's four coverages on Q in total:
the trivial coverage, where J(V) = {V} and J(A) = {A},
the vertex coverage, where J(V) = {V} and J(A) = {A,B},
the arrow coverage, where J(V) = {∅,V} and J(A) = {A},
the maximal coverage, where J(V) = {∅,V} and J(A) = {A,B,S,T,E}.
It's clear that any category can be made into a site by equipping it with its trivial or its maximal coverage. A general fact is that any presheaf is a sheaf for the trivial coverage, and the only presheaves that are sheaves for the maximal coverage are those which are constant functors to a one point set. So for the trivial coverage, all graphs are sheafgraphs, and for the maximal coverage, only the graph with one vertex and one loop is a sheafgraph. For the arrow coverage, because V is covered by the empty subgraph, a sheafgraph must have exactly one vertex, and that is in fact sufficient to be a sheafgraph.
For the vertex coverage, a graph G is a sheafgraph whenever for each matching family of vertices indexed by B (that is, a pair of vertices of G, because the matching condition is vacuously satisfied) there exists a unique arrow with those vertices as source and target. So the sheafgraphs are what you might call the indiscrete graphs, with a unique arrow from each vertex to any other. Note that a graph is a sheafgraph for both the vertex coverage and the arrow coverage if and only if it is a sheafgraph for the maximal coverage.
By the general theory, each of these categories of sheafgraphs is a Grothendieck topos, meaning they are cocomplete, finitely complete, have subobject classifiers, etc. In this case this is not terribly interesting, as for the trivial coverage this is the category Q^hat, which we've already explored, for the vertex and arrow coverages the resulting category is equivalent to the category of sets, and for the maximal coverage the sheafgraph category is equivalent to the terminal category.
As a final bit of calculation, there's another way of viewing a coverage on Q: as a Lawvere-Tierney topology on Q^hat, meaning it's specific kind of morphism into (or, equivalently, subobject of the) subobject classifier Ω. We previously worked out what the graph Ω looks like. Can you see which subgraphs of Ω the four different coverages correspond to?
6 notes
·
View notes
Text
So you know how you can talk about pre- or postcomposing with a function as an operation in itself, usually denoted as f* such that f*(g) = g ∘ f for precomposition and f∗ such that f∗(g) = f ∘ g for postcomposition? And then you need a name for f* and f∗, and people call those the “pullback” and “pushforward” sometimes respectively, but it’s kind of confusing because those are also names for more general constructions and it’s not clear whether “the pullback of f” is a thing that pulls back along f (common intended meaning), or is what you get by pulling f back along something else (which means the opposite)? And calling them “precomposition with f” and “postcomposition with f” is long and tiresome?
so here’s my proposed nomenclature, to take advantage of English’s syntax: f* is pronounced “f-pre” and f∗ is pronounced “f-post”
Then f*(g) is pronounced “f-pre g” (oh my god that looks like “fpreg” but just. say it out loud instead pls) and means what it sounds like: “f, pre-g”. See how “g” is now in position to be the complement of the preposition “pre”, and the whole phrase “pre-g” can be an adjunct of “f”? Because f*(g) means that f is pre-g? Same with f∗(g) as “f-post g” = “f, post-g”, and f is post-g. So there ya go!
6 notes
·
View notes
Note
Just stumbled upon your account and I absolutely fell in love with your work, especially the animations and character designs! I wonder how you rig them? Because I love the "floating" motions.
thank you!! it really depends on the piece, but usually the joints are pretty much about where you'd expect like wrist, fingers, elbow, all that stuff. if they're literally floating there will also be a composition for the entire body so they boing up and down, also in after effects i do precompositions of stuff that goes together like fingers on hands so theyd move together
8 notes
·
View notes
Text
Developing the Experience
Angelique Shelley (MA Concept Art)
Blog Post #6
Special FX, Compositing
The next task was to bring the entire composition together and create the final After Effects file that would be rendered for the group and ensure that everything was suitable to be projected onto the dome.
The pillar falling at the beginning required being paused, a clock tracked to it in After Effects. I modified a video of an animated clock (Kummaru, n/d) first using time remapping and keyframes with easy ease enabled. I then learned how to use the graph editor and adjusted the handles in there for a slower acceleration (see Fig. 1). Note that my experience in After Effects before this project was limited to adding simple parallax animations to my digital paintings.

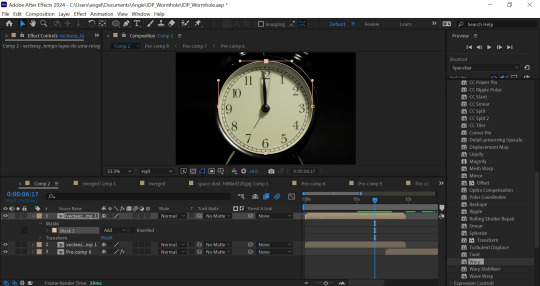
Fig. 1. Screenshots of the animation graph editor and mask.
I made the clock transition into the wormhole with some special effects that I found through experimentation. I used CC flo motion to make the clock face distort radially like a liquid, then on a duplicated layer adding CC lightrays but adjusting the source size so that you can actually see the clock distorting back in. I added a ripple effect to the first few frames of the wormhole itself to complete the transition between clock and wormhole.
Fig. 2 Final clock and wormhole animation.
I then precomposed the clock and attempted to match the speed and position of the pillar falling with further easy ease keyframes with adjustments made in the graph editor to match the acceleration of the falling pillar and eye.
I used a mask on the clock face along with hue and saturation and curves to ensure that it fit onto the eye. I used masking, scale and position tracking to fully integrate it into the scene.


Fig. 2 A selection of screenshots showing compositing the clock render onto the pillar.
I then had to modify a few issues with the renders from the game engine, especially with the pinching texture at the top of the skydomes. This required a gaussian blur with a mask which would not work at all with the After Effects VR camera. I found that precomposing the footage helped. In fact I would advise that precomposing fixes most problems in After Effects and choosing “move all attributes to new composition” was the best option to choose.


Fig. 3 Screenshots showing before and after blurring the pinched pole.
I then blended scenes together with different methods such as fading blending modes, masks and overlays to seamlessly transition into Sai’s red architectural scene. I had to brighten the scene significantly with curves as there were issues with lighting in Unreal causing it to start off as almost black in After Effects. I found that avoiding the curves from touching the edge of the curve graph avoided the image breaking or banding too much.


Fig. 4 Screenshots showing post-render adjustments.
I then created the beginning and end text using an ultra bold font with the VR converter effect applied to it set from 2D to fisheye. I precomposed this and set it to a luma matte mode so that the world could be seen through the letters at the end. I found that this was more visually interesting and original than just putting white text on top of everything.
I also wanted the text with our names on to be more interesting than just popping onto the screen. I learned from a few tutorials how to create the trim paths effect to text after converting it from text to a shape layer. Unfortunately the effect requires action on each letter but I feel that it was worth the time. I like how it looks like alien glyphs as it forms on the screen.

Fig. 5 A Screenshot showing the application of the trim paths effect.
I then used hue and saturation to better colour match the scenes together to attempt to make it more cohesive.
This screenshot (fig. 6) shows the layers and keyframes in one of about 12 precomposition nests that this After Effects file required.

Fig. 6 Screenshot of composition layers
Despite an RTX 3070 GPU, i5 12th gen and 32GB RAM the frames were taking up to 5 seconds each to finish loading. I learned to reduce the quality to quarter while working on it and toggling various effects off temporarily.
I have learned more workflows in Maya and After Effects in the past two weeks than I have in my entire 3 years of university and all the years since. While it is unfortunate that the project direction meant that I was unable to use my primary skills in environment matte painting and character design at all for this project, I look forward to using these newfound skills to further enhance my digital painting work.
References:
Kummaru, T. (n/d). Time lapse of a clock time passing over a day to night. [Video]. Available at: https://www.vecteezy.com/video/23423225-time-lapse-of-a-clock-time-passing-over-a-day-to-night [Accessed 07 February 2024]
0 notes
Note
For the elemental ask game, how about water, clouds and spirit?
@amistrio, thanks for the ask! Let's do it!
Water: How did you start writing?
Oh ... it's a very uneasy process. Given, I'm a scholar and am kinda accustomed to "mandatory" writing. I'd usually have the whole piece written out in my head, or scenes playing out over and over. Since I've "read" it so many times in my mind's eye - it's hard to actually commit to writing it out on paper (text file). But sometimes words come and I maybe dissociate a little bit. It's hard to remember sometimes how exactly I wrote this or that piece.
Oh, I think I didn't read the ask accurately. But just as well. My first ever published fanfiction was for Battlestar Galactica (2004). I was dealing with a lot emotionally at the time and the words came and wouldn't let go. I typically would do lots of meta in a fandom before I ever feel like reading or writing fic.
Clouds: How clearly do you picture a scene before you start writing it down?
As per previous answer- pretty clearly. I have to "see" it, and I have to have the whole narration composed to describe what I see, before I start typing. Something would get tweaked, but mostly in "precomposition".
Spirit: What’s the best compliment you’ve ever received on your writing?
Oh, I cherish compliments and comments! In part because I mostly write about characters and feelings I deeply resonate with personally. It's rewarding to know that came across and moved someone. Partly because English is not my native language and there's still a little girl in me, who thrives on a teacher's approval for an essay. One of the best compliments I got was someone commenting that my stories had a better grasp on a character than the actual show and made the reader appreciate the character more on rewatch. I have a special appreciation for comments on the comments I make for other people's stories. I usually pour heart, effort, and feeling into those too.
3 notes
·
View notes
Text
yeh so it goes like
SieveSpan(E) has objects of E as 0-cells
it has sieves of spans as 1-cells
and it has, as 2-cells α:S → T, sets of arrows of spans F → G where F is in S and G is in T that are closed under precomposition with F’ → F in S and G → G’ in T. Possibly one can add requirements here? Like say that dom(α)=S or something, that can’t hurt...
anyways you compose 1-cells S:X → Y and T:Y → Z by letting TS be the set of spans X ← F → Z such that there is some arrow F → Y such that X ← F → Y is in S and Y ← F → Z is in T,
and for 2-cells, vertical composition is the obvious way, while horizontal composition is by defining like, for α:S→T and β:S’→T’, β*α to be the set of all arrows of spans a:(X←F→Z ∈ S’S) → (X←G→Z ∈ T’T) such that there exist F→Y←G such that a is also a map a:(X←F→Y ∈ S) → (X←G→Y ∈ T) as well as a map a:(Y←F→Z ∈ S’) → (Y←G→Z ∈ T’).
and then this is like. a strict 2-category? everything commutes on the nose
and the monads in this 2-category end up including all categories in E if E has pullbacks, but the point is SieveSpan(E) does not require pullbacks in E in order to exist :p
...
anyways you can do the same thing with spans that are like, “decorated”, i think, where they go like TX ← F → SY where T and S are either monads or comonads and you have a distributive law between them? or at least i think, idk. i still need to work out the associativities and units and so on and so forth, and it probably ends up being a lax bicategory in general. when E is cartesian, T has to be cartesian as well for this to be a bicategory, but in this setting, that’s not something you can formulate? soooooo...
yeah
2 notes
·
View notes
Video
tumblr
As I was having issues with my rendering I did a test of one of my shots with a static image of my mushroom. I tried to make the process as least destructive as possible to allow me to import my animation later on, making use of precomposits.
0 notes