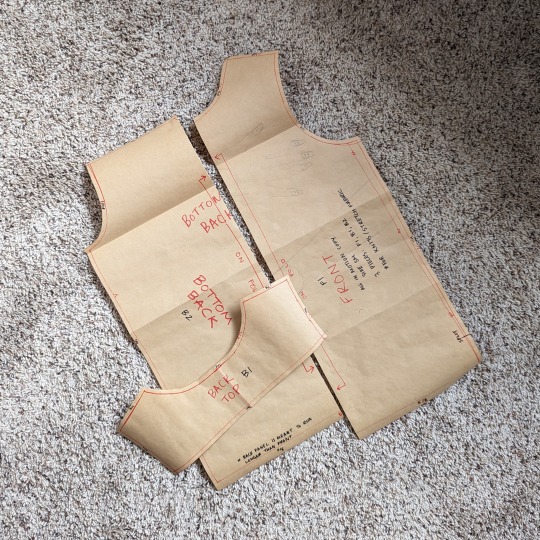
#self drafted pattern
Explore tagged Tumblr posts
Visit Tumblr Blog
Explore Tumblr blogs with no restrictions, modern design and the best experience.
Last Seen Tumblr Blogs


Fun Fact
Mobile US users spent an average of 115.8 minutes on Tumblr app monthly.
Text


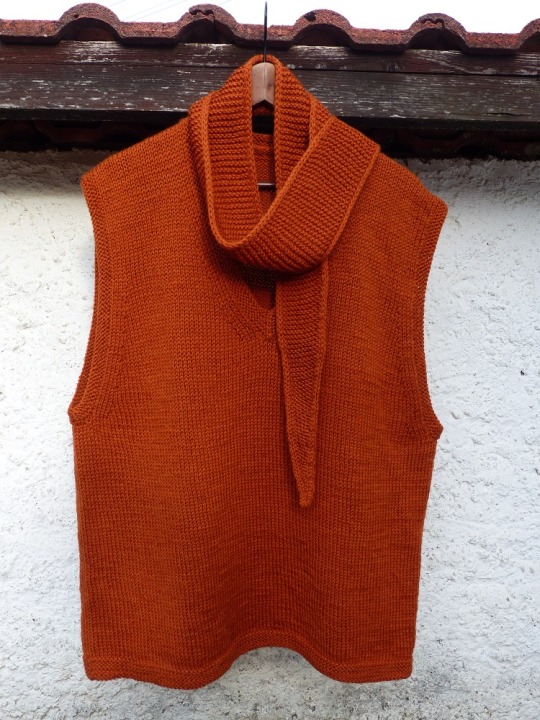
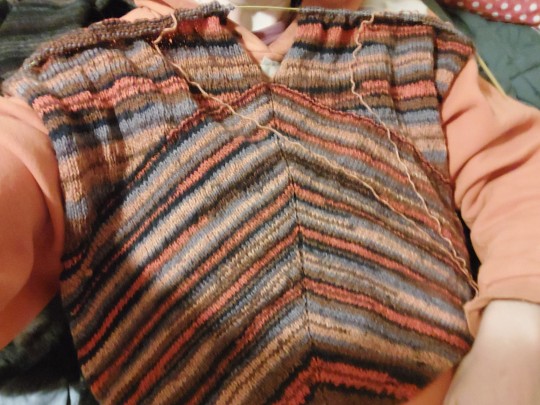
My new sweater... yay!
#knitting#knitblr#self drafted pattern#i am happy how it turned out#i love the colour changing yarn#i love knitting
87 notes
·
View notes
Text


Explanation for how to make this:
Start at the center back by casting on a few stitches (3? I'm pretty sure I did 3). Increase every other row by 4 stitches, one on either side of the center and one each edge. I used a lifted increase (picking up the yarn thread between stitches and knitting it) but you can do whatever you like. I marked the center stitch by purling it, and then with stitch markers when the number of stitches got unwieldy.
Keep increasing until you've got the width you want for your body! I had 69 (nice) stitches on each half. Then maintain that number and make the sides go up by increasing at the center spine and decreasing at the edges. Learn from my mistakes and don't panic about the center back being too long, keep going until the sides are a reasonable length.
Now sleeves! I had two balls of yarn but you could probably just put one half on a stitch holder and get back to it later. It's short row shaping time.
I worked my way up, wrapping and turning every 3 stitches. Depending on how many stitches you have, that number might be different? Once you've made it all the way across, knit straight for a while to bring the sleeve over the top of the shoulder.
Oh yeah, that center stitch marking the spine. Uh. I had knit both sleeves up to the point of having all the stitches knit, and then (let me remember...) knit two together on one side to work in the center stitch?
Short row shaping the other side: same thing backwards.
Front time! Increase at the sides, decrease at the front middle. To make sure that the front and back ended up the same size, I was knitting the front panel to the back by either slipping a picked up stitch from the back (knit rows) or purling two together (with a picked up stitch from the back). This is because I'm an idiot who hadn't kept count of how many rows I had done on the back, you could keep count and just stitch the sides, or if there's a better way to knit the sides together let me know.
Anyways, once the front and back are the same length decrease on both sides of the knitting until you only have a few left and then you can bind off or choose to knit those last few into an I-cord.
I picked up the bottom hem and the front edges/ neck of the cardigan with single crochet to stabilize the edges.
Sleeve bands!
I guess I'll have to write out what I did bc the guides for double sided knitting I'm looking at are different. Hmmm.
Take yarn A and yarn B. Slip knot A then B on your needle, cast on a stitch of A, then a stitch of B, etc alternating. I did 9 stitches of each.
Hold B with your left hand! This is the knit hand. Hold A in your right hand, the purl hand. (Assuming that B is the first stitch on the needle, which it should be?) Hold both yarns at the back when knitting, and at the front when purling, or you'll end up with yarn wrapped around the needle. Yeah. At the end of the row, turn the work and swap which yarn is in which hand.
For the diamonds, I did a pattern of
Row 1: stitches 2 and 8
Row 2: stitches 3 and 7
Row 3: stitches 4 and 5
Row 4: stitch 5
(And reverse and repeat etc etc)
The colour swap is just. Using the other yarn on that stitch. And by stitch I mean set of 2 stitches. Hmmm. Hopefully I've made myself clear?
The sleeve bands are obviously thicker (double fabric) and I don't know if the change in tension came from me holding two yarns or something about the process of knitting both sides at once, but the stitches are looser. I'm okay with that
Again I didn't keep track of how many rows I had made the sleeves, so once I had a fair bit of sleeve band I sewed it to the arm hole and used that as a guide for how much further I needed to knit. But you could be smarter!
Creating things: a wonderful blend of "I'm genius" and "I'm a fucking idiot".
I'm incredibly pleased with how it turned out (and with myself for ACTUALLY FINISHING A PROJECT)
But I was just making it up as I went along. If anyone has advice or suggestions for how to do things differently/ better, please share!
The striped yarn turned out beautifully for this, really highlighting the diagonal pattern. It would be interesting to see how this sweater would look in different yarns, maybe with different stitch patterns too?
41 notes
·
View notes
Text


Making a pride sweater for my roommate. The first one I had to undo because it was too big and I almost cried because of a month of work going down the drain, but the second one is turning out much better. Will update when it has sleeves.
150 notes
·
View notes
Text
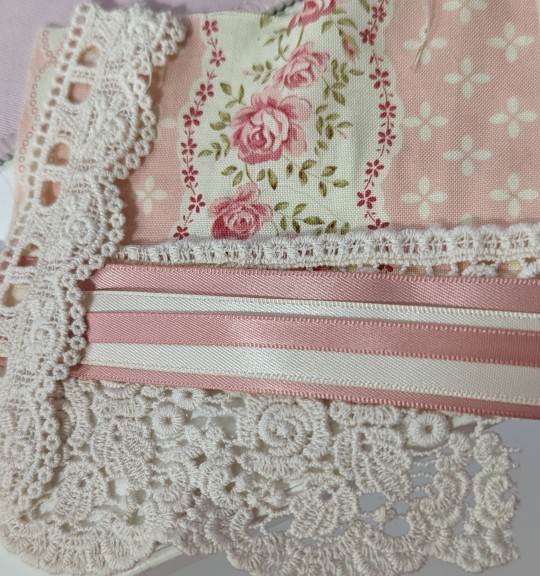
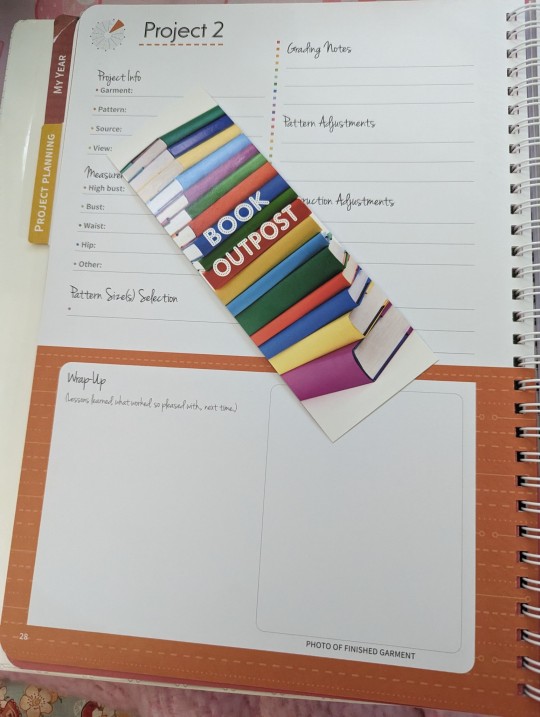
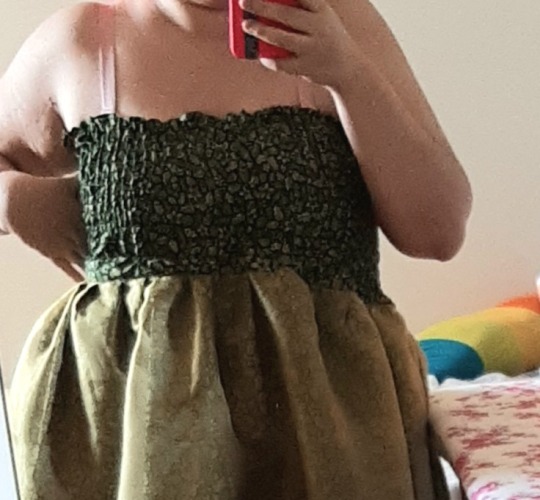
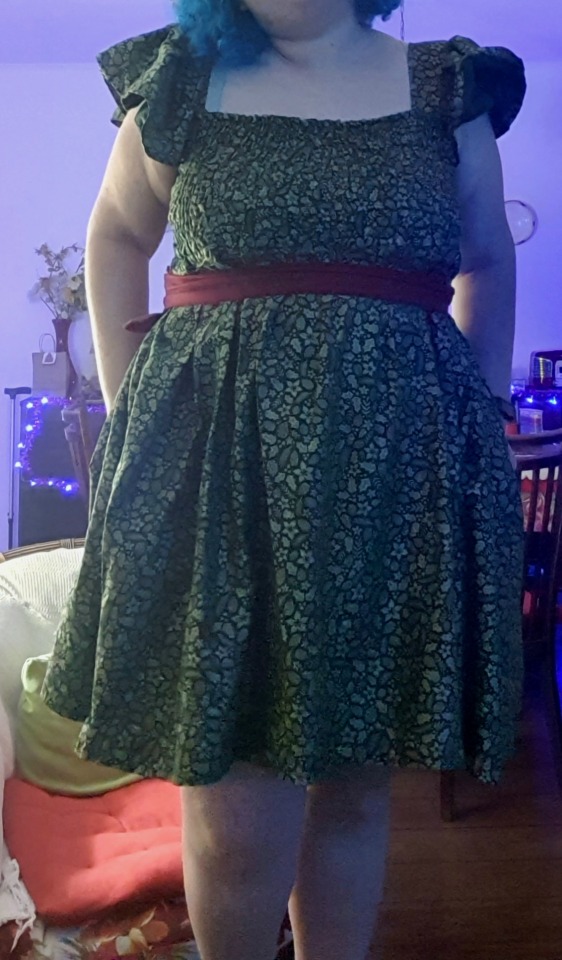
I'm aliveeee! I'm not that good with social media, it seems, but I have some progress! I'll be printing my patterns again soon and can start working on my first Lolita piece since I first tried it in 2011 with an ELG McCall's pattern.
The plan isn't for anything too complicated, a simple jsk with lace trim and layered ribbons going perpendicular to the stripes. Now to measure, refit and reprint my bodice blocks!
I recently got two planners to use for projects, one technically for cosplay as a Google sheet, and a physical one they both have differing spaces for each step laid out. I love them so much already! And they were both under $10!

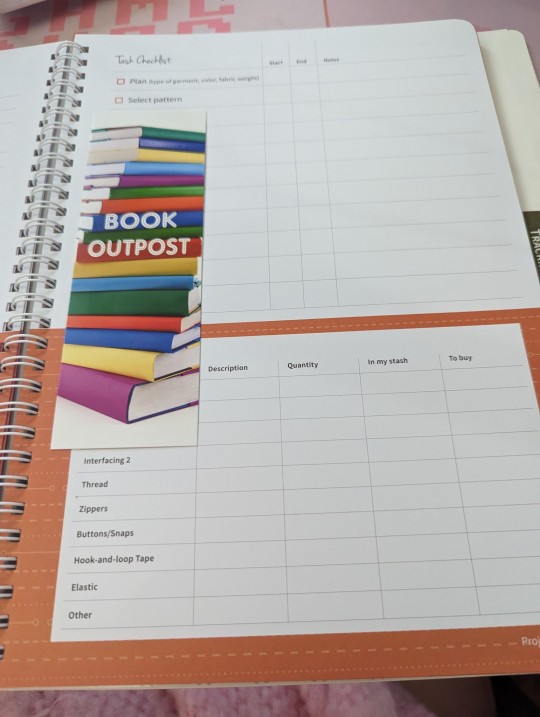
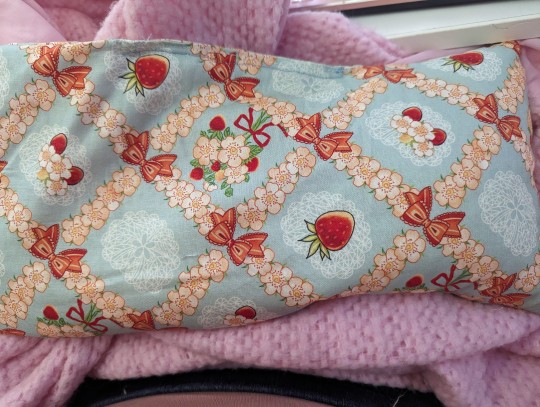
I also recently made a rice bag for warmth on bad pain days (aka almost all days recently), it works really well! I plan to use the fabric for another jsk, and am looking forward to that!
That's most it for me, have a great day everyone!
#lolita sewing#plus size lolita#homemade lolita#lolita fashion#lolita pattern#lolita community#lolita dress#lolita coord#lolita jsk#sewing#seamstress#sewist#pattern drafting#self drafted pattern#custom dress#early steps#planning stage#tall lolita
26 notes
·
View notes
Text
PANTS

10 notes
·
View notes
Text
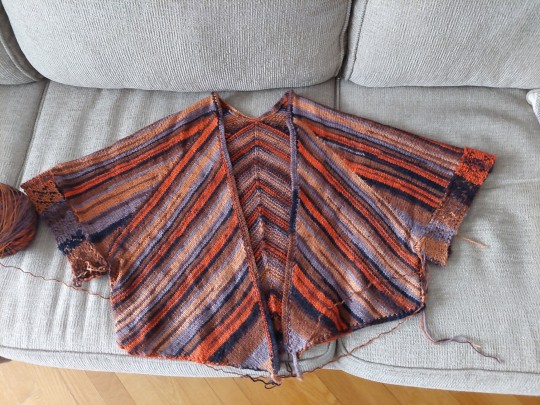
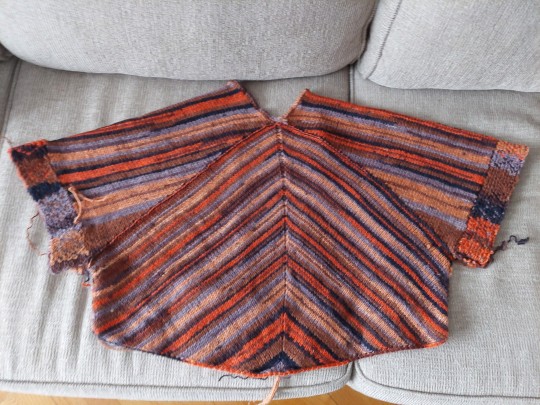
WIP Wednesday: 🎄Noëlle
About halfway through what will become a large triangle shawl.
Pattern by me, yarn by Wild Atlantic Yarns on Etsy.
6 notes
·
View notes
Text
The Scottish Castles dress is done! Thus forcing me to realize I absolutely did not account for how this is going to get soaking wet considering it will probably rain the whole time I’m in Scotland.
2 notes
·
View notes
Text

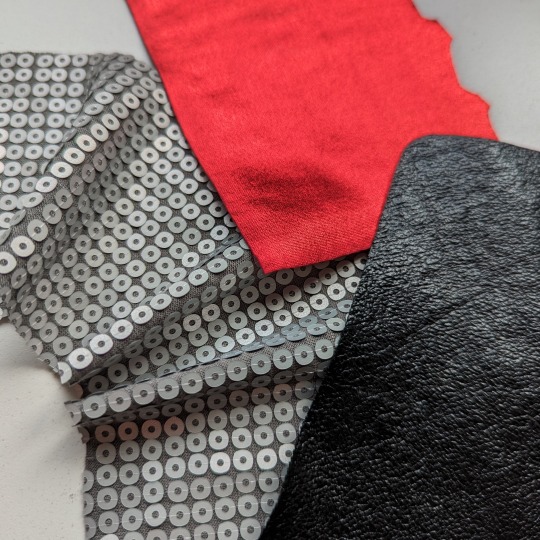
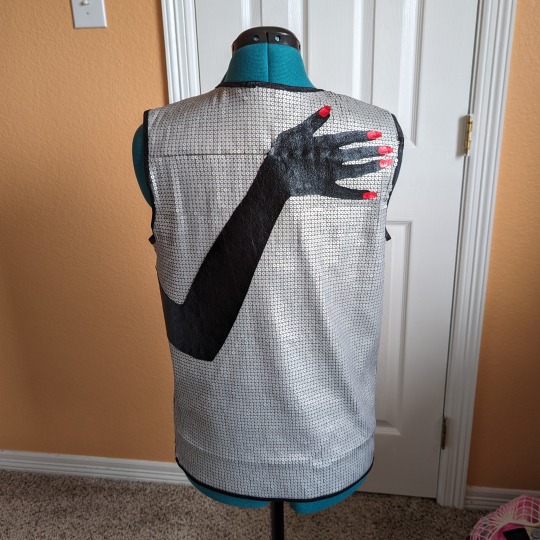
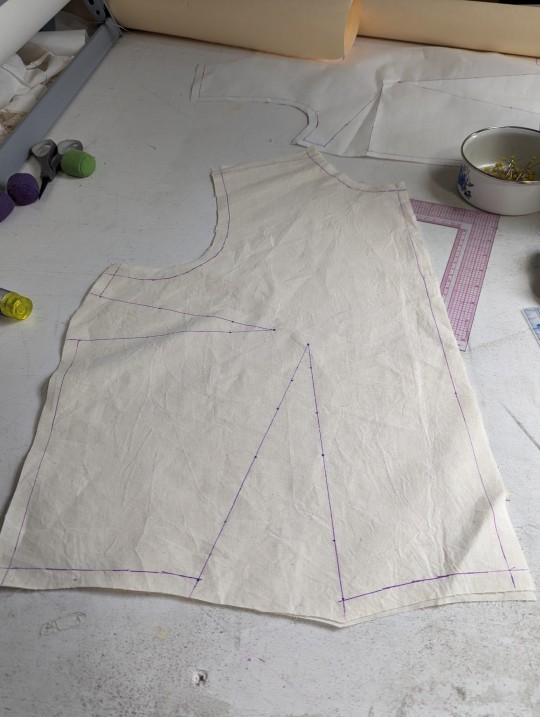
✂️ Project Overview ✂️
Pattern: self-drafted from All-in-Motion Athletic Tank Size: Small Est. Time: 10-15 hrs. Fabric:
Silver jersey knit w/ all-over circle sequins
Ileana metallic black textured faux leather
Metallic ruby red polyester spandex
Shiny elastic trim (black)
🧵 Summary 🧵
A few weeks ago I saw a friend of mine tweet out to our extended cosplaying friends network for assistance in creating a piece for the Beyoncé Renaissance tour. I was very intrigued, so I reached out and he told me he wanted to evoke Bey's custom Loewe bodysuit in a tank style shirt. Looking at the suit, I knew that the fabric was going to be the make-or-break for this project. So I started hunting.
Thankfully, I found this stunning metallic sequined jersey over at Mood. It caught the light beautifully, and was extremely soft on the wrong side of the fabric making it very comfortable to wear.
Leaning into that metallic sheen, as opposed to utilizing sparkly fabrics, helped to elevate this piece and keep it from looking too costume-y.
(Also quick shoutout to Mood Fabrics for having such big swatches. I ended up being able to cut all of the nail appliques out of a single swatch, with plenty leftover.)
Once we found our fabric, the next step was finding a pattern. I had my client go purchase a stretch material tank that fit him the way he wanted, and then copied it.

I really took my time with this since the fabric was stretchy and it really paid off. The final fit on my client was perfect and almost an exact match the tank he purchased.
This was also my first time copying an item, and despite how fiddly it was I am hoping that I can try this again with some of my wardrobe items that are starting to fall apart.
Getting the sequined jersey through my machine wasn't the most pleasant experience, but it worked okay. Serging the main seams ended up working really well, since the threads covered the sequins and kept the inside from being too scratchy.
Overall, the most challenging part was binding the edges of the neck and arm holes. I used some 1/2' wide elastic like double fold binding, sewing down one edge on the inside of the garment, and then folding it over the front to finish with a zig-zag stitch. By itself it was a lot of bulk to push through the machine, but keeping the holes (which were cut on the bias in places) from stretching was my highest priority. I only ended up with a couple of puckers in the neckline, and fearing what would happen if I unpicked things, I decided to call that a win and move on to the appliques.
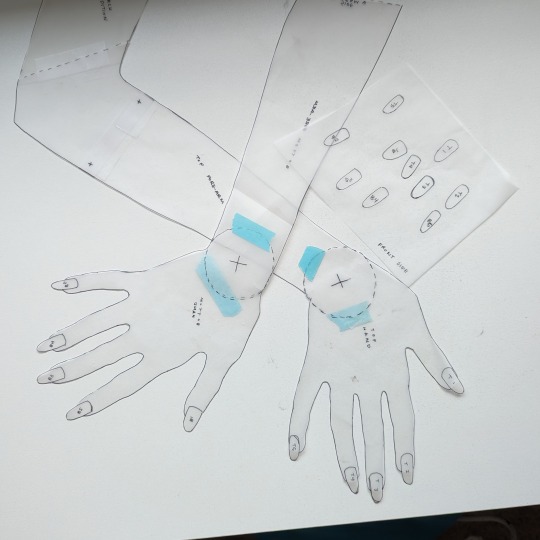

The hands were patterned off my own hands. I pinned the pattern to the tank and traced my hands to get a general idea of the placement. Then I built my patterns with joints so I could play around with them.
Once I finalized my shapes, I cut the hands out of a 1-way stretch metallic pleather (making sure that the stretch of the pleather matched the stretch of the jersey). Since all of the materials were stretchy, and the fabrics I was trying to attach were heavily sequined and pleather, I had decided from the beginning to treat the hands as appliques. I made sure when purchasing my swatches to check if the pleather and spandex for the nails didn't fray or have any issues when cut so I didn't have to worry about finishing their edges.

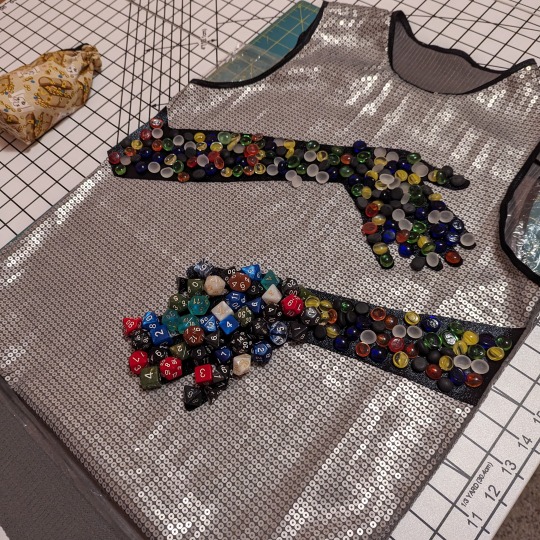
I used Tulip Applique Bond to attach the arms and nails to the tank, and it worked fantastically. Again, since I was attaching two stretchy materials I opted to use a dot pattern so that there was still lots of flexibility for the large appliques.
I really wanted to make sure that the glue bonded well, so in an attempt to find something heavy to keep on the appliques overnight I ended up using a bunch of gaming pieces and dice like pie weights.
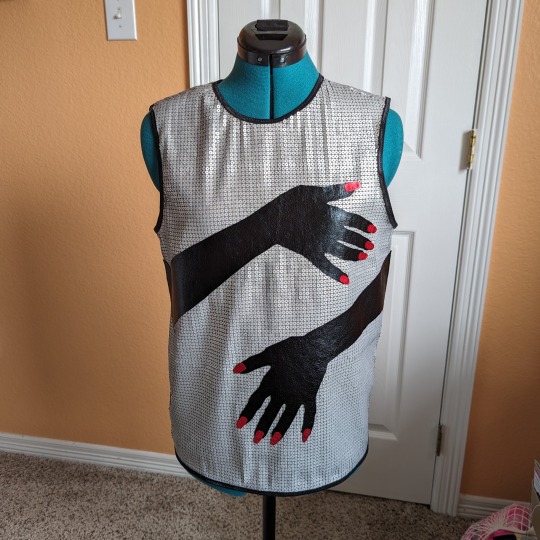
After drying for 24 hours she was finished! Overall, this project was a very fun challenge and I think I learned a lot.
I experienced a ton of firsts:
first time drafting a pattern off an existing garment
first time sewing with stretchy fabric
first time working with sequined fabric
first time working with large appliques
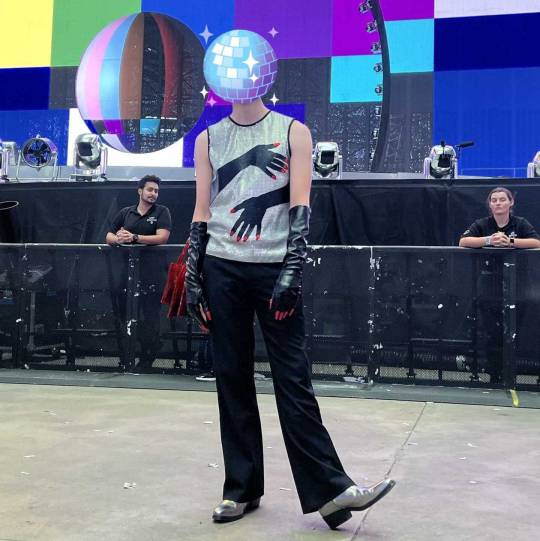
But most importantly, I loved building something with my client that he ended up loving.
Happy sewing ✂️🧵✂️🧵,
Mrs. Crow
#beyonce renaissance#beyonce world tour#sewing#costume#costume design#self drafted pattern#concert#beyonce#renaissance tour#sequins#virgo season#virgo#commission#loewe#custom made#mood#mood fabric#thank you mood#metallic#long nails#concert pics#concert fit#loewe inspired#client work
2 notes
·
View notes
Text

‘Don’t you leave him, Samwise Gamgee,’ and I don’t mean to, I don’t mean to!
#lotr#frodo baggins#lotr fanart#lotr frodo#lotr sam#sam gamgee#embroidery#cross stitch#my art#mine#my first self-drafted pattern!#finally bought a frame for it#lord of the rings#fibercraft#fiber art#hand embroidery
223 notes
·
View notes
Text

For almost a year now I've been working on and off on a paper piecing quilt pattern of Astartes helmets. I just think they're neat.
I have given myself quite the challenge, not least of which is that the designs are not consistent across official GW artwork. But this one I think I nailed. It's a Noise Marine Helmet complete with the mohawk, made out of intentionally clashing patterned fabrics. The wall hanging is around 50x100cm, with free motion quilting. It's a gift for the wonderful @tagedeszorns.
The pattern is a bit of mess, but if anyone is intersted: https://drive.google.com/file/d/1tpz0ypDM94BDMUfxoV7qrlkF5vLoJEmJ/view?usp=sharing
#warhammer 40k#warhammer 30k#emperor's children#noise marines#chaos marines#sewing#quilting#paper piecing#quilt pattern#self drafted#fanart
191 notes
·
View notes
Text


It’s finally completed.
165 notes
·
View notes
Text
Yay!
#knitting#a new vest for my mum#again#self drafted pattern#i made it as she wished#i used almost all of the yarn#hurray#sophie scarf inspo#i love knitting
8 notes
·
View notes
Text
All done! Aside from weaving in some ends, and deciding if I want to do more crochet along the bottom hem, that is.
I'm so incredibly pleased with how it turned out, for something that I was just making up as I went. It did turn out a little cropped, but after blocking it wasn't as bad as I had thought. And like I said, I'm mulling over options to add a crochet border at the bottom (considering that I still have a LOT of yarn left from the afghan).
The sleeve bands are idk what the proper term is, double sided knit? Except trying to search for the term I mean shows me that what I was doing is different from how it's meant to be done. I was working from a memory of reversible fingerless gloves in Alice Hoffman's Faerie Knitting, where you cast on two colours of yarn and swap yarns for the colourwork. I did a simple diamond, which shows better in some parts than others (I thought I had spaced the colour sequence better on the second band, and then hit a section where both yarns were brown. Very annoying to remember which stitches to swap when I can't visually check)
I made I-cords at the front bottom and still need to figure out what I want to do with that. The cardigan is big enough to overlap the fronts, so I'm thinking put some loops in at the side seams so I can wrap and tie? The very fun part is that the angled stripes match the angle of the cross over when I do that.
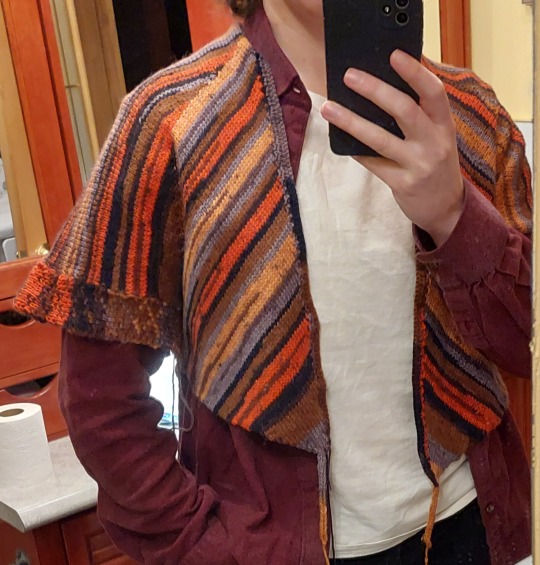
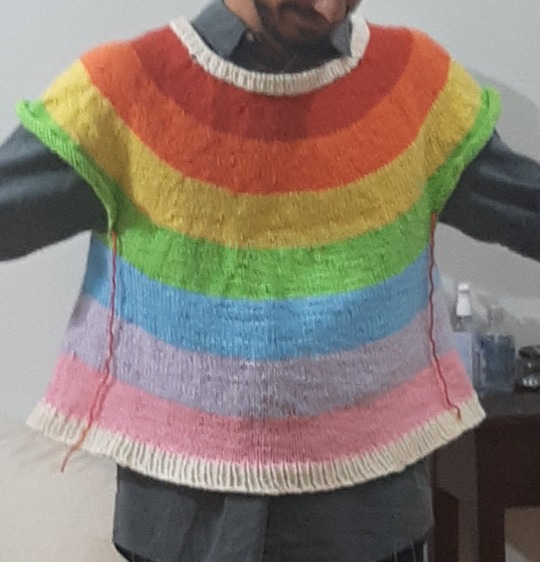
Photo of how it fits (taken before I had crocheted the bottom edge or even finished the second arm band)
Progress on the sweater that I'm making up as I go along: maybe possibly 50% done?
This would actually be the back since I'm planning a cardigan style front, but I wanted to check that my sleeves will be about the right size
Based on my camera photos I started this back in October, tho there's several weeks where it sat untouched in a project bag

The actual colours are somewhere between these two wildly different saturations
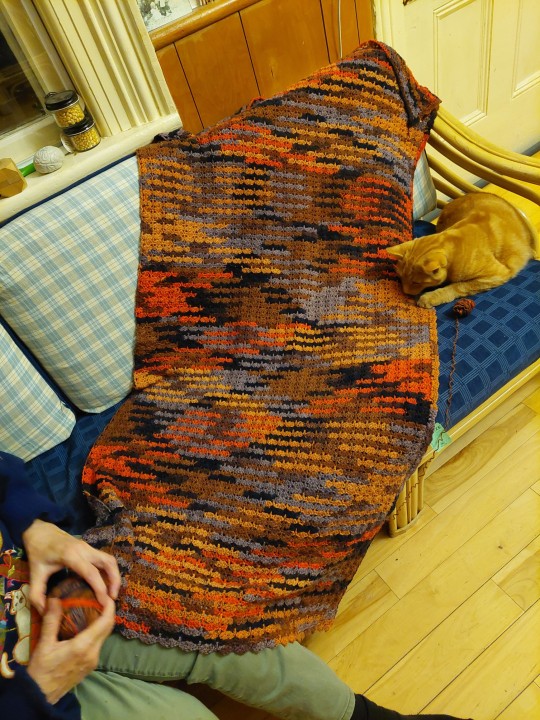
The yarn is from a thrift store crochet blanket that I heartlessly frogged (with help from my mom and Pumpkin)
16 notes
·
View notes
Text


So, I wanted to make a Christmas dress. I found a wonderful Christmas fabric and thought it would look beautiful with a golden organza overlay on the skirt.
It didn't. I ripped it out and made organza details. I also hated it. So, in the end I just used the cotton for everything, but honestly by then the dress was pretty messy from having been ripped so many times. Either way I was happy wearing it at Christmas and that's what counts.
#diy sewing#craftblr#self drafted pattern#sewing#sewblr#sew#fabric#fashion#christmas#textile crafts#textile
2 notes
·
View notes
Text
Hoop skirt is done! I have to get a better pic of it though, so that'll be a post for another day most likely.
But what I'm still working on (now that my procrastinated procrastination project is done) the 2 dart bodice again, so I can move on to princess seams, aka the best seams.
Wish me luck! I just had to recut this version because of an alteration that should've been done with the 1 dart bodice, but I just made adjustments to both so I didn't have to remake the 2 dart bodice from the ground up.
I am totally not procrastinating by posting here.../s
#homemade lolita#lolita sewing#lolitafashion#pattern drafting#plus size lolita#lolita sewing blog#sewing#lolita fashion#lolita pattern#sweet lolita#handmade lolita#self drafted pattern#making patterns#I'm not procrastinating you are#tall lolita
15 notes
·
View notes
Note
Did you use a pattern for the undershirt? It’s so wonderful, and very much something I’d like to attempt to adapt into an underdress for a renfest (if you’d not mind)
Unfortunately no! I adapted it from one of my earlier Galadriel dress patterns which I had drafted from scratch. If you can find a pattern with raglan sleeves and a gathered neckline though—maybe a chemise?—you might be able to modify from there. :)
#pretty much all my patterns are self drafted these days#I do a lot of draping#but I always feel bad then that I can’t direct anyone to the pattern
11 notes
·
View notes