#serial key of software
Explore tagged Tumblr posts
Visit Tumblr Blog
Explore Tumblr blogs with no restrictions, modern design and the best experience.
Last Seen Tumblr Blogs


Fun Fact
If you dial 1-866-584-6757, you can leave an audio post for your followers.
Text
Axolt: Modern ERP and Inventory Software Built on Salesforce
Today’s businesses operate in a fast-paced, data-driven environment where efficiency, accuracy, and agility are key to staying competitive. Legacy systems and disconnected software tools can no longer meet the evolving demands of modern enterprises. That’s why companies across industries are turning to Axolt, a next-generation solution offering intelligent inventory software and a full-fledged ERP on Salesforce.
Axolt is a unified, cloud-based ERP system built natively on the Salesforce platform. It provides a modular, scalable framework that allows organizations to manage operations from inventory and logistics to finance, manufacturing, and compliance—all in one place.
Where most ERPs are either too rigid or require costly integrations, Axolt is designed for flexibility. It empowers teams with real-time data, reduces manual work, and improves cross-functional collaboration. With Salesforce as the foundation, users benefit from enterprise-grade security, automation, and mobile access without needing separate platforms for CRM and ERP.
Smarter Inventory Software Inventory is at the heart of operational performance. Poor inventory control can result in stockouts, over-purchasing, and missed opportunities. Axolt’s built-in inventory software addresses these issues by providing real-time visibility into stock levels, warehouse locations, and product movement.
Whether managing serialized products, batches, or kits, the system tracks every item with precision. It supports barcode scanning, lot and serial traceability, expiry tracking, and multi-warehouse inventory—all from a central dashboard.
Unlike traditional inventory tools, Axolt integrates directly with Salesforce CRM. This means your sales and service teams always have accurate availability information, enabling faster order processing and better customer communication.
A Complete Salesforce ERP Axolt isn’t just inventory software—it’s a full Salesforce ERP suite tailored for businesses that want more from their operations. Finance teams can automate billing cycles, reconcile payments, and manage cash flows with built-in modules for accounts receivable and payable. Manufacturing teams can plan production, allocate work orders, and track costs across every stage.
86 notes
·
View notes
Text
On Bodging Silly Mistakes
After a few weeks of rest and working on non-homebrew-related projects since getting my 68030 stack running 8-user BASIC, I've circled back around to the project. My goal is to have it ready to exhibit for VCF Southwest 2025 in June.
The first thing to do when picking up an old project is to make sure it still works to begin with.
It did not.
The computer would start up, go through its boot process, and start the user programs. The supervisor terminal would accept and execute commands, but none of the user terminals would accept input.
I could tell the serial data was making it to the machine, because my 8-port serial card has indicator LEDs on the Transmit & Receive signals and they were working as expected. If I held down a key as the system booted, it would print that character a few times before stopping and then no longer accept any more data. So it really looked like the hardware was working. Nothing had changed in software so that wasn't likely to be the issue.
It reminded me of the problems I encountered with reading from disk when CPU cache was preventing the updated disk status bit from being read. The serial card supports asserting the CPU's Cache Inhibit signal, but perhaps that circuit wasn't functioning. There was no change with it connected or not. Time to break out the oscilloscope. The Cache Inhibit signal was always low — always asserted. Cache wasn't the problem because cache was effectively always disabled.
Out of ideas, it was time to break out the logic analyzer. The I/O Read & Write signals on the serial card were working as expected, and it was properly addressing the card & its individual ports. So next thing was to check was the actual data being read from the UARTs.
Letting the logic analyzer run and watching the data fly through, the problem finally made itself known — the UARTs were not setting bit 0 of the status byte to indicate that they had received data. The data was getting to the UART, it just wasn't acknowledged.
But why? And why did it work initially on restart and then stop? And why did it work without issue a few weeks ago? What is different?
What is different, indeed. I have made one change to the hardware since I last ran it — I added a proper watchdog/power-on-reset controller. If the power supply drops below 4.7 volts, it will reset the computer. The power supply I had been using was marginal and was getting caught by the watchdog, so I switched to a proper power PC supply.
So what's different since last time I ran the system is my reset circuit is more effective and the system voltage should be much more stable 5V.
And that's when I realized a mistake I made in the design for my 8-port serial card. The 68k reset signal is active-low and the 16C55x UART reset signal is active-high. I was trying to minimize part count, and didn't have an inverter for the reset signal, so I used what I had on hand — a buffer with an active-low enable signal.

Anyone well-versed in electronics may already see the problem.
When the CPU-RESET# signal is asserted (low), the buffer will set its output, IO-RESET to match its input, VCC (high). That's great, we get a high signal on the output whenever the CPU Reset signal is low.
Except ... what happens when the CPU Reset signal is not asserted? The buffer goes open-collector and doesn't pull the IO-RESET signal one way or the other; it's just left floating.
Floating signals are bad news for digital circuits. Their behavior is unpredictable and subject to environmental noise, power fluctuations, etc. For my IO-RESET signal to function properly, something needs to pull it low whenever the 74'125 buffer is not actively driving it high. A good-sized pull-down resistor should do the job just fine, so I dug through my stock and found a 3.65k surface-mount resistor and bodged it onto the back side of the board.

And sure enough, that fixed the problem!
It is possible that when I was running the system on that marginal power supply previously, the IO-RESET signal was able to stay just low enough to not trigger reset on the UARTs. Or it could have just been different environmental factors.
I'm glad I took the time to test the machine today, and I'm glad this bug came up. It's the kind of bug that could easily have come up when running in a new environment for the first time — such as on the show floor at VCFSW. Far better to run into a bug like this at home with access to all of the tools (and time) to figure it out.
Now that things are up and running again I can continue my testing and setup for VCFSW.
#homebrew computing#homebrew computer#vintage computing#motorola 68030#motorola 68k#mc68030#wrap030#vcfsw
16 notes
·
View notes
Text
Matt Shuham at HuffPost:
President Donald Trump on Monday demanded that Tina Peters — a key supporter who was behind one of the most significant election security breaches in years — be freed from incarceration in Colorado, where she’s serving a yearslong prison sentence. Peters is a former county clerk found guilty on seven counts by a jury of her peers in state court last year. In a Truth Social post Monday night, Trump referred to Peters’ prosecution as “a Communist persecution by the Radical Left Democrats to cover up their Election crimes and misdeeds in 2020.” He attacked Colorado’s Democratic attorney general, Phil Weiser, and demanded the Justice Department “take all necessary action to help secure the release of this ‘hostage’ being held in a Colorado prison by the Democrats, for political reasons.” Trump said Peters, who he called an “innocent Political Prisoner,” had “worked to expose and document Democrat Election Fraud” — repeating his yearslong lie that he didn’t actually lose the 2020 election but, rather, was the victim of an impossibly complex, nationwide fraud scheme. What Peters actually did — while working as the elected county clerk in Mesa County, Colorado — was allow a computer analyst associated with MyPillow CEO Mike Lindell into a secure in-person software update for the county’s election machines, in yet another unsuccessful effort to sow doubt about Joe Biden’s 2020 win. The analyst, former pro surfer and RVCA founder Conan Hayes, attended the software update, using the name and recently issued office badge of a Mesa County local. Images of the update process, known as a trusted build, were later shared online and at a 2021 “symposium” on the 2020 election results hosted by Lindell — around the same time state officials arrived at the Mesa County clerk’s office to investigate. Ultimately, a Colorado jury convicted Peters on four felony counts (three counts of attempting to influence a public servant and one count of conspiracy to commit criminal impersonation) and three misdemeanors (official misconduct, violation of duty and failing to comply with the secretary of state). Peters was acquitted on three felony counts, one each of identity theft, conspiracy to commit criminal impersonation and criminal impersonation.
The case represents one of the most significant U.S. election breaches to result from Trump’s attack on the voting process. Prosecutors described Peters as “a fox guarding the henhouse,” and Colorado Judge Matthew Barrett sentenced her to nine years behind bars, calling her a “charlatan” who’d peddled election “snake oil.”
[...]
‘A Grotesque Attempt To Weaponize The Rule Of Law’
Despite the strong evidence, conviction and sentence against Peters — or maybe as a result of them — the Trump administration has since March made some unusually aggressive moves to help Peters. That month, the Justice Department took the unusual step of filing a statement of interest in a federal court case Peters has filed to challenge her ongoing detention while she appeals her state conviction. “Reasonable concerns have been raised about various aspects of Ms. Peters’ case,” the filing read, urging the court’s prompt and careful consideration of Peters’ habeas corpus petition. The filing also said the Justice Department was reviewing Peters’ conviction under an executive order from Trump concerning federal law enforcement — specifically whether Peters’ case was “oriented more toward inflicting political pain than toward pursuing actual justice or legitimate governmental objectives.”
Donald Trump panders to criminals by calling for the release of former Mesa County Clerk and serial election denier Tina Peters from prison.
#Tina Peters#Election Denialism#Mike Lindell#Donald Trump#Mesa County Colorado#Cyber Symposium#Phil Weiser
3 notes
·
View notes
Text
A little something that popped into my head this afternoon as part of a possible sequel to "Working for the Doctor". Yeah, I know. I need to finish it. It's getting there.
***
Layne frowned deeply as he drove over to Geoff's house. His body was tense and he was ready for a fight--and with the way Geoff had been acting lately he knew he was likely to get one.
Geoff's behavior had been growing increasingly erratic lately, but today had crossed all lines. Layne could still hear the collective gasp when Geoff had slapped Kathy in full view of Tony and VoicePlay. None of them had been able to move for several seconds, which had given him time to declare that he was leaving VoicePlay and wanted a divorce, then turn and storm out of PattyCake. They had taken turns hugging Kathy to comfort her, and Cesar had even cried a little along with her. Right now Kathy and William were staying at a hotel, and they would all be helping her get her and William's belongings in the morning--just in case Geoff was still spoiling for a fight.
But Layne couldn't wait that long to confront Geoff. He'd barely made it until closing time. He was going to find out what was going on come hell, high water, or angry bass singer. Something had gone severely sideways, and Geoff wasn't going to throw his life away as long as Layne could stop it.
Layne parked on the street and walked up the sidewalk to Geoff's house. They had exchanged house keys long ago in case of emergencies--and as far as Layne was concerned, this qualified. He'd surprise Geoff in whatever he was doing, and they'd have it out.
He opened the door and walked in. His first stop was the living room--
Layne froze as his eyes went wide.
Geoff was sitting on the living room couch, his head slumped over to the side. A white egg-shaped drone floated near him, a claw extended and picking at the left side Geoff's head. As Layne watched it extracted a small black cone-shaped object from Geoff's skull.
Layne quickly ducked around a corner and grabbed his phone to record what he saw. No one would believe it without evidence. He barely believed it.
He zoomed in and watched his phone screen. Another claw extended and inserted another cone into Geoff's head, and then Layne heard a small metallic click. The drone picked a little more, and Layne realized it was covering...whatever it was...back up with Geoff's scalp.
The claws retracted back into the drone, and then Geoff twitched a few times before his eyes blinked open. A voice Layne remembered well came from the drone. "Name and serial number."
Robotnik.
Of course. Layne's heart pounded as the pieces fell into place. Robotnik's controlling him somehow...Tom warned us that Robotnik probably wasn't finished with Geoff yet...
"Name and serial number," Robotnik demanded again.
"Geoffrey Castellucci, 2.7."
Two point seven? Sounds like software versions... Layne's eyes widened as another possibility came to him. Was that even Geoff at all? Or one of Robotnik's machines?
And if it is one of Robotnik's machines...how long has it been here? Did Geoff ever even come home at all?
Robotnik's voice went on. "All right, Seven. Six got a little out of hand. Do you recall what happened?"
Several seconds passed. "Yes." The voice was soft, almost timid.
"You're going to have to do damage control. Start with Kathryn."
"Yes, Doctor."
"Good. Remember your instructions. I'll be watching." The drone began to float off, and Layne drew back out of sight. He fought to control his breathing as he turned off the recording and sent it to everyone. My phone'll start blowing up any second now...Well, now what do I do?
Footsteps approached as Two Point Seven walked to the front door, and Layne drew back a little more. The front door opened and closed, and Layne released a breath he hadn't realized he'd been holding as his legs gave out and he slid down the wall to the floor.
His phone began pinging rapidly as the others responded to his text, but Layne could only sit there and breathe for the next several seconds.
#fan fiction#fanfic#voiceplay#geoff castellucci#layne stein#out of character#seriously out of character#dr. robotnik
12 notes
·
View notes
Text
Wyatt drifted through work as if walking three inches above the ground, a giddy, uncharacteristic buoyancy leaving his coworkers bemused. The cause was no mystery to anyone paying attention. Even his war-gaming Discord group caught on quickly after the third time Wyatt, who was usually the king of dry wit and sarcasm, responded to a rules-lawyering meme with a heart emoji. The source: an upcoming second date with Shane - one of the most handsome men he'd ever seen, having met by chance and having somehow scored a first date with. His calendar app had been summoned and dismissed at least a dozen times before lunch, as if he could will the hours to hurry up by sheer force of will. In between software builds, he found himself replaying the first date in an endless loop—Shane's dimpled smile, the way he'd rested his hand on Shane’s thigh under the rickety table, the gentle laughs and the conversation that flowed so naturally, time itself seemed to speed past them while they both moved at their own unique pace in a bubble with one another. And of course … then there was what had happened after their first date.
The crowning jewel of the night had been when that same beautiful man had come home with him and the two had romped like animals until dawn - a fact that should be enough to assure him that they were compatible and also one of the many things that excited him about seeing the other again. It had been sex like he’d never had before, the other having let him truly let loose and go wild. He was used to never even getting that far with guys- most seeing his height or his nerdy glasses and immediately turned off. But Shane seemed into every part - every inch - of him, even when he was sure he’d let his dominant side out a little too much, the other had done nothing but encourage and praise it. He had to admit he got a little hard every time he thought back to that night and hoped the other did too. Most times, Wyatt's usual instinct would have been to spiral- overthink, second-guess, construct elaborate narratives of how he'd already fucked it up. Instead, the anticipation felt like the slow, exhilarating climb of a roller coaster.
By the time he arrived home, the urge to channel his excitement into action was overwhelming. He took the shortest shower of his life, then stood in front of his open closet for a full ten minutes, weighing the merits of various sweaters and button-downs as if choosing a skin for a video game avatar. He even, in a fit of self-doubt, googled "outfits for casual second dates" and landed on an impenetrable Reddit thread that only convinced him he would look like a serial killer no matter what he picked. Still, he pressed on, trying on outfit after outfit, discarding each in a growing pile on his bed. Eventually he settled on an American classic; a tight white shirt, blue jeans and lace-up boots paired with his favorite leather jacket.
“Hello handsome!” he cooed at himself in the mirror, running a hand through his mid-length curls before letting out a nervous laugh, "God. Pull it together, Wyatt.”
He was pretty sure Shane would like him in person again. The trick was, Wyatt thought, not getting in his own way. He grabbed his keys, fingers drumming on his thigh the whole ride, and arrived at their meeting spot five minutes early. He stood under the awning, rocking on his heels, heart pinballing around his chest. He texted Shane: "Here!" and watched the typing bubble appear almost immediately. Wyatt grinned at the screen, feeling a flush creep up his ears. This was happening. He was ready.

2 notes
·
View notes
Text
pirating the drawing software i have been using for two decades because the serial key i bought in 2018 no longer works
13 notes
·
View notes
Text
#TheeForestKingdom #TreePeople
{Terrestrial Kind}
Creating a Tree Citizenship Identification and Serial Number System (#TheeForestKingdom) is an ambitious and environmentally-conscious initiative. Here’s a structured proposal for its development:
Project Overview
The Tree Citizenship Identification system aims to assign every tree in California a unique identifier, track its health, and integrate it into a registry, recognizing trees as part of a terrestrial citizenry. This system will emphasize environmental stewardship, ecological research, and forest management.
Phases of Implementation
Preparation Phase
Objective: Lay the groundwork for tree registration and tracking.
Actions:
Partner with environmental organizations, tech companies, and forestry departments.
Secure access to satellite imaging and LiDAR mapping systems.
Design a digital database capable of handling millions of records.
Tree Identification System Development
Components:
Label and Identity Creation: Assign a unique ID to each tree based on location and attributes. Example: CA-Tree-XXXXXX (state-code, tree-type, unique number).
Attributes to Record:
Health: Regular updates using AI for disease detection.
Age: Approximate based on species and growth patterns.
Type: Species and subspecies classification.
Class: Size, ecological importance, and biodiversity contribution.
Rank: Priority based on cultural, historical, or environmental significance.
Data Collection
Technologies to Use:
Satellite Imaging: To locate and identify tree clusters.
LiDAR Scanning: For precise 3D modeling of forests.
On-the-Ground Surveys: To supplement remote sensing data.
AI Analysis: For rapid categorization and health diagnostics.
Registration and Citizenship Assignment
Tree Dossier: Each tree receives a profile in the database with all its recorded attributes.
Citizen Designation: Trees are acknowledged as citizens of Thee Forest Kingdom, emphasizing ecological respect.
Legal Framework: Advocate for laws to grant trees specific rights under environmental protection acts.
Maintenance and Monitoring
Health Monitoring: Use drones, satellite updates, and IoT sensors for ongoing health assessments.
Database Updates: Incorporate real-time data about environmental changes and tree growth.
Public Involvement
Encourage people to "adopt" trees and participate in their preservation.
Create educational programs to promote awareness of tree citizenship.
Key Benefits
Environmental Conservation: Improved forest management through real-time data and protection of ecosystems.
Cultural Recognition: Trees are recognized as a vital part of the Earth’s community, honoring their importance.
Ecological Advocacy: Strengthened legal protections for forests and individual trees.
Next Steps
Assemble a task force of environmental scientists, satellite imaging experts, and software developers.
Secure funding through governmental grants, non-profits, and eco-conscious corporations.
Pilot the program in a smaller region before scaling to all of California.
Would you like me to draft a more detailed technical or legal framework for this system?
The implementation of the Tree Citizenship Identification Network and System (#TheeForestKingdom) requires a robust technological and operational framework to ensure efficiency, accuracy, and sustainability. Below is an implementation plan divided into major components.
System Architecture
a. Centralized Tree Database
Purpose: To store and manage tree data including ID, attributes, location, and health.
Components:
Cloud-based storage for scalability.
Data categorization based on regions, species, and priority.
Integration with satellite and IoT data streams.
b. Satellite & Imaging Integration
Use satellite systems (e.g., NASA, ESA) for large-scale tree mapping.
Incorporate LiDAR and aerial drone data for detailed imaging.
AI/ML algorithms to process images and distinguish tree types.
c. IoT Sensor Network
Deploy sensors in forests to monitor:
Soil moisture and nutrient levels.
Air quality and temperature.
Tree health metrics like growth rate and disease markers.
d. Public Access Portal
Create a user-friendly website and mobile application for:
Viewing registered trees.
Citizen participation in tree adoption and reporting.
Data visualization (e.g., tree density, health status by region).
Core Technologies
a. Software and Tools
Geographic Information System (GIS): Software like ArcGIS for mapping and spatial analysis.
Database Management System (DBMS): SQL-based systems for structured data; NoSQL for unstructured data.
Artificial Intelligence (AI): Tools for image recognition, species classification, and health prediction.
Blockchain (Optional): To ensure transparency and immutability of tree citizen data.
b. Hardware
Servers: Cloud-based (AWS, Azure, or Google Cloud) for scalability.
Sensors: Low-power IoT devices for on-ground monitoring.
Drones: Equipped with cameras and sensors for aerial surveys.
Network Design
a. Data Flow
Input Sources:
Satellite and aerial imagery.
IoT sensors deployed in forests.
Citizen-reported data via mobile app.
Data Processing:
Use AI to analyze images and sensor inputs.
Automate ID assignment and attribute categorization.
Data Output:
Visualized maps and health reports on the public portal.
Alerts for areas with declining tree health.
b. Communication Network
Fiber-optic backbone: For high-speed data transmission between regions.
Cellular Networks: To connect IoT sensors in remote areas.
Satellite Communication: For remote regions without cellular coverage.
Implementation Plan
a. Phase 1: Pilot Program
Choose a smaller, biodiverse region in California (e.g., Redwood National Park).
Test satellite and drone mapping combined with IoT sensors.
Develop the prototype of the centralized database and public portal.
b. Phase 2: Statewide Rollout
Expand mapping and registration to all California regions.
Deploy IoT sensors in vulnerable or high-priority areas.
Scale up database capacity and integrate additional satellite providers.
c. Phase 3: Maintenance & Updates
Establish a monitoring team to oversee system health and data quality.
Update the network with new technologies (e.g., advanced AI models).
Periodically review and revise data collection protocols.
Partnerships
Government Agencies: U.S. Forest Service, California Department of Forestry and Fire Protection.
Tech Companies: Collaborate with Google Earth, Amazon AWS, or Microsoft for cloud and AI capabilities.
Environmental Organizations: Partner with WWF, Sierra Club, or TreePeople for funding and advocacy.
Budget Estimation
Initial Investment:
Satellite data and licenses: $10M
IoT sensors and deployment: $5M
Database and app development: $3M
Operational Costs:
Cloud services and data storage: $2M/year
Maintenance and monitoring: $1M/year
Research and development: $1M/year
Long-term Vision
Expand the system to other states or globally.
Use the database for reforestation efforts and combating deforestation.
Develop educational programs to teach communities about the importance of trees as citizens.
Would you like me to assist in designing the user interface for the public portal or drafting partnership proposals for funding?
To begin building the program for the Tree Citizenship Identification System, we’ll start with a scalable framework that allows us to process, store, and analyze data while preparing for future expansions. Here's an actionable development plan with an initial focus on foundational code and infrastructure:
Step-by-Step Development
Phase 1: Setting Up the Backend Infrastructure
Objective: Create the core database and develop the data pipeline for processing tree data.
Technologies:
Programming Languages: Python, JavaScript (Node.js), SQL.
Frameworks: Flask or FastAPI for APIs, Django for web application backend.
Database: PostgreSQL for structured data, MongoDB for unstructured data.
Code Snippet 1: Database Schema Design (PostgreSQL)
-- Table for Tree Registry CREATE TABLE trees ( tree_id SERIAL PRIMARY KEY, -- Unique Identifier location GEOGRAPHY(POINT, 4326), -- Geolocation of the tree species VARCHAR(100), -- Species name age INTEGER, -- Approximate age in years health_status VARCHAR(50), -- e.g., Healthy, Diseased height FLOAT, -- Tree height in meters canopy_width FLOAT, -- Canopy width in meters citizen_rank VARCHAR(50), -- Class or rank of the tree last_updated TIMESTAMP DEFAULT NOW() -- Timestamp for last update );
-- Table for Sensor Data (IoT Integration) CREATE TABLE tree_sensors ( sensor_id SERIAL PRIMARY KEY, -- Unique Identifier for sensor tree_id INT REFERENCES trees(tree_id), -- Linked to tree soil_moisture FLOAT, -- Soil moisture level air_quality FLOAT, -- Air quality index temperature FLOAT, -- Surrounding temperature last_updated TIMESTAMP DEFAULT NOW() -- Timestamp for last reading );
Code Snippet 2: Backend API for Tree Registration (Python with Flask)
from flask import Flask, request, jsonify from sqlalchemy import create_engine from sqlalchemy.orm import sessionmaker
app = Flask(name)
Database Configuration
DATABASE_URL = "postgresql://username:password@localhost/tree_registry" engine = create_engine(DATABASE_URL) Session = sessionmaker(bind=engine) session = Session()
@app.route('/register_tree', methods=['POST']) def register_tree(): data = request.json new_tree = { "species": data['species'], "location": f"POINT({data['longitude']} {data['latitude']})", "age": data['age'], "health_status": data['health_status'], "height": data['height'], "canopy_width": data['canopy_width'], "citizen_rank": data['citizen_rank'] } session.execute(""" INSERT INTO trees (species, location, age, health_status, height, canopy_width, citizen_rank) VALUES (:species, ST_GeomFromText(:location, 4326), :age, :health_status, :height, :canopy_width, :citizen_rank) """, new_tree) session.commit() return jsonify({"message": "Tree registered successfully!"}), 201
if name == 'main': app.run(debug=True)
Phase 2: Satellite Data Integration
Objective: Use satellite and LiDAR data to identify and register trees automatically.
Tools:
Google Earth Engine for large-scale mapping.
Sentinel-2 or Landsat satellite data for high-resolution imagery.
Example Workflow:
Process satellite data using Google Earth Engine.
Identify tree clusters using image segmentation.
Generate geolocations and pass data into the backend.
Phase 3: IoT Sensor Integration
Deploy IoT devices to monitor health metrics of specific high-priority trees.
Use MQTT protocol for real-time data transmission.
Code Snippet: Sensor Data Processing (Node.js)
const mqtt = require('mqtt'); const client = mqtt.connect('mqtt://broker.hivemq.com');
client.on('connect', () => { console.log('Connected to MQTT Broker'); client.subscribe('tree/sensor_data'); });
client.on('message', (topic, message) => { const sensorData = JSON.parse(message.toString()); console.log(Received data: ${JSON.stringify(sensorData)}); // Save data to database (Example for PostgreSQL) saveToDatabase(sensorData); });
function saveToDatabase(data) { const query = INSERT INTO tree_sensors (tree_id, soil_moisture, air_quality, temperature) VALUES ($1, $2, $3, $4) ; const values = [data.tree_id, data.soil_moisture, data.air_quality, data.temperature]; dbClient.query(query, values, (err) => { if (err) console.error('Error saving to database', err); else console.log('Sensor data saved successfully!'); }); }
Phase 4: Public Portal Development
Frontend Technologies:
React.js or Vue.js for interactive user interfaces.
Mapbox or Leaflet.js for tree visualization on maps.
Features:
Interactive tree maps with search functionality.
User registration for tree adoption programs.
Deployment Plan
Use Docker to containerize the application.
Deploy on AWS, Azure, or Google Cloud for scalability.
Monitor system health using Prometheus and Grafana.
Next Steps
Develop a testing environment for pilot deployment.
Add AI-based disease detection and prediction using TensorFlow or PyTorch.
Create an adoption feature where citizens can adopt trees and track their health.
Would you like me to set up a GitHub repository with this initial framework or assist further with deployment?
I'll prepare the project framework and outline the repository structure for the Tree Citizenship Identification System. Below is the proposed structure for the repository, followed by details of the files and components.
Proposed Repository Structure
tree-citizenship-id-system/ ├── backend/ │ ├── app.py # Flask application for backend API │ ├── database/ │ │ ├── schema.sql # Database schema for PostgreSQL │ │ ├── db_config.py # Database connection configuration │ │ └── seed_data.sql # Initial sample data for testing │ ├── services/ │ │ ├── tree_registration.py # Functions for tree registration │ │ └── sensor_data.py # Functions for processing IoT sensor data │ └── requirements.txt # Python dependencies ├── frontend/ │ ├── public/ │ │ ├── index.html # Main HTML file │ │ └── favicon.ico # Favicon for the app │ ├── src/ │ │ ├── App.js # Main React/Vue app file │ │ ├── components/ │ │ │ ├── TreeMap.js # Map component for visualizing trees │ │ │ └── TreeDetails.js # Component for detailed tree view │ │ └── styles.css # Styling for the frontend │ └── package.json # Frontend dependencies ├── scripts/ │ ├── satellite_data_processor.py # Script for processing satellite data │ └── sensor_data_simulator.py # Mock data generator for IoT sensors ├── deployment/ │ ├── Dockerfile # Docker configuration │ ├── docker-compose.yml # Docker Compose for multi-service setup │ └── cloud_setup_instructions.md # Deployment guide for cloud platforms ├── tests/ │ ├── test_backend.py # Unit tests for backend API │ └── test_frontend.js # Unit tests for frontend ├── README.md # Overview of the project └── LICENSE # Project license
Repository Details
Backend:
app.py: Main Flask app for handling API requests like tree registration and sensor data.
database/schema.sql: SQL script for creating necessary tables.
services/: Directory for modular backend logic.
Frontend:
App.js: Main entry point for the frontend application.
TreeMap.js: Integrates Mapbox/Leaflet.js for displaying tree locations.
TreeDetails.js: Displays detailed information about a selected tree.
Scripts:
satellite_data_processor.py: Automates the extraction and classification of tree data from satellite imagery.
sensor_data_simulator.py: Generates fake sensor readings for development and testing.
Deployment:
Docker configuration ensures that the app runs consistently across environments.
Cloud setup instructions provide guidelines for deploying on platforms like AWS, Azure, or GCP.
Tests:
Unit tests ensure the reliability of both the backend and frontend.
Next Steps
I will initialize the repository structure locally.
Package the files and components needed for the first version.
Provide a link to the repository for access.
I’ll get started. Please hold on for a moment.
4 notes
·
View notes
Text

MacCharlie advertisement, 1985, scan sourced from vintagecomputing.com
Manufactured and released by Dayna Communications in 1985, the MacCharlie was a hardware add-on for the original Macintosh 128K and the Macintosh 512K that enabled users to run DOS software designed for the IBM PC on their Macintosh.
It did so by literally being an entire IBM PC compatible with an 8088 microprocessor, 256 KB RAM, and a 360 KB floppy disk drive. The RAM was upgradeable to 640 KB and a second disk drive was also available, with the MacCharlie Plus including 640 KB RAM and two floppy drives as standard.
The MacCharlie also included a keyboard extension that added a number pad and function keys, as the Macintosh keyboard lacked a numpad, function keys, or arrow keys (a deliberate choice by Apple who thought that developers would just port their old software to the Macintosh rather than developing software around the GUI paradigm if they had included those keys).
The MacCharlie connected to the Macintosh via a 9-pin serial cable and performed all DOS operations itself (obviously), with the Macintosh serving as a terminal for the MacCharlie. This required you to run the MacCharlie application software that was included on a 3.5 inch floppy disk for your Macintosh along with MS-DOS, which was also (naturally) included on a 5.25 inch floppy disk for the MacCharlie.
While the MacCharlie software included the ability to transfer files from itself to the Macintosh (and vice versa), you could not run a DOS program and a Macintosh program simultaneously (the System Software, later renamed to Mac OS, for the Macintosh did not support the running of multiple programs simultaneously until the release of the MultiFinder extension in 1987, with the feature eventually becoming integrating into the operating system with System 7 in 1991).
The MacCharlie software was also limited to running text-based DOS software only.
(Oh and if you're curious about the name 'MacCharlie', it was in reference to the advertising campaign for the IBM PC featuring Charlie Chaplin's Little Tramp character)
3 notes
·
View notes
Text
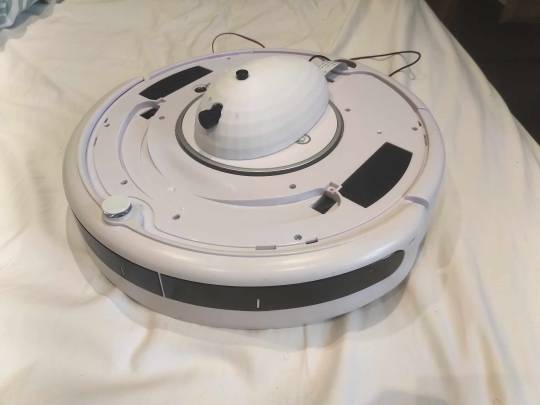
Applied AI - Integrating AI With a Roomba
AKA. What have I been doing for the past month and a half
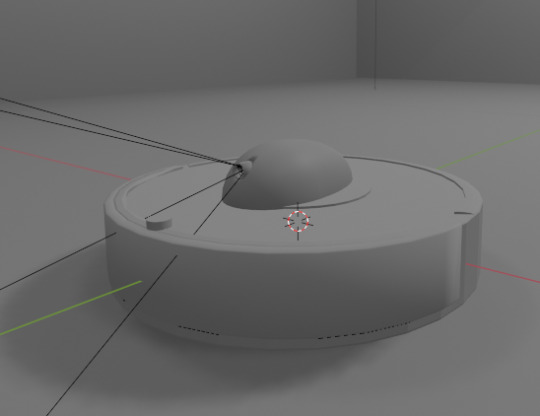
Everyone loves Roombas. Cats. People. Cat-people. There have been a number of Roomba hacks posted online over the years, but an often overlooked point is how very easy it is to use Roombas for cheap applied robotics projects.
Continuing on from a project done for academic purposes, today's showcase is a work in progress for a real-world application of Speech-to-text, actionable, transformer based AI models. MARVINA (Multimodal Artificial Robotics Verification Intelligence Network Application) is being applied, in this case, to this Roomba, modified with a Raspberry Pi 3B, a 1080p camera, and a combined mic and speaker system.

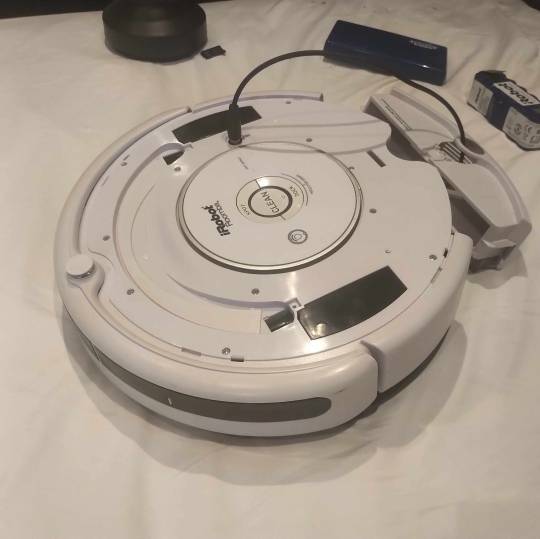
The hardware specifics have been a fun challenge over the past couple of months, especially relating to the construction of the 3D mounts for the camera and audio input/output system.
Roomba models are particularly well suited to tinkering - the serial connector allows the interface of external hardware - with iRobot (the provider company) having a full manual for commands that can be sent to the Roomba itself. It can even play entire songs! (Highly recommend)
Scope:
Current:
The aim of this project is to, initially, replicate the verbal command system which powers the current virtual environment based system.

This has been achieved with the custom MARVINA AI system, which is interfaced with both the Pocket Sphinx Speech-To-Text (SpeechRecognition · PyPI) and Piper-TTS Text-To-Speech (GitHub - rhasspy/piper: A fast, local neural text to speech system) AI systems. This gives the AI the ability to do one of 8 commands, give verbal output, and use a limited-training version of the emotional-empathy system.
This has mostly been achieved. Now that I know it's functional I can now justify spending money on a better microphone/speaker system so I don't have to shout at the poor thing!
The latency time for the Raspberry PI 3B for each output is a very spritely 75ms! This allows for plenty of time between the current AI input "framerate" of 500ms.
Future - Software:
Subsequent testing will imbue the Roomba with a greater sense of abstracted "emotion" - the AI having a ground set of emotional state variables which decide how it, and the interacting person, are "feeling" at any given point in time.
This, ideally, is to give the AI system a sense of motivation. The AI is essentially being given separate drives for social connection, curiosity and other emotional states. The programming will be designed to optimise for those, while the emotional model will regulate this on a seperate, biologically based, system of under and over stimulation.
In other words, a motivational system that incentivises only up to a point.
The current system does have a system implemented, but this only has very limited testing data. One of the key parts of this project's success will be to generatively create a training data set which will allow for high-quality interactions.

The future of MARVINA-R will be relating to expanding the abstracted equivalent of "Theory-of-Mind". - In other words, having MARVINA-R "imagine" a future which could exist in order to consider it's choices, and what actions it wishes to take.
This system is based, in part, upon the Dyna-lang model created by Lin et al. 2023 at UC Berkley ([2308.01399] Learning to Model the World with Language (arxiv.org)) but with a key difference - MARVINA-R will be running with two neural networks - one based on short-term memory and the second based on long-term memory. Decisions will be made based on which is most appropriate, and on how similar the current input data is to the generated world-model of each model.
Once at rest, MARVINA-R will effectively "sleep", essentially keeping the most important memories, and consolidating them into the long-term network if they lead to better outcomes.
This will allow the system to be tailored beyond its current limitations - where it can be designed to be motivated by multiple emotional "pulls" for its attention.
This does, however, also increase the number of AI outputs required per action (by a magnitude of about 10 to 100) so this will need to be carefully considered in terms of the software and hardware requirements.
Results So Far:
Here is the current prototyping setup for MARVINA-R. As of a couple of weeks ago, I was able to run the entire RaspberryPi and applied hardware setup and successfully interface with the robot with the components disconnected.
I'll upload a video of the final stage of initial testing in the near future - it's great fun!
The main issues really do come down to hardware limitations. The microphone is a cheap ~$6 thing from Amazon and requires you to shout at the poor robot to get it to do anything! The second limitation currently comes from outputting the text-to-speech, which does have a time lag from speaking to output of around 4 seconds. Not terrible, but also can be improved.
To my mind, the proof of concept has been created - this is possible. Now I can justify further time, and investment, for better parts and for more software engineering!
#robot#robotics#roomba#roomba hack#ai#artificial intelligence#machine learning#applied hardware#ai research#ai development#cybernetics#neural networks#neural network#raspberry pi#open source
8 notes
·
View notes
Text
Raspberry Pi Pico W has been designed to be a low cost yet flexible development platform for RP2040, with a 2.4GHz wireless interface and the following key features:
RP2040 microcontroller with 2MB of flash memory
On-board single-band 2.4GHz wireless interfaces (802.11n)
Micro USB B port for power and data (and for reprogramming the flash)
40 pin 21mmx51mm ‘DIP’ style 1mm thick PCB with 0.1″ through-hole pins also with edge castellations
Exposes 26 multi-function 3.3V general purpose I/O (GPIO)
23 GPIO are digital-only, with three also being ADC capable
Can be surface mounted as a module
3-pin ARM serial wire debug (SWD) port
Simple yet highly flexible power supply architecture
Various options for easily powering the unit from micro USB, external supplies or batteries
High quality, low cost, high availability
Comprehensive SDK, software examples, and documentation
Dual-core Cortex M0+ at up to 133MHz
On-chip PLL allows variable core frequency
264kByte multi-bank high-performance SRAM
2 notes
·
View notes
Note
Okay...
*Goes tô the monitors, and tries to access the permissions tô make herself admin*
Do you guys know her Serial number and key code, or do I need to hack in?
(I know nothing on software, sorry if it is too wrong)
N: I do! It's U-█████████
(OOC: The redaction doesn't have lore importance, I just don't know)
3 notes
·
View notes
Text
Barcode Reader SDK That Lets Educators Track Learning Materials Using QR Codes
Every time I tried managing classroom resources, I’d end up drowning in paper piles and misplaced handouts. Keeping track of textbooks, learning aids, and digital resources scattered across different platforms felt like an impossible puzzle. If you’ve ever wished there was a smarter way to track learning materials without the hassle, you’re not alone.
That’s exactly why I started using the VeryUtils JavaScript Barcode Scanner SDK for Developers Royalty Free. This tool transformed how I manage educational content by turning everyday devices into powerful QR code scanners. Whether you’re a teacher, school administrator, or edtech developer, this SDK has something to make your life easier.
Why This Barcode Reader SDK is a Game-Changer for Educators
I found out about VeryUtils’ JavaScript Barcode Scanner SDK when I needed a simple way to track learning materials digitally without buying expensive scanners or devices. The SDK is designed to integrate easily into web applications, letting you scan and decode QR codes and various other barcodes right from a smartphone or computer camera.
What makes this solution stand out is its speed and reliability. I’ve tested it in different classroom scenarios, and it never disappoints—even with damaged or partially obscured codes. Plus, it comes with AI-powered scanning algorithms that know exactly which codes to pull from a messy background.
This tool is perfect for:
Teachers and Educators: Track textbooks, student assignments, and digital licenses.
School IT Teams: Integrate barcode scanning into school apps for asset management.
Edtech Developers: Build seamless scanning features for educational software.
Diving Into the Key Features That Made a Difference
Here’s what really hooked me:
AI-Powered, Context-Aware Scanning
The SDK doesn’t just blindly scan everything. It uses an AI engine that understands context, meaning it filters out irrelevant data and focuses on the codes you actually need. In a busy classroom where many QR codes or barcodes might be close together, this makes a huge difference.
For instance, while managing library books and student tablets, the scanner only picked up the relevant QR codes attached to devices instead of random barcodes on packaging nearby. That precision saved me from hours of manual data cleaning.
Batch and Multi-Barcode Scanning
In education, you often deal with batches of materials. This SDK supports batch scanning—so I could scan multiple codes in rapid succession without closing the app after each scan.
During one parent-teacher conference, I quickly scanned all the learning packets parents needed, speeding up the check-out process dramatically. And with multi-barcode scanning, it even detects several barcodes simultaneously, which is perfect for inventory days when I had to audit all classroom supplies.
Real-Time Augmented Reality (AR) Feedback
This was a neat surprise. The SDK offers AR overlays that give instant visual cues during scanning. It’s like the scanner is guiding you with a flashlight in real-time, highlighting where the code is and confirming the scan immediately.
For educators who aren’t tech-savvy, this feedback made scanning intuitive and less frustrating. It’s the little things that count when you’re juggling a dozen other tasks.
How It Saved Me Time and Made Tracking Effortless
Before using this SDK, I relied on clunky handheld scanners or manually entering serial numbers. Both were slow and prone to errors. After integrating the VeryUtils JavaScript Barcode Scanner into my school’s web app, the whole process became seamless.
Speed: Scanning went from minutes to seconds.
Accuracy: No more misread codes or duplicates.
Flexibility: Used it on tablets, phones, and desktop browsers with no hiccups.
Customization: The Ready-To-Use UI made setup straightforward, and I could tweak colors and layout to fit our school’s branding.
One highlight was during a school-wide equipment audit. Using the batch scanning feature, my team scanned over 500 items in just a few hours—something that previously would’ve taken days. The SDK’s ability to work flawlessly under low light and with slightly damaged barcodes made that task doable without headaches.
How This Compares to Other Barcode Scanners
I’ve tried a few barcode scanning libraries before, but VeryUtils stood out in several ways:
Better in Tough Conditions: Others struggled with smudged or small QR codes. VeryUtils’ AI handled those gracefully.
Cross-Platform: Works smoothly on all major browsers and devices without extra plugins.
No Data Privacy Worries: The SDK runs fully on-device in the browser, so no data leaks or uploads to third-party servers.
Developer-Friendly: Rich API documentation and sample code made integration easier than I expected.
If you’ve ever dealt with bulky scanning software that’s slow or clunky, this will feel like a breath of fresh air.
Who Should Seriously Consider This SDK?
If you’re:
An educator managing physical or digital learning materials,
A school IT administrator responsible for inventory or asset tracking,
Or an edtech developer building solutions that need barcode scanning features,
This SDK is tailored for you. It fits small classrooms and large school districts alike, thanks to its scalable batch and multi-scan capabilities.
Getting Started: Quick Integration and Powerful Features
The JavaScript Barcode Scanner SDK integrates quickly via:
Pre-built UI Components: Get scanning up and running with minimal coding.
Full API Access: Customize scanning behaviour, UI elements, and add features like text recognition or AR overlays.
Symbology Support: Over 30 barcode types including QR codes, Data Matrix, PDF417, and more.
The SDK supports major browsers like Chrome, Firefox, Safari, and Edge across desktop and mobile, so your app’s users don’t need to install anything extra.
Final Thoughts: Why I Recommend the VeryUtils JavaScript Barcode Scanner SDK
This SDK solved my biggest headache: keeping learning materials organised and easy to track without expensive hardware or complex software.
If you work in education or build tools for educators, this SDK is a must-have. It’s fast, reliable, and offers features that genuinely save time and reduce frustration.
I’d highly recommend you try it out and see the difference yourself. It transformed how I track and manage resources, and it can do the same for you.
Click here to try it out for yourself: https://veryutils.com/javascript-barcode-scanner-sdk Start your free trial now and boost your productivity.
Custom Development Services by VeryUtils
VeryUtils offers bespoke development to tailor solutions exactly to your needs.
Whether you want custom PDF processing for Linux, macOS, Windows, or server environments, or need specialised tools built with Python, PHP, C/C++, JavaScript, .NET, or mobile platforms, their expertise covers it.
They develop Windows Virtual Printer Drivers for PDF and image formats, capture and monitor print jobs, and offer system-wide Windows API hooks for monitoring file access.
VeryUtils also specialises in barcode recognition and generation, OCR and layout analysis for scanned documents, as well as cloud-based document conversion and digital signature solutions.
If your project requires unique features or integration support, reach out to VeryUtils via their support center at https://support.verypdf.com/ to discuss your requirements.
FAQs
Q1: Can this SDK scan QR codes in low-light classroom settings? Yes, the SDK’s advanced AI scanning and real-time AR feedback make it effective even in challenging lighting conditions.
Q2: Is coding experience necessary to integrate the SDK? Not necessarily. The Ready-To-Use UI lets you add scanning features with minimal coding, but advanced customisation options are available if you want to dive deeper.
Q3: What barcode types does the SDK support? It supports over 30 types including QR codes, Data Matrix, PDF417, EAN, Code 39, and more.
Q4: Can this SDK be used on mobile devices? Absolutely. It supports all major mobile browsers on Android and iOS, enabling scanning on smartphones and tablets.
Q5: How does the SDK protect user data? Scanning happens locally in the browser using Web Assembly, so no barcode data is sent to external servers, ensuring privacy and security.
Tags / Keywords
JavaScript Barcode Scanner SDK
QR Code Scanner for Educators
Barcode Reader SDK for Schools
Batch Barcode Scanning Tool
Web-based QR Code Scanner
0 notes
Text
Leading Portable Laser Marking Machine Supplier & Manufacturer in Ahmedabad | Divine Laser Technologies

Portable Laser Marking Machine Manufacturer in Ahmedabad, Divine Laser Technologies is committed to delivering state-of-the-art laser marking solutions that cater to diverse industry needs. With cutting-edge engineering, unmatched customer service, and an unwavering focus on quality, we have positioned ourselves as a trusted Portable Laser Marking Machine Supplier in Ahmedabad and across India.
What is a Portable Laser Marking Machine?
A Portable Laser Marking Machine is a compact, mobile, and high-performance device used for engraving or marking various surfaces. Unlike traditional marking systems that require the object to be brought to the machine, a portable laser marker allows the operator to move the machine to the object. This flexibility makes it especially useful for marking large or heavy components, irregular surfaces, or onsite applications in industrial environments.
These machines utilize laser beams—usually fiber, CO2, or UV—to mark materials like metals, plastics, ceramics, and more. The result is a high-contrast, permanent mark that resists wear, heat, and environmental conditions.
Why Choose Divine Laser Technologies?
At Divine Laser Technologies, we combine innovation, precision, and reliability to offer the best Portable Laser Marking Machine solutions. As a leading Portable Laser Marking Machine Manufacturer in Ahmedabad, our machines are engineered with user-centric designs, ensuring both portability and performance. Here's what sets us apart:
Engineering Excellence: Our machines are built with premium components and modern software interfaces. This ensures high-speed marking with superior accuracy, minimal maintenance, and long operational life.
Portability and Flexibility: The lightweight, ergonomic design of our portable laser marking systems makes them ideal for a variety of industries such as automotive, aerospace, defense, and metal fabrication. These machines can easily be transported and operated in any environment, whether it’s a shop floor or a remote location.
Customization Options: As a customer-oriented Portable Laser Marking Machine Supplier in Ahmedabad, we understand that different industries have different requirements. Our engineering team works closely with clients to develop tailored solutions—from adjustable laser sources to specialized fixtures and software interfaces.
Advanced Software Compatibility: Our machines are compatible with multiple file formats and offer user-friendly software for creating complex codes, logos, serial numbers, QR codes, and more. The software allows quick adjustments and real-time previews, enhancing operational efficiency.
Low Power Consumption: Divine Laser Technologies ensures that all machines, while high in performance, are also energy-efficient. Our laser marking machines are designed to consume less power without compromising output quality.
Applications of Portable Laser Marking Machines
Portable laser markers are used across a wide range of sectors for several purposes. Below are key industry applications:
● Automotive Industry
Marking VIN codes, part numbers, logos, and safety instructions on engine parts, gearboxes, or metal chassis. Portability is crucial when marking parts that are already assembled.
● Aerospace & Defense
Marking serial numbers, QR codes, and batch numbers on aircraft components, control panels, and weapon systems for traceability and compliance.
● Manufacturing & Fabrication
Ideal for marking pipes, sheets, tools, and machinery components, especially when it’s impractical to move large or heavy items.
● Medical Devices
Used to engrave barcodes, logos, and manufacturing data on surgical instruments, implants, and medical tools. High-precision marking ensures regulatory compliance.
● Electrical & Electronics
Marking labels, specifications, and traceability codes on circuit boards, enclosures, and electronic components.
Benefits of Portable Laser Marking Machines
Choosing a Portable Laser Marking Machine over traditional marking solutions offers multiple benefits:
✅ Mobility
No need to bring the product to the machine—move the machine to the product.
✅ Permanent & High-Quality Marking
The laser beam creates precise, clean, and permanent marks that won’t fade or wear over time.
✅ Non-Contact Process
No mechanical contact means no damage to the surface and no additional consumables like inks or pastes.
✅ Low Operating Costs
Apart from occasional maintenance, there are minimal recurring costs. No need for inks, chemicals, or stencil replacements.
✅ Time-Efficient
High-speed operation results in faster processing times, increasing overall productivity.
✅ Eco-Friendly
The non-chemical, clean process makes it an environmentally safe marking solution.
Portable Laser Marking Machine Models at Divine Laser Technologies
As a seasoned Portable Laser Marking Machine Manufacturer in Ahmedabad, we offer a variety of models tailored to specific industry needs:
Fiber Laser Marking Machines – Ideal for metals, hard plastics, and industrial components.
CO2 Portable Laser Marking Machines – Best suited for wood, glass, leather, and organic materials.
UV Portable Laser Marking Machines – Excellent for marking heat-sensitive materials such as plastics and silicon wafers.
Each machine comes with advanced features such as autofocus, inbuilt cooling systems, adjustable power levels, and real-time monitoring through dedicated software.
Quality Assurance & Support
Divine Laser Technologies adheres to strict quality control measures during manufacturing. Every Portable Laser Marking Machine is thoroughly tested for accuracy, safety, and performance before dispatch. We also provide on-site installation support, technical training, and periodic maintenance services to ensure uninterrupted operation.
Serving Ahmedabad and Beyond
Being strategically located in Ahmedabad, we have easy access to logistic networks across Gujarat and the rest of India. As a reliable Portable Laser Marking Machine Supplier in Ahmedabad, our fast response times and excellent customer support have helped us build long-standing relationships with clients from diverse sectors.
Our extensive clientele in Ahmedabad includes manufacturers, workshops, exporters, and government contractors who rely on our machines for their marking needs. We take pride in contributing to Ahmedabad’s growing reputation as a hub for industrial innovation and automation.
Why Ahmedabad is an Ideal Base for Laser Technology Manufacturing
Ahmedabad, known for its vibrant industrial ecosystem, has emerged as a hotspot for machinery and equipment manufacturing. It offers skilled manpower, robust infrastructure, and a business-friendly environment. As a result, leading technology companies like Divine Laser Technologies have chosen Ahmedabad as their base of operations. Being a Portable Laser Marking Machine Manufacturer in Ahmedabad gives us the advantage of tapping into local expertise and serving both domestic and international markets effectively.
When precision, portability, and performance matter, Divine Laser Technologies is your go-to destination. As a Portable Laser Marking Machine Supplier in Ahmedabad, we bring you machines that are robust, cost-effective, and future-ready. From initial consultation to post-sale support, our team ensures you receive an unmatched experience. Whether you're a startup or an established enterprise, we are here to help you mark your brand, your data, and your legacy—clearly and permanently.
Looking for a high-performance Portable Laser Marking Machine?
Partner with Divine Laser Technologies – the trusted Portable Laser Marking Machine Manufacturer in Ahmedabad. Explore our wide range of models and customize your marking solutions today.
Experience precision like never before—mark your products with excellence, only with Divine Laser Technologies!
For more information: https://www.lasermarkingmachine.info/
Call us: 8069220249
E-mail ID: [email protected]
Location: 10 Grand Vishala Odhav Ring Road Ahmedabad, Gujarat, (India)
#Portable Laser Marking Machine#Portable Laser Marking Machine Supplier in Ahmedabad#Portable Laser Marking Machine Manufacturer in Ahmedabad#Ahmedabad
0 notes
Text
Getting Started with TallyPrime: Beginner’s Guide
If you’re running a business in India, you’ve already heard of Tally. It’s one of the most trusted accounting software solutions for small and mid-sized businesses. From managing your sales and purchases to generating GST-compliant invoices and financial reports, Tally does it all — quickly and reliably.
In this blog, we’ll walk you through the basics of using TallyPrime, step by step. Whether you’re just exploring or ready to go live with your accounts, this guide is designed to help you get started quickly and correctly.
Before diving into the setup, it’s important to know that Tally has evolved over the years, from older versions like Tally ERP 9 to the latest TallyPrime. If you’re unsure which version suits your business or curious about what changed over time, check out our full blog on All Versions of Tally
Step-by-Step Guide to Start Using TallyPrime
Step 1: Install Tally on Your System
Visit the official Tally Solutions website.
Look for the Download Tally or Tally License section.
Download the latest version — TallyPrime.
Run the setup file and follow the installation instructions.
Note: While many people search for terms like “Tally free version download”, it’s best to avoid unofficial sources. These versions may be pirated, outdated, or unsafe. Only download Tally from the official site or get help from a certified partner like Izoe.
Step 2: Activate Your License
Launch TallyPrime after installation.
If you’ve purchased a license, enter your serial number and activation key.
If not, you can use the 30-day free trial to explore the software before buying.
Tip: Not sure whether to go with a Single User (Silver) or Multi-User (Gold) license? Izoe helps you choose the right one and assists with activation too.
Step 3: Create a Company Profile
Press Alt + F3 from the dashboard and select Create Company.
Fill in basic details: company name, financial year, address, etc.
Save the profile to begin working.
Step 4: Set Up Ledgers and Accounts
Go to Accounts Info → Ledgers → Create.
Start with essential ledgers like Cash, Bank, Sales, Purchases, and Expenses.
Group them appropriately to make future reporting simpler.
Step 5: Add Inventory (if applicable)
Navigate to Inventory Info to set up stock items.
Create item categories, units of measurement, and GST rates.
Add opening stock values if needed.
Step 6: Start Recording Transactions
Tally uses vouchers to record every transaction.
Go to Accounting Vouchers (press V on the main screen).
Choose a voucher type like Sales, Receipt, Payment, or Journal.
Fill in the details and save the entry.
Step 7: Check Your Financial Reports
One of the reasons Tally is so powerful is its ability to generate real-time reports.
Use the Display Menu to access reports like Balance Sheet, Profit & Loss, Stock Summary, and GST Returns.
These are updated instantly based on the data you’ve entered.
A Quick Note
Now that you’ve seen how simple it is to get started with Tally, let’s talk about the most searched topics around it — especially related to downloads, free versions, and licenses.
Many users get confused when they look for terms like “Tally download for free” or “Tally full version free download”. Some even end up installing cracked or outdated files that compromise both data and system safety.
Conclusion
There’s no doubt that tally prime is one of the most reliable accounting tools out there — but starting with it doesn’t have to feel overwhelming.
At iZoe, we make it easier by helping you:
Select the right Tally license
Complete setup and installation
Enable secure cloud backups and remote access
Connect with our team today and get started with the latest version of Tally — tally prime 6.0 right way — no trial-and-error, just results.
0 notes
Text
Warehouse Management System: Transforming Modern Supply Chains
In the fast-paced world of logistics and supply chain management, efficiency, accuracy, and real-time visibility are no longer optional—they are essential. Businesses must constantly adapt to the growing complexities of inventory management, customer expectations, and market dynamics. A Warehouse Management System (WMS) plays a pivotal role in streamlining warehouse operations, reducing costs, and enhancing customer satisfaction.
What is a Warehouse Management System (WMS)?
A Warehouse Management System (WMS) is a software solution designed to optimize and control warehouse operations from the moment goods enter the facility until they are shipped out. It provides tools for inventory tracking, order picking, packing, shipping, and replenishment, all while ensuring real-time data visibility.
By automating many manual processes, WMS minimizes errors, improves inventory accuracy, and maximizes labor productivity. The system integrates with other supply chain solutions such as Enterprise Resource Planning (ERP) and Transportation Management Systems (TMS) to create a seamless flow of information across the organization.
Key Features of Warehouse Management Systems
1. Inventory Management
One of the primary functions of a WMS is to maintain accurate inventory records. It enables businesses to monitor stock levels, track goods by SKU, lot, or serial number, and automatically update inventory counts. This helps prevent stockouts, overstocking, and misplacements.
2. Order Fulfillment
WMS optimizes order picking, packing, and shipping processes by suggesting efficient picking paths, grouping orders logically, and guiding warehouse staff through every step. It improves the speed and accuracy of order fulfillment, reducing customer complaints and returns.
3. Receiving and Putaway
The system automates receiving processes by verifying incoming shipments, assigning storage locations, and ensuring proper putaway based on product characteristics, storage requirements, or turnover rates.
4. Labor Management
With labor tracking capabilities, WMS monitors employee productivity, tracks task completion times, and helps managers allocate resources effectively. This leads to better workforce planning and reduced labor costs.
5. Real-time Reporting and Analytics
Modern WMS platforms offer advanced analytics and reporting tools, providing valuable insights into warehouse performance. Managers can monitor key metrics such as inventory turnover, order accuracy, and shipment timelines to make data-driven decisions.
6. Integration Capabilities
A robust Warehouse Management System integrates seamlessly with other business systems such as ERP, TMS, e-commerce platforms, and manufacturing software. This ensures smooth data exchange, reduces manual entries, and enhances overall supply chain visibility.
Benefits of Implementing a Warehouse Management System
Enhanced Inventory Accuracy
By automating inventory tracking and reducing manual errors, WMS improves inventory accuracy. Businesses can achieve near-perfect inventory counts, which minimizes losses due to shrinkage or misplacement.
Improved Operational Efficiency
WMS streamlines all warehouse processes, from receiving to shipping. With features such as optimized picking paths, automated replenishment, and barcode scanning, employees can work faster and more efficiently.
Reduced Operational Costs
Automation reduces the need for excessive manual labor, lowers operational costs, and minimizes human errors. Accurate inventory management also decreases carrying costs associated with excess stock.
Better Space Utilization
By guiding product putaway based on product size, weight, and demand frequency, WMS helps optimize storage space and improve warehouse layout planning.
Faster Order Fulfillment
With automated picking, packing, and shipping processes, WMS shortens order cycle times and ensures faster deliveries, which directly improves customer satisfaction.
Regulatory Compliance
WMS assists in compliance with industry regulations by maintaining accurate records for traceability, reporting, and auditing purposes. This is especially crucial for industries like pharmaceuticals, food and beverage, and chemicals.
Choosing the Right Warehouse Management System
Selecting the right WMS depends on several factors, including warehouse size, product types, business complexity, and budget. Companies should consider:
Scalability: Choose a solution that can grow with your business.
Ease of Use: Ensure the system is user-friendly and easy to train employees on.
Customization: Look for configurable workflows and reports to fit specific business needs.
Cloud vs. On-Premises: Cloud-based solutions offer flexibility and lower upfront costs, while on-premises systems may provide more control.
Conclusion In today’s highly competitive and customer-driven market, having a Warehouse Management System is no longer optional—it’s a necessity. From increasing operational efficiency to improving inventory accuracy and customer satisfaction, WMS solutions offer comprehensive benefits that directly impact a company’s bottom line. Investing in the right WMS can empower businesses to meet evolving supply chain demands, scale operations effectively, and maintain a competitive edge in the marketplace
#WarehouseManagement#SupplyChainSolutions#LogisticsTechnology#InventoryManagement#DigitalTransformation
0 notes
Text
RFID Definition|, How Radio Frequency Works, Uses, and Benefits
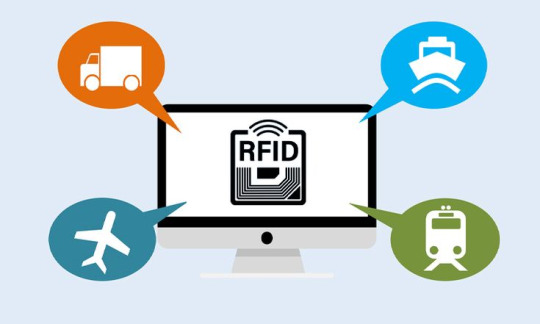
What is RFID? AIDC India Defines Radio Frequency Identification
Understanding the RFID Definition helps businesses see why Radio Frequency Identification is such a powerful technology today. RFID stands for Radio Frequency Identification—a system that uses electromagnetic fields to automatically identify and track tags attached to objects. Unlike barcodes, which need direct scanning, RFID can read multiple tags at once without direct line of sight.
At AIDC India, we explain the RFID Definition as more than just a technical explanation. It's about creating smarter, faster, and error-free operations for industries such as retail, logistics, healthcare, and manufacturing. By using RFID, companies can achieve real-time inventory updates, reduce human error, and gain better visibility into assets and products.
How RFID Works: Step-by-Step Guide by AIDC India
To fully grasp the RFID Definition, it’s important to see how RFID works. The process involves three main components:
Tags (Transponders): Small devices attached to items, storing data like serial numbers or product info.
Readers (Interrogators): Devices that send out radio waves to communicate with tags.
Middleware/Software: Systems that collect, process, and manage the data.
When an RFID reader emits radio signals, tags within its range respond by sending back their stored data. This data then flows into your inventory or asset tracking software, helping you monitor items in real time.
AIDC technologie India helps businesses set up these systems seamlessly, offering customized RFID solutions tailored to their operations. This practical application of the RFID Definition makes everyday processes faster, more reliable, and less dependent on manual labor.
Components of RFID Systems Explained by AIDC India
Understanding the RFID Definition also means recognizing each part of an RFID system and its role:
RFID Tags: These are divided into passive (no battery) and active (battery-powered) types.
RFID Readers: Devices that capture data from tags.
Antennas: Enable communication between tags and readers.
Software & Middleware: Process data into useful business insights.
At AIDC India, we provide all these components along with the expertise to integrate them into your existing workflows. This complete approach ensures that your RFID system works reliably from day one.
Key Applications of RFID Technology from AIDC India
The RFID Definition isn't just about what it is; it's about what it can do. Here are some key uses of RFID technology:
Inventory Management: Track thousands of items across warehouses or retail stores quickly.
Asset Tracking: Monitor tools, equipment, and machinery, reducing theft or loss.
Supply Chain Visibility: Know where shipments are at any moment.
Retail Automation: Enable smart shelves, faster checkouts, and real-time stock updates.
Healthcare: Manage patient information, track medical devices, and ensure medication accuracy.
AIDC India has implemented these RFID applications across multiple industries, helping clients boost efficiency and cut operational costs.
Business Benefits of RFID: Insights from AIDC India
Beyond the RFID Definition, the benefits of adopting RFID include:
Speed: Read hundreds of tags in seconds.
Accuracy: Reduce errors caused by manual data entry.
Efficiency: Automate stock counts and asset monitoring.
Cost Savings: Lower labor costs and prevent product loss.
Data Visibility: Get real-time information to make better decisions.
By bringing these benefits to businesses, AIDC India empowers them to stay ahead in competitive markets.
Industry-Specific RFID Solutions Offered by AIDC India
Every industry has unique needs, which is why AIDC India customizes RFID systems for different sectors:
Retail: Automated checkouts, anti-theft solutions, and smart inventory.
Healthcare: Patient tracking, equipment monitoring, and medication management.
Logistics: Shipment tracking and warehouse automation.
Manufacturing: Production monitoring and quality control.
Education & Libraries: Manage books and student IDs efficiently.
These tailored solutions reflect how the RFID Definition transforms into real-world value for each sector.
Why Choose RFID Systems by AIDC India?
AIDC India isn’t just a provider of RFID hardware and software—we’re a technology partner. Here’s why businesses choose us:
Expertise: Decades of experience in data capture and RFID solutions.
Complete Support: From planning and installation to training and after-sales service.
Customization: Solutions designed around your unique requirements.
Reliable Brands: We partner with the best global technology providers.
When companies look beyond the basic RFID Definition, they discover that working with AIDC India means trusted guidance, quality products, and measurable results.
Future of RFID Technology: AIDC India’s Perspective
Looking forward, RFID technology is becoming smarter and more connected. Trends include:
Smaller Tags: Tagging smaller items and materials.
IoT Integration: Connecting RFID to wider networks for smarter insights.
Sustainability: Eco-friendly and reusable tags.
Cloud-Based Systems: Easy remote access and analytics.
AIDC India keeps clients updated with these advances, ensuring your RFID systems remain future-ready. By staying ahead of trends, we make sure the RFID Definition you know today keeps delivering tomorrow.
About AIDC India
AIDC India is a leading solutions provider specializing in automatic identification and data capture technologies. We design, supply, and implement RFID, barcode, and QR code systems to help businesses boost efficiency and accuracy. With years of expertise and partnerships with top global brands, AIDC India serves industries such as retail, logistics, healthcare, and manufacturing, making modern technology accessible and reliable.
Book RFID Solutions with AIDC India Today
Understanding the RFID Definition is the first step. The next is transforming that knowledge into action.
Ready to upgrade your operations? Contact AIDC India today to explore RFID solutions that fit your business perfectly.
Book a free consultation with AIDC India now!
#RFIDTechnology2025#RadioFrequencyID#HowRFIDWorks#RFIDExplained#RFIDUsesAndBenefits#ModernRFIDSystems#RFIDInBusiness#RadioFrequencySolutions#SmartInventoryRFID
0 notes