#smallest midi controller
Explore tagged Tumblr posts
Visit Tumblr Blog
Explore Tumblr blogs with no restrictions, modern design and the best experience.
Last Seen Tumblr Blogs


Fun Fact
If you dial 1-866-584-6757, you can leave an audio post for your followers.
Note
Hello love!
Are you guide me and suggest what clothes would suit apple body shapes? Any examples would be greatly appreciated ! :)
Hi love! I would say the following silhouettes/items are best for an apple body shape:
Tops:
Necklines: V-Neck, Square Neck, Sweetheart Neckline, Wide Scoop Neck, Off-The-Shoulder
Sleeves: Wide Tanks/Cap Sleeves with Self-Tie/Strap Detailing, Dolman, Fluted, Belle, or Other Loose-Fitting Sleeves
Silhouette: Straight-Cut, Button-Down, Empire Waist (cinched below the bust and flares outward), Bias-Cut, Peplum, Baby Doll, Wrap Top
Length: Bottom of Hip or Longline (Covers Underwear)
Examples: Top 1, Top 2, Top 3 , Top 4, Top 5
Dresses:
Styles: Slip Dress (V-neck or Straight neck), Fit & Flare/Empire Waist, Wrap Dress, Shirt Dress, T-Shirt Dress, Slip Dress, Shift Dress (with a lower cut/V-neckline), Blazer Dress
Length: Mini, Knee-Length, or Midi Length
Examples: Dress 1, Dress 2, Dress 3 , Dress 4 , Dress 5
Outerwear:
Open Cardigans/Knitwear
Tailored Blazer/Jackets (worn open)
Moto Jackets
Longline Denim Jackets
Trench Coats
Mid-Thigh/Knee-Length Wool Coats
Examples: Cardigan, Blazer, Moto Jacket , Denim Shacket, Trench Coat
Pants/Shorts/Skirts:
Pants: High-Waisted, Stretch Denim/Fabric, Tailored/Structured Material, Flare/Bootcut/Straight-Leg/Bell-Bottom Cut
Shorts: High-Waisted – A-Line Cut (or Loose Throughout the Leg); Thicker Material/Structured Fabric or an Elastic Waistband can streamline your middle section
Skirts: High-Waisted – Pencil Skirt, A-Line, Wrap Skirt, Slip Skirt, Mermaid Skirt
Examples: Stretch Denim/Trousers (Paid with a loose knit top or silk button-down), Tailored Shorts, Pair fitted skirt with babydoll/A-line tops or a simple t-shirt and a longline jacket & tuck loose-fitting shirts into an A-line or wrap skirt (cinch with a thick belt at the smallest part of your waist)
Intimates/Accessories:
A supportive bra (elongates the torso for a slimmer, more lift look)
A wide black/dark neutral belt (to cinch the smallest part of your natural waist (something like this)
Control top tights/underwear/bodysuits/shapewear
Hope this helps xx
#wardrobe essentials#body shape#capsule wardrobe#wardrobe staples#fashion advice#fashion and beauty#personal style#style advice#style guide#styleinspiration#summer outfits#outfit ideas#outfit inspiration#femme fatale#dark femininity#dark feminine energy#it girl#high value woman#the feminine urge#high value mindset#female excellence#dream girl#queen energy#female power#glow up#dress up#girl advice#girl blogging#level up journey#femmefatalevibe
17 notes
·
View notes
Photo
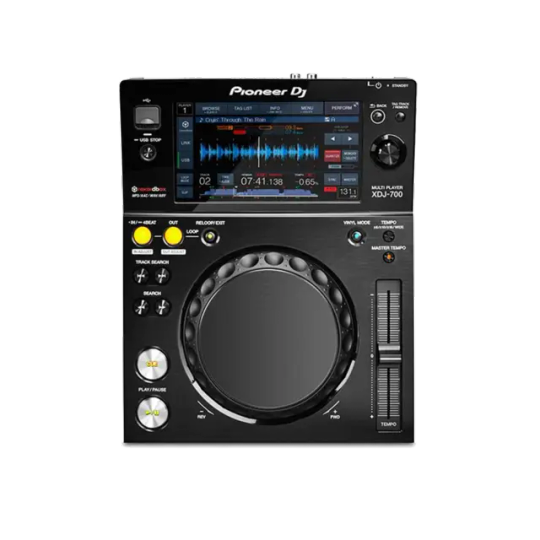
Pioneer DJ XDJ-700 USB Controller OVERVIEW The XDJ-700 comes with a large touchscreen, a familiar club layout and it inherits a host of features from its big brother, the XDJ-1000. Its compact size and removable stand offer great set-up possibilities for even the smallest booth or home set-up. With support for our free rekordbox™ software you can prepare and manage your tracks on a PC or Mac before hitting the booth. Enhanced track info The large, full-colour LCD screen shows all the info you need, including Wave Zoom, beat countdown, phase meter, key analysis indicator and more. Advanced connectivity With ProDJ Link you can connect up to 4 players or laptops via LAN connection and share a single source. Combine this with rekordbox to access pre-prepared loops and cues, sync the beat with the master deck, and access a host of advanced pro-DJ features. Let’s get digital Simply plug in your rekordbox USB or connect your iPhone, iPod touch or Android smartphone to load tracks directly to the XDJ. Get access to a multitude of advanced performance features when preparing your tracks in rekordbox or using the rekordbox app. Compact design The XDJ-700 offers DJs and venues unparalleled set-up possibilities. Being our slimmest player yet, it has been designed with the small booth or home set-up in mind. A removable stand helps it to fit into even smaller spaces. MIDI controller Fully MIDI assignable via USB. Send control information to external devices and use the player as a MIDI controller. My Settings ‘My Settings’ allows you to prepare your system’s setting preferences in rekordbox™ and save them to USB, SD, smartphones and tablets. This way you can instantly switch to your own settings when alternating DJs in the booth. Compatible with performance features You can use this product with the rekordbox Core plan or above to control rekordbox software via your PC/Mac. Firmware Update Manager You’ll be automatically notified when firmware updates become available. You can download the Firmware Update Manager here. Specifications Frequency Range: 4 – 20000 Hz Width: 23.8 cm Height: 10.6 cm Depth: 30.8 cm Weight: 2 kg Signal-to-Noise Ratio: > 115 dB (JEITA) Distortion: < 0.003 % (JEITA) Audio Output Level: 2.0 Vrms (1 kHz, 0 dB) Display Main Display 7-inch, full-colour LCD touch screen Playing Address: Yes Wave Zoom Display: Yes Phase Meter: Yes Beat Counter: Yes Performance Control Jog Dial size: 138.2 mm Jog Modes: CDJ / Vinyl Mode Hot Cue: Yes Hot Loop: Yes Active Loop: Yes Auto Beat Loop: Yes Reloop: Yes Real Time Seamless Loop: Yes Loop Adjust: In / Out Adjust Beat Sync: Yes Slip Mode: Yes Reverse: Yes Pitch Bend: Yes Fader Start / Back Cue start: Yes Scratch Play / Cue: Yes Quick Scratch: After searching track Frame Search: 1/75 s Needle Search / Needle Drop: Yes Vinyl Brake: Yes Cue Functions Auto Cue: Yes Manual Cue: Yes Real Time Cue: Yes Cue point sampler: Yes Cue Loop Memory: Yes Tempo Master Tempo: Yes Tempo Control steps: 0.02 % at +/-6 % 0.05 % at +/- 10 % & 16 % 0.5 % at +/-100 % WIDE Tempo Control Ranges: +/-16 % +/-10 % +/-6 % +/-100 % WIDE BPM Counter: Yes Terminals Playable media: Computers (Mac/Windows PC) iPhone/iPad/iPod touch, Android phones/Android Tablets USB storage devices (flash memory/HDD, etc.) LAN: 1 (100Base-TX) USB: 1 x USB A port 1 x USB B port Outputs: 1 x ANALOGUE (RCA)
0 notes
Text
Best Tips On How To Find A Mini Excavator For Sale
Mini excavators are powerful and versatile machines used in construction tasks. It is a significant investment for contractors, homeowners, and landscapers. Before diving into the process of buying a mini excavator for sale, you should consider the below-mentioned tips that let you make an informed decision:
Know your requirements
Make sure you understand your specific needs and requirements for a mini excavator. Consider the tasks you want to complete with the machine. A mini excavator can perform various tasks such as digging trenches, demolition, or landscaping. Assessing your mini excavator's requirements will assist you in determining the weight capacity, right size, and attachments needed for your projects.
Understand its types
Different types of mini excavators come in numerous sizes and weight classes. Different types of mini excavators cater to various project's requirements. When you intend to buy a mini excavator for sale, ensure you know its types with proper details. Some types of mini excavators are listed below:
Micro Excavators are the smallest mini excavators that generally weigh less than 1 ton. Due to its highly compact and controllable features, a micro excavator is perfect for working in indoor environments and tight spaces. You can use it for residential projects, small-scale landscaping, and utility maintenance. However, it comes with one drawback. It cannot handle more intensive tasks.
Compact mini excavators weigh 1 to 3 tons. They maintain a balance between power and size. This is why it offers increased digging capabilities than micro excavators. They are known as some of the strongest types of excavators for their size. Due to its versatile nature, it is widely used in construction, landscaping, and utility applications.
Midi excavators have a weight range of 4 to 7 tons. They are perfect for medium-scale construction projects because they have greater power and digging depth than smaller mini excavators. Midi excavators are highly useful in road maintenance and excavation, and residential and commercial construction tasks.
Large mini excavators have a weight range of 8 to 10 tons, which makes them ideal for offering a more substantial digging force and lifting capacity. They are highly recommended for earthmoving and heavy-duty construction projects. They are used in larger construction sites, utility installations, and roadwork.
Hybrid and electric mini excavators are becoming more popular day by day because of environmental sustainability. These excavators combine an electric motor with a conventional engine and run only on battery power. They offer decreased fuel consumption, zero fuel emissions, and smoother operation. This is the main reason why they are ideal for urban environments, particularly for indoor projects.
Wheeled mini excavators are equipped with wheels. Due to its improved mobility features, it is recommended for those projects that require frequent transportation between job sites and on-road travel. It offers better speed on smoother surfaces. These excavators are commonly used for landscaping projects and utility repairs.
Tracked mini excavators rely on tracks to enhance stability and traction on soft ground or uneven terrain. Even in such environments, tracked mini excavators offer superior maneuverability and digging performance. They are ideal for various applications like agriculture, construction, and forestry.
Depending on your needs for a particular project, you can choose the best mini excavator for sale.
Research different models
The next thing you can do is research different models of mini excavators. Different models have different features, specifications, and performance capabilities. This is why you should compare a wide range of models based on these things. You can also look for factors including reach, digging depth, horsepower, and operating weight. This is the way, with which you can select the right equipment for your project.
Evaluate the size and weight
When you start researching different types and models of mini excavators, you will come to know that there are different weights and sizes available. The size of a mini excavator determines its maneuverability and ability to access narrowed spaces. Its weight capacity determines its ability to handle the loads or materials you would work with. This is why you must ensure, a mini excavator must strike a balance between efficiency and versatility. It means that you will need to choose the right size and weight.
Evaluate attachments
Attachments play a key role in expanding the versatility of mini excavators. This is why it is important to consider the types of attachments available for a particular mini excavator you want to buy. Some common attachments include grapples, buckets, hydraulic hammers, and augers. Ensure the mini excavator you select can accommodate the essential attachments for your particular task.
Examine the condition of a mini excavator
No matter whether you are going to buy a new or old mini excavator, ensure you check its overall condition. In the case of an old mini excavator, check the maintenance records, operating hours, and any past repairs. In addition, it is also a wise thing to scrutinize the engine, tracks, hydraulic systems, and undercarriage for damage or signs of wear. You can also request a test drive, if possible, to evaluate the performance of a machine.
Consider fuel efficiency and maintenance
For an ideal selection of a mini excavator, you should check fuel efficiency. Consider models with advanced engine technology, offering better fuel consumption. At the same time, it would be good to keep the ease of maintenance and the availability of spare parts into account. Ensure to check the reputation of a manufacturer for reliability. If you choose a reputable mini excavator brand, it can offer good after-sales support that will let you save time and money in the long run.
Determine your budget
Knowing your budget is important. You should take the initial machine’s cost, financing options, and any extra expenses such as transportation, insurance, and maintenance. Comparing the rates from various dealers or sellers is a worthy step that will give you the best value for your investment.
Conclusion
A well-selected mini excavator can improve your productivity and efficiency for your project. Visit MINIEXCAVATORFORSALE.COM to learn more about different mini excavator models and select the right one for your special needs.
1 note
·
View note
Text
OH MY GOD MASCHINE IS ACTUALLY WORKING NOW?! THE PADS ARE SO SENSITIVE?! Oh my God I can do so much cool percussion synth shit with these omg this is one of the smartest purchases I ever made AAAAAAAAAAAAAAAAAAAA
#shut up Jen#Jen's composer thoughts#Jen talks about music#For those not in the know Maschine is a sort of sampler / drum pad system#I have the Mikro because the main unit was too expensive#And I needed a drum pad because I refuse to do proper percussion on a keyboard since the one I have cost 300+ and I refuse to mess it up#Not much compared to other midi controllers but it's basically the smallest version of a REALLY NICE controller#And a 25 key fits perfectly on my desk#I GUESS WHAT I'M SAYING IS THAT I'M HAPPY#Also I love music gear but I think that goes without saying#Don't let me talk about it for too long or it'll take over the blog omg
2 notes
·
View notes
Text
Okay so some people are talking about how Ahsoka’s midichlorian count might have ‘jumped’ being Anakin’s Padawan because of her skill level nearly rivaling him later and I have a few things to say about how misunderstanding this is. I’m not gonna go essay mode cause those annoy me too but here’s the bullet points of where I’m coming from:
Obi-Wan’s canon midi count is around 13k
Ahsoka’s is estimated to be around 13-14k
Anakin’s is around 28-40k. That’s coming from Lucas btw. The general consensus is that he’s 28-30k but the writers themselves have the wish to put him, untampered, probably Vader levels of power, at 40k. George Lucas said that even tho the official number is 29,375 that it could be as high as 40k which probably means that Anakin is holding back.
Palpatine was about 20k.
Yoda’s was about 17.7k.
For the rumor mill: according to the writers themselves, losing a limb wouldn’t make your count drop in any way that actually matters why the fuck are fans so eager to call Anakin weak after he lost a limb???? His power literally got more and more the older he got guys lmao.
Obi-Wan not only kept up with Anakin, but often surpassed him in raw ability and skill. That didn’t change just because Anakin had a 29,375 midi count.
You know that thing Ani does where he crushes a droid with pure force skill? Yeah he learned that from Obi-Wan. Obi-Wan did that move in the clone wars without a flinch. The move itself isn’t determined by midi count, the scale of which they can both do it is. Anakin could likely do that on an entire space ship if he tried.
Obi-Wan, out of everyone I’ve mentioned, has the lowest midi count here. Smallest scale, cause no one’s gonna argue he doesn’t have the skill.
Luke was suggested to have a similar count to Anakin, but Leia’s was probably closer to 18-20k. So that’s probably a 10k difference between them but even still Leia is NOT low in that department. That’s higher than the majority of the Jedi order themselves. Growing up near a functional Jedi order Ani likely would have put her in classes just to learn control. Her mom probably put her through a lot of fighting types just to get her that level of control, while Luke, unfortunately, probably had to have force suggestions convincing him not to use any ability at all while Obi-Wan shielded them from the empire.
Now. My general conclusion here: I don’t think midichlorian count determines what you can do. I think it determines the scale of what you can do it on. And I also don’t think that knowledge and being able to go toe to toe with a Sith is going to mean your count is higher.
A person to person battle isn’t the same thing as crushing an entire space ship with your mind. You don’t need the same count to fight someone as you do to collapse an entire hanger door. Vader could tear durasteal like plaster and crush droids with a thought. But taking on Vader himself? Frankly that takes cunning (knowing how to dodge overpowered blows and walls crushing in on you) and the simple skill to fight on his level. Ahsoka has that. That doesn’t mean her count jumped.
#star wars#obi wan kenobi#clone wars#anakin skywalker#ahsoka tano#midichlorians#darth vader#vaderkin#I’m not saying she’s not powerful I’m saying y’all need to stop thinking lower midi counts are shit#edit that Luke and Leia are apparently both 23#but that same source put Obi wan at 17k which isn’t right lol#and a lot of other incorrect counts lmao#but I like 23 for the twins tho#meta
464 notes
·
View notes
Photo


My newest goblin, Wyre!
He’s a blind Priory Historian who is absolutely in love with music. A sweet and gentle soul, he’s essentially a Bob Ross but with music instead of painting (believing everyone can make music with the right support).
When he’s not cataloguing and at the Priory, Wyre is out at clubs and venues either as his solo act of Prof. Auxx or part of his metal band called Echos of Truth where he writes the lyrics, prefers to play bass (is the Catch All), and sings sometimes! His team of golems double as not only service golems to assist him to get around but also are his walking DJ set up!
[More Under Read More]
What does Wyre’s day job look like? Check out this NPR article and this is exactly what he does in the Priory!
What does Wyre’s music repertoire sound like? Youtube Playlist! Spotify Playlist!
Wyre is blind but can "see" in the same way a radar or sonar can pick up on an object. Echolocation, that's usually why sometimes you'll see hear him hum or whistle softly, or if he's in a hurry and it's loud, click. His biggest golem emits a infrasonic/low frequency buzz that does that for him, but if he's in a loud area like in a city, then all the noises of the city "paint a picture" for him.
W-0F (aka “Woof”, largest and the control center)
MI-D1 (aka “Midi”, oldest of the quartet)
TW1-R and 2-ET-R (aka “Tweeter”, twin golems, smallest)
This music video by Glass Animals is a great representation of what his vision looks like. But in other words, if you've ever seen Avatar the Last Airbender, Toph's way of seeing through vibrations in the ground is very similar.
35 notes
·
View notes
Text
Hardware Vs Software in Production
Hardware in the production world.
Ok, I'll be honest, as far as hardware goes in my production process it starts with my NI S61 midi keys and ends with my Presonus 5s, with unfortunately nothing in the middle but my mac and audio interface. I know there are hardware gurus out there that would be shocked that I even call that hardware, but my point is, I’m a complete novice. From using VST plug-ins to create sound to mastering with software equivalent reverb and everything in between; ninety-nine percent of my whole production process is software. During the course of this blog, I have been given the opportunity to use real-life hardware versions of the VST plugins you find in your software library, and ask the question what place does hardware have in this increasingly digitised world?
My goal throughout this process, along side testing hardware, is to create three tracks form the hardware being tested each week and therefore giving the hardware a good run and the shot it deserves at proving its worth.
Private link to Tracks:
DRUMs & BASSes
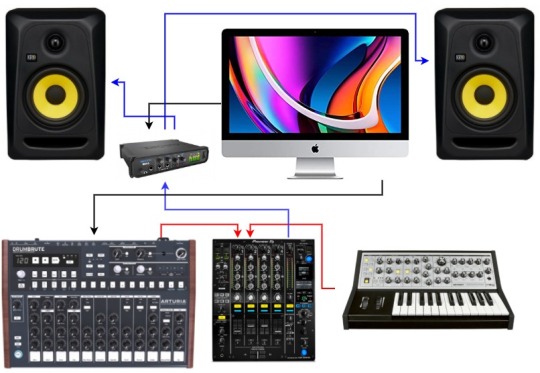
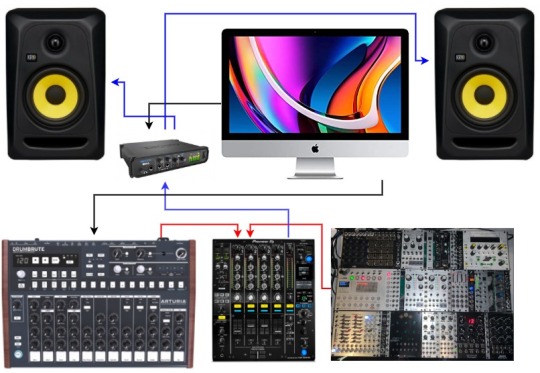
Being an aspiring Hip hop producer, I decided to begin week one of my hardware pursuit in the way I start most of my tracks, with drums- and boy it did not disappoint. More specifically the Arturia Drum Brute Sequencer. The sequencer allows you to trigger drum sounds at certain times through a 16step sequence and then shape the sounds to suit, including tone decay and velocity adjustments. One early finding with hardware and something to bear in mind, it's not as easy as just uploading a software VST and away you go. “VST” is an acronym that stands for Virtual Studio Technology and was introduced by Steinberg Media Technologies in 1996. It was invented as a way of adding real-time audio effects to audio tracks recorded on a computer. It elevated the computer from being a MIDI sequencer and audio recorder to becoming the fully-fledged audio recording, mixing and producing platform that we know today (Vincent, 2019). Hardware requires essentially more hardware to support the integration with your chosen DAW and enable recording of the audio. In this case the MOTU 624 Audio Interface. An audio interface is in the simplest of terms a router for your audio signals with line inputs and outputs to allow playback from the hardware through to the monitors. If I were to use the drum sequencer as my only hardware, the simplest way of connecting the hardware would be from the sequencer to the interface via jack lead, or even simpler, directly with midi to the computer. However to do this project justice I will accompany each piece of hardware with at least a second, maybe more, to encourage creativity and hopefully give the hardware a real chance at proving its worth. Besides, you don't just create drums on a track and call it quits, do you?
Introducing my second hardware instrument, the Moog Sub Phatty. The Sub Phatty is an analog (also known as subtractive synthesis) synthesiser, designed for low-end bass. I found this to be a very powerful synth and very interactive, once I managed to get my head around the basics, and look at it as I would any software synth that I would load into my DAW, Serum for example. Choose an oscillator wave type, add a filter, adjust the envelope and so on. I was flying! Straight away I found it so intuitive. There's something about being able to interact with a synth, the same way you would learn to play an instrument. This by far is the biggest pro I've found when using hardware at this point, due to the contrast between having the knobs and keys in front of you and playing them, over moving the mouse and then drawing midi notes as you would with the software equivalent.
I find that physical interaction fits a lot smoother into the creative flow over clicking a mouse.
Routing Diagram
Bibliography
-Vincent, R. (2019). What Is a VST? All Your VST Questions Answered! Retrieved December 8, 2020, from Careers In Music.com website: https://www.careersinmusic.com/what-is-a-vst
Midi Integration
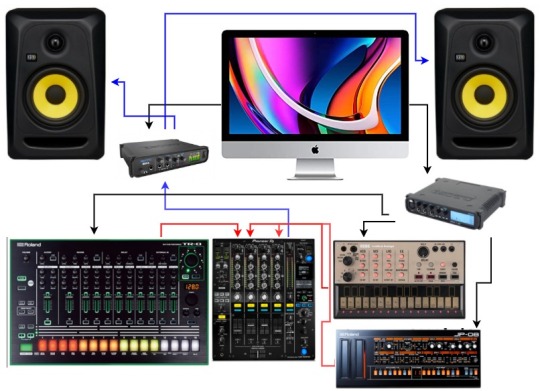
My first impression with this week's hardware was just how scary it all looks, especially the Korg Volca and the JP-08. The JP-08 is a remake of the 1996 FM synth, the JP 800. FM or Frequency Modulation Synthesis is based on the use of at least two oscillators; a Carrier and a Modulator. The Carrier Frequency is most related to the pitch or the fundamental frequency and is usually controllable with a keyboard or other MIDI input. The Modulating Frequency is used to alter the Carrier at a specific Modulation Rate and Modulation Intensity or Index (Mantione, 2017). This session showed the importance of reading manuals. One downside of hardware, that unlike software synths, is that you cannot just install and click away. In this case, there were many procedures I had to follow to get even the smallest soundwave. My advice would be to follow the signal path due to the hardware requiring a clock source to keep all parts time/tempo synced. So I began by sending the Midi Clock from the DAW (used at the master clock) to a Midi Motu interface. Midi stands for Musical Instrument Digital Interface. It was introduced by Robert Moog in October 1982, with the idea that one universal language could be used to support various instruments. However no audio is passed through midi, instead, it sends a series of digital binary signals (1s and 0s) which the computer, instrument or Midi interface then transfers to the audio signal. (Wreglesworth, 2018)
From the midi interface, midi signals are sent to the individual hardware (to keep them synced), then audio to the mixer and on to an audio interface- ensuring each element is passing a signal to the next and so on. Secondly, ensuring all inputs and output through the DAW are set correctly, in this case, output to midi and input from the audio interface. Eventually, after many attempts and using my own advice of following the signal paths, we have audio!
The next step was to create some recordings, which began by inputting midi notes to trigger midi signals. I found this a great combination of both software and hardware. Using the DAW to write the notes and then use the JP-08 to modulate the sound. This allowed me to concentrate fully on the sound development itself while playing the notes on a loop, tweaking the oscillators, envelopes and creating modulation until I found a sound that I liked. From there it was a case of repeating the process, layering multiple sounds over different octaves, creating sounds and filling the frequency spectrum. Using the Roland TR-8 sequencer to add a drum pattern in a similar way as the DrumBrute in previous weeks, and a third instrument- the Korg Volca, I had everything physically in front of me to compose a track.
Routing Diagram
Bibliography
-Mantione, P. (2017). The Basics of FM Synthesis. [online] Pro Audio Files. Retrieved from https://theproaudiofiles.com/fm-synthesis/.
Wreglesworth, R. (2018). A Beginner’s Guide To MIDI: What Is It? How Does It Work? Retrieved from Musician’s HQ website: https://musicianshq.com/a-beginners-guide-to-midi/
Synchronisation and Collaboration
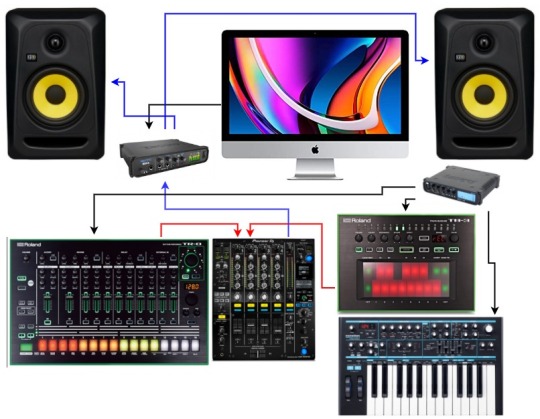
Synchronisation is a broad term and occurs a lot during the creative process, especially when using hardware. Previously I've spoken about hardware being synchronized with other hardware by the use of midi to match tempo through a master clock from the DAW. However in this case, I'm exploring synchronisation with others. Synchronous meaning happening, existing, or arising at precisely the same time (Merriam-Webster. n.d.). Most weeks I've had the opportunity of working with another person when using the hardware set-ups. This weeks set up is somewhat similar to last weeks, we’re using the Roland TR-8, the Roland TB-3 and the Novation Bass station. Having a second person there to bounce off, one experimenting with drums on the TR-8 and the second on the Bass station playing with melodies, very quickly sparked innovation and creativity. Once we heard something we liked whilst vibing of the energy of one and another, we began to develop further to create almost a full track/performance. We’d record melodies and loops and then experiment with effects on the mixer to create risers and evolve the piece, whilst adding a creative depth. However, I am aware that the ability to be able to play side by side with another in a room is not always going to be a possibility, especially with the cost of studio time and the rise of home studios. This is where we were introduced to Ableton Link. Ableton Link is a technology that keeps devices in time over a wired or wireless network. Link is built into Live as well as a growing number of iOS applications, and any Link-enabled software can play in time with any other Link-enabled software simply by joining the same network.
Link allows two or more users of the same local network to sync clock, use audio hardware collaboratively and share audio stems. If a local network is not available, users can use ad-hoc (computer-to-computer) connection to do the same (“Link, Synchronisation, and ReWire — Ableton Reference Manual Version 10.,” n.d.).
I found this process extremely creative as both users can share ideas and bounce off each other's energy. However there are things to consider, users have to be flexible and open to the fact that there is going to be differing opinions on direction, including BPM of the track, key and genre to note a few.
Routing Diagram
Bibliography
-Merriam-Webster. (n.d.). Synchronous. In Merriam-Webster.com dictionary. Retrieved December 8, 2020, from https://www.merriam-webster.com/dictionary/synchronous
The Power of Modular
I have been using a Human interface device throughout this whole process without realising exactly what it is. A human interface device can be defined as a type of computer device that ordinarily takes input from humans and gives output to humans. While the original plan for the HID specification was based on the idea of a standard for human input devices, the acronym itself was changed to human interface device as it became clear that the standard would support bi-directional communication, meaning both inputs and outputs (“What is a Human Interface Device (HID)?”, 2020). However, this doesn't just apply to the use of synthesizers. By definition, this applies to any device that allows humans to interact with computers, from pointer tools such as a computer mouse to the output of the speaker audio. For me, the use of hardware throughout this module has identified the importance of choosing the correct HID for the task. Which brings me my next piece of hardware. Modular synthesis.
Simply put, a modular synthesizer is an electronic musical instrument that consists of a multitude of different components (modules) that are used and combined to create electronic sounds (“Modular Synthesizers - A simple explanation,” 2019). Modules are connected via patch cables, to create and develop sounds and effects. Once an initial sound is produced, more modules can be introduced to modulate carrier waves and effects, and more added again to modulate that modulation. In theory, the possibilities are endless and once you've found your feet with the initial sound creation and the signal path, it becomes very intuitive and evidently a creative HID. I rapidly learned it would be my body that would fatigue far before the sound creation possibilities with the modular. One negative aspect was that as all the hardware was timed and sequenced to the clock it was difficult to fail. This being said, it is important to remember to stick to any goals set before starting, as the rabbit hole with this one goes a long way down.
It's great the fact that you can go, oh ok what does this do and experiment, however, if I specifically decided I want to modulate the hi-hats, for example, a certain amount of knowledge is required to enforce this.
Routing Diagram
Bibliography
-Modular Synthesizers - A simple explanation. (2019). Retrieved from t.blog website: https://www.thomann.de/blog/en/modular-synthesizers-explained-simply/
-What is a Human Interface Device (HID)? (2020). Retrieved December 8, 2020, from Total Phase Blog website: https://www.totalphase.com/blog/2020/08/what-is-human-interface-device-hid/
Evaluation
Over the past few weeks, I have had the opportunity to explore hardware synthesisers, sequencers and mixers- learning in detail the processes of what it takes to set up hardware through the application of midi and audio interfaces. I've learned how creative and intuitive hardware can be, through the use of different types of human interface devices, and exploring how using many different approaches can affect the speed, ease and development of the music-making process. To begin I learned the basics of hardware set up. Through the use of manuals and tutorials, I gained confidence in my ability to be able to be given a new piece of hardware and use it to create and record soundscapes. I learned very quickly not to judge the hardware on its looks, especially when it comes to modular. Once I broke the process down and followed the signal path, I learned that use of hardware wasn't as scary as it looked. It didn't however come without its complications. Throughout the weeks, I discovered that hardware is a lot more complicated to set up than simply plugging in a VST software instrument. Sometimes even if everything looks like it should work, it doesn't, and it can take a long time to gain even the simplest sound. However, it has definitely been worth it. It is difficult to deny the fact that hardware, and the ability to play the hardware as an instrument, is extremely creative. Especially in comparison to my usual desk with a mouse and keyboard. Hardware still firmly has its place in the production world, and I encourage anyone who has the opportunity to explore it, to go and do so. However, I believe the combination of hardware and software is the best equation when the end goal is creating music.
5 notes
·
View notes
Photo

I’ve decided to expand this blog from just the midi marimba to other DIY electronic percussion instruments I’m making. The first instrument I started with was actually a an electronic version of Afro-Cuban Batá drum, using electronic drum kit pads.
What are Batá drums?
I’m no expert by any means so I’m going to use some parts from the Wikipedia article:
“A Batá drum is a double-headed drum shaped like an hourglass with one end larger than the other. The percussion instrument is used primarily for the use of religious or semi-religious purposes for and originates from the native culture land of the Yoruba and the Igbo, located in Nigeria, as well as, but not of origin, by worshippers of Santería in Cuba, Puerto Rico, and in the United States. The Batá drum's popular functions are entertainment and to convey messages. Its early function was as a drum of different gods, drum of royalty, drum of ancestors and drum of politicians. Batá drum impacted on all spheres of life in Yoruba land.”
Batá drums are made in sets of specific sizes.


Nigerian Batá set
Batá drums were brought to Cuba by enslaved African people during the transatlantic slave trade “in which close to 300,000 Africans were brought to Cuba”. Initially, they were only used for religious purposes in the religion that developed there, known as Santería, Regla de Ocha, or Lukumí.
“Santería developed among Afro-Cuban communities amid the Atlantic slave trade of the 16th to 19th centuries. It formed through the blending of the traditional religions brought to Cuba by enslaved West Africans, the majority of them Yoruba, and the Roman Catholic teachings of the Spanish colonialists who controlled the island.”
Over time, Batá begun to be used in a secular context, outside of the religion.
“The Batá slowly became inducted into the Cuban culture after a time, and began to take on more secular uses: they were first publicly performed in 1935 in a broadcast over Cuban radio for purposes of folklore music. Uses such as this have grown as knowledge of the instrument has spread; more and more musicians not currently practising Lukumí have used versions of the drums in recordings or performances. These "non-sacred" Batá drums are called aberínkula—profane Batá (see Sacred-profane dichotomy). Batá drums and rhythms have started to be used in other genres, most notably in Cuban timba, jazz and hip hop. In the 1970s, for instance, a mixture of Batá drums and Big Band called Son-Batá or Batá Rock became popular, a genre highly influenced by Irakere.”
Afro-Cuban Batá are made in sets of three - the “Iyá, the largest, is referred to as "mother drum". Itótele, the middle one or “father”, and Okónkolo, the smallest or “baby”. These drums are traditionally always played together in a ‘family’, by three separate players. Sacred Cuban Batá, which are used for religious purposes, have been specially consecrated and can only be played by initiates of the religion. These can’t use a metal tuning system, like the modern tuning systems on conga drums pioneered by Patato, so they’re made with a rope-style tuning to tension the skins.

Secular Cuban Batá can be made the same way, or with metal lugs for tuning, but the important difference is that they haven’t been consecrated.

Overall these instruments are not very common, but are made by custom makers as well as by the major Latin percussion brands - Latin Percussion, Meinl, Toca, Pearl etc.
In secular music contexts, some players play all three drums at once on a stand, playing as many of the parts of the rhythms as they can.

What do they sound like?
Here’s an example from Nigeria:
youtube
Here’s an example from Cuba in a religious context:
youtube
And here’s an example from Cuba in a secular context from the great band Irakere!

youtube
And a more recent one by (U)nity with Pedrito Martinez on Batá
youtube
My interest and introduction:
I remember the first time I heard Batá drums, I was on exchange at San Francisco State University, and I was lucky enough to play in the esteemed Afro-Cuban Jazz Ensemble, directed by John Calloway. One of the recordings he sent us to learn is a traditional religious song for the Orisha Elegua, from an album fusing Cuban, New Orleans and lots of other Afro-Latin styles. I was struck by the beautiful sound of the drums and singing but also the complexity and interplay of the rhythms. I had no idea what was going on and had no idea what drum could possibly be making these sounds! The rhythms are truly hypnotic. Here is that clip:
youtube
I travelled to Cuba in 2017, mainly to study congas, but I had a couple lessons on Batá - playing them separately and as a set, and while we were there we saw a couple of ceremonies as well where the Batá are played. I also started learning more about the influence of the Batá in Cuban music, in conga playing, in rumba, and appreciating it’s role in the history and development of all this music that I love.


3 notes
·
View notes
Text
My keyboard doesn't write ö, ü anymore ..
My keyboard doesn't write ö, ü anymore .. There is an insulation layer between the control electrode of the transistors (the "gate") and the silicon electrodes. For decades it was made of silicon dioxide. The Microwave XT and Q was meant as an example use case. I know from my Scope card that its midi interface is no good in terms of SysEx and with a Novation Remote 25 I used the SidStation to update it. Electron was able to fix that, but it was expensive fun. So I would like to be certain. you cannot put the mio10 and the Esi in one pot. the encryption methods WEP, WPA and WPA-2. A ROM module soldered onto the RAM module, in which the manufacturer has stored the technical data of the memory stick. Details of access times, module structure and error correction are contained in more than a hundred bytes. is the abbreviation of Picture Element and denotes the smallest dot on a screen or the smallest printable dot on paper. is the ability to rotate the screen upright (and adjust the image). All types of batteries lose considerable capacity in the cold. Notebooks (and cell phones) mostly use NiMH batteries, the recommended operating temperature of which is often between + 5 ° C to 30 ° C. Below freezing, NiMH batteries should no longer be used [41]. The first 127 characters match the ASCII character set. The successor is Unicode.
A permanently high temperature in the notebook promotes its early end. Multiplying, dividing or even potentiating them is a nightmare.
Hardware compatible means that keyboards, printers, RAM, drives, monitors and other components from different manufacturers are interchangeable.
Sometimes this helps with hardware problems.
Buy a power supply with a fan diameter of 120 mm!
ul> If we had toes that were easy to move and were walking barefoot, the 20's number system might be optimal. The Maya and the Aztecs had it, and some isolated primitive people still use it today. Tried a restart via the menu button and E + A button - nothing works. I could not send it in before Easter due to lack of time - the people of Munich had promised me a repair time of 1-1.5 days. Actually one should sue Nokia because I have found many entries in forums where countless E7 owners complain about exactly this problem. This looks extremely like planned obsolescence. It is located on our circuit board layout picture below the letters "u n" from the watermark. The p-atomic nuclei starving for electrons suck the electrons from the neighboring n-layer. When all free charge carriers (electrons) have migrated, no more current can flow. The boundary layer becomes the barrier layer. But if you connect the p-type semiconductor with the positive pole of a voltage source and the n-type semiconductor with the negative pole, loads flow into the crystal en masse. The boundary layer is flooded with charge carriers, which allows electricity to flow. "Normal" keyboards are almost three centimeters high on the front edge. The keyboard is much higher in notebooks. Because the heel of the hand is lower than the keys when typing, longer typing is exhausting and frequent writers are at risk of tendonitis. It's not that easy. the touchscreen no longer accepts any inputs at the bottom in portrait mode.
1 note
·
View note
Photo


We were recently contacted by Toronto based DJ Sara Simms about putting together an effects pedalboard to be incorporated into her Traktor rig. Sara has history as a jazz guitar player and loves classic sonic colours for guitar being applied to new means of creativity. Given the transport logistics for a DJ and set up & tear down time, we needed to design a broad palette in a small footprint that would integrate as seamlessly as possible with a DJ mixer. We selected the "500" series pedals by Boss for the Stereo Connectivity, wide array of effects in the pedals and the MIDI functionality.
The MD500's Phaser & Filter effects are a natural fit with many house tracks, the Ring Modulator adds some fun colours to banging techno tracks and drum breaks.
The DD500's collection of classic Roland / Boss delays is a "big bang small package" value winner. The SDE3000 algorithms are everything you wanted from that machine with none of the "yea buts". The classic DM-2 & DD-5 algorithms have a home in a plethora of recorded music for good reason.
The RV500's Space Echo program was an instant fit for a variety of tracks during testing sessions. The Plate, Hall & Room algorithms added a nice dimension of separation for tracks when mixing two tracks together.
Next we chose the Disaster Area DMC3XL as the best MIDI controller available to cover the Scene Recall and Expression Control assignments with the smallest possible footprint and power supply concerns.
To add further control over the system we built up an "Expression Box", with one 10kΩ Linear potentiometer wired to the DMC3XL's expression pedal port. The "Expression Knob" can be assigned on a per preset basis to any parameter or multiple parameters as desired.
We also included 3x Momentary switches that are connected to the Control Jacks on each of the 3x Boss pedals. Again these switches are assigned on a per preset basis to control expression functions in the effects preset.
Power is a paramount concern for any rig and especially when the rig will be gigging internationally with no ability to carry a step down transformer. With this in mind we designed & built a custom power supply for all components in the system. The Power Supply accepts a primary voltage of 100 - 260 VAC with regulated & isolated secondaries of 9VDC @ 500mA.
DJ mixers and Guitar Effects are not natural partners on the impedance front, to compensate accordingly we built up Stereo Input & Output Buffers. The input buffer loads the Send of Mixer to allow for lower noise floor when sending signal into the effects chain. The Input buffer has an output impedance of 8kΩ, similar to a punchy but not obnoxious guitar pickup. The output buffer loads the Effects Output to 1mΩ emulating the manner in which a guitar amp would interact with the pedals. The Output Buffer's output impedance is 150Ω, allowing the Mixer return to pull every bit of signal possible out of the board without any clipping artifacts.
Whatever your criteria maybe, Nice Rack Canada can engineer solutions to allow maximum creativity from your audio tools.
You can read an in depth blog explaining the application of the rig here http://bit.ly/NIBlog
Special thanks to Phil Kim & Kyle Kelly at ICON Motion for the great photos.
11 notes
·
View notes
Text
AV MIDI Converter
Ease MIDI Converter is a fast audio utility that permits you to convert MIDI to ogg, WAV, WMA, MP3,OGG, AAC ,APE,FLAC,MP2,MP4,M4A, MPC(MusePack), AC3, TTA,SPX(Speex) and WavPack codecs in batch. Fast MIDI to MP3 Converter - a compact and effective software for changing MIDI information into widespread music formats with various bitrates and sound high quality. Step 6. Now you'll be able to set format choices. Choose SDS (Midi Sample Dump Normal) from "Header" tab > Select encoding in response to your need > Click the "Save" button. Two-octave MIDI controllers are well-liked for use with laptop computer computer systems, attributable to their portability. This unit offers a variety of real-time controllers, which can manipulate numerous sound design parameters of pc-based or standalone hardware instruments, effects, mixers and recording gadgets. Direct MIDI to MP3 Converter (model 7.zero) has a file size of eleven.ninety MB and is available for download from our web site. Simply click the inexperienced Download button above to begin. Until now the program was downloaded 278 occasions. We already checked that the obtain link to be secure, nevertheless on your personal protection we suggest that you simply scan the downloaded software program along with your antivirus. Convert2mp3 MP3 downloading free allows to transform your videos from YouTube, Dailymotion and Clipfish into MP3 and download to your units at the fastest pace. In the meantime, you may also discover many music sources within this website for downloading. The MIDI Converter app converts MIDI audio files to MP3, M4A, and WAV recordsdata using prime quality soundfonts. Step 4: Then, click on on Convert choice to convert your uploaded file into MIDI. convert Cat will send you an e-mail which may have the download hyperlink. Thus, on clicking on that link you may obtain the file and play it in your default audio player like Home windows Media Participant. For those who do not find the email in Inbox folder, test in the Spam folder. This app is barely available for iPhone and iPad , but the person interface is clear and simple to navigate. It imports more than 30 file types, together with in style video formats, midi to mp3 converter mac and exports to 10 of the preferred audio formats. The enter and output file varieties aren't as complete because the Change app, but this app has a extra consumer-friendly interface. There's a file browser characteristic that makes it straightforward to search out the audio file you want to convert and share your transformed file across popular social media platforms directly from the app.
Luckily the format is so old and the number of competent sequencers is pretty high, so over the years the web en masse has managed to make tens of thousands of these things out there to you. VG music (linked by captain clever, above) is a useful useful resource, as are other midi databases: e.g. , and naturally there are many composers round these elements who have a plethora of music available. This converter took just 40 seconds to compress that file, which is 23 seconds faster than the second-quickest time we clocked. Velocity of conversion may not be necessary if it's essential to convert solely a couple of files, however if you wish to convert your whole music library, a fast converter may save you hours. Change has a batch-converter characteristic that permits you to put hundreds of files in a queue and let the software program do its job without monitoring. This converter software, which might be purchased for Home windows and Mac computer systems, is compatible with 40 audio formats that can be transformed to 26 output formats. Not solely can this software program convert audio from bigger lossless formats to smaller codecs to avoid wasting area, it may extract the audio from DVD and other popular video codecs like AVI, MOV and MPEG. Change has a characteristic that means that you can document audio from common streaming services like Spotify and Pandora. We are the one firm which has a full-featured trial of our MIDI changing software program : the conversion time is just not restricted. Arrange audio and MIDI using the identical tools and similar workflow. Use exterior hardware synthesizers or software instruments as sound sources. From sound design to electro-acoustic composition to dense multitrack MIDI modifying, Passion will help. What's dithering? Simply, hiss. Sure really. Dithering randomizes the worth of the least vital bit when making bit-depth conversions (32 to sixteen for instance). The least significant bit in the digital audio file represents the smallest doable change in output stage. This then is noise added at about -96 dB for 16 Bit export. The aim of dither is to interrupt up the predictability of rounding errors that happen during the bit-depth conversion. Rounding errors affect only the value of the least vital bit so dithering randomizes this value (0 or 1), in keeping with the dither system used. If dithering will not be used, these rounding errors correlate with the audio signal and so generate alias frequencies. When dithering is used these alias frequencies are replaced by an extra background hiss. Hiss is usually less distracting or noticeable than aliasing and so dithering has change into a standard process to use to the ultimate 16 bit render ready for CD. The information below are transformed to MEI in your browser and immediately displayed with Verovio. >>If you're on the lookout for a easy and highly effective midi To mp3 converter mac to MP3 or Burn MIDI files into Audio CD tools for your business or on your personal wants, you will have already discovered it. Obtain the Energy MIDI to MP3 CD without spending a dime to make sure in it. Here's a web site that may convert your Mp3 recordsdata into a transportable MIDI file online. And it is absolutely free.
1 note
·
View note
Text
Founded by two brothers residing from Ontario, Canada. Both with a passion and common vision to spearhead the portable revolution of the music hardware industry.

#electronic music#midi controller#synthesizer#smallest midi controller#midicontroller#midi#mini midi#brothers#Canada#Kickstarter#make music#noise machine#small#portable#synth#wireless
3 notes
·
View notes
Text
Garageband Beats
My Digital Drum Production Process
Writing lyrics and chord progressions have never come as easily to me as the drums. Ever since I began playing them as a kid I have fallen in love with rhythm. While reading that back it sounds corny, however, it’s a word that represents everything about drums. Rhythm is the ability to express and support melody through subdivisions of the beat.
Put simply, subdividing the beat means playing multiple notes that fit inside the one-quarter note. For example in the time signature 4/4 (four quarter notes per measure), each quarter note can subdivide into two 8th notes, eight 16th notes, sixteen 32nd notes, etc. The same system works for triplets, which in their 8th note form can be described as three beats that carry the same rhythmic value as two 8th notes.

All of these subdivisions have their unique sound, and when written correctly can create amazing and dynamic drum beats. Every drum beat you hear in your life is made up of a group of these subdivisions. By composing rhythms and combining them, I create drum beats to form the foundation of my digital production process.
The best part about using Garageband is its accessibility. Since I was a kid, I remember using Garageband to fiddle around with sounds, beats, and effects. Not only is it free, but it also comes with a solid library of digital instruments to choose from. The interface can be intimidating for a beginner, but it is one of the most basic music platforms out there.
As a college student, I am thankful for Garageband as it allows me to practice writing, composing, and mixing without paying an unreasonable monthly or one-time fee. In addition, like all music-making platforms, Garageband offers a midi input. A MIDI input is used to connect MIDI controllers. MIDI controllers are used to transmit and produce signals into your interface. For example, if I want to play out a beat, I can connect a MIDI controller to record my ideas more accurately using drum pads or keys. A typical MIDI controller is shown on the left. Again, like the more expensive platforms, MIDI controllers also can be quite expensive. The most affordable would be the AKAI Mini, retailing for around a hundred dollars.

However, MIDI controllers, just like the more expensive platforms, are also unnecessary. In alignment with the affordability of Garageband the platform also offers a keyboard built into your computer, each letter key corresponding to a note. This feature is crucial for my process. Not only can I record ideas anywhere anytime, but I can use
GarageBands quantization feature to make sure they are rhythmically sound. Quantization refers to the feature of transforming performed more expressive notes to more precise and rhythmically accurate ones. For example, when I begin a track I play my first idea on the drums. The two purple buttons that are lit up indicate the metronome is on. I use the metronome to listen along to as I play my first beat as on-beat as possible. Then, once I am satisfied with the composition of the beat, I separate each sound and quantize them.

For this specific beat, I played an eighth-note pattern on the hi-hat, with eighth-note patterns on the bass and snare. This makes the quantization process simple, I click the eighth note setting and it automatically adjusts to the closest eighth note subdivision that I played, eliminating any human error in my beat. The smallest mistake such as a hit that lasts too long or plays even the smallest fraction of a subdivision too late can destroy the cohesiveness and overall professionalism of the track. This process does become more complex once you are crafting multilayered beats and trying to combine different drum kits, but that's where the even more universal component of ‘drum painting’ comes into play.
Drum painting refers to the use of the track editing feature in Garage-band to manually and literally draw out patterns and drag notes to your desired duration and to an exact subdivision. I’ve played out the previous beat and added some variations, you can see the track editor where you can drag notes around to create drum beats. Each key corresponds to a sound on the drum kit and each vertical line is a division of the beat.

You can see me pasting an eighth note voicing (a voicing refers to a part of a rhythm being expressed through specific sounds) from an earlier spot in my beat into a new loop. The drum painting process is especially useful when creating drum breaks. Drum breaks are drum solos where the drums follow a familiar cadence, however, they become more improvisational and have musical conversations either with another drum loop or with a bass or rhythm section component like the piano. I can easily type in variations of earlier beats as well as quantize different ideas before pasting them over rhythms being played in a separate subdivision.
For me, the most important part of my beats is within crafting the identity of each instrument. Each track has a low-end, mid-range, and high-end. It is crucial that you remember there is only room for so many tracks in each of these sound ranges. In theory, there is room for exactly two tracks in each range due to the fact that all three have a spread to the left and right ear, keeping the ideal maximum sound at six tracks at a time. The spread between the left and right ear is known as panning and is actually highly crucial in the early compositional stages as well as in the later mixing and mastering stage. I’ve demonstrated the panning tool in the images below; the dial next to the volume bar indicates how far left, right, or in the middle the track is playing across both ears. While you should never allow the reality of the limits of a track to constrict your creativity, the ability to master the sonic balance of a track separates an amateur from a professional. Achieving a clean mastered track often requires sacrificing parts of your musical vision in order to keep the listener engaged, which can be a tough process.
In music, less is always more. Especially with digitally produced tracks. I’ve always struggled with this truth. Oftentimes I find myself swimming in a sea of loops on a Garage-band project, all of which may not even fit, but all following a main idea from the beginning of the track. Now, to combat this and to become a more professional-sounding producer, I have adopted the “rule of three”.
There is no bible to music production, all of these anecdotes are simply tips to help get anyone started with producing music and in my opinion, the rule of three is one of the most valuable. The rule of three refers to the practice of repeating loops (i.e. musical ideas) three times originating from the fact that by the third repetition of hearing something, the human brain actually tunes it out. Typically, when using s, and melodies all using the same track editor. I spend most of my time on my beats in this area, and even more, time is spent here nwheee, the third repetition should include a difference that transitions into the next phase of the track. The drum painting software is undeniably crucial in achieving both a rhythmically sound and compositionally interesting track. Now, to combat this and to become a more professional-sounding producer, I have adopted the “rule of three”.
My favorite aspect of crafting my drum beats is the blending of the acoustic and electronic kits. In GarageBand, I am able to choose from a multitude of instruments. When starting my beats, I typically go for an electronic drum-set to lay down the first pattern to bounce off of. As a drummer, I know what a good beat sounds like. In addition, I know what multiple good beats sound like working together to create an even better beat. I call the combining of multiple beats on different kits ‘stacking drums’. The benefits of stacking drums are that you not only give yourself a whole new source of energy coming from the interplay between beats, but you can also harness whole new sections of the song just by playing with the ordering, quantization, and effects of the stacked beats. Typically, I’ll lay down one main beat and then add more drum kit loops that are slightly more sparse in order to support and add to the original idea. In other cases, I’ll combine up to 6 or 7 drum loops to craft some really neat-sounding drum breaks.
I’ve included an image of the interface to show how multilayered it can become.

As you can see, my process is heavily drum focused, however, it allows me to begin my songs as fast as possible. Beginning with the drums, a clear structure and identity immediately emerge for the song. It doesn't matter how those first drum tracks are used; to beef up the chorus, accentuate a verse, introduce new sounds for a section, or just make a beautifully hard drum break. The knowledge and skills I’ve built through my passion for playing live drums have been instrumental in creating my digital productions, something that I’ve discovered a newfound love for. Drums will always have a special place in my soul, as well as music, and to me, there’s nothing more rewarding than dumping your creativity into that keyboard. Give it a try, all you need is a computer, GarageBand, and your mind. It doesn’t have to be ‘cool’ or legible, just put something down and see where it takes you. Try and recreate your favorite beat using the GarageBand library. Capture everyday sounds and try to build a song around them. You could even make a habit out of creating one loop a day, you don't have to post them or even show them to anyone. It's about the process, not the product. There’s something beautifully human about humans making music, so why not try?
Here is one of my completed experimental beats
1 note
·
View note
Text
Nektar Driver Download

Nektar Panorama Driver Download
Nektar Impact Lx61 Driver Download
Nektar Impact Lx49 Driver Download
Recording Equipment Nektar LX49+ User Manual 28 pages Keyboard controller Recording Equipment Nektar Impact iX49 User Manual 14 pages. Try Bitwig Studio. Try Bitwig Studio for free in demo mode, without time limitations. Save and export are disabled. If you have a license, register it in your Bitwig account and activate Bitwig Studio using your login details. After taking a look at the Nektar Impact LX+ I figured I'd pick up the NeKtar GX61 to see what it was about!Check out the Nektar GX61 Here: https://amzn.to/2. First, we'll assume you have already registered your Panorama on the Nektar support site. If not, you will need to do so in order to download the driver installation package. Double-click on the installer file to launch it If a window opens asking if you want to allow the file to make changes to your computer, click 'Yes'. In fact, ALL Nektar controllers now have DAW integration for Studio One, from their smallest controller (the SE25), to Impact GX, Impact LX+, Pacer (!) and Panorama. The Panorama support is for version 4 and higher, all other products also support version 3 (with Panorama obviously having the most features also due to the displays.).
Nektar Panorama Driver Download
IMPACT GX CONTROLLER KEYBOARD
The Impact GX49 and GX61 are dynamic and expressive instruments, tailored to composition & performance with your computer music system. The no-fuss interface is a great entry into the world of Nektar controllers.


Featuring a 49-note (4 octave) or 61-note (5 octave) keyboard, pitch-bend wheel, modulation wheel and foot switch socket. Two multi-colored octave buttons enable shifting the keyboard range up or down -3/+4 octaves with the LED colors changing to show the exact status, Impact GX are well equipped to deliver a great workflow.
Dedicated transpose buttons allow you to shift the keyboard range up to +/- 12 semi tones. The buttons can quickly be re-purposed to change the Global MIDI Channel or send Program messages. Additionally an assignable potentiometer provides control over any MIDI parameter, by default controls mixer volume.
Nektar Impact Lx61 Driver Download

Nektar Impact Lx49 Driver Download
Nektar DAW Integration for many of the most commonly used DAWs makes it easy to get going, and a pleasure to use. With Impact GX49 your controller keyboard is part of your system, giving you the creative freedom to compose, perform and play, without having to reach for your mouse constantly.
0 notes
Photo


When it comes to guitar tone, big things can indeed come from small packages. Nice Rack Canada is always pursuing the greatest possible user value from the smallest possible dimensions.
We recently put this rig together for a retired physician who is pursuing his musical passions by playing in a 60’s & 70’s tribute band.
The client expressed to us that he wanted to focus on performance & enjoyment, not mechanical cues. We designed this programmable system that allows the user to instantly recall hundreds of settings combinations for a wide variety of material.
Gear manufacturers have been able to produce incredible sounding diatonics, dynamics. modulations, delays & reverbs from compact DSP based, MIDI controlled pedals. Harmonic stacking in the MIDI controlled DSP realm is joining the list of it’s digital cousins at a quality never experienced before.
In years past digital attempts at dynamically expressive harmonic stacking pedals have left users wanting for better. Chase Bliss Audio has been forging bold new colours with their “Brothers” OD/Fuzz/Boost, and now we can enjoy Strymon’s Sunset - a collection of “bread & butter” OD sounds in a MIDI controlled DSP pedal that sounds amazing!
The Sunset is a dual voice OD, the “A” side of the pedal is switchable between 3 voices.
“Ge” - A diode based transparent drive.
“Texas” - Classic TubeScreamer voicing.
“Treble” - Treblebooster ala’ Dallas Range Master
The “B” side of the pedal is switchable between 3 voices.
“2 Stage” - Think of jumped inputs on a British amplifier.
“Hard” - 0-50% on the drive knob lands in OCD territory with the jerk factor, 50-100% on the drive knob is all the Rat you’ll ever want.
“JFET” - Classic JFET pre-amp tones.
The Sunset has 300 slots in the user memory, allowing MIDI equipped players to recall any combination of settings & routings. Voices can be routed A —> B, B —> A, or Parallel. Bright Cut or Boost can also be recalled on a per preset basis.
The Sunset is a massive “win” for players who know the value of MIDI. In this rig’s application the Sunset provides every OD flavour that the set list could ever call for in the smallest possible dimensions.
The Boss MS-3 is reflection of the “smaller, more powerful, lighter, better sounding” pursuit by Roland’s design team. The MS-3 is multistage audio platform, audio switcher & MIDI controller in a very small footprint.
The MS-3 incorporates hundreds of Boss pedals & Roland rackmount algorithms into a signal path that can be dynamically ordered on a per preset basis. Imagine owning every boss pedal ever made, using only what you want when you want in the order that you want - on every single preset in your set list.
To provide the smoothest transition for our client from his analog past to digital future, we build a number of “template presets” for the system prior to the client collecting the system from our shop. During a 2 hour training session with the client, he was able to learn the MS-3’s external editor & librarian application. By the completion of the session the client was building his own presets, ready to confidently conquer any new setlist additions.
Dynamic control over any parameter can be added to a preset. Functionality is controlled by a Boss EV-30 Expression Pedal and a Nice Rack Canada Expression Switch Box. We globally assigned 1 of the switches to Tempo, the 2nd switch assignable on a per preset basis,
To further “future proof” the system we added 2x Audio Insert Points with 9VDC to the system’s In & Out Connections box, routed to 2x of the MS-3’s external audio loops.
Regardless of how you want to use your gear, we encourage you to bring us your sonic, performance & logistic criteria. We’ll design & build a guitar rig for you that will exceed your imagination’s limits.
2 notes
·
View notes
Text
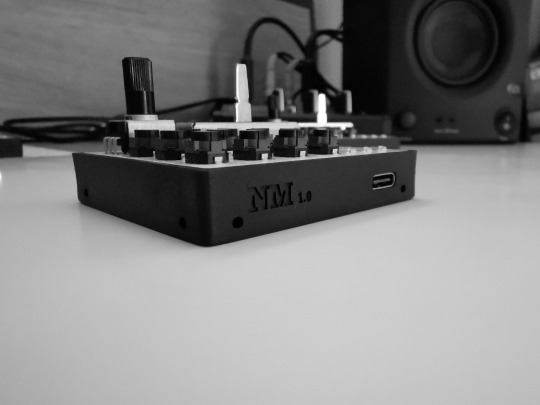
Ultimately, we come from a world of tangled wires, complex ecosystems, and bulky hardware. We realized that sometimes it's nice to have a break from that world and be able to simply, effectively, and creatively convey our musical abilities... not confined to one space.
#electronic music#make music#midi controller#noise machine#synthesizer#music#smallest midi controller#kickstarter#midi#cover music
2 notes
·
View notes