#so i have to export each file manually as html
Explore tagged Tumblr posts
Visit Tumblr Blog
Explore Tumblr blogs with no restrictions, modern design and the best experience.
Last Seen Tumblr Blogs


Fun Fact
In 2020, 44% of users from Denmark used Tumblr daily.
Text
at this point i realize i just really like coding very specific text file converters. it's kind of only a matter of time before i bite the bullet and write an .rtf to .html converter to make my scrivener --> ao3/shrine of cringe posting process more streamlined
#for some reason scrivener keeps bugging out when i try to export a folder as individual html files#so i have to export each file manually as html#it's not that bad since i obviously have my html sanitizer n stuff now but scrivener's html converter is itself kind of flawed lol#花話
0 notes
Text
So over the course of about a week, I had extracted the game roms from the various Virtual Console games I had bought on the Wii, 3DS, and Wii U over the years when their online stores were still up. (Well actually, my brother had bought Final Fantasy 1, Circle of the Moon, Minish Cap, Phantom Hourglass, A Link to the Past, and Super Metroid, but whatever. We shared the consoles.)

Now I can do whatever I want with these roms, whether that's using them in an emulator, or putting them on a flashcart or some other rom loader to play them on authentic hardware.
Some of these were easier to get than others. For the Wii U Virtual Console games, I used the Dumpling homebrew application to dump all of the games, and from there, it varied depending on the game. For N64 and DS games, I just had to find the files and rename their extensions. For NES, SNES, and GBA games, I used a program called wiiuvcextractor that converted the proprietary formats they used to more common formats used in emulators (.nes, .sfc, .gba). It was pretty easy to use. And then for the Wii games, I used a program called nfs2iso2nfs to stitch the files together to make an ISO. It was easy enough to use once I knew what I was doing by reading a guide a bit more carefully.
The 3DS Virtual Console games were a bit more complicated to do. I had to go through GodMode9's file explorer to go through the files for each VC game to export the roms. The Game Boy and Game Boy Color games were easy enough to deal with (just had to rename the extensions). The one Game Gear game I had bought, Sonic Triple Trouble, I had to decompress with an application called mdfTools. I don't remember whether or not I just dragged and dropped it or used a command prompt, but it wasn't hard either way. And then there's the one NES game I had on 3DS, The Mysterious Murasame Castle. It was a Famicom Disk System game, and hoo boy, was it quite a doozy. First of all, I had to use a hex editor to copy and paste the actual game data without the filler data to a new file labeled .qd, and then I had to download Python specifically so that I could use a specific Python script so that the .qd file could be converted to a regular ol' .fds file.
It was quite a hassle, and technically, it would probably be the hardest one to do, given that some very basic hex editing shenanigans had to be done, but somehow, I found extracting the roms from the Wii Virtual Console games to be far more infuriating.
After some trial and error trying to extract files from the .wad files I had extracted from my Wii (with mixed results), I had found out about a Python program called vcromclaim, which streamlined the whole process, but I had to provide a NAND dump to use it. So after some more trial and error trying to find a program that could create a proper NAND dump, it took even more fiddling to get it to work because I have a monkey brain, but eventually I was able to get it to work... except I wasn't able to extract the one Neo Geo game I had, The King of Fighters '98, because it used a specific kind of compression. According to the readme on github, I would've needed some Python thing called PyCryptodome installed. I don't know what it did, but if I wanted to get every Virtual Console game I owned, I would need to install it. This took several attempts, but I had to reinstall Python outright because it turns out I didn't install it right the first time, but eventually, I got it to download, and got King of Fighters '98 properly extracted, too. And as an added bonus, I got all of their respective digital manuals as html files, so that's pretty neat.


So I know what you might be wondering after reading all of this, because I've come across the same comment trying to look up guides and tools for this whole process.
"Why go through all of this hassle just for a couple of game roms? Wouldn't it just be easier and faster to just go to [INSERT ROM HOSTING SITE HERE] and download the same games?"
To which I say:

Anybody can go onto the internet and download game roms. I should know. I've done it plenty of times myself. But it was never about the games. It was about wondering if it was possible and seeing if I could do it myself. Life's a journey, not a destination.
#video games#gaming#nintendo#virtual console#nintendo hacking#nintendo homebrew#nintendo modding#some of these roms actually have differences from their original releases#as an example: The Legend of Zelda 1 has a better translation for the opening text#late night rambles
1 note
·
View note
Note
I really wouldn't mind you aiding me with some tutorials love
giffing tutorial/resources
hi anon! sorry it took me so long to answer. i figured this might be helpful for others out there who have asked me similar questions, so i’ve compiled a pretty comprehensive list of tutorials/resources. idk about others but when i was new to giffing, it took me a lot of painful effort to go around and look for resources, so i’m putting it all here to make it a little easier!
i download videos using 4k video downloader. it will download very good quality 1080p videos in .mp4 format. if you’re downloading a 4k video, make sure to change the setting option to .mkv so that you get 4k and not 1080p—for obvious reasons since you want the highest quality.
i rely on kpopexciting to get .ts files — which are basically raw, very high quality video files for live performances. they are much less grainy than .mp4 versions of live performances—which are the ones you’ll see uploaded to youtube. i’ve found that 4k videos (in .mkv) are just as good quality as .ts, but obviously you will rarely see live performances in 4k, so get .ts when you can!! you can also try to find .ts files on twitter, but you may have to do a lot of digging. i wish i could recommend you twitter accounts, but the ones i used to go to have been very inactive/taken down all their drives :( but this website is really nice and updated frequently so i would recommend it!
vapoursynth links + download. the reason you would use vapoursynth is to resize your gif, while maintaining the optimal quality of the gif. if you gif without vapoursynth (.ie only using photoshop), it will still be fine, but the image quality may be grainier. also, you will definitely need vapoursynth to gif .ts files —more will be explained in the tutorial i’ve linked below. i would recommend that you have a high processing/lots of ram/newer desktop or laptop to use vapoursynth so that 1, your computer isn’t fried and 2, your vapoursynth process will go a lot faster. i am using a 2017 macbook pro for all my work, and it runs pretty well, but my laptop still gets pretty hot so just make sure you’re not running a million things in the background while using adobe products and vapoursynth lol. i used a pretty old and beat up 2011 model macbook air back then, and i will say that yes vapoursynth worked and ran on it, but it took much longer, and basically fried the laptop’s battery (aka i had to get the battery changed twice and the laptop would die randomly) but issok it was a school borrowed laptop so i didn’t feel too bad lol. im just saying this as a precaution, to preserve the health of your electronic devices!! but don’t be afraid to use vapoursynth! you should still try it at least once.
thank you to @realstraykids for this super detailed, really nice tutorial! it includes how and where to download videos, how to gif using vapoursynth, using photoshop, comparisons, coloring, and pretty much all you need to know. 10/10 would recommend
thank you to @dreamcolouring for this lifesaver!!! the best and easiest way to blur out unwanted captions/objects in your gifs. i recommend doing this step after converting your frames to video timeline and before you do sharpening and coloring. another tip i’ll add is to feather the selection you’ve made right before you click on “add vector mask” —this will make sense once you’ve read through the tutorial. feathering it will make the blurred spot less noticeable and more subtle.
i use this generator to create gradient colored captions! copy and paste your text, then select the colors you want. generate the code, and copy it. change the settings of the text editor on your post to HTML. paste the code, preview, and voila! add elements <blockquote>,<b>,<i>, etc as needed. see more on colored captions in this tutorial by @kylos --i believe op mentioned a different and better color generator but for some reason it won’t work for me :( hopefully it works for u! basically same idea as the previous generator i mentioned.
my own mini tutorial/workflow process of making gifs. this includes working with a .ts file, vapoursynth, photoshop, coloring, watermarking, etc. and a few of my own tips below:
if you are working with an .mp4, you do not have to make any changes to the preprocessor/denoise filters/sharpening in the resizing part of vapoursynth—it doesn’t make that big of a difference if you do. but if you are working with a .ts file, definitely do make those changes,, that’s the whole reason you have vapoursynth. with an .mp4, i like to use vapoursynth to just resize, but i don’t add any additional settings. i use smart sharpen in photoshop to sharpen it, which is pretty good on it’s own (at least in photoshop 2020!).
my rule of thumb is to do add .02 seconds when i am setting frame delay. so if when you first import the frames, they are at 0.04 seconds, i usually change them to 0.06. of course, this is my personal taste—you can make all your gifs faster or slower depending on how you want em to look.
if you are on a mac, you can screen record by pressing Command+Shift+5 (it’s a shortcut to quicktime screen recording). I only screen record for things like the beyond live concert or other live streamed events. the image quality of the screen recording, in my experience, is actually pretty good. when you gif the screen recording however, you may notice that it adds extra frames that you don’t need. by that i mean duplicate frames. you could keep the duplicate frames but that just means the size of your gif is going to be much bigger (keep in mind the limit is 8mb). in order to remove those duplicates, my only solution has been to remove them manually (by holding Command while selecting), or when you are importing the video to frames, select the option to “limit to every 2 frames”—but this method will be less precise and still not as good as manually removing frames. if you remove the duplicate frames, this means you will need to set the frame delay even slower, to make up for lost frames. in my experience, fps(frames per second) and frame delay work in conjunction. so for example, if i delete every other frame because they are duplicates, but the starting frame delay is 0.02, i am now going to change it to something like 0.05 (so i added 0.03 seconds rather than my usual 0.02). if the duration length and the image dimensions of the gif are short/small, feel free to keep the duplicate frames in—i only delete duplicate frames in order to keep my gif under the 8mb limit. then, if you keep the duplicate frames in, continue with your standard frame delay preferences. now that i’m writing this im realizing this might not make a lot of sense lol.. but don’t worry about it for now and if you run into trouble w screen recorded gifs then you can come back to this for reference. again, this is only my experience recording on a mac—it may be a lot different if you use a screen recording program or are on a pc.
i don’t really use .psd templates because i like to give every gif/gifset it’s own unique coloring—so i remake the coloring every time, but if you get into a rhythm it’s pretty easy. there are a lot of nice coloring tutorials out there, too! my personal coloring adjustments in order: levels, exposure, color balance, selective color (if needed), vibrance, photo filter (if needed), color lookup (i use 2strip most often and i put it on ‘color’ blending mode). don’t forget to adjust the opacities and fills of the ‘color lookup’ adjustment layer in case it’s too strong. go back to correct each adjustment layer as needed. then, when you’re done and satisfied, group all those layers, copy the group (you can do an easy command+c), and paste it onto the next gif you’re working on for easy workflow.
if for some reason you can’t see the frames when you import your layers/video, it’s likely because your ‘timeline’ window isn’t showing up. just go to the window menu on photoshop, go to the bottom and you’ll see ‘timeline.’ make sure it has a check next to it.
i recommend watermarking your gifs because a lot of people like to repost tings these days 😠 - so make sure u got your brand on it! i keep my watermark saved to my ‘libraries’ in photoshop so it’s ready when i need it. i use the blending mode ‘overlay’ and adjust the opacity, but if you don’t want to do that you can also add a stroke/shadow to your watermark/do all sorts.
tag #nctinc for your nct creations and #jenonet for your jeno creations!!
here’s my own mini tutorial (well not much of a tutorial ig more like a work process vid?): took about ten minutes including the time to search and download the video (but i didn’t record that part i trust yall know how to do that), vapoursynth, and exporting. i hope this helps somewhat! feel free to ask more questions whenever :)
youtube
keep in mind that giffing takes a lot of patience, energy, and experience—so don’t worry if it takes you a bit to figure things out or if your gifs don’t turn out the way you want them to the first time around. we all start at the same place and all run into problems. i know giffing can sound intimidating and seem like a lot of work, but i promise, once you get into a routine, giffing is going to happen in minutes—and you’ll get beautiful gifs. have fun! 😊
#anon#answered#tut#tuts#giffing tutorial#should i make a tut/resources post on gfx? not rly sure if gfx can be taught.. it's like a lottt about personal style imo lol#hope this helps!#not just for anon but for anyone
120 notes
·
View notes
Text
Scrivener 3 and AO3: A Workflow
Hi! I write a lot of long fanfiction, and I write it in Scrivener! If you are a fellow Scrivener user, you are probably aware that getting your work out of the program can occasionally be a challenge, especially if you want to post somewhere like AO3, where what you want is text that has been lightly marked up with a small set of HTML tags rather than a full-on HTML document. My previous workflow for posting to AO3 from Scrivener involved exporting my work as an OpenOffice document, running Astolat’s OpenOffice conversion macros, and then (usually) manually checking the HTML to make sure everything was what I wanted anyway.
But now that Scrivener 3 has been released (currently Mac-only; Windows version forthcoming), the Compile system has been changed, and I am pleased to report that I now have a Scrivener Format for creating very basic AO3-ready HTML just by clicking the Compile button. For those of you who want to have one of these yourself, I will walk you through creating it.
This format does exactly two things with the text: it turns italics into HTML italics, and it adds a horizontal rule between scenes. I realize that you may have more complicated HTML needs, in which case you would probably be happier with something like this Google Doc that will create HTML for you. However, 95% of the time, I just want italics and scene breaks, so that is what I made for myself.
Have a project open. Go to File > Compile.
In the window that comes up, change the top dropdown to "Compile for plain text (.txt)."
In the lower left corner, click on the + sign for "Create a new format" and select "New Format."
Name it whatever you want (mine is “Fanfiction for AO3″), make sure it has the extension "txt" (in the Extension box in the upper-right-hand corner) and make sure it saves as My Formats rather than Project Formats. (This is so it will be available to all your projects.)
Now there are many panes (on the left) of things you can modify. Above the list of panes on the left there is a bar that says TXT and a little cog wheel. Click on the cog and uncheck everything that isn't TXT -- because you're making a format just for text files. Here you can see that I have done this:

In the first pane, the one that says Section Layouts, you can click on every kind of section that isn't Text Section and delete it because you are probably only working with Text Sections. (I don't know if this is strictly necessary but it works for me because I just want something that shoves all my scenes together and I don't have any header sections.) The result looks like this:

Click on the pane that says Separators. Where it says Default Separators, there are options for Folders and Text Files. For both of these, select them and then click the box on the right that says "Override separator after" and select the dropdown "Custom." In the little box next to Custom, type in the HTML for a horizontal rule (<hr>). I like to add a return before and after the <hr> so it will end up on a different line, so I can see where it is in the resulting text; if you want to do this, you can either hit option-return to type a return in the box or you can type your <hr> with surrounding returns in another program and copy/paste it with the returns.


If you are like me and you hate smart quotes, click on Transformations and check the box to convert smart punctuation to dumb punctuation.

Click on the pane that says Markup. Where it says "Enclosing markers for unstyled italics" type in the HTML for italics (either <i></i> or <em></em>, whichever you like), open in the left box and close in the right.

Hit Save, and you've got a Compile format. Now when you want to use it, go to File > Compile, select "Compile for plain text" and your format will appear in the list on the left for you to use. When you compile your story, Scrivener will spit out a text file that you can then copy and paste into the HTML upload box on AO3. (AO3 will automatically add paragraph tags for you if you have a hard return between each of your paragraphs.)
I hope that was helpful to someone! Again, it doesn’t do anything beyond italics and scene breaks, but if that’s all you need, you can have them very, very easily with Scrivener 3.
457 notes
·
View notes
Text
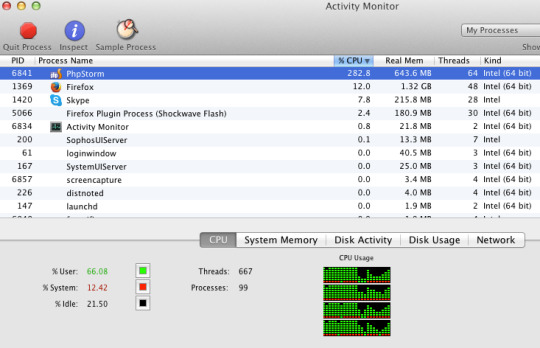
Phpstorm Slow

Once upon a time, PhpStorm was the IDE I loved. I thought I would use it all my life, happily without looking at any other editor.
Phpstorm Slow Cooker
Phpstorm Slow Ftp
Phpstorm Show Main Menu
Phpstorm Slow Startup
I was wrong.
I discovered the true love of my live, called Vim.
Are you confused? Are you yelling “why” to the deaf sky? What happened between PhpStorm and me? Why a PHP developer would use this… old smelly thing called Vim?
Phpstorm does a very good job of saving, importing, exporting settings so upgrading your Phpstorm version doesn't require you to redo all your settings. This is also beneficial if you are setting up Phpstorm on another computer or sharing your company coding style guide with other developers. Now you will be working with the terminal - you can use Window's cmd or the PHPStorm's terminal. I prefer to use the terminal built inside the PHPStorm - it is: better, faster and more intuitive. I prefer to use the terminal built inside the PHPStorm - it is: better, faster and more intuitive.
I was happy with PhpStorm. We had a productive relationship. Its basic rules was simple, as simple as many text editor in the computing world. You use a mouse, you click where you want to change or add something, somewhere. The basic editor. We are all used to that from the beginning of times!
PhpStorm provides the following main ways to upload project files and folders to deployment servers: Manually, at any time through a menu command. Automatically, every time a file is updated, or before starting a debugging session, or during a commit to your version control system. PHPStorm was and now is very slow under Linux (currently am using version 2016.2). All its versions were slow. Even at powerful computers with SSD. Jamming and sticking is a normal behavior for this program. It's a pity that authors do not pay attention to it. Running PHP storm on windows 10 is incredible slow. I'm running PHPstorm on my windows 10 laptop, where it is extremly slow. I made a screenshot showing the about information. I have a 64bit so I'm correct running phpstorm64.exe for this. During work I'm also using phpstorm on an.unix system, which is great. So I thought about buying a private license for me at home, but with the given performance I really cant work.
I loved the auto completion with PhpStorm! I loved the fact that you could find easily a peculiar file even within a massive codebase. I loved its stability. I liked the snippets. I loved its numerous options to refactor, generate getter / properties / methods using one or two handy shortcuts.
And now, I don’t use it anymore.
Firstly, I want to tell you my story with Vim and PhpStorm in order for you to understand how you can switch between the two.
Then I will compare the two and underline what Vim brings on the table.
Vim: the Hate before the Love
It was a newcomer who first showed me Vim.
He was a PHP developer hired in the company I was working for. I was curious, I began to look what tools and IDE he was using, expecting seeing the good old PhpStorm, like every good PHP developer who suffered too much with Eclipse.
“I don’t use PhpStorm” said the newcomer. “Vim is way better!”.
Vim! This dinosaur! This boring terminal editor! So complex nobody knows how to use it, except the perfect nerd without life / girlfriend / whatever real things!How can he compares the wonderful shiny PhpStorm with this relic?
At that point, I went in a crusade. I tried to show him how a good IDE with tons of features could suit his needs even better than this… Vim thing! Without success, I let him swimming in his ocean of mistakes, sad he couldn’t see the Truth as I was.
Time past. Days became years. Years became centuries. I began to understand that this newcomer was a very interested and knowledgeable developer. It astonished me. How can he be that good and use Vim?
Quickly we began to work on the same project: a tandem was born.
The Time of Mockeries
I mocked my work tandem. A lot. He was persisting in his mistake to use Vim and I couldn’t do anything to dissuade him.
I mocked the austerity of Vim’s interface. I mocked the fact that he had to configure everything in config files. I mocked that this configuration (in my opinion) was always broken. Who wants to code with a broken IDE? It was pure nonsense.
With hindsight, I may have been a bit jealous. He mastered a tool full of shortcuts in order to use the mouse as less as he can, and, without knowing it, I envied him.I envied him because I didn’t feel capable to learn how to use Vim in a reasonable amount of time.
More and more, my contempt toward Vim let place to curiosity.
PhpStorm and Me: the Breakdown
My attraction and curiosity toward Vim kept growing and growing.
The hate became love when I decided two things:
Quitting the company I was working in.
Learning to type like true crazy typists.
I wasn’t happy at that time, till I decided to quit the company I was working for. My decision opened new horizons and a true desire to learn more about everything.Moreover, I wanted to learn a maximum from my fellow work tandem before leaving for new and crazy adventures.
I wanted at the same moment to get rid of my very bad habit of typing with two or three fingers. I wanted to use typists techniques: using the home row keys and my ten fingers.
Quickly I began to understand the power of this typing method. You feel definitely faster and more in control of your computer. A very cool sensation!I knew as well that Vim was designed for this type of typing. Due to the pleasure I had with my new typing techniques, I slowly decided to give Vim a chance.
More and more, I asked tips to my tandem in order to learn how to use The Beast. At first, I just wanted to use it for editing configuration or text files, not for actually coding, too afraid that it would put down my productivity.
I stopped using PhpStorm in two weeks. Transfer from bitpay to coinbase.
Vim vs PhpStorm
Vim on the left, PhpStorm on the right. The clash.
Here we are finally: the comparison between PhpStorm and Vim. Do you want to replace PhpStorm with something more powerful and versatile? Do you want to be sure that Vim is the good choice?
I won’t cover here how to do a PHP IDE out of Vim since I wrote another article on the topic.
Who’s in Charge: You or Your IDE?
An IDE is obviously very important for developers. It’s the tool which helps us doing what we like: coding. It simplifies our lives, automatize all these boring stuff you repeat over and over again.
Therefore your IDE should reflect the way you are coding. It should give you the choice for you to do what you want, the way you want.
PhpStorm doesn’t really give you many choices: it is a bunch of tools and you have to stick with them.I never used 70% of it. I know a lot of shortcuts and I am able to navigates in the panels without even using the mouse. However I never used the composer tools / terminal / git GUI / database interface thingy integrated in PhpStorm.
I couldn’t configure that. I couldn’t choose to install what I wanted, what I needed. PhpStorm was choosing for me.
The result? Many panels and notifications popping, a lot of visual noise which was totally useless for me. Perfect to lose focus.
Some may argue that PhpStorm is really configurable compared to other IDE. It is nothing compared to Vim.
Vim has a great community who develop a LOT of plugin. Nowadays you can install them and get rid of them by typing two words. Not even command lines. Words.
You can choose exactly what you want and what suits you. You can even modify it easily and extends it. Vim can be bent following your wishes.
You are the master.
PhpStorm Only Allow You to Code in… PHP
Another point which was bothering me for a long time. Of course you can use it to write HTML / CSS but you won’t have many tools for those. And what about Go you want to learn so hardly? Ruby? Basic?
Vim is an editor, not an IDE, but you can make an IDE out of it for every language you want. Right now, I have very good auto completion systems for PHP, JavaScript, Go and Ruby.
Even better: the plugins can be activated depending of the file type you are editing. You will never have the Ruby autocompletion while editing a PHP file. Sweet, isn’t it?
I have tons of plugins for refactoring, creating snippets and so on. No need to change IDE and get use to different interfaces. With Vim I can switch from one language to another transparently. Believe me, it’s awesome.
When I open Vim, everything I need is there for whatever language.
Vim is Light
Each time I open PhpStorm I have the impress that my computer is running a marathon. And he doesn’t do well.
Even on my very lightweight arch linux / i3 system (running on very good hardware), everything suddenly slow down. Welcome to the Matrix, or the stop motion applied to computing!
Sometimes I like to open two projects at the same time to get some configuration or code from one to another. Sometimes I want to open even more if I need to work with multiple micro services.
With PhpStorm… you know what I am talking about. Your memory scream, your CPU burns some calories, your vans consume more electricity than your fridge.
In comparison, Vim is a feather. So light! You can run multiple instances of it if you want, your computer won’t slow down.Try to use Vim, then come back to PhpStorm and you will see what I’m talking about.
Your hardware will love Vim.
Vim is Fun
This is something I didn’t imagine: Vim is really fun to use. This is something my work tandem told me, and it’s so true: it’s basically the gamification of coding.
It is time to precise a bit how to use it. There are many modes in this editor:
The Normal mode is for executing commands (delete words, lines, paragraphs and a lot of others). Basically, it’s to edit your text (or code).
The insert mode is there for you to concretely write.
A simple separation of concern and, believe me, it’s brilliant!
This is Vim: you can learn to be productive with it in a couple of minutes (I promise). Get used to it may take a bit more time, and then you will learn new stuff all your life. The whole editor feel so logical that you will come up with new way to do things without even asking Google. Yes, by yourself, only!
Like: “Maybe if I press those keys, it will do that eventually. Yes it does! I’m a genius!”
Indeed, Vim is so sweet, you can talk to it like an old friend. For example: you want to delete all characters from your cursor till the coma? In Normal mode, type dt,, which means delete till ,. You can do as well dtf, which delete till f. Magical!
In comparison, PhpStorm is boring. To me, 70% of the tools are useless (by adding a useless graphical interface on top on very efficient terminal tools) and the editor itself use the mouse extensively, like 99% of the editors in the world.If shortcuts were invented, it’s because it’s more convenient and fast to use the keyboard to execute actions. Vim definitely nailed that.
If you want to build a complete Mouseless Development Environment, you might be interested by this book.
To be honest with you, I always have the impression I’m some sort of a hacker doing crazy things with my keyboard in three different Vim instances. Of course I am just writing down my shopping list but… who cares? The feeling is great!
I am always happy when I discover a new shortcut or way to do thing even more easily. It’s like finding a secret way to beat a video game even faster! Gamification, I tell you.
PhpStorm Cost Money
PhpStorm is not free, far from it. Even if it’s pretty affordable (around 100euro), you pay only for one year. Welcome to the era of renting instead of acquiring…
If you want a Go, Ruby or whatever IDE for whatever language, you have to pay. Again.
Vim is free, available on everything (linux, windows, mac).
You Might be Faster with Vim…
Honestly I don’t care that much if I’m faster with it. To me, being fast doesn’t mean being a good developer. Our brain is more valuable than our typing speed.
However you will feel fast and precise, which is a good cherry on the cake. Adblock plus google chrome. Especially when you have to move a bunch of classes and renaming namespaces again and again. You know, what we call refactoring: Vim can simplify that and many other things.
Vim Allow You to do More than PhpStorm
Here some examples what you can do with Vim but not with PhpStorm:
You can search through open tabs (“buffers” in Vim), files and entire projects very fast with the fzf plugin. Even faster than with PhpStorm.
You can go directly to php.net with a keystroke when you are on a method / function / whatever to see its definition. Very handy.
You can run Vim with a GUI or in the terminal. Doing the last will open a lot of possibility like the winning combo zsh / tmux / Vim. You will have a lot of flexibility and fun with those tools, I can guarantee it!
Since a tonne of plugins exist for Vim you can extend the possibilities as you wish. You can even write little functions which extend / alter whatever you want.
The possibilities are infinite.
A Great Community
A lot of people use Vim and will be happy to help you. You have access to a lot of plugins for every development language you dream of.
Some will argue (as I did) than Vim is too old. It is a strength! Think about it: what software is more stable than the one tested for decades?
It is very stable indeed, thanks to the community. If you are stuck, if you have a problem, you have tons of resources where you can found the solution.
Neovim!
Vim is old and maintained for a long long time, which means as well that its codebase is (apparently) not-that-goodish.That is why a bunch of people rewrote the whole editor. It’s called Neovim and it’s compatible with every Vim plugin available.
Even if it’s still in beta I didn’t have any issues with it. It works like a charm.
I want to be in love with Vim! Tell me how!
First you need to be motivated and learn how to properly use it. It is less complicated than you think.
You Work on Linux or macOs? Try Vimtutor!
First, go to your terminal.Then type vimtutor. Press enter.Here we are!
Vimtutor comes with a lot of linux-based distribution. It is a 15 minutes tutorial for you to learn Vim’s basics. After that, you can begin to use Vim for whatever need you have.
15 minutes! Who said that Vim was complicated?
You don’t believe me? Just try it!
Get Inspired by Other’s Configurations
Vim alone is a bit… too weak functionality wise. You need plugins, and the best way to find what you need is to look to configurations from other developers.They are most of the time hosted publicly on github.
Here my personnal config.
Be careful though. It is tempting to copy entire configuration from others but you will be lost very quickly. Vim needs to be personalized. It can suits you if you take the time to tune it depending on your needs.
Take the configurations available on the web as inspirations. Copy them little by little, plugin by plugin. Test it, try to understand what the plugin is doing. Take your time. Read the plugin documentations. In short: do everything with Vim you should do as a developer. Analyzing, acting step by step and see if it suits your need.
Vim Cheat Sheet
My advice for the beginning: having a cheat sheet printed you can refer to. You can find a lot of them everywhere.
It will help you memorising the basics of Vim and experimenting to be more effective and have even more fun!
Vim is a Winner! But… Do I Miss PhpStorm?
I hope you are now ready to try Vim, and maybe replace PhpStorm!
Now let be honest with one another:
Yes PhpStorm has some tool that Vim doesn’t. The search plugin I use for example has less options than PhpStorm’s search… but is so faster, you’ve no idea.
In PhpStorm the auto completion was slightly better… in 2017. In 2019, Vim auto completion plugins are as good as any IntelliJ plugin.
You need to spend time configuring Vim to have a powerful PHP IDE.However, it means as well that you can personalize it the way you exactly want it to behave. An IDE should answers your need, not imposing them!
After three weeks using Vim as my PHP IDE, I tried to reinstall PhpStorm. I used it for ten minutes… before coming back to Vim.
I won’t get back to you, PhpStorm. Never. Bartender for wedding near me. I am a faithful man to Vim now.
This section provides the list of solutions and workarounds for common problems with deployments in PhpStorm.
Collecting PhpStorm deployment logs
If your issue is not addressed in this section, contact our support engineers. If asked to provide deployment logs, follow the instructions to collect them.
Select Help | Configure Debug Log in the main menu.
In the Custom Debug Log Configuration dialog that opens, add the following lines depending on the issues you are experiencing:
Issues with deployment/synchronization: #com.jetbrains.plugins.webDeployment
Issues with issues with SSH/SFTP: #com.intellij.ssh
Click OK and reproduce the issue.
Locate the log file by selecting Help | Show Log in Explorer (for Windows and Linux) or Help | Show Log in Finder (for macOS).
If necessary, you can locate the log manually:
Syntax
%HOMEPATH%.<product><version>systemlog
Example
C:UsersJohnS.PhpStorm2021.1systemlog
Syntax
~/Library/Logs/<product><version>
Example
~/Library/Logs/PhpStorm2021.1
Syntax
~/.<product><version>/system/log
Example
~/.PhpStorm2021.1/system/log
The most recent log file is named idea.log; older files names end with a number, that is idea.log.1, idea.log.2, and so on. In most cases you need only the most recent one.
Attach the log file(s) to the issue or forum thread.
General troubleshooting
Deployment is slow or fails
Deployment can be a resource-intensive operation, especially if a project or a deployment server contains lots of directories and files. In the Settings/Preferences dialog Ctrl+Alt+S, navigate to Build, Execution, Deployment and explore the following configuration options, which can speed up deployment:
Exclude directories that are not needed from deployment (for example, images). This can be done from the Deployment: Excluded Paths Tab page.
On the Options page, clear the Overwrite up-to-date files to skip uploading files that don't need to be uploaded.
Depending on the server, switching between active and passive transfer mode in the advanced FTP settings may help. This can be done by toggling Passive mode in the Deployment: Connection Tab for the server.
Limit number of concurrent FTP connections. This can be done by toggling Limit concurrent connections and setting the number of connections (usually 3-5 concurrent connections is OK for any server if you experience problems with a greater number of connections) in the Deployment: Connection Tab for the server.
File transfer becomes unresponsive
This can happen in case PhpStorm tries to resolve an IPv4 host via IPv6. By default, PhpStorm only listens for incoming IPv4 connections. To make sure IPv6 is disabled, check the PhpStorm JVM options:
Select Help | Edit Custom VM Options from the main menu.
In the .vmoptions file that opens, make sure the -Djava.net.preferIPv4Stack=true line is present.
Restart PhpStorm.
Otherwise, to enable IPv6 support, delete the -Djava.net.preferIPv4Stack=true line. In this case, make sure to add the IPv6 entry for your host to the /etc/hosts file.
Download/upload actions are not available
Download/upload actions may not be available because of a missing mapping. If a file or folder that you want to download is not configured in any mapping, PhpStorm will not download it. Mappings can be configured as described in the Map project folders to folders on the server and the URL addresses to access them.
For some actions, a default deployment server needs to be selected on the Deployment page of the Settings/Preferences dialog.
Some folders are not deployed
A common cause for folders not being deployed is when they are explicitly excluded. To solve this, in the Remote host tool window right-click the given folder and select Remove Path From Excluded from the context menu. Once this is done, the folder will be deployed.
This can also be configured from the Deployment page of the Settings/Preferences dialog Ctrl+Alt+S. Open the Excluded Paths tab for the server and remove the excluded path. Note that both the source and the target folders should be checked. Folders can also be excluded by name on the Options page under Exclude items by name.
Sharing deployment configurations between projects
Deployment Servers are configured at the IDE level: they are available for all projects and can be shared between them.
Note that only the name and connection details (specified on the Deployment: Connection Tab tab) are shared between projects: mappings and excluded paths are project-specific and have to be configured separately. Using this approach, connection details have to be entered just once, while mappings and excluded paths can be configured per-project, sharing the connection details. This can be useful when projects share the same deployment server and use the same connection settings. If connection settings are different between projects, they have to be configured for every project separately.
If necessary, you can set a server to be visible in a single project by selecting the Visible only for this project checkbox on the Deployment: Connection Tab.
IDE settings do not allow me to configure mappings
The default new project settings are used to configure the default settings for new projects and do not affect the currently opened projects. To configure settings for the current project, use the Settings/Preferences dialog Ctrl+Alt+S.
Can subfolders within the same folder have different deployment settings? Can a local folder be deployed to multiple locations?
When uploading folders and configuring mappings, note the following:
You can specify mappings for specific folders to different paths on the deployment server. This can be configured on the Deployment: Mappings Tab for the server.
You can exclude specific folders and files from being uploaded/downloaded. This can be configured on the Deployment: Excluded Paths Tab for the server.
You cannot upload the same folder (or subfolders) to different sites at once. A separate deployment configuration needs to be created for each of them and uploaded to each site one by one.
If this is what you want to do, we recommend automating the process with a capable tool. For example, Phing has an FTP task which can be used from PhpStorm. Within PhpStorm, you can use the Sync with Deployed.. command and select from available deployment servers for every upload.
I cannot assign a keyboard shortcut to the Sync With Deployed to My Server menu item
It is not possible to assign a keyboard shortcut directly to the Sync With Deployed to <server name> command, only to the generic Sync with Deployed to.. command, which will then display a popup menu with the list of servers. Refer to Configure keyboard shortcuts for details.
If you do wish to assign a keyboard shortcut to a specific deployment server, it is possible to record a Macro and assign a shortcut to it instead:
Select Edit | Macros | Start Macro Recording and start recording a Macro.
Select Tools | Deployment | Sync With Deployed to <server name> and close the sync window.
Stop recording the Macro by selecting Edit | Macros | Stop Macro Recording from the main menu.
Set the Macro name, for example Sync with <server name>.
Open in the Settings/Preferences dialog Ctrl+Alt+S, select Keymap and find the Macros node. From the context menu of the new sync Macro that was just recorded, select Add keyboard shortcut and provide the desired shortcut .
How do I deploy a database using PhpStorm?
There are a couple of ways to deploy a database using PhpStorm:
Make use of the integrated database tools and run the required DDL and SQL statements manually.
Work with Phing and set up a DBDeploy task.
Can I run a script or executable on my files before the upload occurs?
Things like minifying CSS, optimizing images, encoding PHP files using IonCube and so on are actions that you may want to execute before an upload happens. The best approach to do this is run them not when the upload is started, but when the files are changed, by using File watchers in PhpStorm. When the time comes to upload them to a deployment server, upload the processed files instead.
Note that the Skip external changes checkbox must be cleared on the Options page for this to work.
Sometimes files are not uploaded automatically
By default, PhpStorm uploads the files if they are changed by some external processes (VCS, transpilers, and so on). If the files are not uploaded, make sure that the Upload changed files automatically to the default server on the Options page is set to Always and the Skip external changes checkbox is cleared.
Can I run pre- and post-deployment actions?
It's possible using Run/Debug configurations. You can create a fake Run/Debug Configuration, or a Run/Debug configuration that should be the last step, and add the required steps under Before launch.
As an alternative, we recommend using Phing or any other build system to execute complex sequences of steps.
FTP troubleshooting
FTP issue: Invalid descendent file name 'http:'
When a deployment server has been configured or when using the Test Connection button in the project settings, the Invalid descendent file name 'http:' error is displayed. Note that all file names with a colon : in the name will be considered invalid.
This can happen if a file containing http: Pioneer desserts. in its name exists in the project. The library that PhpStorm uses to connect to FTP (Apache Commons VFS) cannot read the contents of a folder containing such a file, which causes the operation to fail. The only solution is to remove the file containing http: in its name from the project.
PhpStorm seems to connect to the server but can't list files or perform upload
Phpstorm Slow Cooker
This may be because the deployment server requires a so-called passive FTP connection. To set this mode, select the Passive mode checkbox in the Deployment: Connection Tab for the selected server.
Phpstorm Slow Ftp
Limiting the number of concurrent FTP connections may also help in this situation. To do this, open the Deployment: Connection Tab for the selected server, select the Limit concurrent connections checkbox, and set the number of connections (usually, 3-5 concurrent connections is OK for any server if you experience problems with a higher number of connections).
Phpstorm Show Main Menu
Deploying files when changing branches using Git checkout
There are a couple of ways to go about deploying files when switching between branches using Git checkout:
One way is to configure deployments to always upload files and external changes. To do this, on the Options page, set Upload changed files to the default server to Always and clear the Skip external changes checkbox. Note that this will upload all files to the server when switching branches.
Use git-ftp. It performs minimal uploads and is also able to mirror file and directory removals.
Phpstorm Slow Startup
Known issues
Is rsync supported to synchronize files and folders with a deployment server?
No. If you feel this should be part of PhpStorm vote for this issue.
0 notes
Text
Using static data in React
While working on a Gatsby project recently, I found myself in need of a way to import some data into another component to display it. Typically this would be done by making an async call to your database or some external API and then using your component to translate that data to display on the DOM. In 99% of situations this is what you want, so 99% of information on this topic outlines various ways to complete this task.
However, for my particular case this was not what I wanted. The data I have is a fixed, static bit of data that I would store within the application itself, not in a database, not pulled from a third party.
This use case is not common, but should anyone be curious, here is how I accomplished this.
The Problem
I am currently making a personal portfolio site to send to potential employers as I job hunt. One of the most important things in a portfolio of course is examples of your work. Currently I have about 5 projects that I would like to highlight here. The model for this data is relatively simple; each project will have a title, description, GitHub link, an optional link to the live application, an image and an array containing the technologies used to create it.
Since it’s only 5 or so objects I’d need for this, the idea of creating a whole backend to manage this little bit of essentially static data seemed like overkill. What I decided to do instead is manually write some JSON with the data I needed and store it locally in the application, in src/data/data.json.
The Setup
The issue here is exporting JSON and using it in another component. My solution here was to simply use a JavaScript file instead. So now, my data is here.
src/data/data.js
and is structured like so:
export const Data = [ { title: 'project 1', description: 'Lorem ipsum dolor sit amet.', github: 'https://github.com/account/slug', image: 'image1.png', technologies: ['ruby','html', 'css'] }, { title: 'project 2', description: 'Lorem ipsum dolor sit amet.', github: 'https://github.com/account/slug2', image: 'image2.png', technologies: ['react','redux', 'sass'] }, ... ]
The Solution
With my data now structured like this I am free to import and use it in any React component.
This is done by adding import { Data } from 'src/data/data' to the top of the component, and then calling it however your need in the component.
In my application it looks somewhat like this:
const projects = Data.map(project => { return ( // I made a separate component //to handle creating individual //cards for each project ) })
Then, in the return of your component, you simply call {projects} and it should output your data formatted and styled however you like.
Other Uses
This technique can be used for a variety of things. For example, I cam across a library of icons I'd like to use. Rather than hard coding them into the JSX each time I want to use them, I can simply store the icons in src/data/icons.js and then refer to them this way. Formatting this like a JSON object is handy because you can easily store multiple icons with useful names associated with them and simply call on them using dot notation in the JSX.
I personally am using this to add emojis easily throughout my application. I created an component that takes some props to properly format an emoji using its hexadecimal code, and I have a small library that contains the hex code associated with a simple description of that emoji for accessibility (all emoji should have a role="img" attribute as well as an aria-label for screen readers).
Conclusion
This is a relatively straightforward process, but one that I found next to no information on throughout the web. Certainly nothing particularly clear. Using static data like this is not very common, but on a smaller project like mine it makes more sense than creating a whole separate backend, or calling in whole libraries of information when you only need 2-3 bits of data.
0 notes
Text
The User Does Not Have Rsop Data

Ubuntu aax to mp3. Converting Audible.aax Audiobook Files Into.mp3 on Ubuntu. May 15, 2020 Stardate: 73834.4 Tagged as: Ubuntu FFmpeg. I have a bunch of audio-books on Audible.com that I’ve collected in the past year or two. I’ve been meaning to cancel my monthly subscription but I don’t get around to it, which leads to more monthly credits, and then I.
This works well only if that User executing the command has logged-in once at-least in the target computer. Else it throws below error. The user does not have RSOP Data. Method 2: Method 2 is to use Get-GPResultantSetOfPolicy PowerShell command-let which is detailed here. This command also works similar to Method 1 and requires User to login at-least once. The User Does Not Have Rsop Data; Rsop Data Not Available; Rsop Command Line; This is because the user specified has never logged onto the PC before. If you need to gather RSOP data without logging onto a PC, try using the GPMC management console and running the Group Policy Modelling Wizard instead. Group Policy – GPResult Examples. The user “domain user” does not have RSOP data. INFO: The user 'domain userid' does not have RSOP data. When I log on locally or via RDP to this server I can run gpresult. When I log off and rerun the script, the server I have logged on to is succesful, but the other servers I have not yet logged on to are not. I figured this would be caused by a lack of a userprofile on the local.
GPResult is a command-line utility for determining the resultant set of policy for a given user and/or computer. In other words, it shows you what Group Policy Objects have been applied and their settings. This is typically one of the first tools I go to when troubleshooting Group Policy from a client once basic connectivity has been confirmed (e.g. Network/DNS). The tool itself is very simple to use and I will run through some common examples below.
Rsop Windows 10
List GPOs Applied with Summary Data
/r Displays RSOP summary data
This is pretty useful when you simply want to see what GPOs have applied and in what order. It will also display summary data, such as last time group policy was applied, which Domain Controller it was applied from, the site, security groups and if the slow link threshold has been activated. If you are unsure if a GPO has been applied, this is a quick way of checking.
Here we see that 4 GPOs have applied to the Computer settings portion.
Export Rsop Data
If you don’t want to view both Computer and Users settings in the output you can request one or the other with the /scope flag. Rise of nations gold edition full download.
The output reads fairly well from within the command prompt, but if you need to export the output you could use either of the following.
Gpresult /r > gpresult.txt Export output to a text file Gpresult /r |clip Export output to Windows clipboard
I can’t see the Computer Settings?
If UAC is enabled, running GPResult without elevating the command prompt will only show you the user settings. If you want to see both user and computer settings, elevate the command prompt by either tapping the winkey+cmd then ctrl+shift+enter or right click on the command prompt and select run as administrator. If you elevate with an admin account different to the currently logged in user (common if the user does not have administrator rights), then you will receive an error message stating INFO: The user “domainuser” does not have RSOP data. This is because GPResult is using the elevated user’s context. To work around this, specify the standard user that you are troubleshooting.
Generate HTML Report

/h Saves the report in HTML format /f Forces GPresult to overwrite the file name specified with /h /user Specifies the user name for which the RSOP data is to be displayed
To get a more graphical view of what’s going on, you can generate a HTML report. This gives a detailed break down of each setting and the GPO from which it came. This view is particularly nice as you can show all and use ctrl+f to find a particular policy or setting.
Run GPResult on Remote Computer
/s Specifies the remote system to connect to
This allows you to run GPResult on a remote system, all of the above applies.
The following GPOs were not applied because they were filtered out
Sp kinney model a strainer attachment. Model A Automatic Self-Cleaning Strainer S.P. Kinney is most noted for our heavy-duty Model A and Model AP Automatic Self-Cleaning Strainers. The Kinney Model “A” strainer eliminates troublesome disassembly by providing an opening in the side of the strainer body. To inspect the straining media, simply remove the cover and manually rotate the drum. As each row of media passes the inspection opening, easy access to the media is achieved. Kinney is most noted for our heavy-duty Model A and Model AP Automatic Self-Cleaning Strainers. Both models are designed for continuous removal of suspended particles from all types of liquids. The Model A is designed for operation under positive pressure (20 psi or greater). Pipeline sizes range from 2'. Kinney Engineers, Inc. Is a family owned and operated engineering and manufacturing company that is located in Pittsburgh, PA with a satellite manufacturing facility in Richmond, VA. Selwyne Perez Kinney opened the company’s doors in 1941 in Pittsburgh with a focus on manufacturing equipment for the American Steel Industry.

You may see this for a few reasons. The first that the policy is empty in which case you’ll see Filtering: Not Applied (Empty), this is fairly self explanatory. The second is Filtering: Denied (Security), which typically boils down to the “Apply Group Policy” permission on the GPO. You may also see Filtering: Denied (Unknown Reason) Echo j12 cycle computer manual. which is similar to (Security) in that the “Read” permissions has been denied.
To review the last two examples, launch the GPMC (Group Policy Management Console). https://shinydragoncrown.tumblr.com/post/642641332888846336/how-to-create-windows-10-theme-pack. Find the offending GPO, and select Delegation- from there you may see an additional group or a single user or machine that has been added.
Click on advanced and review the permissions against the object. In this case you can see that the Seven computer object has been denied Apply Group Policy resulting in the Filtering: Denied (Security) message.
If in doubt, select Advanced -> Effective Access and enter the required computer or user object. If you scroll down to around halfway you’ll see the Apply Group Policy permission with either a green tick of a red cross against it. If deny read has been granted every permission will have a red cross next to it.
I hope this gives you the basics behind GPResult and some good real world example to aid in your Group Policy troubleshooting.
2007-08-22 12:00:00 UTC
Hello, I have written a little script that checks and reports what group policies have been applied to a number of servers. In short the scripts runs the following command foreach of the servers: gpresult /S <servername> /U <domainuserid /> /P <password> /SCOPE COMPUTER /USER <domainuserid> When I run the script (or gpresult manually) I get the error message: INFO: The user 'domainuserid' does not have RSOP data. When I log on locally or via RDP to this server I can run gpresult. When I log off and rerun the script, the server I have logged on to is succesful, but the other servers I have not yet logged on to are not. I figured this would be caused by a lack of a userprofile on the local computer, so I embeded a psexec -e (the one that creates a profile, not the newest that avoids creating a profile on the remote computer) command in the script to create a userprofile on the remote computer before running gpresult on it. This did however not work, a userprofile directory was created, but that was not adequate for gpresult to work correctly. The only difference with loging on locally or via RDP was that the user did not get its own registrykey under HKEY_USERS. It looks like gpresult wants to check the HKEY_USERS<SID of user> to check for user gpo's applied. Although I only want to check computer policies, the lack of possiblity to check user policies for the user is stopping me. Does anyone know how I can have the userprofile load correctly, including creating the HKEY_USERSusersid key from a commandline (preferably remote)? Is there any other way of getting the same info as gpresult /S <servername> /SCOPE COMPUTER ? Any help would be appreciated, instead of having to log on interactively at all my servers. Greetings, Jos Rossiau
0 notes
Text
Migration from Angular JS to Angular

Stage-1: Choose the Type of Migration Based on Your Requirement
There are 2 types of migration based on your existing application –
Migration From the Scratch
Hybrid Approach
If you want to revamp your application completely, migration from scratch could be a better option. In this approach, you can re-engineer your application, starting from designing to the functionality. But, before you start with the migration, evaluate the resources required such as time, money, and human resource. Generally, this type of migration is more feasible for a small size application in comparison to the larger one.
Hybrid Approach is preferable when you want to migrate your application in an incremental way. In this approach, the new code lives with the old until the migration process is completed, requiring you to take care of the framework and maintenance.
The AngularJS/Angular-hybrid module empowers you to run and maintain the operations of two different frameworks simultaneously in one project. The new features are implemented in the new framework, and the old features are being transferred steadily, without affecting the application performance as a whole.
Stage-2: Preparation
Once you have decided the migration type, start preparing your application for the migration-
1. Set up TypeScript.
2. Abide by AngularJS Style Guide for the Code Structure
3. Using a Module Loader
4. Using Component Directive
It is not mandatory to use TypeScript in Angular, it works well with JavaScript and Dart. If you plan to use TypeScript in your upgraded application, it is recommended to bring in the TypeScript compiler before you start the up-gradation process. You can use the TypeScript features in Angular JS as well, this way you will be TypeScript ready.
Being a superset of ECMAScript 2015, switching to TypeScript only requires you to do the following preparations-
Install the TypeScript compiler.
Rename files from *.js to *.ts.
TypeScript imports/ exports can be used in the applications using module loaders, to arrange the code into modules.
Type annotations should be added to the existing functions and variables.
The JavaScript features that are new to ES2015, should also be gradually added to make the code more comprehensible and functional.
You can convert the services and controllers into classes.
Angular is an upgraded version of AngularJS, hence their goals are the same, empowering you to follow the same AngularJS Style Guide for your Angular app as well. AngularJS Style Guide helps you to create cleaner, as well as highly maintainable AngularJS applications, which is also more closely Angular aligned.
Following rules can make the up-gradation much easier-
One Component per File
Folders-by-Feature Structure and Modularity
These rules make it easier to navigate, find as well as migrate the component/ modules in a cleaner and easier way. Hence, it is the most recommended part of the preparation.
Before you break down the application code as per the rules of the AngularJS style guide, make sure you have a module loader. Though breaking down the code into modules/ component files makes the code more manageable, loading all these files to the HTML page with script tags and that too in a specific order is a bit challenging task. Module Loader helps you with this, maintaining and loading the code in the correct order.
To build the UI of an Angular application, you need components. For AngularJS, this can be done through component directives. In both cases the templates, controllers as well as the I/O bindings are defined by their respective frameworks, making it easier to migrate.
To make the component directives compatible with Angular, make sure you configure these attributes to the directives:
restrict: ‘E’.
scope: {}
bindToController: {}.
controller and controllerAs.
template or templateUrl.
transclude: true/{}
require
Do not use the attributes like compile, replace, priority as well as terminal as these are not supported by Angular
Stage-3: Migration to Angular
If you are writing your application from scratch to upgrade it to angular then the process is comparatively easier than that in the case of a hybrid approach. In this approach, you need to manage both the code simultaneously during the migration process. Angular provides a very useful library for the same called the ngUpgrade library.
It empowers you to mix and match components of both Angular JS and Angular in the application. Also with the help of the ngUpgrade library, these components can interoperate with each other seamlessly making the migration super smooth and easier.
The ngUpgrade library provides you with a very powerful tool called the UpgradeModule that helps you throughout the migration process. This module consists of the utilities for bootstrapping as well as managing hybrid applications, thereby supporting both Angular and AngularJS code.
ngUpgrade library empowers you to execute the code simultaneously enabling the services and components of one framework to interoperate with the services and components managed by the other framework. This takes place in three major areas-
1. Dependency Injection
2. The DOM
3. Change Detection
Both Angular and AngularJS function a bit differently in various aspects and this holds for dependency injection as well. AngularJS always has only one dependency injection which is always of String type. On the other hand, Angular has a hierarchy of dependency injection which can vary in its type. Despite the differences upgrade/static makes them work seamlessly together in 2 ways-
Upgrade the Angular JS services to avail them for injection to Angular code.
Downgrade the Angular service for injection to Angular JS code.
The DOM of a hybrid application consists of the components and directives of both Angular and AngularJS. The point to consider here is that among all the available elements i.e. components and directives present in the DOM, a framework only treats the elements that are owned by them, else it ignores it.
In the case of upgrading the AngularJS application to Angular, the hybrid application starts as the AngularJS application. Whenever an Angular component is encountered in the AngularJS template, Angular takes control and manages it.
To interleave the frameworks, you can cross the boundary either by using the other framework components or by projecting or transcluding the contents from the other framework.
In Angular JS the change detection and data binding updates are done by the function called scope.$apply(). Whenever an event occurs this function is called either by the framework itself or manually by you after which the updates are made.
Angular takes it differently, executing the code in the angular zone. As soon as the code finishes, Angular automatically detects changes and makes the update. Unlike AngularJS you need not call any functions like scope.$apply(). If the function is already present in the code, no need to remove it, it won’t affect the code anyways.
Steps of Migration-
Switch to Typescript
Install the Angular and ngUpgrade Library
Import UpgradeModule in the NgModule for bootstrapping
Bootstrap the hybrid (AngularJS and Angular) application, for which you need to bootstrap each part of the application be it Angular or AngularJS.
Note: In the hybrid application, bootstrapping has to be done manually with the UpgradeModule unlike the pure AngularJS applications, in which bootstrapping can be done automatically just by adding an ng-app directive in the HTML page. Hence, it is advised that before you switch your application to hybrid mode, switch it to AngularJS, so that you can use the angular.bootstrap method for bootstrapping.
As we have discussed, there are two ways in which you can carry the migration process- Upgrade and Downgrade. We will consider both ways in the steps ahead.
Upgrade your Code
Upgrade– Now that you are running a hybrid app, start upgrading your code. If you want you can upgrade the AngularJS component directives and access it from the Angular code.
Downgrade- Use the Angular component into the AngularJS code. For this, you can downgrade the component by using downgradeComponent() method. You can rewrite the AngularJS components into the Angular components or you can also add a new Angular component as well.
Project/ Transclude
Upgrade- If you want to upgrade the AngularJS component, you can transclude the Angular content in it, by marking the transclusion point through the ng-transclude directive.
Downgrade: In case you are downgrading the Angular component, to transclude the AngularJS content into the Angular component, you can use the feature called content projection instead of transclusion feature. To make the component support the content projection, use the tag in it. Inject the Dependencies
Upgrade- To include some essential logic, which you cannot change, you need to inject it in your code. To make the AngularJS dependencies injectable into Angular, you can request for the service from AngularJS $injector.
Downgrade- To inject the Angular code into the AngularJS, you can downgrade the Angular dependencies and use them from AngularJS. For this, you need to import the ‘downgradeInjectable’ function from ‘upgrade/static’.
Gradually, you will be able to upgrade your AngularJS application to Angular. Once you’ve upgraded all the AngularJS application components with the Angular ones, make sure you also upgrade the routing process as well by adding the Angular router. And lastly, the testing process, test your final Angular application for its performance and accuracy. Source: https://www.aceinfoway.com/blog/angularjs-to-angular-migration
0 notes
Text
Spot Light On GSA SER manual
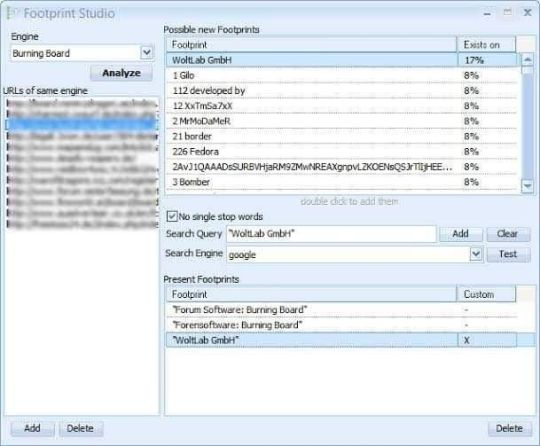
Table of ContentsLearn How To Use GSA Search Engine Ranker How to Export Content for GSA SER How To Build Backlinks With GSA Search Engine Ranker GSA Search Engine Ranker Tool And Review – AVS How to use GSA Search Engine Ranker correctely
Set the HTML timeout to 120 seconds to make certain GSA SER manages to register accounts on more complex sites. Use proxies for online search engine always. Use proxies for submission as well. Tick the option to stop tasks on no active proxies and after that to restart projects on active proxies.
They will be resurrected not long after. Imitate GSA Captcha Breaker as some other captcha resolving service, for example AntiGate, and connect it to GSA SER that method. Usage ReverseProxies OCR as a 2nd captcha resolving service. Include it through GSA Captcha breaker's menu. Gsa search engine ranker video tutorials. This will fix hard captchas such as ReCaptcha.
Uncheck the option so you can stop getting all the captcha windows to popup. Uncheck the option. A 3rd party indexation service is useful, however not necessary. We do not use any. We simply enable the lower tiers to serve as indexers for the upper tiers' backlinks. Uncheck the choice.
Save only the website lists to increase the efficiency of GSA SER and besides, these are the lists you in fact need in order to run this software more effectively. Examine the choice if you will be utilizing a lot of PR filters on your tasks. Backup your website notes regularly, just in case.
How to Use GSA SER with Proxies for Maximum Results
Use and every day. Use whenever you start seeing method a lot of and messages in the GSA Search Engine Ranker log. Tick the checkbox to ensure that SER is not attempting to send backlinks when your device has no access to the Web. Usage SERengines to develop some actually good Web 2.
Make usage of GSA Online search engine Ranker's Scheduler to run just a certain quantity of projects at a time. Helpful if you do not have the capacity to run numerous projects on your SER circumstances i. e. not adequate proxies, not enough RAM, weak CPU, etc. Always take a look at the version history after an update to see what's altered and what's new worldwide of this GSA SEO tool.
It's well worth it. Group your jobs into project groups for a much easier navigation through GSA SER. Come up with a great and smart calling convention for both your projects and your task groups. Set the top priority of all of your tasks to begin at the most affordable so that you can quickly provide more attention to delayed tasks in the future.
Erase Target URL History so that the job can begin getting target URLs from the top of the site lists. GSA SER video tutorials. Take care not to erase your account information. We will take a look at Tier 1, Tier 2, and Tier 3+ ideal configurations for your GSA SER jobs. Short article, Directory Site, Social Bookmark, Social Media, SEREngines posts and profiles, and Wikis.
7 Tier GSA Search Engine Ranker - Overview
youtube
1% exact match, 4% partial match and LSI, 50% branding, 25% generic, 20% naked URLs. If you will be running the Tier 1 towards a parasite site i. e. YouTube, you can just move the 50% from branding to the partial match and LSI anchors. backlinks at random places, 0 2 authority URLs, 0 2 images or 0 1 videos.

How to Use GSA SER with Proxies for Maximum Results
Post, Online Forum, Image Comment, Microblog, Social Bookmark, Social Media, Wikis, SEREngines posts and profiles (optional). 5% exact match, 25% LSI, 40% generic, 30% naked URLs. backlinks at random locations with 33% utilizing the option, 0 1 authority URLs, 1 3 images or 1 2 videos (GSA Search Engine Ranker help). No limit on the PR, let the link structure monster toss some link juice down to the Tier 1 backlinks.
Get Kick-ass GSA Search Engine Ranker Help at - Asia Virtual Solutions
30% specific match, 70% LSI. Create the material for your GSA SER tasks utilizing Kontent Device and its pre-defined Tier 1, Tier 2, and Tier 3+ templates. Combining it with WordAI's effective spinning homes and occasionally blending it up with Spin Rewriter, gives you the material you will require.
If you got the time, you can likewise include a manual touch to make it even better. Check the alternative and likewise add a few exceptions in the location, for instance,, and so on. Depending upon the age of the website, set up the amount of backlinks permitted to be produced each day.
Understand GSA Search Engine Ranker video tutorials
e. the upper Tier they point at. No point in linking to Social Bookmarks and other nofollow platforms. Yes, they benefit indexation and social evidence, however not a lot for link juice (at this point in the space-time continuum). Inspect the checkbox from the tab to make sure there is randomness in the backlinks developed towards your client URLs.
Usage for the alternative. setting need to be examined The setting needs to be set to. We do not utilize online search engine to scrape target URLs, so uncheck all online search engine by default, 8 are chosen. Just use site lists as sources of target URLs of your project. This will skyrocket your VpM and the total efficiency of GSA SER.
GSA Search Engine Ranker Tutorial - from Asia Virtual Solutions
We never ever utilize set up posts, just special domains. Only when it comes to producing Tier 1 jobs with SEREngines posts and profiles exclusively. Only then do we permit arranged posting. Examine all types of backlinks to produce. Inspect the option and set it to a minimum of 900 seconds. Use Yahoo emails.
Constantly check your job prior to you start it to make certain all is great. Do not select the Web 2. GSA SER manual. 0 engine type ever, due to the fact that it is not supported any longer. Use SEREngines rather (GSA Search Engine Ranker Training). This was the answer I received from the SEREngines support when I inquired why I had a lot of error messages in my log for my Web 2.
GSA search engine ranker license key
You can check the example link pyramids we have come up with, that are optimized for GSA SER by going to our Providers page. Another extremely essential thing you must do is go to the folder inside your GSA Search Engine Ranker installation folder, and modify the following. dat files (these are default texts which GSA SER will utilize if you do not clearly specify your own content for your projects): about_yourself.
dat remarks. dat comments_forum. information comments_guestbook. dat comments_guestbook_german. dat comments_image. dat Produce your own extremely spun content and change the one currently existing inside of these files. Beware due to the fact that in a few of them, there are macros used, so initially, take a look at this and ended up being aware of the approach GSA SER usages by default, and only then exchange them with your own material.
Change these on a weekly or regular monthly basis to leave no footprints on online search engine. GSA Search Engine Ranker Reviews. This is exceptionally crucial otherwise you risk leaving material the exact same as thousands of other unaware GSA SER users, which will one day come back and bite you on the ass. Not the other SER users, but the effects.
First of all, I want you to understand that if you truly do not have the time to construct your own lists and filter them the proper way, you will have to take benefit of the services of some GSA SER website lists supplier check out this case study of the top 4 GSA SER site lists service providers which will help you make a notified decision or take a look at our site lists - GSA Search Engine Ranker Help.
0 notes
Text
GSA Search Engine Ranker: Learn To Rank Sites
GSA SER tutorial
Table of ContentsReview of GSA Search Engine Ranker and Step by Step Tutorial Learn How To Use GSA Search Engine Ranker GSA Search Engine Ranker Youtube - How to How to use GSA Search Engine Ranker correctely GSA Search Engine Ranker Review - Best link Building Tool Help
Set the HTML timeout to 120 seconds to ensure GSA SER manages to register accounts on more complex websites. Usage proxies for search engines constantly. Use proxies for submission as well. Tick the alternative to stop projects on no active proxies and after that to restart projects on active proxies.
They will be resurrected not long after. Imitate GSA Captcha Breaker as some other captcha solving service, for instance AntiGate, and connect it to GSA SER that way. Use ReverseProxies OCR as a second captcha fixing service. Include it through GSA Captcha breaker's menu. go to this web-site. This will solve hard captchas such as ReCaptcha.
Uncheck the alternative so you can stop getting all the captcha windows to popup. Uncheck the option. A 3rd party indexation service is beneficial, but not obligatory. We do not use any. We simply allow the lower tiers to serve as indexers for the upper tiers' backlinks. Uncheck the choice.
Conserve only the site notes to increase the performance of GSA SER and besides, these are the lists you really need in order to run this software application more effectively. Inspect the alternative if you will be using a lot of PR filters on your tasks. Backup your website lists routinely, just in case.
Tutorial for GSA Search Engine Ranker
Usage and every day. Use whenever you begin seeing way too many and messages in the GSA Search Engine Ranker log. Tick the checkbox to make certain that SER is not trying to send backlinks when your device has no access to the Internet. Usage SERengines to create some really nice Web 2.
Utilize GSA Search Engine Ranker's Scheduler to run only a particular quantity of tasks at a time. Helpful if you do not have the capability to run many tasks on your SER instance i. e. not enough proxies, inadequate RAM, weak CPU, etc. Constantly check out the version history after an update to see what's altered and what's new on the planet of this GSA SEO tool.
It's well worth it. Group your projects into task groups for a a lot easier navigation through GSA SER. Develop a great and clever calling convention for both your jobs and your task groups. Set the priority of all of your tasks to start at the most affordable so that you can easily provide more attention to delayed projects later on.
Erase Target URL History so that the project can start getting target URLs from the top of the site lists. GSA Search Engine Ranker training. Take care not to erase your account information. We will look at Tier 1, Tier 2, and Tier 3+ optimum setups for your GSA SER jobs. Short article, Directory, Social Bookmark, Social Media Network, SEREngines posts and profiles, and Wikis.
GSA software verified lists - How to configure
youtube
1% specific match, 4% partial match and LSI, 50% branding, 25% generic, 20% naked URLs. If you will be running the Tier 1 towards a parasite website i. e. YouTube, you can merely move the 50% from branding to the partial match and LSI anchors. backlinks at random places, 0 2 authority URLs, 0 2 images or 0 1 videos.

GSA Search Engine Ranker Ultimate Tutorial Guide
Post, Forum, Image Comment, Microblog, Social Bookmark, Social Media Network, Wikis, SEREngines posts and profiles (optional). 5% exact match, 25% LSI, 40% generic, 30% naked URLs. backlinks at random areas with 33% utilizing the choice, 0 1 authority URLs, 1 3 images or 1 2 videos (GSA SER training). No limitation on the PR, let the link structure monster toss some link juice down to the Tier 1 backlinks.
Get Kick-ass GSA Search Engine Ranker Help at - Asia Virtual Solutions
30% precise match, 70% LSI. Create the content for your GSA SER projects utilizing Kontent Maker and its pre-defined Tier 1, Tier 2, and Tier 3+ templates. Integrating it with WordAI's powerful spinning residential or commercial properties and occasionally blending it up with Spin Rewriter, provides you the material you will require.
If you got the time, you can also include a manual touch to make it even much better. Inspect the choice and likewise include a few exceptions in the area, for example,, and so on. Depending upon the age of the website, set up the amount of backlinks allowed to be developed each day.
GSA software verified lists set up guide
e. the upper Tier they point at. No point in linking to Social Bookmarks and other nofollow platforms. Yes, they are great for indexation and social proof, but not so much for link juice (at this point in the space-time continuum). Check the checkbox from the tab to ensure there is randomness in the backlinks developed towards your client URLs.
Use for the alternative. setting must be examined The setting should be set to. We do not utilize online search engine to scrape target URLs, so uncheck all online search engine by default, 8 are chosen. Just usage website lists as sources of target URLs of your project. This will skyrocket your VpM and the total efficiency of GSA SER.

How to Export Content for GSA SER
We never use set up posts, just special domains. Only in the case of developing Tier 1 projects with SEREngines posts and profiles exclusively. Only then do we enable arranged publishing. Check all types of backlinks to develop. Examine the alternative and set it to at least 900 seconds. Use Yahoo emails.

Constantly test your job before you start it to ensure all is great. Do not choose the Web 2. GSA SER reviews. 0 engine type ever, due to the fact that it is not supported anymore. Usage SEREngines rather (GSA Search Engine Ranker reviews). This was the response I received from the SEREngines support when I asked why I had numerous error messages in my log for my Web 2.
Understanding GSA Search Engine Ranker training
You can examine the example link pyramids we have created, that are optimized for GSA SER by going to our Solutions page. Another really important thing you should do is go to the folder inside your GSA Search Engine Ranker setup folder, and edit the following. dat files (these are default texts which GSA SER will use if you do not clearly specify your own content for your tasks): about_yourself.
dat comments. dat comments_forum. data comments_guestbook. dat comments_guestbook_german. dat comments_image. dat Generate your own highly spun material and change the one already existing within these files. Beware because in a few of them, there are macros utilized, so first, have a look at this and become mindful of the method GSA SER uses by default, and just then exchange them with your own material.
Change these on a weekly or month-to-month basis to leave no footprints on online search engine. gsa Ser manual. This is very important otherwise you risk leaving content the like countless other uninformed GSA SER users, which will one day come back and bite you on the ass. Not the other SER users, but the repercussions.
To start with, I desire you to know that if you truly don't have the time to develop your own lists and filter them the ideal method, you will have to make the most of the services of some GSA SER site lists supplier check out this case research study of the leading 4 GSA SER website lists service providers which will help you make an informed choice or take an appearance at our website lists - GSA SER Tutorial.
0 notes
Text
Should I buy GSA search engine ranker? Reviews
Table of ContentsIndexing and Linking with GSA Search Engine Ranker GSA Search Engine Ranker Review & Step By Step Tutorial How to Export Content for GSA SER GSA Search Engine Ranker Guides - SER Verified Lists GSA Search Engine Ranker: Learn To Rank Sites
Set the HTML timeout to 120 seconds to ensure GSA SER manages to register accounts on more complex websites. Use proxies for search engines constantly. Usage proxies for submission as well. Tick the option to stop projects on no active proxies and then to restart projects on active proxies.
They will be reanimated not long after. Replicate GSA Captcha Breaker as some other captcha solving service, for example AntiGate, and link it to GSA SER that way. Use ReverseProxies OCR as a 2nd captcha solving service. Include it through GSA Captcha breaker's menu. visit this link. This will fix difficult captchas such as ReCaptcha.
Uncheck the option so you can stop getting all the captcha windows to popup. Uncheck the alternative. A 3rd party indexation service works, however not mandatory. We do not use any. We merely permit the lower tiers to function as indexers for the upper tiers' backlinks. Uncheck the choice.
Conserve just the website notes to increase the performance of GSA SER and besides, these are the lists you in fact require in order to run this software more efficiently. Examine the alternative if you will be utilizing a lot of PR filters on your tasks. Backup your site lists regularly, just in case.
GSA Search Engine Ranking – Tutorials - For Free
Usage and every day. Usage whenever you begin seeing way too many and messages in the GSA Online search engine Ranker log. Tick the checkbox to make certain that SER is not attempting to send backlinks when your maker has no access to the Internet. Usage SERengines to develop some actually good Web 2.
Utilize GSA Online search engine Ranker's Scheduler to run only a particular quantity of jobs at a time. Beneficial if you do not have the capability to run numerous tasks on your SER instance i. e. not sufficient proxies, not enough RAM, weak CPU, etc. Always take a look at the variation history after an update to see what's altered and what's brand-new in the world of this GSA SEO tool.
It's well worth it. Group your jobs into project groups for a a lot easier navigation through GSA SER. Come up with a great and smart naming convention for both your tasks and your task groups. Set the top priority of all of your projects to begin at the most affordable so that you can easily give more attention to lagging jobs in the future.
Erase Target URL History so that the job can start getting target URLs from the top of the site lists. GSA SER tutorials. Take care not to delete your account information. We will look at Tier 1, Tier 2, and Tier 3+ ideal configurations for your GSA SER projects. Post, Directory, Social Bookmark, Social Media Network, SEREngines posts and profiles, and Wikis.
GSA Search Engine Ranker Ultimate Tutorial & Genuine Review
youtube
1% precise match, 4% partial match and LSI, 50% branding, 25% generic, 20% naked URLs. If you will be running the Tier 1 towards a parasite website i. e. YouTube, you can just move the 50% from branding to the partial match and LSI anchors. backlinks at random locations, 0 2 authority URLs, 0 2 images or 0 1 videos.

GSA Search Engine Ranker Tool And Review – AVS
Short article, Forum, Image Comment, Microblog, Social Bookmark, Social Media, Wikis, SEREngines posts and profiles (optional). 5% exact match, 25% LSI, 40% generic, 30% naked URLs. backlinks at random areas with 33% utilizing the alternative, 0 1 authority URLs, 1 3 images or 1 2 videos (GSA SER training). No limitation on the PR, let the link building beast toss some link juice to the Tier 1 backlinks.
Get Kick-ass GSA Search Engine Ranker Help at - Asia Virtual Solutions
30% specific match, 70% LSI. Create the material for your GSA SER jobs utilizing Kontent Maker and its pre-defined Tier 1, Tier 2, and Tier 3+ templates. Integrating it with WordAI's effective spinning residential or commercial properties and here and there blending it up with Spin Rewriter, gives you the content you will require.
If you got the time, you can likewise add a manual touch to make it even much better. Check the alternative and likewise add a few exceptions in the location, for example,, and so on. Depending on the age of the site, set up the quantity of backlinks allowed to be developed each day.
Review of GSA Search Engine Ranker and Step by Step Tutorial
e. the upper Tier they point at. No point in connecting to Social Bookmarks and other nofollow platforms. Yes, they benefit indexation and social proof, but not a lot for link juice (at this moment in the space-time continuum). Examine the checkbox from the tab to make sure there is randomness in the backlinks developed towards your client URLs.
Use for the choice. setting need to be examined The setting must be set to. We do not utilize online search engine to scrape target URLs, so uncheck all search engines by default, 8 are picked. Just use site lists as sources of target URLs of your project. This will increase your VpM and the overall efficiency of GSA SER.

Exclusive GSA SER reviews
We never ever utilize arranged posts, just unique domains. Just when it comes to developing Tier 1 projects with SEREngines posts and profiles solely. Just then do we allow scheduled publishing. Inspect all kinds of backlinks to create. Check the choice and set it to a minimum of 900 seconds. Usage Yahoo e-mails.

Always test your project prior to you begin it to ensure all is great. Do not select the Web 2. GSA SER manual. 0 engine type ever, since it is not supported anymore. Usage SEREngines rather (gsa Search engine ranker training). This was the answer I obtained from the SEREngines support when I inquired why I had many mistake messages in my log for my Web 2.
How To Build Backlinks With GSA Search Engine Ranker
You can check the example link pyramids we have actually created, that are optimized for GSA SER by going to our Providers page. Another really essential thing you ought to do is go to the folder inside your GSA Online Search Engine Ranker installation folder, and modify the following. dat files (these are default texts which GSA SER will use if you do not explicitly define your own content for your projects): about_yourself.
dat comments. dat comments_forum. information comments_guestbook. dat comments_guestbook_german. dat comments_image. dat Generate your own highly spun content and change the one already existing within these files. Take care since in some of them, there are macros utilized, so initially, take a look at this and ended up being aware of the approach GSA SER uses by default, and just then exchange them with your own content.
Change these on a weekly or regular monthly basis to leave no footprints on online search engine. GSA Search Engine Ranker video Tutorials. This is extremely essential otherwise you risk leaving content the like countless other uninformed GSA SER users, which will one day come back and bite you on the ass. Not the other SER users, however the effects.
First of all, I desire you to know that if you truly don't have the time to construct your own lists and filter them the right way, you will need to take advantage of the services of some GSA SER website lists supplier check out this case study of the top 4 GSA SER website lists companies which will assist you make a notified decision or have a look at our site lists - GSA Search Engine Ranker Training.
0 notes
Text
How to Use Github Actions to Deploy a Next.js Website to AWS S3
The beauty of Next.js and static web apps is that they let you run the project pretty much anywhere using object storage, like on AWS S3. But it can be a pain to manually update those files each time.
How can we use GitHub Actions to automate and continuously deploy our app to S3?
youtube
What are GitHub Actions?
GitHub Actions is a free service from GitHub that allows us to automate code tasks.
I previously wrote about how we can use them to automate tasks like running tests on our code and sending notifications to Slack.
They provide a flexible way to automatically run code based on our existing workflows. This provides a lot of possibilities like even deploying our website!
What is AWS S3?
S3 (Simple Storage Service) is an object storage service from AWS. It allows you to store files in the cloud easily making them available around the world.
It also allows you to use these files as a website. Because we can upload an HTML file as an object, we can also configure S3 to access that file as an HTTP request. This means that we can host an entire website right in S3.
What is Continuous Deployment?
Continuous Deployment, often referred to by its acronym CD, is the practice of maintaining code in a releasable state and deploying that code automatically or in short cycles.
Particularly in our use case, we’re going to configure our project so that any time a new update is pushed or merged to the primary Git branch, our website will deploy.
What are we going to build?
We’re first going to bootstrap a simple Next.js app using the default Next.js starting template and configure it to compile to static files.
If you don’t want to create a Next.js project, you can follow along with even a simple HTML file and not run any of the build commands. But Next.js is a modern way to build dynamic web apps, so we’ll start there.
With our website files ready to go, we’ll create and configure an S3 bucket in AWS where we’ll host our website.
Finally, we’ll create a new GitHub Action workflow that will automatically update the website files in S3 any time a new change occurs on our primary branch (main).
Step 0: Setting up a new Next.js project on GitHub
We’re going to get started with the default template with Next.js.
After navigating to the directory you want to create your project in, run:
yarn create next-app my-static-website # or npx create-next-app my-static-website
Note: Feel free to replace my-static-website with the name of your choice. We’ll use that for the rest of this tutorial.
If you navigate to that directory and run the development command, you should be able to successfully start up your development server.
cd my-static-website yarn dev # or npm run dev

New Next.js App
Next, let’s configure our project to statically compile.
Inside the package.json file, update the build script to:
"build": "next build && next export",
What this will do is tell Next to take the website and export it to static files, which we’ll use to host the site.
We can test this out by running the command:
yarn build # or npm run build
And once finished, we can look inside of the out directory and see all of the files of our new website.

Static output from Next.js
Finally, we want to host this on GitHub.
Inside of your GitHub account, create a new repository. This will then provide instructions on how you can add an existing project to that repo.
And once you push our your project to GitHub, we should be ready to set up our new website project!

New repo in GitHub
Follow along with the commits:
Step 1: Manually creating and deploying a Next.js project to a new S3 Bucket
To get started with our new S3 Bucket, first log in to your AWS account and navigate to the S3 service.

No buckets in S3
We’ll want to create a new bucket, using the name of our choice, which will be used for the S3 endpoint where our website is hosted. We’ll also want to configure our S3 bucket to be able to host a website.
Note: this tutorial will not walk you through how to host a website on S3, but you can check out my other tutorial that will walk you through hosting a website on S3 step-by-step.

Static website hosting in AWS S3
Once we have our S3 bucket configure as a website, we can go back to our Next.js project folder, run our build command, and then upload all of our files from the out directory into our new S3 bucket.

S3 Bucket with Static App
And once those files are uploaded and we’ve configured our S3 bucket for website hosting, we should now be able to see our project live on the web!

AWS S3 hosted Next.js app
Step 2: Creating a new GitHub Action workflow to automatically build a Next.js project
To get started, we’re going to need to create a new workflow.
If you’re familiar with GitHub Actions, you could create one manually, but we’ll quickly walk through how to do this in the UI.
Navigate to the Actions tab of your GitHub repository and click on "set up a workflow yourself."

New GitHub Action Workflow
GitHub provides a starting template that we can use for our workflow, though we’ll want to make some changes.
Let’s do the following:
Optional: rename the file to deploy.yml
Optional: rename the workflow to CD (as it’s a bit different from CI)
Optional: remove all of the comments to make it a bit easier to read
Remove the pull_request definition in the on property
Remove all steps except for uses: actions/checkout@v2
So at this point we should be left with:
name: CD on: push: branches: [ main ] jobs: build: runs-on: ubuntu-latest steps: - uses: actions/checkout@v2
This code alone will trigger a process that spins up a new instance of Ubuntu and simply checks out the code from GitHub any time there’s a new change pushed to the main branch.
Next, once we have our code checked out, we want to build it. This will allow us to take that output and sync it to S3.
This step will differ slightly depending on if you are using yarn or npm for your project.
If you’re using yarn, under the steps definition, add the following:
- uses: actions/setup-node@v1 with: node-version: 12 - run: npm install -g yarn - run: yarn install --frozen-lockfile - run: yarn build
If you’re using npm, add the following:
- uses: actions/setup-node@v1 with: node-version: 12 - run: npm ci - run: npm run build
Between both of these sets of steps, what we’re doing is:
Setting up node: this is so that we can use npm and node to install and run our scripts
Install Yarn (Yarn Only): if we’re using yarn, we install it as a global dependency so that we can use it
Install Dependencies: we install our dependencies and we use a specific command that makes sure we use the lock file available to avoid any unexpected package upgrades
Build: finally, we run our build command which will compile our Next.js project into the out directory!
And now we can commit that file right to our main branch which will kick off a new run of our workflow that we can see in our Actions tab.

New workflow in GitHub Actions
To see that it works, we can navigate into that run, select our workflow, and see that all of our steps ran including building our project!

Successful build logs for a GitHub Action workflow
Follow along with the commit!
Step 3: Configuring a GitHub Action to deploy a static website to S3
Now that we’re building our project automatically, we want to automatically update our website in S3.
To do that, we’re going to use the GitHub Action aws-actions/configure-aws-credentials and the AWS CLI.
The GitHub Action that we’re using will take in our AWS credentials and configuration and make it available to use throughout the lifecycle of the workflow.
As of now, the Ubuntu instance that GitHub Actions provides allows us to use the AWS CLI as it comes included. So we’ll be able to use the CLI commands right in our workflow.
Alternatively, we could use the S3 Sync action. But by using the AWS CLI, we gain more flexibility to customize our setup, we can use it for additional CLI commands, and it’s also generally nice to get familiar with the AWS CLI.
So to get started, let’s add the following snippet as additional steps in our workflow:
- uses: aws-actions/configure-aws-credentials@v1 with: aws-access-key-id: $ aws-secret-access-key: $ aws-region: us-east-1
What the above will do is use the AWS credentials configuration action to set up our AWS Access Key, Secret Key, and region based on our settings.
The AWS Region can be customized to whatever region you typically use with your AWS account. I’m in the northeast United States, So I’ll keep us-east-1.
The Access Key and Secret Key are credentials that you’ll need to generate with your AWS account. The way our code is set up is that we’ll store those values inside of GitHub Secrets, which will prevent those keys from being leaked. When the action runs, Github changes those values to stars (***) so people can't access those keys.
So to set up those secrets, we first want to generate Access Keys in AWS.
Navigate to the AWS console. Under the user menu, select My Security Credentials, and then select Create access key.

Creating an Access Key in AWS
This will provide you with two values: the Access key ID and the Secret access key. Save these values, as you won’t be able to access the Secret key ID again.

Finding Secret and Access Key in AWS
Note: remember to NOT include the Access Key and Secret Key inside of your code. This could lead to someone compromising your AWS credentials.
Next, inside of the GitHub repo, navigate to Settings, Secrets, then select New secret.
Here we’ll want to add our AWS keys using the following secrets:
AWS_ACCESS_KEY_ID: your AWS Access key ID
AWS_SECRET_ACCESS_KEY: your AWS Secret key
And once saved you should have your two new secrets.

Creating Secrets in GitHub
Now that we have our credentials configured, we should be ready to run the command to sync our project to S3.
Inside of the GitHub Action, add the following step:
- run: aws s3 sync ./out s3://[bucket-name]
Note: be sure to replace [bucket-name] with the name of your S3 Bucket.
This command will trigger a sync with our specified S3 bucket, using the contents of the out directory, which is where our project builds to.
And now, if we commit our changes, we can see that our action is automatically triggered once committed to the main branch, where we build our project and sync it to S3!
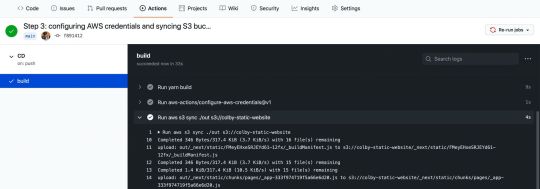
Successful AWS S3 sync in GitHub Action workflow
Note: Make sure that before setting up this action you’ve configured the S3 bucket to host a website (including unblocking permissions on S3 bucket) – otherwise this action may fail.
At this point, our project probably looks the same, as we didn’t make any changes to the code.
Next.js app on AWS S3
But if you make a code change, such as changing the title of the homepage inside of pages/index.js and commit that change:
<h1 className={styles.title}> Colby's <a href="https://nextjs.org">Next.js!</a> Site </h1>
We can see that our change triggers the workflow to kick off:

New GitHub Action workflow from code change
And once our workflow finishes, we can see that our content is now automatically updated on our website:

AWS S3 hosted app with updated code changes
Follow along with the commits:
What else can we do?
Setting up CloudFront
The goal of this post wasn’t to go through the entire process of configuring a website for AWS, but if you’re serving a website on S3, you might want to also include CloudFront in front of it.
You can check out my other guide here which walks you through setting up CloudFront as well as a step-by-step guide through creating the site in S3.
Invaliding CloudFront cache
If your S3 website is behind CloudFront, chances are, you’ll want to make sure CloudFront isn’t caching the new changes.
With the AWS CLI, we can also trigger a cache invalidation with CloudFront to make sure it’s grabbing the latest changes.
Check out the docs here to learn more.
Pull request deployments
If you’re constantly working on website changes in a pull request, sometimes it can be easier to see the changes live.
You can set up a new workflow that only runs on pull requests, where the workflow can dynamically create a new bucket based on the branch or environment and add a comment to the pull request with that URL.
You might be able to find a GitHub Action that exists to manage the comments on the pull request for you or you can check out the GitHub Actions docs.
0 notes
Text
Tutorial for GSA Search Engine Ranker
How to Export Content for GSA SER
Table of ContentsGSA Search Engine Ranker Youtube - How to GSA Search Engine Ranker Tutorial - Free information Special GSA SER video tutorials Incredible GSA Search Engine Ranker reviews GSA software verified lists set up guide
No, no. We are really using GSA Captcha Breaker which is replicating AntiGate. If you want to know why we are doing it like this, take a look at our GSA Captcha Breaker Ultimate Tutorial, but simply put, it is more effective that way. Let's look at the buttons on the right-hand side of the table: This will enable you to add a new captcha fixing service.

GSA Search Engine Ranker Youtube - How Too
com 9kw. eu slow AntiGate AntiGate API with IP Finest DeCaptcha Beat Captchas Bolo API Bypass Captcha Captcha 24 Captcha Bot Captcha Infinity obsoleted Captcha Sniper Captcha Trader Captcha Tronix Captcha X CheapCaptcha Death by Captcha DeCaptcher DeCaptcher API with IP Eve specializes in ReCaptcha OCR Expert Decoders HiCaptcha Image Typerz Image Decoders Mega OCR unsteady and sluggish PixoDrom ReversProxies OCR RipCaptcha RuCaptcha ShaniBPO unsteady SpamVilla erases the captcha you have actually chosen from the table.
opposite to. resets the captcha statistics for the picked captcha solving service in the bar. opens the homepage of the picked captcha resolving service. tests the selected captcha (if you are using GSA Captcha Breaker and linking it with GSA Search Engine Ranker by emulating some third-party captcha resolving software application, if the test achieves success, it needs to show something like this: ).
e. utilizing the "Include" -> "GSA Captcha Breaker" mix of actions, often, they might lose connection to each other and GSA SER will stop building links or a minimum of will lose a lot of VpM. So either replicate AntiGate utilizing GSA CB (see how) and link the 2 tools this way, or test the connection regularly to make certain the captchas are being sent to GSA CB.
Latest GSA Search Engine Ranker tutorials
Listed below the buttons you can see the setup of the selected captcha service for each captcha, these fields might vary: some have logins, some secrets, some API keys, and so on. However, there are a few settings which use to all captchas: the variety of times the picked captcha resolving service will try and resolve each captcha (we keep this at 3, but bear in mind that the greater the number, the lower the LpM, but the lower the number, the lower the success rate you will have i.
successful registrations on target sites). this is excellent if you are utilizing some high paid captcha fixing service such as Death by Captcha and you want to utilize it only for the important websites. useful in the exact same method as the above option. again, beneficial in the exact same way as the above alternative.
GSA SER gives you the possibility to manually solve a captcha if all other captcha solving services fail it will open a little window with the captcha image and a basic input. Www.Ntacentre.Co.Uk. However, if you run a lot of tasks, and even just a few, this will get overwhelming and irritating - GSA SER help.
youtube
this will flash the window if you have actually ticked the above alternative and a brand-new captcha window appears. Enjoy the lightning show if you have several jobs. At the bottom of the tab we have numerous API key input fields, again for services which fix captchas. I have not used any of these so I actually can't talk about them.
Understand GSA Search Engine Ranker training
The is ticked by default, however we have actually not included this service, so it does not matter anyhow. However, if you have SpamVilla added, this checkbox will force captchas which are simple concerns (not images) to be addressed by SpamVilla's text captcha solver. That's it for the "Captcha" tab. Moving along the waves of this GSA SER tutorial.
As you can see, you have a general checkbox, which if ticked, will send out all validated backlinks to the chosen blog search engines from the list you see below the checkbox. Now, the method this works is, when a task gets a new validated URL, it is simply pinged by all the chosen blog site engines.
Just my humbled viewpoint. Next to the list, as you can see, you can add, edit, erase, import, or reset blog online search engine. Easy as that. The next part of the tab is where you can configure numerous indexing services. Supported ones are: GSA SEO Indexer while it is really low-cost, we do not use it because in my opinion, from reading and understanding what it does, it is unworthy the resources it will use from our VPS.
GSA URL reroute PRO This GSA SEO tool quite simply constructs 301 redirect URLs to your site (this one is not an indexation tool particularly) InstantLinkIndexer Indexification Linklicious. me ExpressIndexer LinkHuggers NuclearLinkIndexer LinkPipeline BacklinksIndexer IncredibleIndexer XIndexer LinkCentaur Lindexed. com OneHourIndexing LinkProcessor Crazy Indexer WitchIndexer FastLinkIndexer LinkIndexr When you pick your indexing service (if you choose to utilize one at all), you can then pick from a few settings listed below the list of supported indexing software applications: will send out just DoFollow links to the indexing services.
Tutorials - GSA Manuals and Docus - GSA SEO
Get Kick-ass GSA Search Engine Ranker Help at - Asia Virtual Solutions
a few of the indexing services above support drip feed, which you can benefit from, and you should. this will open a window where you will have the ability to choose from the engines supported by GSA Online search engine Ranker i. e. WordPress, Joomla, etc (we will list all extremely quickly).

GSA Search Engine Ranker Review & Step By Step Tutorial
And you are all set with the configuration of your GSA SER. Next we move onto the tab: You can utilize this tab to filter out some possibly spammy and hazardous sites which appear on the blacklists you have actually marked from the table. We have disabled this because, I can't keep in mind where I read it (I think it was a post by a SERengines developer), however enabling this.
And besides, we setup each of our tasks with filters configured from its task settings, so no concerns there. And we likewise conserve GSA SER a long time by preventing this blacklist check. If you do pick to use this functionality: the variety of minutes which will need to pass before the chosen blacklists get immediately upgraded include a new blacklist URL edit the selected blacklist URL from the table delete the picked blacklist URL import blacklists from a.
The option merely sets the limitation (in megabytes) which a website's HTML code can be in order for GSA Online Search Engine Ranker to download it and parse it using one of its engines. So, for instance, if you have a target URL which GSA SER is going to download, however it is some guestbook which has tens of thousands of talk about it, making its HTML method too fucking huge (possibly 1.
GSA Search Engine Ranker Tutorial - Manuels and Guidance

And now you understand how to utilize the tab of GSA SER. Proceeding with the ultimate tutorial of this link building monster. Lastly. This is where a great deal of the magic occurs. Read this area completely, because it is of crucial value! The tab: Let's start with the very first 4 rows of this tab i - gsa Ser video tutorials.
the ones with the input fields filled in with courses to directory sites - GSA SER tutorials. This is a screenshot of a few of the files inside the lists folder. Each of the. txt files you see is complete of possible target URLs which you can later use in your jobs to attempt and post a backlink on each of them (we will see how in a minute).
0 notes
Text
TabExport: A High Resolution MS Office Plugin For Tableau Server
Updated version for Tableau Server v10.5+
Anybody who has ever used or seen Tableau understands the power of interactive visual analytics. So when someone asks 'can we just get that analysis in Powerpoint / Excel / Word please?' there are a million reasons why we try and persuade them on the benefits of the secure, interactive, visual experience that Tableau brings. However, even the most die hard Tableau fans will admit that sometimes there are legitimate reasons why this is not possible, and let's face it, your users are going to find another way if they can't do what they (think) they want in Tableau. Examples I have come across recently include organisations who state, 'we provide analysis to external stakeholders who do not have access to Tableau Server and we can't insist on them installing Tableau Reader' and 'we want people to use Tableau Server but its going to take some time before we can persuade our execs to stop relying on MS Office'.
TabExport is an html/javascript plugin for Tableau Server which allows your users to export their Tableau Dashboards and Workbooks in glorious high definition to MS Powerpoint, Word, Excel, and .PNG. To install the plugin you will first need to clone/download the code from my github repository here.
Given that the tabadmin import_webdataconnector command was deprecated in Tableau Server v10.5 you will need to manually copy the tabexport folder you downloaded from github to the webdataconnectors folder on all nodes running your gateway service. On windows the directory will be C:\Program Files\Tableau\Tableau Server\data\tabsvc\httpd\htdocs\webdataconnectors by default.

Now you should be able to test the plugin in your browser by navigating to http://<tableauserver>/webdataconnectors/tabexport/html/tabexport.html (it won’t do anything yet!).

The plugin accepts 3 URL parameters to enable you to specify the file formats you want to display, the pixel size of the icons, and the background colour.
format: string containing the first letter of the file formats to display 'p', 'e', 'w', 'i'. Default value 'wepi'.
size: integer containing the pixel size for the buttons. Default value 50.
background: string containing the hex colour value for the background excluding the leading '#'. Default value 'ffffff'.
For example, the following url will display only the powerpoint and excel icons with size 25px and a blue background: https://tabserver.tableaujunkie.com/webdataconnectors/tabexport/html/tabexport.html?format=pe&size=25&background=000FFF

To use this on your dashboard, simply add a web part with the URL format above and publish to Tableau Sever (or use web edit on Tableau Server).

Once your dashboard has been published to Tableau Server your users will be able to export high resolution files. The behaviour is as follows:
PowerPoint: Exports all sheets in the current workbook as high resolution images with hyperlinks to the original viz on Tableau Server. Each sheet is sized to fit a single PowerPoint slide.
Word: Exports all sheets in current workbook as high resolution images with hyperlinks to the original viz on Tableau Server. Each sheet is sized to be 600px wide and maintains aspect ratio.
Excel: Exports current dashboard as high resolution image on first tab of Excel Workbook. Summary data for all views on current dashboard is also exported as separate Excel tabs (using the JavaScript API).
Image: Exports a high resolution image of the current dashboard in .png format.
Here is an animated gif of the plugin in action:
via GIPHY
This plugin would have not been possible without exploiting a number of techniques that have been promoted by the awesome Tableau Community:
Tamás Földi: Pushing the Limits of Tableau Server – Practical Lessons from a Zen Master
Alan Eldridge: Generating high resolution images of Tableau views
Alex Lokhov: Export To Excel Plugin for Tableau Server
Mark Jacobson: The Unofficial Guide to Tableau’s Vizportal API
TabExport also makes use of a number of open souce javascript libraries for generating MS Office documents: PptxGenJS, html-docx-js, and SheetJS.
There are of course a few known limitations including the fact that the plugin is not compatible with Tableau Online and will export the published version of a workbook as opposed to the current state (i.e. filters and selections are ignored). If a user would like to export a customised version of the dashboard they will need to save a customised view and make it their default.
Hopefully people in the community will find this tool useful for those exceptional cases where users just must have their PowerPoint deck :)
2 notes
·
View notes
Text
React: The Basics
React JS is today's most popular JavaScript library for building User Interfaces, which has created by Facebook. We can build modern, fast Single Page Applications or websites with React. React is so popular in the market and beneficial to know for a Web/Frontend Developer.
Is React JS a Library or a Framework?
This is one of the most unclear subjects of React. Let’s make this clear from the beginning. React is a Library, not a Framework.
What is a Library?
A library in programming can be explained as a collection of codes. We use a library to write code in a much simpler way or to import a feature from it into our project. JQuery is a library for example. We can write JavaScript much simpler by using JQuery, or we can import written JQuery features to our project. The project itself is not dependent on a library.
What is a Framework?
A Framework, on the other hand, is a complete package of code with its own functionalities & libraries. A Framework has its own rules, you don’t have much flexibility and the project is dependent on the Framework you use. Angular is an example of a framework. So React is for building User Interfaces, and how you program the rest of the project is up to you. Like JQuery, you can include React in your project partially, or completely. So React JS a library.
React Virtual DOM
To understand the importance of React Virtual DOM, first, you need to know what DOM (Document Object Model) is. DOM is basically a representation of the HTML code on a webpage. The document is the web page itself, the objects are the HTML tags. And finally, the model of DOM is a tree structure:
The Document Object Model (DOM) is a programming interface for HTML and XML documents. It represents the page so that programs can change the document structure, style, and content. The DOM represents the document as nodes and objects. That way, programming languages can connect to the page.
A Web page is a document. This document can be either displayed in the browser window or as the HTML source. But it is the same document in both cases. The Document Object Model (DOM) represents that same document so it can be manipulated. The DOM is an object-oriented representation of the web page, which can be modified with a scripting language such as JavaScript.
What is the benefit of Virtual DOM?
Each time you make a change in the code, DOM will be completely updated and rewritten. This is an expensive operation and consumes lots of time. In this point, React provides a solution: The Virtual DOM.
So when something changes:
React first creates an exact copy of the DOM
Then React figures out which part is new and only updates that specific part in the Virtual DOM
Finally, React copies only the new parts of the Virtual DOM to the actual DOM, rather than completely rewriting it.
This approach makes a webpage much faster than a standard webpage. That’s also one of the reasons why React is so popular.
So what is this JSX?
JSX (JavaScript XML) is a syntax extension to JavaScript used by React. JSX is basically used to write HTML tags inside JavaScript. Later, the JSX code will be translated into normal JavaScript, by Babel.
In summary, React doesn’t have HTML files, HTML tags are rendered directly inside JavaScript. This approach makes React faster.
What is a React Component?
A component is an independent, reusable code block, which divides the UI into smaller pieces. In other words, we can think of components as LEGO blocks. Likewise, we create a LEGO structure from many little LEGO blocks, we create a webpage or UI from many little code blocks (components).
We don’t really want to have thousands of lines of code together in one single file. Maintenance of the code gets more and more complex as the project gets bigger. In this point, dividing the source code into components helps us a lot. Each component has its own JS and CSS code, they are reusable, easier to read, write and test. In web development, as the reasons I explained above, it’s beneficial to use component-based technologies, and React JS is one of them.
React has 2 types of components: Functional (Stateless) and Class (Stateful).
Functional (Stateless) Components
A functional component is basically a JavaScript (or ES6) function which returns a React element. According to React official docs, the function below is a valid React component:
function Welcome(props) {
return <h1>Hello, {props.name}</h1>;
}
IMPORTANT: Functional components are also known as stateless components
So a React Functional Component:
Is a JavaScript / ES6 function
Must return a React element
Take props as a parameter if necessary
Class (Stateful) Components
Class components are ES6 classes. They are more complex than functional components including constructors, life-cycle methods, render( ) function and state (data) management. In the example below, we can see how a simple class component looks like:
import React, { Component } from 'react';
class ParentComponent extends Component {
render() {
return <h1>I'm the parent component.</h1>;
}
}
export default ParentComponent;
So, a React class component:
It is an ES6 class, will be a component once it ‘extends’ React component.
Can accept props (in the constructor) if needed
Can maintain its own data with state
Must have a render( ) method which returns a React element (JSX) or null
Props
Let’s start by defining Component’s props (obviously short for properties) in React. Props are used to customize Component when it’s being created and give it different parameters.
import React, {Component} from 'react'
class Topic extends Component {
render{
return(
<div>
{this.props.name}
</div>
)
}
}
One of the most important features of props is that they can be passed by a parent component to its child components. This allows us to create a component that can be customized with a new set of props every time we use it.
import React, {Component} from 'react'
class Welcome extends Component {
render{
return(
<div>
<p> Welcome to React, today you will learn: </p>
<Topic name="Props"/>
<Topic name="State"/>
</div>
)
}}
Props are passed to the component and are fixed throughout its lifecycle. But there are cases when we want to use data that we know is going to change over time. In this case, we use something called state.
State
Unlike props, the state is a private feature and it strictly belongs to a single Component. The state allows React components to dynamically change output over time in response to certain events.
Component’s state is initialized inside a constructor:
class Counter extends Component{
constructor(props){
super(props);
this.state = {counter: 0}
}
render(){
return(
<p>{this.state.counter}</p>
)
}
And can be changed later using inbuilt setState() function
class Counter extends Component{
constructor(props){
super(props);
this.state = {counter: 0}
this.increment = this.increment.bind(this);
}
increment(){
this.setState({counter: this.state.counter + 1})
}
render(){
return(
<button onClick={this.increment}>Like</button>
<p>{this.state.counter}</p>
)
}
Lifecycle of Components
Each component in React has a lifecycle that you can monitor and manipulate during its three main phases.
The three phases are Mounting, Updating, and Unmounting.
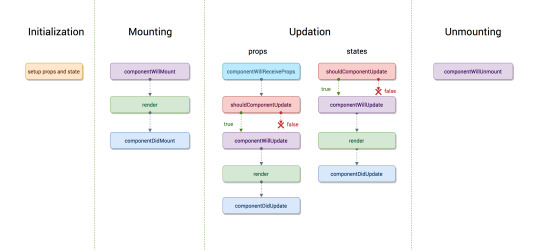
Common React Lifecycle Methods
render()
componentDidMount()
componentDidUpdate()
componentWillUnmount()
render()
The render() method is the most used lifecycle method. You will see it in all React classes. This is because render() is the only required method within a class component in React. As the name suggests it handles the rendering of your component to the UI. It happens during the mounting and updating of your component.
componentDidMount()
Now your component has been mounted and ready, that’s when the next React lifecycle method componentDidMount() comes in play. componentDidMount() is called as soon as the component is mounted and ready. This is a good place to initiate API calls if you need to load data from a remote endpoint.
componentDidUpdate()
This lifecycle method is invoked as soon as the updating happens. The most common use case for the componentDidUpdate() method is updating the DOM in response to prop or state changes. You can call setState() in this lifecycle, but keep in mind that you will need to wrap it in a condition to check for state or prop changes from the previous state. Incorrect usage of setState() can lead to an infinite loop.
componentWillUnmount()
As the name suggests this lifecycle method is called just before the component is unmounted and destroyed. If there are any cleanup actions that you would need to do, this would be the right spot.
Routing
Routing is a key aspect of web applications (and even other platforms) that could not be left out in React. We can make full-fleshed single-page applications with React if we harness the powers of routing. This does not have to be a manual process, we can make use of React-Router.
Switch
Switch component helps us to render the components only when path matches otherwise it fallbacks to the not found component.
<Switch>
<Route exact path="/" component={App} />
<Route path="/users" component={Users} />
<Route path="/contact" component={Contact} />
<Route component={Notfound} />
</Switch>
Browser Router
A <Router> that uses the HTML5 history API (pushState, replaceState, and the popstate event) to keep your UI in sync with the URL.
<BrowserRouter
basename={optionalString}
forceRefresh={optionalBool}
getUserConfirmation={optionalFunc}
keyLength={optionalNumber}>
<App />
</BrowserRouter>
Go through this link for better understanding of Routes: Getting started with React Router
Handling Events
Handling events with React elements is very similar to handling events on DOM elements. There are some syntactic differences:
React events are named using camelCase, rather than lowercase.
With JSX you pass a function as the event handler, rather than a string
<button onClick={activateLasers}></button>
Named Export vs Default Export in ES6
Named Export: (export)
With named exports, one can have multiple named exports per file. Then import the specific exports they want to be surrounded in braces. The name of the imported module has to be the same as the name of the exported module.
// imports
// ex. importing a single named export
import { MyComponent } from "./MyComponent";
// ex. importing multiple named exports
import { MyComponent, MyComponent2 } from "./MyComponent";
// ex. giving a named import a different name by using "as":
import { MyComponent2 as MyNewComponent } from "./MyComponent";
// exports from ./MyComponent.js file
export const MyComponent = () => {}
export const MyComponent2 = () => {}
Default Export: (export default)
One can have only one default export per file. When we import we have to specify a name and import like:
// import
import MyDefaultComponent from "./MyDefaultExport";
// export
const MyComponent = () => {}
export default MyComponent;
Getting Started:
You can just run the create-react-app on the command line, followed by the name of the app you want to create. This creates the react app, with all the necessary functionality you need, already built into the app. Then you can just cd into the react app and start it with npm start.
Command: create-react-app my-app
Basic Structure
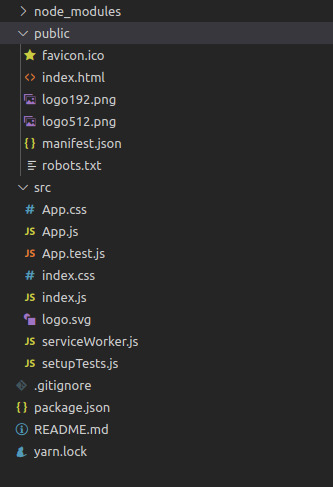
node_modules is where packages installed by NPM or Yarn will reside.
src is where your dynamic files reside. If the file is imported by your JavaScript application or changes contents, put it here.
public is where your static files reside.
0 notes
Text
Ways to Organize and Prepare Images for a Blur-Up Effect Using Gatsby
Gatsby does a great job processing and handling images. For example, it helps you save time with image optimization because you don’t have to manually optimize each image on your own.
With plugins and some configuration, you can even setup image preloading and a technique called blur-up for your images using Gatsby. This helps with a smoother user experience that is faster and more appealing.
I found the combination of gatsby-source-filesystem, GraphQL, Sharp plugins and gatsby-image quite tedious to organize and un-intuitive, especially considering it is fairly common functionality. Adding to the friction is that gatsby-image works quite differently from a regular <img> tag and implementing general use cases for sites could end up complex as you configure the whole system.
Medium uses the blur-up technique for images.
If you haven’t done it already, you should go through the gatsby-image docs. It is the React component that Gatsby uses to process and place responsive, lazy-loaded images. Additionally, it holds the image position which prevents page jumps as they load and you can even create blur-up previews for each image.
For responsive images you’d generally use an <img> tag with a bunch of appropriately sized images in a srcset attribute, along with a sizes attribute that informs the layout situation the image will be used in.
<img srcset="img-320w.jpg 320w, img-480w.jpg 480w, img-800w.jpg 800w" sizes="(max-width: 320px) 280px, (max-width: 480px) 440px, 800px" src="img-800w.jpg">
You can read up more on how this works in the Mozilla docs. This is one of the benefits of using gatsby-image in the first place: it does all the resizing and compressing automatically while doing the job of setting up srcset attributes in an <img /> tag.
Directory structure for images
Projects can easily grow in size and complexity. Even a single page site can contain a whole bunch of image assets, ranging from icons to full-on gallery slides. It helps to organize images in some order rather than piling all of them up in a single directory on the server. This helps us set up processing more intuitively and create a separation of concerns.
While attempting to organize files, another thing to consider is that Gatsby uses a custom webpack configuration to process, minify, and export all of the files in a project. The generated output is placed in a /public folder. The overall structure gatsby-starter-default uses looks like this:
/ |-- /.cache |-- /plugins |-- /public |-- /src |-- /pages |-- /components |-- /images |-- html.js |-- /static (not present by default) |-- gatsby-config.js |-- gatsby-node.js |-- gatsby-ssr.js |-- gatsby-browser.js
Read more about how the Gatsby project structure works here.
Let’s start with the common image files that we could encounter and would need to organize
For instance:
icons
logos
favicon
decorative images (generally vector or PNG files)
Image gallery (like team head shots on an About page or something)
How do we group these assets? Considering our goal of efficiency and the Gatsby project structure mentioned above, the best approach would be to split them into two groups: one group that requires no processing and directly imported into the project; and another group for images that require processing and optimization.
Your definitions may differ, but that grouping might look something like this:
Static, no processing required:
icons and logos that require no processing
pre-optimized images
favicons
other vector files (like decorative artwork)
Processing required:
non-vector artwork (e.g. PNG and JPG files)
gallery images
any other image that can be processed, which are basically common image formats other than vectors
Now that we have things organized in some form of order, we can move onto managing each of these groups.
The "static" group
Gatsby provides a very simple process for dealing with the static group: add all the files to a folder named static at the root of the project. The bundler automatically copies the contents to the public folder where the final build can directly access the files.
Say you have a file named logo.svg that requires no processing. Place it in the static folder and use it in a component file like this:
import React from "react" // Tell webpack this JS file requires this image import logo from "../../static/logo.svg" function Header() { // This can be directly used as image src return <img src={logo} alt="Logo" /> } export default Header
Yes, it’s as simple as that — much like importing a component or variable and then directly using it. Gatsby has detailed documentation on importing assets directly into files you could refer to for further understanding.
Special case: Favicon
The plugin gatsby-plugin-manifest not only adds a manifest.json file to the project but also generates favicons for all required sizes and links them up in the site.
With minimal configuration, we have favicons, no more manually resizing, and no more adding individual links in the HTML head. Place favicon.svg (or .png or whatever format you’re using) in the static folder and tweak the gatsby-config.js file with settings for gatsby-plugin-manifest
{ resolve: `gatsby-plugin-manifest`, options: { name: `Absurd`, icon: `static/favicon.svg`, }, },
The "processed" group
Ideally, what we’d like is gatsby-image to work like an img tag where we specify the src and it does all the processing under the hood. Unfortunately, it’s not that straightforward. Gatsby requires you to configure gatsby-source-filesystem for the files then use GraphQL to query and processed them using Gatsby Sharp plugins (e.g. gatsby-transformer-sharp, gatsby-plugin-sharp) with gatsby-image. The result is a responsive, lazy-loaded image.
Rather than walking you through how to set up image processing in Gatsby (which is already well documented in the Gatsby docs), I’ll show you a couple of approaches to optimize this process for a couple of common use cases. I assume you have a basic knowledge of how image processing in Gatsby works — but if not, I highly recommend you first go through the docs.
Use case: An image gallery
Let’s take the common case of profile images on an About page. The arrangement is basically an array of data with title, description and image as a grid or collection in a particular section.
The data array would be something like:
const TEAM = [ { name: 'Josh Peck', image: 'josh.jpg', role: 'Founder', }, { name: 'Lisa Haydon', image: 'lisa.jpg', role: 'Art Director', }, { name: 'Ashlyn Harris', image: 'ashlyn.jpg', role: 'Frontend Engineer', } ];
Now let’s place all the images (josh.jpg, lisa.jpg and so on) in src/images/team You can create a folder in images based on what group it is. Since we’re dealing with team members on an About page, we’ve gone with images/team The next step is to query these images and link them up with the data.
To make these files available in the Gatsby system for processing, we use gatsby-source-filesystem. The configuration in gatsby-config.js for this particular folder would look like:
{ resolve: `gatsby-source-filesystem`, options: { name: `team`, path: `${__dirname}/src/images/team`, }, `gatsby-transformer-sharp`, `gatsby-plugin-sharp`, },
To query for an array of files from this particular folder, we can use sourceInstanceName It takes the value of the name specified in gatsby-config.js:
{ allFile(filter: { sourceInstanceName: { eq: "team" } }) { edges { node { relativePath childImageSharp { fluid(maxWidth: 300, maxHeight: 400) { ...GatsbyImageSharpFluid } } } } } }
This returns an array:
// Sharp-processed image data is removed for readability { "data": { "allFile": { "edges": [ { "node": { "relativePath": "josh.jpg" } }, { "node": { "relativePath": "ashlyn.jpg" } }, { "node": { "relativePath": "lisa.jpg" } } ] } }
As you can see, we’re using relativePath to associate the images we need to the item in the data array. Some quick JavaScript could help here:
// Img is gatsby-image // TEAM is the data array TEAM.map(({ name, image, role }) => { // Finds associated image from the array of images const img = data.allFile.edges.find( ({ node }) => node.relativePath === image ).node; return ( <div> <Img fluid={img.childImageSharp.fluid} alt={name} /> <Title>{name}</Title> <Subtitle>{role}</Subtitle> </div> ); })
That’s the closest we’re getting to using src similar to what we do for <img> tags.
Use case: Artwork
Although artwork may be created using the same type of file, the files are usually spread throughout the in different sections (e.g. pages and components), with each usually coming in different dimensions.
It’s pretty clear that querying the whole array, as we did previously, won’t wor. However, we can still organize all the images in a single folder. That means we an still use sourceInstanceName for specifying which folder we are querying the image from.
Similar to our previous use case, let’s create a folder called src/images/art and configure gatsby-source-filesystem. While querying, rather than getting the whole array, here we will query for the particular image we need in the size and specification as per our requirements:
art_team: file( sourceInstanceName: { eq: "art" } name: { eq: "team_work" } ) { childImageSharp { fluid(maxWidth: 1600) { ...GatsbyImageSharpFluid } } }
This can be directly used in the component:
<Img fluid={data.art_team.childImageSharp.fluid} />
Further, this can be repeated for each component or section that requires an image from this group.
Special case: Inlining SVGs
Gatsby automatically encodes smaller images into a base64 format and places the data inline, reducing the number of requests to boost performance. That's great in general, but might actually be a detriment to SVG files. Instead, we can manually wrangle SVGs to get the same performance benefits, or in the case we might want to make things more interactive, incorporate animations.
I found gatsby-plugin-svgr to be the most convenient solution here. It allows us to import all SVG files as React components:
import { ReactComponent as GithubIcon } from './github.svg';
Since we’re technically processing SVG files instead of raster images, it’d make sense to move the SVG file out of static folder and place it in the folder of the component that’s using it.
Conclusion
After working with Gatsby on a couple of projects, these are a few of the ways I overcame hurdles when working with images to get that nice blur-up effect. I figured they might come handy for you, particularly for the common use cases we looked at.
All the conventions used here came from the gatsby-absurd starter project I set up on GitHub. Here's the result:
It’s a good idea to check that out if you’d like to see examples of it used in a project. Take a look at Team.js to see how multiple images are queried from the same group. Other sections — such as About.js and Header.js — illustrate how design graphics (the group of images shared across different sections) are queried. Footer.js and Navbar.js have examples for handling icons.
The post Ways to Organize and Prepare Images for a Blur-Up Effect Using Gatsby appeared first on CSS-Tricks.
Ways to Organize and Prepare Images for a Blur-Up Effect Using Gatsby published first on https://deskbysnafu.tumblr.com/
1 note
·
View note