#there's no editing the line tool for binary tool cause it's not like. sai lineart layer
Explore tagged Tumblr posts
Visit Tumblr Blog
Explore Tumblr blogs with no restrictions, modern design and the best experience.
Last Seen Tumblr Blogs


Fun Fact
28.6 is the average number of monthly visits per US mobile user.
Text
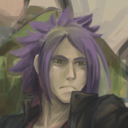
((when you can't draw circles but literally every character you ever draw has at least one circle in their design so you end up with circles with the most wobbly fuckin lines ever. also read the tags pls))
#hOPEFULLY YOU GUYS DON'T MIND IT...#idk if you even notice#there's no editing the line tool for binary tool cause it's not like. sai lineart layer#that would take even longer to do. so i just do binary tool#which is done by hand aka by dragging my mouse around#so that's why it's wobbly#i zoom in to draw the lines and try to make em smooth but. yeah lol. i got the hand shakies#anyway this is me saying i'm working on it. we get this plot point then not much else before chap 2#hell i. might take tomorrow (friday) off for a little more wiggle room and slight planning time#would that be ok??? i'm indecisive#cause this is like the last thing i wanna do before chap 2. i know how i want the chapter to start#wHATEVER i'll. decide by tomorrow. then saturday is the kickoff of chapter 2#or like the start#you know what i mean
2 notes
·
View notes
Text
DR Sprite Edit Tutorial!
So this has been in the making for a couple of months due to a lot of art blocks and stuff, but!! I think this will help some people who have asked for some advice on how to draw your ocs dr ocs in the DR style (or at least close to it)! I’m gonna try and make this as simple as possible without all the complicated steps!
Just to say it now, I use Paint Tool SAI and I have the download file as well for anyone who would like it as well. The download link will be at the bottom as well. This is gonna be long so bear with me!
Let’s get to it!
Okay so first off!! You wanna have a ref of your oc! I usually use dreamselfy cause it gives you a lot of options (I used the japanese version and the simulator to put it all together. If you guys want those links, I’ll put them down at the bottom for you guys.)
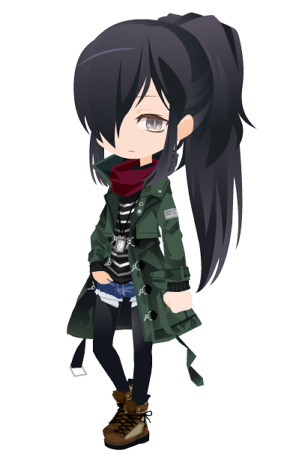
This is an old character of mine named Kagami that I’m gonna use, they needed a redesign and to be re-written so I thought this would be the best opportunity for them! They are non-binary and so I think the best base sprite to use is Ibuki’s! It fits their body type.

What I’m gonna do first in sai is load the sprite into it and lower the opacity and add another layer on top of it. (I also load the ref in there next to the base sprite so that I have something to look off and draw it how I want it.)
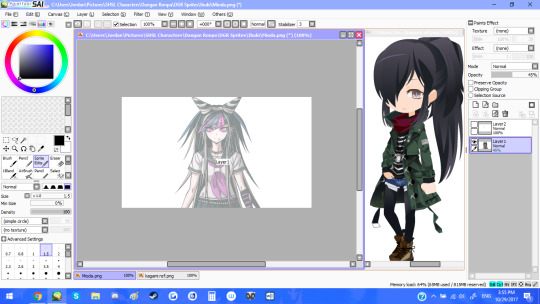
This is the brush I will be using for all the lineart:
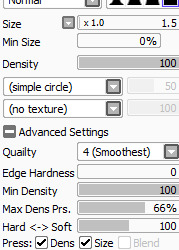
(I tend to keep my stabilizer on 3 so that it gives me a little more steady lines when i draw)
The first thing I do is trace one side of the sprite on the new layer. It’s important to remember to make sure the lines are clean and it’s okay to redo the line as many times as you need until you get it to how you want it!

After this I’ll take the layer, copy, paste it and then flip the layer and line it up to the other side like so:

Now before I do anything, I start on the face so that I won’t forget it later or that it doesn’t look too unproportional to the face when I draw the hair. I’ll repeat the same thing I did for the bust in the previous image and go from there.

If you see off to the left, I’ve made separate layers for the eyes, mouth and eyebrows. This is really important that you do this if you want to make expressions for your oc to use in posts and such! Plus it’s just nice to have it all separated. You’re going to now start drawing the hair! Now Kagami’s hair is really simple, I’m going to draw it as I see it until I get it to what I want it to look like! Make sure the hair is on a separate layer so that you can erase what you don’t need of the head.

Now that I have their hair done, I’m going to make sure that the hair is on another layer before making it invisible so that I can start on the clothing. You’ll add another layer and begin drawing on that. It’s important to note that clothing folds, it moves, and makes the character look a little bigger. It happens often that you can draw too many folds and wrinkles or too little. Points where limbs can move tend to have more wrinkles placed near them on clothing.

So i’ve drawn half the jacket, and to make it so much easier on myself, I’m going to copy, paste and flip it to put it on the other side, and then add the scarf and some other details to make it a little less like I copied and pasted it. (I ended up changing a few things because I am indecisive, but overall you should have a complete outfit on your oc.

What you’re going to have to do next is get rid of the excess lines from the bust layer and make it to where lines aren’t going through each other. You’re gonna wanna do that with the hair layer as well, erasing things that don’t need to be there. After some time of cleaning up lines and erasing, I now have the lineart of my sprite!

Now the next step is very important, it’s how you make your sprite transparent. Circled in Green is what you want to click on and you're gonna click on the outside of the sprite so that it looks like this:

Circled in green on the sprite is spaces where you want to use the select tool (that’s in the brushes) to fill in the empty spaces. After you get it filled in, you want to go to the top where it says ‘Selection’ next to the ‘Layer’ dropdown and click invert. Your sprite should look something like this:

The next thing you want to do is create another layer. Take the color white and use the bucket tool ON THE NEW LAYER. The sprite should be completely whited out. On that layer, you’re going to want to set the layer to multiply so that you can see the sprite again. That layer with the white on it, merge it with the lineart layer. Create another layer and set that layer to a clipping layer (circled in red). The layer should be set to ‘Multiply’ as well. Now what you can do is color on the sprite without having to erase! Like so:

This is what your layers should look like!

The clipped layer should be the layer you color on! I personally only use 1 or 2 layers to color so I’m just gonna do ahead and use 2 layers to make it easy. You want to use the first layer for the base color:

Make another clipped layer and met it to multiply so that you can start shading. You want to use colors that are a little bit darker so that the shading looks a little more natural. Rule number 1: NEVER shade with black, unless the base color you’re shading is black itself. It causes the shaded part to look muddy and you don’t want that. It’s hard to explain shading and how you do it because it depends on where your light source is. The light source on this sprite is coming in from the right, so most of the darker areas will be on the left.
Now when you color the eyes, you want to create another layer under the eye layer and color the inside of the eye white. Merge the eye layer and that layer you colored and create another layer on top of it and set it to ‘Multiply’. I would look up a ref of another dr character and see how the eye is colored and shaded there because I tend to do it a bit differently. After you’ve colored it, merge the two layers again and then you’re all set! You should now have a sprite!
When you go to save, save it as a .png file. It will prompt you with this:
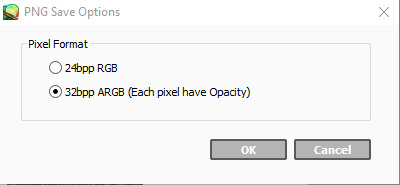
Click the second one so that it turns out like this: (If you drag it around you can see that there’s no white background, making it transparent!)
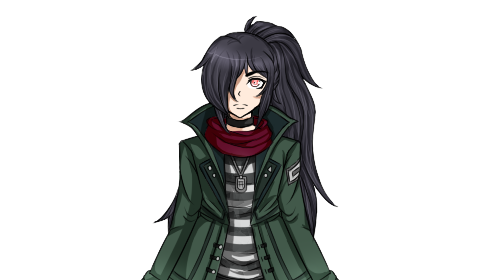
Congrats!! You did it! Sprite editing takes time to get used to and it's not always eyes, but all I can do is urge you to practice. It’s the only way you learn and get better. You don’t have to take everything that I said seriously, either. If there’s something that works better for you that you’ve found a lot easier, then do it! It’s all about doing it how you want to and what makes it fun for you! Art should be fun to draw, isn’t that the whole point?
I hope you guys found this really helpful!! I’m actually really impressed with this sprite it came out better than I thought.
Thank you for reading!!
Here are the links from the top!
SAI Download: [Link]
Dreamselfy Simulator: [Link]
Dreamselfy @Trade: [Link]
#fangan ronpa#fangan ronpa sprites#dr oc#dr oc sprites#dangan ronpa sprites#dr sprite tutorial#art tutorial#this is really long#i am so sorry
17 notes
·
View notes