#vcenter log
Explore tagged Tumblr posts
Visit Tumblr Blog
Explore Tumblr blogs with no restrictions, modern design and the best experience.
Last Seen Tumblr Blogs


Fun Fact
25% of US internet users with an annual income of $80-100K use Tumblr.
Text
vCenter Log Toplama İşlemleri
Merhaba, bu yazımda sizlere vCenter log toplama işlemleri kısmından bahsedeceğim. Buna ek olarak ESX loglarını toplama işlemine de değineceğim. vCenter Server Appliance (VCSA) loglarını toplamak için çeşitli yöntemler mevcuttur: vCenter Server Arayüzünden: vCenter Server örneğine sağ tıklayın ve Actions > Export System Logs seçeneğini seçin. Gerekirse, loglarını almak istediğiniz spesifik…

View On WordPress
#ESX Host ve vCenter Loglarının Toplanması#vcenter log#vcenter log disk cleanup#vcenter log disk full#vcenter log forwarding#vCenter Log Toplama İşlemleri
0 notes
Text
Ransomware Attacks Target VMware ESXi Infrastructure Following Interesting Pattern

Cybersecurity firm Sygnia has shed light on a concerning trend where ransomware attacks targeting VMware ESXi infrastructure follow a well-established pattern, regardless of the specific file-encrypting malware deployed. According to the Israeli company's incident response efforts involving various ransomware families, these attacks adhere to a similar sequence of actions.
The Attack Sequence
- Initial access is obtained through phishing attacks, malicious file downloads, or exploitation of known vulnerabilities in internet-facing assets. - Attackers escalate their privileges to obtain credentials for ESXi hosts or vCenter using brute-force attacks or other methods. - Access to the virtualization infrastructure is validated, and the ransomware is deployed. - Backup systems are deleted, encrypted, or passwords are changed to complicate recovery efforts. - Data is exfiltrated to external locations such as Mega.io, Dropbox, or attacker-controlled hosting services. - The ransomware initiates execution and encrypts the "/vmfs/volumes" folder of the ESXi filesystem. - The ransomware propagates to non-virtualized servers and workstations, widening the scope of the attack.

Mitigation Strategies
To mitigate the risks posed by such threats, organizations are advised to implement the following measures: - Ensure adequate monitoring and logging are in place - Create robust backup mechanisms - Enforce strong authentication measures - Harden the environment - Implement network restrictions to prevent lateral movement
Malvertising Campaign Distributing Trojanized Installers
In a related development, cybersecurity company Rapid7 has warned of an ongoing campaign since early March 2024 that employs malicious ads on commonly used search engines to distribute infected installers for WinSCP and PuTTY via typosquatted domains. These counterfeit installers act as a conduit to drop the Sliver post-exploitation toolkit, which is then used to deliver more payloads, including a Cobalt Strike Beacon leveraged for ransomware deployment. This activity shares tactical overlaps with prior BlackCat ransomware attacks that have used malvertising as an initial access vector, disproportionately affecting members of IT teams who are most likely to download the infected files.
New Ransomware Families and Global Trends
The cybersecurity landscape has witnessed the emergence of new ransomware families like Beast, MorLock, Synapse, and Trinity. The MorLock group has extensively targeted Russian companies, encrypting files without first exfiltrating them and demanding substantial ransoms. According to NCC Group's data, global ransomware attacks in April 2024 registered a 15% decline from the previous month, with LockBit's reign as the top threat actor ending in the aftermath of a sweeping law enforcement takedown earlier this year. The turbulence in the ransomware scene has been complemented by cyber criminals advertising hidden Virtual Network Computing (hVNC) and remote access services like Pandora and TMChecker, which could be utilized for data exfiltration, deploying additional malware, and facilitating ransomware attacks. Read the full article
4 notes
·
View notes
Text
Dell VxRail Deploy Exam (D-VXR-DY-01) Prep Guide & Practice Exam
The D-VXR-DY-01 Dell VxRail Deploy Version 2 exam is a qualifying exam for the Dell VxRail Deploy v2 Certification, designed to assess your knowledge of implementing and managing a VxRail cluster. This exam covers various topics, from solution planning to hardware and software installation, and troubleshooting, making it essential for IT professionals working with VxRail solutions.
In this blog post, we’ll dive into the key aspects of the exam, explore its structure, and share the best tips for preparing, including how to make use of the D-VXR-DY-01 practice exam from Cert007 for optimal study results.
Dell VxRail Deploy Version 2 Exam Overview
The Dell VxRail Deploy v2 Certification exam tests your ability to implement a basic VxRail cluster, including hardware installation, environment validation, software implementation, and post-deployment tasks. The exam is split into two parts:
Part 1: 90 minutes
Part 2: 30 minutes
To pass the exam, you need to meet the passing score requirements for both parts.
Understand Key Exam Topics
The following topics are essential for the D-VXR-DY-01 Dell VxRail Deploy Version 2 exam:
1. VxRail Physical Components (4%)
Understanding VxRail cluster architecture
Knowing rack requirements for VxRail clusters
2. VxRail Deployment Planning (12%)
vCenter server and its role in deployment
Networking components and vSphere Distributed Switches
DNS options, node discovery, and vSAN settings
3. Using VxRail Configuration Tools (4%)
Creating and reviewing VxRail projects and configurations
4. VxRail Hardware Installation and Initialization (8%)
Procedures for installing and cabling VxRail hardware
Configuring VxRail node iDRAC and system time settings
5. VxRail Network Environment Requirements and Initialization (8%)
Configuring and validating VxRail network settings manually
6. Deploying the VxRail Cluster (24%)
Initializing VxRail clusters with VxRail or customer-managed vCenter Server
vSAN ESA (vSAN Express Storage Architecture) setup
7. VxRail Post-Deployment Procedures (18%)
Performing post-installation validation
Configuring vSAN settings and native backups
8. VxRail Cluster Upgrade and Expansion (10%)
Understanding upgrade requirements and scale-out processes
9. VxRail Troubleshooting (6%)
Collecting logs and troubleshooting using VxRail and vSAN tools
10. VxRail REST API (6%)
Using VxRail REST APIs to automate tasks and troubleshoot issues
Study Tips for D-VXR-DY-01 Dell VxRail Deploy Exam
Preparing for the D-VXR-DY-01 exam requires a solid understanding of the VxRail system, hardware installation, networking, and troubleshooting. To maximize your chances of success, follow these steps:
Understand the Core Topics: Focus on the key areas of the exam, including deployment planning, hardware installation, and post-deployment procedures. Review Dell’s official documentation and guides related to VxRail clusters.
Hands-On Experience: Practical experience with VxRail components, vCenter Server, and networking setups is crucial. Try to work on a live or simulated VxRail environment to get familiar with the installation and configuration processes.
Use VxRail Tools: Gain proficiency with tools like the VxRail Configuration Portal and REST API. Understanding how to troubleshoot common issues using logs and vSAN tools will be particularly useful for the troubleshooting section.
Practice Exams: One of the best ways to prepare for the exam is by using D-VXR-DY-01 practice exams from Cert007. These practice exams closely simulate the real exam experience, helping you assess your readiness and pinpoint areas that need more study.
Review Study Materials: Cert007 offers comprehensive and up-to-date study materials specifically designed for the Dell VxRail Deploy v2 exam. These materials cover every exam topic in detail and provide insights into common issues and troubleshooting strategies.
Final Thoughts
The D-VXR-DY-01 Dell VxRail Deploy Version 2 Certification is an essential step for professionals looking to demonstrate their expertise in deploying and managing Dell VxRail clusters. By focusing on key exam topics, gaining hands-on experience, and leveraging practice exams from Cert007, you can confidently prepare for and pass the exam.
Invest in quality study materials and practice exams to ensure you're well-prepared for this important certification. Good luck on your journey to becoming Dell VxRail Deploy certified!
0 notes
Text
Hướng dẫn các bước đẩy Log từ Client lên Graylog chi tiết

Graylog là một nền tảng mạnh mẽ để thu thập, phân tích và quản lý log. Việc đẩy log từ các nguồn khác nhau lên Graylog giúp bạn tập trung hóa việc quản lý log, dễ dàng giám sát hệ thống và phát hiện các sự cố kịp thời. Bài viết này sẽ hướng dẫn bạn cách đẩy log từ Client lên Graylog.
1. Tìm hiểu về Input trong Graylog
Input trong Graylog là các điểm nhập dữ liệu, nơi Graylog nhận và xử lý log messages từ các nguồn khác nhau. Hiểu rõ về các loại Input là điều cần thiết để có thể cấu hình Graylog nhận log từ các hệ thống và thiết bị khác nhau. Dưới đây là chi tiết về các loại Input phổ biến và cách cấu hình chúng.
Dưới đây là một số loại Input phổ biến:
Syslog: Sử dụng để nhận log từ các thiết bị và ứng dụng hỗ trợ giao thức Syslog.
GELF (Graylog Extended Log Format): Một định dạng log mở rộng của Graylog, hỗ trợ cấu trúc dữ liệu JSON.
Beats: Sử dụng để nhận log từ Filebeat, Metricbeat và các Beats khác của Elastic.
Raw/Plaintext: Nhận log dưới dạng văn bản thô hoặc định dạng tùy chỉnh.
JSON Path: Sử dụng để nhận log có định dạng JSON, giúp trích xuất và phân tích dữ liệu JSON.
HTTP: Nhận log qua HTTP/HTTPS, cho phép gửi log từ các ứng dụng web và dịch vụ hỗ trợ HTTP.
TCP/UDP: Nhận log qua giao thức TCP hoặc UDP, thường dùng cho các ứng dụng và thiết bị không hỗ trợ Syslog nhưng có khả năng gửi log qua mạng.
AMQP: Sử dụng để nhận log từ các hàng đợi tin nhắn (message queues) hỗ trợ giao thức AMQP.
Kafka: Nhận log từ Apache Kafka, một nền tảng stream-processing phổ biến.
2. Mô hình đẩy log từ Client lên Graylog
Chúng tôi có một mô hình cơ bản giúp bạn hiểu rõ hơn về cách đẩy log từ Client lên Graylog.
IP Planning
Tên máy
IP
Graylog
172.16.66.55
Linux
172.16.66.54
vCenter
172.16.66.46
3. Đẩy log từ vCenter sang Graylog
3.1 Cấu hình trên vCenter
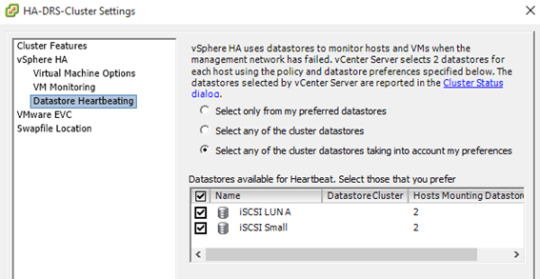
Ta cần vào trang VAMI của vCenter để tiến hành mở dịch vụ rsyslog và tiến hành đẩy log sang. Để truy cập vào trang VAMI ta thực hiện theo đường dẫn sau.
Tiếp theo ta chọn vào Syslog và tiến hành cấu hình đẩy log. Chúng ta cần khai báo IP của Graylog và giao thức đẩy log là UDP.
3.2 Cấu hình trên Graylog
Việc đầu tiên để Graylog có thể nhận được log thì ta phải cấu hình firewall mở port 514/UDP. Ở đây mình dùng Ubuntu 22.04 nên sẽ sử dụng lệnh sau.
ufw allow 514/udp
Bây giờ ta sẽ lên giao diện Web của Graylog và tiến hành đẩy log. Graylog mình dùng là bản 5.2 nhé.
Ta chọn vào System / Inputs để tiến hành add Input mới. Hãy chọn giao thức là Syslog UDP nhé.
Nội dung cần cấu hình.
Titlle : vCenter ( Tên để bạn gợi nhớ ra Input này)
Bind address : 0.0.0.0 (Lắng nghe trên tất cả các interface của graylog)
Port : 514
Sau khi Launch Input ta sẽ nhận được kết quả như này.
Như vậy là đã cấu hình xong bạn có thể xem log bằng cách nhấn vào Show received messages.
4. Đẩy log từ máy Client Linux bất kỳ lên Graylog
4.1 Cấu hình trên Linux
Việc cấu hình trên Linux thì lại rất đơn giản chúng ta chỉ cần sử dụng đúng 1 câu lệnh.
echo '*.* @172.16.66.55:1514' >> /etc/rsyslog.conf
Bây giờ ta chỉ cần tiến hành restart lại dịch vụ rsyslog là xong.
systemctl restart rsyslog
4.2 Cấu hình trên Graylog
Cấu hình trên Graylog ta cũng làm tương tự như các bước ở phần 3 nhưng ta sẽ đổi thành port 1514 và mở firewall đối với port 1514/udp.
Mở firewall.
ufw allow 1514/udp
Cấu hình graylog.
Titlle : netbox-log ( Tên để bạn gợi nhớ ra Input này)
Bind address : 0.0.0.0 (Lắng nghe trên tất cả các interface của graylog)
Port : 1514
Ta kiểm tra xem đã nhận được.
Như vậy là SunCloud đã hướng dẫn các bạn gửi log từ vCenter hay một máy Linux bất kỳ với giao thức UDP. Nếu trong quá trình thực hiện, bạn gặp phải vướng mắc cần được hỗ trợ, hãy liên hệ với chúng tôi để được tư vấn nhanh nhất nhé. Chúc các bạn thành công!
Nguồn: https://suncloud.vn/client-graylog
0 notes
Quote
もう手に入らないものは何ですか? リスト は 次のとおりです。 VMware vSphere エンタープライズ プラス VMware vSphere+ VMware vSphere Standard (サブスクリプションを除く) VMware vSphere ROBO VMware vSphere スケールアウト VMware vSphere デスクトップ VMware vSphere アクセラレーション キット VMware vSphere Essentials キット VMWare vSphere Essentials Plus Kit (新規サブスクリプション製品を除く) VMware vSphere スターター/ファウンデーション VMware vSphere と運用管理 VMware vSphere ベーシック VMware vSphere アドバンスト VMware vSphere ストレージ アプライアンス VMware vSphere ハイパーバイザー VMware Cloud Foundation (新しい VCF サブスクリプション サービスを除く) VDI 向け VMware Cloud Foundation VMware Cloud Foundation for ROBO VMware SDDC マネージャー VMware vCenter Standard VMware vCenter Foundation VMware vSAN VMware vSAN ROBO VMware vSAN デスクトップ VMware HCI キット VMware サイト リカバリ マネージャー VMware Cloud エディション/クラウド パック VMware vCloud スイート VMware Aria スイート (旧 vRealize Suite) VMware Aria Universal Suite (旧称 vRealize Cloud Universal) vMware Aria Suite の期間 VMware Aria Operations for Networks (旧称 vRealize Network Insight) VMWare Aria Operations for Networks Universal (旧称 vRealize Network Insight Universal) VMware vRealize Network Insight ROBO VMWare Aria Operations for Logs (旧称 vRealize Log Insight) VMware vRealize Operations 8 アプリケーション監視アドオン VMware Aria の操作 VMware Aria オートメーション VMware Aria Automation for Secure Hosts アドオン (旧称 SaltStack SecOps) VMware vRealize Automation SaltStack SecOps アドオン VMware Aria Operations for Integrations (旧称 vRealize True Visibility Suite) VMware クラウド ディレクター クラウドディレクターサービス VMware NSX VMware NSX デスクトップ用 VMware NSX ロボ VMware NSX 分散ファイアウォール VMware NSX ゲートウェイ ファイアウォール VMware NSX の脅威から分散ファイアウォールへ VMware NSX 脅威防御からゲートウェイ ファイアウォールまで VMware NSX Advanced Threat Prevention から分散ファイアウォールへ VMware NSX Advanced Threat Prevention からゲートウェイ ファイアウォールまで VMware NSX Advanced Load Balancer (サブスクリプション、SaaS を除く) Antrea を使用した VMware Container Networking Enterprise VMware HCX VMware HCX+
VMware、インフラストラクチャの「地殻変動」の中で 56 製品を廃止
1 note
·
View note
Text
New Post has been published on
New Post has been published on https://www.tayfundeger.com/vcenter-support-bundle-nasil-olusturulur.html
vCenter Support Bundle Nasıl Oluşturulur?
Merhaba,
vCenter Support Bundle Nasıl Oluşturulur? isimli bu makalemde sizlere vCenter Server üzerinden logların nasıl alınacağını anlatacağım.
Daha önce vCenter Server log dosyaları ile ilgili aşağıdaki gibi bir makale yazmıştım.
vCenter 6 log dosyaları nerede?
Eğer ESXi Server’in support loglarının nasıl oluşturulduğunu merak ediyorsanız aşağıdaki linki inceleyebilirsiniz.
ESXi Support Bundle Nasıl Oluşturulur?
Windows vCenter Server yakın bir zaman içinde EOL olacak. Bundan dolayı ben bu yazımda sizlere vCenter Server Appliance log dosyalarından bahsedeceğim. Kısaca VCSA üzerinden loglar nasıl alınır bundan bahsedeceğiz.
vCenter Server Appliance’in log dosyalarını toplamak için Management Console’u kullanabilirsiniz. Bunun için aşağıdaki adrese giriş yapıyoruz.
[php]https://VCENTER-IP:5480 [/php]
Management Appliance’a login olduğumuzda Summary bölümünde sağ kısımda yer alan Create Support Bundle butonuna basarak vCenter Server’ın support loglarını download edebilirsiniz.
Eğer burada sorun yaşıyorsanız aşağıdaki link’e giderek root bilgileri ile login olabilir ve support loglarını download edebilirsiniz.
[php]https://VCENTER-IP/appliance/support-bundle [/php]
Support loglarını download etmek için root bilgilerini giriyoruz ve Enter butonuna basıyoruz.
vCenter Server ‘in support loglarını toplamak oldukça basit bir işlem.
Umarım faydalı olmuştur.
İyi çalışmalar.
0 notes
Text
Logging into vCenter when vCenter Cloud Gateway (VCGW) is disconnected from vSphere+ Cloud Service
As part of setting up access to the vSphere+ / vSAN+ Cloud Service, a vCenter Cloud Gateway (VCGW) is deployed into your on-premises infrastructure and serves as a gateway between your vCenter Server(s) and the VMware Cloud Console. If the VCGW has connectivity issues to the VMware Cloud Console for whatever reason, your infrastructure and […]http://dlvr.it/SjqwJj
View On WordPress
0 notes
Text
ESX Host ve vCenter Loglarının Toplanması
ESX Host ve vCenter Loglarının Toplanması
Merhaba, bu yazımda sizlere ESX host ve vCenter loglarının toplanması konusundan bahsedeceğim. VMware vCenter Server ve ESXi hostlardan log toplama işlemi birkaç farklı yöntemle gerçekleştirilebilir. Aşağıda bu yöntemlerden bazılarını ve kullanılacak komutları bulabilirsiniz. ESXi Host Logları VMware ESXi hostlar üzerinde log toplamak için SSH veya DCUI (Direct Console User Interface)…

View On WordPress
#collecting logs to esx host#collecting logs to vcenter#esx host logs#ESX Host ve vCenter Loglarının Toplanması
0 notes
Text
For the past one week, I’ve been working on a centralized Logs management system for VMware vSphere and vCenter environment. Having searched on the web for a simple, better open-source solution for this, the ideal solution seemed to be Rsyslog collector. So I ended up installing Rsyslog server on CentOS 7 system and configuring it as a central logs server for vCenter Server Appliance(vCSA) logs and all logs generated by vSphere servers. In this guide, we will cover both installation/configuration of Rsyslog server and configuration of vCSA/vSphere to send logs to remote Rsysog server we configured. Setting up vSphere and vCenter Central Logs Management with Rsyslog Before we get started, let me state the assumptions here: You have installed CentOS 7 server; Debian based system should be fine Rsyslog is installed Your user account has sudo privileges If any of the above is not satisfied, make sure you have all set. When done, use steps below to install and configure Rsyslog server to receive logs from your VMware vSphere and vCenter infrastructure. Step 1: Update your system Let’s update our system packages to the latest releases: sudo yum update For Ubuntu, do the same with apt: sudo apt-get update && sudo apt-get upgrade Reboot the system if possible for updates which require an update to take effect, e.g kernel updates: sudo reboot Step 2: Configure the Rsyslog server Both CentOS and Ubuntu/Debian systems come with rsyslog installed and running. We will need to create an additional configuration file for our VMware setup. For basic configuration of Rsyslog on Ubuntu/Debian, refer to How to Configure Rsyslog Centralized Log Server on Ubuntu 18.04 LTS The default configuration file is./etc/rsyslog.conf. Any additional configuration can be placed under the directory/etc/rsyslog.d/. Create a directory for VMware vSphere and vCSA appliance logs: $ sudo mkdir -p /data/logs/vcenter,esxi Then add the following configuration file to /etc/rsyslog.d/vmware.conf.This is a config for vSphere Infrastructure logging. It has templates which dictate where and how to store logs, match patterns, and log timestamp definition. # Provides TCP syslog reception $ModLoad imtcp #### Create Templates for Log parsing #### Log store is created folder previously template(name="TIMESTAMP" type="string" string="%timegenerated:8:25%||%HOSTNAME%||%syslogtag%||%msg%\n") template(name="ESXI" type="string" string="/data/logs/esxi/%fromhost-ip%/%$YEAR%-%$MONTH%/%$DAY%.%$MONTH%-messages.log") template(name="VCENTER" type="string" string="/data/logs/vcenter/%fromhost-ip%/%$YEAR%-%$MONTH%/%$DAY%.%$MONTH%-messages.log") #### Define remote logging RuleSet $RuleSet remote ### The following rule is created to store logs coming from vCenter with different parameters ### If log is coming from vcenter with IP 192.168.10.50 it will be stored using VCENTER template. ### Replace 192.168.10.50 with your vCSA IP address if $fromhost == '192.168.10.50' then *.* ?VCENTER else # Store all other logs using TIMESTAMP and ESXI templates. *.* ?ESXI;TIMESTAMP ### Tell rsyslog to listen TCP port 514. ### All events coming to this port will be parsed using remote RuleSet. $InputTCPServerBindRuleset remote $InputTCPServerRun 514 Here we defined three templates: TIMESTAMP: Used to format all logs coming from certain IP Address. This is to make logs more readable by having proper time formats. ESXI: This tells rsyslog to store logs from each host in a separate folder and logs from each day be stored in a folder corresponding to that day. Logs from vSphere hosts will be stored in /data/logs/esxi VCENTER: This tells rsyslog to store logs from a vCenter appliance in /data/logs/vcenterusing timestamp and structure similar to the one used on ESXI template. Restart rsyslog service after making the changes: sudo systemctl restart rsyslog Check status, it should be in running state: $ systemctl status rsyslog
● rsyslog.service - System Logging Service Loaded: loaded (/usr/lib/systemd/system/rsyslog.service; enabled; vendor preset: enabled) Active: active (running) since Thu 2018-08-02 11:54:03 EAT; 1min ago Docs: man:rsyslogd(8) Main PID: 12489 (rsyslogd) Tasks: 8 Memory: 7.6M CGroup: /system.slice/rsyslog.service └─12489 /usr/sbin/rsyslogd -n Aug 02 11:54:03 rsyslog.example.com systemd[1]: Starting System Logging Service... Aug 02 11:54:03 rsyslog.example.com rsyslogd[12489]: [origin software="rsyslogd" swVersion="8.24.0" x-pid="12489" x-info="http://www.r...] start Aug 02 11:54:03 rsyslog.example.com systemd[1]: Started System Logging Service. Hint: Some lines were ellipsized, use -l to show in full. Open Rsyslog firewall ports Rsyslog listens on port 514, we configured it to user TCP, open it using your firewalld administration tool. On Ubuntu / Debian with ufw: sudo ufw allow 514/tcp On CentOS 7: sudo firewall-cmd --add-port=514/tcp --permanent sudo firewall-cmd --reload Step 3: Configure vSphere hosts and vCSA Appliance The only pending piece is to configure vSphere and vCSA appliance to push logs to our rsyslog server. How to Configure vSphere remote Syslog Open your vCenter and navigate to: Hosts and Clusters > Select Host > Configure > Advanced System Settings > Edit on Filter box, search “syslog”. You should see “Syslog.global.logHost“. Fill rsyslog server address inside this box: tcp://192.168.10.35:514 If you want to configure both tcp and udp, separate them using a comma: tcp://192.168.10.35:514,udp://192.168.10.35:514 It should look like below: How to Configure vCenter (vCSA) remote Syslog For vCSA, configure remote rsyslog by opening vCSA administration UI: http://vCSA-IP:5480 This will give login dashboard: Enter username and password provided during installation. The initial default username is root, and the default password is vmware. Procedure: In the vCenter Server Appliance Management Interface, select Syslog. In the Forwarding Configuration section, click Configure if you have not configured any remote syslog hosts. Click Edit if you already have configured hosts. In the Create Forwarding Configuration page, enter the server address of the destination host. The maximum number of supported destination hosts is three. From the Protocol drop-down menu, select the protocol to use. In the Port text box, enter the port number to use for communication with the destination host. In the Create Forwarding Configuration pane, click Add to enter another remote syslog server. Click Save. Verify that the remote syslog server is receiving messages. In the Forwarding Configuration section, click Send Test Message. Verify on the remote syslog server that the test message was received. The new configuration settings are shown in the Forwarding Configuration section. If you go back to the rsyslog server, there should be two folders created under logs directory configured earlier: $ ls /data/logs/ esx vcenter $ ls /data/logs/vcenter/192.168.10.50/2018-08/02.08-messages.log /data/logs/vcenter/192.168.10.50/2018-08/02.08-messages.log And for ESXI hosts: $ file /data/logs/esx/192.168.10.31/2018-08/02.08-messages.log /data/logs/esx/192.168.10.31/2018-08/02.08-messages.log: ASCII text, with very long lines You can consider configuring log rotation for the same. $ cat /etc/logrotate.d/vmware /data/logs/esxi/*/*/*.log rotate 90 daily notifempty compress /data/logs/vcenter/*/*/*.log rotate 90 daily notifempty compress You now have a working rsyslog server for your vSphere Infrastructure. Have a happy logging.
0 notes
Text
Vmware vcenter storage monitoring service initialization failed


Funny thing though is that this particular vCenter Appliance should’nt even be working anymore because once the certificate is expired, most of the time it won’t even start all of the vCenter services once you reboot it.
Below you can find some snippets of logs which might be interesting for you to match your problem to the one I was having:Īll certificates checked out but guess what, the “MACHINE_SSL_CERT” didn’t. Which got me thinking and looking at the certificates for this vCenter Server Appliance. Once we dove into the log files from the license service in “/var/log/vmware/cis-license/license.log” we noticed some Security Token Service STS service, SSO service and web-client service issues in regards to certificates. We also noticed that the License module in the vSphere client was also providing us with a timeout. Going to the ESXi host directly you could however see that the license was present and activated.
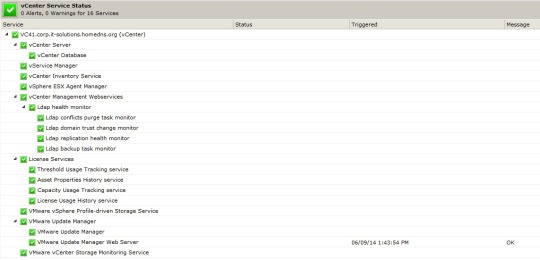
Going to the “Licensed Features” tab in the vSphere Client (VCSA version 6.0 GA) usually gives you a nice overview of what vSphere license is installed, but this time it was just empty. So we started troubleshooting the VCSA server and noticed that it couldn’t retrieve the installed licenses (VMware vSphere Enterprise Plus) from the production ESXi hosts anymore. Which is weird and something I’ve never seen before. For starters the vMotion and Storage vMotion features weren’t working anymore because of time-outs. Recently we’ve had some weird issues on one of our customers vCenter Servers.
0 notes
Text
Litemanager wont reconnect after restart

#LITEMANAGER WONT RECONNECT AFTER RESTART HOW TO#
#LITEMANAGER WONT RECONNECT AFTER RESTART INSTALL#
#LITEMANAGER WONT RECONNECT AFTER RESTART ARCHIVE#
#LITEMANAGER WONT RECONNECT AFTER RESTART FULL#
#LITEMANAGER WONT RECONNECT AFTER RESTART PRO#
#LITEMANAGER WONT RECONNECT AFTER RESTART INSTALL#
To access the PC remotely through LiteManager, you need to install a file named Server on it and a file named Viewer on the host computer.
#LITEMANAGER WONT RECONNECT AFTER RESTART ARCHIVE#
Unzip the archive – there will be two files.
Go to the manufacturer’s website and download the distribution corresponding to the bit size of your computer.
#LITEMANAGER WONT RECONNECT AFTER RESTART HOW TO#
This is suitable for large companies and professional system administrators, as well as for freelancers who conduct training courses. If you have already made a choice between LiteManager Free and Pro, let’s understand how to use the program. drawing with the mouse on the workspace.convenient add-ons for corporate use: general address books, synchronization, etc.unlimited number of computers to connect to.
#LITEMANAGER WONT RECONNECT AFTER RESTART PRO#
If you need advanced rights: access to fine-tuned proxy server, for example, the paid version of LiteManager Pro Server – this is the same program, but with great features:
remote access to a PC via LiteManager has no time limit.
you can download and install programs on a computer far away from you.
#LITEMANAGER WONT RECONNECT AFTER RESTART FULL#
through the application you get full access to another PC, including system management functions.
there is a chat that is very helpful if you use the application for educational purposes or provide support to interns at work.
you can record what is happening on the screen and convert it to a convenient format.
I need to get smarter on this to include High Availability which seemed to "work" for the VMs on this host during this whole ordeal but also reported errors.LiteManager Free allows you to work with a computer (or several at once) that is at a distance from the user. Unlike similar programs, this software does not prohibit free corporate use – the coverage limit is 30 machines at a time. Otherwise, there are no restrictions, and it is not necessary to buy a paid license. In addition to free use, the program has a number of other benefits: I'm going to guess restarting the management agents successfully restarted something that allowed the server to resolve correctly from the DNS server once again. The GUI still seems to be running very slow, but the host reconnected to vCenter and I am able to login with root using the vSphere/web console once again. Maybe not? At this time, it still looks like Restart Management Agents is running in the KVM GUI. But I would assume that Restart Management Agents and services.sh restart would do the same thing. This method would always result in hanging on certain services, most notable the lsass service which is an Active Directory service which again points to the unintentional removal of the DNS entry for this host as the likely culprit that started all of this. The odd thing is I had spent a large portion of the day in the ESXi host Shell trying to restart all services using the services.sh restart command. This is located under F2-> Troubleshooting Mode Options-> Restart Management Agents. I'd say this is PFM cause I'm not exactly sure what fixed it, but it started working after I ran the Restart Management Agents option from the ESXi KVM GUI. However, the KVM access runs extremely slow and I was also wondering if full System Event Logs (SEL) might be attributing to any of this and/or how to clear the event logs.Īfter troubleshooting for most of the day my ESXi host reconnected with the vCenter server. Everything appears to be configured fine in the Shell. How can I reconnect the host to vCenter given the information provided above? How can I regain login access to the host with the root login using vSphere? It should also be noted that I can login to the host directly via KVM and access the Shell. Currently all the VMs on the host are up, accessible, and running fine, but it is disconnected from vCenter. Also I'm not sure if restarting the host will even correct this issue. I'm trying to avoid restarting the ESXi host for two reasons a) my user's Domain Controller and Horizon View server are located on this host and restarting would cause interruption and b) because I cannot login to the host console, I'm not sure if I'll be able to restart the DC and View VMs after the host comes back up. It stays here for upwards of 20-30 minutes until it finally times out. At this point the Reconnect host task runs but does not progress beyond 0%. I have also selected the host in vCenter and clicked Connect (right-click -> Connection -> Connect). I've since re-added the host to the DNS server. After a bit of poking around, I noted the host was deleted from my DNS server. I also cannot login to the host using the vSphere client or web client using the root login. The event log shows Error Cannot synchronize host. I recently noted an ESXi host in my vCenter environment had a warning (not responding). My environment is ESXi 6.0 and vCenter 6.0.
0 notes
Text
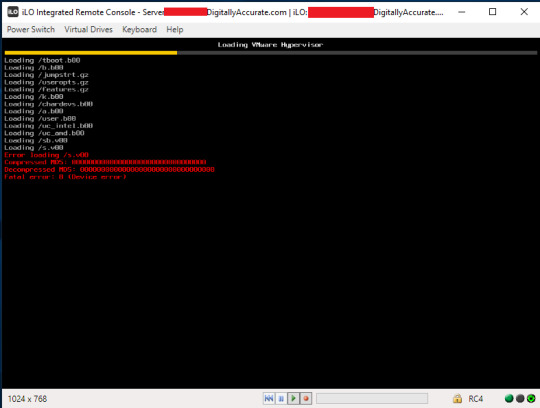
Vmware esxi 6.7 the system has found a problem on your machine failed to decompress s.v00

Is the package extraction location the System Swap location? Now since his solution was to adjust the system swap location, it begs the question. The main thing mentioned by the blogger is “The problem is caused by ESXi not having enough free space available to extract the installation packages.” but failed to specify where that exactly is, and the event log didn’t specify that either. Lookup up the error about not being able to stage the file I found this one blog post which of course mentioned changing the swap location to get past the error… The VMware docs doesn’t seem to describe accurately the difference between these two options. Which if you look on the vCenter Web UI on a ESXi hosts there are two options available: VM – Swap, and System Swap. However, researching this even more lots of posts on reddit mentioned the swap file for VM’s being on their VM directories, so if using a shared datastore they will reside there, and I shouldn’t see issues around swap usage at all at the host level.
Swap Location: VMware Doc 1 (Configure), VMware Doc2 (About), Tech Blogger Who seem to regurgitate the exact about page from VMware.
Scratch Log: VMware KB Tech Blogger 1 Tech Blogger 2.
However, not many source specify changing the system swap location. So couple things to note here, first the ESXi image is installed on a USB/SD Card style setup as such it should be well know to define the persistent log location, as well as the scratch location. It just hasn’t fully flooded /tmp just yet. However I feel maybe there’s a bit of the known HPE bug as mentioned the last time this happened. Huh, Now note this host was installed running the official VMware Image provided by HPE for this exact hardware supported by the VMware HCL. OK I guess… moving on… the very next error event was: Could not stage image profile '(Updated) HPE-ESXi-Image': ('VMware_bootbank_vmware-fdm_7.0.2-18455184', ' No space left on device') This seemed a bit weird but I could find any info other than what’s usuallly a very Microsoft type answer of “you can just ignore it” or “ usually this is not an issue, just it says vCenter saying it is connecting to esxi host and installing it’s agent” Which was in the log right after this event of attempting to install a base ESXi image? Installing image profile '(Updated) HPE-ESXi-Image' with acceptance level checking disabled As a result, the file /tmp/img-stg/data/vmware_f.v00 could not be written Which showed only 90% full, which was still pretty high, which might have explained the one log event that I did see about it: The ramdisk 'tmp' is full. Un like the last time this happened, the event log wasn’t as blatant (flooded) complaining about the /tmp being full. This time after updating again a host in the cluster had the error message. This seems to be a reoccurring story these last couple posts… Error on Host The information on this site is not directed at residents of the United States and is not intended for distribution to, or use by, any person in any country or jurisdiction where such distribution or use would be contrary to local law or regulation.Another vCenter Patch, Another problem 😀 The company is authorized and regulated by the VFSC (Reference number 14,691) and is a proud member of the Financial Markets Association of Vanuatu.

GCH (Global Clearing House) is a company incorporated under the laws of Vanuatu (Register number 14,691) with registered address 1276 Kumul Highway, Port Vila, Vanuatu, Republic of Vanuatu. The company is also registered under the MiFID regulations with a lot of European regulators - AFM Netherlands, BaFin Germany, CONSOB Italy, CySEC Cyprus, FMA Austria, FSA Denmark, FSA Estonia, FSMA Belgium, KFN Poland, NBS Slovakia etc.
The address of FH Ever JSCo is 1303, Stamboliiski Blvd, Sofia, Bulgaria. Read more in our Risk Notice.įH Ever JSCo is registered in Bulgaria (831649724) and is authorized and regulated by the Financial Supervision Commission (Register number RG-03-08). You should consider whether you understand how CFDs work and whether you can afford to take the high risk of losing your money. 71% of retail investor accounts lose money when trading CFD’s with this provider. CFDs are complex instruments and carry a risk of losing money. Tax treatment depends on your individual circumstances and may be subject to change. Past performance is no guarantee of future results.
0 notes
Text
Vmware vsphere 6.5 keygen torrent

Vmware vsphere 6.5 keygen torrent license key#
Vmware vsphere 6.5 keygen torrent pro#
Vmware vsphere 6.5 keygen torrent software#
Vmware vsphere 6.5 keygen torrent Pc#
Vmware vsphere 6.5 keygen torrent software#
In this manner, you can, for example, test software on multiple systems. VMware Player, you can run multiple ora’s on the same unit. You may able to publish, run, and view exclusive machines from the Workstation user interface. Furthermore, easily hook up to vCloud Air.
Vmware vsphere 6.5 keygen torrent Pc#
Seamlessly move and drop online machines in the middle of your PC as well as your internal cloud jogging vSphere, ESXi or another illustration of Workstation. It gives you to increase and range your exclusive machines in the cloud. VMware Workstation provides relationships to VMware vSphere and vCloud Air service.
Support for systems with multiple screens.
Intelligent download and installing a fresh version of the toolkit VMware Tools.
The automatic suspension system of the VM when the node is turned off.
Main Features of VMware Workstation 15 Keygen The advanced functions of the VMware Workstation 14 products provide users with a secure workplace. Predicated on this great experience, the VMware Workstation team has had the opportunity to regularly improve and improve our products over time, “said Dave Offer, VP of Product Marketing, VMware PERSON Processing. VMware has been hearing and giving an answer to the precise needs of builders, IT specialists and companies for more than 17 years. VMware Workstation Torrent facilitates hundreds of visitor. This program has a number of different qualities which make it a great software so that you can run another os’s inside Windows. VMware Player is without a doubt one of the better programs for creating and emulating online machines. As all users who ever before worked with online machines know, they are really stored on hard disks in the same way archives that may be activated and packed by wide selection of VMware software players, which VMware Player aspires to be the best one, light and having the ability to be used in virtually any situation.
Vmware vsphere 6.5 keygen torrent license key#
VMware Workstation License key enables you to launch any recently created exclusive machines on your pc – this makes tests and setting up different applications easy and safe. In cases like this, a digital machine (VM), including the VMware Workstation Player, pays to in which os can be installed and operate on the desktop. VMware Player has increased support for the Glass windows program, which can react both as a bunch so that as a guest operating system. VMware Workstation 15 License keygen freeload Compared to earlier versions, the utmost number of reinforced virtual systems was up to 20. A new feature is a simple Install, rendering it easy to perform exclusive machines on the latest Home windows and Linux personal computers. To put it simply, it simplifies the execution of other VMware products, such as Workstation Expert, Server, and ESX Server. However, for commercial use, a cost is claimed. The player is free software which allows online machines to be created and rotated. VMware has released Workstation Player, which is going to save.
Vmware vsphere 6.5 keygen torrent pro#
VMware Workstation Pro Crack will not only run current os’s but also as old as OR WINDOWS 7. Inside the network part, VMware Workstation now allows an individual to rename online systems, brings new network latency simulator (great for evaluating certain types of software) and support for observing the Ip on the electronic machine unit – with it isn’t essential to log into it for IP and Apple pc address visualization. The built-in wizard, now you can transfer the VMware vCenter Server Equipment virtual module, that allows you to control the VMware vSphere digital infrastructure. With a straightforward user interface, fantastic operating-system support and portability, IT professionals are now able to provide their users with even more standard enterprise desktops. VMware Workstation 16.2.0 is a desktop virtualization software which allows you to perform a number of os without rebooting on a single computer. Main Features of VMware Workstation 15 Keygen.VMware Workstation 15 License keygen freeload.VMware Workstation 16 Pro Crack Free Torrent 2020.
0 notes
Text
Esxi 6.5 keygen torrent

ESXI 6.5 KEYGEN TORRENT LICENSE KEY
ESXI 6.5 KEYGEN TORRENT CRACK SOFTWARE
ESXI 6.5 KEYGEN TORRENT KEY FREE
ESXI 6.5 KEYGEN TORRENT LICENSE NUMBER
ESXI 6.5 KEYGEN TORRENT DOWNLOAD
vRealize-Endpoint-Operations-Management-Agent-x86-64-linux-6.7.vRealize-Endpoint-Operations-Management-Agent-noarch-linux-6.7.0-7947327.rpm.vRealize-Endpoint-Operations-Management-Agent-noJRE-6.7.0-7947327.zip.vRealize-Endpoint-Operations-Management-Agent-noJRE-6.7.VMware-NSX-Manager-upgrade-bundle-6.4.Related posts: Vsphere 6 7 Tpm Trusted Platform Module Let's hope for smooth upgrades in the next couple of weeks. vSphere 6.5 had a long closed and open beta phase to hunt for bugs. With 614 days, the development time of vSphere 6.5 was over 20 month. However, vSphere 6.0 still had some serious issues. Since vSphere 6.0 VMware started to extend major release cycles. VMware vSphere Management Java SDK 6.5 for Workbench IS.VMware vSphere Virtual Disk Development Kit 6.5.VMware vSphere Command Line Interface 6.5.VMware vSphere Automation Java SDK 6.5 for Workbench IS.VMware vSphere Automation SDK 6.5 for.VMware vSphere Automation SDK 6.5 for Ruby.VMware vSphere Automation SDK 6.5 for REST.VMware vSphere Automation SDK 6.5 for Python.VMware vSphere Automation SDK 6.5 for Perl.VMware vSphere Automation SDK 6.5 for Java.VMware Virtual SAN Management SDK 6.5.0.VMware Open Virtualization Format Tool 4.2.0.VMware vRealize Operations Manager 6.4.VMware vRealize Log Insight 4.0.0 for NSX.VMware vSphere Management Assistant 6.5 (vMA).VMware vRealize Log Insight 4.0.0 for vCenter.VMware Virtual SAN Witness Appliance 6.5.VMware vSphere Hypervisor (ESXi) 6.5.0.Another way is to select the 'Create board outline' tool, left click on the first point on design area, right click and select 'Arc mode' from the submenu. I can't see the solder mask and solder paste for pads. Press 'OK' to apply changes and you'll get the board you need. The easiest way to create a circular board is to select 'Objects Board Points' from main menu then choose 'Create circular board' option and specify the board radius. Specify the opposite point of the circle then left click on first point to close the board outline.
ESXI 6.5 KEYGEN TORRENT DOWNLOAD
VMware vSphere 6.5 Release Notes and Download Links
Vsphere 6 7 Tpm Trusted Platform Module.
ESXI 6.5 KEYGEN TORRENT LICENSE KEY
Free Vmware Esxi 5.1 License Key Crack Download.
ESXI 6.5 KEYGEN TORRENT CRACK SOFTWARE
Free Vmware Esxi 5.1 License Key Crack Software.
But it wasn’t what I expected it only let’s you create a VM with 8vcpu to get more you need to buy a license I bought one for £580 that includes 3 hosts and 1 vcenter server.
ESXI 6.5 KEYGEN TORRENT LICENSE NUMBER
When you go onto the VMware website to download esxi 6.5 u1 it gives u a free license number to enter on the esxi web interface after you have installed it. VMware Player Crack 15.5.6 With Keygen Free 2020 Windows + Mac With many applications that range from a single educational instrument to a company tool for providing simplified expertise to conduct a corporate background on a BYO apparatus, Workstation Player frees the VMware vSphere hypervisor to provide a simple yet stable and secure. VMware player is publicly available on the current market and isn’t subject to any licensing or restrictions. Trade associations need to be paid permits to utilize Workstation Player. We encourage pupils and non-profit organizations to profit from this offering.
ESXI 6.5 KEYGEN TORRENT KEY FREE
VMware Player 15.5.6 2020 Crack & Key freeload.
0 notes
Text
Network scanner

Network scanner windows#
Accept the default frequency and run the discovery immediately.On the Discovery Settings panel, click Next.When you scale monitoring, you can configure discovery to automatically start monitoring objects it finds. This allows you to review the list of discovered objects and select the ones you want to monitor. On the Monitoring Settings panel, SolarWinds recommends manually setting up monitoring the first time you run discovery.
Network scanner windows#
On the Windows panel, to discover WMI or RPC-enabled Windows devices, click Add New Credential and provide the required information.If any device on your network uses a community string other than public or private, or if you want to use an SNMPv3 credential, click Add Credential and provide the required information.If all devices on your network require only the default SNMPv1 and SNMPv2 public and private community strings, click Next.Select and provide required information.Check Poll for VMware and click Add vCenter or ESX Credential.On the Virtualization panel, to discover VMware vCenter or ESX hosts on your network:.If there are no nodes using agents, you can leave this option unchecked. This setting ensures any agents you deploy, including the one on your Orion server, are up to date. If any nodes are using agents, select the Check all existing nodes check box. The QoE agent monitors packet-level traffic. If the Agents panel appears, you’ve enabled the Quality of Experience (QoE) agent during installation.If this is your first discovery, add a limited number of IP addresses on the Network panel.Click Add New Discovery, and then click Start.If the Discovery Wizard does not start automatically after configuration, click Settings > Network Discovery.After you have configured SolarWinds NPM, log in to NPM and scan the network for devices to monitor.īefore discovering your network, take these steps:
0 notes
Text
Vmware vcenter converter standalone 6.2 download

VMWARE VCENTER CONVERTER STANDALONE 6.2 DOWNLOAD INSTALL
VMWARE VCENTER CONVERTER STANDALONE 6.2 DOWNLOAD UPGRADE
VMWARE VCENTER CONVERTER STANDALONE 6.2 DOWNLOAD OFFLINE
Red Hat Enterprise Linux 4.x (32-bit and 64-bit).Supported Guest Operating SystemsĬonverter Standalone 6.2.x supports the following guest operating systems: For example, for interoperability with VMware Workstation Player 14, see VMware Workstation 14. Note: The interoperability information for VMware Workstation Player is published under the VMware Workstation product with matching versions. For selected hardware versions above 11, features are limited to the features in version 11. Note: Converter Standalone 6.2.x does not support Virtual Hardware versions above 11. In addition, Converter Standalone 6.2.x supports as sources physical machines running an operating system noted in Supported Guest Operating Systems.
VMWARE VCENTER CONVERTER STANDALONE 6.2 DOWNLOAD OFFLINE
VMware Converter Standalone can convert offline virtual machines from the following Hyper-V servers:įor the most up-to-date interoperability of Converter Standalone with VMware Desktop products and VMware vCenter virtual machines, check the VMware Product Interoperability Matrices.
Windows Server 2008 SP2 (32-bit and 64-bit).
VMWARE VCENTER CONVERTER STANDALONE 6.2 DOWNLOAD INSTALL
You can install VMware Converter Standalone 6.2.x on the following platforms: If you have a previous version of Converter Standalone installed, uninstall it and then install Converter Standalone 6.2x.
VMWARE VCENTER CONVERTER STANDALONE 6.2 DOWNLOAD UPGRADE
Note: You cannot upgrade to VMware vCenter Converter Standalone 6.2.x from previous versions. You must log in as an elevated administrator to install Converter Standalone. Users with limited rights cannot install Converter Standalone on Windows. You can download, install, and run VMware vCenter Converter Standalone in English only.
Enable non-disruptive conversions through hot cloning, with no source server downtime or reboot.
Ensure conversion reliability through quiesced snapshots of the guest operating system on the source machine before data migration.
Enable centralized management of remote conversions of multiple physical servers or virtual machines simultaneously.
Convert physical machines running Windows or Linux operating systems to VMware virtual machines quickly and without any disruption or downtime.
Through an intuitive wizard-driven interface and a centralized management console, Converter Standalone can quickly and reliably convert multiple local and remote physical machines without any disruptions or downtime. VMware vCenter Converter Standalone provides an easy-to-use solution that automates the process of creating VMware virtual machines from physical machines (running Windows and Linux) and other virtual machine formats.
Customer Experience Improvement Program.
What's in the Release Notes These release notes cover the following topics: Note: VMware vCenter Converter Standalone 6.2.0.1 | 22 May 2018 | Build 8466193 replaces the previously released VMware vCenter Converter Standalone 6.2 | | Build 7348398Ĭheck for additions and updates to these release notes.
0 notes