#wanted to focus on shapes of shadows and facial structure
Explore tagged Tumblr posts
Visit Tumblr Blog
Explore Tumblr blogs with no restrictions, modern design and the best experience.
Last Seen Tumblr Blogs


Fun Fact
The total number of visits Tumblr.com received during January 2021 is 327 million.
Text
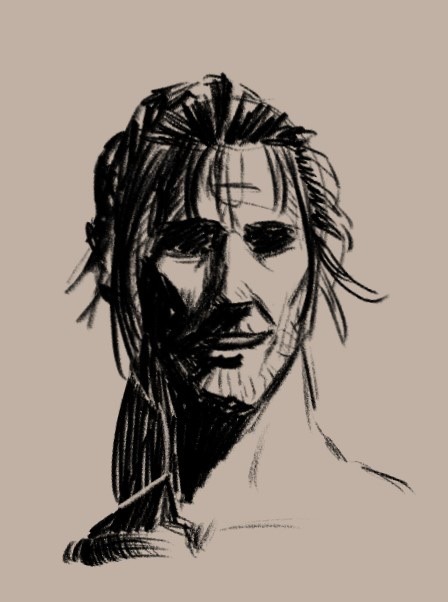
Super low res and unintentionally unsettleing Varré
#elden ring#varre#white mask varre#elden ring varre#white faced varre#mohgwyn dynasty#varré#white mask varré#like that one art style#yeah#wanted to focus on shapes of shadows and facial structure#2 poorly drawn irises away from being part of the Mandela catalogue#he’s still baby tho
107 notes
·
View notes
Text
Concealer vs. Contour: Understanding the Key Differences for a Flawless Look
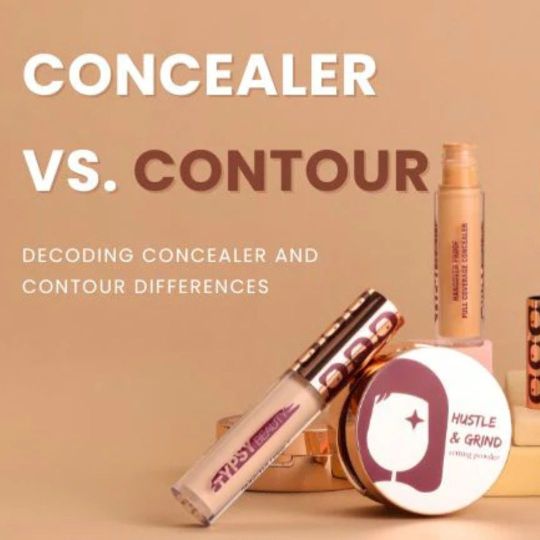
Concealer and contour are two makeup essentials that can transform your look, but they serve different purposes. Concealer is used to cover blemishes, dark circles, and imperfections, providing a bright and even complexion. It typically comes in shades lighter than your skin tone to brighten problem areas. On the other hand, contour is applied to define and sculpt the face, creating shadows that accentuate your bone structure. Contour products are usually darker than your natural skin tone and help add depth and dimension. While concealer focuses on coverage and correction, contour is all about enhancing facial features and creating a sculpted look. Knowing how and when to use these two products will elevate your makeup routine, giving you a radiant and chiseled finish.
Key Differences Between Concealer and Contour
Purpose:
Concealer: The main goal of concealer is to cover imperfections and even out skin tone. It helps to brighten areas like the under-eyes or conceal blemishes and redness.
Contour: Contouring’s purpose is to enhance the shape of the face. It adds definition and depth, creating shadows to sculpt the face, especially along the cheeks, jawline, and nose.
Application Area:
Concealer: Applied directly to areas of concern like under the eyes, on blemishes, redness, or any other spots you want to camouflage.
Contour: Applied to the sides of the forehead, beneath the cheekbones, along the jawline, and sometimes the sides of the nose to create the illusion of shadows and structure.
Shades:
Concealer: Typically comes in a shade lighter than your skin tone to brighten areas or match your skin tone to cover imperfections.
Contour: Comes in shades that are darker than your skin tone to create shadows and add depth.
Texture:
Concealer: Can have a creamy, liquid, or stick texture, offering full coverage and a smooth, opaque finish.
Contour: Usually matte and can be cream-based or powder-based, providing a more natural shadow effect rather than full coverage.
Blending:
Concealer: Needs to be blended into the skin to ensure that it seamlessly covers imperfections and doesn’t leave a cakey finish.
Contour: Requires blending as well, but the goal is to make the shadows look natural and soft, rather than blended seamlessly into the skin like concealer.
How to Use Concealer and Contour Together
To get the most out of your makeup routine, using concealer and contour together is key. Here’s how:
Start with Concealer: Apply concealer after your foundation to cover any blemishes or dark circles. Focus on areas where you need extra coverage and brightness.
Apply Contour: After your concealer is blended, apply your contour to the areas where you want to add depth. Focus on the hollows of your cheeks, the sides of your nose, and around your jawline to define your face.
Highlight: To complement contouring, use a highlighter to bring attention to areas like the tops of your cheekbones, your cupid's bow, and the bridge of your nose.
Set with Powder: Finally, set everything with a light dusting of powder to ensure it stays in place throughout the day.
Conclusion
While concealer and contour may seem similar at first glance, they serve different purposes in the makeup routine. Concealer is used to cover imperfections and brighten the face, while contour adds definition and sculpts the face. Together, they can help create a more balanced and radiant look. By understanding how each product works and how to apply them correctly, you can enhance your natural features and create the perfect makeup look for any occasion.
Whether you’re a beginner or a makeup pro, mastering the art of concealer and contour can elevate your beauty routine to the next level. So, next time you reach for your makeup bag, remember that these two products are your best friends for flawless, sculpted skin!
0 notes
Text
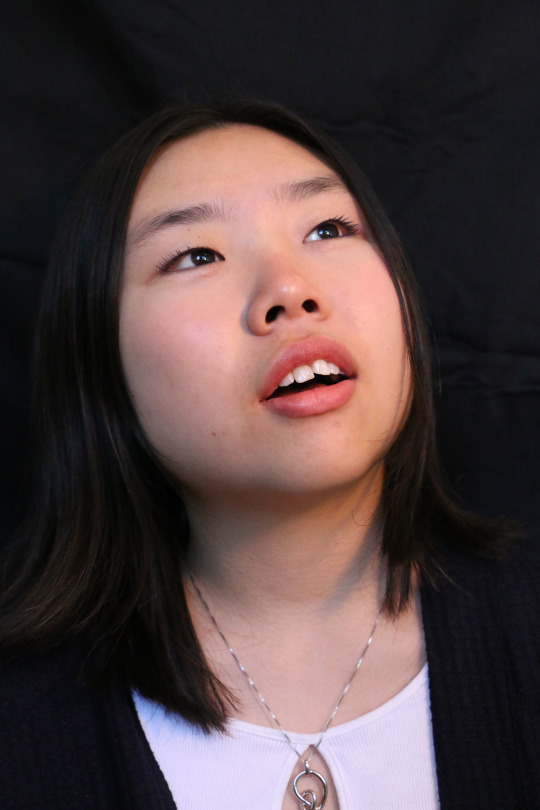
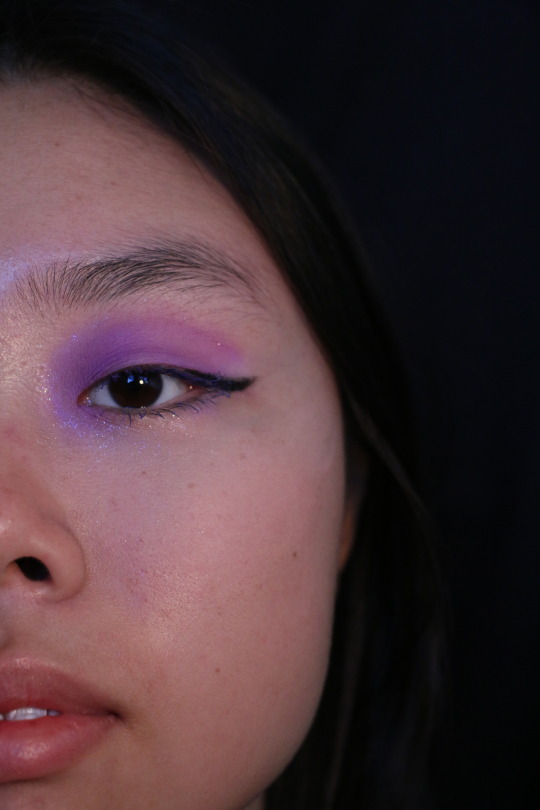
Week 5 - Hinami Photos
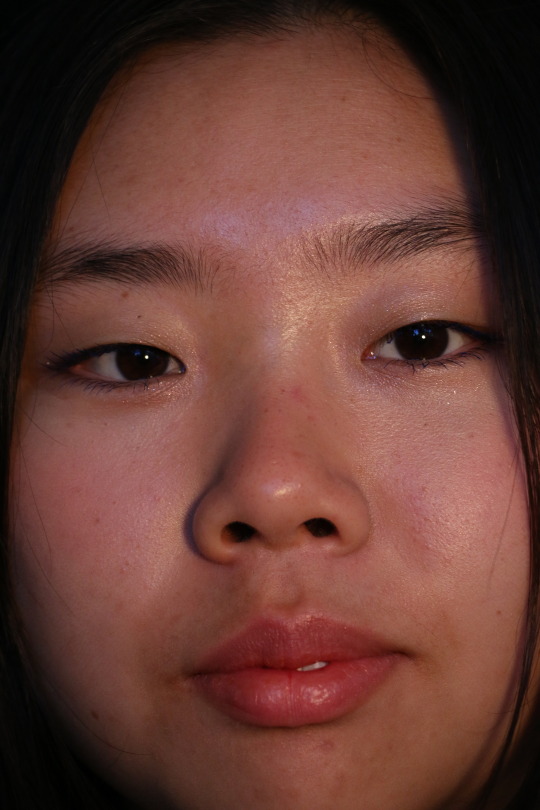
For my second shoot of week 5, I took photos of my friend Hinami in the same set-up I'd done for myself. I felt this would suit her best as she has an amazing face for close-ups and striking facial features. The lighting at this time was primarily overhead lighting with the lamp as well. Because Hinami has darker hair, I had to make sure the lighting and exposure were just right so we could see the silhouette of her hair, though sometimes it looked cool when you couldn't see it. I focused on moody, intimate, up-close shots of her face. Focusing on the vibe of a professional studio. I did play around with makeup, but I felt it fell short as I didn't think it suited her face. And then, finally, we played with more moody grungy makeup but continued to struggle to get the right facial expressions and angles to create a moody effect. I took inspiration from Kenneth Willardt and Bud Fraser for these shots. Kenneth Willardt for the up-close makeup shots with even lighting. And inspiration from Bud Fraser's for the moody, intimate, soft-lit portrait with concentration on the cheekbone.


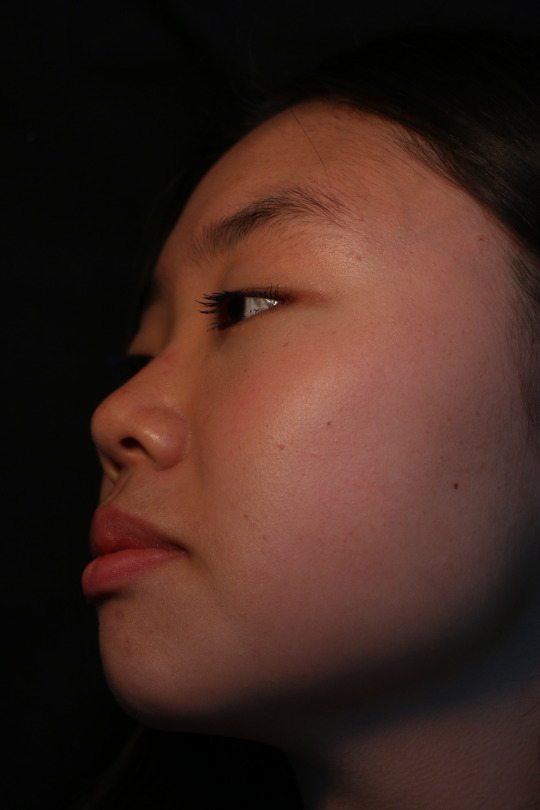
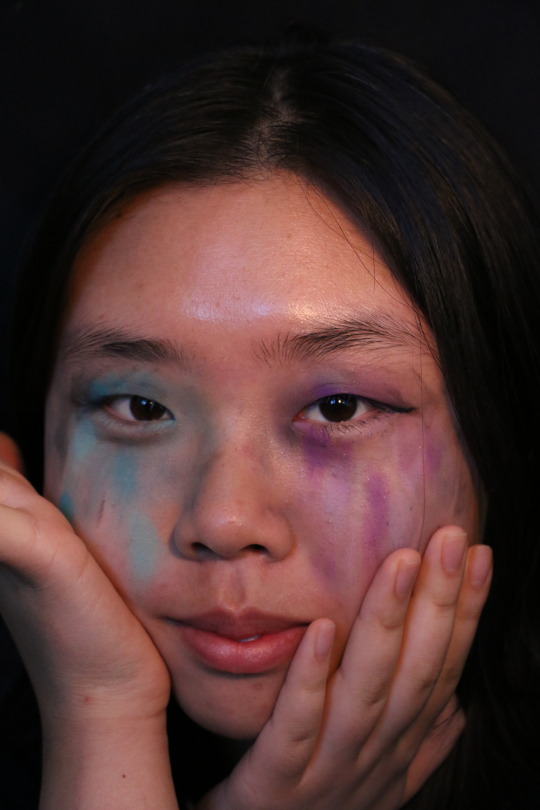
In these shots, I took inspiration from Bud Fraser's focus on the cheekbones. I also tried playing with shadows created by angling the face like in the shots. I really like the soft lighting in the first two shots and the hand placement in the second, which adds elegance. The second two have warmer lighting, which brings out gold tones in Hinami's skin. I also like the shadows in the third photo, which adds dimension to her face. But I particularly like the last as it is a different angle than others and draws attention to her face shape, and her expression matches the moody lighting.
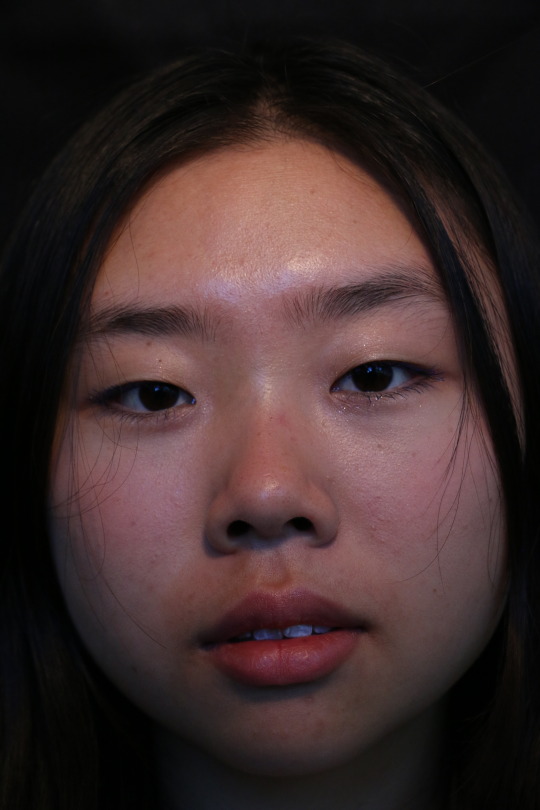
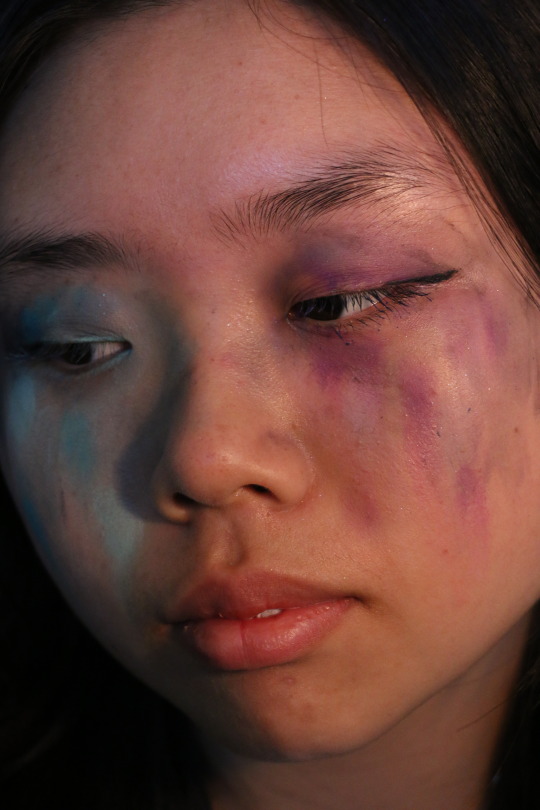
I wanted to play with the close-up shot like in the Kenneth example, as I like the intimacy and symmetry of these types of shots. I like how the first photo has a cold, sadder atmosphere, and her eyes portray sadness to them (unintentionally!!). I like how these shots make you focus on a person's facial structure and the nuances of facial features showing emotion. I also like how evenly dispersed the lighting is, as it allows the whole face to pop out. The first photo is especially nice, as you can see her hair against the backdrop. Which gives her more pictorial depth.

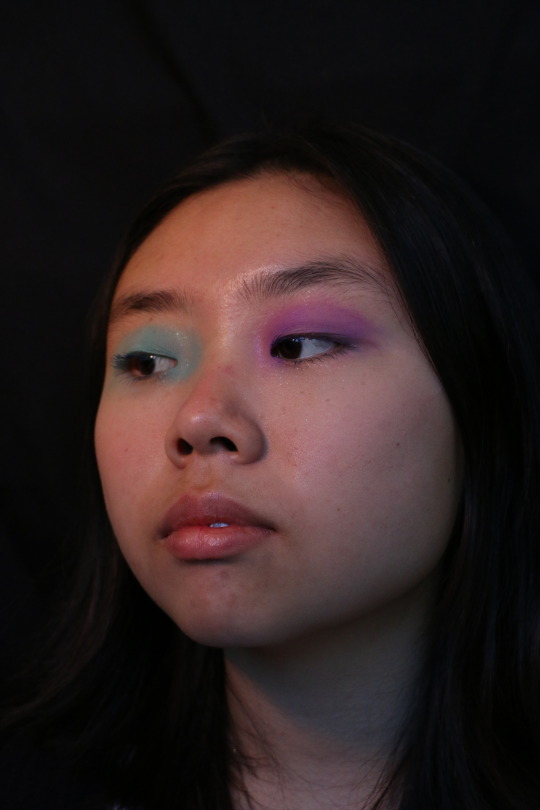
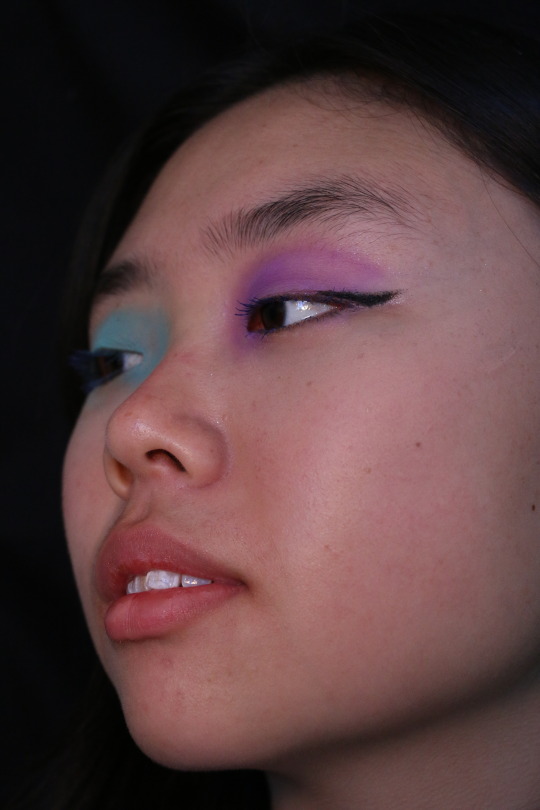
Inspired by Kenneth's shot, I played around with two different eye colours and chose close-up shots to focus on the makeup. I feel like the second two shots work the best as they focus primarily on the makeup, and it pops the most. Though, I really like the way the lashes pop in the first shot. I did take centre-on shots like the example I did for research, but I felt like they fell short.
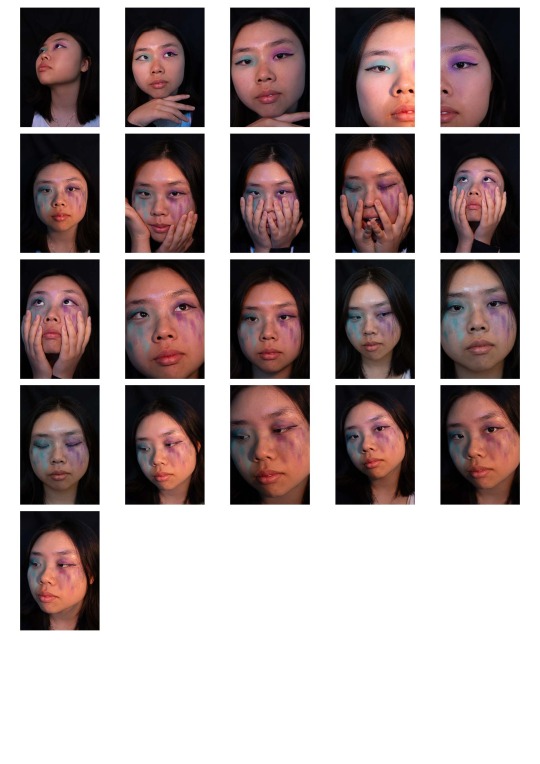
These photos I do not plan to use these as I feel like they fall short in terms of composition and vision. The grungy makeup didn't work right with the lighting, and my execution wasn't great. If I had time to redo this shoot, I would change the lighting and redo the makeup darker and more intense to really run with the theme.
Contact Sheets:

0 notes
Text
New Tax Year Resolutions
(no, it's not an April Fools thing)
I've always had strong opinions about how January 1st is a really stupid time to make resolutions. Especially in Britain. It's freezing. It's dark by 4pm. You've only just made it through Christmas, and you feel exhausted and kinda depressed. You've probably got a cold. All you want to do is hide under a blanket until Spring arrives.
I also know that a new tax year is ... not something to get excited about. Buuuut it is genuinely feels like a good time for a new start - the days are getting longer, things are growing and changing every day, you've probably still got a cold but somehow you don't feel so annoyed about it.
So, I've decided it's time to get some focus. And I'm writing it down here as a post, because saying things in public makes me significantly more likely to actually do them.
I had a lot of fun over the past three months just doing whatever I wanted, when I wanted, but I've got a bit frustrated with flip-flopping all over the place. I'll sit down to, say, draw a picture of a person, and my brain will instantly start whirring around all the things involved which I want to practice, and the list is ... extensive:
Heads - facial features, muscles, the skull, expressions, different types and shapes of heads.
Hair - styles, hair types, shading, stylisation.
Anatomy - basic proportion, different body shapes / types.
Posing - fluid movement, active rather than static poses, camera angles.
Clothing - folds, how clothes hang on the body, fabrics, styles.
Colouring - colour theory, palette choice.
Shading - shadow placement, types of shading, spot blacks.
Medium - digital painting? Markers? Pencils? Inks? Watercolours?? Gouche??? When are you going to try gouche, huh, huh????
Backgrounds - just ... just so much stuff my head hurts aaaaaa
... and that's just drawing a person, something I've done thousands of times over the years in the course of making comics - it's not even getting into any of the other art areas I'm interested in. I'll sit down and I'll have so many things I want to learn and try, that I won't be able to concentrate on anything properly and I'll feel slightly hysterical.
SO.
I want to start focusing on one thing at a time. Maybe just for a week or so on each thing to start with? I don't want to trap myself too much. I'm going to start with learning about heads, because I've had that one goddamn Andrew Loomis book on my desk for two months at this point, and I really should get it back to the library.
It's my ... my ... okay, I'm gonna call it my Spring Resolution, because New Tax Year Resolution does sound a bit rubbish.
Wish me luck! .... And if you've got any good resources on learning about head structure, then drop them in the comments!
2 notes
·
View notes
Text


FA222 ,principles of graphic design:
Instructor : mr.munwar mukhtar
@uob-funoon @mnwrzmn
Project 1 : lecture
dr katherine from the institute of fine arts new york university she is and get ready for this long series of titles she is professor of art history and visual culture in the department of visual performing arts she is director of the classical studies program she is director of the school of communication arts and media in the college of arts and sciences and she is also curator of the plaster cast collection at the fairfield university arresearch focuses on the parthenon sculptural program especially the metapees scans of her metapee drawings
classical influence influences in the work of ruby sky styler one means of gaining insight into ruby's visual language
explore, it is worth noting that in terms of archaeology excavations usually don't reveal a complete object let alone a whole building instead one excavates and finds fragments uh one reveals stratigraphy or levels and one records absolutely everything we have recovered approximately three percent of the material culture or fines from ancient greece that's a very modest amount isn't it this tells you how much we do not have at the same time fragments form pieces to amuch larger image or picture and something that i often find in ruby's work when i first saw this sculpture my immediate thought was a connection to a well-known image of sleeping ariadne seen here in a roman marble version in the vatican collections the same languid sleeping ariadne was among a selection of plaster casts that formed a series the gazing blue ball series by jeff coons the idea of using plaster casts of or with ancient sculpture is a practice that we can now date back to the 4th century bce in ancient greece today one can find numerous plaster casts cast collections throughout the world we are very fortunate at fairfield to have a beautiful collection of historic plaster casts either on loan or gifted to us by such generous organizations as the metropolitan museum of art yale university art gallery as well as other sources in 2014 i had the pleasure of meeting ruby sky
styler when she visited our campus to see the plaster cast collection she was preparing for a remarkable exhibition at the aldridge museum of contemporary art curated by amy smith stewart a view of her installation for ghost versions 2015 which you see in front of you places our historic plaster casts on low platforms while ruby's massive relief panels in plaster are displayed on the walls for those of us fortunate enough to see this beautiful exhibition one of many aspects that stood out to me was this sense of a silent
but direct communication between the historic cast representing ancient sculpture and ruby's new work from the figural to the relief we begin to notice the layers of shapes and patterns in ruby's work behind the cast of a boy closer still more details emerge of patterns
textures and letters suggesting fragments of words or language it is as if a language is being spoken but can we understand it ruby's exploration of the surface can be seen here in this outdoor sculpture bust of a woman when i first saw this sculpture only through a photograph it seemed familiar to me perhaps recalling especially this lovely female figure of a maiden or corey dedicated on the athenian acropolis by eutheticos i should note that we have a plaster cast of this maiden which might explain why it is so
familiar to me normally i see it every day that i teach in the museum classroom facial features hair texture while different nevertheless seem to share a direct and bold gaze at the viewer ruby's image on the left a head in profile required a little more sleuthing but surely its starting point is connected with the apollo piambino on the right while the ancient bronze may have been a starting point for ruby's transformation
of the image that ruby's transformation of the image is entirely contemporary and fascinating as we look through layers almost like a stratigraphy to see the rather ephemeral image recalling the ancient bronze apollo and if you look really closely you can see behind the profile image there are words let's return to the exhibition in the walsh galler starting with the sculpture male head in her september 10th conversation with ian berry ruby commented that she wanted
to see just how far she could take how far she could go in reducing the image to its essential elements while still being able to support itself as a sculpture the male head has multiple views from straight on and even reflected in the floor here in back view in profile where which shows us the supporting element and again reflected on the floor and even as a shadow on the low platform one is rewarded by taking the time to walk around the sculpture after all it is a three-dimensional it is three-dimensional and beckons the viewer to consider all the angles the essence of the form for a male head seems to me to be more than that and i have a difficult time not seeing the connection to this ancient greek bronze helmet the helmet contours both define a male head and distill facial features to their minimum for recognition in a similar vein the vase with sienna handles seems to capture the essence of a well-known ancient greek vessel type called an amphora which was originally designed in antiquity as a storage jar with a lid very practical phase allows us to focus purely on the structure and the contours it is both solid in its presence and wonderfully transparent
8 notes
·
View notes
Note
Hii~~~ I want to try make up on, but I dont really know how or where to begin(?) Like, I know theres a hell lot of products, but thats it! Dont really know how to make it work.
Hello darling!
Be prepared to read a long post. Makeup can be intimidating because there is 50 different types of things for the same thing.
You can put the bare necessities into two categories:
Skin care - It’s really important to make your skin look good even after you remover makeup
Actual Makeup - This is what we generally think of when thinking about makeup, but this should be removed before you go to sleep
In skincare, you could have the following:
Cleanser: This is to clean the makeup off your face as well as dirt and oil and other stuff that builds up throughout the day. You use this morning and night, before you apply your makeup, so that you have a fresh clean canvas to work with, and after you remove it, so that everything comes off. There’s different types based on your needs and likes. Some people have really oily skin whereas other people have really dry skin, and then there’s people like me that have combination skin where some parts are oily and some parts are dry. If you have acne, there may be some that are geared just for that, like ones with tea tree oil in them.
Exfoliator: You should only do this once or twice a week, otherwise you can irritate your skin and make it more prone to breaking out. There are some things that a cleanser cannot remove, like the upper layer of dead skin cells, or oil and dirt that have gone deep into your pores. There are physical and chemical exfoliators. I personally do not recommend using physical ones on your face because they can cause micro-abrasions into your skin. But once again, you may be able to find one that suits your skin type. You should use physical exfoliators on your body once a week, though, because just like a cleanser, soap and loofahs don’t get everything out.
Toner: This is certainly not a necessary thing, but it does help improve the overall look and glow of your skin, even when it’s bare faced. It’s usually the consistency of water, and witch hazel is a pretty popular toner, but you may be able to find one that, once again, suits your skin type. Take a shot for every time I say suit your skin type in this post...
Serum: If you have a certain dermal issue, like acne, or eczema, or even wrinkles, you may find a serum that helps with that. If you use a toner, then you put this on after the toner, but before the moisturizer. There’s also day and night serums, but that is based on whatever you are getting. If this step is overwhelming, then you can totally skip it.
Moisturizer: This is one step you should not skip, even if you have oily skin. This locks the moisture in and hydrates your skin all day so that it doesn’t flake or start producing excess oil to make up for the lack of hydration. If you have oily skin, then you can find a moisturizer that fits that skin type.You can even get a moisturizer with SPF.
Sunscreen: If your moisturizer and foundation does not have sunscreen then get separate sunscreen to apply, which you should even on a cloudy day, since the UV rays are still coming through.
Now that your skin has been taken care of, you can put on makeup.
Primer: If you’re planning on wearing your makeup for an entire day, or a night out when you know you’ll be sweaty, or you feel like your makeup will be smudged for whatever reason, you can put on a primer, which basically covers your skin like a paint primer so that that the makeup can have a smoother and a longer lasting finish. But, it’s not necessary. I only wear primers if I have a huge event to go to, like a wedding or something. I don’t bother with it on the daily.
Foundation vs BB Cream: Unlike foundations, BB, CC, and EE, creams focus on particular details, like color correcting, and other details. Foundations are heavier, even the lighter coverage ones, but they work better for heavier makeup. Make sure to have your foundation matched to your skin tone. I don’t want to hear any of this fair-and-lovely, or ethnically-ambiguous BS. It never looks good, and it’s just plain disrespectful. I also don’t recommend foundations with SPF, since those are the ones that tend to create flashback (is that what it’s called?) if you take a picture with the flash on.
Concealer: This is a couple shades lighter than your skin tone, and goes over the under-eye bags to brighten it up. You can also use concealer as a eye-shadow primer, to make sure that the powder doesn’t smudge throughout the day. Be sure to set it with a setting powder, which I’ll explain later.
Contour: If you don’t want to do this, then you’re more than welcome to skip it. But basically, applying darker shades in some places and light shades in others creates the illusion of a different facial structure, but can also make you look like a clown if done wrong. Once you get the hang of overall makeup, you can definitely try it out, but make sure you get some practice before you wear it out. If not, you can just apply a bit of bronzer under the cheek bones and be good to go.
Powders: Remember when you’d dig through your mom’s purse and find a compact mirror with a lil round sponge and a pressed powder? Those were the days. These days, you’re better off with a setting powder under the eye area, which is often too white, but you let it sit for a few minutes to “bake” into your foundation. Then you can apply translucent powder all over your face to finish the skin stuff.
Eyes: Eye-shadows are pretty straight forward, but I suggest looking at the color wheel to see what works best with your eye and hair color for the ultimate wow effect. Mascara and eyeliner get easier to put on with practice. You don’t have to curl your lashes. I think I’ve only ever done that once in my life and that was only to test it out. You can also shape and darken your eyebrows with Anastasia Beverly Hills Dipbrow. Though you may need some practice to make it look natural.
Lips: You should try our liquid vs cream and gloss vs matte to figure out what you like best. Just keep in mind that matte liquid tends to stay on much longer than cream or gloss, and is also harder to budge, in case you plan on eating a messy meal or doing... messy activities.
Highlighter: If there is one trend that I wish would go out of style, it’s highlighters. Everyone seems to love it, which I respect, but I can’t help but think of disco balls every time I see a makeup guru on instagram. If you want to try it, apply a little but on the tip of your nose and cheekbones, and maybe a lil bit on your cupid’s bow and chin for an extra razzle dazzle.
Setting Spray: This is another one of those extra steps that you can take if you really want your makeup to last through a night out, or a trip to the beach in July. Once you’ve applied everything, hold the spray at an arms length and spritz your face like you’re disciplining a puppy. But, like, don’t discipline a puppy. That’s mean.
Here’s some general overall tips to remember:
These are a bunch of infographs about types of brushes and makeup applications that I could not explain here.
There are a ton of YouTubers that can teach you all sorts of makeup. I recommend Kaushal Beauty, Alexandra’s Girly Talk, and Brianna Fox, where I learnt all my makeup and other beauty stuff from, back when I knew absolutely nothing. For more bolder and artistic looks, you can check out Nikkie Tutorials.
Experiment with as many looks as you want, but if you’re trying something new, be sure to try it at home and when you’re not in a rush.
Keep practicing drawing on eyeliner, because that’s the only way you’ll get better at it.
If you want to go for the “natural” look, you can just apply some toner, sunscreen, and tinted moisturizer on your skin. You can also put on some mascara and lip gloss, and maybe do your brows if you have extra time. That way you look completely put together without it looking like you even bothered, because who even bothers to look good, right? We all just wake up like this.
I realize that I started slipping in more of my snark as time went on, but it was a long post, and I’m tired. Have fun playing with makeup, though! It’s actually pretty fun once you start doing it for yourself rather than to look good, because then the possibilities are endless and everyone’s Michelangelo.
💋
336 notes
·
View notes
Note
This is maybe weird question, but. I'm strugling with drawing faces. My problem is, that any method of admeasuring face can't help me .Is there anything you can recommend me to do it better?
…this is a first art ask I ever got, this is exciting! =))
You wanted an essay. Here is an essay.
Let me start with a preface:
Faces are complicated. They are formed not only by bone and muscle, aka the ANATOMICAL STRUCTURE, but the also exist as parts of HEADS, that are parts of BODIES, and out bodies are basically objects like any other that exist within the multi-dimentional space of perceived reality, aka SPACIAL POSITIONING.
Sounds terrifying, I know.
Good thing about it is - we all are unique, therefore all faces are unique! Before starting with anatomy and such, I think it is important to welcome this idea that this Uniqueness IS Beauty. Therefore every face, no matter the proportion, racial features, anything else, is BY DEFAULT beautiful.
Basically, when drawing a face, the artist’s job (especially if this artist is of academic school, or focused on realism) is to detach from personal perception of aesthetical, and focus on studying the beauty of nature’s design. There will be time for personal taste and creative decisions.
To break the rules you need to know what rules there are.
How to Draw a HEAD
(Mostly because you can draw a disambullated head with some of that shoulder action and get away with it. When you draw just a face - it’s… well it can serve a purpose, but there will be questions. It’s generally better to think of a face as part of a head, it makes life a lot easier.)
As it is customary, the process of drawing an object starts with understanding two basic concepts:
The base shape: if you simplify the object to it’s most basic 3-dimentional shape, what shape would it be (a box, and elongated box, a sphere, a pyramid and so on.) Out of which comes the next one-
Where that object exists in relation to you, aka the Artist, since you are the one who will be drawing it. You have the power. The Power of Perspective.
A head is an object like any other. And a head, as an object, is A BOX.
The basic proportions of the box - and I’m talking the commonly art teacher accepted medium - are:
4 units tall : 2 units wide : 3 units deep
What is a unit, you ask? Will come to that, when talking about points and proportions.
So we have a box, and it’s something like this.

(Picture belongs to Stan Prokopenko, who is a remarkable artist of anatomical drawing, and generally a professional art teacher. I suggest watch everything he ever made, he has ton of stuff on anatomy. http://www.stanprokopenko.com/)
The grey line in the middle signifies the line of symmetry of the face. It’s on the front plane of box, in the middle. The box is much easier understand that a head with a face.
What we do with the box? We rotate it in any possible we can come up with, while keeping in mind the proportions. It’s important to always keep those proportions in the back of your mind.
Why we do this? Because this box will tell us about about the lines of perspective that will interact with our portrait’s features. As you can see on Stan’s picture, the yellow lines indicate which way perspective goes.
(Perspective is a whole another topic altogether that would require a separate tl;dr post, so I’m going to step over it in this essay.)
I took the liberty to use one of your pictures to illustrate, especially since you asked for some feedback.
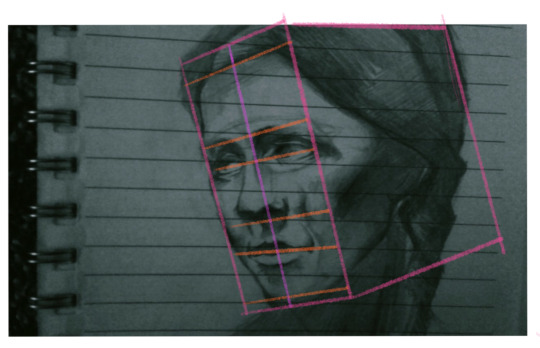
Overall this is a good drawing, but see how the orange lines start to stray away from the perspective the box exists in? By sticking to the directions the box helps us with, we can get rid of that feeling of something being crooked - becasue all the facial features will exist in the same architecture as the rest of the head.
Second reason why the box is our friend is becasue on the box we can clearly understand: okay, this side is facing the light, and this is the side is in the shadow. This is the break line between the planes of the object.
But Ler, you may say, the face is curvier than a box.
Yes, young padavan. Here is a trade secret: first we tackle the overall, and then we go into details. (then we come back to overall, then back to details, and so on, until you can’t find anything sticking out of the unity of the piece, and you can decide that your job here is done. [it is never done, but perfect is an enemy of good, and sometimes good is “good enough” and “as good as I can do at the moment which is still good”)
This may sound familiar, because it is - it’s a lot like the Loomis method, which is, in it’s essence, your good old illustrative version of academic portrait, but without the hassle of learning all skull bones and facial muscles and crying yourself to sleep.
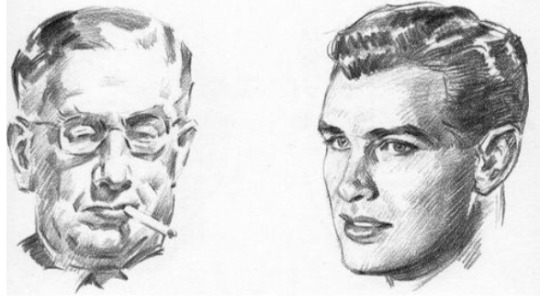
See how he clearly identifies here the border between the frontal planes of the faces and the side ones? Look how is is not afraid of laying that tone on the sides? This is what I’m talking about. He got it from The Box.
(I would suggest reading Loomis’s books in general, and especially “Drawing the Head and Hands”, where the illustration above is from. His method of drawing heads is quite good, and he explains it in a very approachable way.)
Now that we sorta figured out the head in space, and the box the head truly is, lets figure out
Where Do We Put The FACIAL FEATURES
There are a few different school of thought on “where the features are” and “what are the proportions”, so I’m going to share with you how I work around them.
My personal approach is a mix of different methods, and years of life studies - as I explained in the beginning every face is unique and has different proportions, and the more “cartoony” and “caricaturistic” (is this a word?) the style is, the more those proportions are exaggerated.
My approach to placement of features goes like this [unless I got a life model before me, then I measure with my pencil, old school style.] It’s pretty math intense, so buckle up.
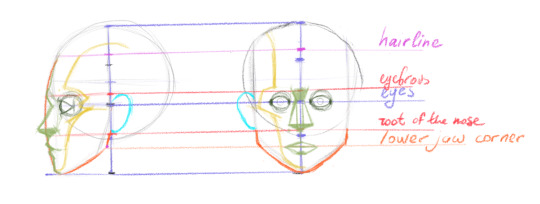
1) [Purple] Cranium is a SPHERE. The axis of the sphere is your friend. Cut it in 3 equal parts. Add one part down - hey presto, this is the height of your head. [Remember the thing about the proportions of the box? These are the units I was talking about. It’s all coming together now.]
2) [Purple] Eyes exist in the middle of the axis.
3) [Orange] The protrusion of the face is *design* and may vary. Rule of the thumb: make it an arc, similar to what I did. The lower jaw corner falls into the same cathegory, but I prefer it to be on the same level as the corners of the mouth.
4) [Magenta] Mark 1/7th of the height from the top - that’s your hairline.
5) [Red] After you mark the hairline, divide the remaining part of the height in 3 equal parts. Lower part is chin to root of the nose, the middle one is root of the nose to eyebrows (actually to the glabella, but let’s call it eyebrows), the upper - from eyebrow to hairline. this is the Rule of Thirds. In reality nothing is perfect.
6) [Yellow] This is the tricky part. This is where I personally mark the border between the frontal facial planes and the side ones. There is a general guideline on how it’s done, but it does require understanding the skull and the subplanes of the frontal plane of the face. In layman’s terms, go from the hills of the forehead down to the middle of the brow, around the eye socket, over the cheek bone, through the middle of the cheek (preferably on an arc) to the chin bone, not foregetting the chind also has upper plane and lower plain and yes, there is a break between them, rounded as it is.
7) [Dark green] Back to eyes. They are also spheres. In the drawing above I marked them as “width of 1 eye = 1/5th of the face’s width”. This is my design (and also the “fashion portrait design”, but don’t get me started) . What is not my design is that the distance between eyes is about the width of one eye, very convenient. The distance between the ear and the outer corner of the eye is 1 third of the rule of thirds. (see point 5) Don’t forget: eyelids cover the eyeball like peel covers the orange. It has thickness.
8) [bright blue] EAR! Love ears. Their traditional space is snuggly in the middle third. Also their angle usually follows the angle of the nose.
9) [light green] Nose and Mouth.
Nose.Take your middle third. Divide it by three (approximately). The top part is where the dip of the nose is. For reference is about the same level as the eyes, maybe a bit higher. The nose itself is a trapezoid. The general width of it - the space between the eyes. There is a shadow under it, in most cases. When drawing from reference, pay attention is the root of the nose goes lower than the edges of the nostrils. It’s important. That’s where character hides.
Mouth. Take your lower third. Divide it by two. That’s - no, it’s not the slit of the mouth. That’s the dip under the lower lip. Take the distance between the eyebrows and the eyes, measure it, and apply from the root of the nose down. That’s where the upper edge of the upper lip is. The width of the mouth is very different, but I prefer somewhere between the irises.
Oof, that’s about it.
If you are looking into indepth anatomy, I’m going to recommend the bible of all anatomy artists, Mr Gottfried Bammes, and “The Complete guide to human anatomy for artists and illustrators”. No better book was ever assembled. I wouldn’t suggest “reading” it, it’s dry as stale bread, but it has hundreds of illustrations that are pretty self-explanatory.
How to combine this whole knowledge together?
By drawing. Honestly, the rest comes with practice. Lots and lot’s of it.
I would personally suggest downloading a million photos of faces, plugging them into photoshop and studying then step by step as per process above.
Second, I would suggest making studies of separate parts of the face: mouth, ear, eye and nose. Break them down into basic shapes. Look at what covers what. There things do in, where they come out.
Third. After you do your studies on photos, draw the faces you studied. But don’t draw them to minute details. Be as constructive as possible. Basic shape - ok. Hairline - ok. Thirds in proper perspective! - ok. Border of light and dark sides - ok. And so on.
First hundred many look like crap. It’s okay. You are learning. Then things will get better. The more you draw - the better it goes. The more your drawing chakras open.
I hope this was helpful. Have fun. Do art. Post art.
#Ler loves asks#oh this is long#but honestly there are whole books on how to draws heads#and this is extremely fast way to explain basic principles#mirrinka
25 notes
·
View notes
Link
Read “ Sell Your Soul “ on Archive of Our Own. Support me here.
Fandom: Overwatch (Video Game) Relationship: Reaper | Gabriel Reyes/Soldier: 76 | Jack Morrison Characters: Reaper | Gabriel ReyesSoldier: 76 | Jack Morrison Additional Tags: Tentacles, Rough Oral Sex, Rough Sex, Blood and Injury, Excessive Cum, Demon Sex, Demon Summoning Language: English
Jack Morrison was known to the world as a man of meticulous research. Meticulous meaning a great attention to detail, for example, in his younger years at the very peak of Overwatch, Jack Morrison had been so meticulous about a freshly shaven face he would wake an hour earlier than needed to inspect and shave himself.
Time had not diminished such an principal piece of himself as it often did when one aged.
Never would he willingly enter a situation without planning accordingly; whether it was the mundane activity of creating a list of groceries, with a written note to coupons and restocked shops, or the more exhilarating and controversy research towards the rituals of demon summoning. He had memorized the standard set of several demons and their sigils of summoning, spent hours with a pinched brow, eyes straining from the hours spent staring at the taboo documents, waiting for God, if he truly existed, to strike him down for his treachery.
Jacks toes curl against the hardwood floor, skin prickling at the cold. He was shirtless, chest cold along the circle lines of red, wet paint smeared along his body; delicate, scarred fingers mimicked the pattern of the demons sigil onto his chest, his breath caught in his throat during the act. He wondered vaguely how it would feel for the demon to be summoned to stand before a shirtless, shivering, aging man.
Jack supposed he wouldn’t feel anything. Whatever demon he summoned may feel disgust or annoyance at the mortal with a want that was considerably more cliche than a kiss in summers fine rain.
The anticipation would kill him. Jack had never felt more frightened as thick, clumsy fingers struck a match to light the ritual candles he’d made himself; they were of a deep crimson wax, smelt of cinnamon, and had a thick black wick. The candle itself was not important to the ritual, a fact that Jack did not come across during his meticulous demonic research. In his research, Jack believed the candle had to represent the malevolent spirit he wished to summon: pink for lust, blue for sorrow, yellow for human nature, and red for the everlasting.
The anticipation, as the seconds of an old clock ticked down louder than the blood rushing through his ears, was a killer. Jack felt more fright when it came to lighting the ritual candles, a deep crimson wax with a black wick, than when he’d once stared down the barrel of a shotgun. Fingers strike the match, and for once, Jack Morrison acted without thought to consequence.
“Know I call to you … “ Swallowing thickly, the man knelt, fingers smoothed alongside the burning candle, wax coated his fingers unnaturally quick, and the markings on his chest began to bleed. In the moment he did not know the true extent of summoning, only knowing the vaguest want could derail him. “Think of me, think of me. So mote it be.��� How silly he felt. So mote it be, as if he were a fictitious character in a low-budget indie film, whose writers had long since given up the research in demonic summoning, choosing instead to copy verbatim the spells written by a modern days witch, attempting to summon a demon.
The ringing in his ears a distracting white noise, silence was a buzzing white noise as striking blue eyes track the flame of a ritual candle; the red wax pooling from the burning wick, his legs swayed side to side as the flame of the candle, and he fell to his knees in dubious defeat. Dedicated research, his years spent searching for the key of immortality, waisted and lost in his failure. He would not summon a demon, a creature of pure religious superstition, and Jack Morrison had never felt foolishness this way; unable to breath, eyes clenched shut until furrowed brows and the corners of his eyes burned with salty tears. He was pathetic, time would take him, and the world would know him as a failure throughout life: the soldier program, Strike Commander of Overwatch, Soldier 76, and an witless man seeking immortality.
Through his tears, his body shook with his regrets, and only a cool touch to his cheek, where claws curled against the side of Jacks cheek to raise his gaze, forced eyes open wide and frightful. Breath catching in his throat, his bottom lip quivered, and Jack did not recoil from the oddity he saw in fear the claws like pins in his face would rip and disfigure him.
“What are you,” he spoke barely above a whisper, looking to the mass before him. He could not get a good look at the creature, it’s body seemed to change shape the second he managed to focus on the last form it took; at one moment the creature was a normal man, standing tall and prideful above him, and the next he was a beast with a thousand teeth and millions of eyes blinking, their irises spinning clockwise. He had summoned an enigma in a greedful haze, and the fear that settled in his gut was a solid ball of ice refusing to melt, prolonged by the entity.
“You summoned me.” The creature’s voice was a rasp of words, as if its vocal cords were buried beneath gravel. “... For what reason have you brought The Reaper back.” The mass formed a face, detached from a body, shifting like smoke, and Jack was only able to focus on his face; well-structured jawline with facial hair that looked softer than anything he’d ever touched before, and unlike the mass of eyes ever shifting and bright red behind him, the two on the human face were beautiful.
Jack Morrison had never felt love like this. His heart had never sung loudly. Soul-mates were a cliche, but the man felt he had been made to serve this entity; to love and hold him, and kiss what figure held its form long enough.
“Immortality.” Jack cleared his throat. Years of research, planning, dedication to an archaic craft would not be forgotten in lieu of coquettish grins to a lovecraftian beauty.
“Foolish.” The Reaper snarled, claws travel across Jacks face featherlight, hooking the corner of his mouth and parting his lips with his index and middle finger. The entity seemed to be in thought, a low and rumbling growl leaving the mass of life signifying his thought. “You will do. Stay on your knees, mortal.”
“Why?” he asked, but The Reaper offered no answer. Jack sat on his knees in awe as the mass formed into a man, and his eyes were not tricked or deceived by a captivating, ever shifting figure any longer. The face he had admired became hidden away, tucked behind a mask of sharpened bone and dark shadows, a low and soft whine left Jack, his mouth held open no longer by claws, but two tentacles that squirmed against the back of his throat.
He gagged and The Reaper chuckled, Jacks stomach clenched and his toes curled. He doesn’t remember getting naked, but then again, he hadn’t remembered The Reaper entering the room. It had happened, and he wasn’t opposed to it just … happening.
A hand slipped down his chest and fingers curled around the base of his cock, playing a very dangerous game with the demon that had demanded him stilled and ragdolled; with Jacks jaw stretched wide by very thin smoke tendrils blacker than tar. Jack prayed that his immortality would taste just as sweet as the cock fucking his mouth and be as pleasurable too. Breathing heavily through his nose, he managed two quick pumps on his aching cock before the demon rammed suddenly into his mouth, burying his nose against a thick patch of curled public hair. Jack gagged on his thick dick, choking. The Reaper paid him no mind, it seemed he didn’t care if the immortal suffocated on his cock, if anything the idea of blue lips and watching life leave the white man’s eyes turned him on, his body shuddering.
“Be ... still.” Snarled the demon whose fingers curled into Jacks white hair, claws scraping harshly against his scalp. Thrusting his hips roughly, the black tentacles widened the immortals mouth to the point the corners of which threatened to unwravel like the seams of a fine silk dress; saliva dribbled thickly onto the demons pubes, and tears sprung from the corners of blue eyes half-lidded. The tips of smog tentacles curled around the demons shaft, jacking The Reaper off within the soft and warm confines of Jacks mouth, and Jack had never felt as used and full before; this was better than sucking cock, to be treated like a glorified fleshlight was a fantasy he had not thought of even in his younger years, and to feel the twist of tentacles in his mouth stroking off a cock, their tips sliding across the slit of its head, drove Jack wild.
He wondered how much semen The Reaper would fill him with. If he would pump him until his stomach bulge, tongue shriveled from the amount of cum he’d happily swallow.
Aroused by the pain, Jack groaned, the heavy weight of cock on his tongue and the weightless sensation of tentacles was becoming an oasis of pleasure to a man who found himself in a dry spell of sex, where three quick pumps of his cock once had him flaccid with thick ropes of semen between his fingers would now have him achingly hard, disobedient and wanton.
Thrusting into his hand, his hips rocked slowly to make the pleasure of friction from calloused palms last, soft blues flickered up to stare at his counters thousand-eyed crimson glare. The Reaper’s claws curled even tighter into the mortals aged hair and pulled back his head harshly, freeing his cock from the confines of his velvet mouth with a soft pop, and a thick trail of saliva connecting the head of his cock to Jacks bottom lip.
With a snarl too low and inhuman to be attractive, although Jack found his balls tingling and hips thrusting weakly from the noise that sent frightful shivers along his spine, Reaper pulled Jack up from his knees to a full stand. Claws came to rest on either side of his boney hip, seemingly thousands of red, distorted eyes studied Jacks demeanor; the immortals cheeks were flushed a bright scarlet red, his breathing heavy, chest falling and rising rapidly from arousal, and his cock stood aching and hard with white beads of precum leaking from the tip. Jack curled his fingers tightly around the base of his cock, moaning softly, his bottom lip quivered. “-- Reaper.”
Tentacles whipped the air, the demon clearly agitated that the man found any pleasure in being treated like the fuck toy he intended him to be. Immortality would come at the price of a demon, he had warned the mortals that sought his powers before, often it was their souls to be the price, claimed by The Reaper to be used; The Reaper had been alone for eons, and he would claim Jacks body over soul, he would rather fuck him whenever and however he wanted, with cock and tentacles alike, than claim his spirit.
“The couch … bend over that armrest. Now.” The Reaper demanded of him, releasing the painful grip he held on Jacks hair. Cool trickles of moisture dripped along his neck and it took Jack a moment to realize The Reaper’s claws had pricked his scalp, causing him to bleed, leaving stands of white hair to fall to the floor and his shoulders.
In a trance Jack moved to the back of the room, bare feet dragged unhurried against the ground as he made his way to the couch. Before his attempt at summoning a demon, Jack had pushed the piece of furniture against the wall, having wanted more room for the summoning. Now bent over with his forearms resting against the armrest, Jack blinked lazily, the slightest smirk pulled on his lips as he shook his ass to tantalize the other. “I’m--” Breathlessly he moaned, teeth catching his bottom lip and biting hard, thrusting forward to rut against the couch. Legs quivered at the friction, his hole clenched in anticipation. “-- I’m ready. Take me.”
With another snarl and lashing tentacles, the air crackling with annoyance, The Reaper stepped forward, his hand curled around the base of his cock and he slapped his dick between Jacks spread cheeks. “Shut up, Morrison.” The two tentacles that spread his cheeks writhed in fervor of the warm flesh of Jacks flushed skin, cupping either of his perfect cheeks to spread him even more, showing how deliciously his hole quivered under a lustful gaze.
The Reaper licked his lips, his tongue was long and smog like, and his eyes focused on the mans tight, quivering, wanting hole. Jack mewled pathetically, arching his back as the two tentacles massaging him spread his ass further apart mimicking the feel of hands while a third coming to prod curiously at his tight hole; the third tentacle was wet and cold, clearly meant to prepare him for a cock that changed thickness and length at The Reaper’s will, seemingly a very rare kindness from the other that saw him as nothing more than a fuck toy and who became annoyed at Jack touching himself.
Jack didn’t believe The Reaper saw him as a toy, he had to find him interesting. There had to be something that made him decide he was worth what trouble came with immortality.
Without much warning above a few testing, lazy prods, the tentacle slipped completely inside of him. Jack bit his lip harder, his mouth going agape as a moan ripped from his throat; the slick squelching sound of the tentacle slipping in and out of his ass filled the room, the sensation would remain cold, wet, and slick, even as Jack began rocking back in an attempt create friction. He was torn between humping the couch and begging for a second or even third tentacle to fuck him senseless.
“Reaper! Reaper, please,” Jack croaked, voice raw from moaning and throat sore from being mouth fucked. “Please.”
Quickly the tentacle was removed and slick leaked freely and plentiful down his thighs. Whatever The Reaper used as lubricant he used so excessively, and Jack mewled at the loss of stretch.
Then a hand slapped his left cheek harsh, causing him to yelp, claws pricking the soft flesh of his rump, and then The Reaper slammed his cock into his prepared hole with a grunt. Jack groaned, hissed, moaned and arched his back, “Ye -- yes.” Breath coming quickly, he hardly noticed the tentacles that wrapped around his biceps and thighs or the tentacles that slithered along his shaft, curling and cupping his balls, to furious jerk him off.
The Reaper groaned, claws digging carelessly into the mortals back, drawing blood as he fucked Jack senseless. Deep, fast, and rough, the pace was just as relentless as it was inhuman. Too fast for Jack to find a perfect rhythm to grind back, tears streamed freely down Jacks flushed cheeks, in more pain than pleasure, but still he cried out desperately for more. As he fucked him, thousands of red eyes examined his body, littered in scars and age, The Reaper had little care for confidence in appearance; as sweat gave Jack a sheen, he noticed a fine sprinkling of freckles along his shoulders, and through the mass of wiggling tentacles massaging his spread cheeks, he noticed a thin pink scar that ended just across his right buttcheek.
Curious, The Reaper cocked his head to the side, eyes squinting. Jack Morrison’s bodily imperfections were cute.
“More! More!” Jack cried out, sobbing pitifully as The Reaper claimed his hole, thick ropes of cum shooting from his cock, coating the couch and more. “Please … more, fill me and fuck me. I’m yours, Reaper...” Jack fell flat against the armrest, his toes curling against the cold floor beneath them, becoming a little less than a fuck doll as his cum coated his abdomen and dripped down his balls. The tentacles refused to stop jerking him off, going faster now, squeezing his balls tightly, trying to milk him for all he was worth.
The Reaper complied to the request of more, gripping tightly to Jacks shoulders as he fucked him ruthlessly, claws raking down his back, following old scars and threatening to reopen them. Blood bloomed where his hands had been, thin lines of red, and the sound of balls slapping against bare ass and Jacks pitiful, weak whimpering broke the demon. “Mine.” He snarled, “All mine!” The Reapers hips flushed to his ass, he came with an loud and inhuman growl, bending to bite viciously into the shoulder of the man. Teeth ripped at tender flesh, ever eager to mark the mortal-now-immortal and steal the delicious taste of human blood that bloomed on the tip of his tongue. Sweeter than cotton candy.
The Reaper bit even harder.
He filled Jack until his stomach began to expand from his spunk, cum dripped from his asshole, coating The Reapers pubic hair just as it slid along Jacks thighs. “You are mine! A toy to be fucked and you are nothing without me.” He snarled between the chunk of shoulder he refused to release from sharpened teeth, giving several rough thrusts into Jack as he rode out his own orgasm, the slick squelch of semen having filled the man, now leaking freely from his abused hole had the demon debate on a second round.
He wasn’t known for comply completely with sexual wants, taking what he had wanted when it was given, and The Reaper vanished with another slap to the ass of the immortal motionless, bleeding from head to back, and whimpering pathetically against the couch.
The old man, exhausted and soaked with sweat and blood, panted heavily against the couch. Spreading himself, Jack Morrison closed his eyes, focusing on the feeling of semen slowly dripping from his abused hole, and the cool prick of blood along his backside. With each uncomfortable stream, he whimpered, forcing a body exhausted and used to push itself over the armrest and collapse stomach first onto the couch.
The semen in his stomach shifted, even when he had subjected himself to mindless nights of sex, where his goal was not in the pleasure of two people, but rather to be completely and utterly filled and forgotten, no feeling of being full had been so persistent as this.
Jack could feel his cock twitching at the sensation, though he found he had little energy to slip a hand between himself and the couch. For now he would sleep, cheek pressed against the surface of a seat cushion too uncomfortable to be used while naked, enamored with the demon that had claimed that he would be nothing, but had treated him with a sexual kindness Jack Morrison had not granted himself in years.
12 notes
·
View notes
Text
The Best Drawing Tutorials: Learn How To Draw
Good drawing tutorials teaching you the simple steps of how to draw a face or how to draw a person are not easy to find. Everybody wants to learn to draw realistic portraits, but good tutorials are unfortunately scattered on the Internet.
In this article, you will find some of the best tutorials about how to draw step by step.
Digital artwork is so common nowadays that we consider it as something natural, and we almost don’t remember how it began.
The main reason for its success is that it takes traditional realistic drawings to the next level.
-> Click here to skip to the actual drawing tutorials.
Drawing human anatomy, especially how to draw faces may be the biggest challenge of traditional drawing, especially if you don’t have the right approach.
Image source: Arman Akopian
It will take a lot of practice and time before you learn how to draw a head and how to draw a human in general, paying the necessary attention to every part before you’ve finished the entire figure.
Interestingly enough, artists that know how to draw a realistic face or person are in demand on the market regardless of their digital skills.
That’s why we encourage you to learn how to draw realistic people too, practicing drawing with the help of many advanced sketching tutorials, universally applicable theories, techniques, comic arts, tips, and methods which will later on converting your traditional creation into a digital format.
Image source: WL OP
What your easy drawing tutorials will reveal first and foremost is that traditional realist drawing requires much more effort than its digital counterpart, which is why artists often fall behind.
We’re not saying there are no people whose drawing doesn’t go further than the screen, but the recommended drawing tips are to still follow some old school painting before going into digital design. For instance, for drawing faces, the classical standards always apply.
Therefore, we’ve decided to share some of the most interesting tutorials about how to draw a person step by step for beginners, where the most important traditional drawing techniques and methods are mixed with digital tricks aimed at bringing life and dynamism to the creations on the screen.
Image source: Esben Lash Rasmussen
There is a variety of intermediate and advanced level learning to draw tutorials that can provide you some helpful tips, teach you how to do a pencil drawing, human sketching, color processing, or how to handle perspectives, shapes, and proportions. For now, we hope we’ve shared enough techniques and practices helping you to overcome the initial drawing difficulties.
Is never easy learning how to draw. It takes a lot of time to practice and you need to have good guidelines and easy step by step drawings tutorials to follow. Finding the right sketching tutorials hasn’t been easy but I’ve managed to make a pretty good list of drawing tutorials that would help you in your quest for becoming a master of drawing.
I’ve sorted them in six categories: the drawing of a face, the human body, hands, hair, animals and caricatures and also added at the end other resources where you can find lots and lots of drawing tutorials.
Drawing humans
Image source: Deryl Braun
The nose of the character you just drew looks like anything but a real nose? We understand your distress!
Before you’ve actually started to recreate humans as they really are, you have to learn how to do realistic faces, but there is no need to worry – Soon, you will be able to easily recreate your favorite characters.
The trick is to learn how to do blending – take a pencil and a piece of paper, and use the tutorial to learn how to shade light and dark gradually. This is the first step towards replicating essential skin contours.
In fact, shading is the first thing you need to learn in order to make shapes look three-dimensional and part of the lesson about how to draw a face step by step.
Once you’ve adopted the basics, proceed with face drawing. The secret of drawing a face is to look at features carefully, paying special attention to interlocking shapes in order to apply shadows and highlights in the right places.
Next thing you need know, is learning of drawing heads. Soon, by daily practice, you’ll be an expert in drawing facial expressions, and combining elements in incredibly realistic portrait drawing having a lot to do with the character you are trying to recreate. Let us guide you through the process of drawing step by step:
Drawing faces
The most difficult, yet most rewarding part of your drawing experience will be learning how to draw realistic faces, as this is something even experienced artists are struggling with.
Our purpose here is to teach you how to make pencil portraits, where the steepest learning curve is of natural expressions.
How to Draw the Head from Any Angle
In this tutorial, you’ll see Andrew Loomis’s approach to drawing heads. It’s a great method for head drawing from various angles, learning the details of head proportions.
youtube
How To Draw A Female Face: Step By Step
There are many ways to draw. In this art video, the author shows some of the tricks he has discovered over the years that he uses in his own art and art teaching.
youtube
Drawing, shading and blending a face
youtube
How to Draw a Face Accurately – Exercises to Improve Your Drawing
Learn how to draw with pencils with this guy’s step by step drawing tutorials. He’ll show you how to draw anything from beginning to the end, but especially a portrait reference.
For some subjects like drawing animals, getting used with the basic shapes first is a useful practice. For human face drawing, the preferred method is of starting with the eye. But whatever the subject matter or method, he will always show you the easiest and most effective way how to draw realistic images.
youtube
How to Draw a Pretty Face with Pencil
youtube
Basic Anatomy for the Artist – Lesson 2
Drawing the Human Eye
How to Draw Eyes
How to Draw a mouth and teeth
How to Draw a Realistic Eye
How to draw ears
Lackadaisy Expressions
Facial Aging
How to draw lips
Eye-drawing tutorial
Drawing a facial expression
Facial expressions are an important part of how to draw a human face experience. It helps to understand how people are feeling or what they want and expect you to do. The information they provide for drawing people is vital, the same as the experience artists glean by simply looking at random people.
When learning how to draw face, the best source of inspiration is looking at people while they’re relaxing.
Part of the process of how to draw a person step by step is letting them share their emotions with you, paying specific attention to every detail. It is considerably easy to understand how to draw a face when people are comfortable and keep theirs in a comfortable position.
Besides, it is critical for them to look at you without a specific emotion so that you can pull out the perfect eye scratch, and translate every detail to the portrait sketch.
As you can see, the basics of drawing a person are really simple. It takes only to ‘spice them up’ with a pinch of your own creativity, and you’ll have the best step-by-step drawings at your little finger.
How to draw Various Expressions
In this video you will see learn to draw 5 different types of expressions and the principles of creating these shapes. The author will also explain how the art of cartooning is perfect for learning how to sketch a face and various facial expressions.
youtube
Facial Expressions in Comics: 10 Tips to Help You
youtube
How to draw 4 types of facial expressions
youtube
Drawing human body
How to draw the Human Figure – Body Construction tutorial
youtube
How To Draw Characters in Perspective: Bird’s Eye View
youtube
How to Draw Gesture
youtube
Female body study
Clothes study
Clothing Tutorial
Drawing hands
Don’t worry about being unable to recreate hands and legs, as both are perceived to be the most difficult body parts to portray on a drawing or a sculpture.
Keeping the focus on faces as the most challenging parts, we’d consider their connection to emotional states for the second position on our ‘difficulty list’. Part of the larger anatomy drawing tutorial, hands are the perfect tool to showcase fear, anger, serenity, resignation, or even surprise.
These tutorials of how to learn to draw will also teach you to recreate the hand’s anatomy: you need to consider the basic bone framework first, and work around it with the right proportions for further drawing the muscles’ actions. Not an easy draw, anyway, but an important stage of the process of learning how to draw good.
Draw arms and hands
youtube
How to Draw HANDS and HAND POSES
youtube
How to Draw Hands, 2 Different Ways
youtube
How to Draw Hands – 5 Different Ways
youtube
Tutorial: Drawing Hands
Drawing Hands and Feet
Basic Anatomy for the Artist – Lesson 6
Drawing hair
Drawing hair won’t make the ‘human challenge’ any easier, and will be particularly intimidating for beginners already fighting hard to manage drawing the head techniques.
Usually, some serious commitment to detail is required, which explains more or less why some artists gave up on their dream and preferred sloppy scribbles instead.
Even for those who’re in the branch for years, drawing hair is still a daunting experience. That, however, is because they didn’t adopt the right approach to overcome their fears. Drawing hair will require you to pay attention to three specific details: the strands, the structure, and the tone of the hair. You need to practice this is you want to learn how to draw people step by step.
Image source: Serge Birault
First and foremost, you have to make hair look shiny, which can be easily achieved by shadowing and highlighting certain parts with a wide loose pencil. Start with the lighter tones first, in order to reveal the structure. Once that’s done, proceed with the darker strips.
Don’t be afraid to do strand by strand, even if it takes a lot of time, but it will help to maintain certain drawing proportions. Of course, we’re not saying each and every hair has to be depicted, rather that the hair needs to appear rich, crispy, and highlighted with light and mid tones in certain areas.
An important rule you shouldn’t forget for completing your face drawing tutorial is avoiding too many dark tones, as they can affect the shine of the hair.
You’ll be required to do some highlighting even when the hair of the original character is really dark, by simply applying more mid-tones than the ones usually used for lighter hair. In that case, you better stick to medium gray as the darkest tone you’re allowed to use.
How to Draw Hair the Easy Way
youtube
Emily’s Tutorials: How to draw realistic hair!
youtube
Drawing hair demonstration
Need tips on how to draw hair? The author is walking you through her tips for creating realistic hair texture. The tips apply no matter what medium you’re working in for drawing portraits.
youtube
Detailed Hair part 1
Hair drawing tutorial
Drawing animals
Drawing animals is as challenging as drawing people, even more, if you may think you’re less familiar with them than you are with human nature.
Once again, there will be a variety of lifelike reproduction details to pay attention to, and a large effort to make the drawing unique instead of simply duplicating someone’s previous work.
Luckily, there are many animal-inspired artists and admirers who prepare in-depth tutorials and provide rich illustrations teach you how to recreate these charming creatures in easy realistic drawings.
How to Draw Animals
youtube
Dog portrait
Drawing caricatures
How to Draw Caricatures: The 5 Shapes
How to Draw Caricatures: Head Shapes
The post The Best Drawing Tutorials: Learn How To Draw appeared first on Design your way.
from Web Development & Designing http://www.designyourway.net/blog/resources/tutorials/drawing/the-most-comprehensive-drawing-tutorials-collection/
2 notes
·
View notes
Text
03/10/20
MP1
Another artist I have been interested in for a while, is Ashley Verse. Again, finding his work on social media, I found his work powerful in reflection of the environments that he is photographing, and highly impactful. His work reveals intense emotion with skills in composition, lighting, and post-editing.

(Photograph by Ashley Verse - https://www.ashleyverse.co.uk/portraits/47oa1z3gkadb4186z8nhjhypw4syga)

(Photograph by Ashley Verse - via Instagram)

(Photograph by Ashley Verse - via Instagram)
What works well?
All these shots are simple compositions with the subject’s face and upper torso being captured. I think this particular construction of the photograph with the lower body not being visible is an effective way of drawing the attention to the emotion of the face, while still capturing the personality of the subject. Clothing is an essential part of a persons character, and this is a key aspect to remember throughout my project concerning women as this is often how they represent themselves to the world. Attention to detail is also visible, with tattoos and jewellery being a subtle yet necessary aspect of these portraits.
Colours are saturated and worked with effectively, to achieve depth but not distraction. For me, the green and red tones work well together in bringing vibrancy to the photograph without it being overdone.
I also really like how the lighting is used and manipulated to make the face appear different to how we’d see it in real-life, especially in the last photograph. Using something as simple as the window panels to create shadow and depth - highlighting parts of the face.
What would I do differently?
To better reflect my idea for my work, I would photograph more details. I want to be entirely attentive to my subject in how they are as a person and I want this to mirror what my audience sees when look at my work. I think a combination of shots that capture one’s environment as well as images that capture merely a nose piercing, or earrings - more personal.
Despite Verse’s objective in capturing these subjects in an immersive state with backgrounds that add to their personality, he also captures a vast majority of his photographs in a studio, with studio lighting, and nothing but a blank canvas in the background. Although, for my project, I will instinctively lean towards a less constructed way of photographing, to make it as natural as I can, I can appreciate his lighting and compositional techniques in this approach to his work:

(Photograph by Ashley Verse, via instagram)

(Photograph by Ashley Verse - https://www.ashleyverse.co.uk/portraits/gkax75bsuy25r8n8c9z9nzw9thx2kl)

(Photograph by Ashley Verse - https://www.ashleyverse.co.uk/portraits/bf4io0lfy3egvhz7iv0qb0wo47lp81)
What works well?
Whether or not the subject is making direct eye-contact with the lens in these photographs, the connection between them and the camera holds a strong sense of intensity. Whether it is merely the posing, or the facial expressions, the body language, or the studio lighting, these portraits encapsulate a sense of emotion and impact with little else needing to provoke this.
The positioning of the subject, being dead-centre in the middle of the photograph also helps this and it is something to consider - this technique allows certain facial features to be emphasised.
The lighting is well controlled with shadows being manipulated skilfully to compliment the subject and the overall feeling that Verse is wanting to achieve, particularly with the eyes and facial expressions. This is something I plan to take forward in my photographs.
What would I do differently?
For my project, I intend to make it less staged and posed and more candid and natural. I want to make my photographs appear as comfortable as I can, to make my subjects more relatable and realistic. I feel as though, with images such as these, an audience is less inclined to create a narrative but rather take it how it is. I want my audience to be able to look at my work and visualise a story behind the image, and perhaps envision themselves in the same position. I want them to be able to connect on an emotional level. Although, to an extent, this achieved in these portraits, I want my photographs to connect further.
Verse takes his photographs on a digital camera which is the format I will be predominately taking forward into my own work. This is because I want to capture moments quickly and in an unrehearsed fashion. If I am to take the time to capture a powerful portrait shot, I will be more inclined to incorporate a medium format camera into my photographic process, to adjust the depth of field better and to a greater depth, than a digital camera is capable of.
---------
Another photographer I found today, whilst researching online, was Sophie Jones (Instagram @sophographylondon). She is a photographer, film director and creative director, who works with stills and moving image. The fact she works with stills and moving image is something that automatically drew me into looking at her work. As moving image is something I would like to incorporate into my practice, in the future.

(Photograph by Sophie Jones - https://www.sophiejonesldn.com/?pgid=jpu85gww-785a7b16-1469-4d96-a112-7a705d3bbb27)
An object covering part of the face but still achieving a powerful photograph is an idea I would like to carry through to my project. A lot of objects symbolise women and femininity, and whether or not I make these objects explicitly obvious to manipulate a narrative or to place them subtly in the photograph to allow the viewers eye to wonder is a composition to think about.

(Photograph by Sophie Jones - https://www.sophiejonesldn.com/?pgid=jpu85gww-370cbd6c-0e44-4eb1-a893-aee396a0c3aa)
Incorporating friends or family in my images could also work nicely. It brings meaning and familiarity to the image, that audience can begin to narrate from. With this photograph in particular, the colour scheme, clothes and their body language reveals a strong narrative almost instantly.

(Photograph by Sophie Jones - https://www.sophiejonesldn.com/?pgid=jpu85gww-35d7dfd6-28b7-4d43-b8ed-e769c5613d74)
Again, running with the idea of objects fragmenting a facial structure - revealing parts of the face while hiding others.
What works well?
The colour scheme in this image with the green fence against her skin tone and hair colour is effective in bringing the photograph together, and not distracting the eye too much to different sections of image.
The lighting, what I assume to be natural, is controlled accordingly and is used to benefit the subjects body and facial shape. It is essential that I recognise the importance of lighting in my project by carefully adapting it to benefit my subject, in the style that best represents them but also their surroundings.

What works well?
This appears to be a still taken from a moving image, in the case that it isn’t, the composition well-reflects the concepts of cinematography. The positioning of the camera, being low-down and through the window, as if we (as the audience) are bending through the window, allows us to perceive this image from a personal point of view. It is intimate and despite facial expressions being out of focus, we can grasp the tone of the image. For me, through the process of post-editing, I like how the images are stacked on top of one another - it makes the images appear as a sequence and that they are connected, like a cinematic reel.
The image itself seems grainy and it appears that one of the photographs has been post-edited into black and white. For me, right now, I’m not unsure as to why it is edited like this but I like the effect that it gives.
What would I incorporate, or change?
I like the idea of incorporating stills from a moving image into my work, however I feel as though using both portraiture and moving image could discredit one another and counteract. I would like to find a way to try and make this work, so they can compliment each other and work well in a book together.
0 notes
Text
Bewitching Glamour

BY ALISE MARIE
The timeless, eternally beautiful sorceress slowly removes her dramatic ruby choker, placing it with intention upon a table. Turning away, she walks gingerly to her bed and begins to undergo an extraordinary transformation. The vibrant rouge mane turns to snow white, the supple body changes shape, and the luminous eyes cloud as the exquisite face acquires a new texture. As she lies down with great effort, her true self is revealed: She is, in fact, a very old woman.
But we see her quite differently. Is the magic in the necklace? Perhaps. She is, after all, a very powerful witch. With ancient lineage and skills honed for decades, she is quite capable of enchanting an object through many moons. Or is it her? Does her own inner fire burn so brightly as to alter our perception?
Many cultures claim the origin of glamoury, a form of witchcraft that prompts the world to see the sorceress as she desires to be seen, with reality firmly hidden in shadow. From the old Norse, to the French, Greek, and eventually Celtic, the term has meant “illusion,” “spoken words,” and “enchantment.” It is actually a mélange of all these things, coming together to form a familiar ritual—a spell just like any other, with focus as its ignition, visualization and senses creating form, and passion amplified by cosmic waves raising energy.
One thing ancient witches could all agree upon is that the success of glamour magic depends upon the personal allure or magnetism of the witch performing it. Charisma, from the Greek word meaning “the grace of the gods,” is a mysterious quality that some seem to just naturally possess, but it can really be defined quite simply: Life force. Chi. Vitality. The more energy that is invested in your own wellness, health, and balance, the stronger all your magic will be.
Mind you, glamours aren’t actual physical changes but rather controlled or directed projections. It is a way to put forth certain traits or features that you wish to be seen as dominant, noticeable, so that they become part of the first and lasting impression. Remember that what we focus on gathers strength, so if you are always staring in your mirror obsessing about the size or shape of a feature you don’t like, that feature will become more pronounced to the outside world. By contrast, focusing on what you do like also becomes dominant. It’s up to you. What is it you want others to perceive in you? How do you want others to feel in your company? Glamour is transcendent.
More commonly, we have the practical glamour magic that comes in the form of luscious adornment. Like the sweet fairy godmother who bedecks, bejewels, and beautifies Cinderella in finery, our everyday consorts of makeup, wardrobe, and beauty potions carry considerable sorcery in the confidence-boosting department. They allow us to become a heightened version of ourselves, stepping into character, if you will. The finishing touch of adding mystical bling—our amulets and talismans—certainly can help us feel protected, empowered, and at one with our magical selves, and as such, glamours are often traditionally placed into an object of jewellery. The ritual art of dressing and preparing has a profound effect on how we approach the world around us, and neglecting it can have an equally forceful result, one in which we are dragged down into an abyss of low vibrations.
And, of course, enhancement comes in many forms. In this modern world, all kinds of actual modifications are available, from the relatively tame visits to your colourist to the more drastic measures of a dermatologist or surgeon. Whichever road you choose, it all comes down to this: What makes you feel beautiful, desirable, powerful? How the world perceives you is really in your graceful hands.
Because what, my loves, really gives the witch her magic? Her own strength. How she lives is how she casts her spells. Which brings us inward once again. A healthy, balanced witch wields a million times the firepower of one who is fatigued, filled with stress, and has barely the will to get dressed, let alone raise energy. Of course, we all go there sometimes—but the real magic lies in pulling yourself back up.
I want you to try something. Each morning, reserve five minutes for yourself. (Yes, you have five minutes—steal it from the time you might otherwise be glued to your phone.) After you’ve washed your face, sit down in front of your mirror. If you usually get ready in the bathroom, change it up: Grab a fluffy pillow and settle down in front of a floor mirror, or employ a chair in front of a mirror hanging on the wall. Get into this petite ritual from the new moon to the full moon and see what happens.

GLAMOURY RITUAL
You will need: 3-ounce bottle of organic flower water (rose, jasmine, or lavender) 3-ounce coloured glass bottle, with cap or cork 2½ ounces pumpkin seed oil ½ ounce pure vitamin E Rose quartz facial roller
A simple concoction of two oils is delivered deeply into your skin to provide a gorgeous, supple luminosity. Pumpkin seed oil, with its powers of renewing the ravages of summer, is a delightful way to greet autumn: It brilliantly lightens sunspots, increases collagen production, encourages cellular turnover, and deeply nourishes your delicate skin. Vitamin E heals damaged skin, including fine lines and wrinkles, making it one of the most effective oils to add to any potion—and it won’t stress your wallet.
Beauty Witch Secret:If you have never used a crystal facial roller before, prepare for a truly pleasurable ritual! Most rollers are made with jade, which of course has its own invaluable magic, but I particularly like the rose quartz. It has a certain energetic lightness that increases the magic here, as well as the bright, heart-opening love it brings.
Prepare the Potion Pour the pumpkin seed oil into the empty glass bottle, then carefully add the vitamin E. Swirl it gently eight times clockwise, bringing in the energy of the new moon, the stirring air of autumn, the magic of the witches’ season, and pure love.
Anoint Yourself Lightly mist your face and neck with the flower water. Pour a small amount of potion—about the size of a quarter—onto your fingertips, rubbing them together to create a warming effect. Lightly apply to your face and neck using a combination of circular and upward strokes to conjure gentle massaging motions. (Don’t forget your earlobes!) Really get into it and enjoy how it feels: Close your eyes and see everyone you meet taking notice of your radiance. This not only feels amazing and begins your day on a beautiful note, but it actually raises the energy needed to get your glamour going.
Conjure Glamour Look at your face in the mirror. Take three deep breaths and begin to chant:
Everyone see, the light in me
Keep chanting as you take the larger end of the rose quartz roller and, beginning at the base of your neck, roll it in upward strokes to your jawline. Then move upward along your face, rolling each section all the way to the top of your forehead. Use the smaller end of the quartz roller for around your eyes (be gentle!), your nose, above your top lip, and other sensitive areas.
Be Gracious When you have finished, ground the energy with three more breaths. Take a good look in the mirror and give thanks for your unique beauty, inside and out. Smile. Now there’s a gorgeous witch!
Beauty Witch Secret: Storing the rose quartz facial roller in the freezer amplifies its ability to help de-puff and firm your skin, and it feels fabulous.
You will find that a similar ritual does wonders for the entire body. You can do it as you apply your body oil or as you are getting dressed. And before the mere idea of this exhausts you, remember that there is no need for pom-poms or loud cheers. A soft, even voice states fact. Should you feel inclined to whisper sweet nothings to yourself, all the better! But if not, just approach your mirror, and your body, with certainty. To amp your wattage even higher, I’ve conjured a few more delights as magical helpers to your glamour workings. One promotes beauty and glow from the inside; the other expertly polishes your outer layer. Both are endowed with the riches of treasured autumnal offerings. Though they fare quite well by themselves, I do recommend enjoying this pair together, beneath the glow of the full moon, as a celebratory and sensual way to top off the glamoury ritual you have just aced!
Chrysanthemum An age-old witches’ flower of protection, this fall favourite is also a beauty powerhouse. It expertly smooths wrinkles and reduces puffiness while lightening discoloration and redness. Its vitamin A and antioxidant content works both internally and topically, and is found to soothe and calm fears.
Clove Fiery clove protects, brings love, increases abundance, and has been known to banish negativity. It firms, reduces redness, and keeps skin clear with a deliciously spicy scent while internally fighting off illness and increasing circulation.
Sage Velvety sage brings health and longevity, along with antioxidant and anti-inflammatory benefits. It strengthens both the immune system and the skeletal structure, and fights the visible signs of ageing when used on the skin.
Star Anise The potent compounds of star anise help reduce fine lines by repairing the skin, firming, and keeping breakouts at bay. Magically, star anise protects, purifies, and restores youth—no necklace needed.
Apple Another autumnal star, the apple is sacred to Freya and Venus, and revered for its ability to give perpetual youth to the ancient gods. Filled with love and beauty magic, apples cleanse and nourish with abundant fibre, vitamins, and minerals, and have natural alpha hydroxy acids that exfoliate both mature and acne-prone skin with aplomb.

CHARMED SORCERY
Facial Exfoliant and Masque Per treatment
2 tablespoons ground flaxseed meal 3 tablespoons The Fire Within elixir 3 drops clove essential oil
Adding to the beautifying sorcery of our elixir, flaxseed is a skin-loving delight. Rich in nutrients and good fats, it makes a wonderful gentle exfoliate and feeds vitamins to the skin, leaving it soft, dewy, revitalised, and entirely glowing.
In a small bowl, combine the elixir slowly with the flaxseed meal, stirring clockwise until it becomes a smooth, thin paste. Add in the clove oil, all the while keeping the vision and feel of your inner beauty radiating outward for all to see. Holding that energy, apply a layer of masque to a clean face. Massage gently in circular motions. Now apply a second layer carefully—it will be a little messy—and relax for 10 to 15 minutes. (You can even repeat your chant if you like while the potion absorbs into your skin.) To remove, first soak a washcloth in warm water. Wring it out and apply to your face, allowing the heat to soften the potion. Remove most of the masque with the cloth, then rinse well with cool water. Pat your face dry, and follow with a toning mist and serum or crème.
Now, my loves, pour the elixir into a fetching vessel and toast your unstoppable charisma! Beauty rituals and potions have a cumulative effect, just as any focused, repetitive magic will. Time spent building your confidence, tending your beauty, and harnessing your own strength is invaluable and necessary for a wise witch. And much like Melisandre’s necklace, it holds a power that the world can see. Claim it. It is yours.

THE FIRE WITHIN
Elixir 4 servings
32 ounces pure spring water 1 cup organic or wild chrysanthemum flowers 1 tablespoon whole cloves 5 whole star anise 8 leaves sage 1 red apple, finely chopped
Begin by preparing a tea infusion. In a mortar, slightly crush the star anise pods to release the oils in the seeds. Next, fill a large glass bottle or decanter with spring water, then drop in each of the herbs and flowers, one at a time. As you do so, connect to them, feeling their magic create the essence of your potion. Cap or cork the bottle, and let it rest for several hours. Then strain the liquid into a high-speed blender, reserving three tablespoons of tea for use with the companion potion. Add the chopped apples and pulse until smooth. Add stevia or coconut nectar if you like, and set aside while you create its sexy companion.
https://enchantedlivingmagazine.com/bewitching-glamour/
1 note
·
View note
Text
Undiscovered Country #2

Undiscovered Country #2 Image Comics 2019 Written by Scott Snyder & Charles Soule Illustrated by Giuseppe Camuncoli & Daniele Orlandini Coloured by Matt Wilson Lettered by Crank! As the team goes on the run from the deadly Destiny Man, the focus shifts to Charlotte’s brother, Daniel. Until this expedition, he was the only person on Earth to successfully infiltrate the black box that is the United States. What secrets did Daniel learn that might keep the team alive, and what did they cost him? I was a little shocked with this issue and I am not sure if that's a good thing. Personally I would rather have learned that Daniel wasn't so trustworthy through subterfuge and not being shown it right off the bat. I mean I get where it's going but honestly I am not sure I like seeing this laid bare so quickly there is more fun in learning as we go and seeing him possibly arrange things off screen so we are never quite sure who's responsible for what. The opening here is great and it's a nice way of showing them as kids and introducing us to Sam, who bears an uncanny resemblance to Uncle Sam. It also actually explains quite a bit about how they are now and as crazy as that seems I found it highly enlightening. So the way that we see this being told is well done. The story & plot development we see through the sequence of events unfolding and how the reader learns information is laid down solidly. I am not entirely a fan of the content but how it's presented is another story. The character development is interesting and I don't think we get a strong enough look at some of these characters. Which is going to happen when you have a cast as diverse as this one. More so when we add into this mix the various leaders of the rings they have to go through not mention our missing pilot so yeah there really is a large cast and right now I think spotlighting one is a little eh. The pacing is strong and as the twists and turns come into being and we see how that shapes the overall ebb & flow of the story it highlights how the book is structured. I look at this with a critical eye and I will admit that wholeheartedly as these men are two of the more prolific storytellers. So this should be flawlessly done and I am not entirely sure that it is and the hype that surrounded it may have been overdone. What is absolutely spectacular about this book is the interior artwork. The linework is phenomenally laid down and the way we see the utilisation of the varying weights that bring out this level and quality of attention to detail is extraordinary. There really something interesting happening here with the composition inside the panels. Usually I am saying there should be more backgrounds being utilised but the way we see the angles and perspective here as well as the sense of size and scope, scale and depth perception that we see is stunning. We see one of the more talented eyes for storytelling around here and it's just captivates and mesmerises the reader in some really beautiful ways. The colour work is awesome to see. I am a huge fan of seeing how the different hues and tones within any given colour to create the shading, highlights and shadows. I am loving seeing how the flesh tones are utilised to really help bring out the musculature and facial expressions here! There is so much going on here that I am dying to learn about. The creatures that now exist in America and how, how, they are able to exist is among those things I need to know. Giant man eating shrimp really oh god that is some truly magnificent work being shown here. The creativity and imagination within these pages keep us coming back time and time again because what's been created here is something that we want see more of, we want to understand better and that interest and intrigue factor that's been instilled in the reader is a powerful thing.

#comic books#comics reviews#image Comics#scott snyder#charles soule#giuseppe camuncoli#daniele orlandini#matt wilson#crank!
0 notes
Text
Get Your Cheeks Plumped with Injectable Cheek Fillers
Feeling like your cheeks are a little thin? Maybe you wish your cheeks would be more angular, or cast more of a shadow, or just have a bit more volume to them. No matter what you do, you might just not have the right bone structure, or age might leading to volume loss in your cheeks. That’s why you need injectable cheek fillers.
Injectable cheek fillers are growing in popularity, and it’s no surprise why: more and more patients are seeing the value in having their cheeks shaped and volumized to perfectly complement the rest of their face.
In this article, we discuss everything you need to know about cheek fillers and the cheek filler procedure.
What Are Cheek Fillers?
Cheek fillers are essentially dermal fillers that are specifically injected into the cheeks. Dermal fillers are gel-like, soft injectables that are injected beneath the surface of the skin. They are used for a variety of common cosmetic applications, such as smoothing lip lines, volumizing lips and nasolabial folds, lifting cheekbones, reducing circles under the eyes, volumizing the hands, and of course, filling in the cheeks.
Dermal filler products come in both synthetic and naturally-occurring formulas. The most popular formulas use hyaluronic acid or HA as their base substance. Hyaluronic acid is a natural substance that is produced by the body, helping the skin with rejuvenation, augmentation, hydration, and general skin health.
How Do Cheek Fillers Work?
When injected into the skin, the dermal filler process is determined by the formula of the product. In most formulas, particularly those that are made with hyaluronic acid, the gel sits underneath the skin, spreading in the area around the injection site.
After a period of six months or longer, the filler is gradually and safely absorbed into the body, after which another treatment is required to maintain results and beauty.
With the gel injected into the cheeks, the hyaluronic acid or similar compound used in the formula acts to increase the volume and hydration of the cheeks, giving the cheeks a natural and healthy augmentation and fullness.
A major benefit of using injectables made with hyaluronic acid is that hyaluronic acid fillers can be dissolved by certain safe solutions. This means that if a patient is unhappy with their cheek filler, the provider can follow it up with a solution to force the filler to dissolve, rather than waiting for the filler to be naturally absorbed by the body.
Other safe and popular options are made out of polymethyl methacrylate, poly-L-lactic acid, calcium hydroxyapatite, and autologous fat, which is fat that is sourced from the patient’s own body and injected into the treated area.
While each substance brings its own advantages and disadvantages to the table, hyaluronic acid fillers are the most popular choices due to their risk-free and immediate results.
Why Are Cheek Fillers Important?
While popular applications include injections around the lips and the eyes, most people are less aware of the potency of treatments around the cheek areas. So what exactly do cheek injectables accomplish?
Cheek injectables have a singular goal: defining the patient’s cheekbones. Many plastic surgeons and dermatologists agree that defined cheekbones are the foundation of a prominent and attractive facial bone structure.
When an individual has prominent cheekbones, their face automatically has a more elevated and lifted look, while the central shadow underneath the cheekbone creates a slimness and youthfulness to the upper and mid-face.
This treatment is also surprisingly customizable. While other treatments can be slightly more limited in how they are used, cheek injectables offer individuals many different choices in application. For example, people with round faces can customize the treatment to give them an angular face; people with thinner faces can focus on plumping their cheeks.
With the cheek treatment, here is more art to it than just adding volume to the treated area. The goal of the doctor or provider should be to complement the face with the cheek filler, to achieve a right and left facial symmetry, creating harmony out of the patient’s natural facial beauty.
Read more: Can You Combine Lip Fillers With Other Facial Treatments?
What is the Best Filler for the Cheeks?

How Do You Choose the Best Doctor?
Some doctors like to refer to cheek fillers as a “contouring treatment in a syringe.” However, it is important that you use the right compound, as well as the right technique. As we said above, strong cheekbones are the foundation of an attractive facial bone structure, but the cheekbones are a delicate area which can be easily overtreated.
If the patient and doctor use a cheek filler that is too harsh or overly effective, you run the risk of achieving a too-angular look, making the face look weird instead of attractive.
The best cheek fillers to choose are those with formulas that contain a hyaluronic acid base, as well as fillers that have a higher viscosity. High viscosity options are more difficult to spread as they have greater firmness. When treating the cheeks, you want fillers that will stay in their intended injection site, to create the cheekbone prominence that you are looking for.
Most doctors recommend Juvederm Voluma for cheek fillers, as Juvederm Voluma is made with hyaluronic acid and is known for its high viscosity. Individuals who are treated with Juvederm Voluma see their cheeks lift up without becoming too angular, which could possibly resemble a plastic facial implant.
The Ideal Candidate for Cheek Fillers
As these are a noninvasive and nonsurgical treatment, most people can be safely and successfully treated with injectables around the face, including the cheeks. The ideal candidates for cheek fillers are those who:
Don’t smoke
Are physically healthy
Completely understand the filler process, and the potential results and expectations afterwards
Are aware of proper after-care methods after the treatment
Have faces that can be complemented by cheek fillers (consult your chosen provider or doctor about whether or not a filler treatment is appropriate for you)
Price: How Much Does It Cost for Cheek Fillers?
The exact price of your cheek filler treatment will depend on a number of factors, including the expertise of your provider or doctor, the location of your treatment, and the amount of filler required for your cheeks.
On average, you can expect a range of $1000 to $4000 for a complete filler treatment.
Non-Filler Treatments for Defined Cheeks
Dermal fillers are by far the easiest and least invasive way to increase the prominence of your cheekbones or to add volume to your cheeks. Cheeks and cheekbones are a difficult area to treat with other methods, and the only other treatment to volumize deflated cheeks is a facial implant.
Facial implants provide permanent beauty results, but they also require long and tedious surgery, which is why many individuals these days opt for cheek fillers instead.
The Cheek Filler Experience: Everything You Need To Know

Before the Procedure
Choosing a Trusted Provider
Before any treatment, it is important that you choose a doctor or provider that you can trust. Due to the high cost of this treatment, there is a growing black-market dermal filler presence, for DIY usage as well as practitioners who provide the treatment for much more affordable costs, but use questionable products.
Anything that is injected in the skin should be FDA-approved for absolutely safety, as there can be dangerous complications that arise when unsafe products are used during treatments by untrained practitioners. In some cases, off-brand gels are made of nonsterile substances (commonly hair gel or plastic compounds).
Hair gel based fillers or plastic compounds can often lead to skin cell death, dangerous infections, wildly allergic reactions, and in some cases, embolism, which can cause blindness.
If you are tempted to purchase an off-brand derma filler or have your treatment done by an unlicensed and more affordable practitioner, note that the FDA has released an official warning, advising consumers to avoid Internet options as they might be contaminated and harmful.
Consultation
Once you have chosen a trusted provider or clinic, a consultation will be set up between you and your doctor prior to the treatment. During this consultation, you and your doctor will discuss:
Your goals and expectations with the filler treatment
Any existing allergies, medical conditions, and ongoing medical treatments
Any medications or supplements that you might be on
Any drug use, alcohol, or smoking
The expected results, as well as how they will last
What the treatment will hope to accomplish, and how the injectable will be used to actively shape and contour your face
During the Procedure
The procedure itself is quite simple. The patient will come in on the scheduled day of the treatment, and the procedure begins with the patient’s face being numbed, to avoid any pain from the injections. The numbing process should take no longer than five minutes.
After the face has been numbed, the cheeks will then be drawn on, so the doctor can position the exact injection sites for proper filler placement. The injectables are then injected into the cheeks and surrounding area; this process should take no longer than five to ten minutes.
You should not expect to see results immediately after the procedure.
After the Procedure
Possible Side Effects
After the procedure, it is typical for a patient to experience minor swelling around the injection sites. To reduce the swelling, you can apply ice to the swollen areas, however this should not be necessary as the swelling will naturally go away after just a few days. After the swelling, any previous volume loss should start to improve.
It is important that you have your treatment performed by an experience and trusted professional, as serious side effects only generally occur when the treatment has been incorrectly performed. As stated above, some serious possible side effects when treated by a non-professional include:
Embolism
Skin cell death
Allergic reactions
How Long Do Cheek Fillers Last For?
The lifespan of the filler dermal in your cheek depends on a number of factors, most importantly on the natural metabolic rate your body breaks down and absorbs the hyaluronic acid gel, which can slightly vary from person to person.
However, typically a patient can expect a dermal filling injection to last and continuously improve for as little as 6 months, to an average of 10 to 12 months, with some individuals even still seeing results 18 months after their procedure.
While this might disappoint some readers, note that there is nothing stopping you from getting a treatment again once your results begin to fade. Many patients choose to book a treatment every nine to ten months to maintain their ideal beauty structure and volume results in their cheeks.
Set Your Cheek Filler Appointment with Ethos Spa Today
It is crucial that you have your cheek fillers done by a trusted professional, and at Ethos Spa, Skin and Laser Center, we are home to one of the most trusted dermal filler teams in the New Jersey area. Search no further for the ideal cheek filler provider close to you!
We have performed countless cheek filler procedures on patients young and old, and can help you craft the ideal facial structure with your cheekbone and face shape. We do more than just volumize your cheeks – we understand the art of contouring the face to make it the best version of itself it can be. We treat all parts of the face to increase a patient’s beauty – lips, nasolabial folds, eyes, and more.
Call or message us today, and begin your journey to your ideal treatment with doctors you can trust. Let us help you with your search for maximum beauty. Your perfect close up is just days away.
The post Get Your Cheeks Plumped with Injectable Cheek Fillers appeared first on Ethos Spa Skin and Laser Center.
source https://www.myethosspa.com/injectable-cheek-fillers/ from Ethos Spa Skin and Laser Center http://myethosspacom.blogspot.com/2019/12/get-your-cheeks-plumped-with-injectable.html
0 notes
Text
Year 2 Weekly Summaries - Week 11

Day 1- Lecture with Lyndsey
Brief- build a body of research and development work
Two part project - script and character design, both have to have an element of human anatomy
Week 11-17 project
Including three week Christmas break
Requirement
Character research and development bible
Character reel
Experimentation reel
Reflective journal
Min three sequences
-turnaround
Walkcycle walking across the scene
Submission :focus on body mechanics
Character research and development bible
Research - imagery of anything and everything related to the character, artists research
thumbnails- silhouettes , contour , colour
Colour- experimentation with cool schemes
Posing - dynamic range of posing
Construction- turnaround, core shapes , breakdown of rigging and mesh
Can also have facial expressions and turnaround
For Monday - bring initial ideas
Ba2a research: Narrative strategies
In this unit you’ll take inspiration from a classic text to make an original screenplay suitable for animation.
Blog is required
Got to read strange case of dr jekyll and mr Hyde(1886) by Robert Louis Stevenson and create your own screenplay for an animated film inspired by the text.
Submission requirement
1000 words creative text
1000 word critical reflection
Optional can submit concept art
Won’t be retelling the story of Jekyll and hide just keeping the them of duality.
Has to be a short film and tell a complete story- primarily visual
Use the summaries of the novel
Jekyll and Hyde - is an allegory- it has a deeper hidden meaning
Day 2 - Jekyll and Hyde
In todays session we had an introduction into creating characters. Starting with a silhouette and moving through to add colour and then finalising. We chose the characters of Santa clause and Krampus. I found that this was a good introduction into how I could structure my initial designs for the Jekyll and Hyde project. I feel like I need to produce a mood board of the era I want to focus on as well as conduct research into the world itself at that time. I found the character designing process very organic in this session and tried to stay as loose as possible as this would allow more ideas to organically flow throughout. Silhouette will be a major factor in my character design for this project as a good silhouette is essential in good character design. This allows us to differentiate which character is which due to the shape language used within the silhouette.
Day 3 - Life Drawing
In todays life drawing session we focused on light and shade as well as perspective. The initial task was to draw the subject with the box 8 times with 7 minutes per pose. I found this quite easy in order to achieve the scale and proportions of the figure. However, I feel like the perspective of the box needs improvement. At times the scale of the box would be detrimental to the figure itself with some of the edges needing to be made larger in order to ensure that it was up to scale. The next was was a 30 minute light and ark drawing over a charcoal background. I started by blocking in the elements of light with a rubber and white chalk and this helped me to establish key landmarks around the face and upper torso.. I then added darker segments for shadows and used the charcoal base as a mid-tone. I am really happy with this piece and want to try and improve further in drawing facial features.
Day 4- CG session 6th December 2019
In todays session we learned how to rig most of the body for a character. We started with the legs that was learned previously and moved up to the torso. Using parenting I was able to connect the spine to the hip and then the hip to the leg itself. This allowed a full range of motion in the hip. The next part off the task was to rig the arm. Starting at the clavicle I placed joints in the shoulder, elbow and wrist. This is very much similar to rigging the leg. I then parented this to the spine.The next part of the task was a lot trickier as I had to create a reverse foot roll. This is something I need to improve on as I became increasingly confused when the IK’s became involved. I struggle to understand what parented with each other in order to establish this. To fix this issue I will watch rigging tutorials and begin to practice rigging in my spare time in order to complete the task.
0 notes
Text
Improvement and Myself
Hey so today I’m going to be tackling one of my own drawings that for a long time I considered a master piece. I was evenso proud of it I submitted it into my college art acceptance portfolio (I did get in but found the environment and students ended up killing m passion so I quickly left the school an reclassified my art as a hobby instead of a career). In the famous words of Isterbrak, ‘A Master piece is only good at showing your flaws’, so let’s see the piece.

Right off the bat you can tell the face is skewed. This is because I never flipped my canvas, and I still don’t on occasion. Flipping your canvas is impostant because it refreshes your view on the piece you are working on to allow you to see your bias. An artist bias is often times lines tending to curve in a certain way, often leaving jaws and facial features off kilter. You can notice my curve more to the right because I draw in an anti clockwise direction with my left hand. It’s something natural but it’s an easy fix I never did. So of course I marked out the problems to go a little more in depth.

First things first, the composition is bad. The head is sort of just floating there with these missing shoulders and thick lines to show a cut off, almost as if it was a plaster bust or latex mask. But it’s not, it’s supposed to be a character portrait. This is also just very boring composition with it just plastered in the middle with a mono coloured background. There’s not even a gradient to draw more interest to the flowing hair, which is the main focus. The character was supposed to be appear magical and a little frightening because of the exposed veins in her neck and face (fun fact I used a medical diagram for the neck ones so that’s fun). I feel like this almost could have worked if I just pushed the shadows a little more and brightened up the neck veins to the same bright red as the rest of the portrait.
I also mixed lines with lineless sections in my art. That’s a no no. Let me tell you why it’s a no no. When you mix between lines and lineless it becomes very obvious that the lines are there as a crutch because you can’t develop proper edges to define important features, like the nose and ridge of the lips. You can see how I struggled with that by the way the collar bone just evaporates after the dip is properly defined, and poorly at that. It doesn’t even help that the lines are shaking and super distracting because your eye is just picking through these black lines instead of focusing on the hair.
Which is messy and blurry at the edges may I add.
So I went back and I drew it again.

First thing I want to say is, I didn’t flip my canvas and you very much tell so I would like to apologize for that. But, the face is slightly more aligned then before. The nose also has a defined bridge with obvious shadows, highlights and mid tones, giving it an actual structure and 3-d shape. I also upped the contrast in a very simple way. I added a gradient. By putting a darker colour at the bottom, I’ve highlighted how fair the character is, drawing the eyes up to the hair which is stark against the creme background.
Then I upped the values on the points of interest, this times it was the veins. by choosing a predominately cool colour palette, the sudden use of a warm colour, like red, becomes very effective as it plays off of the opposing colour wheel value.
I want to say as well that because of these contrasts and better framing, having the shoulders end at the bottom of the canvas (as apposed to having a floating head) it has made this more interesting to look at. It also adds a layer of polish which tells the audience this is more of a complete piece than the sketch sort of feeling you have on the first one.
This has bee achieved because I am more versed in the rules of digital painting. There are a couple tools that every artist has that help them paint, Isterbrak preaches this in everyone of her seminars and honestly I would encourage you to watch them. they’re free, about an hour long and she critiques students work and goes over everything. There’s bound to be something there that can help you out.
Final thoughts on this whole thing, Redraw your Master pieces, don’t mix lines with lineless in your art and think about the whole piece so you don’t end up with a half finished feeling in your art
-Mod Jibs
2 notes
·
View notes
Text
Hellblade: Senua’s Sacrifice
Wading through a river of blood, in the center of a valley of corpses and bodies screaming out in agony. The swirling sunless sky is blood red with flashes of lightning illuminating the tortured souls as you keep moving onward towards a mountain with a voice at the peak that calls for you; this is one of the harrowing set pieces that make up Hellblade: Senua’s Sacrifice.
Story
Ninja Theory’s latest game, Hellblade: Senua’s Sacrifice, is a sinister odyssey that delves into the most maniacal crevices of one’s mind. The game’s protagonist, Senua, is a young Celtic warrior on a quest to rescue the soul of her beloved, Dillion. Senua’s journey becomes more excruciating the further she travels due to suffering from a recently heightened psychosis deemed as “The Darkness”. The Darkness manifests itself as demonic warriors that reflect the internal struggles of Senua’s past. As her journey progresses the psychosis transforms her environment into horrifying hellscapes of oblivion, fire, and darkness. These backdrops can be especially nerve-racking due to a threat imposed on the player at the beginning of the game; this threat promises to permanently delete the player’s save file if Senua falls to the darkness too many times. This mechanic is a thoughtful tool that raises the stakes of every encounter and brings the player closer to the dread that Senua must endure at every obstacle of her quest.
Design
Graphics
Despite being an independently funded and published game, Hellblade’s visuals surpass many of its AAA brethren. At the start of the journey, Senua paddles towards shore and immerses the player with Ninja Theory’s attention to detail. With every stroke of the paddle the water ripples away from every contact point. As Senua gets closer to shore the grotesque aftermath of war is on display with charred corpses skewered on spikes, floating in the water and hung from trees. The fidelity of these set dressings is impressive and disturbing. The most impressive feat however is Senua herself, with the camera close behind her shoulder through the majority of the duration of the game it was important to render Senua at the highest fidelity possible. Senua’s design strays from a video game’s archetype of a female protagonist. Senua is strong and muscular, she doesn’t have a large chest or wide hips; she has an average body brought to its physical peak. The facial animation is impeccable and brings the model through the other side of the uncanny valley. Senua is believable and lifelike in every expression and movement. Senua’s skin is textured and imperfect; she’s dirty, bloody, and sweaty. Strands of hair move independently from one another, creating one of the most believable hair physics I’ve seen in a video game. An interesting choice by Ninja Theory was to add in full motion video that Senua interacts with. These videos can being jarring at first but when brought to the context of the game’s subject matter, oddly fit within the delusional mind of Senua.
Sound
Though the visuals are impressive, the sound design takes center stage. Ninja Theory went above and beyond to simulate psychosis induced voices that stir in Senua’s head with the use of binaural audio that begs for the use of a good pair of headphones or a finely tuned surround sound system. When reaching a stressful situation, Senua’s voices are the true enemy as they will create an auditory ambush of doubt and anguish as Senua tries to persevere through her obstacles. The way that the sound design distorts and positions these voices truly exhibits the struggle of psychosis to the player. In addition, movement in the environment feels exactly the way it should. Senua’s footsteps will change sound effects as she walks through different terrain. The combat deeply benefits from the wise sound design, from the unsheathing of Senua’s sword to a perfectly timed counter, everything is satisfying.
Andy LaPlegua’s score perfectly accompanies every story beat and feeling. There are times where the score is brought to the forefront and completely washes a scene in emotion. In particular, the finale being a wide array of complex emotions is scored masterfully and immediately made my list of favourite video game tracks of all time.
With all that being said, the sound choices are not without fault. In particular, there was an out of place sound effect for Senua jogging through a flooded area; the effect was almost comically cartoony and really placed me out of the experience. In my entire playthrough this was the only part of the sound design that felt out of place and it baffles me.
Gameplay
Exploration
Although Hellblade is a linear game, something has to be said about the traversal. The camera is kept close to Senua which keeps the player from feeling anywhere near comfortable while moving towards your objective. When needing to cross a crevice the game introduces an age-old gameplay trope of balancing across a beam to get across. This is done by counter balancing where Senua is leaning using the movement stick, however with the camera so uncomfortably close to Senua, the fear of falling is magnified by a clear view of her perspective.
There are runes to be found which are the game’s collectibles. Gathering these runes unlocks segments of the Norse mythology that heavily influences Senua’s psychosis. Collecting all of these will unlock an extra scene at the game’s finale and ultimately makes the game’s story more comprehensible.
Problem-solving
Despite Hellblade being an an action game, the majority of the time in game is actually spent solving puzzles; this gameplay element derives from psychosis patients having an exceptional ability to identify and decipher patterns. These puzzles usually involve approaching a door marked with a set of runes for Senua to find in the environment. These runes can be found as a shadow on a wall or a set of trees aligned just right to make the shape of the rune. In addition to these rune puzzles, there are a few visual perspective riddles to solve along the way. There’ll be shards floating in air with refracted images of a structure that needs to exist to get through a specific area. For example, at a certain point there was an unfinished bridge with these refracting shapes floating above the uncompleted half. To cross this bridge, Senua must reach a higher viewpoint and look down at these shapes at a certain angle to complete the other half of the bridge. The rationality of seeing runes somehow opening the doors and making structures appear out of thin air reinforces the player’s suspicion that not everything they’re experiencing as Senua is real.
Combat
Combat has been a strong point in all of Ninja Theory’s previous works and despite a few shortcomings, still remains a standout gameplay element. Combat is your traditional affair, you have light and strong attacks, a block when timed correctly creates an opening to lash out at a tough opponent, a handy dodge roll, and focus ability that’ll slow down enemies and materialize enemies shrouded in darkness. The camera is tight on Senua and instantly creates tension as you have to have a quick response time to your enemies’ tells.
The default difficulty setting is set to an automatic scaling which was worrisome initially due to the ease of the first couple encounters, however those fears were quickly dispelled as enemies will change their tactics and throw a quick jab to break your combo. The scaling works beautifully and continually challenges the player all the way to the end of the game. The combat is quick and due to the camera being so close to Senua, battling multiple enemies at once creates feelings of claustrophobia and paranoia as an enemy can spawn behind Senua without an indication until a voice in her head says “behind you” or tells her to “watch out”. As the game progresses this becomes more and more a juggling act as you will want to keep rolling around your environment to keep all enemies within sight.
The animations within combat are dazzling, there’s a fluidity to Senua’s every movement, you feel nimble and strong as you feel the weight of every attack connect with your foes. Enemies’ movements are just as well articulated; they show their remaining health by how they hold themself, they limp, they cover their wounds when badly injured. The thought and attention to detail when your enemy reacts to the gushing wound across their chests keeps you sold on every moment in battle.
The combat isn't perfect however; unfortunately it suffers drawbacks due to a lack of diversity. There are only a handful of combos that Senua can execute so you’ll be seeing the same attack and combo animations repeatedly and will more than likely default to repeating the same strategies over and over.
Lasting Impressions
Hellblade: Senua’s Sacrifice is a triumph in the marriage of storytelling and gameplay that showcases the medium’s ability to invest deeper into a subject matter; it is a tense, heart-pounding, thrilling adventure that demands to be played. Hellblade doesn’t just send people through the motions of a person struggling with psychosis but brings the player to empathise with the horrible and gut-wrenching mental illness; all while telling a story of loss, despair, betrayal, and revenge. The story’s mysteries have the most lasting impression on me: I know exactly what had happened and why, but I will never know what was real and what was a delusion. This uncertainty is simply something the player has to live with alongside the everyday struggles of sufferers of this condition. Although Hellblade is a game with exploration, puzzles, combat, and excitement it also is hard to recommend to just anyone who’s a fan of games. The subject matter can be illusive and the deeper layers will pass over the heads of players with no prior knowledge of psychosis. The game can be difficult to play for prolonged periods of time (especially with headphones) due to its level of immersion into the mind of a sufferer of psychosis; I found myself needing breaks and taking a walk outside from time to time due to the heavy subject matter. Nevertheless, Hellblade: Senua’s Sacrifice is a must play game for players who want to see the medium’s progression into being an art form and a way of storytelling. Despite its very few flaws, it stands out as one of the best games of the year.
Reviewed by Mitchell Ness on PS4 Pro
10 notes
·
View notes