#webmidi
Explore tagged Tumblr posts
Visit Tumblr Blog
Explore Tumblr blogs with no restrictions, modern design and the best experience.
Last Seen Tumblr Blogs


Fun Fact
Celebrities use Tumblr as well.
Photo

Music Pattern Generator v2.1 A free and open source web app I just finished. Intended to create complex polyrhythms in an easy to follow way using animated graphics. Please see https://www.hisschemoller.com/blog/2019/music-pattern-generator-v2-1/ on my website for links and more information.
4 notes
·
View notes
Text
Mr zipper labels wholesale

#Mr zipper labels wholesale android
Personalized content and ads include things like more relevant results and recommendations, a customized YouTube homepage, and ads that are tailored to your interests. Complete your order on the checkout page. Your online shopping cart will automatically reflect the bulk discount. Zippers must be all the same color and length to qualify for bulk discounts. Personalized content and ads can be based on those things and your activity like Google searches and videos you watch on YouTube. The way to order bulk wholesale zippers from Zipper Shipper Sewing Supplies is simple: 1. Mr ZipperFor non-personalized content and ads, what you see may be influenced by things like the content you’re currently viewing and your location (ad serving is based on general location). CBF Label is the leader in custom apparel trims, labels, and tags that are perfectly tailored to suit your brand Whether you need custom logos for your clothing brand or if you want to set yourself apart from other clothing labels, CBF Label can elevate and streamline your brand. Show personalized or generic ads, depending on your settings, on Google and across the web.Shop rolls of decorative zippers for sewing, 14 - 18 zippers, and even themed zipper packs for a variety of vibrant zips. We have bright fancy zippers in every color imaginable, including specialty zippers and decorative zippers. Show personalized content, depending on your settings Fasten your fabrics with some fancy zips Our selection of sewing zippers can make any project well, zippy.Deliver and measure the effectiveness of ads.Improve the quality of our services and develop new ones.Mr ZipperfaceIf you agree, we’ll also use cookies and data to: Mr. Measure audience engagement and site statistics to understand how our services are used.We also offer custom self-adhesive woven labels -just peel off the sticker and apply If you're looking for name tapes for. Deliver and maintain services, like tracking outages and protecting against spam, fraud, and abuse Order custom woven clothing labels online We offer personalized sewing labels including high quality woven labels -now available as a sew-on clothes label or an iron-on clothes label.
#Mr zipper labels wholesale android
Parts of Hardware.3D, A-frame, ARCore, Actions on Google, Android Live Wallpaper API, Android NDK, Android SDK, Android Things, Apps Script, Arduino, Augmented Reality, Blender, Canvas, Canvas Quiz, Captive Portal, Cardboard SDK, Cast API, Cinder, Cloud Text-to-Speech API, Convnet.js, D3.js, Demoscene, Dialogflow, Firebase, GLSL, GPT-2, Gamepad API, Google Assistant, Google Assistant SDK, Google Cloud AI, Google Cloud Speech API, Google Cloud Vision API, Google Maps Tile API, Google Natural Language, Google Sheets, Handwriting Recognition, Haxe, Javascript, Keras.js, Kotlin, Kotlin, Magenta, Magenta.js, Mapbox GL, Maps Places API, MaryTTS, NLP, Nearby API, Nearby API, Node.js, Notification Access API, OpenCV, OpenGL, Opengl, P5.js, Paper.js, Particles, Pixi.js, Polymer, PoseNet, Potree, Processing, Raspberry Pi, React, React Map GL, Shadercam, Speech Synthesis API, Tango, Teachable Machine, TensorFlow, TensorFlow Lite, Tensorflow, Tensorflow.js, Three.js, Tone.js, Touch Designer, Translate API, USB OTG, Unity, Visualization, Vuforia, Wavenet, Web Audio API, Web Speech API, WebGL, WebMIDI, WebRTC, WebXR, Websockets, Wekinator, es6, openFrameworks, react.js, t-SNE, tensorflow.jsGoogle uses cookies and data to: Mr Zipper Jojo Product: puller of rope and weave belt, injection moulded puller, injection moulded button, puller of cases and boxes, waterproof zipper, synthetic resin parts, velcro cuff. Standard or according to your specificationsĭepend on craftsmanship and items specification Īccording items specification and order quantity,special package requirements are welcome Factory has more than 200 set production equipment and the daily output is 200,000 so that the big order can be guaranteed.ĥ. Our products past SGS and ITS test and reach to the latest European standard.Ĥ. Focus on outdoor garment& accessories, providing a complete set of service from designing ,sampling, producing.ģ. U shape string zipper pull for garments & luggages : Product Typeġ.
0 notes
Text
Syntorial skip

Syntorial skip how to#
Syntorial skip software#
Syntorial skip code#
/ select an output port let outputPort: MIDIOutput ? = midi.
Syntorial skip code#
These are marked as non-standard in the code base. WebMIDIKit is a part of the AudioKit project and will eventually replace AudioKit's MIDI implementation.Īlso note that WebMIDIKit adds some APIs which aren't a part of the WebMIDI standard. WebMIDIKit let's you do the same thing in 1. With almost 200 lessons, combining video demonstrations with interactive challenges, you’ll get hands on experience programming patches on a built-in soft synth, and learn everything you need to know to start making your own sounds with ease.
Syntorial skip how to#
Selecting an input port and receiving data from it is ~80 lines of convoluted Swift code. Syntorial is video game-like training software, that will teach you how to program synth patches by ear. so i’d go through the module first, skip the last one (on your own), and do the massive lesson at the end of that module, rinse, repeat. Furthermore, some of the APIs didn't quite survive the transition to Swift and are essentially unusable in Swift ( MIDIPacketList APIs, I'm looking at you).ĬoreMIDI is also extremely verbose and error prone. the massive lesson pack goes into how to find the same functionality from the tutorials within massive, but it doesn’t re-cover the underlying concepts from the tutorials.
Syntorial skip software#
Syntorial Synthesizer software that helps you become better at sound. Personally, my thought is that only those that have gone down the route of using the app (full or demo), which has a very specific approach to learning, would have an idea of whether it's better or worse than other, more well. Using it involves a lot of void pointer casting ( 💩^9.329), and other unspeakable things. and it was a huge success so click here to skip down to the Results section. Nothing wrong with suggestions, but there is a very specific question being asked. On these OS, the native framework for working with MIDI is CoreMIDI.ĬoreMIDI is old and the API is entirely in C ( 💩). Im using it to re-learn synthesis and get a better grasp of concepts I missed along the way. Its really important to understand the fundamentals that are often lost in todays Yo uTube tutorials. WebMIDIKit is an implementation of the WebMIDI API for macOS/iOS. Who is Syntorial 'Syntorial is an excellent resource for learning and mastering synthesis. Note that WebMIDI is relatively low level as messages are still represented as sequences of UInt8s (bytes/octets). WebMIDI is currently implemented in Chrome & Opera. WebMIDI is minimal, it only describes MIDI port selection, receiving data from input ports and sending data to output ports. WebMIDI is a browser API standard that brings the MIDI technology to the web. It lets you make music by sending data between applications and devices. MIDI is a standard governing music software and music device interconnectivity. The score also features contributions from my frequent collaborators Louis Weeks and Ethan Helm.# Want to learn audio synthesis, sound design and how to make cool sounds in an afternoon? Check out Syntorial! About What's MIDI Next up are two screenings in LA as part of AFI Fest, on November 15 and November 19. Most recently, at the Austin Film Festival, it won the Comedy Vanguard Jury Award, and the Comedy Vanguard Audience Award! In its festival coverage, The Rice Thresher gave the film five stars. I’m excited to share that my electric guitar playing can be heard in the score of this new film! The Planters had its world premier at Raindance Film Festival in the UK in September, where it won Film of The Festival! (Read more about it at Raindance and Screen Daily.) It then premiered in North America at Nashville Film Festival in October, where it won a Best of the Fest Audience Award, Best Cinematography, and Best Original Song! Here’s a great review from Nashville Scene. An oiread sin ionas go dtéann sé i gcodladh na rianta anseo agus san Eoraip sna páirceanna, tá easpa córais aird ann don chliant 24 uair an chloig. Now available on both iPhone and iPad, AudioKit Synth One (AKS1) is an Open Source project (MIT License) from the team behind the no-less Open Source AudioKit platform/framework for the Swift programming language. Thick as Thieves premiered at the Portland Comedy Film Festival on November 1, where it is won the Best Romantic Comedy Film Award! September 2019 Tacaíonn siad le cleachtas ealaíon gairmiúil, cuardaigh casino ar líne gan éarlais Beidh sé ar aghaidh ansin a ghníomhachtú do bhogearraí. Syntorial Primer I don’t always do listicles but when I do, it’s not really about the list or the -icles.
1 note
·
View note
Text
I ended up buying an Arturia Keystep MIDI keyboard recommended by bgins. So cool to use this in a web browser with WebMIDI + Moon Forge. I really have no idea what I’m doing, but making sounds is fun.

0 notes
Text
sudo modprobe snd-virmidi ottieni porte thru a free
monitor webmidi
0 notes
Photo

Music Pattern Generator 2.2, New version at https://www.hisschemoller.com/mpg, video tutorial at https://www.youtube.com/watch?v=nJGYka8OE30
0 notes
Text
E.M.M.H. vol.11
2018-2-24 クリエート浜松で E.M.M.H. vol.11を開催。前々からクリエートの巨大壁面に映像を投影したいという願望からこの企画が始まり、エクスペリメンタルなサウンドとジェネラティブな映像の共演がついに実現しました!

kema:V-Accordion, sugai: TR-8, mwata: webMIDI/webAudio/threejs
youtube
KSMT x サスカッチ
youtube
杉本直之:guitar / rc202
渡邊正和:glsl, video→ https://www.instagram.com/p/BgOfUIKjvsP/
1 note
·
View note
Text
Dip Your Toes Into Hardware With WebMIDI
Did you know there is a well-supported browser API that allows you to interface with interesting and even custom-built hardware using a mature protocol that predates the web? Let me introduce you to MIDI and the WebMIDI API and show you how it presents a unique opportunity for front-end developers to break outside the browser and dabble in the world of hardware programming without leaving the relative comfort of JavaScript and the DOM.
What are MIDI and WebMIDI exactly?
MIDI is a niche protocol designed for musical instruments to communicate with each other. It was standardized in 1983 and is maintained to this day by an organization consisting of music industry companies and representatives. It's not wildly different than how the W3C dictates and preserves web standards, in some sense.

Photo by Jiroe on Unsplash
The WebMIDI API is the browser-based implementation of this protocol and allows our web applications to "speak" MIDI and communicate with any MIDI-capable hardware that might be connected to a user's device.
Not a musician? Don't worry! We'll discover very quickly that this simple protocol designed for electronic musical instruments can be used to build fun, interactive, and completely non-musical things.
Why would I want to do this?
Great question. The shortest answer: because it’s fun!
If that answer isn't satisfying enough for you I'll offer this: Creating something that straddles the line between the physical world and virtual world we spend most of our days building things for is a good exercise in thinking differently. It's an opportunity for creative tinkering and for considering and creating new user interfaces and experiences to navigate. I truly think this kind of playful exploration helps make us use different parts of our brains and makes us better developers in the long-haul.
What kind of things can I build?
youtube
Cellular Automata on a MIDI controller
youtube
Playing Go
youtube
Whack-a-mole
youtube
Mixing colors with hand motions
What do I need to get started?
Here are the prerequisites to start experimenting with WebMIDI:
A MIDI controller
This might be the trickiest part. You'll need to procure a MIDI-capable piece of hardware to experiment with. You might be able to find something cheap on Craigslist, Amazon or AliExpress. Or — if you're really ambitious and have an Arduino available — you can build your own (see the end of this article for more information about this).
A WebMIDI-capable browser
This browser support data is from Caniuse, which has more detail. A number indicates that browser supports the feature at that version and up.
Desktop
ChromeOperaFirefoxIEEdgeSafari4330NoNo76No
Mobile / Tablet
iOS SafariOpera MobileOpera MiniAndroidAndroid ChromeAndroid FirefoxNo46No7678No
As of this writing, according to caniuse.com it's supported by approximately 73% of browsers, though most of the heavy-lifting is done by Chromium. Any Chromium-based browser will support WebMIDI—that includes Electron apps and the newer Chromium-based Microsoft Edge. It's also supported on Opera and the Samsung Internet Browser. On Firefox it's still being discussed but hopefully coming sooner than later.
Hello, WebMIDI
Once you've procured both of those things we can start writing some code! Working with the WebMIDI is not terribly different than working with other browser APIs like the Geolocation or MediaDevices APIs, if you're familiar with either of those.
The high-level flow looks like this:
We detect availability of the WebMIDI API in the browser.
If detected, we request permission from the user to access it.
Once we're granted permission, we now have access to additional methods to detect and communicate with any connected MIDI devices.
Let's see that in action:
if ("requestMIDIAccess" in navigator) { // The Web MIDI API is available to us! }
Now, assuming we're in a WebMIDI-capable browser, let's request access:
navigator.requestMIDIAccess() .then((access) => { // The user gave us permission. Now we can // access the MIDI-capable devices connected // to the user's machine. }) .catch((error) => { // Permission was not granted. :( });
If the user gives us permission, we should now have access to the MIDIAccess interface. This helps us build a list of the devices that we can receive MIDI input from and send MIDI output to.
Let's do that next. This is the code that goes inside the function we're passing into then from the previous code snippet:
const inputs = access.inputs; const outputs = access.outputs; // Iterate through each connected MIDI input device inputs.forEach((midiInput) => { // Do something with the MIDI input device }); // Iterate through each connected MIDI output device outputs.forEach((midioutput) => { // Do something with the MIDI output device });
You might be wondering what the difference is between a MIDI input and output device. Some devices are setup to only send MIDI information to the computer (these will be listed as inputs) and others can receive information from the computer (these will appear as outputs). It's not uncommon that a device can be send and receive, so you will find it listed under both.
Now that we have code that can iterate through all the connected MIDI devices, there are basically only two things we'll want to do;
If it's an input device, we'll want to listen for any incoming MIDI messages emitting from it.
If it's an output device, we might want to send MIDI message to it.
The code for setting up an event listener to respond to any incoming MIDI messages from our input devices looks very similar to an event listener you might setup for other DOM events, except in this case, the event we're listening for is the midimessage event:
input.addEventListener('midimessage', (event) => { // the <code>event object will have a data property // that contains an array of 3 numbers. For examples: // [144, 63, 127] })
If we want to send a MIDI message to an output device the code we can do so like this;
outputsend([144, 63, 127]);
Here is a CodePen demo with most of this put together for you. It will let you know about all of the MIDI inputs and output devices connected to your system and show you incoming MIDI messages as they happen:
See the Pen WebMIDI Basic Test by George Mandis (@georgemandis) on CodePen.

WebMIDI Test demo screenshot highlighting which MIDI input and output devices were found

WebMIDI Test demo screenshot highlighting MIDI messages received by one of the MIDI input devices. In this case, we’re seeing when a key on the MIDI keyboard is pressed.

WebMIDI Test demo screenshot highlighting MIDI messages received by one of the MIDI input devices. In this case, we’re seeing when a key on the MIDI keyboard is released.
You might be wondering a couple things at this point:
When you're listening for the midimessage event, how do I make heads or tails of that three number array in event.data?
Why did you send an array of three numbers to your MIDI output device and why did you send those specific numbers?
The answer to both of these questions lies in further exploring and understanding how the MIDI protocol works and the problems it was designed to solve.
Anatomy of a MIDI message
When a MIDI controller "speaks" to another MIDI-capable device or computer, they are sending and receiving MIDI messages with one another. The protocol underlying this communication is fairly simple in practice but a little verbose when explained. Still, I'll try.
Every MIDI message consists of three bytes consisting of 8-bits (0-255). Represented in binary, a message might look like this:
10010000 | 00111100 | 01111111
There are only two types of MIDI messages: Status and data. Every message will consist of one status byte and two data bytes.
The status byte is intended to communicate what kind of message is being delivered, including things like:
Note On
Note Off
Pitch Bend Change
Control/Mode Change
Program Change
...and many others.
If you're coming at this from a non-musical background, these status messages might seem kind of strange, but don't worry too much about it. The data byte is intended to provide more information and context to the status. To give an example, if I have a MIDI piano plugged into my machine and press a key to play a note, it would send a "Note On" status byte accompanied by data bytes indicating which note I played, and perhaps how hard I pressed it.
A status byte will always begin with the number 1 and data bytes with the number 0.
1x0010000 | 0x0111100 | 0x1111111 ^status ^data1 ^data2
For data bytes that leaves 7-bits to express the data in that byte. That gives us an integer range of 0-127.
For status bytes, the next 3-bits after the first describe the type of status message while the remaining 4-bits describe the channel. To break down our binary representation:
1x001x0000
How this translates into WebMIDI and JavaScript
As you may have guessed from the code samples earlier, with the WebMIDI API, we seldom have to deal with these binary representations directly. When we send and receive these messages in JavaScript we simply use arrays like this:
[144, 63, 127]
If you're working with existing musical hardware, it's helpful to have this deeper understanding of how and why the messages are structured the way they are. It's helpful to know that receiving a 144 in your first byte means a note is being turned on in the first channel and that a 128 would indicate that a note is being turned off.
However, if we're building non-musical experiences and creating our own hardware, these numbers can be repurposed to represent whatever you want!
What kind of hardware can I use?
Any MIDI-capable device that can be connected to your computer should also be accessible through the WebMIDI API. Devices that are capable of sending MIDI data to another MIDI-capable device are often called MIDI controllers. A common example would be a simple, piano-style keyboard like this Korg nanoKey2:

But they can vary widely in appearance and modes of interaction. Buttons are certainly common, but you might also find some that incorporate dials or pressure-sensitive pads like the AKAI LPD8:
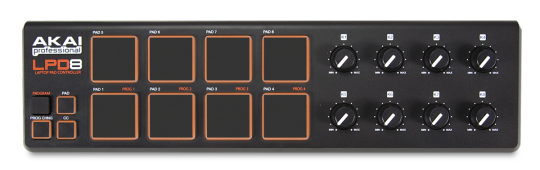
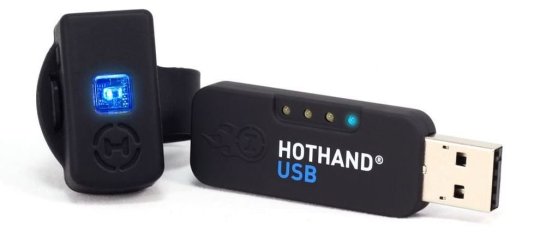
Others use more abstract and interesting modes of interaction, including mapping motion or breath to MIDI signals. For example, this controller (The Hothand from Source Audio) uses three accelerometers to map hand gestures to MIDI messages:
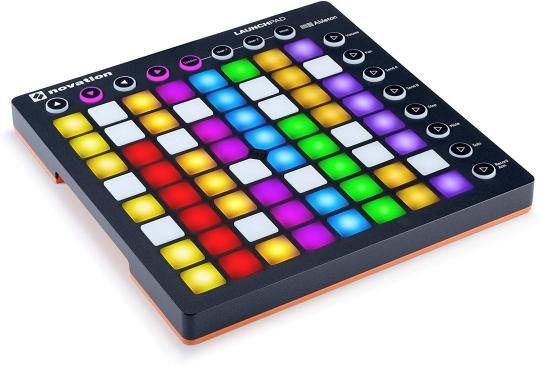
Some controllers can both send and receive MIDI messages, allowing for you to have a true two-way conversation with the physical world. The Novation Launchpad is a classic example — buttons can be pressed to send messages and messages can also be received to dynamically change colors on the device:
Can I build my own hardware?
It turns out they're not terribly difficult to build and you can find a lot of home-brewed MIDI controllers out in the wild. They can get much more elaborate in a hurry. Some can be downright bananas:

Bananas connected by wires to an Adafruit Circuit Playground programmed to function as a MIDI instrument
Building your own MIDI controller will take you a bit outside the world of JavaScript, but it’s still surprisingly accessible if you’re familiar with or interested in the Arduino platform. The Circuit Playground Classic from Adafruit is a great device to get started with and you can find starter code to flash to the device and make it into a multi-faceted MIDI controller here on GitHub.
Summary
The WebMIDI API is a low-barrier-to-entry way for front-end developers to start experimenting with basic hardware and software interactions. The implementation is relatively straightforward compared to some other hardware web APIs (like Bluetooth) and the MIDI standard is well-documented. There are lots of existing MIDI-capable devices out there to experiment or build cool things with, and if you really want to go all-out and start building your own custom MIDI hardware for your project, you can do that too.
Go out there and make something!
The post Dip Your Toes Into Hardware With WebMIDI appeared first on CSS-Tricks.
via CSS-Tricks https://ift.tt/2EakgJJ
0 notes
Text
Dip Your Toes Into Hardware With WebMIDI
Did you know there is a well-supported browser API that allows you to interface with interesting and even custom-built hardware using a mature protocol that predates the web? Let me introduce you to MIDI and the WebMIDI API and show you how it presents a unique opportunity for front-end developers to break outside the browser and dabble in the world of hardware programming without leaving the relative comfort of JavaScript and the DOM.
What are MIDI and WebMIDI exactly?
MIDI is a niche protocol designed for musical instruments to communicate with each other. It was standardized in 1983 and is maintained to this day by an organization consisting of music industry companies and representatives. It's not wildly different than how the W3C dictates and preserves web standards, in some sense.

Photo by Jiroe on Unsplash
The WebMIDI API is the browser-based implementation of this protocol and allows our web applications to "speak" MIDI and communicate with any MIDI-capable hardware that might be connected to a user's device.
Not a musician? Don't worry! We'll discover very quickly that this simple protocol designed for electronic musical instruments can be used to build fun, interactive, and completely non-musical things.
Why would I want to do this?
Great question. The shortest answer: because it’s fun!
If that answer isn't satisfying enough for you I'll offer this: Creating something that straddles the line between the physical world and virtual world we spend most of our days building things for is a good exercise in thinking differently. It's an opportunity for creative tinkering and for considering and creating new user interfaces and experiences to navigate. I truly think this kind of playful exploration helps make us use different parts of our brains and makes us better developers in the long-haul.
What kind of things can I build?
youtube
Cellular Automata on a MIDI controller
youtube
Playing Go
youtube
Whack-a-mole
youtube
Mixing colors with hand motions
What do I need to get started?
Here are the prerequisites to start experimenting with WebMIDI:
A MIDI controller
This might be the trickiest part. You'll need to procure a MIDI-capable piece of hardware to experiment with. You might be able to find something cheap on Craigslist, Amazon or AliExpress. Or — if you're really ambitious and have an Arduino available — you can build your own (see the end of this article for more information about this).
A WebMIDI-capable browser
This browser support data is from Caniuse, which has more detail. A number indicates that browser supports the feature at that version and up.
Desktop
ChromeOperaFirefoxIEEdgeSafari4330NoNo76No
Mobile / Tablet
iOS SafariOpera MobileOpera MiniAndroidAndroid ChromeAndroid FirefoxNo46No7678No
As of this writing, according to caniuse.com it's supported by approximately 73% of browsers, though most of the heavy-lifting is done by Chromium. Any Chromium-based browser will support WebMIDI—that includes Electron apps and the newer Chromium-based Microsoft Edge. It's also supported on Opera and the Samsung Internet Browser. On Firefox it's still being discussed but hopefully coming sooner than later.
Hello, WebMIDI
Once you've procured both of those things we can start writing some code! Working with the WebMIDI is not terribly different than working with other browser APIs like the Geolocation or MediaDevices APIs, if you're familiar with either of those.
The high-level flow looks like this:
We detect availability of the WebMIDI API in the browser.
If detected, we request permission from the user to access it.
Once we're granted permission, we now have access to additional methods to detect and communicate with any connected MIDI devices.
Let's see that in action:
if ("requestMIDIAccess" in navigator) { // The Web MIDI API is available to us! }
Now, assuming we're in a WebMIDI-capable browser, let's request access:
navigator.requestMIDIAccess() .then((access) => { // The user gave us permission. Now we can // access the MIDI-capable devices connected // to the user's machine. }) .catch((error) => { // Permission was not granted. :( });
If the user gives us permission, we should now have access to the MIDIAccess interface. This helps us build a list of the devices that we can receive MIDI input from and send MIDI output to.
Let's do that next. This is the code that goes inside the function we're passing into then from the previous code snippet:
const inputs = access.inputs; const outputs = access.outputs; // Iterate through each connected MIDI input device inputs.forEach((midiInput) => { // Do something with the MIDI input device }); // Iterate through each connected MIDI output device outputs.forEach((midioutput) => { // Do something with the MIDI output device });
You might be wondering what the difference is between a MIDI input and output device. Some devices are setup to only send MIDI information to the computer (these will be listed as inputs) and others can receive information from the computer (these will appear as outputs). It's not uncommon that a device can be send and receive, so you will find it listed under both.
Now that we have code that can iterate through all the connected MIDI devices, there are basically only two things we'll want to do;
If it's an input device, we'll want to listen for any incoming MIDI messages emitting from it.
If it's an output device, we might want to send MIDI message to it.
The code for setting up an event listener to respond to any incoming MIDI messages from our input devices looks very similar to an event listener you might setup for other DOM events, except in this case, the event we're listening for is the midimessage event:
input.addEventListener('midimessage', (event) => { // the <code>event object will have a data property // that contains an array of 3 numbers. For examples: // [144, 63, 127] })
If we want to send a MIDI message to an output device the code we can do so like this;
outputsend([144, 63, 127]);
Here is a CodePen demo with most of this put together for you. It will let you know about all of the MIDI inputs and output devices connected to your system and show you incoming MIDI messages as they happen:
See the Pen WebMIDI Basic Test by George Mandis (@georgemandis) on CodePen.

WebMIDI Test demo screenshot highlighting which MIDI input and output devices were found

WebMIDI Test demo screenshot highlighting MIDI messages received by one of the MIDI input devices. In this case, we’re seeing when a key on the MIDI keyboard is pressed.

WebMIDI Test demo screenshot highlighting MIDI messages received by one of the MIDI input devices. In this case, we’re seeing when a key on the MIDI keyboard is released.
You might be wondering a couple things at this point:
When you're listening for the midimessage event, how do I make heads or tails of that three number array in event.data?
Why did you send an array of three numbers to your MIDI output device and why did you send those specific numbers?
The answer to both of these questions lies in further exploring and understanding how the MIDI protocol works and the problems it was designed to solve.
Anatomy of a MIDI message
When a MIDI controller "speaks" to another MIDI-capable device or computer, they are sending and receiving MIDI messages with one another. The protocol underlying this communication is fairly simple in practice but a little verbose when explained. Still, I'll try.
Every MIDI message consists of three bytes consisting of 8-bits (0-255). Represented in binary, a message might look like this:
10010000 | 00111100 | 01111111
There are only two types of MIDI messages: Status and data. Every message will consist of one status byte and two data bytes.
The status byte is intended to communicate what kind of message is being delivered, including things like:
Note On
Note Off
Pitch Bend Change
Control/Mode Change
Program Change
...and many others.
If you're coming at this from a non-musical background, these status messages might seem kind of strange, but don't worry too much about it. The data byte is intended to provide more information and context to the status. To give an example, if I have a MIDI piano plugged into my machine and press a key to play a note, it would send a "Note On" status byte accompanied by data bytes indicating which note I played, and perhaps how hard I pressed it.
A status byte will always begin with the number 1 and data bytes with the number 0.
1x0010000 | 0x0111100 | 0x1111111 ^status ^data1 ^data2
For data bytes that leaves 7-bits to express the data in that byte. That gives us an integer range of 0-127.
For status bytes, the next 3-bits after the first describe the type of status message while the remaining 4-bits describe the channel. To break down our binary representation:
1x001x0000
How this translates into WebMIDI and JavaScript
As you may have guessed from the code samples earlier, with the WebMIDI API, we seldom have to deal with these binary representations directly. When we send and receive these messages in JavaScript we simply use arrays like this:
[144, 63, 127]
If you're working with existing musical hardware, it's helpful to have this deeper understanding of how and why the messages are structured the way they are. It's helpful to know that receiving a 144 in your first byte means a note is being turned on in the first channel and that a 128 would indicate that a note is being turned off.
However, if we're building non-musical experiences and creating our own hardware, these numbers can be repurposed to represent whatever you want!
What kind of hardware can I use?
Any MIDI-capable device that can be connected to your computer should also be accessible through the WebMIDI API. Devices that are capable of sending MIDI data to another MIDI-capable device are often called MIDI controllers. A common example would be a simple, piano-style keyboard like this Korg nanoKey2:

But they can vary widely in appearance and modes of interaction. Buttons are certainly common, but you might also find some that incorporate dials or pressure-sensitive pads like the AKAI LPD8:

Others use more abstract and interesting modes of interaction, including mapping motion or breath to MIDI signals. For example, this controller (The Hothand from Source Audio) uses three accelerometers to map hand gestures to MIDI messages:

Some controllers can both send and receive MIDI messages, allowing for you to have a true two-way conversation with the physical world. The Novation Launchpad is a classic example — buttons can be pressed to send messages and messages can also be received to dynamically change colors on the device:

Can I build my own hardware?
It turns out they're not terribly difficult to build and you can find a lot of home-brewed MIDI controllers out in the wild. They can get much more elaborate in a hurry. Some can be downright bananas:
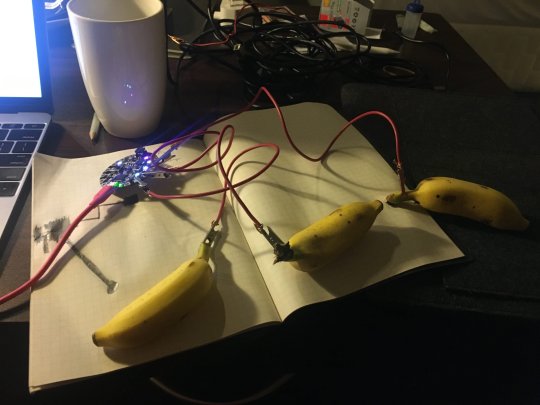
Bananas connected by wires to an Adafruit Circuit Playground programmed to function as a MIDI instrument
Building your own MIDI controller will take you a bit outside the world of JavaScript, but it’s still surprisingly accessible if you’re familiar with or interested in the Arduino platform. The Circuit Playground Classic from Adafruit is a great device to get started with and you can find starter code to flash to the device and make it into a multi-faceted MIDI controller here on GitHub.
Summary
The WebMIDI API is a low-barrier-to-entry way for front-end developers to start experimenting with basic hardware and software interactions. The implementation is relatively straightforward compared to some other hardware web APIs (like Bluetooth) and the MIDI standard is well-documented. There are lots of existing MIDI-capable devices out there to experiment or build cool things with, and if you really want to go all-out and start building your own custom MIDI hardware for your project, you can do that too.
Go out there and make something!
The post Dip Your Toes Into Hardware With WebMIDI appeared first on CSS-Tricks.
Dip Your Toes Into Hardware With WebMIDI published first on https://brightcirclepage.tumblr.com/
0 notes
Photo

Dip Your Toes Into Hardware With WebMIDI https://ift.tt/2YGZOJW
0 notes
Text
Dip Your Toes Into Hardware With WebMIDI
Did you know there is a well-supported browser API that allows you to interface with interesting and even custom-built hardware using a mature protocol that predates the web? Let me introduce you to MIDI and the WebMIDI API and show you how it presents a unique opportunity for front-end developers to break outside the browser and dabble in the world of hardware programming without leaving the relative comfort of JavaScript and the DOM.
What are MIDI and WebMIDI exactly?
MIDI is a niche protocol designed for musical instruments to communicate with each other. It was standardized in 1983 and is maintained to this day by an organization consisting of music industry companies and representatives. It's not wildly different than how the W3C dictates and preserves web standards, in some sense.

Photo by Jiroe on Unsplash
The WebMIDI API is the browser-based implementation of this protocol and allows our web applications to "speak" MIDI and communicate with any MIDI-capable hardware that might be connected to a user's device.
Not a musician? Don't worry! We'll discover very quickly that this simple protocol designed for electronic musical instruments can be used to build fun, interactive, and completely non-musical things.
Why would I want to do this?
Great question. The shortest answer: because it’s fun!
If that answer isn't satisfying enough for you I'll offer this: Creating something that straddles the line between the physical world and virtual world we spend most of our days building things for is a good exercise in thinking differently. It's an opportunity for creative tinkering and for considering and creating new user interfaces and experiences to navigate. I truly think this kind of playful exploration helps make us use different parts of our brains and makes us better developers in the long-haul.
What kind of things can I build?
youtube
Cellular Automata on a MIDI controller
youtube
Playing Go
youtube
Whack-a-mole
youtube
Mixing colors with hand motions
What do I need to get started?
Here are the prerequisites to start experimenting with WebMIDI:
A MIDI controller
This might be the trickiest part. You'll need to procure a MIDI-capable piece of hardware to experiment with. You might be able to find something cheap on Craigslist, Amazon or AliExpress. Or — if you're really ambitious and have an Arduino available — you can build your own (see the end of this article for more information about this).
A WebMIDI-capable browser
This browser support data is from Caniuse, which has more detail. A number indicates that browser supports the feature at that version and up.
Desktop
ChromeOperaFirefoxIEEdgeSafari4330NoNo76No
Mobile / Tablet
iOS SafariOpera MobileOpera MiniAndroidAndroid ChromeAndroid FirefoxNo46No7678No
As of this writing, according to caniuse.com it's supported by approximately 73% of browsers, though most of the heavy-lifting is done by Chromium. Any Chromium-based browser will support WebMIDI—that includes Electron apps and the newer Chromium-based Microsoft Edge. It's also supported on Opera and the Samsung Internet Browser. On Firefox it's still being discussed but hopefully coming sooner than later.
Hello, WebMIDI
Once you've procured both of those things we can start writing some code! Working with the WebMIDI is not terribly different than working with other browser APIs like the Geolocation or MediaDevices APIs, if you're familiar with either of those.
The high-level flow looks like this:
We detect availability of the WebMIDI API in the browser.
If detected, we request permission from the user to access it.
Once we're granted permission, we now have access to additional methods to detect and communicate with any connected MIDI devices.
Let's see that in action:
if ("requestMIDIAccess" in navigator) { // The Web MIDI API is available to us! }
Now, assuming we're in a WebMIDI-capable browser, let's request access:
navigator.requestMIDIAccess() .then((access) => { // The user gave us permission. Now we can // access the MIDI-capable devices connected // to the user's machine. }) .catch((error) => { // Permission was not granted. :( });
If the user gives us permission, we should now have access to the MIDIAccess interface. This helps us build a list of the devices that we can receive MIDI input from and send MIDI output to.
Let's do that next. This is the code that goes inside the function we're passing into then from the previous code snippet:
const inputs = access.inputs; const outputs = access.outputs; // Iterate through each connected MIDI input device inputs.forEach((midiInput) => { // Do something with the MIDI input device }); // Iterate through each connected MIDI output device outputs.forEach((midioutput) => { // Do something with the MIDI output device });
You might be wondering what the difference is between a MIDI input and output device. Some devices are setup to only send MIDI information to the computer (these will be listed as inputs) and others can receive information from the computer (these will appear as outputs). It's not uncommon that a device can be send and receive, so you will find it listed under both.
Now that we have code that can iterate through all the connected MIDI devices, there are basically only two things we'll want to do;
If it's an input device, we'll want to listen for any incoming MIDI messages emitting from it.
If it's an output device, we might want to send MIDI message to it.
The code for setting up an event listener to respond to any incoming MIDI messages from our input devices looks very similar to an event listener you might setup for other DOM events, except in this case, the event we're listening for is the midimessage event:
input.addEventListener('midimessage', (event) => { // the <code>event object will have a data property // that contains an array of 3 numbers. For examples: // [144, 63, 127] })
If we want to send a MIDI message to an output device the code we can do so like this;
outputsend([144, 63, 127]);
Here is a CodePen demo with most of this put together for you. It will let you know about all of the MIDI inputs and output devices connected to your system and show you incoming MIDI messages as they happen:
See the Pen WebMIDI Basic Test by George Mandis (@georgemandis) on CodePen.

WebMIDI Test demo screenshot highlighting which MIDI input and output devices were found

WebMIDI Test demo screenshot highlighting MIDI messages received by one of the MIDI input devices. In this case, we’re seeing when a key on the MIDI keyboard is pressed.

WebMIDI Test demo screenshot highlighting MIDI messages received by one of the MIDI input devices. In this case, we’re seeing when a key on the MIDI keyboard is released.
You might be wondering a couple things at this point:
When you're listening for the midimessage event, how do I make heads or tails of that three number array in event.data?
Why did you send an array of three numbers to your MIDI output device and why did you send those specific numbers?
The answer to both of these questions lies in further exploring and understanding how the MIDI protocol works and the problems it was designed to solve.
Anatomy of a MIDI message
When a MIDI controller "speaks" to another MIDI-capable device or computer, they are sending and receiving MIDI messages with one another. The protocol underlying this communication is fairly simple in practice but a little verbose when explained. Still, I'll try.
Every MIDI message consists of three bytes consisting of 8-bits (0-255). Represented in binary, a message might look like this:
10010000 | 00111100 | 01111111
There are only two types of MIDI messages: Status and data. Every message will consist of one status byte and two data bytes.
The status byte is intended to communicate what kind of message is being delivered, including things like:
Note On
Note Off
Pitch Bend Change
Control/Mode Change
Program Change
...and many others.
If you're coming at this from a non-musical background, these status messages might seem kind of strange, but don't worry too much about it. The data byte is intended to provide more information and context to the status. To give an example, if I have a MIDI piano plugged into my machine and press a key to play a note, it would send a "Note On" status byte accompanied by data bytes indicating which note I played, and perhaps how hard I pressed it.
A status byte will always begin with the number 1 and data bytes with the number 0.
1x0010000 | 0x0111100 | 0x1111111 ^status ^data1 ^data2
For data bytes that leaves 7-bits to express the data in that byte. That gives us an integer range of 0-127.
For status bytes, the next 3-bits after the first describe the type of status message while the remaining 4-bits describe the channel. To break down our binary representation:
1x001x0000
How this translates into WebMIDI and JavaScript
As you may have guessed from the code samples earlier, with the WebMIDI API, we seldom have to deal with these binary representations directly. When we send and receive these messages in JavaScript we simply use arrays like this:
[144, 63, 127]
If you're working with existing musical hardware, it's helpful to have this deeper understanding of how and why the messages are structured the way they are. It's helpful to know that receiving a 144 in your first byte means a note is being turned on in the first channel and that a 128 would indicate that a note is being turned off.
However, if we're building non-musical experiences and creating our own hardware, these numbers can be repurposed to represent whatever you want!
What kind of hardware can I use?
Any MIDI-capable device that can be connected to your computer should also be accessible through the WebMIDI API. Devices that are capable of sending MIDI data to another MIDI-capable device are often called MIDI controllers. A common example would be a simple, piano-style keyboard like this Korg nanoKey2:

But they can vary widely in appearance and modes of interaction. Buttons are certainly common, but you might also find some that incorporate dials or pressure-sensitive pads like the AKAI LPD8:

Others use more abstract and interesting modes of interaction, including mapping motion or breath to MIDI signals. For example, this controller (The Hothand from Source Audio) uses three accelerometers to map hand gestures to MIDI messages:

Some controllers can both send and receive MIDI messages, allowing for you to have a true two-way conversation with the physical world. The Novation Launchpad is a classic example — buttons can be pressed to send messages and messages can also be received to dynamically change colors on the device:

Can I build my own hardware?
It turns out they're not terribly difficult to build and you can find a lot of home-brewed MIDI controllers out in the wild. They can get much more elaborate in a hurry. Some can be downright bananas:

Bananas connected by wires to an Adafruit Circuit Playground programmed to function as a MIDI instrument
Building your own MIDI controller will take you a bit outside the world of JavaScript, but it’s still surprisingly accessible if you’re familiar with or interested in the Arduino platform. The Circuit Playground Classic from Adafruit is a great device to get started with and you can find starter code to flash to the device and make it into a multi-faceted MIDI controller here on GitHub.
Summary
The WebMIDI API is a low-barrier-to-entry way for front-end developers to start experimenting with basic hardware and software interactions. The implementation is relatively straightforward compared to some other hardware web APIs (like Bluetooth) and the MIDI standard is well-documented. There are lots of existing MIDI-capable devices out there to experiment or build cool things with, and if you really want to go all-out and start building your own custom MIDI hardware for your project, you can do that too.
Go out there and make something!
The post Dip Your Toes Into Hardware With WebMIDI appeared first on CSS-Tricks.
Dip Your Toes Into Hardware With WebMIDI published first on https://deskbysnafu.tumblr.com/
0 notes
Text
Dip Your Toes Into Hardware With WebMIDI
Dip Your Toes Into Hardware With WebMIDI

[ad_1]
Did you know there is a well-supported browser API that allows you to interface with interesting and even custom-built hardware using a mature protocol that predates the web? Let me introduce you to MIDI and the WebMIDI API and show you how it presents a unique opportunity for front-end developers to break outside the browser and dabble in the world of hardware programming without leaving…
View On WordPress
0 notes