The journey has begun and the project to restore DMC-12 VIN 16606 is in motion. Use this blog to follow progress and its new future post restoration.Now also follow this blog's updates from Facebook by liking and following this page: https://www.facebook.com/timemachine16606/.
Don't wanna be here? Send us removal request.
Statistics
We looked inside some of the posts by timemachine16606 and here's what we found interesting.
Average Info
Notes Per Post
53
Likes Per Post
48
Reblog Per Post
5
Reply Per Post
0
Time Between Posts
4 months
Number of Posts By Type
Text
16
Video
1
Last Seen Tumblr Blogs


Fun Fact
Tumblr has been providing a Korean-language service since 2013.
Text
Fuel Leak Snowball...
Firstly apologies for it being almost 38 months since my last post. Nothing happened with 16606 for the majority of that time, what with the pandemic, and then as lockdowns started to lift we started a building project at home, so the D went for a little holiday to a storage facility on a farm in deepest Essex. I had her back in late August 2022, got it re-taxed and MOT'd with only a few outings around the block until very recently.
Trust the D to ruin a lovely day
It was a lovely sunny Sunday on 30th September when I decided to take 16606 for a short spin following some in and out TLC. After parking up on the drive something drew me to look under the car where I found a liquid dripping from the mid section of the car.
youtube
Upon closer inspection is stank of fuel.
Side-note: Readers of this blog will know I've been on a learning journey with this car and as each issue arises I try to learn what needs to be done and then dive in, admit defeat and speak nicely to members of the DeLorean Eurotec club for assistance (who are always beyond fantastic and generous with their time), or go down the professional garage route (this is the last resort, not because I don't want to pay professional prices but because they tend to have never encountered a DeLorean, let alone a car of some 40 years old, and are actually not often able to do a "professional" job).
After taking advice from members of the DeLorean Eurotec club I tentatively started the engine and drove the D back into the garage in the knowledge that I should check the fuel pump. This filled me with dread since this was an area of the car I had no previous experience of and the thought of messing with the pump, fuel tank and fuel in general required me to pluck up courage and just go for it.
The following documents the journey I went on that comprised getting the job done over two attempts and almost giving in and asking a new business created by a club member to do the job in-between.
I got the car back into the garage and emptied my mandatory travel tools and parts out in order to access the fuel tank.

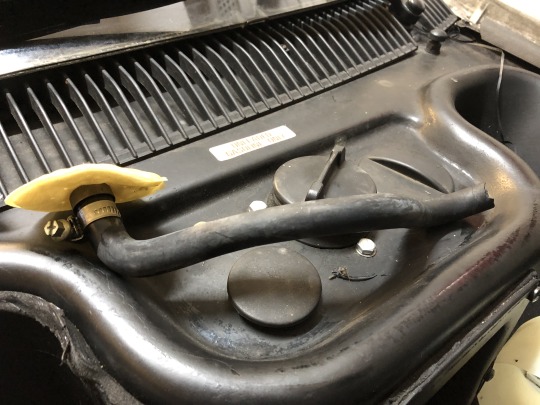
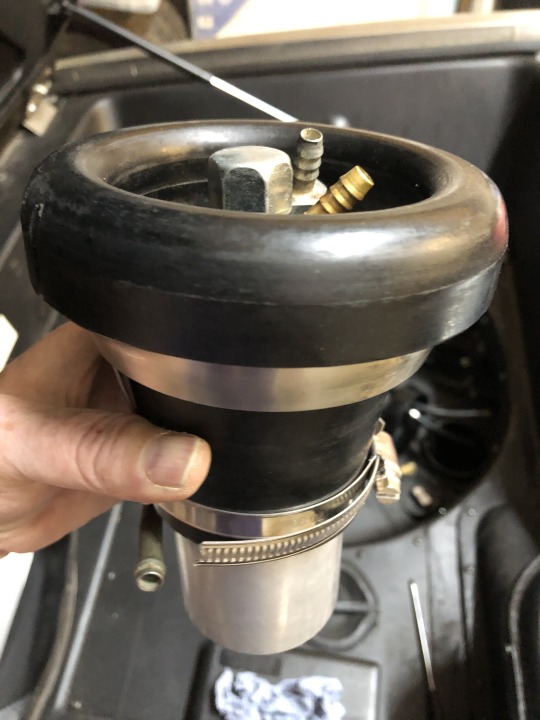
Inside the "Frunk" of the DeLorean, under the mat is this sunken area where the original spare tyre resides. I took this out, the first time I'd touched it since getting the car back following restoration in 2016. Once set aside I undid the screws to the access panel as seen above. This would expose the fuel tank and associated hoses and equipment.
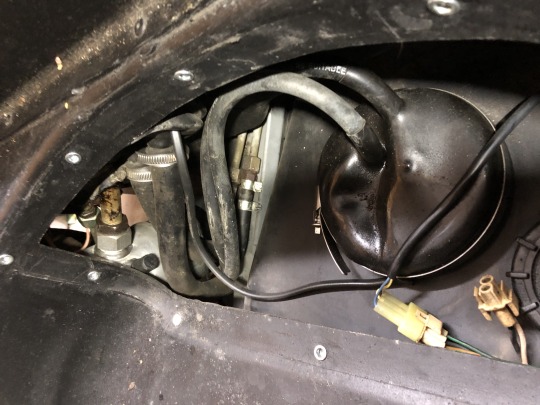
For reference the photo above shows, beneath the access panel, the fuel feed and return hoses coming from the fuel pump seal that covers the pump boot (that houses the pump). The boot is set into the tank, the black area beneath and surrounding the boot. On the left the fuel hoses attach to the pipes that flow eventually to the engine at the rear of the car.
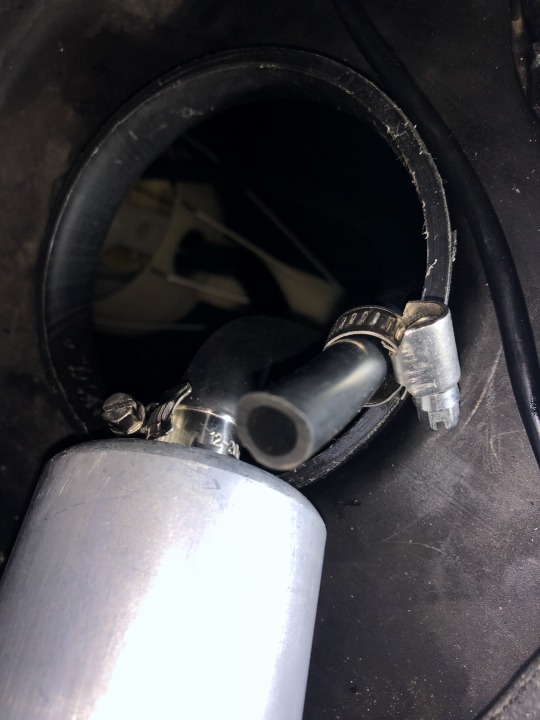
With the access panel removed I could smell the over-powering odour of fuel (and odour but one of those strangely nice ones...). Mild panic set in when I saw the remnants of spilt fuel. I could see that the boot seal was a strange shape and not clamped down by the jubilee clip. I lifted the accessible part of the seal and could see the pump covered in fuel residue. Wondering how this had happened, and how it had apparently seeped over and out onto the top of the fuel tank, I decided to start the car to get the pump working. The following video is what I was confronted with.
youtube
The shakiness of the above video gives some idea of the "holy crap" moment I was experiencing. At this same time I had also noticed that the fuel feed and return lines were also deteriorating, showing signs of cracking all along the outside.
I had to figure out what to do next, so after switching the engine off, the fuel in the boot drained back into the tank and I stepped away from the offending car and did some research and messaging with the DeLorean Eurotec club over the course of the next week.
I watched some videos on YouTube to learn how the fuel pump assembly works and fits together so I could become familiar with this journey into the unknown. I specifically got benefit from the following two,
The first part of this video showing the extraction of the pump and it's assembly:
youtube
The following for learning how the fuel feed and return hoses attach.
youtube
I realised I needed to buy some parts so got on to DeLoreanGo.com and ordered,
SKU 106979 Fuel Hose - return and feed line
SKU 101391PU Polyurethane Fuel Pump Boot
SKU 106684PU Polyurethane Fuel Pump Cover Seal
SKU SP10830 W1 Steel Spring Clip for Fuel Pump Boot
SKU SP10356 Stainless Hose Clamp (lower fuel pump boot)
SKU 10349 Stainless Hose Clamp
Needless to say the turnaround at DeLoreanGo.com was amazingly fast and they arrived in a couple of days.
Next weekend
On 8th October I rolled the car out of the garage to start work. I was going to
Replace the feed and return fuel lines
Replace the fuel pump boot
Fit the W1 steel spring clip that was missing
Replace the fuel pump boot cover seal
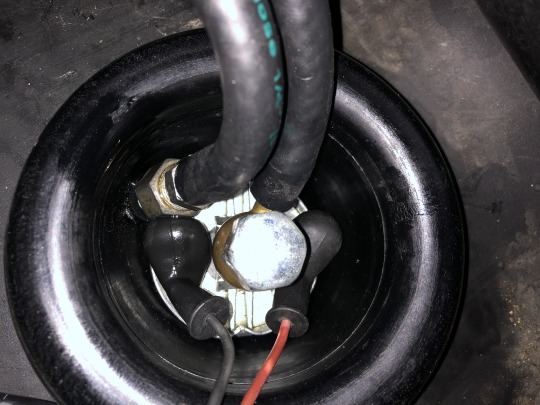
I made sure I had noted what goes where. I took the following photos to remind me which hose was the feed and the return, and which colour electrical connects went to positive and negative terminals
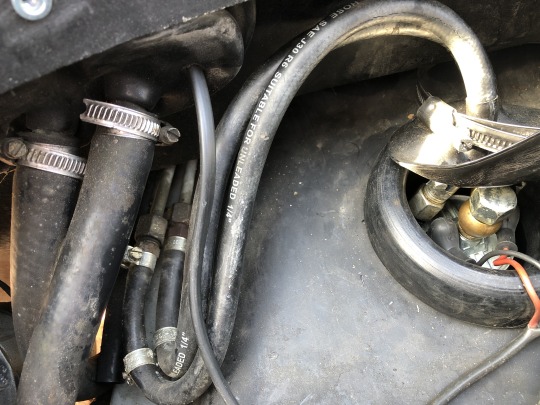
The feed is the hose from the banjo to right of the two fuel pipes, and the return runs from the left.
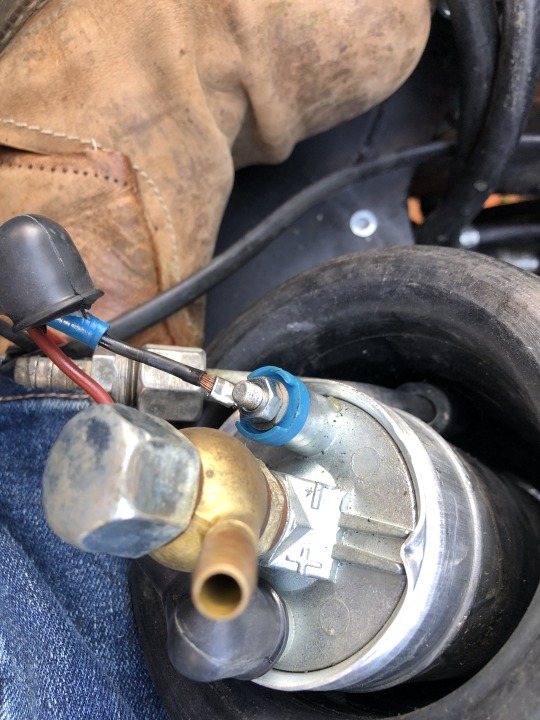
The black wire is the negative whilst the red is the positive.
Whilst the boot was in situ, the pump was surprisingly moveable which I'm not sure it should have been. This made it difficult to pull the fuel hoses off and could have been a possible reason for why the boot was filling with fuel.
I undid the hose clamps to the fuel hoses and with plenty of tissue at the ready, in case of spills, I manipulated them until free at both ends.

So far so good. Next it was time to fit the new hoses, boot and seal and to reconnect the wires to the terminals. Easier said than done!
These were the parts purchased from DeLoreanGo.com. I had already transferred the return hose and support ring to the new boot.

Whilst removing the old hoses and attaching the new ones required a lot of manipulation and strength, I found this task to be less troublesome than the YouTube videos had implied.
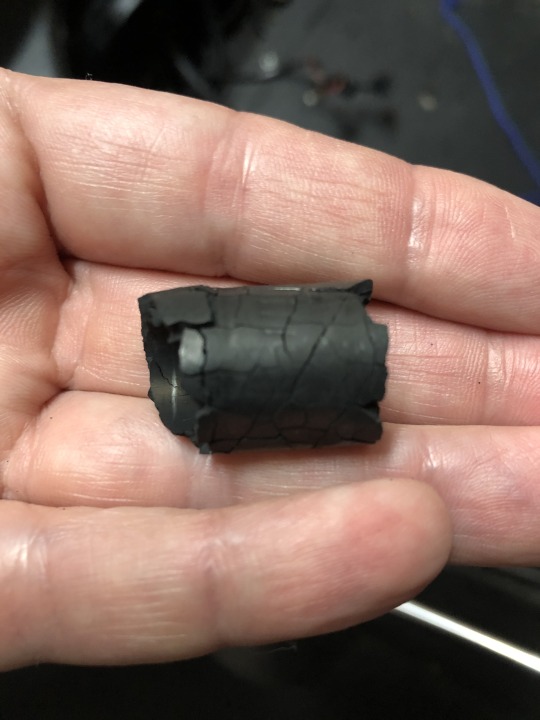
The first connections were made to the pipes. It was as I was getting ready to attach them to the pump that I spotted how cracked the fuel pick up hose was.

No sooner had I noticed the state of this pick up hose, then as I picked it up to start attaching the fuel hoses it completely disintegrated and broke off.

With an almost full tank of fuel I had to find a cord to tie and secure the pick up hose to stop it falling back in.
It was clear that I would then need to get the pick up hose replaced, but that then also meant dealing with the baffle and associated parts, plus I had a virtually full tank of fuel. I realised this was as far as I was going to get for the day, and that I should pack away and spend some time thinking about how to tackle the new problem. I couldn't push the car back in to the garage due to the slope of my driveway, so I took a Stanley Knife to the pick up hose to make the end level and then reattached it to the pump. I then attempted to reconnect everything else to enable me to drive the car back in to the garage.
When trying to reconnect the wires to the terminals I could not get the rubber boots back over the connectors, they had turned from malleable to solid rubber with no give. This concerned me greatly since I was unsure what the consequence might be if fuel filled the boot once more when moving the car and these terminals were flooded. I took more advice from the Eurotec club and watched some more YouTube that some cars didn't even have rubber boots and also experienced similar flooding to me. So I risked it. Fortunately nothing happened and I was able to drive the car back into the garage.
Over the next day or two I searched more videos on YouTube and found the following one particularly useful to explain to me what it takes to replace the fuel pick up hose. It's a great tutorial.
youtube
Watching this also made me realise that my pump/tank had no return hose to return fuel back to the baffle area as well as no Baffle Seal. After watching I also felt confident that this was a job I could do if it were not for the almost full tank of fuel. My ability to do this job flip-flopped over the course of the next week. What was clear to me however was that I would not have this fixed before the following weekend, which was the DeLorean Eurotec October Meeting, 100 miles north in King's Lynn, Norfolk.
Having replayed the above video a few times I then generated a list of the parts I would need. I ordered the following from DeLoreanGo.com,
SKU 106287 Fuel Pickup Hose
SKU 106287A Stainless Fuel Pickup Hose Reinforcement Spring
SKU 106318 Pickup Pipe Baffle Seal
SKU 106286 Viton Lower Return Fuel Hose
SKU SP10573 Stainless Hose Clamp (fuel return pipe)
SKU SP110085 Fuel Pump Terminal Connectors
In true DeLoreanGo.com form these parts then arrived less than 24 hours after ordering with just the regular free shipping option selected.
DeLorean Eurotec October Meet Weekend
That next weekend I attended the Eurotec meet and garnered opinions about how to tackle the fuel pick up hose job. Opinions ranged from "dive in despite the full tank of fuel, it'll be fiddly, messy and your arms might sting somewhat" to "you must drain the tank before starting, then it will be fiddly". I also learnt that weekend how it seemed many owners were also experiencing fuel pump related issues. This is when I came to learn of one owner who had set up his own business for working on DeLorean's. I tentatively arranged for him to come and do mine next time he was in the area, which would have been a few weeks later, however during the journey home I changed my mind.
Close to home I decided to stop to charge my daily driver at Tesla Tottenham. Whilst charging I grabbed myself a tea and biscuits at the showroom. I sat in the lounge and started googling options for pumping out fuel from tanks. It was then I found the following product from Euro Car Parts, and fortuitously there was a branch, open across the road.
I was a little unsure at first but the reviews convinced me, and at £8.99, it wouldn't be a huge loss if it turned out not to be appropriate.
I purchased said pump and over the course of the next week I managed to find sufficient fuel cans/containers for up to 50 litres.
The Weekend after that
Okay, so it's now this recent weekend, the kids are away at Scout camp, it's peaceful at home so now is the time to do this!
I decided to leave the car in the garage this time due to constant rain so there wouldn't be much room around the side of the car to work.
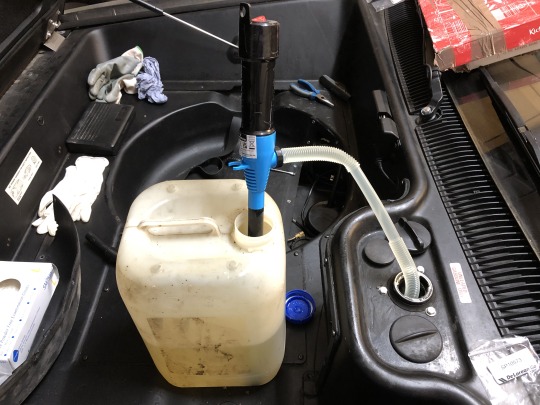
After preparing the area I proceeded to pump the fuel out from the tank. This turned out to be amazingly simple with the new pump, so much so that I almost forgot to film the process. The following shows almost the final fuel being pumped out. The pump can do about 22 litres per minute, which I reckon we achieved, however the clip below is a little slower as the final fuel is trickier to pick up, but it did the job.
youtube
In the end I calculated I had taken approximately 46 litres of fuel out of the tank.

Following the pumping out I had a peek into the tank with my phone camera.
youtube
Whilst getting ready for pumping out the fuel I of course had to remove the boot and pump. When doing this I could see that the current pick up hose had in fact disintegrated further, unattached to the pump, lying in the tank. I felt relief that I had not attempted to drive up to the previous weekends' DeLorean Eurotec meeting, since once the fuel level would have dropped below the bottom of the pump, it would not have been able to draw any more fuel and I would have been stranded.
The following piece of pick up hose is all that was left attached to the pump, surrounded by the hose clamp.
I also removed the electrical connections from the pump terminals which I would later trim to attach new connectors and boots. Those boots were rock solid!

I set the pump and boot assembly to one side and then began tackling removal of the baffle in order to fit the new pick up hose, seal and return line.
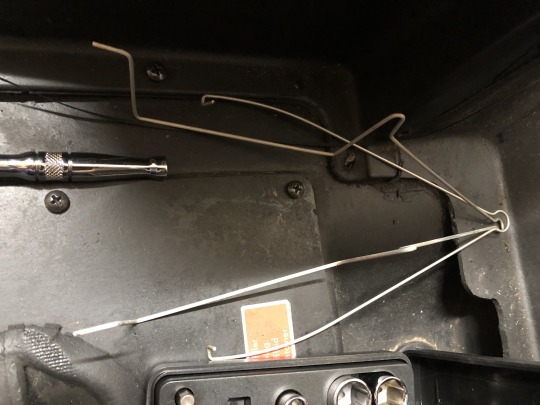
The only minor issue I faced in removing the baffle was removing the Fuel Tank Baffle Outer Retainer Spring, DGo SKU 108683. The YouTube video showed it being attached over the top of the baffle to the sides, however as can just be seen in the picture below, mine was attached through the perforations of the lower baffle assembly, which was very tricky to dislodge.

Once the baffle was removed the stud that the baffle and retaining springs attach to can be seen (near the fuel sender casing)

With all the components out of the tank I could take a closer look. Below you can see the failed fuel pick up hose complete with filter, the baffle with signs of disintegrated rubber settled on it, and the retaining springs.

I then reassembled the baffle with the new parts outside of the tank to ensure I knew how it all went together for when I would do it effectively blind inside.

As mentioned in the YouTube video I found I didn't have the clip to attached the end of the return hose to, so I used a tie to affix it to the baffle.
Since I couldn't make a video of me rummaging around inside the tank to fit all the components of the baffle assembly together, the photo below is a fast forward to the finished job.

Following the instructions in the YouTube video my only variation was that I did it from a standing position from the front passenger side wing, leaning over with just one hand in the tank. I expected to be really frustrated with this step but I think I got lucky. Everything slotted together nicely and the only minor difficulty encountered was attaching the nut on top of the washer and retainer springs to lock down the baffle. I found the arm of the baffle had an arch in it so I found a metal rod to push down on it, between the springs. Once flat the nut went on easily.
Relieved at the in-tank baffle success I now needed to replace the boots and connectors to the pump wiring.
Below shows the current state of the wires. The picture doesn't relay how solid the boots had become. These can't be replaced without removing the connectors, but even by my standards this is an simple job.

Below you can see the replaced wires with the new boots and connectors.

Now for re-connecting the fuel pump assembly and fitting it back into the tank.
Lessons learnt from my first attempt a couple of weeks back is that the positioning of the pump in the boot relative to the electrical connections, the fuel feed and return hose barbs, and the eventual placement in the tank so that hoses do not hinder the re-fastening of the compartment cover panel is very important. It would be a real pain to have to undo it all if you cannot fit the panel after all the hard work. Believe me I found out the hard way!
I'm not saying the following is the "correct" positioning, but it's what worked for me.

I think the indentations in the pump casing on opposite sides is designed to allow the return pipe to sit nicely in between, however I could not get the hoses to fit sufficiently such that the boot seal then can close nicely over the boot. So the above photo shows how I ended up positioning the pump and return pipe.
Below you can see a side on view that also shows the position of the return pick outside of the boot.

I then attached the pick up hose to the pump and the return hose to the pipe.
I inserted the boot into the tank and attached the electrical connections and the feed and return hoses.
I then completed this part of the job by sliding down the seal and after the below photo was taken, tightened the hose clamp.

As per the lesson learned, mentioned just above, I had to slightly twist the boot clockwise a little to position the hoses more pointing backwards so the compartment cover could be screwed back in.
Before closing the compartment I wanted to check to see if my low fuel indicator light worked. By my reckoning, with no fuel in the tank I should be able to turn ignition to position two and see the light illuminated in the binnacle.

Either my theory was wrong or my low fuel light wasn't working, as I had long suspected. I next put back a couple of litres of fuel and tried again also fully starting the car, no luck, then added up to five litres, repeated, and still nothing.
Finally I pumped all fuel back in to the tank.
and after starting the car for a final check, replaced the compartment cover.

Job done! Hopefully...
Upcoming jobs that I'll aim to document soon include fitting a fan override switch, and fitting new circuit breaker holder clips.
Stay tuned!
6 notes
·
View notes
Text
A Milestone for 16606

A few weeks back as I drove 16606 home from the repair shop I pulled over to take a photo of the mileage as it hit 16,606 miles, equalling - yes you got it, the same figure as the VIN. This was only a brief moment of excitement since by the time I got home I had forgotten and failed to post the photo.
Well, better late than never, here it is in a montage with the VIN plate.
3 notes
·
View notes
Text
Coolant Leak

The two linked videos below show a coolant leak that has developed with my car. It appeared to be coming from the area of the hose clamp. I thought I would try to tighten but unfamiliar as I am with the hoses I didn’t want to force it. That’s when I reached out via Facebook on the DeLorean Club UK group page and as a result had a WhatsApp chat with Alistair Vanstone who advised to use my 7mm socket to tighten it a quarter turn.
youtube
youtube
I did this and it appeared to work, however once I had driven 16606 back on to the level surface of the garage the leak resumed. Having reversed it back out I messaged Al who recommended getting a new clip and refitting.

I went out and purchased new Jubilee Clips. Having never gone near hoses before I was apprehensive about removing the old clip and flooding coolant around the place. It turned out to be a none-issue since after jacking the car up the angle prevented coolant from flowing out unless I purposefully pulled the hose down. I then fitted the new clip but once driven back on to the flat surface of the garage it leaked again. I reversed back out of the garage, pondered a while and then noticed how the clip was pretty much flush against the radiator, as can be seen from the two photos above, but I had seen when I had taken off the hose how the barb was about an inch long. I then decided to reposition the clip a little further back. Once driven back into the garage over the course of a few minutes only two drips were seen which could have just been residual coolant from the earlier leaks. I've placed a pan under the potential drips to see later if more drips have flowed out. Hopefully not and fingers crossed this is now resolved.
3 notes
·
View notes
Text
Improving Light Distribution Through The Door Light Lenses

Just a minor job done on 16606 today. I had heard how some owners put foil within the casements of the door lights, surrounding the bulb, to help distribute the light, especially with LED lights where more often than not, the light emanates from just the point of the bulb, i.e. the lens is not filled with the light source. Well today I thought I would fashion a solution along the same theme.
I had already swapped bulbs over to LED’s a while back. The first LED’s I had were not great and only gave out a small amount of light emanating from the centre of the lens. I next swapped the LED’s to the latest DeLoreanGo bulbs (Red, Amber), these were a big improvement but as can be seen from the “Before” picture above, the lens was still not filled sufficiently for my liking.
In order to get the result shown in the “After” picture, above, I undertook the following steps.

1) I identified the first light to tackle

2) I had my door card tool ready to help remove the lens from the rubber frame.

3) Using the door card tool I inserted it along the bottom edge, prising the rubber away from the lens. I’ve head some owners use vaseline to help with extracting the lens if their rubber is old and brittle. I did not need to apply any in my case.

4) Moving the tool I gently eased the lens out from the casing.

5) When sufficiently removed I used my hand to complete the extraction.


6) The bulb and casing is now exposed.


7) Taking kitchen foil and having the dull side upwards I marked a 5cmx5cm square for each light and also marked a cross section. After cutting out the square I then took a craft knife to cut approximately 1cm from the centre up each line (four cuts in all).

8) Turning the foil square over I peeled back the tabs of foil. The bulb will eventually fit through the whole and the reflective side of the foil will be uppermost.

9) This may not be the neatest solution but it works. Place the foil square over the bulb and push the square into the corners and flatten it out around the bulb and to the corners. Try to ensure the foil is flat at the outer edges otherwise this will affect the light shining through the lens.
10) After each light has had it’s foil placed, the lenses can be re-inserted, using the door-card tool to prise the fourth side over the edge of the lens.

The final result can be seen above. The light fills the lens more fully and I think this is the best result possible with the current LED bulbs on offer.
1 note
·
View note
Text
Wheel Alignment @Wheels In Motion

Today I went (with Marty and Doc) to Wheels In Motion, part of Blackboots, in Chesham, Buckinghamshire, to have my wheel alignment performed. I previously went to them back in 2017 but recently I’ve had work done on the steering rack and new tyres due to inside wearing of the front tyres.
youtube
Upon arrival 16606 was loaded on to the ramp and set up for the procedure.


Once in position the alignment was performed and some updates to the shims were made to bring the car back into spec.

2 notes
·
View notes
Text
Interior Dome Lights

Ever since I first had the car in my possession from December 2016 my interior dome lights have never functioned correctly. They worked in the permanently on setting but not in the mode activated by an open door. It didn’t help either that my front light was a different make with an alternative connecting format than the rear.
I had “meddled” in the past and just ended up blowing a fuse, so for some time now I’ve just left them in the central Off position and never had the convenience of them illuminating when getting in and out of the car.
What with all this working from home due to the COVID-19 pandemic I’ve been able to work during lunch breaks and immediately after work has finished on all those jobs I’ve added to my to-do list but never managed to get around to. This was the next in line.
After some research most indications pointed to the diodes located behind the centre console in the driver’s footwell. I disconnected each in turn and tested them on my multimeter. They all tested okay so this was not the cause. After more research and scratching of my head I reached out to Mike Ward. I sent photos of my lights and their wiring and in lighting speed he was able to determine that my front light was non-standard whilst the rear was the Renault part (Renault part SKU 7701366036) used in DeLoreans.
Below is my rear dome light and how it was wired up.

The next photo shows the front dome light and it’s wiring.

Further Mike managed to find a photo of the standard (Renault) part with correct wiring (see below), something I had spent quite some time searching for online and not finding.

Firstly I rewired my rear light. Hey presto! it worked. Because I have LED’s I have the Delay Unit removed (It had been removed since I originally took possession of my car following restoration) it comes on when one of the doors is opened and extinguishes when both doors are closed.
Next Mike also found a photo of the correct wiring on the version of dome light I had in the front. See below.
However Mike knew that this version of the light didn’t work with DeLorean wiring on it’s own. He also linked me to an article from DMC Talk forum that showed a mod that is required. A photo of the mod that is required is shown below.

I prepared my soldering iron and a piece of wire but then noticed that my light had a diode positioned between the two contacts that are bridged in the above photo. See Below.

I used the multimeter to test this diode and found it to have failed. So I soldered the above mod and refitted it. Alas this did not work. Having discussed with Mike I then decided to source the Renault part. I found it to be cheaper from renaultgenuineparts.com so purchased it and within two days it arrived.
Today I fitted the Renault part and now with the correct lights and the correct wiring both front and rear dome lights function on the setting that has them switching on and off with the opening of a door.
1 note
·
View note
Text
New Tyres

I’ve always wanted Raised White Letter (RWL) tyres on my DeLorean, even though that is not how the cars left the factory in Dunmurray (yes I know I recently posted how I like my car to be as close to factory standard as possible, oh the hypocrisy!), it was how the car was presented in Back to the Future, sporting Goodyear Eagle GT tyres, complete with raised white outlined lettering as per the BTTF screen-grab below.

Since my MOT tester has warned me of my only just legal front tyres that had worn on the insides I figured that during 2020 I should replaced them and also use this as an excused to get some RWL tyres.
I’m no authority on tyres but I understand the Goodyear Eagle GT are no longer manufactured, I certainly couldn’t find them available on any continent, so my research turned up the Cooper Cobra Radial G/T or the BF Goodrich T/A. Unfortunately neither come in the front tyre size of 195/60/14, so for these I took the recommendation of a couple of the DeLorean EuroTech club guys and purchased the Continental ContiPremiumContact. Therefore, following the reading of many reviews, and without using price as a determining factor, the Cooper Cobra Radial G/T came out tops for the rears and are the ones I purchased.
Next I had to select a fitter, I chose Auto Speed in Waltham Cross, not so close to where I live but I thought it would also allow me a nice drive there and back. I had the tyres delivered there and today they were fitted.


After fitting I drove home and took with me the removed rear tyres to keep as back-ups.
Above, as per the lettering - the Cooper Cobra Radial G/T on the rear.

Above, the Continental ContiPremiumContact on the front.


Next, on Saturday 1st August I’m booked in to get my tracking sorted.
1 note
·
View note
Video
tumblr
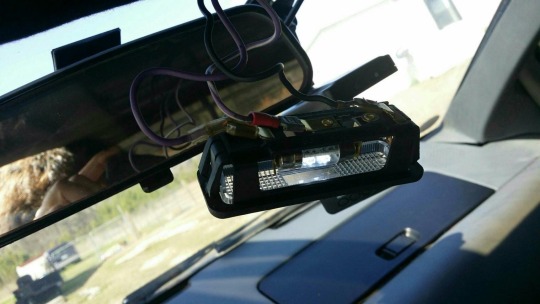
Wireless Phone Charging Installation
So first of all, full credit for this solution goes to Luke Palmer following his Facebook post - https://www.facebook.com/DeLoreanBoy/posts/10158259744244555.
I like to keep 16606 as original as possible but every now and then an idea comes along for a mod that is just so useful and does not alter the cars outward appearance, as with the one referenced above by Luke.
When I saw the ability to have wireless phone charging hidden out of site I had to do it. Following a few messages to Luke I purchased the two following components and set about installing them (click on the link to find them on eBay),
Wireless Qi Charging Mat
12v to 5v USB Output DC-DC Converter Module
Firstly I had to figure how to connect the converter. I decided to ensure power to the charge mat behaved as per the cigar lighter. I connected the converters black wire to the black and the red to the purple wire of the cigar lighter.
Next I placed the mat into the recess of the coin tray and re-fitted it. With by battery cut-off switch turned on I did the test as per the video and Voilà, wireless phone charging, even through the phones case just by placing it in to the tray.
1 note
·
View note
Text
Oil Leak Repair
Finally, after a couple of years, an oil leak from the transmission, that has gradually got worse, is to be fixed. It’s taken me all this time, and some stern words from my MOT tester, to finally put trust in a local garage to perform this repair.


16606 will go in on Monday 15th June for a couple of days. I’ll also be getting other minor work completed such as replacing the steering rack boots whilst it’s there.
Monday 15th June

Earlier today I dropped 16606 at Shaftesbury Garage in Barnet. I left her on the forecourt as instructed and checked her in and discussed the work to be done. Since then, I can’t help but think how the car is. I’m having separation anxiety!
Saturday 20th June
Yesterday, Friday 19th June, the garage contacted me to request some parts. They preferred that I source the parts from my usual DeLorean supplier since they trusted that over using their everyday suppliers. It was also suggested that they replace the clutch whilst they were working on that area of the care and since mine had not been updated during the restoration I agreed and also sourced a clutch kit.
So with a list of the required parts I placed my order from DeLoreanGo.com after lunch which was speedily processed by Arran. Expecting the package to arrive early next week I was pleasantly surprised when I read the shipping notification to learn it would arrive the next day (a Saturday).
Well, at only 22 hours after placing the order the package arrived. Great service once more from DeLoreanGo.

Monday 22nd June
This morning I dropped the parts around to the garage. Whilst there the owner, George, told me what a focus of attention the car has been since so many people have come up to him to ask if this was a real DeLorean and being amazed at seeing it. Due to this, even though originally it had been kept in the workshop, rather than on the forecourt, George told me that even though it was blocking a lift, he kept it raised up out of harms way so no one could touch it.


Being raised up allowed for a better view of the leak.


Whilst having a general conversation, George told me he had seen a documentary on the cars and saw “this British guy going overseas to restore and brush stainless in the USA”. I recognised the person George was referring to as Chris Nicholson who restored my car. George described him as a real master of his work and was amazed at the results he got.
We also discussed what a great general condition the car was in and what a thorough restoration had been done.
Whilst it’ll be another week before I get 16606 back, due to workload at the garage, I’m very confident it is in great hands. If anyone in the North London area wants to know the garage I’ve used then you can message me and I’ll be happy to let you know.
Thursday 2nd July
Today the garage called to say my Clutch Slave Cylinder was leaking and asked me to source a new one. So I wouldn’t be getting 16606 back this week. Not a problem since I’d rather only get her back once it’s fully repaired, but I am missing her!
I got on to DeLoreanGo.com and ordered the part,

https://www.deloreango.com/uk/clutch-slave-cylinder.html
Friday 3rd July
The Clutch Slave Cylinder affixed about 11:30 so I drove it round to the garage. I expect now to get 16606 back by middle of next week. 🤞
Tuesday 7th July
As the work nears completion I was contacted today to check about the Rear Seal Gasket I had provided (102022). As the photo below shows it does not fit naturally over the bolt holes. I was told that usually they would just apply grease and manipulate it into place but that they didn’t want to take any chances with my DeLorean. I asked for advice from Arran of DeLoreanGo.com who advised that it “can be manipulated and expands with heat. Some people don't bother with a gasket there at all. But in an ideal world you would sandwich that gasket between RTV sealant - i.e. sealant on the metal face of the engine, and on this plate, paper gasket in-between”.
I relayed this advice and then later went around to the garage to see how they got on. It worked a treat and all is good.

Fingers crossed now for getting 16606 back for the weekend🤞.
Thursday 16th July
It’s ready! Just had the call that all is done and 16606 has been test driven. I’ll therefore be going to collect her on Friday afternoon 😁.
Friday 17th July
And she’s home. I collected 16606 this afternoon, drove her home and now she’s nicely tucked up back in the garage. The sum total of the work performed was
Replaced complete clutch kit, spigott shaft bearing, gear box output shaft seals, rear main oil seal and gasket.
Replaced inner and outer CV gaitors on both drive shafts.
Replaced both steering rack gaitors.
Just from the drive home I could instantly feel how smooth and easier the clutch and gear changes were.
Great work by Shaftesbury Garage, extremely fair and honest. I highly recommend them to any DeLorean owner. They are based in Barnet, North London and their exact details can be found on Googlemaps at this link. As for George.
3 notes
·
View notes
Text
First trip since long before lockdown began.

I decided to take the D on a pharmacy run to Sainsbury’s for its first ride since Lockdown, and probably some time before that. It performed impeccably and now with great functioning air conditioning it was a real joy to drive. Thanks Dan, Al and Julian once more for getting the a/c working 👍🏻.
3 notes
·
View notes
Text
OEM Cigar Lighter Fitting
Ok so this is somewhat embarrassing, but I thought I would share just in case someone else believes they have the same issue and cannot see the solution.
I’ve previously shown in this blog, a few years back, the replacement of my factory original cigar lighter. I replaced it with a non-OEM part. Two things were wrong that at the time I could do nothing about. Firstly I didn’t like the fact that I didn‘t have an OEM cigar lighter when I knew they could be sourced from DMC Houston. The problem was I could not justify the extortionate shipping cost that DMCH were charging to ship the part(s) to the UK when I knew other couriers charged less. The other problem was that I could not get the replacement cigar lighter and illumination ring to seat properly. I put this down to a problem with the replacement part which also fuelled my desire to source an OEM part. More recently, I found myself working in the USA, and decided to order both these parts from DMCH and have it shipped to me in Tulsa, Oklahoma.
Originally the OEM cigar lighter, as mentioned, and as per the photo below fitted snuggly and correctly.

However, when I removed it to learn why the illumination ring was not working, I discovered that the connector to the bulb of the illumination ring was broken. Also, not shown in the photo below, the contact that, when fitted, touches the barrel of the cigar lighter was also damaged. Note also the scratches and impressions on the casing of the illumination ring bulb. These marks would later make sense as to why I was having some of the problems in refitting the cigar lighter.

Once the replacement cigar lighter was fitted, as can be seen in the two photos below, the barrel would not locate itself fully into the illumination ring. As mentioned, I thought that this was an issue with the replacement part and lived with it until I was able to source the OEM part from DMCH.


Below the new OEM cigar lighter which I received from DMCH.

When attempting today (27th May 2020) to fit the cigar lighter, lo and behold, it too would not fit correctly into the illumination ring. I was initially flummoxed! A cup of tea later I re-examined the situation. After shining a torch into the recesses of the void where the cigar lighter barrel is inserted, I realised that the direction I had inserted it caused a blockage. In my defence however, I must say that I had previously taken photos of the original OEM in situ and ensured I had re-fitted the replacement and now also the new OEM cigar lighter in the same orientation. Once I removed and reinserted the cigar lighter at 180 degrees to the original position, it easily fitted fully and snugly into position.
The crude picture below helps demonstrate the problem. Under the centre console plate that houses the cigar lighter and further back the switches (window, defrost, etc.) there is what I can only think of calling a shelf, a section of rigid material. In this shelf is a rather crudely cut-away hole. In the picture below the correct positioning of the cigar lighter is shown. Originally the OEM had been, at some point, inserted 180 degrees off from this position and the illumination ring bulb housing had been jammed into the shelf, causing the connector to break and possibly cause the scratches and marks seen on the earlier photograph. When inserting both the replacement and the new OEM part, the illumination ring bulb housing prevented the correct fitting since it was being resisted by the shelf. After rotating it 180 degrees it was all good.
Job done.

3 notes
·
View notes
Text
DMCS August Bank Holiday Weekend Tech for 16606
After a DeLorean hiatus since August last year I’m finally getting back to my blog. To pick up where I left off, the following records the fantastic work undertaken by Dan Knowlton, Alistair Vanstone and Julien (”Bandit” on the Eurotec Forum - apologies Julien, I don’t know your surname).
Over the bank holiday weekend those great guys of the DeLorean Club UK sacrificed their time to take my car into their care to recommission the air conditioning. This coincided with a family vacation to Devon so it worked well to drop the D off on the way and collect it on the return journey. Inevitably, in the lead up to the weekend, additional items got added to the wish list. As a result not only was the air conditioning recommissioned, the shocks were changed to front and rear Spax. This was due to the leaking of the driver’s side rear shock absorber (probably happening during the July 2019 1500 mile round-trip to Hamburg. After one or two hairy moments during this recent trip with the absence of a functioning hand-brake, the guys also replaced the pads and installed new cables to recommission it. It is now said in Eurotec Club circles that I now have the best functioning hand-brake in a DeLorean! What’s more, when dropping off the car I had mentioned the trouble I had getting my side marker lights off in order to change to LED bulbs. Well guess what, they even used the box of LED bulbs in my boot and replaced them for me.
But first, time for a doors aloft photo of Dan’s i8, his DMC-12 and my Tesla Model X.

One of the first jobs was to get Timemachine16606 on the lift.

Next the new air conditioning compressor pump was prepared (100746).

Below, the other air conditioning parts required for the job,
Orifice Tube (109122)
High Pressure Cut-out Switch (106917)
Low Pressure Switch (100744)
R134a Filling Nipples PAIR (100016)
Air Con Condenser to Evaporator Hose (110525)
Air Con Compressor to Accumulator Split Hose (100750)
Air Con Compressor to Condenser Split Hose (100748)
Air Conditioning Condenser (106327)
O ring seal (AC system) (2 required per car) (106866)
O ring seal (AC system) (2 required per car) (106868)

Once the parts were fitted and testing was taking place, the guys encountered a problem. Unfortunately there was an issue with the air-conditioning running at high pressure. Following much investigation it was identified that the driver’s side fan was operating in the reverse direction. How my DeLorean made it all the way to Hamburg and back during the hottest days on record across The Netherlands and Germany, without over-heating, is a miracle.

The sockets in these photos are triangular in shape and can only be plugged in one way, therefore it is the opinion of the guys that this must have been a factory error that existed for the cars entire life up until this point in time.


Dan solved the issue by cutting the cables and re-joining them to the opposite cables to enable the fan to rotate in the correct direction.


Whilst the air conditioning was being sorted the Spax shock absorbers were unpacked and prepared for fitting.

They were fitted and Dan suggested I might want the rear Spax to be coloured black so the bright yellow isn’t obvious when viewing the car from behind. I agreed with this, liking my D to have, as near as possible, an original look.

One of the final jobs was the hand-brake, below the new Ferodo pads.

The cables used were as follows,
Parking Brake Handbrake Cable - RH (101964)
Parking Brake Handbrake Cable - LH (101965)

On the way home I collected the car. The air-conditioning was working well. We got all the way back to London, from Southampton, and then once in typical bumper to bumper London traffic, the D started to overheat. It was the first time this had happened to me and I kind of knew what to do, but I still checked in with Dan and Al and they talked me through likely causes and what I needed to do to get the car home. So, after walking to a local store and buying numerous litres of bottled water, the car had cooled and was then filled up with the water before heading home. The cause was probably due to the coolant being low following the weekend’s work.

4 notes
·
View notes
Text
27th International DeLorean Meeting, Hamburg - 24-28 July 2019
24th July
On the morning of 24th July I set off from North London to the Eurotunnel terminals outside of Folkestone. I filled up with fuel at the Tesco petrol station nearby where I also found Mike (Mec), Dan and Samantha who had come from Essex. We were also in contact with Justin and Ben who came down the night before and stayed at the Holiday Inn around the corner. We therefore decided to meet them at their hotel. Mike K and George were coming from Southampton and arrived at the hotel shortly after us.

At the Holiday Inn.


I decided to fill up on breakfast before the main part of this epic journey.

Mike K and George had personalised convoy T-Shirts made up for us.


Radios were distributed, Roger!

Inside the Eurotunnel Terminal in Folkestone. I was extremely hot, late 30 degrees celsius. Engine bay covers opened to aid engine cooling.


My 16606.

After being called we lined up ready for boarding.


The time came to board but as we approached the train someone had miscalculated since the train was full before we got there. We were led back up the opposite ramp over and down onto the parallel platform and back up the ramp and made to wait. This was testing with no functional handbrake.


I made it up the ramp and managed to park on a relatively flat area. Handbrake dilemma avoided.

Justin and the convoy gang out of their cars awaiting loading of the next train.


After much time in direct sunlight in these high temperatures we finally boarded.

Inside the carriage. Fortunately we all fitted within one carriage and thus had it to ourselves.


After the 35 minute crossing and debarring we were on our way. Firstly the stretch from the Eurotunnel terminal to the Belgium border.


Only 10 minutes in to the continental run Dan’s front passenger side wheel started smoking.

We pulled off into the nearest petrol station. After jacking it up and investigating it transpired that the brake calliper had ceased on. Once cooled and freed we where on our way again.

Into Belgium and another reason to pull over. This time Mike K and George had fuelling issues.

The heat was the main culprit but this still needed to be sorted.

The fuel relay was replaced. Testing initially looked promising but this turned out not to be the answer.

The front trunk was cleared.


With George getting into the trunk the team proceeded to inspect and then replace the fuel pump.


This appeared to have worked... We were then on our way again. By now we were several hours behind the intended schedule.

As the sun set further problems occurred. Mike’s car was still experiencing fuelling issues. The common factor to all the fuelling issues was the heat.

Once more, as the fuel cooled and the evening brought somewhat cooler temperatures we continued on to Arnhem in The Netherlands.


As we come close to entering The Netherlands this shot of 16606 and the hot air ballon was taken.

In Arnhem we made our way to the Holiday Inn about four hours later than intended.


Once in the car park, 16606 was left overnight.

25th July

The following morning we met up with Mark from The Netherlands and set off in convoy once more. As if yesterday wasn’t hot enough today would see temperatures hit 40 degrees celsius.


Part way along Mec, Mike and George got separated from the rest of us. It turned out Mike and George were facing further feeling issues. We pulled in to a service area and waited about an hour for the stragglers to join us. After refreshments and refuelling to put cool fuel into the car we set off again.

Not more than a few miles further on and Mike and George had to pull off the on-ramp to the autobahn outside Osnabrück where fortunately there was a pull-off area. This time Mike decided to call it a day and get the car recovered.

The rest of the convoy headed off while George hitched a lift to get a rental car and Mike waited for the recovery vehicle.


Meanwhile the rest of us steamed on to Hamburg making good use of the lack of German Autobahn speed limits. All I know was my speedometer needle stopped at 85mph.

Just around 5pm we arrived at the hotel and registered for the event.

That evening we were invited to the formal opening dinner by the German Delorean Owners Club where we were treated to a talk by Barrie Wills among other speakers.

26th July
The next morning circa 38 DeLorean’s set off for a visit to Lüneberg, south west of Hamburg, for a visit to this historic town.


In Lüneberg we had permission to park up on the otherwise pedestrianised town hall square.


Barrie Wills posed for these pictures with me and 16606.

It was also necessary to cover the windscreen to try to inhibit the direct scorching sunlight.


The owner of the former DeLorean of Sammy Davis Jr. was also present.


Other diverse DeLorean's were present including the above DeLorean World Tour car.


After much time kicking the tyres in the square we started our town tours.


Mid afternoon we set off for a location alongside the river Elbe for photo opportunities and ice cream.


That evening the UK contingent that was by then also joined by the “Flyers”, including Al, Alex, Arran, Carl, Julian and Lisa and went to the Dom, a massive fairground in the centre of Hamburg.

27th July
Saturday was Back to the Future day. We set off from the hotel to the Auswanderermuseum (Emigration Museum) BallinStadt Hamburg which had been turned in to Hill Valley, California.


Biff was there ready to apply those “two” coats of wax.

Biff’s Ford was also present.


George McFly’s BMW was also receiving the Biff Tannen Auto Detailing treatment.

The Time Machine made it to Twin Pines Mall.


Below, Stephen Wynn of the current DeLorean Motor Company was checking out the Time Machine.


16606 was having the Hill Valley experience.

16606 crashed through the twin pines but made such an impact that even the lone pine fell over leaving no pines in its’ wake.


Refreshments were courtesy of an unwanted “Welcome Home” cake that Lorraine McFly discarded after Uncle Joey failed to make parol! Pepsi Perfect was also on hand for liquid stimulation.

Saturday evening was the Enchantment Under The Sea Dance at the Old Timer Petrol Station in Hamburg.


Music was provided by Mikelonetwo.


28th July
Sunday morning meant the return journey, in one stretch, back to London. Mike and George were flying home which therefore left just four UK DeLorean's in the convoy. Whilst still warm, the weather was considerably more changeable.


Refuelling in Belgium.

Due to the intensity of the journey to ensure we made it in time for our allotted train not many photos were taken, however in the end we arrived in good time at the Eurotunnel terminal in France.

Upon Check in we were offered and took a train approximately one hour earlier. Once past security we parked up awaiting our call for boarding.


When called, which was incidentally about the time of our originally booked train due to delays, we followed the route to the platforms where we boarded the train.


Once more, and despite one DeLorean less, we had a carriage to ourselves.


As we arrived back in Blighty we each set off to our respective destinations, into the sunset.

9 notes
·
View notes
Text
Replacement LED Bulbs and Tail Light Fixings Repair.
This weekend I’m tackling a couple of basic jobs I’ve been meaning to do for sometime. I’ve got all the required parts so now there is no excuse not to get on with it.
The jobs, as the title of this blog indicates are,
1. replace exterior bulbs and door bulb with LED’s
2. fit alternative fixings in order to correctly secure the tail lights too.
These two jobs compliment each other which is why I’m going to tackle them together.

To tackle this weekends work I have a variety of parts, mostly obtained by www.deloreango.com and B&Q comprising the LED bulbs that I’ll show in greater details as I document the fitting of them, the fixings, washers including rubber ones, and screws.
I’m starting with the door lights, each door having two amber and one red bulb. To say I’m replacing the door bulbs with LED’s is a little disingenuous, I actually had LED’s put in during 16606′s restoration. However I never really liked the bulbs that were installed, at the time they did not fill the lens and appeared like a dot of light. A few years further on and the LED bulbs have advanced and now they have LED emitters placed all over which has the desired effect of filling the full lens, queue the time to finally swap to these modern LED’s in the doors and in all exterior locations.
Door lights
I started by removing the lenses of the door lights to remove the restoration installed LED bulbs, the red drivers side bulb is shown below in situ before I removed it.

The photo below shows the complete set of removed LED’s showing the two reds and the four amber bulbs. What you will notice is that two of the ambers are of a different type, unbeknown to me.

The new door LED’s are shown below.

The first fitted new LED bulb can be seen in the drivers side door below.

Unfortunately photos tend not to give a good indication of how the bulbs perform. A difference can be seen in the next two photos, with the first being the now removed red LED bulb which presents as a dot in the centre of the lens whereas the second photo shows the fitted replacement LED bulb that give light that fills the lens more. You will have to trust me however that in person the new bulb gives a better fuller glow of light that the former.


So next I am starting on the tail lights. First I opened up the garage to give more working space and make the rear of the car accessible without moving it out on to the drive.

I’m starting on the drivers side tail light. You will notice how ill-fitting the tail light is, due to the slight warping of the rear facia and the makeshift fixings which I am going to be replacing. You will also see the six silver screws. It’s always been an annoyance to me that they are not black stainless ones, so I will be replacing these also. The intention is that I will fit six new secure fixings in which I will re-fit the tail light with six black stainless screws. I’m hoping this will result in a more aligned and better fitting tail light.

With the tail light removed I have also removed the combination of past fixings, some which have failed and other which have previously been repaired on a temporary basis by lodging a nut in the orifice within the facia frame that the tail light is affixed to.The former situation with the holes in the facia can be seen in the photo below look at the passenger side.

A close-up of the fixing holes that required fixing is seen below.

Next the new fixings were prepared. This involves using one of the black stainless screws inserted into a Long Jack Nut insert screw anchor, and a rubber washer - my ideal just to project the facia and help grip. I inserted these into the hole in the facia and by using a pair of pinchers, griped the Long Jack Nut insert behind the facia to stop movement and then screwed the screw until the jack nut and collapsed firmly against the frame. In doing so the arms/legs of the nut collapse and fold back until the head and foot of the unit is fastened either side of the hole.

The front of the fitted Long Jack Nut can be seen below.

The rear of the fitted Long Jack Nut can be seen in the photo below from within the facia, looking back to the outside. The collapsed nuts arms can be seen folded and fastened against the facia frame.

The prepared facia on the drivers side can be seen below.

With the re-fitted tail light the bright stainless screws are now replaced with the black ones. Also the tail light casing fits some much better than before and is better alighted, however the photo does not really show any improvement from beforehand. Trust me however, it is improved.

On the passenger side the before situation can be seen below. Again the mis-alignment cannot be seen in the photo but you can see the bright stainless screws previously fitted. What is also not directly obvious is that actually the whole tail light casing is only being held in place by the upper left and centre screws. the others whether in place or missing are actually not doing anything.

The after show is shown below. This side was more difficult to re-fit. Unfortunately, despite a fair while trying to fit them, the top and bottom right hand screws would not catch and therefore screw in. I’ve removed them for safe-keeping. I suspect that the jack nuts have not gripped sufficiently causing it to just spin around when attempting to screw them in. With time against me I had to admit defeat for this time.

The before and after shots can be seen below. The main difference visible is that of the colour of the screws, but I can confirm the tail lights are much more secure than ever they were before.


Next was the turn of the license plate lights.

I removed the license plate casing to access the screws of the two sets of lights. The photo below shows the license plate casing removed and also the drivers side light casing.

The light casing is shown close-up below prior to unscrewing.

The removed light casing is shown below. I also used the opportunity to clean the lens of the casing inside and out.

The new LED bulb is interred into the casing.

The casing is then plugged back in.

After the fitting of the passenger side LED bulb a test was performed before putting everything back together. It worked!

Finally I came to the front indicators.

For each side I unscrewed the casing and removed it from the housing.

I twisted and removed the bulb and socket.

I then got a bit carried away and forgot to take further photos. I preceded to fit and test the LED bulbs that were the ones as in the photo below.

I had no time left to fit the side marker lights. I’ll leave this now to another day.
0 notes
Text
Hamburg or Bust
(fingers crossed it’s not bust!)

From 24th July 2019 I will be taking 16606 for its most epic adventure yet. I’ll be driving her to the 27th International DeLorean Meet in Hamburg, Germany. https://www.facebook.com/Int-Delorean-Meeting-Hamburg-2019-2115947705299160/
This will be a journey of some 591 miles each way. The route as shown in the maps below depict the stages I, along with, at the time of writing, five other DeLorean Owners will be taking.
On the outbound journey I will firstly drive myself to the Eurotunnel Le Shuttle UK Passenger Terminal where upon arrival I will meet the other convoy participants. This stretch of the journey covers the first 78 miles.
From this point the convoy proper begins. We’ll organise ourselves and prepare to drive our cars on to the train ready for the 11.30am departure to France. From the UK terminal entrance to the French terminal exit a further 38 miles will be covered, although most of it by train and not under our own steam.
Once we depart the Eurotunnel Le Shuttle terminal in Coquelles, the convoy truly gets going. With stops for fuel and rest along the way we plan then to drive into Belgium, via Antwerp and on into The Netherlands where we will stop for the evening in Arnhem. This will tick off a further 232 miles.
On the morning of 25th July, the start of the 27th International DeLorean Meeting, we will meet up with two Dutch DeLorean owners and begin the final leg to Hamburg.
This final leg will cover a further 253 miles (approximately depending on the exact route taken).
All in all roughly 591 miles will be covered getting to Hamburg.
One there the agenda for the event is as follows:


On Sunday 28th the convoy will return home. We will mostly retrace the route taken however this time we need to complete the entire journey in one go. This will be tough going but we need to make it back for our 21:50 train from France back to the UK. Therefore we will need to judge whether we attend any of the Sunday planned activities.
This will be a very exciting experience and one that will test 16606 to the max. Breakdown cover is arranged as would be prudent but I have great confidence in my DeLorean.
Check back here and on my Facebook page for updates leading up to and during the trip. https://www.facebook.com/timemachine16606/.
1 note
·
View note
Text
D-Reverse Installation
Having purchased the D-Reverse kit well over a year ago I finally got around to installing it today. Here’s how I got on.

After purchasing the kit I immediately went to B&Q and purchased the required L shaped plastic strip (2000x30x20mm) which has also been stood in my garage for over a year. I gathered all the required parts ready to begin. In truth I actually pre-read the instructions and did some preparatory work. This involved one of the first steps which is to cut the length of the plastic strip to 1480mm in length and to stick the adhesive foil strip (shown above) to it and reinforce the spade connector. This becomes the antennae. I was concerned that when fitting the plastic strip, which involved wedging it between the facia and the rear impact absorber, that a freshly applied foil strip could be scuffed and unstick. Therefore by sticking the foil to the plastic strip a couple of days prior, this would at least give it the best chance of staying stuck in place.

The antennae can be seen across the back of the car, above, and in close-up below.

Some insulation tape was used to reinforce the spade connector (see below). I am very much a novice with all thing I do with the D but take on the challenges willingly. Therefore some of my work, including the reinforcing of the spade connector might look unprofessional, especially my soldering and insulating, however it all works and has the required effect.

Next I needed to take off the tail lights/covers and disconnect the circuit boards.

Drivers side tail light removed (below).

Both tail lights removed and circuit boards disconnected.

The antennae then needed to be fed through the tail light recesses, across the back of the car. It initially rested on top of the impact absorber. It took a lot of wiggling and flexing of both the antennae and the facia to get it to wedge in over the edge of the impact absorber, this probably took the majority of the time. In my case it did not simply drop in and fit. I was conscious however that as I was fitting it, if something failed to work it would be very difficult to remove, so I didn’t completely fit it into its final position until after a test that I performed a little later.

I attached the transmitter to the spade connector of the antennae.

I then prepared the sounder. I used the adhesive pad on the rear of the sounder and stuck it to the idle speed ECU tray, cleaning the surface first with alcohol. Instructions advise to remove the black and white wire from the 4-pin connector that leads from the sounder to the transmitter and then position a draw wire through the back of idle speed ECU compartment to the rear facia via the charcoal canister and the engine bay.

Unfortunately I was unable to find a way through using the advised route, so after many attempts I had to find another way. I replaced the charcoal canister.

There was another hole that fed to the chassis. I then fed the wire back up into the engine bay, ensuring that it did not get positioned close to any moving parts. As can be seen below the black and white wires fed along the bottom of the bay and up through an access hole to the tail light compartment.

Following the routing of the wire I then plugged the four-pin connector in to the transmitter and proceeded to perform a test. I took the other two wires, red and black, that flow from the four-pin connector, and made contact with them to a spare 12v car battery. The test proved successful and the D-Reverse functioned successfully.

With the test done I then continued to position the antennae into its final place and then stripped back the black and the green/brown wires, that flow from the tail-light connector, and soldered the black wire from the four-pin connector to the black wire from the tail-light connector. Then I soldered the red wire from the four-pin connector to the green/brown wire from the tail-light connector. I then used insulation tape to seal the solder joins.

Close up image below of the solder joins.

I used the adhesive pad on the back of the transmitter and secured it to the facia inside the tail-light compartment. I then gathered up the excess wire and tidied them up with ties.

Next I used pieces of insulation tape to temporarily secure the cable in the engine bay whilst I used silicone glue to fasten the wire to the side of the bay.

Finally I refitted the tail-light circuit boards and casings, retested the D-Reverse, and then went for a nice 45 mile drive. Job done.
8 notes
·
View notes
Text
Fire Extinguisher Fitting
Having had the idea to fit my previously purchased fire extinguishers using the following method since shortly after Daryl Kemsley’s “Extinguisher-Gate” https://www.facebook.com/Darylk/posts/10214643787665849, I finally had the time to do it today.
I had purchased two 1Kg Powder Extinguishers from B&Q (https://www.diy.com/departments/first-alert-powder-fire-extinguisher-1kg/261546_BQ.prd#icamp=product).

My next challenge was where and how I was going to fit them so they didn’t move around as I hit 88mph.
I positioned them in several locations but the luggage shelf seemed like the best option. After many ideas I thought I should position them at either side on the removable covers over the fusebox and ECU. Because the carpet would be in the way I wanted a system that allowed for quick release of the extinguisher bracket for times when I might need to get to these areas.
I searched the web with many varied search terms and discovered the existence of DZUS D-Ring Fasteners, used mostly in the general aviation and motorcycle worlds, complete with clip and a Bail Handle that attach and release with a quarter turn. I found many options on eBay, however after reading the reviews I went directly to Speedy Fasteners (www.speedyfasteners.com). The product I wanted was the DZUS Fastener, 15-35mm with Bail Handle - product code SF114 (http://www.speedyfasteners.com/Dzus_Fasteners_15mm_35mm_Bail_Handle_Panex_DRing_p/sf114.htm). After measuring all the materials, the wood, carpet, extinguisher bracket I settled on the 25mm fastener. I also selected the “Rivet-On” version of the clip for the fact that it had the holes for reasons that will become apparent later.

The DZUS Ring above, the stud length I chose was 25mm.

I chose the “Rivet-on” version which comes with the rivets and washers for the fact that the clip comes with the rivet holes.

As can be seen above I removed the bail handle since the extinguisher frame was too narrow to accommodate it.

The operation of attaching and detaching the fastener can be done by a quarter turn with a flat-head screwdriver. Above the fastener can be seen fitting perfectly between the bars of the extinguisher bracket.


After measuring where the holes through the covers should be drilled I then turned them over and used screws instead of rivets to attach the clips. A clip with the fastener in situ can be seen above.

Both clips can be seen above, attached by screws.

The passenger side extinguisher bracket can be seen above affixed to the fusebox cover.

With the carpet laid over I made holes in the carpet first of all with a jewellers screwdriver and then enlarged it with a punch. When the bracket, carpet and fasteners were in place I tried to re-fit the fastener however it would not catch; it was about 1mm too short. Despite this I knew that had I ordered the next size stud, the 35mm this would have been much too long. To remedy this I marked out the footprint of the clip before removing it and then chiselled out approximated a 1mm recess.

I then refitted the clips and refitted the bracket, through the carpet, to the covers of the luggage shelf. They now fastened perfectly and are extremely strong and firm. My carpet for the luggage shelf is somewhat shrunk which I can only imaging is from cleaning/laundering that may have occurred during the refurbishment process. This can be identified in the photo above.

Above, the view from the drivers side.
So now I feel somewhat equipped to deal with a small fire should one occur. Naturally anything more than a small fire will probably be game over for 16606 - let’s hope this doesn’t happen.
4 notes
·
View notes