
A cozy little blog dedicated to my fashion FMP, chosen subject being 'Mushrooms & Fungi' :^)
Don't wanna be here? Send us removal request.
Statistics
We looked inside some of the posts by u3-mushisnails and here's what we found interesting.
Average Info
Notes Per Post
3
Likes Per Post
3
Reblog Per Post
0
Reply Per Post
0
Time Between Posts
3 minutes
Number of Posts By Type
Text
17
Last Seen Tumblr Blogs


Fun Fact
Tumblr has been banned in Indonesia for providing people with access to pornographic content.
Text
♜ 𝐃𝐞𝐬𝐢𝐠𝐧 𝐁𝐨𝐚𝐫𝐝𝐬 ♜


My final designs! A lot of them had alterations done in comparison to my media experimentation, I changed up the hair on some and made smaller changes such as eye position and size on a few, changed the blue one's hands and overall made them a little more presentable. Adding watercolour was enjoyable, allowing me to wash out colours and add layers to build deeper shades and such.

My final board displaying just my garment's design! An acetate version of my spec drawing was included for a back view, and much like all of them I collaged various shrooms around and behind.
Alternatives below cut! I didn't play around too much with these, as I was pretty happy with the results as they came along- Though there were still some changes, even if slight.


3 notes
·
View notes
Text
♜ 𝐏𝐡𝐨𝐭𝐨𝐬𝐡𝐨𝐨𝐭 𝟐/𝟐 ♜


The second lot of my photoshoot! These were taken in New Miller Dam, taking advantage of the sun. There were tons of knocked down logs, tree stumps and the likes ready to be climbed over. Fungi as well! I wanted to sit in them and almost act like one myself, growing out- but without the eccentric posing, I tried to keep it more delicate. No freaky stretches, focusing more on the theme of looking like an adventure. Felt cute to do :(
Next time I'm definitely going to ask around for models, socially I'm improving so hopefully it won't be too hard to do. x,) I even attempted poses at home! the difference it makes in posture when you're uncomfortable, I look way too tense. Still, happy with the results! very proud of these :D
0 notes
Text
♜ 𝐏𝐫𝐞𝐬𝐬 𝐫𝐞𝐥𝐞𝐚𝐬𝐞 ♜

My press release! a lil bit of history for my designs, pulling in my customer and a nice way to explain choices behind designs. I wanted to express how important nature was in my collection without the flowery wording- I'm not sure how well I like this but marketing really isn't my strong point. I'm happy with most of it, just unsure about it professionally.
Some alternatives below!


0 notes
Text
♜ 𝐦𝐞𝐝𝐢𝐚 𝐞𝐱𝐩𝐞𝐫𝐢𝐦𝐞𝐧𝐭𝐚𝐭𝐢𝐨𝐧 ♜


Media experimentation added to pages! Pencil has and always will be quite painful, though collage, pastels and ink turned out so so much better than I could of expected. Pro markers are far too vivid for my style and collection, so not something I would use for my final, the same applying to acrylic- so I’ll be sticking with my all time favourite, watercolour.
0 notes
Text
♜ 𝐆𝐢𝐟 𝐒𝐞𝐭 ♜


Gifs done and dusted! It took way too long imo, though half the time still of a commercial. Really fun and I hope I can do this again over commercials in future units! It was a bit of a fight trying to jump between websites to cut it down, I used Final Cut Pro just to crop and sort the videos to hit certain lengths (requirement was 10sec each gif) and used Canva for the animation, text, details etc! I had to screen record them off of Canva due to the files being too large when downloaded, and then put them through Ezgif's optimiser so Tumblr would accept them.
Definitely a lot of fun and I'm really happy how they came out! :D
0 notes
Text
♜ 𝐏𝐡𝐨𝐭𝐨𝐬𝐡𝐨𝐨𝐭 𝟏/𝟐 ♜


My indoor photoshoot! Bless Nicole so much for helping, I’d planned so many poses but my nerves got the best of me; 84 attempts in total :,) and here are the best results! Whether it was the lighting or embarrassment my face was bright red which made it honestly so awkward. Overall I’m really happy how these have come out, but definitely wouldn’t model again for them.
0 notes
Text
♜ 𝐌𝐞𝐭𝐡𝐨𝐝 𝐨𝐟 𝐂𝐨𝐧𝐬𝐭𝐫𝐮𝐜𝐭𝐢𝐨𝐧 ♜


Added my method of construction to my book! An absolute pain, but glad it’s out the way. I’ve tied in my patterns as well, securing them with tape so I don’t lose any pieces.

Additional page with some colour experimentation on my spec drawings! I used promarkers, and from top to bottom is the development for the colours. Originally it was going to be just the sleeves, but added the coloured peplum really brought it to life. I changed from red to black due to some confusion about the sewing side seeing as we're using just black and white, and nobody was quite sure if we were only using accents of colour- this later turned out to not matter, but by that point I was set on black.
0 notes
Text
♜ 𝐏𝐡𝐨𝐭𝐨𝐬𝐡𝐨𝐨𝐭 𝐒𝐭𝐨𝐫𝐲𝐛𝐨𝐚𝐫𝐝 ♜

A storyboard for my photoshoot! From the start I was adamant on a more minimalistic mushroom makeup which I was lucky to find some pretty decent examples for! Hair was a struggle to find when it comes to curls, and this one was just perfect being tidy and controlled yet loose and relaxed. Poses were a mix, I wanted more relaxed ones but also to explore more stiff and confident poses.
0 notes
Text
♜ 𝐅𝐢𝐧𝐢𝐬𝐡𝐞𝐝 𝐆𝐚𝐫𝐦𝐞𝐧𝐭 ♜

Finished my garment! Took approx. 3 weeks to finish, thank god. Photoshoot is booked! I had some frustrations with it, primarily due to some issues with overhanging around the collar and peplum but overall I’m really happy how it’s come out! The buttons are from my mum, and it fits like a glove. I’ll be the one modeling, so time to prepare a photoshoot storyboard :,)
0 notes
Text
0 notes
Text
0 notes
Text
♜ 𝐌𝐞𝐭𝐡𝐨𝐝 𝐨𝐟 𝐂𝐨𝐧𝐬𝐭𝐫𝐮𝐜𝐭𝐢𝐨𝐧 ♜

Bodice
Cut out pieces according to lay plan, interface wrong sides of pieces specified
Sew front body piece to side front body piece at 1cm, right sides together and matches notches. Repeat with back panel and side back panels.
Sew back side and front side together as well as shoulder points, notches matching at 1cm then overlock all seams to create a closed seam.
Peplum
Matching notches, sew side peplum pieces to the back peplum piece, overlock seams to create closed seam.
Overlock along the bottom longest curve as well as the short edges.
Fold the overlocked edges and sew it down creating a topstitch, start with long bottom hem. Try to avoid roping.
Sew to bodice at 1cm, right sides together matching notches and seams . Leave 1cm on each side of the bodice.
Sleeves
Fold the sleeve right sides together and sew longest edge at 1cm to create the sleeve. Do the same for the sleeve interfacing, sewing the shortest sides together. Overlock both sewn edges.
Overlock the long edge of the sleeve facing where it dips inwards.
Connect the facing to the sleeve by turning the sleeve right sides facing out, and pinning the sleeve facings onto the sleeves outside, interfacing facing up and right sides together. The pointed dip and seams should match. Sew the facing to the sleeve at 1cm.
Fold the facing inwards so it is hidden inside the sleeve, and press to hold shape. Use bondaweb or any alternative inside between the facing and wrong side of the sleeve and iron to stop the facing from catching or flipping out.
Sew the sleeve into the arm hole, right sides together and keeping seams and notches matching. Avoid tucks, and overlock seam afterwards.
Repeat for second sleeve.
Collar
Sew collar right sides together at the short inwards curve and edges, leaving the longest edge open. Trim the inwards curve seam allowance by half a centimetre.
Turn right way through, use scissors to push out tips to keep it defined.
Pin right sides together against the bodice neck and sew, leaving 1cm at each side of the bodice neck.

Button and hoops
Sew in a hoop or two using elastic thread, facing inwards on the 1cm seam allowance of the bodice. Place on mannequin or persons and mark preferred place. Mark place parallel for buttons.
Hoop must be sewn in before facings are added.
Facings
Sew short ends of back neck facing and top shoulder points of front facings, right sides together.
Overlock seams and the outer rim of front facing, outer larger curve and following front facing.
Pin facing to outside of bodice, right sides together and notches matching.
Turn up peplum to sew along bottom, and sew facing to the bodice at 1cm.
Fold facings into the inside to hide seams. Hoop for buttons should stick out from seam.
Spot tack facing into shoulder seam of bodice to keep down.


Toile done!! Very happy with how this came out, and excited to see my garment come to life! I had to take plenty of photos for reference, writing the facings was the hardest part :,)
0 notes
Text
♜ 𝐅𝐚𝐜𝐞 𝐃𝐞𝐯𝐞𝐥𝐨𝐩𝐦𝐞𝐧𝐭 ♜

Face development! My first attempts. They fall too close to my old designs which was a large issue, prompting me to try branch out and change my style up for this unit.

More attempts! Mushroom hats are a must, i wanted to try different types but the one on the left, inspired by more psychedelic art forms I’ve seen about, has been my favourite response. They remind me of Tim burton’s style to an extent. Also added spec drawing :^)

0 notes
Text
♜ 𝐏𝐚𝐭𝐭𝐞𝐫𝐧 𝐝𝐞𝐯𝐞𝐥𝐨𝐩𝐦𝐞𝐧𝐭 ♜
Began on the pattern! I'll post my spec drawing later on.
With a base body block I connected a line from neck to bottom dart, added notches and cut out removing bottom dart. I connected a line meeting the bust from the side dart and cut out said dart, pulling the paper in to create the necessary pieces for neck style lines.
For peplum I measured the bottom of the two front panels and created a rectangle using the length for the peplum. I folded the rectangle into 4 sections then cut them up to the very edge of the long side, and spread them out by 9cm, and added an additional 4cm onto the side.
For my body facings, I went over my front panel pieces and traced around the neck, then measured in by a few cm to form the facing.
For my back neck facing I measured around of the collar, adding a few cm for height when it sticks up.
0 notes
Text
♜ 𝐅𝐥𝐲 𝐀𝐠𝐚𝐫𝐢𝐜 ♜
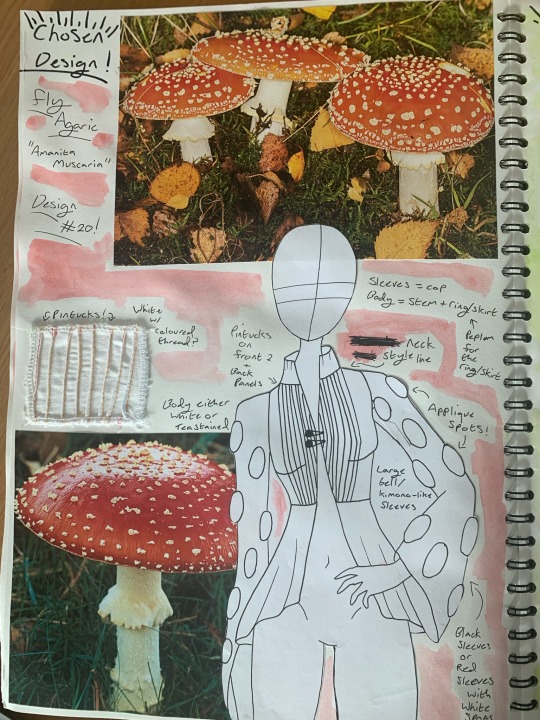
Final design! We had our design meeting too, and overall this was my chosen one for creating. It's a mix between the last fly agaric and my Wrinkled peach cap sleeves, with pin tucks decorating the front and back panel. I'm torn between colours just due to some confusion, but I'll be dying the sleeves and possibly peplum red or keeping them black.
0 notes
Text
♜ 𝐌𝐢𝐱𝐞𝐝 𝐝𝐞𝐬𝐢𝐠𝐧 ♜

Mixed design! a mix between the last of my stinkhorn designs utilising the sleeves and fraying, mixing with turkey tail layers for a flowing look. Pintucks to decorate the bust, overall another favourite design.
0 notes
Text
♜ 𝐅𝐥𝐲 𝐀𝐠𝐚𝐫𝐢𝐜 ♜

The best mushroom, hands down. Poisonous, spotty and classic :D
One of my favourite designs, puff sleeves with appliqué spots and puff binding for smaller details. The body would be tea-stained, possibly using pin tucks or darts around the collar and bottom of the top to add detail. I wanted to make the design look like the mushroom, so for my final designs I definitely plan for mushroom hats. >:D
0 notes