
A micro blog with geeky HOWTOs. Linux, kubuntu, web, browsers ...
Don't wanna be here? Send us removal request.
Statistics
We looked inside some of the posts by uhowto and here's what we found interesting.
Average Info
Notes Per Post
2
Likes Per Post
0
Reblog Per Post
0
Reply Per Post
2
Time Between Posts
4 months
Number of Posts By Type
Text
10
Link
7
Last Seen Tumblr Blogs


Fun Fact
Users from the US are the majority of Tumblr visitors.
Text
Ranger is a cool text-based file manager for Linux
Highly recommended; mc sucks! ;-)
0 notes
Text
HOWTO install canon scanning software for MG6100 multifunctional printers in ubuntu 19.04 “Disco Dingo”
My Canon PIXMA MG6140 inkjet printer/scanner/copier is a wonderful, though a bit dated piece of technology. Unfortunately, Canon have dropped support for modern linux distros a few years ago.
In ubuntu 19.04 open source printing driver for the device could be installed by usual OS procedure. The driver is good enough for everyday purposes. But scanning seems not to be fully supported by open-source solution. Manufacturer’s scangearmp software worked very good for me a couple of years ago on older ubuntu distribution. But on Ubuntu 19.04 installation of the package fails.
The instructions below are for 64-bit (x86_64) version of ubuntu. They could be easily adapted for 32-bit variant.
Install prerequisite packages:
$ sudo apt install libatk1.0-0 libcairo2 libfontconfig1 libgtk2.0-0 libpango1.0-0 libusb-0.1-4 libxcursor1 libxfixes3 libxi6 libxinerama1 libxrandr2 libxrender1
Download legacy libpng library https://packages.ubuntu.com/xenial/amd64/libpng12-0/download. However, it could not be installed on Disco Dingo with dpkg -i :-(.
Unpack and install manually:
$ dpkg-deb -R libpng12-0_1.2.54-1ubuntu1.1_amd64.deb tmp $ cd tmp $ sudo cp lib/x86_64-linux-gnu/libpng12.so.0.54.0 /lib/x86_64-linux-gnu/ $ sudo ln -s /lib/x86_64-linux-gnu/libpng12.so.0.54.0 /lib/x86_64-linux-gnu/libpng12.so.0
Download Canon’s driver package from https://files.canon-europe.com/files/soft40264/Software/MG6100series-scanner_driver.tar
Unpack
$ tar xvf MG6100series-scanner_driver.tar $ tar xvzf scangearmp-mg6100series-1.60-1-deb.tar.gz
Install, forcing ignore of libpng12-0 dependent:
$ sudo dpkg -i --ignore-depends=libpng12-0 scangearmp-common_1.60-1_amd64.deb $ sudo dpkg -i scangearmp-mg6100series_1.60-1_amd64.deb
#ubuntu#ubuntu19.04#ubuntu-disco#cannon#scanner PIXMA#MG6140#MG6100series#driver#installation#scangearmp
1 note
·
View note
Text
HOWTO make strikethrough text in Telegram
Here’s nice text formatting utility.
https://spectrox.ru/strikethrough/
Write your text in the left box, push >>, copy the result from the right box and paste into your telegram message.
0 notes
Text
Boxcryptor classic for Android replacement
TLDNR: Encrdroid
Three years ago I’ve used Boxcryptor classic by Secomba GmbH on my phone to store files securely in the cloud. After upgrading to Android Oreo Boxcryptor classic failed to perform.
I installed new Boxcryptor just to find out it is incompatible with encfs-based classic version.
Encdroid by Mark Pariente has been my next try and it just worked, allowing to access my encrypted data folder on Dropbox using passphrase.
1 note
·
View note
Text
Creating and activating swapfile on linux
These ares the steps to create a swap on a file:
sudo mkdir -p /var/cache/swap/ # create a driectory that holds the swap file sudo dd if=/dev/zero of=/var/cache/swap/myswap bs=1M count=4096 # for 4 GByte sudo chmod 0600 /var/cache/swap/myswap # only root can access sudo mkswap /var/cache/swap/myswap # format as swap sudo swapon /var/cache/swap/myswap # announce to system
Insert the following line in /etc/fstab for swap from the next boot:
/var/cache/swap/myswap none swap sw 0 0
0 notes
Text
HOWTO configure analog surround sound on (k)ubuntu linux for mobo with only three audio connectors
Some budget motherboards supporting 5.1 channel audio have only three audio connectors (Light blue, Lime and Pink) on the real audio panel.
Freshly installed kubuntu 14.10 (utopic unicorn) shows only stereo output (Built-in audio analog stereo) on such motherboards.
Actually such a motherboard has rear channels out shared with line-in, and mike input with Center/LFE output.
At first, you should make speaker connections as shown on photo

1. Connect the "Rear Speaker" (black) jack to Line In (Light blue) port 2. Connect the "Front Speaker" (lime) to Line Out (Lime) port 3. Connect the "Central / Subwoofer" (orange) to Microphone (Pink) port
Now you should configure audio backend software to recognize those connected devices as surround speakers rather than aydio input sources.
(k)ubuntu 14.10 uses PulseAudio for the backend sound system.
Open /etc/pulse/daemon.conf with your favorite editor
sudo vi /etc/pulse/daemon.conf
and configure default number of output channels.
... default-sample-channels = 6 ...
Save the file.
Start alsamixer and change number of channels from 2 to 6
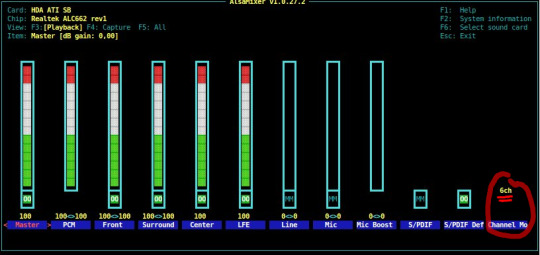
Exit alsamixer and reboot the computer.
(See http://drona.csa.iisc.ernet.in/~uday/surround-pulse.shtml for details on configuring PulseAudio, if you have other or older linux distro).
Now you are able to select 5.1 output from system settings GUI.
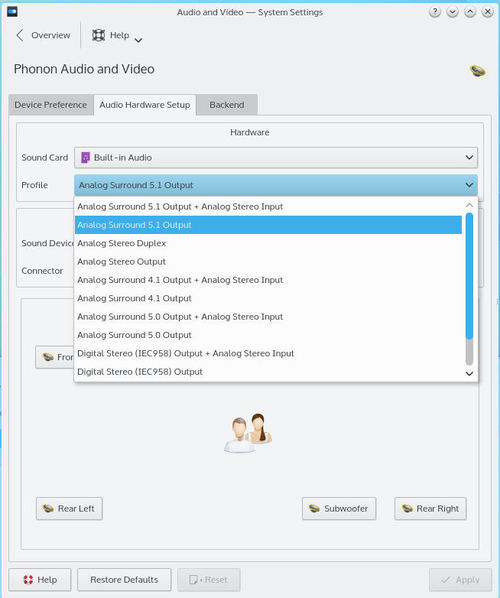
After selecting sound profile switch to Device Preference tab and make sure that Built-in Audio Analog Surround 5.1 comes first in the list of preferred devices for Audio Playback node.
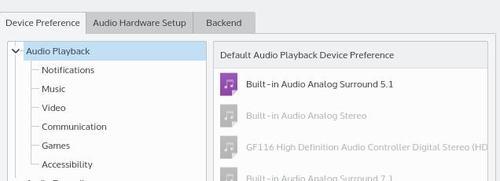
You may check that this preference is not overriden in child nodes (Notifications, Music etc).
If you still do not hear surround speakers during playback, also check that no channels are muted in the mixer.
That's it
0 notes
Link
Sometimes, don’t ask me why, building my assets does not seem to work, my code is just not being picked up. And then you need to do use brute force cleaning (throw everything out). Run
rake assets:clobber
to actually clean the assets.
0 notes
Text
HOWTO view Rails 4 routes in browser
To view and search currently active routing table in development mode visit the url
http://localhost:3000/rails/info/routes
0 notes
Link
Ctrl-Z fg; echo "done"
Some useful notification instead of just >echo could be used, of course
0 notes
Link
Workaround: delete .helpcollection directory and contents in user config dir.
0 notes
Link
Summary: just
init bare git repo
install post-update hook from hooks/post-update.sample (just copy the file without .sample extension)
That's all. You can use username@server:/path/to/repo.git as the git repo url in clone, remote add origin and other git commands.
0 notes
Text
Setting Rails 4.1 application to run with Phusion passenger for nginx
You have Rails application named doozy which should have access to mysql database doozy_production as database user deployer identified by password b-h7x+*u3M6n. Your application is deployed by capistrano to /home/deployer/public_html/doozy directory on the server.
You also generate secret key for cookies with
$ bundle exec rake secret 05a0fd20a8c410f5b469096914b973fa141a7716b9c153938041ffa611ed80b613bb44633d50388a8de31f9374d99054f8b22deb55df576048f3418e65eccbd2 $
Nginx with Phusion passenger is installed to /opt/nginx
As a root you create and restrict access to :
# mkdir /opt/nginx/secrets # chmod 700 /opt/nginx/secrets
Create secret file with following contents:
/opt/nginx/secrets/doozy.conf:
passenger_set_cgi_param DATABASE_URL "mysql2://deployer:b-h7x+*u3M6n@localhost/doozy_production"; passenger_set_cgi_param SECRET_KEY_BASE 05a0fd20a8c410f5b469096914b973fa141a7716b9c153938041ffa611ed80b613bb44633d50388a8de31f9374d99054f8b22deb55df576048f3418e65eccbd2;
Change access rights, so only root can read the secret file:
# chmod 600 /opt/nginx/secrets/doozy.conf
Create site configuration for nginx which includes the secret file /opt/nginx/sites/doozy:
server { listen 80; server_name doozy.example.com www.doozy.example.com; root /home/deployer/public_html/doozy/current/public; passenger_enabled on; include /opt/nginx/secrets/doozy.conf; }
Restart nginx:
# /etc/init.d/nginx restart
Here are contents of corresponding database.yml and secrets.yml files: /home/deploy/public_html/doozy/shared/config/secrets.yml:
# Be sure to restart your server when you modify this file. # Your secret key is used for verifying the integrity of signed cookies. # If you change this key, all old signed cookies will become invalid! # Make sure the secret is at least 30 characters and all random, # no regular words or you'll be exposed to dictionary attacks. # You can use `rake secret` to generate a secure secret key. # Make sure the secrets in this file are kept private # if you're sharing your code publicly. # Do not keep production secrets in the repository, # instead read values from the environment. production: secret_key_base: <%= ENV["SECRET_KEY_BASE"] %>
/home/deploy/public_html/doozy/shared/config/database.yml:
default: &default encoding: utf8 reconnect: false pool: 5 production: <<: *default url: <%= ENV['DATABASE_URL'] %>
0 notes
Text
*NIX tool improvements (VII)
The silver searcher a.k.a.ag is a beter ack is a better grep.
0 notes
Text
HOWTO ignore changes in files tracked by git
What if you made changes in a git-versioned file you do not want to commit/add to index? Say fixed some configuration or path for debugging purposes.
You may mark a file in your index with "assume-unchanged" flag.
git update-index --assume-unchanged <file>
Files marked with assume-unchanged bit are never considered as modified. In case the assumed-unchanged file is changed upstream, you will need to handle the situation manually. The --no-assumed-unchanged option resets tracking behaviour to normal:
git update-index --no-assume-unchanged <file>
Provided ack is installed, the following command lists the files with assumed-unchanged bit set:
git ls-files -v | ack ^h
0 notes
Link
There are at least three ways to avoid typing your password repeatedly when using git. First solution requires to use KDE wallet, second solution doesn't require additional tools and third is not the safest one.
0 notes
Link
A little collection of cool unix terminal/console/curses tools
0 notes
Link
Place this script into ~/.gimp*/scripts/. Run with following:
gimp -i -b '(batch-awb "*.JPG")' -b '(gimp-quit 0)'
0 notes