
Statistics
We looked inside some of the posts by vijayonstuff and here's what we found interesting.
Average Info
Notes Per Post
9
Likes Per Post
9
Reblog Per Post
0
Reply Per Post
0
Time Between Posts
5 months
Number of Posts By Type
Text
13
Link
1
Video
2
Photo
1
Last Seen Tumblr Blogs


Fun Fact
There were a total of 171.5 billion posts on Tumblr in 2019.
Text
Moving on!
This blog has officially moved to https://thekumar.github.io
5 notes
·
View notes
Text
5 Steps Towards Better Engineering.
I just realized that I haven’t posted anything to my blog since my dad’s passing, and this post has been in my draft since about 2 days after Tim Dodd’s interview was uploaded onto Youtube. It’s still worth a read.
I “recently” (retroactively applied) watched an interview of Elon Musk by Tim Dodd, the Everyday Astronaut, and in it he listed 5 steps every project must follow to be successful. I couldn’t agree more with him, and at the risk of coming across as an Elon fanboy, I wanted to share them here:
1. Question your requirements, or bluntly put, “make a requirement less dumb.”
Even smart people are dumb some of the time. So question every feature requirement that comes along your way. Especially, if it’s coming from a smart person.
Product managers and customers ask for many things, and a lot of it truly necessary. But, some of their asks may sound like necessary feature requests on the surface, but once you dig deeper, the reason for the ask might be moot or can be solved in a simpler way with less work or no work. Question whether requirements are actually necessary, or if they can be simplified and made better, or be eradicated.
2. Delete the part, delete the process.
This follows logically from #1, but is more of an active conscious effort to remove clutter that adds to unnecessary complexity. Every single additional feature you implement adds one more item that can and will fail, needs to be tested, requires additional maintenance, and increases complexity and adds to backwards compatibility headaches when developing new more important features.
So, cut down ruthlessly on what you deliver, and build only what is absolutely necessary. Spring clean your spring board.
3. Simplify, then optimize.
Do step #1 and #2 before you start to optimize features. If you’ve eradicated the part/feature completely, there is no need to optimize it at all. Think of it as 100% optimization at 0% cost.
4. Accelerate cycle time.
This is about iterative development, and to speed up spec, implementation, test, and evaluation time. If you’ve worked on Agile teams, you probably are already accustomed to fast iterations... but even then, it’s good to always think of a project as a bunch of small iterative MVPs that are built and validated quickly.
Yes, this may not always seem feasible, especially in long term large scale efforts. But, when SpaceX is launching, testing, failing, and iterating on giant Startships, you really have no excuses to claim you can’t practice this in your software project.
5. Automate.
Once you’ve figured out how to do something consistently at an acceptable standard, then automate it. Automation is the last step, but it’s critical.
A. It will improve quality of your outcomes by minimizing variance in operations and eradicate operator error; and
B. It frees you up to work on other cool and more fulfilling things.
No engineer wants to be repeating the same mundane manual process day after day, week after week, month after month... You do it manually once or twice to figure it out, but then as soon as you have it figured... AUTOMATE!
But, remember not to rush and do things out of order. We are struggling to get past #1 and #2 at my current work but are already automating things, and it is just soul sucking every time I have to do the monthly bill run, where a bunch of script automations have to be manually kicked off in sequence over a period of 5 days... Ahem! I have said too much.
Seriously though, #2 is probably the most important step. While the rest of my org is skipping to #5, I myself have made the blunder of optimizing performance for steps that shouldn’t exist in the first place, albeit while I’m fully aware of it. For instance, we have a manual workflow that involves exporting data as CSV which then gets validated by another team... and I have optimized memory utilization and implemented multipart uploads for this CSV generation step.
Am I proud of it? Uhhhh... Quick! Look here! Elon Musk!
https://www.youtube.com/watch?v=t705r8ICkRw&t=800s
I have linked directly to the part where he talks about the 5 step process, but the entire video (along with Part 2) is very informative and totally worth your time.
1 note
·
View note
Text
Immortal
Thatha

Aug 12, 2012 Tears flow through my heart when I try to remember all our moments together, only to be wiped away with the comfort of knowing that you now live through me. You molded me every step of the way, into the man that I am today. To the man who taught me everything I needed to know about life, language, and mathematics… Cheers! And thanks for everything!
I received the news of my grandfather’s passing while I was in the crowd watching Justice end their live set at Outside Lands. I vividly remember the text and call from my aunt in India, and not knowing what to feel as I made my way out through the crowds in Golden Gate Park. I walked back home that night, all the way to my apartment in Hayes Valley, and went to bed to sleep off all that I got to sample at WineLands that day. It took me a mere 2 days then to process my grief and pen my feelings in a short Facebook Note afterwards.
As an atheist, I don’t have the luxury of comfort that many get from a belief in the afterlife. But, it was easy for me to come to terms with my grandfather’s mortality.
Although he was no longer with us, I knew that the idea of him would still live within us, and it would continue to leave an imprint on the world through our actions – the actions of those who have been touched by his kind, curious, and perfectly flawed soul.
Growing up, I had spent enough time with my grandfather to get to know his true essence. Yes, he was flawed. Yes, my grandmother, my parents, my uncles, my aunt, my sister and myself have each complained about him from time to time. Some of us even hold grudges towards him still to this day. But if you had spent just a little time with him, you would know that he always meant well.
Was he perfect? Far from it. Even the gods aren't. He was only human -- a mere mortal. And so are we, flawed mortals navigating an imperfect world.
I have come across many versions of the “three deaths”, but the one that struck me the most went something like the following:
Every man dies three deaths. Once when his biological self dies. Yet again, when the last person he knows dies. And lastly, his real death occurs when his name is uttered for the last time.
I found comfort in the knowledge that he was still alive and well in our collective memories.
Then this year, after enduring through his cancer diagnosis for over two years, my dad passed away on April 7th. And, I couldn't find peace in the same thought that had given me calm during my grandfather's demise.
Appa

April 9, 2021 We had been expecting this day for a while. Yet, when it finally came, it all felt so hurried. As the long night drew closer, I was growing worried, that after this last mile, I would never remember your smile. That my feelings will forever lay burried beneath our strained relationship, muddied. Will I only remember you as a cynic? Will I still be your harshest critic? Will I only lean on you, for what not to do? Will you fade away misunderstood? Like I was to you, no good.
I couldn't trust my memories to be a true reflection of the man he was. In the ~months~ years leading up to his death, he had become increasingly reclusive and distant from the rest of us -- or, at least from me. There were increasingly more negative interactions, both first and second-handed, than positive ones. And, even during the last month, when I got to spend more one on one time with him in Houston, there were more confrontations and disagreements than consensus and trust.
I had referred to him as "The Petulant Parent", "Imsai Arasan 24th Pulikesi", etc. albeit jokingly. I even got so frustrated at one point that I had settled on "In Service of Assholes" as the title for my non-existent autobiography. (Please save the Sir Mixalot jokes 😎)
Near the end, we had gotten into many arguments about our politics, and our ethics. We were almost polar opposites in how we viewed the world, and our headbuttings only became more frequent as we both knew we were running short on time to convince each other of our ways. I was worried I won't be left with any good memories to carry forward in life.
But all those worries faded away after he passed away.
I realized that though we were different, there was so much that we had in common -- From our unhealthy disregard for authority, to our unbounded curiosity and urge to understand how the world really works beneath the way it presents itself. We are both humble in certain aspects of our lives, and elitist smarter/holier-than-thou dickheads in others, though, there isn't much overlap between us in the things we were humble about and not.
And, where he was being difficult towards me, he pushed me to take a step back and gain a deeper understanding about what I'm doing wrong, or why I'm certain about being right.
That is the part I miss the most -- having to live up to the unattainable demands of a petulant parent. Watching him hold on to his convictions and view points, no matter how wrong they were, or seemed to be, had forced me to be aware of my own mistaken views of the world And if I have to be honest, that is the part that worries me the most -- that without his push, my life will become stagnant.
My grandfather taught me how to lead life with purpose, and to find purpose in service to others. But my dad imparted in me the importance of acting and doing, even when there isn't a clear purpose.
I hope I am lucky enough to always find purposeful avenues to express myself. But when I don't, I hope that I can follow my father's spirit and push through blindly.
All along until now, I was placing the utmost importance on the legacy I will be leaving behind. On how I will be remembered. How I could become immortal.
But his passing's biggest lesson has been this: Our legacies are the concerns of those who come after us, not ours. We may be wrong, but we should stake our position and act. Our time here is short. We're mortal.
I'm mortal.
Happy Father's Day!

0 notes
Text
Corona-Oh-Nah-Nah!
This post will either go down in my blog history as one of the stupidest dumbest paranoid analysis of the numbers behind COVID-19 fatality rates, or (hopefully) end up as a thoughtful neutral analysis of the facts as they stand currently. With the recent coronavirus pandemic, there have been a lot of comparisons made in the media with the flu, and a lot of discussions had about the severity of this virus. Especially about its mortality rate. Since, I’m currently funemployed and got nothing better to do while in quarantine, I felt the need to chime in on the topic as well :)
Mortality vs. Case Fatality
First, we need to understand the metric we are discussing here. The Center for Disease Control (CDC) as well as the World Health Organization (WHO) both define mortality rate as the number of people dying from an infection divided by the total number of people infected.
Mortality Rate = Number of Deaths / Number of Infected.
For COVID-19, or more precisely, for SARS-nCOV2, the WHO estimates mortality rate for the virus to be around 3.4% (and climbing). The CDC estimates it to be around 1 - 2%. And everyone in the media have been comparing it with Influenza, which has a mortality rate of about 0.1%, and claiming that this Coronavirus infection is 10 - 15x as deadly.
For a pessimistic outlook, talk to any statistician (or me) and they will point out that the numerator isn’t fully determined as you are dividing deaths from just closed cases over the total number of cases including both active and closed cases. And just based on that, assuming active cases close with the same percentage of fatalities, you would end up with double the numerator and around a 7% mortality rate by WHO’s measure. Of course, that is assuming that new cases are growing linearly. But we know, we are on an exponential curve up... so, this metric will in fact land somewhere higher.
For instance, consider a hypothetical scenario where an epidemic lasts 20 weeks, and the average duration from infection to recovery or death is around 4 weeks. Assuming a 50% mortality rate, the weekly metrics for deaths and new cases would look something like the following:

In the graph above, red represents the count of new infections, and blue represents the number of deaths per week. And, the cumulative graph would look like this:

If you calculate the mortality rate the way the WHO and CDC calculate today, then up until week 4, it would be 0%, and it will always be less than the true mortality rate of 50% slowly inching it’s way up to the true value at the end of the epidemic. This is why the WHO’s 3.4% and CDC’s 1-2% estimates are artificially optimistic. Sure, they sound nicer to our ears, but it’s only gonna get worse. Unless of course, we can find a vaccine or a cure before the bell curve peaks, which is highly doubtful.
For an optimistic outlook, talk to any doctor, and they will correctly point out that these estimates are meaningless as we don’t know how big the denominator is, because we aren’t testing everyone for the virus, and only test those with severe symptoms. So far, South Korea and the Diamond Princess Cruise are the only places where they tested people regardless of whether or not they showed symptoms, and thus those populations provide a more accurate estimate of what the mortality rate will be for the virus. And in those populations, the mortality rate was shown to be around 0.9%.
Those populations also showed that 82% of the infected either were asymptomatic (i.e, showed no symptoms) or were mildly symptomatic (i.e, a cold, or very mild fever, or a sore throat) and the symptoms went away.
This is in stark contrast to Influenza, where if you contract the virus, then you end up being symptomatic. And, this makes comparing mortality rates between the two diseases ever more meaningless. If I catch the flu, I’m gonna need hospitalization, and the 0.1% probability of dying from it applies to me. If I catch nCoV2, neither the 3.4% nor the 0.9% applies to me. If I’m over 80, then 21.9% applies to me. If I’m young and asymptomatic, almost 0% applies to me. But if I’m symptomatic enough to be admitted to the hospital, then my prognosis depends on a much smaller denominator containing just the population of those infected and had to be hospitalized. And this is where the Case Fatality Rate/Ratio (CFR) applies to me.
Case Fatality Rate
CFR = Number of Deaths / Number of Hospitalized Patients.
For Influenza, this is almost synonymous with the mortality rate. Because, if you catch the virus, then you are going to end up with the flu, and need to be hospitalized. Thus total number infected approximately equals the total number hospitalized.
But for Coronavirus, this would be vastly different from mortality rate as the number that need hospitalization is only around 17% of those infected. And since we can assume that if you are severely symptomatic, then you would end up hospitalized (similar to the flu), you can get at this number by looking at the closed cases thus far. And the numbers thus far paint a much direr picture than the 10-15x comparisons around the mortality rates.
While the flu has a CFR of around 0.1% (the same as its mortality rate), COVID-19′s CFR is around 12% and growing. (When I started writing this post, it was around 11%, and by the time I’m done writing it, it’s at 14%... Go figure! I think it’s because of the systemic failure with the Italian Healthcare System). This is about 100x that for Influenza. While this is alarming, we need to remember that while the flu affects everyone almost uniformly regardless of age, COVID-19 is especially lethal to the elderly. And a majority of those that require hospitalization are elderly and thus the numbers will get skewed towards the 21.9% mortality rate for above 80-somethings than the 0.2% mortality rate for the below 20s. And the elderly are already filling up our hospital beds, where they are most likely to contract it as well as get tested for it. So, there is definitely a bias in the overall CFR towards that of the elderly.
If you’re like me, you might think “I’m close to 40, how does this CFR affect me?” It is still worth noting that the virus is much more deadlier than the flu, and affects older population more severely because of co-morbid conditions. But it doesn’t affect old people exclusively. It also affects those with heart and pulmonary diseases, those with cancer, as well as those with diabetes more adversely than others. A lot of these conditions arise with old age. But, they also arise with obesity. And in the US, where a majority of the population is now overweight or obese, we don’t know how these conditions will affect the case outcomes for this disease. Of course, it also affects fit young people as well (I know of one 33 year old personally that had to be hospitalized for a week).
So, what do we do now?
Take this sh** seriously. Avoid contracting it as much as possible. Don’t take social distancing lightly, and be extra careful about visiting your parents / grandparents. Facetime/Zoom/Duo/WhatsApp your family. Buy them groceries and leave it at their doorstep to show that you care. But, please don’t hug and KOD your parents.
Most importantly, if you have a fever, or sore throat, DO NOT rush to the ER!!! At least, not until your symptoms turn out to be severe and you really need in-patient care, because:
1. If you have COVID-19, you are most likely to spread it to others in the ER unnecessarily, when you are just mildly symptomatic and don’t need to be hospitalized.
2. If your symptoms are not due to COVID, you are more likely to contract the virus in the ER.
You are most likely better off waiting for your symptoms to wean off while quarantining yourself at home. Also, you can’t create videos like this at the hospital... So, stay home! Stay safe! Stay creative! :)
View this post on Instagram
A post shared by babecabiita (@babecabiita) on Mar 17, 2020 at 4:38am PDT
0 notes
Text
Elevator System Design
I came across an interesting System Design interview question.
I have a building with 50 floors. I would like to have 4 elevators to serve the people of this building. How would you go about designing for this?
On the surface, this looks like a very simple arrays/lists/counts based algorithm problem. But I very quickly realized this wasn't a question on manipulating lists and such, but actually a question about Inteface design and separation of concerns between various components in a system. Of course, I most likely bombed when it came to answering this question, because the design I came up with was embarrassingly lacking in terms of clean separation of concerns.
But, for an interview that spans 45-mins to 1-hour, I hope the purpose of the question isn't to judge whether the candidate can come up with the cleanest most optimum solution, but instead, rather assess how they think about componentizing different aspects of functionality vs. optimizing for performance vs. readability vs. upgradability, etc. Is the code monolithic (too vertically integrated)? Are components spread out too thin (too separated with having to follow multiple classes to understand a simple action)? Is it a balanced approach? Is there even such thing as a balanced approach? :)
Anyway, after the interview was over, I wondered what kind of a system I would actually be happy about committing to a source repo if I was actually tasked to come up with it at work. And thus, I began going down a rabbit hole of designing the components of a building elevator system with details all the way down to the button, light, and motor controls :/
Hold up! Let's follow the KISS principle and Keep It Stupid Simple. (I know that it's actually "keep it simple, stupid!" but in the spirit of self love and self respect I would like to... you get the point.)
The basic principle followed at every level of the design was to ensure that the design allows for testability, abstraction, encapsulation, and separation of concerns.
The design I’ve come up with -- BTW, feel free to dissect and criticize as you wish -- is as follows. A Building has floors and zero or more elevator shafts. The shafts each contain one elevator and are responsible for moving them up and down the floors. There is a central controller that orchestrates which elevator shaft should service a call at any floor. And each elevator is responsible for the actions riders take within one such as selecting the desired floor, opening the door, etc.
Let's define the interfaces...
Interfaces & Dependency Injection:
The four basic interfaces I came up with are:
IBuilding
IElevatorShaft
IElevator
IElevatorCallController
To make it testable, and easy to come up with various configurations, I also had abstract factories for each of those defined.
IBuildingFactory
createBuilding(options: IBuildingOptions, eccf: IElevatorCallControllerFactory, esf: IElevatorShaftFactory, ef: IElevatorFactory)
IBuildingOption {numFloors: number, numShafts: number)
IElevatorShaftFactory
createElevatorShaft(options: IElevatorShaftOptions, ef: IElevatorFactory)
IElevatorFactory
createElevator(options: IElevatorOptions)
IElevatorCallControllerFactory
createElevatorCallController(shafts: IElevatorShaft[])
You can see how dependency injection is used here to provide all of the dependencies at each level. There is a bit of balance to be struck here in terms of code readability and testability. As you can tell from above, the ElevatorFactory needs to be passed in through all the layers (Building -> ElevatorShaft -> Elevator), and this could get out of hand. For a good (i.e, bad) example, look at any Guice based project's codebase, and you will come across plenty of nested factories. DI Frameworks such as Spring (and Guice as well) help you avoid this issue and preserve readability in your code through annotations and autmagically injecting the dependencies through reflection. They acheive this primarily by employing Factory Provider and Service Locator patterns, but that's for a future post.
Let's take a look at what actually is handled by each interface...
Separation of Concerns:
IElevator
IElevator is only concerned with the properties and actions of a single elevator. What might these involve?
requestFloor(floor: number) - Pressing a floor
openDoor(): void - Opening the elevator door. Mind you, this does not include the shaft door.
closeDoor(): void - Closing the elevator door.
addPerson(): void - A person entered the elevator.
removePerson(): void - A person exited the elevator.
Additional elevator attributes such as rider capacity, current rider count, etc.
NOTE: This is just a basic interface. If we wanted, we could also specify which person entered, and who exited for finer tracking abilities. But for the sake of simplicity, I'm leaving those details out.
IElevatorShaft
IElevatorShaft is only concerned with the properties and actions of a single elevator shaft.
moveElevator(floor: number) - move elevator to floor X.
openDoor(floor: number) - open the shaft door at floor X (and ideally instruct the elevator to open its door as well)
closeDoor(floor: number)
additional shaft attributes such as range of floors serviced by this shaft, elevator’s current direction of travel within the shaft, etc.
getElevator() - of course, the elevator in the shaft.
Let’s pause here to notice that the actual motor drive system for both the elevator cable as well as the doors themselves is abstracted away here. Those are additional details that can be handled by the implementations of IElevator and IElevatorShaft.
IElevatorCallController
IElevatorCallController is only concerned with figuring out some way of scheduling an elevator to handle a call at any given floor.
scheduleElevatorForCall(floor: number, direction: UP|DOWN)
IBuilding
IBuilding is only concerned with the properties and actions of the building. To keep it simple, for now let’s just say this is the only action provided by the interface.
callElevator(floor: number, direction: UP|DOWN): void
getShafts(): IElevatorShaft[]
Communicating through Delegates
So far, we have isolated the basic actions and properties within each interface. However, these concepts don't exist in the void by themselves, and have a need to interact with each other. For instance, when an ElevatorShaft instructs an Elevator to open it's door, it may need to notify back to the shaft after the action was performed. Or, an Elevator might have to notify to its ElevatorShaft that its running at full capacity.
Or, if we want to dive deeper, when a rider presses a floor, the Elevator might have a need to check whether that floor is serviced by its particular shaft before it lights up the button. We see that an ElevatorShaft contains an Elevator, so that communication is take care of. And for the callbacks, we can have the Elevator contain a ElevatorShaft reference as well, and we are done, right? What's the big deal?
Nope! If we did that, 1. we would introduce a circular dependency and tightly couple the interfaces. 2. ElevatorShaft composes an Elevator, thus needs to know about IElevator. However, Elevator need not know about IElevatorShaft.
We still want the callbacks to happen but have the objects be loosely coupled. One way to achieve the necessary communication and still maintain decoupling between the interfaces is through the Delegate Pattern. i.e, IElevator would communicate with an IElevatorDelegate for its back and forth communication needs. In the concrete implementation, the same object (the concrete ElevatorShaft instance) will satisfy the needs of both the IElevatorShaft and IElevatorDelegate, but the interfaces are not coupled. This might not seem that important, but it helps a lot with testability where we can pass different fake and mock those methods independently.
To make it more clear, let's go one level deeper and look at IElevator and its buttons IButton. IElevator needs to know about the IButton interface since it composes of a bunch on buttons. But IButton need not be coupled with IElevator. Instead, it can just rely on implementers of IButtonDelegate. That way, the same button can be used in an Elevator, or in a Keyboard, or on a Wall, etc.
interface IElevatorDelegate { // Basic handleFloorKeyPress(floor: number, sender: IElevator): boolean; // return true if allowed, false otherwise. handleDoorOpened(sender: IElevator): void; // Door opened handleDoorClosed(sender: IElevator): void; // Door closed // Advanced handleCallKeyPress(sender: IElevator): boolean; handleCancelKeyPress(sender: IElevator): boolean; handleDoorOpenKeyPress(sender: IElevator): boolean; handleDoorCloseKeyPress(sender: IElevator): boolean; }
Putting it all together
I'm not gonna cover implementing concrete objects for all interfaces in this post. But with the above interfaces, let’s consider how two buildings might be constructed.
Building A - A wooden 4-story building with a single elevator made by Schindler Lifts.
Building B - A concrete 50-story building with 4 elevators made by Otis Lifts.
class Building implements IBuilding { ecc: IElevatorCallController; shafts: IElevatorShafts[]; numFloors: number; constructor(numFloors: number, ecc: IElevatorCallController, shafts: IElevatorShaft[]) { this.numFloors = numFloors; this.ecc = ecc; this.shafts = shafts; } callElevator(floor: number, direction: UP|DOWN): void { this.callController.scheduleElevatorForVCall(floor, direction); } } class WoodenBuilding extends Building implements IElevatorShaftDelegate{ // ... all wood building specific props constructor(shafts: IElevatorShaft[]) { for ( var shaft: IElevatorShaft in shafts ) { shaft.setDelegate(this); // Set self as delegate } } } class ConcreteBuilding extends Building { // ... all concrete building specific stuff } class WoodBuildingFactory implements IBuildingFactory{ createBuilding(options: IBuildingOptions, eccf: IElevatorCallControllerFactory, esf: IElevatorShaftFactory, ef: IElevatorFactory) { let ecc = null; let shafts = []; if (options.numShafts > 0) { for ( var i = 0; i < numShafts; i++) { let es = esf.createElevatorShaft(ef); shafts.push(es); } if (eccf != null) { ecc = eccf.createElevatorCallController(shafts); } } return new WoodBuilding(shafts); } } class ConcreteBuildingFactory implements IBuildingFactory{ // ... similar stuff goes here. } // A generic dumb call controller that round robins through all available shafts. class GenericCallController implements IElevatorCallController { shafts: IElevatorShaft[]; currShaft: number; constructor(shafts: IElevatorShaft[]) { this.shafts = shafts; } scheduleElevatorForCall(floor: number, direction: UP|DOWN) { shafts[currShaft]. currShaft = currShaft++ % len(shafts); } } // A more advanced call controller that might use specialized algorithms to maximize people flow. class OtisMultiShaftCallController implements IElevatorCallController { //... } class OtisElevatorShaft implements IElevatorShaft, IElevatorDelegate { //... } //... //... //... and so on.
and to instantiate the buildings, you would simply code something along the lines of...
func main() { //... //... let buildingA = WoodenBuildingFactory.createBuilding( {numFloors: 4, numShafts: 1}, SchindlerCallControllerFactory.getInstance(), SchindlerElevatorShaftFactory.getInstance(), SchindlerElevatorFactory.getInstance()); let buildingB = ConcreteBuildingFactory.createBuilding( {numFloors: 50, numShafts: 4}, OtisCallControllerFactory.getInstance(), OtisElevatorShaftFactory.getInstance(), OtisElevatorFactory.getInstance()); //... //... }
A few things to note above.
Even though I haven't included concrete implementations of the classes above, you can see from whatever little bit of code I have included, that we are primarily dealing with interfaces. This is very important in terms of testability, as now we can easily swap in mock and fake implementations while testing, thus making writing unit tests a breeze. It also makes the code very reusable and extensible.
I am callig singleton instances of the factories in the main function. Ideally, these would be provided by a DI framework such as Guice or Dagger or Spring through the use of simple annotations.
Okay! I'm gonna continue going down this rabbit hole and develop an Elevator Simulator inside a React SPA. I'll post the code on my bitbucket soonish... Until then, Happy coding/interviewing!
0 notes
Text
Sync-o de Mayo!
I know it’s not May 5th yet. But, I don’t have enough Star Wars geek cred to pull off a “May the fourth be with you!” related pun. So, please bear with me.
Previously, I mentioned how the two magical words, “Operational Transforms,” a.k.a. “OT”, were the solution to all of my real-time syncing woes. So, what is OT? Before answering that, let’s first take a look at the problem we face with syncing.
Consider the scenario where two people, A and B, are simultaneously editing a simple document containing the text “hello!” initially.
The initial state of the document contains the text “hello!” at Version 0.
Person A makes an edit replacing the ‘h’ with a capital ‘H’ so that the document now says “Hello!” at their Version 1.
Person B makes an edit inserting the text “ world” before the ‘!’ to make it say “hello world!” at their Version 1.
Now each person has arrived at a different state of the document, and we want to be able to merge their changes together to converge the divergent states back to a version of the document that contains both edits and says “Hello world!”
There is nothing new about this. We deal with this almost everyday in today’s workplace whether you are a developer merging changes in Git, or a product manager merging different versions of a Powerpoint slideshow, or a lawyer merging suggestions in a contract using Track Changes, or simply keeping your Dropbox / Google Drive in sync with your local folder. And regardless of what scenario you are dealing with, the solution is pretty much the same.
Diff, Sync, Merge.
You diff your version of the document, as well as the version that you want to sync with, against a common ancestor version from history to determine what exactly changed, and then determine how to merge both your changes. Finally, you sync the merged document back to the repository.
The Problem with Diff/Sync/Merge
Diff Sync Merge (aka Diff Merge) is a solid and proven way to perform merges, but it comes with one huge caveat. It needs multiple versions of the entire model to be retrieved/synced for performing sync and merge operations. Whether it was just a single character that was replaced, or the entire document, you still need access to the entire document to perform the diffs. This works well for use cases where you only have to sync relatively rarely.
But, if you want to build a real-time collaborative application a la Google Docs, the latency involved in pushing/retrieving entire document models back and forth on each individual edit would make it unusable. We need to rethink syncing and merging. We need a way to sync changes without syncing entire documents.
OT to the Rescue!
The basic premise behind operation transform is quite simple, and can be explained with the following diamond.

You start at an initial model state m0. Client A performs an Operation A and arrives at model state mA. Client B simultaneously performs Operation B to arrive at model state mB. Now, given the pair of operations A and B, we need to find complimentary operations A’ and B’ such that mB + A’, and mA + B’ both converge back to a single model that both clients can sync back to. For example, Client A’s operation of inserting ‘!’ at the 5th index-0 position get’s transformed to inserting ‘!’ at the 4th index-0 position, after B’s operation of deleting the first character is performed. And B’s operation undergoes no transformation because A’s operation doesn’t affect it’s index.
The important thing to note here is that regardless of what the model was, those two operations will lead to the same exact transformed operation. For instance, if the initial model state was “namaste”, and we performed the same operations as above. We would arrive at the same synced state of “amas!te”.
If we can define transformations A’ and B’ for every possible pair of operations A and B, then we can achieve our goal of syncing changes without syncing documents.
Of course, figuring out the useful transformations for all the different combinations of A and B could get quite complicated, but once they’ve been figured out, OT will guarantee that the clients will arrive at a synced state.
I emphasize “useful” because one could easily define A’ and B’ to simply delete the entire model for any and all combinations of A and B. In that case, your clients would technically arrive at a synced state and satisfy OT’s requirements. But it would be an empty document, and that does nobody any good :/
So, let’s take our initial example of taking the string “hello!”, and the two clients A and B, with A replacing ‘h’ with ‘H’, and B inserting “ world” before the exclamation mark. These state changes and all other text manipulation can be achieved via a minimal set of 2 operations:
1. deleteCharacter(atPosition p) aka DELETE (index) 2. insertCharacter(character c, atPosition p) aka INSERT (char, index)
This implies there are 4 possible pairs of inputs for our OT diamond.
DELETE / DELETE
DELETE / INSERT
INSERT / DELETE
INSERT / INSERT
And we could define our transformation logic as follows:
Operation A Operation B Transform A' Transform B' DELETE (indexA) DELETE (indexB) (indexB == indexA) ? NO_OP : (indexB < indexA) ? DELETE(indexA - 1) : DELETE(indexA) (indexB == indexA) ? NO_OP : (indexA < indexB) ? DELETE(indexB - 1) : DELETE(indexB) INSERT (charA, indexA) DELETE (indexB) (index B < indexA) ? INSERT(charA, indexA - 1) : INSERT(charA, indexA) (index A <= indexB) ? DELETE(indexB + 1) : DELETE(indexB)</td> DELETE (indexA) INSERT (charB, indexB) (index B <= indexA) ? DELETE(indexA + 1) : DELETE(indexA)</td> (index A < indexB) ? INSERT(charB, indexB - 1) : INSERT(charB, indexB) INSERT (charA, indexA) INSERT (charB, indexB) (index A > indexB) ? INSERT(charA, indexA + 1) : INSERT(charA, indexA) (index B >= indexA) ? INSERT(charB, indexB + 1) : INSERT(charB, indexB)
There are a couple of interesting things to notice with the transforms we have defined.
First, we defined a new NO_OP operation to return for the case where both clients perform the same delete operation. This is to avoid double-deleting the wrong character.
And second, the >= in the last pair prioritize A's inserts over B's insert if they both insert characters at the same index. So if A inserted " Bob" and B inserted " World", the output will always result in " Bob World".
Note: If both added " World", we would end up with " World World", but in a real-time collaborative environment, this is acceptable. If we really care about avoiding duplicates, we could define higher level operations that look at word inserts and compare whole words/phrases for duplicates.
This transformation model works well for single character operation. But how do we handle a string of operations by each client? For instance, replacing 'h' with 'H' itself takes a minimum of two operations (a DELETE followed by an INSERT) and inserting " world" requires 6 INSERT operations.
Handling Multiple Operations
Once you’ve figured out the transformation logic for a single pair of operations, handling multiple operations becomes a no-brainer. It’s simply the same OT diamond cascading transformed operations as input to the next OT diamond.
Take the following example where A diverges by 3 operations, while B diverges by 2. To compute the transformed operations A1′, A2′, and A3′ to apply on client B, as well as B1′ and B2′ to apply on client A, you simply have to cascade your transformations down. Note that there are intermediate states and intermediate operations shown in the diagram below, but there is no need to store or even care about the intermediate models as OT works independent of model state as shown above with that really lame “amas!te” example :)
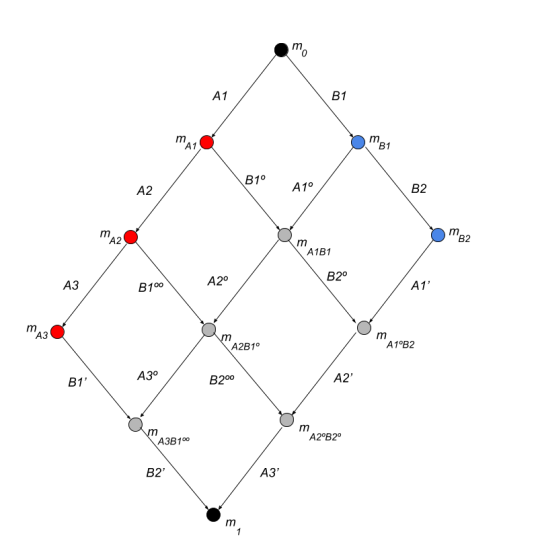
In the above case, we had to perform transformations on 6 different OT diamonds. Basically, OT becomes a O(m*n) operation, where m & n are the number of operations the clients have diverged by. So, it is preferable to sync frequently keeping the count of operations to perform OT on pretty low.
Luckily, this suits really well for real-time collaborative use cases where we are syncing almost continuously after each and every edit.
Handling Multiple Clients
Syncing multiple clients is just as easy. We simply sync them sequentially and additively. Assume that you have 3 clients A, B, and C that have each performed 3, 2, and 2 operations respectively. To bring them all in sync, we first sync A (operations A1, A2, and A3) and B (B1 and B2) to determine A’ (A1′, A2′, A3′) and B’ (B1′, B2′). Now both A + B’ and B + A’ lead to the same synced state mAB for both clients.
We can now take one of these equivalent paths (either A1, A2, A3, B1′, B2′ or B1, B2, A1′, A2′, A3′), and sync that with C to determine C1′ and C2′, as well as the transformed operations to apply on client C. Let’s take the first path A1, A2, A3, B1′, B2′ for illustrating how this works. The sync would work as shown in the following diagram.
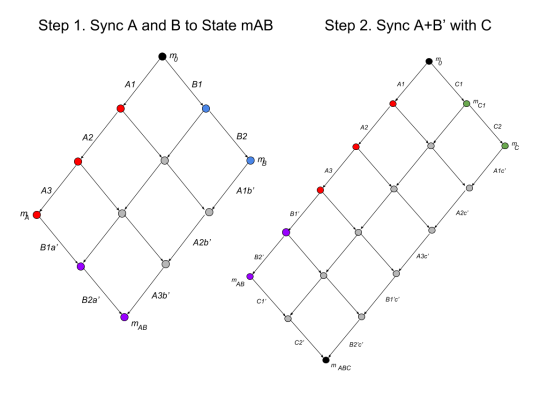
It’s not shown clearly in the diagram, but C1′ and C2′ are operations that get applied on both A and B, which are currently both at state mAB, to bring all three clients to the same synced state mABC. And we can follow this same technique and extend it to as many clients as we need to sync.
That was just a brief intro to Operational Transformations which forms the basis for real-time collaborative tools such as Google Docs, Dropbox Paper, and Apple iWork. Hopefully, it made sense, and you got to learn something new.
0 notes
Text
Project Remix: What? Why? How?
It’s been a bit over 3 months since I started working on Mix.byCollab, my stab at building a real-time collaborative video editor.
I am working on this by myself and have nobody to report to or to hold me accountable. And Tax Day just surprised me with the realization that my runway might not last me as long as I thought it would... which is a bummer. I guess that’s my accountability.
So, to not lose motivation and to stay on track, I thought I might as well be transparent and blog about my progress on a regular basis (maybe a weekly blog post, but don’t quote me on it).
What?
Ever since working on ZDO, I have been wanting to create an HTML based online editor for videos that let people upload their shots and stitch them together a la iMovie, Final Cut, and Adobe Premiere. But, I never started on it, because from a UX perspective, I was taking an already complicated experience of a native app and making it shittier by pushing it online.
But then, I started working for Google Docs. And, two realities of the new web dawned upon me:
A highly complex application such as a word editor or spreadsheet can be fully written in client-side javascript, and perform at an acceptable level within your browser window; and
Even though Google’s suite of apps wasn’t providing the sleek (debatable) native experience of Microsoft Office, it was miles ahead of it in terms of usability and functionality. All because of its one killer feature: Real-time Collaboration.
If I can get the application to be as collaborative as Google Docs, then it would be worth any degradation in UX performance. And, with the advances being made in WebGL, Socket IO, Web Workers, and FFMPEG.js, it might as well be an app that runs inside the browser. You must have seen the screenshot from my previous posts about what it will look like. If not here it is again:

And yes, that’s the browser experience that I’m shooting for. And if HTML & Javascript aren’t up to par to handle videos, then I could still build a collaborative editor that runs across all the native platforms, but I’m taking a web first approach.
Why?
I strongly believe that creativity gets better through collaboration, and the current set of available tools don’t enable frictionless collaboration. (I’m well aware of the irony intrinsic to me working solo on this project.)
I am passionate about filmmaking and storytelling, and not bought into the hype surrounding #blockchain yet :/ Definitely not bitcoin, which is literally fool’s gold.
I wasn’t happy about the work I did at Google. Don’t get me wrong! I love the company, and think it’s a great place to work. But, I felt unhappy with the scope of my work, and that feeling Steve Jobs talked about in his Stanford commencement speech kept creeping up on me.
The reason I want to create a collaborative video editor is simple: There’s increasing demand for video content on the web. And, to keep up with the demand, media sites and software companies are focused on speeding up the video creation process by sacrificing on quality and putting out junk content. There are companies like Wibbitz out there that are focusing on using machine learning to automate the creation of more junk videos.
I think there is a better way to keep up with the demand, and still maintain the quality of content being put online. I want to focus on enabling teams to streamline their workflow and unleash their creativity through collaboration. I want there to be more videos like this, and less like its subject matter :)
youtube
How?
Two words: “Operational Transforms”

Actually, it’s a lot more than that, but’s that’s the basic tech behind making the project state sync in real time. That’s how Google Docs syncs documents across user sessions. That’s how Dropbox Paper syncs its paper docs . And pretty soon, how Eclipse Che editors will sync their source code.
Words beyond “Operational Transforms” which I will get into detail in future posts:
React Components for UI.
Canvas + WebGL for rendering preview.
Ffmpeg.js for exporting.
Web Workers + Socket IO for communication.
gRPC + Spring Boot for sync backend.
Spring Boot + MySQL for backend services.
Dockers + Kubernetes for deployment (potentially on GCP or AWS).
Google Cloud Store or S3 for asset storage requirements, which is currently satisfied by my dev Macbook’s local filesystem.
What’s the status?
I spent a lot time initially to get the OT syncing right, and have a working gRPC service for syncing operations on the shared document between clients, which, as an engineer looking at it from an architecture perspective, is where the meat of the project is.
I’m currently working on building the editor front-end which, as far as the rest of the world is concerned from a value perspective, is where the meat of the project is.
And, it currently looks like this :/ #DontJudgeABookByItsCover #DontJudgeAProjectByItsLooks

In my next couple of posts I’ll dive into the details of how OT syncing works, the overall client-server sync architecture, as well as how I’m architecting the front-end using React components. And hopefully, the status screenshot will evolve with each post.
0 notes
Link
Happy New Year!!!
My 2018 resolution is to launch the beta by Q2. Sign up to get notified!
0 notes
Text
Eject > Side B

This is my first blog post in over a year. I tried to blog a few times in between, but left those posts as drafts, because my nihilism took over :/
What’s the point?
So, I’m repurposing the title from a post I drafted last year after the presidential election to give an update on what's up.
TL,DR; I am not at Google anymore. I’m now working on my passion project that I’ve personally wanted to work on for over 4 years. Expect more posts on it with details, but here’s a sneak peek.
Sometime near the beginning of this year, I suddenly stopped being happy about a lot of things that I used to be ecstatic about... Stuff that others would kill for! I fell in love in NYC, and with NYC. Then I wasn’t happy about either of that. I was in love with Google. Then I wasn’t happy about that either. I initially blamed oxygen deprivation from Kilimanjaro and exhaustion from running a marathon for messing up my brain. But then after a lot of shower thoughts, I realized it’s actually because of something much worse!!! It was because of muthafuckin’ Tony Robbins! And my buddy that channeled him by asking me blunt piercing questions during his visit to NYC in February. (You know who you are!!!) Things just weren’t the same after that.
I started feeling the same sense of stagnation that had originally forced me to move out of San Francisco, and made me look for a job in NYC. It was like the plot to INCEPTION. The thought was seeded in my mind that I’m not living up to my full potential, and it made me unhappy about everything that I did. There was a cloud of apathy hovering over me with whatever I did. And it affected everything! Both in life, and at work. And it didn’t go unnoticed, especially at work. Apathy + Google’s work demands just don’t mix. So, after months of feeling like a millennial craving for “impact” and feeling like I’m stagnating, and not particularly caring about things perf (Googler speak) wanted me to care about... I quit and decided to start on my passion project!
What is it? Why now? And How? I’ll get into those details in follow up posts. I have loftier goals. But for now, it has to do with online video editing and real-time collaboration, and it's gonna stretch Operational Transforms, the basic tech behind Google Docs, beyond its limits. I’ll get into the technical details of OT in a subsequent blog post as well. But, here’s a sneak peak of what it will look like visually:

I took most of December off to destress from everything, and to take care of some personal finance stuff back home in California. (I need to save in every which way I can to extend my runway for this project.)
And, in the last week of actually working full time on the project, I’ve gotten much farther that I thought I would with the technical design. (And of course, the visual design as well.) I have come up with a generic algorithm and a set of operations to perform OT efficiently on any large complex hierarchical model. (Uhhhh, say for instance... a video editing project?) And more importantly, I think I’ve found a way to sync the same document across multiple servers, which will allow for a lot more large-scale collaborative applications beyond just video editing. This one is a hard problem to solve for, especially when it comes to handling network and server failures. There’s a reason why Google limits the number of people that can simultaneously edit the same doc. I even have the front-end Javascript, and the video rendering pipeline figured out.
It’s all coming together! My confidence in my project’s feasibility is now at 100% 💯. My confidence in my execution... uhhhhh, not so much. 😕 J/k. My goal is to have a working prototype that looks like that visual design by March.
Aggressive? Yes.
Achievable? Absolutely! (I think...)
But not if I simply keep blogging about it, and don’t write any code. Peace!
A Note on Porters
In my previous super-dramatic post about not dying on a mountain, I mentioned about writing a follow-up post on the colonial era concept of porters. I did start writing about it, and the stains of a racially biased colonial past that are still evident in today’s tourism industry in Africa and the third world. But, as I was drafting, I realized that it wasn’t any different that any of us working for the man, and that it was only a matter of economics and access to education. And in time, porters as a profession will be extinct.
We, as consumers and tourists should just be cognizant of the human cost involved in the profession, and be empathetic to how much we demand of them. Sure, you are paying them to carry your shit... but don’t be a dick about it by stuffing your bag with unnecessary stuff that you don’t need. So, that’s that.
Here’s the original post (sans a chart) from last November with the title “Pause || Resume >”:
I originally wanted to write a post about how my 2016 NYC Marathon run went, and about how badly the Nike app on my new Nike+ Apple Watch failed in tracking my run. But, that happened on a Sunday, a whole 2 days before more pressing matters took over people’s attention and fears, and the whole world seemed to turn upside down for many when Trump swept in his victory on election night.
Suddenly, a lot of emotions started pouring out of those around me, and most of it negative. Fear. Anger. Despair. Sorrow. And along with emotions poured out snap judgements, and misguided inferences. “A lot of people must’ve been closet Trump supporters that voted for him, though they supported Hillary in public.” “I don’t feel safe in this country anymore!” “I can’t believe how racist this country has become to have elected Trump!” “Let’s sign this petition to ask the Electoral College to vote their conscience!”
Alright, pause right there!
TL,DR; Don’t trip chocolate chip! It’s not as bad as you think it is.
First of all, the nation is no more xenophobic/racist/ignorant than before. I’m not saying those elements don’t exist. But that’s not the reason why we lost this election to a misogynist. It’s just that not enough democrats came out to vote for Hillary this time, and DWS and the DNC are to blame for that. And partially, Bernie as well. I love Bernie and I know the scales were unfairly tilted against him during the primaries, but Hillary would have won the nomination even if the primaries were fair. And he should have acknowledged that earlier, instead of fueling the anger and rage felt by the berners that eventually turned into disillusionment and apathy.
Here’s the voter turnout for the last 3 elections. Republicans had more or less the same number of people voting their way. Democrats didn’t.
Second, not all trump supporters are racist ignorant tribal xenophobes. Okay, I take that back. They are all pretty much ignorant for thinking he actually cares about their issues, and tribal for voting just because of the (R). Regardless of whether they just feel patriotic and want to make America great “again”, or whether they are just selfish ultra capitalists that hope to benefit from Tax cuts for the rich and service cuts for the poor, a Trump presidency is not going to be beneficial for any of them. Even the racist xenophobes aren’t gonna benefit from his presidency. Mexico is not going to build that wall, and those Nazi saluters at trump rallies aren’t gonna become mainstream. Although, there is a huge chance that race relations will stop progressing.
The only people that are gonna benefit from this presidency are gonna be Trump’s cronies, and the spineless GOP politicians that stood in line to kiss King Trump’s feet... I’m staring at you Ted Cruz!
But, that’s not a bad thing at all. Sure, the nation will suffer from gross mismanagement for 4 years. But, the ignorant public will hopefully wake up and realize the big con Trump and the GOP pulled on them, and vote them out of office in the upcoming mid-term elections. And hopefully, Trump will be a single term president.
Then again, there is Fox News spewing misinformation to the section of public that just voted him in. Never mind. Scratch everything I wrote. Dumbassery has achieved critical mass. We are royally fucked!
0 notes
Text
"Don't Die on this Mountain Today!"
When I signed up to climb Kilimanjaro, I simply took it for granted that I would summit it. And why not? I have always loved nature, and it has always been kind to me in return. I have hiked up almost all of the high points in Yosemite, and though they were not nearly as high as Kilimanjaro, they were steep and somewhat technically challenging hikes. And on top of that, I had to carry 30lb packs while climbing them.
Kilimanjaro on the other hand, though almost twice as high as Yosemite’s highest point (19,341′ vs. Clouds Rest at 9,990′), was just one long arduous climb up a steady incline. And we had guides and porters with us to help carry our gear (more on that whole colonial era concept in a follow-up post). And if not for anything else, all my long distance training for marathons had prepared me well for winning the mind over matter game needed to endure such long treks.
Of course, there were many times on this trail when my mind had to do just that, and remind my body what it’s really capable of. The route we took was the newly opened Northern-Circuit, which closely follows the well known Lemosho route and takes 8 days to summit and descend, giving us an extra day to acclimatize to the high altitude over the already long 7-day Lemosho route.

The first two days of hike getting through Forest Camp up to Shira 1 Camp were a breeze. But on the critical third day, when we were expected to actually start feeling the effects of altitude, I got hit with a contagious stomach bug that was making its round around our camp. I wasn’t the only one to get sick. In fact there were five of us in our climbing group, and all but one got sick on the mountain. I just happened to be the one with the unfortunate timing of getting hit on acclimatization day when we camped above 4000m for the first time.
So, I had to visit the “toilet tent” a few more times than the others... So what? Big deal! Even after hitting the loo twice before 8am, I brushed it off as just a case of indigestion and went onwards with our 5-hour hike to the next camp at Moir Hut. This camp was at an elevation of around 4200m, the highest I had ever been up until that point. Once there, I was still feeling okay, and even decided to do the optional acclimation hike that evening up to a towering rock formation around 4670m (approx. 15,200ft), the highest elevation I have ever climbed to.
In hindsight, this was probably a mistake and I should’ve probably rested at camp like my campmate who was recovering from her sickness from day 1. But, I had a huge case of FOMO, and I had no idea how much worse it could get. It was daunting, but I just kept saying to myself “sip by sip, step by step!” and made sure I stayed hydrated. And it was totally worth the hurt. I got to see one of the most beautiful sunsets ever.
vimeo
Sadly, it will also be the highest I will ever get to on this trip. When we returned to camp that night, we had to go through our routine checks for our pulse and blood oxygen saturation levels. Everyone else registered a healthy reading in the range of 89%-92%, slightly lower than the 95%-100% readings we got the day before. But that drop was expected due to the decrease in atmospheric oxygen at high altitudes. I registered a mere 73% – way below the 80% threshold the guides were comfortable with on the mountain.
Before I proceed any further, let me explain a little bit about blood oxygen saturation. It’s basically the percentage of red blood cells that are oxygenated in your body. Usually, 95 - 100% of your RBCs are oxygenated. And as you go higher up in elevation, the lack of atmospheric oxygen causes a lesser amount of blood passing by your lungs to get oxygenated, thus causing your saturation level to drop. Below 80%, the main organs like your brain and heart begin to get affected. And to compensate, your heart starts to beat faster to push more oxygenated blood to your organs, resulting in higher blood pressure, a higher pulse, and a throbbing headache.
Here’s a little video that explains a bit more about the effects of Hypoxia.
youtube
The video focuses on the drastic effects above 25,000ft and how it affects your mind in a matter of minutes. We obviously weren’t that high, but we had to deal with it for days, not minutes. And symptoms aren’t the same for everyone affected by hypoxia. For some, it’s diminished cognitive skills. Others start to slur while they speak. For me, it was fatigue and headache. Both of which could be attributed to just dehydration.
The only sure way to keep track of the effects of hypoxia was to measure your blood oxygen saturation. On the mountain, the guides recorded our pulse and saturation levels twice daily – once after breakfast, and once before bedtime. Your saturation level is expected to drop to 80 - 90% on the third day until your body acclimatizes, at which point it creeps back up to settle around 85 - 95%. My 73% reading that night was definitely a cause for concern.
We attributed my low reading to the stomach bug, and decided to check again the next morning, thinking may be my body had to prioritize my sickness over altitude. That night I had to use the toilet tent four additional times, and when morning came, my reading hadn’t changed by much. In fact, I woke up with an even lower reading of 69%. The highest reading I could get even with my sleeping bag acting as a temporary hyperbaric chamber was 77%. We did register a reading of 86% at some point in the morning, and the guides decided to officially record me at that. They didn’t want me to take further readings that day.
They wanted me to continue on the mountain and successfully summit just as much as I did. We decided to give it another day, and headed off to the next camp, Pofu Camp, which is at a slightly lower elevation of around 3850m. I thought I was feeling better that morning, but I couldn’t have been more wrong. This hike was brutal. I was still sick, and I had to hike 12km in 6 hours over rolling hills through a burning fever. Mind over matter right? Well, somehow I made it through that day.
That second night at altitude, my oxygen saturation was still stuck at 77%. My fever had begun to subside, and I was starting to feel a lot better. The guides though were weary with doubtful faces, but still tried to be optimistic about it. And I was too. Maybe things will get better once we get to the next camp at Third Cave, which is at around the same elevation as Pofu camp. “Don’t worry, tomorrow is gonna be an easy hike. It’s only 3 to 4km, and after about 20 minutes of uphill, it’s all downhill. We will take a reading once we get to Third Cave and then decide if you should continue or not. But I think you will be fine!”
The Northern Circuit is pretty much designed to give the body as much time as necessary to acclimatize. After the third day at 4200m, it’s basically two days of camping at lower elevations to let the body acclimatize before getting up to base camp on the 6th day around 4600m at School Hut, all ready for the summit and descent on the 7th day.
On the morning of the fifth day, my fever was gone, and I was upbeat about my health. The pulse oximeter still showed a reading of 77%. “It’s fine, we’ll check along the way to the next camp, and hopefully it will go up as the day progresses.” We checked along the way, and it didn’t waver much. It still showed 77% wherever we stopped to take water breaks. By the time we made it to camp, I was exhausted. It was only 3km, and it was all downhill, but I was done. I was ready to quit.
It was no longer a matter of mind vs. body. The night prior, I slept in the cold for a good half of it because I woke up to go take a leak, then decided not to, but then, forgot to zip up my sleeping bag. I kept waking up cold after that, and noticed every single time that my sleeping bag was open. But I kept forgetting to zip up. This happened not just once or twice, but three times! And earlier in the night, I was shivering for a bit in my fully zipped up warm sleeping bag. I was not thinking straight. I had already been feeling fatigue and constant headache for the past two days. And now, add reduced cognitive skills to my list of symptoms.
My body was telling me to GTFO, and this time, my mind was in agreement.
When we arrived at Third Cave, everyone went to take pictures with the camp signs. I went straight to a tent to rest. The lead guide came and checked my levels, and looked at me with a serious face. “You need to descend immediately! One of the guides and a porter will accompany you, but you should eat your lunch, or pack a boxed lunch, and descend right away. You can come back and climb again another day, but not today. Next year, next month, may be even next week if you want. This mountain will still be here. You’re still too young. You still have a lot of life left in you. Don’t die on this mountain today! Go!”
Words can’t express my gratitude towards Msafiri and Twalib, the guide and porter who left the mountain with me and helped carry my stuff. It took us 5 hours to descend via the scenic Rongai Route, and I already started feeling better half-way down the trail. I still had some symptoms of altitude sickness begin to show up even after I got back to the hotel that night, like a little bit of fluid in my lungs. But, they would have been worse had I decided to stay up on the mountain another night. I had had enough with altitude sickness after the throbbing headaches and shivers. I didn’t need to cough up blood to realize how bad it could get.
I have always loved nature, but now I have a new found respect for it.
I will be back to climb the mountain again, and the next time I will be better prepared for it. I will go climb other high elevation peaks to train for it, and not just rely on running with my scorpion-looking altitude training mask. I will put in the work the mountain demands, and give it the respect the mountain deserves. I only ask that the mountain returns the favor and respects my effort.
In the video about hypoxia, they mention that death can occur at any instant when your blood oxygen level drops below 60%. My reading that afternoon was 63%. I have no regrets descending that day.
0 notes
Video
vimeo
The weirdest thing for me was how all of this didn’t seem like mind-blowing Sci-Fi stuff of the future. VR, AR, Light Field Immersion, and the points-based service economy... We’re already there.
0 notes
Text
2016: Time to Train
The last time I made a blog post, I was working on my Arduino project as part of my grand plan of building 12 vastly different things in the span of 12 months, each of which will force me to learn something new each month. And, just when it was beginning to progress forward, something big happened and my biggest project of the year took over... Moving to New York for a job at Google NYC. And along with it, my Arduino project got put on hold. Quite literally, in storage, along with most other tools I could use for creative purposes. Though the siege will soon be over when I move into my own apartment next month, I can’t wait to get all my stuff back.
All was not lost however, as I did get to work on a couple of software projects that were well beyond my area of expertise. I got to learn Machine Learning with Tensor Flow, and built a couple of domain-specific content recommendation systems using Hadoop MR. And on top of that, I definitely took advantage of my honeymoon period here at Google, and started learning as much random tech as possible while my actual responsibilities at work are still minimal.
Still, they don’t show the results that I had hoped for when I started on my grand goal of 12 in 12. So, lets focus on something that has a high chance of being on track this year...
Health!
My 12-month goal on the health front was to lose 20+lbs to get into my doctor-recommended BMI range. And, I may have gone a bit too crazy with it by signing up for a bit too much :) May be way too much... And now it’s time to train.
End of July, I’m running the first half of the SF Marathon! EZPZ!

A month later, I’m climbing Kilimanjaro the last week of August! Woot?

And today, I found out that I got selected in the drawing for the NYC Marathon this year in November!

TL;DR:

1 note
·
View note
Text
D3MO - Part 2
Continuing on with the D3 Clock-face we created in Part 1, Let’s create a simple SVG representation of a clock hand.
HTML
<svg width="120" height="20"> <path d="M 0 10 L 20 0 L 120 10 L 20 20 z"/> </svg>
Demo
Let’s turn it into a reusable symbol, and create the hour, minute, and second hands by reusing the symbol.
HTML
<svg width="300" height="300"> <defs> <symbol id="hand" > <path d="M 0 10 L 20 0 L 120 10 L 20 20 z"/> </symbol> </defs> <use id="secondHand" xlink:href="#hand" fill="#a00" transform="translate(150,150),rotate(-90),scale(1.5,0.75),translate(-20,-10)"/> <use id="minuteHand" xlink:href="#hand" fill="#666" transform="translate(150,150),rotate(30),translate(-20,-10)"/> <use id="hourHand" xlink:href="#hand" fill="#333" transform="translate(150,150),rotate(0),scale(.75,1.0),translate(-20,-10)"/> </svg>
Demo
Once the scale and translate transforms are done, the only thing we will need to worry about would be the rotation of the hands around that original 10,20 point in the symbol. So, let’s rewrite our SVG with nested groupings (or graphics contexts, or whatever G means) as follows:
HTML
<svg width="300" height="300"> <defs> <symbol id="hand" > <path d="M 0 10 L 20 0 L 120 10 L 20 20 z"/> </symbol> </defs> <g transform="translate(150,150)"> <g transform="rotate(0)"> <use id="secondHand" xlink:href="#hand" fill="#a00" transform="rotate(-90),scale(1.5,0.75),translate(-20,-10)"/> </g> </g> <g transform="translate(150,150)"> <g transform="rotate(120)"> <use id="minuteHand" xlink:href="#hand" fill="#666" transform="rotate(-90),translate(-20,-10)"/> </g> </g> <g transform="translate(150,150)"> <g transform="rotate(90)"> <use id="hourHand" xlink:href="#hand" fill="#333" transform="rotate(-90),scale(.75,1.0),translate(-20,-10)"/> </g> </g> </svg>
Demo
Notice that we adjusted the rotation of the hands inside the groupings to be -90º. This is to make the math simpler when we calculate rotation based on the current time, so that 0º would be 12 o’clock, and 90º 3 o’clock.
Now that we know what the SVG that we need looks like, let’s create the same using javascript & D3, and get references to the graphics context / grouping elements that we actually care about... the ones that define the rotation of each hand in degrees.
DOM
<div id="d3vis">
Script
// From Part 1 of this Blog Post var dim = 300; var svg = d3.select("#d3vis") .append("svg") .attr("width",dim) .attr("height",dim); var gHours = svg.append("g") .attr("transform", "translate(" + [dim/2, dim/2] + ")"); var gSeconds = svg.append("g") .attr("transform", "translate(" + [dim/2, dim/2] + ")"); var hourMarkers = gHours.each(function(d) { d3.select(this).call(clockFace, 12, dim/2); }).selectAll("circle"); var secondMarkers = gSeconds.each(function(d) { d3.select(this).call(clockFace, 60, dim/2); }).selectAll("circle"); secondMarkers.attr("fill","#aaa"); hourMarkers.attr("fill",function(d,i){return (i == 0)?"#666":(i % 3 == 0)?"#666":"#aaa";}); function clockFace(selection, numDots, size) { offset = 0; radius = numDots * size / (numDots + 2); deltaY = (numDots % 2 == 0)?0:(radius / 2) * (1 - Math.cos(Math.PI / numDots)); selection.selectAll("g") .data(d3.range(numDots)) .enter().append("g") .attr("transform",function(d) { var angle = d * 360 / numDots + offset; return "translate(0,"+deltaY+")rotate("+angle+")translate("+radius+")rotate("+ -angle + ")"; }) .append("circle").attr("r",0.9*(size)/(numDots)); } // All the NEW STUFF for Part 2. svg.append("defs") .append("symbol").attr("id","hand") .append("path").attr("d","M 0 10 L 20 0 L 120 10 L 20 20 z"); var secondRot = svg.append("g").attr("transform","translate(150,150)") .append("g").attr("transform","rotate(10)"); var secondHand = secondRot.append("use") .attr("xlink:href","#hand") .attr("fill","#e33") .attr( "transform", "rotate(-90),scale(1.5,0.5),translate(-20,-10)"); var minuteRot = svg.append("g").attr("transform","translate(150,150)") .append("g").attr("transform","rotate(30)"); var minuteHand = minuteRot.append("use") .attr("xlink:href","#hand") .attr("fill","#999") .attr( "transform", "rotate(-90),translate(-20,-10)"); var hourRot = svg.append("g").attr("transform","translate(150,150)") .append("g").attr("transform","rotate(40)"); var hourHand = hourRot.append("use") .attr("xlink:href","#hand") .attr("fill","#666") .attr( "transform", "rotate(-90),scale(.75,1),translate(-20,-10)");
Demo
// From Part 1 of this Blog Post var dim = 300; var svg1 = d3.select("#d3vis1") .append("svg") .attr("width",dim) .attr("height",dim); var gHours1 = svg1.append("g") .attr("transform", "translate(" + [dim/2, dim/2] + ")"); var gSeconds1 = svg1.append("g") .attr("transform", "translate(" + [dim/2, dim/2] + ")"); var hourMarkers1 = gHours1.each(function(d) { d3.select(this).call(clockFace, 12, dim/2); }).selectAll("circle"); var secondMarkers1 = gSeconds1.each(function(d) { d3.select(this).call(clockFace, 60, dim/2); }).selectAll("circle"); secondMarkers1.attr("fill","#aaa"); hourMarkers1.attr("fill",function(d,i){return (i == 0)?"#666":(i % 3 == 0)?"#666":"#aaa";}); function clockFace(selection, numDots, size) { offset = 0; radius = numDots * size / (numDots + 2); deltaY = (numDots % 2 == 0)?0:(radius / 2) * (1 - Math.cos(Math.PI / numDots)); selection.selectAll("g") .data(d3.range(numDots)) .enter().append("g") .attr("transform",function(d) { var angle = d * 360 / numDots + offset; return "translate(0,"+deltaY+")rotate("+angle+")translate("+radius+")rotate("+ -angle + ")"; }) .append("circle").attr("r",0.9*(size)/(numDots)); } // This is the new stuff for Part 2 svg1.append("defs") .append("symbol").attr("id","hand") .append("path").attr("d","M 0 10 L 20 0 L 120 10 L 20 20 z"); var secondRot1 = svg1.append("g").attr("transform","translate(150,150)") .append("g").attr("transform","rotate(10)"); var secondHand1 = secondRot1.append("use") .attr("xlink:href","#hand") .attr("fill","#e33") .attr( "transform", "rotate(-90),scale(1.5,0.5),translate(-20,-10)"); var minuteRot1 = svg1.append("g").attr("transform","translate(150,150)") .append("g").attr("transform","rotate(30)"); var minuteHand1 = minuteRot1.append("use") .attr("xlink:href","#hand") .attr("fill","#999") .attr( "transform", "rotate(-90),translate(-20,-10)"); var hourRot1 = svg1.append("g").attr("transform","translate(150,150)") .append("g").attr("transform","rotate(40)"); var hourHand1 = hourRot1.append("use") .attr("xlink:href","#hand") .attr("fill","#666") .attr( "transform", "rotate(-90),scale(.75,1),translate(-20,-10)");
Moving the Clock Hands
Okay, time to update the rotation angles based on the current time, and voila!
Script
currentTime = function() { var date = new Date(); var secondAngle = (date.getSeconds()/60) * 360; var minuteAngle = (date.getMinutes()/60) * 360 + (secondAngle/360)*6; var hourAngle = ((date.getHours() % 12)/12) * 360 + (minuteAngle/360)*30; hourRot.attr("transform","rotate("+hourAngle+")"); minuteRot.attr("transform","rotate("+minuteAngle+")"); secondRot.attr("transform","rotate("+secondAngle+")"); } resetTime = function() { hourRot.attr("transform","rotate(0)"); minuteRot.attr("transform","rotate(0)"); secondRot.attr("transform","rotate(0)"); }
Demo
var svg2 = d3.select("#d3vis2") .append("svg") .attr("width",dim) .attr("height",dim); var gHours2 = svg2.append("g") .attr("transform", "translate(" + [dim/2, dim/2] + ")"); var gSeconds2 = svg2.append("g") .attr("transform", "translate(" + [dim/2, dim/2] + ")"); var hourMarkers2 = gHours2.each(function(d) { d3.select(this).call(clockFace, 12, dim/2); }).selectAll("circle"); var secondMarkers2 = gSeconds2.each(function(d) { d3.select(this).call(clockFace, 60, dim/2); }).selectAll("circle"); secondMarkers2.attr("fill","#aaa"); hourMarkers2.attr("fill",function(d,i){return (i == 0)?"#666":(i % 3 == 0)?"#666":"#aaa";}); svg2.append("defs") .append("symbol").attr("id","hand") .append("path").attr("d","M 0 10 L 20 0 L 120 10 L 20 20 z"); var secondRot2 = svg2.append("g").attr("transform","translate(150,150)") .append("g").attr("transform","rotate(0)"); var secondHand2 = secondRot2.append("use") .attr("xlink:href","#hand") .attr("fill","#e33") .attr( "transform", "rotate(-90),scale(1.5,0.5),translate(-20,-10)"); var minuteRot2 = svg2.append("g").attr("transform","translate(150,150)") .append("g").attr("transform","rotate(0)"); var minuteHand2 = minuteRot2.append("use") .attr("xlink:href","#hand") .attr("fill","#999") .attr( "transform", "rotate(-90),translate(-20,-10)"); var hourRot2 = svg2.append("g").attr("transform","translate(150,150)") .append("g").attr("transform","rotate(0)"); var hourHand2 = hourRot2.append("use") .attr("xlink:href","#hand") .attr("fill","#666") .attr( "transform", "rotate(-90),scale(.75,1),translate(-20,-10)"); currentTime = function() { var date = new Date(); var secondAngle = (date.getSeconds()/60) * 360; var minuteAngle = (date.getMinutes()/60) * 360 + (secondAngle/360)*6; var hourAngle = ((date.getHours() % 12)/12) * 360 + (minuteAngle/360)*30; hourRot2.attr("transform","rotate("+hourAngle+")"); minuteRot2.attr("transform","rotate("+minuteAngle+")"); secondRot2.attr("transform","rotate("+secondAngle+")"); } resetTime = function() { hourRot2.attr("transform","rotate(0)"); minuteRot2.attr("transform","rotate(0)"); secondRot2.attr("transform","rotate(0)"); } That's cool, but ours is an analog clock, and analog clocks don't move like that! Let's throw in a splash of D3 transition animation. The D3.js framework includes support for smooth transitions and animations with the help of the transition() construct. Inside a transition() block, all numeric and color attributes (which end up with a numeric representation anyway) get interpolated to their new values over a short duration (I think default is 300ms, but it can easily be changed). For instance, to make all our second markers pulse, (with a staggered delay for a cool ring effect) we can define a function such as:
Script
pulse = function(){ secondMarkers .transition() .delay(function(d,i){return i*5;}) .attr("r",function() { return d3.select(this).attr("r") * 2; }) .each("end",function(){ d3.select(this).transition().attr("r", d3.select(this).attr("r")*.5); }); }
Demo
var svg3 = d3.select("#d3vis3") .append("svg") .attr("width",dim) .attr("height",dim); var gHours3 = svg3.append("g") .attr("transform", "translate(" + [dim/2, dim/2] + ")"); var gSeconds3 = svg3.append("g") .attr("transform", "translate(" + [dim/2, dim/2] + ")"); var hourMarkers3 = gHours3.each(function(d) { d3.select(this).call(clockFace, 12, dim/2); }).selectAll("circle"); var secondMarkers3 = gSeconds3.each(function(d) { d3.select(this).call(clockFace, 60, dim/2); }).selectAll("circle"); secondMarkers3.attr("fill","#aaa"); hourMarkers3.attr("fill",function(d,i){return (i == 0)?"#666":(i % 3 == 0)?"#666":"#aaa";}); svg3.append("defs") .append("symbol").attr("id","hand") .append("path").attr("d","M 0 10 L 20 0 L 120 10 L 20 20 z"); var secondRot3 = svg3.append("g").attr("transform","translate(150,150)") .append("g").attr("transform","rotate(0)"); var secondHand3 = secondRot3.append("use") .attr("xlink:href","#hand") .attr("fill","#e33") .attr( "transform", "rotate(-90),scale(1.5,0.5),translate(-20,-10)"); var minuteRot3 = svg3.append("g").attr("transform","translate(150,150)") .append("g").attr("transform","rotate(0)"); var minuteHand3 = minuteRot3.append("use") .attr("xlink:href","#hand") .attr("fill","#999") .attr( "transform", "rotate(-90),translate(-20,-10)"); var hourRot3 = svg3.append("g").attr("transform","translate(150,150)") .append("g").attr("transform","rotate(0)"); var hourHand3 = hourRot3.append("use") .attr("xlink:href","#hand") .attr("fill","#666") .attr( "transform", "rotate(-90),scale(.75,1),translate(-20,-10)"); pulse = function(){ secondMarkers3 .transition() .delay(function(d,i){return i*5;}) .attr("r",function() { return d3.select(this).attr("r") * 2; }) .each("end",function(){ d3.select(this).transition().attr("r", d3.select(this).attr("r")*.5); }); }
The code above doubles the radius attribute ("r") of each second marker inside a transition, and at the "end" of the transition, once again transitions it back to its original size.
However, the rotation of the clock hand is defined as a string inside a transform attribute, and it's not as simple to interpolate as a numeric field. Luckily, D3 provides many interpolation functions that we can employ, and one such function is the interpolateString function that finds numeric values inside a string, and interpolates them individually to new values found in the replacement string.
So, in our case, if we change transform attribute from "rotate(0)" to "rotate(30)", interpolateString function will take care of automagically tweening between 0 and 30 within the String. So, rewriting our time update function above...
Script
hourRot.transition() .attrTween("transform", function() { return d3.interpolateString(d3.select(this).attr("transform"), "rotate("+hourAngle+")"); }); minuteRot.transition() .attrTween("transform", function() { return d3.interpolateString(d3.select(this).attr("transform"), "rotate("+minuteAngle+")"); }); secondRot.transition() .attrTween("transform", function() { return d3.interpolateString(d3.select(this).attr("transform"), "rotate("+secondAngle+")"); });
Demo
var svg4 = d3.select("#d3vis4") .append("svg") .attr("width",dim) .attr("height",dim); var gHours4 = svg4.append("g") .attr("transform", "translate(" + [dim/2, dim/2] + ")"); var gSeconds4 = svg4.append("g") .attr("transform", "translate(" + [dim/2, dim/2] + ")"); var hourMarkers4 = gHours4.each(function(d) { d3.select(this).call(clockFace, 12, dim/2); }).selectAll("circle"); var secondMarkers4 = gSeconds4.each(function(d) { d3.select(this).call(clockFace, 60, dim/2); }).selectAll("circle"); secondMarkers4.attr("fill","#aaa"); hourMarkers4.attr("fill",function(d,i){return (i == 0)?"#666":(i % 3 == 0)?"#666":"#aaa";}); svg4.append("defs") .append("symbol").attr("id","hand") .append("path").attr("d","M 0 10 L 20 0 L 120 10 L 20 20 z"); var secondRot4 = svg4.append("g").attr("transform","translate(150,150)") .append("g").attr("transform","rotate(0)"); var secondHand4 = secondRot4.append("use") .attr("xlink:href","#hand") .attr("fill","#e33") .attr( "transform", "rotate(-90),scale(1.5,0.5),translate(-20,-10)"); var minuteRot4 = svg4.append("g").attr("transform","translate(150,150)") .append("g").attr("transform","rotate(0)"); var minuteHand4 = minuteRot4.append("use") .attr("xlink:href","#hand") .attr("fill","#999") .attr( "transform", "rotate(-90),translate(-20,-10)"); var hourRot4 = svg4.append("g").attr("transform","translate(150,150)") .append("g").attr("transform","rotate(0)"); var hourHand4 = hourRot4.append("use") .attr("xlink:href","#hand") .attr("fill","#666") .attr( "transform", "rotate(-90),scale(.75,1),translate(-20,-10)"); currentTimeAnimated = function() { var date = new Date(); var secondAngle = (date.getSeconds()/60) * 360; var minuteAngle = (date.getMinutes()/60) * 360 + (secondAngle/360)*6 + ((date.getHours() % 12)*360); var hourAngle = ((date.getHours() % 12)/12) * 360 + ((minuteAngle % 360)/360)*30; hourRot4.transition().duration(2000) .attrTween("transform", function() { return d3.interpolateString(d3.select(this).attr("transform"), "rotate("+hourAngle+")"); }); minuteRot4.transition().duration(2000) .attrTween("transform", function() { return d3.interpolateString(d3.select(this).attr("transform"), "rotate("+minuteAngle+")"); }).each("end", function() { secondRot4.transition().duration(300) .attrTween("transform", function() { return d3.interpolateString(d3.select(this).attr("transform"), "rotate("+secondAngle+")"); }); }); } resetTimeAnimated = function() { hourRot4.attr("transform","rotate(0)"); minuteRot4.attr("transform","rotate(0)"); secondRot4.attr("transform","rotate(0)"); }
We need to modify it a little bit so that the hands don't spin counterclockwise when going from 11 to 12, or from 59 to 0. So, with minor modifications, and a Javascript timer function, we have our functioning clock widget!
Script
updateTime = function() { var date = new Date(); var secondAngle = (date.getSeconds()/60) * 360; var minuteAngle = (date.getMinutes()/60) * 360 + (secondAngle/360)*6; var hourAngle = ((date.getHours() % 12)/12) * 360 + (minuteAngle/360)*30; animateClock(hourAngle,minuteAngle,secondAngle); } var currHourAngle = 0; var currSecondAngle = 0; var currMinuteAngle = 0; animateClock = function(hourAngle,minuteAngle,secondAngle) { hourRot.transition().duration(300) .attrTween("transform", function() { return d3.interpolateString("rotate("+currHourAngle+")", "rotate("+((currHourAngle > hourAngle)?(360+hourAngle):hourAngle)+")"); }).each("end",function(){currHourAngle = hourAngle;}); minuteRot.transition().duration(300) .attrTween("transform", function() { return d3.interpolateString("rotate("+currMinuteAngle+")", "rotate("+((currMinuteAngle > minuteAngle)?(360+minuteAngle):minuteAngle)+")"); }).each("end",function(){currMinuteAngle = minuteAngle;}); secondRot.transition().duration(300) .attrTween("transform", function() { return d3.interpolateString("rotate("+currSecondAngle+")", "rotate("+((currSecondAngle > secondAngle)?(360+secondAngle):secondAngle)+")"); }).each("end",function(){currSecondAngle = secondAngle;});; } window.setInterval(updateTime, 500); // Just to be safe, schedule it 2 times per second.
Demo
var svg = d3.select("#d3vis") .append("svg") .attr("width",dim) .attr("height",dim); var gHours = svg.append("g") .attr("transform", "translate(" + [dim/2, dim/2] + ")"); var gSeconds = svg.append("g") .attr("transform", "translate(" + [dim/2, dim/2] + ")"); var hourMarkers = gHours.each(function(d) { d3.select(this).call(clockFace, 12, dim/2); }).selectAll("circle"); var secondMarkers = gSeconds.each(function(d) { d3.select(this).call(clockFace, 60, dim/2); }).selectAll("circle"); secondMarkers.attr("fill","#aaa"); hourMarkers.attr("fill",function(d,i){return (i == 0)?"#666":(i % 3 == 0)?"#666":"#aaa";}); svg.append("defs") .append("symbol").attr("id","hand") .append("path").attr("d","M 0 10 L 20 0 L 120 10 L 20 20 z"); var secondRot = svg.append("g").attr("transform","translate(150,150)") .append("g").attr("transform","rotate(0)"); var secondHand = secondRot.append("use") .attr("xlink:href","#hand") .attr("fill","#e33") .attr( "transform", "rotate(-90),scale(1.5,0.5),translate(-20,-10)"); var minuteRot = svg.append("g").attr("transform","translate(150,150)") .append("g").attr("transform","rotate(0)"); var minuteHand = minuteRot.append("use") .attr("xlink:href","#hand") .attr("fill","#999") .attr( "transform", "rotate(-90),translate(-20,-10)"); var hourRot = svg.append("g").attr("transform","translate(150,150)") .append("g").attr("transform","rotate(0)"); var hourHand = hourRot.append("use") .attr("xlink:href","#hand") .attr("fill","#666") .attr( "transform", "rotate(-90),scale(.75,1),translate(-20,-10)"); updateTime = function() { var date = new Date(); var secondAngle = (date.getSeconds()/60) * 360; var minuteAngle = (date.getMinutes()/60) * 360 + (secondAngle/360)*6; var hourAngle = ((date.getHours() % 12)/12) * 360 + (minuteAngle/360)*30; animateClock(hourAngle,minuteAngle,secondAngle); } var currHourAngle = 0; var currSecondAngle = 0; var currMinuteAngle = 0; animateClock = function(hourAngle,minuteAngle,secondAngle) { hourRot.transition().duration(300) .attrTween("transform", function() { return d3.interpolateString("rotate("+currHourAngle+")", "rotate("+((currHourAngle > hourAngle)?(360+hourAngle):hourAngle)+")"); }).each("end",function(){currHourAngle = hourAngle;}); minuteRot.transition().duration(300) .attrTween("transform", function() { return d3.interpolateString("rotate("+currMinuteAngle+")", "rotate("+((currMinuteAngle > minuteAngle)?(360+minuteAngle):minuteAngle)+")"); }).each("end",function(){currMinuteAngle = minuteAngle;}); secondRot.transition().duration(300) .attrTween("transform", function() { return d3.interpolateString("rotate("+currSecondAngle+")", "rotate("+((currSecondAngle > secondAngle)?(360+secondAngle):secondAngle)+")"); }).each("end",function(){currSecondAngle = secondAngle;});; } window.setInterval(updateTime, 500); // Just to be safe, schedule it 2 times per second.
Thoughts on D3.
My original understanding was that D3 would allow view elements to be dynamically bound to data objects, and somehow we would be able to automagically rebind and refresh the view. But instead, all it provides is a mechanism to statically bind data (array elements) to selections, and a way to create/remove/update elements based on data provided. Don’t get me wrong, this is still a powerful library that helps simplify creation of amazing visualizations. And it comes with a rich set of helper functions around plot axis management, geo mapping, time slicing, interpolating string/colors/hues, etc. Just look at all visualizations its creator made while working for the New York Times. http://bost.ocks.org/mike/
But having built a mark-up based framework way back in the past for J2ME and WindowsMobile (pre WindowsPhone7) phones that allowed for some pretty powerful interactions using dynamically bound data and view nodes, I’m left yearning for more. This is pre-iPhone days we are talking about here... May be I’ll just build that dream framework as part of my 12in12 this year. I already have a name and github repo for it... JuST need to work on JuST! ;)
1 note
·
View note
Video
Delayed Start, but getting there! #infinity #arduino #visualizer #12in12
0 notes
Text
D3 Demo... D3MO? - part 1
My goal last week was to get a basic understanding of D3.js and to build a basic demo. A simple bar chart? a pie chart may be? But, the more I learned about it, I found out that it was way more powerful framework for data-binding & visualization, that to limit it to just charts felt like a crime :/ I didn’t want to build a simple chart anymore. I wanted to build a clock! Hopefully, these demos work on my blog :) (Also, this would be my first post with code. Entering new territory here on tumblr.)
Obviously D3 is a vast powerful framework, and I can't cover all of it in a week. So, instead of claiming I learnt D3 in a week, I will instead post code & demos to showcase how far I have progressed. In this first part of the series, I'm gonna try and walk you through building the Clock Face, and along the way, introduce you to some core concepts in D3
Start with the Basics!
Let's start by building a simple circle. Apparently, circular clocks have been all the rage with the kids since like... before the Grand Canyon was formed. Anyway, the simple way to draw a circle in HTML5 is to use SVG (Scalable Vector Graphics). I'm not gonna go into the details of SVG here, but here's the HTML that would give us a circle.
<svg width="100" height="100"> <g transform="translate(50,50)"> <circle r="45"/> </g> </svg>
And here's the D3 way of generating that. Let's provide a simple target DIV element inside which we will generate the SVG.
DOM
<div id="vis"/>
Script 1:
var dim = 300; var svg = d3.select("#vis") .append("svg") .attr("width",dim) .attr("height",dim); var circle = svg.append("g") .attr("transform","translate("+[dim/2,dim/2]+")") .append("circle") .attr("r", (dim/2) * .9);
Demo 1:
Selectors
If you are familiar with JQuery or CSS Selectors, you already know how selectors work, and how powerful they can be in quickly applying a function on a list of elements. D3 works the same way, except the API is designed in such a way that every function returns a reference to the Selection it was applied on as well, so that you can chain calls gracefully like "attr()" above. The only exception is when the function creates a new selection, in which case that selection is returned.
So, in the above code, d3.select("#d3vis1") returns the selection for the div element, following which, append("svg") returns the selection containing the newly created svg element.
Okay, it's kinda cool that I don't have to do document.getElementById() all over the place, and the having every function return the selector it was applied on makes chaining calls easy... But I could do that with JQuery, and I don't see what's the hype about D3. Let's explore something a bit more complex to understand D3's most powerful feature...
Bindings.
Now instead of just one circle, let's draw 12 circles.
First, the iterative way.
var svg = d3.select("#vis") .append("svg") .attr("width",dim) .attr("height",dim); for (i = 0; i < 12; i++) { svg1.append("g") .attr("transform","translate("+[i*dim/12 + dim/24,dim/2]+")") .append("circle") .attr("r", (dim/2) * .9); }
and the D3 way...
var svg = d3.select("#vis") .append("svg") .attr("width",dim) .attr("height",dim); var circles = svg.selectAll("g") .data(d3.range(12)) .enter().append("g") .attr("transform",function(d){ return "translate("+[(d)*dim/12 + dim/24,dim/2]+")"; }) .append("circle") .attr("r", (dim/2) * .9 / 12);
Demo 2:
var svg2 = d3.select("#d3vis2") .append("svg") .attr("width",dim) .attr("height",dim); var circles2 = svg2.selectAll("g") .data(d3.range(12)) .enter().append("g") .attr("transform",function(d){ return "translate("+[(d)*dim/12 + dim/24,dim/2]+")"; }) .append("circle") .attr("r", (dim/2) * .9 / 12);
It may be hard to see the benefits of this approach right away, but notice how we were able to bind specific values of "d" (which is a range going from 0..11), and create elements for each of those values automatically, and in the end, automatically get the selection of all "circles" that were created in one step, even though they are a bunch of second-level elements from the node where data binding was applied. It may take a bit of effort in the beginning, but once you start wrapping you mind around it, coding with D3 becomes a thing of beauty. (Nerdgasm!)
Let's make things a bit more complicated and create a clock face. Let's draw the 12 inside a circle for the hour markers. And instead of having a for loop, lets do a simple binding operation on an array containing the numbers 1 through 12 to generate our circles.
Script 3:
var svg = d3.select("#vis") .append("svg") .attr("width",dim) .attr("height",dim); var g = svg.append("g") .attr("transform", "translate(" + [dim/2, dim/2] + ")"); var circles = g.each(function(d) { d3.select(this).call(clockFace, 12, dim/2); }).selectAll("circle"); function clockFace(selection, numDots, size) { offset = 0; radius = numDots * size / (numDots + 2); deltaY = (numDots % 2 == 0)?0:(radius / 2) * (1 - Math.cos(Math.PI / numDots)); selection.selectAll("g") .data(d3.range(numDots)) .enter().append("g") .attr("transform",function(d) { var angle = d * 360 / numDots + offset; return "translate(0,"+deltaY+")rotate("+angle+")translate("+radius+")rotate("+ -angle + ")"; }) .append("circle").attr("r",0.9*(size)/(numDots)); }
Demo 3:
var svg3 = d3.select("#d3vis3") .append("svg") .attr("width",dim) .attr("height",dim); var g3 = svg3.append("g") .attr("transform", "translate(" + [dim/2, dim/2] + ")"); var circles3 = g3.each(function(d) { d3.select(this).call(clockFace, 12, dim/2); }).selectAll("circle"); function clockFace(selection, numDots, size) { offset = 0; radius = numDots * size / (numDots + 2); deltaY = (numDots % 2 == 0)?0:(radius / 2) * (1 - Math.cos(Math.PI / numDots)); selection.selectAll("g") .data(d3.range(numDots)) .enter().append("g") .attr("transform",function(d) { var angle = d * 360 / numDots + offset; return "translate(0,"+deltaY+")rotate("+angle+")translate("+radius+")rotate("+ -angle + ")"; }) .append("circle").attr("r",0.9*(size)/(numDots)); }
Notice how easy it was to get a reference to all the circles you just created. Anyway, to draw the second/minute markers, we just need to call the same clockFace function with 60... Right?
Script 4:
var hourMarkers = g.each(function(d) { d3.select(this).call(clockFace, 12, dim/2); }).selectAll("circle"); var secondMarkers = g.each(function(d) { d3.select(this).call(clockFace, 60, dim/2); }).selectAll("circle");
Demo 4:
var svg4 = d3.select("#d3vis4") .append("svg") .attr("width",dim) .attr("height",dim); var g4 = svg4.append("g") .attr("transform", "translate(" + [dim/2, dim/2] + ")"); g4.each(function(d) { d3.select(this).call(clockFace, 12, dim/2); }).selectAll("circle"); g4.each(function(d) { d3.select(this).call(clockFace, 60, dim/2); }).selectAll("circle");
Wait a minute! What happened there? Why are there only 48 second dots, instead of 60?
That's because we are using the enter() data-binding function in our code, which defines how to create objects for additional data-points that don't have backing DOM elements from the results of the selection. So, in our case, there were already 12 circles created which get skipped.
One simple way to fix this is to have two separate top-level graphics contexts created, and draw into each one, so you won't find the 12 existing ones during the second call.
Script 5:
var gHours = svg.append("g") .attr("transform", "translate(" + [dim/2, dim/2] + ")"); var gSeconds = svg.append("g") .attr("transform", "translate(" + [dim/2, dim/2] + ")"); var hourMarkers = gHours.each(function(d) { d3.select(this).call(clockFace, 12, dim/2); }).selectAll("circle"); var secondMarkers = gSeconds.each(function(d) { d3.select(this).call(clockFace, 60, dim/2); }).selectAll("circle");
Demo 4:
var svg5 = d3.select("#d3vis5") .append("svg") .attr("width",dim) .attr("height",dim); var gHours = svg5.append("g") .attr("transform", "translate(" + [dim/2, dim/2] + ")"); var gSeconds = svg5.append("g") .attr("transform", "translate(" + [dim/2, dim/2] + ")"); var hourMarkers = gHours.each(function(d) { d3.select(this).call(clockFace, 12, dim/2); }).selectAll("circle"); var secondMarkers = gSeconds.each(function(d) { d3.select(this).call(clockFace, 60, dim/2); }).selectAll("circle");
Let me also introduce you to the function(d,i) signature for biding data to functions. So, function(d) signature can be used on attr() as well as call() functions to bind each array element in data d to each sekection element. You can also use the function(d,i) signature to get the array index passed in as well. And if there's no data bound to the selection, you can still use function(d,i) to get the index of the element in your selection. (Basically, you have bound null data to the operation)
So, let's try and make every 3rd hour marker a different color than the rest.
Script 6:
secondMarkers.attr("fill","#aaa"); hourMarkers.attr("fill",function(d,i){return (i == 0)?"#666":(i % 3 == 0)?"#666":"#aaa";});
Demo 6:
var svg6 = d3.select("#d3vis6") .append("svg") .attr("width",dim) .attr("height",dim); var gHours6 = svg6.append("g") .attr("transform", "translate(" + [dim/2, dim/2] + ")"); var gSeconds6 = svg6.append("g") .attr("transform", "translate(" + [dim/2, dim/2] + ")"); var hourMarkers6 = gHours6.each(function(d) { d3.select(this).call(clockFace, 12, dim/2); }).selectAll("circle"); var secondMarkers6 = gSeconds6.each(function(d) { d3.select(this).call(clockFace, 60, dim/2); }).selectAll("circle"); secondMarkers6.attr("fill","#aaa"); hourMarkers6.attr("fill",function(d,i){return (i % 3 == 0)?"#666":"#aaa";});
In the next part, we'll explore how to apply transitions, and update elements by binding new data to them. i.e, build the clock hands and bind them to the current time.
0 notes

Text
Burning Man Shelter: Cooling and Ventilation
I’ve been busy with life in general, and hadn’t found the time to make a blog post about Burning Man in a while. But, here is the follow up post about cooling your shelter on the playa, just in time for the man next year. )’(
(You can't tell, but that BM emoticon above has a sad face.)
Why Cool?
You are in the freakin’ desert! The Sun is shining on your yurt all day long heating it up (Radiative heating). The air outside is hot and dry as hell, and heating it up (Conductive heating). When you’re sleeping/hanging out inside your yurt, your body is heating it up (Generative heating). Somebody’s gotta cool it! It’s plain thermodynamics... ‘Nuff said!

Ways to Cool?
The simplest thing to do would be to buy a portable Air Conditioner / Cooler, and a portable generator to power it. But, if you are not a DIY’er, then you might as well skip the whole hexayurt building thingamajig and drive up in an RV and “camp” out on the playa in luxury.
No!!! This is Burning Man! And we get to hack life here on the playa! (Well, we each get to re-invent the wheel for ourselves, and in the process end up discovering a more efficient way to do things) So, in that spirit, let’s take a look at Evaporative Cooling.
Evaporative Cooling
Having been a kid in the 80s growing up in India, I know a few things about cooling water through evaporation. How do earthen clay pots keep water cool in the hot arid climate? How do mud huts stay cool on hot sunny days? (Well, after splashing water on them) How do canvas pouches keep water cool in the desert?
Not going into too much detail, it’s because they are all permeable membranes with water evaporating on the outer surface extracting heat required for the state change (from liquid to vapor) from the water/air inside the membrane (pot, canvas, mud wall).
Air Coolers expand upon the same idea, and use that cold water to extract heat out of air to make it cool before blowing through a fan. They also help moisturize the air, which is a necessity in the hot dry playa. But, for what they are, they are quite pricey and quite power hungry. So, let’s figure out how to build a DIY Air Cooler out of dirt cheap materials for under $40.
Home Depot 5-gal Homer Bucket......... $3.00 120mm 12V DC Fan @ $7.50x2............ $15.00 12V DC Submersible Pump............... $5.00 Tube for drip system (enough for 2)... $3.50 Dura-Foam............................. $12.00
The setup goes something like this...
You basically drill holes along the top half of the bucket. You then line it with foam, and fill the bottom half with water. You then lay a drip system that pumps water on to the top of the foam, which slowly evaporates through the holes you just drilled, thus cooling the air/water/stuff inside the bucket. Oh, and most importantly, you blow this cooled air using fans from the top of the bucket. Simple stuff! Right?
Here’s what the setup looks like...

Please don’t cut the entire way down the bucket!!! I just drew a sectional diagram for illustrative purposes.
And here’s a simple wiring diagram, if you aren’t sure how to connect the wires...

A quick note about the battery: Use a Marine/Boat Battery to power your setup instead of a Car Battery. They have a more steady discharge curve, and are better for powering low power devices over long periods of time, unlike Car Batteries which are designed to discharge quickly to power the high-torque needed for the engine starter. Your headlamp lights mainly run off of the alternator, and use the battery only when the engine is turned off.
Staying Cool
Just blowing cold air inside your yurt may sound like a quick way to cool it. But now, we have to find ways to get it to stay cool, and this is where the R-Value (aka Thermal Resistance) of your build material matters. It specifies how slowly heat can transfer through the surface (or in other words, coolness can be lost), and the higher the R-Value, the better the insulation.
The rate at which this happens depends on three things:
How much insulation the walls provide. (aka the R-Value of the panels)
How much colder the inside is relative to the outside. (the higher the temperature difference, the larger the amount of heat transferred)
How much surface area there is for heat transfer to take place. (Did you know? It’s better to pack cold food/ice in one large cooler than 2 smaller half-sized ones.)
The unit of R-Value is defined as h·ft2·°F/Btu.
That’s... time in hour * area in sq.feet * temperature difference in Farenheit / heat transferred in Btus (British thermal units). Gosh, I love imperial units!!! They make the math calculations so much simpler... said nobody! (Actually, it isn’t that bad if we stick to those units all along, but a lot of science literature is in S.I., as it should be.) Anyway, if it isn’t obvious from that...
The more time it takes to transfer the same amount of heat across the same surface area, the higher the R-Value. i.e, R-value is directly proportional to time. So, get the higest value you can afford in money and space, so that you can run your coolers less frequently. Similarly, the more surface area required to transfer the same amount of heat over the same amount of time, the higher the R-Value. Also, the more the temperature difference required to transfer same amount of heat... you get the point.
In addition to that, you need to counteract all the other sources of heat, such as your own body heat, Sun's radiation, etc.
Are you guys ready for some R-Value Mathematics?
Let’s assume we have a closed Yurt without any ventilation, that we’ve somehow managed to cool it down by 20ºF, and that we have 4 persons inside it.
Let’s first figure out how much heat is being added to our yurt’s interior. First, there’s body heat:
330 Btu/hr per person x 4 persons = 1320 Btu/hr.
Next, there’s Conductive Transfer of heat through the yurt’s walls from the hot air outside. i.e, R-Value part.
In our case, we can’t change the Surface Area of our Yurt (well, we could if we redesign it to be a geodesic dome), and the temperature difference is what we want to achieve... so, we will keep that target as a constant as well. That leaves us with rate of heat transferred per hour being the variable that’s directly affected by the R-Value. (Technically, inversely affected).
We know from before that the unit of R-Value is defined as h·ft2·°F/Btu, and our R-9 construction material implies that we have an R-Value, R = 9h·ft2·°F/Btu.
Given that the inside of our yurt is 20ºF cooler than outside, and our Yurt's walls and roof have a total combined surface area of 384ft2 (12 panels that are 8′x4′ each.), we could easily solve for the hourly rate (x) of Heat Transfer by solving:
9 hr·ft2·°F/Btu = 1hr * 384ft2 * 20ºF / (x) Btu
=> (x) = 384*20/9
=> x = 853.33 Btu/hr.
Then there’s radiative heat from the sun, but the reflective surface of the R-Max panels, and the fact that the inside is well shaded and dark kinda makes it negligible.
The same applies for radiative heat from the earth. Desert sand cools down pretty quickly in the shade, and the reflective tarp that we used in Yurt construction also helps make any radiative surface heat negligible
So, in total there’s 2173.33 Btu added to the system inside. To maintain a constant temperature inside, the same amount of heat must be extracted out of the system through some rate of water vaporization! This is on top of the what you need to cool it down to the desired temperature (about 20ºF cooler than outside) in the first place. If you’re smart, you can see from above that it’s way faster to cool the yurt with you not inside it as you will be the primary generator of heat :)
Let's now take a look at the other side of math to balance this out.
Enthalpy of Evaporation
Water is a great liquid for cooling purposes, primarily because of its strong Hydrogen Bonds holding its molecules together, that cause it to have a high enthalpy of vaporization – a.k.a latent heat capacity. (Did you know? It takes 5 times as much heat to vaporize boiling water at 100ºC/212ºF as it takes to heat it from 0ºC/32ºF to 100ºC/212ºF in the first place.)
For water, this value is 2257 kJ/kg. (kilojoules / kilogram)... 1 kg = 1 liter, and 1 kJ = 0.94 Btu. So, it’s about 2121 Btu/l. So, it takes just a bit over a liter of water per hour to reach equilibrium and maintain one of our yurts at 20ºF cooler than the outside with you sitting inside it. But, we also need to remember that the water evaporating from the foam surface in our bucket doesn’t just extract heat from inside the bucket, but also from the air outside... so to be conservative, let’s double the amount of water needed. So, if your home depot bucket setup can actually get about 2 liters (approx. 1/2 gallon) to evaporate in an hour, you can indeed maintain a yurt interior that’s cooler by 20ºF with 4 of you present inside.
Even if all the heat needed for evaporation is extracted from the air inside, it still takes about a liter/hr to maintain that temperature. That’s not a realistic expectation to set, even though you could do it with a large enough evaporator setup :/
Luckily, all that math above does not apply in our case! Say WHAAAAAAT??? Yep! if you look above, the very first assumption is that we are looking at a Yurt without ventilation. And, all that math still applies to that closed system :) But, we have Fans and Ventilation!!!
Ventilation!
The hole on top of our roof for exhaust and the holes in our bucket for intake mean that we don’t have to cool and maintain the equilibrium for the entire volume of air inside the yurt. Instead, we just need to evaporate enough water to cool the smaller volume of air inside the bucket, before pushing it into our Yurt where it get’s heated up and pushed out of the exhaust. The cool air enters the yurt through the intake placed closer to the feeling, and pushes out warmer air up through the exhaust vent in the roof... thus rapidly bringing the temperature of the yurt down close to the temperature of the cold air inside your bucket air cooler :) This is why ventilation in yurts (and in buildings) is important!
You should also note that most of the heat added to the system (both conductive, as well as body heat) also escapes through the roof vent, thus reducing the cooling requirements of your evaporator.
Sorry about those unnecessary equations, and I wont bore you with more math about cooling the air inside the bucket ;) Just know that it doesn’t take much water to cool the air inside the bucket before blowing it through the fan. Though, I’m glad to do it if you guys are interested. But the main reason was to show you the importance of ventilation in any construction. Also, it’s more efficient as the heat extracted for vaporization comes from air that’s being sucked in through the holes in the bucket, which means none of the water is wasted to cool unused outside air.
Hopefully, you got to learn something a bit useful today, along with a lot that’s useless :)
0 notes