#10.0.0.1 ip login
Text
Understanding Piso WiFi and the 10.0.0.1 Interface
Piso WiFi has become a popular solution for providing affordable internet access in public spaces, such as shops, cafes, and communal areas. This system allows users to purchase WiFi access for a set period, typically using coins, hence the name "Piso" which means "coin" in Filipino. At the heart of many Piso WiFi systems is the 10.0.0.1 interface, a crucial element for managing the network.
What is Piso WiFi?
Piso WiFi is a coin-operated WiFi hotspot system that provides internet access to users who insert coins into a machine. This system is particularly popular in the Philippines, where it offers an affordable way for people to get online without needing a personal internet connection. Users can purchase time on the internet by inserting coins into the machine, which then grants them access for a specified period.
The Role of 10.0.0.1 in Piso WiFi
The IP address 10.0.0.1 is commonly used as the default gateway for many Piso WiFi routers. This address is part of the private IP range reserved for use within private networks, making it an ideal choice for local management interfaces.
Key Functions of 10.0.0.1 in Piso WiFi
Configuration and Setup: The 10.0.0.1 IP address is primarily used to access the router’s configuration page. Here, administrators can set up the network, configure security settings, and manage connected devices.
User Management: Through this interface, admins can monitor user activity, manage bandwidth allocation, and view usage statistics. This is essential for ensuring that the service is running smoothly and efficiently.
Maintenance and Troubleshooting: The interface provides tools for troubleshooting network issues. Admins can check the status of the connection, update firmware, and perform system diagnostics to resolve any problems.
Customization: Operators can customize the user experience by setting the price for different durations of internet access, creating promotional offers, and tailoring the login page with branding or advertisements.
Accessing the 10.0.0.1 Interface
To access the 10.0.0.1 interface, follow these steps:
Connect to the Network: Ensure your device is connected to the Piso WiFi network.
Open a Browser: Launch a web browser on your device.
Enter the IP Address: Type http://10.0.0.1 into the address bar and press Enter.
Login: You will be prompted to enter a username and password. These credentials are usually provided by the device manufacturer or set by the network administrator.
Troubleshooting Common Issues
Sometimes, users may encounter issues when trying to access the 10.0.0.1 interface. Here are some common problems and their solutions:
Unable to Connect to 10.0.0.1: Ensure you are connected to the correct network. If the IP address doesn’t load, it might have been changed by the administrator. Try finding the correct IP address using network discovery tools or consulting the device manual.
Forgotten Password: If you’ve forgotten the login credentials, you may need to reset the router to factory settings. This process varies by device, so refer to the manufacturer’s instructions.
Network Conflicts: Ensure no other devices on the network are using the same IP address, as this can cause conflicts and prevent access.
Conclusion
Piso WiFi systems, with their easy-to-use, coin-operated access, have revolutionized internet availability in public spaces. The 10.0.0.1 interface plays a crucial role in managing these networks, offering administrators a powerful tool for configuration, maintenance, and user management. Understanding how to effectively use and troubleshoot this interface can help ensure a smooth and reliable internet experience for all users.
1 note
·
View note
Text
How to Reset Xfinity Router
To reset Xfinity router, locate the router and look for the 'Reset' button on the router. Once you've located this button, hold down the 'Reset' button for five seconds before releasing it. When the button is released, the reset process begins and ends in a matter of minutes.

If your Xfinity router is acting up, or you have forgotten your password, you can reset it to get it back to the defaults. There are two fairly easy ways to do this: Option
1: Reset through the admin interception
2: Pressing the reset button
Option 1: Reset through the admin interface
We can continue resetting your Xfinity router once you have completed the checklist.
Open your preferred web browser (Firefox, Chrome, Safari, Internet Explorer, ..)
Access http://10.0.0.1.
Common IP addresses for Xfinity routers are:
10.0.0.1
192.168.1.1 and
192.168.0.1.
Enter your username and password to access your device.
None / None is the most common Xfinity router combination.
Depending on your Xfinity model, the reset page may look something like this:
Troubleshooting > Gateway Reset/Restore > RESTORE FACTORY SETTINGS
Select the factory reset/restore option, and then confirm if necessary.
Allow some time for the router to reboot.
Option 2: Pressing the reset button :
If you don't remember the password to your Xfinity router, or it is not working, this is probably the way to go.
Step 1: Locate the reset button
The reset button is typically hidden inside a small hole, but it can also be seen sticking out like any other button.
Note- If you can't find a reset button on your Xfinity router, the WPS button may function as one if pressed long enough.
Step 2: Perform the Xfinity reset sequence
The following is the router reset sequence:
Make sure the device is turned on by pressing and holding the reset button for about 10 seconds.
When the LED lights begin to flash, release the reset button.
Wait about a minute for the LED lights to begin lighting normally.
Your Xfinity router has now been reset to factory settings
You can easily reset Xfinity router by pressing and holding the reset button or through the router’s login page. But, if you have difficulties resetting it, you may have to connect with our expert team they will assist you.
1 note
·
View note
Link
Use 10.0.0.1 and 10.0.0.1 admin login to access the settings of your Wifi router. This IP address can also be used to change the network settings. It's easy to login and connect with a few quick steps.
1 note
·
View note
Text
Mikrotik scripting

It adds a new item with the values you have specified, usually at the end of the item list, in places where the order of items is relevant.

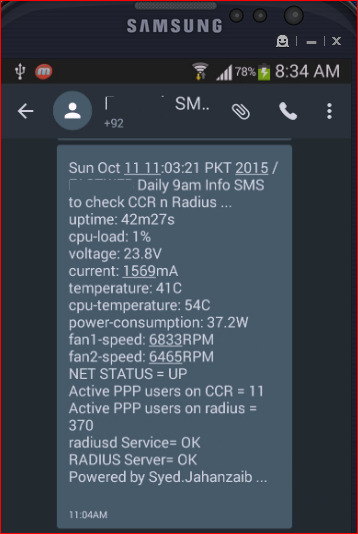
This command usually has all the same arguments as a set, except the item number argument. Almost everywhere, where you can write the number of items, you can also write a list of numbers. You can specify multiple items as targets to some commands. Also, numbers are assigned separately for every item list, so ip address print will not change the numbering of the interface list. Item numbers are assigned on a per session basis, they will remain the same until you quit the console or until the next print command is executed. But the results of the last print commands are memorized and, thus, once assigned, item numbers can be used even after add, remove and move operations (since version 3, move operation does not renumber items). Item numbers are assigned by the print command and are not constant - it is possible that two successive print commands will order items differently. Generally, item names are more "stable" than the numbers, and also more informative, so you should prefer them to numbers when writing console scripts. However, there are all kinds of obscure situations possible when several users are changing the router's configuration at the same time. Thus, they would not change on their own. You do not have to use the print command before accessing items by their names, which, as opposed to numbers, are not assigned by the console internally, but are properties of the items. There you can use item names instead of item numbers. Some lists have items with specific names assigned to each of them. To change the properties of an item, you have to use the set command and specify the name or number of the item. All items in the list have an item number followed by flags and parameter values. Such arrays are displayed in similarly-looking lists. Many of the command levels operate with arrays of items: interfaces, routes, users, etc. On our account server Current installation "software ID": ABCD-456ĭec/10/2007 10:40:06 system,error,critical login failure for user root from 10.0.0.1 via telnetĭec/10/2007 10:40:07 system,error,critical login failure for user root from 10.0.0.1 via telnetĭec/10/2007 10:40:09 system,error,critical login failure for user test from 10.0.0.1 via telnet Command PromptĪt the end of the successful login sequence, the login process prints a banner that shows the command prompt, and hands over control to the user.ĭefault command prompt consists of user name, system identity, and current command path />įor example, change the current path from the root to the interface then go back to the /ip/route> /ping 10.0.0.1Ģ packets transmitted, 0 packets received, 100% packet /ip/firewall/nat>. To upgrade, register your license "software ID" (avoid re-installation and re-configuring your router) If the number is not present then the implicit value of the parameter is used.Įxample: admin+c80w - will disable console colors and set terminal width to 80. If the parameter is not present, then the default value is used. Login OptionsĬonsole login options enable or disable various console features like color, terminal detection, and many other.Īdditional login parameters can be appended to the login name after the '+' sign. Please consult the Scripting Manual on some advanced console commands and on how to write scripts. This manual describes the general console operation principles. The console is also used for writing scripts. The console is used for accessing the MikroTik Router's configuration and management features using text terminals, either remotely using a serial port, telnet, SSH, console screen within WinBox, or directly using monitor and keyboard.
0 notes
Text
Firewall builder policy read from bottom up

#Firewall builder policy read from bottom up how to
#Firewall builder policy read from bottom up software
#Firewall builder policy read from bottom up password
#Firewall builder policy read from bottom up license
#Firewall builder policy read from bottom up download
Now you're ready to start updating the content on this device, so navigate to the Device tab, then select Dynamic Updates from the left pane.
#Firewall builder policy read from bottom up license
If the device was registered but no licenses added yet, select Activate feature using authorization code to activate a license through its authorization code, which you will have received from your Palo Alto sales contact.Īfter the licenses have been succesfully added, the Licenses page looks similar to this: If the device has been registered using the above method and auth codes have already been added, go ahead and select Retrieve License keys from license server. Navigate to the Device tab and select Licenses from the left pane:
#Firewall builder policy read from bottom up how to
If the device has not been registered on the support portal yet, please follow these steps to register the device: How to Register a Palo Alto Networks Device, Spare, Traps, or VM-Series Auth-Code
URL license enables URL categories for use in security policies.
ThreatPrevention license adds virus, threats and malware signatures.
#Firewall builder policy read from bottom up software
Support license entitles the system to software and AppID updates.
Various licenses control the different functions of the system, so the.
#Firewall builder policy read from bottom up download
To be allowed to download content and application updates or software upgrades, the system needs to be licensed. Preparing the licenses and updating the system You should be able to connect to the management IP from the network, and you should be able to surf out to the Internet.Ģ.
Connect the Managment (mgmt) interface to the switch.
The firewall is now configured with a proper IP address to work in your LAN network, so go ahead and connect the cables: To complete this step and apply changes to the device, click the Commit link at the top right:Īfter the commit completes, the browser eventually times out as the IP address has changed, so you'll need to manually change the address in the address bar to reconnect to the new IP. Next, select the Services tab and configure a DNS server. Select Setup on the left pane, then select Management, where you can change the Management Interface Settings:Ĭhange the interface configuration and click OK.
#Firewall builder policy read from bottom up password
Log in, using the default username and password admin / admin, then navigate to the Device tab. You can safely ignore the error message at this time, which then takes you to the login screen: This is because the certificate used by the web interface is a self-signed certificate your browser does not trust. When making your first connection to the web interface, your browser may display an error message. Now you need to reconnect to the new IP address -please skip to step 1.3. 55%.60%75%.99%.100%Īt this point, you'll lose SSH and SSL access to the device, as the IP address was changed and the management service restarted to adopt these changes. Use the commit command to apply the new settings to the commit Please change your password prior to configureĮntering configuration set deviceconfig system ip-address 10.0.0.10 netmask 255.255.255.0 default-gateway 10.0.0.1 dns-setting servers primary 4.2.2.2 Warning: Your device is still configured with the default admin account credentials. Using keyboard-interactive authentication. From here, we'll start setting up the proper IP address and subnet for the device, and the default gateway and DNS settings, so the unit can collect updates later. The default username and password are admin / admin, so we'll go ahead and log in to reveal the CLI. and the Graphical User Interface or GUI in step 1.2. We'll highlight the console and SSH in step 1.1. Remounting root filesystem in read-write mode: Īfter the device is booted, a login prompt is displayed in the console connection and SSH or SSL connections can be made to 192.168.1.1. Īfter preparing the cables and the workstation, plug the unit into an electrical outlet and watch the firewall boot up. If you use PuTTY, it should come with the appropriate configuration if connection type is set to Serial. When using a console cable, set the terminal emulator to 9600baud, 8 data bits, 1 stop bit, parity none, VT100. When using the management port, the workstation you'll be using must be reconfigured so its network interface has an IP address in the 192.168.1.0/24 IP range, as the default IP of the management port will be 192.168.1.1. The two methods available to connect to the new device is either using a network cable on the management port or an ethernet-to-db-9 console cable. The first thing you'll want to configure is the management IP address, which makes it easier to continue setting up your new device later on.
0 notes
Text
Xfinity router login
Xfinity router login is the very first step in accessing your router and configuring its settings. Once you login to the Xfinity wireless router, you can access all the wireless settings and many features of our Xfinity router.
You don’t have to use any installation CD or setup CD to interact with your Xfinity router and manage its wireless settings. Simply, connect your PC to the Xfinity router’s network, and with the support of a web browser, login to your router. Kindly follow the steps given below to go about the Xfinity router login process:
Connect your PC to the Xfinity network using WiFi.
After that, go to a web browser on your PC.
You need to enter the default internal IP of your Xfinity wireless router.
Type http://10.0.0.1 in the address bar and press Enter.
Thereafter, the Xfinity router login page will ask you to put down your router’s username and password.
Enter username as “admin” and password as “password”.
Click Login and you will get inside your Xfinity wireless router successfully.
If you find it difficult to login to the Xfinity wireless router, kindly abort the process and restart.
#Xfinity router login#xfinity default router login#login to router xfinity#xfinity router blinking orange
0 notes
Text
10.0.0.1 Login for Router Setup
Access the default IP address 10.0.0.1 login for the setup of your router. It will help you in accessing the stable and high-speed internet connection on your device. To know more steps in detail to login to 10.0.0.1, visit our website.

2 notes
·
View notes
Text
How To Login Admin With 10.0.0.1
In this modern world, most things are possible with the help of the internet. Therefore, you can say that the internet has become an important part of our daily life. You can set up the WiFi Router at your home if you want to access the high-speed internet. There is a wide range of companies available nowadays which manufactures the excellent quality of the Routers, Repeaters, Extenders and many more devices. 10.0.0.1 IP Address is a private class IP address that can be used as the default gateway address. This address is basically used to access the admin panel of the router. You can also use the 10.0.0.1 IP Address to set up the network. In case you will face any problem while 10.0.0.1 Admin Login, then take the best guidance of the professionals.
Simple Steps to Login to 10.0.0.1 IP Address
The process to access the 10.0.0.1 IP Address is not a difficult job. You need to first make sure that the default gateway address for your router is 10.0.0.1. This address is mostly used by Comcast or Xfinity for the admin panel of their routers. Once you will be confirmed, then all you need to do is to follow the steps given to log in to 10.0.0.1:
The first step is to open a new web browser.
Then tap on the http://10.0.0.1/ or simply type 10.0.0.1 in the address bar.
After that, you will see a login page appear.
Carefully enter the username and password of the router’s admin panel. In case you have any queries then refer to the default router username and password list.
Finally, you will now be logged in to the router’s settings or admin panel.
You can make the required changes accordingly.
Troubleshooting Guide for 10.0.0.1 Login
In case you will see that the admin panel is loading too slow or if it is not opening. Then make sure that the router default IP Address 10.0.0.1 entered is correct or not. If not, then you can also try other IPs such as 192.168.0.1 or 192.168.1.1.
Sometimes the user has changed the username/password and forgot it. The best way to get out of it is that you can reset the router to its default settings.
You can also check for the Reset button which is available at the back of your router. Use a pin-type object to press the reset button for a few seconds.
If you will face any technical problem while performing the 10.0.0.1 Login, then reach the best professionals. All the experts use unique ways to solve the common technical problems of the customers. You can simply drop a message to us and get the best possible solutions. We have experienced professionals who will deeply analyze the issue and then provide the best solutions accordingly. Do not delay in making the best choice of the professionals. We are here to serve you all the time.
Visit Us: https://10001ip.com/
1 note
·
View note
Text
Complete Guide-192.168.1.1 Router Admin Login
Routers have become an important part of our daily life. One cannot imagine their lives without the invention of the Routers. It provides you high-speed internet that will surely provide you complete satisfaction while doing some work using the Internet. You can either set up the WiFi Router at your or office. In case you have recently purchased the WiFi Router, and you have set it up. Then you must regularly update or change the settings of the WiFi Router. To access the login page of the WiFi router you need to use the Myrouter.local 192.168.1.1 address. In case you will face any challenge while using this web address. Then all you need to contact the experts for instant help.
192.168.1.1 IP Address is one of the most widely known IP addresses. This specific IP address is used as the default login gateway to the admin panel for various modern router devices. Apart from this, you can also use other IP addresses such as 10.0.0.1, 192.168.0.1, and 192.168.1.2. In simple terms, 192.168.1.1 is a well-known universal IP address for routers irrespective of its manufacturer.
Step By Step Guide To login to the 192.168.1.1 Web Interface
Most of the routers come with dedicated web-based setup pages. With the help of these setup pages, you can easily perform necessary changes in the settings of the router and network. Here is a simple step-by-side guide to perform 192.168.1.1 login:
In order to begin with the process of 192.168.1.1 router login, the initial step is to launch the new web browser. Make sure that you are using the updated web browser. You must prefer to use Google Chrome, Firefox, etc.
Once you have launched the web browser, then you must navigate to the go address field.
In this address field you need to carefully type in the right IP address of your router. You can use the default IP address of your router such as ‘192.168.1.1’ and then press the Enter button.
As soon as you will tap on the Enter button. You will be successfully entered into the router admin login page. Now you need to provide the router login details such as username and the password.
By inserting the details you will finally reach the router’s settings page.
Here you will be able to make the necessary changes with the router settings and configuration.
Facing any severe challenge while accessing the web page Myrouter.local 192.168.1.1? If yes, then reach out to the best technical team of professionals. The availability of our expertise is 24*7 hours; do not feel hesitate to dial our helpline number. We have technical experts who are rich in knowledge and experience to deal with the common queries of the customers. Our technical team members will initially deeply analyze the issue and then provide the best solutions accordingly. Feel free to reach us. We will be highly glad to serve you.
1 note
·
View note
Text
192.168.0.1 Username and Password
10.0.0.1 10.0.0.0.1 and 10.0.0.1 In case you're searching for 10.0.0.0.1 login or 10.0.0.1 username and secret word, you're at the correct spot. Let us make a plunge directly into the post for a point by point instructional exercise on the equivalent. What is 10.0.0.1 and 10.0.0.0.1 IP Address? 10.0.0.1 Is a private IP address that is regularly incorrectly spelled as 10.0.0.0.1. This IP address is utilized to login into the firmware settings of mainstream switch brands. In case you're thinking about what a private IP address, we're here to disclose it to you. As we as a whole realize that an IP address is related with each associated gadget on the planet. IP delivers are hard to retain so we use space names instead of them. An IP address goes about as the area of a gadget that has been associated with the web utilizing Internet Protocol. Presently, there are just a predetermined number of IPv4 addresses on the planet. Consequently, NAT or system address interpretation is utilized to remap an open IP address to a private IP address. 192.168.0.1 username
10.0.0.1 Is one such private IP address. In the event that this is the login IP of your switch, you can change your switch's settings by playing out an effective 10.0.0.1 login. In this article we'll give you how you can login into 10.0.0.1 and change different settings identified with the switch's firmware. How to discover the login IP and login into it? So as to change the switch's settings, the initial step is to login into the default login IP and so as to do so you'll first need to discover what the login IP of your switch is. For finding the login IP of your switch, follow these straightforward advances:- For MAC OS:- Go to framework inclinations which can be found in the apple menu at the upper left of your work area. Go to organize tab > arrange association. Presently, click on advance > TCP/IP. You would now be able to see your default IP address on the correct side. For Windows:- Open CMD (order brief) presently, type ipconfig and press enter.

You'll presently have the option to see your default IP address close to default door. When you've discovered your login IP, you can now login into it by entering the right accreditations of your switch. Here's a bit by bit instructional exercise to do as such:- Open a program and go to the location bar. Presently, in the location bar, enter 10.0.0.1 or whatever your login IP is. After entering, you'll be taken to the login page of your switch. Here you'll have to enter the right username and secret word mix of your switch. Once entered, click on "login" or hit "enter" and you'll be taken to the administrator board where you can change different settings. 10.0.0.1 – How to change your Wife SSID? SSID represents administration set identifier and goes about as your Wife’s name in the system tab. Each organization has its own default SSID. Notwithstanding, most clients need to change the SSID or the name of the Wife to something cool and one of a kind. You can change Wife SSID or name by:-
1 note
·
View note
Text
IP address 192.168.0.1
192.168.0.1 is pre-specified from the router firms as the default gateway address and can be used to create various adjustments to the router's preferences.
How to Login into 192.168.0.1?
To login into 192.168.0.1 follow those steps --
Open an internet browser and then go to http://192.168.0.1 or type 192.168.0.1 into the browser's URL bar.
Enter the username and password in the specified areas.
You will now be logged into the Admin Panel of this router.
Notice: If you are unable to access the router's admin panel at 192.168.0.1, try using a different IP address -- 192.168.1.1 or even 10.0.0.1.
Forgot IP Address Username and Password?
If you have forgotten the IP Address Username and Password or even if they are not working then you can --
Consider the manual/box or rear of router. (or assess default username and password listing ).
In the event that you changed the password and also have lost it or forgotten it then you need to do a factory reset. To do that, search for a small concealed RESET button on the back of your router. Press and hold that button for approximately 10-15 seconds using a paper clip or a needle. The router will reboot itself and will return to default settings.
The default gateway IP address comes pre-assigned by your internet service provider, however, a user can configure it par to demands. It is often changed to prevent bad men access your admin panel, prevent DDoS attacks, or just to add an extra layer of security. Here is how to do it --
Login to your default admin panel in 192.168.0.1 or 192.168.1.1 (admin/admin is username and password)
Visit Advanced settings > Network > LAN.
Under"IP Address" field you may change it to a desired address for example 192.168.1.2.
Save it and the router will reboot to apply the changes.
Login to your router configuration page (username: admin & admin: admin/blank)
Visit Setup > Network Settings.
You will find Router IP Address field.
Change it as preferred and Save Settings.
Linksys:
Login to Linksys router settings page via 192.168.0.1 or 192.168.1.1 or you could access via http://www.routerlogin.net or http://www.routerlogin.com.
After logged in navigate to Advanced > in left side menu go to"Setup" > LAN Setup.
Under LAN TCP/IP Setup, you'll see IP Address. Change 10.10.10.1 as preferred.
Apply Changes and the machine will reboot to update settings.
In any case during the procedure something goes wrong, you might reset your router to default factory settings so all customization will probably be reverted back.
Assessing your WiFi network is very important to prevent unauthorized access. Follow basic principles such as allowing WPA2 encryption, setting up powerful password, disabling WPS adds more security since it's an old technique of synchronization between networks, enable MAC-address filtering and update your router firmware occasionally. Here is a complete guide on how best to guard your WiFi network.
2 notes
·
View notes
Link
Are you finding an easy guideline for accessing router 10.0.0.1 admin login? If Yes then this guide helps you 10.0.0.1 login. For any query regarding admin login you can reach out to our experts through our helpline number or live chat option.
1 note
·
View note
Text
How To Login To Xfinity Router?
There could be several reasons for you to access your Xfinity router such as, you want to change your wireless password or you want to set up port forwarding for a project that you are currently working on. No matter what your reason is, you will need the Xfinity router IP address to log in to your router. In case, you are using a modem router combo, then the process will be known as modem login, and there won’t be any change in the process.

Here are the steps for How To Login To Xfinity Router:
1. You need to make sure that you are connected to your internet network, and it can be a wired connection or WiFi. For reliable connectivity, a wired connection is preferred.
2. Turn on your computer, launch a web browser, and go to ’10.0.0.1’.
3. This web address is the gateway to the router and it is going to automatically bring up the login screen.
4. Now, you will have to enter the login credentials, which comprises of a username and password. The username is ‘admin’ whereas the password is going to be ‘password’. After entering these details, hit that ‘login’ button.
5. Now, if you want to change the password for your Xfinity router, you can easily do that by clicking ‘Change Password’, an option that you can find at the top right of the admin panel.
If you need information regarding Xfinity Default Router Login or their steps then, visit our website. Our Team is always ready to help.
#XfinityRouterLoginPassword#XfinityRouterIpLogin#HowToLoginToXfinityRouter#XfinityDefaultRouterLogin#XfinityRouterLogin
1 note
·
View note
Text
192.168.0.1
192.168.0.1 is a private IP address used to login the admin panel of a router. 192.168.0.1 is pre-specified from the router firms as the default gateway address and may be used to create different adjustments to the router preferences.
How to Login into 192.168.0.1?
To login into 192.168.0.1 follow these steps --
Open an internet browser and then go to http://192.168.0.1 or kind 192.168.0.1 to the browser URL bar.
A login page will appear asking you to enter the login username and password.
Enter the username and password in the specified fields.
You will now be logged into the Admin Panel of the router.
Note: If you are unable to access the router admin panel at 192.168.0.1, consider using another IP address -- 192.168.1.1 or even 10.0.0.1.
Forgot IP Address Username and Password?
If you have forgotten that the IP Address Username and Password or if they Aren't working then you can --
Look at the manual/box or back of router. (or check default username and password password listing ).
If you changed the password and have dropped it or forgotten it then you need to perform a factory reset. To do that, look for a small hidden RESET button on the back of your router. Press and hold that button for approximately 10-15 seconds with a paper clip or a needle. The router will reboot and will be back to default settings.
The default gateway IP address comes pre-assigned from the online service provider, though, a user may configure it par to needs. It's often changed to prevent bad men access your admin panel, stop DDoS attacks, or simply to add an additional layer of security. Here's the way to do it --
TP-Link:
Login into your default admin panel at 192.168.0.1 or 192.168.1.1 (admin/admin is username and password)
Go to Advanced settings > Network > LAN.
Under"IP Address" field you may change it to your desired address for example 192.168.1.2.
Save it and the router will reboot to apply the changes.
D-Link:
Login to your router setup page (username: admin & password: admin/blank)
Visit Setup > Network Settings.
Now you will find Router IP Address field.
Change it as preferred and Save Settings.
Linksys:
Login to Linksys router configurations page through 192.168.0.1 or 192.168.1.1 or you can access via http://www.routerlogin.net or http://www.routerlogin.com.
By default, the username is admin and password is password.
After logged in browse to Advanced > from left side menu go to"Setup" > LAN Setup.
Underneath LAN TCP/IP Installation, you'll see IP Address. Change 10.10.10.1 as favored.
Apply the system will reboot to upgrade settings.
In any case throughout the process something goes wrong, then you may reset your router to default factory settings so all of customization will be reverted back.
Assessing your WiFi system is very important to avoid unauthorized access. Follow basic principles like allowing WPA2 encryption, setting up strong password, disabling WPS adds more safety since it is an old method of synchronization between networks, empower MAC-address filtering and upgrade your router firmware occasionally. Here is a comprehensive guide about the best way best to protect your WiFi network.
1 note
·
View note
Text
Private IP address 192.168.0.1
192.168.0.1 is a personal IP address used to login the admin panel of a router. 192.168.0.1 is pre-specified by the router firms as the default gateway address and may be used to create various changes to the router preferences.
How to Login to 192.168.0.1?
To login into 192.168.0.1 follow these steps --
Open a web browser and then go to http://192.168.0.1 or type 192.168.0.1 into the browser URL bar.
Input the username and password in the designated areas.
You will now be logged in into the Admin Panel of this router.
Notice: If you are unable to access the router's admin panel in 192.168.0.1, consider using another IP address -- 192.168.1.1 or 10.0.0.1.
If you have forgotten the IP Address Username and Password or even if they are not working then you can --
Look at the manual/box or rear of router. (or assess default username and password password listing ).
If you changed the password and have dropped it or forgotten it then you want to perform a factory reset. To do that, search for a tiny hidden RESET button on the rear of your router. Press and hold that button for approximately 10-15 seconds using a paper clip or a needle. The router will reboot and will be back to default settings.
The default gateway IP address comes pre-assigned from the online service provider, however, a user may configure it level to needs. It's often shifted to stop bad guys access your admin panel, stop DDoS attacks, or just to add an additional layer of security. Here's the way to get it done --
Login into a default admin panel in 192.168.0.1 or 192.168.1.1 (admin/admin is password and username )
Visit Advanced settings > Network > LAN.
Under"IP Address" field you will change it to a preferred address such as 192.168.1.2.
Save it and the router will reboot to apply the changes.
D-Link:
Login to your router configuration page (username: admin & admin: admin/blank)
Visit Setup > Network Settings.
You may find Router IP Address field.
Change it as preferred and Save Settings.
Login to Linksys router settings page through 192.168.0.1 or 192.168.1.1 or you can access through http://www.routerlogin.net or http://www.routerlogin.com.
By default, the username is admin and password is password.
Once logged in navigate to Advanced > from left side menu go to"Setup" > LAN Setup.
Underneath LAN TCP/IP Installation, you'll see IP Address. Change 10.10.10.1 as favored.
Apply the system will reboot to update settings.
Whatever the case during the process something goes wrong, you might reset your router to default factory settings so all of customization will probably be reverted back.
Assessing your WiFi system is very important to avoid unauthorized access. Follow basic principles such as allowing WPA2 encryption, setting up strong password, disabling WPS adds more safety as it is an old method of synchronization between networks, enable MAC-address filtering and update your router firmware sometimes. Here is a complete guide about how to protect your WiFi network.
1 note
·
View note
Text
Wireless router IP address 192.168.0.1
192.168.0.1 is a private IP address used to login the admin panel of a router. 192.168.0.1 is pre-specified by the router companies as the default gateway address and may be used to make various changes to the router preferences.
How to Login into 192.168.0.1?
To login into 192.168.0.1 follow these steps --
Open an internet browser and go to http://192.168.0.1 or kind 192.168.0.1 to the browser's URL bar.
Input the username and password in the designated areas.
You will now be logged into the Admin Panel of this router.
Notice: If you cannot access the router's admin panel at 192.168.0.1, try using a different IP address -- 192.168.1.1 or 10.0.0.1.
If you have forgotten the IP Address Username and Password or even if they Aren't working then you can --
Consider the manual/box or rear of router. (or assess default username and password list).
In the event that you changed the password and also have dropped it or forgotten it then you want to do a factory reset. To do that, look for a small hidden RESET button on the back of your router. Press and hold that button for approximately 10-15 seconds with a paper clip or a needle. The router will reboot and will be back to default settings.
The default gateway IP address comes pre-assigned from the internet service provider, though, a user may configure it level to needs. It's often changed to stop bad men get into your admin panel, stop DDoS attacks, or simply to add an extra layer of security. Here's how to do it --
Login into your default admin panel in 192.168.0.1 or 192.168.1.1 (admin/admin is username and password)
Visit Advanced settings > Network > LAN.
Under"IP Address" field you will change it to a desired address for example 192.168.1.2.
Save and the router will reboot to use the changes.
Login to your router setup page (username: admin & admin: admin/blank)
Go to Setup > Network Settings.
Now you will find Router IP Address field.
Change it preferred and Save Preferences.
Login to Linksys router configurations page through 192.168.0.1 or 192.168.1.1 or you could access through http://www.routerlogin.net or http://www.routerlogin.com.
By default, the username is admin and password is password.
After logged in browse to Advanced > from left side menu go to"Setup" > LAN Setup.
Underneath LAN TCP/IP Setup, you will see IP Address. Change 10.10.10.1 as favored.
Apply the system will reboot to update configurations.
In any case during the procedure something goes wrong, you might reset your router to default factory settings so all customization will probably be reverted back.
Protecting your WiFi system is important to prevent unauthorized access. Follow basic rules such as allowing WPA2 encryption, setting up powerful password, disabling WPS adds more safety as it's an old method of synchronization between networks, empower MAC-address filtering and upgrade your router firmware occasionally. Here's a complete guide about the best way to protect your WiFi network.
1 note
·
View note
Last Seen Blogs

selennesverchzt
smile, you’re on camera ! 💋

cat--gabriel
Cat Gabriel

whencatsdraw
like... y'know nyah

loodle-doodle
Loodle

rabiesram
local knucklebones loser