#Android Q Beta: Compatible Devices and How To Download
Text
Proxifier 4.11 Crack + Registration Key Full Version ( Mac & Windows)
Proxifier Crack is a powerful and versatile proxy client that allows you to access any internet application through a proxy server. Whether you want to bypass firewall restrictions, improve your connection speed, or protect your privacy online. Proxifier Crack for Mac can help you achieve your goals.
Proxifier Cracked Version Free Download Is Here!
The proxifier Registration Key redirects any application's network traffic to a proxy of your choice. You can use SOCKS or HTTPS proxies or even chain multiple proxies together for more flexibility. You can assign different brokers to different applications or create rules based on the destination address, port, or protocol.
With Proxifier Crack Download, you can master your corporate network and control resource access. You can also monitor and log all the network activities, troubleshoot network problems, and test your proxies. Proxifier Crack Version Download supports IPv6, DNS over HTTPS, proxy auto-configuration (PAC), and remote DNS resolution.
Proxifier 4.11 Registration Key is available for Windows, macOS, and Android devices. You can download a fully-functional copy of Proxifier and use it for 31 days for free. After that, you must buy a license to continue using it. Proxifier Key is easy to install and configure and has a user-friendly interface and comprehensive documentation.
If you are looking for a reliable and advanced proxy client for your network applications, Proxifier is your best choice. Download it today and enjoy the benefits of proxying everything!
Proxifier Key Features:
Proxy everything: Redirect connections of any internet app through a proxy
Master your corporate network: Control access to resources and route all connections through a single entry point
Improve your connection: Optimize performance and ensure reliability
Lightweight and flexible: Use a proxy as a gateway for your internet activities
Secure and private: Encrypt your traffic and hide your IP address
Support SOCKS and HTTPS proxies: Use any proxy server
Proxy chains: Chain multiple proxies for more flexibility
Proxy rules: Assign different proxies or chains to different connections based on criteria
IPv6 support: Work with both IPv4 and IPv6 networks
DNS over HTTPS: Resolve domain names securely
Proxy auto-configuration (PAC): Use a script to configure proxies automatically
Remote DNS resolution: Resolve hostnames through a proxy server
Network monitor: View detailed information about network activities
Network log: Record all network events
Network troubleshooter: Test proxies and diagnose network problems
What's new in Proxifier 4.11 Crack:
Added support for Android devices (beta version)
Added support for Windows 11 and Server 2022
Improved compatibility with some applications
Fixed some bugs and crashes
System requirements:
Windows (x86, x64, ARM) 7, 8, 10, 11; Server 2008, 2012, 2016, 2019, 2022
macOS 10.15 Catalina or later
Android 5.0 Lollipop or later (beta version)
Internet connection
Proxy server
How to install Proxifier Cracked Full Version?
Download the setup file or the portable zip file from the official website²
Run the setup file or unzip the portable file to any folder
Follow the installation wizard or launch the executable file
Enter the serial key if you have one, or use the trial version
Configure the proxy settings and rules as needed
FAQs:
Q: How can I buy a license for Proxifier?
A: You can buy a license online from the official website or one of the authorized resellers.
Q: How can I get technical support for Proxifier?
A: You can contact the support team by email at [email protected] or using the contact form on the website. You can also check the online documentation⁴ or the forum⁴ for answers.
Q: How can I update Proxifier to the latest version?
A: You can check for updates from within the program by clicking on Help > Check for Updates. You can also download the latest version from the website² and install it over the existing one.
#proxifier#proxifier Crack#proxifier Registration Key#proxifier Key#proxifier Crack for Mac#proxifier Crack for Windows#proxifier Mac Crack#proxifier Registration Key Mac#proxifier 4.11 Crack
1 note
·
View note
Text
MOBILE APP DEVELOPMENT SERVICES
The rapid growth of mobile devices such as smartphone smartphones and tablet tablets is considered the ideal environment for mobile applications to become famous. Every day, tens of thousands of applications are launched on Apps Store, Google Play, or other app stores.
These applications not only meet the needs of human interaction, entertainment but also serve many different purposes like sales, management, education, health, and so on. With that being said, the mobile app development service is tailored to be perfect and functional.
WHAT IS MOBILE APP DEVELOPMENT SERVICES?
Mobile applications are becoming an essential and highly beneficial marketing tool. A popular mobile application design provides many useful aspects for users such as beautiful interface, outstanding features.
Users only need to download to use it freely without network (e.g., games, books, cooking, etc.). So mobile application downloads are increasing rapidly with dizzying speed.
Surprisingly, there is no such official definition for mobile application development services. But simply put, this is the activity of app developers building, designing and developing software, applications running on mobile devices. These applications are built by smart algorithms to give users the best mobile device experience possible.
These applications can be preloaded on phones in production platforms or distributed as web applications using server-side or client-side processing (e.g., JavaScript) to provide coverage application experience in the Web browser.
Application software developers must also consider an extended range of screen sizes, hardware specifications, and configurations because of the intense competition in mobile software and changes in each platform.
Mobile application development services have grown steadily, in revenue and jobs created. An analysis report in 2018 estimated that 10 million jobs were directly employed in 28 EU members, 85% of which were mobile app developers.
What is mobile app development service?
iOS APP DEVELOPMENT OR ANDROID DEVELOPMENT?
If you are app developers, developing an app for Android or IOS is still the question presented on the drawing board. We know IOS is a popular one, run on every Apple products.
And its main rival, Android by Google, are also deemed to be the big name, if not biggest. Each of these two platforms has its own distinct features, customers, coding language, and even the cost to maintain for a Mobile app developer to choose from.
iOS or Android who will win?
iOS APP DEVELOPMENT
Creating by Steve Jobs back in 2007, IOS continuously upgraded and extended as it’s now a home for more than 2.1 million applications, with hundreds of features, such as gesture recognition supports and personal assistant Siri, and several more…
Apple’s iOS and compatible apps like iTunes, a media player app mainly focus on music, which unfortunately will discontinue its mother developer in 2019, And a data storage service name ICloud, saving billions of documents, or maybe hundred photos of your precious dogs that you resist to delete.
With iOS, creating an app meant to be without any difficulties. Their target audience is mostly teenagers, and around North America, Western Europe, and Australia. iOS users are also businessman entrepreneurs, and mostly wealthy.
iOSrun on Swift, an original programming language by Apple, which gives mobile app development service more flows and structures to work on, more comfortable to create apps. However, putting an app on iOS is not easy, consider that Apple App store follows stringent rules and depends a lot on design and interface.
That is why the cost to create and maintain the apps on IOS is quite expensive and requires a lot. Other than that, it is somewhat a good idea to choose iOS as a platform to launch your applications.
ANDROID APP DEVELOPMENT
Presented in 2008, Androids, on the other hand, runs on multiple smartphone devices and praised by its versatility. Initially developed by Android Inc., Google has second-handedly brought glory to this mobile operative system; while still giving freedom to hardware manufacturers and Android’s devices users.
Android has various of usages beyond one software can comprehend, such as experimenting on non-phone electronics, a gaming platform such as Google Play or even an open-source platform for a lot of mobile application development service thrive their creations.
Having a lot of large smartphone brands such as SAMSUNG, Pixel, HUAWEI, and many more…, Android is taking over its target audience in Asia and South America. Many new features have been found in the upcoming Samsung Note X and Galaxy Fold. And an introduction for Android Q Beta 3 which reminds a lot of people of an IOS design.
With some comments about the lacks of appealing aesthetic, Android, using Java as their programming code, remains its creativity and gives their audience an easily customizable interface, and becoming more and more advanced in the eyes of the apps developers.
Monetization is significant to apps developers because customers tend to download the free app rather than paying in-App like Apple.
HOW TO CHOOSE YOUR APP DEVELOPMENT SERVICE TEAM?
Our two main tiers for developing an app are Design and Development. If you want to pitch a perfect app idea, an excellent development service team is required. Mobile app developer and designer, a skilled IT team, will guide you through a list of thing they can do.
Even if they are proficient, don’t let your opulence blinds you, they may claim to be expertise and promise to build you a beautiful website, your ideas of how to make it are priorities, and you have to control your team to produce your perfect, million worth app.
Why do we need a perfect app development team?
WHO WILL BE YOUR PERFECT SMARTPHONE APPLICATIONS DEVELOPERS?
To pick out a perfect team, you will have to understand these app companies and select the best option.
Some app development services will do all the work for you; these companies have proficient skills, proper management; some will even offer a marketing strategy. With that being said, a company like such must be extremely experienced, you should to ask some of their previous product, rather than ask what they can do.
Another difficulty is a different idea; somewhere along the way, you may find yourself disapprove your team works. It must be said. Otherwise, your app will be a misfit and out of place.
While these companies control most of your apps, others are required to just focus on one or two things, which is developing and designing your ideal app.
If your app is lacking pretty interface or overall messy, you need to find a team of professional designers, but do be careful, wisely pick a qualified team of designers and again, ask for their product, if they aren’t advanced, they usually don’t have an art director for UX/UI design.
And if you want a developer team full of IT experts and coder, make sure they can do cross-platform coding, whether it is Android or iOS.
SHOULD YOU DO MOBILE APP DEVELOPMENT YOURSELF?
As mentioned before, the demand for mobile phones is now increasing significantly, as those who use the phone often keep their eyes on many different applications which stand out and attracts them. Therefore, mobile programming is becoming very captivating for a lot of people.
The app store model is like a software supermarket. Programmers have the opportunity to interact with millions of customers on the app store. Those who know mobile programming can work for software companies, especially when their code skills are strong, implementing the idea into an app will become easier.
Other can quickly make money from writing as well as selling applications without mobile app development service. The app store model is like a software supermarket. Programmers have the opportunity to interact with millions of customers on the app store.
HOW TO DEVELOP YOUR OWN MOBILE APPLICATION?
All tools and documents are available for your reference. However, the most important thing is that you must have a good source of motivation and environment to study, exchange, and get the best support. In other words, whether your mobile application is going to be favorable depends on many factors.
First and foremost, you should acknowledge the urge of competitiveness by carefully take into consideration that the startup market has existed for quite a while now and there is a wide range of well-trained app developers who are currently working day-to-day to launch new projects.
Knowing your audience well is another critical point to achieve success. Most of the ideas are targeted to a specific task or function rather than a particular audience. Target audience only becomes significant at the planning stage of marketing. However, you never should underestimate your target audience. After all, those are the ones responsible for the success of your application
The mobile platform that you will be focusing on also plays a crucial role. In the world of mobile devices, Android and iOS are still the most popular and optimal operating systems today. In short, to develop mobile applications for a specific platform, it is more convenient if you apply the language supported by that platform.
IS THAT A GOOD IDEA?
The best thing about being an app developer is to bring your ideas to life by turning it into a selling application. However, accomplishing it and bringing it to the user is not a simple thing, and only a few wrong actions can lead to an application’s failure.
Regardless of your career, if you do not have a career orientation and a clear plan, the path you will take is going to be difficult and frustrating. It is also the first thing that those who step into this path need to remember. Many difficulties will arise during app creation.
For example, you can sit for hours, even days, to code an application, but when it is almost done, you have to give up and replace it with a faster, more accurate solution. This is very difficult to accept, but inevitably, you will encounter this situation if you study programming.
You need to understand that programming changes very quickly, and there are many good ways to approach problems. Finding a new solution is the reason for programming.
In general, this is a high-income and attractive job, and it also allows you to create, solve problems, and understand yourself more. Indeed, it will be more difficult when you create your own without having a mobile app development service, but when it is finished, you will feel very worthy of what you have spent.
WHY SHOULD YOU CHOOSE A CUSTOM MOBILE APP DEVELOPMENT SERVICE?
Choose mobile app development service team know what they are doing…
Custom software development (also referred to as bespoke software or tailor-made software) is the process of designing software applications for a specific user or user group within an organization. Such software is designed to accurately address their needs and preferences as opposed to traditional and more popular software.
Developing customized mobile applications is the perfect choice due to its several utilities. Consider this simple example. Two grocery stores offer customers a nearly identical range of goods. But at the same time, they have completely different tactics and goals. Thus they cannot have the same application. The design and functionality of the application should depend on the intent of each store and in each case.
The notable feature of developing customized mobile applications is the ability to deploy your ideas exactly the way you envision. In other words, developing a customized application to meet your business needs, and the final product will fit into your business’s operational path. In contrast, available application development solutions provide a common platform for everyone to cover as many companies as possible.
Customizable walkways also allow the development of a personalized strategy for each customer. This is feasible due to the combination of analytical tools with the early stages of app development. You can follow each guest’s preferences and create personalized suggestions to serve their needs. Forming close relationships with customers has never been so easy.
Finally, it indeed creates a highlight for the company. Return to the example of two grocery stores. One prioritizes delivery at home, while the other relies on a loyalty program. Therefore, mobile applications should emphasize the factors that make the difference of proposals.
The custom application is completely capable of doing this. Meanwhile, pre-built mobile application solutions are created to provide defined functions. Therefore, these apps cannot expand the features, so the company’s mobile proposals will be limited. In case you try to add some features, your app will become like a fake car – with good looks but lousy performance.
CONCLUSION
In short, the success of the mobile application development business depends on the dynamism and creativity. It also poses the problem of how to provide users with the best digital experience. The more social and media develop the more mobile applications developers need to pay more attention to the future direction of the mobile industry.
Now when you have fully understood the concept of a mobile application development service, go out there and spread your wings!
The post MOBILE APP DEVELOPMENT SERVICES appeared first on Vietnam Technology.
source http://vietnamtechnology.net/mobile-app-development-services/
1 note
·
View note
Text
Exfat Vs Ntfs Tuxera For Mac Windows Drives

Aug 28, 2018 However, I did noticed that an external exFat volume is read write when Tuxera is active but read only under paragon. I started looking for an answer and came across your posts After reading both I’m in the process of moving everything off that exFat drive elsewhere, then format it NTFS. Another issue is the Tuxera ntfs format. Oct 13, 2018 USB stick Format SD card in exfat or NTFS. Windows Server Administration for Beginners - Duration. How to format USB drives to NTFS on a Mac with Tuxera Disk Manager. Jun 23, 2017 NTFS is the modern file system which is currently used by Windows for its system drive and, by default, for most non-removable drives. FAT32 is an older file system that’s not as good as NTFS and it doesn’t support many modern features but does offer greater compatibility with other operating systems like Linux, Mac or Android. Tuxera ntfs for mac free download - Tuxera NTFS, Paragon NTFS for Mac, M3 NTFS for Mac, and many more programs. Read and write to NTFS drives on Mac. Get full access to Mac HFS File System. Apr 23, 2012 Question: Q: FAT or exFAT or NTFS. Don't use NTFS. Drives, partitions, formatting w/Mac's + PC's. Apr 23, 2012 11:07 AM Reply Helpful. Thread reply - more options. ExFAT is built into Windows Vista and 7. Microsoft has an exFAT update for Win XP if you need it for that. So you figured, “Fine, I’ll just get an external hard drive. I’ll store my media files on it while keeping the internal hard drive clear for apps and the OS.” While browsing the Internet for your external hard drive, you come across weird terms like NTFS, HFS+, FAT32, and exFAT. Jan 02, 2018 FAT32 vs. ExFAT - Difference Between Three File Systems. FAT32, NTFS, and exFAT are the three file systems created by Microsoft which used to store data on storage devices. The difference between FT32, NTFS, and exFAT is the storage size that the file systems can access apart from various feature.
Tuxera Ntfs For Mac Free
Tuxera For Mac Free
Tuxera Ntfs For Mac Key
Posted by Juno to NTFS for Mac on December 14th, 2017
It is never an easy thing to transfer files across several computer platforms, like transferring from Windows to macOS. This is especially difficult by the fact that macOS doesn't support to write to NTFS drive, including the newest macOS Catalina. On Windows, NTFS is the default file system for hard drives.
The easiest way to enable NTFS write support is usingNTFS driver for macOS. NTFS-3G and Tuxera NTFS for Mac are two common NTFS for macOS software among users. Here, we will make a comparison between NTFS-3G and Tuxera NTFS for Mac with the aim of finding a better NTFS for macOS software.
NTFS-3G vs Tuxera NTFS for Mac
Here is the comparison between NTFS-3G and Tuxera NTFS for Mac from 3 aspects:
1. Compatibility: NTFS-3G supports macOS 10.12 and previous Mac OS X, but is not compatible with macOS Catalina 10.15/Mojave 10.14/High Sierra 10.13. Tuxera NTFS for Mac supports macOS Mojave 10.14/High Sierra 10.13/Sierra 10.12.
2. Software stability: Tuxera NTFS for Mac is developed from NTFS-3G and has a lot of improvements. Certainly, Tuxera NTFS for Mac performs much better than NTFS-3G.
3. Tech support: NTFS-3G is a freeware and doesn't have any technical support. While Tuxera NTFS for Mac is a paid software. So when we get into problems using Tuxera NTFS for Mac, we can get timely technical support.
The biggest defect of NTFS-3G is that it doesn't support macOS Mojave 10.14 and High Sierra 10.13, so it is not recommended even though it is a freeware. Tuxera NTFS for Mac is certainly a better choice than NTFS-3G. But Tuxera NTFS for Mac also has its cons and can't be regarded as the best NTFS driver for macOS.
Here are two disadvantages of Tuxera NTFS for Mac:
1. Slow speed: Tuxera NTFS for Mac commonly has very slow speed when transferring large number of files and large volume data size.
2. Expensive: The lifetime license of Tuxera NTFS for Mac charges US$31, which is relatively high than other similar software.
Tuxera NTFS for Mac alternative
Since Tuxera NTFS for Mac transfers files with slow speed and is expensive, we have found two Tuxera NTFS for Mac alternatives: NTFS Assistant and iBoysoft Drive Manager. Both of them can transfer files efficiently and are very easy-to-use.
1. NTFS Assistant - the most cost-efficient NTFS for Mac software
NTFS Assistant is a reliable Mac tool that can mount NTFS drive on Mac as a regular drive with read-write mode. It has stable and efficient performance. What's more, it only sales at a very low price and can be regarded as the most cost-efficient NTFS for Mac software.
Tutorial to download and use NTFS Assistant:
Step 1: Download and install NTFS Assistant fromApp Store >>.
Step 2: Download and install NTFS Assistant Helper >>.
Step 3: Launch NTFS Assistant and connect NTFS drive to Mac.
2. iBoysoft Drive Manager - handy tool to manage external drives & network drives
iBoysoft Drive Manager is a professional Mac tool that can enable NTFS write support on Mac. With it, we can create, edit, delete and transfer files on NTFS drive. It can help mount, unmount, read and write to FAT32 drives, exFAT drives, NTFS drives, etc. on macOS 10.15/10.14/10.13/10.12 and Mac OS X 10.11/10.10/10.9/10.8.
iBoysoft Drive Manager is also a handy tool to manage external drives and network drives. Only a simple click from the menu bar, we can mount, unmount and remount network drives & external drives, including network drive, external hard drive, USB flash drive, SD card, memory card, CF card and pen drive.
Instruction to mount NTFS drive on Mac with iBoysoft Drive Manager
Step 1: Download and install iBoysoft Drive Manager on Mac.
Download

Step 2: Launch iBoysoft Drive Manager and connect NTFS drive to Mac. Skins pioneer cdj 2000 djm 900 nexus virtual dj download.
Step 3: Write to NTFS drive after getting notification that the NTFS drive has been mounted successfully.
For comparison between Paragon NTFS for Mac and Tuxera NTFS for Mac, please refer toParagon NTFS for Mac vs NTFS-3G.
Still have questions?
Posted by Katrina to NTFS for Mac on December 19th, 2017
NTFS-formatted hard drives are read-only when plugged into a Mac. Towrite to NTFS formatted drive, the easiest way is to install a NTFS for Mac software. Among them, Tuxera NTFS for Mac, NTFS-3G andParagon NTFS for Mac are widely used by Mac users. But which one is your best choice? Here we compare Tuxera NTFS for Mac, NTFS-3G and Paragon NTFS for Mac, guiding you to make a better choice.
Tuxera NTFS for Mac vs NTFS-3G vs Paragon NTFS for Mac
Here is the comparison between NTFS-3G and Tuxera NTFS for Mac from 3 aspects:
1. Cost: Tuxera NTFS for Mac is the most expensive, charging US$31. Paragon NTFS for Mac sales for US$19.95, while NTFS-3G is free.
2. Software stability: Developed from NTFS-3G, Tuxera NTFS for Mac performs much better than NTFS-3G. From the user feedback of Tuxera NTFS for Mac, 'Tuxera NTFS could not mount' error occurs commonly. But Paragon NTFS for Mac performs stably.
3. Compatibility: Both Tuxera NTFS for Mac and Paragon NTFS for Mac is fully support macOS 10.15/10.14/10.13/10.12 and Mac OS X 10.11/10.10/10.9/10.8/10.7. But NTFS-3G only supports macOS 10.12 and previous Mac OS X but can't support the newest macOS High Sierra 10.13.
Tuxera Ntfs For Mac Free
4. Tech support: NTFS-3G is a freeware and doesn't have any technical support. While Tuxera NTFS for Mac and Paragon NTFS for Mac is a paid software. So when we get into problems using Tuxera NTFS for Mac and Paragon NTFS for Mac, we can get timely technical support.
Teamviewer pc to mac not working. Re: Team Viewer NOT Working on Mac Is there a box at the top right of the TeamViewer window for the partner ID? If you don't have the TeamViewer window open, right click the TeamViewer icon on your Doc and select TeamViewer.
To conclude, Paragon NTFS for Mac is better than Tuxera NTFS for Mac and NTFS-3G for it has the best software stability and reasonable price. But is Paragon NTFS for Mac is really your best choice? Not exactly, Paragon NTFS for Mac is still so expensive because it will cost much on major upgrades (like from version 14 to version 15) after buying lifetime license.
Aria math mp3 1 hour download torrent. Oct 10, 2011 50+ videos Play all Mix - Minecraft C418 - 13 (mp3 download) YouTube Minecraft volume Alpha by C418 full album - Duration: 59:32. Squadratic Formula 1,083,623 views. Nov 29, 2013 Minecraft -OST- Creative#4 (Aria Math) Download Minecraft Volume-Beta here:Give credits for the music to: C418. Mtc S3rl mp3 high quality download at MusicEel. Choose from several source of music. Toggle navigation. 1 HOUR S3RL - MTC (Different Heaven Remix) size:84. The phone soulja boy looped frank casino rich is gangsta teddy pendergrass aria math minecraft stephen manders adoration aria math minecraft piano migos stripper bowl song twista do.
Paragon NTFS for Mac alternative
Since Paragon NTFS for Mac costs too much, we'd like to recommend you two cost-efficient Paragon NTFS for Mac alternatives: the cheaper one - NTFS Assistant and the free one -iBoysoft Drive Manager.
1. NTFS Assistant: a cheaper Paragon NTFS for Mac alternative
NTFS Assistant is a professionalNTFS driver for Mac that is design to read and write to NTFS drive on macOS Mojave 10.14/High Sierra 10.13/Sierra 10.12 and Mac OS X El Capitan 10.11/Yosemite 10.10/Mavericks 10.9/Mountain Lion 10.8/Lion 10.7. NTFS Assistant not only has lower price than similar software but also works fast when transferring files.
Tutorial to download and use NTFS Assistant:
Step 1: Download and install NTFS Assistant fromApp Store >>.
Step 2: Download and install NTFS Assistant Helper >>.
Step 3: Launch NTFS Assistant and connect NTFS drive to Mac.
Tuxera For Mac Free
2. iBoysoft Drive Manager: Mount external drive & network drive for free
iBoysoft Drive Manager gives you full read and write capabilities on NTFS external drives, which allows us to read, write, delete, add and rename folders and files of NTFS drive on macOS Catalina 10.15/Mojave 10.14/High Sierra 10.13/Sierra 10.12 and Mac OS X El Capitan 10.11/Yosemite 10.10/Mavericks 10.9/Mountain Lion 10.8.
Download
Besides, iBoysoft Drive Manager can also help to mount and unmount various external drives (including external hard drive, USB flash drive, SD card, memory card, CF card and pen drive). Network drives can be also managed with iBoysoft Drive Manager. It enables us to give each external drive/network drive a new drive letter, which makes it possible for us to easily manage specific external drive/network drive. Only a simple click from the menu bar, we can mount, unmount and remount network drives & external drives. Very easy to use.
Omnisphere 2 is slow as heck. So I just got omnisphere 2 and it is super slow. It takes 30 seconds to load the plugins and 5 seconds to load each sound so browsing for sounds is hell. My PC can definitely run it since it is an i7 7700HQ, 16 GB RAM 256 GB SSD. Also, all of omnisphere and fl studio is on the ssd so i can't see where the problem lies. Omnisphere 2 slow.
Instruction to mount NTFS drive on Mac with iBoysoft Drive Manager
Step 1: Download and install iBoysoft Drive Manager on Mac.
Step 2: Launch iBoysoft Drive Manager and connect NTFS drive to Mac.
Step 3: Write to NTFS drive after getting notification that the NTFS drive has been mounted successfully.
Tuxera Ntfs For Mac Key
Still have questions?
0 notes
Text
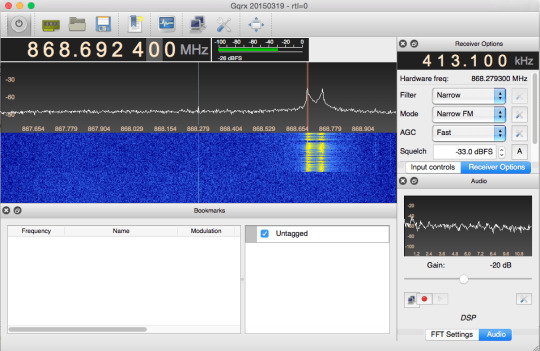
Rtl Sdr For Mac

Follow our tweets!
Rtl-sdr For Mac
Rtl Sdr For Mac Computers
Rtl-sdr Macports
Rtl Sdr For Mac Os

Home
Purchase
News
macOS Software
Windows Software
Ham Radio iPhone/iPad
Linux Software
Documentation
Support/FAQ
Update Policy
Lost Reg Code?
USB Icom CI-V Interface
MIL-STD-188 Interface
Radio Hobbyist Products
22m Part 15 Beacon Kit
CW Keyer For Beacons Kit
Jellyfish Transformer
Cyclops Antenna Transformer
General Interest Programs
Atomic Mac/PC
Audiocorder
Audio Toolbox
Black Cat Timer
Diet Sleuth
iUnit
Graffikon
Graph Paper Maker
Health Tracker
Image Resizer
Knitting Wizard
Label Wizard
Prog Audio Gen
Sound Byte
Synth 76477
Amateur Radio Programs
AirSpyHF+ Server
Audiocorder
Black Cat ACARS
Black Cat CW Keyer
Black Cat HF Fax
Black Cat SSTV
Carrier Sleuth
Cocoa 1090
Cocoa RTL Server
DGPS Decoding
DX Toolbox
Elmer
eQSL Factory
MatchMaker
KiwiSDR Sound Client
KiwiSDR Monitor
MININEC Pro
Morse Mania
MultiMode
mySdrPlayback
RF Toolbox
SDRuno/SDRSharp UDP
SelCall
Sonde
iPhone/iPad Apps
ALE
Atoms To Go
dB Calc
Clik Trak
DGPS Decoder
Drill Calc
DX Toolbox
Elmer Extra
Elmer General
Elmer Tech
Feld Hellschreiber
Field Strength Calc
Function Generator Pad
GMDSS
Godafoss
HF Weather Fax
iAttenuate
iFunctionGenerator
iSoundex
iSoundByte
iSweep
iUnit
Morse Mania
ACARS Pad
Morse Pad
NAVTEX Pad
Packet Pad
PSK31 Pad
SSTV Pad
Photon Calc
Rad Map Tracker
RF Link Calc
SelCall Tone Gen
Sound Byte
Sound Byte Control
Spectrum Pad
SWBC Schedules
Synth 76477
Synth Motion
Transmission Line Calc
Weather Calc
Wire Calc
iPhone/iPad Bundles
RF Calculator Apps
Ham Radio Decoder Apps
Audio Utility Apps
Shortwave Weather Apps
Ham Radio Exam Study Apps
Shortwave Decoder Apps
Android Apps
ACARS
Audio Function Generator
Audio Spectrum Analyzer
DGPS Decoder
HF Weather Fax
NAVTEX
Rad Map Tracker
SelCall Tone Gen
Sound Byte Control
SWBC Schedules
Wire Calc
About Black Cat Systems
Site Map
Our software for Mac OSX
Privacy Policy
Press/Media
HFunderground
Apple /// Emulator
This video explains how the RTL-SDR dongle works. I will show you how to open the RTL-SDR dongle and show you (very detailed) what it inside this particular. Download rtltcp SDR for macOS 10.15 or later and enjoy it on your Mac. This is a macOS version of the iOS rtltcp SDR app. Connect, via the rtltcp network protocol, to a remote or directly connected RTL-SDR USB peripheral - Listen to AM, FM, SSB and CW radio signals - View an RF spectrum and waterfall This app requires either a local. Mac OSX users can have a hard time with the RTL-SDR as there are not many software packages available for it. One software package that is known to work well on OSX is GQRX, which is a general multi mode receiver GUI that is similar to the Windows software SDR#.
Macintosh Links
Shortwave Radio
Pirate Radio
Spy Numbers Stations
Science and Electronics
Ham Radio Software
I’ve been working on developing OSX/Mac and Windows versions of SdrDx. At this time, SdrDx for OS X and Windows supports Ethernet-connected version of AFEDRI SDRs, the USB-connected Airspy (AirSpy HF+ under OS X only, via this OS X server), Ethernet-based Andrus MK1.5, USB FunCube Pro, USB FunCube Pro Plus, Peaberry, Ethernet based RFSPACE SDrs, USB RTL sticks (RTL supported under OS X only, via this OS X server) and Softrock SDR receivers. Both the Peaberry and Softrock SDRs require a lot of expertise to get working. The others are pretty much plug-and-play.
For this to work just install Tongbu Assistant, connect your device and look for the info. And email icloud id, doest work in all idevices it seems need not be restored, can be in lost mode not erased. Find email icloud apple idalso many people use this software because helps you download paid apps for free.In this app the good thing is have many options you can check about your idevice, and one of them is serial number, Imei, USUS, Phone number, etc. Tongbu assistant for mac download.
In addition, SdrDx can be made to support any SDR with a sound card interface, including I/Q input via your native or auxiliary sound card, with a little scripting work; the Peaberry and Softrock support use this mechanism via Python.
SdrDx (running on the Mac) is shown to the right. SdrDx is a closed-source, free application.
SdrDx, in combination with your SDR, is an extremely powerful receiver. Reception, recording, playback, analysis, processing — it’s all there, and it’s all been made as easy to use as possible. Extensive documentation covers every aspect of operating the software, as well as providing numerous examples and images to help you along. If you’re an expert radio user, you’re sure to settle right in. If you’re still learning, you can look forward to software that lets your capabilities grow with your knowledge.
Youtube converter to mp4 mac. While many want to download YouTube videos, the only way to do so responsibly is on iOS and Android, by paying the $11.99 for YouTube Premium. Otherwise, you're violating YouTube's terms of.
You can have real knobs and buttons
AirSpy HF+, RTL, SDR-IQ and SDR-14 users: You can download the executable application(s) appropriate to your OS (OS X or Windows) and the networking server for your OS (if you have an AirSpy HF+, SDR-IQ or SDR-14 and don’t already have a server) below. Remember, you must have a network server application installed to support these USB-based SDRs. Server applications for both OS X and Windows platforms for the SDR-IQ and SDR-14 are available in the list of downloads below; so far, the only available servers for the AirSpy HF+ and RTL sticks run under OS X. Other supported SDR types do not require a server application.
Buying an SDR?
Please consider the following makers of SDRs ahead of any others. These manufacturers have gone the extra mile to see that SDR software developers such as myself are provided with working SDR samples, technical support and interfacing data:
• AFEDRI (822, 822x)
• AirSpy (HF+)
• Andrus (MK 1.5)
• Funcube (pro, pro plus)
The main application zip file will un-compress to a folder, inside which you will find the SdrDx application, and some other files. Please read

the documentation carefully. Take advantage of the extensive index. If you can’t find something in the index, please let me know. I try to keep the documentation up to date. It’s no trouble at all to add index entries, and generally speaking, I’m willing to expand the main manual itself if you find something I have not covered yet. Recent changes to the documentation may only be found in the beta documentation until a version update of the entire package is made; this is where to look if you ask me to add something, it’ll appear there first.
Note to Windows OS users: Only run SdrDx and SwDb out of the folders I supply them in. Don’t stick the executables somewhere else. That way lies madness. MaDnEsS!
Current Version and related downloads
Related Videos:
For Developers (and those who would encourage developers)
In order that SdrDx is able to support additional USB-based SDRs, a protocol-compatible server must be written by the SDR vendor or a third party. You can use this fully functional RTL USB-to-network server as a starting point — it does everything you need to do to talk to SdrDx. SdrDx will work with any SDR or SDR network server that acts like the sample server software; if you need to extend the network methods, for instance to control features unique to your SDR, let me know and I will do my best to support those extensions. However, note that I require that the actual SDR be provided to me for development and testing of those extensions.
Likewise, if you’re considering a new SDR design where you plan to have an Ethernet connection as one of, or the only, method of communication to the host computer, ideally it will be compliant with those protocols. If it is, it will “just work.” If it isn’t — it won’t, and software support for your design will be considerably more limited. Examples of such well-designed SDRs include the Andrus MK 1.5 and the AFEDRI, as well as the SDR-IQ via its network server applications. And of course all the RFSPACE networked SDRs.
If you’re looking for something to do, many USB-based receivers are desperately in need of precisely such a server. No, I don’t write these servers. I spend what time I have adding radio features to SdrDx. However, here is GPL’d source code for an SdrDx-compatible USB-to-Network server for the RTL 'stick' SDRs that can be refactored to support other USB devices. All you need to do with regard to SdrDx is tell me what device name you will use with the server (it currently reports in as 'RTLSVR', you need to pick a name for the device you’re supporting, and tell me what it is.)
For Everyone:
Is my SDR already supported? The answer is here: Check this list.
Wideband RF Recordings — these are useful if you’d like to try out SdrDx but you don’t have an SDR yet. You can start SdrDx, press '>play (click that link, then look for the green button) and then enjoy receiving the described band, event, etc. You can tune within the bandwidth of the recording. So for instance, if you play the 6100 kHz recording, which is 200 kHz wide, you can tune from 6000 kHz to 6200 kHz — most of the 49 meter band! Just download and install SdrDx, then the file of interest, start SdrDx, press > and select the file (if it’s zipped, you have to unzip it first.)
ISS space station on 145.800 MHz, April 13th 2018, with AFE822x HF/VHF SDR; SSTV transmission in PD120 mode – 84.0 MB download (image as received with Black Cat SSTV software can be viewed here)
ISS space station on 145.800 MHz, Dec 5th 2017, with AFE822x HF/VHF SDR; SSTV transmission in PD120 mode – 111.5 MB download (image as received with Multimode software can be viewed here)
Large (370 Mb download, 500 Mb file unzipped) wideband recording:6100kHz (49m band) SW, about 8 minutes. Settings: 200 khz span, fixed 6100.0 center, gridspacing=20, 6 db/div, Max=-54db
SdrDx-WOL-8474-KHz-FSL-RTTY-news.wav.gz 100 MB gzip file containing a recording of RTTY news station WLO as received here at my QTH a few years ago. You can try out SdrDx’s RTTY demodulator with it: 8474 KHz, , , demo to Lo=-1150 and Hi=-850, scope set for 1033 Hz center and 170 Hz shift.
Short (35Mb download) wideband recording:20m Pileup. 190 khz wide recording, fixed 14260.0 center, tune to 14207.0 and nearby USB, grid spacing 19, 0-3khz demod
Short (13.5Mb download) wideband recording:Lovely 5 khz wide USB signal with canary. 190 khz wide recording, fixed 14245.0 center, tune to 14178.0 USB, grid spacing 15, 0-5 khz wide demod. Adjust CWO for perfect man’s voice at end. After I recorded this, I played it back over the air, and the ham told me his bird acted super interested in what it was hearing!
Mac (Stable Version) for OS X 10.6.8 through 10.15
SwDb 0.1m for the Mac (feedback! I need feedback!)
Highly recommended:DX Toolbox
for USB SDRs:
USB Driver (you probably don’t need this):
Snow Leopard (OS X 10.6) and up USB-to-network server for the SDR-14 and SDR-IQ
Snow Leopard (OS X 10.6) and up USB-to-network server for the RTL stick SDRs
OS X RTL Stick Server (10.6 and later)
OS X AirSpy HF+ Server (10.6 and later, at Black Cat Systems)
OS X Beta
64-bitOS X Beta 2.20o ZIP archive
Please Note: The OS X Beta changes at odd intervals, sometimes quite often. You can see when the beta build you have has been superseded by a new one by examining the SdrDx title bar at startup. Your SdrDx build time, and the latest SdrDx build time, are both displayed there. When there is a difference, there is a more recent Beta, and you can come right here and download it. Significant changes are indicated on the page below:
Windows
SdrDx 2.19n Beta for Windows (feedback! I need feedback!)
SwDb 0.1m for Windows (feedback! I need feedback!)
Highly recommended:DX Toolbox
For USB SDRs:
Windows USB-to-network server (SDRxx for the SDR-IQ only)
Help for AFEDRI (preliminary)
People have been having problems getting the AFEDRI to work with SdrDx; I’m not sure why, but here is some information on what I did to get mine going.
Before you start, make sure you’ve set the audio output within SdrDx using to the correct device. If this is not set correctly, SdrDx cannot run.
Now as to the AFEDRI itself: First of all, I could not make the AFEDRI’s DHCP settings work at all. I contacted Alex, the designer, and after quite a few emails back and forth, he suggested a static IP configuration. I set that up, got it working on my normal network, and then connected it to my 2nd ethernet port on the Mac (this is under OS X 10.6.8) under a second network of 192.168.10.1; this involved some fairly annoying screwing around with the OS X configuration files. I never did get the DHCP to work, though some SdrDx users have. So I strongly suggest you set the AFEDRI up using a static IP; I think there may be some fairly severe bugs in the AFEDRI’s DHCP handling, or at least, ways it can be set up that simply don’t work. Other SDRs, such as the Andrus MK 1.5, configure using DHCP no problem, so it’s definitely something unique to the AFEDRI.
Having said that, it could very well be something I did in the configuration utility of the AFEDRI; the version I had only provided a Windows-only program, and I only fired up the laptop to work with it until I got it to work in general, and never looked back. Running windows give me hives. Still, I know for sure you can get the AFEDRI working with OS X — the AFEDRI is the SDR I’ve been using for quite a few months now; it’s a great SDR. I would expect results to be similar for Windows, that is, static IP will definitely work, and DHCP might not.
Support for Andrus MK1.5 SDR
Connect Andrus MK1.5 to your LAN Ethernet
Start SdrDx 2.12p (or later)
Open NET dialog and use auto-find to locate Andrus
Close NET dialog
Open SDR dialog and set bandwidth as desired
Close SDR dialog
Press RUN
Support for Peaberry and (possibly) Softrock
Unzip and copy .py file from within the .zip to your home directory
Download and install PyUSB library
Start SdrDx 2.12p (or later)
Open a shell at your home directory and type ./tcp-to-peaberry.py
In SdrDx, left-click SND button, select “Peaberry Radio” as input sound card, OK
In SdrDx, right-click FCD button, check ON and AUDIO IQ, set OSX rate to 50000, or Windows rate to 48000, OK
In SdrDx, left-click SDR button, set sample rate to 50000, OK
In SdrDx, left-click FCD button — Peaberry should be running now
Acknowledgements and Notices
Changes
Please refer to this page for the release version documentation.
Please refer to this page for the beta version documentation. Adobe photoshop cs5 download windows.
System Requirements
SdrDx and SwDb for the Mac require an Intel CPU, running Snow Leopard 10.6.8 or later.
So far, I have numerous third-party reports of SdrDx working under 10.6, 10.7, 10.8, 10.9, 10.10, 10.11 10.12, and 10.13.
Users of 10.11 through 10.13 report mixed results, under these OS X versions, USB server based SDR users are facing driver installation and activation problems, and tooltips and drop-down menus are blank; Apple’s gone and broken perfectly stable APIs again. Steps required to compensate for Apple’s idiot USB shenanigans are in the docs under new installs. No fix in known for the tooltips issue at this time.
There are two tricks required as of 10.9 and later:
First, you need to turn the “App Nap” feature off or when SdrDx is not the front window, OS X will put it to sleep, which will break it. Right click on the SdrDx app icon, select “info”, turn off App Nap, and close the info window. If you’ve got an SDR-IQ where the server runs under 10.9, you’ll need to do the same thing to the server application. Note: I suggest the very first thing you do with any application you install is turn off App Nap — it’s one of Apple’s worst ideas ever. That’s all there is to that.
Second, under 10.9 and later, for users of the SDR-IQ, Apple thoroughly broke the USB driver that is required for the SDR-IQ and SDR-14 (and possibly the CloudIQ — anyone have a CloudIQ running?) So in order to use the USB driver in the SDR-IQ/SDR-14 server application instead (so the USB to Net server will work), you need to enter the following in a shell right after you boot your machine…
sudo kextunload -b com.apple.driver.AppleUSBFTDI
Rtl-sdr For Mac
…it’s not sticky, so you’ll have to do this every time you reboot your Mac.
And of course SdrDx requires an SDR as well if you want to receive live, although it can play back pre-recorded files without an SDR; in the specific cases of the AirSpy HF+, RTL SDR, SDR-IQ and SDR-14, you’ll need to use one of the server applications that puts these SDRs on the network. SdrDx’s support of RFSPACE SDRs and compatibles, and near-compatibles, is only via network connections, SdrDx does not directly interface with the USB connection of the SDR-IQ.
For the Mac, I am presently designing and testing and compiling under an OS X 10.6.8 (Snow Leopard) virtual machine (VMWARE) running under OS X / MacOS 10.12.6.
Rtl Sdr For Mac Computers
—
Rtl-sdr Macports
SdrDx and SwDb for the PC require an Intel CPU, running Windows XP or (possibly) a later version of the OS. SdrDx requires an RFSPACE, AFEDRI, Andrus MK1.5, FUNcube Dongle SDR, or a Soundcard-based SDR, or pre-recorded RF files (see above for some of these) in order to do anything useful; in the specific cases of the SDR-IQ and SDR-14, you’ll also need a server application that puts the SDR-IQ on the network. SdrDx handles the RFSPACE SDRs and compatibles (and near-compatibles) via the network, it does not directly interface with them via USB. You must run these applications out of the folders they are supplied in, as they depend on files in those folders.
Rtl Sdr For Mac Os
For Windows, I am presently cross-compiling under Windows XP (in a VMWARE VM under OS X / MacOS 10.12.6.)
0 notes
Text
All You Need to Know About the Android 10 Release
Android 10 or Android Q is an updated version of Android 9.0 or Pie. Breaking the conventional nomenclature policy acquired in its predecessors of naming them after the name of desserts, Android Q, or Android 10 released as ‘Android 10’ officially. This article on Android Q will help readers understand the top features, release date, and how to get it.
Smartphone users who have Android 8 or Oreo compatible phones can download Android 10 updates. Google had released the beta version of the operating system on March 13, 2019, which came out to be a big hit in the world of mobility. The beta version of the Android Q was available for Google Pixel devices, is now available on almost all the mobile devices that were supposed to support this OS from Apple.
Read more-
#Android app development company#android app development company dubai#android app development in dubai#Android app development services#Android application development company
0 notes
Link
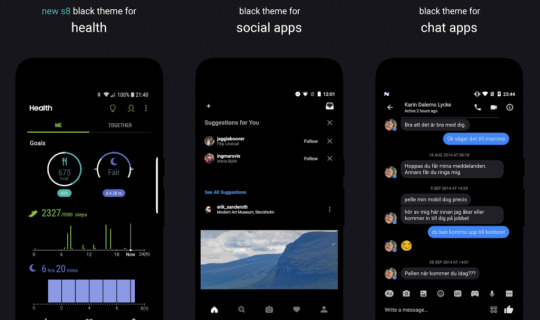
If you are also that curious tech enthusiast who always tries something new and does experiments with his device by using and testing the latest features and functioning. If you are also interested in customizing your Android device to have a brand-new look. So for sure, you are also trying to install Substratum themes on Android 10/Q, most of the Android 10 users have a doubt regarding how to install Substratum themes on the latest Android version, i.e. Android 10/Q right now (Android 11 is in its beta version and yet to be released).
So, if you are also confused or have any doubts regarding installing the substratum theme on your Android device (especially Android 10/Q). So, don't worry, here in this article we are going to guide how you can install substratum themes on Android 10/Q. So, let's get started
Substratum
A substratum is a theming tool that can be used to apply various themes with or without rooting. The Substratum theme is started with an extremely popular custom ROM Cyanogen Mod, which has a theming engine that made it so easy to apply themes. However, Cyanogen Mod has failed and not in use anymore, but somehow Substratum theme rises from there and becomes an immensely popular theming engine.
At first, it was used for rooted devices only, but after Android 8/Oreo came into the picture, the Substratum theme can also be used without root. Again, with Android 9/Pie Google said that OMS (Overlay Manager Service) is intended to be used by device manufacturers only, so OMS in the current form is not designed to be a generic feature.
Then Again, with Android 10/Q Google has changed so many features and other things, and most of them are related to the internals of the system. Android Q itself provides various features and customization options, so Android 10 has eliminated the need for a substratum theme, but the substratum theme is so much better and has many customization options than Android 10 in some aspects. So, let's get started and install substratum themes in Android 10/Q with root.
Also Read: How to Install ViPER4Android on Android 10/Q
How to Install Substratum Themes on Android 10/Q
Before you Start
Before getting started with the installation procedure, here are some important instructions you should know and follow before getting started with the method to install substratum themes on Android 10/Q
First of all, before starting to install substratum themes on Android 10/Q, make sure that your device is rooted using Magisk, running on Android version 10/Q.
Install Substratum Lite.
Install any Android 10 compatible theme.
Related Article
How to Root Your Android Device
[Top]10 Best Magisk Modules For Your Rooted Phone
Why Magisk Over SuperSU for Rooting your Android Device?
Some Android 10 Compatible Substratum Theme
You should first purchase a compatible theme to install substratum themes on Android 10/Q. Here is some best substratum themes, you can purchase and install them from the Play store.
Outline
Ethereal
Valerie
Flux White
PitchBlack
Also Read: How to Enable Always-on Display on Any OnePlus Phone
Method
This is a complete step-by-step guide, by following each step carefully this you can easily install substratum themes on Android 10/Q, and also set up the theme in the device.
Make sure your device is rooted and running on Android 10/Q.
Go to Google PlayStore, and install any of the themes of your choice. (In this article, we are using Pitch Black theme)
Download and Install the Substratum from the Google Play Store.
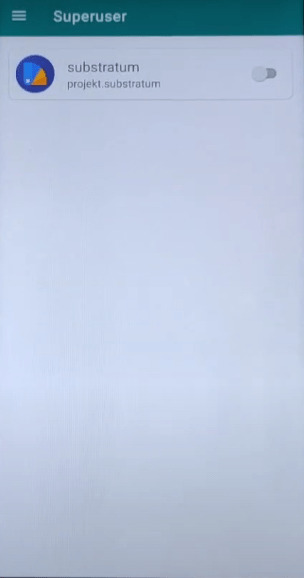
Open the Substratum app from the app drawer.
It will ask you for Superuser permission, grant the permission.
If it doesn't ask superuser permission or somehow you unable to grant the permission
So, open the Magisk Manager.
Tap on hamburger menu from the top-left corner and go to Superuser.

Enable the toggle on in front of Substratum (if it was disabled).
Also Read: How to Fix Magisk Install Error 1 in TWRP Recovery
Clear all the recent apps, from the background.
Again, Open Substratum, A welcome screen will be displayed (skip it if you want)
Allow all the required permission.
And here, you will see the theme which you have purchased and installed from the Play Store.
Click on the theme.
In the Overlay tab, click on the arrow (facing downward) select Android 10 from it.

Enable the Toggle just beside the arrow, it will select all the app.

Also Read: How to Fix Error 70 While Installing Gapps in TWRP
Or you can manually choose the apps from the app list below.
Make suitable customization.
After customizations, tap on the circular icon at the bottom-right corner.

Here, enables the toggle in front of Disable other themes, to avoid conflict between themes. (You can always perform experiments so you can also disable it).
Now tap on Build and Install.

Also Read: How to Fix Error 7 in TWRP While Flashing any Custom ROM?
It will take a while to overlay all the apps.
After successful building and installing, reboot your device.
After rebooting, open the substratum again.
Go to the manager tab.
Enable the toggle on in front of Select to bottom all overlays (or choose the apps manually). To apply the theme in respective apps.

Again, tap on the circular icon at the bottom-right corner.
Tap on Change overlay states.

It will reboot the system UI automatically.
Now if you unlock your device, so all the changes would be saved.
That's it from our side and I hope you have successfully installed substratum themes on Android 10/Q. If you like the content and found this article useful so, please share your valuable reviews in the comment box. Also, if you have some more suggestions so please let us know in the comment section.
[su_box title="More Like This" box_color="#000000"]
How to Enable Live Captions on Android 10 Phones [ROOT]
How to Run Android APK Files in Windows 10?
How To Remove Youtube Ads on Android? [No Root]
[/su_box]
via TechLatest
0 notes
Text
Android 10 Is Now Released: With Latest Google's Updates
Google has released its big new update to Android 10, and for the first time, it is available for more than just a couple of Google-made smartphones.
Announced in May, Android Q – known as Android 10 – ditches the pudding-based names that have been used for versions of Google’s software for the past 10 years including Marshmallow, Nougat, Oreo and Pie.
But that’s not the only modernizing shift in Android 10. Here’s everything you need to know.
When can I get it?
If you have a Google Pixel phone, simply check for updates in the system settings to download it over the next couple of days – or head to Google’s developer site if you are impatient.
Unusually for Android, other manufacturers have joined the early release schedule. A full Android 10 update is available for the Essential Phone globally and the Xiaomi Redmi K20 Pro in China and India. Meanwhile, OnePlus has released Android 10 for the OnePlus 7 and 7 Pro in “open beta”, which is part of the firm’s long-running early access software series.
Many other manufacturers are still running developer previews of Android 10 and are expected to release full versions soon. One of the biggest exceptions is Samsung, which is not expected to release Android 10 for at least a few months.
How much will it cost?
The update from Google and other manufacturers is free. If you are asked to pay to update it is likely to be a scam.
Will all my apps work?
The majority of the apps on your phone will work as normal. Some may need small updates for full compatibility, but many of those apps have already received the necessary updates including from companies such as Samsung for support of its smartphone accessories on other company’s phones.
Google has introduced a new gesture navigation system as part of Android 10, which sits alongside the traditional three-button and Google’s Android 9 Pie two-button navigation options.
The new navigation gestures are a blend of those used by Apple on its iPhone X, XS and XR lines and those deployed by manufacturers such as Huawei and OnePlus.
There is a new thin gesture bar at the bottom of the screen. Swiping up on it goes home, up and hold shows recently used apps; swiping left or right on the bar switches directly between the last-used apps. The back button has been replaced by a swipe from the left or right sides of the lower portions of the screen.
The new gestures are fast, smooth and make using large-screen phones much easier, particularly the back swipe gesture, which no longer forces a reach to the bottom left of the phone to tap the back button.
Dark mode

Many Android manufacturers have implemented their own dark themes, including Samsung, Huawei and OnePlus. But now Google has added a full dark mode baked into Android 10, which can be enabled all the time or through a schedule. It joins the dark theme added to a variety of Google and other apps available on Android.
For those with OLED screens, such as those used on higher-end smartphones, enabling the dark theme can help prolong battery life as only the pixels that are not black consume electricity. But most people will enable it for aesthetic reasons.
Smart replies for more apps

Android
(@Android)
With on-device learning, #AndroidQ prioritizes notifications that matter most. #io19 pic.twitter.com/DY8kQBW0yV
May 7, 2019
Smart replies have been expanded from a very limited number of Google apps to most messaging apps, which uses on-device machine learning to provide you with one-tap replies to messages straight from the notification area.
It can also open the appropriate app for things like an address, URL or video straight from the messaging app without having to copy or paste anything, such as giving one-tap access to navigation directions in Google Maps.
Notifications: take back control
To help reduce notification overload, Android now has the choice of: general alerts as they always have been, which make a sound or vibration; silent alerts, which do not make a sound and are held in a cluster out of the way at the bottom of the notification shade; or no notification, which blocks an app from showing particular types of notifications or all notifications if you do not want to be bothered by them.
Silent notifications are useful for things such apps for accessories that you have attached to your phone requiring persistent notifications to work (sports watches are a good example) or mundane but useful things such as the weather.
More control over app privacy

Google is making great strides to give users greater control over the data they share with apps on their phone, catching up with many of the protections Apple employs in iOS. Android 10 introduces a raft of new controls including the ability to share your location information with an app only when you are using it. Android will also remind you that an app you do not use is accessing your location so you can stop it if you wish.
Privacy controls including an app permission manager, personalized ads, location history, and Google account activity are now more easily accessible in the settings menu too, so it’s more straightforward to see what kinds of data is being collected and stop it.
Parental controls

Google is beefing up parental controls on Android using its Family Link feature, which will now be built into the Digital Wellbeing settings app on Android 10. Parents can set up a new phone or device for their child, link it to their account and take control over screen time limits, app installs, track their child’s usage and set things like bedtime when the phone shuts off.
Faster security updates straight from Google Play
The state of Android security updates, which are delivered by Google once a month but do not always reach other manufacturer’s phones in a timely manner, is getting better, with most devices getting at least bi-monthly updates.
In Android 10 a new system allows Google to push out crucial security and privacy fixes straight from the Google Play store. That means users won’t have to wait for their phone manufacturer to release a full Android system update to make sure their data is protected. Faster and more frequent security updates are becoming more and more critical as our phones are tempting targets for hackers and thieves the world over.
Even more emoji, Focus mode, Live Caption

Android 10 includes a large collection of new emoji including gender-inclusive designs, such as gender non-specific representations of professions with the option of specifying male or female models if you’d like.
Focus mode, which temporarily silences specific apps you find distracting, is available in beta with a full rollout expected this year. Live Caption, which uses on-device machine learning to put real-time captions on videos, podcasts, audio messages and recordings in any app, will also roll out in the autumn, on Google’s Pixel devices at first.
Read the full article
0 notes
Text
Promise of a Solar Storm & Satellite Environment Check-In | Space Weather News 08.22.2019
youtube
//pagead2.googlesyndication.com/pagead/js/adsbygoogle.js
(adsbygoogle = window.adsbygoogle || []).push({});
Antenna

7 element 144MHz LFA-Q Super-Gainer Quad Style Yagi
February 01, 2015
No comments
Description If it is GAIN you want from a small boom, this is the antenna for you! Wow, Super compact boom!! Massive 13.6dBi from this antenna!… Read more

QM7 – Seven elements Yagi -Uda Antenna – 144MHz
December 03, 2014
No comments
Make yourself your antenna for 144MHz Great yagi antenna for 2 meters Band – Download .pdf File – To open file you neeed adobe reader … Read more

3-Element 3-Band Mini-Beam from ZX-Yagi
February 01, 2015
No comments
3-Element 3-Band Mini-Beam from ZX-Yagi Better have a small one than none…. Compact built and light-weight 3-band antenna for 10, 15 and 20m. Ab… Read more

3/3 (6) element 50/70MHz Yagi (1.2m)
July 26, 2019
No comments
An Excellent Dual Band Yagi for 50/70MHz with 1.2m boom Model: DB-664 A dualband balun is recommended for this antenna, details can be found HERE The… Read more

ALEXLOOP PREMIER
May 02, 2018
No comments
The AlexLoop has long been the gold standard of the portable magnetic loop antenna. The AlexLoop Premier is the new and further enhanced version of th… Read more

KT31WARC, 18.068-18.168 / 24.890-24.990 MHZ
November 03, 2015
No comments
The updated KT31WARC offers flexibility in size and frequencies. It is truly unique in many ways. The KT31WARC covers 12,17 and 20 or 30 meters. 20 or… Read more

Multiband Delta Antenna – M0PLK
May 04, 2015
No comments
Multiband Delta Antenna Closed loop antennas are always less sensitive to noise than open driven element antennas (e.g. vertical or dipole). T… Read more
News

FCC issues $39,000 + Forfeiture Order against man from North Carolina
August 22, 2019
No comments
The WIA report the FCC has issued a $39,000 + Forfeiture Order against a man from North Carolina, for intentional misuse of a local public safety radi… Read more

Inter-American Proposal Removes 47 – 47.2 GHz from Bands under Study for 5G Services
August 21, 2019
No comments
The 34th meeting of the Inter-American Telecommunication Commission (CITEL) Permanent Consultative Committee II (PCC.II) concluded a week of meetings… Read more

ARRL Contest and DXCC Rules Now Prohibit Automated Contacts
August 20, 2019
No comments
Following the direction of the ARRL Board of Directors, ARRL has incorporated changes to the rules for all ARRL-sponsored contests and DXCC, prohibiti… Read more

Happy 150! The Hiram Percy Maxim Birthday Celebration!
August 20, 2019
No comments
As announced in September 2019 QST – page 86 This year marks the 150th anniversary of the birth of the League’s first president and… Read more

Alexanderson Alternator Station SAQ Hails “Incredible” Number of Listener Reports
August 20, 2019
No comments
Sweden’s Alexanderson Alternator station SAQ says it received 438 listener reports — “an incredible amount” — for its June 30 Alexanderson Day transmi… Read more

Pirates On US Navy Satellites – UHF SatCom
August 18, 2019
No comments
Here we take a look at how to listen to the Brazillian Pirates on UHF SatCom Read more

FCC Dismisses ARRL, AMSAT Requests in Small Satellite Proceeding
August 16, 2019
No comments
An FCC Report and Order (R&O) released August 2 in the so-called “small satellite” rulemaking proceeding, IB Docket 18-86, failed to address conce… Read more
//pagead2.googlesyndication.com/pagead/js/adsbygoogle.js
(adsbygoogle = window.adsbygoogle || []).push({});
Review

Unboxing the AnyTone 878PLUS by David Casler
August 22, 2019
No comments
Read more

Yaesu 891 + WSJT + FT8 Digital on Raspberry Pi 4
August 17, 2019
No comments
Read more

Wouxun KG-UV980P Quad Band First Look
August 16, 2019
No comments
Read more

NX-3000 Series lightbar and custom voice prompts | Kenwood Comms
August 15, 2019
No comments
The lightbar and custom voice prompts are shown in operation on the NX-3000 series heandheld walkie talkie radio, these features are a big advantage f… Read more

The RS-918 clone of a clone of an outstanding open source SDR transceiver, the mcHF
August 14, 2019
No comments
RS-918 10WATT HF SDR Transceiver RX:1.8-30MHz TX:All HAM HF BANDS,Full Modes: SSB(J3E),CW,AM(RX Only),,FM, FREE-DV Features: Spectrum Dynamic Waterf… Read more

Yaesu FT3D Full Review and Battery Torture Test
August 13, 2019
No comments
“This is it. The first complete unbiased review of the new Yaesu FT3D dual band Fusion handheld ham radio with built in GPS and APRS. Watch this… Read more

SDRplay HF Diversity Demo
August 12, 2019
No comments
Read more
App – Mobile

New APP for digital QST
March 25, 2019
No comments
Apple has released a new app for digital QST (version 5.1) readers that use that platform. A long-standing problem involved the inability of some Appl… Read more

6 Must Have Amateur Radio Apps!
December 24, 2018
No comments
Read more

iWSPR TX – WSPR for iOS version 2.8 now available
October 16, 2018
No comments
WSPR WSPR implements a protocol designed for probing potential propagation paths with low-power transmissions. Normal transmissions carry a station’s… Read more

RUMlogNG2Go for iOS version 3.5.2 now available
August 19, 2018
No comments
Thomas Lindner, DL2RUM, is happy to announce the availability of version 3.5.2 of his RUMlogNG2Go logger for the iPhone and iPad. RUMlogNG2Go can be … Read more

SmartSDR for iOS v2.6.2 Now Available
August 12, 2018
No comments
FlexRadio Systems announces the release of SmartSDR for iOS v2.6.2 is now available for download or update from the Apple App Store. This App requires… Read more

QRZ.com App for Android now in Beta Testing
May 07, 2018
No comments
The updates to QRZ’s Android App, formerly known as QRZDroid have been released and are available to those who are interested in trying it out…. Read more

EchoLink for iOS version 2.10.18 is now available
May 07, 2018
No comments
EchoLink for iOS version 2.10.18 is now available in the App Store. This is a 64-bit build that is fully compatible with iOS 10 and modern iOS devices… Read more
The post Promise of a Solar Storm & Satellite Environment Check-In | Space Weather News 08.22.2019 appeared first on QRZ NOW – Ham Radio News.
from RSSMix.com Mix ID 8922796 https://ift.tt/2L0VwXC
via IFTTT
from WordPress https://ift.tt/2ZpxURH
via IFTTT
0 notes
Text
Final Beta update, official Android Q coming soon!

Posted by Dave Burke, VP of Engineering
We’re just a few weeks away from the official release of Android Q! As we put the final polish on the new platform, today we’re rolling out Beta 6, the last Beta update. Now is the time to make sure your apps are ready, before we bring the official release to consumers. Take this opportunity to finish up your testing and publish your app updates soon to give users a smooth transition to Android Q.
You can get Beta 6 today on Pixel devices by enrolling here. If you're already enrolled and received Beta 5, you'll automatically get Beta 6 soon. Partners participating in the Android Q Beta program will also be updating their devices over the coming weeks -- visit their sites to learn more. To get started with Android Q, visit developer.android.com/preview.
Watch for more information on the official Android Q release coming soon!
What’s in Beta 6?
Today’s Beta 6 update includes the latest Android Q system images for Pixel and Android Emulator, the final API 29 SDK, and updated build tools for Android Studio. Beta 6 includes all of the features, system behaviors, and developer APIs that you’ll find in the final platform, so it gives you everything you need to get your apps ready. For users, Beta 6 includes many new fixes and optimizations -- take a look at the release notes for details.
We've made further refinements to Gesture Navigation in Beta 6 based on user feedback. First, to ensure reliable and consistent operation, there's a 200dp vertical app exclusion limit for the Back gesture. Second, we've added a sensitivity preference setting for the Back gesture. Watch for more details coming soon in our blog post series on optimizing for gesture navigation.
Get your apps ready for Android Q!
With the consumer release coming soon, we’re asking all Android developers to update your current apps for compatibility as soon as possible.
Here’s how to do it:
Install your app on Android Q: Install your current app from Google Play onto an Android Q Beta device or emulator, then test. Your app should look great and run well, with full functionality, and handle all of the Android Q behavior changes properly. Watch for impacts from privacy changes, gestural navigation, changes to dynamic linker paths for Bionic libraries, and others.
Test with the Android Q privacy features, such as the new location permissions, restrictions on background activity starts, changes to data and identifiers, and others. See the privacy checklist to get started, and review the behavior changes doc for more areas to test.
Test for uses of restricted non-SDK interfaces and move to public SDK or NDK equivalents instead. Details here.
Test the libraries and SDKs in your app: If you find an issue, try updating to the latest version of the SDK, or reach out to the SDK developer for help. You can also report SDK compatibility issues here.
Update and publish your compatible app: When you’ve finished your testing and made any updates, we recommend publishing your compatible app right away. This lets Android Beta users test the app now, and helps you deliver a smooth transition to users as they update to Android Q.
We realize that supporting these changes is an investment for you too, so thanks to all of you who have prioritized the work to get your apps ready for Android Q!
Enhance your app with Android Q features and APIs
Next, when you're ready, dive into Android Q and learn about the new features and APIs that you can use. Here are some of the top features to get started with.
We recommend these for every app:
Dark Theme: Ensure a consistent experience for users who enable system-wide dark theme by adding a Dark Theme or enabling Force Dark.
Support gestural navigation in your app by going edge-to-edge and making sure your custom gestures are complementary to the system navigation gestures.
Optimize for foldables: Deliver seamless, edge-to-edge experiences on today’s innovative devices by optimizing for foldables.
We recommend these if relevant for your app:
More interactive notifications: If your notifications include messages, enable suggested replies and actions in notifications to engage users and let them take action instantly.
Better biometrics: If you use biometric auth, move to BiometricPrompt, the preferred way to support fingerprint auth on modern devices.
Enriched recording: To support captioning or gameplay recording, enable audio playback capture -- it’s a great way to reach more users and make your app more accessible.
Better codecs: For media apps, try AV1 for video streaming and HDR10+ for high dynamic range video. For speech and music streaming, you can use Opus encoding, and for musicians, a native MIDI API is available.
Better networking APIs: If your app manages IoT devices over Wi-Fi, try the new network connection APIs for functions like configuring, downloading, or printing.
These are just a few of the many new features and APIs in Android Q -- to see them all, visit the Android Q Beta site for developers.
Publish your app updates to Google Play
As soon as you're ready, publish your APK updates to Google Play that are compiled against, or optionally targeting, API 29. To make sure that your updated app runs well on Android Q as well as older versions, try using Google Play testing tracks. With tracks you can safely get early feedback from a small group of users and then do a staged rollout to production.
How do I get Beta 6?
It’s easy! Just enroll any supported Pixel device here to get the update over-the-air. If you're already enrolled, you'll receive the update soon and no action is needed on your part. Downloadable system images are also available here. Partners who are participating in the Android Q Beta program will be updating their devices over the coming weeks. See android.com/beta for details.
To get started developing, download the official API 29 SDK and tools into the stable release of Android Studio 3.4, or for the latest Android Q support update to Android Studio 3.5 Beta. Then follow these instructions to configure your environment, and see the release notes for known issues.
Please continue to share your feedback and requests in our issue tracker. You can use our hotlists for filing platform issues (including privacy and behavior changes), app compatibility issues, and third-party SDK issues.
A big thank you to our developer community for your participation in our recent Reddit AMA on r/androiddev! It’s always great to hear what’s important to you and we hope we were able to help!

Final Beta update, official Android Q coming soon! published first on https://phonetracking.tumblr.com/
0 notes
Text
How to Install Latest Android Q beta 4 on Non-Pixel Smartphones
Android Q beta 4 is the most recent Android version. Surely, it has various new excellent features and themes. However, most of the latest releases are not available for all Android Smartphones and tablet. But thankfully, Android Q beta 4 is available for some compatible non-pixel smartphones. Here are some compatible devices and the instruction to install Android Q beta 4 on non-Pixel smartphones.

If you also want to use Android Q beta 4 version on your Android device, first check whether your device is compatible. You can only install the operating system on compatible non-Pixel smartphones.
How to install latest Android Q beta 4 on Huawei Mate 20 Pro
Finally, the Android Q beta 4 is available for Huawei. If you want to use it, then your Huawei account must be signed up with the same email address, your developer account is.
1. From your Huawei Mate 20 Pro, go to “consumer.huawei.com/en/support/fut/.”
2. Install the Beta app from the page that opens.
3. Open the Beta app and sign in with your Huawei account sign up with the email of Google play developer account.
4. And the sign up for the Developer project.
How to install latest Android Q beta 4 on One Plus 6 & 6T
1. Go to the official site of One Plus and download the most recent ROM upgrade on your One Plus device storage.
2. When the file download, open ‘Settings.’
3. Go to ‘System.’
4. Select ‘System Updates’.
5. Click on the icon at the upper right side.
6. Select ‘Local upgrade.’
7. Click the installation and click ‘Upgrade.’
8. Restart your smartphone when the system upgrade completes.
Now, wait once your device reboot in recovery mode to erase the user data. Then after updating restart again.
How to install latest Android Q beta 4 on Essential smartphone
Note: Before starting the installation process, create and save a factory image. And, add the fastboot tool from “developer.android.com/studio/releases/platform-tools.html” to the path. You must be a developer because, without developer options, you can’t install the Android Q beta 4 on your Android device.
Tips: Continue clicking on the build number until a message saying, “You’re now a developer.”
1. Access the developer option to enable USB Debugging and OEM Unlocking.
2. Then connect the device to the PC.
3. Open the ADB tool.
4. Run “adb reboot bootloader” command.
5. Then restart your smartphone.
6. Now, unlock the bootloader by running the fast flashing unlock command.
7. When your phone is restarting, hold down the ‘Volume -‘ button to open Fastboot mode.
8. Then unzip the factory image that you have created earlier by running “flashall.bat” command on Windows and “flashall.sh” on Mac or Linux.
9. Run ‘fastboot flashing lock’ command to lock the bootloader again.
How to install latest Android Q beta 4 on Sony Xperia XZ3
Only H8416 & H9469/9493 versions of Sony Xperia XZ3 are compatible with Android Q beta 4. If you also have any of these models and want to install the beta version on it, then factory reset your phone before beginning the procedure.
1. Download Sony’s Companion app on your Windows PC or Mac computer from “support.sonymobile.com/global-en/xperia-companion/.”
2. Open the Companion application, after complete installing.
3. When you’re on the main screen, press and hold the ‘Alt’ button then click on the ‘Software Repair’ option.
4. Select ‘My device can’t be detected or started.’
5. Click ‘Next.’
6. Wait until the initialization completes.
7. Then follow the instructions to finish.
How to install latest Android Q beta 4 on Nokia 8.1
Only TA-1119/-21/-28 models & 00WW images of Nokia 8.1 are compatible with Android Q beta. To install the beta version on your Nokia 8.1,
1. Visit “www.nokia.com/phones/en_int/developer.”
2. And sign up or sign in with a Nokia account.
3. Then add your Nokia 8.1 in your account.
4. Now, you can request for Android Q beta 4 to install on your phone.
These are some most popular Android and non-Pixel smartphones that support Android Q beta 4.
Enne garcia is a self-professed security expert; she has been making the people aware of the security threats. Her passion is to write about Cyber security, cryptography, malware, social engineering, internet and new media. She writes for Norton security products at norton.com/setup.
Source: http://uk-norton.com/blog/how-to-install-latest-android-q-beta-4-on-non-pixel-smartphones/
#Install Latest Android Q beta 4 on Non-Pixel Smartphones#norton.com/setup#www.norton.com/setup#norton setup
0 notes
Text
Features of Google’s Latest Android Q Beta First

Last week Google officially announced the beta 1 of Android 10 Q, which is available for Google’s Pixel devices. The release of the final version of Android Q is scheduled in Q33 of this year, before that there are six beta versions will be released. This version of Android brings some major changes in UI and quite a few innovations under the hood. Android Q also has a dark mode whose activation is quite complicated in Beta 1, for some specific reason.
The beta version of Android Q is available to install for all Google Pixel devices (Pixel 1, 2, and 3) and includes a number of features from improved security to the support for foldable devices. The Android app development companies can download the beta version and start using it.
Here is a list of newly added features of Android Q:
UI Changes: The UI changes consist of options to set-up accent fonts and colors in developer settings. This is one of the common features that most of the devices have for ages; with the Q update, this will be natively supported. In this version of Android Q, the theming option is in developer sections, which is quite confusing. Another change in the UI is the visual improvement in the sharing menu and the estimated battery life is shown in the status bar. Next major change is in the screenshot, they have included the rounded and notch corners on screenshots for devices that have the rounded and notch corners.
Privacy Protection: With the Android Q, users can now have control over various apps and their access to the distributed files. Also, the user will be able to track on an app’s access to the videos and images. Apart from this, a user can also control the access of files to apps. Few other privacy features offered by Android Q have limited access to device identifiers like IMEI, serial numbers, etc.
Foldable Screen Support: With Android Q, the android application development team will be capable of controlling the way their apps should look on the large and foldable screens. To allow users to make the most of these features, Android Q comes with a few improvements like modifications to onPause and onResume to allow multi-resume, etc. To assist users in managing how her/his app is being displayed on a foldable and large screen, Android Q has also made some changes the way the resizable Activity manifests attribute works. Also, the Android Emulator has been updated to support the multiple-display type switching.
Control over Locations: The upgraded OS of Android Q Beta First facilitates a user to manage an app in searching his/her desired locations. For example, when an app is searching for a user’s location to deliver a product, it makes sense and the user might allow the app to access the location.
Setting Panels: The incorporation of Setting Panel API has made it possible to display the system settings in an app’s context. This is taking the benefits of the Slices features from the Android Pie. The Setting Panel is a floating UI that can be evoked from an app to display toggles as well as system settings.
Mode of Wi-Fi Performance: Android Q Beta First ensures a low-latency mode and a very high performance for several wireless connections. The enhanced real-time gaming and voice calls can get benefited by this.
Improved Network Connection: The Android Q can bring a distinct improvement in the privacy and performance by refactoring Wi-Fi stack. It can also boost the performance in common scenarios such as IoT devices management and suggestion of various Internet connections needing location permission.
Better (Android Run-Time) Performance: Improved run-time helps apps perform quickly without consuming much memory. By improving the Zygote process, Android Q Beta First can initiate the app’s process and transfer it to a security container.
Camera, Graphics and Media: In an Android Q Beta first, apps will have the ability to request the dynamic images, which includes JPEG or XMP metadata as well as the maps in the same file. This version of Android also supports a bunch of new audio and video codecs. Also, it allows audio encoding with open source video codec AV1, Opus, HDR 10+, etc.
These are just some of the features that Android Q’s first version incorporates; there are five more beta versions to go before releasing the final version of Android Q. It’s high time for android mobile app development companies to start working on the latest updates. At Panacea, our team of Android developers has started researching about the updates and learning to incorporate the same in our upcoming projects to deliver the most compatible apps to every customer.
Source URL: https://www.panaceatek.com/features-of-googles-latest-android-q-beta-first/
0 notes
Text
Lineage OS 17.1 for OnePlus 7 (non-pro) Offically supported
Finally Lineage OS 17.1 for OnePlus 7 is out now. Lineage OS 17.1, a popular Android 10 based custom ROM, is now officially available for OnePlus 7 (Non-pro). In this article, we will share with you the method to download and install Lineage OS 17.1 for OnePlus 7.
Note – Before you begin, make sure that your device is on the latest Android 10 firmware and Go through the guide before you actually perform any steps.
Also see – Best TikTok Tips and Tricks to Grow Followers instantly
We will first download the essential files, then follow a few basic requirements and then follow the below four steps –
Unlock Bootloader on OnePlus 7.
Boot into Custom Recovery
Sideload Copy Partitions
Install/flash Lineage OS from Custom recovery
Download Lineage OS 17.1 for OnePlus 7
Download OnePlus 7 Lineage OS 17.1
Other Downloads
Download ADB and Fastboot tools. You can also download the Minimal ADB and Fastboot Tool on Windows
Download a Custom Recovery like TWRP Recovery, or OrangeFox Recovery or Lineage Recovery.
Download Android 10 GApps (Google Apps)
Dont miss –Download Android 10 for Samsung Galaxy S8 and Note 8 via Lineage OS 17.1
Install Lineage OS 17.1 for OnePlus 7
Prerequisites
Take a complete back up of device data.
Make sure to have atleast 60% battery power on your device.
Enable USB debugging on OnePlus 7.
Working and reliable USB cables.
Step 1. Unlock Bootloader on OnePlus 7.
Go to Settings> About Phone> tap on Build number for 7-8 times> Go back > Developer Options> tap on the OEM Unlock toggle to enable it.
Using USB cables, connect your Device to the PC.
Open a command window on Windows PC or Terminal Window for Linux or Mac OS.For Windows –
Navigate to the folder where the ADB and Fastboot tools have been installed (e.g. C:\platform-tools).
Then press the SHIFT key on the keyboard and right-click on any space inside this folder.
Choose the ‘Open PowerShell window here’ option.
For macOS/Linux –
Open the Terminal Window and change its directory (using ‘cd’ command) to the folder where the ADB and Fastboot tools are installed (e.g. Documents/platform-tools).
cd Documents/platform-tools
Enter the below command in the Command prompt so as to see if your device has heen detected by ADB –
fastboot devices
Enter below command to Unlock Bootloader-
fastboot oem unlock
Reboot if the device doesn’t reboot by itself.
For the further steps, you will have to again enable USB debugging.
Step 2. Boot into Custom Recovery
Download and Install Custom Recovery on OnePlus
Connect device to the PC using USB cables.
Open a command window on Windows PC or Terminal Window for Linux or Mac OS. You can take help from the Unlock Bootloader section above.
Enter the below command-
adb reboot bootloader
Now enter below command to see if ADB has detected your device –
fastboot devices
Now flash a recovery on your device by entering –
fastboot flash boot <recovery_filename>.img
When the device is switched off, press down the Vol Down+ Power button.
Step 3. Sideload Copy Partitions
We will now sideload the copy-partitions.zip package so as to populate slot b by copying the contents of slot a to avoid a potential hard-brick.
Download copy-partitions.zip.
On your device, choose Apply Update, >Apply from ADB so as to begin sideload.
Now on host machine, sideload the package by entering the command –
adb sideload copy-partitions.zip
Step 4. Install/flash Lineage OS from Custom recovery
Assuming you have downloaded the LineageOS 17.1 for OnePlus and GApps, we can now proceed further to install Lineage OS 17.1 for OnePlus 7.
Reboot into Recovery. For this, switch off your device and press down Vol Down+ Power button.
Tap on Factory Reset.
Go to main menu in the recovery.
Sideload the LineageOS zip package. For this, on your device, choose Apply Update>Apply from ADB so as to begin sideload. Then, on host machine, sideload the package using –
adb sideload filename.zip
Note – The below step is crucial if you are booting into Lineage OS for the first time and want GApps or any other addons.
Now if you want to Sideload any additional files like GApps, tap on Advanced>Reboot to Recovery. When your device reboots, tap on Apply Update> Apply from ADB, then adb sideload filename.zip those packages in sequence.
After you are done installing everything, tap on the back row present in the top left corner and then tap on Reboot System Now.
That’s it. You have successfully installed Lineage OS 17.1 based on Android 10 for OnePlus 7. You can now go ahead and do all the customizations and personalization you want.
Note – Some recoveries might ask you to install additional apps or addons. We recommend you to avoid doing so as those may cause your device to bootloop.
Dont miss – Download Lineage OS 17.1 based on Android 10
FAQs
What is Lineage OS 17.1?
LineageOS 17.1 is an open-source and free operating system for set-top boxes, smartphones, PCs, tablets that are based on the Android Linux distribution. LineageOS 17.1 is based on Android 10 which was recently announced by Google.
Why to install Lineage OS 17.1 for OnePlus?
Lineage OS 17.1 is the latest Android 10 based custom ROM for OnePlus 7 and brings up some really amazing features like the Android Q. It paves the way for customization and personalization this giving you the full control of your Android phone.
Also check out – Download Android 10 based Official LineageOS 17.1 for OnePlus 3/3T, 6/6T, Poco F1, MI Note 4 and so on
Is it safe to use Lineage OS 17.1?
Most of the Android users are confused about the LineageOS and whether this Android Custom ROM is reliable and safe or not. Well, to clarify this, let me introduce to you the number of active installations – 1.5 Million.
The LineageOS has compatibility with most of the Android devices. This might be enough to let you know about the popularity of this ROM.
Do see – How to root Android 11 using Magisk canary?
Very rarely Android Custom ROM software gets the monthly security updates and LineageOS is one of those very few ROMs that offer the latest Monthly Security Patches from Google.
If you have the Unofficial LineageOS 17.1, it will be the developer’s responsibility to provide you with the Monthly Security Updates and in case you have the Official LineageSO 17.1, you do not have to worry about the OTA Updates as those will arrive every week from the Official LineageOS Servers.
It is often dubious as of how much secure the personal information of a user is when they install a ROM. Well, with LineageOS, all that can be said that this team has clarified the data they collect from the users and exactly how they do so.
Hope the article was useful and you could easily install Lineage OS 17.1 for OnePlus 7 using you above guide.
Dont miss out –
Download & Install LineageOS 17 for Asus Zenfone 6 based on Android 10 Q
Local upgrade for OnePlus 8 Pro Rooted users
OxygenOS Open Beta 11 Update for OnePlus 7 and 7 Pro (March 2020 Security Level)
Download latest Open Beta 10 update for OnePlus 7 and 7 Pro
Happy Androiding:-)
The post Lineage OS 17.1 for OnePlus 7 (non-pro) Offically supported appeared first on Android Jungles.
from WordPress https://bit.ly/2Z4Rlm7
via IFTTT
0 notes
Text
DOWNLOAD REALTEK RTL8192DE WIRELESS DRIVER
Date Added: 09 December, 2019
File Version: 315161869
Operating Systems: Windows NT/2000/XP/2003/2003/7/8/10 MacOS 10/X
Uploader: Garv
File Name: realtek rtl8192de wireless driver
File Size: 23 Mb
File Format: exe
Downloads: 7326
Price: Free
Download Type: http

What's New:
- Fixed system hangs while install MS-DOS(realtek rtl8192de wireless driver MS-DOS) 6.22 on "writing drvspace.
- Fixed issue that the MAC address(realtek rtl8192de wireless driver address) of LAN not same to the label.
- Fixed a bug where a backup job failed if a shared folder in a LVM volume is configured as a backup source.
- Fixed the intermittent error for detecting USB connection.
- Fixed Splendid button can’t(realtek rtl8192de wireless driver can’t) work.
- Fixes displaying wrong CPU String (Duron) after resuming from S3 in Windows OS.
- Beta Version Fixes problem where system could boot from an add-on SCSI card.
- Fixes(realtek rtl8192de wireless driver Fixes) & Enhancements:- Fixed problem with WiFi tethering when connecting to an Apple iPhone.
- Fixes system hang at format process of ZIP device when internal CPU# cache enabled.
- Fixed detection error of some(realtek rtl8192de wireless driver some) HDD set as slaves.
Users content:
B (A) (best quality mode)- Dimensions (W x D x H): 601 x 317.6 x 193.2mm- Weight: Approx. Then provide the path to the folder where you have downloaded the file. The tool tips now reference the correct video presets for the adjustment options. Enhance HDD compatibility. How to Use Updater: - Connect the TeraStation properly and configure the TeraStation and a computer to run the updater on the same network subnet. - Enhance the compatibility with some CPU Fans It is highly recommended to always use the most recent driver version available. SetLoopMode() makes it possible to configure video playback to loop non-seamlessly in all cases, as shown in the following example: v. Fan Xpert 2+: Flexible controls for ultimate cooling and quietness, plus GPU-temperature sensing for cooler gaming. Performance Improvements with VMQ/vRSS/RDMA Enabled. The original factory-installed firmware is permanently available on the scaler. DOWNLOAD HXTT TEXT DRIVER
Supported OS:
Microsoft Windows 8.1 Enterprise (64-bit)
Windows Server 2003 64-bit
Microsoft Windows 10 (32-bit)
Microsoft Windows 8.1 (32-bit)
Windows 10
Windows 8
Microsoft Windows 8.1 (64-bit)
Windows Vista 64-bit
Windows Vista 32-bit
Windows XP 64-bit
Windows Server 2016
Microsoft Windows 8 Pro (32-bit)
Windows 8.1/8/7/Vista 32-bit
Microsoft Windows 8 Enterprise (32-bit)
Windows 8.1
Microsoft Windows 10 (64-bit)
Windows 8.1/8/7/Vista 64-bit
Microsoft Windows 8.1 Enterprise (32-bit)
Windows Server 2012 R2
Windows 7
Windows Server 2008
Windows XP 32-bit
Windows 2000
Microsoft Windows 8.1 Pro (32-bit)
Windows 7 64-bit
Notebook 8.1/8/7 64-bit
Microsoft Windows 8 (32-bit)
Windows Server 2003 32-bit
Microsoft Windows 8 Pro (64-bit)
Windows Server 2008 R2
Notebook 8.1/8/7 32-bit
Microsoft Windows 8.1 Pro (64-bit)
Windows Server 2012
Microsoft Windows 8 Enterprise (64-bit)
Microsoft Windows 8 (64-bit)
Windows 7 32-bit
Searches:
wireless driver rtl8192de realtek; realtek rtl8192de wireless driver for Microsoft Windows 8 (64-bit); realtek rtl8192de wireless QHDRB8243; realtek rtl8192de wireless driver for Windows 8.1/8/7/Vista 32-bit; realtek rtl8192de wireless Q QH824-8; realtek rtl8192de wireless Q82s; realtek rtl8192de wireless driver for Windows Server 2008 R2; realtek rtl8192de wireless QH8243; realtek rtl8192de wireless driver for Microsoft Windows 8 Pro (32-bit); realtek rtl8192de wireless Qsq824-sqf; realtek rtl8192de wireless driver for Microsoft Windows 8.1 Enterprise (32-bit)
Compatible Devices:
Wifi adapter; Videocard; Android; Keyboards; Soundcard; Wifi router
To ensure the integrity of your download, please verify the checksum value.
MD5: ec22509fe19d09743f2d6d5d55afaf3f
SHA1: 6647d0992dc841de54c744da600ca3f363ecbc0b
SHA-256: f7663c3251573535535f71b828fbadb6a0565cdacba2602ef29bb7038d7d1d03
0 notes
Text
Android 10 has officially launched heralding very little aesthetic revamp but more focussed on performance and privacy improvement. This year, Google ditched its year-long tradition of dessert names and kept the nomenclature simple as Android 10. The new rebranding also overhauled the Andy logo, color schemes, fonts, etc. But the beta cycles and update trajectory was more or less on track, same as yesteryears. OnePlus flagships which are part of this beta program have been right beside the Pixel phones. Hence, they were quick to receive a final Android 10 update, albeit an Open Beta.
Like you, we have been eagerly waiting for this update. So, without a second thought, we flashed the ROM onto our OnePlus 7 Pro. There’s good news for OnePlus 6 and 6T users as the brand has announced the update, which will hit your devices later this month.
Before we jump onto the first impression and see what’s new and changed from the Android Pie, here’s a quick guide to installing the Android 10-based Oxygen OS on the OnePlus 7 and OnePlus 7 Pro.
How To Install OxygenOS beta on your OnePlus device
For those of you trying to install it on your devices, please follow the steps as follows –
1. Download the latest ROM here – OnePlus 7 | OnePlus 7 Pro
2. Copy the downloaded upgrade package (Zip format) to the phone storage (root directory).
Note: You’re advised to make a backup of important phone data before proceeding further.
3. Now, open the System Updates section within the phone Settings. Next, click on the wheel icon at the top right corner. Tap on the Local upgrade option and select the installation package from the internal storage. Rest is easy and take a few minutes.
4. Once the System upgrade is completed, restart the phone.
5. This boot will take some time. But, once you see the lock screen, voila! it means the update is successful.
Here is a link to the official OnePlus community for more details.
Now that’s done, let’s get to our nascent thoughts on what has changed in the new Oxygen OS ROM powered by Android 10.
Android 10 on OnePlus 7 Pro: What’s new?
Here’s everything that’s new and changed in the Android 10 based Oxygen OS version OP7Pro_O2_Beta_1.
1. Easter Egg
https://www.smartprix.com/bytes/wp-content/uploads/2019/09/19-09-05-15-06-29.mp4
In the Pixels, Android 10 comes with a Picross puzzle as the Easter Egg. To access it, you have to go to Device settings > Tap on About Phone > Repeated clicks on the Android Version > Android 10 logo.
#gallery-0-25 { margin: auto; } #gallery-0-25 .gallery-item { float: left; margin-top: 10px; text-align: center; width: 50%; } #gallery-0-25 img { border: 2px solid #cfcfcf; } #gallery-0-25 .gallery-caption { margin-left: 0; } /* see gallery_shortcode() in wp-includes/media.php */
Now, when you arrange the number 10 as letter Q and tap the screen a few time, the aforementioned puzzle game should show. In OnePlus, however, we were welcomed by this paint application instead.
2. Gesture Navigation
#gallery-0-26 { margin: auto; } #gallery-0-26 .gallery-item { float: left; margin-top: 10px; text-align: center; width: 50%; } #gallery-0-26 img { border: 2px solid #cfcfcf; } #gallery-0-26 .gallery-caption { margin-left: 0; } /* see gallery_shortcode() in wp-includes/media.php */
The new gestures let you swipe inward from either side of the screen (bottom half) to go back. If you swipe diagonally from either bottom corners, Google Assistant gets triggered. Then, there is an option to jump between recent apps by quickly swiping left or right along the bottom edge of the screen. Except for the last gesture, the rest was easy to master. The reason could be that the gesture activation area is deep down and tough to execute in a large phone like the OnePlus 7 Pro.
Here’s how it looks in action –
https://www.smartprix.com/bytes/wp-content/uploads/2019/09/19-09-05-18-45-45.mp4
Back Swipe
https://www.smartprix.com/bytes/wp-content/uploads/2019/09/19-09-05-18-48-00.mp4
Google Assistant Activation on Android 10
https://www.smartprix.com/bytes/wp-content/uploads/2019/09/19-09-05-18-50-39.mp4
Bottom Swipe for switching between recent apps
OnePlus has removed the 2-button navigation option present in Android Pie based Oxygen OS.
3. Customization
#gallery-0-27 { margin: auto; } #gallery-0-27 .gallery-item { float: left; margin-top: 10px; text-align: center; width: 33%; } #gallery-0-27 img { border: 2px solid #cfcfcf; } #gallery-0-27 .gallery-caption { margin-left: 0; } /* see gallery_shortcode() in wp-includes/media.php */
Now, you have a dedicated Customization Section within the main settings, wherein you can tinker the display calibration, icons, themes, Horizon Light, font, the shape of the Quick Settings Tiles, etc. We love this new implementation.
4. Privacy
#gallery-0-28 { margin: auto; } #gallery-0-28 .gallery-item { float: left; margin-top: 10px; text-align: center; width: 50%; } #gallery-0-28 img { border: 2px solid #cfcfcf; } #gallery-0-28 .gallery-caption { margin-left: 0; } /* see gallery_shortcode() in wp-includes/media.php */
Google has put a major emphasis on privacy with the Android 10 update. We now get a separate Privacy section within the device settings, within which the Permission manager resides. This is an underlining feature which gives you granular toggles to stop apps from having unnecessary app permissions.
The most important one amongst the various permissions is – Location!
Now, you can prevent an app from stalking your location by either ‘Denying’ it or opting- ‘Allow only while using the app’.
5. Adaptive Notifications
#gallery-0-29 { margin: auto; } #gallery-0-29 .gallery-item { float: left; margin-top: 10px; text-align: center; width: 33%; } #gallery-0-29 img { border: 2px solid #cfcfcf; } #gallery-0-29 .gallery-caption { margin-left: 0; } /* see gallery_shortcode() in wp-includes/media.php */
Within Apps and Notification Menu
In developer options
Press to toggle Notifications as Important or Other (Gentle)
With Android 10, Google has doubled down on improving notifications. One of the initiatives is called Adaptive Notification, which divides the notifications into – Gentle (Other) and Priority (Important and time-sensitive). The unimportant notifications are grouped at the bottom under the title – Other Notifications. This will ideally prevent useless distractions.
6. Focus Mode in Digital Wellbeing
#gallery-0-30 { margin: auto; } #gallery-0-30 .gallery-item { float: left; margin-top: 10px; text-align: center; width: 50%; } #gallery-0-30 img { border: 2px solid #cfcfcf; } #gallery-0-30 .gallery-caption { margin-left: 0; } /* see gallery_shortcode() in wp-includes/media.php */
At first, the Digital Wellbeing (Stable) version didn’t come with the new Focus Mode. Only after we transitioned into its beta version, the focus mode appeared. First, you have to choose the apps that you find distracting. Then, when you want to indulge in any productive work, turn on Focus Mode to temporarily disable those apps.
So, with this new update, you have the Digital Wellbeing with Wind Down, Focus Mode and OnePlus’s Zen Mode application to Digital Detoxify your life.
7. Smart Reply and Links
#gallery-0-31 { margin: auto; } #gallery-0-31 .gallery-item { float: left; margin-top: 10px; text-align: center; width: 50%; } #gallery-0-31 img { border: 2px solid #cfcfcf; } #gallery-0-31 .gallery-caption { margin-left: 0; } /* see gallery_shortcode() in wp-includes/media.php */
Are you a fan of Smart Compose feature in Gmail? If Yes, then you’ll probably dig this new Android 10 addition. Basically, Google goes sentient and shows contextual quick replies and relevant link-opening apps in the notification. For instance, if a friend of yours sends you an address, the notification will automatically show an “Open Maps” launch option. Cool right?
8. Project Mainline
No need to get startled by the Project Mainline moniker. Simply put, Google will roll out critical security patches and other small system updates via Play Store.
9. Developer Options
#gallery-0-32 { margin: auto; } #gallery-0-32 .gallery-item { float: left; margin-top: 10px; text-align: center; width: 25%; } #gallery-0-32 img { border: 2px solid #cfcfcf; } #gallery-0-32 .gallery-caption { margin-left: 0; } /* see gallery_shortcode() in wp-includes/media.php */
There are plenty of features stuffed inside the Developer options like –
Override Force-Dark – It essentially converts all compatible apps into a dark theme. Compatibility is the key as at the moment, even apps like Whatsapp have inverted color elements in the Status/Story section. However, if apps start adopting the feature natively in their code, then we could one day have a Dark UI across the board.
Bubbles – An option for devs to deploy Facebook Chat Heads like feature onto their apps, primarily for communication notifications.
Freeform and Resizable Activities – As the name indicates, it lets you transform any app into small floating windows on your screen.
Additional Theming option including Accent Color and Headline/Body Font
10. Miscellaneous things
Finally, there are a few features which made the cut here as they didn’t belong specifically in any of the above subheadings. But, that doesn’t make them any less important.
Snappy Share Menu – One of the long-time pet peeves with the Android OS has been its stupid slow sharing menu. Google has listened to the fans and fixed it. Yippie, its considerably fast.
WiFi sharing using QR – This will be an easy way to scan a QR and share your WiFi with the other person, without spelling out or revealing the password.
Intelligent Battery Optimization – Android 10 smartly manages the background power consumption depending upon app characteristics and your usage.
Progress Bar in Media (Music/Video) notification – It shows you a seek bar with the progress of the song or video you’re currently playing. Unfortunately, there isn’t an option to fast forward or backward the media.
OnePlus 7 Pro Android 10 Quick Review
Kudos to OnePlus for catching up to the Pixels in terms of the timely Android 10 update. And for the most part, it apes the goodies of the Queen Cake (which is the internal code name for Android 10). Still, we weren’t able to find some features, found on the Pixel phones running the same update (ahem “Stable”).
The missing and half-baked features are –
Dark Mode toggle in the quick settings menu
Live Caption, which in theory at least transcribes text captions for the media playing on your phone. Google claims that this works in real-time without an internet connection.
Rest, Google has future-proofed the future of Android device ecosystem with support for foldable devices, project mainline, and so on. To sum up, we appreciate the privacy-centric update with nice to have intuitive applications and theming support. We are also ready to look beyond minor gripes like the wonky gesture mechanism. As for now, Android 10 feels like an incremental upgrade towards a more mature operating system, which is reaching for a much larger smarter ecosystem.
OnePlus 7 Pro Android 10 Quick Review Android 10 has officially launched heralding very little aesthetic revamp but more focussed on performance and privacy improvement.
0 notes
Text
How to Install Android 10 on MI Devices
How to Install Android 10 on MI Devices
At present, the Mi MIX 3 5G, Mi 9, and Redmi K20 Pro are in the Android Q Beta program, which is free for developers to use. Follow Below Steps to Install Android 10 on MI Devices.
Simply download the preview tool and you will be able to use it immediately. The Android Q Beta provides you all the features needed to improve the compatibility and development of your application for the next version…
View On WordPress
0 notes
Last Seen Blogs

coffeeshopreads
Where My 💙 Is

paws-gills-and-polyps
A blog for my salty, fresh, and furry pets

troublernaker
ɪᴍᴍᴏʀᴛᴀʟs.

deepestsheepyouth
Naamloos

sirens-wrath
✦ so it goes