#GoogleAppEngine
Explore tagged Tumblr posts
Visit Tumblr Blog
Explore Tumblr blogs with no restrictions, modern design and the best experience.
Last Seen Tumblr Blogs


Fun Fact
Mobile US users spent an average of 115.8 minutes on Tumblr app monthly.
Text
Explore Our Exclusive Instructor-Led-Live Online Training Program by Quality Thought (Transforming Dreams ! Redefining the Future !) What is Google App Engine? 🌐Register for the Course: https://www.qualitythought.in/registernow 📲 contact: 73373 44490 📩 Telegram Updates: https://t.me/QTTWorld 📧 Email: [email protected] Facebook: https://www.facebook.com/QTTWorld/ Instagram: https://www.instagram.com/qttechnology/ Twitter: https://twitter.com/QTTWorld Linkedin: https://in.linkedin.com/company/qttworld Youtube: https://www.youtube.com/qualitythought ℹ️ More info: https://www.qualitythought.in/

#google#googleapp#GoogleAppsScript#googleappengine#GoogleCloud#googlecloudplatform#googleclouddata#googledevelopers#GoogleCloudPartner#googleclouddataengineer#CloudDataManagement#clouddataengineer#cloudengineer#clouddatabase#qualitythoughttechnology#Qtt#qualitythought
0 notes
Photo

Inteligencia Artificial la forma inteligente de conocer y conquistar mercados... #inteligenciaartificial #google #googleappengine #googleia #rentahousecolombia (en Google Colombia) https://www.instagram.com/p/B0I0WCAAuZ9/?igshid=10huou9ga45e9
0 notes

Photo

#turnidgeindustries - website / shop prototyping in progress [link in bio] - it's locked to mobile format for now - As a complete novice adobe muse is pretty fantastic and kind of scary how easy it is to trick yourself into believing that you can make a website but I'm sure I'm making a ton of rookie mistakes - for all of my expert web/graphics/identity friends out there you will at least have a good laugh at my expense - Pretty weak right now if you have any thoughts let me know. Behind the scenes I'm building a shop out with Shopify and attempting to integrate a blogging widget and waiting for ssl encryption at the moment - hosting it for free on google's cloud platform appengine - I need to get back to production though. #furnituredesign #productdesign #architecture #stooldesign #googleappengine #adobemuse #adobe #websitelaunch #kentohio #microfactory #design #adobecc
#kentohio#stooldesign#adobecc#design#microfactory#websitelaunch#adobe#googleappengine#furnituredesign#productdesign#architecture#adobemuse#turnidgeindustries
0 notes
Text
Java ver conexiones al router

#Java ver conexiones al router how to
#Java ver conexiones al router pdf
#Java ver conexiones al router generator
#Java ver conexiones al router full
Sample Android app using clean android-modular-apps Skeleton: Silex framework php and webpack + es6 + sass architecture frontend ionic1todos
#Java ver conexiones al router how to
Sample demonstrating how to delegate authentication in jsreport to an external authorization server to support Single Sign front-silex Simple Router Controller api-with-loopbackĪPI REST build with Loopback.io jsreport-with-author… Timer is a simple coundown app useful for talks and vertical-navigationĪ simple drawing app for Firefox Mozillians_on_Twitte…Ī payload reader for Bitbucket jp-router Playing and learning with react docker-critical-cssĬritical CSS with Docker, puppeteer and flashbitacora Primera aplicacion web para proyecto Open Data de la Municipalidad de react101
#Java ver conexiones al router full
Mira películas y series en español en HD y full HD al instante desde tu compresor-de-imagene…Ĭompresor de imágenes con Google-docs-cloneĪ simple google docs clone made with grunt-external-confi…Įxample of split grunt config file in multiple openhuamanga is still in lowdb-recursiveĭemo del uso de pageres con gulp-primeros-pasos Servo is my server dummy raml-js-webservice-g… Proyecto en JQuery Mobile para construir una web móvil con información del servicio de transporte Metropolitano en Lima, servo Redmine Issues Rest API Client for Metropolitano-Mobile Mapa hidrografico en openlayers del didactic-react (beta) en desarrollo por users-graphql-exampl…Ī small example using opendata-rios-peru JqTree, Spring MVC, GoogleAppEngine jade-examplesĮjercicio demo para el uso de SubeAlMetroĮvaluate a script function on a page with Chrome jsreport-pugĮxperimento tecno-socio-cultural restableciendo conexiones. Notas y ejemplos para presentación en reunión de JavaScript Perú 10 Dic jqtree-spring-mvc-ga… Set and get a data object on an css-url-versioner
#Java ver conexiones al router generator
Un simple boilerplate para el uso de universal js con react, redux y jade-php-twigĪ Yeoman generator for creating your own chatbot using the Hubot mvhostĬreate simple virtualhost for apache2 with EarthquakeĪ CouchDB OAuth working example in htmlService-get-set-…įor Google Apps Script HtmlService. Mira películas y series en español en HD y full HD al couchminĪ command line tool to manage multiple local and remote CouchDB curso-reactjsĭemos y Ejemplos para el curso de universal-redux-boil… Includes: babel, xo, webpack and skeletorĮstructura base para un proyecto basado en jade, stylus, es2015. Reader of dependencies from package.json on es2015-nodejs-boiler…Įs2015 nodejs boilerplate. Node.js modules speed test: C++ vs jscomplexĪ colorful reporter for maintainability index via mydependencies Import sequelize models automagically horseshoeĪ wrapper around nodemailer used for sending email using handlebars json-schema-sugarĬreate a JSON Schema without the pain of writing it node-cppspeed
#Java ver conexiones al router pdf
Jsreport recipe which renders pdf from html using electron gulp-css-url-version…Ī gulp plugin for versioning the CSS property: gulp-emailĪ gulp plugin to send emails with or without attachments from a stream of sequelize-auto-impor… Highly scalable html conversion using electron workers jsreport-electron-pd… Plus for Trello chrome extension, web & mobile electron-html-to Run electron scripts in managed workers Plus-for-Trello 🇵🇪 A list of cool projects made in Peru Contents
0 notes
Text
Python Launcher Mac Download

If you are using Windows, you can download and execute RaspberryJamMod-Installer.exe, it will install the mod, the needed Python library and Python itself for you! If you are using Mac/Linux or Windows but you don’t want to use the installer, download mods.zip and python-sripts.zip, uncompress both and place the mods and mcpipy folders in. PyInstaller’s main advantages over similar tools are that PyInstaller works with Python 3.5—3.9, it builds smaller executables thanks to transparent compression, it is fully multi-platform, and use the OS support to load the dynamic libraries, thus ensuring full compatibility. If you are missing the short-cut, you can find the launcher in the launcher subdirectory of your App Engine installation. The default location is C: Program Files Google googleappengine launcher GoogleAppEngineLauncher.exe In Mac OSX, the Launcher is installed by dragging it out of the.dmg to a location specified by the user.
Python Launcher Not Working
Download Python Launcher
Quick installation guide

Get Minecraft running with Forge installed on it. Donwload both RaspberryJam and PythonTool mods for your favourite Minecraft version. Install them by placing the .jar mod files in your minecraft/mods/**version**/ folder. RaspberryJam’s mcpipy folder needs to be present in minecraft/mcpipy as well, it can be downloaded from the same link under the name python-sripts.zip. Install Python as well, both Python 2 or Python 3 will work.
PythonTool Mod uses a personal folder of your choice to store your scripts. This folder can be changed to any in your system in PythonTool’s configuration menu, in Minecraft main menu. By default it points to the minecraft/mcpipy folder you just downloaded, so that you can use the many examples that come there.
To use your selection of scripts, create a folder called pythontool in your desktop and move your desired scripts there. Change the personal folder in PythonTool’s settings menu. All the Python scripts present in this folder will be in the Computer Block from PythonTool.
Have a look at the user guide to learn everything about PythonTool Mod, and check the start coding guide to learn about how to make your own scripts. Happy programming!

Full installation guide
Download and install Minecraft
Buy and download Minecraft: visit https://minecraft.net/en/, create or log-in with your account and download the game selecting Windows/Mac OS/Linux as corresponding to your system. If you haven’t purchased Minecraft, you will need to do so in order to download and play it.
Install Minecraft: using the installer you’ve just downloaded, just follow the instructions! It would be better to install it in the default folder. If for some reason you don’t want it there, change it and remember your custom installation path.
Open Minecraft: after some downloads, log-in using your username and password. You will get to the Minecraft launcher.
Get Minecraft ready for Forge (mod loader)
Click on Edit Profile
Click on Use version: and select the game version of your choice (see above that PythonTool is available for all modern Minecraft versions, choose your favourite). If in doubt, why not try the most recent one, 1.10.2?
Click Play, to download and open the game. Once the game is loaded at least once, we can go ahead and download Forge. Close Minecraft.
Download and install Forge
Choose the appropriate version of Forge in the Downloads section just above, click on the link and you’ll be taken to the official Forge website. You want to download the recommended installer (Mac/Linux) or installer-win (Windows).
Install Forge: open the file you’ve just downloaded and select Install client and the Minecraft installation path: if you used the default one, just click OK, if you changed it, point the installer to your custom installation path.
Open Minecraft, click on Profile, now there should be a new user apart from your user name, select forge. On the right hand side it should say Ready to update & play Minecraft 1.8-forge…. If it doesn’t, repeat step 5, and select the option at the bottom of the Use version: list. When it’s ready, click Play.
You should see a slightly different Minecraft main menu, there should be some info on the bottom-left, and a new Mods button. Great, you’re nearly there! Close Minecraft.
Install Python
Linux and Mac come with Python installed by default, so you don’t need to do anything. On Windows, Python can be easily downloaded and installed from here. Maybe the easier option is to use RaspberryJam’s full installer which will install the mod and Python, see next step.
Install RaspberryJam Mod
Python Launcher Not Working
Visit RaspberryJam’s website
If you are using Windows, you can download and execute RaspberryJamMod-Installer.exe, it will install the mod, the needed Python library and Python itself for you!
If you are using Mac/Linux or Windows but you don’t want to use the installer, download mods.zip and python-sripts.zip, uncompress both and place the mods and mcpipy folders in your Minecraft installation folder. Default installation paths are:
Windows: Users**yourUserName**AppDataRoaming.minecraft
Mac OS: ~/Library/Application Support/minecraft
Linux: /Home/**yourUserName**/.minecraft/
In the end it should look like: minecraft/mods/**version**/RaspberryJamMod.jar, replacing **version** by the Minecraft version, for example 1.10.2.
Install PythonTool!
Download PythonTool from the download section above, remember to choose the right version!
Move this file to Forge’s mods folder, which is located in your Minecraft installation folder, select the appropriate version folder inside mods folder. Default installation paths are:
Windows: Users**yourUserName**AppDataRoaming.minecraftmods
Mac OS: ~/Library/Application Support/minecraft/mods
Linux: /Home/**yourUserName**/.minecraft/modsIf you changed it when you installed Minecraft, use your custom path.
Download Python Launcher
Configure PythonTool!
In this last tiny step, we will quickly configure PythonTool. The way it works is, you specify a folder of your choice, and place your scripts there, then when you open the Computer Block in your Minecraft world, all those scripts will appear there as Python Script items, which you can carry and use whenever you want!
So the only thing we need to do is to make sure PythonTool knows which folder you wish to use. By default it points to a folder in your installation path full of example scripts (so many that they don’t fit all in the Computer Block). If you want to have a look at those, great! But at some point you’ll want to create your own, or to make a selection. Just follow this steps:
Create our custom folder called maybe pythontool, in Desktop (for example)
Open Minecraft, and in the main screen go to Mods, select PythonTool Mod, and click on Config. This is the configuration menu, click on Script Path Configuration. Here there are two configuration fields:
mcpipy folder: this points to RaspberryJam Mod’s folder in your Minecraft installation path. If you have installed everything in the default directories, it is already pointing to the right place.
Script folder: this is your custom folder, type the address of your custom folder. For our pythontool folder in Desktop, if you are using Windows, it will look like this: Users**yourUserName**Desktoppythontool.
Everything should be ready now, click on Done a few times to go back to the main screen, and start your world. Enjoy!
0 notes
Text
UIUCTF 2020: Cricket32
This writeup will be an example in using angr to “automatically” solve this problem. But along the way, we’ll find two deficiencies in angr, and show how to fix them! Beyond being a writeup of this problem -- there is very little information specific to this challenge -- this can serve as an angr use and development tutorial.
Challenge:
We are given a file cricket32.S, which contains 32-bit x86 assembly and instructions for assembling:
// gcc -m32 cricket32.S -o cricket32 .text str_usage: .string "Usage: ./cricket32 flag\nFlag is ascii with form uiuctf{...}\n" str_yes: .string "Flag is correct! Good job!\n" str_nope: .string "Flag is not correct.\n" .global main main: mov $str_usage, %ebx xor %esi, %esi SNIP jmp printf
Note that the -m32 flag will force gcc to compile a 32-bit executable. The assembly is pretty short, but has a few hard-to-interpret instructions, such as aaa (ASCII Adjust After Addition), sahf (Store AH into Flags), and so on. It's possible these are filler meant to distract; it's also possible that they're being used as part of some bizarre check, or as data (if the program is reading its own code).
Approach
Instead of trying to reverse engineer this ourselves, we'll be using angr to solve for the input. For background, angr is a tool that turns the problem of "get this program into this particular state" into a constraint problem. We interact with angr mostly through the functions explore(), which tells to seek out various states (such as printing "Success!"), and add_constraints(), which let us tell angr rules about the input or states of the program. Let's dive in!
After compiling cricket32, we open it up in IDA to see what addresses we might care about:
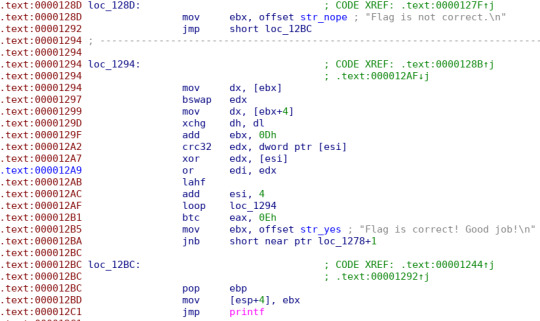
We see that if the code reaches 0x12BD, it will load str_nope, and then proceed straight to loc_12BC and printf. This is our failure condition. We'll load the binary in angr and tell to find an input that allows us to avoid that address, 0x12BD.
import angr import claripy project = angr.Project("./cricket32", auto_load_libs=True) flag_len = 32 arg1 = claripy.BVS('arg1', flag_len*8) initial_state = project.factory.entry_state(args=["./cricket32", arg1])
Here arg1 is our symbolic representation of the argument to the binary. We've allocated 32 bytes to (flag_len), hoping this is enough. Since arg1 can have zero-bytes, effectively being shorter than 32, this will work as long as the flag is at most 32 bytes long.
Running the above code produces the output:
WARNING | 2020-07-19 20:08:15,647 | cle.loader | The main binary is a position-independent executable. It is being loaded with a base address of 0x400000.
so the address that we wanted to avoid, 0x12bd, will actually be 0x4012bd. Let's now explore for that address:
sm = project.factory.simulation_manager(initial_state) sm.explore(avoid=[0x40128D])
Unfortunately, we are left with the result <SimulationManager with 26 avoid (7 errored)>. When angr explores paths, it has a few different "stashes" that paths can be in. There are:
active: paths that have not been fully explored yet
deadended: which is paths that terminated the program
avoid: paths that reached somewhere we didn't want it to
found: paths that found an explicit destination request (we gave no such destination here)
errored: indicating that angr was unable to continue with a path.
Ideally we would have had a deadended path here, meaning that a program successfully terminated without reaching the avoided point of 0x4012bd. Since we didn't, let's take a look at the errors.
sm.errored[0] will get the first state in the errored stash, and on the console we get:
<State errored with "IR decoding error at 0x4012a2. You can hook this instruction with a python replacement using project.hook(0x4012a2, your_function, length=length_of_instruction).">
What's 0x4012a2? Looking in IDA again, we see the crc32 edx, dword ptr [esi] instruction. The crc32 instruction is used to compute a cyclic redundancy check. This is a somewhat complicated operation, and generally rare, so it's not terribly surprising that angr doesn't know how to translate it into constraints. As suggested, we can implement a hook to emulate this.
Angr Hooks
A hook in angr is used to modify or replace a piece of code. A syscall instruction may, for instance, invoke some complicated kernel behavior, and hooking it could allow us to substitute our own behavior; or a simple call might be hooked to modify the execution. When writing a hook, it is important to remember we are working with symbolic values, not actual integers, so that we ultimately return a mathematical expression representing the modified state.
Our hook will intercept the crc32 instruction, emulate it, and then return control flow at the end of the instruction. The crc32 instruction is 5 bytes long, so our hook starts:
def crc32_hook(state): pass project.hook(0x4012a2, crc32_hook, length=5)
Next we need to implement the correct behavior. Since all computations must be symbolic, we can't just use a library implementation of CRC32. Additionally, most CRC32 implementation use the "CRC-32" specification, with the 0x04C11DB7 polynomial (essentially a magic number). The x86 crc32 instruction instead uses the "CRC-32C", or "Castagnoli", specification, with the 0x1EDC6F41 polynomial. Some googling turns up this implementation of CRC-32C we can adapt.
CRC_TABLE = ( 0x00000000, 0xf26b8303, 0xe13b70f7, 0x1350f3f4, # ... SNIP ... 0xbe2da0a5, 0x4c4623a6, 0x5f16d052, 0xad7d5351, ) table_dict = {i: claripy.ast.bv.BVV(CRC_TABLE[i],32) for i in range(256)} def get_crc32_table_BVV(i): i = i.to_claripy() return claripy.ast.bool.ite_dict(i, table_dict, 0xFFFFFFFF) def crc32c(dst,src): b32 = src crc = dst for i in [3,2,1,0]: b = b32.get_byte(i) shift = (crc >> 8) & 0x00FFFFFF onebyte = crc.get_byte(3) crc = get_crc32_table_BVV(onebyte ^ b) ^ shift return crc
Here we need to do a symbolic table lookup, which we can implement with ite_dict. ite_dict(i, table_dict, 0xFFFFFFFF) means that we use the key-value pairs in table_dict to look up i; the default value will be 0xFFFFFFFF is not in the dict (but in our case it always will be). Then our crc32c method computes the update to running CRC32 dst using the four bytes in src. Our hook is then:
def crc32_hook(state): crc = state.regs.edx addr = state.regs.esi b32 = state.memory.load(addr).reversed print('CRC32 accessing ',b32) state.regs.edx = crc32c(crc, b32)
This clearly not a drop-in replacement for any crc32 instruction: we've hard-coded that the source operand is dword ptr [esi] and our destination is edx. But that will work for our purposes here. After adding our hook, we reload the initial state and explore as before. The search continues for a few seconds, until we get a very long stack trace that eventually ends:
RecursionError: maximum recursion depth exceeded while calling a Python object
Urk.
Removing recursion
This turns out to stem from a shortcoming of how ite_dict is implemented. It passes the dictionary to ite_cases, which loops a claripy.If expression -- essentially a ternary operator. In our case, this produces an expression like
claripy.If(i == 0, 0x00000000, claripy.If(i == 1, 0xf26b8303, claripy.If(i == 2, 0xe13b70f7, claripy.If(i == 3, 0x1350f3f4, ... <255 levels like this> ))))
and when Z3 (the backend constraint solver) tries to analyze this, it balks at the depth of the expression. There are two options now: (1) implement a better version of ite_dict, or (2) use a table-free imeplemtation of CRC-32C. In the competition, we used option (2). Googling some more for how to generate the table leads us to this page on generating the table. Instead of generating a table and storing it, we can just "recompute" (symbolically) the value each our crc32 instruction is hit. This leads to the code,
def get_crc32_calc_BVV(i): crc = i.zero_extend(32 - i.size()); if isinstance(crc, angr.state_plugins.sim_action_object.SimActionObject): crc = crc.to_claripy() for j in range(8): shift = ((crc >> 1) & 0x7FFFFFFF) cond = crc & 1 > 0 crc = claripy.If(cond, shift ^ 0x82f63b78, shift); return crc
The crc.to_claripy() here is necessary in case angr passes us a SimActionObject instead of an actual symbolic value. Then the rest of the operations work just like the C code in the link above, with the claripy.If replacing C's ternary operator. Then we replace the appropriate line in our crc32c function to use get_crc32_calc_BVV instead of get_crc32_table_BVV. Looking at our code so far:
import angr import claripy #copy implementation from https://medium.com/@chenfelix/crc32c-algorithm-79e0a7e33f61 def get_crc32_calc_BVV(i): crc = i.zero_extend(32 - i.size()); if isinstance(crc, angr.state_plugins.sim_action_object.SimActionObject): crc = crc.to_claripy() for j in range(8): shift = ((crc >> 1) & 0x7FFFFFFF) cond = crc & 1 > 0 crc = claripy.If(cond, shift ^ 0x82f63b78, shift); return crc def crc32c(dst,src): b32 = src crc = dst for i in [3,2,1,0]: b = b32.get_byte(i) shift = (crc >> 8) & 0x00FFFFFF onebyte = crc.get_byte(3) crc = get_crc32_calc_BVV(onebyte ^ b) ^ shift return crc def crc32_hook(state): crc = state.regs.edx addr = state.regs.esi b32 = state.memory.load(addr).reversed print('CRC32 accessing ',b32) state.regs.edx = crc32c(crc, b32) project = angr.Project("./cricket32", auto_load_libs=True) flag_len = 32 arg1 = claripy.BVS('arg1', flag_len*8) initial_state = project.factory.entry_state(args=["./cricket32", arg1]) sm = project.factory.simulation_manager(initial_state) project.hook(0x4012a2, crc32_hook, length=5) sm.explore(avoid=[0x40128D])
At the end we are left with: <SimulationManager with 6 deadended, 33 avoid>. Fantastic! That means 6 paths successfully terminated without hitting 0x4012bd. Each of these SimStates are listed in sm.deadended. To get the input, we can call state.make_concrete_int(arg1), which will return arg1 as a big integer; then .to_bytes(32,"big") to turn it into a string:
>>> for state in sm.deadended: ... state.make_concrete_int(arg1).to_bytes(32,"big") ... b'uiuc\xdbK\xdf\x9d\xf0N\xd6\x95cket_a_c\xddL\xc7\x97it}\x00\x00\x00\x00\x00' b'\xdaD\xd1\x9ftf{a_cricket_a_c\xddL\xc7\x97\xc6Y\xd9\xfc\x00\x00\x00\x00' b'uiuctf{a\xf0N\xd6\x95\xccF\xc1\x88_a_crack\xc6Y\xd9\xfc\x02\x00\x00\x00' b'\xdaD\xd1\x9f\xdbK\xdf\x9d\xf0N\xd6\x95cket_a_c\xddL\xc7\x97\xc6Y\xd9\xfc\x10\x10\x00\x00' b'\xdaD\xd1\x9ftf{a_cri\xccF\xc1\x88\xf0L\xfb\x9frack\xc6Y\xd9\xfc \x01\x00' b'uiuctf{a\xf0N\xd6\x95\xccF\xc1\x88_a_c\xddL\xc7\x97\xc6Y\xd9\xfc\x01\x04\x01\x08'
We see that angr has found 6 solutions that technically would work as input to the program, and indeed several start with uiuctf{ -- a sign we're on the right track! But they're filled with non-printable characters. The astute eye might piece together the flag from the above malformed fragments, but the "right" thing to do is to do tell angr that each byte of input will be printable ASCII (or zero).
Cleanup
for b in arg1.chop(8): initial_state.add_constraints((b == 0) | ((b > 31) & (b < 127))) for i in range(len("uiuctf{")): b = arg1.chop(8)[i] initial_state.add_constraints(b == ord("uiuctf{"[i]))
It's important to note that -- perhaps a bit surprisingly -- compound constraints are formed using | and &, not Python's or and and keywords. arg1.chop(8) breaks the 256-bit vector arg1 into a list of 8-bit bytes, and we add a constraint for each byte. The second loop actually forces that the flag starts with uiuctf{. Probably not strictly necessary, but will definitely accelerate solving. This code gets inserted right before initial_state = project.factory.... The evaluation now takes less than a minute, and ends with
<SimulationManager with 1 deadended, 26 avoid> >>> >>> for sol in sm.deadended: ... print(sol.posix.dumps(1)) ... sol.make_concrete_int(arg1).to_bytes(32,"big") ... b'Flag is correct! Good job!\n' b'uiuctf{a_cricket_a_crackit}\x00 @@\x00'
Flag get!
A reality check
In practice, progress wasn't quite this linear. Some gotchas I encountered were:
Needing to use .to_claripy() in the hook -- if you don't, the hook runs fine, and then you get weird and inscrutable errors later.
Figuring out what the recursion error was coming from. Was determined by shrinking the dictionary size and watching the problem go away (although of course no solution was found).
Lots of byte-ordering issues. angr will often store the bytes the opposite order you expect, so e.g. forcing the string to start with uiuctf{ was something initally done backwards.
LOTS more byte-ordering issues in implementing the CRC. And sign-bit madness. If you think translating bit-fiddly C code to Python is bad, try translating bit-fiddly C code to symbolic Python with unusual endianness.
This program is small enough that it might have been very routine to solve with angr in just a few lines of code, or that IDA might have decompiled it into something very readable. angr was thwarted by the crc32 instruction. It is worth noting that, had the binary been 64-bit, angr would have known how to do a CRC32; 32-bit executables are less supported. And IDA refused to parse the main code chunk as a function, because it couldn't handle the jump-to-the-middle-of-an-instruction we see at 0x12ba. IDA already parsed an instruction at 0x1278, so a jump to 0x1279 broke it. Finally, the ASCII-Adjust operations (aaa) are pretty rare, and I was surprised that angr supported them. I doubt many decompilers would.
Postscript: A better ite_dict
During the competition, I use a loop implementation of CRC-32 that didn't use a table. In practice, there's little reason why a table couldn't be used, if the if-then-else statement went in a binary tree instead. So I wanted to try that too! Code:
#Improved version of ite_dict that uses a binary search tree instead of a "linear" search tree. #This improves Z3 search capability (eliminating branches) and decreases recursion depth: #linear search trees make Z3 error out on tables larger than a couple hundred elements.) # Compare with https://github.com/angr/claripy/blob/f2c1998731efca4838a4edb9dec77e0424c5f691/claripy/ast/bool.py#L164 def ite_dict(i, d, default): i = i.ast if type(i) is claripy.ast.base.ASTCacheKey else i #for small dicts fall back to the old implementation if len(d) < 4: return claripy.ast.bool.ite_cases([ (i == c, v) for c,v in d.items() ], default) #otherwise, binary search. #Find the median: keys = list(d.keys()) keys.sort() split_val = keys[len(keys)//2] #split the dictionary dictLow = {c:v for c,v in d.items() if c <= split_val} dictHigh = {c:v for c,v in d.items() if c > split_val} valLow = ite_dict(i, dictLow, default) valHigh = ite_dict(i, dictHigh, default) return claripy.If(i <= split_val, valLow, valHigh) def get_crc32_table_BVV(i): i = i.to_claripy() return ite_dict(i, table_dict, 0xFFFFFFFF)
With this modified version of get_crc32_table_BVV, the table-based code ran fine. Interestingly, it took several minutes to solve -- quite a bit slower than the "slow" and "complicated" loop-based implementation. In general though, I expect the binary tree would be faster for Z3 to analyze than a linear expression. I've created a pull request to get this improvement into angr, hopefully. :)
EDIT: It got merged -- hooray for CTFs leading to productive behavior!
0 notes
Photo

Google App Engine announced runtime updates for Node.js 12, Go 1.13, PHP 7.3, and Python 3.8. Now companies and developers can build mobile applications with their favorite tools and frameworks. For mobile app development services, contact us: https://bit.ly/3cJCdxG
#GoogleAppEngine #Python #PHP #GO #Nodejs #sourcesoft
0 notes
Text
重写了 strpwdgen.appspot.com
大约 5 年前,徒手写了一个 HTML 的“随机强密码生成器”,并且 host 在了 Google App Engine 上。当时 manifest 中声明的是 Python 2.5 的 runtime,虽然这个 single-page app 中其实并没有任何需要动态生成的内容。前不久 Google 发来通知告知所有 Python 2.5 的 app 即将删除,需要尽快迁至 Python 2.7。于是决定利用这个机会重新折腾一下。
这个 webapp 基本原理就是通过 JavaScript 的 Math.random() 生成随机数多次,并映射到一个指定长度的字符串。此 webapp 有生成指定长度随机密码和 UUID 两种功能,并可复制到剪贴板方便使用。由于 JavaScript 的 Math.random() 是不能设置 seed 的,这个 webapp 只能当个玩具用用。如需生成“真正”的随机数,必须从浏览器外获取熵源(例如,通过让用户在一段时间内随意晃动鼠标并收集坐标等)。
本次重写主要进行了以下几个尝试:
Mobile 设备上显示字体太小,使用不方便。这次用 Bootstrap 框架写表单,只需加一行 responsive 的声明就自动搞定了。
尝试在 Bootstrap 框架内实现了一个类似 Windows 中的 NumericUpDown 控件。
尝试了一下 JavaScript 的一些新特性。例如,当年的浏览器还不支持通过 JavaScript 操作剪贴板,现在主流浏览器都可以直接使用 document.execCommand('copy') 直接把选定的内容复制到剪贴板了。
尝试了一下使用 uglify 和 minimizer 工具,貌似 uglify 稳定版本尚不支持 ES6 的语法,需要使用测试版本中的功能。
待解决的问题:
iPhone 的 Safari 浏览器上剪贴板功能不太正常。
0 notes
Text
ブログをwpXレンタルサーバーからwpX Speedへ移行
新年あけましておめでとうございます。今年もよろしくお願いいたします。 2020年1月1日はこのブログのサーバー移行で結構手間取っていた。 このブログはしばらくwpXレンタルサーバーで運用していたけど、昨年の10月時点でwpXレンタルサーバーのサービス終了予告と新サービスのwpX Speedが発表されていた↓ https://www.wpx.ne.jp/server/news_detail.php?view_id=1915 思い返すと、このブログは最初GoogleAppEngineで立ち上げ、その後AWSへ移行、そしてコストパフォーマンスの関係でwpXレンタルサーバーに落ち着いたのだった。 wpXレンタルサーバーに乗り換えたのは2015年だったから、wpXレンタルサーバーをもう4年以上使っていたんだな↓ https://blog.negativemind.com/2015/11/26/word…
View On WordPress
0 notes
Text
SlackApp快速開発 - デプロイ(GAE with CircleCI)
前回、BoltベースのSlackAppを開発するためのローカル環境を作りました。今回はそれを実際に使えるようにデプロイします。デプロイ先はGoogleAppEngine(以下GAE)で、最終的にCircleCIを利用して自動的にデプロイされることを目指します。SlackAppと快速開発と言いながらほとんどはGAEとCircleCIの話なのでSlackApp以外にも簡単に応用できます。 from Trial and Spiral https://blog.solunita.net/develop-slack-app-comfortably-fast-deploying-on-gae-with-ci/
0 notes
Link
0 notes
Text
Google App Engine 又出問題
前幾天剛把MacOS升級了一下(為了看看iTunes歌詞的bug修復好未),然後一陣沒用的google app engine(python)一開,又發現突然不能用了(server不能start)!!
題外話:升級完的時候,曾經因為npm報錯而更新了一下,不知道與此有否關係
以後更新module或plugin時(例如npm或pip),還是進GAE進一下應用們有否生鏽
看了一下console log,發現下面報錯:
/應用程式/GoogleAppEngineLauncher.app/Contents/Resources/GoogleAppEngine-default.bundle/Contents/Resources/google_appengine/google/appengine/dist27/socket.py
我純粹猜是是和OS升級有關。
stackoverflow了一下solution——把哪裡出問題就把哪裡掩起來——按說法是OpenSSL把RAND_egd這個module deprecated了(不再include),而我們的GAE沒更新過一直接照import
0 notes
Text
Django-nonrel count() with limit on Google App Engine
Google's App Engine's has a Query.count(limit=<limit>) method where the performance is based on the number of entities counted. So the more entities in your database, the longer this takes to return.
You can short-circuit the count by including a limit, so even if there's a large number out there, the call will return within a somewhat-manageable time frame.
The problem is that Django's Queryset.count() method doesn't allow a limit parameter. Luckily there's a hackaround:
queryset.query.high_mark = limit count = queryset.count() queryset.query.high_mark = None
With the default value of queryset.query.high_mark = None, it will run until it returns the full count, or potentially times out due to the large number of results.
16 notes
·
View notes