#Grout and Caulk Repair
Text
Masterpiece Tile and Grout is your go-to expert for tile grout repair service in DFW area. We specialize in restoring the beauty and functionality of your tiled surfaces, ensuring that your grout is sealed and protected against moisture and staining. Our experienced technicians are skilled in matching your existing grout color, providing a seamless repair that blends perfectly with your tiles.
Masterpiece Tile and Grout
5803 Ridge Drive, Arlington, TX 76016
(817) 770–7275
My Official Website: https://www.masterpiecetileandgroutdfw.com/
Google Plus Listing: https://www.google.com/maps?cid=9304022979906256141
Our Other Links:
Grout and Caulk Repair DFW: https://www.masterpiecetileandgroutdfw.com/general-tile-grout-dfw
Shower Pan Replacement DFW: https://www.masterpiecetileandgroutdfw.com/showers
Service We Offer:
Shower Repairs
Bathroom Services
Kitchen Services
General Tile Services
Follow Us On:
Facebook: https://www.facebook.com/people/Masterpiece-Tile-Grout/100091066913580/
Linkedin: https://www.linkedin.com/company/masterpiece-tile-&-grout/about/
Twitter: https://x.com/MasterpieceTil
Pinterest: https://www.pinterest.com/MasterpieceTileandGrout/
#Tile Grout Repair Service DFW#Grout and Caulk Repair DFW#Custom Shower Pan Dallas#Shower Pan Replacement Near Me#Tile Floor Company DFW
0 notes
Text
Concrete Grouting in Sydney
Concrete Grouting in Sydney is essential for ensuring the strength, durability, and longevity of various concrete structures. For top-quality grouting services, trust Concrete Grouting Sydney by Civcom Patch & Caulk. Known for their expertise and commitment to excellence, Civcom Patch & Caulk is a leading provider of concrete grouting solutions in the Sydney area.
Civcom Patch & Caulk offers a…
#Caulking#Caulking Services Sydney#Commercial Caulking Services Sydney#Commercial Caulking Sydney#concrete#Concrete Grouting#Concrete Grouting in Sydney#Concrete Grouting Sydney#Concrete Repairs Services in Sydney#Concrete Repairs Sydney
0 notes
Text
How Can You Identify Mold and Mildew in Your Shower?
Mold and mildew are common problems in bathrooms, where they find the perfect environment to grow and spread. They can ruin the appearance of your shower and cause health issues for you and your family. That’s why it’s important to keep your bathroom clean and dry and to spot any signs of mold and mildew as soon as possible.
This article explores how to identify mold and mildew in your shower and how to get rid of them effectively so you can enjoy a fresh and healthy bathroom.

Understanding Mold and Mildew
Mold and mildew are fungi that can grow in moist environments, indoors and outdoors. Though often mentioned together, they have distinct characteristics.
Mold is usually darker in color, ranging from black to green, and can penetrate beneath the surface of the affected material, leading to more significant damage.
Mildew, on the other hand, tends to be lighter, appearing white or gray, and usually grows on the surface, making it easier to clean.
The primary culprits behind the growth of mold and mildew in showers are high humidity levels, poor ventilation, and standing water. Bathrooms, especially showers, provide the perfect breeding ground for these fungi due to the constant moisture and warmth.
Lack of adequate ventilation traps moist air inside, while residual water from showers contributes to the damp conditions that mold and mildew thrive in. Regularly leaving wet towels or shower curtains in the area can also exacerbate the problem.
Identifying Mold and Mildew in Your Shower
Recognizing the signs of mold and mildew in your shower is essential for maintaining a healthy living environment.
Visual Identification
Mold typically appears as irregularly shaped spots that can range in color from black, green, or red, indicating a deeper infestation that might require more aggressive treatment. Mildew often looks like powdery or fluffy patches of white or gray on the surface of shower walls, floors, or curtains. You're likely to find mold and mildew in the grout lines between tiles, on ceilings, in corners, and around the edges of showers where water tends to collect.
Smell
A musty, earthy odor is a telltale sign of mold and mildew presence, even if you can't immediately see it. This smell is due to the microbial volatile organic compounds (MVOCs) produced by the fungi as they grow. If you notice such an odor in your bathroom, it's time to inspect your shower for visible signs of mold and mildew.
Health Symptoms
Exposure to mold and mildew can lead to various health issues, particularly for individuals with allergies, asthma, or weakened immune systems. Symptoms may include sneezing, coughing, skin irritation, and respiratory problems. If members of your household start to experience these symptoms without a clear cause, it could indicate a mold or mildew problem in the home, necessitating a thorough inspection and remediation effort.
The Risks of Ignoring Mold and Mildew
Ignoring mold and mildew in your shower doesn't just leave an unsightly blemish; it can have serious implications for both your health and your home.
Health Risks
Prolonged exposure to mold and mildew can significantly affect your health. Individuals with allergies, asthma, or compromised immune systems are especially at risk. Health complications can range from mild symptoms like sneezing, coughing, and skin irritation to more severe respiratory issues.
Damage to Your Home
Beyond health concerns, mold and mildew can cause considerable damage to your home. They can eat away at grout and caulk, leading to leaks that may result in structural damage over time. Porous surfaces like wood and drywall can absorb mold, necessitating costly repairs and replacements.
How to Remove Mold and Mildew
Eliminating mold and mildew from your shower requires careful attention to both the cleaning products you use and the methods you employ.
Initial Cleaning Steps
Before tackling mold and mildew:
Equip yourself with gloves and a mask to avoid direct contact with harmful spores.
Ensure the bathroom is well-ventilated to disperse any airborne spores and cleaning fumes.
Start by scrubbing the affected areas with a stiff brush and a mixture of water and mild detergent to remove surface mold and mildew.
For persistent spots, you may need a more potent solution.
Recommended Products
For a more effective cleaning, MARBLELIFE Mold & Mildew Stain Remover Cleaner is highly recommended. Specially formulated for bathroom surfaces, this cleaner penetrates deep to eliminate mold and mildew at the source. Its powerful cleaning agents are designed to tackle the toughest stains without damaging your tiles, grout, or shower surfaces.
Application Tips
When using MARBLELIFE Mold & Mildew Stain Remover Cleaner, follow these tips for the best results:
Apply the cleaner directly to the affected areas and allow it to sit for few minutes. This dwell time helps the solution penetrate deeply and break down the mold and mildew.
Use a brush or sponge to gently scrub the area after application. For stubborn stains, a second application may be necessary.
Rinse thoroughly with water after cleaning and dry the area to prevent future mold and mildew growth.
Regular use of MARBLELIFE Mold & Mildew Stain Remover Cleaner as part of your cleaning routine can help prevent the recurrence of mold and mildew, keeping your shower clean and healthy.
Act Now to Protect Your Home and Health
The presence of mold and mildew in your shower is not just a cosmetic issue but a health and structural hazard that requires immediate attention.
If you're facing persistent mold and mildew issues or are unsure about tackling the problem yourself, seek professional help.
MARBLELIFE offers a free consultation to assess your situation and recommend the best course of action.
2 notes
·
View notes
Text
I hate being poor
I hate that “having nice things” is only for wealthy people
And by “nice things” I mean proper grout between the titles and tub in their bathroom, proper caulk in the seams of the shower
Plaster that’s not riddle with cracks
The peace of mind that if they have to call a contractor to do repairs, it just means they can’t go on vacation—not “if they find unaddressed structural problems it’s going to wipe out all of your savings”
It’s exhausting
#if your response is: oh just diy then please shut the fuck up#no NOT every goddman thing can be done yourself#I already caulked my bathtub myself I’m doing what I’m able to#with a full time job minimal mechanical skills and fucking depression
2 notes
·
View notes
Text
Guy who enjoys...
Repairing roofing
Grouting
Caulking
Yardwork
4 notes
·
View notes
Text
HANDYMAN
Furniture Assembly:
Assists with assembling flat-pack furniture like desks, chairs, bookshelves, or cabinets
Electrical Repairs:
Repairs electrical issues such as faulty outlets, light fixtures, switches, and appliance installations.
Painting and Touch-Ups:
Offers interior or exterior painting, including wall repairs, touch-ups, or full room painting.
Drywall Repair:
Fixes holes, cracks, or water damage in walls and ceilings, ensuring a smooth finish.
Caulking and Sealing:
Applies caulk around windows, doors, and bathrooms to prevent drafts or water leaks.
Gutter Cleaning:
Removes debris and clogs from gutters to prevent water damage to the roof and foundation.
Appliance Installation:
Installs new appliances like dishwashers, washing machines, and ceiling fans.
Tile and Grout Repair:
Repairs or replaces broken tiles, cleans or re-grouts surfaces in bathrooms and kitchens.
Deck and Fence Repairs:
Fixes damaged boards, posts, and rails on decks or fences, including staining or painting.
Carpentry Services:
Handles minor carpentry tasks such as installing shelves, building storage solutions, or repairing woodwork.
Window and Door Repair:
Repairs or replaces broken windows, aligns misaligned doors, and installs weather stripping.
Power Washing:
Cleans driveways, patios, siding, or decks using high-pressure water to remove grime, mold, and dirt.
Lock Installation and Repair:
Installs new locks, repairs broken locks, or re-keys existing locks for security.
Shelving Installation:
Installs custom or pre-made shelving units in closets, garages, or offices for better organization.
Flooring Installation and Repair:
Installs or repairs hardwood, laminate, or tile flooring.
Minor Roof Repairs:
Fixes small leaks, replaces damaged shingles, and clears debris from roof surfaces.
TV Mounting:
Securely mounts flat-screen TVs to walls and conceals wires for a cleaner look.
Blind and Curtain Installation:
Installs blinds, shades, or curtain rods to improve privacy and light control in your home.
Weatherproofing:
Installs weatherstripping, door sweeps, and window film to improve insulation and energy efficiency.
Garage Door Maintenance:
Lubricates, adjusts, and repairs garage door mechanisms, including opener systems and springs.
With multiple locations throughout North Shore and Northwest suburbs of Chicago, Illinois, Emergency Plumbing offers prompt and professional handyman services.
Phone
224-754-1984
0 notes
Text
DIY Fixes That Boost Your Home's Value Before Selling
When preparing to sell your home, making strategic upgrades and repairs can significantly enhance its value and appeal to potential buyers. While some improvements may require professional help, there are several DIY fixes that you can tackle on your own to increase your home's market value and attract more interest. Here’s a comprehensive guide to DIY fixes that can boost your home’s value before selling:
1. Freshen Up with a New Coat of Paint
One of the most cost-effective ways to increase your home's value is by applying a fresh coat of paint to sell house Grand Junction fast. A well-painted home looks clean and updated, making it more attractive to buyers.
How to Do It:
Choose Neutral Colors: Opt for neutral shades like beige, gray, or white, which appeal to a wide range of buyers and make spaces feel larger and more inviting.
Focus on Key Areas: Paint high-traffic areas such as the living room, kitchen, and hallways. Don’t forget to touch up or repaint trims, doors, and ceilings.
Prep Properly: Clean and patch any holes or cracks in the walls before painting. Use painter's tape to protect trim and edges.
Benefits:
Increases Appeal: A fresh coat of paint gives your home a clean, updated look, making it more appealing to buyers.
Enhances Light and Space: Neutral colors can make rooms appear larger and brighter, which can be a significant selling point.
2. Update Cabinet Hardware
Changing outdated cabinet hardware is a simple yet impactful upgrade that can give your kitchen or bathroom a fresh, modern look and enhance your chances to sell house Grand Junction quickly.
How to Do It:
Select Stylish Hardware: Choose contemporary knobs and handles that complement your cabinets and overall decor.
Match Finishes: Ensure the hardware finish matches other fixtures and elements in the room, such as faucet finishes or lighting.
Install with Precision: Remove old hardware and align new pieces with existing holes to avoid extra drilling.
Benefits:
Modernizes Spaces: New cabinet hardware gives an instant update to kitchens and bathrooms without the need for a full remodel.
Cost-Effective: This is a budget-friendly upgrade that can have a significant visual impact.
3. Enhance Curb Appeal with Landscaping
First impressions count, and improving your home’s curb appeal can make a big difference. Well-maintained landscaping creates an inviting exterior that can attract more buyers.
How to Do It:
Mow and Trim: Regularly mow the lawn, trim bushes, and edge garden beds to keep the exterior looking neat.
Plant Flowers: Add seasonal flowers or shrubs to brighten up the garden and create visual interest.
Clean Up: Remove weeds, dead leaves, and debris. Consider pressure washing pathways and driveways.
Benefits:
Improves First Impressions: A well-maintained exterior makes your home more inviting and attractive to potential buyers.
Boosts Value: Landscaping improvements can increase your home’s perceived value and appeal.
4. Upgrade Lighting Fixtures
Updating outdated lighting fixtures can modernize your home’s appearance and improve its overall ambiance.
How to Do It:
Choose Modern Designs: Select fixtures that complement your home's style and provide ample light. Consider energy-efficient options like LED lights.
Replace Old Fixtures: Swap out old, dated fixtures with contemporary designs. Focus on key areas like the foyer, dining room, and kitchen.
Add Dimmer Switches: Install dimmer switches for added flexibility and ambiance.
Benefits:
Enhances Aesthetics: New lighting fixtures can make rooms look more stylish and well-lit.
Increases Functionality: Upgraded lighting can improve the functionality of spaces, making them more appealing to buyers.
5. Refresh Grout and Caulking
Dirty or cracked grout and caulking can make even the cleanest bathrooms and kitchens look neglected. Refreshing these details can make a significant difference.
How to Do It:
Clean Grout: Use a grout cleaner and a brush to scrub away stains and restore the grout’s original color.
Reapply Caulk: Remove old, cracked caulk around sinks, tubs, and showers, and apply a fresh bead of caulk for a clean, water-tight seal.
Use Matching Colors: Choose grout and caulk colors that match or complement your tile and fixtures.
Benefits:
Improves Cleanliness: Fresh grout and caulk make bathrooms and kitchens look well-maintained and hygienic.
Adds Value: Clean, well-sealed areas are more attractive to buyers and can prevent issues like water damage.
6. Fix Minor Repairs
Addressing small repairs around your home can make a big impact on how buyers perceive its condition.
Common DIY Repairs:
Patch Holes: Fill in nail holes, cracks, and dents in walls with spackle or joint compound, then sand and paint over them.
Fix Leaky Faucets: Repair any leaky faucets or toilets to prevent water damage and improve functionality.
Repair Cabinet Doors: Tighten loose hinges, replace broken handles, and fix any alignment issues with cabinet doors.
Benefits:
Enhances Condition: Small repairs ensure your home is in good condition, which can prevent potential buyers from being turned off by visible issues.
Increases Appeal: A well-maintained home is more attractive and may command a higher selling price.
7. Improve Kitchen and Bathroom Fixtures
Upgrading fixtures in your kitchen and bathroom can provide a fresh look without the need for a full renovation.
DIY Fixture Upgrades:
Replace Faucet and Showerheads: Install modern faucets and showerheads for a quick update.
Update Light Switches and Outlets: Swap out old switch plates and outlet covers with new ones for a cleaner look.
Add a Backsplash: Install a simple tile backsplash in the kitchen or bathroom to add style and protect walls from splashes.
Benefits:
Modernizes Key Areas: Updating fixtures can make high-use areas like kitchens and bathrooms look more contemporary and appealing.
Cost-Effective: These upgrades are generally affordable and can make a significant visual impact.
Conclusion
Preparing your home for sale involves both strategic and aesthetic improvements. By focusing on DIY fixes such as freshening up paint, updating cabinet hardware, enhancing curb appeal, and addressing minor repairs, you can increase your home’s value and make it more attractive to potential buyers. These cost-effective upgrades can make a significant difference in how quickly and successfully your home sells. With a little effort and creativity, you can maximize your home’s market potential and achieve a successful sale.
0 notes
Text
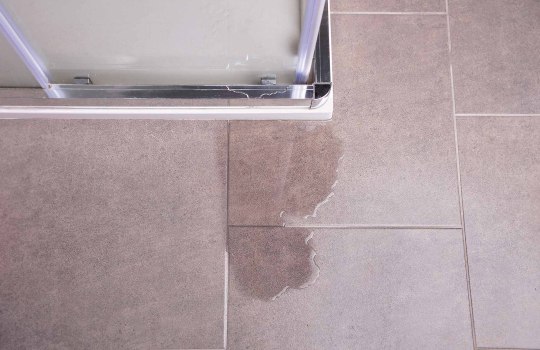
How to Check if Your Shower is Leaking?

A leaking shower can lead to water wastage, high bills, and damage to your bathroom and surrounding areas. It is important to regularly check for any signs of leaks to prevent these issues. One of the easiest ways to check if your shower is leaking is to inspect the area around the shower for any water damage or mould growth. Look for discoloured tiles or walls, peeling paint, or a musty odour, as these are common signs of a leaking shower.
Another way for shower leak detection in Logan is to monitor water meter. Turn off all water sources in your home, including your shower, and note the readings on your water meter. Wait a few hours, then check the meter again. If the reading has increased despite not using any water, it could indicate a leak in your shower. Additionally, be on the lookout for any unusual sounds coming from your shower, such as dripping or running water, which could also be a sign of a leak.
To further investigate if your shower is leaking, inspect the caulk and seals around the shower fixtures and door. Cracked or deteriorating caulk can allow water to seep through and cause leaks. Check for any loose tiles or grout as well, as these can also lead to water leaks. Lastly, don't forget to check for any leaks in the pipes leading to your shower by inspecting the area under the shower pan or around the water connections. If you suspect a leak but are unable to locate it yourself, consider hiring a professional plumber or shower leak detection team in Logan to conduct a thorough inspection and make any necessary repairs.
0 notes
Text
He glanced around the room, trying to spot something that needed replacing or repair. Such flaws were mainly an occasion for discourse. It put Vernon at an advantage to talk about gaskets and washers, about grouting, caulking, spackling. There were times when he seemed to attack me with terms like ratchet drill and whipsaw. He saw my shakiness in such matters as a sign of some deeper incompetence or stupidity. These were the things that built the world. Not to know or care about them was a betrayal of fundamental principles, a betrayal of gender, of species.
Don Delillo, White Noise
0 notes
Text
Top Bathroom Repair Services to Keep Your Space Functioning Perfectly
Maintaining a well-functioning bathroom requires the expertise of reliable repair services. This guide highlights the top bathroom repair in Fulham and Chelsea, ensuring that any issues are addressed promptly and effectively.
Plumbing Services
Plumbing issues are common in bathrooms, making plumbing services essential. From fixing leaks and unclogging drains to replacing old pipes, professional plumbers handle a range of tasks. Many services in Fulham and Chelsea offer emergency plumbing repairs, ensuring quick solutions to urgent problems.
Tile and Grout Repair
Cracked tiles and deteriorating grout not only look unsightly but can also lead to water damage. Tile and grout repair services specialise in replacing broken tiles, re-grouting, and sealing surfaces to prevent water infiltration. These services help maintain the bathroom’s appearance and functionality.
Fixture Replacement
Over time, fixtures such as taps, showerheads, and toilets may need replacement. Fixture replacement services provide expert installation of new fixtures, ensuring they are properly fitted and functioning. Choosing modern, water-efficient fixtures can also enhance the bathroom’s performance.
Waterproofing Services
Waterproofing is crucial in preventing water damage in bathrooms. Professional waterproofing services apply sealants and membranes to walls, floors, and shower areas, creating a water-resistant barrier. This process protects the bathroom structure and prolongs its lifespan.
Electrical Repairs
Bathroom electrical systems require specialised attention due to the presence of water and moisture. Electrical repair services handle tasks such as installing lighting, fixing faulty wiring, and adding new outlets. Ensuring electrical work is done by licensed professionals is vital for safety.
Ventilation Improvements
Proper ventilation prevents mould and mildew growth in bathrooms. Ventilation improvement services install exhaust fans and upgrade existing ventilation systems to enhance air circulation. These services contribute to a healthier bathroom environment.
Shower and Bath Repairs
Showers and baths are prone to issues like leaks, clogs, and wear. Shower and bath repair services address these problems by fixing leaks, replacing worn parts, and ensuring proper drainage. Regular maintenance of these fixtures keeps them in optimal condition.
Painting and Finishing
A fresh coat of paint can revitalise a bathroom’s appearance. Painting services specialise in using moisture-resistant paints suitable for bathroom conditions. Finishing touches, such as sealing edges and caulking, are also handled to ensure a neat and polished look.
Routine Maintenance Services
Routine maintenance is key to preventing major bathroom issues. Maintenance services offer regular inspections, cleaning, and minor repairs to keep the bathroom functioning smoothly. Scheduling routine maintenance can save money by addressing problems early.
Emergency Repair Services
For urgent issues that cannot wait, emergency repair services are invaluable. These services are available 24/7, providing prompt solutions to problems like burst pipes, severe leaks, and electrical faults. Having a reliable emergency repair service on hand offers peace of mind.
By utilising these top bathroom repair services in Chelsea, a well-maintained and functional bathroom space can be ensured. Whether in Fulham or Chelsea, professional services address various issues, keeping bathrooms in excellent condition.
0 notes
Text
Enhance Your Home's Protection with Professional House Caulking Services
Sealing the gaps between different building materials in a house is known as house caulking services in Melbourne, and it may enhance the living environment in a number of ways. Being able to relax and de-stress in a more natural environment is made possible by having a house free of mould growth, dampness, and other related issues. Caulking has several uses, such as keeping the house looking tidy, stopping water from leaking out of bathrooms, and reducing the loss of conditioned air.

Providers of Caulking Services Are Adaptable and Provide Many Services
Tile re grouting services is very important as it keeps the tiles neat and clean and also keep the bathroom of the house neat and clean.Sealing the grout after regrouting is very important part of the process as it makes the bathroom watertight.
Similar to caulking, waterproofing the house is essential to maintaining the structure, especially in moist areas. Professionals with a Certificate III in construction waterproofing are qualified to provide re grouting services in Melbourne and can complete the job appropriately. Because the grout absorbs a lot of water and dirt, it becomes discoloured with filth more quickly, giving the house an awful appearance.
The durability of a tiled floor depends on the grout between the tiles;thus it must be refilled often. Only experts possess the equipment and know-how necessary to remove stains from grout and reapply it. Because it retains the tiles in place and completes the process with the application of sealant, regrouting is the ideal choice when the flooring is damaged or the stain cannot be removed. Sealing the grout is the best course of action since it prevents germs and fungus from growing there and prevents mould.
Pressure washing services may be used to remove dust and dirt from surfaces such as patios, decks, driveways, and other exterior hardscapes. The best thing about utilising a pressure washer to remove filth and debris is that it eliminates the need for scrape and strain methods.
Whether it's gutter installation, basement waterproofing, or caulking repair, the work should be done carefully. Time is of the essence when it comes to waterproofing and related work, so pick trustworthy contractors, look for references, and engage the finest right away to safeguard the home!
Source: https://waterproofingmelb.blogspot.com/2024/07/enhance-your-homes-protection-with.html
0 notes
Text
The process of silicone tile repairing
Silicone slate repair is an indispensable skill for the homeowners and DIYers whose sole aim in life is to preserve the beauty and power of their tiled surfaces. Whatever carrying the image of wrinkled and dreary silicone sealant around tiles in bathrooms, kitchens, or other areas of the home, getting skilled in the silicone tile mending process may save the homeowner money and time and will keep the tiled surfaces neat and functional for years to come. Here's a comprehensive step-by-step guide to silicone tile repair:Here's a comprehensive step-by-step guide to silicone tile repair:
Step 1: Analyse the State of Current Silicone (Decomposition).
Initiate the process by carefully looking over the existing silicone caulking between the border tiles. Indicate the places where there is cracking, yellowing, or mould growth, because all these will need heavy treatment and more attention during the process of patching the silicone. Thereafter, verify if there is any water damage or evidence of mould growth behind the tiles, as these problems might necessitate the solutions of them before reapplying silicone sealant.
Step 2: Extract Eliminate Silicone Sealant: The repair method begins by eliminating the old sealant comprising natural platinum silicate.
Cut away the old sealant from tile joints with the utility knife or with a silicone sealant removal tool being careful not to scratch the exposed surface. Handle with care, so that the tiles and surrounding materials are not hurt during the process. Make sure that the entire silicone sealant parts are completely removed from the surfaces, or residual of any of them might stop the new sealant from clinging properly.
Step 3: Preparing the Area:
Give the tile joints and the surrounding surfaces a close scrub with a mild detergent and water mixture to make sure that the dirt, grease, and any other residues are removed. Rinse the raw concrete with clean water and then air dry completely in order to go on with the action. Further, scrape off any remaining silicone residue with the help of rubbing alcohol or silicone-solvent and follow through with the installation of new sealant for the storage tank.
Step 4: Opt for silicone sealants that are intended for your specific application.
Look for a highly rated silicone sealant that is, specifically, developed for use in bathrooms and kitchens, where it's wet consistently. Consider the colour of the new tile grout a match with the existing colour to display a discreet finish. Choose a creature resistant in nature silicone sealant type that will not allow the growth of any fungus in the future.
Step 5: Use of The Silicon Sealant Again:
Use a suitable silicone sealant to line the caulking gun, cutting off the nozzle at 45 degrees making it open up to the required size. Engage in a continuous bead sealant application and fill in the joints, making certain that the sealant is evenly distributed and penetrates the joint fully. Adjust pressure on the caulking gun gradually so it squeezes out an even layer without bonds.
Step 6: Cut all of the edges carefully and smoothen the sealant.
Within minutes of applying the regime after that, you could use a silicone smoothing tool or wet fingers, along with the moisture, to tool it and produce a neat, uniform result. Working speedily so as not to smear or unevenly plaster will help bring a superiority in sealing. Moisten all extra sealant off using a paper towel or damp cloth.
Step 7: After an Application of the Sealant Let it Cure.
The silicone through which you have applied the sealant should remain undisturbed according to the instructions of the manufacturer until it is completely cured. Normally, the silicone sealant takes 24 to 48 hours to cure while the conditions of the environment determine the time of curing.The curing time depends upon the temperature and humidity in the environment.
Step 8: Have A Frequent Service:
The silicone sealant will cure in some time; therefore, during these periods, you should regularly inspect it to keep it in good shape and to ensure its efficacy. To eliminate dirt, and grimes, clean the tiled surfaces with mild detergent and water solution frequently. Perform a visual inspection of the silicone sealant periodically for signs of duress or damage. Subsequent application will be required if the sealant wears out or gets damaged to regain a watertight seal.
Silicone tile repairs is a vital yet uncomplicated daily routine for owners or Do it yourself who want to keep the tiled surface in good shape. Doing this allows anyone to use the instruction guide and choose the right materials correctly to get professional-quality results that will last against water damage and moulds in your tiled environment. Taking into account necessary measures and maintenance the silicone tile will keep the tiled surface intact as well as original for a long lasting period.
For more info visit here:- shower tile repair
0 notes
Text
Keeping Your Home Dry: How to Find and Shower Leak Repair
Shower leak repair can be difficult to fix so, identifying the problem's origin requires knowledge. Experts possess the necessary skills to identify problems including broken tiles, leaky pipes, and faulty seals. In Melbourne, fixing a leaky shower calls for certain tools and equipment. Melbourne specialists have the necessary equipment to handle the problem quickly and effectively while minimising the chance of more harm.
It Enhances the Look of Your Bathroom
The process of shower regrouting in Melbourne includes scraping off the old grout, applying fresh grout, and caulking any voids or fractures. A dirty and outdated bathroom is a result of tiles that are discoloured, discoloured, or broken. This helps shield your bathroom from water damage while also improving its looks. Furthermore, by choosing a new grout colour, regrouting gives you the chance to change the appearance of your bathroom.
For successful regrouting of tiles, certain tools and methods are needed. You will need a grout cleaning tool or a suitable grout saw to scrape off the old grout. Before installing and curing a new impermeable grout junction, a grout floating and a towel are also necessary for spreading and cleaning grout.
A Comprehensive and Preventative Approach Using Premium Materials
More than obvious damage is repaired by experts providing shower repair in Melbourne. They comprehensively address the underlying issues. In the long term, this will save you money by stopping leaks in the future.
Reliable Melbourne repair companies provide guarantees for their services. You may thus feel secure knowing that any problems that arise after repair will be fixed at no additional cost. They comprehensively address the underlying issues. In the long term, this will save you money by stopping leaks in the future. Professionals choose premium materials that are resilient to the demands of moist surroundings. This prolongs the repair's lifespan and guarantees continuous leak prevention.
Source
0 notes
Text
10 Genius Ways to Use Polyurethane Sealant for Home Renovation
Polyurethane sealant is a versatile and indispensable tool in any homeowner's arsenal. Its ability to create a durable, waterproof seal makes it perfect for a wide range of applications in home renovation. In this comprehensive guide, we'll explore ten genius ways to utilize polyurethane sealant to enhance and protect your home.

1. Seal Bathroom Fixtures
The bathroom is a hotspot for moisture, making it prone to mold and mildew growth. By sealing around fixtures such as sinks, tubs, and toilets with polyurethane sealant, you can prevent water infiltration and prolong the lifespan of these essential components.
2. Waterproofing Windows and Doors
Leaky windows and doors can lead to energy loss and water damage. Apply polyurethane sealant along the seams and edges of window and door frames to create a tight seal that prevents drafts and moisture intrusion, keeping your home comfortable and dry.
3. Protect Outdoor Wood Surfaces
Decks, fences, and outdoor furniture are exposed to the elements, making them susceptible to rot and decay. Coat wooden surfaces with polyurethane sealant to create a protective barrier against moisture, UV rays, and temperature fluctuations, extending their lifespan and enhancing their appearance.
4. Repair Cracks in Concrete
Cracked concrete not only detracts from the aesthetic appeal of your home but also poses safety hazards. Fill cracks and gaps in concrete driveways, sidewalks, and patios with polyurethane sealant to prevent water penetration and inhibit further deterioration, restoring the integrity of these surfaces.
5. Seal Gutters and Downspouts
Clogged or leaky gutters and downspouts can lead to water damage to your home's foundation and landscaping. Apply polyurethane sealant to seal seams and joints in gutters and downspouts, ensuring proper drainage and preventing water from infiltrating your home.
6. Caulk Kitchen Fixtures
In the kitchen, where spills and splashes are common, it's essential to maintain a watertight seal around sinks, countertops, and backsplashes. Use polyurethane sealant to caulk gaps and seams, preventing water damage and preserving the integrity of your kitchen surfaces.
7. Waterproofing Basements
Basements are particularly vulnerable to moisture intrusion, which can lead to mold growth and structural damage. Seal cracks and gaps in basement walls and floors with polyurethane sealant to create a waterproof barrier that protects against groundwater seepage and humidity, creating a healthier and more comfortable living environment.
8. Seal HVAC Ducts
Leaky ductwork can lead to energy loss and compromised indoor air quality. Seal joints and seams in HVAC ducts with polyurethane sealant to prevent air leakage, improving the efficiency of your heating and cooling system and ensuring consistent temperatures throughout your home.
9. Protect Tile Grout
Grout lines in tiled surfaces are prone to staining and water damage, detracting from the beauty of your floors and walls. Apply polyurethane sealant over tile grout to create a waterproof barrier that repels moisture and prevents discoloration, keeping your tile surfaces looking clean and pristine.
10. Secure Exterior Trim
Exterior trim such as fascia boards, soffits, and molding are exposed to the elements, making them susceptible to rot and decay. Seal seams and joints in exterior trim with polyurethane sealant to protect against moisture infiltration and prolong the lifespan of these architectural elements
Conclusion
In conclusion, polyurethane sealant is a versatile solution for a wide range of home renovation projects. By utilizing these ten genius ways to use polyurethane sealant, you can enhance the durability, functionality, and beauty of your home while protecting it from the damaging effects of moisture and the elements.
#polyurethane#sealants#polyurethane sealant#silicone adhesive#construction#home renovation#home repair
0 notes
Text
Defects Check
Beware Of The Imperfections: Common Defects Check In BTO Homes!
When purchasing a Build-To-Order (BTO) home, it's crucial to be vigilant and thorough in potential BTO defects check. Common issues to watch out for include uneven flooring, cracks in walls or ceilings, faulty electrical outlets or switches, plumbing leaks, and poorly installed fixtures.
Identifying and addressing these issues early can save you from headaches and expenses. Here are some common defects to be mindful of when purchasing a BTO property:
1. Plumbing And Water Leakage:
One of the most common issues found in BTO properties is plumbing and water leakage. Check for leaky faucets, dripping pipes, and signs of water stains on walls or ceilings.
Inspect the bathroom and kitchen thoroughly, paying close attention to areas around sinks, toilets, and showers.
Additionally, ensure that the water pressure is adequate and that no unusual noises are coming from the plumbing fixtures.
2. Electrical Wiring And Fixtures:
Faulty electrical wiring can pose serious safety hazards. During your inspection, check all electrical outlets, switches, and light fixtures for proper functionality.
Look for exposed wires, flickering lights, or sparking outlets, which could indicate underlying issues.
It's advisable to hire a professional electrician to conduct a more comprehensive inspection to ensure the safety of your home.
3. Structural Integrity:
Inspect the structural integrity of the property, including walls, ceilings, and floors. Look for cracks, bulges, or sagging, which could indicate potential structural problems.
Pay attention to the alignment of doors and windows, as misalignment may suggest issues with the building's foundation or framing.
If you notice any significant structural defects, consult with a structural engineer to assess the extent of the problem.
4. Defective Finishes And Materials:
Check for defects in finishes and materials used throughout the property. This includes paintwork, tiles, flooring, and cabinetry. Look for scratches, chips, uneven surfaces, or discoloration.
In addition to aesthetics, defective finishes can also affect the functionality and durability of your home.
Address any concerns with the developer to ensure that repairs or replacements are made before you move in.
5. Poor Workmanship:
Poor workmanship can manifest in various forms, from sloppy paint application to uneven surfaces. Inspect the property meticulously for signs of shoddy craftsmanship, such as uneven joints, gaps, or poorly aligned fixtures.
Pay attention to details such as grout lines, trim work, and caulking. If you encounter any areas of concern, document them and discuss them with the developer to seek resolution.
6. Ventilation And Air Quality:
Good ventilation is essential for maintaining a healthy indoor environment. Ensure that the property is adequately ventilated, with proper airflow in all rooms.
Check ventilation systems in bathrooms, kitchens, and other areas prone to moisture buildup. Poor ventilation can lead to issues such as mold growth, stale air, and humidity problems, which can impact your comfort and well-being.
Conclusion:
Conducting a thorough inspection of your BTO property is essential to ensure that it meets your expectations in terms of quality and safety.
By being vigilant and proactive, you can identify and address any defects early on, allowing you to enjoy your new home with peace of mind.
If you encounter any significant issues during your inspection, don't hesitate to seek assistance from Uncle Defect professionals or the developer to resolve them promptly. At Uncle Defect, your satisfaction and peace of mind are our top priorities.
0 notes
Text
Shower Repair: A Guide to Restoring Your Refreshing Oasis
The shower, a sanctuary of rejuvenation, can lose its charm when faced with issues like leaks, worn-out fixtures, or damaged tiles. To bring back the joy of your daily shower routine, understanding the nuances of shower repair is essential. In this comprehensive guide, we'll explore common shower problems and provide practical solutions to restore your refreshing oasis.
1. Identifying Common Shower Issues
Leaky Showerhead: A persistent drip or leak can lead to water wastage and potential damage.
Grout and Caulk Damage: Cracked or deteriorating grout and caulk can cause water seepage and compromise the integrity of your shower.
Tile Damage: Damaged or loose tiles not only affect the aesthetic appeal but can also lead to water damage if left unaddressed.
2. Importance of Timely Shower Repairs
Preventing Water Damage: Timely repairs prevent water from infiltrating walls and floors, avoiding costly structural damage.
Maintaining Hygiene: Prompt repairs ensure a clean and hygienic shower environment, preventing mold and mildew growth.
3. DIY Shower Repair Solutions
Leaky Showerhead Fix: Replace worn-out washers or O-rings, and use thread seal tape to secure connections.
Grout and Caulk Repair: Remove damaged grout or caulk, clean the area thoroughly, and reapply fresh grout or caulk for a watertight seal.
Tile Replacement: Replace loose or damaged tiles using appropriate adhesives and sealants.
4. Professional Shower Repair Services
Leak Detection and Repair: Professionals use specialized tools to detect and repair hidden leaks, preventing water damage.
Grout and Caulk Restoration: Professional services ensure precise removal and replacement of grout and caulk for long-lasting results.
Tile Restoration: Experts can assess and restore damaged tiles, matching them seamlessly with the existing design.
5. Shower Door Repairs
Leaking Shower Door Seals: Replace worn-out seals to prevent water leakage around the shower door.
Sticking Shower Doors: Adjust the door hinges and tracks for smooth operation.
6. Preventive Maintenance for Shower Longevity
Regular Cleaning: Prevent mold and mildew by cleaning tiles, grout, and shower fixtures regularly.
Sealant Application: Periodically reapply sealant to grout lines and caulked areas for added protection.
7. Upgrading Your Shower Experience
Modern Fixtures: Consider upgrading to water-efficient showerheads and modern fixtures for an enhanced shower experience.
Accessible Design: Explore accessible and user-friendly design options for a shower that caters to diverse needs.
8. Conclusion: Rediscovering Shower Bliss
Shower repair is not just about fixing issues; it's a journey to rediscover the bliss of your shower oasis. Whether you opt for DIY solutions or enlist professional help, restoring your shower ensures a refreshing and enjoyable experience every day.
1 note
·
View note
Last Seen Blogs

007-bigbull
Untitled

falloutfoxart
FalloutFox Draws

juls4
Juls

wearetheonesthatlisten
oh how we missed the noise
rrisssa
𝓇𝒾𝓈𝒶