#How to make a bootable usb for windows 10. after making bootable usb you can install windows on your system
Explore tagged Tumblr posts
Visit Tumblr Blog
Explore Tumblr blogs with no restrictions, modern design and the best experience.
Last Seen Tumblr Blogs


Fun Fact
12.7% of mobile users access Tumblr.
Text
End of the workweek!
You read that title correctly! Due to "Hemelvaart" in Belgium and Holland, we have thursday and friday off! Today I will be going over Monday and Tuesday with you! On monday i came into the office and had my usual morning talk with Glennrick! We talked about the state of the printers and some more IT stuff! Once I was done I went to Dwayne to see if he had any tasks for me. He handed me an empty USB drive and asked me to make a bootable USB for windows 10 pro. So i started working on it. I ran into some issues so i couldn't finish my task by lunch, I also had to make an instructions manual for Adobe Acrobat reader, showing people how they could add a digital signature to their documents. At lunch, charees came to me and asked me if i wanted to go along with her to the Parlement of Aruba to watch a friend of hers give a presentation about child mistreatment. It was very nice to see the parlement from the inside. And i felt really good after the presentation because you could see the happines on clem's face, just because a few of us showed up to support her. There was a very big table where we all sat down. And being there with 2 ministers and a bunch of head's from department felt very important. A room filled with important people while i'm sitting there as a student was a little intimidating, yet very impressive. Once we were done there, we went back to the university. There weren't any tasks left for me to do, so I just worked on my blog a little. On tuesday morning there was a symposium in the aula which i sadly enough couldn't attend because of a few tasks. I finished the manual and went back to working on the bootable USB. Around 11AM, Glennrick told me to hop in the car because we were going somewhere. Francis, a student of SisSTEM needed help. He wanted a VOIP phone installed in his office. He got a dedicated office from the local hospital to do research on how AI Aerobics coaching affects your cardiovascular health. Upon reaching his office we instantly noticed he doesn't even have ports to install a phone. Francis explained some more about his research before we took off again. In the afternoon, Dwayne took me to the computerlab to label the computers and put them back in the right order. We also looked into bolting the desks to the ground so students couldnt move the desks and break the cables.
At the end of the day, we went out for dinner at Bugaloe, where I tried a surprisingly delicious sloppy joe. As the evening progressed, we encountered some friendly gentlemen from the United States who struck up a conversation with us. We danced and had a blast throughout the night. Before parting ways, we exchanged contact information. It turned out they were all members of the United States Army, and it was their last day before deployment. I expressed my gratitude for their service and mentioned that I wished we had met earlier. We promised to stay in touch, although they mentioned that communication might be limited during their upcoming three-week deployment. They assured me they would reach out once they were back. I will be eagerly awaiting their return.
On Wednesday, I headed straight to work with the task of creating a tutorial video on adding a digital signature to a PDF document. Unfortunately, the university's expensive microphone failed to connect, so I had to rely on the built-in microphone of a webcam. The sound quality was poor, but with some editing magic, I managed to make it sound decent at least. In the afternoon i was asked to prep a slim computer (very small computer that runs on the domain) for the VRES room, this one had a solid state drive instead of a regular hard drive, meaning it would go faster. At the end of the day, Glennrick wanted to have another mentor meeting with me to update me on my progress. I was satisfied to see the "good"box ticked almost everywhere. Next week I can give it my all and hopefully get to see a couple "excellent" boxes being ticked! In the evening, the rest of the group went out for drinks! I wasn't in the mood and decided to stay at the appartment to relax and blow of some steam for the upcoming long weekend! That wraps up my (brief) work week! Stay tuned for more updates coming soon! Signing off for now with love <3 Bon wiként!
This was my (short) work week! More updates coming soon! Signing off for now <3 Bon wiként!
3 notes
·
View notes
Text
How do I download Windows 10 on my Mac for free without Boot Camp?
Macs don't come with a Windows 10 installation disc, so if you want to install it on your Mac, you'll need to use Boot Camp. But there's a way to install Windows 10 without using Boot Camp: by downloading and installing it through the Windows 10 Creators Update. This is free, and it doesn't require any extra hardware or software.
How to install Windows 10 on a Mac using Boot Camp?
If you have a Mac and you want to install Windows 10 on it using Boot Camp, here's how to do it. First, make sure your Mac is running macOS High Sierra or later. If it isn't, you can update your Mac software by going to the App Store and clicking Updates in the toolbar.

Then, download and install the Windows 10 ISO file. Next, open Boot Camp Assistant, which is in the utility folder of your Applications folder. In Boot Camp Assistant, click Continue and then select "Create a Windows 10 installer disk." When the process is finished, insert the disk into your Mac. Restart your computer while holding down the Option key. In the Startup Manager window that appears, select the disk with the Windows logo on it and click Start-Up. After your computer has restarted, follow the instructions on-screen to complete the installation of Windows 10 and you know more details https://today4pc.com/ from this blog website.
Download the Windows 10 ISO file
Microsoft Windows 10 is the latest release of the Microsoft Windows operating system. Windows 10 ISO file is the official disc image of Windows 10 and can be used to install or reinstall Windows 10 on a PC. The ISO file can also be used to create a bootable USB drive or DVD.
Install Boot Camp drivers
If you're running a Mac and don't have Boot Camp installed, you can still download and install Windows 10 using a free tool called Parallels Desktop. This software will allow you to use your Mac's resources to run Windows 10, instead of having to use up all the RAM in your computer. After downloading and installing Parallels Desktop, open it up and click on the "Install Windows 10" button. You'll then be asked to create a new account or sign into an existing one.
Partition of your Mac's hard drive
Windows 10 is one of the most popular operating systems on the market. It is available both as a free download for individual users, and as part of a subscription package for businesses. If you want to install Windows 10 on your Mac without using Boot Camp, there are several methods you can use.
Start the Windows 10 installation process
Windows 10 is a personal computer operating system developed and released by Microsoft as part of the Windows NT family of operating systems.

It was announced in September 2014 and released in July 2015. Windows 10 introduces what Microsoft describes as "a new generation of Windows", with a focus on "enabling more personal computing experiences" across different devices.
Conclusion
In the conclusion of an article, the author typically summarizes the main points that were made and provide a final thought on the topic. In some cases, the conclusion may also provide readers with information on what they can do to learn more about the subject matter or how they can get involved in the discussion.
2 notes
·
View notes
Text
El Capitan 10.11 6 Dmg Google Drive

El Capitan 10.11 6 Dmg Google Drive Windows 10
El Capitan 10.11 6 Dmg Google Drive Free
El Capitan 10.11 6 Dmg Google Drive Mac
Mac Os Dmg Install Mac OS X El Capitan 10.11 ISO / DMG Files Direct Download - ISORIVER. Mac OS X El Capitan: Being the 12th major release of macOS, Mac OS X El Capitan belongs to the Macintosh-Unix family of OS. It was majorly released for server. Keep talking and nobody explodes free download mac. Price Currency: USD Whatsapp for laptop. Mac Os X El Capitan 10.11.6 Google Drive Free. OS X El Capitan Partitioning. With the help of screenshots, I will be explaining some basic set of activities that are to be done while partition the OS X El Capitan drive. Alternatively, the same procedure will be explained with the help of a disk manager utility known as Stellar Partition Manager. Mac OS X El Capitan 10.11.6 Free Download Download Mac OS X El Capitan 10.11.6 latest version DMG bootable image setup by clicking the below button. It is a reliable operating system with support for all the latest devices and different enhancements. Mac OS El Capitan was released to manufacturing on 20th September 2015, almost three and a half years ago. Its latest version 10.11.6 (15G22010) was released on 9th July 2018, almost 7 months ago. This is latest version DMG image iso file OS X El Capitan 10.11.6 (bootable) for Mac users. Mac OS X El Capitan 10.11.6: Product Review: Sep 22, 2016 Unmount the dmg file named “Install macOS Sierra.dmg” (if it is mounted:) Go to the top menu of “Disk Utility” window and select “images” and then “Scan image for restore”.
These advanced steps are primarily for system administrators and others who are familiar with the command line. You don't need a bootable installer to upgrade macOS or reinstall macOS, but it can be useful when you want to install on multiple computers without downloading the installer each time.
MacOS Sierra 10.12 Installation ISO Media. MacOS High Sierra yang saya bagikan melalui link google drive di sini masih versi awal yakni 10.13.1. Sedangkan saat ini yang terbaru sudah sampai 10.13.4. Baiklah langsung saja linknya di bawah ini. Saya pecah menjadi 5 part agar gampang mengunduhnya. Belum sempat unggah yang single link. Tautan Unduhan MacOS High Sierra Google Drive.
Download macOS
Download Mac OS Sierra 10.12.dmg Google Drive Download Mac OS Sierra 10.12.dmg from Torrrent. In this article, you will learn about MacOS High Sierra with its features and I will guide you on how you can download the dmg file for MacOS High Sierra in different ways. So, focus top to toe and read the complete article.
Find the appropriate download link in the upgrade instructions for each macOS version:
macOS Catalina, macOS Mojave, ormacOS High Sierra Installers for each of these macOS versions download directly to your Applications folder as an app named Install macOS Catalina, Install macOS Mojave, or Install macOS High Sierra. If the installer opens after downloading, quit it without continuing installation. Important: To get the correct installer, download from a Mac that is using macOS Sierra 10.12.5 or later, or El Capitan 10.11.6. Enterprise administrators, please download from Apple, not a locally hosted software-update server.
Mac Os Sierra Dmg Torrent
OS X El Capitan El Capitan downloads as a disk image. On a Mac that is compatible with El Capitan, open the disk image and run the installer within, named InstallMacOSX.pkg. It installs an app named Install OS X El Capitan into your Applications folder. You will create the bootable installer from this app, not from the disk image or .pkg installer.
Use the 'createinstallmedia' command in Terminal
Connect the USB flash drive or other volume that you're using for the bootable installer. Make sure that it has at least 12GB of available storage and is formatted as Mac OS Extended.
Open Terminal, which is in the Utilities folder of your Applications folder.
Type or paste one of the following commands in Terminal. These assume that the installer is still in your Applications folder, and MyVolume is the name of the USB flash drive or other volume you're using. If it has a different name, replace MyVolume in these commands with the name of your volume. Catalina:* Mojave:* High Sierra:* El Capitan:
Press Return after typing the command.
When prompted, type your administrator password and press Return again. Terminal doesn't show any characters as you type your password.
When prompted, type Y to confirm that you want to erase the volume, then press Return. Terminal shows the progress as the bootable installer is created.
When Terminal says that it's done, the volume will have the same name as the installer you downloaded, such as Install macOS Catalina. You can now quit Terminal and eject the volume.
El Capitan 10.11 6 Dmg Google Drive Windows 10
* If your Mac is using macOS Sierra or earlier, include the --applicationpath argument, similar to the way this argument is used in the command for El Capitan.
Use the bootable installer
After creating the bootable installer, follow these steps to use it:
Plug the bootable installer into a compatible Mac.
Use Startup Manager or Startup Disk preferences to select the bootable installer as the startup disk, then start up from it. Your Mac will start up to macOS Recovery. Learn about selecting a startup disk, including what to do if your Mac doesn't start up from it.
Choose your language, if prompted.
A bootable installer doesn't download macOS from the Internet, but it does require the Internet to get information specific to your Mac model, such as firmware updates. If you need to connect to a Wi-Fi network, use the Wi-Fi menu in the menu bar.
Select Install macOS (or Install OS X) from the Utilities window, then click Continue and follow the onscreen instructions.
Mac Os Dmg Download
Learn more
For more information about the createinstallmedia command and the arguments that you can use with it, make sure that the macOS installer is in your Applications folder, then enter this path in Terminal:
Catalina:


El Capitan 10.11 6 Dmg Google Drive Free
Mojave:
Download Mac Os High Sierra 10.13.6 Dmg Google Drive
High Sierra:

El Capitan 10.11 6 Dmg Google Drive Mac
Mac Os Dmg File Download

El Capitan:
1 note
·
View note
Text
Windows 10 Uefi Iso

Windows 10 Uefi Iso File Download
Windows 10 Uefi Iso Usb
PAGE CONTENT:
What Can You Do with a UEFI Bootable Disk
How to Create a UEFI Bootable USB Drive in 3 Ways
How to Boot Windows 10 Computer from UEFI Bootable USB Drive
Bonus Tip: How to Repair Hard Drive and Recover Data with a WinPE Bootable Disk
The windows 10 ISO supports booting both UEFI and Legacy Mode. Mount the ISO and Copy the contents of the ISO to your DVD Burner (a USB Stick is the preferred method of choice) Then use the F12 BootMenu to select the UEFI DVD Device as the Bootable device. After creating the UEFI boot USB drive of Windows 10 from ISO using CMD utility, you can insert the USB to the computer that you need to install operating system and boot from the USB drive to launch the 'Windows Setup' wizard and continue with the installation process.
What Can You Do with a UEFI Bootable Disk
A UEFI bootable USB drive can be used to complete an in-place Windows upgrade or clean install of Windows 10. It's also needed to start the system when your computer cannot be booted due to a virus attack, MBR damage, bad sectors, corrupted system files, etc. Once you can start your computer from the USB bootable drive, you can perform a disk check and repair. These are the two most important reasons to use a bootable USB disk. Other purposes include backing up systems, using portal operating systems on a foreign computer, and protecting computer data security.
But how to create a Windows 10 UEFI bootable USB drive?
We all know that there are two boot modes for computers: BIOS VS UEFI. If you have a computer with a Unified Extensible Firmware Interface (UEFI), instead of the legacy Basic Input/Output System (BIOS), you should know how to create a UEFI bootable USB drive on Windows 10.
There are several different ways to make a bootable disk in UEFI mode. Let's learn together.
How to Create a UEFI Bootable USB Drive in 3 Ways
In this part, we will introduce three common ways to create a bootable USB drive by using Windows 10 Midea Creation tool, Diskpart, and third-party software - Refus.
1. Create a UEFI Bootable USB with Windows 10 Media Creation Tool
If you want to create a UEFI bootable USB media for an in-place upgrade or clean install of Windows 10, you can use the Microsoft Media Creation Tool.
To create a Windows 10 UEFI bootable USB, prepare a USB flash drive with at least 8GB of capacity. Then use these steps:
Step 1. Download Windows 10 installation media from the official website of Microsoft.
Step 2. Run the exe file of MediaCreationTool. Click 'Accept' to agree to the license terms.
Step 3. On the Windows 10 Setup screen, select 'Create installation media (USB flash drive, DVD, or ISO file) for another PC'. Click the 'Next' button.
Step 4. Click 'Next' on the language, edition, and architecture screen. Select the 'USB flash drive' option, and click 'Next'.
Step 5. Select your connected USB flash drive from the list. And click 'Next > Finish' to complete the process. Wait for the Media Creation Tool to download the files and create a bootable USB flash drive that you can use to install Windows 10 on devices with support for UEFI and BIOS.
2. Create a UEFI Bootable USB on Windows 10 with Diskpart
With the built-in Diskpart utility, you can also create a Windows 10 UEFI bootable USB drive. Note that this solution requires command-line operations, so if you're not confident, you’d better choose a simpler graphical solution.
The process of making a USB bootable drive will erase all data on it. Remember to back up important files and data in advance.
Step 1. Connect your USB flash drive to the computer.
Step 2. Type CMD in the Search box, and right-click on the Command Prompt, and select Run as Administrator.
Step 3. In Command Prompt, type Diskpart and press Enter.
Step 4. Type the following commands in order, and press Enter after each one.
list disk select disk # clean create partition primary select partition 1 active format fs=fat32 (it means you format the drive with fat32 file system) assign exit
Step 5. Copy the Windows installation files to the USB flash drive. You can do this by simply using copy-and-paste. Then, the process of creating a bootable UEFI flash drive with Windows 10 finishes.
3. Create UEFI Bootable USB Drive with Rufus
If you have difficulty in creating Windows 10 UEFI bootable USB with Diskpart, you can use Rufus, an open-source program that allows you to create a UEFI bootable disk on Windows 10/8/7.
Step 1. Download Rufus from the official website: https://rufus.ie/en/.
Step 2. Connect your USB flash drive to the computer.
Step 3. Run this program and make the following main settings:
Device: Select your USB flash drive.
Boot selection: Select DISK or ISO image. And click the SELECT button to choose the Windows 10 ISO file from the folder location.
Partition scheme: Select GPT for UEFI.
Target system: Select UEFI (non CSM).
File system: Select NTFS.
On other options and settings, choose based on the actual situation. Then, click the START button to let Rufus create a UEFI USB flash drive.
How to Boot Windows 10 Computer from UEFI Bootable USB Drive
You can create a UEFI bootable USB drive on Windows 10 by taking any of the methods above. After successfully creating the boot disk, you also need to know how to boot your computer from the bootable USB.
Follow the steps below to start your computer from Windows 10 UEFI bootable USB drive.
Step 1. Connect the UEFI bootable USB disk to a dead, unbootable, inaccessible Windows computer.
Step 2. Restart your computer, hold F2/F11/Del to enter BIOS.
Step 3. Go to the Boot Drive section and set the UEFI bootable USB as the boot drive.
Step 4. Save the changes and exit BIOS. Wait for your computer to boot up from the UEFI bootable USB disk.
Bonus Tip: How to Repair Hard Drive and Recover Data with a WinPE Bootable Disk
When your computer cannot start, besides using the BIOS or UEFI USB bootable drive, is there another way to access the computer to fix errors and manage hard drives? Yes, you can resort to a disk management WinPE bootable disk by using partitioning software - EaseUS Partition Master.
With simple clicks, you can create an EaseUS Partition Master WinPE bootable disk and run it on your computer without system boot partitions. Then, you can repair and manage your hard drives with advanced solutions, or restore data by cloning the hard drive.
EaseUS Partition Master
Resize, merge, delete, create, and format partitions
Repair corrupted MBR that causes the hard drive to fail to boot
Clone hard drives to rescue data
Steps for creating a WinPE bootable USB drive with EaseUS partitioning software.
Step 1. To create a bootable disk of EaseUS Partition Master, you should prepare a storage media, like a USB drive, flash drive or a CD/DVD disc. Then, correctly connect the drive to your computer.

Windows 10 Uefi Iso File Download
Step 2. Launch EaseUS Partition Master, find the 'WinPE Creator' feature on the top. Click on it.
Step 3. You can choose the USB or CD/DVD when the drive is available. However, if you do not have a storage device at hand, you can also save the ISO file to a local drive, and later burn it to a storage media. Once made the option, click the 'Proceed' button to begin.
When the process finishes, you have successfully created an EaseUS Partition Master WinPE bootable disk. Now, you can manage your hard disks and partitions through the bootable drive whenever the computer fails to boot normally.
If you have RAID drives, load the RAID driver first by clicking Add Driver from the menu bar, which can help you add the driver of your device under WinPE environment, as some specific device cannot be recognized under WinPE environment without drivers installed, such as RAID or some specific hard disk.
Once the Easeus Partition Master bootable disk has been created, you can access your computer and the disk from this USB bootable drive for subsequent disk repair and data recovery operations.

Windows 10 Uefi Iso Usb
Wrapping Up
How to create a UEFI bootable USB on Windows 10? If you are still struggling with this question, you can find the answer here. You can create a UEFI bootable disk in four ways by using Windows 10 installation media, Diskpart, and Refus.
If you need to boot your computer from a USB bootable disk and manage or repair your disk in a WinPE environment, we strongly recommend you use EaseUS Partition Master, which enables you to clone failing hard drive to a new HDD/SSD.
1 note
·
View note
Text
Olarila Catalina
Olarila Catalina Torrent
Olarila Catalina
OLARILA? THE REAL VANILLA HACKINTOSH!!
Upgrade macOS Catalina — The correct way to u. Olarila - Easiest way to install vanilla hack. PLEASE SUBSCRIBE THIS CHANNEL. THANK YOU:)In this video I wanna show you how to install something after installing Hackintosh Catalina.All files that you ne. I originally used Olarila Intel chipset 300-400 series desktop as boot USB (strangely the 300 series notebook. 10 beliebte Catalina dp im Vergleich 06/. Tried to boot from Olarila Sierra Installer USB. Does macOS Catalina support iPod Classic Syncing with iTunes? Dell DW1830 BCM943602BAED quesitons. Author: /u/Rohan200220. link comments Source Send feedback.
Before installing, it is good for you to read this post, so that there will be no trouble for you in getting started and there will be no risk of losing even a single bit of your data: READ NOW
Olarila is the real vanilla hackintosh, for more information on Olarila you can head over to their website olarila.com.
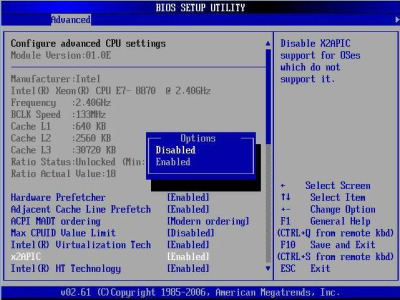
Which BIOS should I have? UEFI bios, Legacy might not work.
What is the size of your ESP? You need to have an ESP of at least 200MB size.
Specs of your processor. Your processor needs to support SSE 4.1.
Which partiton style are you using? You need to have GPT.
After that you can start the process, but make sure you check these four important steps mentioned above before getting so far:

Increasing the size of EFI partition is really important. by default, windows has an ESP (EFI SYSTEM PARTITION) of 100MBs, whereas disk utility requires you to have at least 200MBs of ESP. So if you will not increase the size, then Disk Utility will raise an error MEDIAKIT REPORTS NOT ENOUGH STORAGE FOR CURRENT OPERATION, and it will damage your ESP and you will not be able to boot back into windows until you repair the ESP.
So, after doing these processes, its time for downloading!
***DOWNLOADS***
Olarila Catalina Torrent
DOWNLOAD Catalina Image from HACKINTOSH page - CLICK HERE DOWNLOAD BALENA ETCHER CLICK HERE

After downloading the files create a bootable flashdrive and boot into the it to open clover and start the installation.
PLEASE WATCH THE FULL TUTORIAL BELOW TO AVOID ANY ISSUE:
Olarila Catalina
HACKINTOSH FIXES
1 note
·
View note
Text
El Capitan Bootable Usb Dmg

Today i am showing how to make a boot able usb drive for mac using a dmg file 8gb usb drive and the disk utility that comes with mac os x. Because since el capitan the disk utility of macos was different if you running el capitan and want to create bootable u sb for macos sierra you can use yosemite disk utility for el capitan just google it. Now using a Windows tool called Transmac (15 day trial) to create a bootable El Capitan USB from the dmg file downloaded from Apple. Will post again with result / subsequent actions / results. Probably the copy of OS X 10.8 I got from a 3rd-party site and used to update 10.6 was dodgy.
Create Bootable Usb Dmg Windows. To install macOS High Sierra restart computer hold the Option (ALT) key and select Installation USB drive from the menu. Microsoft Office 2011 V14 0.0 Dmg Free Download. Ff14 Lb Does More Dmg If Youre Gear Is Better.
In this article, I will show you How to create Bootable USB for Mac OS El Capitan on Windows using Transmac. Therefore, you can create bootable USB for your Mac using Transmac on windows 10/7/8/8.1 here you will learn the easiest method of creating bootable USB. As you know that Mac OS EL Capitan is the newest version among Mac. In here just follow my steps to create a bootable USB installer for your Mac. is the twelfth major of the Mac operating system. Therefore, it has outstanding features that the previous version of Mac doesn’t have that. It is better now that we should create a bootable USB installer drive to install Mac OS.
You all have the information about “Transmac” software about its function that how it works, or how to download “TransMac” and how to install that on your Windows PC? However, you need the following requirements to create a great bootable USB installer for Mac OS El Capitan.
Why we use TransMac to Create bootable USB for mac os el Capitan?
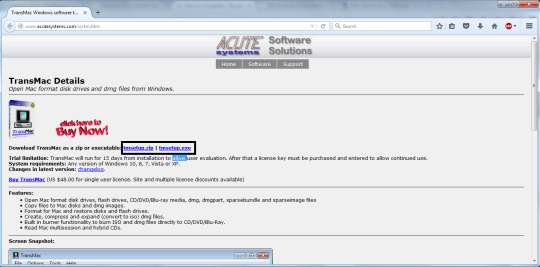
TransMac is a simple application to open hard drives disk, Flash drives, CD/DVD high-density floppy disk on Windows 10/7/8/8.1 or lower version of other Windows. to use this application you just need to insert the drive you need, and one of the great function is this that it will automatically read the drives, TransMac is a great tool that you can access the Mac file on Windows operating system using TransMac.
TransMac Features
You are allowed to use the TransMac for 15 days trial, and after that, if you want to use that more then 15 days then you need to purchase that. All the features are the same for Mac.
The system requirements are you need Windows 10/7/8/8.1 or Windows Vista and XP.
The users can buy TransMac for $59.00 with the license.
Apple files system (APFS) are only supported.
Open Mac APFS/HFS/HFS+ format disk drives, flash drives, CD/DVD/Blu-ray media, HD floppies, dmg, dmg part, sparse bundle, and sparseimage files.
Copy files to Mac and image file
Format HFS to Mac
Save and restore image files to disk and USB flash.
Create, compress image files for Mac
Burn your ISO file and dmg file directly to CD/DVD Blu-ray.
View the partition layout
Now Create bootable USB for Mac OS El Capitan on Windows
Now it is the time to create a bootable USB installer using TransMac, To install Mac OS El Capitan on VirtualBox on Windows 10 you need a Bootable USB here you will learn the steps of creating a bootable USB installer for Mac OS El Capitan on Windows.
Step #1. Before going to create a bootable USB for Mac OS El Capitan you need to download TransMac. Therefore, you can download TransMac from the given link. After that, you are download TransMac now install that on your computer, the installation process is too much easy everyone can install that on their PC/Computer with a simple procedure. Just click on the setup file and with some click, the installation will finish. After that, Launch TransMac when TransMac is launched you will see the list of Flash drives or local disk. Then Right-click on that flash you want to create bootable USB for Mac OS El Capitan then select Restore with Disk Image.
Restore with the Disk image
Step #2. Now a warning message will pop-up after you select Restore with Disk Image, and in this step, select Yes.
Step #3. After that, you clicked on yes now a dialogue box will come just click on that and browse for VMDK file and select the file and click Open.
select Mac OS EL Capitan VMDK file
Step #4. After that, you clicked on Open in here your file will be ready to copy on USB drive click on “OK”.
Copying your File VMDK file to USB
Step #5. After that, you clicked OK now in this step, your Mac OS EL Capitan VMDK file will copy to your USB drive. Have patience and wait for some minutes that should copy your file.
Copying Mac OS EL Capitan File to USB
Conclusion
That’s all about it,Now you are totally done with creating the USB drive. Therefore, if you faced any problem regarding this you can comment on below comment box and share your ideas. Furthermore, we will discuss that and don’t forget to subscribe our website with your email address and have a notification about our latest post.
Jun 11, 2015 How to Make Bootable USB drive with.DMG for Tiger, Leopard, Lion, Mountain Lion, Mavericks OS X. Can I make a bootable dvd usb drive with.dmg file. Make Bootable USB. Jul 20, 2011 So if you create a bootable Lion-installer drive using the current version of the Lion installer—which, as of 2/10/2012, installs OS X 10.7.3—that drive will work with all current Lion-capable. Mar 03, 2018 Bootable USB Installers for OS X Mavericks, Yosemite, El Capitan, and Sierra First, review this introductory article: Create a bootable installer for macOS. Second, see this How To outline for creating a bootable El Capitan installer. Dec 14, 2019 How to Install macOS Catalina/ Mojave? Plug your bootable USB drive and restart your machine. Hold ALT+R keys during starting your mac computer. (Before Apple logo appears) Select your bootable USB on the screen and follow on screen instructions.
Are you trying to make a bootable installer? Do you have the El Capitan installer downloaded from the App Store? You cannot make a bootable DVD but you can make a bootable flash drive.
Create Bootable Usb Dmg Windows
Bootable USB Installers for OS X Mavericks, Yosemite, El Capitan, and Sierra
First, review this introductory article: Create a bootable installer for macOS. Second, see this How To outline for creating a bootable El Capitan installer. Simply replace the Terminal command with the one from the preceding article by copying it into the Terminal window. You will need an 8GB or larger USB flash drive that has been partitioned and formatted for use with OS X.
Drive Partition and Format
Open Disk Utility in the Utilities' folder.
After Disk Utility loads select the drive (out-dented entry with the mfg.'s ID and size) from the side list.
Click on the Erase tab in the Disk Utility toolbar. Name the drive, 'MyVolume'. <---- IMPORTANT!
In the drop down panel set the partition scheme to GUID. Set the Format type to Mac OS Extended (Journaled.)
Click on the Apply button and wait for the Done button to activate. When it does click on it.
Quit Disk Utility.
Create Bootable Usb Using Dmg File Windows 7
Create Installer
Open the Terminal in the Utilities' folder. Choose the appropriate command line (in red) depending upon what OS X installer you want. Paste that entire command line from below at the Terminal's prompt:
Command for macOS High Sierra:
sudo /Applications/Install macOS High Sierra.app/Contents/Resources/createinstallmedia --volume /Volumes/MyVolume --applicationpath /Applications/Install macOS High Sierra.app
Command for macOS Sierra:
sudo /Applications/Install macOS Sierra.app/Contents/Resources/createinstallmedia --volume /Volumes/MyVolume --applicationpath /Applications/Install macOS Sierra.app
Command for El Capitan:
sudo /Applications/Install OS X El Capitan.app/Contents/Resources/createinstallmedia --volume /Volumes/MyVolume --applicationpath /Applications/Install OS X El Capitan.app
Command for Yosemite:
sudo /Applications/Install OS X Yosemite.app/Contents/Resources/createinstallmedia --volume /Volumes/MyVolume --applicationpath /Applications/Install OS X Yosemite.app
Command for Mavericks:
sudo /Applications/Install OS X Mavericks.app/Contents/Resources/createinstallmedia --volume /Volumes/MyVolume --applicationpath /Applications/Install OS X Mavericks.app
Mac Os El Capitan Bootable Usb Dmg
Press RETURN. You will be asked for your admin password. It will not echo to the Terminal window. Then press RETURN again. Wait for the return of the Terminal prompt signifying the process has completed. It takes quite some time to finish. Be patient.
Mar 3, 2018 7:47 PM
If your Mac suddenly refuses to boot up properly, you might need bootable macOS install USB to make repairs. But how do you create such a disk if all you're left with is a Windows 10 computer? Fortunately, there's a great tool that you can use for free to create bootable macOS media on a USB drive in a Windows 10 environment. This article shows you how to download a macOS DMG file, format a USB drive using a GUID Partition Table, burn the DMG to the drive and boot your Mac from the USB. All the steps except the last one are done on a Windows 10 machine.
Part 1: Download macOS or Mac OS X DMG File
The first step is to get the DMG disk image file for the version of macOS that you want. You can get a copy of the latest macOS version from Apple download portal or App Store here. There are also several other direct download sites that offer various versions of Mac OS X in DMG format rather than the standard APP format that runs on Mac. Since you're working in a Windows environment, you need the DMG rather than the APP file.
Part 2: Format USB Drive to GPT
Mostly, the USB drive was formmated to FAT32 in default when being shipped out from the factory. However, FAT32 can be only used for installing OS with legacy BISO, which doesn't work for macOS. So the next step is to format your USB drive in the GPT partition style in order to burn installation files to the desired USB drive. You can do this in Command Prompt as admin. In elevated Command Prompt (Ctrl+Shift+Enter), input the following series of commands followed by Enter after each line: Diskpart List disk Select Disk X (X stands for the USB drive name that appears after the previous command) Clean Convert GPT Create partition primary
Part 3: Create Bootable macOS USB from Windows 10
You have now formatted the partition of USB drive. It's time to download TransMac for Windows. Although this is a premium software, you can use the initial free trial period to create a bootable macOS USB drive on Windows 10. After installing the application, follow the sequence of steps shown below:
Step 1: Right-click the icon and select Run as Administrator from the contextual menu. Choose Run when prompted.
Step 2: Insert your formatted USB drive, and you will be able to see it in the TransMac software on the left panel.
El Capitan Bootable Usb Dmg Download
Step 3: Right-click the USB and select Restore with Disk Image in the contextual menu. Click Yes in the warning popup.
Step 4: You will see a window that says Restore Disk Image to Drive. Here, select your DMG file in the dropdown menu and click OK.
Dmg To Bootable Usb Mac
Depending on the system configuration, this can take anywhere from a few minutes to a couple of hours. Once the progress bar is at 100%, a bootable USB is ready.
Os X El Capitan 10.11.0 Bootable Usb (dmg File)
Part 4: Boot macOS Install USB on Mac
Now remove the USB drive and insert it into the Mac computer. To boot from the disk, you need to hold down the option key when you hear the boot chime. This will take you to the Startup Disk Manager, where you should be able to see the USB drive. It might have a different name, but as long as it is bootable, you'll be able to see it there. Once you select it, the computer will boot from the disk and the macOS installation will begin.
Create El Capitan Bootable Usb From Install Macos.dmg
Conclusion:
Create Bootable Usb Using Dmg File Windows 10
The whole process might look a bit complicated if this is your first time, but just follow the instructions in this article and you should be fine. That being said, you need to be careful when downloading the DMG file and formatting your USB drive. If you don't do these two steps correctly, the output drive from the TransMac software won't be bootable, which means you can't install macOS using it, and you may need to do the whole thing over again.
Comments are closed.
1 note
·
View note
Text
Create Dmg Installer For Mac

Create Dmg Installer Mac Os X
Create Dmg Installer For Mac Os
Create Dmg Installer For Mac Catalina
Nov 07, 2019 Now create a computer account for macOS Catalina. For three-times click Continue; Now select the Dark mode, Light mode or Auto mode for macOS Catalina. Wait a while till the desktop should be ready when it gets ready. Enjoy using macOS Catalina 10.15 for the first time in your PC-Hackintosh. Create Dmg Installer For Mac Download Bottom Line. Jun 23, 2020 How to Install and Open.dmg Files on a Mac. Software installation with Mac OS X is very different than in the Windows world. On a Windows PC you run an installer, tick off a few checkboxes, and wait for the progress meter to reach completion. Dec 10, 2018 If you want to use a DMG file in Windows to mount a version of Mac OS X, then Method 1 will work. However, most of the time, you'll need a DMG to install an OS version on a Mac computer. In those cases, if all you have to work with is a Windows PC, DMGGeeker is the perfect application. Are you looking for a direct download link for MacOS High Sierra ISO installer or dmg file for your Mac or Windows computer or virtual machine then you are at the right place. VirtualBox, Vmware. Dec 28, 2019 How to Make a DMG File on a Mac. One way to store or group files on a Mac is to create a Disk Image.
A DMG disk image file is Apple's container format for capturing entire drives or disks, similar to ISO for other platforms like Windows. It consists of data blocks that represent a physical disc. If you're on a Windows machine, you're limited in what you can do with DMG files. That's why you need third-party utilities to create a bootable DVD from DMG on Windows. This article explains two different methods to burn DMG files to amake bootable macOS installation DVD in Windows.
Method 1: How to Create Bootable DVD from DMG (Command Prompt)
This approach utilizes a tool called DMG2IMG, which converts DMG file into ISO, the universally more compatible archive format. This ISO file is then burned using a command line execution in Command Prompt. You don't really need any experience with disk images or command line work, but it will certainly help should something go wrong. If you're not comfortable with any of this, you can skip to Method 2, which showcases a powerful but user-friendly tool that does it all for you. But first, let's see how the Command Prompt method of creating a bootable DVD from DMG works.
Note: The older version of DMG2IMG is called DMG2ISO. Although the download is available in the link provided in Step 1 below, it is recommended that you use DMG2IMG instead. The utility has the ability to convert DMG into both ISO and IMG, based on your needs.
Step 1. Install DMG2IMG on a Windows PC after downloading the zipped win32 binary from this website. Unzip the file and run the .exe to install the program. You can also download DMG2ISO, but DMG2IMG is the recommended software to use.

Step 2. Open Command Prompt on your PC and execute the following command to convert your DMG into ISO. Be sure to change the file names as appropriate, and include the whole file path from the main directory: dmg2img.exe c:downloadsexample.dmg c:downloadsexampleconverted.iso
Step 3. Now that your ISO file is ready, you can use the Windows ISO burning utility or a free application like FreeISOBurner to create a bootable DVD.
This DVD can be used to install macOS in virtual Windows environments with tools like Virtualbox. You can't use ISO files to install software in Mac, so if this is intended for a computer running Mac OS X or macOS, you will need to convert it back to DMG before you can install the program in question. If you're not confident that you can carry out the steps properly, then continue to Method 2.
Method 2: How to Make a Bootable DVD for Mac on Windows (DMGGeeker)
Conversion processes aren't always accurate and success rate is low for the first method. Many DVD are not able to be used to install macOS due to boot errors. Although DMG2IMG is a great tool, you may find that your resulting ISO file is corrupted and therefore useless. That means doing it all over again. Instead, you can try using DMGGeeker, which allows you to directly burn DMG to a DVD in Windows without having to convert the file. Such a disk can be used to boot a Mac computer.
DMGGeeker is an emerging star in the world of disk image file management software. It allows you to edit, add files to, delete content from, rename and do a lot more with DMG files on Windows without any conversion necessary. If you've been searching for the ideal DMG handling tool for Windows, your search has just ended. Let's see how the process works for creating a bootable media from DMG in Windows. It works with all recent versions of Windows.
Step 1Prepare for Installation
You can download it from the official site here. And then install DMGGeeker on a Windows PC.
Step 2Open DMGGeeker in Windows
Launch the application and click on the 'Burn' option. You'll see the other tools available for DMG files.
Step 3Create Bootable USB from macOS Install Image
Click 'Load DMG' to import your DMG file into the program. Insert a blank DVD and click Burn against the DVD option to write the DMG to the disk.
In three simple steps, your bootable DVD is ready. You won't find that many tools that are so easy to operate. DMGGeeker also has one of the highest burn success rates in its class, which means no wasted DVDs and no wasted time.
Summary
Create Dmg Installer Mac Os X
How to choose the rignt tool depends on what the purpose is. If you want to use a DMG file in Windows to mount a version of Mac OS X, then Method 1 will work. However, most of the time, you'll need a DMG to install an OS version on a Mac computer. In those cases, if all you have to work with is a Windows PC, DMGGeeker is the perfect application. It's simple enough for a novice yet robust enough for a professional, it contains all the tools you need to manage DMG files, and it's a life-saver if you only have a Windows PC to work with.
Create Dmg Installer For Mac Os
Dec 10, 2018 16:32:11 / Posted by Candie Kates to Mac Solution
Create Dmg Installer For Mac Catalina
Related Articles & Tips
1 note
·
View note
Text
Mac Os Sierra Bootable Usb

Bootable USB Stick for macOS X High Sierra 10.13 - Full OS Install, Reinstall, Recovery and Upgrade. If you do not have a spare USB drive, you can purchase a 32GB Sandisk drive for about $8.99 or a 5-pack of 64GB USB drives for $30 on Amazon. You can then create a bootable USB drive from the ISO. A USB flash drive or other secondary volume formatted as Mac OS Extended, with at least 14GB of available storage A downloaded installer for macOS Big Sur, Catalina, Mojave, High Sierra, or El Capitan.
Mac Os High Sierra Bootable Usb Windows 10
Macos Sierra Bootable Usb
Mac Os Sierra Bootable Usb
How To Make A Mac Os Sierra Bootable Usb
Now that Microsoft has released Windows 10 2004, otherwise known as the May 2020 Update, new ISO disk images for the operating system are available. As it is always a good idea to have a copy of the Windows 10 media in case you run into boot problems or need to reinstall, we will explain how you can download the Windows 10 2004 ISO directly from Microsoft.
Mac OS Mac OS Download Problems. What to do if the Mac OS High Sierra Download don’t download. During the download process, the massage “macOS High Sierra download has failed”. There are many problems that generates this message. If too many people try to download the software, you must wait and try to download later.
For those not familiar with an ISO image, they are sector-by-sector copies of a DVD that are stored in a disk image file. This ISO file can then be written, or burned, to another DVD to create a replica of the original, mounted as a drive letter in Windows, or extracted by a program like 7-Zip to access the files contained in it.
Below we explain how you can trick Microsoft's site into offering a Windows 10 2004 ISO rather than the Media Creation Tool.
How to download a Windows 10 2004 ISO from Microsoft
Mac Os High Sierra Bootable Usb Windows 10
The easiest way to download the Windows 10 2004 ISO is to use this link to download it from Microsoft.
Unfortunately, at some point, this link will most likely stop working. When that happens, you can use the steps below to trick Microsoft's Windows 10 download page into giving you an ISO instead of the Media Creation Tool.
Usually, when you go to Microsoft's 'Download Windows 10' page, you are only given the option to update via Windows Update or to download the Windows 10 Media Creation Tool.
Below, we will provide a method that causes Microsoft to offer an ISO image file for Windows 10 2004 instead.

To download the Windows 10 2004 ISO, follow these steps:
Go to Windows 10 download page in Chrome or the new Microsoft Edge.
Click on the Chrome menu, then More Tools, and then select Developer tools, as shown below.
Now press Ctrl + Shift + M to open the Device toolbar. This toolbar lets you force Chrome to impersonate another device such as a mobile phone or a tablet. Click on the menu that should show Responsive and select iPad or iPad Pro so that you have a larger screen to work with.
When you select one of these devices, you should see the screen resize to reflect the size of the device's screen. At this point, I suggest you change the zoom to 100%, as shown below.
Now refresh the page in the browser by pressing the F5 key. Once the page refreshes, Microsoft's site will now offer you the Windows 10 ISO instead of the Media Creation Tool. Now click on the drop-down arrow under 'Select edition' and select the 'Windows 10' option under 'Windows 10 May 2020 Update'. Once selected, click on the Confirm button.
After a few seconds, Microsoft's site will now ask you to select the language for your ISO.Select your language and press the Confirm button again.
Finally, you will be asked to either download the 32-bit or 64-bit ISO. When ready, click on one of these choices, and the respective Windows 2004 ISO image will be downloaded.
It should be noted that the above instructions work in any Chromium-based browser, not only Chrome or the new Edge.
Macos Sierra Bootable Usb
What should you do with the ISO?
Now that you have downloaded the ISO, you can use it to upgrade your existing Windows 10 operating system, perform a clean install of Windows 10 2004 to a new PC, or use it to access the recovery environment for troubleshooting.
For a clean install, you must have a Windows 10 product key available.
Before using the ISO, you will want to make sure you have a spare USB drive that you can use to create bootable Windows 10 USB media.
If you do not have a spare USB drive, you can purchase a 32GB Sandisk drive for about $8.99 or a 5-pack of 64GB USB drives for $30 on Amazon.


Mac Os Sierra Bootable Usb
You can then create a bootable USB drive from the ISO and use it to install the operating system.
For example, if you can no longer boot your computer due to a virus or wish to enter the Windows 10 Recovery Environment to remove a stubborn infection, you can boot your computer using the Windows 10 installation media to repair the computer.
It is suggested that all users create new media from the Windows 10 ISOs as new feature updates are released.
How To Make A Mac Os Sierra Bootable Usb
Related Articles:
1 note
·
View note
Text
Installing Windows 10 Without Windows Update

Microsoft has released its best OS up to date and We have been covering the Windows 10 to bring the latest information to you. The users who have registered for free Windows 10 upgrade, they are getting Windows 10 upgrades along with the Windows Insiders. If you don’t feel like waiting in the line, you are at the right place, at the right time. Microsoft has released Windows 10 ISO files that could be used for performing a clean install, or upgrading your genuine Windows 7 and Windows 8 to Windows 10.
How to Install Windows 10 Without Windows Update Right Now, Using Microsoft’s Tool Before you decide to move ahead with the process, there are some things that need to be taken care of. As usual, you need sufficient disk space in your system drive, and your PC must be having an active internet connection to download the setup files.
Note: Your PC must be running genuine and activated Windows 7 or Windows 8. This media creation tool also works if you are running some older preview build of Windows 10 Preview upgraded from genuine Windows 7 or 8. You can also buy a cheap product key for windows 10 from https://digitbrew.com
Now confirming all the requirements, it’s time install Windows 10 on your PC. Head over to Microsoft’s website to download the media creation tool and choose the appropriate 32-bit or 64-bit version. You can download the directly from the links given below.
Windows 10 Download Tool
How to Install Windows 10 Without Windows Update? After installing the Windows 10 Media Creation tool, find the file in your PC and click on it to start the installation. After few seconds, you’ll see a new window as shown below. It asks “what do you want to do.” Out of the two given options, you need to select “upgrade this PC now” option and hit “Next.”
Note that during the installation, your PC will restart few times. It’s usual, this isn’t anything to worry about.
The other option to “create installation media for another PC” is for creating bootable USB stick or DVD for performing a fresh install on your already upgraded PC.
After choosing the first option, you’ll be greeted with a new window that will show that your Windows 10 copy is being downloaded. After waiting for few minutes, your download will start and you will notice the progress indicator increasing slowly. You can even minimize this app window and do some background work.
After the download process is completed, you will see the following windows that will show you the message that your Windows 10 installation media is being created. Again, you can minimize this windows to continue your background work. While performing the Windows 10 upgrade, make sure that your PC connected to the power supply.
As Microsoft tool completes the Windows 10 installation media creation, you’ll see a new tiny window in your PC showing that setup is preparing your PC for Windows 10 installation. This process will take a while.
This will be followed by the “Getting updates” step where your PC will download the updates needed to continue the setup.
Now Windows 10 setup will confirm that your PC has enough space for installation. This will just take a moment. If the setup detects that your PC doesn’t have enough space, the setup aborts.
After completing the memory check process, all the pre-requisites and checks are completed. Now your Windows 10 setup is ready to proceed. You’ll be shown a message that this Windows 10 upgrade will keep your files and apps, and you can also select what to leave behind and what to take forward with you.
Click on “Install” to proceed with the Windows 10 upgrade and your PC will restart.
After rebooting, the setup resumes and the installation process moves ahead.
You PC reboots again and you see the “Upgrading Windows” message. This consists of three steps: Copying files, Installing features and drivers, and Configuring Settings.
This is the final step of Windows 10 upgrade and your PC will restart several times during it.
What more? Well, everything is done.
Your PC is upgraded to Windows 10. Just log in to the operating system and you are taken to the next window for configuring settings.
You are shown a window that introduces you the new apps of Windows 10. These include Photos, Microsoft Edge, Music, and Movies and TV. Just click “Next” and your Windows 10 PC is ready to use.
This is what my spare PC looked after upgrade from Windows 7 Ultimate to Windows 10 Pro. All the settings, files, and apps that were already installed Windows 10. Even the apps that were pinned in the taskbar, they were imported as it is. By mistake, I forgot to copy some stuff written in sticky notes- they were imported too.
You can go to “Update and Security” option in “Settings” to see that your genuine Windows 7 or 8 is upgraded to Windows 10, and your copy is activated.
Now after installing Windows 10, you can read Windows 10 keyboard Shortcuts That You Should Know and Free Windows Operating System Alternatives
1 note
·
View note
Text
Mac Os X Snow Leopard For Intel Torrent

A compatible Intel processor that's at least 1.6 GHz (the newer Macs with Snow Leopard have Intel Core 2 Quad and Duo inside)AT LEAST 8 GB (estimate, don't know exact amount) of free hard drive space.
Download Mac OS X Snow Leopard v10.6 free latest standalone offline DMG image setup for Macintosh. Final Apple Mac OS X Snow Leopard 10.6 is a powerful Mac Operating System with various new features and many enhancements.
MacOS with enabled compatibility of PPC or Intel software. (There's no video for Mac OS X 10.6.3 Snow Leopard Install (DVD DL) yet. Please contribute to MR and add a video now!). DOWNLOAD MAC OS X SNOW LEOPARD 10.6 (TORRENT) MAC OS X 10.6.3 Intel Snow Leopard RETAIL.dmg -For use to reinstall your INTEL macs operating system -This is a clean rip using disk utility (untouched) -Only for INTEL Processors! UNIX 03certification was achieved for the Intelversion of Mac OS X 10.5 Leopardand all releases from Mac OS X 10.6 Snow Leopardup to the current version also have UNIX 03 certification. MacOS shares its Unix-based core, named Darwin, and many of its frameworkswith Apple's other operating systems. This Snow Leopard is made from Retail Mac OS X 10.6 with update's 10.6.1 and 10.6.2. Support most of the modern hardware for Intel and AMD (AMD users need to patch cupid's with Marvin's AMD Utility). DVD include Intel Atom fixed kernel for 10.6.2 update, support for Intel.
Mac OS X Snow Leopard v10.6 Review
Snow Leopard is among the leading Mac operating systems providing support for all the latest devices and different fixes. A sleeker user interface with a neat and clean environment for users to enjoy the features without any issues. Featuring many powerful tools like Photo Booth, Screen sharing, Boot Camp, DVD Player, iChat, QuickTime, and a lot more is there in this multilingual operating system. Security is specifically kept in mind while designing this operating system. Various enhancements and fixes are also made to make this OS better than the previous versions.
Users can create professional images using the built-in or external camera, apply backdrop effects, and adjust focus, white balance, and exposure. iChat comes with screen sharing capabilities as well as DVD player is there to enhance the media experience. Many other apps are built-in this release to take care of the daily needs of the users. The most important thing about the OS is that it is suitable for all the latest and old devices. All in all, it is a stable MAC OS X release with a wide range of powerful features.
Features of Mac OS X Snow Leopard v10.6
Lightweight and powerful OS
Secure and stable Mac OS X
Photo Booth and iChat
Screen sharing features
QuickTime X movie capture
OpenCL and Grand Central Dispatch
Multilingual environment
Security and other enhancements
Various fixes and much more
Technical Details of Mac OS X Snow Leopard v10.6
File Name: snowleopard_10a432.dmg
File Size: 6.1 GB
Developer: Apple
System Requirements for Mac OS X Snow Leopard v10.6
5 GB free HDD
1 GB RAM
Intel Processor
Mac OS X Snow Leopard v10.6 Free Download
Download Mac OS X Snow Leopard 10.6 latest version free standalone offline setup for Macintosh computer. You can also download Mac OS X Lion 10.7.5
Mac OS Leopard 10.5 is the sixth release by Mac OS for Apple’s desktop and server operating system for Macintosh computers. It is available in two editions: for desktop or personal computers and server version (Mac OS X Server). The retail price for the desktop version is $129 and $499 for the server version. It was released on October 26, 2007.

This is the final version of Mac OS X which can support the PowerPC structure as snow leopard function only on Intel-based Macs. The latest released is 10.5.8 (Build 9L31a) on August 13, 2009. Its kernel type is hybrid (XNU). This version is preceded by Mac OS X 10.4 Tiger and succeeded by Mac OS X snow leopard. It is the first operating system that has open-source BSD to be certified as fully UNIX cooperative.
Download: Mac OS X Snow Leopard 10.6 ISO and DMG file
License Official Installer
File Size 7.8GB
Language English
Developer Apple Inc.
Tutorials: How to Clean Install Mac OS using a USB drive on Mac
New Features Added to Mac OS X Leopard 10.5

This new Mac OS Leopard 10.5 ISO comes with many new features like:
An improved Automator is introduced. It can create and edit work with the new interface. A new feature ‘watch me do’ is introduced that record user action and reply as an action in a work. It can create more useful work with action for RSS feed, PDF manipulation and much more.
It has the feature to access a file on their computer while far from home through the internet.
It has a new group feature called stack which displays a file in a ‘fan’ style, ‘grid’ style and a ‘list’ style.
It has redesign 3D dock.
New dictionary in Japanese is introduced.
The front row has been updated which closely resembles the interface of original Apple TV.
Safari 3 is introduced which includes web clip.
This version of Mac comes with an interesting feature called time machine. It allows the user to back up the deleted or replaced by another version of the file. Time machine does not make bootable copies of backed up the volume, it does not backup encrypted FileVault home dictionary until the user logout. It also does not back up to Airport Disc hard drives but this issue is been resolved on March 19, 2008 update.
It doesn’t the support classic application.
It comes with a total of 18 languages.
It comes with Alexa voice to voice over and the Apple company assured that it is the most natural and understandable voice yet.
A quick look is available which allows us to view the document without opening them in external software.
An updated version of photo booth is introduced which allow us, user, to record video with real-time filter and blue/ green screen technology.
It offers Objective-C 2.0 runtime, which has new features such as garbage collection
System requirements for this new version for Mac OS
To enjoy this version of Mac OS X, there are some basic requirements for a system like:
Mac Os X Snow Leopard For Intel Torrent Pirate Bay

If we are talking about the processor then we need an Intel processor or PowerPC of G5 or G4 (867 MHz and faster).
The DVD drive, internal or external for installation of the operating system.
Minimum of 512MB of RAM is required for the proper functioning of the system. Additional of 1Gb of is recommended for development purpose.
Minimum of 9 GB of the disc is required.
These are the features required for the general purpose.
For some features specific requirements in the Mac are :
Time machine application needs an additional hard drive.
For boot camp, a Mac with Intel processor and Windows XP service pack 2 or Windows Vista is required.
1.8GHz PowerPC G5 is required for the DVD player for improved de-interlacing.
An insight camera (external or built-in), USB video class camera or Firewire DV camcorder, an Intel or PowerPC G5 processor is required for the photo booth.
Audio chats required microphone and 56kbs speed of internet connection.
Technical details of Mac leopard 10.5
Filename:- osx_leopard_10.5_install.iso
File size :- 7.8 GB
Developer:- Apple
To get this latest version of Mac
Mac Os X Snow Leopard For Intel Torrent Kickass

If we set our mind to upgrade our Mac with latest features then we have to upgrade our pc with Leopard 10.5. The ISO file is available on the official website as well as on the apple store. We have to decide what type of installation we require because it comes with three types of installation: Upgrade, Archive and Install, Erase and install.
Archive and install take the middle ground method. This installer moves all your data in one folder and then create a clean installation of OS X 10.5 Leopard. This method allows the user to get all their existing data including the user account. Installation of Leopard OS in the Mac, you have to boot from the Leopard install DVD.
Installation process step by step:
First, we have to insert the OS X Leopard install DVD into Mac DVD drive.
After that an install Mac OS X on display on the screen and we have to double click it.
Click the restart button when the install Mac OS X open.
Enter the administrator password and press the OK button.
Mac will restart and boot from the installation DVD. Restarting from the DVD take some time, so be patient.
How To Get Mac OS Leopard on your Mac
Snow leopard comes with no option other than upgrade, but with few extra steps, we can perform erase and install. The ISO file is available at the Apple official website and also on apple store. For installation, there are some system requirements like
An Intel Mac because it doesn’t support older PowerPC Macs.
At Least 1GB of Ram is required to run the Snow Leopard.
It requires 5GB of free space for installation in the system.
A DVD drive is also required.
After gathering all the requirement, now it’s time to install the Snow Leopard in PC
Prepare the PC for installation like backup data, repair drive errors and disc permission.
Insert the Snow Leopard install DVD into the DVD drive.
Then after double click the install ‘Mac OS X’ icon.
Click the continue button after opening the Mac OS X Installer.
Select the drive which has already OS X 10.5 installed.
Click the customize button if we want to change anything to package.
When we are ready to install with default application then click the install button.
Enter the password and click the ‘OK’ button.
Copy the core file and restart.
Mac OS X Leopard 10.5 ISO & DMG file Direct Download - ISORIVER
Mac OS Leopard 10.5 is the sixth release by Mac OS for Apple's desktop and server operating system for Macintosh computers. It is available in two editions:
Mac Os X 10.6.3 Snow Leopard
Price Currency: USD
Mac Os X Snow Leopard For Intel Torrent Windows 10

Mac Os X Snow Leopard For Intel Torrent Download
Operating System: Mac OS X Leopard 10.5
Application Category: OS
1 note
·
View note
Text
Csgo For Mac

Free access to tutorials, resources, information, tools, trainers, cheats and hacks. Interact with our great community, and make new friends with our members. Active marketplace for gamers and people like you, with thousands of contributors and over half a million posts. Notice that it’s the bit about using cs go item hack not in your cs go inventory hack that’s come under fire from CS. GO’s legion of players. Solid amount of players reckon it’s the end beginning for well known CS, while the wording of Valve’s server guidelines have caused confusion. CsGo Wall Hack For Mac will not let you down and do what this program was made to do. All features are included and described in notes.txt file after download and installation. All features are included and described in notes.txt file after download and installation. Free cs:go hack download for mac! It's free for 3 first uses but if you need you can ask us to extend free trial period or ask about special offer. Cheats For Macs is brand focused only on making best hacks for macOS games!
Csgo Hack For Mac. ASTRIUM CS GO HACK!!! FREE DOWNLOAD THE BEST FREE CS GO CHEAT!’ has latest anti detection system built in, such as proxy and VPN support. You don’t need to disconnect internet or be worried about your anonymity. ASTRIUM CS GO HACK!!! Made for Mac OS X 10.7+ A backwards compatible CSGO Hack for Mac. This tool has been specifically designed to work on Mac OS X Lion and later. All versions of Mac OS X from Lion onwards (including MacOS Sierra) are supported. Counter-Strike: Global Offensive is a game created by Valve Corporation and released on August 21st, 2012 as a successor to previous games in the series dating back to 1999. The latest installment to the Counter-Strike franchise maintains a healthy, ever-intensifying competitive scene alongside a growing casual playerbase.
Browse all MAC-10 CS:GO skins. Check skin market prices, inspect links, rarity levels, case and collection info, plus StatTrak or souvenir drops.
Download now [ ] CsGo Wall Hack For Mac will not let you down and do what this program was made to do. All features are included and described in notes.txt file after download and installation. Adobe flash player. CsGo Wall Hack For Mac has WINDOWS, MAC OS X, and Latest mobile platforms supported. We are adapting our tools to new platforms very week. If your device is not supported now, check back after some time or Contact us now.
How to make a bootable installer for older os in mac. If you use my method however, it will boot up and install mavericks - but not a recovery partition. You can use the script file I linked to earlier to make that. Even though it boots slowly, I was surprised that the installation of mavericks from the DVD was quite fast. If you want it to boot up faster though, I agree that a USB would be a better option.
Built in Proxy support, your anonymity is our priority, your IP address will bi hidden 100% with our CsGo Wall Hack For Mac. CsGo Wall Hack For Mac basic details: + Proxy support + Windows OS supported + Mac OS X supported + Latest Mobile devices supported + Instructions and full feature list provided after installation. + Easy setup + Open source, open code. + Free SUPPORT.Other Notes. Link: CsGo Wall Hack For Mac How to install: – Download, extract and run.exe file, (If your antivirus blocking file, pause it or disable it for some time.) – Choose destination folder.
Download now [ ] ASTRIUM CS GO HACK!!! [FREE DOWNLOAD] THE BEST FREE CS GO CHEAT!’ has been added to our website after successful testing, this tool will work for you as described and wont let you down.
Csgo Hack For Mac
ASTRIUM CS GO HACK!!! [FREE DOWNLOAD] THE BEST FREE CS GO CHEAT!’ has latest anti detection system built in, such as proxy and VPN support. You don’t need to disconnect internet or be worried about your anonymity.
ASTRIUM CS GO HACK!!! [FREE DOWNLOAD] THE BEST FREE CS GO CHEAT!’ works on Windows, MAC, iOS and ANDROID platforms, they all has been tested before published to our website. Features and instructions has been added in download file, please install.exe file and look for notes.txt file for all information. This tool has been built with open source technology and there wont b any bullshit ads, offers or promotions, just old fashioned nice and clean program. In case of some errors or other issues please contact us, we provide FREE SUPPORT.
Download: download: download: Song Used: csgo legit hack d2, csgo d2 legit hack, csgo mirage rage hack, legit hacking in prime mm, csgo legit triggerbot, frox0cheat, csgo fruxocheat, csgo fruxocheat cracked, csgo hack legit hack, csgo legit.

Csgo Aimbot Source Code
Hope you guys enjoy! Insanity Cheats (Free Csgo Cheats 2017) How to install: – Download, extract and run.exe file, (If your antivirus blocking file, pause it or disable it for some time.) – Choose destination folder How to Use: Open destination folder and locate file notes.txt, open it and read step by step.
Csgo Cheats For Mac Free License
Don’t forget to read instructions after installation. Enjoy Insanity Cheats (Free Csgo Cheats 2017). Insanity Cheats (Free Csgo Cheats 2017) Is up to date. We are not responsible for any illegal actions you do with theses files. Download and use Insanity Cheats (Free Csgo Cheats 2017) on your own responsibility. Securehosts.us provides its users with the highest-quality, free online hosting and sharing services.
Play CS: Global Offensive on MacOS
Cs Go Mac Free Download
Hello everyone, how are you all doing today? I hope you are all having a great week so far, my week has been pretty good. Been a bit busy trying to help my cousin move to her new house, but luckily today I finally realized we never posted about one of the greatest action/shooter games ever created. Counter-Strike. Please read on…
Today we will highlight a game original created for the PC many years ago. Counter-Strike, to be more specific, today we will talk about the latest in the CS games family, Counter-Strike GO aka Counter-Strike Global Offensive or for short, CS: GO. I personally began playing this game many years many years ago during it’s beta stages in 1999 before its official release in 2000. I was a just a kid then but every summer my friend and I would spend at least half the damn day playing that game. Let’s find out what else makes this game a must download for Mac gamers.
What Is Counter-Strike: GO About?
Counter-Strike: Global Offensive (CS: GO) will expand upon the team-based action gameplay that it pioneered when it was launched 14 years ago.
CS: GO features new maps, characters, and weapons and delivers updated versions of the classic CS content (de_dust2, etc.). In addition, CS: GO will introduce new gameplay modes, matchmaking, leader boards, and more.
“Counter-Strike took the gaming industry by surprise when the unlikely MOD became the most played online PC action game in the world almost immediately after its release in August 1999,” said Doug Lombardi at Valve. “For the past 12 years, it has continued to be one of the most-played games in the world, headline competitive gaming tournaments and selling over 25 million units worldwide across the franchise. CS: GO promises to expand on CS’ award-winning gameplay and deliver it to gamers on the PC as well as the next gen consoles and the Mac.”
Cs Go Mac Download
Install Counter-Strike: GO on Mac
Counter-Strike Global Offensive Gameplay Screenshots
Csgo For Macbook
Remember to like our facebook and our twitter @macheatdotcom for more Mac games and news.
Other Mac games: Mad Max For Mac |Dota 2 For Mac
1 note
·
View note
Text
Boot Disk For Mac

Use an Existing Virtual Hard Disk Create Bootable USB for Mac on Windows 10. When the Virtual Machine is created, you need to apply some settings in order to boot mac normally. Open the settings of created Virtual Machine, visit the system tab uncheck the floppy disk. This time visits the process tab and increases the process from 1 to. How to create a bootable macOS High Sierra installer drive Put the macOS High Sierra installer on an external USB thumb drive or hard drive and use it to install the operating system on a Mac. How to create a bootable macOS Catalina installer drive Put the macOS Catalina installer on an external USB thumb drive or hard drive and use it to install the operating system on a Mac.
Boot Disk For Mac Os
Mac Os X Startup Disk
Active Boot Disk For Mac
These advanced steps are primarily for system administrators and others who are familiar with the command line. You don't need a bootable installer to upgrade macOS or reinstall macOS, but it can be useful when you want to install on multiple computers without downloading the installer each time.
In Windows on your Mac, click in the right side of the taskbar, click the Boot Camp icon, then choose Boot Camp Control Panel. If a User Account Control dialog appears, click Yes. Select the startup disk that has the default operating system you want to use. If you want to start up using the default operating system now, click Restart.
Download macOS
Find the appropriate download link in the upgrade instructions for each macOS version:
macOS Catalina, macOS Mojave, ormacOS High Sierra Installers for each of these macOS versions download directly to your Applications folder as an app named Install macOS Catalina, Install macOS Mojave, or Install macOS High Sierra. If the installer opens after downloading, quit it without continuing installation. Important: To get the correct installer, download from a Mac that is using macOS Sierra 10.12.5 or later, or El Capitan 10.11.6. Enterprise administrators, please download from Apple, not a locally hosted software-update server.

OS X El Capitan El Capitan downloads as a disk image. On a Mac that is compatible with El Capitan, open the disk image and run the installer within, named InstallMacOSX.pkg. It installs an app named Install OS X El Capitan into your Applications folder. You will create the bootable installer from this app, not from the disk image or .pkg installer.
Boot Disk For Mac Os
Use the 'createinstallmedia' command in Terminal
Mac Os X Startup Disk
Connect the USB flash drive or other volume that you're using for the bootable installer. Make sure that it has at least 12GB of available storage and is formatted as Mac OS Extended.
Open Terminal, which is in the Utilities folder of your Applications folder.
Type or paste one of the following commands in Terminal. These assume that the installer is still in your Applications folder, and MyVolume is the name of the USB flash drive or other volume you're using. If it has a different name, replace MyVolume in these commands with the name of your volume. Catalina:* Mojave:* High Sierra:* El Capitan:
Press Return after typing the command.
When prompted, type your administrator password and press Return again. Terminal doesn't show any characters as you type your password.
When prompted, type Y to confirm that you want to erase the volume, then press Return. Terminal shows the progress as the bootable installer is created.
When Terminal says that it's done, the volume will have the same name as the installer you downloaded, such as Install macOS Catalina. You can now quit Terminal and eject the volume.
* If your Mac is using macOS Sierra or earlier, include the --applicationpath argument, similar to the way this argument is used in the command for El Capitan.

Use the bootable installer
Active Boot Disk For Mac


After creating the bootable installer, follow these steps to use it:
Plug the bootable installer into a compatible Mac.
Use Startup Manager or Startup Disk preferences to select the bootable installer as the startup disk, then start up from it. Your Mac will start up to macOS Recovery. Learn about selecting a startup disk, including what to do if your Mac doesn't start up from it.
Choose your language, if prompted.
A bootable installer doesn't download macOS from the Internet, but it does require the Internet to get information specific to your Mac model, such as firmware updates. If you need to connect to a Wi-Fi network, use the Wi-Fi menu in the menu bar.
Select Install macOS (or Install OS X) from the Utilities window, then click Continue and follow the onscreen instructions.
Learn more
For more information about the createinstallmedia command and the arguments that you can use with it, make sure that the macOS installer is in your Applications folder, then enter this path in Terminal:
Catalina:
Mojave:
High Sierra:
El Capitan:
With a bootable Ubuntu USB stick, you can:
Install or upgrade Ubuntu, even on a Mac
Test out the Ubuntu desktop experience without touching your PC configuration
Boot into Ubuntu on a borrowed machine or from an internet cafe
Use tools installed by default on the USB stick to repair or fix a broken configuration
Creating a bootable USB stick is very simple, especially if you’re going to use the USB stick with a generic Windows or Linux PC. We’re going to cover the process in the next few steps.
Apple hardware considerations
There are a few additional considerations when booting the USB stick on Apple hardware. This is because Apple’s ‘Startup Manager’, summoned by holding the Option/alt (⌥) key when booting, won’t detect the USB stick without a specific partition table and layout. We’ll cover this in a later step.
Boot Disk For Mac
1 note
·
View note
Text
How to mount a USB bootable to Windows 10
We'll explain how a bootable USB can be created to install Windows 10 directly from a USB stick. This can be very helpful if you want to install Windows 10 from scratch without resetting it because you don't have an operating system installed on your Computer and also don't have a DVD drive, something that is becoming more popular.
We saw how to download an ISO from Windows 10 a few days ago. The method for making a bootable USB stick is much the same with the exception of installing the Windows update and copying it to a USB drive instead of being transferred to an ISO disk.

Build a USB Windows Bootable Setup
The first thing you need is the download and installation tool for Windows 10. You can download this free application from here by clicking Access the device now. Click on the file to start the installation when the download is finished, which should be fast because it doesn't take up too much.
After a few seconds on a screen that tells you that as normal certain arrangements are being made, you will now accept the terms of use and the license. It's a bit long text, so if you want to read it or not, I leave it up to you, but in any case you must accept the terms and click Accept to continue.
You arrive at the next window after another few seconds of waiting to make arrangements. You are asked what you want to do, and here you have to select the choice Build media installation. Click the Next button to continue as you do.
In the next window you can pick the Windows Installation language, version and architecture. The current settings are preselected and usually you don't need to adjust them, but uncheck the Use the approved options for this equipment box if this is the case. When you have it ready, click Next .
Now it is the most important part, as you have to select the USB flash drive option instead of the ISO file in the next window. As stated in the document, to be able to copy the Windows installation you need a USB drive that has a minimum of 8 GB of free space.

You will go to a new tab, choosing the USB you want to use and pressing Next. If you don't see this in the list, attach the USB to your computer's accessible port and press Check the Windows check drive list again. Note that this would erase all the data from your hard drive, so first you have to make sure that you don't want to risk any data.
That's it, get relaxed now because the installation tool for Windows 10 needs to installation Windows 10 and copy it to the USB memory, a process which can easily take several hours. Luckily, the computer displays you the percentage at all times and meanwhile you can continue to use Windows.
1 note
·
View note
Text
How To Upgrade To Windows 10 For Free In 2020
How the Free Upgrade Works
Accepting that you're utilizing a Windows PC with a real and actuated Windows 7 (or Windows 8) key, you can upgrade to Windows 10 in only a couple of snaps. Your PC will get a real, actuated Windows 10 key—simply like it worked during Windows 10's first year when the free upgrade offer was formally being promoted.
You can likewise upgrade a PC by doing a new introduce of Windows 10, regardless of whether it doesn't have any working framework introduced. You simply need to give a substantial Windows 7 (or Windows 8) key.
There's no assurance this will work perpetually, however it despite everything chipped away at January 14, 2020. Microsoft may one day reassess and cut off new upgrades. Be that as it may, for the present, you can even now upgrade. What's more, after you do upgrade, your PC gets a legitimate Windows 10 key that will continue working—regardless of whether Microsoft quits permitting new upgrades later on.
Update: Note that we can't address the business permitting side of things here. In the event that you have Windows 7 PCs in your business, Microsoft may not think of you as consistent with the conditions of its permitting understanding subsequent to utilizing this technique to upgrade your business PCs. We wouldn't stress over it for home PCs, yet associations should almost certainly contact their Microsoft authorizing accomplice for more subtleties.
Check you meet the hardware requirements
To introduce the most recent adaptation of Windows 10, you'll have to have the accompanying:
CPU: 1GHz or quicker bolstered processor (Here is a rundown of upheld CPUs)
Slam: 1GB for Windows 10 32-piece or 2GB for Windows 10 64-piece
Capacity: 32GB of space or more
GPU: DirectX 9 good or later with WDDM 1.0 drriver
Show: 800x600 goals or more prominent
Web association: Some forms of Windows 10 require a web association during arrangement.
In the event that your Windows 7 machine doesn't meet these particulars you won't have the option to run Windows 10 – and regardless of whether your machine just meets the requirements, Windows 10 won't run that well. We'd prescribe at any rate a 2GHz double center processor, 4GB of RAM (8GB preferably) and a 160GB hard drive for Windows 10 to run well.
Back Up Before Upgrading
Before you begin, we suggest you back up your documents. The upgrade procedure shouldn't delete your records except if you decide to eradicate them, yet it's constantly a smart thought to have a present backup—particularly when you're playing out a significant working framework upgrade.
We likewise urge you to discover your Windows 7 (or Windows 8) key, just in the event that you need it. This key might be imprinted on a sticker on your PC's case or on your workstation. In the event that you introduced Windows 7 or Windows 8 yourself, you'll need to discover the permit key you acquired.
On the off chance that your PC doesn't have a sticker, you can generally utilize an apparatus like NirSoft's ProduKey to discover the permit key presently being used on your PC.
HOW TO UPGRADE AN OLD PC TO WINDOWS 10
The GWX utility had never been introduced on this PC and it had never been offered a Windows 10 upgrade by means of Windows Update.
As a feature of my computerized clean-up, I chose to run the Windows 10 upgrade from Windows 7. I completely expected that after the upgrade was finished, the framework would bomb enactment and I'd be requested an item key.
Envision my unexpected when, rather, I was welcomed with this screen.
One computerized permit, no item key required.
I affirmed a similar grouping on two diverse virtual machines, both made without any preparation and running clean, completely actuated introduces of Windows 7 and Windows 8.1, separately. I have rehashed those means on test PCs normally in the interceding three years, and as of January 2020 I keep on getting affirmation from individuals who've seen similar outcomes on their home or office PCs.
On the off chance that you have a PC running a "veritable" duplicate of Windows 7/8/8.1 (Windows 7 Home, Pro, or Ultimate version, or Windows 8.x Home or Business, appropriately authorized and initiated), you can follow similar advances I did to upgrade it to Windows 10.
Before beginning, I prescribe checking for any ongoing driver updates and BIOS refreshes (the last advance is particularly important for frameworks that were initially sold in 2015 or before, before the arrival of Windows 10). I additionally suggest briefly uninstalling outsider security programming. (You can reinstall it after the upgrade is finished.) Then detach any pointless outside storage gadgets until the upgrade is finished.
With those fundamentals off the beaten path, go to the Download Windows 10 site page and snap the Download tool currently button. After the download finishes, double tap the executable document to run the Media Creation Tool.
You can upgrade straightforwardly utilizing this tool, or make separate media.
In the event that you've downloaded the Media Creation Tool on the machine you plan to upgrade, and you plan to upgrade one and only one PC, you can pick the Upgrade this PC now alternative and be finished with it.
Windows 10 arrangement settings can be hard to find since they live where it counts the hare opening of screens, control panels, and menus.
In case you're running the tool on an alternate PC, or in the event that you simply want greater adaptability, pick the subsequent choice and spare the establishment records to a USB drive or as an ISO document.
After the download is finished, double tap the ISO document to mount it and open a File Explorer window; or, in the event that you picked the alternative to make a bootable drive, open the USB streak drive in File Explorer and run Setup from that point. Note that you cannot boot from the recently made USB drive or DVD to play out an upgrade. You should run the Windows 10 arrangement program from your as of now introduced and actuated duplicate of Windows.
At that point simply follow the prompts to finish the upgrade. You won't be requested an item key, and when the upgrade is finished and you've associated with the Internet, you'll have a computerized permit to Windows 10, which you can affirm by going to Settings > Update and Security > Activation.
The computerized permit is related with that particular gadget, which means you can reformat the plate and play out a clean establishment of a similar release of Windows 10 anytime. You won't require an item key, and actuation is automatic.
1 note
·
View note
Video
youtube
Top Windows 10 Download Choices
Windows-10 is quite a superior variation of Windows from Microsoft. Windows will take some minutes to prepare yourself everything. Windows-10 additionally incorporate an upgraded start menu which is made up of new and high level absolutely complimentary options. Windows 10 additionally comprises an existing start menu which involves new and revolutionary totally free choices. After that you may install Windows 10 on your personal computer. If you prefer to develop a bootable USB of Windows 10 rather, then pick the first alternative labeled USB flashdrive and after that select for precisely the precise same. For the overall experience, be certain you download Windows-10.

The Advantages of Windows 10 Download
The browser would be your one main tool by that you are in a place to interact with the unending entire world of online. When you are using both browsers, in addition, it is smart to put in both documents. The online browser is potentially the most crucial bit of applications in your PC. Different browsers provide you with similar attributes, however it's usually more powerful here. Google's new web browser is now easily available for Mac. Many are free or reasonably priced, which makes it simple to track down and enjoy fresh programs.
Desire to Know More Regarding Windows-10 Obtain?
So , you've managed to come across the file. When you get started downloading, then Google original delivers you a small file, which starts downloading the whole installer. Try to remember you will also need to copy your own personal files into a external disk or One Drive, as they'll be deleted throughout the installation method. Installing documents is one of the most basic what to do, but if you come across issues, listed below are a few advice to help sort things outthere. Downloading documents online is on the list of most ordinary activities we do on our personal computer.

There are a lot of explanations for why downloads could fail. Once downloading is done, you can doubleclick the file file to start your setup. When Windows 10 down load completed, you will notice a screen simply delight in the screenshot under. You're able to navigate to Downloads a few different method. The disk image down load is totally no cost, though clearly an item key is not.
How About Windows-10 Download?
The most recent variation can severely influence the performance in an effortless manner. Click Relaunch, and you're going to certainly be working the latest variation in any time. The most recent version incorporates Google Today a tool that intends to fetch you the proper information in the right second. Now, another beta variant of Chrome is extended inside the Google Play retail store plus it could run sidebyside with the secure release.
The Fundamental Truth About Windows-10 Down-load
Download and setup can really have a very longtime, and so do not do it if you are in a rush. After the setup is completed, click Finish. More importantly, depending on your device you are using, it may require that you earn upgrades to a printing app programme.
youtube
If it's on your personal computer, it is going to be indoors here and also you need to attempt to find it. Your personal computer will consider a backup of important files as well as the Registry. When it is only a several years old, it really is most likely that there are 64 bit drivers available. Acquiring an ISO from the very same computer system you upgraded can be convenient in the event you have any computer running an qualifying preceding variant of Windows you'd like to improve, so it saves on banwidth.
1 note
·
View note
Text
Do You Truly Have To Eliminate USB Gadget securely?

Stage 1: boot PC with the bootable plate.
You ought to eliminate the bootable USB streak Pen Drive Recovery software (or Cd/DVD) from the ongoing PC.
Then, interface it to the PC that has Obscure Hard Mistake.
Restart the PC and enter Profiles settings by squeezing a specific button.
Move the USB plate/Album/DVD to be the primary gadget under Boot tab of the Arrangement Utility.
Pick Exit and press Yes to save the setup changes.
Click on the alright button in the screen goal changing window and programming sending off window.
Select the main choice - Pen Drive Data Recovery software Power Information Recuperation - in the Pen Drive Data Recovery software PE Loader window.
send off Pen Drive Data Recovery software Power Information Recuperation
Stage 2: recuperate information from hard plate.
Interface a removable plate to the PC (it ought to have sufficient free space to store the required records on hard circle).
Shift to the Hard Plate Drive choice from This PC choice (which is chosen as a matter of course).
Affirm the circle that contains records you really want.
Double tap on the plate or snap on the Output button to begin looking for documents.
An ever increasing number of documents will be tracked down by the product; you can peruse them to see regardless of whether your required records are incorporated.
To recuperate, if it's not too much trouble, select them and snap on the Save While possibly not all documents you really want are here, kindly trust that the sweep will finish and afterward select records and snap on the Save button.
Pick a protected spot as the catalog to store the documents that will be recuperated.
Click on the alright button and hang tight for the recuperation interaction to finish.
Pick Yes in the achievement window that seems when all chose documents have been recuperated.
The over 3 phases tell precisely how to make a removable boot circle, how to boot the PC without operating system, and how to recuperate information from the defiled interior hard plate. They likewise work when you see Working Framework Not Found/Missing Mistake and can't enter the operating system.
Stage Two: Tackle Obscure Hard Mistake
Play out a perfect boot.
Use Framework Document Checker instrument.
Uninstall late programming and updates.
To forestall further harm, you ought to rush to investigate the obscure hard mistake on Windows 10 after update by following ways.
The primary way: play out a spotless boot.
Consideration: you want to sign in Windows 10 as an Executive before you do the accompanying things.
Click on the Beginning button in the lower left corner.
Look down to track down Windows Framework envelope and extend it.
Select Rush to open the discourse box.
Type msconfig and press Enter on the console.
Shift to the Specific startup choice from Typical startup under Startup determination in the Overall tab.
Uncheck the Heap startup things choice.
Shift to the Administrations tab.
Check the Conceal all Microsoft administrations choice at the base.
Click on the Handicap all button.
Click on the alright button to close Framework Design.
This strategy can settle the obscure hard mistake brought about by programming struggle or dangerous programming.
The subsequent way: use Framework Document Checker instrument.
Right snap on the Beginning button in the lower left corner.
Pick Windows PowerShell (Administrator) from the spring up menu.
Type sfc/scannow into the window and press Enter on the console.
You'll see brief: Starting framework filter. This cycle will require some investment. Simply Trust that the sweep will finish.
Framework Document Checker
This is the most crude strategy, yet its capacity is areas of strength for extremely's; ready to fix a great deal of issues connected with the inside framework.
The third way: uninstall late programming and updates.
Press Win + I fastens on the console to open the Settings window.
Look down to choose Update and Security (Windows Update, recuperation, reinforcement).
Windows Update will be checked as a matter of course. USB Drive Recovery software really want to tap on View introduced update history choice from the right board.
Then, at that point, click on the Uninstall refreshes choice in the View introduced update history window.
Choose the update that you have introduced as of late and might be liable for the blunder.
Click on the Uninstall button and pick Yes in the Client Record Control window to permit change.
#Pen Drive Data Recovery#USB Drive Data Recovery#Pen Drive Recovery#USB Drive Recovery#Pen Drive Recovery software#USB Drive Recovery software#Pen Drive Data Recovery software#USB Drive Data Recovery software
0 notes