#Vpn step setup instructions
Text
seeing a lot of “always morally okay to pirate from shit corporations!” and zero instructions for how to do that besides watching in 270p on miserable ad-infested laggy streaming sites.
it sure would be a shame if there were better ways, wouldn’t it?
windows users everything described below should also work for you, just change filepath syntax as needed [ ~/some_folder -> C:\Users\you\some_folder ].
WHAT YOU’LL NEED:
basic internet privacy setup. VPN tracker blocking etc.
firefox [or any browser, but really. switch to firefox.]
ffmpeg
https://ffmpeg.org
homebrew users: brew install ffmpeg
JDownloader
https://jdownloader.org
we’re also going to use the command line interface for the final step, so if you don’t know what that is or have never used the CLI before, you’ll want to do a quick search for “open command prompt” (windows) or “open terminal” (macos/linux) and then practice using the cd command to move around between folders. we’re not doing anything complex or risky with the CLI, so don’t let this part intimidate you—really. it’s super simple.
if ffmpeg isn’t already installed on your machine, the JDownloader installer package should prompt you to install it automatically—say YES if it asks.
NB: this method will not allow you to download first exclusive content, but it’s very simple to work around this limitation using burner accounts and the 7-day free trial to access paywalled content. just be sure to cancel your “subscription” once you’re done
NB2: you’ll need to WHITELIST “Brightcove Player” in your tracker blocking. that’s the service responsible for hosting/streaming videos, we need it to load so that we can yank the links :)
STEP ONE: JDOWNLOADER CONFIG
launch JDownloader and go to Settings. set the directory you want it to send downloaded files to. mine is ~/Downloads/JDownloader/RT.
set “If the file already exists” to “Overwrite.” this will make downloading many videos at a time more streamlined.
set “Remove finished downloads” to “when package is ready.” this will automatically clear finished downloads from the Downloads panel, to keep the UI clean while you work.
leave JDownloader running so the link grabber can do its thing.
STEP TWO: FINDING THE LINKS
log in to your RT account and go to the first video you want to download. open the page inspector by pressing alt+ctrl+i, then enter the “Network” tab. at the top of this tab you’ll see a “Filter URLs” text field; type m3u8 into it.
IF YOU DON’T SEE ANY RESULTS: 1. confirm that Brightcove Player is whitelisted, and 2. refresh the page without closing the Inspector.
we are looking for links from the manifest.prod.dns domain beginning with master.m3u8 and rendition.m3u8. there should be one master link and 2-4 rendition links. copy the urls for ALL of them, allowing JDownloader to grab them from your clipboard. if JDownloader doesn’t grab them automatically, you can manually paste them into the LinkGrabber tab by clicking “Add New Link.”
STEP THREE: DOWNLOADING VID AND AUDIO FILE
back to JDownloader: in the LinkGrabber tab, you should see something like:
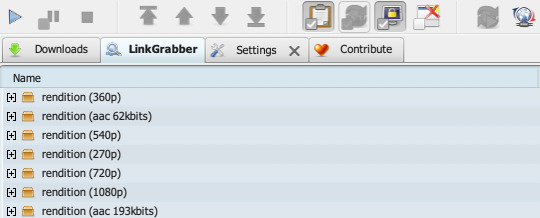
NB: the 193kbits audio is only available for first accounts—so if you want the higher quality audio you’ll need a burner account :)
anyway, what we want to do now is select the highest available video and audio folders—1080p and aac 193kbits in this case—right click, and select “Start Downloads.” JDownloader will download them to the default directory specified in step one, like so:
-RT
--rendition (1080p)
.|....rendition (1080p).mp4
--rendition (aac 193kbits)
.|....rendition (aac 193kbits).m4a
STEP FOUR: PUTTING IT TOGETHER
what we’ve just downloaded is a video file with no sound and the audio track that goes with it, so what we need to do now is combine them into a single file. to do that, we’re going to execute an ffmpeg command using our CLI.
open terminal [or command prompt] and cd into your JDownloader default directory. for me, this is:
cd ~/Downloads/JDownloader/RT
if there are any spaces in your file path, enclose them with straight double quotes, like this: ~/Downloads/"Some Folder"/RT
the syntax for the ffmpeg command we need is:
ffmpeg -i <path to video>.mp4 -i <path to audio>.m4a -acodec copy -vcodec copy <outputfilename>.mp4
for example:
ffmpeg -i ./"rendition (1080p)"/"rendition (1080p).mp4" -i ./"rendition (aac 193kbits)"/"rendition (aac 193kbits).m4a" -acodec copy -vcodec copy 1.16_BlackAndWhite.mp4
if you’re on macos or linux, you can just copy that string, change the output filename, and paste directly into your terminal. windows users will need to change the path syntax also. hit enter to execute the command. if there are any errors they will be printed in the CLI—you’ll want to keep an eye on the path and file names for the audio files, they sometimes vary a little from video to video (192kbits vs 193kbits, or 65 vs 63).
the new, combined file will be created in whatever directory you run the command from. play it in your media player of choice to confirm that everything worked / that the audio track is correct, and you’re done.
FURTHER NOTES:
if you want to download a bunch of videos all at once, the most efficient way to do so is to grab the m3u8 links, download [allowing JDownloader to overwrite], run the ffmpeg command to combine, repeat. otherwise you can manually rename each set of files in JDownloader before initiating the download, then batch create all the combined files at once, but this is probably more of a hassle than it’s worth.
when downloading multiple videos, if you navigate from one to the next using the “Up Next” menu, make sure to MANUALLY REFRESH THE PAGE every time you load a new video, to ensure you are only seeing m3u8 links associated with that specific video. [they don’t get unloaded when you move on to the next video, only when the page itself is reloaded.]
83 notes
·
View notes
Text
What is IPTV Smarters App and How to Set up on Various Devices?
This article will show you how to set up IPTV Smarters and IPTV Smarters Pro on Android, iOS and Firestick as smoothly as possible. However, blindly aiming for Internet Protocol TV (IPTV) and IPTV Smarters Pro capabilities without learning about them is a bad move.
Can I find it in the Google Play Store? Is there a difference between the Pro App and the Basic App? Is it possible to access multiple IPTV subscriptions? Many questions can arise before deciding on a setup.
Start with the IPTV Smarters app.
What is IPTV Smarters?
Suppose you want to subscribe to multiple IPTV services, but the service provider allows him one playlist per service, so that is not possible.
This is if you install the IPTV Smarters Pro app and use only one device with a screen to purchase various IPTV services. Remember IPTV Smarters is an application, not a service. You can’t host a channel because you don’t own the playlist or file URL. It’s just a platform that allows you to access channel playlists from multiple IPTV services.
One more note — the app only supports her IPTV service using the Xtream Code API or M3U playlists.
Unlike Smart IPTV (SIPTV), IPTV Smarters do not charge you while managing your service. You can enjoy the app directly with various functions.
IPTV Smarters vs IPTV Smarters Pro App
Still, it’s a good idea to understand the differences between the two versions before moving on to the ultimate features. There are two versions, IPTV Smarters Lite and IPTV Smarters Pro.
Other than two minor changes, there aren’t many obvious differences between the two. Likewise, if you set up the Smarters Pro version, you have achieved all the features included in the Lite version.
IPTV Smarters Lite
This incredible media player offers basic features available in the Pro version. These features are unlocked and do not require any additional charges.
Smarters has developed an app where he provides all unlocked attributes except paid ones in one app. IPTV Smarters lite is suitable for any smart device as long as you follow the instructions. You can easily get it at Google Play Store, app store and almost every trusted resource.
IPTV Smarters Pro
Install the IPTV Smarters Pro app (technically a lite version, but with premium features included) and you won’t miss anything.
Other than that, it’s one of the best streaming apps that offers all developer locking and unlocking features. You can get something locked for a small payment.
The Lite version has limited download options, but Smarters Pro is available on various downloader app sites. I mentioned the link below to install the app immediately. Remember that it is suitable for Android TV Box (or other Android devices), iOS devices, Firestick (Fire TV), etc. Easily stream live TV channels to other shows.
It is located at: Google Play Store, Apple App Store, Windows, Mac.
IPTV Smarters Pro App Features/Benefits
In the meantime, let me introduce you to the list of main features of the Pro app. Also available in Lite.
Supports Live TV/Radio
new UI design
Change buffer size
Multi-user and screen improvements
Load M3U and file URL
Improved casting in Chrome
Supports autoplay next episode
Additional media player controls
Manual and automatic cache clearing
Allow tab view
Can open channel list/episode list in video player
An improved way to download content
Here are the premium features that are found only in the paid version, aka Smarters Pro:
Supports picture-in-picture view
Compatible with external players; offers a player selection
Avails VPN integration and speed test
Allows master search
Includes parental authority
Offers EPG source management
Setup IPTV Smarters Pro App on Firestick:
There are no shortcuts to this, but the methods to Install IPTV smarters pro on firestick can be walk-in-the-park with a few steps. However, you must know that the smarters pro app is not on Amazon.
Hence, you will require outside help; the Downloader app to use IPTV smarters on firestick.
Step 1: Get your Firestick Ready
Yes, you have to change a setup slightly so that it allows third-party apps downloading:
Turn on the Fire tv and launch to the home screen
Select Settings (the cogwheel icon)
A list of banners will appear; pick My Fire TV
This time, a panel with various options will come up; choose Developer Options
Select Install unknown apps (some might show it as the Apps from unknown sources)
You will see the Downloader icon; select it and turn it ON
Now you can install the IPTV smarters pro app without any issue
Step 2: Install Downloader App
If you’re uncertain and dubious whether the app contains malware properties — it doesn’t. So be rest assured. The Downloader app acts as a body to allow other unknown apps/other apps to be installed on your Firestick if they are not available in the Amazon App Store. that’s it.
How to get the app:
A downloader is available on Amazon app store, which simplifies the process.
Return to the Fire TV home screen.
Go to search. Select the search banner.
Enter the app name (Downloader) in the search bar.
Select an app and it will appear under APPS & GAMES.
Just navigate to Download/Get with your remote.
Once installed, it will appear on your home screen (recently installed) or in the Apps & Games section.
Step 3: Install IPTV Smarters Pro app on Firestick
Since you already started from step 1, you don’t need to do any app permission configuration. New users may first try to get the downloader app and then look for permission to install third party apps.
Either one is fine. Now let’s get back to accessing IPTV Smarters on Firestick.
Launch the downloader app.
Ignore the prompt when prompted. A screen will appear with Home in the top left pane.
A bar also appears in the body below Enter a URL or search term.
Go there and type: https://www.iptvsmartersproapp.com/smarters.apk
Select GO
The app downloads the IPTV smarters pro.apk file
Then the downloader will automatically run and start the installation process.
Select Install that appears in the lower right corner.
Wait for the installation to complete. Then select Done (you can also select Open, but this won’t delete the .apk file).
Click Done to return to the downloader interface.
An automatic prompt will appear. Click Delete.
Select Delete again to confirm.
Your Fire TV is ready to use the IPTV Smarters Pro app.
Step 4: Setup & Run IPTV Smarters Pro app on Firestick:
So how can I access the channels of all IPTV services with this app? Do I need anything from my IPTV provider? Will all IPTV users get the basic service with smarters pro?
First, make sure you have subscribed to at least one IPTV service. Otherwise, all this hard work will go to waste in the long run.
Follow the whole process to understand better:
Open the IPTV Smarters Pro app.
Scroll down the window and agree to the terms of use.
A new window will appear. You can select either ADD USER (top right) or ADD NEW USER (center of screen).
You will be presented with two options to access the IPTV service. Load a playlist or file URL and log in using the Xtream Codes API.
From here, you can choose either Step 5 or Step 6, depending on your IPTV service provider and ease of use.
Step 5: Login Using “Loading a Playlist or File URL”
After registering for the IPTV service, the service provider will send you an email with his IPTV credentials. Additionally, there are EPG links and M3U playlists.
If you have not received such an email after purchasing the service, you should contact your service provider.
Also make sure M3U is supported as many services do not.
If you select Add User or Add New User, go to Load Playlist or File/URL.
When prompted for permission, select Allow.
Screen is displayed. Enter any name in PLAYLIST NAME.
Select M3U URL in PLAYLIST TYPE.
Enter her M3U link you received by email.
Then select Add User.
If you want to watch live tv, just select Install EPG > EPG link (provided in the email) > ADD EPG > Live TV.
Or, you can opt for Step 6 given below.
Step 6: Using ‘Login with Xtream Codes API’
While this second option offers a user-friendly function, it has been taken down recently. Though I’m unsure if this will work, the API codes are also provided in the email alongside other details.
Once you choose this option after clicking ADD NEW USER/ADD USER, the screen will ask you to enter your login credentials, a name for the playlist, and the server URL. The URL is in the email from your provider. After adding all the details, select Add User.
Then if you want to watch live TV, select Live TV > select a channel group > select a channel > zoom in if the screen is small.
Also, no additional URL is required to add an EPG. Simply select Install EPG and the EPG will load automatically.
Install the IPTV Smarters Pro app on Android
The best thing about this app is that it is officially accessible on any Android device, including smartphones, tablets or Android TV boxes. The good news is that you don’t have to adopt any other approach to set up IPTV Smarters Pro. Please tell me how:
Download IPTV Smarters from the Play Store on your Android device. You can find it on your home screen.
Once downloaded, install and open it.
Detect if the device is a TV or a mobile phone. Confirm the correct options and select Save. When the Terms of Use page appears, select Agree.
The following steps are the same as described in step 5 of IPTV Smarters in the Firestick section. This is because the functionality is almost identical to that of Fire TV.
Take advantage of the multi-screen feature that allows you to view multiple channels simultaneously.
Install the IPTV Smarters Pro app on iOS
As a result, you can continue with similar steps for Firestick as iOS devices have equivalent functionality. But don’t forget to download and install IPTV Smarters from the Apple App Store. Once installed, launch IPTV smarter and use the same credentials sent by your IPTV service provider. Then follow the path given in Step 5 IPTV Smarters on Firestick.
At the End:
So this is the easiest process of how to set up IPTV Smarters and IPTV Smarters Pro for Android, iOS and Firestick. It turns out that knowing your Firestick version is enough to install and use IPTV Smarters.
And when you subscribe to new IPTV services, you can forget about installing individual apps. Access your content like never before.
Also, IPTV Smarters will greatly benefit users who are struggling with IPTV services as some of them do not offer user-friendly interfaces. If you think this process is long, it’s just words. The actual transaction only takes about 15 minutes. Get ready to stream tons of channels on one platform today!
3 notes
·
View notes
Text
Perfect Player IPTV for Firestick / Android: How to Install and Setup
Flawless Competitor Internet Protocol Television (IPTV) is one of the scarcest of IPTV players that is freely accessible. Developed by Niklabs Software, it is the most favored IPTV player application. The application is offered for free on the Google Play Store. Since the application is available for free, there is no necessity to sign up or register. You can simply install the IPTV Player application and utilize it on your device.
Table of Contents
IPTVGREAT – Rating 4.8/5 ( 600+ Reviews )
IPTVRESALE – Rating 5/5 ( 200+ Reviews )
IPTVGANG – Rating 4.7/5 ( 1200+ Reviews )
IPTVUNLOCK – Rating 5/5 ( 65 Reviews )
IPTVFOLLOW -Rating 5/5 ( 48 Reviews )
IPTVTOPS – Rating 5/5 ( 43 Reviews )
Toggle
Why is VPN Necessary to access IPTV?
Supported Devices
How to Add Flawless Competitor IPTV on Android Smartphones
How to Add Flawless Competitor IPTV on Amazon Firestick
Pre Requisite
Add Flawless Competitor IPTV on Firestick Using Downloader
How to Configure Flawless Competitor IPTV
How to Add Flawless Competitor IPTV on Android Smart TV
How to Add Flawless Competitor IPTV on Windows PC
How to Add Flawless Competitor IPTV on Linux PC
Peculiarities of Flawless Competitor IPTV
Client Support
Flawless Competitor IPTV Review
Why is VPN Necessary to access IPTV?
Most of the IPTV providers might track the user data and will store online logs. To prevent your data from these trackers, we advise you to use a VPN. Premium VPNs like NordVPN and CyberGhost VPN will safeguard your data with the most advanced security protocols. With the VPN, the IP address will be hidden and your real location will be altered. By connecting to a VPN, your actual identity will remain undisclosed.
Supported Devices
Android Smartphone
Amazon Firestick
Android Smart TV
Windows and Linux PC
How to Add Flawless Competitor IPTV on Android Smartphones
(1) On your Android device, open the Google Play Store.
(2) Search for the Flawless Competitor IPTV on the search bar.
(3) Choose the IPTV app and tap the Add button on the next screen.
(4) After the app is added, tap the Open button to run the IPTV app.
(5) To access the IPTV content, you need to configure the Flawless Competitor IPTV app. The configuration instructions are the same as Firestick, which is mentioned below.
If you want a remote control of the IPTV app, you can add the Flawless Cast IPTV from the Play Store.
How to Add Flawless Competitor IPTV on Amazon Firestick
Unlike the Play Store, Amazon App Store does not have the Flawless Competitor IPTV app. You need to use the Downloader app to add the IPTV player on your Firestick.
Pre Requisite
(1) Go to the Settings option from the Fire TV home screen.
(2) Choose the My Fire TV or Device option from the Settings menu.
(3) Select the Developer options from the list of options.
(4) Choose the Apps from Unknown Sources option.
(5) Select the Turn On button to confirm the selection.
Add Flawless Competitor IPTV on Firestick Using Downloader
(1) Navigate back to the Firestick home screen and click the Search icon.
(2) Using the Fire TV remote, type Downloader using the on-screen keyboard.
(3) Choose the Downloader app that is listed under the Apps & Games category.
(4) Click Download, followed by the Open icon to launch the Downloader app.
(5) Go to the https:// bar and enter the Flawless Competitor download link https://bit.ly/36G9r1C. Once you finish typing, click the Go button.
For Flawless Cast IPTV: https://bit.ly/3lmWQED
(6) The apk file will start downloading. Wait for the download to complete.
(7) Then, click the Install button. After installation, select Open to run the IPTV app.
How to Configure Flawless Competitor IPTV
To configure the Flawless Competitor IPTV on your smartphone and Firestick, follow the steps below.
(1) Open the Flawless Competitor IPTV app on your device.
(2) Tap the Settings icon located at the top of the screen.
(3) Choose the General option from the Settings menu.
(4) Now, select the Playlist option.
(5) Enter the M3U URL associated with your IPTV provider and tap the OK button.
(6) Now, under Playlist 1, your IPTV provider's link will appear. Then, choose the EPG option.
(7) Here, type the EPG link and tap the OK button.
(8) Then, you will see both the Playlist 1 and EPG guide.
(9) After that, you will have access to all the live TV channels on the left side of the screen.
How to Add Flawless Competitor IPTV on Android Smart TV
(1) Launch the Play Store application on your Android TV.
(2) Search for the Flawless Competitor IPTV application.
(3) Install the application on your smart TV by selecting the Install button.
(4) Open the Flawless Competitor application. If it prompts for setup, follow the same procedure as mentioned above.
(5) Then, you will have access to all the live TV channels and video contents from your IPTV provider.
How to Add Flawless Competitor IPTV on Windows PC
(1) Visit the NIKLABS website on your Windows PC.
(2) Click the Downloads button on the webpage.
(3) Download the Flawless Competitor IPTV 1.1.4 under the Windows tab.
0 notes
Text
Setting Up a Residential Server: A Step-by-Step Guide
In today’s digital age, having a residential server can offer numerous benefits, from enhanced security and privacy to centralized storage and media streaming capabilities. Setting up a residential server may seem daunting at first, but with the right guidance, it can be a rewarding and empowering experience. In this step-by-step guide, we will walk you through the process of setting up your own residential server.
Step 1: Planning and Preparation
Before diving into setting up your residential server, it’s crucial to plan and prepare adequately. Consider the following points:
Purpose: Define the purpose of your server — whether it’s for file storage, media streaming, hosting a website, or other specific tasks.
Hardware: Choose the right hardware based on your needs. This includes a reliable server-grade computer, sufficient storage drives, adequate RAM, and a stable internet connection.
Operating System: Select a suitable operating system for your server. Popular choices include Linux distributions like Ubuntu Server, CentOS, or specialized server OS like Windows Server.
Step 2: Installation and Configuration
Once you have your hardware and software ready, it’s time to install and configure your residential server:
Install the Operating System: Follow the installation instructions for your chosen operating system. Ensure all necessary drivers are installed correctly.
Network Configuration: Set up network settings, including IP address, subnet mask, gateway, and DNS servers. Ensure your server is connected to your home network.
Security: Implement security measures such as firewall configurations, user authentication, and regular software updates to protect your server from potential threats.

Step 3: Setting Up Services
After the basic setup is complete, you can start configuring services on your residential server:
File Storage: Set up file-sharing services like Samba (for Windows) or NFS (for Linux) to create a centralized storage solution accessible from all devices on your network.
Media Server: Install media server software like Plex or Emby to stream movies, music, and photos to various devices within your home.
Web Server: If you plan to host a website, install a web server software like Apache or Nginx and configure it to serve web pages.
Step 4: Remote Access and Monitoring
To manage your residential server effectively, consider setting up remote access and monitoring tools:
Remote Access: Configure remote access tools like SSH (Secure Shell) or VPN (Virtual Private Network) to manage your server from anywhere securely.
Monitoring: Install monitoring software like Nagios or Zabbix to keep track of server performance, resource usage, and potential issues proactively.
Step 5: Backup and Disaster Recovery
Lastly, don’t forget to implement a robust backup and disaster recovery plan for your residential server:
Regular Backups: Schedule regular backups of your data to an external drive, cloud storage, or another server to prevent data loss in case of hardware failure.
Disaster Recovery Plan: Create a detailed disaster recovery plan outlining steps to restore your server in case of a catastrophic event.
By following these steps and guidelines, you can successfully set up a residential server that meets your specific needs and enhances your digital lifestyle. Remember to stay informed about best practices, security updates, and new technologies to keep your server running smoothly and securely. Happy server building!
0 notes
Text
Exploring 快连下载: The Fast VPN Solution for Secure Online Browsing
In an age where online privacy and security are paramount, a fast and reliable VPN solution is essential for protecting personal data and ensuring a secure browsing experience. 快连下载 (Kuai Lian Download), commonly known as 快连VPN (Kuai Lian VPN), emerges as a leading provider offering high-speed connectivity and robust encryption to users worldwide. In this article, we delve into the features, benefits, and advantages of 快连下载, shedding light on its role as a trusted VPN solution for both individuals and businesses.
Understanding letsvpn download :
Introducing 快连下载: An overview of 快连下载, highlighting its reputation as a fast and efficient VPN service provider known for its reliability, security features, and user-friendly interface.
The Need for Fast VPNs: Discussing the importance of fast VPNs in today's digital landscape, where internet users require seamless connectivity and swift access to online resources without compromising security.
Key Features of 快连下载:
High-Speed Connectivity: Exploring 快连下载's commitment to providing fast and stable connections, ensuring smooth browsing, streaming, and downloading experiences for users.
Secure Encryption Protocols: Highlighting 快连下载's use of advanced encryption protocols to safeguard user data and communications from prying eyes, hackers, and cyber threats.
Global Server Network: Discussing 快连下载's extensive network of servers located in strategic locations worldwide, allowing users to access geo-restricted content and websites with ease.
Cross-Platform Compatibility: Exploring 快连下载's compatibility with various devices and operating systems, including Windows, macOS, Android, and iOS, ensuring a seamless and consistent user experience across devices.
Benefits of Using 快连下载:
Enhanced Online Privacy: Discussing how 快连下载 encrypts user data and masks IP addresses, preventing ISPs, governments, and hackers from monitoring online activities and tracking user behavior.
Geo-Unblocking Capabilities: Highlighting 快连下载's ability to bypass geo-restrictions and access region-locked content on streaming platforms, social media sites, and online services from anywhere in the world.
Secure Public Wi-Fi: Exploring how 快连下载 protects user connections on public Wi-Fi networks, shielding sensitive information from potential threats and cyber attacks.
Anonymous Browsing: Discussing 快连下载's role in providing users with anonymity and privacy while browsing the internet, allowing them to explore online content without fear of surveillance or censorship.
Choosing 快连下载 as Your VPN Solution:
Assessing Your Needs: Providing guidance on evaluating your VPN requirements, including speed, security, and compatibility with devices and platforms.
Researching Options: Exploring 快连下载's features, pricing plans, and user reviews to determine if it aligns with your needs and expectations for a VPN service provider.
Setting Up 快连下载: 快连官方 -by-step instructions for downloading, installing, and configuring 快连下载 on various devices and operating systems, ensuring a seamless setup process for users.
快连下载 emerges as a reliable and efficient VPN solution for users seeking fast, secure, and private online browsing experiences. With its high-speed connectivity, robust encryption protocols, and global server network, 快连下载 empowers individuals and businesses to protect their online activities, access geo-restricted content, and browse the internet with confidence. By choosing 快连下载 as your VPN solution, you can enjoy fast and reliable connectivity while safeguarding your privacy and security in today's digital world.
1 note
·
View note
Text
Step-by-Step Guide: Downloading 快连 VPN for Enhanced Privacy | 快连vpn
In an era where online privacy and security are paramount, Let's VPN emerges as a leading provider offering users a secure and private browsing experience. With its user-friendly interface and robust encryption protocols, Let's VPN has gained popularity among individuals and businesses alike. In this article, we explore the features, benefits, and installation process of Let's VPN, empowering users to enhance their online security and privacy.
Understanding Let's VPN:
Introduction to Let's VPN: An overview of Let's VPN and its mission to provide fast, reliable, and secure VPN services to users worldwide.
The Importance of VPNs: Discussing the significance of VPNs in safeguarding online privacy, protecting against cyber threats, and bypassing geo-restrictions.
Key Features of Let's VPN:
High-Speed Connectivity: Exploring Let's VPN's commitment to providing fast and stable connections, ensuring smooth browsing, streaming, and downloading experiences for users.
Secure Encryption Protocols: Highlighting Let's VPN's use of advanced encryption protocols to safeguard user data and communications from prying eyes, hackers, and cyber threats.
Global Server Network: Discussing Let's VPN's extensive network of servers located in strategic locations worldwide, allowing users to access geo-restricted content and websites with ease.
letsvpn -Platform Compatibility: Exploring Let's VPN's compatibility with various devices and operating systems, including Windows, macOS, Android, and iOS, ensuring a seamless and consistent user experience across devices.
Benefits of Using Let's VPN:
Enhanced Online Privacy: Discussing how Let's VPN encrypts user data and masks IP addresses, preventing ISPs, governments, and hackers from monitoring online activities and tracking user behavior.
Geo-Unblocking Capabilities: Highlighting Let's VPN's ability to bypass geo-restrictions and access region-locked content on streaming platforms, social media sites, and online services from anywhere in the world.
Secure Public Wi-Fi: Exploring how Let's VPN protects user connections on public Wi-Fi networks, shielding sensitive information from potential threats and cyber attacks.
Anonymous Browsing: Discussing Let's VPN's role in providing users with anonymity and privacy while browsing the internet, allowing them to explore online content without fear of surveillance or censorship.
Choosing Let's VPN as Your VPN Solution:
Assessing Your Needs: Providing guidance on evaluating your VPN requirements, including speed, security, and compatibility with devices and platforms.
Researching Options: Exploring Let's VPN's features, pricing plans, and user reviews to determine if it aligns with your needs and expectations for a VPN service provider.

Setting Up Let's VPN: Offering step-by-step instructions for downloading, installing, and configuring Let's VPN on various devices and operating systems, ensuring a seamless setup process for users.
Let's VPN emerges as a reliable and efficient VPN solution for users seeking fast, secure, and private online browsing experiences. With its high-speed connectivity, robust encryption protocols, and global server network, Let's VPN empowers individuals and businesses to protect their online activities, access geo-restricted content, and browse the internet with confidence. By choosing Let's VPN as your VPN solution, you can enjoy fast and reliable connectivity while safeguarding your privacy and security in today's digital world.
1 note
·
View note
Text
Exploring 快连下载: The Fast VPN Solution for Secure Online Browsing
In an age where online privacy and security are paramount, a fast and reliable VPN solution is essential for protecting personal data and ensuring a secure browsing experience. 快连下载 (Kuai Lian Download), commonly known as 快连VPN (Kuai Lian VPN), emerges as a leading provider offering high-speed connectivity and robust encryption to users worldwide. In this article, we delve into the features, benefits, and advantages of 快连下载, shedding light on its role as a trusted VPN solution for both individuals and businesses.
Understanding 快连下载:
Introducing 快连下载: An overview of 快连下载, highlighting its reputation as a fast and efficient VPN service provider known for its reliability, security features, and user-friendly interface.
The Need for Fast VPNs: Discussing the importance of fast VPNs in today's digital landscape, where internet users require seamless connectivity and swift access to online resources without compromising security.
Key Features of 快连下载:
High-Speed Connectivity: Exploring 快连下载's commitment to providing fast and stable connections, ensuring smooth browsing, streaming, and downloading experiences for users.
Secure Encryption Protocols: Highlighting 快连下载's use of advanced encryption protocols to safeguard user data and communications from prying eyes, hackers, and cyber threats.
Global Server Network: Discussing 快连下载's extensive network of servers located in strategic locations worldwide, allowing users to access geo-restricted content and websites with ease.
Cross-Platform Compatibility: Exploring 快连下载's compatibility with various devices and operating systems, including Windows, macOS, Android, and iOS, ensuring a seamless and consistent user experience across devices.
letsvpn download of Using 快连下载:
Enhanced Online Privacy: Discussing how 快连下载 encrypts user data and masks IP addresses, preventing ISPs, governments, and hackers from monitoring online activities and tracking user behavior.
Geo-Unblocking Capabilities: Highlighting 快连下载's ability to bypass geo-restrictions and access region-locked content on streaming platforms, social media sites, and online services from anywhere in the world.
Secure 快连vpn下载 -Fi: Exploring how 快连下载 protects user connections on public Wi-Fi networks, shielding sensitive information from potential threats and cyber attacks.
Anonymous Browsing: Discussing 快连下载's role in providing users with anonymity and privacy while browsing the internet, allowing them to explore online content without fear of surveillance or censorship.
Choosing 快连下载 as Your VPN Solution:
Assessing Your Needs: Providing guidance on evaluating your VPN requirements, including speed, security, and compatibility with devices and platforms.
Researching Options: Exploring 快连下载's features, pricing plans, and user reviews to determine if it aligns with your needs and expectations for a VPN service provider.
Setting Up 快连下载: Offering step-by-step instructions for downloading, installing, and configuring 快连下载 on various devices and operating systems, ensuring a seamless setup process for users.
快连下载 emerges as a reliable and efficient VPN solution for users seeking fast, secure, and private online browsing experiences. With its high-speed connectivity, robust encryption protocols, and global server network, 快连下载 empowers individuals and businesses to protect their online activities, access geo-restricted content, and browse the internet with confidence. By choosing 快连下载 as your VPN solution, you can enjoy fast and reliable connectivity while safeguarding your privacy and security in today's digital world.
1 note
·
View note
Text
Exploring 快连下载: The Fast VPN Solution for Secure Online Browsing
In an age where online privacy and security are paramount, a fast and reliable VPN solution is essential for protecting personal data and ensuring a secure browsing experience. 快连下载 ( letsvpn ), commonly known as 快连VPN (Kuai Lian VPN), emerges as a leading provider offering high-speed connectivity and robust encryption to users worldwide. In this article, we delve into the features, benefits, and advantages of 快连下载, shedding light on its role as a trusted VPN solution for both individuals and businesses.
Understanding 快连vpn :

Introducing 快连下载: An overview of 快连下载, highlighting its reputation as a fast and efficient VPN service provider known for its reliability, security features, and user-friendly interface.
The Need for Fast VPNs: Discussing the importance of fast VPNs in today's digital landscape, where internet users require seamless connectivity and swift access to online resources without compromising security.
Key Features of 快连下载:
High-Speed Connectivity: Exploring 快连下载's commitment to providing fast and stable connections, ensuring smooth browsing, streaming, and downloading experiences for users.
Secure Encryption Protocols: Highlighting 快连下载's use of advanced encryption protocols to safeguard user data and communications from prying eyes, hackers, and cyber threats.
Global Server Network: Discussing 快连下载's extensive network of servers located in strategic locations worldwide, allowing users to access geo-restricted content and websites with ease.
Cross-Platform Compatibility: Exploring 快连下载's compatibility with various devices and operating systems, including Windows, macOS, Android, and iOS, ensuring a seamless and consistent user experience across devices.
Benefits of Using 快连下载:
Enhanced Online Privacy: Discussing how 快连下载 encrypts user data and masks IP addresses, preventing ISPs, governments, and hackers from monitoring online activities and tracking user behavior.
Geo-Unblocking Capabilities: Highlighting 快连下载's ability to bypass geo-restrictions and access region-locked content on streaming platforms, social media sites, and online services from anywhere in the world.
Secure Public Wi-Fi: Exploring how 快连下载 protects user connections on public Wi-Fi networks, shielding sensitive information from potential threats and cyber attacks.
Anonymous Browsing: Discussing 快连下载's role in providing users with anonymity and privacy while browsing the internet, allowing them to explore online content without fear of surveillance or censorship.
Choosing 快连下载 as Your VPN Solution:
Assessing Your Needs: Providing guidance on evaluating your VPN requirements, including speed, security, and compatibility with devices and platforms.
Researching Options: Exploring 快连下载's features, pricing plans, and user reviews to determine if it aligns with your needs and expectations for a VPN service provider.
Setting Up 快连下载: Offering step-by-step instructions for downloading, installing, and configuring 快连下载 on various devices and operating systems, ensuring a seamless setup process for users.
快连下载 emerges as a reliable and efficient VPN solution for users seeking fast, secure, and private online browsing experiences. With its high-speed connectivity, robust encryption protocols, and global server network, 快连下载 empowers individuals and businesses to protect their online activities, access geo-restricted content, and browse the internet with confidence. By choosing 快连下载 as your VPN solution, you can enjoy fast and reliable connectivity while safeguarding your privacy and security in today's digital world.
1 note
·
View note
Text
can you get vpn on ps4
🔒🌍✨ Get 3 Months FREE VPN - Secure & Private Internet Access Worldwide! Click Here ✨🌍🔒
can you get vpn on ps4
Installing VPN on PS4
Installing a VPN on your PS4 can bring several benefits, such as enhanced online privacy, improved security, and access to geo-restricted content. While the PS4 doesn't have native support for VPN apps, you can still set up a VPN connection on your console through different methods.
One popular way to install a VPN on your PS4 is by configuring the VPN connection on your router. By doing so, all devices connected to that router, including your PS4, will automatically benefit from the VPN protection. You can follow the specific instructions provided by your VPN provider on how to set up the VPN on your router.
Another option is to share the VPN connection from a computer to your PS4 using an Ethernet cable. This method involves connecting your computer to the VPN and then sharing that VPN connection through the Ethernet cable to your PS4. Keep in mind that this method may require some technical expertise to set up correctly.
Additionally, some VPN providers offer Smart DNS services, which allow you to access geo-blocked content on your PS4 without encrypting your connection. This can be a simpler alternative for streaming purposes, as it doesn't impact your internet speed as much as a full VPN connection.
By installing a VPN on your PS4, you can enjoy a more secure and versatile gaming and streaming experience. Just ensure that you choose a reputable VPN provider and follow the setup instructions carefully to protect your online activities and data while using your console.
VPN compatibility for PS4
Title: Ensuring VPN Compatibility for PS4: A Guide for Gamers
In the realm of online gaming, privacy and security are paramount concerns. With the rise of cyber threats and privacy breaches, many gamers are turning to Virtual Private Networks (VPNs) to safeguard their online activities. PlayStation 4 (PS4) users, in particular, seek to enhance their gaming experience by using VPNs to protect their connections and access geo-restricted content. However, ensuring VPN compatibility for PS4 can be a bit tricky but not impossible.
The first step in using a VPN with your PS4 is to choose a VPN service provider that supports gaming consoles. While many VPNs cater to desktop and mobile users, not all of them offer dedicated apps or configurations for gaming consoles. Look for VPN providers that explicitly advertise compatibility with gaming consoles or provide setup guides specifically for PS4.
Once you've chosen a compatible VPN provider, you'll need to set up the VPN on your home network. This typically involves configuring your router to connect to the VPN service. However, not all routers support VPN connections, so you may need to invest in a VPN-compatible router or flash custom firmware onto your existing router to enable VPN functionality.
After configuring your router to connect to the VPN, you'll need to configure your PS4 to use the VPN connection. This usually involves adjusting network settings on the PS4 to route all internet traffic through the VPN. Depending on the VPN provider and your router setup, you may also need to configure additional settings such as DNS servers or port forwarding.
Once everything is set up correctly, you should be able to enjoy the benefits of VPN protection on your PS4, including enhanced security, privacy, and access to geo-restricted content. Just remember to choose a reliable VPN provider, follow setup instructions carefully, and test your connection to ensure everything is working smoothly before diving into your favorite games. With the right setup, VPN compatibility for PS4 can greatly enhance your gaming experience without compromising your online security.
Setting up VPN on PlayStation 4
Setting up a VPN on PlayStation 4 can enhance your gaming experience by providing a secure and private connection. A Virtual Private Network (VPN) allows you to mask your IP address and encrypt your internet traffic, protecting your online activities from prying eyes.
To set up a VPN on your PlayStation 4, you will first need to choose a reliable VPN service provider that offers compatibility with gaming consoles. Once you have selected a VPN provider, you will need to sign up for a subscription and download the VPN app on your gaming console.
After downloading the VPN app on your PlayStation 4, follow the instructions to install and launch the app. You will then need to sign in to your VPN account and connect to a server location of your choice. Connecting to a server closer to your physical location can help reduce latency and improve your gaming performance.
Setting up a VPN on your PlayStation 4 can also bypass geo-restrictions and access region-locked content, allowing you to enjoy games and streaming services not available in your country.
Keep in mind that using a VPN may slightly slow down your internet speed due to encryption processes. However, the added security and privacy benefits make it a worthwhile trade-off for many gamers.
By setting up a VPN on your PlayStation 4, you can protect your online privacy, access geo-restricted content, and enjoy a more secure gaming experience.
VPN apps for PS4
Title: Enhance Your PS4 Gaming Experience with VPN Apps
In the realm of gaming, the PlayStation 4 (PS4) stands as one of the most popular consoles, offering a plethora of immersive gaming experiences. However, to truly unlock its potential and safeguard your online activities, integrating a Virtual Private Network (VPN) app with your PS4 can be a game-changer.
VPN apps for PS4 provide numerous benefits, foremost among them being enhanced security and privacy. By encrypting your internet connection, VPNs shield your online activities from prying eyes, protecting sensitive information such as login credentials and personal data from potential hackers or data thieves.
Moreover, VPNs enable access to geo-restricted content and gaming servers. With many games and streaming services imposing regional restrictions, a VPN allows you to bypass these limitations by connecting to servers in different countries. This means accessing exclusive game releases, downloadable content (DLC), and even gaming events that may not be available in your region.
Additionally, VPNs can mitigate network congestion and reduce lag during online gaming sessions. By connecting to optimized servers, VPNs can provide smoother gameplay experiences by minimizing latency and ensuring a stable connection, particularly crucial for competitive gaming where split-second reactions can determine victory or defeat.
Choosing the right VPN app for your PS4 involves considering factors such as server coverage, speed, security features, and compatibility with gaming consoles. Popular VPN providers like ExpressVPN, NordVPN, and CyberGhost offer dedicated apps or setup guides tailored for PS4 users, simplifying the process of integrating VPN protection into your gaming setup.
In conclusion, integrating a VPN app with your PS4 can elevate your gaming experience by bolstering security, accessing geo-restricted content, and improving network performance. With the right VPN solution in place, you can game with confidence and explore a world of limitless possibilities on your PlayStation 4.
VPN services for gaming consoles
Title: Enhance Your Gaming Experience with VPN Services for Gaming Consoles
In the realm of online gaming, a smooth and secure connection is paramount for an optimal experience. With the rise of geo-restricted content and the increasing emphasis on privacy and security, Virtual Private Network (VPN) services have emerged as a solution for gamers looking to enhance their gameplay on consoles.
VPN services for gaming consoles offer several benefits. Firstly, they allow gamers to bypass geographic restrictions by masking their IP address and connecting to servers in different regions. This means accessing games, downloadable content, and online multiplayer features that may be restricted in their own country. For example, a gamer in the US could connect to a server in Japan to access exclusive Japanese game releases or events.
Moreover, VPNs can improve gaming performance by reducing lag and latency. By connecting to servers closer to gaming servers or using optimized routes, gamers can experience smoother gameplay and faster response times, crucial for competitive gaming where split-second decisions can make all the difference.
Security is another significant advantage of using VPN services for gaming consoles. VPNs encrypt internet traffic, protecting gamers from DDoS attacks, phishing attempts, and other cyber threats that could compromise their personal information or disrupt their gaming sessions.
When choosing a VPN for gaming consoles, it's essential to consider factors such as server locations, connection speeds, encryption protocols, and compatibility with gaming platforms. Popular VPN providers like ExpressVPN, NordVPN, and CyberGhost offer dedicated apps for consoles like PlayStation, Xbox, and Nintendo Switch, making setup and usage hassle-free.
In conclusion, VPN services for gaming consoles offer a compelling solution for gamers seeking to expand their gaming horizons, improve performance, and safeguard their online gaming experiences. By harnessing the power of VPNs, gamers can unlock a world of possibilities while ensuring their privacy and security in the digital realm.
0 notes
Text
what happens when you add vpn configuration
🔒🌍✨ Get 3 Months FREE VPN - Secure & Private Internet Access Worldwide! Click Here ✨🌍🔒
what happens when you add vpn configuration
VPN configuration setup process
A Virtual Private Network (VPN) is a useful tool that provides a secure connection over the internet, allowing users to access a private network remotely. Configuring a VPN involves a step-by-step process to ensure a secure and seamless connection. Here is a guide to the VPN configuration setup process:
Choose a VPN Provider: There are several VPN providers available in the market. Research and select a reputable provider that offers secure encryption protocols and a user-friendly interface.
Sign Up and Subscribe: Create an account with your chosen VPN provider and choose a subscription plan that suits your needs. Make sure to review the terms and conditions before proceeding.
Download and Install VPN Software: After subscribing, download the VPN software compatible with your device's operating system. Install the software following the on-screen instructions.
Configure VPN Settings: Launch the VPN application and enter your login credentials. Select a server location from the list provided by the VPN provider.
Customize Connection Preferences: Depending on your requirements, you can customize connection preferences such as protocol selection, automatic connection on startup, and kill switch feature.
Test the Connection: Once you have configured the settings, test the VPN connection by accessing a website or service. Ensure that your IP address is masked, and your data is encrypted.
Troubleshoot if Necessary: If you encounter any connectivity issues, refer to the VPN provider's troubleshooting guide or contact their customer support for assistance.
In conclusion, configuring a VPN involves selecting a provider, subscribing to a plan, installing the software, customizing settings, testing the connection, and troubleshooting if needed. By following these steps, you can set up a secure VPN connection to protect your online privacy and security.
VPN connection establishment steps
Establishing a VPN connection involves several steps to ensure a secure and reliable connection between your device and the VPN server. Here's a breakdown of the typical process:
Selecting a VPN Provider: Start by choosing a reputable VPN provider that meets your needs in terms of security, speed, and server locations. Look for providers with strong encryption protocols and a no-logs policy to safeguard your online privacy.
Downloading and Installing VPN Software: Once you've chosen a provider, download their VPN client software onto your device. Most VPN providers offer apps for various platforms, including Windows, macOS, iOS, and Android. Install the software according to the instructions provided by the provider.
Logging In or Creating an Account: Open the VPN app and either log in with your existing account credentials or create a new account if you're a first-time user. Some providers offer free trials or money-back guarantees, allowing you to test their service before committing.
Choosing a Server Location: After logging in, you'll typically have the option to choose a server location from a list provided by the VPN provider. Select a server that's geographically close to your actual location for optimal performance, or choose a server in a different country to bypass geo-restrictions.
Initiating the Connection: Once you've selected a server, simply click or tap the "Connect" button within the VPN app to initiate the connection. The app will then establish a secure tunnel between your device and the chosen server, encrypting all data transmitted over the connection.
Verifying the Connection: Once the connection is established, the VPN app will usually display a notification or icon indicating that you're connected to the VPN. You can also verify the connection by visiting a website that displays your IP address, which should now reflect the IP address of the VPN server rather than your own.
By following these steps, you can securely establish a VPN connection to protect your online activities and data privacy.
Network security enhancements with VPN
Title: Strengthening Network Security Through VPN: A Comprehensive Guide
In today's interconnected digital landscape, safeguarding sensitive data and maintaining privacy is paramount for individuals and organizations alike. With the proliferation of cyber threats, ensuring robust network security has become an imperative task. Virtual Private Networks (VPNs) offer a powerful solution to enhance network security and protect against potential breaches.
VPN technology establishes a secure, encrypted connection between a user's device and a remote server, effectively masking their IP address and encrypting data transmissions. By rerouting internet traffic through encrypted tunnels, VPNs prevent unauthorized access and eavesdropping, thus safeguarding sensitive information from prying eyes.
One of the key benefits of VPNs is their ability to ensure confidentiality and anonymity while browsing the internet. By encrypting data traffic, VPNs shield users from potential surveillance and tracking by ISPs, governments, or malicious actors. This is particularly crucial for remote workers accessing sensitive company resources over public Wi-Fi networks, where the risk of interception is high.
Moreover, VPNs enable users to bypass geographical restrictions and censorship measures imposed by governments or network administrators. By connecting to servers located in different regions, users can access restricted content and services while maintaining their privacy and security.
For businesses, implementing VPNs is essential to secure remote access to corporate networks and protect confidential data. VPNs create a secure tunnel for remote employees to access company resources without compromising security. Additionally, VPNs facilitate secure communication between geographically dispersed offices, ensuring seamless collaboration while mitigating the risk of data breaches.
In conclusion, VPNs play a crucial role in enhancing network security by providing encryption, anonymity, and access control. Whether for personal privacy or corporate cybersecurity, integrating VPN technology into your network infrastructure is a proactive step towards safeguarding sensitive data in an increasingly interconnected world.
Impact on internet browsing speed with VPN
Using a VPN (Virtual Private Network) can have a significant impact on your internet browsing speed, both positive and negative, depending on various factors.
Firstly, let's explore the potential positive impacts. VPNs encrypt your internet connection and route it through remote servers, which can enhance your online security and privacy. In some cases, connecting to a VPN server closer to your physical location can actually improve your browsing speed. This is because it can reduce latency by bypassing internet congestion and routing your connection through a faster pathway.
However, there are also potential drawbacks to using a VPN that may slow down your internet browsing speed. One common reason for decreased speed is the distance between your device and the VPN server. If you connect to a server located far away from your physical location, it can introduce latency and result in slower loading times for websites and online content.
Furthermore, VPNs can also impact your browsing speed due to encryption overhead. The process of encrypting and decrypting data requires computational resources, which can add processing time and contribute to slower internet speeds, especially on devices with limited processing power.
Additionally, some internet service providers (ISPs) may throttle VPN traffic, deliberately slowing down connections to VPN servers to discourage their use. This can further exacerbate speed issues for users attempting to browse the internet through a VPN.
In conclusion, while VPNs offer numerous benefits for online security and privacy, they can also impact internet browsing speed. Users should consider factors such as server location, encryption overhead, and potential ISP throttling when evaluating the impact of a VPN on their browsing experience.
Privacy and anonymity implications of VPN configuration
Privacy and anonymity are crucial considerations in the digital age, and VPN (Virtual Private Network) configuration plays a significant role in safeguarding these aspects. By understanding the implications of VPN setup, users can better protect their online identities and sensitive information.
One of the primary benefits of VPN configuration is the encryption of internet traffic. When data is transmitted through a VPN connection, it is encrypted, making it unreadable to anyone attempting to intercept it. This encryption ensures that sensitive information, such as login credentials, financial details, and personal communications, remains secure from prying eyes.
Additionally, VPN configuration enables users to mask their IP addresses. Instead of connecting directly to the internet through their ISP (Internet Service Provider), users connect to a VPN server located in a different geographical location. As a result, their true IP address is hidden, and websites and online services only see the IP address of the VPN server. This enhances anonymity and prevents websites from tracking users' online activities based on their IP addresses.
Furthermore, VPN configuration allows users to bypass geo-restrictions and censorship measures. By connecting to a VPN server in a different country, users can access content and services that may be restricted in their own location due to regional limitations or government-imposed censorship. This freedom to access information without limitations contributes to a more open and unrestricted internet experience.
However, it's essential to recognize that while VPN configuration can enhance privacy and anonymity, it is not foolproof. Users should choose reputable VPN providers that prioritize user privacy and do not log or monitor their online activities. Additionally, maintaining good security practices, such as regularly updating software and using strong, unique passwords, is crucial for overall online safety. By understanding the implications of VPN configuration and implementing best practices, users can enjoy a more private and secure online experience.
0 notes
Text
what's vpn iphone
🔒🌍✨ Get 3 Months FREE VPN - Secure & Private Internet Access Worldwide! Click Here ✨🌍🔒
what's vpn iphone
VPN setup on iPhone
Setting up a VPN on your iPhone is a prudent step towards safeguarding your online privacy and security. Whether you're accessing public Wi-Fi networks or simply want to encrypt your internet traffic, configuring a VPN on your iPhone is relatively straightforward. Here's a step-by-step guide to help you through the process:
Choose a VPN Provider: Start by selecting a reputable VPN provider that offers a dedicated app for iOS devices. Look for providers with strong encryption protocols, a no-logs policy, and a wide server network.
Download the VPN App: Once you've chosen a VPN provider, visit the App Store on your iPhone and download their VPN app. Most providers offer their apps for free, although you may need a subscription to access premium features.
Install and Launch the App: After downloading the app, install it on your iPhone and launch it. You'll typically be prompted to sign in with your account credentials or create a new account if you're a first-time user.
Connect to a Server: Once you're logged in, the app will display a list of available servers. Choose a server location from the list and tap to connect. For optimal performance, select a server that's geographically close to your actual location.
Enable VPN Connection: After selecting a server, toggle the VPN connection switch to the "On" position. You may be prompted to allow the app to configure VPN settings on your device. Follow the on-screen instructions to proceed.
Verify Connection: Once the VPN connection is established, you'll see a VPN icon in the status bar at the top of your iPhone screen. You can also verify the connection by visiting a website that displays your IP address. It should reflect the IP address of the VPN server you're connected to.
By following these steps, you can successfully set up and activate a VPN on your iPhone, ensuring that your online activities remain private and secure.
VPN benefits on iOS
Using a VPN on your iOS device can offer numerous benefits, enhancing your online experience and ensuring your digital security and privacy. VPN, which stands for Virtual Private Network, helps in creating a secure connection to another network over the internet, encrypting your data and shielding your online activities from prying eyes.
One of the main advantages of using a VPN on iOS is the enhanced security it provides. By encrypting your data, a VPN protects your sensitive information such as passwords, bank details, and personal messages from potential hackers and cybercriminals. This is especially crucial when using public Wi-Fi networks, as VPN adds an extra layer of security to prevent unauthorized access to your data.
Additionally, a VPN allows you to access geo-restricted content and bypass censorship on your iOS device. By connecting to servers in different locations, you can enjoy unrestricted access to websites, streaming services, and social media platforms that may be blocked in your region. This is particularly beneficial for travelers or expats looking to access content from their home country.
Moreover, using a VPN on iOS helps in maintaining your anonymity online. Your real IP address is masked when you connect to a VPN server, making it difficult for websites and advertisers to track your online activities and target you with personalized ads.
Overall, incorporating a VPN into your iOS device not only safeguards your digital privacy and security but also opens up a world of possibilities in terms of accessing content and staying anonymous online.
Best VPN apps for iPhone
Looking to enhance your online security and privacy while using your iPhone? VPN apps are the perfect solution. They encrypt your internet connection, making it harder for hackers, ISPs, and other prying eyes to monitor your online activities. But with so many options available, it can be overwhelming to choose the right one. Here's a roundup of the best VPN apps for iPhone:
ExpressVPN: Known for its blazing-fast speeds and strong security features, ExpressVPN offers a user-friendly iOS app with a vast server network spanning across numerous countries.
NordVPN: With a reputation for top-notch security and privacy features, NordVPN provides an intuitive iOS app that includes features like double VPN encryption and a built-in ad blocker.
Surfshark: Offering unlimited simultaneous connections, Surfshark is a budget-friendly option without compromising on security. Its iOS app is easy to use and includes features like CleanWeb to block ads and malware.
CyberGhost: Perfect for beginners, CyberGhost's iOS app boasts an intuitive interface and a wide range of servers optimized for streaming and torrenting, along with robust security features.
Private Internet Access (PIA): PIA's iOS app prioritizes privacy with features like a strict no-logs policy and customizable encryption settings, making it a favorite among privacy-conscious users.
IPVanish: With a focus on both security and speed, IPVanish offers a reliable iOS app with features like unlimited simultaneous connections and customizable connection settings.
Whether you're looking to bypass geo-restrictions, secure public Wi-Fi connections, or simply maintain your privacy while browsing, these VPN apps for iPhone have you covered. Choose the one that best fits your needs and enjoy a safer, more private online experience on your iOS device.
VPN security features on iOS
Ensuring robust security on iOS devices is paramount, especially when accessing sensitive data or browsing the internet. VPN (Virtual Private Network) services offer a layer of protection by encrypting your internet connection and shielding your online activities from prying eyes. Here are some essential VPN security features tailored for iOS users:
AES Encryption: Advanced Encryption Standard (AES) is a widely recognized encryption protocol utilized by top VPN providers. It secures your data by encoding it with complex algorithms, making it virtually impossible for hackers to intercept and decipher.
Kill Switch: A Kill Switch is a fail-safe mechanism that automatically disconnects your device from the internet if the VPN connection drops unexpectedly. This prevents your data from being exposed to unsecured networks, maintaining your privacy at all times.
Multi-Protocol Support: Look for VPN services that support multiple protocols like OpenVPN, IKEv2, and IPSec. This versatility ensures compatibility with various networks and enhances security by offering different layers of encryption.
No-Logs Policy: Opt for VPN providers that adhere to a strict no-logs policy, meaning they don't store any information about your online activities. This ensures your browsing history remains private and cannot be traced back to you.
DNS Leak Protection: Domain Name System (DNS) leaks can expose your browsing habits to third parties. A reliable VPN service on iOS should include DNS leak protection, which prevents your device from inadvertently leaking DNS queries outside the encrypted tunnel.
IP Address Masking: By masking your real IP address with one from the VPN server, you can browse the internet anonymously. This feature adds an extra layer of security by making it difficult for websites to track your location or identify you based on your IP address.
By leveraging these VPN security features on iOS, users can enjoy enhanced privacy and peace of mind while navigating the digital landscape. It's essential to choose a reputable VPN provider that prioritizes security and offers reliable performance on Apple devices.
VPN troubleshooting on iPhone
Troubleshooting VPN issues on your iPhone can be frustrating, but with the right steps, you can often resolve them quickly. Whether you're experiencing connection problems or issues with accessing certain websites or services, here are some common troubleshooting tips to get your VPN back up and running smoothly on your iPhone.
Firstly, ensure that you have a stable internet connection. VPNs rely on an internet connection to function properly, so if your Wi-Fi or cellular data is spotty, it can cause disruptions. Try switching between Wi-Fi and cellular data to see if one works better than the other.
Next, check your VPN settings. Make sure you've entered the correct server information provided by your VPN provider. Sometimes, simply reconnecting to the VPN server can resolve connectivity issues. You can do this by toggling the VPN switch off and then back on in your iPhone's settings.
If you're still encountering problems, try restarting your iPhone. This can help clear any temporary glitches or bugs that may be affecting your VPN connection.
Additionally, ensure that your VPN app is up to date. Developers often release updates to address bugs and improve performance, so keeping your app current can help prevent issues.
If none of these steps solve the problem, consider contacting your VPN provider for further assistance. They may be able to offer additional troubleshooting tips specific to their service or investigate any server-side issues that could be causing the problem.
By following these troubleshooting tips, you can hopefully resolve any VPN issues you're experiencing on your iPhone and get back to browsing the web securely and privately.
0 notes
Text
what is cisco anyconnect vpn client
🔒🌍✨ Get 3 Months FREE VPN - Secure & Private Internet Access Worldwide! Click Here ✨🌍🔒
what is cisco anyconnect vpn client
Cisco AnyConnect VPN client features
Cisco AnyConnect VPN client is a robust solution designed to provide secure remote access to corporate networks. Packed with a multitude of features, it offers users a seamless and protected connection experience.
One of the standout features of Cisco AnyConnect VPN client is its cross-platform compatibility. Whether you're using a Windows, macOS, Linux, iOS, or Android device, AnyConnect ensures consistent performance and security across all platforms. This flexibility allows users to stay connected from any device, anywhere, without compromising on security.
Another key feature is its strong encryption protocols. AnyConnect employs state-of-the-art encryption methods such as AES-256 to safeguard data transmission over the internet. This ensures that sensitive information remains confidential and protected from unauthorized access or interception.
Moreover, AnyConnect offers comprehensive endpoint security posture assessment. Before granting access to the corporate network, it assesses the security posture of the connecting device to ensure compliance with predefined security policies. This helps prevent potential security breaches and ensures that only trusted devices gain access to the network.
Additionally, AnyConnect provides seamless integration with other Cisco security solutions, such as Cisco Identity Services Engine (ISE) and Cisco Umbrella. This integration enhances overall network security by allowing administrators to enforce access policies based on user identity and application traffic, as well as providing additional layers of protection against malware and malicious websites.
Furthermore, AnyConnect's intuitive user interface and centralized management capabilities make it easy for administrators to deploy, configure, and monitor VPN connections across the organization. This streamlines administration tasks and reduces the burden on IT staff.
In conclusion, Cisco AnyConnect VPN client offers a comprehensive set of features designed to provide secure remote access to corporate networks while ensuring ease of use and robust protection against cyber threats.
Cisco AnyConnect VPN client setup
Cisco AnyConnect VPN client is a robust and user-friendly solution for establishing a secure connection to a remote network. Setting up the Cisco AnyConnect VPN client is a straightforward process that allows users to access sensitive information and resources from anywhere while maintaining a high level of security.
To begin setting up the Cisco AnyConnect VPN client, you will first need to download the software from the official Cisco website. Once downloaded, run the installer and follow the on-screen instructions to complete the installation process.
After the installation is complete, launch the Cisco AnyConnect VPN client and enter the server address provided by your network administrator. This server address will allow the client to establish a secure connection to the remote network.
Next, enter your username and password to authenticate yourself and gain access to the network resources. It is essential to use strong and unique credentials to ensure the security of your connection.
Once you have successfully connected to the network, you can begin accessing the resources available, such as files, applications, and internal websites. The Cisco AnyConnect VPN client provides a seamless and encrypted connection, ensuring that your data remains secure while in transit.
In conclusion, setting up the Cisco AnyConnect VPN client is a simple yet effective way to establish a secure connection to a remote network. By following these steps, you can enjoy the benefits of secure access to network resources from anywhere in the world.
Cisco AnyConnect VPN client compatibility
Cisco AnyConnect VPN client is renowned for its robust security features and seamless connectivity, but ensuring compatibility across various platforms is crucial for users' convenience. Whether you're using Windows, macOS, Linux, or mobile devices, Cisco AnyConnect strives to maintain compatibility across the board.
For Windows users, compatibility is extensive, spanning from legacy versions like Windows 7 to the latest iterations such as Windows 10 and beyond. The client integrates smoothly with the operating system, ensuring a hassle-free setup and operation.
Mac users also benefit from Cisco AnyConnect's compatibility, with support extending to recent macOS releases. This allows Apple enthusiasts to enjoy the same level of security and connectivity on their MacBooks and iMacs.
Linux aficionados need not worry either, as Cisco AnyConnect extends its compatibility to various distributions, catering to the diverse needs of the Linux community. Whether you're running Ubuntu, Fedora, or Debian, the VPN client is designed to seamlessly integrate into your environment.
Mobile compatibility is equally paramount in today's interconnected world, and Cisco AnyConnect delivers on this front as well. Whether you're using an iOS or Android device, the VPN client offers dedicated apps optimized for each platform, ensuring secure access on the go.
Furthermore, Cisco AnyConnect's compatibility extends beyond traditional operating systems. It also integrates seamlessly with virtualization platforms and network appliances, providing flexibility for organizations with diverse IT infrastructures.
In conclusion, Cisco AnyConnect VPN client prioritizes compatibility across a wide range of platforms, ensuring users can stay securely connected regardless of their device or operating system preferences. This commitment to compatibility underscores Cisco's dedication to providing a versatile and reliable VPN solution for both individual users and enterprises alike.
Cisco AnyConnect VPN client security
Cisco AnyConnect VPN client is a crucial tool for ensuring secure remote access to corporate networks. However, its effectiveness hinges on robust security measures to protect sensitive data and thwart potential cyber threats.
One of the primary security features of Cisco AnyConnect VPN client is its encryption protocol. It employs industry-standard encryption algorithms like AES (Advanced Encryption Standard) to encrypt data transmitted between the client and the VPN server. This ensures that even if intercepted, the data remains unreadable to unauthorized parties.
Furthermore, Cisco AnyConnect incorporates advanced authentication mechanisms to verify the identity of users attempting to connect to the VPN. This typically involves multifactor authentication, requiring users to provide not only a username and password but also additional factors such as a security token or biometric authentication. By implementing multifactor authentication, AnyConnect strengthens access control and mitigates the risk of unauthorized access.
Another vital aspect of Cisco AnyConnect VPN client security is its support for secure tunneling protocols. AnyConnect supports protocols like SSL (Secure Sockets Layer) and TLS (Transport Layer Security), which establish secure tunnels for data transmission over the internet. These protocols ensure the integrity and confidentiality of data by preventing interception and tampering by malicious entities.
Moreover, Cisco regularly releases updates and patches to address vulnerabilities and enhance the security of AnyConnect VPN client. These updates not only fix known security flaws but also incorporate new security features to adapt to evolving threats in the cybersecurity landscape.
In conclusion, Cisco AnyConnect VPN client prioritizes security to provide organizations with a reliable and secure remote access solution. By leveraging encryption, authentication, secure tunneling protocols, and regular updates, AnyConnect helps safeguard sensitive data and maintain the integrity of corporate networks in an increasingly hostile online environment.
Cisco AnyConnect VPN client troubleshooting
Cisco AnyConnect VPN client is a widely used software solution that allows users to securely connect to remote networks. However, like any technology, it can sometimes encounter issues that may disrupt connectivity and productivity. In this article, we will explore some common troubleshooting steps to help you resolve problems with the Cisco AnyConnect VPN client.
One of the most common issues users face with the Cisco AnyConnect VPN client is difficulty in establishing a connection. If you are unable to connect to the VPN server, first check your internet connection to ensure it is stable. Additionally, verify that the VPN server is operational and that you have the correct server address and login credentials.
Another troubleshooting step is to check for software conflicts on your device. Sometimes, other security software or firewall settings can interfere with the VPN client's functionality. Temporarily disabling or adjusting these settings may help resolve connectivity issues.
If you are encountering slow connection speeds or frequent disconnections, consider optimizing your network settings. Adjusting MTU settings or changing protocols within the Cisco AnyConnect client may improve performance.
Lastly, keeping the Cisco AnyConnect VPN client up to date with the latest software updates and patches can help prevent and resolve potential issues. Regularly checking for updates and installing them promptly is essential for maintaining a reliable VPN connection.
By following these troubleshooting steps, you can effectively address common issues with the Cisco AnyConnect VPN client and ensure seamless connectivity to remote networks. Remember, if you continue to experience problems, reaching out to your IT support team for further assistance is always a good idea.
0 notes
Text
does windows 8 support vpn
🔒🌍✨ Get 3 Months FREE VPN - Secure & Private Internet Access Worldwide! Click Here ✨🌍🔒
does windows 8 support vpn
Windows 8 VPN compatibility
Windows 8 VPN Compatibility: Everything You Need to Know
If you are using Windows 8 and considering setting up a VPN connection for enhanced security and privacy, understanding the compatibility of VPN services with this operating system is crucial. Windows 8 comes with built-in VPN support, allowing users to easily configure and connect to VPN networks for secure web browsing and data protection.
Most VPN services available in the market today are compatible with Windows 8. These VPN providers offer dedicated apps or detailed setup guides for configuring VPN connections on Windows 8 devices. Whether you prefer industry-leading VPN services like NordVPN, ExpressVPN, or CyberGhost, or smaller niche providers, you are likely to find a Windows 8-compatible solution to suit your needs.
Setting up a VPN on Windows 8 is a straightforward process. Users can navigate to the Network and Sharing Center in their system settings, select "Set up a new connection or network," and follow the on-screen instructions to configure a VPN connection. Alternatively, you can install the VPN provider's app directly from the Microsoft Store or their official website for a more user-friendly setup experience.
With a VPN connection on your Windows 8 device, you can benefit from encrypted internet traffic, bypass geo-restrictions, access region-locked content, and shield your online activities from prying eyes. Whether you are using your computer for work, streaming, or general browsing, VPN compatibility with Windows 8 ensures a secure and private online experience.
VPN setup on Windows 8
Setting up a VPN on Windows 8 can provide enhanced security and privacy while browsing the internet. A Virtual Private Network (VPN) creates a secure connection between your device and the internet, encrypting your data and masking your IP address.
To set up a VPN on Windows 8, follow these steps:
Choose a VPN service provider: Select a reputable VPN service provider that offers reliable connections and strong encryption protocols.
Sign up and install the VPN client: Create an account with the VPN service provider and download the necessary software for Windows 8.
Configure VPN settings: Open the VPN client and enter the login credentials provided by the service provider. Choose the server location you want to connect to.
Connect to the VPN server: Click the connect button within the VPN client to establish a secure connection to the VPN server. Once connected, your internet traffic will be encrypted and routed through the VPN server.
Verify the connection: Ensure that your IP address has been masked and that your data is encrypted by visiting a site like whatismyipaddress.com.
By setting up a VPN on Windows 8, you can protect your personal information from hackers, encrypt your internet traffic on public Wi-Fi networks, and access geo-restricted content securely. Stay safe and secure online by using a VPN for your Windows 8 device.
Windows 8 VPN configuration
Windows 8 VPN Configuration Guide
Configuring a VPN (Virtual Private Network) on Windows 8 allows users to establish a secure connection to a remote network, ensuring privacy and data security. Setting up a VPN on your Windows 8 device is a straightforward process that can be done in a few simple steps.
To begin the VPN configuration process on Windows 8, first access the Control Panel by searching for it in the Start menu. Once in the Control Panel, navigate to the "Network and Sharing Center" and select "Set up a new connection or network."
From the available connection options, choose "Connect to a workplace" and then opt for "Use my Internet connection (VPN)." You will be prompted to enter the IP address or domain name of the VPN server you wish to connect to.
Next, provide a name for the VPN connection and enter your credentials, including your username and password. If required, you may also need to enter a pre-shared key for authentication.
Once you have completed these steps, save the settings and return to the Network and Sharing Center. Select the newly created VPN connection and click "Connect" to establish a secure connection to the remote network.
Windows 8 VPN configuration offers users a convenient way to ensure data privacy and security when accessing networks remotely. By following these simple steps, users can set up a VPN on their Windows 8 device in no time.
VPN software for Windows 8
When it comes to ensuring online privacy and security, using a Virtual Private Network (VPN) software is crucial, especially for Windows 8 users. With the increasing concerns about data breaches and surveillance, having a reliable VPN on your Windows 8 device can offer peace of mind and protection against various online threats.
One of the top VPN software options for Windows 8 is ExpressVPN. Known for its speed, security, and user-friendly interface, ExpressVPN offers a seamless experience for Windows 8 users. With servers located in numerous countries worldwide, ExpressVPN allows users to bypass geo-restrictions and access content from anywhere in the world while encrypting their internet connection to keep their data safe from prying eyes.
Another popular choice is NordVPN, which offers a wide range of features tailored to Windows 8 users. With advanced security features like Double VPN and Onion Over VPN, NordVPN provides an extra layer of protection for sensitive information. Additionally, NordVPN's user-friendly interface and fast connection speeds make it a favorite among Windows 8 users looking for both security and convenience.
For those concerned about privacy, CyberGhost VPN is an excellent option for Windows 8. With its strict no-logs policy and strong encryption protocols, CyberGhost VPN ensures that your online activities remain private and secure. Furthermore, CyberGhost VPN's dedicated servers for streaming and torrenting make it a versatile choice for Windows 8 users who want to access content anonymously and without restrictions.
Overall, investing in a reputable VPN software for your Windows 8 device is essential for safeguarding your online privacy and security. Whether you choose ExpressVPN, NordVPN, CyberGhost VPN, or another trusted provider, having a VPN installed on your Windows 8 device offers invaluable protection against online threats and ensures a safer browsing experience.
VPN troubleshooting on Windows 8
If you encounter issues with your VPN connection on a Windows 8 operating system, troubleshooting the problem is essential to regain secure and private online access. Here are some common steps to resolve VPN issues on Windows 8:
Check Internet Connection: Ensure that your internet connection is stable and active. A VPN connection cannot be established without a working internet connection.
Verify VPN Credentials: Double-check your VPN username and password. Incorrect credentials can lead to authentication failures.
Restart VPN Service: Sometimes, restarting the VPN service can fix connectivity issues. To do this, open the Services window, find the VPN service, and restart it.
Update VPN Client: Ensure that your VPN client is up to date. Outdated software can sometimes cause compatibility issues with the Windows 8 operating system.
Firewall and Antivirus: Disable your firewall and antivirus temporarily to check if they are blocking the VPN connection. Add an exception for the VPN client in your security software settings.
Switch VPN Protocols: Experiment with different VPN protocols like OpenVPN, L2TP, or IKEv2 to see if one works better than the other on your Windows 8 system.
Restart Your Device: A simple restart of your computer can sometimes resolve VPN connectivity issues by resetting network settings.
By following these troubleshooting steps, you can potentially resolve VPN issues on your Windows 8 device and enjoy a secure and private internet connection without interruptions. If the problem persists, reaching out to your VPN provider's customer support for further assistance may be necessary.
0 notes
Text
does vpn work with att uverse
🔒🌍✨ Get 3 Months FREE VPN - Secure & Private Internet Access Worldwide! Click Here ✨🌍🔒
does vpn work with att uverse
VPN compatibility with AT&T U-verse
VPN compatibility with AT&T U-verse
Using a virtual private network (VPN) with your AT&T U-verse internet service can enhance your online privacy and security. However, not all VPNs are compatible with AT&T U-verse due to certain restrictions and configurations. Understanding the compatibility between VPNs and AT&T U-verse is crucial for ensuring a smooth and secure internet browsing experience.
AT&T U-verse uses a fiber-optic network to deliver high-speed internet to its users. While the service provides robust internet connectivity, certain VPN protocols may encounter compatibility issues. It is recommended to use VPN services that support the IPSec protocol as it is widely compatible with a variety of routers, including those used by AT&T U-verse.
Before setting up a VPN with AT&T U-verse, it is essential to check if your VPN provider offers detailed instructions or customer support for configuring the VPN on your specific router model. Additionally, ensuring that your VPN is using up-to-date encryption protocols will help maintain a secure connection while browsing the web.
It is important to note that using a VPN may result in slightly slower internet speeds due to the encryption and rerouting of traffic. However, the added security and privacy benefits often outweigh this minor inconvenience.
In conclusion, VPN compatibility with AT&T U-verse is possible with the right VPN protocol and configuration. By selecting a VPN service that aligns with the requirements of AT&T U-verse and following the proper setup steps, you can enjoy a more secure and private internet browsing experience.
AT&T U-verse VPN connectivity
AT&T U-verse is a popular choice for home internet and television services, offering a range of features to enhance the user experience. For those looking to enhance their online security and access, setting up a VPN connectivity with AT&T U-verse can offer added benefits.
A VPN, or Virtual Private Network, creates a secure connection between your device and the internet. This added layer of security can help protect your data from prying eyes and allow you to access region-restricted content.
Setting up a VPN with AT&T U-verse is a straightforward process. First, you will need to choose a reliable VPN service provider. Once you have signed up for a VPN plan, you can configure the VPN settings on your device. This typically involves inputting the VPN server's information provided by your VPN service provider.
By connecting to a VPN through your AT&T U-verse network, you can enjoy benefits such as enhanced online privacy, the ability to access geo-restricted content, and added security when browsing on public Wi-Fi networks.
It's essential to note that while using a VPN can enhance your online security and privacy, it may also slightly impact your internet speed due to the encryption process. However, the trade-off between privacy and speed is often worth it for many users.
In conclusion, setting up a VPN connectivity with AT&T U-verse can be a valuable addition to your online browsing experience, providing added security and access benefits.
VPN configuration for AT&T U-verse
Configuring a VPN for AT&T U-verse can enhance privacy and security while accessing the internet through your U-verse connection. VPNs, or Virtual Private Networks, encrypt your internet traffic, making it difficult for third parties to intercept or track your online activities.
To configure a VPN for AT&T U-verse, follow these steps:
Choose a VPN Service: First, select a reputable VPN service provider that offers reliable performance and strong encryption. Look for providers that support the OpenVPN protocol, as it's widely compatible and secure.
Subscribe and Install: Sign up for a VPN subscription and download the VPN client software onto your device. Most VPN providers offer applications for various operating systems, including Windows, macOS, iOS, and Android.
Configure VPN Settings: Launch the VPN client software and follow the instructions to configure the settings. You'll typically need to enter your login credentials provided by the VPN service.
Select Server Location: Choose a server location from the VPN provider's network. For optimal performance, select a server that is geographically close to your physical location.
Connect to VPN: Once configured, connect to the VPN by clicking the connect button within the VPN client software. This will establish a secure connection to the VPN server, encrypting your internet traffic.
Verify Connection: After connecting to the VPN, verify that your internet traffic is encrypted by visiting a website that displays your IP address. It should now show the IP address of the VPN server, indicating that your connection is secure.
By following these steps, you can easily configure a VPN for AT&T U-verse, ensuring that your online activities remain private and secure. Remember to disconnect from the VPN when not in use to maximize your internet speed.
AT&T U-verse network and VPN integration
AT&T U-verse network offers seamless integration with VPN services, providing users with enhanced security and privacy for their internet activities. By connecting to a VPN through AT&T U-verse network, users can encrypt their online data, making it unreadable to potential cyber threats and ensuring a safer browsing experience.
VPN integration with AT&T U-verse network allows users to access geo-restricted content by masking their IP address and connecting to servers in different locations around the world. This feature is particularly useful for individuals looking to bypass censorship or access region-locked websites and streaming services.
Moreover, VPN integration enhances the overall network performance by reducing latency and improving connection speeds. This can be beneficial for remote workers, online gamers, or anyone who requires a stable and fast internet connection.
In addition to security and performance benefits, VPN integration with AT&T U-verse network also helps users maintain anonymity online by concealing their digital footprint and protecting their online activities from prying eyes.
Overall, the integration of VPN services with AT&T U-verse network offers users a comprehensive solution for safeguarding their online privacy, accessing restricted content, and improving their internet experience. By taking advantage of this integration, users can enjoy a more secure and versatile online environment.
AT&T U-verse VPN troubleshooting
If you're having trouble setting up a VPN connection on your AT&T U-verse network, there are a few troubleshooting steps you can take to resolve the issue.
First, ensure that your VPN software is compatible with AT&T U-verse. Some VPN protocols may not work seamlessly with certain network configurations, so double-check to see if your VPN service supports connection over U-verse.
Next, verify that your U-verse modem and router are properly configured to allow VPN traffic. Check if any firewall settings are blocking the VPN connection. You may need to open specific ports or enable VPN passthrough on your router settings.
If you're still facing issues, try restarting your U-verse equipment, including the modem, router, and any devices you are trying to connect to the VPN. Sometimes a simple reboot can fix connectivity issues.
Additionally, make sure your VPN client software is up to date. Older versions may have compatibility issues with newer network configurations. Updating to the latest version of your VPN software could potentially resolve the problem.
If none of these steps work, contact AT&T customer support for further assistance. They can provide specific guidance tailored to your U-verse setup and help troubleshoot any underlying network issues that may be preventing your VPN connection.
By following these troubleshooting tips, you should be able to successfully set up and use a VPN connection on your AT&T U-verse network.
0 notes
Text
what is vpn in ipad settings
🔒🌍✨ Get 3 Months FREE VPN - Secure & Private Internet Access Worldwide! Click Here ✨🌍🔒
what is vpn in ipad settings
VPN setup on iPad
Setting up a VPN on your iPad can enhance your online security and privacy, allowing you to browse the internet safely and anonymously. Whether you're using public Wi-Fi or accessing sensitive information, a VPN encrypts your data, shielding it from prying eyes and potential hackers.
To set up a VPN on your iPad, follow these simple steps:
Choose a VPN Provider: First, select a reputable VPN provider that offers a reliable service with a user-friendly iOS app. Look for providers with strong encryption, a no-logs policy, and servers in locations relevant to your needs.
Download the App: Once you've chosen a VPN provider, go to the App Store on your iPad and download their VPN app. Most reputable VPN services have dedicated apps for iOS devices.
Install and Launch the App: After downloading the app, open it and follow the on-screen instructions to install it on your iPad. You may need to create an account and sign in if you're using a paid VPN service.
Connect to a Server: Once the app is installed, launch it and log in if necessary. Then, choose a server location from the list provided by the VPN app. Select a server in a location that suits your needs, such as a server in your own country for accessing local content or a server in another country for bypassing geo-restrictions.
Enable the VPN Connection: After selecting a server, toggle the VPN connection switch to the "on" position. Your iPad is now connected to the VPN, and your internet traffic is encrypted and routed through the chosen server.
Verify the Connection: To ensure that your VPN connection is active, visit a website like whatismyip.com to confirm that your IP address has changed to reflect the location of the VPN server you're connected to.
By following these steps, you can easily set up a VPN on your iPad and enjoy a more secure and private browsing experience wherever you go.
VPN configuration iOS
Virtual Private Networks (VPN) are essential tools for ensuring online privacy and security while browsing the internet. Configuring a VPN on your iOS device is a straightforward process that can greatly enhance your digital safety.
To configure a VPN on your iOS device, follow these simple steps. First, choose a reputable VPN service provider and sign up for an account. There are many VPN services available, so make sure to choose one that suits your needs in terms of security, speed, and server locations.
Once you have signed up, download the VPN app from the App Store. Install the app on your iOS device and open it. Log in with your account credentials provided by the VPN service.
Within the VPN app, you can select the server location you want to connect to. Choose a server that is geographically close to you for faster connection speeds. Some VPN services also offer specialized servers for streaming or torrenting, so choose accordingly.
After selecting the server, toggle the VPN connection switch to connect. You will see a VPN icon appear in the status bar at the top of your iOS device, indicating that the VPN is now active.
You are now securely connected to the internet through a VPN on your iOS device. Enjoy browsing the web knowing that your data is encrypted and your online activities are protected from prying eyes. Remember to disconnect the VPN when you no longer need it to avoid unnecessary data usage.
Configuring a VPN on your iOS device is a simple yet effective way to enhance your online security and privacy. Stay safe and enjoy anonymous browsing with a VPN on your iOS device.
iPad VPN settings
When it comes to using a VPN on your iPad, ensuring the correct settings are in place is crucial for maintaining online privacy and security. A VPN, or Virtual Private Network, creates a secure connection between your device and the internet by encrypting your data. This is particularly important when using public Wi-Fi networks, as it helps prevent unauthorized access to your personal information.
Setting up a VPN on your iPad is a relatively simple process. You can either install a VPN app from the App Store or manually configure the VPN settings on your device. To manually set up a VPN on your iPad, you will need to enter the details provided by your VPN service provider. This typically includes the type of VPN connection (such as L2TP, IKEv2, or PPTP), the server address, and your login credentials.
To access the VPN settings on your iPad, go to the Settings app and tap on "General." From there, select "VPN" and then tap on "Add VPN Configuration." Enter the required details accordingly and toggle the VPN switch to connect to the VPN server.
By using a VPN on your iPad, you can protect your online activities from prying eyes and potential cyber threats. Whether you're browsing the web, accessing sensitive information, or simply enhancing your online privacy, configuring the right VPN settings on your iPad ensures a safe and secure connection at all times.
Virtual Private Network iPad
A Virtual Private Network (VPN) for iPad provides an extra layer of security and privacy when browsing the internet on your tablet. VPN services encrypt your internet traffic, making it difficult for hackers and other third parties to intercept your data. This is particularly important when connecting to public Wi-Fi networks, where your personal information could be at risk.
Using a VPN on your iPad also allows you to access geo-restricted content and bypass internet censorship. By connecting to a server in a different country, you can unblock websites and streaming services that may be restricted in your location. This can be especially useful for travelers looking to access their favorite shows or websites while abroad.
In addition to security and access benefits, a VPN for iPad can also help improve your online anonymity. By masking your IP address and encrypting your internet traffic, VPN services make it more difficult for websites and advertisers to track your online activities.
When choosing a VPN for your iPad, consider factors such as encryption protocols, server locations, connection speeds, and user-friendly apps. Look for reputable VPN providers with a proven track record of protecting user privacy and data security.
Overall, using a VPN on your iPad can enhance your online experience by safeguarding your personal information, accessing restricted content, and maintaining your anonymity while browsing the internet.
VPN connection iPad
Title: Unlocking Secure Connectivity: How to Set Up a VPN Connection on iPad
In today's digital landscape, where online security and privacy are paramount, setting up a VPN (Virtual Private Network) connection on your iPad is essential. Whether you're browsing the web, accessing sensitive information, or simply wanting to safeguard your online activities, a VPN provides a secure tunnel for your data to travel through.
Here's a step-by-step guide on how to set up a VPN connection on your iPad:
Choose a VPN Provider: Start by selecting a reputable VPN provider. Look for one that offers robust encryption, a wide server network, and user-friendly apps compatible with iOS devices.
Download the VPN App: Head to the App Store on your iPad and search for the VPN provider's app. Download and install it onto your device.
Sign Up and Log In: After installing the app, open it and sign up for an account if you haven't already. Log in using your credentials.
Select a Server Location: Most VPN apps allow you to choose from a list of server locations. Select a server based on your location or specific needs.
Connect to the VPN: Once you've chosen a server, simply tap the "Connect" button within the app to establish a VPN connection. You may be prompted to allow the VPN to add a configuration profile to your iPad—follow the on-screen instructions to proceed.
Verify the Connection: Once connected, verify that your IP address has changed by visiting a website like whatismyip.com. You should see the IP address associated with the VPN server you selected.
Enjoy Secure Browsing: With the VPN connection established, you can now browse the web, access geo-restricted content, and use public Wi-Fi networks with confidence, knowing that your data is encrypted and your online activities are private.
By following these steps, you can easily set up a VPN connection on your iPad, ensuring a safer and more secure online experience wherever you go.
0 notes
Text
can you put a vpn on an xbox one
🔒🌍✨ Get 3 Months FREE VPN - Secure & Private Internet Access Worldwide! Click Here ✨🌍🔒
can you put a vpn on an xbox one
Xbox One VPN compatibility
Xbox One VPN compatibility has been a topic of interest for many gamers looking to enhance their online gaming experience. A VPN, or virtual private network, can offer numerous benefits when used with gaming consoles like Xbox One.
By using a VPN on your Xbox One, you can improve your online security and privacy. VPNs encrypt your internet connection, making it more difficult for hackers to gain access to your personal information or monitor your online activity. This is especially important for gamers who may be sharing sensitive information while playing online.
Additionally, using a VPN can help bypass geographical restrictions and access content that may be blocked in your region. This can be particularly useful for gamers looking to play region-locked games or access game titles earlier than their official release date.
Moreover, a VPN can also help reduce lag and improve gaming performance by providing a more direct and secure connection to gaming servers. This can result in a smoother gaming experience with lower latency, especially when playing multiplayer games that require quick response times.
It is important to note that not all VPNs are compatible with Xbox One, so it is recommended to choose a VPN service that offers dedicated apps or step-by-step guides for setting up a VPN connection on your gaming console.
In conclusion, Xbox One VPN compatibility can be a valuable tool for gamers looking to enhance their online gaming experience through improved security, access to region-locked content, and better performance.
VPN setup for Xbox One
Setting up a VPN for your Xbox One gaming console can enhance your gaming experience by providing a secure and private connection. VPN, or Virtual Private Network, encrypts your internet traffic and routes it through a secure server, protecting your data from hackers, ISP tracking, and DDoS attacks.
To set up a VPN on your Xbox One, you can follow these steps:
Sign up for a VPN service that is compatible with Xbox One. Make sure the VPN provider has servers in locations where you want to access geo-restricted content or reduce lag.
On your Xbox One, go to the Microsoft Store and download the VPN app if available. Alternatively, you can set up the VPN manually through the network settings.
Obtain the VPN configuration details from your VPN provider, including the server address, username, and password.
Enter the VPN details in the network settings on your Xbox One. This may vary depending on the VPN provider and the method of setup.
Connect to the VPN server of your choice and ensure a secure connection is established.
By setting up a VPN on your Xbox One, you can access region-locked content, improve your online gaming security, and reduce lag by connecting to servers closer to the game servers. Remember to choose a VPN provider with reliable performance, fast connection speeds, and strong encryption protocols for the best gaming experience.
VPN installation Xbox One tutorial
Title: Easy Steps to Install VPN on Xbox One: A Comprehensive Tutorial
Are you concerned about your online privacy and security while gaming on your Xbox One? Installing a VPN (Virtual Private Network) on your console can provide an extra layer of protection and unlock region-restricted content. Follow these simple steps to set up a VPN on your Xbox One and enjoy a safer and more versatile gaming experience.
Choose a VPN Provider: Start by selecting a reputable VPN provider that offers compatibility with Xbox One. Look for features like high-speed servers, strong encryption, and reliable customer support.
Set Up VPN on Your Router: Most VPN providers offer router support, allowing you to protect all devices connected to your home network, including your Xbox One. Follow the instructions provided by your VPN provider to configure the VPN on your router.
Connect Your Xbox One to the VPN: Once the VPN is set up on your router, it will automatically protect your Xbox One whenever it's connected to the internet. You may need to restart your console to establish the VPN connection.
Choose a Server Location: Many VPNs allow you to choose from servers located around the world. Select a server location that best suits your needs, whether you want to access region-locked content or reduce lag by connecting to a server closer to your physical location.
Test Your Connection: After connecting to the VPN, perform a speed test to ensure that your internet connection is still fast enough for gaming. If you experience any issues, try connecting to a different server or contacting your VPN provider for assistance.
By following these steps, you can easily install a VPN on your Xbox One and enjoy enhanced privacy, security, and access to geo-restricted content while gaming. Stay protected and game on!
Best VPN services for Xbox One
When it comes to maximizing your online gaming experience on Xbox One, using a Virtual Private Network (VPN) can offer a range of benefits. VPN services for Xbox One not only provide added security and privacy while gaming, but also help in overcoming geo-restrictions, reducing lag, and protecting against DDoS attacks.
One of the best VPN services for Xbox One is ExpressVPN. Known for its fast and reliable connection speeds, ExpressVPN offers a wide range of server locations around the globe, ensuring smooth gameplay and seamless streaming. With military-grade encryption and no activity logs, ExpressVPN prioritizes user privacy and security.
Another top choice for Xbox One users is NordVPN. With a large network of servers optimized for streaming and gaming, NordVPN boasts strong security features such as Double VPN encryption and CyberSec technology to block malware and ads. Its dedicated IP option can also provide a stable connection for uninterrupted gaming sessions.
For those looking for a budget-friendly option, Surfshark is a popular VPN service that offers unlimited simultaneous connections, making it ideal for gaming households. With features like CleanWeb to block ads and malware, and MultiHop for added security, Surfshark ensures a smooth gaming experience on Xbox One without breaking the bank.
In conclusion, using a VPN service for Xbox One can enhance your gaming experience by providing security, privacy, and improved connection speeds. Whether you choose ExpressVPN, NordVPN, Surfshark, or another reputable provider, investing in a reliable VPN can take your Xbox gaming to the next level.
Xbox One network security VPN
Title: Enhancing Xbox One Network Security with VPN: A Comprehensive Guide
In the digital age, where online gaming is a prevalent form of entertainment, ensuring the security of your Xbox One network is paramount. With the rise of cyber threats and privacy concerns, implementing a Virtual Private Network (VPN) can significantly enhance the security of your gaming experience.
A VPN encrypts your internet connection, making it virtually impossible for hackers to intercept your data. When you connect your Xbox One to a VPN, all the data transmitted between your console and the gaming servers is encrypted, safeguarding it from prying eyes.
One of the primary benefits of using a VPN with your Xbox One is protection against Distributed Denial of Service (DDoS) attacks. DDoS attacks are a common occurrence in online gaming, where malicious actors flood your network with traffic, causing lag and disrupting your gameplay. By masking your real IP address with that of the VPN server, you can prevent DDoS attackers from targeting your network directly.
Moreover, a VPN allows you to bypass geo-restrictions and access region-locked content on your Xbox One. Whether it's unlocking games, streaming services, or exclusive content, a VPN gives you the freedom to enjoy the full range of entertainment options available worldwide.
Choosing the right VPN for your Xbox One is crucial. Look for a provider with a large server network, fast connection speeds, and robust security features. Additionally, ensure that the VPN is compatible with your router or can be configured on your gaming console directly.
In conclusion, integrating a VPN into your Xbox One network security strategy is a proactive measure to protect your privacy, enhance your gaming experience, and mitigate potential cyber threats. By encrypting your connection and masking your IP address, a VPN provides a layer of defense that every gamer should consider investing in.
0 notes
Last Seen Blogs

gaypoplove
We are all gay here

rabbitfootluck
RABBIT FOOT LUCK

iwasscreaming-go-go-go
sweet tea in the summer

toastedstencils
toast

grooveixthemma
4D philosophy