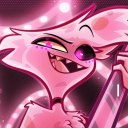
#i love the patterns on cc's mask q q
Note
Wondering how your au turtles will react to seeing all the other turtles have masks that are a different color for each turtle
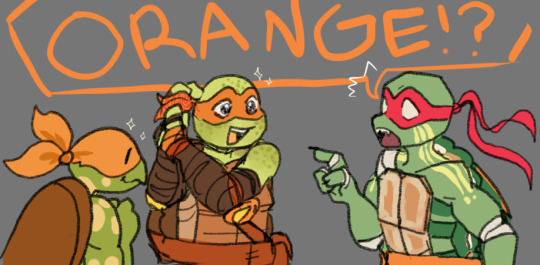
The others are too attached to their red masks but Mikey met these two lovely lads and really wants one now!!
Featuring:
Color-coded Mikey: @camilieroart
Teenage Mutant Neglected Turtles Mikey: @nerves-nebula
Make sure to vote for them @tmntaucompetition !!!
#tmntredline#tmnt redline#tmnt color-coded#teenage mutant neglected turtles#tmneglectedt mikey is so cute i cant#i love the patterns on cc's mask q q#make sure to vote for these guys!!#I WAS SO EXCITED TO POST THIS I FORGOT CC MIKEYS STICKERS NOOOOO
444 notes
·
View notes
Text
Photoshop: How to Create Graphic Portraits from Photos
New Post has been published on https://hititem.kr/photoshop-how-to-create-graphic-portraits-from-photos/
Photoshop: How to Create Graphic Portraits from Photos
Hi. That is Marty from Blue Lightning tv. I’m going to show you easy methods to create lovely, image portraits from images. Before we start, be certain you click the small "Subscribe" button at the cut down, right corner to help you understand as quickly as I add new Photoshop tutorials! Open a image of a face that you simply’d like to make use of for this undertaking. I downloaded this one from Shutterstock. To make certain that your results will look much like mine, investigate your portraits measurement and resolution with the aid of urgent Alt + Ctrl + I on home windows or option + Cmd + I on a Mac or by going to image and photo dimension. Make it roughly this dimension and its decision: a hundred and fifty pixels per inch. The first step is to separate our field from its historical past with the aid of making a choice round our subject. There are numerous methods to do this and i blanketed all of them in my prior tutorials.I mainly use the speedy resolution tool, however on the grounds that the history on this example is an effective color, i’ll use the Magic Wand tool. If you’re using this instrument, as good, ensure "Contiguous" is checked. This ensures that the within of your field is probably not chosen. When you have to add a selection to a further discipline of the history, click on this "Add to" icon, which provides selections as you click on your photograph. I’ll click the history to make the determination. To assess your choice, press "Q" for your keyboard to peer it as a speedy mask. Press "Q" again to revert it again into a decision. Invert the resolution through pressing Ctrl + Shift + I on windows or Cmd + Shift + I on a Mac. To refine the brink of your selection, go to prefer. If you’re using a variation earlier than CC 2015.5, click on "Refine facet. If you’re utilizing CC 2015.5 or later, click on "pick and masks". For those who decide on to make use of Refine part alternatively of opt for and masks, Shift-click on "prefer and masks". I did in-depth tutorials on both filters, so if you want to look at them, I involves their links in my video’s description. I’m going to click on the "Overlay" view and check "intelligent Radius", which tells Photoshop to discover tough and tender edges.I will drag the Radius to five and bush over the brink of the hair. Check, "Decontaminate colors", which minimizes the history colour from leaching into the perimeters of our discipline. Output it to a "New Layer with Layer mask" and click "ok’. We are going to make a new layer below the lively layer with the aid of Ctrl-clicking or Cmd-clicking the new Layer icon. We’ll fill the empty layer with white, but first, check your foreground and historical past colors. If they are now not black and white respectively, press "D" to your keyboard. For the reason that white is your heritage color, press Ctrl or Cmd + Delete. We are going to convert our seen picture right into a sensible Object, that allows you to adjust it non-destructively.To try this, Shift click on the highest layer to make it active, as well, and click the icon on the upper, correct nook. Click on, "Convert to sensible Object". Go to Filter, Blur and Gaussian Blur. For now, blur it 6 pixels. Go to photograph, adjustments and Threshold. I’ll keep its default degree at 128, nonetheless, you could modify your portrait’s density with the aid of sliding the level to the correct or left. That you may also alter it through altering the amount of blur. Double-click Gaussian Blur. If you happen to see this message, it’s just letting us be aware of that we won’t see the edge effect unless had been finished with Gaussian Blur. I’m going to increase the Blur Radius to 10 and click on good enough or press Enter or Return. As you will see that, my image filled in more and became denser. I’ll undo the final step by using urgent Ctrl or Cmd + z. Conversely, it we were to slash the blur radius, our image would fill in less. I will revert it back to the customary blur of 6 pixels and the threshold of 128 stages.As earlier than, convert your snapshot right into a sensible Object. Next, we will create a gradient historical past. Click on the brand new Layer icon to make a brand new layer. Fill it with any color for now, on account that we are going to be changing it with a gradient overlay. I will fill it with my foreground color, which is black. Double-click on the layer to open its Layer type window. Click on "Gradient Overlay". The blend Mode is common and the Opacity is a hundred%. Be certain "Reverse" is unchecked and make the form: "Radial". The perspective is 90 levels and the dimensions is one hundred fifty%.Click the gradient bar to open the Gradient Editor. Click the "Black, White" box and the cut back, left discontinue. Click the field and choose a gentle color for the core of your gradient. Due to the fact that I already know the colour i would like, i’ll variety it into the hexadecimal subject: D3F3FF. Then, click ok. Click the reduce, correct discontinue and the field. Decide on a darker colour for the outer areas of your gradient. I will kind in: 002871.Once you select your colors, click on good enough on the color Picker and the Gradient Editor to shut them. We will reposition the gradient by using dragging it. I will drag it up a wee bit from the center. Convert it into a shrewd Object. Make a brand new layer and temporarily disguise the gradient. Open your Channels panel. Should you do not see it, go to Window and Channels. Ctrl-click on or Cmd-click on the RGB thumbnail to make a decision of channel’s shape. Invert the decision through pressing Ctrl or Cmd + Shift + I. Open again the Layers panel and fill the resolution with black by means of urgent Alt or alternative + Delete. Deselect it by using urgent Ctrl or Cmd + D. Make the Gradient visible again and double-click the top layer to open its Layer variety window. Click "colour Overlay" and the box. Within the hexadecimal area, style in 31, thrice to give us a dismal gray color. Click on adequate. Click on "inside Shadow". The color is black, the combo Mode is Multiply and the Opacity is 50%. The angle is 90 levels, the space is 12 pixels and the scale is eight pixels. Convert it into a wise Object and go to Filter and Filter Gallery.Open the texture folder and click "Texturizer". The "Texture" is "Canvas", the Scaling is 200%, the "relief" is three and the "gentle" is from the "prime". As soon as once more, Ctrl-click on or Cmd-click on the face to make a decision of it. We’ll create an inverted layer mask of the decision subsequent to the gradient. Make the gradient active. Alt-click or choice-click on the Layer mask icon. Click on the "fx" icon and click "Bevel and Emboss". The kind is "inside Bevel" and the technique is "Chisel delicate". The Depth is 50%, the direction is "Up" and the size is 5 pixels. The perspective is ninety levels and the Altitude is 50 degrees. The spotlight blend mode is "Linear avert" and its opacity is 25%.The Shadow combo mode doesn’t matter, on account that its opacity is 0%. Next, we are going to add a starburst pattern behind our discipline. Make a brand new layer. Open your Polygon software and pick "Pixels". If you’re making use of Photoshop variation CS5 or prior, the Pixel icon is right here. Go to View and be certain "Rulers" and "Snap" are each checked. If they are now not, simply click on them to make them active. Go to the ruler at the high and drag down a guideline to the center. It is going to snap in situation considering that we’ve got Snap checked. For those who do not see the rule of thumb, press Ctrl or Cmd + H. Go to the ruler on the left and drag throughout a guideline to the core, as well.Provide it ninety nine facets and click on the gear icon. Which you can ignore the path choices, considering the fact that we chose "pixels". Check "megastar" and indent the edges with the aid of eighty%. Go to the middle of the instructional materials and drag out your device unless the shape goes past the corners. Then, unlock. Curb the Fill to 0%, which makes the layer invisible, but itll retain the visibility of any effects we add to it. Double-click the big name to open its Layer kind window. Click on "Bevel and Emboss". The type is interior Bevel, the manner is "Chisel tender" and the Depth is 50%. The course is "Down" and the scale is 2 pixels. The perspective is 90 degrees and the Altitude is 50 degrees. Make the highlight opacity anywhere from 50 to 70% and the Shadow opacity: one hundred%. We are able to cast off the instructions now by using going to View and "Clear courses". Next, we are going to dispose of the celebrity sample inside the face.Click on the Layer mask icon to make a layer masks next to the superstar layer. As quickly as you made the layer masks, your foreground and historical past colours inverted. Invert it again through clicking this icon or by way of urgent "x" for your keyboard. Open your Pencil device and Pencil Picker. We are going to adjust the dimensions in a second. Make its Hardness and Opacity each one hundred%. Then, press Enter or Return. To make your brush bigger or smaller, press the proper or left bracket key on your keyboard. Brush over areas inside the face to get rid of the star sample. Ultimately, we will crop off the bevel alongside the highest fringe of our report with the aid of first making a composite photo of our noticeable photo. To try this, make the top layer lively and make a new layer above it. To make the composite snapshot, press Alt + Ctrl + Shift + E on home windows or choice + Cmd + Shift + E on a Mac.Open your turn out to be instrument by way of urgent Ctrl or Cmd + T. On the top, next to the develop into’s width and top, make certain the chain-link icon is energetic. This links them collectively, so some thing we kind into one might be applied to the opposite, as well. Kind in 102%, which should be adequate to crop off the bevel at the high. Then, press Enter or Return, twice. That is Marty from Blue Lightning tv. Thanks for looking at! .
0 notes
Last Seen Blogs
ruewrites
RueWrites
kockabors
kockabors
dragon-spaghetti
CEO of Pretty Bat Lady 💖
shibaguyz
Quick Posts From The Shibaguyz

techastalisman
Parsons MFADT Major Studio Blog