#i really had fun with this waterbased brush :')
Photo
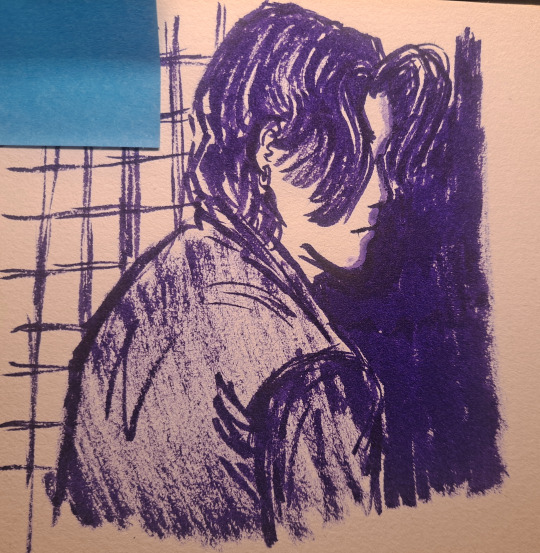


traditional sketches with a new brush 🖌️
#my art#semicart#my friend (an actual artist) gave me bunch of traditional art supplies today#and while it makes me suffer every time and i am nothing without ctrl+z function#i really had fun with this waterbased brush :')#i'm still figuring it out and even having reference didn't help with capturing actors' likeness but it was nice exercise ig#jeff satur#perth nakhun#my tooth your love#i need to draw more plushes from this show
9 notes
·
View notes
Photo


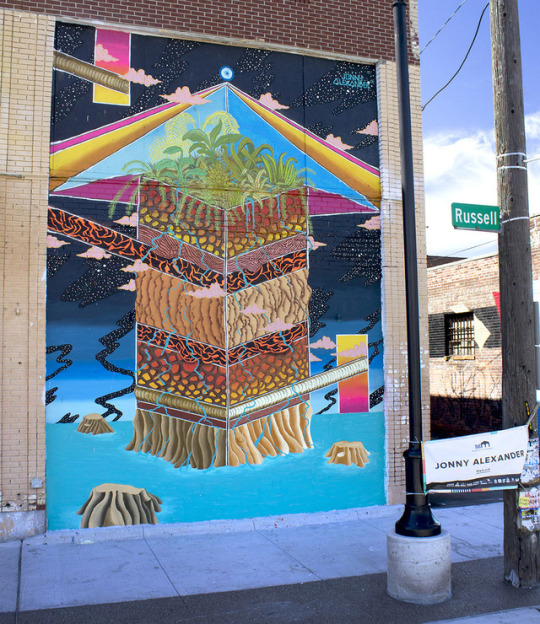
ART SCHOOL | JONNY ALEXANDER (Detroit, MI)
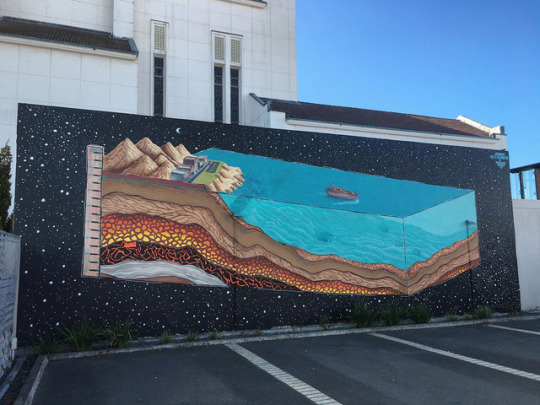
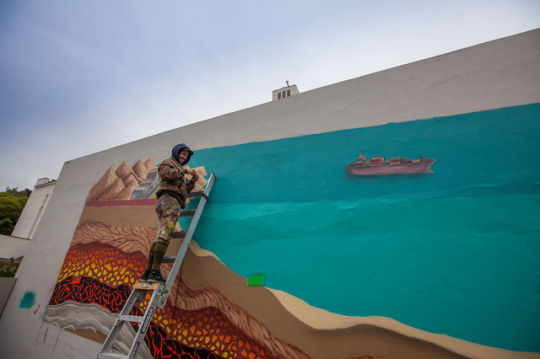
Inspired by his love of the outdoors, artist and Head Screen Printer Jonny Alexander’s work incorporates Nature, landscapes, and its objects/processes, creating large open landscapes to cross sectional terrestrial islands sometimes floating in space, surrounded by oceans, or inhabiting surreal terrains. Devoid of humans and human interactions, his visual narratives do, however, reflect his own “existential quandaries” or spotlight the human consequences to the environment as in a 2016 mural he created with the Pangeaseed: SeaWalls Murals in New Zealand. We’re super excited to chat with Jonny about his art school experiences, his love of the outdoors, as well as his work ethic and tenacious attitude, all in this session of Art School.
Photographs courtesy of the artist
Introduce yourself.
Jonny Alexander / Currently in Detroit, Lived all previous years in California. I’m a painter, muralist, printmaker and Head Screen Printer for 1XRUN in Detroit
If you weren’t a painter, what do you think you would have ended up doing professionally?
Well, I kind of am doing something else professionally besides / as well as painting. I work full time as the Master Printer for the publishing company and gallery 1XRUN / Inner State in Detroit. I am also a full time painter… so I guess that means two full time jobs haha. The Screen Printing is consistent and structured employment and the painting is sporadic in payment but constant in development.
We’re glad you’re a painter and an artist though, can you tell us about your journey? What was art school like for you? What were some of the best things you took away from that experience? What were you glad to get away from, once you graduated? How was life after school for you at the time?
I’ll do a quick rundown of pre-college art. 9-13 years old I got introduced and started writing graffiti with neighborhood skateboarding friends. With high school friends we also skated, we weren’t doing graffiti but drawing weird shit in sketchbooks and starting to screen print t-shirts in the garage. Cut to college I moved from San Diego to Northern California and went to CSU, Chico, which is about 3 hours northeast of San Francisco. I went into college thinking I didn’t want to study art cause it might kill the enjoyment of making it, but I was wrong about that. I took courses regardless though and was introduced to the world of Printmaking. I only knew screen printing, but I took an intro course that had me doing etching, woodblock printing, screen printing, monotypes etc. I was pretty intrigued with the process. I realized that being in other classes was just taking time away from working on art. So I went full on into a Bachelor or Fine Arts with an emphasis in printmaking.I recognized from going through school studying art that the experience is honestly what you make of it. No one is going to teach you style, no one is going to teach you really how or what to paint or draw or make. But they will give you the fundamentals and above all the time and deadlines to produce as much art as you can. That was really what I got most from it. It gave me a really strong work ethic; it pushed me to form a strong studio practice and to produce work. It also, if you are lucky, gives you a strong community of peers to bounce ideas off of and pushes you with healthy competition to get better. What I did like getting away from was some of the real intense academic push to defend everything you make. I don’t want that to come off the wrong way. I genuinely cherish conceptual art and having meaning and depth to what you make, understanding what and why you are doing something and the context in which it lies in the grand narrative or art history. But I found myself chasing ideas into weird places that didn’t even feel like art to me. I would think myself out of a painting or print because I couldn’t conceptualize it, instead of just making it and moving on. I enjoyed the freedom when I finished school of just making a painting to make it. If only for its aesthetic, color or composition without heavy weighted conceptual arguments attached. It helped me to work faster and really push forward in developing my style.
Life after school was fruitful and painful. Lots of uncertainty with the newfound freedom, lack of structure and lack of employment but also a lot of fun. My girlfriend of 4 years broke up with me shortly after we finished school. Shortly after that I quite my crap job at a pizza place, took all the left over house paint I had and went into the rural hills of Northern California and started practicing painting murals. I painted 4 murals in 4 weeks on abandon structures. I was heartbroken the whole time but working my ass off, using my tears to wash my brushes after a long day painting. Haha But really that was the bootcamp I put myself through to break ground on painting murals. Less than a year later I was an assistant to my friend Tavar Zawacki who is a longtime artist who goes by the name ABOVE. He took me out to Detroit to help him with a Solo Exhibition with Inner State Gallery / 1XRUN. About 8 months after that I was moving from California to Detroit to be 1XRUNS Head Screen Printer. It has been almost two years now that I have been here. Side note: The girlfriend of 4 years that broke up with me after school, we got back together a little later on….Hey Bertha I love you
Having acquired a degree in printmaking, what aspects of that particular skill set proved to be super helpful or maybe gave you a different approach to painting as an art form? Or how have you used your printmaking skills to inform what you do as a painter?
One thing that was helpful, as I had kind of mentioned earlier is that it led me into the job I hold with 1XRUN today. It is a pretty useful trade to have and I see myself being a print maker and screen printer for years to come. But in terms of my art practice printmaking definitely helped develop my drawing style. Printmaking also broke down layers for me as well. To make a screen print you have to lay down colors in a specific order. It is a pretty methodic and regimented order of operations. This method of a layering process has come into my painting practice and really into my mural practice. It has helped me to think about how colors “stack” if you think of them as layers. I think it helped me to be able to translate my smaller more time consuming paintings into larger murals by way of simplifying the approach.
In terms of your paintings the landscapes, the natural environments, and the colors of nature – are heightened in a way. As if the viewer is often experiencing a different type of hyper landscape. Could you tells us a little more about these “psychedelic landscapes” and how these visuals came about?
Psychedelic Landscapes was a joke between my friend Ian Roffe and myself in school. Haha I think the real root of it is from my upbringing as a child. Growing up in San Diego my parents could have taken us to Disneyland or something like that but instead we spent all of our family road trips going up to the Eastern Sierras. Going to National Parks or almost every other weekend spent up in the local mountains in San Diego fishing, hiking and camping. I was always picking up rocks and sticks and looking at the patterns in them, collecting them, doing some “organic hoarding” that I still do to this day. I also grew up surfing by myself. None of my close friends picked up surfing so again I spent a lot of time roaming the cliffs and rock formations of some of San Diego’s coastline. I think all that naturally filtered into my paintings. I was really into some of the surrealist painters like Dali and Max Ernst in my younger years so that love of large open landscapes was really appealing. I think it has been a common thread throughout my art making and has just evolved and transformed over the years.
Your paintings often depict geological layers / structures and other aspects of the natural world. What natural structures or landscapes have influenced you the most and what about them most captivated you and percolated into your works?
Rocks man….goddamn rocks. They are so cool. There is so much variation in them. In the texture, the color the way they crack and fold. The way that erosion goes to work on them over years, it’s just some very beautiful patterning. There is also good metaphor for me in rocks and mountains. Rocks are really old material compressed together over vast amounts of time and buried deep in the earth. They have some wisdom to them for that reason. I titled a piece a number of years ago, “The Wisdom Rocks of Old are the Souls of the Past” which kind of sums up that thought. Mountains also though, they are the pushing up of these old chunks of earth and we can climb up them to see beyond what we could from the ground level maybe to get clarity or furthered vision. I think there is metaphor to see in all nature if you are looking for it. I think that is why I have continued to use it in my paintings over the years. Most of my paintings don’t have people in them so I rely on nature and objects to create narratives referring to existential quandaries I have. I read this quote years ago, which I think is pretty nice and applicable. “The finest workers in stone are not copper or steel tools, but the gentle touches of air and water working at their leisure with a liberal allowance of time”. - Henry David Thoreau
Who are some of your top 5 favorite contemporary artists? 5 favorites of all time?
I would have to say…
Interesni Kazki
Aaron Glasson & Celeste Byers (good friends)
Michael Reeder
Saner
Pat Perry
James Turrell
Salvador Dali
Caravaggio
Andy Goldsworthy
Radiohead
What are your top 5 materials? Is there a medium you haven’t yet tried, but are looking to learn?
Acrylic
Gouache
Micron and Radiographs
Waterbased Screen Printed Gradients
Wood Panels built by my friend Craig (For real if you want to buy heavy really nicely made wood panels DM this guy @chejka ) I have painted with oils a couple times but would like to start making some oil paintings and getting some real nice smooth gradients
We gotta find out - What are your favorite Vans?
Love me some Sk8-Hi’s, always been a sucker for high tops, cause they feel good on my feet and look cool with pants and can also make you look like a goofy shit when you wear them with some short shortz.
Being a lover of the outdoors, where’s a place you’d love to go for artistic inspiration and why?
That’s a tough one. There is a ton of places…so lets go for a list? Right?
Never been to Zion or Bryce Canyon, plan on going there in the next year.
Andes in Peru
South Island of New Zealand
Iceland (including small plane flights over all the crazy land formations)
Yellowstone (Not in peak season maybe go in late fall)
The bottom of the Grand Canyon
Patagonia, Argentina
Um… Probably a lot more places But mainly I’d like to go to most of those places to see some intense and awe inspiring natural beauty.
What’s a question you’d like to answer that you’ve never get asked in terms of art?
How do you formulate ideas and what is their lifecycle? (It would be a really long and disjointed answer, but fun to talk about.
I read that you often love painting outside at the beach or just outdoors. What about painting in the outdoors do you enjoy? And when you can’t paint outdoors, what is your studio like? (What do you put in it for inspiration?)
I think I have to change that previous statement about liking to paint outdoors. I think I may have talked about that before I ever really had a proper studio. For most of my life my “studio” has been whatever bedroom I lived in at the time. That was very cramped and limiting. So I used to just go out somewhere and set up and work on stuff, which was really fun. But now that I have been living in my loft in Detroit for 2 years, I really love having a nice open space to work. I have a nice big table, I have panels to paint lying around, I paint upright on the wall, which is nice for my back as apposed to sitting in the sand at the beach. I love having space to sit all day and paint, cause I find I need at least 4-8 hours to really sit and have a successful session painting. My studio does have quite a few plants around, some weird organic hoarding trinkets and always music or a podcast floating through the air. I do still carry a sketchbook with me wherever I go and like to do some drawing outdoors, but I find I am usually too preoccupied with what is going on around me to just look into my book.
You’ve been doing a lot of large scale paintings and murals in the last few years. What was the your favorite large scale work, and what were the challenges (if any) and how did you overcome them? What’s the best advice you’d give to someone working large scale?
I had a lot of fun about a year ago (March 2016) with the Pangeaseed: SeaWalls Murals for Oceans project in Napier, New Zealand. The challenge as it is with murals is the weather. It rained 3 out of the 5 days we were supposed to paint. Which, when using brushes, is a big problem. You can get away with spray paint in some light rain, but liquid house paint with a brush just won’t stick. Besides that it was a really fun piece to work on, it had a definite message to it about sea level rise and the causality of it coming from us humans consumption habits. I also got a lot more comfortable using spray paint on this mural. Previously I had barely every used it, I worked mainly with brushes, but I was able to practice and get much more comfortable with cans. Advice I would give to someone is to have a plan of attack. As I had said before about thinking of it in simplified layers, that really helps. Day 1 for me is usually getting the sketch on the wall nice and proportioned how I want it. Day 2 I fill in all the large flat area of colors and then all the rest days it just tightening things up and doing all the detail and line work.
What advice if any, would you give upcoming artists or folks who want to become artists?
Don’t wait for opportunities to come to you. You’ve got to be very tenacious and dedicated to it and you have to sustain that momentum for a very long time. I have been at it for years now and I still have so much I need and want to do. Also be wise about splitting up time between creating the work and getting the work out to the world. A bunch of painting stuffed under the bed should see the light of day. You kind of have to be the artist, manager, content editor, prompter etc. I think that’s all I’ve got. Well maybe just be genuine and don’t rip off other people work or chase trends, try to be authentic and people can appreciate that. And network! Go meet people in your artist community!!
Finally, what projects or shows do you have that you’re excited about coming up?
I just had a piece in the “Paint It Forward” Exhibition at Cass Contemporary in Tampa last month. I will be showing at Inner State Gallery’s LAX/DTW show curated by Thinkspace in the summer. I have some fun things coming up in my studio working with a friend who does Neon here in Detroit. I am supposed to be painting a mural in Kiev, Ukraine at some point this spring or summer with a project called Art United Us, which will be my largest mural to date. I am also looking for any murals projects the world has to throw at me!
Thank you for your time!
Follow Jonny
Website: http://jonnyalexander.com
Instagram: @jonnyalexander
262 notes
·
View notes
Text
When the Jasika Blazer was announced, it almost felt like the release was timed for me, because I was just starting to get some good job nibbles in motion, so I purchased the pattern, gathered some of the materials and stalled. Not for too long, but I definitely waited until about halfway through the big CCP Blazer of Glory sewalong before I started to catch up.
I’ve made two of these blazers since then, but this post will be about the first one (I’m still in recovery mode for blazer number 2).
All of the materials were stashed for this first blazer, but that also means that a lot of different fabrics went into it. Six in fact. Six fabrics.
1 – Navy blue twill that makes up the bulk of the jacket. I think it’s polyester, and it’s pretty heavy.
2 – Green cotton, possibly flannel for the side panels
3 – Green velvet, which later became crushed for the collar and lapels
4 – Navy blue brushed twill for the bottom sleeves… Because of an interfacing error the original twill pieces became unusable. So I cut more out of the only navy blue twill I had left!
5 – Light blue lining with painted blobs, otherwise known as the only lining fabric in my currently limited selection I could get the back pieces out of.
6 – Turquoise/green lining, because it almost kind of matches. Not really. But kind of.
But before I cut into the fabric I made a muslin. For the muslin, I cut out size 12, with the C cup FBA pattern piece for the front, I think. Size 12 was good, but in ultimate hindsight (one muslin and two makes in) I think I’m probably halfway between the normal pattern and the FBA pattern, and should consider dealing with that next time… If I need a next time.
When I tried on the muslin, though, I realized that I needed to take in the side seams a little, since I’m a petite person and the side seams were doing nothing for me. I also removed about two inches of length from the body and sleeves, and could probably stand to remove more. And finally, I did a swayback adjustment, which ultimately was successful on the outer, but less on the lining. Now that I’ve stepped back, that segment of the lining caused problems solely because of improper adjusting of the lining piece. But the altered muslin did look pretty good!
In making the garment, I did want to do it all from stash, so I did cheat a little and used a double layer of lightweight fusible in place of the hair canvas… Looking back, I don’t know how much of a difference it is. It is definitely stiffer than my hair canvas shoulders on v2, but not super stiff.
I ended up doing a lot of hand sewing in this garment because of sheer determination and lack of willingness to see stuff on the right side of the jacket. Like with the lapel easing… You are very unlikely to see the underside of the lapel, but I decided to hand sew the required ribbon in anyway because what happens if my machine spits out a threadball… Then I’d have to unpick it and hand sew it anyway, right?
(In hindsight, I still think this is fair, but also it was a bit fussy.)
Then I found out that the marker I had used to mark most of the front was waterbased, and that steaming would smudge it. Silly Jess. I only have white chalk at the moment, because most of what I sew is dark or colors, but the interfacing I had for the fronts was a light grey, so I needed to mark it with something darker. Luckily for me the actual jacket front pieces were navy, so the red smudges would never show through, but it was a good lesson to learn.
Let’s not talk about pocket 2…
Sewing the welt pockets was fun, to a degree. I’m not a precision sewist, so I wasn’t sure how it’d go, but I just jumped in and went for it.
For the record, I’ve done double welt buttonholes before, so I felt pretty confident going into it. Thank you coat that I’ve rarely worn because NC is too warm for it!
And then after the welt pocket, it was basically smooth sailing! I have pictures for before and after the collar/lapel insertion, and then the finished garment! I definitely remember completing the lining in one sitting, in maybe 4 hours tops (from cutting to assembling to break to sewing in with very careful detail to the instructions).
I made my own shoulder pads and sleeveheads out of cotton batting from my quilting stash (hip hip hooray for stash!), and because I have what I consider very sloping shoulders, I made them extra big. I don’t think it looks like 80’s shoulders big, so I’m not worrying about it, but just to bring it up: very sloping shoulders may need to adjust somehow…
And yeah, I think that’s it. It was a worthy garment to make, and really boosted my skillset. Plus… very soft velvet lapels/collar.
Sadly it’s too warm for NC, which started believing it was summer in mid April, so I’ll have to give this blazer a second opinion in fall.
Jasika Blazer When the Jasika Blazer was announced, it almost felt like the release was timed for me, because I was just starting to get some good job nibbles in motion, so I purchased the pattern, gathered some of the materials and stalled.
0 notes
Text
Build This Mid-Century Inspired Triangle Leg Bench
Hello, hello, Remodelaholic-ers! I'm Allison from Shark Tails, and I'm so happy to be back sharing another beginner building project that was certainly a labor of love for me (and a little frustration, truth be told)! Last time I visited, I showed you how almost anyone can build a simple nightstand using pine boards and a Kreg Jig, and today I am showing you how I built this modern triangle leg bench for our entry way using some 2x2s and 1x3s.
As part of our entry way refresh, I wanted to replace the little bench we had sitting next to the stairs. We inherited it from the previous home owners, and though there isn't really anything wrong with it, it's a little small for adult-sized butts and also just a bit blah. When I saw this mid-century bench on Etsy, my heart did a little flip-flop:
Source: Etsy
Seriously, how beautiful is that? Let's get real, though: I possess neither the skills nor the tools needed to make such a beautiful piece of furniture, so I settled on using the main structure of the bench (read: those amazing triangular legs) as my inspiration, and attempted to replicate the basic shape using inexpensive pine boards and my drill.
How to Build a Mid-Century Inspired Triangle Leg Bench
Click here to get a free printable version of this building plan
Watch the video tutorial on our YouTube Channel (and subscribe, please!) and click here to get a printable building plan.
Materials and Tools
1x3x10 pine board (1)
2x2x8 pine board (3)
2 1/2″ wood screws
2 1/2″ and 1 1/4″ Kreg screws
Miter saw
Drill and drill bits
Kreg Jig pocket hole system
Random orbit sander and 80, 120 grit pads
Wood glue
Wood filler
Stain of your choice (I used Puritan Pine by Minwax) and cloths/latex gloves
Clear coat and brushes for application
Building Instructions
The first thing I did was determine the angles for my triangles. This was a lot of trial and error, so I used scrap 2×2 framing lumber that I had laying around the garage until I'd perfected a template for the legs. Your legs will look like this:
In order to make the four triangles needed for the legs from the 2x2s, you'll cut four each 14 3/8″ parallelograms with both ends at 15°.
For the other side of the triangle, you'll cut four trapezoids (16″ long end to long end) with one end at 45° and one at 30°.
*Please ensure that the lengths/angles of each piece are checked and rechecked with each cut to keep your triangles as uniform as possible. To make things easier, after I had both side pieces perfect, I used them as my templates for cutting the others, rather than messing with the measuring tape. That way I knew they would all match up perfectly.
Once they are all cut, join them together using 2 1/2″ pocket holes and wood glue. Because of the angle, your outside pocket hole will be closer to the end of your board. I used a 1 1/4″ screw for this hole as I didn't want it to come out the bottom of the leg. It worked really well and the hold was nice and tight. You can go ahead and use a 2 1/2″ screw for the inside hole.
When you're assembling your triangles, make sure to pay attention and mark where the pocket holes should go so that they are all facing the inside of the bench once attached to the seat. It helps to stand them up the way they'll be once the bench seat is attached and mark them that way to make sure you get the right side.
Once the two side pieces are attached together, you can fill the holes with wood filler (which is what I did), Kreg plugs, or leave them as is.
Next it is time to assemble the top frame/seat with 2x2s. I mitered my corners, but that is a personal preference and you can leave the edges square if you prefer (as shown in the diagram below).
For this step, instead of using pocket holes, I simply drilled pilot holes into the corners, and attached each piece using wood glue and 2 1/2″ countersunk wood screws. I kept everything square while I was assembling the frame with my right angle clamp, and it worked really well!
Once you have your frame assembled, measure the inner width and cut your 1×3 slats accordingly. They will be about 13 5/8″ long. I needed seven slats, and attached mine using 3/4″ pocket holes and 1 1/4″ pocket hole screws, flush to the bottom of the bench (with pocket holes facing down). I started from the center board and worked my way outward, putting 2 3/4″ between each slat. The right edge of the center board should be 20″ in from the left side of the frame (see diagram below).
Ok, so once you have your top frame assembled, it should be smooth sailing attaching the legs, but it wasn't for me. I had originally planned on attaching them with pocket holes, but I didn't think ahead, and had no way of fitting the drill in between the inner triangle to make the pocket holes. Dummy! If you want to use pocket holes to attach the legs to the bench frame, you have to drill them before assembling the legs.
After kicking myself for being so stupid, my only choice was to drill directly down into the top of the frame and into the leg, which was obviously not ideal as it would be noticeable. Unfortunately I didn't really have a choice at this point, and they ended up not looking so bad. I applied some wood glue and clamped the legs in place (I lined them up with the seam of the frame corners to make it easy, so about 1 1/2″ in from the end), drilled two pilot holes, and then counter sunk two 2 1/2″ wood screws in to secure the legs.
Once I had all the legs attached, I added a 2×2 support board between front and back legs. You could do this with hidden pocket holes but at this point I figured it would be fine to just drill a pilot hole then countersink a screw right through the outer leg and into the board, and fill it later.
Now that your bench is assembled, you should fill all your holes/gaps with stain-able wood filler. Once it's completely dry, sand down your entire piece to a nice smooth finish.
You can see here where my screw holes were covered with filler, and I guess it's not the end of the world.
I wanted a really light finish to balance the color of my stairs, so I went with Minwax Puritan Pine. I didn't use any pre-conditioner or anything, just rubbed it on with a lint free cloth and called it a day.
Once the stain was dry, I followed up with three coats of Minwax waterbased (oil modified) poly in satin, sanding lightly with 220 grit paper between each coat.
I wasn't too sure if I was loving the color until I got it into the house and accessorized with the seat cushion I made and some fun throws and pillows:
Guys. I love it! It turned out way better than I could have hoped, and dare I say I might like it even more than the inspo picture? I think it fits in perfectly with the space and the rest of our home and I am so proud that I made it myself.
I'm not crazy about the visible screws, but I'm not too bothered by them either!
It's incredibly sturdy and the perfect size: two people can sit on it comfortably, but it's not so huge that it makes the entryway feel cramped.
I spent just under $50 for this triangle leg bench, which includes the fabric and foam for the cushion. You can download the free plans to build this for your own home (above), and it's pretty easy to customize in order to suit any space. Remember to share your photos with Remodelaholic if you do decide to tackle this project!
Good luck, and happy building!
More benches you can build:
chevron bench with box frame
simple tufted upholstered bench
small rustic farmhouse style bench
corner bench with table
leather director's bench
easy 2×6 modern waterfall bench
half lap stacked plywood bench
The post Build This Mid-Century Inspired Triangle Leg Bench appeared first on Remodelaholic.
from mix1 http://ift.tt/2sBaPyA via with this info
0 notes
Text
Build This Mid-Century Inspired Triangle Leg Bench
Hello, hello, Remodelaholic-ers! I'm Allison from Shark Tails, and I'm so happy to be back sharing another beginner building project that was certainly a labor of love for me (and a little frustration, truth be told)! Last time I visited, I showed you how almost anyone can build a simple nightstand using pine boards and a Kreg Jig, and today I am showing you how I built this modern triangle leg bench for our entry way using some 2x2s and 1x3s.
As part of our entry way refresh, I wanted to replace the little bench we had sitting next to the stairs. We inherited it from the previous home owners, and though there isn't really anything wrong with it, it's a little small for adult-sized butts and also just a bit blah. When I saw this mid-century bench on Etsy, my heart did a little flip-flop:
Source: Etsy
Seriously, how beautiful is that? Let's get real, though: I possess neither the skills nor the tools needed to make such a beautiful piece of furniture, so I settled on using the main structure of the bench (read: those amazing triangular legs) as my inspiration, and attempted to replicate the basic shape using inexpensive pine boards and my drill.
How to Build a Mid-Century Inspired Triangle Leg Bench
Click here to get a free printable version of this building plan
Watch the video tutorial on our YouTube Channel (and subscribe, please!) and click here to get a printable building plan.
Materials and Tools
1x3x10 pine board (1)
2x2x8 pine board (3)
2 1/2″ wood screws
2 1/2″ and 1 1/4″ Kreg screws
Miter saw
Drill and drill bits
Kreg Jig pocket hole system
Random orbit sander and 80, 120 grit pads
Wood glue
Wood filler
Stain of your choice (I used Puritan Pine by Minwax) and cloths/latex gloves
Clear coat and brushes for application
Building Instructions
The first thing I did was determine the angles for my triangles. This was a lot of trial and error, so I used scrap 2×2 framing lumber that I had laying around the garage until I'd perfected a template for the legs. Your legs will look like this:
In order to make the four triangles needed for the legs from the 2x2s, you'll cut four each 14 3/8″ parallelograms with both ends at 15°.
For the other side of the triangle, you'll cut four trapezoids (16″ long end to long end) with one end at 45° and one at 30°.
*Please ensure that the lengths/angles of each piece are checked and rechecked with each cut to keep your triangles as uniform as possible. To make things easier, after I had both side pieces perfect, I used them as my templates for cutting the others, rather than messing with the measuring tape. That way I knew they would all match up perfectly.
Once they are all cut, join them together using 2 1/2″ pocket holes and wood glue. Because of the angle, your outside pocket hole will be closer to the end of your board. I used a 1 1/4″ screw for this hole as I didn't want it to come out the bottom of the leg. It worked really well and the hold was nice and tight. You can go ahead and use a 2 1/2″ screw for the inside hole.
When you're assembling your triangles, make sure to pay attention and mark where the pocket holes should go so that they are all facing the inside of the bench once attached to the seat. It helps to stand them up the way they'll be once the bench seat is attached and mark them that way to make sure you get the right side.
Once the two side pieces are attached together, you can fill the holes with wood filler (which is what I did), Kreg plugs, or leave them as is.
Next it is time to assemble the top frame/seat with 2x2s. I mitered my corners, but that is a personal preference and you can leave the edges square if you prefer (as shown in the diagram below).
For this step, instead of using pocket holes, I simply drilled pilot holes into the corners, and attached each piece using wood glue and 2 1/2″ countersunk wood screws. I kept everything square while I was assembling the frame with my right angle clamp, and it worked really well!
Once you have your frame assembled, measure the inner width and cut your 1×3 slats accordingly. They will be about 13 5/8″ long. I needed seven slats, and attached mine using 3/4″ pocket holes and 1 1/4″ pocket hole screws, flush to the bottom of the bench (with pocket holes facing down). I started from the center board and worked my way outward, putting 2 3/4″ between each slat. The right edge of the center board should be 20″ in from the left side of the frame (see diagram below).
Ok, so once you have your top frame assembled, it should be smooth sailing attaching the legs, but it wasn't for me. I had originally planned on attaching them with pocket holes, but I didn't think ahead, and had no way of fitting the drill in between the inner triangle to make the pocket holes. Dummy! If you want to use pocket holes to attach the legs to the bench frame, you have to drill them before assembling the legs.
After kicking myself for being so stupid, my only choice was to drill directly down into the top of the frame and into the leg, which was obviously not ideal as it would be noticeable. Unfortunately I didn't really have a choice at this point, and they ended up not looking so bad. I applied some wood glue and clamped the legs in place (I lined them up with the seam of the frame corners to make it easy, so about 1 1/2″ in from the end), drilled two pilot holes, and then counter sunk two 2 1/2″ wood screws in to secure the legs.
Once I had all the legs attached, I added a 2×2 support board between front and back legs. You could do this with hidden pocket holes but at this point I figured it would be fine to just drill a pilot hole then countersink a screw right through the outer leg and into the board, and fill it later.
Now that your bench is assembled, you should fill all your holes/gaps with stain-able wood filler. Once it's completely dry, sand down your entire piece to a nice smooth finish.
You can see here where my screw holes were covered with filler, and I guess it's not the end of the world.
I wanted a really light finish to balance the color of my stairs, so I went with Minwax Puritan Pine. I didn't use any pre-conditioner or anything, just rubbed it on with a lint free cloth and called it a day.
Once the stain was dry, I followed up with three coats of Minwax waterbased (oil modified) poly in satin, sanding lightly with 220 grit paper between each coat.
I wasn't too sure if I was loving the color until I got it into the house and accessorized with the seat cushion I made and some fun throws and pillows:
Guys. I love it! It turned out way better than I could have hoped, and dare I say I might like it even more than the inspo picture? I think it fits in perfectly with the space and the rest of our home and I am so proud that I made it myself.
I'm not crazy about the visible screws, but I'm not too bothered by them either!
It's incredibly sturdy and the perfect size: two people can sit on it comfortably, but it's not so huge that it makes the entryway feel cramped.
I spent just under $50 for this triangle leg bench, which includes the fabric and foam for the cushion. You can download the free plans to build this for your own home (above), and it's pretty easy to customize in order to suit any space. Remember to share your photos with Remodelaholic if you do decide to tackle this project!
Good luck, and happy building!
More benches you can build:
chevron bench with box frame
simple tufted upholstered bench
small rustic farmhouse style bench
corner bench with table
leather director's bench
easy 2×6 modern waterfall bench
half lap stacked plywood bench
The post Build This Mid-Century Inspired Triangle Leg Bench appeared first on Remodelaholic.
from car2 http://ift.tt/2sBaPyA via as shown a lot
0 notes
Last Seen Blogs

outofcontextbobsburgers
My Heart Just Pooped Its Pants

crcoolstore
Sin título

kubistudio
Kubi Studio

emiour
emilioioio

dokidobe
yellow.dr.monv