#premultiplication
Photo
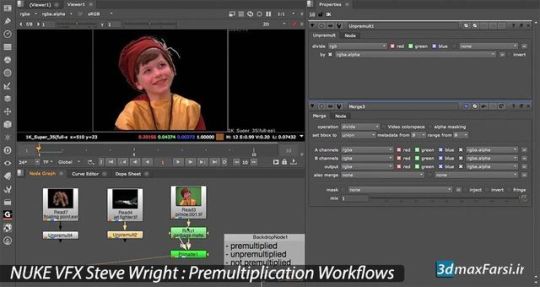
گردش کارهای پیشگیرانه در نرم افزار نوک NUKE | کامپوزیت فیلم و تصویر لینک دانلود : https://www.3dmaxfarsi.ir/nuke-vfx-premultiplication-workflows/?feed_id=11435&_unique_id=5d25bd02a3da2 #3dmaxfarsi
0 notes
Text
Xargus / Game Engine - Dynamically recolourable images - properly supporting translucency
In my previous post, I talked about an alternative method for encoding recolourable images from the one I was using previously, and the pros and cons of doing so.
Both this new method and the previous one did not fully support translucent parts of the source image however, in that the proper colour would not be maintained under certain situations if the source image was partially transparent.
To understand why this is, we need to understand alpha premultiplication:
Alpha premultiplication
Essentially, when an image is rendered onto a background in computer graphics, the resulting rgb of the image is evaluated to this:
output.rgb = image.rgb * image.a + background.rgb * (1-image.a)
In order to make this formula slightly more efficient when rendering images on screen, the rgb values of images can be premultiplied by their alpha values. This means that if a pixel is 50% translucent red, it will be stored in memory as rgba(0.5,0,0,0.5) rather than rgb(1,0,0,0.5).
This allows for the formula to be simplified slightly to this:
output.rgb = image.rgb + background.rgb * (1-image.a)
Because of this, OpenGL premultiplies the alpha values of all images by default.
In most cases, this leads to slightly more efficient rendering, as one less calculation needs to be performed, however this can cause issues for shaders that read the rgb values of pixels and perform mathematical operations on them other than the standard rendering formula:
Implications of alpha premultiplication on the encoding methods
Considering the previous method for encoding images:
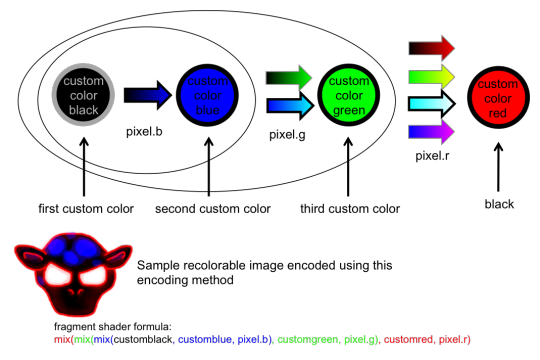
If we think about a pixel in the source image that is 50% translucent red, this pixel will be stored as rgba(0.5, 0, 0, 0.5). When this pixel is evaluated by the fragment shader, this will result in the output pixel colour only being shifted 50% towards the custom red colour, as the red pixel value is only 50%. This is problematic, as the colours will not be correct in translucent regions of the source image.
This shows what fading from each custom colour to transparent will look like for a set of arbitrarily chosen custom colours using this technique:
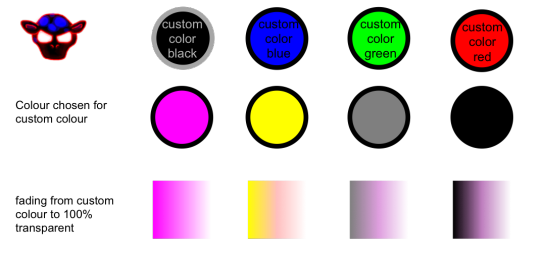
This is not likely to be particularly noticeable for the previous use cases of recolourable images in xargus, as the only use of translucency was where the black lines surrounding the images would fade outwards, which is a tiny area.
However, going forward, this is an issue that needs to be fixed, as other images are likely to require use of translucent areas without colour distortion:
Fixing this issue for the previous encoding method
In order to fix this for the previous encoding method, we must divide each pixel value that we read by the alpha value, to reverse the effect of the pixel premultiplication (changes shown in bold):
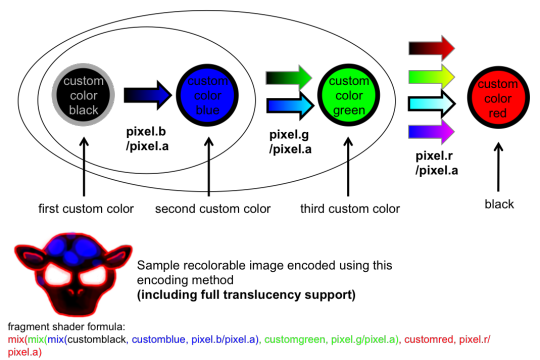
Fixing this issue for the new style encoding method
In order to fix this for the new style encoding method, we only need to divide pixel.r by pixel.a:

The reason we do not need to divide the other values by pixel.a (such as pixel.g) is that we are already dividing them by pixel.r. Both pixel.g and pixel.r are premultiplied by pixel.a, so no further division is required.
What is apparent from this is that, when it is a requirement to support full translucency, the new-style method is approximately the same efficiency as the previous-style method, negating the minor efficiency benefit of the previous method over the new method when not supporting translucency properly.
10 notes
·
View notes
Text
Jakub Malicek
BA (hons) 3D Visual Effects
DD1410 – VFX1
Futureworks
Introduction
The world of Visual effects is like a world of magic. Sometimes we are stunned by an amazing show of tricks and illusions and sometimes we don’t even notice it happened.
Either way there is always a hard work and huge effort behind it. The road to success is steep and skills must be built by learning the basics so the knowledge has strong foundations. In visual effects the Foundation blocks are Tracking, Keying, Rotoscoping and Colour Correction.
This production journal shows my first attempts to build the skills of the four key visual effect elements.
hcw_laptop_green.[0000-0218]
For this shot I was tasked to remove the green screen and replace it with an appropriate image that fits the location.
First thing I had to do after uploading the footage was to change project setting to be HD 1080 and also reformat and resize the footage.
After that I created a Rotoscop for the screen, which I animated so the Roto mask was covering the screen and the hand through out all footage. In the end I changed the Roto output to rgb and rgb alpha.
Next step was to remove the green screen so a new image could be placed instead.
To do that I applied a Keylight which is an industry-proven colour difference keyer, which works the best with background colours which have only one primary colour in it ( red , green or blue}.
First I used Keylight Colour Pick to find the best colour and then switched to an alpha channel to finish the key by adjusting Screen gain, Clip Black, Clip white and screen despot.
After I completely removed the green colour I was ready to proceed to the next step, which was to track the screen.
To obtain the most accurate result I used a 4 point track and tracked one point for each corner of the screen at a time.
It became more complicated when I attempted to track the corner, which is covered with the hand at a certain point of the footage. Since the automatic track did not work well in this case I decided to use a curve editor and adjust the part of the footage manually by locating and deleting the key frames, where the track got off the most. And since the camera move of the footage is fairly linear, this solution worked perfectly.
Once the track was finished I uploaded and reformatted the image that I decided to replace the green screen with. Then I dropped in a Corner Pin node and linked it with Tracker so the corners of the image fit in the corners of the screen.
After that I connected the outM pipe of the Keylight to the Roto node and changed the outM component of the Keylight to alpha and connected it to the footage.
To retrieve the colour information from the source I used a Shuffle copy node which I connected to the Keylight and the Reformat and merge with Corner Pin and then merged the shuffle copy with the previous merge and placed Premult after the shuffle copy to multiple the alpha information.
To placed the hand over the screen I changed the Keylight outM component to an Inverted luminance.
The last step was to correct the colours and give the composition more realistic look.
To achieve this I used Colour Correct and Grade to alter the colour of the screen. Also applied Edge blur, Blur and Glow.
Then I used a Hue Correct to remove the green spill on the hand. Attempted to adjust the exposure and bring back some of the original green colour of the ambient and applied a Light Wrap in the end.
Windowclosepush.[0000-0209]
Like in the previous shot the task was to remove the green screen and replace it with an appropriate image of my own choice.
This footage I was provided with came in very unusual format of 1280 X 1080 so the first thing I did was that I reformatted it to HD 1080, distorted it and changed my project settings to HD 1080 also.
After watching the footage, it become obvious that three different Rotos will have to be applied to key the screen to achieve a seamless integration.
Once my background picture was reformatted I started to create and animate three Rotos. First for the tree, second for the candles and third for the window frame.
Once all three Rotoscopes where finished and animated I was ready to start removing the green screen with Keylight. After connecting the Keylight node to the source and its outM pipe to the Tree Roto I changed the output to RGB and RGB.alpha and also the output component of Keylight to inverted alpha in order to isolate the area I wanted to key only the area that surrounds the tree.
Then I repeated the same process with two remaining Rotos and merged them together.
To maintain a realistic and convincing look of this composition, it was necessary to bring back reflections on the window. To achieve that I created a new Keylight and attached all Rotos bg pipes into it so I could colour pick and remove the green screen but preserve the reflections. Then I have to change the setting on each Roto by inverting the shape and changing the blending mode from over to screen.
Next step was to track the footage so I could use the data for the image I was going to replace the green screen with. I tracked one of the squares on the window.
At this point I uploaded the background picture I choose and after reformating it I merged it with the foreground. To make the image to follow the camera move I attached a Transform node to the background and linked the tracking data to it.
After that I started colour correcting both background and foreground to achieve a seamless integration.
My aim was to adjust the background picture so it looked more like a night shot. I used Colour Correct and Grade to alter the exposure and darkened it.
Then I applied another Grade to reduce the strong blue tint to give it more real look.
Also used Blur and Glow to create the effect that there was a real garden behind the window and added a Grain to it so it matched the foreground.
I approached the colour correcting of the foreground the same way. I darkened it and added a Glow and Light Wrap to give it a warm feel and atmosphere.
Nuke 101 Car Colour Correct
To complete this composite I was expected to place the car into a winter shot, colour correct it and light wrap it.
After opening the background and foreground images I merged them together and created a basic composite.
Next thing I had to do was to place the car behind the piled up snow on the windshield so it did not look like it was sitting on it. To do that I brought a matte of the snow (four-channel image with same image in the R,G,B and alpha) and merged it with the image of the car and then merge them both with the background image.
To place the car behind the snow I had to change the Merge 2 operation from over to stencil.
But before I started colour correction I had to use Unremult node which I placed before Grade node as the image of the car was premultiplied and we are not allowed to colour correct premultiplied images. Then I used a Premult node that I placed after grade not to affect the background.
To do a colour correction, first I attempted to find the brightest and darkest point in these two images. To do that I used CurveTool where I switched to a Max Luma Pixel.
Because the image was premultipled, the value of minimum pixel was 0 in every property.
So I had to disregard that black area and I achieved it by applying a Constant node which creates a solid color with a choosen resolution.
I set color value of the Constant to 0.5 and merged it to the background and replace the black color with a middle grey.
That allowed me to get a true result that showed the lightest and darkest pixels. Then I linked the values to Grade node and obtained a perfect dynamic range.
For values of lift and gain I used a Pixel Analyzer and the copied the values to Grade node and matched the foreground’s shadows and highlights to those of the background.
The last was to match midtones by adjusting values of multiply, offset and gamma by eye.
To do that I was adjusting individual colours (red, green and blue) for multiply, offset and gamma values while viewing the same colour channels in the viewer.
Tears of steal/08_4c
For this shot the task was to remove the green screen, create a garbage matte for the other equipment, match move the footage and composite an appropriate image that fit the location.
Since the original footage was in 4K resolution, before doing anything else I had to reformat it, resize it and change my project settings to HD 1080.
Once I had done that I started to look for the best point to track. After several attempts to track only one point I realised that that was not the right way to do it as the parallax created was too strong.
The best solution I found was to use a three point track and track the red mark under the actors foot and those two balls attached to the stands on each side of the set.
The next step was to Rotoscope the actor so the green screen could be removed.
I created a separated Roto for actors hand as I wanted to remove the shadows on the box he holds.
When I finished the Roto and animated it I used a Keylight to remove the green screen and then switched to an alpha channel to obtain a solid alpha by adjusting screen matte, black and white point and screen dilate. After that I changed Keylight OutM Component to inverted alpha.
When the green screen was removed I replaced the background with an image I chose, added a Transform node and linked it with the Tracker I previously created so the background image followed the camera move.
Then I added an Edge Blur and Degrain to enhance the look of the subject and colour corrected him with Grade and Color Correct.
To match the background I used pixel analyser to find the darkest and lightest points and Colour Correct and Grade to alter the tint so the background matched the subject and looked natural.
Lastly I added a Grain node to the background and Light Wrapped the subject.
�� Tears of steel/01_2a
The task for this shot was to match move the footage and Rotoscope the fence so a test robot could be places behind it.
Like the previous footage the original resolution was 4K so had to reformat it and resized it first as well as change my project setting to HD 1080.
Then I put an image of a robot I researched to a Photoshop and created an alpha channel so I could place him into the scene to see which part of the fence I will have to Rotoscop.
After that I merged the alpha image with background, reformatted it, resized it and positioned it.
When the robot was composited to the scene I decided to match move the fence with planar tracker and then use the Bezier shape to create the mask for the robot so it could be placed behind it.
Next step was to remove the hand from the fence. To do that I created Roto to basically sampled out an area of the fence and placed it over the hand.
After I finished the Roto I changed the output to rgba and rgb.alpha , inverted the shape and change the colour to black. Then I merged it with background image and set the read1 settings to auto alpha.
Then I added a Transform node and move the sampled area over the hand.
To place the robot behind the fence I changed the fence Roto output to mask. Also I changed the settings to mask.a in the Merge node so it interacted with the mask and inverted it.
The Planar tracker I wanted to use to track the movement of the footage did not work as I wanted so I applied a two-point track and choose two bright spots on the fence.
Then I connected the tracking data to a Transform node so the image of the robot followed the camera movement.
To colour correct this shot I started with matching black and white points with Pixel Analyser and obtained data copied to Grade. Added Colour Correct and Hue Correct to enhance the tint and saturation and lastly I used Light Wrap and Grain.
Refrence list
Nuke 101: professional compositing and visual effects
Ron Ganbar - Peachpit Press - 2014
Titans: Mechs in Titanfall 2 - May 31, 2017- https://www.pinterest.co.uk/
hoto Collection Night Winter House Landscap - December 15, 2017 - http://flashlarevista.com
X-Wing Blue Print : December 15, 2017 - DeviantArt
Nuke 101 Class 3 - Remove Unwanted Objects : July 15, 2016 - YouTube
0 notes
Last Seen Blogs

sa-mm-iee
Sammie

whiterufflesphoto
White Ruffles Photography

othernumbskulls-blog
It's Showtime!

a-stoopid-person
[O]

marylongston
UltraPowerGames