#scanner class in java
Explore tagged Tumblr posts
Visit Tumblr Blog
Explore Tumblr blogs with no restrictions, modern design and the best experience.
Last Seen Tumblr Blogs


Fun Fact
Tumblr is available in 18 languages.
Text
Câu Lệnh if-else Trong Java - Hướng Dẫn Chi Tiết
Câu lệnh if-else trong Java là một trong những cấu trúc điều khiển luồng cơ bản nhất, giúp lập trình viên đưa ra quyết định dựa trên các điều kiện cụ thể. Trong bài viết này, chúng ta sẽ tìm hiểu chi tiết về câu lệnh if-else, cách sử dụng, các dạng khác nhau, và ví dụ minh họa. Nếu bạn đang bắt đầu học Java hoặc muốn củng cố kiến thức, bài viết này sẽ là hướng dẫn toàn diện dành cho bạn.
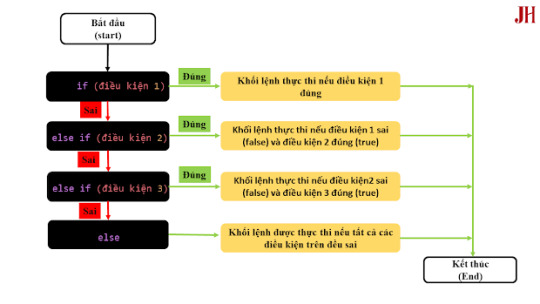
Ảnh mô tả cách xử lí điều kiện và thực thi khối lệnh của câu lệnh điều kiện.
1. Câu lệnh if-else trong Java là gì?
Câu lệnh if-else là một cấu trúc điều kiện trong Java, cho phép chương trình thực thi một khối mã nếu điều kiện được đáp ứng hoặc thực thi một khối mã khác nếu điều kiện không thỏa mãn. Đây là công cụ quan trọng để kiểm soát luồng thực thi trong lập trình.
Cú pháp cơ bản của câu lệnh if-else:
if (điều_kiện) {
// Khối mã thực thi nếu điều kiện đúng
} else {
// Khối mã thực thi nếu điều kiện sau
}
điều_kiện: Một biểu thức logic trả về giá trị true hoặc false.
Nếu điều kiện là true, khối mã trong if được thực thi.
Nếu điều kiện là false, khối mã trong else (nếu có) sẽ được thực thi.
2. Các dạng của Câu lệnh if-else trong Java
Câu lệnh if-else có nhiều dạng khác nhau, tùy thuộc vào yêu cầu của chương trình. Dưới đây là các dạng phổ biến:
2.1. Câu lệnh if đơn giản
Dạng cơ bản nhất, chỉ kiểm tra một điều kiện và thực thi khối mã nếu điều kiện đúng.
int age = 18;
if (age >= 18) {
System.out.println("Bạn đủ tuổi lái xe!");
}
2.2. Câu lệnh if-else
Bao gồm cả khối else để xử lý trường hợp điều kiện sai.
int age = 16;
if (age >= 18) {
System.out.println("Bạn đủ tuổi lái xe!");
} else {
System.out.println("Bạn chưa đủ tuổi lái xe!");
}
2.3. Câu lệnh if-else lồng nhau
Dùng để kiểm tra nhiều điều kiện phức tạp.
int score = 85;
if (score >= 90) {
System.out.println("Xuất sắc!");
} else if (score >= 75) {
System.out.println("Tốt!");
} else if (score >= 60) {
System.out.println("Đạt!");
} else {
System.out.println("Cần cải thiện!");
}
2.4. Câu lệnh if với toán tử logic
Kết hợp các điều kiện bằng toán tử logic như && (và), || (hoặc), ! (không).
int age = 20;
boolean hasLicense = true;
if (age >= 18 && hasLicense) {
System.out.println("Bạn được phép lái xe!");
} else {
System.out.println("Bạn không được phép lái xe!");
}
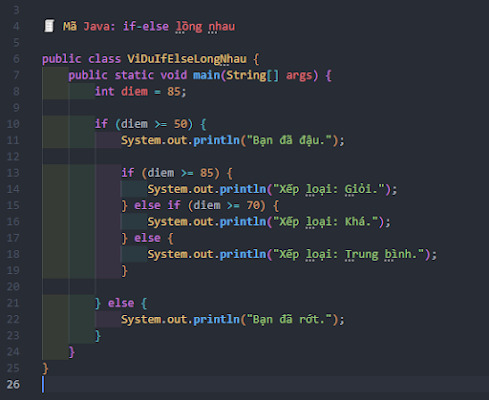
Minh họa câu lệnh if-else lồng nhau
3. Ứng dụng thực tế của Câu lệnh if-else
Câu lệnh if-else được sử dụng rộng rãi trong các ứng dụng Java, từ các chương trình đơn giản đến các hệ thống phức tạp. Dưới đây là một s��� ví dụ:
Kiểm tra đầu vào người dùng: Xác thực thông tin như tuổi, mật khẩu, hoặc quyền truy cập.
Xử lý logic trò chơi: Quyết định hành động của nhân vật dựa trên điều kiện (ví dụ: nếu nhân vật hết máu, trò chơi kết thúc).
Quản lý nghiệp vụ: Phân loại khách hàng dựa trên điểm số hoặc doanh thu.
Ví dụ: Chương trình kiểm tra số chẵn/lẻ.
import java.util.Scanner;
public class EvenOdd {
public static void main(String[] args) {
Scanner scanner = new Scanner(System.in);
System.out.print("Nhập một số: ");
int number = scanner.nextInt();
if (number % 2 == 0) {
System.out.println(number + " là số chẵn.");
} else {
System.out.println(number + " là số lẻ.");
}
}
}
4. Lưu ý khi sử dụng Câu lệnh if-else
Để sử dụng câu lệnh if-else trong Java hiệu quả, bạn cần lưu ý:
Tránh lồng quá nhiều điều kiện: Lồng quá nhiều if-else có thể làm mã khó đọc. Hãy cân nhắc sử dụng switch hoặc các hàm riêng cho logic phức tạp.
Kiểm tra điều kiện rõ ràng: Đảm bảo điều kiện trong if trả về giá trị true/false chính xác.
Sử dụng dấu ngoặc {}: Ngay cả khi khối mã chỉ có một dòng, việc sử dụng {} giúp mã rõ ràng và tránh lỗi.
Tối ưu hóa hiệu suất: Với các điều kiện phức tạp, sắp xếp thứ tự kiểm tra để giảm số lần đánh giá.
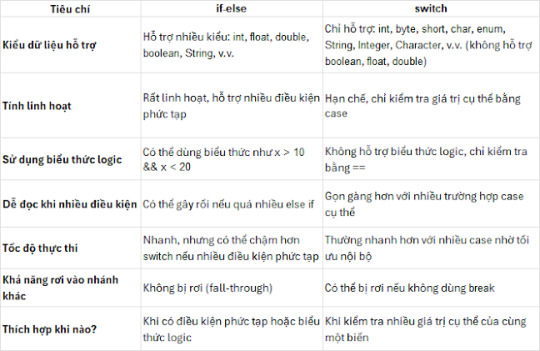
Bảng so sánh giữa câu lệnh if-else và switch
5. Kết luận
Câu lệnh if-else trong Java là một công cụ mạnh mẽ, cho phép lập trình viên kiểm soát luồng chương trình một cách linh hoạt. Từ các ứng dụng đơn giản như kiểm tra số chẵn/lẻ đến các hệ thống phức tạp, if-else luôn đóng vai trò quan trọng. Hy vọng bài viết này đã giúp bạn hiểu rõ cách sử dụng câu lệnh if-else, các dạng khác nhau, và cách áp dụng chúng hiệu quả.
Hãy thực hành với các ví dụ trong bài và thử viết các chương trình sử dụng if-else để làm quen. Nếu bạn có thắc mắc hoặc cần thêm ví dụ, hãy để lại câu hỏi nhé!
🔹 Câu lệnh if-else trong Java – Hướng dẫn chi tiết cho người mới bắt đầu Tìm hiểu cách sử dụng if, else if, và else để xây dựng điều kiện logic trong lập trình Java. Ví dụ minh họa rõ ràng, dễ hiểu, áp dụng thực tế ngay! 🌍 Website: Java Highlight
#JavaHighlight#ifelseJava#JavaBasic#JavaTutorial#LapTrinhJava#JavaForBeginners#ConditionalStatements#Javacoban#JavaLearning#Câu lệnh if-else trong Java
0 notes
Text
Top 10 Free Coding Tutorials on Coding Brushup You Shouldn’t Miss
If you're passionate about learning to code or just starting your programming journey, Coding Brushup is your go-to platform. With a wide range of beginner-friendly and intermediate tutorials, it’s built to help you brush up your skills in languages like Java, Python, and web development technologies. Best of all? Many of the tutorials are absolutely free.

In this blog, we’ll highlight the top 10 free coding tutorials on Coding BrushUp that you simply shouldn’t miss. Whether you're aiming to master the basics or explore real-world projects, these tutorials will give you the knowledge boost you need.
1. Introduction to Python Programming – Coding BrushUp Python Tutorial
Python is one of the most beginner-friendly languages, and the Coding BrushUp Python Tutorial series starts you off with the fundamentals. This course covers:
● Setting up Python on your machine
● Variables, data types, and basic syntax
● Loops, functions, and conditionals
● A mini project to apply your skills
Whether you're a student or an aspiring data analyst, this free tutorial is perfect for building a strong foundation.
���� Try it here: Coding BrushUp Python Tutorial
2. Java for Absolute Beginners – Coding BrushUp Java Tutorial
Java is widely used in Android development and enterprise software. The Coding BrushUp Java Tutorial is designed for complete beginners, offering a step-by-step guide that includes:
● Setting up Java and IntelliJ IDEA or Eclipse
● Understanding object-oriented programming (OOP)
● Working with classes, objects, and inheritance
● Creating a simple console-based application
This tutorial is one of the highest-rated courses on the site and is a great entry point into serious backend development.
📌 Explore it here: Coding BrushUp Java Tutorial
3. Build a Personal Portfolio Website with HTML & CSS
Learning to create your own website is an essential skill. This hands-on tutorial walks you through building a personal portfolio using just HTML and CSS. You'll learn:
● Basic structure of HTML5
● Styling with modern CSS3
● Responsive layout techniques
● Hosting your portfolio online
Perfect for freelancers and job seekers looking to showcase their skills.
4. JavaScript Basics: From Zero to DOM Manipulation
JavaScript powers the interactivity on the web, and this tutorial gives you a solid introduction. Key topics include:
● JavaScript syntax and variables
● Functions and events
● DOM selection and manipulation
● Simple dynamic web page project
By the end, you'll know how to create interactive web elements without relying on frameworks.
5. Version Control with Git and GitHub – Beginner’s Guide
Knowing how to use Git is essential for collaboration and managing code changes. This free tutorial covers:
● Installing Git
● Basic Git commands: clone, commit, push, pull
● Branching and merging
● Using GitHub to host and share your code
Even if you're a solo developer, mastering Git early will save you time and headaches later.
6. Simple CRUD App with Java (Console-Based)
In this tutorial, Coding BrushUp teaches you how to create a simple CRUD (Create, Read, Update, Delete) application in Java. It's a great continuation after the Coding Brushup Java Course Tutorial. You'll learn:
● Working with Java arrays or Array List
● Creating menu-driven applications
● Handling user input with Scanner
● Structuring reusable methods
This project-based learning reinforces core programming concepts and logic building.
7. Python for Data Analysis: A Crash Course
If you're interested in data science or analytics, this Coding Brushup Python Tutorial focuses on:
● Using libraries like Pandas and NumPy
● Reading and analyzing CSV files
● Data visualization with Matplotlib
● Performing basic statistical operations
It’s a fast-track intro to one of the hottest career paths in tech.
8. Responsive Web Design with Flexbox and Grid
This tutorial dives into two powerful layout modules in CSS:
● Flexbox: for one-dimensional layouts
● Grid: for two-dimensional layouts
You’ll build multiple responsive sections and gain experience with media queries, making your websites look great on all screen sizes.
9. Java Object-Oriented Concepts – Intermediate Java Tutorial
For those who’ve already completed the Coding Brushup Java Tutorial, this intermediate course is the next logical step. It explores:
● Inheritance and polymorphism
● Interfaces and abstract classes
● Encapsulation and access modifiers
● Real-world Java class design examples
You’ll write cleaner, modular code and get comfortable with real-world Java applications.
10. Build a Mini Calculator with Python (GUI Version)
This hands-on Coding BrushUp Python Tutorial teaches you how to build a desktop calculator using Tkinter, a built-in Python GUI library. You’ll learn:
● GUI design principles
● Button, entry, and event handling
● Function mapping and error checking
● Packaging a desktop application
A fun and visual way to practice Python programming!
Why Choose Coding BrushUp?
Coding BrushUp is more than just a collection of tutorials. Here’s what sets it apart:
✅ Clear Explanations – All lessons are written in plain English, ideal for beginners. ✅ Hands-On Projects – Practical coding exercises to reinforce learning. ✅ Progressive Learning Paths – Start from basics and grow into advanced topics. ✅ 100% Free Content – Many tutorials require no signup or payment. ✅ Community Support – Comment sections and occasional Q&A features allow learner interaction.
Final Thoughts
Whether you’re learning to code for career advancement, school, or personal development, the free tutorials at Coding Brushup offer valuable, structured, and practical knowledge. From mastering the basics of Python and Java to building your first website or desktop app, these resources will help you move from beginner to confident coder.
👉 Start learning today at Codingbrushup.com and check out the full Coding BrushUp Java Tutorial and Python series to supercharge your programming journey.
0 notes
Text
Armstrong Number in Java - How to Implement It?
I came across the armstrong number in java, where the sum of the cubes (or n-th power) of the digits of a number equals the number itself. For example, 153 is an Armstrong number because:
1³ + 5³ + 3³ = 153
I tried implementing this in Java, but I want to make sure my logic is correct. Here’s my code:
java Copy Edit import java.util.Scanner;
public class ArmstrongNumber { public static void main(String[] args) { Scanner sc = new Scanner(System.in); System.out.print("Enter a number: "); int num = sc.nextInt(); int original = num, sum = 0, digits = 0; int temp = num; while (temp > 0) { temp /= 10; digits++; } temp = num; while (temp > 0) { int digit = temp % 10; sum += Math.pow(digit, digits); temp /= 10; } if (sum == original) System.out.println(num + " is an Armstrong number."); else System.out.println(num + " is not an Armstrong number."); sc.close(); }
} Is there a better way to optimize this, especially for larger numbers? Would recursion be useful here?
0 notes
Text
Display Input Number in Java In Java, displaying an input number is simple using the Scanner class for input and System.out.println() for output. After reading the number with Scanner sc = new Scanner(System.in); int number = sc.nextInt();, you can print it using System.out.println("The input number is: " + number);. This approach ensures efficient user input handling and is a fundamental operation in building interactive Java programs.
0 notes
Text
Uni notes older than me
Bruh these notes are literally older than me, they suggest building a custom text reading class because scanner in java came out in 2004 and these notes predate that.
0 notes
Text
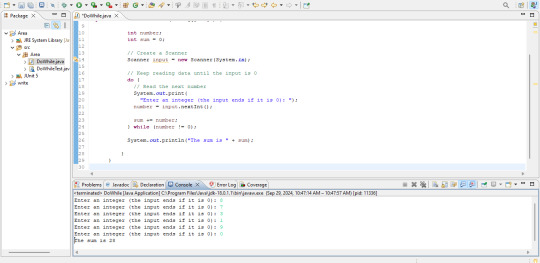
Java Do-While Loop Example: Sum Calculation
import java.util.Scanner; public class DoWhile { /** Main method */ public static void main(String[] args) { int number; int sum = 0; // Create a Scanner Scanner input = new Scanner(System.in); // Keep reading data until the input is 0 do { // Read the next number System.out.print( "Enter an integer (the input ends if it is 0): "); number = input.nextInt(); sum += number; } while (number !=…
View On WordPress
0 notes
Text
Java Básico - 4 .- Tipos de datos y variables en Java

Uno de los conceptos fundamentales en cualquier lenguaje de programación es el manejo de datos. En Java, esto se logra a través de variables y tipos de datos. En esta entrada de blog, exploraremos cómo declarar variables, los diferentes tipos de datos disponibles en Java, y cómo usarlos correctamente para almacenar y manipular información.
¿Qué son las variables?
Una variable es un contenedor en la memoria del ordenador que almacena un valor. Las variables en Java tienen un tipo asociado, lo que significa que solo pueden almacenar datos de ese tipo específico. Para declarar una variable en Java, se utiliza la siguiente sintaxis: tipo nombreVariable = valorInicial; Por ejemplo: int edad = 25; En este ejemplo, int es el tipo de dato, edad es el nombre de la variable, y 25 es el valor que se almacena en esa variable.
Tipos de Datos en Java
Java es un lenguaje fuertemente tipado, lo que significa que cada variable debe declararse con un tipo de dato específico. Los tipos de datos en Java se dividen en dos categorías principales: tipos de datos primitivos y tipos de referencia. 1. Tipos de Datos Primitivos Los tipos de datos primitivos son los más básicos y se utilizan para almacenar valores simples. Java tiene ocho tipos de datos primitivos: - byte: 8 bits, almacena valores enteros desde -128 hasta 127. byte b = 100; - short: 16 bits, almacena valores enteros desde -32,768 hasta 32,767. short s = 1000; - int: 32 bits, almacena valores enteros desde -2^31 hasta 2^31-1. int i = 5000; - long: 64 bits, almacena valores enteros desde -2^63 hasta 2^63-1. long l = 100000L; - float: 32 bits, almacena números de punto flotante (decimales) con precisión simple. float f = 5.75f; - double: 64 bits, almacena números de punto flotante con precisión doble. double d = 19.99; - char: 16 bits, almacena un solo carácter utilizando el conjunto de caracteres Unicode. char c = 'A'; - boolean: 1 bit, almacena solo dos valores posibles: true o false. boolean isJavaFun = true; 2. Tipos de Referencia Los tipos de referencia no almacenan directamente el valor, sino una referencia a un objeto que contiene el valor. Los tipos de referencia incluyen: - Clases: Como String, Scanner, y cualquier clase que definas. - Arrays: Conjuntos de variables del mismo tipo. - Interfaces: Tipos que definen métodos que una clase debe implementar. Ejemplo de tipo de referencia: String saludo = "Hola, Java!"; En este ejemplo, String es un tipo de referencia que apunta a un objeto que contiene la cadena "Hola, Java!". Declaración y Inicialización de Variables En Java, las variables pueden declararse y luego inicializarse por separado, o ambas cosas pueden hacerse en la misma línea. Ejemplos: int numero; // Declaración numero = 10; // Inicialización int otroNumero = 20; // Declaración e inicialización simultánea También puedes declarar múltiples variables del mismo tipo en una sola línea: int x = 5, y = 10, z = 15; Buenas Prácticas para el Uso de Variables - Nombres Significativos: - Usa nombres de variables que describan claramente su propósito. Por ejemplo, edad, totalVentas, nombreCliente, etc. - Consistencia en el Estilo: - Sigue una convención de nomenclatura consistente, como el uso de camelCase para las variables (ejemplo: nombreDeUsuario). - Uso Adecuado de Tipos: - Selecciona el tipo de dato más adecuado para la variable según el valor que deseas almacenar. Por ejemplo, usa int para números enteros y double para valores decimales. - Inmutabilidad: - Si una variable no debe cambiar después de su inicialización, declárala como final. Esto se utiliza comúnmente para constantes. final int DIAS_EN_SEMANA = 7; Ejemplo Práctico: Uso de Variables A continuación, un ejemplo práctico que ilustra el uso de diferentes tipos de datos y variables en Java: public class VariablesJava { public static void main(String args) { // Declaración e inicialización de variables primitivas int edad = 30; double salario = 58000.50; char inicial = 'J'; boolean esEmpleado = true; // Uso de tipo de referencia String String nombre = "Juan Pérez"; // Imprimir valores System.out.println("Nombre: " + nombre); System.out.println("Edad: " + edad); System.out.println("Salario: $" + salario); System.out.println("Inicial del nombre: " + inicial); System.out.println("Es empleado: " + esEmpleado); } } Este programa declara e inicializa varias variables, luego imprime sus valores en la consola.
Detalles sobre Scanner:
El tipo de variable Scanner es un tipo de referencia en Java. - Clase Scanner: Scanner es una clase incluida en el paquete java.util. Esta clase se utiliza para leer la entrada de datos desde varias fuentes, como la entrada estándar (teclado), archivos, cadenas, etc. - Tipo de Referencia: Cuando declaras una variable de tipo Scanner, no estás almacenando directamente el objeto Scanner en la variable, sino una referencia al objeto Scanner que se crea en la memoria. Esto es lo que distingue a los tipos de referencia de los tipos de datos primitivos en Java. Ejemplo: import java.util.Scanner; public class EjemploScanner { public static void main(String args) { // Declaración de la variable de tipo referencia Scanner Scanner scanner = new Scanner(System.in); // Uso de la variable scanner para leer un valor System.out.print("Ingresa tu nombre: "); String nombre = scanner.nextLine(); // Mostrar el valor ingresado System.out.println("Hola, " + nombre); // Cerrar el scanner scanner.close(); } } En este ejemplo: - Scanner scanner: Aquí scanner es una variable de tipo Scanner, que es un tipo de referencia. La variable scanner contiene una referencia al objeto Scanner que se creó con new Scanner(System.in). Resumen: - Tipo de variable Scanner: Es un tipo de referencia en Java. - Uso: Se utiliza para leer y procesar entradas de datos de diversas fuentes. Read the full article
#buenasprácticasenJava#declaracióndevariablesenJava#ejemplosdevariablesenJava#inicializacióndevariablesenJava#JavaBásico-4.-TiposdedatosyvariablesenJava#programaciónenJava#tiposdedatosbooleanosenJava#tiposdedatosdecimalesenJava#tiposdedatosenJava#tiposdedatosenterosenJava#tiposdedatosprimitivosenJava#tiposdereferenciaenJava#variablesenJava
0 notes
Text
Solve me First (solutions) Problem Statement Explanation
The problem requires us to create a function solveMeFirst that computes the sum of two given integers. The function takes two integer inputs a and b and returns their sum.
Intuition
The solution is quite straightforward. We need to add the two given integers a and b and return their sum.
Step-by-Step Algorithm
Define the function solveMeFirst that takes two integer parameters a and b.
Inside the function, compute the sum of a and b using the addition operator (+).
Return the calculated sum.
In the main function:
Create a Scanner object to read input from the standard input.
Read the integer values of a and b.
Call the solveMeFirst function with a and b as arguments and store the result in the variable sum.
Print the value of sum.
Time Complexity Analysis
The time complexity of this approach is constant, O(1), as it involves a simple addition operation.
Space Complexity Analysis
The space complexity is also constant, O(1), as no additional space is required apart from a few integer variables.
for #c++

This C++ code defines a main function that reads two integers, calls the solveMeFirst function to compute their sum, and then prints the result. The solveMeFirst function is meant to return the sum of two integers, as indicated by the comment. for #Java
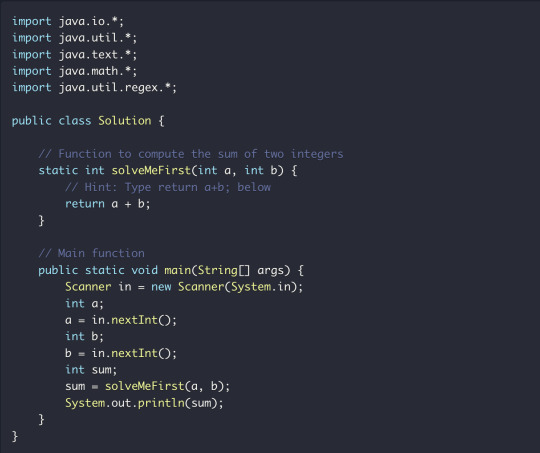
This Java code defines a class Solution that contains a function solveMeFirst to compute the sum of two integers. The main function takes input using a Scanner, calls the solveMeFirst function, and prints the result.
For #python
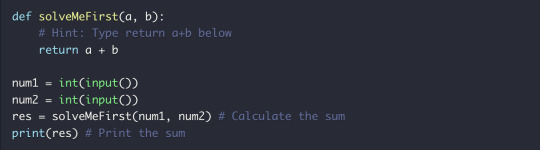
This Python code defines a function solveMeFirst that computes the sum of two integers. The main part of the code reads two input integers, calls the solveMeFirst function to calculate their sum, and then prints the result.
1 note
·
View note
Text
CSC3100 Assignment 4
Problem Scale & Subtasks For 100% of the test cases, 0 ≤ A, B ≤ 106 1 Solutions Java import java . util .*; public class Example { public static void main ( String [] args ) { int a , b; Scanner scanner = new Scanner ( System . in ); a = scanner . nextInt (); b = scanner . nextInt (); scanner . close (); System . out . println (a + b ); } } Python AB = input (). split () A , B = int ( AB [0]) ,…

View On WordPress
0 notes
Text
Activity: Using Classes and Objects solved
Goals: By the end of this activity you should be able to do the following: Ø Understand how to instantiate an object using the new operator Ø Use the Java standard library (the Java API) to look up a class Ø Use the String class and the Scanner class Ø Construct a viewer canvas and run your program in the canvas Program Description: You will create a program that exchanges letters in a String to…

View On WordPress
0 notes
Text
In Và Xuất Dữ Liệu Trong Java - Hướng Dẫn Chi Tiết
In và xuất dữ liệu trong Java là một trong những kỹ năng cơ bản nhưng quan trọng đối với bất kỳ lập trình viên nào khi học ngôn ngữ lập trình này. Việc xử lý xuất dữ liệu ra màn hình hoặc nhập dữ liệu từ người dùng giúp chương trình tương tác hiệu quả. Trong bài viết này, chúng ta sẽ tìm hiểu cách in và xuất dữ liệu trong Java một cách chi tiết, từ các phương thức cơ bản đến các ví dụ thực tế.
1. Tại sao In và Xuất Dữ Liệu trong Java quan trọng?
In và xuất dữ liệu là nền tảng của bất kỳ ứng dụng nào. Trong Java, việc in dữ liệu giúp hiển thị thông tin cho người dùng, trong khi xuất dữ liệu (nhập dữ liệu từ bàn phím hoặc tệp) cho phép chương trình nhận đầu vào để xử lý. Những thao tác này được sử dụng trong:
Giao diện dòng lệnh: Hiển thị kết quả hoặc yêu cầu người dùng nhập thông tin.
Ứng dụng tương tác: Tạo trải nghiệm người dùng động.
Debugging: Kiểm tra giá trị biến trong quá trình phát triển.
Hiểu rõ cách in và xuất dữ liệu trong Java giúp bạn xây dựng các chương trình linh hoạt và dễ sử dụng.
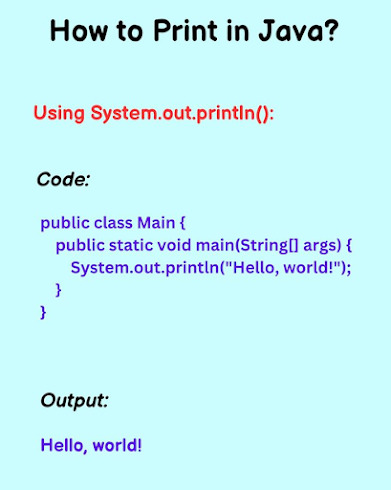
How to print in Java?
2. Các phương thức In Dữ Liệu trong Java
Java cung cấp nhiều phương thức để in dữ liệu ra màn hình console, phổ biến nhất là các phương thức trong lớp System.out. Dưới đây là các phương thức chính:
2.1. System.out.println()
Phương thức này in một chuỗi ra màn hình và tự động xuống dòng.
System.out.println("Xin chào, đây là Java!");
Kết quả:
Xin chào, đây là Java!
2.2. System.out.print()
Không giống println(), phương thức này in chuỗi mà không xuống dòng.
System.out.print("Xin chào, ");
System.out.print("Java!");
Kết quả:
Xin chào, Java!
2.3. System.out.printf()
Phương thức này cho phép định dạng chuỗi, tương tự hàm printf trong C. Bạn có thể sử dụng các ký tự định dạng như %s, %d, %f.
String name = "Nguyễn Văn A";
int age = 25; System.out.printf("Tên: %s, Tuổi: %d", name, age);
Kết quả:
Tên: Nguyễn Văn A, Tuổi: 25
3. Xuất Dữ Liệu trong Java - Nhập dữ liệu từ người dùng
Để xuất dữ liệu (nhập dữ liệu từ người dùng), Java cung cấp các lớp như Scanner và BufferedReader. Dưới đây là cách sử dụng phổ biến:
3.1. Sử dụng lớp Scanner
Lớp Scanner trong gói java.util là cách đơn giản nhất để nhập dữ liệu từ bàn phím.
import java.util.Scanner;
public class Main { public static void main(String[] args) {
Scanner scanner = new Scanner(System.in);
System.out.print("Nhập tên của bạn: ");
String name = scanner.nextLine();
System.out.print("Nhập tuổi của bạn: ");
int age = scanner.nextInt();
System.out.printf("Chào %s, bạn %d tuổi!", name, age);
scanner.close();
}
}
Kết quả:
Nhập tên của bạn: Nguyễn Văn A
Nhập tuổi của bạn: 25
Chào Nguyễn Văn A, bạn 25 tuổi!
3.2. Sử dụng BufferedReader
BufferedReader phù hợp khi cần xử lý dữ liệu lớn hoặc đọc từ tệp.
import java.io.BufferedReader;
import java.io.InputStreamReader;
public class Main { public static void main(String[] args) throws Exception {
BufferedReader reader = new BufferedReader(new InputStreamReader(System.in));
System.out.print("Nhập tên của bạn: ");
String name = reader.readLine();
System.out.println("Chào " + name + "!");
}
}
4. Mẹo tối ưu hóa khi In và Xuất Dữ Liệu trong Java
Đóng Scanner: Luôn gọi scanner.close() sau khi sử dụng để tránh rò rỉ tài nguyên.
Xử lý ngoại lệ: Khi dùng BufferedReader, hãy xử lý ngoại lệ IOException để đảm bảo chương trình ổn định.
Sử dụng printf cho định dạng: Nếu cần hiển thị dữ liệu phức tạp, printf giúp kiểm soát định dạng tốt hơn.
Kiểm tra dữ liệu đầu vào: Với Scanner, hãy kiểm tra kiểu dữ liệu (ví dụ: hasNextInt()) trước khi đọc để tránh lỗi.
5. Ứng dụng thực tế của In và Xuất Dữ Liệu trong Java
In và xuất dữ liệu được sử dụng trong nhiều tình huống thực tế, chẳng hạn:
Xây dựng ứng dụng console: Như các trò chơi đoán số hoặc chương trình quản lý danh sách.
Đọc/ghi tệp: Kết hợp BufferedReader và FileReader để xử lý tệp văn bản.
Tương tác với người dùng: Tạo form nhập liệu đơn giản trong ứng dụng Java.
6. Kết luận
In và xuất dữ liệu trong Java là kỹ năng nền tảng mà mọi lập trình viên cần nắm vững. Từ việc sử dụng System.out.println() để hiển thị thông tin đến lớp Scanner hoặc BufferedReader để nhận dữ liệu, bạn có thể dễ dàng xây dựng các chương trình tương tác. Hãy luyện tập với các ví dụ trên và áp dụng vào dự án của bạn để nâng cao kỹ năng lập trình.
Nếu bạn muốn tìm hiểu thêm về Java hoặc các chủ đề lập trình khác, hãy tiếp tục theo dõi các bài viết của chúng tôi!
Java Highlight – Hướng dẫn chi tiết cách in và xuất dữ liệu trong Java. Tìm hiểu cách sử dụng System.out.println, printf, và các phương pháp xuất dữ liệu chuẩn trong Java. 🌍 Website: Java Highlight
#java highlight#in và xuất dữ liệu trong Java#JavaOutput#JavaHighlight#Java#JavaIO#SystemOut#LapTrinhJava#JavaTips#JavaLearning#JavaChoNguoiMoi#JavaTutorial#InDuLieuJava#XuatDuLieuJava
0 notes
Text
Java Console, Output, Variables, and Comments: A Comprehensive Overview
In the realm of Java programming, mastering the essentials lays the groundwork for robust applications. Let's explore key elements: the Java console, output, variables, and comments.
1. Java Console: The Java console serves as a dynamic interface, facilitating interaction with your programs. Whether you're debugging or seeking user input, understanding the nuances of the console is vital. Utilize System.out.println() for output and leverage the Scanner class for efficient input handling.
2. Java Output: Effective communication with users is paramount in Java. The System.out.println() statement becomes your ally for printing outputs. Learn to manipulate this output mechanism to provide clear, concise information to users and for debugging purposes.
3. Java Variables: Variables are the building blocks of any program. In Java, declare variables with specific data types and names. Grasping the concept of variables empowers you to store and manipulate data efficiently throughout your code.
4. Comment in Java: Comments are the unsung heroes of code documentation. In Java, use // for single-line comments and /* */ for multi-line comments. Annotating your code with comments enhances readability and aids in collaboration.
As you embark on your Java journey, remember that these fundamental aspects form the backbone of your coding endeavors. The console offers interaction, output communicates results, variables store data, and comments provide clarity. Mastering these elements positions you for success in the expansive world of Java programming. Happy coding!
1 note
·
View note
Text
Matrix Multiplication in Java Using Arrays - Need Help with Output
I’m working on a matrix multiplication in java using arrays using 2D arrays. While I have written the code, I am not sure if my approach is correct. I’d appreciate any corrections or optimizations.
Here’s what I have so far:
java Copy Edit import java.util.Scanner;
public class MatrixMultiplicationArrays { public static void main(String[] args) { Scanner sc = new Scanner(System.in); System.out.print("Enter rows and columns for first matrix: "); int r1 = sc.nextInt(), c1 = sc.nextInt(); int[][] mat1 = new int[r1][c1]; System.out.print("Enter rows and columns for second matrix: "); int r2 = sc.nextInt(), c2 = sc.nextInt(); int[][] mat2 = new int[r2][c2]; if (c1 != r2) { System.out.println("Matrix multiplication not possible!"); return; } System.out.println("Enter elements of first matrix:"); for (int i = 0; i < r1; i++) for (int j = 0; j < c1; j++) mat1[i][j] = sc.nextInt(); System.out.println("Enter elements of second matrix:"); for (int i = 0; i < r2; i++) for (int j = 0; j < c2; j++) mat2[i][j] = sc.nextInt(); int[][] result = new int[r1][c2]; for (int i = 0; i < r1; i++) for (int j = 0; j < c2; j++) for (int k = 0; k < c1; k++) result[i][j] += mat1[i][k] * mat2[k][j]; System.out.println("Resultant Matrix:"); for (int[] row : result) { for (int val : row) System.out.print(val + " "); System.out.println(); } sc.close();
0 notes
Text
Les joueurs et les administrateurs de serveurs Minecraft sont confrontés à une nouvelle vulnérabilité de sécurité dangereuse qui pourrait permettre à des acteurs malveillants d'exécuter du code à distance sur leurs ordinateurs. Surnommé "BleedingPipe" par un groupe d'utilisateurs appelé MMPA (Minecraft Malware Prevention Alliance), l'exploit utilise la désérialisation Java pour infecter les serveurs ou les clients sur lesquels l'un des nombreux mods populaires est installé. Comment fonctionne BleedingPipe ? BleedingPipe exploite une faille dans la classe ObjectInputStream en Java. Un pirate peut fournir des données au serveur avec un code qui fait quelque chose de malveillant, puis, lorsque le serveur reçoit le code et le "désérialise" (le changeant de binaire en objet), ce code est exécuté côté serveur. De même, si le serveur lui-même est compromis, il pourrait renvoyer des données binaires à un client (un joueur) dont le PC les désérialise localement et exécute le code. Quels mods sont affectés ? Un étudiant allemand en informatique a identifié trois douzaines de mods populaires qui présentent la vulnérabilité, allant d'AetherCraft à Immersive Armors en passant par ttCore. La page Github de Dogboy21 contient également un correctif pour résoudre le problème, qui consiste à obtenir un nouveau fichier JAR à placer dans votre dossier mods. Le billet de blog du MMPA répertorie encore plus de mods qui sont affectés et affirme que, plus précisément, les modpacks des versions 1.7.10 et 1.12.2 sont ceux qui sont vulnérables. Quelles sont les conséquences d'une infection ? Si un acteur malveillant est capable d'exécuter du code côté serveur ou côté client, les possibilités sont presque infinies. Ils pourraient trouver des moyens d'exfiltrer vos données utilisateur et de les utiliser pour le vol d'identité ou pourraient prendre le contrôle de votre ordinateur et l'utiliser pour des attaques Botnet sur d'autres systèmes. Comment se protéger ? Pour se protéger de BleedingPipe, il existe plusieurs choses que vous pouvez faire : Si vous êtes un joueur qui joue sur les serveurs d'autres personnes, MMPA recommande de vérifier les fichiers infectés dans votre répertoire .minecraft, en utilisant un scanner tel que JSus ou jNeedle. Dogboy21 recommande de télécharger son correctif si vous utilisez l'un des mods. Si vous exécutez un serveur, MMPA suggère d'exécuter JSus ou jNeedle sur tous vos mods installés. MMPA suggère également de mettre à jour les dernières versions d'EnderIO ou de LogisticsPipes, si vous les utilisez. Il est également indiqué d'utiliser le fork "GT New Horizons" de BDLib, si vous l'utilisez. Le groupe a également créé son propre module de sécurité appelé PipeBlocker, censé bloquer ces attaques. Que faire si je suis infecté ? Si vous pensez avoir été infecté par BleedingPipe, il est important de prendre des mesures immédiatement pour vous protéger. Voici quelques conseils : Éteignez votre ordinateur et débranchez-le du réseau. Effectuez une analyse complète de votre ordinateur avec un logiciel antivirus. Supprimez tout fichier ou dossier suspect. Réinstallez Minecraft et vos mods.
0 notes
Text
Java program that reverses a string:
javaCopy codeimport java.util.Scanner; public class StringReversal { public static void main(String[] args) { Scanner scanner = new Scanner(System.in); System.out.print("Enter a string: "); String input = scanner.nextLine(); scanner.close(); String reversed = reverseString(input); System.out.println("Reversed string: " + reversed); } public static String reverseString(String input)…
View On WordPress
0 notes
Text
not yet no, but while copypasting your code to tumblr is completely useless, its somehow super satisfying in an ugly way
like look at her:
import java.util.Scanner; /* File: LAIS1.java Description: Given are two sequences of integers: A = {a1, a2, . . . , am}, and B = {b1, b2, . . . , bn}. Design an O(mn) dynamic programming algorithm that computes the length of the longest alternating increasing subsequence of A and B. */ public class LAIS1 { public static int findLAIS(int n, int[] xArr, int m, int[] yArr){ int length = 0; int[] xLengths = new int[(n)]; int[] yLengths = new int[(m)]; // Initialize DP arrays with length 1 by default for(int i = 0; i<n; i++){ xLengths[i] = 1; } for(int j = 0; j<m; j++){ yLengths[j] = 1; } int bigger = Math.max(n, m); int smaller = Math.min(n,m); // Iterate through smaller array first (if applicable) for(int i = 1; i<smaller; i++){ for(int j = 0; j<i; j++){ if(xArr[i] > yArr[j] && yLengths[j] >= xLengths[i]){ xLengths[i] =yLengths[j]+1; } if(yArr[i] > xArr[j] && xLengths[j] >= yLengths[i]){ yLengths[i] =xLengths[j]+1; } } } // Iterate through larger array if(m>n) { for (int i = 1; i < m; i++) { for (int j = 0; j < n; j++) { if (yArr[i] > xArr[j] && xLengths[j] >= yLengths[i]) { yLengths[i] = xLengths[j] + 1; } } } } else if (m<n) { for (int i = 1; i < n; i++) { for (int j = 0; j < m; j++) { if (xArr[i] > yArr[j] && yLengths[j] >= xLengths[i]) { xLengths[i] = yLengths[j] + 1; } } } } // Determine max length between both DP arrays int maxX = 0; int maxY = 0; for(int i = 1; i<n; i++){ maxX = Math.max(xLengths[i], maxX); } for(int j = 1; j<m; j++){ maxY = Math.max(yLengths[j], maxY); } length = Math.max(maxX, maxY); return length; } public static void main(String[] args) { Scanner input = new Scanner(System.in); int n = input.nextInt(); int m = input.nextInt(); int[] arrX= new int[n]; for(int i=0; i<n; i++) { arrX[i]=(input.nextInt()); } int[] arrY= new int[m]; for(int i=0; i<m; i++) { arrY[i]=(input.nextInt()); } System.out.println(findLAIS(n, arrX, m, arrY)); } } //sample input 1 //5 //6 //8 2 9 1 4 //4 1 5 3 2 6
Is there a good/canonical way to put (highlighted, monospaced) source code in a tumblr post? I looked around and haven't seen any, but maybe someone knows something that I don't.
#i do think tumblr would really benefit from adding a code block format option#and file upload option like how discord does it
16 notes
·
View notes