#the little pieces of washi tape in the first panel are so cute :(
Text
Cutie Reviews: Kawaii Box May 19
Before I begin I have an announcement: later/tomorrow I plan to post a sort of... glossaryish post that will be about ALL the boxes I subscribe to :D Because earlier today it occurred to me, I never really talk about the brands themselves anymore unless they have some update or if I complain in my reviews. I thought this type of post would be nice for anyone who just wanted to learn more about a specific box to see if they would be interested in it. I will also be including my own opinions on the box as a whole, pros and cons, how the box has changed, etc.
So if you like things like that, then make sure you come back soon!
Until then, we’re gonna focus on this:
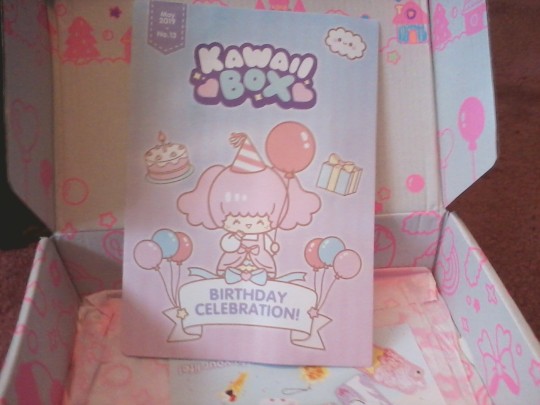
Word of the month: Tanjyoubi - Birthday
Disney Princess Dress-Up Puffy Stickers

Our first item is a set of Disney Princess Ariel/Little Mermaid stickers. Covered to the brim with stickers, this sheet has multiple outfits, accessories/props, and deco bits to have fun with the sticker doll and then-some!
Besides Ariel, there are other Disney Princess and I’ve even seen they added a really cute Minnie mouse one on Blippo.com. Those in this set each cost $3.90.
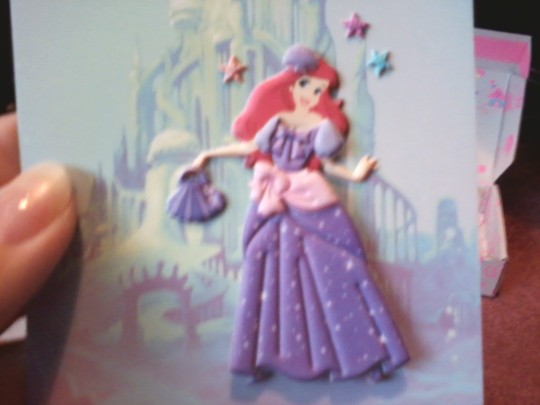
I was really torn between all 3 dresses, the turquoise one was a classic for Ariel, and I love how the pink one reminded me of Aurora, but I actually settled for the purple one because I though it looked really pretty on her. Then I chose the shell purse and matching decoration/accessory and a light pink sash to add more to her dress, what do you think?
While on the subject, which dress would you have chose for her? Or would you have given her a different colored dress entirely?
Rating: ♥ ♥ ♥ ♥ ♥
It’s really simple, but it’s also pretty fun and cute, I love dress-up stickers because of how creative you can be. I mentioned this before but I really want to start a scrapbook or photobook and fill it entirely with dress-ups~
The stickers puffiness is nice and soft, and I like how these don’t feel finished. So I could go back to it a few days later and swap out her purse and hair piece to make her classier with a sun hat. Or I could give her the turquoise dress if I wanted.
Sanrio Ziptop Bag Set

Next up is this pack of adorable Pompompurin zipper bags. You get 6 in total, including 3 Small 70mm x100mm, and 3 Medium 160mm x 190mm. Each set offers different designs, and besides Pompompurin (who I couldn’t find on blippo btw) there was also the other basic characters like my Melody, Gudetama, Little Twin Star. Each set costs $5.90.
Rating: ♥ ♥ ♥ ♥ ♥
I think these are really cute, and practical :D according to the back of the package you could put all sorts of things in these, and I like that both sets are zip-locks. These would be a perfect gift for any Pompompurin fan.
Kawaii Dreams File
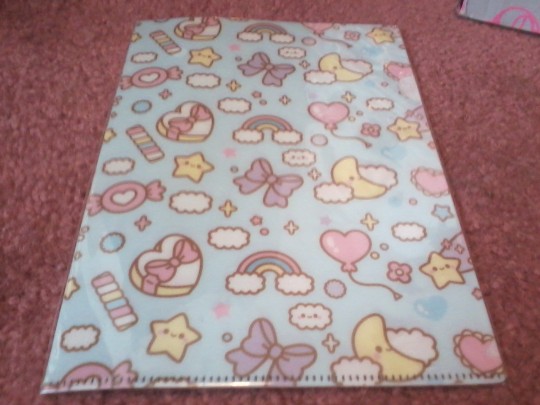
This is the monthly Exclusive item, a file folder featuring a variety of kawaii designs and items you can find on the Kawaii Box box and booklet, with the inside panel being white and pink to match the box’s color scheme. It’s kinda small-medium, about the size of the booklet that comes in each box, and it’s a little flimsy, but for most part it feels durable and sturdy.
You can buy this off of Blippo for $2.90.
Rating: ♥ ♥ ♥ ♥ ♥
I usually don’t look forward to getting these files in the boxes because as cute as they are, they’re always big and bent. This one fits in the box with no problem, so I feel like even though you would need to fold certain things into it, it’s more practical. I also like how despite how colorful and busy it looks, it doesn’t feel too-busy.
Soft Jell Rainbow Gel Pen Set
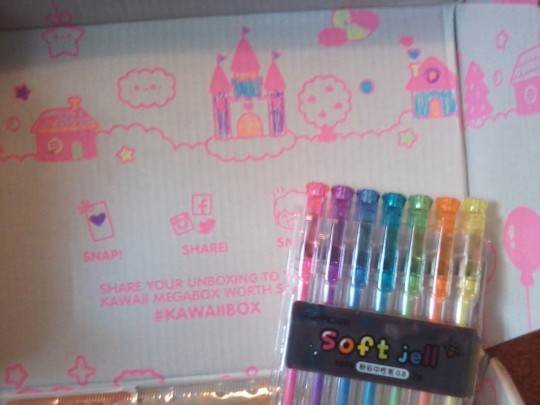
I loved gel pens growing up x3 my friends and I loved to draw on our things and each other during class (but only when we weren’t actually doing anything important <3< I wasn’t a model student but I didn’t get into trouble either), and I remember just admiring the massive rainbow collection my friend had; she must have had at least 100!
My collection was much smaller and modest though, I only had a few glittery metallic ones and a couple multicolored pastels. So for someone who used to love these, getting a whole pretty set like this just made my day~
It’s also pretty rare for us to get a whole set of anything in the boxes. If you’ve seen my prior reviews (or check out the items on blippo) its usually just one separate of your choosing. This set costs $6.90.
Rating: ♥ ♥ ♥ ♥
The colors are vibrant and really pretty, as you can see I did decorate the box with them which in hindsight might not have been the best thing to do, but they still worked once the ink got flowing. They’re juicy and are capable of long lines, writing, dots, coloring.
My only complaint is that both blues (or I suppose you could say one is indigo? Turquoise?) look almost exactly alike. It’s the same in the actual pens, but there’s still a noticeable difference until you go to use them both, so I wish they would have darkened or lightened one of them to make the difference more noticeable.
Cute Animal Friend Masking Tape & Nekoni Cherry Blossoms Badge

For our next items, I got bunnies for both ♥
First is an adorable pastel bunny washi tape that consists of a kawaii bunny doing some silly actions. I would have taken out a piece to show the design, but when I unraveled a long, long amount of it I saw no end to the pattern >3< like it kept going, there was no repeat bunnies. Each bunny was cuter, or sillier than the last.
There are several varieties you could get, and you can guy them in sets of 4 for $5.90 on Blippo.
Rating: ♥ ♥ ♥ ♥ ♥
Well besides being very cute and silly to look at, I like how this doesn’t seem to be repetitive like most tapes. I’m sure it starts repeating somewhere but for now, I just think it would be cute to use them individually as little emoji icons, like for notes or letters or something.
-----
From the brand Nekoni are these adorable pastel badges with cherry blossom designs, ranging from animals, a human girl, scenery, and adorable foods. Each badge costs $1.90.
Rating: ♥ ♥ ♥ ♥ ♥
It’s very cute, but there isn’t really much I can say about a badge other than the fact it seems to be fine quality. There was no problems with it or anything to complain about.
Cute Stationery Buddy
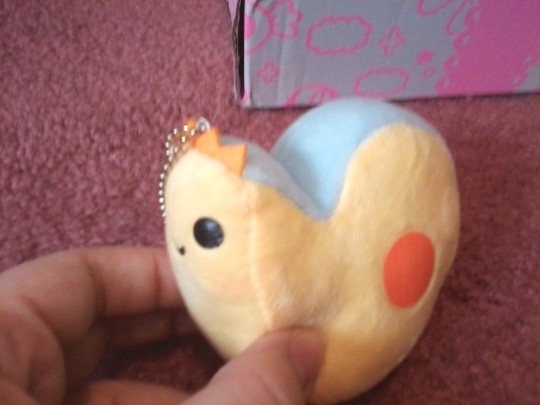
This probably would have been better suited for a school theme- but you also use stuff like this to decorate :P so, our next item is an adorable, soft but firm plush themed after various stationery items. There are 7 in total, each with a ball chain and costing $4.90.
I really hope I’m not the only person, but when I saw this (and even now) I think of a snail; it’s a roll of tape! I was so surprised initially but now that I’ve had it for a while I’ve been seeing it more.
Rating: ♥ ♥ ♥ ♥ ♥
Again, I find myself with little to say. It’s really cute though, and the quality is nice, there’s no obvious flaws or issues.
Yogurt Jelly Hair Clip Set
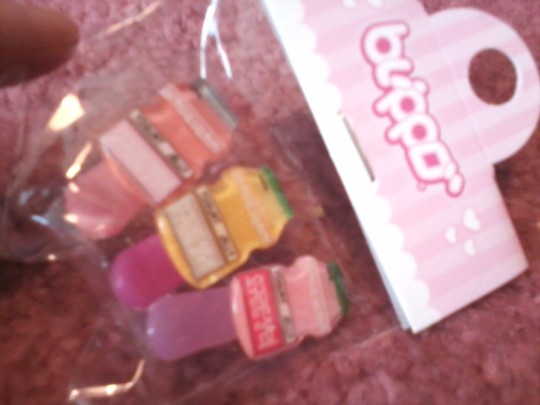
In comparison to stationery, we always get sets of hair clips so I’m happy about that :3 I love their kawaii hair clips and accessories, they’re usually always one of my most favorite items~
Anyway, this set is themed after yogurt jelly and features a small translucent clip attached to a clear, colorful, glittery yogurt jelly attached to it, each with labels, a colorful lid, and a tiny lotte written in the corner. These come in several cute color schemes, each set costs $2.90.
Rating: ♥ ♥ ♥ ♥ ♥
As I’ve been saying this entire review, these are very cute. They’re also well made, in that the pieces don’t feel loose or flimsy, which has been in a problem with one or two past-sets I’ve gotten, but you can easily fix that with some good glue. I was also very happy to get a very pink set, but you couldn’t go wrong with any of them in my opinion!
DIY Fruity Doodle Pen & Flower Candy
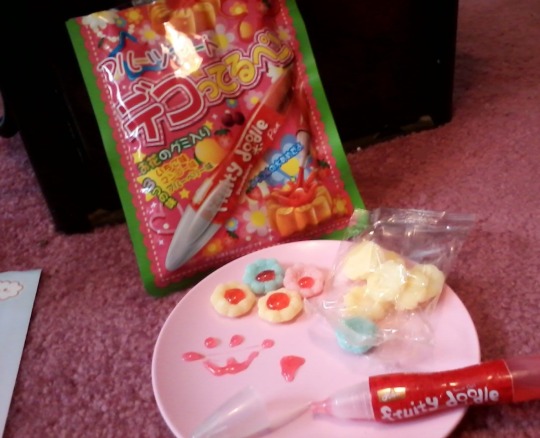
Our last item is this cute little fruity doodle set. Technically I don’t consider this to be a DIY considering you’re just spreading gel on the gummies, but it’s very cute and I really wanted to try it. I started seeing it like a year or two ago?
It’s available on Blippo for $3.50.
As you can see, I got tons of yellow gummies, along with a single pink, and two blues. The gel is supposed to be sour, but it’s actually very light- it reminds me a lot of strawberry jello/gelatin. The gummies are individually flavored, and this is what I thought:
Yellow - might be apricot? It tastes a lot like the apricot jelly filling in the mochi I buy from the mall.
Blue - my favorite, tastes like blue raspberry.
Pink - no flavor I could pick up, just sweetness.
Rating: ♥ ♥ ♥ ♥
As I said, I’m not sure this is entirely a DIY so I didn’t make a separate post on it. All you do is apply the jelly, which I thought actually tasted the best out of everything in the set, but it was very tasty and cute overall, I just wish the colors/flavors of the flowers were more varied.
♥ Cutie Ranking ♥
Content - 5 out of 5: I’m not sure they were all my absolute favorite or anything, but I did genuinely like everything we got this month. I found no quality issues or problems, plenty of variety in both the types of items, and for each item. A very practical and fun box. Some items were fairly pricey though, and I’m not sure if I agreed with some of those. Also, we got one item less than usual, which I assume has something to do with the price?
Theme - ????? out of 5: I found this Happy Birthday theme to be extremely open and up for interpretation, so I had I’m not sure how I feel about how they did on it. On one hand I could say “yes, these are items you could use for gifts or decoration for a birthday“, but on another I’d say “sakura badges and yogurt hair clips don’t make me think of a birthday.”
Total Rank: 8.5 out of 10 Cuties. I liked the items, and I can see why they chose the theme they did, but because of how open it is, I’m not sure how my feelings are towards it. The items worked great and I would recommend mostly all of them. I’m not sure this is my favorite box though...
(I’m sorry but I ended up skipping the last part of this review, I was fine this entire time but towards the end things got really busy in the house and I’m not feeling well at the time. I would have went to lay down but my laptop has been weird lately and I didn’t want to risk losing the work T^T sorry if you were looking forward to that part.)
5 notes
·
View notes
Text
17 Bullet Journal Hacks To Make You Even More Organised!
Bullet Journal Hacks – tips and tricks to keep your planning on point.
There are countless ways to keep making your bullet journal better and better. The trick is to find what works for you and what doesn’t. How you use your index, how you mark collections, how you reference other pages, the list goes on. And on. And on.
I have tried a load of different bullet journal hacks and tips and tricks since I started my Bujo. Some work so so well and some, are just not for me.
I’ve made a list, of 17 of the ones that I think are worth giving a go. They might not all work for you but they’re all really simple and easy to try out.
All these bullet journal hacks add functionality to your planner system and they look super pretty too!
#1 – A Fold-Out Bullet Journal Key
If I had to choose my all time favourite bullet journal hack, it would be this one. This super handy fold-out key makes keeping track of different symbols so easy! I’ve changed my key a few times since I started my bullet journal so it’s really handy for me to have the updated one easily accessible.
I simply use a piece of scrapbook paper folded in half (I like it to be a bit more sturdy than just a piece of paper because it’s constantly being moved). I then write my key out on a post-it and washi tape it to the scrapbook paper so I can easily change it if I need to. And then tape the scrapbook paper into the cover of the journal on one side so it can be folded in and out as needed.
#2 – Corner Tabs
This is another one of my favourite bullet journal hacks and I’ve only been using it a little while. It’s simply a little triangle tab you pop on the corner of the page as a sort of bookmark. Genius. I always have mine on the page I’m currently working on. But you could make multiple ones and use them throughout your whole journal. They’re easy to re-position throughout your journal, they’re easy to make and they look so cute!
You can either make your own triangle tabs but folding a square of paper in half diagonally and then in half again. That’s how I made mine and I prefer it as it’s a bit thicker and won’t tear easily. The other option is to use the corner of an envelope, that’s even easier to make! Just cut the corner off of an envelope…that’s it!
#3 – Collection Threading
When I first read about threading, I was completely over whelmed and confused by the idea. But as it’s not a bullet journal hack I use that often, I’ve got to grips with it and use it when I really need to.
Threading is used for keeping longer collections. Say you have a ‘movie’s to watch’ spread and you’ve filled a whole page with film titles but you still want to add more. Threading is a way of adding another movies to watch spread in the same journal and being able to keep track of where it is. Let’s say the first spread is on page 20.
You’ve used the next 30 pages or so for dailies, weekly’s and even more collections! Your movies to watch spread is full up but you still want to keep track of even more films.
Don’t do what I did in my first journal and tear a page out the back of your journal and attempt to stick it in neatly next to your original movies spread. Just don’t. It’s messy and no matter how careful you are it never looks good.
Instead, just use the next available spread to start the second part of your movies to watch collection. Sounds crazy right? But all you need to do is list the page numbers of the additional spreads next to the original page number.
So, the bottom of the first spread would read something like: 20-50. Does that make sense? That way when you check up on the first spread, you know exactly where the next one is. You could also write the additional page numbers in your index too so you know where all the sections are.
Pretty nifty right? Luckily you shouldn’t need to use this hack too often. Otherwise it would get very confusing if every page had two numbers!
#4 – Marking The Edges Of Your Pages With Symbols Or Letters
This hack is great for keeping a mini log on your daily spreads. You simply add either little symbols or letters to the margin of the page. This way when you flip through pages you can quickly find which pages contain certain activities.
I like to use a B, for anything blog related. W for workouts and a – for notes. This makes finding out when I did something a whole lot easier. Especially for things that I don’t do every single day.
It’s quick and simple to do and will make finding specific tasks or even appointments easy to look up.
#5 – Color Code Edges With Washi Tape
I use this technique a lot. I use wash tape to mark off the edges of certain spreads so I can easily find them.
I’m using glitter tape at the moment to cover the whole edge of each monthly spread. This makes my monthly spreads so cute and makes finding each month really easy. Even with my journal closed I can still see where each month begins and ends.
I also sometimes use just little squares of washi tape on the edges to mark certain collections or pages I flick back to regularly.
#6 – Colour Code Edges With Stickers Or Labels
I don’t use this trick anymore, simply because I’d run out of stickers! So I made do with washi tape and then realised I actually preferred that method haha. This bullet journal hack is the same method as using washi tape on the edge of pages except you use stickers instead.
I was using the little round stickers you can buy in just about any shop in the stationery section. When I was using this method I was using it just to mark out the collections. But you could use them to mark your monthly pages or weekly pages. You could even use different colour stickers to mark the different sections.
#7 – Color Code Your Pages
This bullet journal hack is super simple to do. Just add a swatch of colour to the border part of your page. Do this for all categories you wish to keep track of and voila! An easy flip through way of finding specific pages without having to check your index every time. Colour right up to the edge of page so you can see the colours even when your bullet journal is closed. Highlighter pens work really well for this but a lot of Bujo’ers use coloured markers.
#8 – Color Coding Your Bullet Journal Index
Same principle as the first bullet journal hack. You can either just colour code the index if that’s where you prefer to look up pages. Or if you’ve used the previous bullet journal hack, then you can match up the colours on your pages to your index. Categorise your spreads in a way you can easily distinguish, e.g. blue for monthly spreads, green for anything food related, pink for business etc. Again, I use highlighter pens to do this as you can see through it very easily.
#9 – Mark Collections With Washi Tape
If you have a special collection that deserves a little more decoration than just the edges marked. You can mark these pages with decorative washi tape over the corners in a triangle shape. I just love how these look and they make these pages easy to find. There are so many cute washi tapes you can buy and I had a hard time choosing which to use for this hack but I decided on the zebra print glitter tape.
Below are some links to some of my other favourite fancy washi tapes:
Gold Foil Washi
Gold Washi Tape
Jumbo Pack of Washi
This would be a great idea for event planning pages or for big home projects. Or anything to be honest, I just love how cute they are!
#10 – Dutch Door Spreads
Love this one! It’s a really quick and fun way to add more space to certain spreads. This works particularly well for weekly spreads when you just need a bit more room than two pages. Instead of 2 pages, a weekly spread would be made up of 3 pages. The middle page is where you’re going to put in your dutch door. Simple cut a panel out of the middle page with a craft knife or scissors and you have a bunch more room to add weekly trackers or a section for notes, whatever you like! Plus, it looks awesome!
Awesome Bullet Journal Hacks To Keep You Even More Organised!
Click To Tweet
#11 – Keep Your Journal Open
Not sure if this really qualifies as a hack. But it is damn helpful!
Sometimes I need my to-do list, right in front of me, all day. If I don’t keep reminding myself of what I need to do, sometimes procrastination creeps in and nothing gets done. Something as simple as leaving my journal open is enough to just nudge me into something from my to-do list.
I’ve seen some bullet journalists on Instagram use display stands to keep their journals in front of them all day which seems like a genius idea too!
#12 – Wrap The Strap To Make A Pen Holder Or Make Your Own Pen Loop!
This hack seems a little obvious once you know about it. But when I first started bullet journalling the idea had never occurred to me! Of course, you could just buy a pen loop..but where’s the fun in that?
All you have to do to turn your elastic strap into a pen holder is; pull the bottom of the elastic strap on your journal (I know Leuchtturm and Moleskine notebooks have elastic closure straps that work well for this hack) and wrap it over the bottom left corner of the journal. Voila, one diagonal pen holder that you can just hook your pen on. Love this hack.
Another idea to keep your pen with your journal is to make your own pen loop. This is what I have been using recently and it was really fun to make and looks so cute on my journal.
All you need is a binder clip and some kind of material. You could use either elastic, fabric or thick tape. I used a type of duct tape to make mine with this really really cute cupcake design on it. Simply cut it to the size of your binder clip plus the width of your pen. Glue each end of the material to each side of the binder clip with strong glue (I added a layer of clear tape on top to make it extra secure) and there you have it.
The perfect little pen loop that you can move around your journal whenever you like and you can make as many as you want! It’s a very easy and cheap DIY and the results are awesome!
Supplies you might need:
Binder Clips
Elastic
Very Pretty Duct Tape
#13 – Categorize Your Bullet Journal’s Index
This bullet journal hack I have never actually tried but I could see this working really really well for some people. Simply split your index up into columns and use each section for a different category.
This would be a really good way of keep your dailies and monthly spreads separate or your just your collections separate from the rest of your journal pages. If you’re using the colour coding bullet journal hack from earlier you could incorporate the same colour coding from that hack into this one.
Related: My favourite bullet journal supplies
#14 – Keep A Bunch Of Post It Notes In Your Journal
Now this one has to be the simplest. But also one of the most helpful bullet journal hacks.
If you’re someone like me and you keep a lot of notes, on a lot of different sticky notes, in a lot of different places, all the time. This hack is for you.
Keep a stack of the darn things in the back of your journal! Duhh… Sounds obvious right? This way you always have some on hand, in different sizes and you can just dot down your notes and things and stick it straight where it needs to go.
Some of my favourite sticky notes:
Owl Sticky Notes
Butterfly Sticky Notes
Floral Sticky Notes
#15 – Migrate Only On A New Page
I find, that a good way to make sure I do something, is the prospect of having to right out the same tasks again…and maybe even again.
I hate rewriting things because it’s a horrible reminder that I didn’t get as much done as I wanted to the day or week before. Now, although I don’t always write out tasks from the day before again, I’ve adopted a method of only rewriting them if I need to start a new page.
This way I can just work on the list from the day before if I didn’t get everything done. But if it’s time to start a new page, I’m forced to rewrite the tasks I haven’t completed. It’s a horrible feeling when I have to do this but it does make me work harder to complete things in a timely manner.
#16– Make A Pocket Or Envelope
This hack is something I have only just started doing in my journal and I am loving it. The back pocket you get in a lot of notebooks is so handy and I always use them. To the point they are bulging and making the journal all misshapen and no longer laying flat!
So, why not create another little pocket somewhere else in the journal? You could add one to the front cover or on any page you like throughout the journal.
You can either stick in an envelope and use that as the pocket or make your own. To make one simply fold three edges of a piece of paper or card stock to create the side of the pocket and then sticking it into your journal with either glue, washi tape or double-sided tape
#17 – Write Down Your Mission Statement Or Favourite Affirmations
I’m not sure this one counts as a hack either to be honest. But I think it is definitely worth putting on a bullet journal hacks list as it is something I’m sure a lot of people will find help and inspiring.
It’s always so hard to decide what to put on the first page of a notebook. So why not make it your favourite affirmation? or your favourite quote? Or your mission statement?
I love using one of these three things to start a new notebook. For the first page in this bullet journal, I have the year 2018 written across the top of the page and then the affirmation ‘New Year, New Journal, New Beginnings’ and I just love that. I think it was the perfect quote to start the year off with and I love reading it every time I pick up my journal, it’s so inspiring and motivating.
I also have my word for the year written on the first page of my journal. The word is ‘Progress’. This serves as a reminder that although I might not be where I want to be now, The little steps I take today are still progress and I am still closer than I was yesterday.
All these hacks add functionality to your planner system and they look super pretty too!
Click To Tweet
Any of these bullet journal hacks take your fancy?
I love using variations of all these hacks. They help to add even more functionality to an already solid system. I recommend giving them all a go and see which ones work for you! Let me know if you try any of them out!
Those were all my bullet journal hacks, what are some of yours? Let me know, I’d love to give them a go!
Related Posts:
Must Have Bullet Journal Supplies For Every Planner Addict!
Bullet Journal 1 Year On – What I’ve Learnt
Plan With Me: June 2018
Get Things Done With A Solid Planning Routine!
Day Zero Project – 101 Things In 1001 Days
The post 17 Bullet Journal Hacks To Make You Even More Organised! appeared first on Dani Doll Designs.
from WordPress https://ift.tt/2l4fVhV
via IFTTT
0 notes
Last Seen Blogs