#this 'project' is a bit ambitious but i hope i can post everyday
Text


countdown to jin's return
d-30 ♡ 'fix you' (coldplay cover) ✦ mtv unplugged
#btsedit#btsgif#dailybts#tuserpris#annietrack#usersky#userbangtan#userkelli#raplineuser#*#gifs*#seokjin*#bts*#seokjin#bts#30daysjin#this 'project' is a bit ambitious but i hope i can post everyday#i have most sets ready and queued so let's start the countdown!#can’t believe jinnie will be back this soon <3
390 notes
·
View notes
Text

hello!
so, as of yesterday, i finished posting all the chapters of my series, the doomed, so i'll be taking a little break from posting for a bit.
i'll still be here to reblog stuff and reply to your messages ! i just won't be posting original works for a week or so to let myself focus on other things for a while and rest my mind a little (college decisions are also coming out soon so i'm gonna be a teensie weensie bit on edge ✌️).
however, i will still be working on some projects that i plan on sharing here ! you can take a peek under the cut if you wanna see the things i've got lined up.
again, i'd just like to thank you all for being here and i look forward to sharing more with you <3
- mae.
UPCOMING FICS
take these with a pinch of salt because i might not get around to doing them all and/or i might change their concepts while in the process of writing them, i just thought it would be fun to share my ideas here. please do not copy them.
rekindling — ATSUMU X READER
anthology + slice of life
Three years after their falling out, Y/N and Atsumu reunite and, together, they work on rebuilding their relationship, raising their children, and experiencing the highs and lows of everyday life.
notes! this is a spin-off anthology of the doomed. it'll have a few one shots about how they deal with life after the events of the series. other characters in the series will also have their own little stories
all revolves around you — AKAASHI X READER
series + based on moulin rouge + theater!au
The stage is set. The players wait in the wings. The show must go on.
As the desperate writer readies his pen and the leading lady takes her place, the curtains open on the tragic tale of their doomed romance. We all know how this will end.
notes! it'll probably be released soon because i'm halfway through writing it :> it's very different from what i'm used to writing but it's been such a fun challenge for myself actually sitting down and finishing it
static! — TSUKISHIMA X READER
smau series + band!au
Things get complicated when the drummer and lead guitarist of the band static! accidentally sleep together. With a tour to finish and an album on the way, tensions are running high enough as it is. Will this new dynamic break the band? Or will it bring them closer together?
notes! i'm really looking forward to this if you couldn't tell >.< i just need a tiny break before writing another smau
long time running — HINATA X READER
one shot
When fate destines you to love another man, all Hinata can do is watch.
notes! i've been on an ice dancing binge and i watched the v/m gala routine for "long time running" and i can't get it out of my head 😔 i'll probably get around to writing this in between other projects
throne and thorn
interactive story + royal!au
When the noble House Kageyama welcomes the daughter of a fallen house into their ranks, the court finds its new prey in the unassuming Y/N. In order to survive, she must learn to navigate the glamor, scandal, and inevitable romance that comes with noble life. Or not.
Ultimately, the choice is yours to make.
notes! i've started planning and working on this but it's a really ambitious project so i might not get around to it for a while and, even then, there's gonna be a lot to build for it to work the way i want it to. it's really exciting though :D
ANDDD THAT'S WHAT I HAVE FOR NOW!! i hope i get around to working on them all and sharing them with you <3
13 notes
·
View notes
Text
DRAWING REQUESTS ?
So guys I wanted to tell you about a little project of mine.
A few weeks ago I posted some of my old OP sketches I did 5 or so years ago and some from november / december. I was quite surprised that some were liked by people like you and I can’t thank you enough for it.
You see I simply ceased to draw for several years. Life, mental health, heartache and many other things prevented me to do it. Usually I drew as gift for friends and never for myself. But at the end of last year I rediscovered my love for One Piece. I always loved it with passion but after Dressrosa I distanced myself from it a bit, I stopped watching the anime, read the wano arc but without investing myself or enjoying much of it. And then after several years I just immerse myself in it once again : rereading all wano arc, watching the 200 late episodes, rewatching Water 7, Enies Loby, Thriller Bark, and mostly engaging with the fandom and discovering the amazing artists and writers you are all.
And mostly, I began to sketch again. And for the first time, only for my pleasure (and sharing it with you ^^).
For that I must thank some people like @chromatic-lamina , @basilisa-scorpii and others ... Thank you so much !!!!
So after this quite long preamble I wanted to talk about a project (for me quite ambitious since I have no practice and no talent..). I wanted to do 30 sketches of mine but mostly YOUR favorite One Piece men (and women too if you desire it) all suit up ! Like a kind of modern AU where they all dress up for the occasion (hope it does make sense)!
I’ve already done Kid, Doffy (obviously), Sanji and currently drawing Law tonight, but I wanted to tell you that if you wanted to send me a character you would like to see dress up (with or without a reference for the suit or posture or anything) I’d be happy to do it !
I’m in no way an artist in contrary of the many skilled and talented people you see on this website (i love you all so much you can’t even imagine) but if you wanted a little sketch don’t hesitate to send me a message or an ask ! I’m currently looking for 26 characters (some can appear twice if need be). I’ll try to post a list in the weeks to come !
This is the first time I’m proposing something like that so pardon me if it’s not right (and for the awful english)... Anyway, I wanted to post them one everyday in March ! So once again if you are interested don’t hesitate to contact me ! ^^
Love you all <3
24 notes
·
View notes
Text
2019 Sewing Plans
Hey, folks! Sorry for the long radio silence. I’m afraid all of my in-progress projects have kind of stalled for the moment, so I haven’t had much to post about (although like Anna mentioned, we are more active over on our Instagram). But because I haven’t posted in a while (and because I’m constantly several months ahead of myself) I thought I’d share some plans and goals for the upcoming year.
1880s Evening Gown
This will be my biggest project this year, and it’s definitely the most ambitious project I’ve attempted. I think I’m equally excited and scared. But I have some lovely brocade that I can’t wait to use for the bodice and bustle, and I splurged and ordered my first-ever silk taffeta for the skirt. It’s a project that I’ve been thinking about and planning for the past year or so, and I really can’t wait to get started on it.
1940s Playsuit
Switching gears entirely to a project that’s much smaller-scale, more modern, and somewhat impulsive, I plan to start the year off with something cute for the summer. I fell in love with a pattern from LadyMarlowePatterns (it will be my first time using one of her reproductions, although I’ve heard good things), and the project ended up coming together fairly easily and inexpensively, which was a welcome change after planning the above evening gown. I plan to wear this as an everyday outfit, so it’s a practical project, too!
Victorian “Night” Fancy Dress
This is another project that I’ve been daydreaming about for at least a year, so when I learned that the theme for the 2019 Victorian Ball here in Denver is fancy dress, I knew I couldn’t miss my chance to make this dress. It will be mid-1880s and made from black cotton sateen. The most ambitious aspect of the project is that I plan to hand-embroider a design on the underskirt, and while I’m not too bad at embroidery, I’ll need some more practice before I can actually produce something that I’d want to wear.
Regency Undergarments
I have to admit, I’ve had all of my patterns and materials for this one for about six months, and I just haven’t gotten started yet because, honestly, undergarments are neither my forte nor the most exciting thing in the world to sew. But my hope is that if I tell the world I’m making regency undergarments this year, I’ll hold myself accountable and actually do it. Planned undergarments include a shift, short stays, and a petticoat.
1790s Gown
To go over said undergarments. I don’t have a ton planned for this project yet, but I’m thinking that I’ll use the lovely gown in the American Duchess book as a guide. Despite still not having solid plans for the gown, I did buy the ribbon that I’ll be using for the sash about a year ago. Sometimes you just find the perfect thing and have to get it, you know?
Assorted Victorian Undergarments
To me, one of the most daunting things about venturing into a new decade is the sheer amount of stuff that you need other than the main garment. A new decade means all new undies, and that’s not usually something that I want to tackle when what I’m really inspired to work on is the dress. So I decided that I’d like to build up a bit of an undergarment collection—several chemises and pairs of drawers for various eras, a corset cover or two, maybe even some petticoats. Importantly, I want to actually put some effort into making these undergarments pretty so they’re something I want to wear as much as the dress itself. Also, I just find it incredibly satisfying to get fully dressed up, including era-appropriate undergarments.
Are these goals overly optimistic? Probably. Is it likely that I’ll get sidetracked and end up only getting half of this done? Yes. But I’m a goal-setter, and I know that by sharing my goals with you all, I’m more likely to actually work toward them.
What does everyone else have planned for the new year? Let us know!
-Laurel
12 notes
·
View notes
Text
Welcome
Hello and welcome to Tish&Mickey! Firstly I want to say thank you, so much, for coming by. This is something I have wanted to do for so long, and I’m nervous to begin, but I’ll give you a bit of an introduction as to why.
I went to University in 2010 to study Film and Screen, and in my first year took Creative Writing as an elective subject. I had a dream career of becoming a film critic and viewed it as my best route to take (ambitious, I know, but we’ve all got dreams). I did rather well and from then on in, I took every single opportunity I could to make my main degree about writing. I even ended up writing two dissertations! My final project was running a film blog for my local indie cinema, reviewing their latest releases and getting the public hyped for coming in to watch a film. It earned me a first, I graduated, dabbled in personal blogging, vlogging and even reviewing for online platforms. But then, I just stopped. I continued to adore film, and think about it critically, but I lost the drive to put it on paper.
Years later, my childhood passion for the films of Walt Disney resurfaced, and my partner, Nick (you’ll come to see a lot more of him) took me on our first ever holiday together, to Disneyland Paris.
It’s incredibly hard to explain how it feels walking into a Disney Park for the first time. People think you’re crazy when you try to describe the awe inspiring beauty before you. If you’ve never been, or you hate it (god forbid), then you won’t understand it. It is stepping into the worlds of yesteryear, where the past, present and whimsical future align with an attention to detail that sends me gushing. If you love it, you know in an instant and every new corner turned brings an exciting new adventure. You can be a princess in your own Kingdom, a villain with a terrible plan, a pirate in the Caribbean, a long lost member of the Swiss Family Robinson, a cowboy keeping the law in the west, and even a turn of the century Gibson Girl. You can be all this, and your everyday worries, whether child or child at heart, melt away along with your Mickey premium bar.
I realised recently that if one thing could help me write again, it was this. I’d not felt a passion like it since I first realised how watching films affected people, and the thing is, it is films! Disney is, first and foremost a production company, specialising in motion picture for every generation, and they are that good at their world building, they wanted to bring those films to life. So became the Disney Parks. First Anaheim, then Orlando, overseas to Tokyo, then to my home park Paris, after a long break Hong Kong (I can’t wait to write a blog about why they waited so long and how it was DLP’s fault!) and only six years later, finally, Shanghai. The movie sets I love so much came to life right before my eyes, whether animated or live action, fantasy or distant reality, I could be a part of it, and so my obsession began.
The step back into writing is difficult, even more so when it is a subject which has thousands of blog articles already written on it. I’m not saying I’m going to recreate the wheel here, the content won’t always be fresh. But I do hope it is enjoyable content, fun to read, and maybe even interesting! In the future I’d like to think it will help someone plan their dream holiday, or decide to visit a place they weren’t intending to. I will be posting weekly, every Wednesday, unless otherwise stated, with everything from hotel and restaurant reviews, ride comparisons, trip reports and news from the parks! It will mean the world if I get even a few people following along.
Walt once said “The way to get started is to quit talking and begin doing.” So, in that spirit, it's time I quit talking and start, well… typing!
1 note
·
View note
Photo
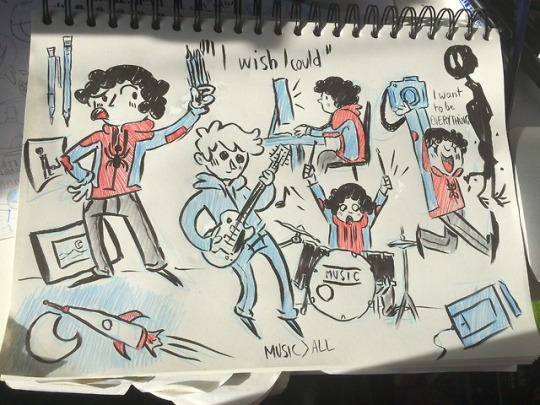
"I wish I could"
Here's a long blog post about having multiple passions, being frustrated because of that and having mental illness that makes me think negative all the time.
I've already been asked to make reviews for books and to share it online to help the writers. It broke my heart but I had to say no because, first of all, I'm incredibly bad at writing articles and I'd put a lot of pressure on myself for that. I don't want to relapse into a depressive episode for a book I'd have to share with people. But that's also mostly because I'd get more demands for reviews and I don't want my account to be about reviews, I prefer sharing my own content. I feel so sorry because I know that would be amazing books by authors that need to be discovered by more people.
But, I still think I can share great books I liked and discovered by myself !
Recently, I read in "Share your work" by Austin Kleon that people like to hear the stories behind the work. (but that book didn't taught me a lot besides this, I preferred his book "Steal like an artist"). So I'll share my stories with my drawings if that is okay with you. If not, just don't read it !
The book "How to be Everything" by Emilie Wapnick I finished helped me a lot ! Emilie taught (actually reminded) me that's it's okay to have several passions and to want to practice them all ! That not being the best at something doesn't mean you're mediocre. I'm fighting this thought everyday. That's a simple message but that helped me a lot ! And I also want to remind you that !
This book also reminded me that I simply wanted to create things. Various things in various areas.
(get ready for a big talk)
There's a little line from a song by Muse that's always in my mind. "I wish I could", from "Stockholm Syndrom" (my favourite Muse song on drums). And I feel like this sums up my entire life. Sometimes I'm thinking about getting it tattooed. This line is in my mind since I stopped school and since I was refused in art schools.
I wish so hard I had more time and motivation for all of my passions. And also more money for these ! Passions can cost a lot. In time, energy and money. I feel so frustrated to not be able to make it all. And the internet keeps showing me people achieving a lot more. (or at least that's what my brain tells me). Maybe I just haven't found my balance yet. Or maybe I'm just a lazy mess.
You'll see if you read, my thoughts are contradictory.
I draw a lot and in various styles because I cannot choose one and love having various projects. I make comics and even self-published one about music, I write and want to make child's books, I try to get better at digital and speed painting to have beautiful illustrations on art shows and to make an amazing artbook someday. I'd also love to draw for music, for tattoos and tons of stuff ! I don't want to limit myself. I'm scared to limit myself. And at the same time scared to look too unstable by doing many things. That makes it harder to define what I do as a creative. I think I'm already bad enough at simply talking, I don't want to add difficulty to this. Oh, and I try to share my thoughts and emotions through that ! That's the only thing that quite works for me when I want to express myself. Also, I'm trying to make a living out of that, I have to admit I'm not at it yet, that's hard (mostly because of my mental illness) and I hope someday I'll success because my illness doesn't let me handle a "real job". I have no idea what to do if all of that doesn't work and that scares the shit out of me.
I play drums in a little band with my friends every thursday and that's always one of my favourite moments of the week. I also love concerts. Music is really what makes me feel alive !
I tried a lot to make music on my own and wish I had more time/motivation for this. (I have some old stuff on soundcloud.com/forsakenstar). I bought a guitar 4 years ago because I wanted to own the one my character has in my drawings. It was an expensive one but I loved it, it's a beautiful one. So I started playing guitar for fun and stopped. I lacked patience because learning guitar is super hard. I admire you, dear guitar players ! (then I also I broke my arm and that's still not repaired so the voice in my head tells me that this broken arm thingy is just a damn excuse to not practice, and that I'm a lazy piece of..."). It was A LOT easier for me when I started drums. I also want to learn to play a bit of keyboard. Just a bit so I can feel better creating funny sounds. I already have the keyboard.
I have ideas for videos. I already made little things for little work commissions with old coworkers and that always was tons of fun ! I posted some of my experiments on youtube and each time I see it was already some years ago, that kills me. It reminds me how time flies and how I wish I could do more. And how much time I've "wasted" not doing as much as I would like. I have bigger video projects ! But I can't make them because I don't have the locations I need. I bought a VERY EXPENSIVE camera 2 years ago because, I don't know why, I sometimes get crazy and buy stuff that costs a lot. Like the guitar, like the keyboard. (that's also in the cyclothymia symptoms but I don't know if that's just me or the illness) And I often regret it because I need the money for something more important. I've almost never used the camera. But I could use it for my video projects ! For one of the videos I'd like to make I need a big castle to play something with a rich princess. I have the princess (my sis', I'm lucky to have her to help me in my crazy projects, I sometimes call her "Dobby". Yeah, like the house elf. I bought her the pop figure and all!) but if someone here has this castle and would like to invite me, I'd be super happy !! .... (I try, who knows ?). For another one, that would be a musical, I need a choreographer, dancers, amazing musics..
All of that just seems impossible to me.
I would also love to make more motion designs ! I tried to make little animations and a lyric video and I loved doing this, I wish I could do more of these ! That's something simple but maybe someday bands will ask me to do that ! I need to practice a bit more before that ! (I'll maybe propose to do some for a really cheap price or something like that to practice more)
I also wish I could animate more videos with my drawings ! I tried little stuff like making a character talk or walk and, even if that took time for a little thing, that was fun. Maybe I could try making an animation of that princess or musical project ! Or not. Making a full short film takes years of practice.
I spent TONS of hours learning a bit of all of that. And must still learn a lot in all of these areas. I tried them all. Loved them all. But I end up frustrated because there's so much to do that I get lost ! I always wish I could do more. If I'd have spent that time doing one thing, I'd be a god at it !
And I'm alone in all those projects. I'm so alone and selfish in my projects that I want to do everything by myself. If I wanted to make a full movie. I'd be the director, producer, musician, actor, make the scenario, film it, edit it, ... How could I do that ? How can I be this stupid ? I'm scared to share my projects. If I do share, let's say, a video project, would that make me a director for it ? Woaw, that's so cool ! But I suck, I can't direct something. I've never done that. How could I tell people what to do ? My mental ghost tells me the people I'll share that with will think I'm a pretentious mess making a project that sucks. And that the finished project will suck. Because I lack experience. ("But you never get experience if you don't try !" "yeah I know how stupid my thoughts are and how they manipulate me") I hate giving orders to people. I'd be like "okay, do this your way" even if I know in which way I want it to be. I did this some times. And I always end up frustrated. I'd be a bad director making bad stuff because of that. Why bothering ? That's why I keep my projects to myself. I know how I want it to be, I know I'm not good enough at it, I sometimes still try to make it and I only have myself to blame. Sometimes, I wish I could duplicate myself. Yeah, good idea, to duplicate the self-hate and frustration.
Sometimes I regret no having been to school just for the experiment I would've got in group projects.
I often tell myself that I should discipline myself a lot more to find a way and time to make it all. Or at least more. I should get more productive everyday. I MUST get more productive every day ! Why am I complaining and not actually DOING IT ?? *$^)_"*ù^. In the end, is that a matter of time or motivation ? Maybe all of that can fit in a week. Maybe I can find a way to enjoy my passions and make a living out of my drawings.
But my other voice tells me that I'm too ambitious and that I cannot really do all of this. How could I do all of that and have a pay every month ? That's ridiculous. I always feel that all of my personal work is a waste of energy as I can't even have enough money to live every month. Would people still follow me if I share tons of various stuff ? Won't I annoy them with content they don't want ? (maybe some of you will say no) But can I do all of that ? I don't know.
Damn. Can't I just shut up and do more ?? Can't I just stop thinking like that ?
Unfortunately, a lot of the time I wish I had ends up eaten by my mental illness.
Welcome into my head !
My brain ALWAYS thinks negatively. Even if I have an ambitious project, my brain will show me only how pointless it is and how that will fail. That's what the illness does. Sometimes it's so strong that I depress and cannot do anything for days. I fight the idea that I suck every minute of every day. And being a "jack of all trades" is hard because you don't have ONE thing to remind you that you're good at it. And I try to fight that everyday through my projects. Every thing I create is a little victory. So I want to do more and more and more and more [...]. I want to share more with people.
I know I shouldn't be that hard on myself. But I just don't know how not to be. My mental illness feels like an excuse. After all that time, I still don't believe I'm ill and just think I suck.
Well, that's it. Maybe you understand my frustration now. Or maybe just think (like I do) that I should shut up and work more.
Sorry about this long post. I'll probably regret writing this in 2 days. If you read all of this, you get 15% more awesome !! (and sorry if I made mistakes !)
120 notes
·
View notes
Text
How Korrasami Saved Me
Hi there :) With the anniversary of the finale being today, I saw the post from @thewillowtree3 and @korrasamay about the stories we could share about the impact Korrasami had on us, and the various ways it helped us through our struggles and how it helped through difficult times. I think that’s such a wonderful idea, and I hope it’s okay that I share my story today.
I try to keep things pretty impersonal on this blog most of the time, and I don’t really share much about myself. I’ve started changing that a little, opening up I guess. So there’s probably no better time then now to put out all my cards on the table. A few years ago, I was probably at the lowest point I’ve ever been in my life. Before I was an adult, I was fairly cheerful and any sort of sadness never lasted long. It took a lot to get me down. That had changed so much, as the adjustment to college and work weren’t going smoothly. I had never been one to be anxious, but around my second year that had changed. I was starting to have full on panic attacks that effected my daily life, with anxiety just crushing down every day. I stopped going to classes, stopped going out with friends or even talking to them all that much. I was withdrawing from everything I cared about.
I don’t know if it was depression, I never really sought any help. I just know I was never so miserable. I started being so hard on myself. Every failure started to become proof of how worthless I felt.Even good things I’d twist in my mind into failure. I felt I didn’t deserve to succeed, and that I was bringing this all on myself. I saw no future for myself. It was like in a short time I realized everything I was doing was gonna get me nowhere. That I’d already screwed up my life beyond any repair. That I was wasting my and everyone else’s time to even try. It was a cycle that fed on itself. Self fulfilling I guess. That’s when the panic attacks became a weekly thing. It was just, every insecurity and shred of doubt, would just descend on me all at once. I’d come up with a thousand reasons why any plan, or any activity would end in failure. I’d imagine every reason why I’d never amount to anything. I’d talk myself out of any happy moment, reminding myself of all this. I’d imagine how my friends thought of me, how I was dragging them down just by being with them. I started harming myself around this time. Not, to feel anything, but almost to vent anger and to give myself what I thought I deserved. I don’t know how best to describe it. I’d hit stone walls, punch myself in the head thinking “you’re so stupid, why did you mess this up. Why can’t you do anything right.” I’d dig my nails into my skin to draw blood. I even broke my own finger once, when hitting that wall, and whenever someone would ask me about it, showing concern I’d just brush it off, convincing myself they didn’t actually care.
The worst feeling of all, was that I was a waste. Friends, family, that I didn’t matter to them. I felt like I was disappointing them. That they wouldn’t be losing anything if I was gone. Like I was leaving no impact on the people I cared about, nothing was more crushing then that feeling and I couldn’t shake it. So I shut myself off, and closed myself away so as not to burden them.
Korra was already on at the time and I had loved atla and often found that stories, art was an escape. I remember watching the first season, and loving it flaws and all. The second season too, and the second season is when I started relating to Korra more then I ever have with any other character I’d ever seen. I didn’t have the responsibilities she had, but I did put similar expectations on myself. I’m ambitious I’ll make no bones about that. I want to do so much, but I’m so afraid I can’t. Watching Korra struggle, watching her believe with all her heart that she was a failure, and that she’d let down not just her family but the world, connected with me so much. A struggle Korra always faced, was the belief that she wouldn’t live up to her responsibility or past lives. That she was “the worst avatar ever” that she was failing to live up to her potential. I will always adore season 2. Because the scene where her past lives are ripped away from her, and she begins to break down, because she in that moment thought she had failed so completely, connected with me so much. Cause I’m a lot like her I think. I’m a touch cocky, arrogant at times. But if I’m honest, it’s a mask to hide the niggling worry and insecurity. The voice telling me I’ll never accomplish anything, and I will leave this world having done nothing positive for anyone else. I saw that in Korra too. She’s tough and boastful, but in her heart for a long time, I think she was scared of not leaving that same positive impact. She looked up so much to her past lives, to the ideal of what the avatar stands for, that to fall short of that was crushing. Her struggle in season two, connected with me so strongly. As did her struggles in the entire show. And seeing her overcome them, by finding a balance within herself, was something I can’t describe in how much it meant to me. It was beyond admiration. I wanted to find the balance within myself as well. To accept my flaws, work with them, and maybe one day improve? Or at least learn to live with them, and to be constructive in my life at the same time.
It wasn’t just Korra alone that was helping me through this. There was a lot of little things too. I’m truly lucky to have the friends I do, the family too. I want to leave it mostly at that, as the rest is personal. Lok was just one of the things helping me piece everything back together. Because I really did feel shattered, and one of, if not the most helpful things during this time, was the woman who has been my girlfriend for three years now. We’d been friends for longer than that. since we were kids. She was the only one I felt I could confide in. Talking to her didn’t feel wrong, and I wasn’t ashamed to admit my feelings with her like I seemed to be everyone else. It was a two way street. She was struggling with her own problems. We could just talk to each other. Without fearing judgement. So you better believe, when I was watching season four, I was blown away by the letters between Korra and Asami. Again I felt an incredible connection I wasn’t getting elsewhere. It was weird, to know exactly what Korra must have felt when she was writing her.
We shared our feelings for each other, and started dating before the finale. Watching that scene, between the two of them at the party was one of the most cathartic things. At the time, I was just kinda taken by the emotion of it and didn’t really draw the parallels to my own experiences. That came later. At the time I was just so invested in their stories, to see this being the culmination of their relationship was so amazing. It definitely made me feel better about opening up to people, especially the ones I cared about. And it gave some courage, because I wanted to be as brave and compassionate as these two. I wanted to live up to their example. Again, the show was just a part of my overall healing process, but it was such an important one. It’s not solely responsible for saving my life, but sometimes it sure does feel like it. I was on a very self destructive path, and I still have moments, where everything hits me again. All the doubt all the self loathing. But I think I can overcome it better then I used to. I’ve found healthier ways of dealing with it too. One of the things I wanted to do was write. I wanted to do that since i was little. In those years, the creativity felt like it was gone. It seemed like everything I was writing was hollow and worthless, and I didn’t have the passion to express myself. I thought I wouldn’t reach this dream, and that I’d never get better. Korrasami helped me so much there. Writing fics for them, about them, thinking of new ways to share their emotions and stories started bringing a little of the spark back. It gave me motivation to keep going, and that’s so important to writing. I feel solid in saying that without them, I maybe would have given up writing altogether. Writing for them gave me the confidence to jump back into my own projects and stories. That I haven’t given up, I’m so very thankful for. Writing is such an outlet for me, a way to handle my own emotions, to pour them out onto the page and express what lies within, what i feel. It’s one of the most important ways I’ve found to channel my feelings and to use them constructively. I haven’t found a balance in myself yet, but I think I’ve started down the path to find it.
Now it’s three years later and I still love these two dorks more than I can say. I love them, I love the show, and I love this community. I love waking up everyday and seeing the creativity and heart they’ve inspired. Every bit of art, every word of a fic. I believe in creativity more than pretty much anything else in life, and it warms my heart to see how lok has inspired others. How it’s impacted their lives. To share in this with other people is one of the best feelings, and I’m sure being a part of this community has also been a part of my healing process. Watching Korra, overcoming the obstacles before her, mastering herself and going through her own trauma and healing meant so much to me. It would be a novella if I wrote down all of my thoughts about her journey as a character and how i related to it. Asami too. I didn’t even go into that here did I? But there are so many ways I relate just as much to Asami’s journey. If I could meet my challenges with even a fraction of the courage, compassion, and kindness that she does, I know I’d be doing okay. I can honestly say, that there are only a handful of characters who I relate to and have actually changed my life for the better. Korra and Asami are perhaps the most important to me. Their relationship too. Nothing in art has ever hit me or mattered to me like them finding happiness with each other. I know I’m never going to forget them, and they will stick with me for the rest of my life. They gave me hope in a time I desperately needed it. They gave me hope that I can find my place in this world. That I can make a difference and that maybe I can share that with someone I love while I’m doing it. That we can be there for each other when we need a hand to hold in our moments of doubt. That we may one day find balance.
It felt really good to do this. To share. Sorry it was a little long, I can go on a lot. Thanks so much to @thewillowtree3 and @korrasamay for suggesting this. I can’t wait to see other peoples stories. It’s the most beautiful thing in the world, how works of art can bring people together, and to help them through dark times. I just wanna thank everyone in the community right now. To the followers, people I follow, and people whose content I have so enjoyed for the past few years. Being a part of it all has meant so much to me. Thank you all so very much, and I wish you all the best :) You’re truly spectacular, in every way.
#How Korrasami Saved Me#korrasami anniversary#korrasami#korra#asami sato#asami#lok#the legend of korra#thank you all#so very much#lok means the world to me#it was part of saving my life
85 notes
·
View notes
Text
44 Writing Hacks From Some of the Greatest Writers Who Ever Lived
New Post has been published on https://writingguideto.com/must-see/44-writing-hacks-from-some-of-the-greatest-writers-who-ever-lived/
44 Writing Hacks From Some of the Greatest Writers Who Ever Lived
Writing looks fun, but doing it professionally is hard. Like really hard. Why on earth am I doing this?-hard.
Which is probably why so many people want to write, yet so few actually do. But there are ways to make it easier, as many writers can tell you. Tricks that have been discovered over the centuries to help with this difficult craft.
In another industry, these tricks would be considered trade secrets. But writers are generous and they love to share (often in books about writing). They explain their own strategies for how to deal with writers block to how to make sure your computer never eats your manuscript. They give away this hard-won knowledge so that other aspiring writers wont have to struggle in the same way. Over my career, Ive tried to collect these little bits of wisdom in my commonplace book (also a writers trick which I picked up from Montaigne) and am grateful for the guidance theyve provided.
Below, Ive shared a collection of writing hacks from some amazing writers like Kurt Vonnegut, George Orwell, Stephen King, Elizabeth Gilbert, Anne Lamott, and Raymond Chandler. I hope its not too presumptuous but I snuck in a few of my own too (not that I think Im anywhere near as good as them).
Anyway, heres to making this tough job a tiny bit easier!
[*] When you have an idea for an article or a bookwrite it down. Dont let it float around in your head. Thats a recipe for losing it. As Beethoven is reported to have said, If I don’t write it down immediately I forget it right away. If I put it into a sketchbook I never forget it, and I never have to look it up again.
[*] The important thing is to start. At the end of John Fantes book Dreams from Bunker Hill, the character, a writer, reminds himself that if he can write one great line, he can write two and if he can write two he can write three, and if he can write three, he can write forever. He pauses. Even that seemed insurmountable. So he types out four lines from one of his favorite poems. What the hell, he says, a man has to start someplace.
[*] In fact, a lot of writers use that last technique. In Tobias Wolffs autobiographical novel Old School, the character types the passages from his favorite books just to know what it feels like to have those words flow through his fingertips. Hunter S. Thompson often did the same thing. This is another reason why technologies like ebooks and Evernote are inferior to physical interaction. Just highlighting something and saving it to a computer? Theres no tactile memory there.
[*] The greatest part of a writers time is spent in reading; a man will turn over half a library to make one book. Samuel Johnson
[*] Tim Ferriss has said that the goal for a productive writing life is two crappy pages a day. Just enough to make progress, not too ambitious to be intimidating.
[*] They say breakfast (protein) in the morning helps brain function. But in my experience, thats a trade-off with waking up and getting started right away. Apparently Kurt Vonnegut only ate after he worked for 2 hours. Maybe he felt like after that hed earned food.
[*] Michael Malice has advised dont edit while you write. I think this is good advice.
[*] In addition to making a distinction between editing and writing, Robert Greene advises to make an equally important distinction between research and writing. Trying to find where youre going while youre doing it is begging to get horribly lost. Writing is easier when the research is done and the framework has been laid out.
[*] Nassim Taleb wrote in Antifragile that every sentence in the book was a derivation, an application or an interpretation of the short maxim he opened with. THAT is why you want to get your thesis down and perfect. It makes the whole book/essay easier.
[*] Break big projects down into small, discrete chunks. As I am writing a book, I create a separate document for each chapter, as I am writing them. Its only later when I have gotten to the end that these chapters are combined into a single file. Why? The same reason it feels easier to swim seven sets of ten laps, than to swim a mile. Breaking it up into pieces makes it seem more achievable. The other benefit in writing? It creates a sense that each piece must stand on its own.
[*] Embrace what the strategist and theorist John Boyd called the draw-down period. Take a break right before you start. To think, to reflect, to doubt.
[*] On being a writer: All the days of his life he should be reading as faithfully as his partaking of food; reading, watching, listening. John Fante
[*] Dont get caught up with pesky details. When I am writing a draft, I try not to be concerned with exact dates, facts or figures. If I remember that a study conducted by INSERT UNIVERSITY found that XX% of businesses fail in the first FIVE/SIX? months, thats what I write (exactly like that). If I am writing that on June XX, 19XX Ronald Reagan gave his famous Tear Down This Wall speech in Berlin in front of XX,XXX people, thats how its going to look. Momentum is the most important thing in writing, so Ill fill the details in later. I just need to get the sentences down first. “Get through a draft as quickly as possible.” is how Joshua Wolf Shenk put it.
[*] Raymond Chandler had a trick of using small pieces of paper so he would never be afraid to start over. Also with only 12-15 lines per page, it forced economy of thought and actionwhich is why his stuff is so readable.
[*] In The Artists Way, Julia Cameron reminds us that our morning pages and our journaling dont count as writing. Just as walking doesnt count as exercise, this is just priming the pumpits a meditative experience. Make sure you treat it as such.
[*] Steven Pressfield said that he used to save each one of his manuscripts on a disk that hed keep in the glovebox of his car. Robert Greene told me he sometimes puts a copy of his manuscript in the trunk of his car just in case. I bought a fireproof gun safe and keep my stuff in therejust in case.
[*] My editor Niki Papadopoulos at Penguin: Its not what a book is. Its what a book does.
[*] While you are writing, read things totally unrelated to what youre writing. Youll be amazed at the totally unexpected connections youll make or strange things youll discover. As Shelby Foote put it in an interview with The Paris Review: I cant begin to tell you the things I discovered while I was looking for something else.
[*] Writing requires what Cal Newport calls deep workperiods of long, uninterrupted focus and creativity. If you dont give yourself enough of this time, your work suffers. He recommends recording your deep work time each dayso you actually know if youre budgeting properly.
[*] Software does not make you a better writer. Fuck Evernote. Fuck Scrivner. You dont need to get fancy. If classics were created with quill and ink, youll probably be fine with a Word Document. Or a blank piece of paper. Dont let technology distract you. As Joyce Carol Oates put it in an interview, Every writer has written by hand until relatively recent times. Writing is a consequence of thinking, planning, dreaming this is the process that results in writing, rather than the way in which the writing is recorded.
[*] Talk about the ideas in the work everywhere. Talk about the work itself nowhere. Dont be the person who tweets Im working on my novel. Be too busy writing for that. Helen Simpson has Faire et se taire from Flaubert on a Post-it near her desk, which she translates as Shut up and get on with it.
[*] Why cant you talk about the work? Its not because someone might steal it. Its because the validation you get on social media has a perverse effect. Youll less likely to put in the hard work to complete something that youve already been patted (or patted yourself) on the back for.
[*] When you find yourself stuck with writers block, pick up the phone and call someone smart and talk to them about whatever the specific area youre stuck with is. Not that youre stuck, but about the topic. By the time you put your phone down, youll have plenty to write. (As Seth Godin put it, nobody gets talkers block.)
[*] Keep a commonplace book with anecdotes, stories and quotes you can always usefrom inspiration to directly using in your writing. And these can be anything. H.L. Mencken for example, would methodically fill a notebook with incidents, recording scraps of dialogue and slang, columns from the New York Sun.
[*] As you write down quotes and observations in your commonplace book, make sure to do it by hand. As Raymond Chandler wrote, when you have to use your energy to put words down, you are more apt to make them count.
[*] Elizabeth Gilbert has a good trick for cutting: As you go along, Ask yourself if this sentence, paragraph, or chapter truly furthers the narrative. If not, chuck it. And as Stephen King famously put it, kill your darlings, kill your darlings, even when it breaks your egocentric little scribblers heart, kill your darlings.
[*] Strenuous exercise everyday. For me, and for a lot of other writers, its running. Novelist Don DeLillo told The Paris Review how after writing for four hours, he goes running to shake off one world and enter another. Joyce Carol Oates, in her ode to running, said that the twin activities of running and writing keep the writer reasonably sane and with the hope, however illusory and temporary, of control.
[*] Ask yourself these four questions from George Orwell: What am I trying to say? What words will express it? What image or idiom will make it clearer? Is this image fresh enough to have an effect? Then finish with these final two questions: Could I put it more shortly? Have I said anything that is avoidably ugly?
[*] As a writer you need to make use of everything that happens around you and use it as material. Make use of Seinfelds question: Im never not working on material. Every second of my existence, I am thinking, Can I do something with that?
[*] Airplanes with no wifi are a great place to write and even better for editing. Because there is nowhere to go and nothing else to do.
[*] Print and put a couple of important quotes up on the wall to help guide you (either generally, or for a specific project). Heres a quote from a scholar describing why Ciceros speeches were so effective which I put on my wall while I was writing my first book. At his best [Cicero] offered a sustained interest, a constant variety, a consummate blend of humour and pathos, of narrative and argument, of description and declamation; while every part is subordinated to the purpose of the whole, and combines, despite its intricacy of detail, to form a dramatic and coherent unit. (emphasis mine)
[*] Focus on what youre saying, worry less about how. As William March wrote in The Bad Seed, A great novelist with something to say has no concern with style or oddity of presentation.
[*] A little trick I came up with. After every day of work, I save my manuscript as a new file (for example: EgoIsTheEnemy2-26.docx) which is saved on my computer and in Dropbox (before Dropbox, I just emailed it to myself). This way I keep a running record of the evolution of book. It comforts me that I can always go back if I mess something up or if I have to turn back around.
[*] Famous ad-man David Ogilvy put it bluntly: Use short words, short sentences and short paragraphs.
[*] Envision who you are writing this for. Like really picture them. Dont go off in a cave and do this solely for yourself. As Kurt Vonnegut put it in his interview with The Paris Review: …every successful creative person creates with an audience of one in mind. Thats the secret of artistic unity. Anybody can achieve it, if he or she will make something with only one person in mind.
[*] Do not chase exotic locations to do some writing. Budd Schulbergs novel The Disenchanted about his time with F. Scott Fitzgerald expresses the dangers well: It was a time everyone was pressing wonderful houses on us. I have a perfectly marvelous house for you to write in, theyd say. Of course no one needs marvelous houses to write in. I still knew that much. All you needed was one room. But somehow the next house always beckoned.”
[*] True enough, though John Fante said that when you get stuck writing, hit the road.
[*] Commitments (at the micro-level) are important too. An article a week? An article a month? A book a year? A script every six weeks? Pick something, but commit to itpublicly or contractually. Quantity produces quality, as Ray Bradbury put it.
[*] Dont ever write anything you dont like yourself and if you do like it, dont take anyones advice about changing it. They just dont know. Raymond Chandler
[*] Neil Strauss and Tucker Max gave me another helpful iteration of that idea (which I later learned is from Neil Gaiman): When someone tells you something is wrong with your writing, theyre usually right. When they tell you how to fix it, theyre almost always wrong.
[*] Ogilvy had another good rule: Never use jargon words like reconceptualize, demassification, attitudinally, judgmentally. They are hallmarks of a pretentious ass.
[*] Print out the work and edit it by hand as often as possible. It gives you the readers point of view.
[*] Hemingway advised fellow writer Thomas Wolfe to break off work when you ‘are going good.’Then you can rest easily and on the next day easily resume. Brian Koppelman (Rounders, Billions) has referred to this as stopping on wet edge. It staves off the despair the next day.
[*] Keep the momentum: Never stop when you are stuck. You may not be able to solve the problem, but turn aside and write something else. Do not stop altogether. Jeanette Winterson
That taps me out for now. But every time I read I compile a few more notecards. Ill update you when Ive got another round to share.
In the meantime, stop reading stuff on the internet and get back to writing!
But if you have a second…share your own tips below.
Read more: http://thoughtcatalog.com/
0 notes
Text
A Birthday for Us, and Cakes From You
Want the Australia Letter by email? Sign up and forward my weekly dispatches to your friends so they can join our discussion about Australia and the world.
______
When Bill Keller was the executive editor of The New York Times, he often told us to pay less attention to two things: journalism prizes, which he said never fully rewarded the breadth of our work; and anniversaries of events, which he saw as an excuse for boring backward-looking stories.
I took his guidance to heart, so much so that I pretty much planned to ignore the first anniversary of our Australia bureau opening on May 1. But of course, like any birthday, it was hard to totally avoid.
Our bosses in New York sent us pastries with a nice note. Our New York Times communications team tweeted out a congratulations message. A Crikey columnist examined the response to our efforts.
And, with a bit of lucky timing, this week’s Australia Diary ended up being about birthday cakes. Not just any birthday cakes, but the crazy brilliant sensations that children of the 1980s and 90s enjoyed, thanks to ambitious relatives and recipes from “The Australian Women’s Weekly Children’s Birthday Cake Cookbook.”
Molly O’Brien, an Australian reader of The New York Times in Brooklyn, did a fantastic job explaining her own history with the elaborate confections. (She was partial to the “Swimming Pool” cake, in case you were wondering.)
She also put it all into context, noting that the book’s creations “fulfilled countless sugary dreams for Australian kids and undoubtedly contributed to kitchen meltdowns nationwide.”
We loved her story and photos so much that we decided to ask all of you for your own experiences with Women’s Weekly cakes, or anything that might compete with them.
Share your photos and memories and we’ll post what we collect. (The image above is one shining example of what we’ve been receiving.)
But her submission also reminded me of how much can be learned when journalism becomes more communal and conversational. I would never have known about cakes like the “Maypole” or “Rocking Horse” — nor would I have known they were such cultural touchstones — if not for our attempt to throw open the doors, and invite in readers’ stories. Your stories.
Looking back over the past year, there are so many things I wouldn’t have known if not for readers of this newsletter.
The responses to last week’s Australia Letter about history taught me just how common it was to grow up in Australia years ago without being taught Indigenous history — something I hadn’t realized since my own children are receiving more of that education in their public school.
If not for all of you, I also wouldn’t have grasped the depth of appreciation for Nippers, nor the nuance and divisions that shape discussions of race and multiculturalism, or gender and power.
I would have missed out on many great books, restaurants, music and movies that many of you suggested; I would have misunderstood the rivalry among Australia’s capital cities, or the degree to which people care so much about those that are often overlooked — I’m looking at you Darwin, Adelaide and Perth — if not for those who wrote to tell us what they loved about where they lived, and why.
I could go on but the point is, for our first anniversary, I’m not going to boast about all the journalism we did that I’m proud of, though there’s a fair amount of that.
I’m just going to thank you for making the journalism better.
Foreign correspondence is nothing if not an attempt to understand, and our bureau’s understanding of Australia — even for those who are Australian — has occurred at an accelerated pace thanks to you.
So happy birthday to all of us engaged in this project. Let’s make year two even better.
And send us your cakes pictures!
Anything made with ambition and love must have something to teach, right?
Here are our stories of the week, starting with Australia, followed by recommendations for what to watch this month.
______
The news of the week, for Australia and Catholics everywhere: A Victoria court ruled that Cardinal George Pell, the Vatican’s No. 3 official, will go to trial on charges of “historical sex offenses.”
The most serious charges were dismissed, but there are several significant charges going forward, from multiple complainants.
If you’re wondering why the case has been so secretive, here’s a guide on what’s happening (and why the court has revealed so little information).
One of our reporters, Jacqueline Williams, also went to Ballarat, Cardinal Pell’s hometown, where she explored how the old mining town is learning to talk about decades of sexual abuse of children by Catholic priests.
______
• The Best Italian Subs — At Least in Australia: At the Re Store, the continental roll has been a community staple for more than 50 years, writes our restaurant reviewer.
• From Green Jelly Swimming Pools to Coconut Rabbits: In this week’s Australia Diary, one reader remembers the cherished birthday cake recipe book that raised a generation.
• ‘Ink,’ a Tale of Rupert Murdoch’s Rise, Is Coming to Broadway: Another British import is coming, this one about an early chapter in Mr. Murdoch’s career.
News
• Why David Goodall, 104, Renowned Australian Scientist, Wants to Die: The ecologist flew to Switzerland to end his life, saying his quality of life had deteriorated badly. His case has renewed a debate about assisted suicide.
• Australia Pledges Millions of Dollars in Bid to Rescue Great Barrier Reef: The government will set aside 500 million Australian dollars to help the global treasure after years of damage from warming waters caused by climate change.
• White House Delays Tariffs on E.U., Canada and Mexico for 30 Days: But the administration said it had reached an agreement with Australia.
• Ex-Lobbyist for Foreign Governments Helped Plan Pruitt Trip to Australia: Though the trip never happened, it shows a pattern in which the American Environmental Protection Agency’s chief has relied on people with business interests to shape the agenda of his foreign travel.
Helmut Lethen and Caroline Sommerfeld speak for two intellectual camps: the old left and the far right. They are political enemies. And they are married, having a dialogue their country is not.
Their marriage is “exceptional, incomprehensible even, but it is also a laboratory for tolerance and a rare window into how the other side thinks,” writes Katrin Bennhold, our Berlin bureau chief.
______
Worldwide cultural moments used to occur around movies or music, but at the moment, it’s a video came called Fortnite that is redefining leisure time and cultural references.
The boys at my son’s school in Sydney are obsessed, and so are millions more.
The game has gotten so big in the United States that malls are being turned into gaming arenas. And parents like me are trying to figure out what makes the game so popular, how to manage their kids’ interest in it and, in my case, how to play.
______
______
… And We Recommend
From Isabella Kwai:
Make sure you have a box of tissues to weep into and a friend to hold onto for comfort.
Season 2 of “The Handmaid’s Tale” has arrived and it’s darker than ever. I learned that the hard way last weekend, while searching for some escapist entertainment.
Our reviewer summed up my feelings toward it pretty well: “Sometimes the best testament to a story’s effectiveness is that it makes you hope for it to end.”
Here’s what else to watch …
• Our guide to Netflix Australia this month.
• Our guide to movies in Australian theaters this month.*
* Yes, we’re making this a regular thing since so many of you seemed to like it.
Damien Cave is the Australia bureau chief for The New York Times. He’s covered more than a dozen countries for The Times, including Mexico, Cuba, Iraq and Lebanon. Follow him on Twitter: @damiencave.
The post A Birthday for Us, and Cakes From You appeared first on World The News.
from World The News https://ift.tt/2jqG4q4
via Everyday News
0 notes
Text
Wood Inlay Ornament with German Glass Glitter
Hi friends! And hi to new friends visiting from the #CreativeChristmas Challenge hosted by Remodelaholic!
youtube
To those of you who don’t know me yet: welcome. Everyone else has already started drinking and saying really embarrassing things (about themselves, not you… we’re not a super judgmental bunch). To those of you who already know me: cheers. As always, you rock. And I was just kidding about the drinking thing (unless it’s football season and a Saturday, which yes to both).
Anyway, from time to time, I like to throw my hat in on a DIY challenge or two because nothing excuses buying more power tools like overcommitting to a deadline for fun (like the 2×4 summer challenge and boom: new coffee table!). This time around, the theme was making something for Christmas. I’ve already been finding inspiration for my color scheme this year in the form of acorns, snowflakes, owls, and other wintery-woodland things, so I figured: why not see if I can fill up the inevitable empty parts of my tree with what I have on hand, rather than buying a bunch of new ornaments? I also just happened upon a set of carving bits for my Dremel and have been itching to experiment with epoxy/inlays/resins, so I started playing around until this happened:
And as a fun little bonus: I actually made a video of it too!
Tools and Materials
affiliate links of items I recommend and use are listed in this post, which support this site at no cost to you… thanks!
scrap wood (I had 1″ x 4″ poplar)
scissors
printer paper
inkjet printer
acetone or nail polish remover
Dremel 200
Dremel engraving/carving kit
band saw or scroll saw
random orbit sander
wood stain (I used Minwax Ipswich Pine and washed while it was still wet with Early American… I’ll have to show you guys more about this as I’ve done it a number of times to get the colors I like)
Mod Podge
small detail paint brush
Miss Mustard Seed’s German Glass Glitter in Silver Tiara
Martha Stewart Crafts extra fine glitter in Smoky Quartz
clear spray sealer (gloss)
small drill bit
thread (I used stuff from my cross stitch stash)
First things first: print out the image (mine is available for download near the end of the post) and cut it out. I used a scrap piece of poplar that was bound for the burn pile, so I wasn’t really expecting perfection (in fact as you can see, I first used a different image that was WAY too intricate for a first-time experiment and then decided on the final design).
To transfer the ink from the printer paper, I swabbed the back with an acetone nail polish remover. As you can see, the image didn’t transfer perfectly, but it was good enough (I got the idea from my buddy Brad’s video here — then went with the option that wouldn’t require changing out of my pajama pants or going into the cold garage that morning).
Next, I took out my Dremel and a new engraving/carving set I’d recently purchased for another inlay project. In my opinion, crafting is a good intro before graduating to larger pieces, so I figured this would help me practice with diamond tips, how to control the carve, etc. A good method is to create the hard outline first, then carve out the middle, and continue to make the inlay deeper and deeper until it’s got enough depth to hold the inlay material (glitter, epoxy I assume, whatever).
Next, I sketched out the overall shape (spoiler: it wasn’t at all even, so I highly recommend using the template) and then went to cut out the piece. And this is when it seemed like things were conspiring against me: my new scroll saw was broken… right out of the box. Womp, womp.
To make the situation a little stickier, I was about 5 hours away at this point from needing to head out of town to Raleigh, NC (recap here), and I had no other tools that would give me the right depth and shape. Disappointed but undeterred, I figured the next best thing would be to ask to borrow tools from the person I’d be visiting (thankfully, it was a trip to visit some DIY blogging friends just for fun — my pal Brittany just so happened to have a band saw in her garage). Of course, now I want one of those, too.
Of course, I’d never actually used a band saw before, so despite the general don’t-cut-your-fingers-off rule, the piece still came out a little wonky (mostly due to my non-templating sketch). I was able to shape it a little more with an orbital sander. I also carved the edges out a little more and did a final sanding with high grit sandpaper before stain.
Since the overall concept was to make this look like an inlay, I wanted to use glitter with a little more grit and sparkle: enter, German glass glitter. It’s really amazing stuff in person. To paint it into place, I relied on a small paint brush (tip: if the brush starts to fray a little, spin it as you’re dipping it into the glue to get the point fine again… check out my video to see a demo of that).
You can layer the glitter in, too: after giving it some time to dry, paint another bit of glue on top of the glitter and add more into the recessed areas. It will add depth!
I added extra-fine gold glitter around the edge and sealed the whole thing with a clear gloss spray, then drilled a hole through the top and threaded it so it could hang on the tree.
Caveat: before I sealed with a clear gloss, I actually tried to seal with an old polycrylic which unfortunately made the top and bottom tips look faded/cloudy once it dried. At first I thought I’d lean into the mistake by painting the back and sides with chalk paint and sanding to make it look rustic, but it looked really sad instead and totally detracted from the sparkle on the front. I wanted to get this done in time for the blog hop, so I just continued on with sealing again and adding the glitter around the edge. So, if you try a project like this, don’t make my mistake and you’ll get even better results!
You can also try other inlay methods, other glitter colors, fill in the center vs the outer rings with opposite hues, etc… the possibilities are pretty endless!
All in all, I think it’s going to make a nice addition to my white/gold/chrome/woodland Christmas decor theme this year (and the less I need to spend on ornaments, the more budget I have to make Christmas cocktails, hehe).
Want to try this for yourself? You can download my template here.
To be perfectly frank, I think the photos really don’t do the sparkle on this piece enough justice (in fact, I worried that it was looking too drab in photos). So, I made a video tutorial too (I’d love it if you subscribed if you haven’t already… with what I��ve learned in making this tutorial, there is more to come no doubt!).
youtube
As I mentioned, this DIY was part of a blog hop, with 25 other bloggers participating — aka, enough DIY Christmas ideas to keep you busy right up until the actual holiday (if you were so ambitiously inclined). So, check out a preview of the other projects and bloggers participating in the images below. You can also head over to the Remodelaholic post (who is hosting this hop) to check out other DIYers submitting their inspired ideas (on social media, you can look for #CreativeChristmas to find them all).
DIY Christmas Trees and Ornaments
Wintry Silver Dollar Store Christmas Tree Decor | Remodelaholic
Marbled Christmas Ornaments | Doodlecraft
Scrap Wood Inlay Ornaments | The Ugly Duckling House (you’re here!)
Woodburned Wood Slice Ornaments | Sisters What
Flocked Pine Cones | Practical and Pretty
Abstract Monogram Ornaments | Domicile37
Concrete Christmas Ornaments | The Palette Muse
Wood Slice Deer Ornaments | Our Crafty Mom
Vintage Gumball Machine Ornaments | Beth Watson Design Studio
Etched Glass Ornaments | Just Call Me Homegirl
Unicorn Inspired Christmas Tree | The DIY Mommy
Driftwood Reindeer Ornaments | Sustain My Craft Habit
DIY Christmas Gifts and Decor
Christmas Pine Hoop Wreath | This Mama’s Dance
Gingerbread Man Candles | Nourish and Nestle
Wire and Glass Chandelier | Home with Cupcakes and Crinoline
Christmas Scroll Wall Art | Grace In My Space
Lighted Wood Trees | Frazzled Joy
Crocheted Christmas Hat | Luz Patterns
Christmas Card Photo Display| Hertoolbelt
JOY Porch Sign | Ginger Snap Crafts
Folding Bar Cart Table | Everyday Party Magazine
Wood and Burlap Christmas Sign | Leap of Faith Crafting
Wood Block Snowman | Anika’s DIY Life
Holiday Candle Wrap | Dragonfly & Lily Pads
Christmas Pom Pom Pillow | Small Home Soul
Handlettered Wall Art | Smiling Colors
Those of us who did videos for this hop can be found in the playlist below, so those of you who would rather watch than read (or just want to blow off work for a few more minutes) have something, too! *If you’re having difficulty playing it, you can jump over to the playlist here.*
youtube
There you have it! Hope you’re getting into the holiday spirit just in time. Will you be working on any decor ideas this Christmas? This is going to be a very busy holiday season for me, so be sure to check back in for more DIYs (I’m going to give that epoxy inlay idea a shot, and a few more scrap ideas are just bubbling in the ol’ brain). Have a great weekend!
You'll Also Love
25 Great Gift Ideas for the Craft Beer Lover
DIY Wooden Couch Sleeve
It’s Pronounced “Damn Good Cookie̶...
Lots of Sneak Peeks: Riding the Buildathon Wave
.yuzo_related_post img{width:170px !important; height:170px !important;} .yuzo_related_post .relatedthumb{line-height:14px;background:#ffffff !important;color:#454747!important;} .yuzo_related_post .relatedthumb:hover{background:#ffffff !important; -webkit-transition: background 0.2s linear; -moz-transition: background 0.2s linear; -o-transition: background 0.2s linear; transition: background 0.2s linear;;color:#454747!important;} .yuzo_related_post .relatedthumb a{color:#102a3b!important;} .yuzo_related_post .relatedthumb a:hover{ color:#113f5e}!important;} .yuzo_related_post .relatedthumb:hover a{ color:#113f5e!important;} .yuzo_related_post .relatedthumb:hover .yuzo__text--title{ color:#113f5e!important;} .yuzo_related_post .yuzo_text, .yuzo_related_post .yuzo_views_post {color:#454747!important;} .yuzo_related_post .relatedthumb:hover .yuzo_text, .yuzo_related_post:hover .yuzo_views_post {color:#454747!important;} .yuzo_related_post .relatedthumb{ margin: 0px 6px 0px 6px; padding: 0px 0px 0px 0px; } jQuery(document).ready(function( $ ){ jQuery('.yuzo_related_post .yuzo_wraps').equalizer({ columns : '> div' }); });
The post Wood Inlay Ornament with German Glass Glitter appeared first on The Ugly Duckling House.
Website // Subscribe // Advertise // Twitter // Facebook // Google+
Wood Inlay Ornament with German Glass Glitter published first on http://ift.tt/2qxZz2j
0 notes
Text
Wood Inlay Ornament with German Glass Glitter
Hi friends! And hi to new friends visiting from the #CreativeChristmas Challenge hosted by Remodelaholic!
To those of you who don’t know me yet: welcome. Everyone else has already started drinking and saying really embarrassing things (about themselves, not you… we’re not a super judgmental bunch). To those of you who already know me: cheers. As always, you rock. And I was just kidding about the drinking thing (unless it’s football season and a Saturday, which yes to both).
Anyway, from time to time, I like to throw my hat in on a DIY challenge or two because nothing excuses buying more power tools like overcommitting to a deadline for fun (like the 2×4 summer challenge and boom: new coffee table!). This time around, the theme was making something for Christmas. I’ve already been finding inspiration for my color scheme this year in the form of acorns, snowflakes, owls, and other wintery-woodland things, so I figured: why not see if I can fill up the inevitable empty parts of my tree with what I have on hand, rather than buying a bunch of new ornaments? I also just happened upon a set of carving bits for my Dremel and have been itching to experiment with epoxy/inlays/resins, so I started playing around until this happened:
And as a fun little bonus: I actually made a video of it too!
Tools and Materials
affiliate links of items I recommend and use are listed in this post, which support this site at no cost to you… thanks!
scrap wood (I had 1″ x 4″ poplar)
scissors
printer paper
inkjet printer
acetone or nail polish remover
Dremel 200
Dremel engraving/carving kit
band saw or scroll saw
random orbit sander
wood stain (I used Minwax Ipswich Pine and washed while it was still wet with Early American… I’ll have to show you guys more about this as I’ve done it a number of times to get the colors I like)
Mod Podge
small detail paint brush
Miss Mustard Seed’s German Glass Glitter in Silver Tiara
Martha Stewart Crafts extra fine glitter in Smoky Quartz
clear spray sealer (gloss)
small drill bit
thread (I used stuff from my cross stitch stash)
First things first: print out the image (mine is available for download near the end of the post) and cut it out. I used a scrap piece of poplar that was bound for the burn pile, so I wasn’t really expecting perfection (in fact as you can see, I first used a different image that was WAY too intricate for a first-time experiment and then decided on the final design).
To transfer the ink from the printer paper, I swabbed the back with an acetone nail polish remover. As you can see, the image didn’t transfer perfectly, but it was good enough (I got the idea from my buddy Brad’s video here — then went with the option that wouldn’t require changing out of my pajama pants or going into the cold garage that morning).
Next, I took out my Dremel and a new engraving/carving set I’d recently purchased for another inlay project. In my opinion, crafting is a good intro before graduating to larger pieces, so I figured this would help me practice with diamond tips, how to control the carve, etc. A good method is to create the hard outline first, then carve out the middle, and continue to make the inlay deeper and deeper until it’s got enough depth to hold the inlay material (glitter, epoxy I assume, whatever).
Next, I sketched out the overall shape (spoiler: it wasn’t at all even, so I highly recommend using the template) and then went to cut out the piece. And this is when it seemed like things were conspiring against me: my new scroll saw was broken… right out of the box. Womp, womp.
To make the situation a little stickier, I was about 5 hours away at this point from needing to head out of town to Raleigh, NC (recap here), and I had no other tools that would give me the right depth and shape. Disappointed but undeterred, I figured the next best thing would be to ask to borrow tools from the person I’d be visiting (thankfully, it was a trip to visit some DIY blogging friends just for fun — my pal Brittany just so happened to have a band saw in her garage). Of course, now I want one of those, too.
Of course, I’d never actually used a band saw before, so despite the general don’t-cut-your-fingers-off rule, the piece still came out a little wonky (mostly due to my non-templating sketch). I was able to shape it a little more with an orbital sander. I also carved the edges out a little more and did a final sanding with high grit sandpaper before stain.
Since the overall concept was to make this look like an inlay, I wanted to use glitter with a little more grit and sparkle: enter, German glass glitter. It’s really amazing stuff in person. To paint it into place, I relied on a small paint brush (tip: if the brush starts to fray a little, spin it as you’re dipping it into the glue to get the point fine again… check out my video to see a demo of that).
You can layer the glitter in, too: after giving it some time to dry, paint another bit of glue on top of the glitter and add more into the recessed areas. It will add depth!
I added extra-fine gold glitter around the edge and sealed the whole thing with a clear gloss spray, then drilled a hole through the top and threaded it so it could hang on the tree.
Caveat: before I sealed with a clear gloss, I actually tried to seal with an old polycrylic which unfortunately made the top and bottom tips look faded/cloudy once it dried. At first I thought I’d lean into the mistake by painting the back and sides with chalk paint and sanding to make it look rustic, but it looked really sad instead and totally detracted from the sparkle on the front. I wanted to get this done in time for the blog hop, so I just continued on with sealing again and adding the glitter around the edge. So, if you try a project like this, don’t make my mistake and you’ll get even better results!
You can also try other inlay methods, other glitter colors, fill in the center vs the outer rings with opposite hues, etc… the possibilities are pretty endless!
All in all, I think it’s going to make a nice addition to my white/gold/chrome/woodland Christmas decor theme this year (and the less I need to spend on ornaments, the more budget I have to make Christmas cocktails, hehe).
Want to try this for yourself? You can download my template here.
To be perfectly frank, I think the photos really don’t do the sparkle on this piece enough justice (in fact, I worried that it was looking too drab in photos). So, I made a video tutorial too (I’d love it if you subscribed if you haven’t already… with what I’ve learned in making this tutorial, there is more to come no doubt!).
As I mentioned, this DIY was part of a blog hop, with 25 other bloggers participating — aka, enough DIY Christmas ideas to keep you busy right up until the actual holiday (if you were so ambitiously inclined). So, check out a preview of the other projects and bloggers participating in the images below. You can also head over to the Remodelaholic post (who is hosting this hop) to check out other DIYers submitting their inspired ideas (on social media, you can look for #CreativeChristmas to find them all).
DIY Christmas Trees and Ornaments
Wintry Silver Dollar Store Christmas Tree Decor | Remodelaholic
Marbled Christmas Ornaments | Doodlecraft
Scrap Wood Inlay Ornaments | The Ugly Duckling House (you’re here!)
Woodburned Wood Slice Ornaments | Sisters What
Flocked Pine Cones | Practical and Pretty
Abstract Monogram Ornaments | Domicile37
Concrete Christmas Ornaments | The Palette Muse
Wood Slice Deer Ornaments | Our Crafty Mom
Vintage Gumball Machine Ornaments | Beth Watson Design Studio
Etched Glass Ornaments | Just Call Me Homegirl
Unicorn Inspired Christmas Tree | The DIY Mommy
Driftwood Reindeer Ornaments | Sustain My Craft Habit
DIY Christmas Gifts and Decor
Christmas Pine Hoop Wreath | This Mama’s Dance
Gingerbread Man Candles | Nourish and Nestle
Wire and Glass Chandelier | Home with Cupcakes and Crinoline
Christmas Scroll Wall Art | Grace In My Space
Lighted Wood Trees | Frazzled Joy
Crocheted Christmas Hat | Luz Patterns
Christmas Card Photo Display| Hertoolbelt
JOY Porch Sign | Ginger Snap Crafts
Folding Bar Cart Table | Everyday Party Magazine
Wood and Burlap Christmas Sign | Leap of Faith Crafting
Wood Block Snowman | Anika’s DIY Life
Holiday Candle Wrap | Dragonfly & Lily Pads
Christmas Pom Pom Pillow | Small Home Soul
Handlettered Wall Art | Smiling Colors
Those of us who did videos for this hop can be found in the playlist below, so those of you who would rather watch than read (or just want to blow off work for a few more minutes) have something, too! *If you’re having difficulty playing it, you can jump over to the playlist here.*
There you have it! Hope you’re getting into the holiday spirit just in time. Will you be working on any decor ideas this Christmas? This is going to be a very busy holiday season for me, so be sure to check back in for more DIYs (I’m going to give that epoxy inlay idea a shot, and a few more scrap ideas are just bubbling in the ol’ brain). Have a great weekend!
You'll Also Love
25 Great Gift Ideas for the Craft Beer Lover
DIY Wooden Couch Sleeve
It’s Pronounced “Damn Good Cookie̶...
Lots of Sneak Peeks: Riding the Buildathon Wave
The post Wood Inlay Ornament with German Glass Glitter appeared first on The Ugly Duckling House.
Website // Subscribe // Advertise // Twitter // Facebook // Google+
from mix1 http://ift.tt/2mesqe5 via with this info
0 notes
Text
Wood Inlay Ornament with German Glass Glitter
Hi friends! And hi to new friends visiting from the #CreativeChristmas Challenge hosted by Remodelaholic!
To those of you who don’t know me yet: welcome. Everyone else has already started drinking and saying really embarrassing things (about themselves, not you… we’re not a super judgmental bunch). To those of you who already know me: cheers. As always, you rock. And I was just kidding about the drinking thing (unless it’s football season and a Saturday, which yes to both).
Anyway, from time to time, I like to throw my hat in on a DIY challenge or two because nothing excuses buying more power tools like overcommitting to a deadline for fun (like the 2×4 summer challenge and boom: new coffee table!). This time around, the theme was making something for Christmas. I’ve already been finding inspiration for my color scheme this year in the form of acorns, snowflakes, owls, and other wintery-woodland things, so I figured: why not see if I can fill up the inevitable empty parts of my tree with what I have on hand, rather than buying a bunch of new ornaments? I also just happened upon a set of carving bits for my Dremel and have been itching to experiment with epoxy/inlays/resins, so I started playing around until this happened:
And as a fun little bonus: I actually made a video of it too!
Tools and Materials
affiliate links of items I recommend and use are listed in this post, which support this site at no cost to you… thanks!
scrap wood (I had 1″ x 4″ poplar)
scissors
printer paper
inkjet printer
acetone or nail polish remover
Dremel 200
Dremel engraving/carving kit
band saw or scroll saw
random orbit sander
wood stain (I used Minwax Ipswich Pine and washed while it was still wet with Early American… I’ll have to show you guys more about this as I’ve done it a number of times to get the colors I like)
Mod Podge
small detail paint brush
Miss Mustard Seed’s German Glass Glitter in Silver Tiara
Martha Stewart Crafts extra fine glitter in Smoky Quartz
clear spray sealer (gloss)
small drill bit
thread (I used stuff from my cross stitch stash)
First things first: print out the image (mine is available for download near the end of the post) and cut it out. I used a scrap piece of poplar that was bound for the burn pile, so I wasn’t really expecting perfection (in fact as you can see, I first used a different image that was WAY too intricate for a first-time experiment and then decided on the final design).
To transfer the ink from the printer paper, I swabbed the back with an acetone nail polish remover. As you can see, the image didn’t transfer perfectly, but it was good enough (I got the idea from my buddy Brad’s video here — then went with the option that wouldn’t require changing out of my pajama pants or going into the cold garage that morning).
Next, I took out my Dremel and a new engraving/carving set I’d recently purchased for another inlay project. In my opinion, crafting is a good intro before graduating to larger pieces, so I figured this would help me practice with diamond tips, how to control the carve, etc. A good method is to create the hard outline first, then carve out the middle, and continue to make the inlay deeper and deeper until it’s got enough depth to hold the inlay material (glitter, epoxy I assume, whatever).
Next, I sketched out the overall shape (spoiler: it wasn’t at all even, so I highly recommend using the template) and then went to cut out the piece. And this is when it seemed like things were conspiring against me: my new scroll saw was broken… right out of the box. Womp, womp.
To make the situation a little stickier, I was about 5 hours away at this point from needing to head out of town to Raleigh, NC (recap here), and I had no other tools that would give me the right depth and shape. Disappointed but undeterred, I figured the next best thing would be to ask to borrow tools from the person I’d be visiting (thankfully, it was a trip to visit some DIY blogging friends just for fun — my pal Brittany just so happened to have a band saw in her garage). Of course, now I want one of those, too.
Of course, I’d never actually used a band saw before, so despite the general don’t-cut-your-fingers-off rule, the piece still came out a little wonky (mostly due to my non-templating sketch). I was able to shape it a little more with an orbital sander. I also carved the edges out a little more and did a final sanding with high grit sandpaper before stain.
Since the overall concept was to make this look like an inlay, I wanted to use glitter with a little more grit and sparkle: enter, German glass glitter. It’s really amazing stuff in person. To paint it into place, I relied on a small paint brush (tip: if the brush starts to fray a little, spin it as you’re dipping it into the glue to get the point fine again… check out my video to see a demo of that).
You can layer the glitter in, too: after giving it some time to dry, paint another bit of glue on top of the glitter and add more into the recessed areas. It will add depth!
I added extra-fine gold glitter around the edge and sealed the whole thing with a clear gloss spray, then drilled a hole through the top and threaded it so it could hang on the tree.
Caveat: before I sealed with a clear gloss, I actually tried to seal with an old polycrylic which unfortunately made the top and bottom tips look faded/cloudy once it dried. At first I thought I’d lean into the mistake by painting the back and sides with chalk paint and sanding to make it look rustic, but it looked really sad instead and totally detracted from the sparkle on the front. I wanted to get this done in time for the blog hop, so I just continued on with sealing again and adding the glitter around the edge. So, if you try a project like this, don’t make my mistake and you’ll get even better results!
You can also try other inlay methods, other glitter colors, fill in the center vs the outer rings with opposite hues, etc… the possibilities are pretty endless!
All in all, I think it’s going to make a nice addition to my white/gold/chrome/woodland Christmas decor theme this year (and the less I need to spend on ornaments, the more budget I have to make Christmas cocktails, hehe).
Want to try this for yourself? You can download my template here.
To be perfectly frank, I think the photos really don’t do the sparkle on this piece enough justice (in fact, I worried that it was looking too drab in photos). So, I made a video tutorial too (I’d love it if you subscribed if you haven’t already… with what I’ve learned in making this tutorial, there is more to come no doubt!).
As I mentioned, this DIY was part of a blog hop, with 25 other bloggers participating — aka, enough DIY Christmas ideas to keep you busy right up until the actual holiday (if you were so ambitiously inclined). So, check out a preview of the other projects and bloggers participating in the images below. You can also head over to the Remodelaholic post (who is hosting this hop) to check out other DIYers submitting their inspired ideas (on social media, you can look for #CreativeChristmas to find them all).
DIY Christmas Trees and Ornaments
Wintry Silver Dollar Store Christmas Tree Decor | Remodelaholic
Marbled Christmas Ornaments | Doodlecraft
Scrap Wood Inlay Ornaments | The Ugly Duckling House (you’re here!)
Woodburned Wood Slice Ornaments | Sisters What
Flocked Pine Cones | Practical and Pretty
Abstract Monogram Ornaments | Domicile37
Concrete Christmas Ornaments | The Palette Muse
Wood Slice Deer Ornaments | Our Crafty Mom
Vintage Gumball Machine Ornaments | Beth Watson Design Studio
Etched Glass Ornaments | Just Call Me Homegirl
Unicorn Inspired Christmas Tree | The DIY Mommy
Driftwood Reindeer Ornaments | Sustain My Craft Habit
DIY Christmas Gifts and Decor
Christmas Pine Hoop Wreath | This Mama’s Dance
Gingerbread Man Candles | Nourish and Nestle
Wire and Glass Chandelier | Home with Cupcakes and Crinoline
Christmas Scroll Wall Art | Grace In My Space
Lighted Wood Trees | Frazzled Joy
Crocheted Christmas Hat | Luz Patterns
Christmas Card Photo Display| Hertoolbelt
JOY Porch Sign | Ginger Snap Crafts
Folding Bar Cart Table | Everyday Party Magazine
Wood and Burlap Christmas Sign | Leap of Faith Crafting
Wood Block Snowman | Anika’s DIY Life
Holiday Candle Wrap | Dragonfly & Lily Pads
Christmas Pom Pom Pillow | Small Home Soul
Handlettered Wall Art | Smiling Colors
Those of us who did videos for this hop can be found in the playlist below, so those of you who would rather watch than read (or just want to blow off work for a few more minutes) have something, too! *If you’re having difficulty playing it, you can jump over to the playlist here.*
There you have it! Hope you’re getting into the holiday spirit just in time. Will you be working on any decor ideas this Christmas? This is going to be a very busy holiday season for me, so be sure to check back in for more DIYs (I’m going to give that epoxy inlay idea a shot, and a few more scrap ideas are just bubbling in the ol’ brain). Have a great weekend!
You'll Also Love
25 Great Gift Ideas for the Craft Beer Lover
DIY Wooden Couch Sleeve
It’s Pronounced “Damn Good Cookie̶...
Lots of Sneak Peeks: Riding the Buildathon Wave
The post Wood Inlay Ornament with German Glass Glitter appeared first on The Ugly Duckling House.
Website // Subscribe // Advertise // Twitter // Facebook // Google+
from car2 http://ift.tt/2mesqe5 via as shown a lot
0 notes
Text
Wood Inlay Ornament with German Glass Glitter
Hi friends! And hi to new friends visiting from the #CreativeChristmas Challenge hosted by Remodelaholic!
To those of you who don’t know me yet: welcome. Everyone else has already started drinking and saying really embarrassing things (about themselves, not you… we’re not a super judgmental bunch). To those of you who already know me: cheers. As always, you rock. And I was just kidding about the drinking thing (unless it’s football season and a Saturday, which yes to both).
Anyway, from time to time, I like to throw my hat in on a DIY challenge or two because nothing excuses buying more power tools like overcommitting to a deadline for fun (like the 2×4 summer challenge and boom: new coffee table!). This time around, the theme was making something for Christmas. I’ve already been finding inspiration for my color scheme this year in the form of acorns, snowflakes, owls, and other wintery-woodland things, so I figured: why not see if I can fill up the inevitable empty parts of my tree with what I have on hand, rather than buying a bunch of new ornaments? I also just happened upon a set of carving bits for my Dremel and have been itching to experiment with epoxy/inlays/resins, so I started playing around until this happened:
And as a fun little bonus: I actually made a video of it too!
Tools and Materials
affiliate links of items I recommend and use are listed in this post, which support this site at no cost to you… thanks!
scrap wood (I had 1″ x 4″ poplar)
scissors
printer paper
inkjet printer
acetone or nail polish remover
Dremel 200
Dremel engraving/carving kit
band saw or scroll saw
random orbit sander
wood stain (I used Minwax Ipswich Pine and washed while it was still wet with Early American… I’ll have to show you guys more about this as I’ve done it a number of times to get the colors I like)
Mod Podge
small detail paint brush
Miss Mustard Seed’s German Glass Glitter in Silver Tiara
Martha Stewart Crafts extra fine glitter in Smoky Quartz
clear spray sealer (gloss)
small drill bit
thread (I used stuff from my cross stitch stash)
First things first: print out the image (mine is available for download near the end of the post) and cut it out. I used a scrap piece of poplar that was bound for the burn pile, so I wasn’t really expecting perfection (in fact as you can see, I first used a different image that was WAY too intricate for a first-time experiment and then decided on the final design).
To transfer the ink from the printer paper, I swabbed the back with an acetone nail polish remover. As you can see, the image didn’t transfer perfectly, but it was good enough (I got the idea from my buddy Brad’s video here — then went with the option that wouldn’t require changing out of my pajama pants or going into the cold garage that morning).
Next, I took out my Dremel and a new engraving/carving set I’d recently purchased for another inlay project. In my opinion, crafting is a good intro before graduating to larger pieces, so I figured this would help me practice with diamond tips, how to control the carve, etc. A good method is to create the hard outline first, then carve out the middle, and continue to make the inlay deeper and deeper until it’s got enough depth to hold the inlay material (glitter, epoxy I assume, whatever).
Next, I sketched out the overall shape (spoiler: it wasn’t at all even, so I highly recommend using the template) and then went to cut out the piece. And this is when it seemed like things were conspiring against me: my new scroll saw was broken… right out of the box. Womp, womp.
To make the situation a little stickier, I was about 5 hours away at this point from needing to head out of town to Raleigh, NC (recap here), and I had no other tools that would give me the right depth and shape. Disappointed but undeterred, I figured the next best thing would be to ask to borrow tools from the person I’d be visiting (thankfully, it was a trip to visit some DIY blogging friends just for fun — my pal Brittany just so happened to have a band saw in her garage). Of course, now I want one of those, too.
Of course, I’d never actually used a band saw before, so despite the general don’t-cut-your-fingers-off rule, the piece still came out a little wonky (mostly due to my non-templating sketch). I was able to shape it a little more with an orbital sander. I also carved the edges out a little more and did a final sanding with high grit sandpaper before stain.
Since the overall concept was to make this look like an inlay, I wanted to use glitter with a little more grit and sparkle: enter, German glass glitter. It’s really amazing stuff in person. To paint it into place, I relied on a small paint brush (tip: if the brush starts to fray a little, spin it as you’re dipping it into the glue to get the point fine again… check out my video to see a demo of that).
You can layer the glitter in, too: after giving it some time to dry, paint another bit of glue on top of the glitter and add more into the recessed areas. It will add depth!
I added extra-fine gold glitter around the edge and sealed the whole thing with a clear gloss spray, then drilled a hole through the top and threaded it so it could hang on the tree.
Caveat: before I sealed with a clear gloss, I actually tried to seal with an old polycrylic which unfortunately made the top and bottom tips look faded/cloudy once it dried. At first I thought I’d lean into the mistake by painting the back and sides with chalk paint and sanding to make it look rustic, but it looked really sad instead and totally detracted from the sparkle on the front. I wanted to get this done in time for the blog hop, so I just continued on with sealing again and adding the glitter around the edge. So, if you try a project like this, don’t make my mistake and you’ll get even better results!
You can also try other inlay methods, other glitter colors, fill in the center vs the outer rings with opposite hues, etc… the possibilities are pretty endless!
All in all, I think it’s going to make a nice addition to my white/gold/chrome/woodland Christmas decor theme this year (and the less I need to spend on ornaments, the more budget I have to make Christmas cocktails, hehe).
Want to try this for yourself? You can download my template here.
To be perfectly frank, I think the photos really don’t do the sparkle on this piece enough justice (in fact, I worried that it was looking too drab in photos). So, I made a video tutorial too (I’d love it if you subscribed if you haven’t already… with what I’ve learned in making this tutorial, there is more to come no doubt!).
youtube
As I mentioned, this DIY was part of a blog hop, with 25 other bloggers participating — aka, enough DIY Christmas ideas to keep you busy right up until the actual holiday (if you were so ambitiously inclined). So, check out a preview of the other projects and bloggers participating in the images below. You can also head over to the Remodelaholic post (who is hosting this hop) to check out other DIYers submitting their inspired ideas (on social media, you can look for #CreativeChristmas to find them all).
DIY Christmas Trees and Ornaments
Wintry Silver Dollar Store Christmas Tree Decor | Remodelaholic
Marbled Christmas Ornaments | Doodlecraft
Scrap Wood Inlay Ornaments | The Ugly Duckling House (you’re here!)
Woodburned Wood Slice Ornaments | Sisters What
Flocked Pine Cones | Practical and Pretty
Abstract Monogram Ornaments | Domicile37
Concrete Christmas Ornaments | The Palette Muse
Wood Slice Deer Ornaments | Our Crafty Mom
Vintage Gumball Machine Ornaments | Beth Watson Design Studio
Etched Glass Ornaments | Just Call Me Homegirl
Unicorn Inspired Christmas Tree | The DIY Mommy
Driftwood Reindeer Ornaments | Sustain My Craft Habit
DIY Christmas Gifts and Decor
Christmas Pine Hoop Wreath | This Mama’s Dance
Gingerbread Man Candles | Nourish and Nestle
Wire and Glass Chandelier | Home with Cupcakes and Crinoline
Christmas Scroll Wall Art | Grace In My Space
Lighted Wood Trees | Frazzled Joy
Crocheted Christmas Hat | Luz Patterns
Christmas Card Photo Display| Hertoolbelt
JOY Porch Sign | Ginger Snap Crafts
Folding Bar Cart Table | Everyday Party Magazine
Wood and Burlap Christmas Sign | Leap of Faith Crafting
Wood Block Snowman | Anika’s DIY Life
Holiday Candle Wrap | Dragonfly & Lily Pads
Christmas Pom Pom Pillow | Small Home Soul
Handlettered Wall Art | Smiling Colors
Those of us who did videos for this hop can be found in the playlist below, so those of you who would rather watch than read (or just want to blow off work for a few more minutes) have something, too! *If you’re having difficulty playing it, you can jump over to the playlist here.*
youtube
There you have it! Hope you’re getting into the holiday spirit just in time. Will you be working on any decor ideas this Christmas? This is going to be a very busy holiday season for me, so be sure to check back in for more DIYs (I’m going to give that epoxy inlay idea a shot, and a few more scrap ideas are just bubbling in the ol’ brain). Have a great weekend!
You'll Also Love
25 Great Gift Ideas for the Craft Beer Lover
DIY Wooden Couch Sleeve
It’s Pronounced “Damn Good Cookie̶...
Lots of Sneak Peeks: Riding the Buildathon Wave
.yuzo_related_post img{width:170px !important; height:170px !important;} .yuzo_related_post .relatedthumb{line-height:14px;background:#ffffff !important;color:#454747!important;} .yuzo_related_post .relatedthumb:hover{background:#ffffff !important; -webkit-transition: background 0.2s linear; -moz-transition: background 0.2s linear; -o-transition: background 0.2s linear; transition: background 0.2s linear;;color:#454747!important;} .yuzo_related_post .relatedthumb a{color:#102a3b!important;} .yuzo_related_post .relatedthumb a:hover{ color:#113f5e}!important;} .yuzo_related_post .relatedthumb:hover a{ color:#113f5e!important;} .yuzo_related_post .relatedthumb:hover .yuzo__text--title{ color:#113f5e!important;} .yuzo_related_post .yuzo_text, .yuzo_related_post .yuzo_views_post {color:#454747!important;} .yuzo_related_post .relatedthumb:hover .yuzo_text, .yuzo_related_post:hover .yuzo_views_post {color:#454747!important;} .yuzo_related_post .relatedthumb{ margin: 0px 6px 0px 6px; padding: 0px 0px 0px 0px; } jQuery(document).ready(function( $ ){ jQuery('.yuzo_related_post .yuzo_wraps').equalizer({ columns : '> div' }); });
The post Wood Inlay Ornament with German Glass Glitter appeared first on The Ugly Duckling House.
Website // Subscribe // Advertise // Twitter // Facebook // Google+
Read more http://ift.tt/2mesqe5
Areas served: Winston-Salem, High Point, Yadkinville, Mocksville, Advance, Clemmons, Kernersville, Greensboro, Walnut Cove, Statesville, NC, North Carolina
Services: House painting, roofing, deck building, landscaping, Carpentry, Flooring, tile, hardwood, remodeling, home improvement, interior, exterior
0 notes
Text
Wood Inlay Ornament with German Glass Glitter
Hi friends! And hi to new friends visiting from the #CreativeChristmas Challenge hosted by Remodelaholic!
To those of you who don’t know me yet: welcome. Everyone else has already started drinking and saying really embarrassing things (about themselves, not you… we’re not a super judgmental bunch). To those of you who already know me: cheers. As always, you rock. And I was just kidding about the drinking thing (unless it’s football season and a Saturday, which yes to both).
Anyway, from time to time, I like to throw my hat in on a DIY challenge or two because nothing excuses buying more power tools like overcommitting to a deadline for fun (like the 2×4 summer challenge and boom: new coffee table!). This time around, the theme was making something for Christmas. I’ve already been finding inspiration for my color scheme this year in the form of acorns, snowflakes, owls, and other wintery-woodland things, so I figured: why not see if I can fill up the inevitable empty parts of my tree with what I have on hand, rather than buying a bunch of new ornaments? I also just happened upon a set of carving bits for my Dremel and have been itching to experiment with epoxy/inlays/resins, so I started playing around until this happened:
And as a fun little bonus: I actually made a video of it too!
Tools and Materials
affiliate links of items I recommend and use are listed in this post, which support this site at no cost to you… thanks!
scrap wood (I had 1″ x 4″ poplar)
scissors
printer paper
inkjet printer
acetone or nail polish remover
Dremel 200
Dremel engraving/carving kit
band saw or scroll saw
random orbit sander
wood stain (I used Minwax Ipswich Pine and washed while it was still wet with Early American… I’ll have to show you guys more about this as I’ve done it a number of times to get the colors I like)
Mod Podge
small detail paint brush
Miss Mustard Seed’s German Glass Glitter in Silver Tiara
Martha Stewart Crafts extra fine glitter in Smoky Quartz
clear spray sealer (gloss)
small drill bit
thread (I used stuff from my cross stitch stash)
First things first: print out the image (mine is available for download near the end of the post) and cut it out. I used a scrap piece of poplar that was bound for the burn pile, so I wasn’t really expecting perfection (in fact as you can see, I first used a different image that was WAY too intricate for a first-time experiment and then decided on the final design).
To transfer the ink from the printer paper, I swabbed the back with an acetone nail polish remover. As you can see, the image didn’t transfer perfectly, but it was good enough (I got the idea from my buddy Brad’s video here — then went with the option that wouldn’t require changing out of my pajama pants or going into the cold garage that morning).
Next, I took out my Dremel and a new engraving/carving set I’d recently purchased for another inlay project. In my opinion, crafting is a good intro before graduating to larger pieces, so I figured this would help me practice with diamond tips, how to control the carve, etc. A good method is to create the hard outline first, then carve out the middle, and continue to make the inlay deeper and deeper until it’s got enough depth to hold the inlay material (glitter, epoxy I assume, whatever).
Next, I sketched out the overall shape (spoiler: it wasn’t at all even, so I highly recommend using the template) and then went to cut out the piece. And this is when it seemed like things were conspiring against me: my new scroll saw was broken… right out of the box. Womp, womp.
To make the situation a little stickier, I was about 5 hours away at this point from needing to head out of town to Raleigh, NC (recap here), and I had no other tools that would give me the right depth and shape. Disappointed but undeterred, I figured the next best thing would be to ask to borrow tools from the person I’d be visiting (thankfully, it was a trip to visit some DIY blogging friends just for fun — my pal Brittany just so happened to have a band saw in her garage). Of course, now I want one of those, too.
Of course, I’d never actually used a band saw before, so despite the general don’t-cut-your-fingers-off rule, the piece still came out a little wonky (mostly due to my non-templating sketch). I was able to shape it a little more with an orbital sander. I also carved the edges out a little more and did a final sanding with high grit sandpaper before stain.
Since the overall concept was to make this look like an inlay, I wanted to use glitter with a little more grit and sparkle: enter, German glass glitter. It’s really amazing stuff in person. To paint it into place, I relied on a small paint brush (tip: if the brush starts to fray a little, spin it as you’re dipping it into the glue to get the point fine again… check out my video to see a demo of that).
You can layer the glitter in, too: after giving it some time to dry, paint another bit of glue on top of the glitter and add more into the recessed areas. It will add depth!
I added extra-fine gold glitter around the edge and sealed the whole thing with a clear gloss spray, then drilled a hole through the top and threaded it so it could hang on the tree.
Caveat: before I sealed with a clear gloss, I actually tried to seal with an old polycrylic which unfortunately made the top and bottom tips look faded/cloudy once it dried. At first I thought I’d lean into the mistake by painting the back and sides with chalk paint and sanding to make it look rustic, but it looked really sad instead and totally detracted from the sparkle on the front. I wanted to get this done in time for the blog hop, so I just continued on with sealing again and adding the glitter around the edge. So, if you try a project like this, don’t make my mistake and you’ll get even better results!
You can also try other inlay methods, other glitter colors, fill in the center vs the outer rings with opposite hues, etc… the possibilities are pretty endless!
All in all, I think it’s going to make a nice addition to my white/gold/chrome/woodland Christmas decor theme this year (and the less I need to spend on ornaments, the more budget I have to make Christmas cocktails, hehe).
Want to try this for yourself? You can download my template here.
To be perfectly frank, I think the photos really don’t do the sparkle on this piece enough justice (in fact, I worried that it was looking too drab in photos). So, I made a video tutorial too (I’d love it if you subscribed if you haven’t already… with what I’ve learned in making this tutorial, there is more to come no doubt!).
As I mentioned, this DIY was part of a blog hop, with 25 other bloggers participating — aka, enough DIY Christmas ideas to keep you busy right up until the actual holiday (if you were so ambitiously inclined). So, check out a preview of the other projects and bloggers participating in the images below. You can also head over to the Remodelaholic post (who is hosting this hop) to check out other DIYers submitting their inspired ideas (on social media, you can look for #CreativeChristmas to find them all).
DIY Christmas Trees and Ornaments
Wintry Silver Dollar Store Christmas Tree Decor | Remodelaholic
Marbled Christmas Ornaments | Doodlecraft
Scrap Wood Inlay Ornaments | The Ugly Duckling House (you’re here!)
Woodburned Wood Slice Ornaments | Sisters What
Flocked Pine Cones | Practical and Pretty
Abstract Monogram Ornaments | Domicile37
Concrete Christmas Ornaments | The Palette Muse
Wood Slice Deer Ornaments | Our Crafty Mom
Vintage Gumball Machine Ornaments | Beth Watson Design Studio
Etched Glass Ornaments | Just Call Me Homegirl
Unicorn Inspired Christmas Tree | The DIY Mommy
Driftwood Reindeer Ornaments | Sustain My Craft Habit
DIY Christmas Gifts and Decor
Christmas Pine Hoop Wreath | This Mama’s Dance
Gingerbread Man Candles | Nourish and Nestle
Wire and Glass Chandelier | Home with Cupcakes and Crinoline
Christmas Scroll Wall Art | Grace In My Space
Lighted Wood Trees | Frazzled Joy
Crocheted Christmas Hat | Luz Patterns
Christmas Card Photo Display| Hertoolbelt
JOY Porch Sign | Ginger Snap Crafts
Folding Bar Cart Table | Everyday Party Magazine
Wood and Burlap Christmas Sign | Leap of Faith Crafting
Wood Block Snowman | Anika’s DIY Life
Holiday Candle Wrap | Dragonfly & Lily Pads
Christmas Pom Pom Pillow | Small Home Soul
Handlettered Wall Art | Smiling Colors
Those of us who did videos for this hop can be found in the playlist below, so those of you who would rather watch than read (or just want to blow off work for a few more minutes) have something, too! *If you’re having difficulty playing it, you can jump over to the playlist here.*
youtube
There you have it! Hope you’re getting into the holiday spirit just in time. Will you be working on any decor ideas this Christmas? This is going to be a very busy holiday season for me, so be sure to check back in for more DIYs (I’m going to give that epoxy inlay idea a shot, and a few more scrap ideas are just bubbling in the ol’ brain). Have a great weekend!
You'll Also Love
25 Great Gift Ideas for the Craft Beer Lover
DIY Wooden Couch Sleeve
It’s Pronounced “Damn Good Cookie̶...
Lots of Sneak Peeks: Riding the Buildathon Wave
.yuzo_related_post img{width:170px !important; height:170px !important;} .yuzo_related_post .relatedthumb{line-height:14px;background:#ffffff !important;color:#454747!important;} .yuzo_related_post .relatedthumb:hover{background:#ffffff !important; -webkit-transition: background 0.2s linear; -moz-transition: background 0.2s linear; -o-transition: background 0.2s linear; transition: background 0.2s linear;;color:#454747!important;} .yuzo_related_post .relatedthumb a{color:#102a3b!important;} .yuzo_related_post .relatedthumb a:hover{ color:#113f5e}!important;} .yuzo_related_post .relatedthumb:hover a{ color:#113f5e!important;} .yuzo_related_post .relatedthumb:hover .yuzo__text--title{ color:#113f5e!important;} .yuzo_related_post .yuzo_text, .yuzo_related_post .yuzo_views_post {color:#454747!important;} .yuzo_related_post .relatedthumb:hover .yuzo_text, .yuzo_related_post:hover .yuzo_views_post {color:#454747!important;} .yuzo_related_post .relatedthumb{ margin: 0px 6px 0px 6px; padding: 0px 0px 0px 0px; } jQuery(document).ready(function( $ ){ jQuery('.yuzo_related_post .yuzo_wraps').equalizer({ columns : '> div' }); });
The post Wood Inlay Ornament with German Glass Glitter appeared first on The Ugly Duckling House.
Website // Subscribe // Advertise // Twitter // Facebook // Google+
from Home Improvement https://www.uglyducklinghouse.com/wood-inlay-ornament-german-glass-glitter/
via http://www.rssmix.com/
0 notes
Text
Wood Inlay Ornament with German Glass Glitter
Hi friends! And hi to new friends visiting from the #CreativeChristmas Challenge hosted by Remodelaholic!
To those of you who don’t know me yet: welcome. Everyone else has already started drinking and saying really embarrassing things (about themselves, not you… we’re not a super judgmental bunch). To those of you who already know me: cheers. As always, you rock. And I was just kidding about the drinking thing (unless it’s football season and a Saturday, which yes to both).
Anyway, from time to time, I like to throw my hat in on a DIY challenge or two because nothing excuses buying more power tools like overcommitting to a deadline for fun (like the 2×4 summer challenge and boom: new coffee table!). This time around, the theme was making something for Christmas. I’ve already been finding inspiration for my color scheme this year in the form of acorns, snowflakes, owls, and other wintery-woodland things, so I figured: why not see if I can fill up the inevitable empty parts of my tree with what I have on hand, rather than buying a bunch of new ornaments? I also just happened upon a set of carving bits for my Dremel and have been itching to experiment with epoxy/inlays/resins, so I started playing around until this happened:
And as a fun little bonus: I actually made a video of it too!
Tools and Materials
affiliate links of items I recommend and use are listed in this post, which support this site at no cost to you… thanks!
scrap wood (I had 1″ x 4″ poplar)
scissors
printer paper
inkjet printer
acetone or nail polish remover
Dremel 200
Dremel engraving/carving kit
band saw or scroll saw
random orbit sander
wood stain (I used Minwax Ipswich Pine and washed while it was still wet with Early American… I’ll have to show you guys more about this as I’ve done it a number of times to get the colors I like)
Mod Podge
small detail paint brush
Miss Mustard Seed’s German Glass Glitter in Silver Tiara
Martha Stewart Crafts extra fine glitter in Smoky Quartz
clear spray sealer (gloss)
small drill bit
thread (I used stuff from my cross stitch stash)
First things first: print out the image (mine is available for download near the end of the post) and cut it out. I used a scrap piece of poplar that was bound for the burn pile, so I wasn’t really expecting perfection (in fact as you can see, I first used a different image that was WAY too intricate for a first-time experiment and then decided on the final design).
To transfer the ink from the printer paper, I swabbed the back with an acetone nail polish remover. As you can see, the image didn’t transfer perfectly, but it was good enough (I got the idea from my buddy Brad’s video here — then went with the option that wouldn’t require changing out of my pajama pants or going into the cold garage that morning).
Next, I took out my Dremel and a new engraving/carving set I’d recently purchased for another inlay project. In my opinion, crafting is a good intro before graduating to larger pieces, so I figured this would help me practice with diamond tips, how to control the carve, etc. A good method is to create the hard outline first, then carve out the middle, and continue to make the inlay deeper and deeper until it’s got enough depth to hold the inlay material (glitter, epoxy I assume, whatever).
Next, I sketched out the overall shape (spoiler: it wasn’t at all even, so I highly recommend using the template) and then went to cut out the piece. And this is when it seemed like things were conspiring against me: my new scroll saw was broken… right out of the box. Womp, womp.
To make the situation a little stickier, I was about 5 hours away at this point from needing to head out of town to Raleigh, NC (recap here), and I had no other tools that would give me the right depth and shape. Disappointed but undeterred, I figured the next best thing would be to ask to borrow tools from the person I’d be visiting (thankfully, it was a trip to visit some DIY blogging friends just for fun — my pal Brittany just so happened to have a band saw in her garage). Of course, now I want one of those, too.
Of course, I’d never actually used a band saw before, so despite the general don’t-cut-your-fingers-off rule, the piece still came out a little wonky (mostly due to my non-templating sketch). I was able to shape it a little more with an orbital sander. I also carved the edges out a little more and did a final sanding with high grit sandpaper before stain.
Since the overall concept was to make this look like an inlay, I wanted to use glitter with a little more grit and sparkle: enter, German glass glitter. It’s really amazing stuff in person. To paint it into place, I relied on a small paint brush (tip: if the brush starts to fray a little, spin it as you’re dipping it into the glue to get the point fine again… check out my video to see a demo of that).
You can layer the glitter in, too: after giving it some time to dry, paint another bit of glue on top of the glitter and add more into the recessed areas. It will add depth!
I added extra-fine gold glitter around the edge and sealed the whole thing with a clear gloss spray, then drilled a hole through the top and threaded it so it could hang on the tree.
Caveat: before I sealed with a clear gloss, I actually tried to seal with an old polycrylic which unfortunately made the top and bottom tips look faded/cloudy once it dried. At first I thought I’d lean into the mistake by painting the back and sides with chalk paint and sanding to make it look rustic, but it looked really sad instead and totally detracted from the sparkle on the front. I wanted to get this done in time for the blog hop, so I just continued on with sealing again and adding the glitter around the edge. So, if you try a project like this, don’t make my mistake and you’ll get even better results!
You can also try other inlay methods, other glitter colors, fill in the center vs the outer rings with opposite hues, etc… the possibilities are pretty endless!
All in all, I think it’s going to make a nice addition to my white/gold/chrome/woodland Christmas decor theme this year (and the less I need to spend on ornaments, the more budget I have to make Christmas cocktails, hehe).
Want to try this for yourself? You can download my template here.
To be perfectly frank, I think the photos really don’t do the sparkle on this piece enough justice (in fact, I worried that it was looking too drab in photos). So, I made a video tutorial too (I’d love it if you subscribed if you haven’t already… with what I’ve learned in making this tutorial, there is more to come no doubt!).
As I mentioned, this DIY was part of a blog hop, with 25 other bloggers participating — aka, enough DIY Christmas ideas to keep you busy right up until the actual holiday (if you were so ambitiously inclined). So, check out a preview of the other projects and bloggers participating in the images below. You can also head over to the Remodelaholic post (who is hosting this hop) to check out other DIYers submitting their inspired ideas (on social media, you can look for #CreativeChristmas to find them all).
DIY Christmas Trees and Ornaments
Wintry Silver Dollar Store Christmas Tree Decor | Remodelaholic
Marbled Christmas Ornaments | Doodlecraft
Scrap Wood Inlay Ornaments | The Ugly Duckling House (you’re here!)
Woodburned Wood Slice Ornaments | Sisters What
Flocked Pine Cones | Practical and Pretty
Abstract Monogram Ornaments | Domicile37
Concrete Christmas Ornaments | The Palette Muse
Wood Slice Deer Ornaments | Our Crafty Mom
Vintage Gumball Machine Ornaments | Beth Watson Design Studio
Etched Glass Ornaments | Just Call Me Homegirl
Unicorn Inspired Christmas Tree | The DIY Mommy
Driftwood Reindeer Ornaments | Sustain My Craft Habit
DIY Christmas Gifts and Decor
Christmas Pine Hoop Wreath | This Mama’s Dance
Gingerbread Man Candles | Nourish and Nestle
Wire and Glass Chandelier | Home with Cupcakes and Crinoline
Christmas Scroll Wall Art | Grace In My Space
Lighted Wood Trees | Frazzled Joy
Crocheted Christmas Hat | Luz Patterns
Christmas Card Photo Display| Hertoolbelt
JOY Porch Sign | Ginger Snap Crafts
Folding Bar Cart Table | Everyday Party Magazine
Wood and Burlap Christmas Sign | Leap of Faith Crafting
Wood Block Snowman | Anika’s DIY Life
Holiday Candle Wrap | Dragonfly & Lily Pads
Christmas Pom Pom Pillow | Small Home Soul
Handlettered Wall Art | Smiling Colors
Those of us who did videos for this hop can be found in the playlist below, so those of you who would rather watch than read (or just want to blow off work for a few more minutes) have something, too! *If you’re having difficulty playing it, you can jump over to the playlist here.*
youtube
There you have it! Hope you’re getting into the holiday spirit just in time. Will you be working on any decor ideas this Christmas? This is going to be a very busy holiday season for me, so be sure to check back in for more DIYs (I’m going to give that epoxy inlay idea a shot, and a few more scrap ideas are just bubbling in the ol’ brain). Have a great weekend!
You'll Also Love
25 Great Gift Ideas for the Craft Beer Lover
DIY Wooden Couch Sleeve
It’s Pronounced “Damn Good Cookie̶...
Lots of Sneak Peeks: Riding the Buildathon Wave
.yuzo_related_post img{width:170px !important; height:170px !important;} .yuzo_related_post .relatedthumb{line-height:14px;background:#ffffff !important;color:#454747!important;} .yuzo_related_post .relatedthumb:hover{background:#ffffff !important; -webkit-transition: background 0.2s linear; -moz-transition: background 0.2s linear; -o-transition: background 0.2s linear; transition: background 0.2s linear;;color:#454747!important;} .yuzo_related_post .relatedthumb a{color:#102a3b!important;} .yuzo_related_post .relatedthumb a:hover{ color:#113f5e}!important;} .yuzo_related_post .relatedthumb:hover a{ color:#113f5e!important;} .yuzo_related_post .relatedthumb:hover .yuzo__text--title{ color:#113f5e!important;} .yuzo_related_post .yuzo_text, .yuzo_related_post .yuzo_views_post {color:#454747!important;} .yuzo_related_post .relatedthumb:hover .yuzo_text, .yuzo_related_post:hover .yuzo_views_post {color:#454747!important;} .yuzo_related_post .relatedthumb{ margin: 0px 6px 0px 6px; padding: 0px 0px 0px 0px; } jQuery(document).ready(function( $ ){ jQuery('.yuzo_related_post .yuzo_wraps').equalizer({ columns : '> div' }); });
The post Wood Inlay Ornament with German Glass Glitter appeared first on The Ugly Duckling House.
Website // Subscribe // Advertise // Twitter // Facebook // Google+
from The Ugly Duckling House https://www.uglyducklinghouse.com/wood-inlay-ornament-german-glass-glitter/
0 notes
Last Seen Blogs


