
Don't wanna be here? Send us removal request.
Statistics
We looked inside some of the posts by charlottegrrtt and here's what we found interesting.
Average Info
Notes Per Post
2
Likes Per Post
2
Reblog Per Post
0
Reply Per Post
0
Time Between Posts
6 days
Number of Posts By Type
Photo
14
Text
3
Last Seen Tumblr Blogs


Fun Fact
The KCSC sent more than 20K requests to delete posts related to prostitution and porn to Tumblr from January to June 2017.
Photo


Trip to Coombe woods! Did a recky today for the potential outside photoshoot depending on the weather and it was really sunny but we didn't have the camera with us or the clothes haha. It turned out to be a very useful trip because I got loads of good ideas for the photos and I also found myself some nice pieces of wood for hanging my samples with for the show. more about that later on
I went round standing in positions I thought would look cool and gaby took test shots on her phone which were really useful to look at and work out what kind of pictures I wanted, how zoomed in I wanted them, what kind of angle, the composition, the pose etc. I was shocked by how green it looks which is perfect for my project as it has been consistently colourful throughout. I think that a combination of bright green photos like this with the bright blue ones from the studio shoot will make a very eyecatching display for my show. I was thinking to have them separately but I think that a combination of blue and green will look really nice but I will work that all out further down the line.
I really like the shots where Gaby is standing very far away and captures a vast amount of the woods in the picture with me looking very small in the middle somewhere. Obviously, this doesn't allow you to see the clothes clearly but I like the idea of showing the magnificent bright green of the forest as the environment is very important to me and is a key part of my project. This links with the concept of the sublime coined by Edmund Burk in the mid 18th century focusing on depicting “a greatness beyond all possibility of calculation measurement or imitation”. I wanted to capture this feeling of the sublime in which you feel insignificant in relation to the enormity, brilliance and complexity of the natural world which is something I often feel and do not know how to capture or put into words. I have always been totally in awe of our environment and enjoy spending my time appreciating it as much as possible as well as incorporating it into my work. Mother nature is a never-ending source of inspiration for me. In respect of this, I have tried to use this project as my effort to protect our environment while making new things and raising awareness to the effect that the fast fashion industry has on our planet.
Walking around the sunny woods I was ashamed I have never visited these woods before as they are so close to college and so beautiful. This just shows you it’s important to explore and appreciate the natural beauty around you. I am happy with this link to Romanticism to finish the project off as it is something that has always clicked with me as I love the idea of looking back to simpler times and rejecting the modernisation of our world as there is so much beauty out there better than staring at any screen. Excited for the actual shoot now!
0 notes
Photo


Was so happy to finally see everything I've made together in different combinations for the final studio shoot. I decided I wanted to stick with the blue background which reminds me of the sky backdrop in pauluschka’s photos of her clothing as a nod to our environment as well as the fact that the blue colour is bright and fun and made the clothes pop. I am really anxious to get outside in some good weather and take some pictures in nature from which my inspiration and purpose originate from to bring the project full circle. It is lovely to see all the recycled materials I have used in my designs all together as a celebration of waste materials in the hope to make a commentary about how we can use our waste and help reduce the effect that the fashion industry has on our beautiful world. I REALLY REALLY REALLY hope we get a sunny day as it would be such a shame to not get any good pictures of this out in the green environment of Somerset. I had initially thought that I wanted to take all of the pictures against a bright blue sky like a lot of shoots I have seen during this project from other designers but now that I have these bright blue studio photos I think maybe I want a nice green backdrop to get some more colour into my final show. Also, the likelihood that we will have a perfect blue sky in the next week is slim.
Overall really happy with the pictures, I have a lot of work to do going through them and deciding which ones I want to get printed for the show now! I want to have some cropped sections and some full-length pictures as well as a variety of poses and outfits to make the selection I end up with interesting. I also think that I don't really need more than 2 of each outfit otherwise it will end up as the Charlotte show with like 100 pictures of me on the wall. So nice to have this outcome now! Very happy with all my hard work!
0 notes
Photo


I recently found a big box of yarn scraps at college and decided I wanted to do something with them. I loved the variety of textures, thicknesses, and most importantly colour in a similar way to the fabric scraps sleeves that I knitted I wanted to combine them all to make a mix match clashing colourful pattern. I took a lot of inspiration from a crochet designer my friend showed me @pauluschkaa-blog or @pauluschkaa-blog.studio on Instagram who uses waste yarns in her crochet projects producing amazing fun colourful and recycled pieces. I started playing around crocheting with short leftover pieces that could not have been used for anything else as they were so short, and I crochet them into a neat circle. Most of the scraps only managed to crochet about 2 or 3 stitches and I used a wide range of yarn so it made a really nice colourful material. All of the ends are on the back and remind me of a rag rug. After making this sample I knew I wanted to try and make a top or something with the scraps I had found.
I liked the thin colourful stripes in her designs and the fact that she used all of the leftover yarn from her projects to make amazing colourful pieces that turned out to be her best sellers. I wanted to use a wider variety of colours and textures and put them through the knitting machine rather than crochet them as it would take forever but the button up top she made was a big source of inspiration for me. I also wanted my stripes to be regularly sized rather than random thicknesses like hers but I just really like the way I can just use up so many different types of yarn in one project. I played around with a few samples and tried out different colour combinations but I found that it looked best when you just put all of the colours completely randomly together. It would defeat the point of using scraps in a way if I only picked out the colours of scraps that I wanted and left the rest, creating more waste! After making a few samples I also managed to work out what tension I needed to knit with on the machine which was hard to work out because I was using a wide range of thicknesses of yarn and it needed to be loose enough to be able to knit the thick stuff and tight enough to make the thin stuff look uniform and not see-through.
I did a couple quick sketches and I knew it would be a simple shape to knit so I just went for it and started knitting. I came across a few problems at first because usually when using a knitting machine you’re meant to spin the yarn you are using onto a spool ready for knitting so that it comes out easily with regular tension and can sit on the knitting table without flying around everywhere but I was too lazy to wrap every single wool that I wanted to use into a spool as it would've taken forever so I just decided that I would try it without. At first, I strung up the machine as normal and put the wool on the table behind the knitting machine but as I knitted the ball of wool flew around and fell on the floor and causing chaos as well as not providing a constant tension so at the end of a row it would pull tight and all the stitches would fall off if I was not careful, and I was not careful multiple times which caused the knitting to fall off the machine which is incredibly infuriating and I find it very fiddly to put it all back on as I don't actually have that much experience. I found that if you held the ball of wool to the front of the machine and just manoeuvred it through the machine carefully holding it above the carriage as you knit it worked well for me and I stopped having that problem which made the whole process a lot easier and quicker. I really enjoyed knitting in this way and seeing the odds and ends come to life in a really colourful and interesting piece of knitting. It reminds me of the stuff I did knitting fabric scraps but this is even more fun I love itttt.
A problem that I came across in making the actual top was the cast on and cast off. The shape of the top couldn't have been easier as I just knitted a rectangle but it was hard to get the exact sizing right to fit me because of different factors like the tension and the fact that the type of top that I chose to do has to be exactly right or it won't look good. Also, the cast on and cast off were important because you generally can stretch knitting so it should be easy to make a top fit in theory, but you cannot stretch a cast on cast off so I had to make it the exact right measurement which was tricky. I had to make a few versions of the same top to get it exactly right.
I started realising as I was knitting that the ends would all have to be sewn/ weaved in at the end of the project as I was using so many different yarns and leaving them long at the end of each row. I tried to find a way to knit them back into the next row but it created staggered stitches and messed up the stripes so I decided I would just have to sit there and weave each one back into the knitting individually and by hand which took FOREVER.
To finish I used buttons I had found on old clothes that I no longer wear or just ones I had in the sewing box to make sure the top has been made out of 100% waste/unused materials that can now have a new life. I loved the top so much that I also made a matching skirt and the outfit is really cuttttteeee I was so happy with it!!!!
0 notes
Text
FMP research links
https://www.stellamccartney.com/gb/en/sustainability/sustainability.html
https://extinctionrebellion.uk/
https://www.evisu.com/ap/men/bottom/jeans.html
https://www.theguardian.com/artanddesign/2022/feb/13/louise-bourgeois-the-woven-child-hayward-gallery-london-review-everyday-horror-shows
https://www.theguardian.com/artanddesign/2021/nov/01/waste-age-exhibition-design-museum
https://iamgia.com/au/collections/denim?redirect_from_auto=us_shop&referrer=https%3A%2F%2Fwww.google.com%2F®ionRedirectReferrer=https%3A%2F%2Fwww.google.com%2F
https://www.wonderlandmagazine.com/2020/02/26/diesel-recycling-for-55dsl/
https://www.notjustalabel.com/bethany-williams
https://londonfashionweek.co.uk/designers/bethany-williams
https://designmuseum.org/exhibitions/bethany-williams-alternative-systems
https://www.yvonneandmitchel.com/
https://www.ianberry.org/
https://www.instagram.com/pauluschkaa.studio/?hl=en
0 notes
Photo


Continuing on trying to make a bag. I initially tried following a pattern for a macrame bag on youtube to see how it would look. I regret doing this because it took AGES to cut up 40x 1 meter strips of plastic and then knot them only to create a bag that I didn’t even like. It looked childish and not what I was after. I did like the colours though. I would have put a picture on here but I accidently deleted them!
I then decided to stick to what I know and try to make a crochet bag. I was thinking something small and square to make a basic side bag with a long shoulder / cross body strap. I started using the same recycled wool I used for the halter top and skirt but in a darker grey with some spare green wool I had because I was sick of using plastic. I wanted to try and make the recycled symbol as I had never made a pattern with crochet in this way before so I just wanted to give it a go and learn something new. I figured out that you just use both pieces of thread and just crochet over the colour that you don’t want visible for that particular stitch and then swap when you need the other colour. I’m not sure if this is the correct way to do it but it worked well for me apart from the fact that the wool that I was using was very different in thickness so you can see the green in the areas of grey crochet which is a bit annoying but I would know how to correct this next time. I drew up a grid to represent the stitches and rows and drew the pattern I wanted and then just followed that while I was crocheting. It could’ve been better but I was very impressed with myself for a first try. It was really fun to see the pattern emerging as I was crocheting.
I did however decide that this is not the direction I wanted to go in for the bag, mainly because it was messier than I had hoped, and also because I really did want to utilise the plastic in some way in my collection and I wanted the bag to be made from plastic waste. I really like the idea of a new reusable funky crochet bag made from old single use plastic. I started by cutting up super thin strips of bags I found at college and I tried to put them through my knitting machine to see if it would work, which it didn’t. I was not surprised. I then got a thinner crochet hook than I had previously used and made a detailed granny square with a circular centre. I wanted it to be lacy and detailed if possible and it actually worked really well and was easier than I though to crochet the plastic when it was so thin. I really like the way it looked and it also made some really cool shadows but when I went to crochet a matching one for the back of the bag I couldn’t find the same pattern I had used on the internet which was literally INFURIATING because I wouldn’t be able to do it without the pattern. I decided that I would just make a plain square for the back but I was not happy about this at all :( I plan to join these with a few rows of crochet to make it 3D and then make a long strap and attach at the sides.
0 notes
Photo


Playing around with alternative ways to create material out of plastic. I tried macrame and weaving and experimented with ironing to fuse the plastic after. It was not successful really i don’t like the way the weaving looks, maybe needs neater thinner strips? The macrame is cool in the way that it can make patterns like the chevron one I made but I’m not keen on any of these samples. I’ve been experimenting to use plastic in some way because I really like the plastic knitted stuff at the start of the project but decided against making clothing because of the texture but I would like to make a bag. I will continue trying perhaps with finer strips of plastic and I might go back to crochet as it did look really nice. Also I could perhaps follow a macrame bag pattern might work well? Also I would choose different colours because I want it to go with all of the clothes I’ve been making.
0 notes
Photo
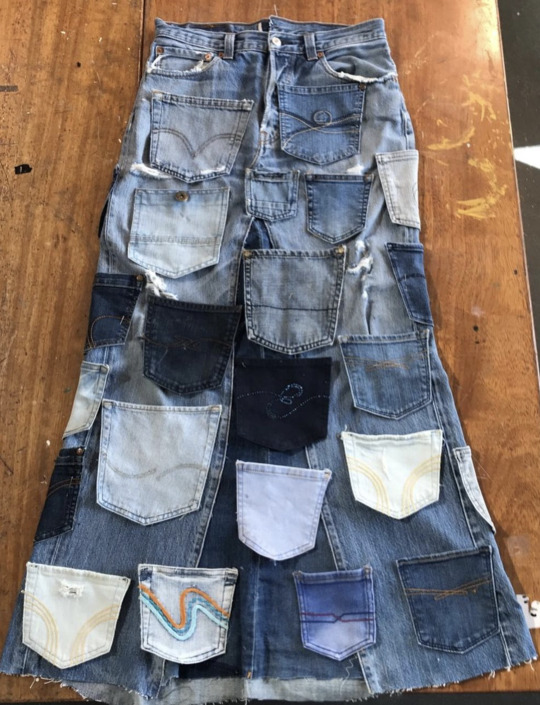


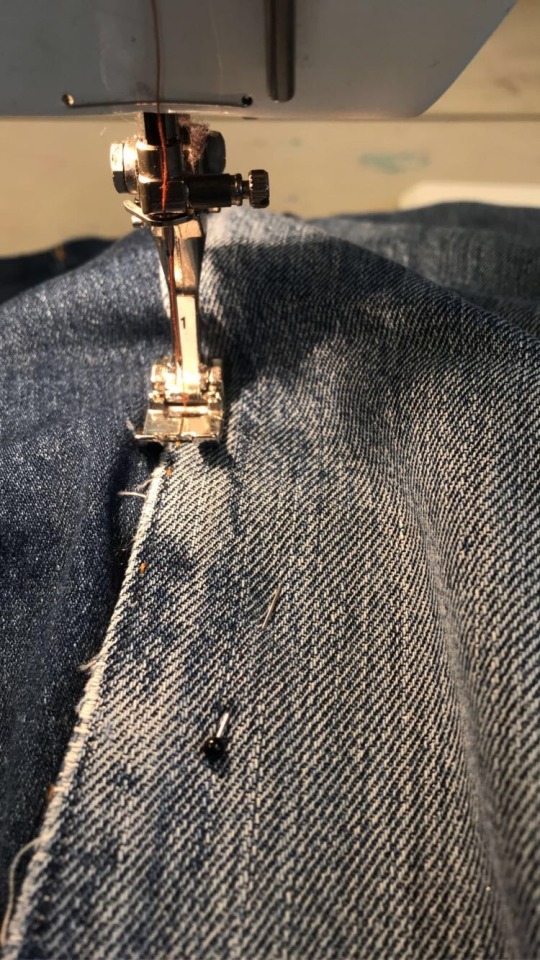
I decided after a lot of sketching and material sourcing that I wanted to make a maxi skirt for my collection from recycled denim. I think that this will look nice with small tops and the classic denim hues go with everything so it will work well with my collection. I had a 2 pairs of old Levi’s my grandad gave to me a couple years ago in case I wanted to make something with them. One of the pairs I have taken in at the waist and are now my favourite pair of jeans, and the other pair I haven’t known what to do with for ages so I decided to finally make use of them for this project. I wanted this piece in the collection to look obviously recycled so I kept the jeans mainly intact so that you can see that they were jeans before they were up cycled. I unpicked the inside leg seam on both legs as layed them out flat. I could have joined them together at the front and back but I didn’t want a tight fitting skirt so I layed them out flat and cut another section of denim in a darker wash to add interest and then place that in the triangle gaps left at the front and back. This made an interesting triangle panel to add volume to the bottom of the skirt. I kept all of the original features of the jeans on the top like the button fly, the belt loops and the front pockets. Maxi skirts like this have been very popular along with the maxi cargo skirts with lots of pockets and buckles, zip off features and buttons, so I wanted my skirt to resemble this trend.
Although the idea of following trends is very much a trait of a fast fashion buisness, I want my clothes to appeal to the same audience these brands target who undeniabley want to be trendy. I don’t think this is problematic unless you ditch old things to make way for the new. Instead I am trying to make something new and current from something old, ‘uncool’ and otherwise unused that is versitile and can last a long time and go with a lot of different outfits.
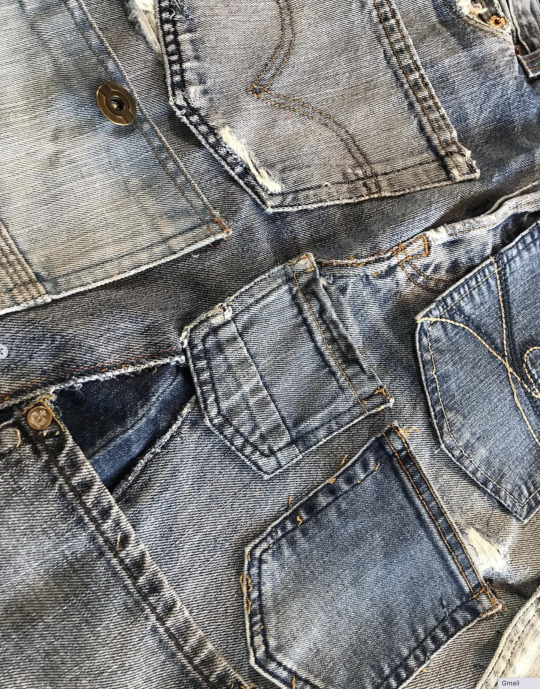
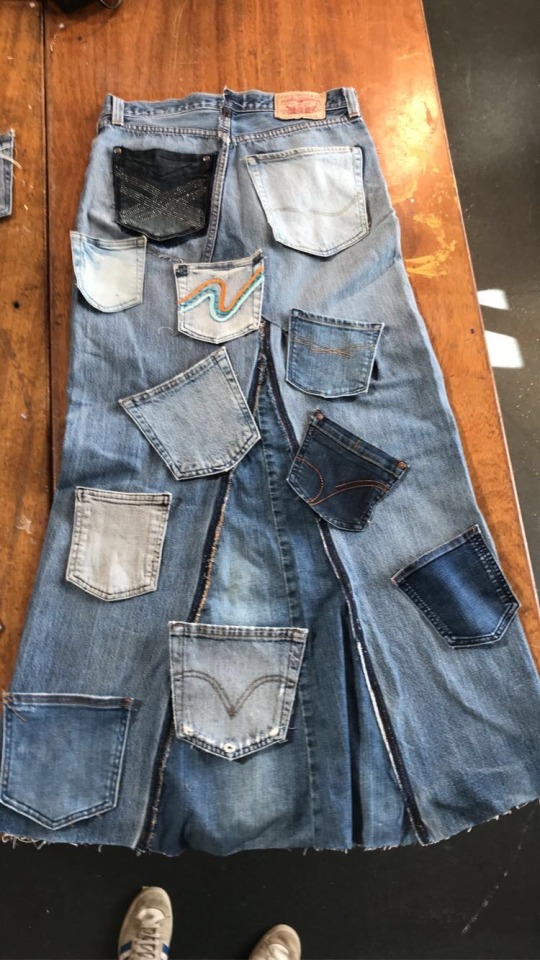
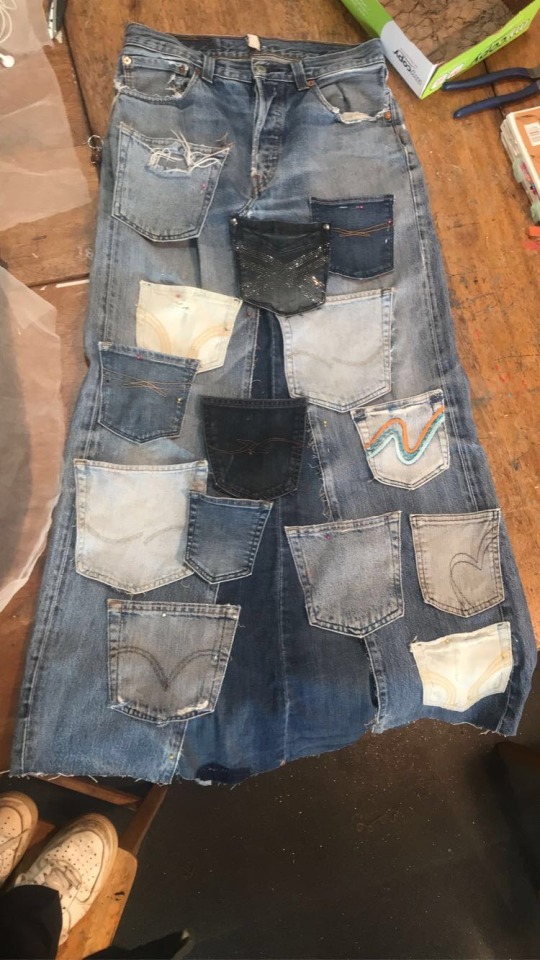
I spent HOURS removing the back pockets from all of the jeans I could find. I used all of my old denim scraps that I could get my hands on as well and leaving all of the jeans in the textiles room pocketless! I decided that the top stitching on the pockets was an important feature of classic denim piece so I wanted this on my skirt. This meant that I had to unpick two rows of tough denim topstitching from every single pocket. I sat in front of the TV with my stitch unpick and a pile of old jeans for what must’ve been 10 hours if not more. I picked off all of the old thread and then they were ready to sew onto the skirt. I debated for ages about how to approach this massive task. A lot of people suggested that I cut the pocket off of the old pair of jeans along with the denim underneath so that the stitching that I wanted to keep remained intact and then I wouldn’t have had to sew them all on again but I didn’t want loads of layers of denim underneath the pocket on the skirt, it would’ve looked messy and the only way I could think to attach them would’ve been glue and I really didn’t want to do that. I also knew that i wanted the pockets to be functioning pockets so I knew that i was going to have to pick them all off individually and re sew them back on.
So, after I had got about 40 pockets, I started trying to arrange them on the skirt to see what looked best. I wanted them all over, to look almost like a mosaic of old pockets, a patchwork of old stories, all different colours and sizes and patterns. I started arranging them haphazardly and at random angles. I thought for ages that it would be really cool to have one upside down but I completely went off this idea. It meant that the pockets had to overlap which I didn’t like and I wanted the pockets to be fully function so I decided to arrange them more neatly which looked way better. One thing I really regret doing is taking the pockets off of the original jeans and then putting random ones back in their place because where the jeans have faded over time the denim underneath the pocket remains a much darker wash and it leaves a pocket shape on the jeans. All of the pockets i tried to put over these marks were not big enough or didn’t match or just looked weird and i wish i had just left the original ones on, not sure why i ever took them off in the first place but oh well.
Now I have the mammoth task of sewing them all back on and fitting the entire skirt under the sewing machine yay.
0 notes
Photo


I’ve started using scrap denim to make some tops inspired by up cycled designs I have seen on Tick Tok and instagram as well as being influenced by 90s celeb culture and brands such as Evisu and Diesel. I started by cutting up pieces and pinning them on the mannequin to make a corset style top. I tried to use the seams from the original piece to create lines on the top to make it look like a corset with boning, I was inspired by a patchwork denim jacket in diesel’s UPCYCLING X 55DSL collection which similarly uses previous garments seams to create lines on the new piece. I liked the idea of using features of the original clothing, which was typically a pair of jeans so had lots of good seams and pockets, and I think its interesting as it makes the new pieces reminicent of old clothes, carrying the memories with them. I want these denim pieces to be obviously upcycled to show how we can use old things to make new without producing waste. I was inspired by Evisu to remove all the pockets from the old jeans I was using and try to make something with them. Once again I like the idea of using the pockets because of the mystery of what has been in those pockets as well as the fact that they all have unique stitching, often as a trademark of the brand, for example Levi’s have the classic curved v shape embroidered on all their pockets. I started making a top with the pockets and I plan to get as many as I can and cover a pair of jeans or perhaps a long skirt to mimic the Evisu pocket jeans but with all different colours of denim and sizes of pockets. I want it to be obvious that it has been made from previous garments to encourage recycling of textiles and to add history to the piece. I think that the denim will go really well with the things I have already made which will be good for the photoshoot at the end. I feel like denim is a good material to use in general for up cycling because it is long lasting, comes in a wide variety of washes, can be frayed to created a nice edge without hemming, it is tough and opaque, and readily available. Everyone has an old pair of jeans that they could make into something new. Very much enjoying playing around with denim at the moment! Soon I will refine my ideas and create some actual pieces for the collection.
1 note
·
View note
Photo


The first shoot for my project in the studio!!!!!
Gaby photographed me in the outfit I have been busy knitting recently. The scraps sleeves are finally finished after hours of hand knitting and cutting up old fabric. I also decided to make matching leg warmers to add balance to the outfit as the sleeves are very loud so I had to match the energy at the bottom of the outfit so it doesn't look top-heavy if that makes sense. I thought they looked cool with baggy jeans as well as the skirt I have knitted so I did another outfit with some jeans I found in a charity shop with a grey waistband and I like the feel the outfit has, relaxed streetwear vibes with a twist. I like how plain the outfits are without the sleeves as it makes the sleeves and the leg warmers the focal point of the pictures which I think is important.
I love the garments I have made out of knitted scraps as I have used lots of old clothing of mine, and my family from when I was younger as well as old work uniforms, my ex-boyfriend's T-Shirt, Clothes from charity shops and other materials that have emotional connections to from the different times of my life that I associate them with. When I put the outfit on I felt nostalgic and comforted in a way by the rich array of memories of people and periods of time in my life knitted into a colourful mini jumper.
I want to continue to make clothes for my final collection that use scraps/found materials which add a level of intrigue and a sense of history. I think that in the environmental climate that we are currently in with regards to the fashion industry, this would be a good thing to glamorise encouraging people to cherish their old clothes that have sentimental value, making them last for longer so that they buy and waste less, as well as making buying second-hand cool due to the charm of a mystery previous life and personal connection with their previous wearer. This can also be a good solution to fast fashion because one of the major reasons so much clothing is bought and wasted is the fact that the clothing is so affordable, but buying second-hand would also be cheap, if not cheaper than brands like Primark or H&M while reducing waste at the same time. So if we can make the fact that someone has previously owned and loved an item prior to our own use cool, we would be flying.
I used the blue backdrop to create a colourful and fun image imitating a blue sky linking back to the theme of nature and how reusing waste to make new things in turn plays a part in protecting the environment. I had a good conversation with Gaby prior to the shoot about this backdrop as well as potential poses and angles I could try. During the photoshoot, Gaby and I collaborated to try a range of shots in order to get the pictures both Gaby and I were happy with. I really like the ones where my arms reach towards the camera because they look fun and they show the detail of the knitting well which is important to me as it is the main focus of this outfit as well as the fact that the bright colour and the knitted pattern make striking and impressive looking photos in my opinion. I do find it really hard doing photoshoots because I always talk the entire time and laugh and make weird faces so end up hating all the pictures afterwards but I tried to be more serious in this shoot and it went ok. I wish I had someone else modelling my clothes, to be honest, but it is easier for me to make the clothes for myself as I am always available to measure and try things on so I can make the clothes fit well
There is something so rewarding about using up scraps you have saved up in anticipation of a project like this, I used about 10 years' worth of collected old fabric and clothes as well as my mum's stash from her own textiles practice. I was just so happy with this in every way! Brilliant pictures as well thanks to Gaby and her help with the photo shoot.
100% Recycled !!!!
0 notes
Photo


I knew that I wanted a basic halter top to wear underneath my knitted sleeves so after a couple of practice runs and a lot of note taking, measuring, and counting stitches, which is something I neglected to do and regretted when making the sleeves, I worked out the perfect pattern for the top. It was actually a very technical pattern for me to make as I am relatively new to the knitting machine and the halter neck style that I wanted required each side for the cup part to be knitted individually meaning I had to cast off the back piece and put the other side into the D position whilst knitting and then finish the strap, cast off, and then come back to the remaining side and knit the exact same for the other side. This made it extremely important to take notes as the top was knitted half at a time basically, meaning that one side could’ve been completely different to the other if I hadn’t made notes and followed the exact pattern. It was also very tricky getting the number of stitches to increase and decrease for the cup parts of the top right. I was pretty much winging it with the first two that I made and making those definitely helped me in being able to make the final piece. The first one I made was was too short and I didn’t like the ruched part at the front because all I wanted was a simple top with ties around the neck to show off the open neck of the sleeves to create a cool layered effect. The second trial run was much better and then I used what I had learnt in making these to make the final top which I am very happy with.
For the final top I used 100% recycled grey wool which has little specs of dark grey in that I really liked. I think that this top will go perfectly with the sleeves and I cant wait to see the together. I also knitted a skirt out of the same wool to potentially wear with this outfit in a photoshoot. it was just a basic rectangle so was nice and easy to make. I do wish it was longer but I ran out of wool and it would defeat the point to buy another entire ball just to finish off the skirt. Also the wool was relatively expensive so we are stuck with a micro skirt for now!
I’m actually really impressed with myself and this top because I’ve never tried to make anything like this before and I’m shocked how well it turned out without having used a pattern. I will most likely make some of these to sell in cool colours now I know how!
0 notes
Photo


After researching about recycled materials I could potentially use for my project I found some recycled wool thin enough to use on the knitting machine. I've started practising shapes that I could make with spare wool I had lying around at home to work out what I want my recycled wool top to look like. Working alongside drawings and measurements I managed to create a halter top pattern that I can recreate when I have ordered the recycled wool. There are a couple of things I would change and a few adjustments that need to be made next time so I am happy that I did this trial run to avoid wasting wool if I mess up when making the actual top.
The top I plan to make based on this shape will not be colourful like this one as I plan to pair it with a piece made from knitted fabric scraps which will be very bright and colourful, the main attraction, and I don't want more colour on top of that to confuse the outfit and take the focus off of the main piece which will be my hand-knitted sleeves.
0 notes
Photo


After hours and hours of hand knitting and fabric cutting I finally managed to put together my sleeves made from recycled fabric. I made the pattern up as i went along with the knowledge gained from my last experiment and i knitted two long rectangles for the arms with a curved shape at the top to fit into the shoulder, and two short and wide rectangles for the front and back with concave sides to accommodate the shoulder. I like the shape that this pattern creates, with the top being much more open on the neckline and shoulders which would look nice with a top / some other detail underneath. I did make a mistake when making this because when I knitted the first sleeve I didn’t write down any notes on the pattern meaning I had to start again from scratch when making the next sleeve and I made it too big so i had to start that sleeve again. After I remade the second sleeve it still looks a little bit different from the first one so I will never do a project like this again without taking notes to help me replicate the pattern exactly again, it was a nightmare!!
When knitting I deliberately left the ends of each row long so that i could use them to tie to each other to join the knitting. I spent ages working out how I would join these pieces to assemble the final top because the material is very thick and chunky so it would’ve made a thick join if I joined it the way you normally would with knitted material. this method worked surprisingly well and I actually really like the way it looked so I decided to leave the ends of the fabric out to add the tassels. It reminds me of the Stella McCartney knitted dress for the project with extinction rebellion using recycled materials with the long pieces dangling off of the knitting. I think that it really celebrates the fabric that has been used allowing you to see what has been used in the making process. they also will look great in photos adding another level of fun to the sleeves.
Another problem I came across while making this was that I broke one of my knitting needles while knitting as it is quite hard work to knit with fabric at this tension so a lot of force was sometimes used to complete the stitches. I had to find another set of needles to continue knitting with but i didn’t have any of the same size so i had to switch to a bigger size needle which creates a variation in the size of the knit halfway up one sleeve which is super annoying. I think that i would probably be the only person in the world to notice this detail but still annoying. There are definitely things I could improve on with this technically but I love the way they look and the idea behind it to use recycled materials to make something new and colourful and crazy. I also just love knitwear and the pattern that the knit gives along with the colours and patterns and textures of the old fabrics. I love it think it worked super well and it was really fun to make.
0 notes
Photo


More crochet and knit samples looking very colourful!
I tried some plainer plastic bags and I like how they look reminiscent of the original bag, even recognisable with the granny square I made from a Tesco bag for example.
I also tried cutting up old fabric scraps from old clothes and previous projects and knitting these. This was very fun to do and created a softer material than the plastic when knitted, which would be better for making a piece of clothing. The different types of fabric create variation in the knit which I find interesting. Because I am using scraps there is not an infinite length I can knit with of each waste material I am using, therefore, I have to use lots together creating these stripes which I really like, it sticks to the recycled nature of the project and creates a rich variety of colours patterns textures and thicknesses in the knit.
0 notes
Photo


Starting my FMP titled “Recycled Fashion”
I've started by finding waste materials that I can recycle to make materials for my designs. Knit and crochet seemed like a good way to start. I used colourful plastic bags and cut them into long strips to work with. I used very chunky knitting needles to start which made a loose-knit and a smaller crochet hook which made a firmer plastic material. I began to realise which types of bags worked better than others and how to join the ends when changing colour. I was also getting used to the fact that the plastic is not that strong and can break when stretched during the knitting so you have to adjust slightly in order to be more gentle when knitting. I like how random they look and the variety of colours and patterns and textures from the different bags.
I love how these have turned out and the textures that they create. This has given me many ideas about designs for my final garments...
0 notes
Photo


Despite the fact this is old work I feel this is a relevant source of research for my FMP as the whole idea was based on the work I completed in the previous unit. The design museum completely changed my approach to making work and the environment and fuelled my FMP.
0 notes
Text


The Red Dress - Kirsty McLeod
This dress has traveled across the world bringing together women from all different walks of life to celebrate their voices and build a sense of community through the practice of embroidery. With over 1 million hand stitches the dress is covered in embroidery of all different styles and colours but the most important part of this artwork is the stories behind the 137 artisans commissioned.
#thereddress #reddressontour #womensupportingwomen
1 note
·
View note


