
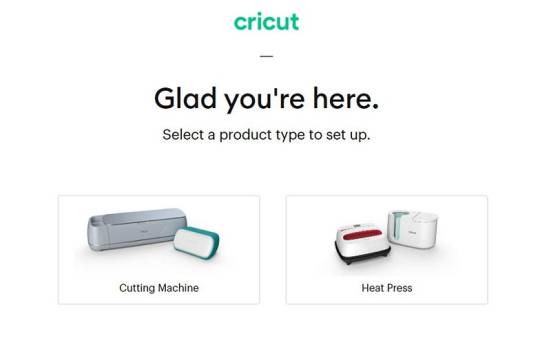
Cricut is a versatile tool for crafting limitless handmade projects. There is a Cricut- compatible app that you can pair with the machine to take your creativity to the next level. Visit cricut.com/setup to download and install the Cricut Design Space application and set up your Cricut machine properly. The cricut software app will make it easy to get into some pre-made projects that you can include in your crafting. Thus, make sure to download and install the app on your Windows & Mac computers or Android and iOS devices.
Don't wanna be here? Send us removal request.
Statistics
We looked inside some of the posts by cricutmaker01 and here's what we found interesting.
Average Info
Notes Per Post
2
Likes Per Post
1
Reblog Per Post
1
Reply Per Post
0
Time Between Posts
11 days
Number of Posts By Type
Text
17
Last Seen Tumblr Blogs


Fun Fact
In 2020, 44% of users from Denmark used Tumblr daily.
Text

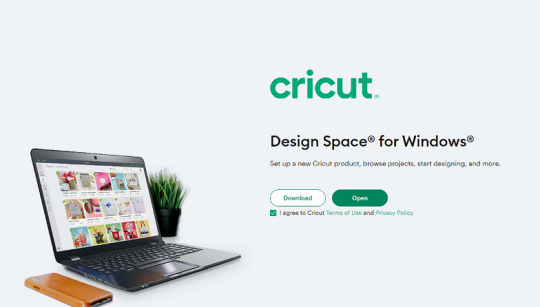
Begin your crafting adventure with Cricut, the premier tool for DIY enthusiasts. With Cricut machines, crafting DIY projects like decals, stickers, frames, keychains, tote bags, hats, cards, t-shirts, and more is effortless. Visit Cricut.com/setup and download Cricut Venture, filled with fonts, images, and project templates. Whether you craft for pleasure or business, Cricut simplifies the entire process. Set up your Cricut machine and create projects that express your unique style.
0 notes
Text
How to Set Up Cricut Explore Air 2: A Complete Tutorial
Are you wondering how to Set up Cricut Explore Air 2? If yes, then you are in the right place! With years of experience using the Cricut machine, I am here to guide you through every step of the setup process. The Cricut Explore Air 2 is a versatile tool that allows you to cut and craft with over 100+ materials, like cardboard, paper, cardstock, vinyl, fabric, and leather. To get started, unbox the machine, connect it, and download the Cricut Design Space app. Let’s start the entire procedure in a step-by-step manner.
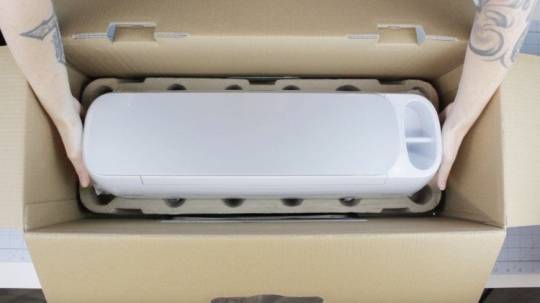
Unboxing Cricut Explore Air 2
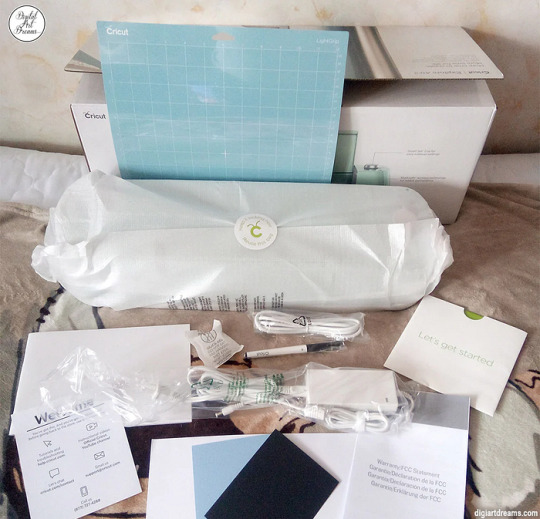
Once you go to set up Cricut Explore Air 2, the first thing you need to do is unbox the machine. Then, remove all the items inside the machine and check whether they are present. Once you have checked all the materials, you can move toward setting up the machine.
Here are the tools and supplies you get inside the box:
Cricut Explore Air 2
USB cable
Power adapter
Guidebook
Accessory adapter
Fine-point blade
Materials for a test cut
LightGrip cutting mat
Cricut Access trial for a month
These are the items you will get inside the box with your machine. To work on DIY projects, you will need other tools and accessories that you will have to buy personally. These tools will be a mat, a scraper, a weeding tool, a lint roller, and the materials required for your crafts.
Set up Cricut Explore Air 2
Once you have unboxed the machine and checked all the items, you can proceed to set up the Cricut cutting machine. For the setup process, you have to follow these steps:
First, you have to take the machine and place it on a flat surface. Try to put it in a place where it is safe, and you can keep it for a long time so you don’t have to move it more often.
Then, plug in the machine using the power adapter. It will give the machine a power supply.
Next, press the power button on the machine and turn it on.
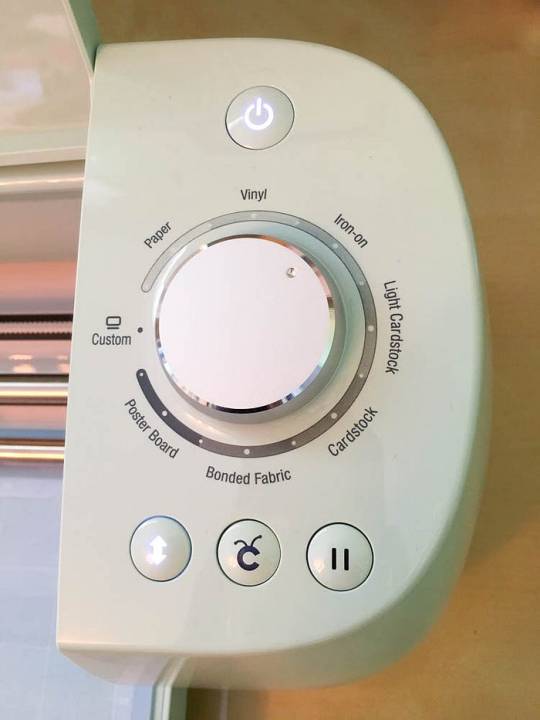
Now, connect the machine to your device using Bluetooth or USB.
Afterward, visit cricut.com/setup and download Cricut Design Space.
Also, open the Design Space and log in with your username and password.
First-time Cricut users need to create an account, as Cricut requires an ID to work on it.
Connect Cricut Explore Air 2 to a Computer
Now that you know the process of setting up Cricut Explore Air 2, you can connect your machine to your computer. Here, we will see how to connect the machine to a Windows computer:
To start the connection, you should first turn on the machine. This will allow the machine to be connected to your computer.
The next thing you need to remember is that you should keep the machine within 10–15 feet of range.
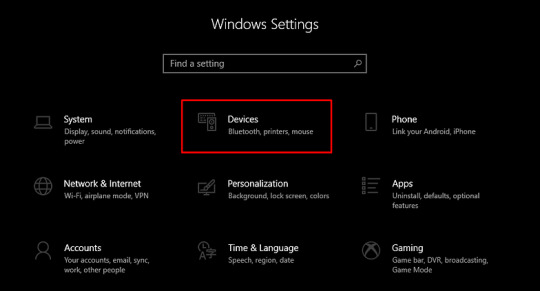
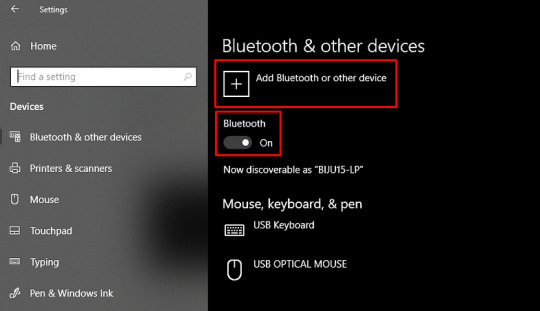
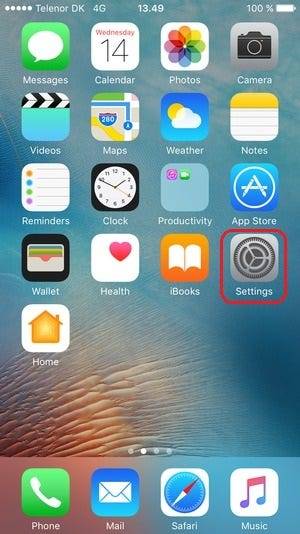
After that, you should click on the Start menu and go to Settings.
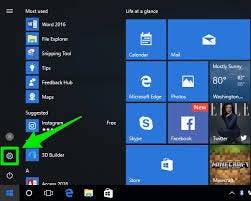
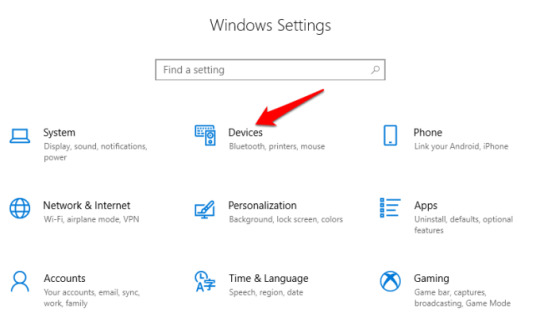
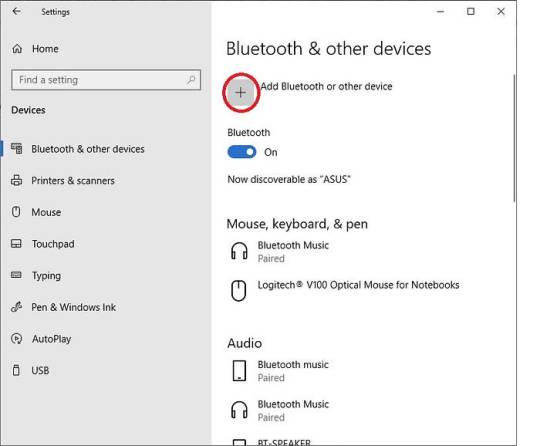
Also, select the machine from the list. If the device asks you to enter a code, type 0000 and then connect.
Your Cricut machine is now connected to your computer device.
Downloading Cricut Design Space on Your Computer
Downloading the Design Space app is important for setting up the Cricut cutting machine. The software helps you control and use the machine on your device. On the app, you have the option to select, create, and upload a design that you will later cut on your machine. The steps to download the software are written below:
Initially, you have to turn on the computer and open a web browser.
Next, visit cricut.com/setup and click Download on the Design Space app. Before that, you will have to tick the box to agree to the Cricut Terms of Use & Privacy Policy.
Then, you should go to the Downloads folder and click on the downloaded file twice.
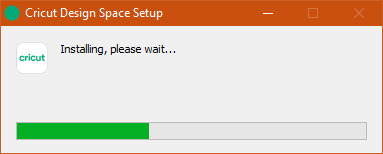
A new window will pop up on the computer’s screen, which means the computer has started installing the app.
By the way, before the installation starts, your computer may ask you to agree that you trust the app on your computer. If you see it, you have to agree that you trust the app.
Once the app is installed, you have to log in with your Cricut ID.
Conclusion
In short, it is important to learn how to set up Cricut Explore Air 2 if you want to use it for your projects. It is an amazing crafting machine, especially great for beginners. It is simple to use and gives you a lot of options to make your projects. To use a Cricut machine, you need Cricut Design Space on your device. With the app, you can use designs to cut on the machine and create unique designs and projects.
FAQs
What Can I Do Using Cricut Explore Air 2?
This Cricut Explore machine allows you to make multiple projects. It is powerful enough to cut from the thinnest to tough materials. You can cut materials like adhesive vinyl, heat transfer vinyl, sticker paper, cork, cardstock, fabric, and heat transfer vinyl. With all these materials, you can create stickers, mug designs, designs on fabrics, greeting cards, and many more things.
Is It Easy to Set Up Cricut Explore Air 2?
Yes, it is! You will have to follow the steps to set up your Cricut cutting machine. The first thing you have to do after buying a machine is unboxing it and checking for the accessories. Then, you must prepare the machine for the setup process. Once the machine is prepared, you should connect it to your device and then download the Cricut Design app. Once you log in with the app, your setup is complete.
Do I Need Software to Work With Cricut Explore Air 2?
Yes, you will need Cricut software to use the Cricut Explore Air 2 machine. Cricut has two different software programs that you can use. The first one is Cricut Design Space, which is a free app that you can download and use on your device. The other app is Cricut Access. You can also download it from the internet, but it is a premium app, and you will have to subscribe to use it.
Source: Set up Cricut Explore Air 2
Visit here to know More: Cricut Joy Xtra
Pinterest
0 notes
Text
How to Use a Cricut Mug Press: A Step-by-Step Guide
When I first bought my Cricut Mug Press, I was quite nervous about learning how to use a Cricut Mug Press. It took some time to read many articles and gather all the essential information. Now that I have gained experience using it, I want to share all the basic instructions for using this Cricut machine. If you are uncertain about using it, make sure to read this post to the end.
The Cricut Mug Press is a small yet impressive tool that transforms plain mugs into stylish designer pieces. Despite its compact size, it is incredibly capable and essential for crafting custom mugs for personal use or as gifts for loved ones. So, let’s start with the materials you will need for your project.
Tools and Supplies You Need to Create a Personalized Mug
Before learning how to use a Cricut Mug Press, it is important to know the necessary materials you are going to need. Here is a detailed list:
Cricut cutting machine: You will have to use this machine to cut designs from the infusible ink sheet. Suitable Cricut models are Cricut Maker 3, Explore 3, or Joy.
Cricut Mug Press: This is the machine used to transfer the infusible ink design onto your mug.
Sublimation mug: Specific mugs made for the Mug Press machine are necessary because they fit perfectly and ensure the best results. Using other mugs of different shapes and sizes may not fit or work well with the machine.
Infusible ink sheet: This material is basic as it is where you will cut your designs, which will later be transferred onto the mug using heat in the machine.
Heat-resistant tape: It is essential for securing the infusible ink sheet onto the mug during the pressing process.
Lint roller: Used to ensure the surface of the mug is clean and free of debris before applying the infusible ink design.
Weeding tools: These are used to remove excess or unwanted material from the design before transferring it to the mug.
Once you have assembled all these supplies and tools, ensure your setup is ready. Connect your Cricut machine to power and turn it on. Establish a connection between the machine and your device using Bluetooth or USB. Download the Design Space app on your device and log in with your account. This setup is essential before proceeding with the Mug Press.
Before beginning to use the Mug Press, ensure it is on and heating up properly. Following these steps ensures you are ready to create custom mugs with your Cricut machine.
How to Use a Cricut Mug Press in 4 Simple Steps?
When you have assembled all the necessary tools and completed the setup, you can start working on your project. Here are the 4 steps you need to follow to use the Mug Press:
Step 1: Create a Design on Cricut Software

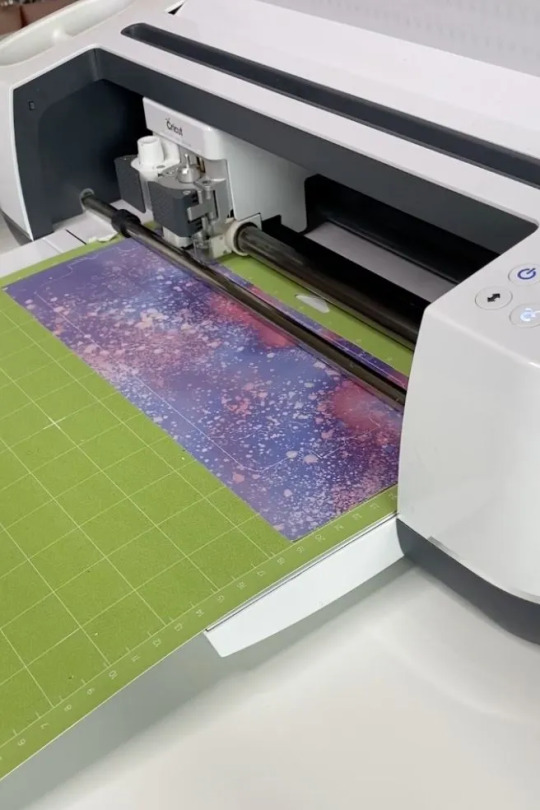
Step 2: Cut and Weed Out the Excess Material

After completing the design, insert the material into the machine and press the Load button. The design will be cut quickly. Once the cutting is done, unload the material and use a weeding tool to peel away any unwanted parts from the design.
Step 3: Transfer the Design to Your Mug

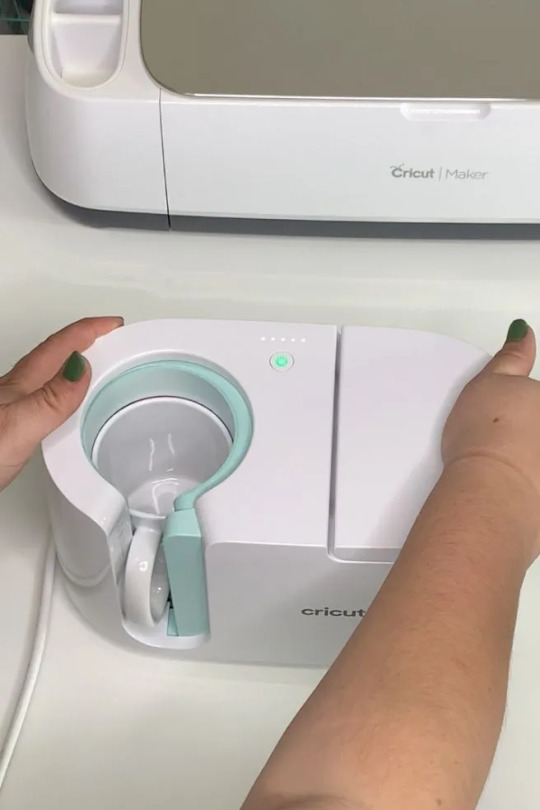
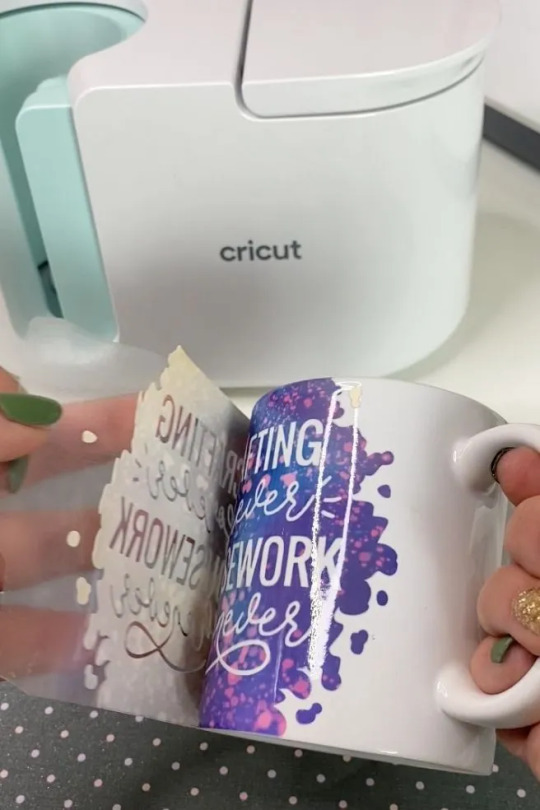
Step 4: Reveal the Final Result

When the pressing is complete, carefully remove the mug from the machine, handling it by the handle to avoid burns. Allow the mug to cool for 20–30 minutes. During this time, it’s important to avoid touching the heated areas to prevent injury. Once the mug has cooled down completely, it will be ready for use, showing your newly transferred design beautifully.
Conclusion
In short, learning how to use a Cricut Mug Press is quite easy. As you can see, the process is simple. First, gather all the necessary tools and accessories and set them up. Once the setup is done, create a design on the Design Space app, cut it on the Cricut cutting machine, and press the design onto the mug using the Mug Press machine. Once the pressing is finished, you will have a beautiful mug ready to use however you like.
FAQs
What Are the Supplies Required for Cricut Mug Press?
To work with a Cricut machine and create designer mugs, you will need some essential supplies:
Cricut cutting machine
Cricut Mug Press
Infusible Ink
Heat-resistant tape
Weeding tool
Lint roller
Sublimation Ink
These tools are important to prepare and execute projects with Cricut effectively.
Do I Need a Computer to Use Cricut Mug Press?
No, not necessarily! You can download the Cricut Design Space app on your computer or any device. If you don’t have a computer, you can use your Android or iOS mobile instead. However, using a computer for the app allows you to work on projects more effectively. Just ensure your computer runs on either Windows or macOS, as Chromebooks do not support the software.
Can I Use Any Mug in Cricut Mug Press?
No, you cannot! The mug used in the Cricut Mug Press must meet specific criteria. It should have a maximum height of 4.72 inches and a diameter between 3.2 to 3.4 inches, with a capacity of 10 to 16 ounces (295 to 450 ml). Also, the mug’s surface should be plain; textured or rough mug surfaces are not suitable for the machine. Ideally, the mug should be white for best results.
Source: how to use a Cricut Mug Press
Visit here to Know More: Cricut Easy Press
Pinterest
2 notes
·
View notes
Text
Cricut Maker 3 Set Up: Getting Started With 5 Easy Steps
Are you in search of a Cricut Maker 3 set up guide? I’ve got your back! Remember the day you made up your mind to start crafting with Cricut? You would have been thinking about the moment when you could make your own crafts hassle-free. In addition, you don’t have to buy anything from outside. Just create your own customized projects easily. I know it must have taken a lot of time to think it over. But better late than never!
Now, the question is how to get started with Cricut Maker 3. Buying a new machine is not enough. Therefore, I will walk you through every step of the Cricut machine setup. From unboxing to downloading the Cricut Design Space app or connecting the machine to a Windows PC, I will explain everything that you need. Let’s start learning how to set up Cricut Maker 3 on your Windows computer.
Step 1: Unboxing Cricut Maker 3
Here, I am going to show you the list of items that I received while unboxing my trust Cricut machine:
Maker 3 machine
Power adapter
Material for a test cut
Power cord
Quick Start Guide
Warranty document
Accessory Adapter (already installed in the clamp A)
USB cable
Bonus materials
Premium fine-point blade and blade housing (already installed in clamp B)
Safety document
Step 2: Verify System Compatibility
Okay, now it’s time to check for compatibility. In it, you need to find out whether your computer or any device you are using for the Cricut Maker 3 set up. Ensure your device or computer meets the basic system requirements.
In order to make it easier for you, I have added some information below for Windows computers only. Go through it and verify with your PC.
Operating System: Windows 10 or later
CPU: Intel Dual-Core or equivalent AMD processor
RAM: 4GB
Disk Space: 2 GB free
PC with Bluetooth in-built or USB port
Display: 1024px x 768px screen resolution
Now that you have checked the system needs, you should proceed further to download the Cricut Design Space app.
Step 3: Download & Install Cricut Software
Once you know whether your system is compatible with running this software, you can start downloading it on your PC. Don’t worry; I will keep the steps beginner-friendly. Let’s start!
First of all, you need to turn on your PC.
After that, open any browser that you prefer and visit cricut.com/setup.
As you enter the site, you will be prompted to select your product type: Cutting Machine.
After that, you have to click on to check the I agree checkbox.
Then, just click on the Download button.
Head to the Downloads folder to install your software when it is downloaded.
To install it, you have to click on the downloaded file and start the installation.

All right, you have downloaded the software now. What’s next? The next step is the fun part: setting up the Cricut machine.
Step 4: Cricut Maker 3 Set Up
After downloading and installing the software, you have to launch it on your desktop. After launching the app, follow the steps in the section below and finish setting up your machine in no time.
Here’s how to set up Cricut Maker 3:
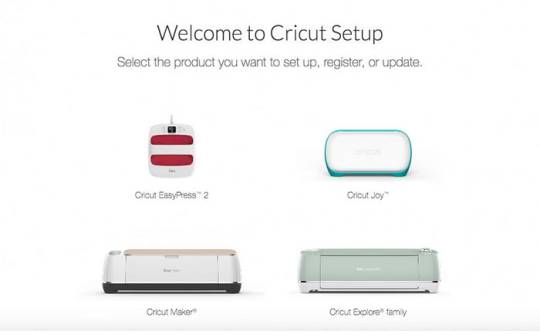
On your Design Space, click on Product Setup.
Then, create a Cricut account or sign in.
Next, select the Smart Cutting Machine.
Now, choose the Cricut model.
After that, follow the next step.
Step 5: Connect Cricut Maker 3 to PC via Bluetooth
Connecting Cricut to your PC is a piece of cake. All you need is a PC with built-in Bluetooth. However, you can connect your PC and machine using a USB cord. But here, I will explain how to connect Cricut to a PC via Bluetooth.
Here’s how to connect Cricut to Bluetooth:
Start by turning on your Cricut cutting machine.
After that, plug all the power cables into the wall outlet.
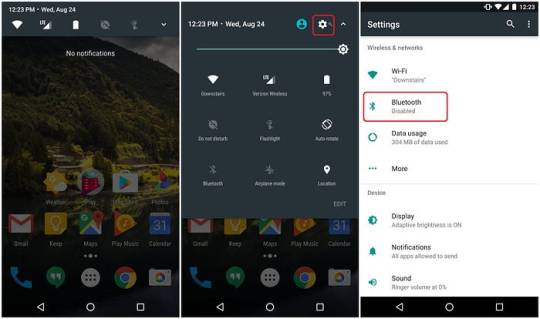
Then, you need to open Settings on your device.
After that, select the Devices option from settings.
Finally, it will be paired in a while. Now, you are ready to use your machine to make any project you want.
That’s all in Cricut Maker 3 set up! If required, you might need to follow some screen prompts. Don’t worry, they are easier, and you can do it.
FAQs
Question 1: Which computer is compatible with Cricut setup?
Answer: The list is endless if you are looking for a particular computer. However, you can use a computer that runs the Windows operating system. In addition, MacBook is compatible with the Cricut Design Space software, meaning you can easily set it up using these two devices. No matter which brand of laptop you are using with Windows OS, the only thing you require is the Windows operating system.
Question 2: How do I connect Cricut Maker 3 to a PC via a USB cord?
Answer: In order to connect your machine to the USB cable, you have to follow the steps given below:
Insert one end of the USB cable into your machine’s USB port.
Then, insert another end to your PC.
Once connected, you can easily send your design to your machine.
Question 3: Why is my Cricut Maker 3 not connecting to Bluetooth?
Answer: If you found your machine not connecting to your PC via Bluetooth, then you need to check the following points:
Check the power connection to see whether your device is properly turned on.
Ensure the distance between your machine and PC is not more than 15 feet.
Check for Bluetooth connection and confirm whether you have turned it on.
Final Words
Finally, you have learned the Cricut Maker 3 set up. In this blog, I explain each step, from unboxing the Cricut cutting machine to the final setup; I’ve got your back. As mentioned above, don’t forget to check the system compatibility; this is a must otherwise, the Cricut Design Space will not run on your PC. Lastly, you have two ways to connect Cricut: Bluetooth or USB cable.
Source: Cricut Maker 3 set up
Visit here For More Information: Cricut Joy Xtra
Twitter
0 notes
Text

Curious about setting up your Cricut? The Cricut Venture is a crucial step in getting your Cricut ready for action. From configuring the blade in the tool guide to installing the necessary software, it's essential for ensuring your Cricut operates smoothly. Begin your Cricut journey by completing its setup. For detailed instructions, head over to Cricut.com/setup.
0 notes
Text
A Guide for Connecting Cricut Joy to Computer [Windows/Mac]
Connecting Cricut Joy to computer but unsure how to do this? No worries; I’ve got your back! Initially, setting up a Cricut machine can be challenging. I also went through the same problem. Luckily, in my case, I got some help from my friend, who was a pro-Cricut user. But everyone might not be as lucky as me, so I decided to help you connect a Cricut machine to your device.
Since I have been crafting with Cricut for many years, I am experienced enough to guide you through the Cricut machine setup. In this blog, I am only talking about how to connect Cricut Joy to the computer of your choice. You must know that Cricut software is only compatible with Windows and MacBook, so we will only connect the device to a computer. Let’s explore this blog further to learn more about it.
Connecting Cricut Joy to Computer via Bluetooth
Before you start establishing the connection, make sure you have located your Cricut machine within 10 to 15 feet of your computer. Then, you can start following the steps further:
Windows
You will need to move to the Start menu and choose Settings.


Now, you will need to turn on the Bluetooth.
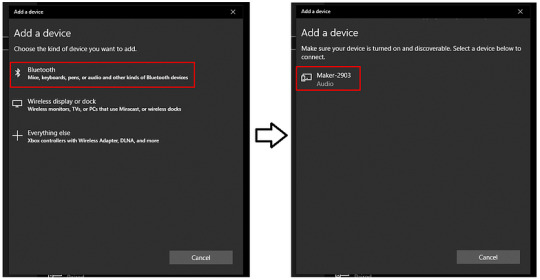
Then, you have to click on Add Bluetooth or other device.

Next, you will need to select the Bluetooth option and hold on for a while.
As it is visible in the opened list, you should select the model and move ahead.

Finally, you have completed the pairing between your Cricut and PC.
Wasn’t connecting Cricut Joy to computer so easy? If so, you can easily set it up in no time.
Mac
First, you need to turn on the Cricut machine.
Once it is turned on, you should place the Mac and machine within 10 to 15 feet.
Now, you need to place the Apple menu and choose the System Preferences option.


Once you find it, turn on the Bluetooth and wait for the computer to detect it.
Once it is detected, you have to click on the visible Cricut model from the available list to add it to your system.
Finally, your Cricut is paired now; you can setup the machine.
How to Setup Cricut Joy: Quick and Easy Steps
After connecting Cricut Joy to computer, it is time to setup your Cricut machine. The setup process is similar for both Mac and Windows computers. Let’s dive in without any further ado!
Step 1: Download Cricut Design Space
Open the browser on your desktop and visit design.cricut.com.
Then, you will move to the Cricut Design Space download page. Here, you have to click on the I agree checkbox.

After that, download the Cricut app.
Once you have downloaded the app, you have to install it.

Installation can vary depending on the computer you are using. The process is very different for Windows and Mac, so you can install it by following the simple instructions on your screen.
Step 2: Complete the Cricut Joy Setup
Now that you have downloaded the app, you can now setup your Cricut cutting machine at a glance. Let’s see the steps below:
Launch the Cricut Design Space software on your computer.
Then, create or sign in to your Cricut account.

After that, you have to choose the Cricut model that you want to setup.
Finally, register the device, and your machine setup is done.
Conclusion
That’s the end of this blog. I have focused on connecting Cricut Joy to computer (Windows & Mac) to help crafters. I tried to explain it in a much easier way so that a novice user could also understand the overall process of connection. Once you’ve connected Cricut to a computer, you can go to the next section where I explain how to setup your Cricut cutting machine.
FAQs
Question 1: How do I connect Cricut Joy to Android?
Answer: Below are the steps to connect your Cricut product to Android using Bluetooth:
Ensure your Cricut machine is powered on.
Keep a distance of up to 10–15 between your Cricut and Android phone.
After that, you need to head to Settings.
In the settings, you have to find the Bluetooth and turn it on.
Once Bluetooth is on. Wait until your device detects the Cricut model.
When your machine appears, click on it to pair it.
Question 2: Does Cricut Joy connect via a USB cable?
Answer: No, Cricut Joy doesn’t have a USB port. Hence, you can’t connect it using a wired USB cable. The only option left is to connect it wirelessly, meaning use Bluetooth. This is the best option for you as you don’t have to deal with clumsy wires. Connect wirelessly, but make sure you are not exceeding the distance of more than 15 feet between your Cricut and your computer or mobile phone.
Question 3: Do I need Cricut Design Space to connect Cricut Joy?
Answer: You will need the Cricut Design Space software only when you want to use your Cricut Joy for any type of operation. However, while building a connection between a computer and a Cricut machine, the Cricut software plays no role. You just need a compatible device with a Bluetooth-enabled feature to connect your Cricut product. You can also connect your Joy to your phone.
Source: connecting Cricut Joy to computer
Visit here For More Information: Cricut Joy Xtra
Pinterest
0 notes
Text
Crafts With a Cricut Machine: Explore 10 DIY Projects Here
Your dear friend’s birthday is near, and you have no idea what to give them. Or, have your Cricut machine come to the address, and you have set it up properly but are searching for some cute ideas about crafts with a Cricut. Your right spot is this blog post. Yes, here I will share with you all some amazing and time-saving DIY projects that you can make easily at home. So, bring your Cricut machine out and put in some effort to create something great for your close friends, family members, or special ones.
I have been doing crafting for the last 5 years, and my craft business is doing well online. Since I have given a lot of time and effort in crafting, I can help you with some creative projects that you will love to do for sure.
Stop wandering and go through some attractive projects straight away.
Project 1: Tea Towels

Are you thinking of creating something for yourself or your home? Tea towels can be a great option. Yes, it is one of the easiest projects when it comes to crafting with Cricut machine free. Moreover, you can create one and gift it to anyone you want. One of the best things about this handmade item is that you can sell it, too. More than that, it can be a good selling item as everyone needs tea towels in their homes. What can be more exciting than making money with Cricut projects?
Project 2: Happy Birthday Acrylic Sign

Do you want to surprise your mom on her birthday? Create a happy birthday sign and surprise her. Personalizing the sign will make the celebration more special. And you know what? You can keep the sign and use it after one or two years, too. You can update the sign to differentiate it. But, when you plan to keep it for a long time, make sure to remove the vinyl and keep the sign in a safe place.
Project 3: Ribbon Bookmarks

If you know a friend who is an avid reader, you can create some cute ribbon bookmarks and give them to him. You can also create personalized bookmarks to remember the pages from where you will need to start reading the next day. Iron-on vinyl scraps are great materials to make ribbon bookmarks with a Cricut machine. Start with these crafts with a Cricut and impress everyone with your amazing DIY skills. With this project, you can be assured that your bookmarks are always in place, even when you are away for a long time.
Project 4: Repurposed Windows

Are you among those who want to make some DIY projects and sell them on some websites? Include repurposing windows in your following DIY project. You will need to use Vinyl or Windows Cling to start this project. You can sell this project or keep it at home, giving your home a unique and eye-catching look. These are really simple to create and make an impressive piece of statement. You can do this project in a quick and efficient way. Gather materials such as vinyl or window cling along with transfer tape. The final look will make your heart laugh out of happiness and satisfaction.
Project 5: Doormats

Handmade doormats are something that will never go out of the trend. What can be more exciting when you have a Cricut machine by your side? This project just requires transfer tape, permanent vinyl, and a bit of patience and effort to complete this DIY project. Add this to your craft inventory, and you will have some nice pieces of design for your home. Moreover, you can sell them on online websites. Add several funny quotes to your mat designs or personalize them, including your last name or something special. That’s how you can start crafting with Cricut machine ideas.
Project 6: Wood Signs

Wood signs are ever-lasting, and you can create them with the help of a Cricut machine you have. Most importantly, everyone loves the sign. So, create a sign and add words displaying the meaning and intention behind them. Use paint or vinyl and sell your craft projects on online platforms. Spark joy to your project by adding phrases. It is obvious customers will fall in love with it. The best part of this project is that you can create wood signs in various ways. Just go with trying different materials.
Project 7: Felt Banners

Are you a great fan of felt banners? Go with felt and iron-on as materials and create the projects you have in your mind. These projects are easy to do and inexpensive, too. Create them effortlessly and make something unique with your Cricut product. There are many possibilities you can do with these projects. Make changes to the shape, or you can create a banner in pennant style. This way, go with these crafts with a Cricut machine and surprise everyone.
Project 8: Baby Clothes & Accessories

Undoubtedly, everyone wants to shop for their babies. And when it comes to shopping for a baby, how can you forget baby clothes and accessories? Whether it’s baby showers or you are going to your loved one’s baby parties, these are some cool gift items you can present to them. The smiles on their faces will be worth the time and effort you put into these projects. By using an Easy Press and iron-on/heat transfer vinyl, you can keep these DIY projects simple.
Project 9: Personalized Vase
A vase is an important piece of project that you can use to decorate your home. So, create one and brighten up your home like never before. Yeah, it is a great idea to make use of the Cricut and get started with creating a cool, personalized vase. Furthermore, this project is easy to make at home when you have a Cricut machine. You can use either Cricut Maker or Cricut Explore Air 2 for this project.
Project 10: Iron-On Corkboards

If you’re looking for an inspiring Cricut idea, iron-on corkboards are a great project idea. Design some awesome cor boards for your busy moms, and she will be more than happy. In addition, you can gift that project to your favorite teacher, too. It’s quite simple, and the steps are effortless. You just need to have an EasyPress/iron and iron-on.
Thus, take inspiration from these projects and make something special with your Cricut.
Conclusion
There are so many Cricut projects you can easily make with your Cricut machine. When you have a Cricut machine, whether it’s Cricut Maker, Cricut Explore, or Cricut Joy, take inspiration from crafts with a Cricut and create the one that needs you at the moment. The Cricut provides an unlimited number of possibilities for creating DIY projects using paper, wood, vinyl, and other compatible materials.
Frequently Asked Questions
What Are Some Inspiring Cricut Projects for Beginners?
Did you buy a Cricut machine a few days ago? Now, the time has come to use it and create some awesome DIY projects. Beginners can take inspiration from the projects given below.
Custom water bottles and tumblers
Mini canvas art
DIY window decals
Drawstring bag
Cork coasters
DIY fall tea towels
How Can I Make a Personalized Vase With Cricut?
If you are excited about making a personalized vase with your own machine, here are the steps to guide you.
First, open the Cricut app.
After that, select the image on the canvas.
Next, select the image layer (each layer of the image).
Further, click on the Make It button.
Remove the vinyl, then.
Lastly, cut the transfer tape.
What are Some DIY Projects to Start With a Cricut Machine?
When you have a DIY machine, get inspired by these super easy and effortless crafts with a Cricut. These are time-saving, too.
Paper projects
Adhesive vinyl and vinyl iron-on projects
Labeling projects
Infusible ink DIYs
Simple crafts with specialty items such as wood, glass, and more.
Felt and fabric diy crafts
Home decor projects
Source: crafts with a Cricut
Visit here For More Information: Cricut Drivers
Pinterest
Twitter
0 notes
Text
8 Cricut Home Decor Ideas to Elevate Your Space
Hey, what if I introduce you to the best Cricut home decor ideas of 2024? I know you must be searching for them; that’s why you landed on this page! By the way, I am really glad to see you as my reader. Do you know how important it is to have a decorated and classy home? It is very important when you want things to be cleaner and well-organized.
I am the kind of person who doesn’t wait for any occasion to decorate my home. I feel that home should always be aesthetic in appearance. I can never compromise when it comes to Cricut projects for home decor. Hence, I made a lot of home decor Cricut projects. And you can find all of them in this write-up. Let’s delve into it!
3D Pyramidal Art

Wall art can make your house look more attractive. It would be great if you could draw your guests’ attention to every corner of your house. Also, as an artist, I always prefer to showcase things that show my interest in the arts.
So, if you are also into the arts, you should try this 3D art with your Cricut. I believe these art projects are the best Cricut home decor ideas.
Frames
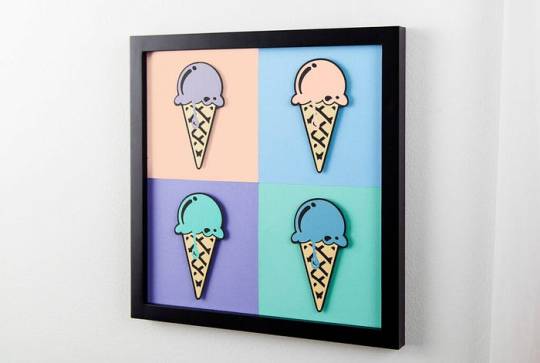
How about this ice cream wall art? If you or kids in your family are an ice cream lover, this can be a great idea for decorating the home wall. I prefer to hang out in my kids’ room as they are ice cream lovers, and they like such cute graphics with multiple colors.
From modern ideas to adding some refreshing color, you will want something like this for your child.
Buttercup Wall Decor

This buttercup wall decor is simple, yet it can be one of the best Cricut home decor ideas to try this year. I made it myself on my Cricut Maker, but you can also create it on the Explore series. Also, it is not going to be that difficult, and it is even easier for many beginner crafters. So what are you waiting for? This is your call. Try it if you find it fascinating. If not, let’s skip it and move on to another one!
Flower Wreath
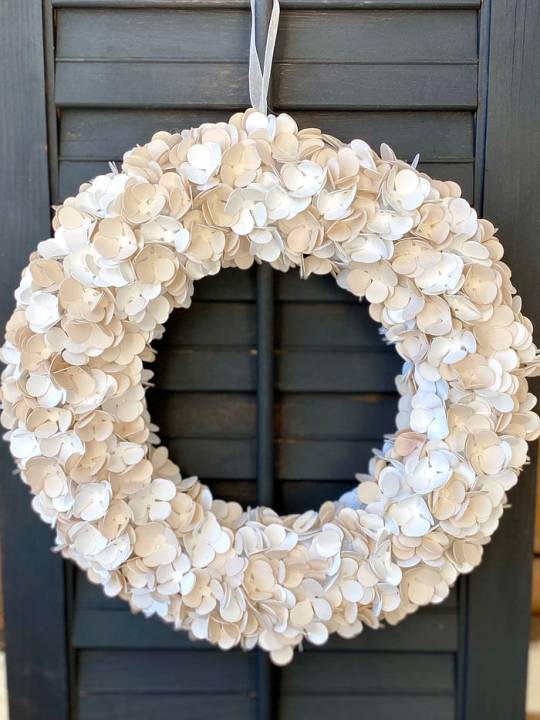
Have you ever tried felt material? If you are a beginner, you might not know. But this material can be great if you want to create something like a wreath! In order to make an incredible wreath, I used woody climbers and felt material.
Moreover, the roses are actually made with Cricut. So, all you need is different felt colors. Just put them in Cricut and cut them according to the designs you have created. But, if you find it hard to create by yourself, you can also use SVG files available on the internet.
Layered Wall Art
How about this wall art? I was inspired to create such beautiful wall decor when I visited one of my friends’ new homes recently. Hence, I couldn’t stop myself from creating it. Also, this is the best fit for someone looking for the best Cricut home decor ideas. With such Cricut projects for home decor, you can make your wall look outstanding.
Plant Pots

Oh, how can you miss your garden, the beautiful area where you might get peace of mind? However, the garden is the heart of my house; it brings joy whenever I wander around in it. Hence, I wanted to make it as good-looking as possible. So, here is my plant pot that I created using a vinyl label and pasted it on my pot.
It looks gorgeous, doesn’t it? It was one of my best Cricut home decor ideas, thanks to my friend Jiya.
Welcome Sign

If you want the best home decor Cricut projects, you should try this Welcome sign board. I made this using a wooden plate and vinyl material to transfer my text to it. In addition, I first wrote the text in the stylish font on my Cricut Design Space. Now, you can elevate the welcoming vibes of someone special, guests or loved ones!
Doormats

Doormats are essential for keeping homes clean and organized and are inseparable parts of home decor. Hence, most people might need to pay more attention to doormat designs and their importance, but it is a must-have accessory if you want someone who loves decorated homes. In general, these small things matter, so make sure you choose the right home decor projects!
FAQs
Question 1: What can I make with Cricut to decorate my home?
Answer: Now, you can easily do the following projects with your Cricut. However, you will need some basic supplies, and you will be ready to go! Have a look at the home decor ideas for Cricut users:
Diamond hanging planters
Paper succulents
Reusable stencils
Floral monogram letters
Modern wall hooks
Leather geometric buffalo pillows
Wooden signs with quotes
Flower paper pinwheels
Home sweet home signs
Corkboard travel maps
Question 2: What do I need to make a wooden sign using my Cricut?
Answer: If you need accessories or supplies to make home decor projects like home signs, look into the following items. So, these items will be enough for you to make a wooden sign for your home decor!
A piece of 1/2″ thick.
Stencil vinyl
Small paint brushes
Finishing nail gun & finishing nails
Mod podge
A Cricut cutting machine
Mitre saw
Fine grit sanding sponge (optional)
Question 3: Can I use my Cricut Joy machine to make home decor?
Answer: Yes, you can make a wide range of Cricut projects. Be it for home decor or other personalized stuff, Cricut Joy can help you create most of the projects easily and without any issues. So, all you need is a collection of the right materials and tools to assist you in creating projects. However, there is only one: Cricut Joy can’t make bigger things.
Source: Cricut home decor ideas
Visit here For More Information: cricut.com/setup
You tube
Twitter
#Cricut home decor ideas#Cricut projects for home decor#home decor Cricut projects#cricut.com/setup#Cricut Explore Air 2
0 notes
Text
How to Pair Cricut Maker to Phone: A Step-by-Step Guide
The Cricut Maker is an in-demand cutting machine that meets the needs of many crafters. Last week, my younger sister graduated, and I gave her a Maker machine as a graduation gift. Since childhood, she has been interested in arts & crafts activities, so to encourage her, I decided to give her a Cricut Maker. After seeing the present, she was on cloud nine and couldn’t stop thanking me for giving her the cutting machine.
As a newbie, she struggled to understand everything about this Cricut model. But as her biggest supporter, I made her aware of this crafting machine’s basic setup and how to pair Cricut Maker to phone. Besides, the Cricut Maker works with the Cricut Design Space app and supports all operating systems. This blog will give you all the info about the pairing process.
How to Set up Cricut Maker on Smartphones?
The foremost step before creating do-it-yourself projects using this Cricut model is to set it up. After successfully setting up the devices, it will be much easier to step towards the wireless pairing process. Below are the steps that will help you in setting up the Maker machine for Android or iOS devices:
First, unpack your cutting machine and plug it in.
After that, switch on the power button and pair it via Bluetooth.
Next, unlock your mobile phone and go to the Play Store or App Store.
Now, download and install the Cricut Design app on your mobile devices.
Launch the downloaded app, sign in, or create your account.
Open the Menu tab and select the Machine Setup option.
In this case, click on your Cricut model to continue the process.
Further, follow the guidelines on your device screen to finish the remaining setup process.
In the end, your setup will end when you are called for a test cut.
Once you have set up your devices, let’s not waste more time and start learning about wirelessly pairing smartphones with this crafting machine.
How to Pair Cricut Maker to Phone via Bluetooth?
In addition to the blog, you can use your Cricut cutting machine to cut the materials into any desired shape or size via Bluetooth. To pair up your cutting machine with a smartphone, you are instructed to follow the below steps:
Android
If you are an Android user willing to pair your craft plotter with mobile devices wirelessly, look at the content below.
Commence the pairing process by turning on your craft plotter.
After doing that, check that your devices are 1015 feet apart.
Now, open the Settings tab and click the Bluetooth to enable it.
In addition to enabling Bluetooth from the Settings tab, you can scroll down the screen and hold the Bluetooth icon for a few seconds.
After a few minutes, you will see a list of nearby devices in the Available devices section.
Next, select your Cricut model and enter the PIN code (0000) on the specific blank.
Lastly, click the OK button, and your device’s wireless pairing process will end after a few seconds.

iOS
All iOS owners searching for how to pair Cricut Maker to phone will find this blog helpful section. In the below pointers, I’ve explained the entire process of pairing up both these devices straightforwardly. Take a look at the details given below:
To initiate the method, ensure your Maker is on and placed within 10–15 feet of your iOS device.
Also, open the Settings tab and then tick the Bluetooth option.
If the Bluetooth is off, you need to enable it by moving the toggle.
Afterward, you will see a list screening on your device screen.
Select your craft plotter from the list under the Devices column.
Now, type the PIN code (0000) and hit the Pair option on the screen’s top-right side.

Finishing up the how to pair Cricut Maker to phone blog post, all crafters need to have a compatible cutting machine and pair it with smartphones. After completing the wireless pairing process, you can make customized projects with a finger snap.
Frequently Asked Questions
Question: How Can I Pair My Cricut to My Windows?
Answer: To pair up your cutting machine to Windows system, you need to follow the steps below:
First, turn on your Cricut machine within a 10–15 ft range of your Windows computer.
Second, enable your device’s Bluetooth and select the Bluetooth option.
After selecting the option, click on Cricut Maker and enter the PIN code.
At last, tick the Connect option to finish the wireless pairing.
Question: Can I Connect My Cricut Maker to My Phone Using a USB Cable?
Answer: Yes, you can connect your Cricut crafting machine to your phone with a USB cable. To make a proper connection, switch on your craft plotter and insert one end of the cable into the machine port. Then, take the other end of the cable and insert it into the phone’s USB port. Finally, you can start designing various projects using the Cricut Design app blank canvas.
Question: How to Download Cricut Design Space on Mac?
Answer: Take a look at the below steps to download the Cricut app on a Mac system:
Start the process by visiting Cricut Design Space’s official website Cricut.com/setup.
Now, click the Download button and wait till the download process is complete.
When the download is complete, open the .dmg file and install it on your system.
After the installation is finished, create your Cricut ID or sign in with your login details.
Source: how to pair Cricut Maker to phone
Visit here For More Information: Cricut.com/setup
You tube
#how to pair Cricut Maker to phone#Cricut Design app#cricut.com/setup#design space cricut#Cricut Explore Air 2
0 notes
Text
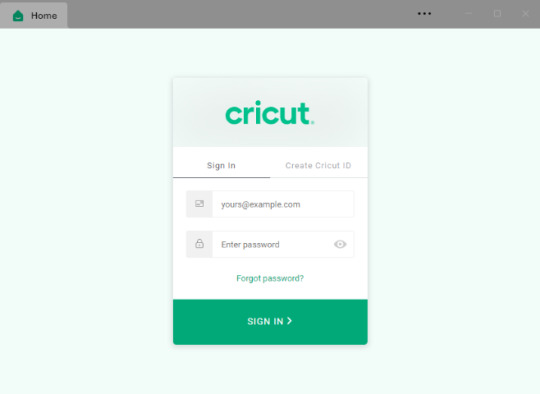
Cricut Design Space Sign In: Access Your Crafting Companion App
Are you looking for the best Cricut Design Space sign in method? Then, my lovely readers, I welcome you with open arms. I have been in the world of crafting for more than two and a half years, and I have discovered my hidden skills and brushed up on the existing ones. Cricut Design Space can be defined as “a digital design program that will allow you to create uncountable do-it-yourself crafts with its tools and library.” Also, it is an easy-to-learn and free-to-use app that runs together with Cricut machines while crafting.
If you want to make your most beloved crafts with the Cricut machine, ensure you’ve installed the Cricut app on your PCs or smartphones. You must create an account and sign in to the Cricut account to create new projects. Continue exploring this blog and learn about downloading and installing this software on Mac, creating a Cricut ID, and signing in to an account.
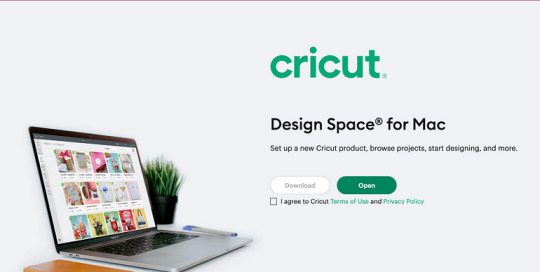
Download Cricut Design Space on a Computer
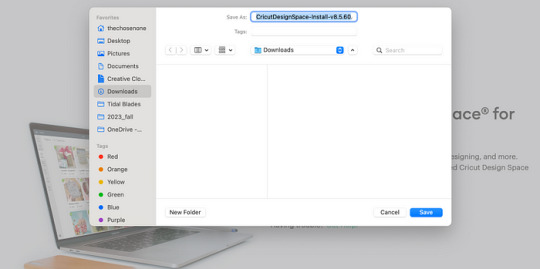
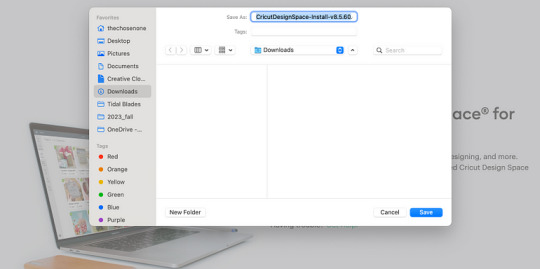
Before starting with the Cricut Design Space sign-in process, you must have the app on your Mac system. Study this specific area of the blog, and you will get to know about the total steps that you need to take while getting this designing application on a computer:
Initiate the method by opening Safari and departing to design.cricut.com.
After arriving there, click the Terms of Use & Private Policy checkbox.
Next, tap the Download option and choose the folder to save the file.
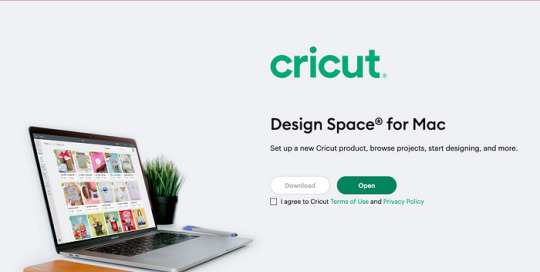
4. Now, tick the Save button, and the file will instantly download to your system.


6. Subsequently, double-click the Cricut software and launch the app.
7. A small pop-up window will ask you to open the downloaded app on your system.
8. Also, press Open to carry on with the process, and your app will get open.

10. Finally, you can now use the Cricut Design app to draw various designs using tools and other features.
After installing the app on your Mac system, let’s organize the blog by teaching you how to create a Cricut account.
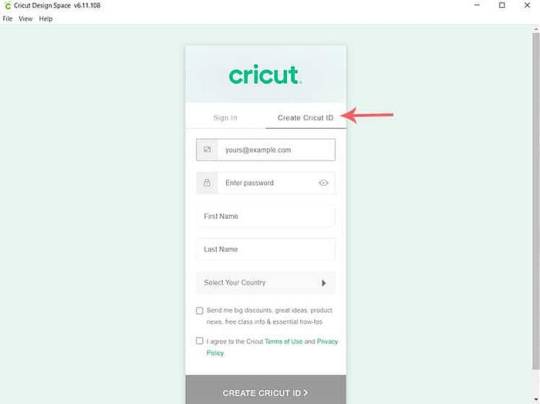
Steps to Create a Cricut Design Space Account
You are a step closer to signing in to the Cricut Design app, and to do it properly, you need to create your Cricut ID. If you are a new user and want to create a separate account, look at the tips below. It will make your process quite simple and aware of the steps involved in it:
After installing the app on your device, open it and tick the Create Cricut ID option.

2. Now, you must enter your personal email ID, first name, and last name and select your country.
3. Next, select the DIY Import & Terms of Use & Privacy Policy checkbox.
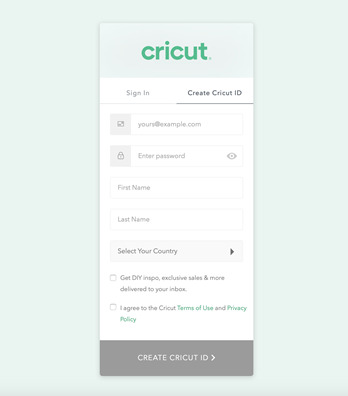
5. After a few minutes, you will receive a pop-up notification with your separate Cricut ID & password.
6. Now, pen down your login credentials on the Cricut sign-in page.
7. Conclude the process by starting to create your projects on Canvas.
Since you have successfully created your Cricut ID, you can now sign into your Cricut account. To learn the process in depth, refer to the details shared in the section below.
Cricut Design Space Sign-In Procedure
Consequently, this is the most important part of the blog, as it will completely focus on teaching you how to sign in to your Cricut Design account. Take the help of the below pointers and get to know in-depth about the process:
Start the process by opening the Design Space app on your respective device.
Now, enter your Cricut ID & password on the Cricut sign-in page.
Afterward, tick the Sign In the present at the center of the page and wait for a few seconds.
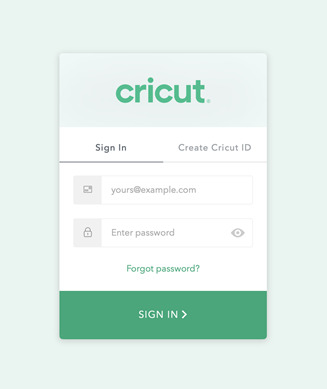
4. At this point, you will automatically get connected to your Cricut Design Space canvas.
5. Put an end to the process by starting drawing your imaginative designs using the tool & other features.
Conclusion
To sum up this blog, it can be stated that Cricut Design Space plays a crucial role for all DIYers when they create something new. Before anything else, you must get the Cricut app on your device, create your account, and sign in with your credentials. Without the account, you won’t be able to draw the design or transfer the file to the crafting machine.
Source: Cricut design space sign-in
Visit Here For More Information: cricut.com/setup
Cricut Explore Air 2
You tube
Pinterest
#Cricut design space sign-in#cricut.com/setup#cricut explore 3#design space cricut#Cricut Explore Air 2
0 notes
Text
Cricut Design Space Desktop Download: A Complete Guide
Are you looking for a way to express your feelings through crafts? Then, the Cricut Design Space desktop download on your computer should be your first choice. If you are new to Cricut, there’s a lot you need to learn about this software. For the past few years, I have been a craft teacher in High School and have guided many young minds. During that period, the Cricut app contributed by allowing me to design new DIY projects. Also, it is free software that runs seamlessly with all Cricut machines.
Also, Cricut Design Space is used by DIYers to create, upload, and choose the design that you want to make with a Cricut machine. Other than that, this software easily connects with Windows and Mac computers. To get the Cricut app on your computer, check out this blog, as it will teach you about the system requirements and installation procedure.
System Requirements for Cricut Design Space Desktop Download
Before making the last appeal to get the Cricut software on your computer, you must confirm that your desktop satisfies the minimum system requirements. These requirements allow the app to run on your desktop without technical errors. The Design Space requirements will undoubtedly change over time, and the features will vary between computers. Have a look at the details about the present requirements for the app below:
Windows
Subsequently, get a chance to learn about the critical Cricut software Windows system requirements. Regarding the operating system, ensure you have Windows 10 or the current version with Intel Dual-Core or a similar AMD processor working as a CPU. Besides, the system must come with 4GB RAM & 2GB free disk space.
Your device must also have a USB port and Bluetooth connectivity. Your system should have an internet speed of 2–3 Mbps while downloading and 1–2 Mbps while uploading any file. After the Cricut Design Space desktop download, you can easily edit your projects without an internet connection. If Windows is running while you are working on the Cricut app, you should update the system.
Mac
Meanwhile, Mac users should verify that their system supports MacOS11 or the current version with a CPU supporting 1.83GHz. The remaining system requirements to make the Cricut Design app run on Mac are alike in terms of internet speed and working offline. Also, you must update the operating system regularly for better performance.
You can learn how to install the Cricut app on your Windows or Mac using the details you previously provided.
Cricut Design Space Desktop Download on Your Computer
The following instructions will impress you at this point by teaching you how to install this Cricut software on your computer.
Windows
Pay attention to this section, and you will encounter the process of downloading and installing the Cricut Design app on your Windows system.
You need to start the method by going to the Cricut page on your installed web browser.
After connecting to the page, tap the Terms of Use and Privacy Policy checkbox.

3. Stand by until your Cricut Design Space desktop download is active.

5. Next, double-click the downloaded file and choose the Trust application option.
6. After a few minutes, open the Cricut app on your Windows home screen.
8. Finish the Cricut Design app download process by creating your designs on the canvas.
The process by which you can get the Cricut software on your Mac computer is in the section below.
Mac
If you want to know how to get the Cricut Design app on your Mac computer, refer to the steps below. To manage your time, I have tried to explain the process crisply by using simple words:
Come forth with the download process by navigating to design.cricut.com.

2. Click the Terms Of Use and Privacy Policy checkbox to continue the process.
3. Following this, pick out the folder where you are willing to save the Cricut software file.
4. Now, exit the search engine and pick up the place where you are willing to save the file.
6. At this time, exit the search engine and visit the folder where you saved the file.
7. Then, double-click the Cricut file and move the file to your device’s Applications folder.

9. Next, a small Mac notice will appear before you, asking you to open the app on your device.
10. Now, press the Open option to go on with the download process.

Note: You are informed that the app will remember your sign-in. It clearly means that you won’t have to sign in every time while using it to create custom-made projects.
FAQs
Question: Can I Start My Project Without Having a Cricut ID?
Answer: No, you won’t be able to start any do-it-yourself project on the Cricut Design Space without a Cricut ID. It doesn’t concern whether you are a new user or already one; you need to have a separate ID as it will permit you to use the library, tools, and other features while creating any project on the canvas.
Question: Which Crafts Will I Be Able to Make Using Cricut Software?
Answer: After installing the app on your device, you will be able to design numerous customized crafts. The crafts will help you in exploring your crafting talents. The names of the projects are:
Birthday cards
Tumblers
Wall decals
Paper wreath
Banner
Soft toys
Tote bags
T-shirts
Question: How Can I Download Cricut Design Space on My Mac?
Answer: Follow these steps to install the Cricut software on your Mac system:
Start the process by downloading the Cricut app file from the official page.
Next, save the file in the Downloads folder, and installation will begin.
Afterward, open the Applications folder and double-click the file to launch it.
Now, open the installed app and sign in with your Cricut ID & password.
Source: cricut design space desktop download
Visit here For More Information: cricut.com/setup
Pinterest
0 notes
Text
Easter Projects With Cricut to Make Delightful Creations
Hey, avid crafters? Are you looking for the best Easter projects with Cricut? Look no further but this write-up. In this blog post, I am covering the 6 best Cricut projects that you can make with every model of Cricut projects.
Easter is my favorite holiday, and it is just around the corner. But do you know what has brought my crafters here? Well, this is nothing but a long list of ideas that I have made over the years, and I am still creating more. Besides, I have recently been working on my DIY projects for the upcoming Easter festival.
So, are you ready to elevate Easter this year? If so, let’s dive into this blog and start your crafting journey together.
1. T-shirts

A festival without wearing new clothes seems incomplete. Do you know what you wore on Easter day? Well, I was wearing a personalized T-shirt that I had created myself. Creating this shirt was fun, and you can make it in no time, as you can see in the picture above. That was for my daughter, which I created recently.
I wish I could show you the T-shirt I wore last year at the Easter festival. But anyway, my purpose was to show you some of the best Easter projects with Cricut that you can make hassle-free.
2. Wooden Signs

I can’t imagine any Easter celebration without a Happy Easter sign. The iron-on vinyl I used in this sign worked perfectly fine; however, when I placed it on the wooden pieces. Look at those circular wooden pieces; they are perfect in shape and precisely cut.
To make it more beautiful, I added some leaves, which give it a naturalistic feel. So, start trying it and spreading the positive vibes of Easter this year.
3. 3D Bunny

Isn’t this 3D Bunny cute? It’s one of my favorite Easter projects with Cricut, and anyone would want to create it. I made this using cardstock; the machine I used was a Cricut Maker 3. This trusty Maker 3 model is one of the best in terms of precise cuts and provides top-notch quality that everyone wants.
Today, it is time to spread the spark of Easter with this cute project. Give it a thought!
4. Table Runner

On Easter, we gather with all our family and relatives. And this day is incomplete without spending time at dinner together. Hence, I wanted to decorate my dining table. So, I made this table runner and added a picture of a rabbit made with soft fabric.
Yes, you might wonder whether your Cricut can cut the fabric. But with the Cricut Maker series, you can easily create it. I created this one for myself; now it’s your turn!
5. Hopping Easter Bouquet

Get started with your Cricut and create something amazing for the Easter festival this year. The Easter projects with Cricut are a breeze if you have a creative mind. You can bring your imagination to reality in no time. All you need is Cricut and its supplies.
With the easy-to-use Cricut Design Space, you can create the design you want. However, this design is available for free on the app, and you can access it anytime you want. Just upload it to your app and give it a try!
6. Bunny Banner

Try this cutie bunny banner if you are looking for Easter projects with Cricut. This cute banner can add an Easter flair to your house. Do you know what sort of material I used in it?
The material I used in this bunny banner is felt. The only thing I don’t like about felt is that it sticks so much to my cutting mat. Yet, I love to make projects out of it because it is softer and gives a good feeling, especially when used for an Easter project.
FAQs
Question 1: Which Cricut machine should I use to make Easter projects?
Answer: To make Easter Cricut projects, you can use Cricut Explore Air 2. Although you can use many of the latest Cricut models, you can easily create such projects with the oldest machine in Cricut’s lineup, the Explore family. In addition, the quality you will get on this machine will be enough for you, so you can use this model if you have a little tight budget.
Question 2: What Easter Cricut projects should I try in 2024?
Answer: With Cricut, the possibilities of making projects are needless, and hence, you can really make amazing decorative items, including gifts. Below is the list of projects you must try this year on Easter:
Easter Bunny
Felt Banner
Treat Box
Easter Cards
Vases
Shirt
Wood Bunny Sign
Question 3: What supplies do I need to make Cricut Easter projects?
Answer: With different projects, the supply needs may vary. For example, if you want to make Easter cards, then you can use the following supplies or tools:
Cricut Joy cutting machine
Hoppy Easter Card Art
Cricut Joy Card Mat
Floral Egg Card Art
Starter Tool Set
Cricut Joy Insert Cards
Cricut Weeding Tool
Source Url: Easter projects with Cricut?
Visit here For More Information: cricut.com/setup
Cricut explore 3
Pinterest
#Easter projects with Cricut?#Cricut Design Space#cricut.com/setup#cricut explore 3#design space cricut
0 notes
Text
How to Download Cricut Design Space on Mac: A Stepwise Guide
Hey crafters! In this blog, I will explain how to download Cricut Design Space on Mac. Ever since I got my new Mac computer, I have been eagerly waiting to download the Cricut software. I got this Mac because I needed a high level of security, and I believe Apple meets my demand. Hence, I chose the Mac over any other computer.
Also, I heard that creating an intricate design on the Cricut Design Space app sounds very exciting. Design Space is a one-stop solution for controlling your Cricut cutting machine. This app allows you to not only set up your machine but also start cutting on it.
So, are you ready to learn the steps to download the Cricut app? This guide will explain the system requirements before downloading the app. Let’s get into it to learn more!
Minimum System Requirements for Cricut Design Space
Here are the basic things about your system that you must know before you learn how to download Cricut Design Space on Mac. Also, you should know some internet needs. It will help you prepare in advance. Let’s have a look at the following system needs.
Operating System: You will need a macOS 11 or later version for the OS.
CPU: 1.83 GHz
RAM: 4GB
Disk Space: 2GB
Connectivity: USB cable or Bluetooth
Display Screen Resolution: Minimum 1024px x 768px
Internet: Minimum 2–3 Mbps Download; Minimum 1–2 Mbps Upload
Offline Feature: Available
Once you have ensured the system requirements mentioned above, you can follow the next steps to download your Cricut app.
How to Download Cricut Design Space on Mac?
Let me show you how I downloaded the Cricut software on my Mac computer. The process of downloading this app is simple and easy. Here are simplified steps to download Cricut Design Space:
First, you will need to power on your computer.
Then, look for any internet browser and double-click on it to launch on your computer.
On your browser, head to the search tab and copy & paste the “design.cricut.com.”
You have to select a checkbox to enable the Download button and click on it to begin downloading.
Afterward, you will move to a page where you should choose a file location to save your downloaded file.
Once done, move to the file location where you downloaded the file. From there, you need to click on the Save tab to start the downloading.
Now, the download will start. However, the interface might be slightly different in every browser. (I am using Google Chrome.)
Finally, you have learned how to download Cricut Design Space on Mac. Now, let’s learn how to install it on a Mac.
How to Install Cricut Design Space on Mac?
Now, let us learn the steps to install the Cricut Design app on our Mac computer.
Below are the simplified instructions to install the Cricut software:
Once Design Space is downloaded, you should head to the Downloads folder.
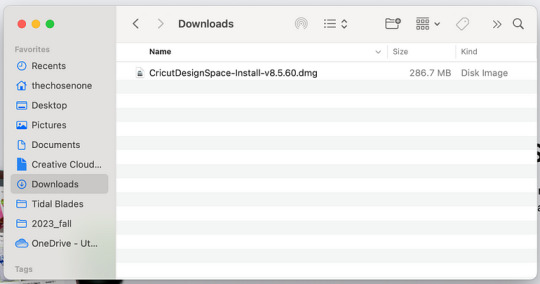
After that, double-click on the .dmg file under the Downloads folder.
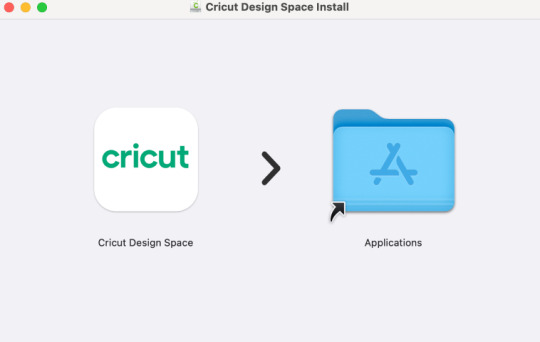
On the next screen, drag the Cricut icon to the Applications folder icon. As a result, it will start installing the app.
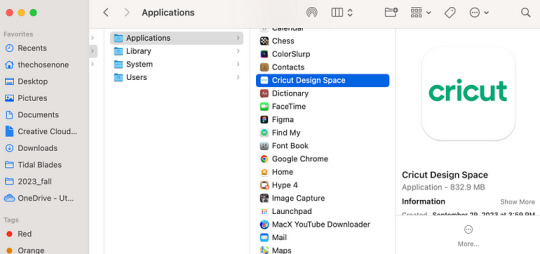
Then, you will need to launch the app on your desktop. To do so, double-click on the Cricut app from the Applications folder.
You can also create a shortcut; just drag the application to your dock.
After that, you will be prompted to ask whether you want to open the app you downloaded from the internet.
To open it, you simply hit the Open tab.
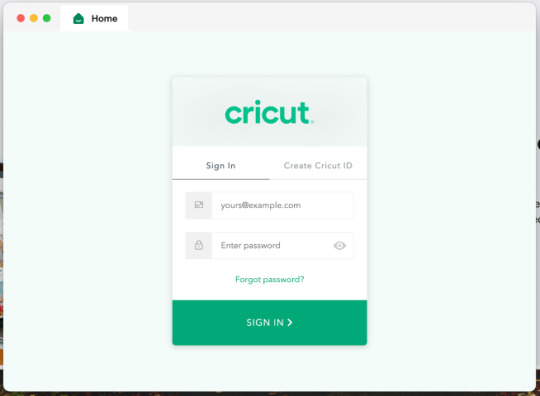
In the next step, you will have to sign into your Cricut account.
To Sign in, you should use your Cricut ID and Password.
Now, enjoy creating intricate designs on your Cricut app.
FAQs
Question 1: Which machine can I use with Cricut Design Space?
Answer: Every model of Cricut cutting machine is compatible with Design Space. These models include the Cricut Joy, Explore series, and Maker series. Besides these, they are compatible with various operating systems, including Mac, Windows, iOS, and Android devices. Make sure your device is capable of meeting the minimum system requirements before downloading them to your device.
Question 2: How do you download Cricut Design Space on iOS?
Answer: Downloading the Cricut app on iOS devices is easy. Follow the steps below to download and install it on iOS:
You must launch the App Store icon on your iOS device and search for the Cricut Design Space app.
Now, you have to click on the Get button to download the app.
Once you’ve done this, you need to verify the download using an iTunes password (if asked).
When the download is complete, you need to open the app and start setting up your Cricut.
Question 3: Do I need the internet to use Cricut Design Space?
Answer: You only need a high-speed internet connection when downloading and installing the Design Space. However, the Cricut app has many offline features that you can use without an internet connection. However, it is only available on iOS devices and not currently available on Android devices.
Wrapping Up
You might have understood how to download Cricut Design Space on Mac by now. I have tried my best to explain everything simply and easily so that beginner craters can download it easily. The system requirements are the only thing you need to remember before downloading the Cricut app. Ensure your Mac meets the minimum needs to run the Design Space. Despite this, you should also ensure that the internet speed is high enough to download the Cricut software. Good Luck!😃
Source: How to download Cricut Design Space on Mac
Visit here for more Information: cricut.com/setup
cricut explore 3
Cricut Design Space
#download Cricut Design Space on Mac#cricut.com/setup#cricut maker bundle#cricut explore 3#design space cricut#Cricut Design Space
0 notes
Text
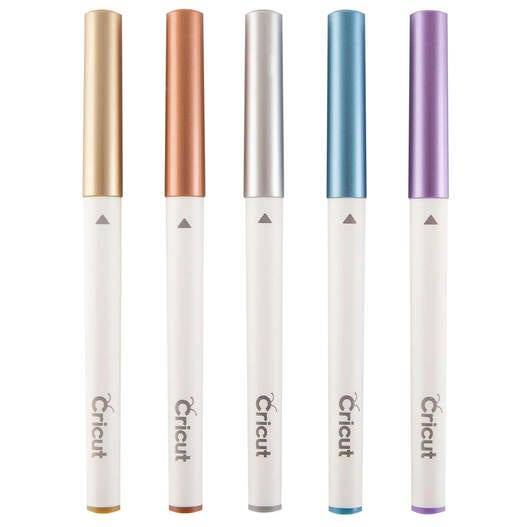
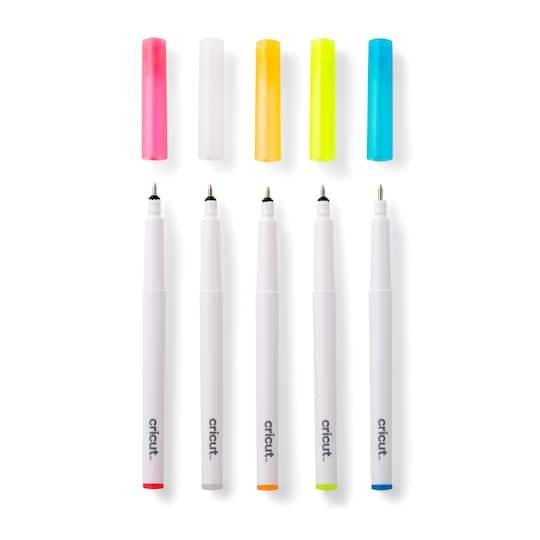
8 Best Cricut Pens to Enhance Your DIY Projects
To complete any project, all crafters must have the best Cricut pens. That crafting item will help you give a personal touch as it will highlight every aspect of the project. Being an experienced crafter, this crafting tool plays the same role as others, creating projects that look more attractive and eye-catching.
To brush up on the creator's skills, the company keeps launching new pens with several features that make them unique. They have these crafting supplies for every task, whether writing or drawing. Apart from that, their Cricut pens are compatible with all craft plotters and work on all kinds of fabrics.
Want to learn more about this crafting time? Then you should probably check this guide, as it will help you see new models.
1. Pen Set, Metallic (5 ct.)
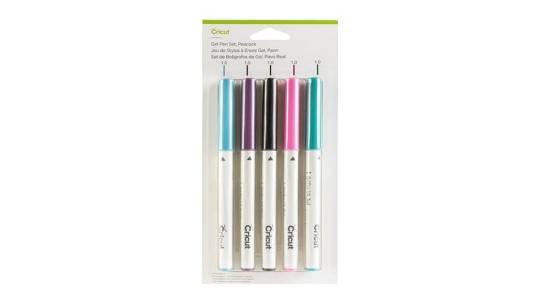
2. Gel Pen Set, Peacock (5 ct.)
3. Opaque Gel Pens 1.0 mm
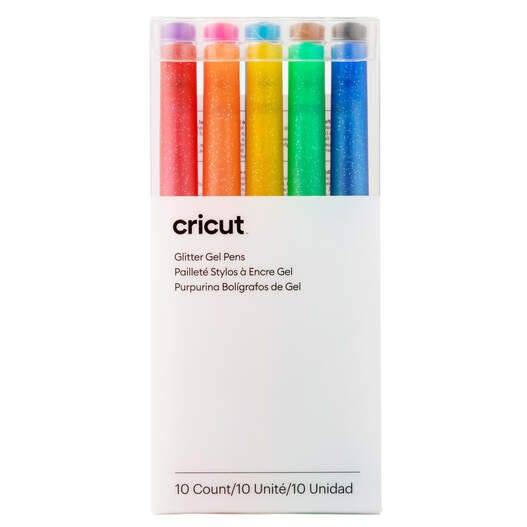
4. Glitter Gel Pen 0.8 mm, Rainbow (10 ct.)
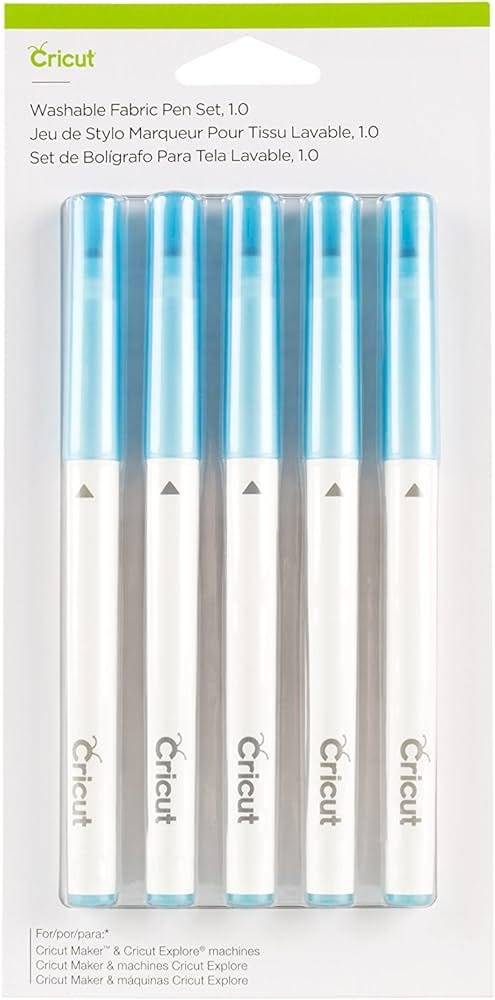
5. Washable Fabric Pen Set
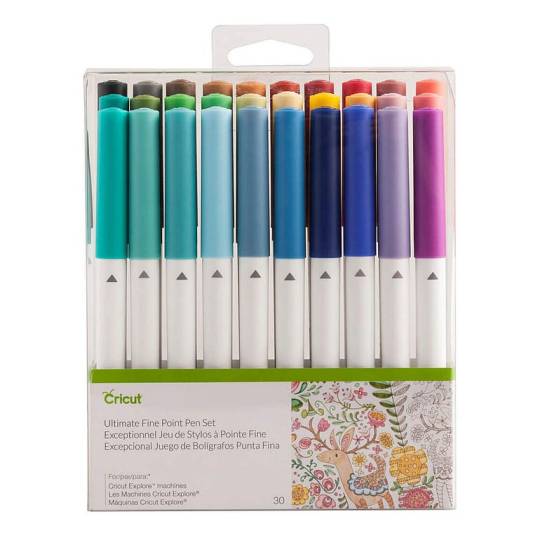
6. Ultimate Fine Point Pen Set (30 ct.)
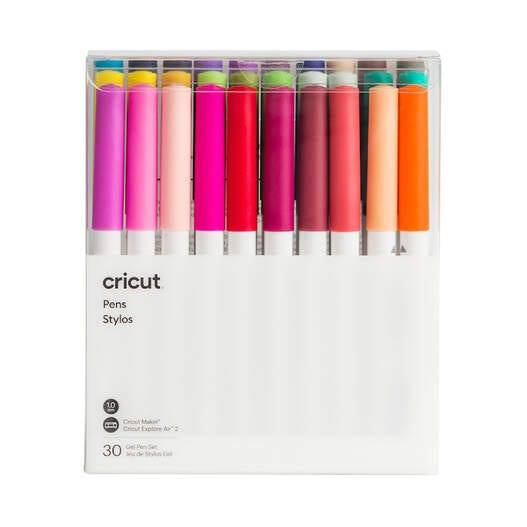
7. Ultimate Gel Pen Set (30 ct)
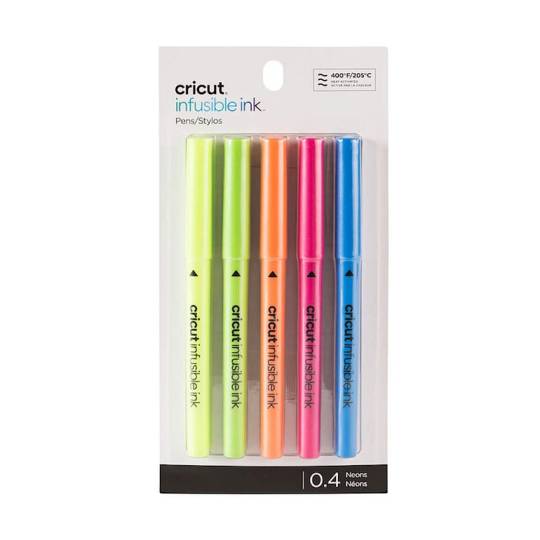
8. Infusible Ink Pens (0.4), Neons (5 ct.)
It was fun to learn something new about one of the crafting supplies as it will help you make the DIY craft more fun and easy. However, you will decide which model to use while making any craft. Moreover, you should also choose the correct one among the best Cricut pens list.
Frequently Asked Questions
Question: How Do I Insert a Pen Inside My Cricut Machine Clamp?
Answer: Go through the process and learn about inserting a pen inside the Cricut clamp:
1. Unlock the clamp by pushing it upwards and then remove the pen cap.
2. After that, slowly insert the pen and ensure it is placed correctly inside the clamp.
3. Lock the clamp and start your cutting machine for designing and writing purposes.
Question: How Should I Store My Cricut Pens?
Answer: Follow these tricks to store the pens and to increase the Cricut pen’s life: 1. Cover the pen with its cap and keep it upside down after using it.
2. After that, store it inside the organizer in the correct position without forcing it.
3. Don't mix the pen with sharp items; otherwise, it will damage the outer side.
Question: How do you use Cricut Pens on Pillow Cover Blanks?
Answer: Follow the steps and make the design with the best Cricut pens on pillow cover blanks:
First, draw your design on Cricut Design Space and cut it with the cutting machine.
2. Second, prepare the blank by setting the temperature and timing and applying the design on the blank.
3. Third, cover the design with butcher paper, and when the heating is complete, enjoy your fully-designed pillow cover.
Source: Best Cricut pens
Visit here for more Information: cricut.com/setup
Cricut maker 3 vs explore 3
design space Cricut
#best Cricut pens#cricut.com/setup#cricut explore 3#download cricut design space#design space cricut#2024
0 notes
Text
10 Unique DIY Cricut Valentine Cards to Spread Love
Have you ever made DIY Cricut Valentine cards for your lover? If not, you need some great Valentine’s Day card ideas. Since the new year started, I have also created several unique cards using my Cricut Joy or other crafting machines. Besides, one of my customers recently ordered customized cards for Valentine’s Day.
I accepted their offer and started making them. For these, I needed supplies like Cricut machines, insert cards, cardstock, weeding tools, cutting mats, and much more. Once I collected these tools, I started creating designs in my Cricut Design Space. Since I was alone, I took help from one of my friends, Emily. She is also a wonderful crafter like me and enjoys making whatever she likes.
In short, I will include all 10 Valentine’s Day card Cricut ideas that will bring a smile to the faces of your loved ones. So, are you ready to explore these card ideas for Valentine’s Day? If so, join me on my crafting journey!
1. Butterfly Heart Pop-Up Card.
How about this lovely card with butterfly and heart cutouts? It looks fantastic! No? I made this card as a sample for my customer’s request. To my surprise, they liked it, and hence, they placed the order. Therefore, I started making unique and simple designs. Since they wanted a combination of simple and wonderful cards, I made all of them to fulfill their demands.
2. “I Love US” Card
Here, Us is associated with all your relations with your parents, sister, brother, husband, wife, or others. With this beautiful card, you must show your love for your loved one. Easy-to-create DIY Cricut Valentine cards will let you express something beautiful for your lovers. However, I made this using my Cricut Joy, and it is really easy to create; hence, you can also give it a try!
3. Simple Heart Card
This simple heart card will not consume much time, as I made it myself within 30 minutes. For projects like these, you only need a Cricut cutting machine and its companion app, such as Design Space. You can easily upload and create your pattern or cut designs using this app. The benefit of making crafts with Cricut is that it cuts very precisely, making it elegant!
4. Bookmark Card
Do you know someone who is a bookworm? This could be the best gift for them. Try this cute-looking Valentine’s Day card, which I made using my Cricut. The process hardly takes an hour, and soon, you will end up creating something amazing. For this, you can get the SVG file for DIY Cricut Valentine cards from Design Space. If you want to add something else instead of this cute bee, you can do so.
5. “Lots Of Love” Card
Do you have lots of love and want to share it with your loved ones? Here’s the complete card project made with Cricut Joy. I used a red insert card that looks stunning, making it eye-catching. So, this card suits everyone, whether it is your lover, friends, or family members.
Despite that, you can also use different colors of insert cards and a different font. Cricut offers various free fonts from Design Space that you can choose from for free.
6. Scratcher Coupon Card
Have you ever heard of coupon cards? Well, this is unique and can be made for your children. This is one of my favorite cards that I have ever made. I use my small cute Joy machine to cut the border area of DIY Cricut Valentine cards. Now, you will need to do the same, but for the color of the card, you can choose whatever you prefer. For the rest, you need to use the printer to print the texts or design, if any.
7. Lovable Cards
So, I have also made this for my customer, and I hope he likes it. As you can observe, those precise, small heart-shaped cuts make it very professional. However, I thought I would make it into two pieces with different colors of insert cards. For example, I added a dark pink and black card inside the folded cards. So, give it a chance and spread the love this Valentine’s Day.
8. “I Love You” Pop-Up Card
Want to confess your feelings to someone? Here’s a simple and exciting card project to impress your loved ones. Whether you want to make it on the Cricut Joy or Maker series, all types of machines can make it in a few minutes. Also, I have used only two colors here. So, if you want to add something extra, then do so. Make sure you are creating the best card for someone you love.
9. Heart Paper Card
Want something unique? Such DIY Cricut Valentine cards fit well for Valentine’s celebrations. Use the best quality of paper and choose a color accordingly. To me, the color red was apt. Hence, I chose it for my heart shape, and then I cut a white paper for those heart shape outlines with small circles. Your lover is gonna like it. Just give it a try!
10. Candy Cards
Sending cards with written messages seems to be an old idea. Now, you need a modern card idea. Make a heart-shaped cutout and fill this colorful card with sweet candy. Cut the card with a Cricut as I cut the heart shape cutout. However, this is also for my customers as they also wanted very unique cards. Let’s see how the feedback comes!
Final Words
I made 10 different types of custom cards using my Cricut Maker and Cricut Joy machine. In this blog, I have mentioned several cards, such as simple and complex ones. So, whatever you want to create or get an idea from, you are free to explore. If you ask about my favorite cards, they’ll be candy cards, butterfly and heart cutout cards, and scratcher cards. All of them are unique, so they are my favorites. Now. It’s your turn to create something amazing with your Cricut. All the best!
Source: DIY Cricut Valentine cards
Visit here for more information: cricut.com/setup
Cricut explore 3
download Cricut design space
#DIY Cricut Valentine cards#cricut.com/setup#cricut explore 3#download cricut design space#Cricut Design Space
0 notes
Text
How to Get Design Space for Cricut: Ultimate Guide
Hey, you all! I want to share something meaningful with you today that will help you in Design Space. Being a full-time crafter, I have learned a few things, and I would like to share them with all of you. As you know how crucial it is to get Cricut Design Space, I will share with you the right method to get it and use it effectively. Design Space for Cricut is a sophisticated software that will help you create several projects.
To understand the process, stick to my guide and get a brief about Design Space, its download, installation, and uses. You will learn how to make customized projects with your Cricut machine by using Design Space.
Design Space for Cricut: Introduction
Cricut’s Design Space is a Cricut software that is specifically designed to work with the Cricut machine and offers various interesting features to help you make a unique project. This tool works well for crafters of all types. All thanks to its user-friendly interface and easy- to-use features. With the help of this software, one can design their own crafts in minimum time.
Crafters can use it to get images, different fonts, shapes, templates, and texts to create a unique project. I have been using this software to create my favorite designs. One good thing about this software is that it allows you to upload a previously designed file on the canvas. So, even if you don’t know how to create designs, you can utilize an existing file.
How to Download and Install Design Space for Cricut?
Cricut Design Space allows you to download and install it on any compatible operating system, such as Windows, Mac, iOS, and Android. So, there will be no limitations for the operating systems. However, in this blog, I will tell you only about the desktop procedure. So, let’s get started to learn that.
On Windows
A Windows desktop is used widely, and almost everyone has one in their home or office. If you want to install the Design Space on Windows, follow these steps.
First of all, launch your internet browser and navigate to design.cricut.com.

2. Then, tick the checkbox to accept the Cricut Terms of Use and Privacy Policy.
3. Hit the Download button, and when you do it, your screen may change a little bit.

5. Next, a window may ask you if you trust the application; select Yes for that.
7. In the following step, you need to sign in using your Cricut ID and password.
8. Now, a Design Space for Cricut will be added to your desktop.
9. You can right-click on your icon and select the Pin to Taskbar option or just drag that icon to your Taskbar.
10. At last, you can use your Design Space the way you want.
That’s how you can learn by downloading and installing the Design Space. Now, it’s time to learn the process for a Mac computer.
On Mac
After Windows, I am here to share the process for a Mac computer. Here are the steps to download and install the Cricut Design Space for Mac computer.
First of all, open an internet browser and head to design.cricut.com.
Then, tick the box to accept the Cricut terms of use and privacy policy.
After that, hit the Download button.
Next, you will see a page where you can select the location to save your file. Most probably, you will get this file inside your Downloads folder.
Now, hit the Save button to start the download.
Then, the download will start. However, this screen will look different on every browser.

7. Once the download is complete, move to your Downloads folder and then click twice on the .dmg file.

9. After that, the Design Space will be added to your Applications folder.
10. You can open the Design Space for Desktop by double-clicking on your Applications folder. Otherwise, you can also create a shortcut and drag the application to the dock.
11. A window will open and ask you if you want to launch the application that you have downloaded previously.
12. Now, choose the Open option to continue with the process.

13. Now, you need to Sign in using your Cricut ID and password.

Finally, you can enjoy the features of your Cricut Design Space and make fun projects for you.
Conclusion
I shared with you how you can get the Design Space for Cricut. The process for getting the Cricut app is so simple. You just need to visit Cricut’s official website and download and install the Design Space on your Windows, Mac, or mobile devices.
Well, I just shared the process for the desktop. But, if you want to set it up on your mobile device, you can do it easily, just like on a desktop. Once you get this software, you can utilize its features, such as fonts, texts, shapes, and images. You can create the best piece of craft with the help of your Cricut software.
Source: Design Space for Cricut
Visit Here, For more Information: Cricut.com/setup
Cricut design space for mac
Cricut design space download
#design space for cricut#cricut design space for mac#cricut.com/setup#Cricut Design Space#cricut design space download#cricut new machine setup#Valentine day
0 notes
Text
Choose the Right Cricut Mats for Your Projects to Get Started
Without any second thoughts, you will surely agree that Cricut mats are one of the crucial tools developed by the company. It doesn't matter whether you are a beginner or a pro; you should choose suitable cutting mats for your DIY projects. If you are clueless about what this Cricut mat is and what its types are, then this blog is beneficial for you.
From the moment I started creating custom-made projects, I was pretty sure that without the mat, I wouldn't be able to make any project. To carry on with the legacy of being a crafter, I need to be very cautious while using it for designing crafts. Let's dive into the world of the mats and their types.
What Are Cricut Cutting Mats?
Putting everything aside, let's focus on what this cutting mat is and why you should need it. In simple words, it is a flexible, reusable item that tightly carries the material during the cutting procedure. It comes with a strong adhesive that holds paper to wood in its place without damaging it. Due to any reasons, if your Cricut cutting mat is not sticky enough, then your material will instantly begin to slide down.
Plus, you can easily take off the material from this item and store it for the next time. Also, the Cricut mats are available in several sizes, stickiness levels, and colors. It helps the user choose which material is compatible with your mat and project design. On the other hand, you should select the correct Cricut item before starting the crafting process.
What Are the Different Types of Cricut Mats Used by Crafters?
As a professional, it's my responsibility to make you aware that this Cricut product has been categorized into four different types, colors, and sizes. Each version has its specific grip strength that is compatible with different materials. Moreover, choosing the mat entirely depends upon the type of project the user is going to make out of their craft machine. To your knowledge, I have briefly explained its types and projects that can be made out of it.
1. Cricut Strong Grip Mat — 12 & quot;x 12"
Referring to one of the first Cricut mats, the Strong Grip mat is specifically designed for holding heavyweight materials. It is the best choice for sticking cardstock, chipboard, mat board, and backed fabric. Also, this reusable mat holds the material firmly in its place during the cutting process. Besides, you can easily remove the extra pieces after the cutting process comes to an end. As an upgrade, it is made with water-based paint and available in purple color.

2. Cricut Standard Grip Machine Mat, 12 "x 12" (2 ct)
Equally important, this cutting mat is ideal for cutting medium-weight material. It is compatible with materials such as vinyl, iron-on, paper-patterned, and more. Just like the earlier-said model, it tightly carries the material so it doesn't slip while cutting down the material. Besides, it is composed of water-based paint with solid adhesion spread in the whole area. Plus, it ensures the best possible adhesion and the longest possible life. With two mats included, you can load one into the craft machine while preparing for the next one.

3. Cricut Light Grip Mat, 12 & quot;x 12" (2 ct)
Inside the Cricut mats variety, the Light Grip mat was made to handle lightweight material. You can easily stick material such as standard paper, light cardstock, vellum, and more on this mat. In addition, this reusable mat is strong enough to keep the material in its place as it cuts down the loaded material. By using the cutting mat, you will surely get the material in the perfect formation. Also, it is formed with water-based paint and strong adhesive.
4. Cricut Fabric Grip Machine Mat, 12 & quot;x 12" (4 ct)
Equally important, most DIYers prefer this Cricut accessory while making something out of fabrics. It includes cotton, polyester, denim, felt, canvas, and many more. Also, this mat is a combination of increased strength and density along with light adhesive to cut fabrics. After making the tight connection between the fabric and mat, it keeps the materials in place while the cutting process is going on. Besides, the DIYer needs to remove the extra pieces, making the mat reusable again.

5. Cricut Card Mat — 2x2 (2 ct)
Concluding the Cricut mats list, get ready to make four different cards at the same time with this cutting mat. This craft machine product is compatible with all the Cricut cards and is the best for making last-minute crafts. One of the reasons why it is famous is that it can make Birthday cards, Thank You cards & Valentine’s cards in just a single go.
After sharing all kinds of info, it will get easier for you to decide which will be the compatible Cricut cutting mat for your project. Each model of this craft machine supply holds the ability to make severe projects that can help the DIYer brush up their creative skills. Besides, it's essential to keep all of these mats in good condition before they start getting worn out and affecting your crafts. Other than that, the above-said craft machine items are budget-friendly and can be accessed easily by any newbie or an experienced one.
Frequently Asked Questions
Question: How to Clean a Cricut Cutting Mats Using Baby Wipes?
Answer: To maintain the stickiness of this Cricut product, go through the steps given below:
You need to buy alcohol-free baby wipes from an online website or general store.
2. Next, take out a piece of wipe from the box and move it from the upward to downward direction.
3. If your mat is too dirty, then you can also move it in a circular motion and clean it two or three times.
4. After cleaning the mat, keep it aside and let it dry in natural heat for a few minutes.
Question: How Do You Make Cricut Mats Sticky Again?
Answer: If your mat is losing its stickiness due to which you are 't able to make your favorite craft, then you are supposed to restick your mat. To do so, follow the below steps:
1. First, you have to clean this crafting tool with the lint roller or with the scraper tool.
2. Then, cover the outer sides of this accessory with masking tape without making any gaps.
3. Now, spread strong adhesive on the mat and use a clean paintbrush to apply it in equal proportion.
4. Next, leave the glue on the mat and let it dry for at least 10–15 minutes.
Question: How to Load a Mat Into Cricut Cutting Machine?
Answer: Go through the following pointers and learn the steps of loading the craft machine mat into Cricut:
1. Initiate the process by unboxing this Cricut material after getting the delivery.
2. Next, switch on your craft machine and place the material on it using the brayer tool.
3. After that, take the cutting mat and insert it into the machine in equal alignment.
Question: How Can I Extend My Cutting Mat Life?
Answer: Several methods can help you extend your mat life, including:
1. Cover your Cricut mats with a clean plastic sheet so that it can be used for the next project.
2. Use a scraper tool, spatula, or weeding tool to remove the extra material from the mat.
3. Keep cleaning the mat regularly to maintain its stickiness with baby wipes or warm water.
Question: Where Can I Buy Cricut Mats to Create My DIY Project?
Answer: If you are planning to buy any model of the mat, then you should 't need to get worried. You can find the compatible mat on Cricut & #39;s official website or from Amazon, Walmart, or other shopping websites. Besides, you will get a certain percentage of the amount and other benefits if you have a Cricut Access membership.
Source: Cricut mats
Cricut cutting mats
For more Information, Visit:
cricut.com/setup
Cricut Design Space
Cricut new machine setup
#Cricut mats#Cricut cutting mats#cricut.com/setup#Cricut Design Space#cricut new machine setup#cricut software app
0 notes