
Statistics
We looked inside some of the posts by gabbyums and here's what we found interesting.
Average Info
Notes Per Post
4
Likes Per Post
4
Reblog Per Post
0
Reply Per Post
0
Time Between Posts
3 months
Number of Posts By Type
Text
17
Last Seen Tumblr Blogs


Fun Fact
Average visit duration of Tumblr.com is 10 mins and 25 secs.
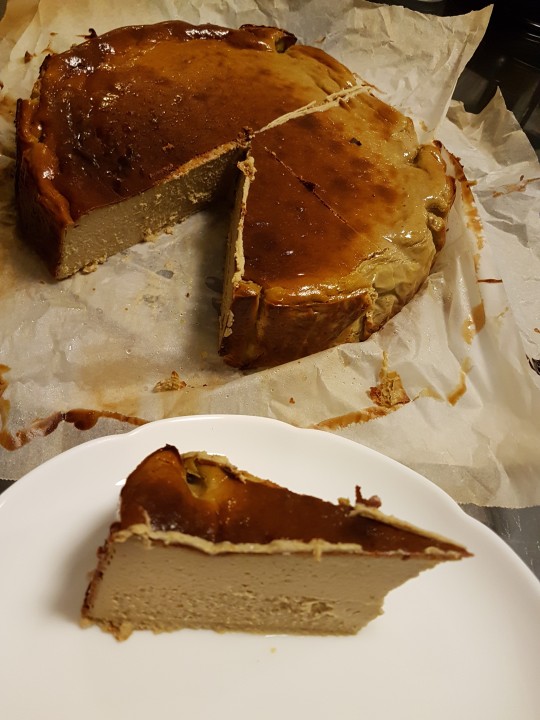
Text
tofu cheesecake
inspired by the one from Sun with Moon that comes in a birdcage, but recipe adapted from here: https://tottstore.com/recipes/tofu-cheesecake/
Original recipe meant for a 6-inch springform pan, but by agaration i think it would work for 2 4-inch pans. so if i wanted to use a whole tofu box... i'd x2 the recipe.
Ingredients
Base
120g digestive biscuits
70g melted butter
Filling
150g silken tofu
125g cream cheese
80g greek yogurt
25g melted butter
50g icing sugar
30g milk
1 1/2 tsp gelatine powder
20g hot water
Instructions
Base
Stir ingredients together in a bowl.
Press the mixture into the base of a lined springform pan, and level it with the back of a spoon.
Refrigerate for at least 10min to set.
Filling
Pulse the rest of the ingredients (except gelatine powder and hot water) in a food processor till smooth.
In a small bowl, sprinkle 20g of gelatine powder to 20g cold water and let it absorb the water (bloom) for 5-10min. DO NOT DUMP IT ALL IN AT ONCE!! After that, heat it up (either in a water bath or in 10s increments in the microwave and stir till dissolved.
Leave the prepared gelatine mixture to cool to room temp before adding it to the pulsed mixture. Blend to incorporate thoroughly.
Sieve the filling mixture and pour over the base.
Refrigerate at least 4h to set.
0 notes
Text
Sourdough discard waffles
Finally found a sourdough waffles recipe I'm happy with!!! AND it's a discard recipe to boot!!
My only gripe is that the recipe had all the measurements in US setting only (who in their right mind would measure 1 cup of sourdough?!) but i guesstimated stuff and moved along. Here's my modified version (in sensible measurements):
Ingredients
Dry
120g AP flour
1/2 tsp baking soda
1/2 tsp salt
1 tbsp sugar (originally 2 tbsp)
Wet
sourdough starter (i used 40g discard + 90g water + 90g AP flour = 220g)
3/4 cup milk (low fat is fine too)
30g melted butter (keep some extra for buttering the pan)
2 large eggs
2 tsp vanilla extract
Instructions
Mix all the dry ingredients together.
Mix sourdough starter + milk + butter, then add in the eggs + vanilla extract.
Add the wet into the dry and mix. (Don't overmix!! Lumps are ok 🙂)
Heat up the waffle iron and grease it with a brush (mine is ready for loading once the green light turns on)
Load the batter and spread it evenly w the back of your small ladle.
Wait till the whole thing turns brown and crispy (it takes longer than i think it will, maybe like 5min or something but i didn't manage to time it exactly)
It seems like you do need to close it tight and kiap it but it starts to squeal quite loudly which makes me panic that it's gonna explode from the built up pressure so i think my plan now is to kiap for a while and open it when it starts to squeal hahaha
0 notes
Text
sourdough discard banana bread
ingredients
butter for coating pan
375g overripe bananas
225g (1 1/4cups) brown sugar
1 1/2 tsp pure vanilla extract
2 large eggs
100g active starter
250g (2 cups) AP flour
1 1/2 tsp baking soda
1/4 tsp fine sea salt
125ml (1/2 cup) neutral flavoured oil
60ml (1/4 cup) milk
directions
Cream: bananas, sugar, vanilla
Add eggs (one by one)
Add sourdough starter
Sift separately: flour, baking soda, salt
Add in batches to banana mixture
Add (don't overmix!): milk, oil
Butter pan(s) and load batter
Bake @ 180deg for 50min (single-pan)
Cool for 20min in pan, then transfer to wire pan to cool completely
Post-munch edit: SDBB 1.0 had a nicer texture, likely cos of the cake flour addition. unfortunately i didn’t take note how much i added... maybe can try 1:1 ratio next time!

0 notes
Text
brown butter brownies!
from https://handletheheat.com/brown-butter-brownies/
prep time: 20min
cook time: 30min
ingredients
1 1/2 sticks (170 grams) unsalted butter
4 ounces (113 grams) semisweet chocolate, chopped
1/2 cup (100 grams) granulated sugar
1/2 cup (100 grams) light brown sugar
3 large eggs
1 tsp vanilla extract
1/2 cup (64 grams) all-purpose flour
1/2 cup (43 grams) unsweetened cocoa powder, preferably Dutch Process
1/2 tsp instant espresso powder, optional
1/2 tsp fine salt
1 cup (170 grams) semisweet chocolate chips
directions
Preheat oven to 176°C. Line a metal 8-inch square pan with parchment paper.
In a small saucepan set over medium low heat, melt the butter. Swirling the pan occasionally, continue to cook the butter, increasing the heat to medium. It should become foamy with audible cracking and popping noises. Once the crackling stops, continue to swirl the pan until the butter develops a nutty aroma and brown bits start to form at the bottom. Once the bits are amber in color, about 2 to 3 minutes after the popping stops, remove from heat and pour into a mixing bowl, scraping the brown bits into the bowl.
Immediately add in the chopped chocolate and stir until melted.
In the bowl of an electric mixer fitted with the whisk attachment, combine the granulated sugar, brown sugar, eggs, and vanilla. Beat mixture on high speed until completely thickened and fluffy in texture and lightened in color, about 8 minutes. On low speed, gradually pour in the warm brown butter chocolate mixture.
Use a rubber spatula to stir in flour, cocoa powder, espresso powder, and salt until just combined. Stir in the chocolate chips.Pour into prepared pan and smooth out with a spatula. Bake in the preheated oven for 22 to 25 minutes, or until set but not overbaked. Let cool in pan completely before slicing and serving.
Brownies can be stored at room temperature for up to 2 days.
0 notes
Text
japanese-style hojicha basque burnt cheesecake
adapted from https://www.justonecookbook.com/matcha-basque-cheesecake/ with my own tweaks
for our 8.5inch pan (it's a weird size, i know)
ingredients
678g cream cheese (3 blocks; room temp)
200g sugar
6 eggs (room temp)
3 egg yolks (room temp)
sea salt
600ml heavy whipping cream (2 bottles bulla thickened cream; room temp)
33g cake flour
18g cornstarch (i eyeballed it...)
18g sifted hojicha (1 tbsp = ~9g)
directions
Preheat oven to 230deg
Line the pan with 2 layers of parchment paper that intersect in the middle but are perpendicular to each other. Place the removable base on top of the paper to make the creases you need. Mess is ok, but leave at least 2 inches (5 cm) of overhang around all edges! Best if the cake pan is at least 3" tall as well.
Squish the room temp cream cheese with a rubber spatula to make it soft.
Add sugar. Combine cream cheese with sugar by rubbing the mixture with the spatula against the bowl. The cream cheese will become fluffy and smooth as the sugar granules disappear. Scrape both bowl and spatula often to ensure that nothing sticks to them and that there are no lumps.
Whisk the egg and yolks together in a separate bowl. Slowly and gradually add the beaten egg 2-3 separate times. Don’t add more egg until the batter is smooth and no lumps, blending COMPLETELY and THOROUGHLY.
Frequently scrape off the batter from the bowl and spatula and make sure there are no lumps in the batter.
Add the rest of the eggs and blend well.
Preheat the oven for at least 30 minutes. Also bring the cream cheese, eggs, and heavy cream to room temp. Sift the hojicha a little bit at a time as you stir and blend together. Take your time to remove all the lumps. Then sift more and continue as you finish sifting and blending in all the hojicha.
Mix all together and if it’s too thick, add more batter. Blend again until smooth (no lumps). I added another scoop of batter. Combine and blend the two batters very well until it has a smooth consistency.
Sift the cake flour and cornstarch into the batter as you stir and blend together. Then sift more and continue as you finish sifting and blending in all the flour. Again, take your time to do this and remove lumps asap.
Gradually add heavy cream while you stir. Mix until it’s all combined. Add salt and blend together.
Pour the cake batter into the prepared pan in one go (avoid stop-and-go) so the air pockets don’t go in.
Tap the cake pan on the countertop a few times. With a bamboo skewer or toothpick, pop the air bubbles if there are any, and then run the batter with it to remove any bubbles.
Bake for 25min, then add 10min at 260deg to burn the top LOL
Take out the cake when the surface is dark, burnt color. The cake should wobble when you gently shake the pan.
Let the cheesecake cool in the pan on a wire rack until it reaches room temperature (about 2-3 hours). Don’t put it on the countertop directly and make sure the air can go through under the cake pan. You can place it on top of the stovetop, if it's is not in use.
Eat as is, or chill and enjoy! (if refrigerated, let stand at room temperature for at least 30 minutes or up to 2 hours before serving.)
Cake keeps for up to 3 days in the fridge.
1 note
·
View note
Text
triple layer matcha & hojicha burnt basque cheesecake
adapted from https://www.siftandsimmer.com/mini-triple-layer-matcha-hojicha-burnt-basque-cheesecake/
we have a 9-inch pan so need to x5 the ingredients?? apparently, a smaller, taller cake will produce better results though.
20min prep time + 30min cook time = 50min total
ingredients
200g cream cheese (room temp)
50g granulated sugar
1 large egg, lightly beaten (room temp)
pinch of sea salt
1 tsp vanilla extract
120ml heavy whipping cream (room temp; >36% fat)
12g all-purpose flour
1 tbsp hojicha powder
1 tbsp matcha powder
directions
preheat oven to 200degC
Line cake pan with parchment paper, ensuring it overahangs about 2" from the pan (creasing the parchment paper is ok!)
in a bowl, whip together the cream cheese and sugar until light and fluffy. scrape the sides of the bowl with a spatula.
add in the beaten egg, salt, and vanilla extract.
pour in the heavy cream.
scrape the sides of the mixing bowl with a spatula and continue to whip until smooth and incorporated.
sift in the flour over the top of the batter and mis with a spatula until the batter is smooth
divide the batter into half. sift match powder over top oft he batter. mix until all the matcha is incorporated.
to make 3 layers, divide plain portion into another half & sift hojica powder over the top of that portion, mix into the batter, and leave the remainder plain. (dividing into 3 equal parts is also ok but depends on desired outcome)
transfer each bowl of batter into the prepared pan, in the desired order.
bake for 30-40min at 200degC, then turn to broil 260degC for 3-5min until the top is browned. WATCH CAREFULLY TO NOT LET IT BURN!
remove from oven while cake is still slightly jiggly in the centre. let cool (it'll deflate, don't panic!)
cut into slices and serve at room temperature OR serve chilled
hacks
eliminate lumps asap because it gets harder
ensure parchment paper is lined about 2" taller than pan
keeping dairy and egg at room temp helps them combine more cohesively
broiling is for burning the top of the cheesecake~
remove the cheesecake while the centre is slightly jiggle -- it will firm up later!
can replace hojicha/matcha with cocoa if desired
0 notes
Text
good pancakes!
adapted from https://cafedelites.com/best-fluffy-pancakes/
ingredients
2 cups (290g) all purpose flour
1/4 cup (60g) granulated sugar or sweetener
4 tsp baking powder
1/4 tsp baking soda
1/2 tsp salt
1 3/4 cups (440ml) milk
1/4 cup (60g) butter
2 tsp pure vanilla extract
1 large egg
directions
DRY: Combine the flour, sugar (or sweetener), baking powder, baking soda and salt in a large-sized bowl.
WET: Make a well in the centre and add the milk, slightly cooled melted butter, vanilla and egg. Whisk the wet ingredients together first before slowly folding them into the dry ingredients.
Continue mixing together until smooth (it’s ok if it’s a little lumpy!).
Set the batter aside and allow to rest while heating up your pan or griddle.
Heat a nonstick pan or griddle over low-medium heat and wipe over with a little butter to lightly grease pan.
Pour ¼ cup of batter onto the pan and spread out gently into a round shape with the back of your ladle or measuring cup. Note: The batter will be thick and creamy in consistency. If you find the batter too thick to ladle out smoothly, fold a couple tablespoons of extra milk into the batter at a time until reaching desired consistency).
When the underside is golden and bubbles begin to appear on the surface, slide spatula under the whole pancake and flip it! Cook until golden. Repeat with remaining batter. Note: if pancake is browning too quickly before other side is cooked, lower the fire.
Serve with honey, maple syrup, fruit, ice cream or frozen yoghurt, or enjoy plain!
pancake hacks:
for perfect, evenly sized pancakes: use a 1/4 cup measuring cup or small ladle to pour your batter. Start pouring from the middle, then continue pouring slowly in a circular motion so that the batter spreads into perfect round shapes.
0 notes
Text
soft & crispy focaccia
by claire saffitz!!
Time taken: 2h30min + 1h 40min = 4h 10min
Special Equipment:
Instant-read thermometer
Stand mixer
Scale
Standard half-sheet pan (18x13 inches)
Ingredients:
1 (1/4 oz / 7g) envelope active dry yeast
6 cups bread flour (24oz / 780g)
2 tablespoons Diamond Crystal kosher salt (0.6oz / 17g)
1/2 cup extra-virgin olive oil (5oz / 110g), plus 1/4 cup for topping plain focaccia and more for oiling hands
Optional toppings
Flaky salt, for sprinkling the top
Instructions
proof yeast: whisk to dissolve yeast in 1/2 cup warm water (~37deg). let sit 5min, check that it's swelling but not active bubbling
add 2.5 cup room temp water. 6 cups flour. salt.
use mixer to incorporate flour at low speed
mix on medium-high for 5min (till dough is smooth, wrapped around hook)
cover and let dough rest 10min w wet cloth
mix on med-high 10-15min till dough starts to pull away from sides. till dough is extremely smooth and elastic.
first rise: 1/4 cup olive oil to coat sides of bowl then dump dough in. scrape dough off sides and coat completely with oil using finger. let rise till size has doubled (maybe 1-1.5h)
poke test: leaves slight indentation
1/4 cup olive oil in pan
hands under dough, lift, wiggle. turn 90deg and repeat. do this 4 times. you should see gases and bubbles underneath
stretch dough as much as possible to fill sheet pan. let rest once bread starts to spring back. pop any big bubbles
coat cling wrap w remaining oil in bowl and cover pan for 10-15min for gluten to relax.
toppings! slice garlic and rosemary + 1/4 cup olive oil + red pepper flakes
second rise: finish stretching the dough into all the corners. let rise 40-55min (overnight is even better) till dough is flush w top of pan.
dimpling dough: dip fingers in pools of oil in pan. poke all the way to bottom of the pan with fingertips.
drizzle prepared toppings all over the top, drizzle flaky salt
preheat to 230deg C, bake on lower rack for 20-25min, then upper rack for 5-10 more min!
let cool for 10min. then loosen the bread with a spatula!
0 notes
Text
subway double chocolate chip cookies
youtube
from a video by Montvale Bakes which is apparently based off the recipe that Subway officially released.
ingredients
125g salted butter, softened (if using unsalted, add 1/2 tsp salt)
100g light brown sugar
75g granulated sugar
1 tsp vanilla extract
1 medium egg
150g plain flour,
sifted 40g cocoa powder,
sifted 1⁄2 tsp baking soda
100g white chocolate, roughly chopped
200g milk chocolate, roughly chopped
directions
add butter + granulated sugar; mix with rubber spatula until pale and smooth
add brown sugar; mix until incorporated
add vanilla extract, room temp egg; mix some more
sift flour + cocoa powder + baking soda into wet mixture; fold but don't overwork the mixture
add white chocolate chunks + milk chocolate chunks
scoop into greased baking tray, leave a LOOOT of space in between
bake at 170C for 12min
allow to cool 10min on wire rack before serving
0 notes
Text
hokkaido milk bread (tangzhong method)

youtube
from emmymade which is adapted from https://www.kingarthurbaking.com/recipes/japanese-milk-bread-rolls-recipe
total time: 3h 15min
Preparation: 15min
1st Proof: 1-1.5h
2nd Proof: 50min
if stalling time, can refrigerate here and then let proof again for 40-50min
Bake: 25-32min
Rest before removing from pan: 10min
ingredients
3 tbsp water
3 tbsp milk + ½ cup (113g) milk
2 tbsp bread flour
1 large egg
2.5 cup (298g) bread flour
¼ cup (50g) sugar
1 tsp salt
1 tbsp instant yeast
¼ cup (57g) melted butter
directions
tangzhong
3 tbsp water (to make earl grey bread, soak teabags in here 10min first)
3 tbsp milk
2 tbsp bread flour
whisk together in a small saucepan.
heat on medium low heat till it becomes a thick paste where you can you see whisk marks on the bottom.
add ½ cup (113g) milk to cool tangzhong down to room temperature.
add 1 large egg* mix together?
(separately)
2.5 cup (298g) bread flour
¼ cup (50g) sugar
1 tsp salt
1 tbsp instant yeast
stir, then add tangzhong mixture + 1/4 cup melted butter
with bread attachment, mix for about 8min till dough no longer sticks to sides
give a few kneads and form into ball
put a few drops of oil in the bowl, then wipe it with the dough ball. let rest for 1-1.5h with damp cloth over it.
it should double in size, but use poke test (if it doesn’t spring back it has proofed enough)
portion into 4. roll each small dough into sphere using table and cupped hands.
one by one, flatten and roll out into a long vertical rectangle and fold inward into thirds.
rotate 90 degrees, and roll it out into a long vertical rectangle again before rolling it up towards the top and pinching it closed.
place gently in covered buttered pan (seam down) and let rise for 40-50min
brush with 1 egg+ 1 tbsp water
preheat oven at 175°C for 25-32min. if bread is browning too fast, cover it halfway.
0 notes
Text
chocolate chip cookies (nytimes)

this cookie is chewy and kind of soft, although crunchy around the edges. don’t overbake it, otherwise it’ll be too hard.
ingredients
2 cups minus 2 tbsp (8.5 ounce / 138 g) cake flour
1 2/3 cups bread flour
1 1/4 tsp baking soda
1 1/2 tsp baking powder
1 1/2 tsp coarse salt
1 1/4 cups unsalted butter
1 1/4 cups light brown sugar
1 cup plus 2 tbsp (8 ounces) sugar
2 large eggs
2 tsp vanilla extract
1 1/4 pounds chocolate discs/ chocolate chips (>60%)
Sea salt
directions
DRY STUFF: Sift flours, baking soda, baking powder, salt into a bowl. Set aside.
In a mixer w paddle attachment, cream butter and sugars together until very light, abt 5min.
Add eggs (one at a time) mixing well after each addition.
Stir in vanilla.
Reduce speed to low, add dry ingredients and mix until just combined (5-10 seconds)
CHUNKY TIME: Drop chocolate pieces in and fold. Don't break them!!
REFRIGERATE 24-36hours (72h max) with plastic wrap pressed into dough
BAKE: preheat to 177deg. Scoop 6 golf-ball sized doughballs onto a lined baking sheet, sprinkle with some salt before baking 18-20min till golden brown.
COOL: on a wire rack.
1 note
·
View note
Text
blueberry muffin bread

adapted from https://sallysbakingaddiction.com/blueberry-muffin-bread/
ingredients
Dry
2 cups (250g) all-purpose flour
1 tsp baking soda
1 tsp baking powder
1/2 tsp salt
Wet
1/2 cup (115g) butter
1/2 cup (100g) brown sugar [reduced sugar, also bc banana]
2 large eggs
1/2 cup bananas [subbed for sour cream]
1 1/2 tsp vanilla extract
1/3 cup (80ml) full cream milk
250g blueberries [or you agak-agak yourself la huh]
Cinammon Crumble
1/4 cup all-purpose flour
2 tbsp brown sugar
1/4 tsp ground cinnamon
2 tbsp (~28g) butter
directions
DRY STUFF: Whisk together the flour, baking soda, baking powder, salt
CREAMING: In another bowl, beat the butter and sugar on high speed until smooth & creamy (about 2 min)
Add in the eggs one at a time, then the bananas, then the vanilla extract on medium speed until combined
COMBINE: Add in the dry stuff and milk, beat on low speed until no more flour pockets remain.
CHUNKY TIME: Dump in the blueberries, give it a few folds
Line your loaf pan and load the batter in
Preheat oven to 177°C. While waiting, make the streusel!! Melt 2 tbsp (~28g) butter and mix it into a combination of 1/4 cup (31g) all-purpose flour, 2 tbsp brown sugar, and 1/4 tsp ground cinnamon using a fork.
Sprinkle the crumbly mixture over the loaf before loading it into the oven :)
Bake for 60-65min. At the 30min mark, loosely cover the bread with aluminum foil to help prevent the top and sides from getting too brown.
Toothpick test should produce clean toothpick! After which, remove from the oven and allow the bread to cool completely in the pan set on a wire rack.
Storage: 2 days at room temperature, up to a week in the refrigerator
0 notes
Text
gyudon (牛丼)
from just one cookbook
ingredients
1 onion
2 green onions/scallions
¾ lb thinly sliced beef (chuck or rib eye) (12 oz or 340 g)
1 Tbsp neutral-flavored oil (vegetable, canola, etc)
3 large eggs (beaten, optional)
2 tsp sugar
2 Tbsp sake
2 Tbsp mirin
1 Tbsp soy sauce
3 cups cooked Japanese short-grain rice
pickled red ginger (beni shoga or kizami beni shoga) (to garnish)
directions
Gather all the ingredients.
Slice the onions, cut the green onion into thin slices (save for garnish), and cut the meat into small pieces.
Heat the oil in a large frying pan over medium high heat and cook the onions until tender.
Add the meat and sugar and cook until no longer pink.
Add sake, mirin, and soy sauce.
Reduce the heat and simmer for 2-3 minutes.
If you like to add the egg, slowly and evenly drizzle the beaten egg over the beef. Cook covered until the egg is done. Add the green onion right before removing from the heat.
Place the beef and egg on top of steamed rice, pour the desired amount of cooking sauce, and top with green onion and pickled red ginger.
0 notes
Text
brown sugar pearls

(if making cold milk tea, you might want to start steeping your tea before producing the pearls, so that the tea has time to cool down to room temperature nicely☺) p.s. would be good to make your tea super gao and bitter because the pearls will sweeten it up!
ingredients
150g brown sugar (50g set aside)
100g tapioca flour
water
directions
In a pan, bring 70ml (10 tbsp) of water to a slight boil and dissolve 50g of brown sugar in it.
Add in 1 tbsp tapioca flour, heat on low heat
Remove pan from heat, dump the rest of the tapioca flour in
Mix well using a spatula till you get a nice collective dough lump
Knead dat ugly dough lump on a floured surface till you get a nice smooth playdough-ish lump
Take a small section of the dough and roll it into a thin snake. Cover the rest of the dough lump in cling wrap and refrigerate it to prevent it from drying out. (if it does end up drying out, wet your hands and reknead the doughball. it won’t be as good as it originally was, but it kinda works as a quick fix)
Slice the snake into small sections, roll them into balls (aim for mini balls, cos the pearls will expand while being boiled later, and also higher chance of getting raw centers post-boiling)
Drop the pearls into a container or bowl with tapioca flour in it (the flour coats the dough balls and prevents them from sticking together)
Repeat pinch-snake-slice-ball until you finish all the dough
Decide how much pearls you want to drink today, and stick the rest of the mini doughballs in the fridge! (keeps for up to 3 days raw)
Boil 1/4 pot of water, drop the pearls in and keep stirring for exactly 15min.
Prepare a bowl of icy water to plop the pearls in right at the 15min mark (this makes the pearls bouncy and qq)
In a clean pot, boil 350ml of water and mix in 100g sugar till dissolved. (vary sugar proportions depending on how much you need)
Reduce to low heat and drop in the pearls which were chilling in the bowl earlier. (mixture should not be bubbling violently, just a quiet subtle blub blub)
Continue heating till the mixture reduces to a gooey, honey-like texture, gently stirring the pearls occasionally. If you can imagine coating your cup with it, it’s done! (no need to constantly be stirring the pearls, just enough to make sure the mixture doesn’t burn or clump together)
2 notes
·
View notes
Text
brownies
from Cookie and Kate
ingredients
10 tbsp (141.75g) unsalted butter, cut into 1/2-inch slices
1 1/4 cups (49.5g) cane sugar
3/4 cup (75g) natural unsweetened cocoa powder
1/2 teaspoon fine sea salt
1/4 teaspoon baking powder
1/2 teaspoon espresso powder or very finely ground coffee (optional)
2 cold large eggs
1 1/2 teaspoons vanilla extract
2/3 cup (80g) white whole wheat flour or flour of choice
2 ounces dark or semi-sweet chocolate, roughly chopped, or 1/3 cup chocolate chips
directions
Preheat the oven to 160°C with a rack in the lower third of the oven. Line an 8-inch square baking pan with two criss-crossed pieces of parchment paper, making sure that the paper is long enough to go up the sides a couple of inches. Grease the parchment paper.
Brown the butter: Melt the butter in a medium-sized saucepan over medium heat. Continue to cook the butter, while whisking constantly, until it’s a pale golden brown and the particles suspended in it are reddish brown. This usually takes me about 10 minutes.
Remove the pan from heat and stir in the sugar. Then add the cocoa powder, sea salt, baking powder and espresso powder. Stir until the ingredients are thoroughly incorporated. Let the mixture cool for 5 minutes.
Add the eggs one at a time, beating vigorously with a wooden spoon or silicone spatula after each one. When the mixture looks thick, shiny and well blended, add the vanilla extract and the flour. Stir until you no longer see streaks of flour. Then beat vigorously (put those arm muscles to work!) for 50 strokes with the wooden spoon or spatula.
At this point, the mixture should be no more than slightly warm (if not, let it cool for a few more minutes). Fold in the chocolate chunks or chips.
Spread the batter in the lined pan, then use a knife to make light swirls in the top of the batter. Bake on the lower rack for about 25 minutes, until a toothpick inserted in the center comes out mostly clean. Cool the brownies in the pan on a baking rack.
Once the brownies are completely cool, lift the edges of the parchment paper and transfer the brownies to a cutting board. Use a sharp chef’s knife to cut the brownies into 16 or 25 squares.
0 notes
Text
strawberry jelly hearts
(This recipe yields about 18 slices of cake based on a 14" by 9" dish)
Ingredients
Base
300g digestive biscuits
120g unsalted butter
Middle
500g cream cheese (room temperature)
135g castor sugar
295ml water
1.5 tbsp gelatin
1 tbsp vanilla bean paste
Jelly
8 - 10 strawberries
150g Jello-O (Strawberry flavour)
350ml hot water
350ml cold water
Directions
Melt butter (stove or microwave both work)
Smash biscuits
Add butter to biscuits, mix well
Spread mixture evenly onto base of dish, compact with back of spoon
Put in freezer
Halve strawberries, cutting out triangle at the top (like a heart)
Dissolve the gelatin by boiling on low heat or using microwave oven, leave to cool to room temperature.
Add castor sugar to cream cheese
Cream the cream cheese and sugar till creamy and smooth
Add 1/3 of cooled gelatin mixture, mix well on low speed
Add in remaining gelatin mixture and vanilla bean paste
Mix well on low speed till well combined. Alternatively, use your spatula to do the mixing... This prevents too many bubbles from forming in the mixture.
Remove base from freezer and pour in mixture. Freeze in freezer for about 8 minutes, no more than that
Remove from freezer and gently place the strawberries into the mixture. It should be 1/2 submerged
Allow cheesecake to set in freezer for 40 minutes
Dissolve jello in hot water
Add in cold water, let it cool completely
Remove cheesecake from freezer, gently spoon the jello onto the cheesecake with a ladle.
Return cheesecake to freezer for another 20-30 minutes or till cheesecake and jello has set.
Slice and serve!
0 notes
Text
(inedible) no-cook playdough
Ingredients
2 cups plain flour (all purpose)
2 tablespoons vegetable oil (baby oil and coconut oil work too)
½ cup salt
2 tablespoons cream of tartar
1 to 1.5 cups boiling water (adding in increments until it feels just right)
gel food colouring (optional)
few drops glycerine (my secret ingredient for stretch and shine!)
Directions
Mix the flour, salt, cream of tartar and oil in a large mixing bowl
Add food colouring TO the boiling water, then into the dry ingredients
Stir continuously until it becomes a sticky, combined dough
Add the glycerine (optional)
Allow it to cool down then take it out of the bowl and knead it vigorously for a couple of minutes until all of the stickiness has gone. * This is the most important part of the process, so keep at it until it’s the perfect consistency!*
If it remains a little sticky then add a touch more flour until just right
0 notes