
Tracking inspiration, land candidates and cob housing thoughts on the mud-hut of our dreams... Cob, Strawbale, geothermal, wind power, solar, composting toilets, cordwood, Off grid living... All that & a biodegradable bag of chips.
Don't wanna be here? Send us removal request.
Statistics
We looked inside some of the posts by handbuilt and here's what we found interesting.
Average Info
Notes Per Post
83K
Likes Per Post
47K
Reblog Per Post
36K
Reply Per Post
134
Time Between Posts
2 months
Number of Posts By Type
Photo
6
Text
7
Video
4
Last Seen Tumblr Blogs


Fun Fact
In February 2021, Tumblr had 518.6 million blog accounts.
Photo

Before the scotch broom murder, the assassinated stack, a meadow set free. Bonus photos: an improvised screen and the beginning of mourning (we’re going to have to pull the earthen floor…) https://www.instagram.com/p/CO9BzPPMFm9/?igshid=heig6wfry0pu
9 notes
·
View notes
Text
That which remains (update)
Here is what is left in unequal size lumps and levels of importance;
Evict the last mice
Fix minor floor damage from building
Wax floor
Install the door
Build the day bed and drawers into the solarium
Build the kotatsu or storage into the cuddle nook
Build the raised wooden floor in the cuddle nook
Get the wall bed installed
Seal the small wood gaps around the solarium
Primer and paint exterior rafters
Hang the rest of the fascia
Decide about if the wood stove is needed or not then install if so (this will take all winter being in the cottage) - need a small stove... The one we have rusted and I'm not sure if its safe, so....
Insulate and install a ceiling.
Plug holes in walls (for future pipes or cables)
Replace rope in the utility pipe and re-seal it (the end out of the house final deteriorated in the sun)
2 notes
·
View notes
Video
Tiny tips for tiny homes.
youtube
Tiny House Self-Isolation Vlog: Trying to Stay Sane n 130 SF
#SelfIsolation tiny house edition: week 3! We’re sharing how we are staying sane in our 130 sqft tiny home. Initial observations: we’re getting weirder. Also, maintaining a morning routine is helping us create a sense of normalcy in this scary, strange time.
👉🏡To see how we prepped our tiny house for lockdown and #selfquarantine, watch this: https://youtu.be/ZUdvreR_heQ
From our home to yours, we’re sending you all warm wishes and positive vibes for good health and wellbeing during this crazy time. ❤️❤️❤️
👉👉👉👉Official Coronavirus (COVID-19) Info for Protecting Yourself and Others: https://www.coronavirus.gov
18 notes
·
View notes
Text
Long overdue update (from last autumn actually) Didn’t finish everything, but am cutting inessentials, so we can maybe round this out this spring and summer, since we’re probably not going anywhere.
Evict the last mice - DONE
Fix minor floor damage from building
Wax floor - floor is still weird, needs something else, what is still unknown
Install the door - DONE
Build the day bed and drawers into the solarium
Build the kotatsu for the cuddle nook
Build the raised wooden floor in the cuddle nook
Get the wall bed installed
Seal the small wood gaps around the solarium - DONE
Primer and paint exterior rafters - not sure
Hang the rest of the fascia - probably should...
Decide about if the wood stove is needed or not then install if so (this will take all winter being in the cottage) - gonna need it, so TBD
Insulate and install a ceiling.
Plug holes in walls (for future pipes or cables)
Replace rope in the utility pipe and re-seal it (the end out of the house final deteriorated in the sun)
Kitchen, all of it.
Maybe color the walls
So yeah... it’s “done” in that one could live in it, but it’s far from finished.
That which remains
The house is 98% done… But that 2% is starting to drive me a little nutty so here is what is left in unequal size lumps and levels of importance;
Evict the last mice
Fix minor floor damage from building
Wax floor
Install the door
Build the day bed and drawers into the solarium
Build the kotatsu for the cuddle nook
Build the raised wooden floor in the cuddle nook
Get the wall bed installed
Seal the small wood gaps around the solarium
Primer and paint exterior rafters
Hang the rest of the fascia
Decide about if the wood stove is needed or not then install if so (this will take all winter being in the cottage)
Insulate and install a ceiling.
Plug holes in walls (for future pipes or cables)
Replace rope in the utility pipe and re-seal it (the end out of the house final deteriorated in the sun)
It’s all kind of driving me mad to not be working on any of these things yet freeing. Once the mice are out, the door is in, solarium sealed and bed delivery scheduled I think I’ll stop twitching. I believe I can live with everything else not quite done. Probably not actually, but I can hope.
The last 2% is driving me a little mad…
16 notes
·
View notes
Video
youtube
Shiny Lime Plaster Sealed with Olive Oil Soap
From the dooblydoo: Mixes:
Base coat: 2-3 parts plaster sand, screened 1/8''-1/4'' to 1 part Type-S lime, and 1 part water or as needed.
Lime Putty: 1 part Type-S lime to 3/4 part water or as needed, use pigment for color (make sure you use a lime fast pigment).
Soap: 1 part Olive oil soap to 20 part water. The soap chemically reacts with the lime plaster, forming lime calcium soaps. Calcium soaps are insoluble in water, and fairly hard. They are familiar in areas with calcium-rich ("hard") water, as deposits in bathtubs, sinks, and showers; when soap is mixed with the water's dissolved calcium carbonate/lime, calcium soaps form. 2 C17H35COO−Na+ + Ca2+ → (C17H35COO)2Ca + 2 Na+
The timing between coats is very important, as explained below. Substrate/existing wall should be something lime bonds to, such as any unsealed lime or cement plasters, cement board, brick, clay or earth walls. Make sure it's well keyed, such as having a texture for the lime to grip to. Using concrete bonder can help bonding and decrease wicking, giving you more time work your base coat.
Applying: Base Coat: is applied 1/4'' thick but can be applied in two passes. It shouldn't go any thicker than 1/2'' in total. Floating is optional, the main goal here is to leave a smooth, fresh base for the putty coat.
Putty Coat: this has to be applied when the base coat is firm but still wet, which varies a lot by weather and how much the substrate is wicking water from the base coat. Typically on a hot day, out of direct sun this would take 1-2 hours. If you apply concrete bonder to your existing substrate and cover your base coat well with plastic, you can extend this window over night. This is usually preferred because the slower the lime drys the stronger it will be. The lime putty needs to applied very thin so as not to crack, you can listen to the video for how it sounds when you're spreading it thin. It is also very important to keep your trowels very clean during this step, wiping it with a rag after, as extra build up on your trowel can lead to it sticking and could pull off your putty coat. Make sure to apply on an angle, because a flat trowel will stick to the putty coat.
Soap: This step is optional as the soap is to waterproof your plaster. This also needs to be done while you're putty layer is still wet, ideally as soon as possible but dry enough so that you don't smudge your surface and your polished, shiny luster which you work so hard at. A good way to test if you're ready to soap is to wet your finger and run across the surface without it smudging the finish. Your plaster may not dry evenly so should check multiple places. After soaping I recommend washing the wall with water. You can apply any additional masonry sealers or wax.
So pretty....
6 notes
·
View notes
Video
youtube
Natural Clay Paint: Homemade with soil and wheatpaste
This is a glorious and inspiring video... Earth building porn, most definitely. Makes me want to head for the house right now...
0 notes
Photo
This is what must happen when we garden.

Need a garden border AND a use for all those empty wine bottles?
Awesome example of using what you have on hand, and only about two blocks from where I live, so I’ll be able to see how this functions and ages all summer.
11 notes
·
View notes
Text
Home appropriate options
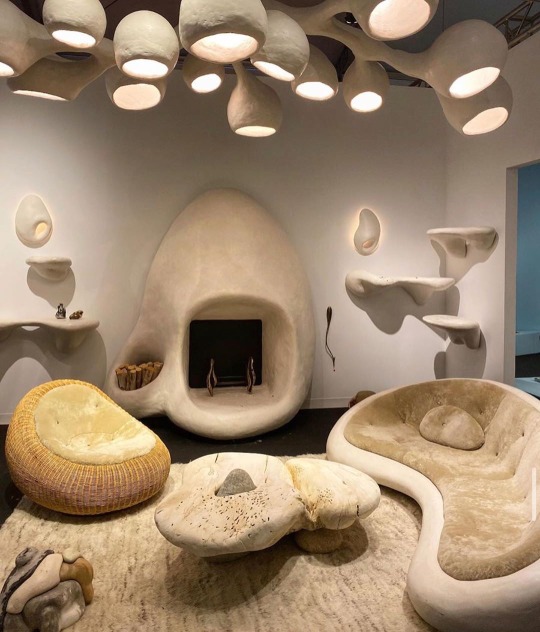
Sculptural works by contemporary artist and designer Rohan Gregory at Design Miami
6K notes
·
View notes
Photo
Perhaps this is next. We have tons of scotch broom and blackberry forthe heart of one of these...

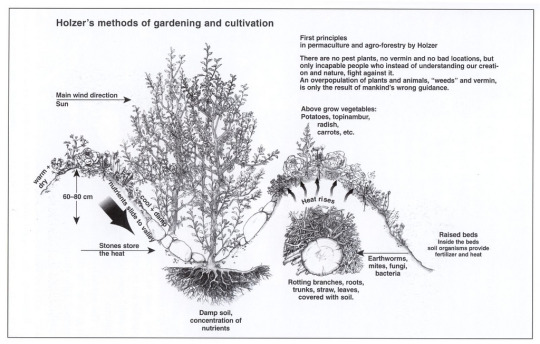
Hügelkultur (German, meaning “hill culture” or “mound culture”) is the garden concept of building raised beds over decaying wood piles. Decayed timbers become porous and retain moisture while releasing nutrients into the soil that, in turn, promote root growth in plant materials. As the logs decay, they expand and contract, creating air pockets that assist in aerating the soil, allowing roots to easily penetrate the soil. This decaying environment creates a beneficial home to earthworms. As the worms burrow into the soil, they loosen the soil and deposit nutrient-rich worm castings, beneficial to plants. An earthworm can produce its weight in castings on a daily basis.
The best decayed wood for a Hügelkultur, according to A Growing Culture, comes from alders, applewood, cottonwood, poplar, maple and birch. Use wood products that have been in the process of decay for about a year (using green, or fresh, wood products will rob the soil of necessary nitrogen). Some wood products, like cedar and black walnut, should be avoided because they produce organisms that negatively effect plant growth.
Read more at A Growing Culture.
26K notes
·
View notes
Text
That which remains
The house is 98% done... But that 2% is starting to drive me a little nutty so here is what is left in unequal size lumps and levels of importance;
Evict the last mice
Fix minor floor damage from building
Wax floor
Install the door
Build the day bed and drawers into the solarium
Build the kotatsu for the cuddle nook
Build the raised wooden floor in the cuddle nook
Get the wall bed installed
Seal the small wood gaps around the solarium
Primer and paint exterior rafters
Hang the rest of the fascia
Decide about if the wood stove is needed or not then install if so (this will take all winter being in the cottage)
Insulate and install a ceiling.
Plug holes in walls (for future pipes or cables)
Replace rope in the utility pipe and re-seal it (the end out of the house final deteriorated in the sun)
It's all kind of driving me mad to not be working on any of these things yet freeing. Once the mice are out, the door is in, solarium sealed and bed delivery scheduled I think I'll stop twitching. I believe I can live with everything else not quite done. Probably not actually, but I can hope.
The last 2% is driving me a little mad...
16 notes
·
View notes
Text
Moss Lawns?!
Okay so we all agree, lawns suck are outdated and useless relics introduced by the French Monarchy to flex on everyone else, but have we considered:
Moss Lawns 😄


Benefits:
Massively photosynthetic- produce loads of oxygen
Doesn’t require fertilising- ever! Mosses actually prefer low nutrient soil!
Doesn’t require mowing! Mosses are non vascular so they never grow tall enough to need mowing
Low maintainance- see above
Improving the air quality around you- mosses can metabolise and absorb a variety of airborn pollutants!
Massively improving your home’s Cottagecore and fairytale vibes, I mean look at it it’s beautiful
Looking online I’ve learned that this is a thing! And it’s actually been popular in Japan for hundreds of years!
That makes me really happy actually because if you know me you’ll know I love moss, not only is it cool af but 12 square metres of moss lawn can apparently absorb as much carbon as 275 mature trees. Stunning and brave.
As we all know it’s much easier to work with nature than against it, we’re all busy and tired and maybe… maybe just let the moss have this one? It’s beautiful.
48K notes
·
View notes
Text
Greek home dieties to honor in the new house...
Household Gods
We usually think of ancient Greek religion as taking place in temples, but there was as well a strong aspect of household worship.
For the most part, household gods were not only household gods–they usually had community temples and festivals as well, although the god was often known by a different epithet or epithets within the household.
The following is a short list of gods who were frequently worshipped within the home.
Hestia
Hestia is the household god par excellence. She is far, far more than that–she occupies a central role in the ancient Greek religion and plays a part in not only household worship but civic rites as well, and takes part in the offerings given in rites honoring most other gods–but she was a center of household worship. She received offerings at family meals, and each new child born to a household was presented to her.
The hearth of each home belongs to Hestia.
Hekate
The hekataion was the home of Hekate within the household, and stood before the door, at the threshold of the house. The many small Hekate triformis statues still in existence may have served to represent the goddess in this context.
Hekate protected the household from evil from outside the home.
Hermes
Hermes was represented before a home in the form of a herm, typically a four-sided pillar with the head of the god on top and an erect phallus on the front. The herms within a city brought good fortune to the city (the destruction of the herms in Athens in the 5th century BCE was a serious crime), as a household’s herm did to the individual home. The herm had a practical function as well, serving as a boundary marker for the property on which it stood.
The herm was a home’s guardian, and would be anointed with oil or draped with garlands by individuals before their homes.
Other herms stood by the side of country roads and thoroughfares, again providing both protective and practical functions for travellers. The earliest forms of these were simple piles of stones which served as road markers.
Apollo Agyeius
Apollo Agyeius was represented before the home in the form of a conical stone or pillar. He protected the household from evil.
Zeus Herkeios (Zeus of the Courtyard)
Zeus Herkeios had an altar in the courtyard of the home, out in the open, where he received his offerings. Possession of such an altar was the mark of a good citizen; without it, one would not be eligible to hold certain offices. It is probable that only households of a certain standing would be expected to have an altar to Zeus Herkeios.
While the precise realm of Zeus Herkeios is uncertain, it seems likely that he protected not only the physical house but the family within the household as well; he would be a protector of the family over generations.
Zeus Ktesios (Zeus of the Storeroom, Zeus of Possessions)
Zeus Ktesios was represented in the storeroom of the home in an interesting and unique way; the householder took a two-handled jar with a lid, wrapped it in white wool, and filled it with an “ambrosia” made from water, olive oil and fruits. The jar was closed and kept in the home’s storeroom or larder.
His concern was the prosperity of the household; the presence of Zeus Ktesios within a home would ensure its material security and wealth.
Zeus Meilichios (Kindly Zeus, Zeus the Mild)
Zeus Meilichios was a chthonic or chthonian deity, which is to say that he had power beneath and within the earth. While he could be dangerous, he could also provide great gifts and blessings if treated properly. He was a giver of wealth and abundance and was often represented in the form of a snake, underlining his association with the underworld.
Although Zeus Meilichios was primarily worshipped by individuals, in Athens he was honored with a community festival as well, the Diasia.
2K notes
·
View notes
Photo
Here's the house 98% done

Okay 5 days later, general brain dump… Outside creamy lime plaster. Inside all walls and ledges plastered. One slightly lavender cuddle nook plaster. Fermented plaster covered. All gaps in the walls filled except some very small gaps in new wood. Many windows polished. Minor floor damage, so yay linseed oil hardened earth floor, go you. Tired and dirty now.
#earthplaster #earthbuilding #cobhouse #tinyhouse #VernacularArchitecture #limeplaster One door and some interior design bits and that’s that. https://www.instagram.com/p/Bxn3xw_lNR2/?igshid=138a2frh54xy9
10 notes
·
View notes
Photo
7 more photos of what it looks like right now before we start the final build...

Last of the “before” photos…
In two weeks, barring surprises, this house will be down to interior design details. It’s been a long road and I can’t believe we’re nearly there. 11" of cob around the top, lime plaster to keep it safe, what ever it’s going on with the solarium and maybe some paint and fascia. An experienced crew of 7 plus 2 of us and 7 days… Let’s see what we can do!
#cobbuilding #earthbuilding #earthenplaster #diy #cobhouse https://www.instagram.com/p/BxL_IQMlwdW/?utm_source=ig_tumblr_share&igshid=7zwflf3udi4c
7 notes
·
View notes
Photo
@aarron garden next?

Now that spring is here it’s time to start planning one’s garden. May I suggest an English knot garden from the Elizabethan era? Created with low shrubs or herbs to appear like intertwined Celtic knots, this garden may be complicated but will impress!
These knot garden layouts appear in Paradisi in sole paradisus terrestris, or, A garden of all sorts of pleasant flowers which our English ayre will permitt to be noursed up, 1629. By John Parkinson, an herbalist to James I.
238 notes
·
View notes
Video
For the next house, some possible considerations...
youtube
So what’s it going to take to tow your tiny house? What size truck should you get? Should you hire it out or do it yourself? In THIS 5 minute episode of our Digital Tiny House Workshop we cover the towing capacity for the three most common truck sizes as well as pros and cons of buying a truck or hiring a company to do it for you.
TOWING CAPACITY FOR EACH TRUCK SIZE:
½ ton: 10,000# Tow Capacity; New $26-34,000 ¾ ton: 14,000# Tow Capacity (Gas) – 18,000# (Diesel); New $32-46,000 1 ton: 18,000# Tow Capacity (Gas) – 30,000# (Diesel); New $32-48,000
3 notes
·
View notes