
Don't wanna be here? Send us removal request.
Statistics
We looked inside some of the posts by hempowerment and here's what we found interesting.
Average Info
Notes Per Post
11
Likes Per Post
10
Reblog Per Post
0
Reply Per Post
1
Time Between Posts
22 days
Number of Posts By Type
Text
7
Photo
10
Last Seen Tumblr Blogs


Fun Fact
Average visit duration of Tumblr.com is 10 mins and 25 secs.
Text
7 Must Visit Bangkok Cafes
Bangkok is a large city the size of London, in both population and land mass, and can be overwhelming for first time visitors.
Most tourists head for the temples, Khao San Road and street food, but for people living in Southeast Asia, is a popular weekend break for spas, desserts and cafe hopping.
Although a cake and latte might not be at the top of your Bangkok to-do list, the city is home to many lovely cafes which can punctuate your holiday with little oases of calm and caffeine.
This is my must-visit Bangkok cafe list. It’s not exhaustive, and mostly revolves around Thonglor and Ekkamai. These neighbourhoods are adjacent and is the prime area for cafe hopping in Bangkok. I’ve included each cafe for different reasons: some for the decor, some for the atmosphere, and some because they have fabulous food and coffee!
1. Roast
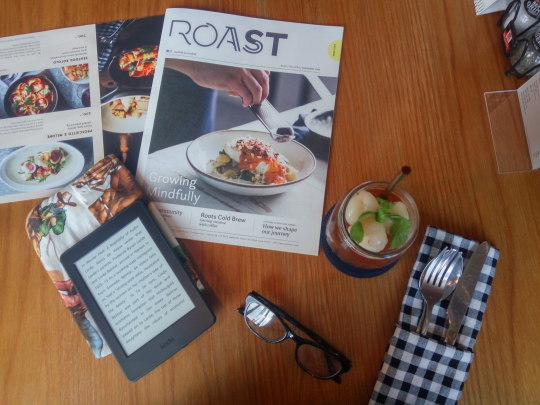
Roast is located in The Commons, which is an eco-friendly mall, open-air with wood laminate flooring and greenery in little planters, and full of ‘artisanal’ shops and cafes. It’s one of the most hipster buildings I’ve seen in my life. When I went there, there were people sitting on the benches dotted around the building, working on their Apple computers and drinking lattes. It’s that kinda place.
The basement is called the Market Floor. It’s little food stalls in an industrial-chic space, more like the Food Hallen in Amsterdam or Gotham West Market in NYC, than the food stalls on the streets of Bangkok. There’s coffee here too: Roots, the more coffee-focused companion to Roast.
Roast is not so conveniently located in the basement. You have to climb the stairs to the very top.

When you do get there it’s an airy, light-filled space. The menu comes in the form of a little magazine. They do brunch, of the eggs benedict variety, and it looks fabulous. We had Roast iced tea (iced tea with lychee rose syrup and lychees, pictured) and amazing shakes: creamsicle and salted caramel. The salted caramel comes with a Pretz stick.
Roast
Unit #T1 (Roast), The COMMONS 335 Thonglor Soi 17, Sukhumvit 55 Klongton Nua, Wattana, Bangkok 10110
Closest station: BTS Thonglor
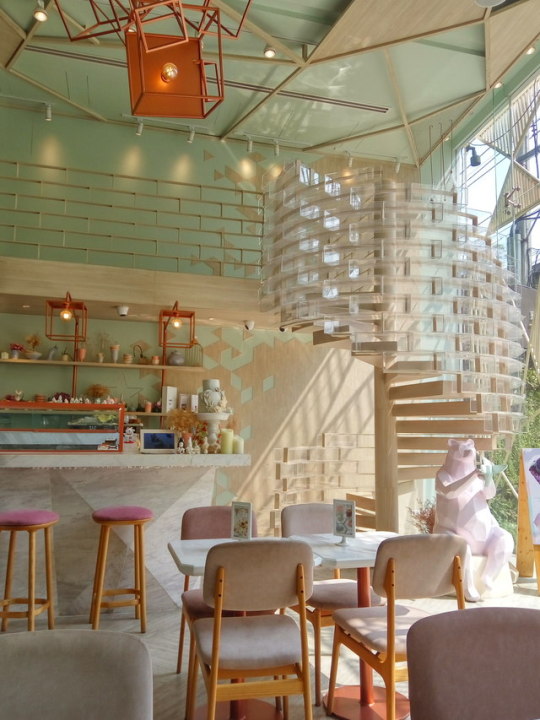
2. Shugaa

Shugaa is a dessert cafe and the main reason you need to go is because it is beautiful.
The space is beautiful, the desserts are beautiful. The decor is apparently sugar-themed, hence the geometric shapes reminiscent of sugar crystals. Everything is in soft, pastel shades. There is a small bear family made of, I imagine, fondant, sitting on the counter.
While it’s obvious that a lot of thought and care goes into the creation of the desserts, they run a little sweet for me, and heavy, for how sweet they are. These are substantial desserts. The different tiers of dessert are stuck together with syrup.
You know how on Bake Off: The Professionals people are sticking shards of sugar together with syrup and a blowtorch like they’re David Smith? Like that kind of industrial strength welding syrup. It’s instagrammable but if you like eating cakes you can do better.
Shugaa
27 The Residence at 61 Sukhumvit Soi 61, Wattana, Bangkok 10110
Closest station: BTS Thonglor or Ekkamai
3. Fill in the blank

Another cute cafe in Ekkamai, this is pretty much across the road from Shugaa with a totally different vibe. The feeling of this cafe is kinda Scandi/Japanese, light and breezy with lots of wood (including an indoor tree!). A great place to chill with a laptop or a book, they have some English and Japanese language local magazines with articles on trendy things to do and daytrips, etc. We went on a weekday and there was one (very friendly) member of staff. The place was pretty empty, just us and a laptopper.
There was a selection of cakes in a display box next to the counter but we didn’t have any as we were going to Shugaa after. I had a caramel iced latte instead which had cream drizzled with caramel syrup, very picturesque and not as sweet as a caramel Frappuccino. I also liked that it came with a little glass of water. Of all the cafes I’ve seen in Bangkok, I wish we had this one in London.
Fill in the blank cafe
28/10 Sukhumvit 61 Alley, Khwaeng Khlong Tan Nuea, Khet Watthana, Krung Thep Maha Nakhon 10110
Closest station: BTS Thonglor or Ekkamai
4. Audrey Cafe

Audrey is an Audrey Hepburn themed/inspired cafe. Normally I’m not into themed cafes, but I like frilly pink cafes and Audrey is the super frilliest pinkest cafe of all. It’s a mini chain with a few different branches, but the one at Thonglor has a fountain and a little rocking horse (!) in front, and is well placed for a day of cafe hopping. Inside the tables are marble-topped and there’s Hepburn quotes on the walls. Some of the staff are dressed in little maid outfits which is interesting but service is a little slow.
We ordered some pastel-coloured drinks: Sakura Glazier (pink) and Audrey on my Mind (light teal). They’re sweet frappe-style and very photographable, I’m like 99% sure the colour is artificial. The pricing is in line with London cafes: as you can see from the sign in the picture it’s 135 Baht for Audrey on my Mind, which is about £3.20.
They have a pretty solid food menu if you’re hungry, it goes way beyond typical cafe food and enters the realm of pizzas, tacos and fried rice, but it was pretty hit and miss. We weren’t really going to order food but while we were there, a little girl was celebrating her birthday (it feels the right kind of place for a little girl’s birthday and a girly afternoon) and her table had a lot of food, all of which looked pretty good. So we capitulated. We got the deep fried chicken wings with nuts and caramel, stir fried morning glory, fried rice and sliced pork loin salad. I was hoping the deep fried chicken wings would be like pok pok chicken wings - they’re were, disappointingly, not. The sliced pork loin salad was the best thing followed by the morning glory, the fried rice was too salty. The little girl’s birthday party had ordered the tom yam pizza and when theirs came out I kinda regretted not having gotten that instead of the fried rice.
The desserts are meant to be good but we felt so sugared up after the drinks that we didn’t want any.
Audrey Cafe
Soi Thong Lo 11, Khwaeng Khlong Tan Nuea, Khet Watthana, Krung Thep Maha Nakhon 10110
Closest station: BTS Thonglor
5. D’Ark Coffee
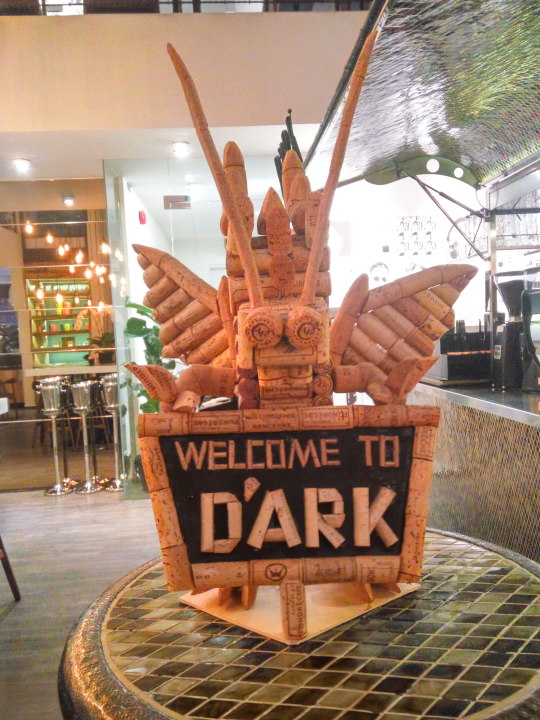
D’Ark seems like a pretty typical modern cafe: exposed lightbulbs, wood, etc. etc. I went on a rainy weekday morning for coffee and there was only one other person there. But! Their coffee is great! They have different beans you can choose from and roast their coffee in house, and you can choose how you want it made: Aeropress, cold brew, Trinity One (which I don’t think I’ve seen before in a cafe). I went for a normal iced latte and decided to go all out and add their housemade salted caramel butter sauce, which is seriously amazing. I strongly recommend getting whatever coffee you like there and adding the salted caramel butter sauce. The coffee itself is not sweet so the sauce isn’t overwhelming.
D’ARK
651 Sukhumvit Rd, Khwaeng Khlong Tan Nuea, Khet Watthana, Krung Thep Maha Nakhon 10110
Closest station: BTS Phrom Phong
6. The Asia Cafe

The Asia Cafe is a tall, bright cafe although it doesn’t have the window action of many Bangkok cafes. It’s bigger than it looks with an airy feeling. I like the giant wood cubbies behind the counter with piles of baguettes. I don’t think they’re real though. It seems to be...socialism themed? IDK. I say that because their front window has pictures of three dudes with little red stars, whom I think are (from LTR in the picture above): possibly Allende? maybe Ho Chi Minh? And some other dude I don’t recognise - his giant moustache + beardlessness stumps me.
I went because I heard they have sea salt coffee which I’m curious about, and also they have free rusks, and I like free things.
Sea salt coffee turned out to be an iced espresso topped with a salted creamy froth, kind of like the froth on cheese bubble tea but not cheesy. I really really like it this, the faint saltiness with the slightly bitter coffee go really well together and is refreshing, a little like when you have bitter unripe guava or grapefruit with salt.
The rusks are in a jar on the counter. I looked at the jar and was like, Can I have one? And the barista guy was like, Yes. You just kinda grab one from the jar, they’re rusks, they’re good.
I recommend this as a pit stop to revive yourself if you’re walking around Thonglor on a hot afternoon. It’s well located along a main road, the cafe has a relaxing atmosphere, is well air-conditioned, and has many plug sockets for your electronics and sea salt coffee to recharge yourself.
The Asia Cafe
159/15 Soi Thong Lor 9,Sukhumvit Road, Khlong Tan, Watthana
Closest station: BTS Thonglor
7. Caturday Cat Cafe

Caturday is Bangkok’s cat cafe. It has huge windows and is bright and airy, far more than Lady Dinah’s in London. There’s no cover charge, you just order a drink and you can be there for as long as you like - I think that’s why despite it being the most adorable of the cat cafes it’s also the busiest and most chaotic. They do food there though we didn’t have any. We had a Thai iced tea and an iced lemon tea, of the two the iced lemon tea was more refreshing, especially after walking around in the heat.
The cats are very sweet, in particular the little grey kitten. Like other cat cafes expect half the cats to be asleep and to be basically ignored by the other cats, although a few come and hang out with you especially if you sit quietly and drink your tea and ignore them.

This is by far the cutest cat cafe I have been to, ever. Granted I’ve only been to two, in Amsterdam and London, but still. There’s a giant cat mural of cats in a fairground, illustrated Caturday glasses and little coasters (I ended up buying one as a souvenir), and it’s all a pastel-coloured cat wonderland.
#bangkok#travel#holiday#cafes#cafe hopping#bangkok cafe hopping#thailand#cat cafe#coffee#latte#wanderlust
6 notes
·
View notes
Text
Crockpot shredded coconut chicken

I find shredded chicken or beef inordinately useful - it goes well with any starch, you can throw it in a sandwich or dump it on a bowl of grains, and if you make lots you can stick it in the freezer for another day - and the crockpot is the most hands-off, foolproof way to cook up a batch.
This recipe is loosely based on malbi, an Indonesian stew from Palembang in Sumatra. Palembang is the oldest city in Indonesia and historically the capital of the ancient kingdom of Srivijaya, a stronghold of Vajrayana Buddhism. Malbi is commonly made with beef or ox meat, but I’ve made this with chicken. Obviously you can sub this with any meat you like, or use tempeh and make it vegan.
One of the things about malbi is that it’s well spiced but with zero chillies, so if you normally avoid South-East Asian food because it’s too hot, you’ll love malbi. It’s also slightly sweet, which makes it somewhat bbq-y. This recipe uses malbi spicing to make sauceless, shredded chicken.

Like most other things I cook, it’s so easy and pretty much involves blitzing stuff in the food processor and dumping it in the pot. You need a few spices, most of which you probably already have: four cloves, half a teaspoon coriander seeds, a quarter teaspoon nutmeg and a cinnamon (cassia) stick. Nothing too out there. The one ingredient you might not already have in your kitchen is kicap (ketjap) manis, a sweet, thick Indonesian soy sauce. If you’re in the Netherlands or the UK you can get it pretty easily, Tesco even has their own version. Alternatively you’ll find it in most Asian grocery shops, or you can mix it up yourself. You’ll also need two tablespoons desiccated coconut, ginger, a red onion, three cloves garlic and about 300-350g protein (I used two skinless boneless chicken breasts, which weighs about that).

First you blitz the onion, garlic, nutmeg, coriander seeds, 2 cm peeled ginger, 6 tbsp kicap manis into a sort of paste. It won’t be perfectly smooth and paste-like but ultimately it doesn’t matter.

Throw it into the crockpot. For this I used my small crockpot with a capacity of 1L. This amount feeds two people comfortably. Don’t hesitate to double the amount to fit your larger crockpot and feed all your people.
Swill out your food processor with a little bit of water, less than a quarter cup. Dump in the chicken, desicated coconut, cloves and cinnamon stick. Mix everything around a bit to coat the chicken. Cook on high for about three hours.
After three hours, shred the chicken. Mix it around so the chicken is coated in the spices. It should be ready. If your chicken isn’t fully cooked, leave it for like an hour or so. I’m a little hesitant to include specific timings for crockpots because everyone’s is different and I’m using an especially small and old-school one, but it’ll take roughly that length of time.

Eat the chicken however you like. It’s good in a sandwich with some slaw, or use it to top some vegetable fried rice.
Ingredients
1 red onion
3 cloves garlic
1/2 tsp coriander seeds
1/4 tsp ground nutmeg
6 tbsp kicap manis
2 cm peeled ginger
1 cinnamon (cassia) stick
4 cloves
2 tbsp desiccated coconut
2 boneless skinless chicken breasts (approx 350g protein)
Method
Blitz first 6 ingredients together. Dump in crockpot. Swill out the food processor/blender with a little bit of water. Add the cinnamon stick, cloves, coconut and chicken breasts to the crockpot. Cover and cook on high for 3 hours. Shred, mix and eat.
#food#food blog#recipe#pulled chicken#easy recipe#easy food#spices#indonesian food#crockpot#slow cooker#slowcooked#food processor#spicy chicken#crockpot chicken#indonesian recipe#shredded chicken#coconut#coconut chicken
1 note
·
View note
Text
Banana blossoms in coconut milk

Banana blossoms are called jantung pisang in Malay and Indonesian, which directly translates as banana hearts - a romantic name for an artichoke-esque vegetable. If you’ve never had one they end up very very like artichokes (but better: similar texture, without the slight tang and you don’t have to deal with the spikes). We ate them in coconut milk, or fried. In Southeast Asia you can pick them up fresh from the market, whole and purple, and inside each there’s a bunch of pistils that are a little bit spicy. Like the banana fruit, the blossoms have a good amount of magnesium.
Technically you can buy them fresh online or from a Thai grocery shop if you’re lucky, but you’re more likely to find them in cans from your local Chinese/Thai/Filipino grocery shops, near the other canned vegetables like water chestnuts, assorted pickles, etc. I got mine from New Loon Moon in Chinatown.

Once you got your can of banana blossoms, cooking it up is so easy. You blitz a red onion, something like 4 regular-sized garlic cloves and 5-10 dried red chillies in the food processor, and saute that until fragrant.

Then you add your drained banana blossoms. You don’t have to rinse it well or anything because you’re adding vinegar anyway. Just kind of vaguely drain it, dump it in the pan, and saute for a few seconds so the buds are mingling with the onions and stuff.

Then add a cup of coconut milk (the thick kind from a can, not the drinky almond-milk type from a carton), 2 tsp coconut sugar and 2 tsp rice vinegar - but you can sub with soft brown (or any) sugar, and any vinegar that’s not got its own strong flavour (eg. cider vinegar is fine, that fancy aged Italian balsamic isn’t). Don’t feel like you got to stock expensive sugars and things to cook Asian food.
Add some red chillies. I used 5 whole red bird’s eye. You can use a large mild chilli for the colour if you don’t want it too spicy.

Then you cook that shit down over a medium heat until the gravy is thick. This will take approx between 15-30 minutes, but you don’t really have to do anything here except poke it once in a while so stuff doesn’t stick to the bottom of your pan.

I know it might look like some weird-ass Star Trek sludge, but trust me it’s good. And super easy. And vegan as is - though you’ll need to top it with some protein (I had it with vegetable fried rice and a fried egg).
Pro tip: If you want it less beige, blitz it with big, mild dried chillies, or big red ones. You can also put little cherry tomatoes in it towards the end.

Ingredients
10 dried red chillies
1 red onion
4 garlic cloves
Can of banana blossoms in brine (drained weight will be something like 250-280g)
250ml coconut milk (1 cup)
2 tsp rice (or any) vinegar
2 heaped tsp coconut (or any) sugar
Method
Blitz the first three ingredients in the food processor and saute in a little oil over a medium heat.
Add the drained can of banana blossoms and saute for a few seconds.
Then add the rest of the ingredients.
Cook down over a medium heat until gravy is thick, about 15-30 minutes. Taste and adjust seasoning (sugar, salt, vinegar, etc.)
Serve with rice and some kind of protein.
#food#recipe#vegan#vegan recipe#vegetarian#vegetarian recipe#vegan food#southeast asian food#bananas#banana blossoms#banana hearts#eating flowers#asian food#easy recipe#budget#Easy recipes#budget recipe#cheap eats#easy#food blog#foodblog
0 notes
Photo

Baked #gochujang wings with rice, #kimchi and marinated garlic stems.
3 notes
·
View notes
Photo


Bergamot marmalade, using the marmalade recipe from the Honey & Co baking book. However I also initially boiled the bergamot for five minutes and drained, to help with the bitterness.
#bergamotmarmalade#citrus#jam#cookthebook#cookbook#preserves#bergamot#food#marmalade#homemade#bergamot marmalade
0 notes
Text
My family’s Javanese rendang recipe

I’ve seen the popularity of rendang in London increasing over the past few years, to the point that you can now get Tesco-brand rendang curry paste.
Rendang is a dry, spiced, coconut-based curry-type food, and normally made with meat. Some regional variations that include fish, but not like that Tesco recipe. The key word here really is dry (technically a wet rendang is really a kalio, but I find interpretations of rendang in the UK to be even saucier, paler and less spiced than that). I’m not generally a huge stickler for food authenticity, I feel arguments for this often sound a little nationalist, discount the reality of trade and the movement of people amongst non-European people in a pre-colonial era, and also conveniently ignore that a lot of the food that we consider authentic to a particular place would not have been possible without trade and colonialism (eg. tomatoes and potatoes both come from the Americas, though tomato-based foods are now seen as authentic to Italy and potatoes are seen as an honest English carb) - so pointing to an idea of a specific interpretation of a dish in a specific place at a specific point in time and declaring this as the only authentic representation isn’t something I normally do.
However a lot of the rendang I see in London veer quite a bit from what I would think of as traditional rendang, ie. they lack spice, dryness, and caramelisation. This includes some of the more popular places that do rendang, including Sambal Shiok. At some point in the past Sambal Shiok had rendang burgers at the street food market behind the BFI, and those were decent, but I recently had their rice boxes not once but twice, just in case the first time was an anomaly, and both times it was pretty disappointing.
Rendang is originally a Minangkabau food and a way to preserve meat in the days before fridges, using spices as anti-microbials and cooking everything down until it’s very dry. The Minangkabau people practice a traditional called merantau (there’s an action movie with the same name), which is essentially wandering...when you go forth and travel to different lands, learn things, teach things, work, and possibly return home and bring these new things to your people...kinda like a gap year but really long, and not limited to those whose parents can fund them, and you bring food, like rendang, with you, so it has to be kinda dry for easy transport, and with a longish shelf life so you don’t die, and when you reheat it you can add a little water to rehydrate it. So there is a little background to why rendang is dry and spicy, and also how it’s spread through the practice of merantau, and rendang is now fairly ubiquitous in the Indonesia-Singapore-Malaysia region, with slight variations in each region.
My particular recipe is one my mother got from my father’s grand-aunt, so it’s a Javanese variation of rendang, specifically from Solo (present-day Surakarta). It’s actually very easy to make with a food processor and you can get the ingredients from the supermarket (or sub), but you need to dedicate several hours to cook it over a low heat until it’s dry and caramelised, so it’s really more of a weekend project. It took me about 3 hours.

First you need to boil about a quarter cup of water and soak 20 dried red chillies in it for half an hour or more. This makes it very hot. You can reduce the amount of chillies, or forgo this step and substitute with ground chillies, which is what I did.
Then you blitz your rendang paste: 15 ‘true shallot’ cloves (or 6-7 of the larger whole bulb-type shallots like these, which are more common in Europe), 5 garlic cloves, 4 lemongrass (white parts only) , 1 cm peeled ginger, 1 cm peeled galangal (or substitute ginger), and your soaked dried chillies along with their soaking water. If you’re using ready-ground chilli powder, you should add a little water here so everything blends into a paste more readily.

Put a little bit of oil in a large, heavy pot or pan over a medium-high heat, and saute the paste until fragrant. Then add 2 tbsp of curry powder and saute for a few minutes.

Regarding the curry powder, I use a generic curry powder blend from the grocery shop. The original recipe does call for curry powder, and is a totally legit option; grinding your own spices with a pestle and mortar isn’t obligatory for a valid rendition. In Southeast Asian markets there’s a guy sitting in a little spice shop and he’s got all your fresh spice powders and mixes, and you can even choose which spices you want and he’ll put it through a machine for you and mill it for you (he’s also usually the guy who’ll run coconuts through a different machine for your fresh coconut milk). If you really want to make your own blend, you can mix: 1/4 tsp ground nutmeg, 1/2 tsp ground turmeric, 1/2 tsp ground ginger, 2 tsp ground cumin, 1 tbsp ground coriander. This should make up the right quantity of spices.

Add a cup of coconut milk (the thick kind from a can, not a carton) and stir with the spices until it looks uniform, then add the meat and toss to coat. If there isn’t enough sauce to cover the meat, add up to 1/2 cup water. Turn the heat down to medium-low (not very low). Now all you have to do is to cook it until it looks dry, and the colour is dark. Check on it occasionally and stir, so stuff doesn’t stick to the bottom.

After about an hour or so, it should look something like this. It’s still not ready but it’s time to add your salt to taste (about 1 tsp) and about 1 tbsp coconut or palm sugar. I used Biona as I already have that in my kitchen, but ideally you’d use gula jawa, which tends to be darker, more caramelly, and a bit more bitter than the more common Thai palm sugar. If palm sugar isn’t available to you, use some soft brown sugar instead.

At this point it’s still not done, even though it’s drier and darker than some rendangs I’ve encountered here.
It should at least be as dry as this: a thick paste of spiced, caramelised coconut clinging to meat. You can cook it down a bit more and make it even darker, but this is fine and tastes amazing. Have it with rice and some leafy greens and herbs, a mix of coriander and chopped chillies, pineapples, raw onions and cucumbers, or this salad. When I was growing up we’d eat the leftovers with bread as well, and it makes a nice sandwich filling.
My Family Recipe for Rendang
Ingredients
15 cloves shallots of 6-7 larger whole-bulb shallots
5 cloves garlic
4 lemongrass (white parts only)
1cm peeled galangal
1 cm peeled ginger
20 dried chillies, soaked in 1/4 cup water
400g beef, cubed
1 cup (250ml) coconut milk
2 tbsp curry powder
1 tsp salt
1 tbsp coconut/palm/brown sugar
Method
Blitz the first 6 ingredients in the food processor and saute with a little oil over a medium-high heat until fragrant.
Add the curry powder and saute for a few minutes, then add the coconut milk and beef. Stir to coat the beef. Add up to an additional 1/2 cup of water if necessary. Cook on a medium-low heat, stirring occasionally.
When the beef has cooked and the sauce has reduced but isn’t dry yet (about an hour), add salt to taste and the tablespoon of sugar.
Cook until dry, for at least an hour, probably at least three.
Serve with rice.
0 notes
Text
On the last Friday of January, a post about my planner for this year.

For the past few years I’ve been trying a combination of apps to try organise my life. I really need this external organisation and can’t just prioritise and do things in my head, but it became increasingly clear to me that apps weren’t working well for me. Despite feeling a little like, since a) I make websites and apps, and should really be using some kind of tech, and, b) that there’s a perfect app or site out there and if there isn’t, I should be making it - I switched back to analog anyway.
I used to use a Filofax with a week-on-two-pages insert, but right now I’m using a pretty watermelon print Kikki K planner. I’ve always used Filofax personal size (Kikki K medium). I find A5 a bit too large to carry around in a bag, pocket too small.

My planner is mostly functional and very slightly decorative. I’m using a pack of purchased 2018 Kikki K inserts, along with some bullet-journal type habit trackers on grid notepaper and random spare Filofax inserts like lined paper, expenses, etc. etc. I punch holes in paper memories and just stick it in the planner.
On one of my birthdays, my husband hid little cards with pictures of wildflowers around the house, as some kind of long-term treasure hunt. I think I found them all after a few months, and taped one to the inside of my planner as a memory.

A dashboard ‘landing page’ is a sticker from Active Distro, and an Angela Davis quote, which is my attempt at inspirational. I find that planner-related merch tends to have Jesus-themed or Go Girl! Let’s Realise Our Potential By Engaging In Capitalist Productivity type quotes, although examples of the latter type come with the Kikki K inserts and are present in my planner.

I record my weekly happenings more or less three times: I mostly record things where I have to be somewhere or do a certain thing at a certain time in the monthly view, and more daily to-dos (deadlines, activity planning, etc.) in detail in the weekly view. I also update where I’m going on Google Calendar, mostly because we share most events anyway, and also me and Mr Hempowerment can see where we’re both gonna be. So if I go out on Sunday and there’s a signal failure on the District line, he’ll know I’m safely near a Piccadilly line station and not just, stuck.

I’m still using a week-on-two-pages layout with some stickers to illustrate my life. From Miss Moss, who makes multicultural women stickers, and Dook Plook, who makes very useful stickers and is UK based. I have a few rolls of washi tape mostly to cover up mistakes. I get my tape from Daiso in Singapore (the Japanese pound shop which is super awesome) or Blippo, which ships from Hong Kong and is cheap. I tick little boxes off as I do them. I’m working on personal projects as well as contract work, and on top of that I workout, blog, I’m doing a course, and all the little daily life things, like clean the fridge and paint my nails - and I find it really helpful to plan exactly what I want to achieve daily, and cross them out or carry them over to another day. I kind of want to practice writing agan, maybe fanfic to start with, but haven’t got round to doing it yet.

Now a bunch of random things.
eg. Generic inspirational quotes that came with the planner.
An address section prefaced by a marketing postcard from a Shoreditch coffeeshop. In the age of the smartphone, this is mostly addresses of cafes/food I want to go to and AirBnbs in my life.
Then a section of Lists…just lists of stuff. I have a 2018 booklist, which is also online if you’re looking for ideas on things to read. A list of movies to watch, which is one movie long (if you’re curious, it’s No). A list of cafes I want to go to, listed only by name and unencumbered by things like addresses.
A ‘Household’ section containing a single item: some kind of aspirational housewife cleaning plan that’ll apparently make your house cleaner and your life easier, according to Martha Stewart. I pared down her plan quite a bit and it technically looks doable, but there’s a psychological barrier to overcome, where I kinda want to sort out the things on the table but I would really prefer to do something else. My menu planner is separate.

It came free with our first veg box of the year. Looks like that. It’s tear-off, which is useful to take with you to the shop or stick on the wall. I’m debating whether to keep them as a record of the meals I’ve cooked, or dump them in recycling when I’m done.

I’ve used some Filofax grid paper for habit trackers. I’m tracking my mood, yoga, running (elliptical counts too), booty-related workouts because 2018 is gonna be the year I build strong glutes, and blogging (I have this personal blog, and a coding blog). Additionally I’m tracking other workout related things, a 6-week kettlebell program and, sporadically, a burpee challenge: I was meant to do burpees for 30 days in a row but I’m taking it on a day-to-day basis.
I was initially hesitant about the mood tracking but actually I quite like it. Clearly, my life is never, really, truly awful. I’m not fleeing war or genocide, or facing a food shortage or natural disaster, but sometimes you just don’t feel super happy or super great and there’s no specific reason. I feel the mood tracker it allows me to record how I actually feel on average on a particular day, without downplaying, analysing or feeling a need to justify it. It also makes any kind of hormonal mood cycles you might have a lot clearer.

At the back of my planner I have random things: stickers, those coffee stamp loyalty cards, post-its, some kind of ‘inspirational’ cards to give people to encourage them I guess, a picture of a tree (actually Edie Art’s namecard. We bought a picture from her at NoLita Market.) and a notepad, for random note desires.
I do feel like I’m getting more done when I’ve got everything written down in a little square and ticking it off. I feel I’m reading more (book list!), wasting less produce (meal planner!) and just generally more on top of things. I also don’t have to worry if I forget details of my life that I might have to scramble through different sites and apps to find a record of, like when I filed my tax return and exactly where a particularly good cafe was. I also find it calming to review my day and plan for the next, and doing it with pen and paper means I can disconnect from my phone an hour before bed and wind down, sort of emptying my mind of to-do things by transferring them onto paper. Don’t discount planning on paper - you really need just a notebook and pen, especially if you’re juggling several different things at once and it feels a little overwhelming.
Resources
Philofaxy
Making your own rainbow tab dividers
How to start a bullet journal
How to print Filofax personal sized inserts
Planning for mental health (specifically for bullet journals, but applicable for all planners)
0 notes
Photo

I like brownies and I can eat lots, so they have to be slightly healthy. These brownies are gluten-free (almonds!) and have fruit (bananas!), which makes them a small part of your five a day, but also gives them a pleasantly gooey texture.
Banana Almond Brownies
Ingredients
100g soft butter
1 egg
4 bananas
4 tbsp almond milk
200g ground almonds
220g coconut sugar
1 tsp baking powder
1/2 tsp baking soda
1/4 tsp cinnamon
scant grinding of sea salt
dash of nutmeg
110g cocoa
1 tsp vanilla
200g chopped dark chocolate
Method
Heat the oven to 180 deg C.
Blitz all the ingredients except the chopped chocolate in a food processor with the steel blades until smooth, then stir the chopped chocolate in with a spatula.
Butter your brownie baking vessel (I half-filled a 22 x 17cm rectangular glass dish) and spread about half the chocolate mixture in. Bake for 40 minutes until firm but gooey. The tester won’t come out totally clean, but it’ll have small crumbs clinging to it. This is fine.
This makes two batches using a 1.5 L pyrex dish.
0 notes
Photo

Homemade pho gà. Broth slow cooked for 48 hours, plus all the herbs. 🍜
#bonebroth#slowcooker#vietnamesefood#broth#reasonablyhealthy#noodlesoup#phoga#food#pho#slowcooked#bone broth#Vietnamese food
0 notes
Photo

Tandoori roast vegetables. Almonds, courgettes, fennel, red onion and cherry tomatoes. 🍅 . . . . . #food #foodgram #instafood #vegetables #roastvegetables #tandoorivegetables #reasonablyhealthy
0 notes
Photo

Possibly the thing I love most about the root vegetable slaw from Ottolenghi’s Jerusalem cookbook is that the beetroot stains everything a pretty pinky-purple. If, like me, you don’t have an appropriate attachment for your food processor, it’s cutting everything into little matchsticks sucks, but I did it anyway. I made a huge batch to eat over a few days.
Today I ate it in a wrap with black beans, grated cheddar and hot sauce in a tortilla. I was going to mash some avocado but forgot. The black beans take zero effort in a crockpot - the recipe for that is below. It’s a delicious, cheap protein source that takes about 5 minutes prep time, one you can easily make while you’re waiting for the water to boil for your morning coffee.
Crockpot Black Beans
Ingredients
250g dried black beans
500ml water
1 diced green pepper
4 cloves minced garlic
1 onion, chopped
2 bay leaves
1 tsp cumin seeds
1 tbsp wine (optional)
olive oil
salt, sugar and pepper
Method
Throw everything except the oil, salt and sugar in the crockpot and turn it on. I use a little crockpot, double it if your crockpot is bigger. No, you don’t need to soak the beans, thought I think you’re actually meant to soak them so they cook faster or for better texture or something, but that requires forethought, and anyway it’s not gonna kill you if you don’t. You don’t need to boil the beans at a high temperature for a minimum length of time - red kidney beans are the toxic ones. I guess you’d also ideally saute the sofrito or, like, toast the cumin seeds first or whatever, but I don’t do that and it turns out fine.
Cook it on high for about 4-6 hours or low for about 8-10. When it’s done turn off the crockpot, lazily mash it up a little with the back of a ladle or a potato masher; add the wine and salt, sugar and pepper to taste, mix, let it sit for a while and it’ll coagulate (coagulation sounds unappealing but is desirable in this instance). Drizzle a little olive oil over to serve.
If you have a rice cooker you can throw some rice in that, grab some salad and you got yourself a meal without being shackled to the kitchen. If you have leftovers the next day, you can add some water when you reheat the beans and you got yourself some black bean soup.
#frijolesnegros#wrap#instafood#vegetarian#foodgram#frijoles#cookbook#reasonablyhealthy#tortilla#blackbeans#winterslaw#pulses#pinkslaw#food#cookthebook#recipe#vegetarian recipe#reasonably healthy#frijoles negros#black beans#budget#budget recipe#easy recipe#easy#Crockpot#slow cooker
1 note
·
View note
Photo

Steamed syrup pudding with clotted cream 🍮
When you’re still Christmassing a little in your soul.
From Mary Berry’s Family Sunday Lunches.
#steamedpudding#pudding#dessert#familysundaylunches#goldensyrup#clottedcream#cookthebook#food#spongepudding#maryberry#cookbook
0 notes
Photo

I made a batch of soup in the crockpot and poured the rest into a kilner jar for lunch tomorrow.
I now have, in my fridge, a jar of organic potato & cauliflower soup with Manchego & Ossau-Iraty cheese - surely that’s some sort of hipster achievement.
0 notes
Photo

I had a dream about the Korean burrito truck @korritouk, and had to eat kimchi fried rice today. 🍚
0 notes
Photo

This was meant to be a cheese and potato pie from Nigella Lawson’s #HowToBeADomesticGoddess. Un-goddess-like, I ended up with much less pastry than filling, which I carefully formed into taco-esque shells to hold my filling. I halved the recipe, which should have logically resulted in fewer, but complete pies…I don’t know, man. The math should have worked out but didn’t. 😐 The upside is the pastry is light and delicious.
I primarily made these to eat with my favourite extreme chilli jam from @southdevonchillifarm and the Christmas chutney I got (for Christmas). It’s from a honey farm in the Ottery area, and is chunky and delicious, and I’m sad it’s only for Christmas.
#savourypie#instafood#chutney#cheese#howtobeadomesticgoddess#foodgram#bakethebook#cookbook#bakingfailures#todayiate#baking#homebaked#handpie#pie#food#how to be a domestic goddess#Nigella Lawson#today I ate#what I ate
0 notes
Text
One pot lentil 'taco’ pasta

I first read about one-pot pasta via Martha Stewart and initially I was skeptical, and afraid to deviate from the original recipe and pasta type, but really, the rules of one-pot pasta are simple: one cup water (or stock) : one cup pasta, plus all your other stuffs. And don’t make the mistake I made in my early one-pot experimentations; passata counts as ‘other stuffs’ and not liquid.
Once I started following this basic ratio, one-pot pasta became one of the easiest and most instantly gratifying of all the things I cook (and thus one of the things I cook most often). One of my favourite permutations is ‘taco’ pasta, a marriage of two comfort foods assembled from storecupboard things and some basic vegetables. On a rainy day I can raid my pantry and fridge and eat in 30 minutes.
Some of the things I like to include are any spare cherry tomatoes and spinach I have in the fridge, chilli powder, cayenne pepper, canned or frozen corn kernels, and ready-cooked beluga lentils or a can of beans. It’s important that the lentils or beans are ready to eat, as they’ll soak up liquid if not and skew the water ratio you need and cooking times. Something else I like to include is a teaspoon or so of chipotle paste, which is also useful to add to chillies, stews, leftover roast chicken, etc.

I also need a pasta sauce base: one chopped onion, three cloves of minced garlic, a 400g can of cherry tomatoes, a tablespoon of tomato paste and a teaspoon of Marigold stock granules.
First I saute the onion and garlic until soft, then add the spices and bag of cooked lentils and drained can of corn. Then I add the sauce ingredients, two cups of water and two cups of conchiglie pasta, then bring to the boil, put a lid on it and turn it down to simmer. This is very similar to what I do to make baked rice: bring liquid to the boil with the rice in it, put a lid on it and stick it in the oven.

I leave it to simmer for about 13 minutes, the cooking time stated on the packet for al dente conchiglie. I especially like conchiglie for this as the little corn kernels and lentils enter the shells. When I was growing up we almost always had shells or spirals for maximum sauce capture. Check that the pasta is done to your Iiking, the sauce should be thick and saucy. If the sauce is too soupy, take the lid off, turn the heat up to high and cook for another few minutes, stirring; if the pasta is too hard, it helps to have some boiling water on hand to add to the pan and simmer longer. It is wise to watch the pan and keep testing the pasta while troubleshooting.

When the pasta’s cooked, turn the heat off and add the spinach, fresh cherry tomatoes, and a little drizzle of olive oil. If you’re wary about adding oil to dishes, keep in mind that lycopenes in tomatoes are fat soluble and the drizzle of olive oil helps your body absorb them. If you like, grate some cheddar or vegan cheese into each bowl of pasta.

ingredients
serves 2
1 onion, chopped
3 cloves garlic, minced
1 can cherry tomatoes
1 tbsp tomato paste
1-2 tsp chipotle paste * optional
1 tbsp chilli powder
1 tsp stock granules
2 cups water
2 cups dry shell-shaped pasta
1 can corn (drained)
1 bag (250g) cooked beluga lentils, or 1 drained can of beans
100g baby spinach
1 punnet cherry tomatoes
cheddar or vegan cheese * optional
olive oil
large pot or pan with lid (I use a saute pan)
method
Saute the onion and garlic in a little olive oil until soft and the onion is translucent.
Add the chilli powder and chipotle paste, drained corn and lentils, stirring to coat.
Add the water, can of tomatoes, tomato paste, stock granules and pasta. Bring the mixture to a boil. Clamp a lid on immediately and turn the heat down to allow to simmer for the stated amount of time on the packet of pasta. The only thing that you really need to cook well here is the pasta.
When done, turn the heat off and add the cherry tomatoes, spinach and a drizzle of olive oil, and mix throughly. Grate some cheddar (optional) into each bowl to serve.
#food#pasta#recipe#Easy recipes#easy#budget#budget recipes#cheap recipes#onepot#onepotmeal#onepan#onepanpasta#onepotpasta#vegan#lentilpasta#veganpasta#vegetarian#veganrecipe#vegetarianrecipe#chipotlepasta#lentil pasta#taco pasta#pantry#pantry recipe#storecupboard#storecupboard recipe#comfort food
0 notes
Text
COFFEE SNICKERS SMOOTHIE

I occasionally eat a Snickers for breakfast. Maybe you do too. This is a better alternative. It’s not the healthiest smoothie in the smoothie spectrum - a lone banana is really the only representative from the fruit & veg food group- but it’s like liquid Snickers. With coffee.
This requires a little bit of preplanning. The frozen bananas of course, which you might or might not keep a stash of in the freezer, and the chilled coffee. I find that making it with fresh, hot coffee cooled with ice waters down the final result, and while you could conceivably make it with a spoonful of instant coffee it doesn’t taste as good as with ‘real’ coffee, though I must confess I’ve only used Sainsburys ‘own-brand’ instant coffee, which I keep for emergencies and baking. So what I do is I make up a small 6oz cup of hot coffee (to be more exact: I use the Bodum ‘Le Pot’ tea cup, the kind Captain Picard drinks from) the night before and stick it in the fridge to chill. You could use a shot of espresso, or cold brew a cafetiere of coffee, or stick with the instant which requires no forethought.

The exact volume of coffee doesn’t totally matter, since you’re just going to fill up the blender with chocolate milk to the 500ml mark. Beware of how sweet your base ingredients are - you’ll need to exercise some common sense here. If you’re using a cheap-ass supermarket own-brand peanut butter with added sugar like I am, then you can probably forego the dates. If you’re using unsweetened peanut butter but your chocolate milk is thick and sweet, you might not need dates either. I like using Oatly chocolate milk which is quite sweet already.
The next day, wake up and blitz everything for a creamy chocolatey smoothie.
This is easily varied to suit your mood and what you’ve got in the kitchen. If you’ve got some plain unsweetened almond milk, you can use that and add a tablespoon of cocoa powder and possibly a date. If you need more sustenance in the morning, you can add 1-2 tbsp of oats. If you feel like opening jars and using spoons and things is likely to be beyond you when you wake up the next morning, you can prep most of it the night before by throwing everything except the frozen banana in your blender jug (or any jug) with the hot coffee, and sticking it all in the fridge to chill (this works especially well if you want to add oats). In the morning just wake up, grab your frozen bananas from the freezer and throw it in the blender with the rest of the stuff. Do note that you need your banana to be frozen to lend a creaminess to your smoothie, this just doesn’t happen with fridge temperature bananas.
ingredients
serves 1
1 serving coffee (chilled)
chocolate (oat) milk
1 chopped frozen banana
2 tbsp peanut butter
optional dates for sweetness
method
Dump the coffee, banana, peanut butter and dates (where necessary) in your blender. Add enough chocolate milk up to the 500ml mark.
Blitz and drink.
0 notes